

EAW Radius RSX series Owner's Manual

3"
IMPORTANT SAFETY INSTRUCTIONS – READ THIS FIRST
Safety Instructions
Read and heed all warnings and safety instructions in this manual before using this product. Failure to follow these
precautions may result in damage, injury, or death.
1) Read these instructions.
2) Keep these instructions.
3) Heed all warnings.
4) Follow all instructions.
5) Do not use this apparatus near water.
6) Clean only with a dry cloth.
7) Do not block any amplifier ventilation openings. Install in accordance with the manufacturer's instructions.
8) Do not install near any heat sources such as radiators, heat registers, stoves, or other apparatus that produce heat.
9) Do not defeat the safety purpose of the polarized or grounding-type plug. A polarized plug has two blades with one wider
than the other. A grounding type plug has two blades and a third grounding prong. The wide blade or the third prong is
provided for your safety. If the provided plug does not fit into your outlet, consult an electrician for replacement of the
obsolete outlet.
10) Protect the power cord from being walked on or pinched particularly at plugs, convenience receptacles, and the point
where they exit from the apparatus.
11) Only use attachments/accessories specified by the manufacturer.
12) Use only with a cart, stand, tripod, bracket, or table specified by the manufacturer, or sold with the
apparatus. When a cart is used, use caution when moving the cart/apparatus combination to avoid injury
from tip-over. In addition, use only with the Caster Pallets and flybars specified by the manufacturer, or sold
with the apparatus. When a Caster Pallet is used, use caution when moving the apparatus combination to
avoid injury from tip-over.
13) Unplug this apparatus during lightning storms or when unused for long periods of time.
14) The AC Mains PowerCon connector (the appliance coupler) is used as the disconnect device.
This connector shall remain readily accessible and operable.
15) Refer all servicing to qualified service personnel. Servicing is required when the apparatus has been damaged in any way,
such as power-supply cord or plug is damaged, liquid has been spilled or objects have fallen into the apparatus, does not
operate normally, or has been dropped.
WARNING: To reduce the risk of fire or electric shock, do not expose this apparatus to rain or moisture.
WARNING: If the AC mains connectors on this product are not compatible with the local AC mains receptacle, employ a licensed
electrician to provide the proper connector and voltage to interface with the product. Ensure that the AC power supply has a properly
grounded safety ground. Failure to follow this warning could cause damage, injury, or death.
CONSIGNES DE SÉCURITÉ – À LIRE EN PREMIER
Instructions Relative à la Sécurité
Lisez et respectez toutes les consignes de sécurité et les mises en garde fournies dans le manuel des enceintes
EAW avant d'utiliser ce produit. Le non-respect de ces consignes et mises en garde peut entraîner des dommages
aux équipements et des accidents aux personnes pouvant être fatals.
ATTENTION: Si l'alimentation secteur connecteurs sur ce produit ne sont pas compatibles avec l'AC locale secteur
Embase, employer un électricien agréé pour fournir le connecteur et la tension appropriée à l'interface avec le
produit. Assurez-vous que l'alimentation en courant alternatif a une terre de sécurité à la terre. Le non-respect de
cet avertissement peut causer des dommages, des blessures ou la mort.

4"
ATTENTION: Si ce produit contient une batterie au lithium, danger d'explosion si la pile au lithium est remplacée
de façon incorrecte. Ne tentez pas de remplacer la batterie vous-même.
PRECAUZIONI DI SICUREZZA - DA LEGGERE PER PRIMO
Norme di Sicurezza
Prima di procedere con l'utilizzo del prodotto, leggere e rispettare ogni avvertenza e norma di sicurezza riportata
nel "Manuale EAW Loudspeaker". Il mancato rispetto di ogni precauzione può causare danni all'apparecchiatura,
nonché infortuni alle persone o la morte.
ATTENZIONE: Se i connettori di rete AC su questo prodotto non sono compatibili con il CA locale di rete presa,
impiegare un elettricista per fornire il connettore corretto e la tensione di interfacciarsi con il prodotto. Assicurarsi che
l'alimentazione CA ha una terra di sicurezza a terra. La mancata osservanza di questa indicazione può causare danni,
lesioni o morte.
ATTENZIONE: Se questo prodotto contiene una batteria al litio, pericolo di esplosione se la batteria al litio non è
sostituita correttamente. Non tentare di sostituire la batteria da soli.
PRECAUCIONES DE SEGURIDAD - LEA EST O PRIMERO
Instrucciones de Securidad
Lea y observe todos los avisos e instrucciones de seguridad que aparecen en el "Manual de altavoces EAW"
adjunto antes de usar este aparato. El no observar esta precaución puede dar lugar a averías en el aparato, daños
en las personas o incluso la muerte.
PRECAUCION: Si los conectores de red eléctrica de CA de este producto no son compatibles con el CA local de red
receptáculo, emplear un electricista autorizado para proporcionar el conector y el voltaje para interactuar con el
producto. Asegúrese de que la fuente de alimentación de CA tiene una conexión a tierra a tierra adecuada. El
incumplimiento de esta advertencia podría causar daños, lesiones o muerte.
PRECAUCIÓN: Si este producto contiene una batería de litio, peligro de explosión si la batería de litio se sustituye de
forma incorrecta. No intente reemplazar la batería usted mismo.
SICHERHEITSHINWEISE - LESEN SIE DIESEN ABSCHNITT ZUERST
Sicherheitsanweisungen
Lesen und beachten Sie alle Warnungen und Sicherheitsanweisungen der mitgelieferten "EAW Lautsprecher
Bedienungsanleitung" vor der Benutzung des Produkts. Nichtbeachtung dieser Hinweise können möglicherweise
zu Schäden am Equipment oder zu Verletzungen bzw. zum Tod von Personen führen.
WARNUNG: Wenn die AC-Netzstecker auf diesem Produkt nicht kompatibel sind mit der lokalen Netzsteckdose Netz,
verwenden einen Elektrofach den richtigen Anschluss und Spannung als Schnittstelle mit dem Produkt zur Verfügung zu
stellen. Stellen Sie sicher, dass die Stromversorgung einwandfrei geerdete Schutzerde hat. Die Nichtbeachtung dieser
Warnung kann zu Schäden, Verletzungen oder zum Tod führen.
ACHTUNG: Falls dieses Produkt eine Lithium-Batterie, Explosionsgefahr enthält, wenn Lithium-Batterie falsch
eingesetzt wird. Versuchen Sie nicht, die Batterie selbst zu ersetzen.
CAUTION: If this product contains a lithium battery, danger of explosion if lithium battery is incorrectly replaced. Do not attempt to
replace the battery yourself. Note: This equipment has been tested and found to comply with the limits for a Class A digital device,
pursuant to part 15 of the FCC Rules. These limits are designed to provide reasonable protection against harmful interference when
the equipment is operated in a commercial environment. This equipment generates, uses, and can radiate radio frequency energy
and, if not installed and used in accordance with the instruction manual, may cause harmful interference to radio communications.
Operation of this equipment in a residential area is likely to cause harmful interference in which case the user will be required to
correct the interference at his own expense.

5"
CAUTION: Changes or modifications not expressly approved by LOUD Technologies® could void the user's authority to operate the
equipment under FCC rules.
Correct Disposal of this Product
This symbol indicates that this product should not be disposed of with your household waste, according to the
WEEE Directive (2012/19/EU) and your national law. This product should be handed over to an authorized collection
site for recycling waste electrical and electronic equipment (WEEE). Improper handling of this type of waste could
have a possible negative impact on the environment and human health due to potentially hazardous substances
that are generally associated with WEEE.
At the same time, your cooperation in the correct disposal of this product will contribute to the effective usage of
natural resources. For more information about where you can drop off your waste equipment for recycling, please
contact your local city office, waste authority, or your household waste disposal service.
Electrical Warnings
AC Mains Supply
WARNING:
Read all instruction and cautionary notes concerning electrical power in this document.
ALIMENTATION SECTEUR
ATTENTION:
Lisez toutes les instructions et mises en garde concernant les notes d'énergie électrique dans
le présent document.
ALIMENTAZIONE AC
ATTENZIONE:
Leggi tutte le note di istruzione e di cautela in materia di energia elettrica in questo documento.
FUENTE DE ALIMENTACIÓN
PRECAUCION:
Lee todas las notas de instrucciones y advertencias relativas a la energía eléctrica en este documento.
NETZSTROMVERSORGUNG
WARNUNG:
Alle Anweisung und Hinweise bezüglich elektrischer Energie in diesem Dokument.
AC Mains Cable
WARNING:
If the AC mains connectors on this product are not compatible with the local AC mains receptacle, employ a licensed
electrician to provide the proper connector and voltage to interface with the product. Ensure that the AC power supply has a properly
grounded safety ground. Failure to follow this warning could cause damage, injury, or death.
WARNING:
Ensure that AC power supply has a properly grounded safety ground. Failure to follow this warning could cause equipment
damage, injury, or death.
Cordon secteur
ATTENTION:
Il se peut que le format de la fiche secteur ne corresponde pas à celui de votre situation géographique. Dans ce
cas, faites appel à un électricien agréé pour qu'il remplace la fiche par une autre du bon format. Respectez les normes
électriques de câblage locales.
ATTENTION:
Assurez-vous que la ligne secteur dispose d'une terre. Le non-respect de cette précaution peut entraîner des
dommages aux équipements et des accidents aux ersonnes pouvant être fatals.

6"
Cavo d'alimentazione AC
CAUTELA:
Il connettore del cavo d'alimentazione AC fornto in dotazione potrebbe non essere adeguato per le prese di
corrente impiegate nell'area in cui il diffusore viene utilizzato. In questo caso, contattare un elettricista qualificato per
sostituire la presa di corrente con una dotata di connessione adeguaa. Per il cablaggio, occorre seguire la codifica corretta
utilizzata nell'area d'utilizzo.
ATTENZIONE:
Assicurarsi che la presa d'alimentazione sia correttamente collegata a terra. Il mancato rispetto di tali
avvertenze potrebbe causare danni all'apparechiatura, nonché infortuni alle persone o la morte.
Cable de alimentación
PRECAUCION:
El enchufe que viene en el cable de alimentación incluido puede que no encaje en las salidas de corriente de
su zona. Si ocurre esto, contacte con un electricista profesional para que sustituya el enchufe problemático y lo cambie
por uno adecuado para la salida de corriente. Compruebe que se sigan todas las normativas de seguridad aplicables.
PRECAUCION:
Asegúrese que la fuente de alimentación tenga una conexión a tierra correcta. El no cumplir con esta
advertencia puede dar lugar a daños en el equipo, en las personas que lo manejen o inclso la muerte.
Netzkabel
VORSICHT:
Das mitgelieferte Netzkabel besitzt möglicherweise einen etzstecker, der nicht in Ihre Steckdose passt. In
diesem Fall können Sie sich von einem zugelassenen Elektrobetrieb einen passenden Netzstecker unter Berücksichtigung
der jeweils gültigen Vorschriften montieren lassen.
WARNUNG:
Stellen Sie sicher, dass er Schutzleiter der Netzsteckdose ein gute Verbindung zur Erde hat. Nichtbeachtung
dieses Hinweises kann zu Schäden am Equipment, zu Verletzungen oder zum Tod führen.
Suspension Warnings
WARNING:
Suspending anything, especially overhead of people, should be done with extreme caution. Always engage the
services of a certified professional who is qualified to determine the requirements for and to implement overhead rigging.
Only persons with the knowledge of proper hardware and safe rigging techniques should attempt to suspend
loudspeakers overhead. Failure to follow these precautions may result in damage, injury, or death.
Avertissements de suspension
AVERTISSEMENT: Suspendre quoi que ce soit, en particulier les frais généraux de personnes, doit être fait avec une
extrême prudence. Toujours engager les services d'un professionnel certifié qui est qualifié pour déterminer les
conditions requises et à mettre en œuvre le gréement en tête. Seules les personnes ayant la connaissance du
matériel approprié et les techniques sécuritaires de gréage devraient tenter de suspendre les haut-parleurs audessus. Le non-respect de ces précautions peut entraîner des dommages, des blessures ou la mort.
Avvertenze sospensione
AVVERTENZA: Sospendere nulla, soprattutto sovraccarico di persone, deve essere fatto con estrema cautela.
Inserire sempre i servizi di un professionista certificato che si è qualificato per determinare i requisiti di e ad
attuare manovre in testa. Solo le persone con la conoscenza di tecniche di assemblaggio di sicurezza hardware e
dovrebbero tentare di sospendere gli altoparlanti in testa. La mancata osservanza di queste precauzioni può
provocare danni, lesioni o morte.

7"
Advertencias de suspensión
ADVERTENCIA: La suspensión de cualquier cosa, especialmente por encima de las personas, se debe hacer con
mucho cuidado. Siempre contratar los servicios de un profesional certificado que está calificado para determinar
los requisitos para implementar y para las maniobras de elevación. Sólo las personas con el conocimiento de las
técnicas de aparejo de seguridad de hardware adecuada y deben intentar suspender altavoces por encima.
El incumplimiento de estas precauciones puede resultar en daños, lesiones o muerte.
Suspension Warnungen
WARNUNG: Schwebend alles, vor allem Aufwand von Menschen, sollte mit äußerster Vorsicht erfolgen. Immer
engagieren, die Dienste eines zertifizierten Profi, der qualifiziert ist, die Anforderungen zu bestimmen und
Überkopfmontage zu implementieren. Nur Personen mit der Kenntnis der richtigen Hardware und sichere
Rigging Techniken sollten Lautsprecher Kopf auszusetzen versuchen. Die Nichtbeachtung dieser
Vorsichtsmaßnahmen kann zu Schäden, Verletzungen oder zum Tod führen.
"

8"
Table of Contents
IMPORTANT SAFETY INSTRUCTIONS – READ THIS FIRST ............................................................................................................................................... 3"
CONSIGNES DE SÉCURITÉ – À LIRE EN PREMIER ................................................................................................................................................................ 3"
PRECAUZIONI DI SICUREZZA - DA LEGGERE PER PRIMO ............................................................................................................................................... 4"
PRECAUCIONES DE SEGURIDAD - LEA EST O PRIMERO .................................................................................................................................................. 4"
SICHERHEITSHINWEISE - LESEN SIE DIESEN ABSCHNITT ZUERST ............................................................................................................................... 4"
Electrical Warnings ...................................................................................................................................................................................................................... 5"
AC Mains Supply ...................................................................................................................................................................................................................... 5"
ALIMENTATION"SECTEUR"....................................................................................................................................................."5"
ALIMENTAZIONE"AC"............................................................................................................................................................."5"
FUENTE"DE"ALIMENTACIÓN"................................................................................................................................................."5"
NETZSTROMVERSORGUNG".................................................................................................................................................."5"
AC Mains Cable ........................................................................................................................................................................................................................ 5"
Cordon"secteur"....................................................................................................................................................................."5"
Cavo"d'alimentazione"AC"......................................................................................................................................................"6"
Cable"de"alimentación".........................................................................................................................................................."6"
Netzkabel"............................................................................................................................................................................."6"
Suspension Warnings ................................................................................................................................................................................................................. 6"
Table of Contents ......................................................................................................................................................................................................................... 8"
RADIUS Series Introduction ................................................................................................................................................................................................... 11"
Functionality and Operation ...................................................................................................................................................................................................... 12"
RSX208L / RSX86 / SX89 / RSX126 / RSX129 Connectors and Controls ............................................................................................................ 12"
RSX12 / RSX18 Connectors and Controls ....................................................................................................................................................................... 12"
AC"Mains"Connection"........................................................................................................................................................."13"
Linking"power"....................................................................................................................................................................."13"
Comm"................................................................................................................................................................................."13"
Audio"Connections"............................................................................................................................................................."13"
Dante"A"/"B"........................................................................................................................................................................."14"
DSP"Navigation"/"Edit"Wheel".............................................................................................................................................."14"
LCD"UI"Display"...................................................................................................................................................................."14"
Front"Panel"LED".................................................................................................................................................................."14"
RSX208L / RSX12 Walkaround ......................................................................................................................................................................................... 15"
Infrared"(IR)"Transceiv er s"[R S X 2 0 8 L"/ "R SX 1 2 ]"....................................................................................................................."15"
Rigging"Assemblies"/"Rigging"Pins"[RSX208L"/"RSX12]"........................................................................................................"15"
RSX86 / RSX89 / RSX126 / RSX129 / RSX18 Walkaround ........................................................................................................................................ 16"
Mounting"Points"(aka"Fly"Points"and/or"Rigging"Points)"...................................................................................................."17"
Handles"..............................................................................................................................................................................."17"
Pole"Cup"............................................................................................................................................................................."17"
Rear Panel Home Screen and Menu Navigation ................................................................................................................................................................. 20"
Radius RSX208L Menus ...................................................................................................................................................................................................... 20"

9"
Level"..................................................................................................................................................................................."20"
OptiLogic"............................................................................................................................................................................"20"
Voicing"................................................................................................................................................................................"21"
Delay"..................................................................................................................................................................................."22"
Output"Check"......................................................................................................................................................................"23"
Settings"..............................................................................................................................................................................."23"
Radius"RSX208L"Home"Screen"............................................................................................................................................"24"
Radius RSX12 Menus ........................................................................................................................................................................................................... 26"
Level"..................................................................................................................................................................................."26"
Crossover"............................................................................................................................................................................"26"
Delay"..................................................................................................................................................................................."26"
Output"Check"......................................................................................................................................................................"26"
Settings"..............................................................................................................................................................................."27"
Radius"RSX12"Home"Screen"................................................................................................................................................"28"
Radius RSX86 / RSX89 / RSX126 / RSX129 Menus ..................................................................................................................................................... 29"
Level"..................................................................................................................................................................................."29"
Voicing"................................................................................................................................................................................"29"
Crossover"............................................................................................................................................................................"30"
Delay"..................................................................................................................................................................................."31"
Output"Check"......................................................................................................................................................................"31"
Settings"..............................................................................................................................................................................."31"
Radius"RSX86"/"RSX89"/"RSX126"/"RSX129"Home"Screen"..................................................................................................."32"
Radius RSX18 Menus ........................................................................................................................................................................................................... 34"
Level"..................................................................................................................................................................................."34"
Crossover"............................................................................................................................................................................"34"
Cardioid".............................................................................................................................................................................."34"
Delay"..................................................................................................................................................................................."34"
Output"Check"......................................................................................................................................................................"34"
Settings"..............................................................................................................................................................................."35"
Radius"RSX18"Home"Screen"................................................................................................................................................"36"
In Depth With Dante™ ............................................................................................................................................................................................................... 37"
Introduction ........................................................................................................................................................................................................................... 37"
Why use Dante? .................................................................................................................................................................................................................... 37"
Using a Wi-Fi Router with EAWmosaic .......................................................................................................................................................................... 37"
Mastering EAWmosaic ............................................................................................................................................................................................................. 38"
Introduction ........................................................................................................................................................................................................................... 38"
What is EAWmosaic? ........................................................................................................................................................................................................... 38"
Why use EAWmosaic? ......................................................................................................................................................................................................... 38"
How does EAWmosaic work? ........................................................................................................................................................................................... 38"
Device and Download Requirements ........................................................................................................................................................................... 39"

10"
Array"Quick-Start"Guide"....................................................................................................................................................."40"
Troubleshooting"................................................................................................................................................................."45"
Service, Inspection & Maintenance ..................................................................................................................................................................................... 46"
"
11"
RADIUS Series Introduction
Congratulations on your purchase of an EAW RADIUS loudspeaker. With proper operation and care, this EAW product will provide
many years of service and reliability.
In addition to offering renowned EAW fidelity at any output level, we are confident that RADIUS will drastically change the way you
use your sound system, saving you time, effort, money and frustration and delivering superior results. The below chart contrasts the
process of getting RADIUS show-ready in comparison to a ‘conventional’sound system, illustrating the tremendous time savings and
simplification, whether for permanent installation or portable applications.
Step
Conventional Sound System
RADIUS
1
Bring equipment into space.
Bring equipment into space.
2
Connect audio cabling.
Connect power and network.
3
Verify each loudspeaker works and that cabling is not
faulty (level shift or polarity inversion).
Not necessary.
4
Troubleshoot any issues found in step #3.
5
Set up measurement system.
6
Take measurements of system. Equlize. Repeat until
system is ‘tuned’.
Open Mosaic. Detect system online, select voicing and
run OptiLogic. Make any adjustments to taste.
7
Use system.
Use system.
This document provides basic guidance and operating instructions for using the system. The user is encouraged to utilize EAWmosaic and
Resolution to explore the range of possibilities that RADIUS can provide for their application. Additionally, this manual and the EAWmosaic
Help File are frequently updated with new and beneficial information, so check back often.
Enjoy the use of your RADIUS system!
"
"
"
"
"
"
"
"
"
"
"
"
"
"

Functionality and Operation
RSX208L / RSX86 / SX89 / RSX126 / RSX129 Connectors and Controls
1 AC Mains Input Connect to AC mains supply as labeled.
2 AC Mains Loop Through Loop AC Mains for additional RADIUS products.
3 AC Loop Circuit Breaker User Resettable, 12A (115 V), 6A (230 V).
4 XLR Input Connect Analog input signals.
5 XLR Thru Loop input signal to additional RADIUS products, or other devices.
6 Comm Enables wireless control.
7 Dante A / B Dual etherCON™ Connectors.
8 DSP Navigation / Edit Wheel Navigate, edit and select parameters.
9 LCD UI Display Displays the current UI information.
10 Front Panel LED Power Indicator / Status.
RSX12 / RSX18 Connectors and Controls
1 AC Mains Input Connect to AC mains supply as labeled.
2 AC Mains Loop Through Loop AC Mains for additional RADIUS products.
3 AC Loop Circuit Breaker User Resettable, 12A (115 V), 6A (230 V).
4 XLR Input Connect Analog input signals.
5 XLR Thru Loop input signal to additional RADIUS products, or other devices.
6 XLR Variable HPF Loop input signal to additional RADIUS products, or other devices.
7 Comm Enables wireless control.
8 Dante A / B Dual etherCON™ Connectors.
9 DSP Navigation / Edit Wheel Navigate, edit and select parameters.
10 LCD UI Display Displays the current UI information.
11 Front Panel LED Power Indicator / Status.
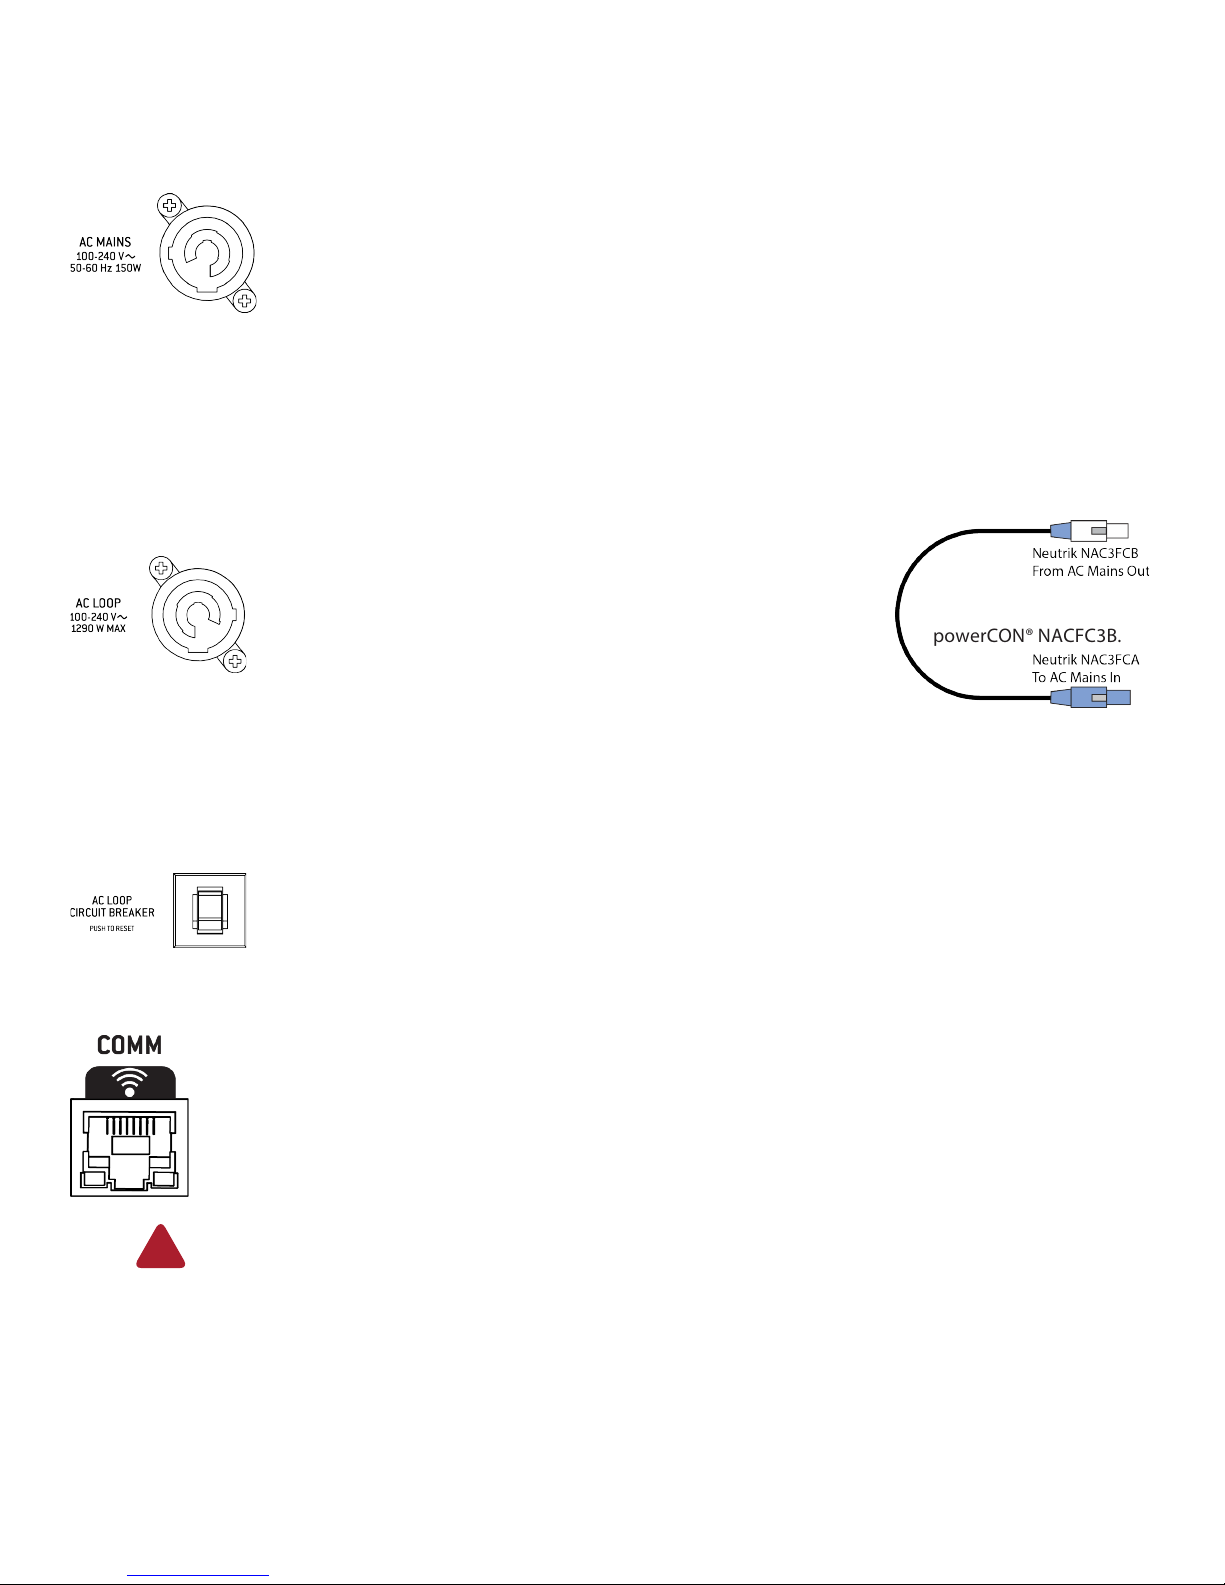
AC Mains Connection
Connect the supplied AC mains cord to the Neutrik powerCON® socket on the rear of the RADIUS.
The powerCON® system utilizes a locking connector. To lock, twist 1/4 turn clockwise after fully inserting
it into the AC MAINS receptacle. Connect the other end to an AC mains supply receptacle, nominally
115 V 60 Hz or 230 V 50 Hz as labeled on the RADIUS. If necessary, have a qualified electrician change
the cable plug as required for compatibility with the local AC mains receptacle.
WARNING: Before connecting a RADIUS to the AC mains supply, completely turn down the input signal using the input level
attenuator. If not, there could be excessive and possibly damaging sound levels from the loudspeaker when energized.
There is no power switch on RADIUS. When connected to the AC mains, the loudspeaker will be fully operational, with the output
level controlled by the signal source feeding it.
Linking power
The Neutrik powerCON® AC mains and AC loop connectors are wired
in parallel to provide an AC mains inlet and outlet on each RADIUS.
The blue AC mains inlet mates with a Neutrik powerCON® NACFC3A
(supplied). The white AC mains outlet mates with a Neutrik powerCON® NACFC3B.
Therefore, to loop the AC mains from enclosure to enclosure, connect
an AC mains jumper cable as shown (jumper is not included with
RADIUS).
Up to three additional RSX208L’s, RSX12’s or RSX18’s may be looped in this fashion at normal listening level (two at maximum
listening level). Up to five additional RSX86’s, RSX89’s, RSX126’s or RSX129’s may be looped in this fashion at normal listening level
(four at maximum listening level). Use an AC loop connector to daisy-chain AC mains power from one enclosure to another.
The maximum continuous load must not exceed 12A for the 115V version and 6A for the 230V version.
NOTE: The circuit breaker only protects the AC loop outlet, not the AC mains connector. If the continuous
load connected to the AC loop outlet exceeds the rated load, the circuit breaker will trip. For this situation,
reduce the connected load and then manually reset the circuit breaker.
Comm
"
The purpose in life of this 100 Mb network connector is to connect RADIUS to a Wi-Fi router via CAT5 (or better)
Ethernet cable, thus enabling wireless control.
Plug one end of the Ethernet cable into the RADIUS network connector and the other end of the Ethernet cable
into a LAN port on the router, NOT a WAN port. Most routers allow the use of either a straight-wired cable or
crossover cable, but if you have a choice, a straight-wired Ethernet cable is the way to go to ensure smooth
operation with any router.
If needed, complete directions for setting up the router may be found in the EAWmosaic Help File
Audio Connections
Analog Audio
Connect the output from your line-level signal source to the XLR-3F INPUT connector on the rear panel. This is an electronically
balanced input. Users must provide their own XLR cables. The XLR-type connectors on the rear of each RADIUS are designed for
professional audio signal levels, nominally 0 dBu (= 0.775 V). Normally, use the female XLR as the signal input. Use a male XLR
as a loop-thru output to connect the same signal input to an additional RADIUS*.
!
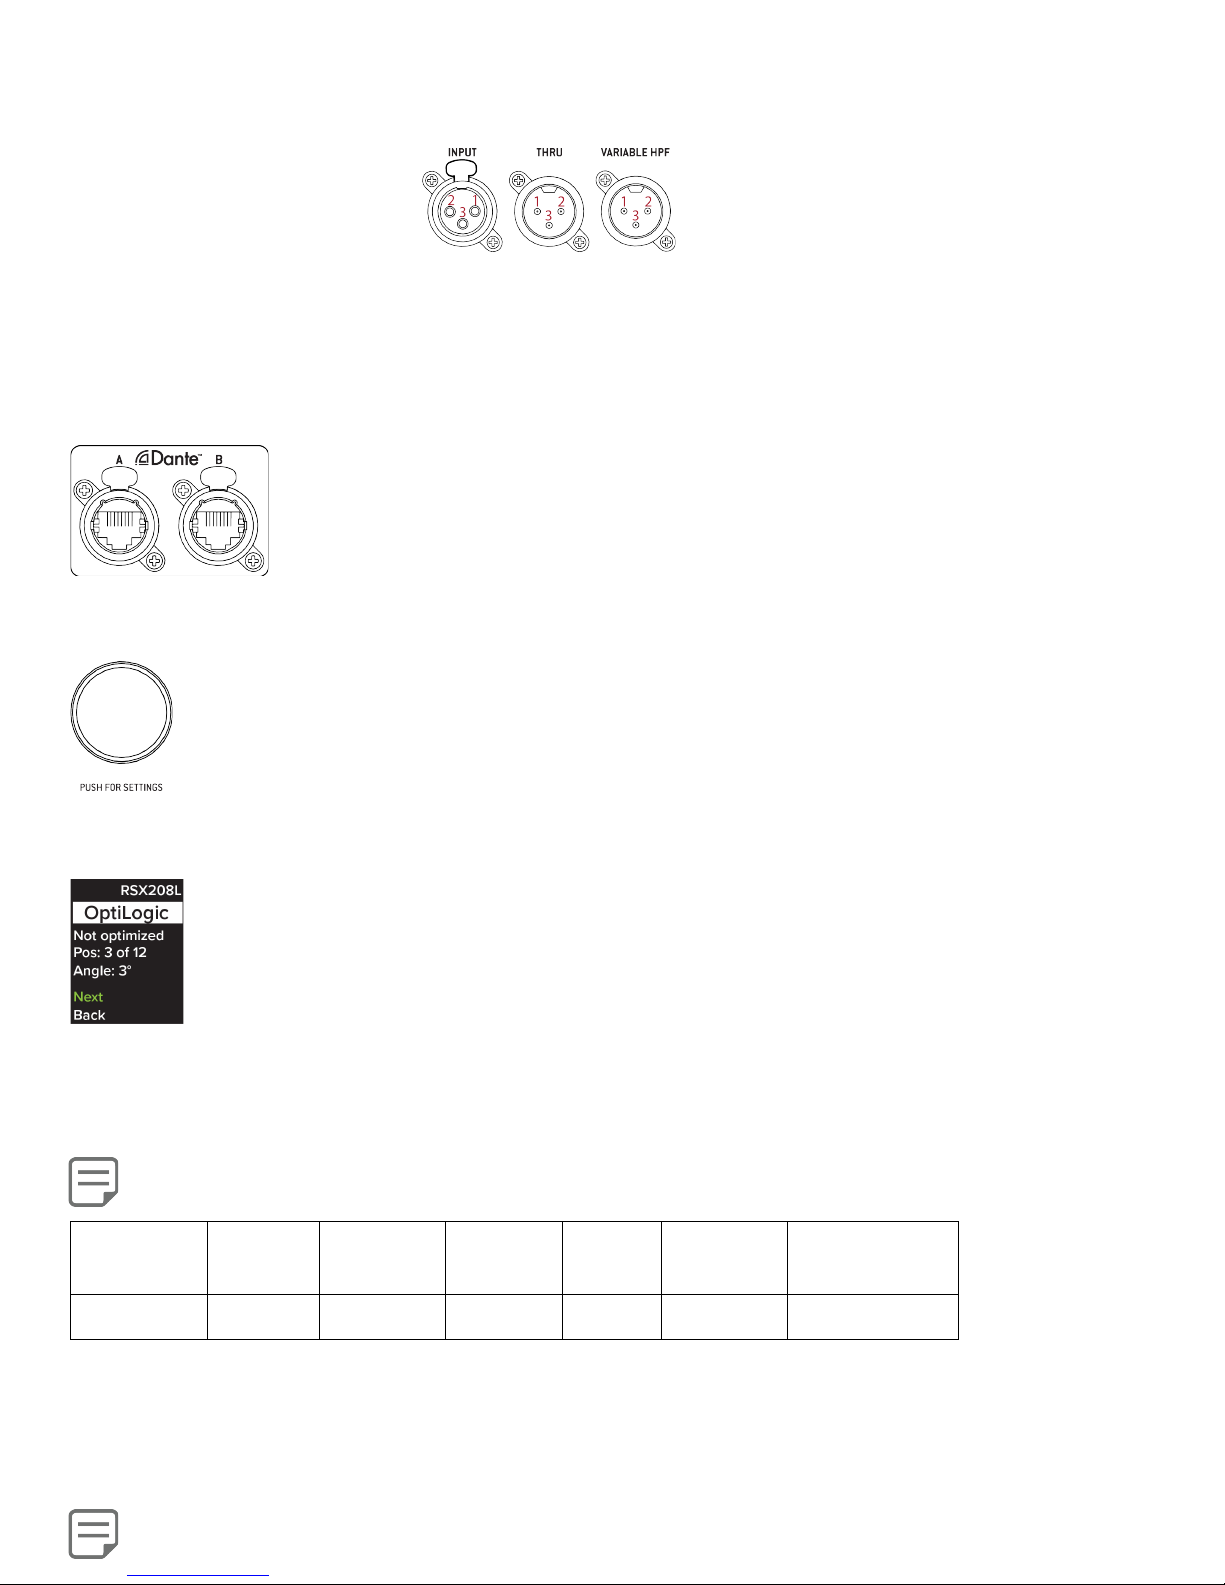
The wiring convention is as follows:
Pin 1: Shield
Pin 2: + / Hot
Pin 3: – / Cold
*Typically, a RADIUS array or full-range loudspeaker is connected to the VARIABLE HPF output of a RADIUS subwoofer to “split” the
work. The subwoofer handles all of the low frequencies and the array | loudspeaker handles the rest. As a result, it is more efficient
and a bit louder.
Dante A / B
Digital Audio
These Dante ports are for connecting one RADIUS to another RADIUS (or another Dante-enabled device)
via CAT5 (or better) Ethernet cable. This features dual Dante ports for daisy chaining.
DSP Navigation / Edit Wheel
Rotate (or push-click) the encoder to open settings, navigate the user interface and edit parameters
and select values.
This endless rotary wheel allows you to navigate the user interface, edit sections of RADIUS and navigate within
screens to select sub-menus, pages and parameters, as well as select values during editing.
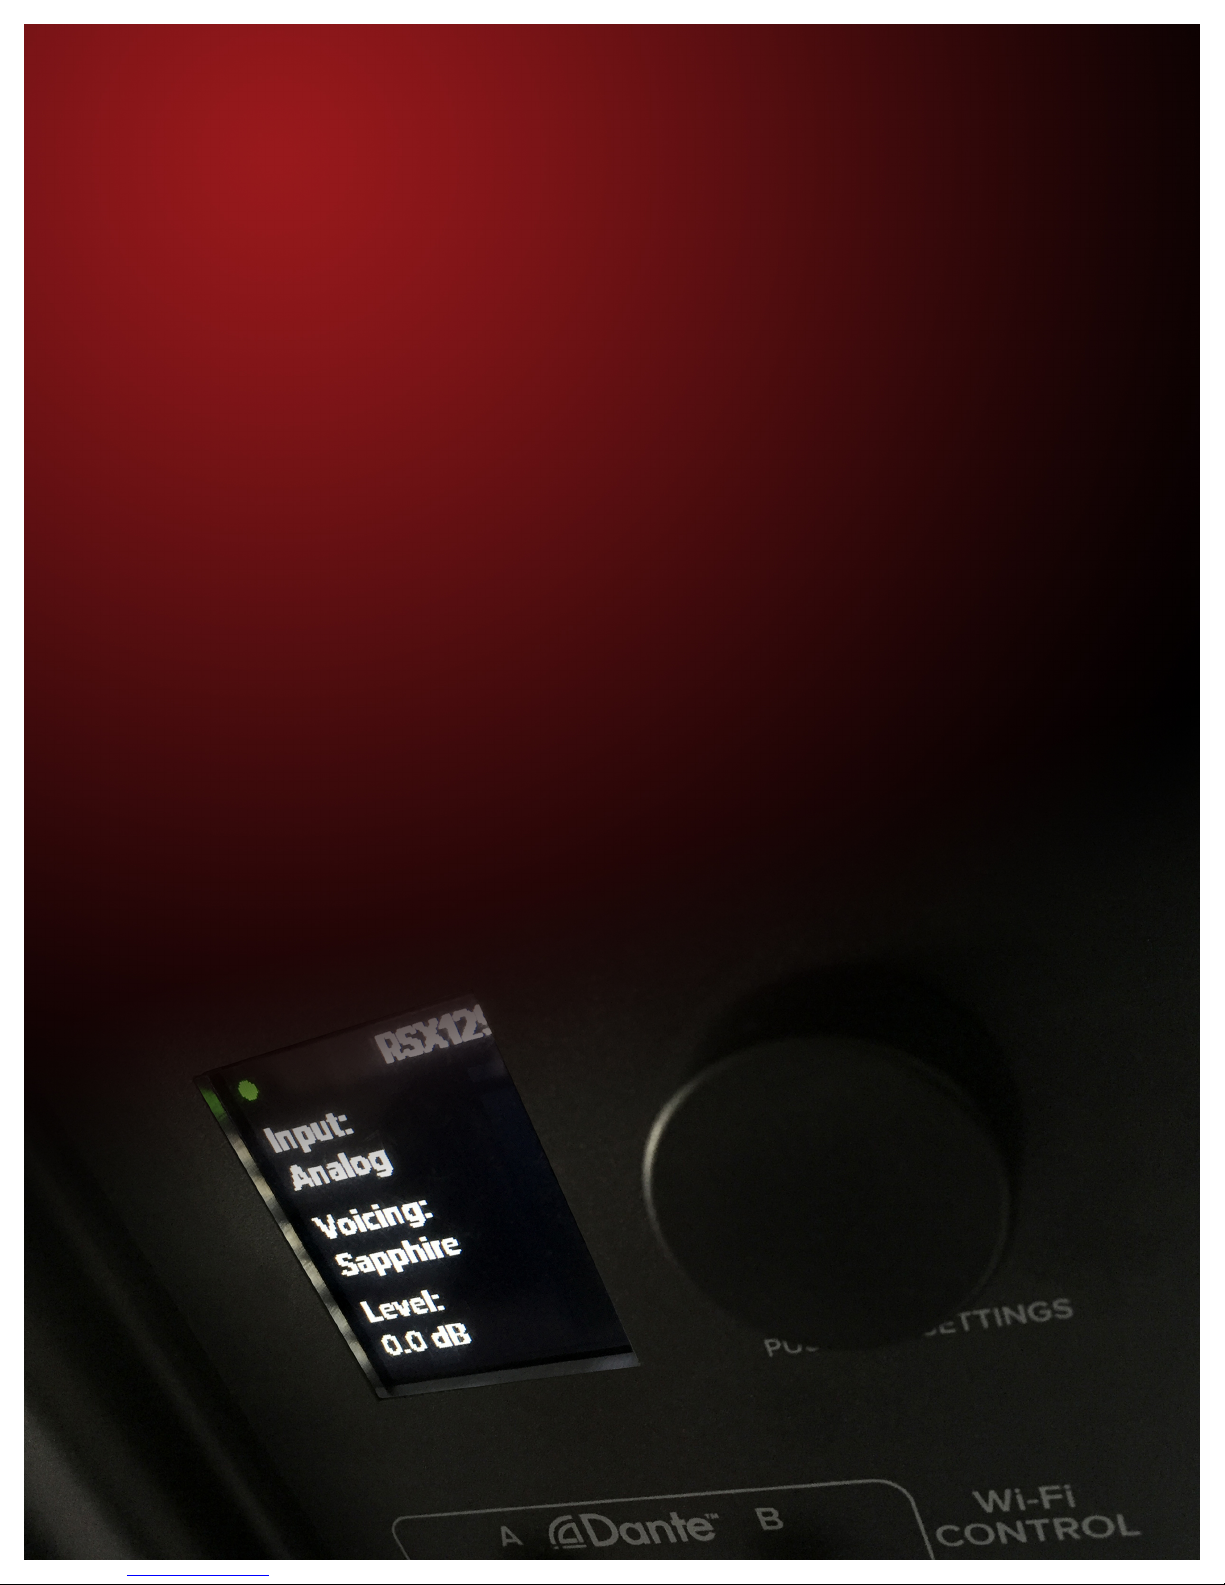
LCD UI Display
The LCD UI Display is one of the most vital features of RADIUS as it displays all of the menu navigation information.
When RADIUS is powered on, it will load up the last state it was in when powered off.
Front Panel LED
The front panel LED illuminates when the AC Mains In of RADIUS is plugged into a suitable AC power supply. The color of the LED,
however, is dependent on the current state of the RADIUS.
These LEDs vary slightly depending on whether EAWmosaic is being used or not. In this case, we’re looking at the
hardware only, so NO EAWmosaic. See below:
MODE
BOOT
NORMAL
LIMITING
FAULT
ADVERTISE
IDENTIFY
OFF
OFF
OFF
OFF
OFF
AMBER
WHITE
As seen above, the front panel LED only illuminates in ‘Advertise’ or ‘Identify’.
Advertise is engaged when a speaker is selected in the discovery shelf in EAWmosaic. This enables you to see the speaker that’s
been selected, identify it and drag it into the appropriate group. The amber color of the LED makes it clear that it is not yet in the
rig and still under EAWmosaic control. Once identified, the LED will turn white.
This is a manual process that can only occur when in setup mode, NOT show mode.
An overview of EAWmosaic is explained later in this manual. There is even greater detail in the EAWmosaic
RSX208L / RSX12 Walkaround
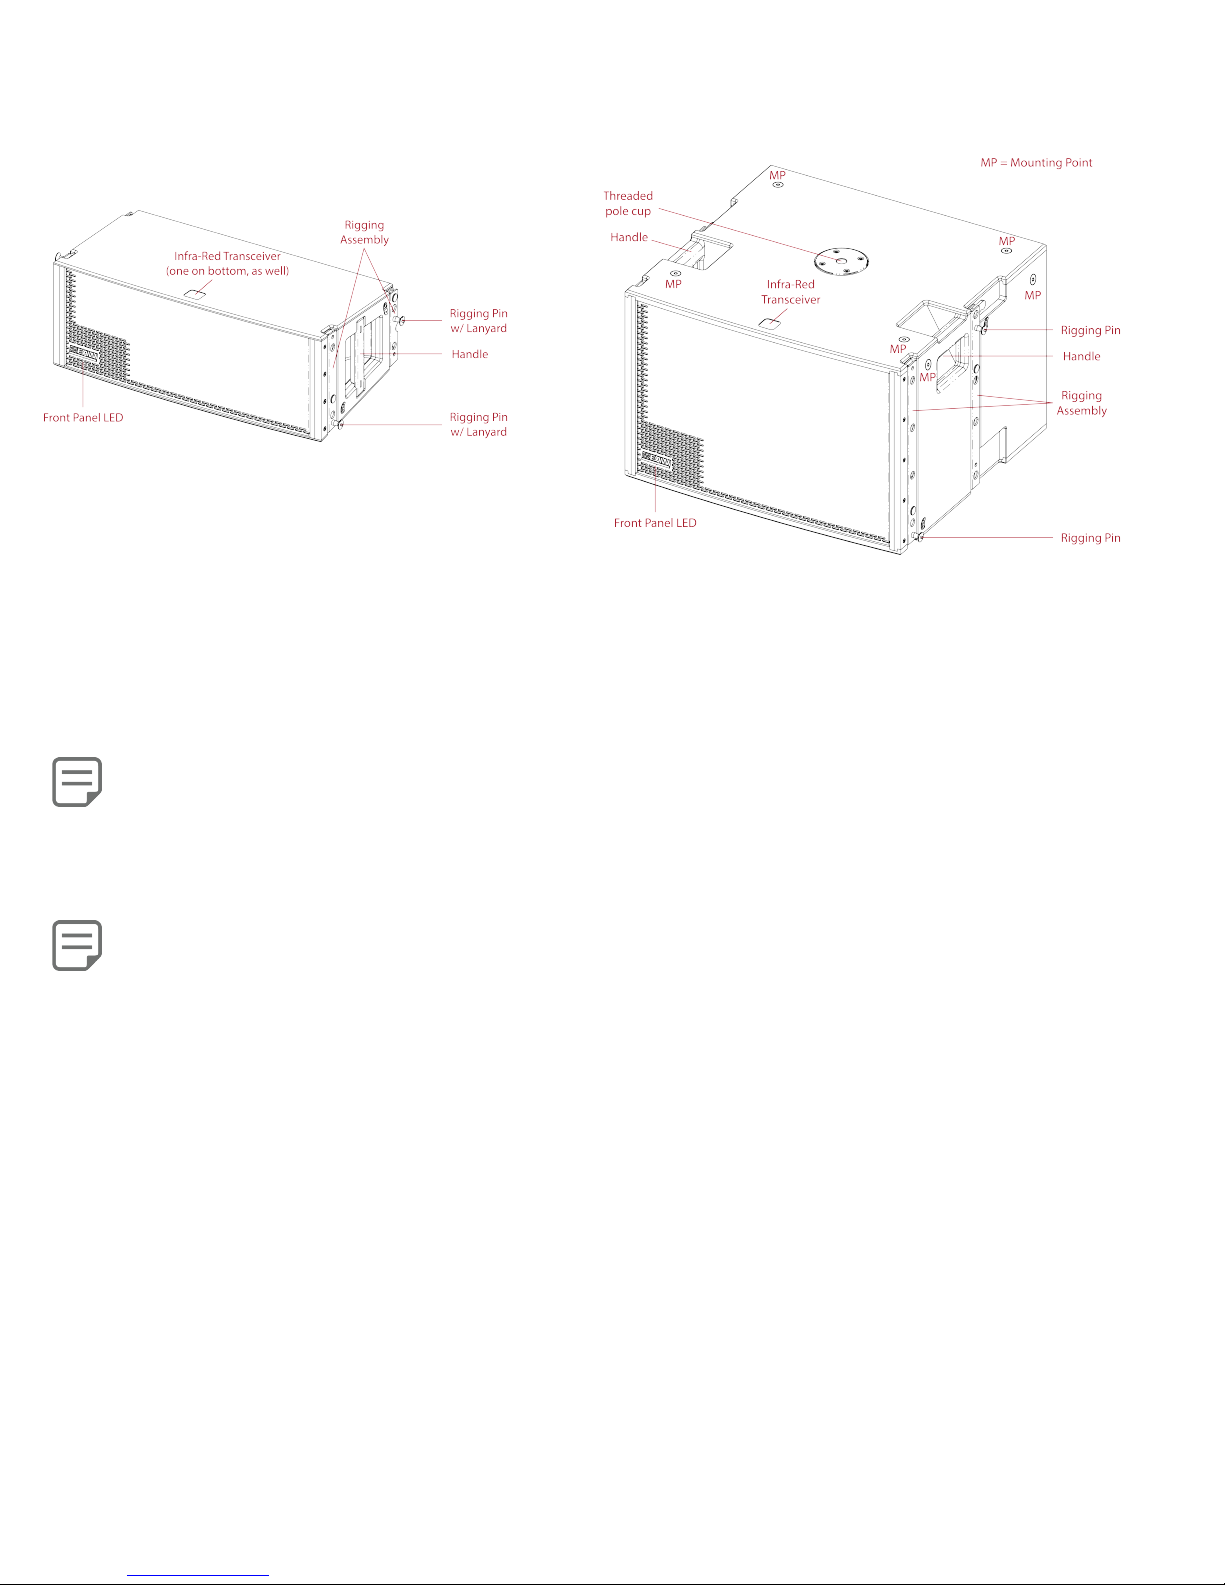
Let’s walk around the boxes and take a look at some of the other features of RADIUS.
"
"
"
"
"
Infrared (IR) Transceivers [RSX208L / RSX12]
Each time a user powers on a RADIUS, the modules immediately use the IR transceivers to announce themselves to their neighbors
and recognize the announcements of their neighbors. RADIUS recognizes each individually and as a whole and presents that to
EAWmosaic. Users never need to struggle to identify specific modules. The user only needs to identify where each RADIUS is located
within the venue (left, right, etc.). The system will determine which modules are within each array, how that array is configured and
their position in the array stack.
The RSX208L has two IR Transceivers; one on the top of the array and one on the bottom of the array.
The RSX12, however, only has one IR Transceiver, located on the top of the box.
Rigging Assemblies / Rigging Pins [RSX208L / RSX12]
Every RSX208L and RSX12 comes with Rigging Assemblies with two connected Rigging Pins on each side, four total.
The RSX208L Rigging Pins come equipped with lanyards. Additionally, the RSX208L ships with two extra Rigging Pins
and lanyards, although these will need to be connected first, if used.
NOTE: The integral mounting points on the RSX12 enclosure are designed to support only a single enclosure. ALWAYS SUSPEND
ENCLOSURES VIA EYEBOLTS DIRECTLY FROM THE STRUCTURE. NEVER SUSPEND ENCLOSURES FROM OTHER ENCLOSURES VIA
EYEBOLTS. The only exception to this is utilizing a flybar and the integral array rigging on the RSX208L or RSX12.
Always use EAWmosaic or EAW Resolution to verify the structural integrity of the array you intend to suspend. The ONLY exception to
this is with the pre-defined, pre-approved array configurations provided later in this manual.
"
 Loading...