

EAW NTS250 Owner's Manual

NTS250 LOUDSPEAKER
OWNER’S MANUAL

ii

1 SAFETY PRECAUTIONS - READ THIS FIRST
1.1 Safety Instructions
Read and heed all warnings and safety instructions in the accompanying "EAW Loudspeaker Owner’s
Manual" before using this product. Failure to follow this precaution may result in damage, injury, or death.
WARNING: The loudspeaker is supplied with an AC mains power cable. Depending on the
voltage model ordered, this cable is configured with the most common AC mains connector for
that voltage. If the connector is not compatible with the local AC mains receptacle, employ a
licensed electrician to re-configure the cable with the proper connector. Ensure that AC power
supply has a properly grounded safety ground. Failure to follow this warning could cause
damage, injury, or death.
1 CONSIGNES DE SÉCURITÉ - À LIRE EN PREMIER
1.1 Instructions Relative à la Sécurité
Lisez et respectez toutes les consignes de sécurité et les mises en garde fournies dans le manuel des
enceintes EAW avant d'utiliser ce produit. Le non-respect de ces consignes et mises en garde peut
entraîner des dommages aux équipements et des accidents aux personnes pouvant être fatals.
ATTENTION: L'enceinte est fournie avec un cordon secteur. Selon la tension du modèle
commandé, ce câble est fourni avec la fiche la plus communément utilisée avec cette tension. Si
la fiche n'est pas compatible avec les prises secteur de votre région, faites appel à un électricien
agréé pour modifier le cordon secteur en fonction du format local. Vérifiez que la fiche secteur
dispose d'une mise à la terre. Le non-respect de la mise à la terre peut entraîner des dommages
aux équipements et des accidents aux personnes pouvant être fatals.
1. PRECAUZIONI DI SICUREZZA - DA LEGGERE PER
PRIMO
1.1 Norme di Sicurezza
Prima di procedere con l'utilizzo del prodotto, leggere e rispettare ogni avvertenza e norma di sicurezza
riportata nel "Manuale EAW Loudspeaker". Il mancato rispetto di ogni precauzione può causare danni
all'apparecchiatura, nonché infortuni alle persone o la morte.
ATTENZIONE: Il diffusore è completo di cavo d'alimentazione ac fornito in dotazione. In base
la voltaggio del modello di diffusore acquistato, il cavo è configurato con il connettore ac più
adeguato. Nel caso in cui il connettore non sia compatibile con le prese di corrente adottate
nell'area d'impiego, rivolgersi ad un elettricista qualificato per ri-configurare il cavo con il
NTS250 Loudspeaker Owner’s Manual
Congratulations on the purchase of your new EAW loudspeaker. You now own one of the finest
professional audio products available - the result of exceptional engineering and meticulous
craftsmanship. Please read these instructions to get the maximum performance from your new
loudspeaker.
iii

connettore più appropriato. Assicurarsi che la presa di corrente sia adeguatamente collegata a
terra. Il mancato rispetto di tali norme può causare danni all'apparecchiatura, nonché infortuni
alle persone o la morte.
1. PRECAUCIONES DE SEGURIDAD - LEA ESTO PRIMERO
1.1 Instrucciones de Securidad
Lea y observe todos los avisos e instrucciones de seguridad que aparecen en el "Manual de altavoces
EAW" adjunto antes de usar este aparato. El no observar esta precaución puede dar lugar a averías en el
aparato, daños en las personas o incluso la muerte.
PRECAUCION: El altavoz viene de fábrica con un cable de corriente. Dependiendo del voltaje
que use el modelo solicitado, este cable estará configurado con el enchufe más habitual para ese
tipo de corriente. Si ese enchufe no es compatible con su salida de corriente, contacte con un
electricista profesional para que cambie el enchufe del cable por el tipo adecuado. Asegúrese de
que la salida de corriente tenga una conexión a tierra adecuada. El no observar esta advertencia
puede dar lugar a averías en el aparato, daños en las personas o incluso la muerte.
1. SICHERHEITSHINWEISE - LESEN SIE DIESEN
ABSCHNITT ZUERST
1.1 Sicherheitsanweisungen
Lesen und beachten Sie alle Warnungen und Sicherheitsanweisungen der mitgelieferten "EAW
Lautsprecher Bedienungsanleitung" vor der Benutzung des Produkts. Nichtbeachtung dieser Hinweise
können möglicherweise zu Schäden am Equipment oder zu Verletzungen bzw. zum Tod von Personen
führen.
WARNUNG: Der Lautsprecher wird mit einem Netzkabel geliefert. Abhängig von der jeweiligen
Netzspannung wird das Kabel mit dem für die jeweilige Netzspannung gängigsten Netzstecker
ausgeliefert. Sollte der Netzstecker nicht in Ihre Netzsteckdose passen, dann lassen Sie von
einem zugelassenen Elektrobetrieb einen passenden Netzstecker montieren. Stellen Sie sicher,
dass der Schutzkontakt der Netzsteckdose einen guten Kontakt zur Erde hat. Nichtbeachtung
dieser Hinweise können möglicherweise zu Schäden am Equipment oder zu Verletzungen bzw.
zum Tod von Personen führen.
vi

1.2 EC Declaration of Conformity
Manufacturer: Eastern Acoustic Works -- USA
Declares that the following product(s) have been tested and passed all relevant requirements as
described below by the appropriate European Directives as they apply to Professional Audio Products.
Product Model: NTS250
Product Description: Self-powered loudspeaker
Safety Directive(s): EN 60065-2002
EMC Directive(s): EN 55103-1 (Radiated/Conducted Emissions)
EN 55103-2 (Radiated/Conducted Emissions)
2004/108/EEC Directive
Low Voltage Directive: 72/23/EEC
Markings Directive: 93/68/EEC
The Technical Report/Files is maintained at:
LOUD Technologies Inc.
16220 Wood-Red Road NE
Woodinville, WA98072 USA
Authorized Representative: Tel: +1 425 892 6500
Walter Hsu Tel: +1 425 402 6259
Compliance Manager Fax: +1 425 487 4337
Loud Technologies, Inc. e-mail: info@eaw.com
Issued: March, 2010
1.3 FCC Compliance
This equipment has been tested and found to comply with the limits for a Class A digital device,
pursuant to Part 15 of the FCC Rules. These limits are designed to provide reasonable protection
against harmful interference when the equipment is operated in a commercial environment. This
equipment generates, uses, and can radiate radio frequency energy and, if not installed and used in
accordance with the instruction manual, may cause harmful interference to radio communications.
Operation of this equipment in a residential area is likely to cause harmful interference in which case
the user will be required to correct the interference at his own expense.
CAUTION: Changes or modifications not expressly approved by the LOUD Technologies could void
the user's authority to operate the equipment.
Correct disposal of this product. This symbol indicates that this product should not be
disposed of with your waste, according to the WEEE Directive (2002/96/EC) and your
national law. This product should be handed over to an authorized collection site for
recycling waste electrical and electronic equipment (EEE). Improper handling of this
type of waste could have a possible negative impact on the environment and human health
due to potentially hazardous substances that are generally associated with EEE. At the
same time, your cooperation in the correct disposal of this product will contribute to the
effective usage of the natural resources. For more information about where you can drop off your waste
equipment for recycling, please contact your local city office, waste authority, or your household waste
disposal service.
v

CONTENTS
1 SAFETY PRECAUTIONS - READ THIS FIRST . . . . . . . . . . . . . . . . . . . . . . . . . . . . . . . . . . . . . . . . . . . . . . .iii
1.1 Safety Instructions . . . . . . . . . . . . . . . . . . . . . . . . . . . . . . . . . . . . . . . . . . . . . . . . . . . . . . . . . . . . . . . . . . . . .iii
1 CONSIGNES DE SÉCURITÉ - À LIRE EN PREMIER . . . . . . . . . . . . . . . . . . . . . . . . . . . . . . . . . . . . . . . . . .iii
1.1 Instructions Relative à la Sécurité . . . . . . . . . . . . . . . . . . . . . . . . . . . . . . . . . . . . . . . . . . . . . . . . . . . . . . . . .iii
1. PRECAUZIONI DI SICUREZZA - DA LEGGERE PER PRIMO . . . . . . . . . . . . . . . . . . . . . . . . . . . . . . . . . . .iii
1.1 Norme di Sicurezza . . . . . . . . . . . . . . . . . . . . . . . . . . . . . . . . . . . . . . . . . . . . . . . . . . . . . . . . . . . . . . . . . . . .iii
1. PRECAUCIONES DE SEGURIDAD - LEA ESTO PRIMERO . . . . . . . . . . . . . . . . . . . . . . . . . . . . . . . . . . . .iv
1.1 Instrucciones de Securidad . . . . . . . . . . . . . . . . . . . . . . . . . . . . . . . . . . . . . . . . . . . . . . . . . . . . . . . . . . . . . .iv
1. SICHERHEITSHINWEISE - LESEN SIE DIESEN ABSCHNITT ZUERST . . . . . . . . . . . . . . . . . . . . . . . . . .iv
1.1 Sicherheitsanweisungen . . . . . . . . . . . . . . . . . . . . . . . . . . . . . . . . . . . . . . . . . . . . . . . . . . . . . . . . . . . . . . . . .iv
1.2 EC Declaration of Conformity . . . . . . . . . . . . . . . . . . . . . . . . . . . . . . . . . . . . . . . . . . . . . . . . . . . . . . . . . . .v
1.3 FCC Compliance . . . . . . . . . . . . . . . . . . . . . . . . . . . . . . . . . . . . . . . . . . . . . . . . . . . . . . . . . . . . . . . . . . . . . .v
CONTENTS . . . . . . . . . . . . . . . . . . . . . . . . . . . . . . . . . . . . . . . . . . . . . . . . . . . . . . . . . . . . . . . . . . . . . . . . . . . . .vi
2 UNPACKING . . . . . . . . . . . . . . . . . . . . . . . . . . . . . . . . . . . . . . . . . . . . . . . . . . . . . . . . . . . . . . . . . . . . . . . . . . . .1
2.1 Contents . . . . . . . . . . . . . . . . . . . . . . . . . . . . . . . . . . . . . . . . . . . . . . . . . . . . . . . . . . . . . . . . . . . . . . . . . . . . .1
3 QUICK START . . . . . . . . . . . . . . . . . . . . . . . . . . . . . . . . . . . . . . . . . . . . . . . . . . . . . . . . . . . . . . . . . . . . . . . . . .2
3.1 Rear Panel Connectors and Controls . . . . . . . . . . . . . . . . . . . . . . . . . . . . . . . . . . . . . . . . . . . . . . . . . . . . . . .2
3.2 Initial Control Settings . . . . . . . . . . . . . . . . . . . . . . . . . . . . . . . . . . . . . . . . . . . . . . . . . . . . . . . . . . . . . . . . .3
3.3 Audio Connection . . . . . . . . . . . . . . . . . . . . . . . . . . . . . . . . . . . . . . . . . . . . . . . . . . . . . . . . . . . . . . . . . . . . .3
3.4 AC Mains Connection . . . . . . . . . . . . . . . . . . . . . . . . . . . . . . . . . . . . . . . . . . . . . . . . . . . . . . . . . . . . . . . . . .3
3.5 Adjusting the Output Level . . . . . . . . . . . . . . . . . . . . . . . . . . . . . . . . . . . . . . . . . . . . . . . . . . . . . . . . . . . . . .3
4 OVERVIEW . . . . . . . . . . . . . . . . . . . . . . . . . . . . . . . . . . . . . . . . . . . . . . . . . . . . . . . . . . . . . . . . . . . . . . . . . . . . .4
4.1 Introduction . . . . . . . . . . . . . . . . . . . . . . . . . . . . . . . . . . . . . . . . . . . . . . . . . . . . . . . . . . . . . . . . . . . . . . . . . .4
4.2 Description . . . . . . . . . . . . . . . . . . . . . . . . . . . . . . . . . . . . . . . . . . . . . . . . . . . . . . . . . . . . . . . . . . . . . . . . . . .4
4.3 Amplification . . . . . . . . . . . . . . . . . . . . . . . . . . . . . . . . . . . . . . . . . . . . . . . . . . . . . . . . . . . . . . . . . . . . . . . . .5
4.4 Using the Loudspeaker . . . . . . . . . . . . . . . . . . . . . . . . . . . . . . . . . . . . . . . . . . . . . . . . . . . . . . . . . . . . . . . . .5
5 ARRAY DESIGN . . . . . . . . . . . . . . . . . . . . . . . . . . . . . . . . . . . . . . . . . . . . . . . . . . . . . . . . . . . . . . . . . . . . . . . . .5
5.1 Software Program . . . . . . . . . . . . . . . . . . . . . . . . . . . . . . . . . . . . . . . . . . . . . . . . . . . . . . . . . . . . . . . . . . . . .5
6 ELECTRICAL INSTALLATION . . . . . . . . . . . . . . . . . . . . . . . . . . . . . . . . . . . . . . . . . . . . . . . . . . . . . . . . . . . .5
6.1 AC Mains . . . . . . . . . . . . . . . . . . . . . . . . . . . . . . . . . . . . . . . . . . . . . . . . . . . . . . . . . . . . . . . . . . . . . . . . . . . .5
6.2 AC Mains Connection . . . . . . . . . . . . . . . . . . . . . . . . . . . . . . . . . . . . . . . . . . . . . . . . . . . . . . . . . . . . . . . . .6
6.3 AC Mains Cable . . . . . . . . . . . . . . . . . . . . . . . . . . . . . . . . . . . . . . . . . . . . . . . . . . . . . . . . . . . . . . . . . . . . . .7
6.3 Cordon secteur . . . . . . . . . . . . . . . . . . . . . . . . . . . . . . . . . . . . . . . . . . . . . . . . . . . . . . . . . . . . . . . . . . . . . . . .7
6.3 Cavo D’alimentazione AC . . . . . . . . . . . . . . . . . . . . . . . . . . . . . . . . . . . . . . . . . . . . . . . . . . . . . . . . . . . . . . .7
6.3 Cable de alimentacione . . . . . . . . . . . . . . . . . . . . . . . . . . . . . . . . . . . . . . . . . . . . . . . . . . . . . . . . . . . . . . . . .7
6.3 Netzkabel . . . . . . . . . . . . . . . . . . . . . . . . . . . . . . . . . . . . . . . . . . . . . . . . . . . . . . . . . . . . . . . . . . . . . . . . . . . .8
6.4 Power On / Off . . . . . . . . . . . . . . . . . . . . . . . . . . . . . . . . . . . . . . . . . . . . . . . . . . . . . . . . . . . . . . . . . . . . . . .8
6.5 AC Mains Voltage . . . . . . . . . . . . . . . . . . . . . . . . . . . . . . . . . . . . . . . . . . . . . . . . . . . . . . . . . . . . . . . . . . . . .8
6.6 Power Cord Receptacle . . . . . . . . . . . . . . . . . . . . . . . . . . . . . . . . . . . . . . . . . . . . . . . . . . . . . . . . . . . . . . . . .9
6.7 Grounding . . . . . . . . . . . . . . . . . . . . . . . . . . . . . . . . . . . . . . . . . . . . . . . . . . . . . . . . . . . . . . . . . . . . . . . . . . .9
6.8 AC Loop Connector . . . . . . . . . . . . . . . . . . . . . . . . . . . . . . . . . . . . . . . . . . . . . . . . . . . . . . . . . . . . . . . . . . .9
6.9 Operating Temperature . . . . . . . . . . . . . . . . . . . . . . . . . . . . . . . . . . . . . . . . . . . . . . . . . . . . . . . . . . . . . . . . .10
6.10 Input Connections . . . . . . . . . . . . . . . . . . . . . . . . . . . . . . . . . . . . . . . . . . . . . . . . . . . . . . . . . . . . . . . . . . . . .10
6.11 Network Configurations . . . . . . . . . . . . . . . . . . . . . . . . . . . . . . . . . . . . . . . . . . . . . . . . . . . . . . . . . . . . . . . .11
7 ARRAY OPERATION . . . . . . . . . . . . . . . . . . . . . . . . . . . . . . . . . . . . . . . . . . . . . . . . . . . . . . . . . . . . . . . . . . . . .13
7.1 Overview . . . . . . . . . . . . . . . . . . . . . . . . . . . . . . . . . . . . . . . . . . . . . . . . . . . . . . . . . . . . . . . . . . . . . . . . . . . .13
7.2 Engineering Design . . . . . . . . . . . . . . . . . . . . . . . . . . . . . . . . . . . . . . . . . . . . . . . . . . . . . . . . . . . . . . . . . . . .13
7.3 Operating Controls . . . . . . . . . . . . . . . . . . . . . . . . . . . . . . . . . . . . . . . . . . . . . . . . . . . . . . . . . . . . . . . . . . . .13
7.4 Signal Processing . . . . . . . . . . . . . . . . . . . . . . . . . . . . . . . . . . . . . . . . . . . . . . . . . . . . . . . . . . . . . . . . . . . . . .14
7.5 User Adjustable DSP . . . . . . . . . . . . . . . . . . . . . . . . . . . . . . . . . . . . . . . . . . . . . . . . . . . . . . . . . . . . . . . . . . .14
8 RIGGING & HANDLING . . . . . . . . . . . . . . . . . . . . . . . . . . . . . . . . . . . . . . . . . . . . . . . . . . . . . . . . . . . . . . . . . .15
8.1 Rigging Overview . . . . . . . . . . . . . . . . . . . . . . . . . . . . . . . . . . . . . . . . . . . . . . . . . . . . . . . . . . . . . . . . . . . . .15
8.2 Rigging Warnings . . . . . . . . . . . . . . . . . . . . . . . . . . . . . . . . . . . . . . . . . . . . . . . . . . . . . . . . . . . . . . . . . . . . .16
8.3 Permanent Installation Suspension . . . . . . . . . . . . . . . . . . . . . . . . . . . . . . . . . . . . . . . . . . . . .
. . . . . . . . . . .16
9 SERVICE, INSPECTION, and MAINTENANCE . . . . . . . . . . . . . . . . . . . . . . . . . . . . . . . . . . . . . . . . . . . . . . .18
9.1 General Service . . . . . . . . . . . . . . . . . . . . . . . . . . . . . . . . . . . . . . . . . . . . . . . . . . . . . . . . . . . . . . . . . . . . . . .18
9.2 Rigging Service . . . . . . . . . . . . . . . . . . . . . . . . . . . . . . . . . . . . . . . . . . . . . . . . . . . . . . . . . . . . . . . . . . . . . . .18
9.3 Basic Field Troubleshooting and Repair . . . . . . . . . . . . . . . . . . . . . . . . . . . . . . . . . . . . . . . . . . . . . . . . . . . .18
9.4 Inspection and Maintenance . . . . . . . . . . . . . . . . . . . . . . . . . . . . . . . . . . . . . . . . . . . . . . . . . . . . . . . . . . . . .18
9.5 Contacting EAW . . . . . . . . . . . . . . . . . . . . . . . . . . . . . . . . . . . . . . . . . . . . . . . . . . . . . . . . . . . . . . . . . . . . . .18
10 BLOCK DIAGRAM . . . . . . . . . . . . . . . . . . . . . . . . . . . . . . . . . . . . . . . . . . . . . . . . . . . . . . . . . . . . . . . . . . . . . .19
10.1 Signal Flow Diagram . . . . . . . . . . . . . . . . . . . . . . . . . . . . . . . . . . . . . . . . . . . . . . . . . . . . . . . . . . . . . . . . . . .19
10.2 Block Diagram . . . . . . . . . . . . . . . . . . . . . . . . . . . . . . . . . . . . . . . . . . . . . . . . . . . . . . . . . . . . . . . . . . . . . . . .20
vi

2 UNPACKING
2.1 Contents
Qty Item
1 NTS250 Loudspeaker
1 Power Cord (dependent on product's AC mains rating)
115 V - Neutrik® PowerCon® to Nema 15R plug 9.5 ft / 2.9 m
or
230 V - Neutrik PowerCon to male Schuko plug 8 ft / 2.5 m
1 Power Cord AC Loop (Neutrik PowerCon to Neutrik PowerCon)
1 USB Cable 6 ft / 2 m
1 NTS250 Owner’s Manual (this document)
1 EAW Loudspeaker Owner’s Manual
1 Warranty Card
1 RJ45 Ethernet Cable 4 ft / 0.6 m (Neutrik® EtherCon®)
Page 1
3 QUICK START
If you are in a hurry or are knowledgeable about using powered loudspeakers, these Quick Start
instructions provide the details particular to the NTS Series loudspeakers.
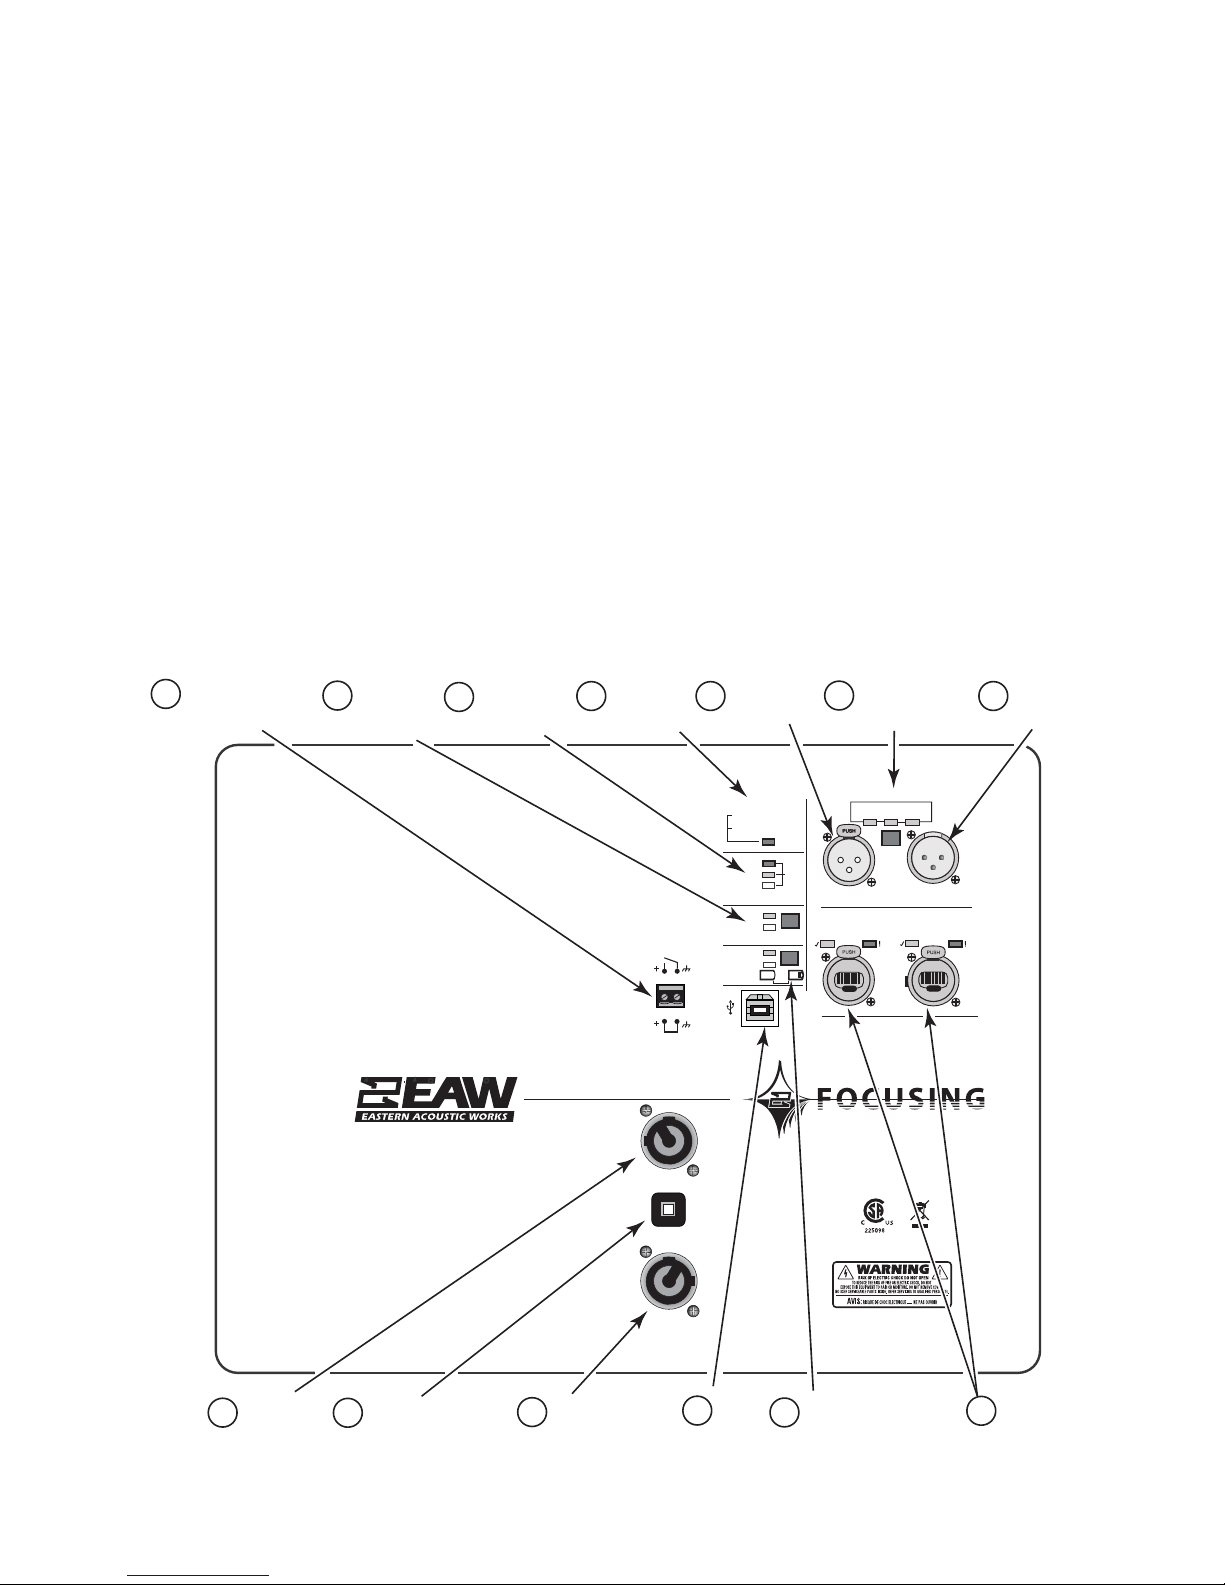
3.1 Rear Panel Connectors and Controls
1 AC Mains Input: Connect to AC mains supply as labeled.
2 AC Mains Loop Through Loop AC mains to four (4) additional NTS250 (1440 W MAX)
3 AC Loop Circuit Breaker User resettable, 10 A (115 V), 5 A (230 V)
4 Enable/Standby Contacts Closed = Standby, Open = On
5 System Gain Provides Gain for system balance
6 Rear Spkr ASP Provides cancellation using multiple NTS250
7 USB Port Connect to a PC for controlling with EAWPilot
8 Dual U-Net Connectors Connection and loop through for U-Net network
9 Input Level Status Indicators Indicators for signal present, limiter active, and clip
10 Amplifier Status Indicator Indicator for normal and fault status
11 Audio Input Connector Connect analog or AES/EBU digital input signals
12 Input Selector Switch and Indicators Select type of input signal, analog, AES/EBU, or U-Net
13 Audio Loop Through Connector Loop input signal to additional NTS250 or other device
Page 2
ELECTRONIC
4
STANDBY / ENABLE
CONTACTS
SYSTEM
5
GAIN
SWITCH &
INDICATORS
INPUT LEVEL
9
STATUS
INDICATORS
AMPLIFIER
10
STATUS
INDICATOR
ENABLE
STANDBY
10A
AUDIO INPUT
11
CONNECTOR
AMPLIFIER STATUS
GREEN = NORMAL
RED CONSTANT = FAULT
RED FLASHING = STANDBY
LIMITER ACTIVE
SIGNAL PRESENT
SYSTEM GAIN
CARDIOID
HYPERCARDIOID
REAR
SPKR DSP
AC MAINS
~ 100-120 VAC
50-60 HZ 350W
AC LOOP
CIRCUIT
BREAKER
PUSH TO RESET
AC LOOP
~ 100-120VAC
1450 W MAX
CLIP
INPUT LEVEL
+6dB
+12dB
250
mm
INPUT SELECTOR
12
SWITCH &
INDICATORS
INPUT SELECT
ALL ON = U-NET INPUT
AES/EBU
LEFT
ALL ON
INPUT
MUTE
INPUT
1
THIS EQUIPMENT COMPLIES WITH THE LIMITS FOR A CLASS A
DIGITAL DEVICE AS DESCRIBED BY FCC RULES, AND THE
CANADIAN DEPARTMENT OF COMMUNICATIONS, ICES-003.
THIS EQUIPMENT GENERATES, USES, AND CAN RADIATE
RADIO FREQUENCY ENERGY AND MAY CAUSE HARMFUL
INTERFERENCE TO RADIO COMMUNICATIONS. OPERATION OF
THIS EQUIPMENT IN A RESIDENTIAL AREA IS LIKELY TO CAUSE
INTERFERENCE TO ELECTRICAL DEVICES.
DESIGNED IN WHITINSVILLE, MA, USA. MANUFACTURED
IN CHINA. ©2009 LOUD TECHNOLOGIES, INC. “EAW” IS A
REGISTERED TRADEMARK OF LOUD TECHNOLOGIES, INC.
NORM/
ANALOG
U-NET
AES/EBU
FLASHING = USER DSP ENABLE
RIGHT
CONSTANT = USER DSP DISABLE
LOOP
2
AUDIO LOOP
13
THROUGH
CONNECTOR
AC MAINS
1
INPUT
AC MAINS
3
LOOP THROUGH
CIRCUIT BREAKER
AC MAINS
2
LOOP THROUGH
USB
7
PORT
REAR SPKR ASP
6
SWITCH & INDICATORS
U-NET I/O
8
CONNECTORS

3.1.1 BUTTON PRESS/HOLD FEATURES
While Powered:
Hold Input Select button for five (5) seconds --- user DSP bypass/enable
Hold all three buttons for five (5) seconds --- lock/unlock buttons
(disables rear panel button; software controls still active)
On power up:
Hold Input Select and System Gain buttons --- reset all settings to factory default
(all user settings will be overwritten)
Hold System Gain and Rear Spkr DSP buttons --- put into boot mode
(only used for troubleshooting)
3.2 Initial Control Settings
Use these nominal settings for the rear panel switches. These are multi-state “soft” switches which
control software functions. Repeatedly pressing each switch cycles through its multiple states.
CONTROL SETTING LED INDICATION
System Gain Normal Both LED’s off
Rear Spkr DSP Normal Both LED’s off
Input Select Normal Center LED on (Norm/Analog)
WARNING: Before connecting an NTS loudspeaker to the AC mains supply, completely turn
down the input signal to the loudspeaker using the signal source's output level (master volume
control or other output level control). If not, there could be excessive and possibly damaging
sound levels from the loudspeaker when energized.
3.3 Audio Connection
Connect the output from your line-level signal source to the XLR-3F Input connector on the rear panel.
This is an electronically balanced input. Use the loop through connector to daisy-chain the signal to
additional NTS250s.
3.4 AC Mains Connection
Connect one of the supplied AC mains cord to the Neutrik PowerCon receptacle on the rear of the
loudspeaker. Use the appropriate cord for the AC mains voltage as labeled on the loudspeaker: nominal
115 Vor 230 V. Connect the other end to the AC mains supply receptacle. If necessary, have a qualified
electrician change the AC mains cord plug as required for compatibility with the local AC mains
receptacle.
CAUTION: There is no power switch on the loudspeaker. When connected to the AC mains,
the loudspeaker will be fully operational, with the output level controlled by the signal
source feeding the loudspeaker.
3.5 Adjusting the Output Level
With a source program playing, gradually turn up the level of your signal source until the desired
volume is reached but below the point where the CLIP and/or LIMITER lights illuminate.
CAUTION: If there is no sound, turn down the signal source's output level before
investigating the problem. Do this to avoid excessive and possibly damaging sound levels
from the loudspeaker.
Page 3
 Loading...