

Eaton Managed ePDU, Managed ePDU 0U, Managed ePDU 1U User Manual

Managed ePDU
User’s Guide

Eaton are registered trademarks and ePDU is a trademark of Eaton Corporation or its subsidiaries and aliates. HyperTerminal is a
registered trademark of Hilgraeve. Microsoft, Internet Explorer, Vista, and Windows are registered trademarks of Microsoft Corporation. JavaScript
is a trademark of Sun Microsystems, Inc. Mozilla and Firefox are registered tradmarks of Mozilla Foundation. Netscape and Netscape Navigator are
registered trademarks of Netscape Communication Corporation. All other trademarks are property of their respective companies.
Copyright 2008 Eaton Corporation, Raleigh, NC, USA. All rights reserved. No part of this document may be reproduced in any way without the
express written approval of Eaton Corporation.

FCC Information
This equipment has been tested and found to comply with the limits for a Class A digital device, pursuant to Part 15 of the FCC Rules. These limits
are designed to provide reasonable protection against harmful interference in a commercial installation. This equipment generates, uses, and can
radiate radio frequency energy and if not installed and used in accordance with the instructions, may cause harmful interference to radio
communications. Operation of this equipment in a residential environment may cause harmful interference.
VCCI Information (Japan)
Eaton is not responsible for damage to this product resulting from accident, disaster, misuse, abuse, non−Eaton modification of the product, or
other events outside of Eaton’s reasonable control or not arising under normal operating conditions.


INTRODUCTION
EATON Managed ePDU User’s Guide 164201xxx Rev 1 DRAFT 10−OCT−2008
3
Features
All models and congurations of the ePDU provide the following features:
The ability to control outlets collectively and individually
The ability to power on, power o and reboot the devices connected to each outlet
The ability to group outlets from multiple ePDUs as virtual outlets accessible from
a single session
The ability to monitor the following at the outlet level:
− RMS Current
− Power Factor
− Maximum RMS Current
− RMS Voltage
− Active Power
− Apparent power
The ability to monitor internal CPU temperature of the ePDU
The ability to monitor environmental factors such as external temperature and
humidity
An audible alarm (beeper) and a visual alarm (blinking LED) to indicate current
overload
Congurable alarm thresholds
Support for SNMP v1, v2 and V3
The ability to send traps using SNMP protocol
The ability to retrieve outlet specic data using SNMP, including outlet state,
current, voltage and power
The ability to congure and set values through SNMP, including ePDU and outlet
threshold levels
Fully shrouded local branch circuit breakers on products rated over 20A to protect
connected equipments against overload and short circuits
Contents
The following describes the equipment and other material included in each model
package.
0U Models
ePDU including power cord
Bracket for 0U and screws
Tool−less mounting bracket for 0U models
Null modem cable with RJ−45 and DB−9F connectors on either end
1U Models
ePDU including power cord 1.80m (6 ft)
1U bracket pack and screws
Null modem cable with RJ−45 and DB−9F connectors on either end

TABLE OF CONTENTS
EATON Managed ePDUt User’s Guide S 164201xxx Rev 1 DRAFT 10−OCT−2008
ii
6 Using the Web Interface 23. . . . . . . . . . . . . . . . . . . . . . . . . . . . . . . . . . . . . . . . . . . . . . . . . . . . . . . . . . . . . . . . . .
Logging into the Web Interface 23. . . . . . . . . . . . . . . . . . . . . . . . . . . . . . . . . . . . . . . . . . . . . . . . . . . . . . . . . . . . . . . . . . . . . . . . . . . . . . . . .
Logging In 23. . . . . . . . . . . . . . . . . . . . . . . . . . . . . . . . . . . . . . . . . . . . . . . . . . . . . . . . . . . . . . . . . . . . . . . . . . . . . . . . . . . . . . . . . . . . .
Changing Your Password 25. . . . . . . . . . . . . . . . . . . . . . . . . . . . . . . . . . . . . . . . . . . . . . . . . . . . . . . . . . . . . . . . . . . . . . . . . . . . . . . . . .
Using the Web Interface 25. . . . . . . . . . . . . . . . . . . . . . . . . . . . . . . . . . . . . . . . . . . . . . . . . . . . . . . . . . . . . . . . . . . . . . . . . . . . . . . . . . . . .
Menus 25. . . . . . . . . . . . . . . . . . . . . . . . . . . . . . . . . . . . . . . . . . . . . . . . . . . . . . . . . . . . . . . . . . . . . . . . . . . . . . . . . . . . . . . . . . . . . . .
Navigation Path 26. . . . . . . . . . . . . . . . . . . . . . . . . . . . . . . . . . . . . . . . . . . . . . . . . . . . . . . . . . . . . . . . . . . . . . . . . . . . . . . . . . . . . . . . .
Status Panel 27. . . . . . . . . . . . . . . . . . . . . . . . . . . . . . . . . . . . . . . . . . . . . . . . . . . . . . . . . . . . . . . . . . . . . . . . . . . . . . . . . . . . . . . . . . .
Status Messages 28. . . . . . . . . . . . . . . . . . . . . . . . . . . . . . . . . . . . . . . . . . . . . . . . . . . . . . . . . . . . . . . . . . . . . . . . . . . . . . . . . . . . . . . .
Unavailable Options 28. . . . . . . . . . . . . . . . . . . . . . . . . . . . . . . . . . . . . . . . . . . . . . . . . . . . . . . . . . . . . . . . . . . . . . . . . . . . . . . . . . . . . .
Reset to Defaults 29. . . . . . . . . . . . . . . . . . . . . . . . . . . . . . . . . . . . . . . . . . . . . . . . . . . . . . . . . . . . . . . . . . . . . . . . . . . . . . . . . . . . . . . .
Default Asterisk 29. . . . . . . . . . . . . . . . . . . . . . . . . . . . . . . . . . . . . . . . . . . . . . . . . . . . . . . . . . . . . . . . . . . . . . . . . . . . . . . . . . . . . . . . .
Refresh 29. . . . . . . . . . . . . . . . . . . . . . . . . . . . . . . . . . . . . . . . . . . . . . . . . . . . . . . . . . . . . . . . . . . . . . . . . . . . . . . . . . . . . . . . . . . . . . .
Using the Home Page 29. . . . . . . . . . . . . . . . . . . . . . . . . . . . . . . . . . . . . . . . . . . . . . . . . . . . . . . . . . . . . . . . . . . . . . . . . . . . . . . . . . . . . . . .
Global Status Panel 29. . . . . . . . . . . . . . . . . . . . . . . . . . . . . . . . . . . . . . . . . . . . . . . . . . . . . . . . . . . . . . . . . . . . . . . . . . . . . . . . . . . . . .
Outlets List 30. . . . . . . . . . . . . . . . . . . . . . . . . . . . . . . . . . . . . . . . . . . . . . . . . . . . . . . . . . . . . . . . . . . . . . . . . . . . . . . . . . . . . . . . . . . .
Turn an Outlet On, Off, or Cycle the Power 30. . . . . . . . . . . . . . . . . . . . . . . . . . . . . . . . . . . . . . . . . . . . . . . . . . . . . . . . . . . . . . . . . . . . . .
Display Additional Details 30. . . . . . . . . . . . . . . . . . . . . . . . . . . . . . . . . . . . . . . . . . . . . . . . . . . . . . . . . . . . . . . . . . . . . . . . . . . . . . . . . .
All Outlets Control 31. . . . . . . . . . . . . . . . . . . . . . . . . . . . . . . . . . . . . . . . . . . . . . . . . . . . . . . . . . . . . . . . . . . . . . . . . . . . . . . . . . . . . . .
Setting Up User Profiles 31. . . . . . . . . . . . . . . . . . . . . . . . . . . . . . . . . . . . . . . . . . . . . . . . . . . . . . . . . . . . . . . . . . . . . . . . . . . . . . . . . . . . . .
Creating a User Profile 32. . . . . . . . . . . . . . . . . . . . . . . . . . . . . . . . . . . . . . . . . . . . . . . . . . . . . . . . . . . . . . . . . . . . . . . . . . . . . . . . . . . .
Copying a User Profile 33. . . . . . . . . . . . . . . . . . . . . . . . . . . . . . . . . . . . . . . . . . . . . . . . . . . . . . . . . . . . . . . . . . . . . . . . . . . . . . . . . . . .
Modifying a User Profile 33. . . . . . . . . . . . . . . . . . . . . . . . . . . . . . . . . . . . . . . . . . . . . . . . . . . . . . . . . . . . . . . . . . . . . . . . . . . . . . . . . . .
Deleting a User Profile 34. . . . . . . . . . . . . . . . . . . . . . . . . . . . . . . . . . . . . . . . . . . . . . . . . . . . . . . . . . . . . . . . . . . . . . . . . . . . . . . . . . . .
Setting User Permissions Individually 34. . . . . . . . . . . . . . . . . . . . . . . . . . . . . . . . . . . . . . . . . . . . . . . . . . . . . . . . . . . . . . . . . . . . . . . . . .
Setting Up User Groups 34. . . . . . . . . . . . . . . . . . . . . . . . . . . . . . . . . . . . . . . . . . . . . . . . . . . . . . . . . . . . . . . . . . . . . . . . . . . . . . . . . . . . . .
Creating a User Group
35. . . . . . . . . . . . . . . . . . . . . . . . . . . . . . . . . . . . . . . . . . . . . . . . . . . . . . . . . . . . . . . . . . . . . . . . . . . . . . . . . . . .
Setting System Permissions 36. . . . . . . . . . . . . . . . . . . . . . . . . . . . . . . . . . . . . . . . . . . . . . . . . . . . . . . . . . . . . . . . . . . . . . . . . . . . . . . .
Setting the Outlet Permissions 37. . . . . . . . . . . . . . . . . . . . . . . . . . . . . . . . . . . . . . . . . . . . . . . . . . . . . . . . . . . . . . . . . . . . . . . . . . . . . . .
Copying a User Group 38. . . . . . . . . . . . . . . . . . . . . . . . . . . . . . . . . . . . . . . . . . . . . . . . . . . . . . . . . . . . . . . . . . . . . . . . . . . . . . . . . . . . .
Modifying a User Group 38. . . . . . . . . . . . . . . . . . . . . . . . . . . . . . . . . . . . . . . . . . . . . . . . . . . . . . . . . . . . . . . . . . . . . . . . . . . . . . . . . . .
Deleting a User Group 39. . . . . . . . . . . . . . . . . . . . . . . . . . . . . . . . . . . . . . . . . . . . . . . . . . . . . . . . . . . . . . . . . . . . . . . . . . . . . . . . . . . . .
Setting Up Access Controls 39. . . . . . . . . . . . . . . . . . . . . . . . . . . . . . . . . . . . . . . . . . . . . . . . . . . . . . . . . . . . . . . . . . . . . . . . . . . . . . . . . . .
Forcing HTTPS Encryption 39. . . . . . . . . . . . . . . . . . . . . . . . . . . . . . . . . . . . . . . . . . . . . . . . . . . . . . . . . . . . . . . . . . . . . . . . . . . . . . . . . .
Configuring the Firewall 39. . . . . . . . . . . . . . . . . . . . . . . . . . . . . . . . . . . . . . . . . . . . . . . . . . . . . . . . . . . . . . . . . . . . . . . . . . . . . . . . . . .
Enabling the Firewall 40. . . . . . . . . . . . . . . . . . . . . . . . . . . . . . . . . . . . . . . . . . . . . . . . . . . . . . . . . . . . . . . . . . . . . . . . . . . . . . . . . . . . .
Changing the Default Policy 40. . . . . . . . . . . . . . . . . . . . . . . . . . . . . . . . . . . . . . . . . . . . . . . . . . . . . . . . . . . . . . . . . . . . . . . . . . . . . . . . .
Creating Firewall Rules 41. . . . . . . . . . . . . . . . . . . . . . . . . . . . . . . . . . . . . . . . . . . . . . . . . . . . . . . . . . . . . . . . . . . . . . . . . . . . . . . . . . . .
Deleting a Firewall Rule 42. . . . . . . . . . . . . . . . . . . . . . . . . . . . . . . . . . . . . . . . . . . . . . . . . . . . . . . . . . . . . . . . . . . . . . . . . . . . . . . . . . .
Creating Group−Based Access Control Rules 42. . . . . . . . . . . . . . . . . . . . . . . . . . . . . . . . . . . . . . . . . . . . . . . . . . . . . . . . . . . . . . . . . . . . .
Enabling Group−based Access Control Rules 43. . . . . . . . . . . . . . . . . . . . . . . . . . . . . . . . . . . . . . . . . . . . . . . . . . . . . . . . . . . . . . . . . . . . .
Changing the Default Action 43. . . . . . . . . . . . . . . . . . . . . . . . . . . . . . . . . . . . . . . . . . . . . . . . . . . . . . . . . . . . . . . . . . . . . . . . . . . . . . . .
Creating Group−Based Access Control Rules 44. . . . . . . . . . . . . . . . . . . . . . . . . . . . . . . . . . . . . . . . . . . . . . . . . . . . . . . . . . . . . . . . . . . . .
Deleting a Group−based Access Control Rule 44. . . . . . . . . . . . . . . . . . . . . . . . . . . . . . . . . . . . . . . . . . . . . . . . . . . . . . . . . . . . . . . . . . . . .
Setting Up User Login Controls 45. . . . . . . . . . . . . . . . . . . . . . . . . . . . . . . . . . . . . . . . . . . . . . . . . . . . . . . . . . . . . . . . . . . . . . . . . . . . . .
Enabling User Blocking 45. . . . . . . . . . . . . . . . . . . . . . . . . . . . . . . . . . . . . . . . . . . . . . . . . . . . . . . . . . . . . . . . . . . . . . . . . . . . . . . . . . . .
Enabling Login Limitations 46. . . . . . . . . . . . . . . . . . . . . . . . . . . . . . . . . . . . . . . . . . . . . . . . . . . . . . . . . . . . . . . . . . . . . . . . . . . . . . . . . .
Enabling Strong Passwords 47. . . . . . . . . . . . . . . . . . . . . . . . . . . . . . . . . . . . . . . . . . . . . . . . . . . . . . . . . . . . . . . . . . . . . . . . . . . . . . . . .

TABLE OF CONTENTS
EATON Managed ePDUt User’s Guide S 164201xxx Rev 1 DRAFT 10−OCT−2008
iii
Setting Up a Digital Certificate 48. . . . . . . . . . . . . . . . . . . . . . . . . . . . . . . . . . . . . . . . . . . . . . . . . . . . . . . . . . . . . . . . . . . . . . . . . . . . . . . . .
Creating a Certificate Signing Request 48. . . . . . . . . . . . . . . . . . . . . . . . . . . . . . . . . . . . . . . . . . . . . . . . . . . . . . . . . . . . . . . . . . . . . . . . .
Installing a Certificate 50. . . . . . . . . . . . . . . . . . . . . . . . . . . . . . . . . . . . . . . . . . . . . . . . . . . . . . . . . . . . . . . . . . . . . . . . . . . . . . . . . . . . .
Setting Up External User Authentication 50. . . . . . . . . . . . . . . . . . . . . . . . . . . . . . . . . . . . . . . . . . . . . . . . . . . . . . . . . . . . . . . . . . . . . . . . . .
Setting Up LDAP Authentication 51. . . . . . . . . . . . . . . . . . . . . . . . . . . . . . . . . . . . . . . . . . . . . . . . . . . . . . . . . . . . . . . . . . . . . . . . . . . . .
Setting Up RADIUS Authentication 52. . . . . . . . . . . . . . . . . . . . . . . . . . . . . . . . . . . . . . . . . . . . . . . . . . . . . . . . . . . . . . . . . . . . . . . . . . . .
Setting Up Outlets and Power Thresholds 53. . . . . . . . . . . . . . . . . . . . . . . . . . . . . . . . . . . . . . . . . . . . . . . . . . . . . . . . . . . . . . . . . . . . . . . . .
Setting Default Outlet State 54. . . . . . . . . . . . . . . . . . . . . . . . . . . . . . . . . . . . . . . . . . . . . . . . . . . . . . . . . . . . . . . . . . . . . . . . . . . . . . . .
Setting the ePDU Thresholds 55. . . . . . . . . . . . . . . . . . . . . . . . . . . . . . . . . . . . . . . . . . . . . . . . . . . . . . . . . . . . . . . . . . . . . . . . . . . . . . . .
Setting the Outlet Power−Up Sequence 56. . . . . . . . . . . . . . . . . . . . . . . . . . . . . . . . . . . . . . . . . . . . . . . . . . . . . . . . . . . . . . . . . . . . . . . . .
Naming Outlets 57. . . . . . . . . . . . . . . . . . . . . . . . . . . . . . . . . . . . . . . . . . . . . . . . . . . . . . . . . . . . . . . . . . . . . . . . . . . . . . . . . . . . . . . . .
Setting Outlet Thresholds 58. . . . . . . . . . . . . . . . . . . . . . . . . . . . . . . . . . . . . . . . . . . . . . . . . . . . . . . . . . . . . . . . . . . . . . . . . . . . . . . . . .
Viewing Outlet Details 58. . . . . . . . . . . . . . . . . . . . . . . . . . . . . . . . . . . . . . . . . . . . . . . . . . . . . . . . . . . . . . . . . . . . . . . . . . . . . . . . . . . .
Power Cycling an Outlet 59. . . . . . . . . . . . . . . . . . . . . . . . . . . . . . . . . . . . . . . . . . . . . . . . . . . . . . . . . . . . . . . . . . . . . . . . . . . . . . . . . . .
Turning an Outlet On or Off 59. . . . . . . . . . . . . . . . . . . . . . . . . . . . . . . . . . . . . . . . . . . . . . . . . . . . . . . . . . . . . . . . . . . . . . . . . . . . . . . . .
Environmental Sensors 60. . . . . . . . . . . . . . . . . . . . . . . . . . . . . . . . . . . . . . . . . . . . . . . . . . . . . . . . . . . . . . . . . . . . . . . . . . . . . . . . . . . . . . .
Connecting the Environmental Sensors 60. . . . . . . . . . . . . . . . . . . . . . . . . . . . . . . . . . . . . . . . . . . . . . . . . . . . . . . . . . . . . . . . . . . . . . . . .
Mapping the Environmental Sensors 60. . . . . . . . . . . . . . . . . . . . . . . . . . . . . . . . . . . . . . . . . . . . . . . . . . . . . . . . . . . . . . . . . . . . . . . . . .
Configuring Environmental Sensors and Thresholds 61. . . . . . . . . . . . . . . . . . . . . . . . . . . . . . . . . . . . . . . . . . . . . . . . . . . . . . . . . . . . . . . .
Viewing Sensor Readings 62. . . . . . . . . . . . . . . . . . . . . . . . . . . . . . . . . . . . . . . . . . . . . . . . . . . . . . . . . . . . . . . . . . . . . . . . . . . . . . . . . .
Setting Up Alerts 62. . . . . . . . . . . . . . . . . . . . . . . . . . . . . . . . . . . . . . . . . . . . . . . . . . . . . . . . . . . . . . . . . . . . . . . . . . . . . . . . . . . . . . . . . . .
Configuring Alert Events 62. . . . . . . . . . . . . . . . . . . . . . . . . . . . . . . . . . . . . . . . . . . . . . . . . . . . . . . . . . . . . . . . . . . . . . . . . . . . . . . . . . .
Creating Alert Policies 63. . . . . . . . . . . . . . . . . . . . . . . . . . . . . . . . . . . . . . . . . . . . . . . . . . . . . . . . . . . . . . . . . . . . . . . . . . . . . . . . . . . .
About Policies 64. . . . . . . . . . . . . . . . . . . . . . . . . . . . . . . . . . . . . . . . . . . . . . . . . . . . . . . . . . . . . . . . . . . . . . . . . . . . . . . . . . . . . . . . . .
Display Existing Policies 64. . . . . . . . . . . . . . . . . . . . . . . . . . . . . . . . . . . . . . . . . . . . . . . . . . . . . . . . . . . . . . . . . . . . . . . . . . . . . . . . . . .
Create a Policy
65. . . . . . . . . . . . . . . . . . . . . . . . . . . . . . . . . . . . . . . . . . . . . . . . . . . . . . . . . . . . . . . . . . . . . . . . . . . . . . . . . . . . . . . . . .
Modify a Policy 66. . . . . . . . . . . . . . . . . . . . . . . . . . . . . . . . . . . . . . . . . . . . . . . . . . . . . . . . . . . . . . . . . . . . . . . . . . . . . . . . . . . . . . . . .
Delete a Policy 66. . . . . . . . . . . . . . . . . . . . . . . . . . . . . . . . . . . . . . . . . . . . . . . . . . . . . . . . . . . . . . . . . . . . . . . . . . . . . . . . . . . . . . . . . .
Specifying the Alert Destination 67. . . . . . . . . . . . . . . . . . . . . . . . . . . . . . . . . . . . . . . . . . . . . . . . . . . . . . . . . . . . . . . . . . . . . . . . . . . . .
Setting Up Event Logging 68. . . . . . . . . . . . . . . . . . . . . . . . . . . . . . . . . . . . . . . . . . . . . . . . . . . . . . . . . . . . . . . . . . . . . . . . . . . . . . . . . . . . .
Configuring the Local Event Log 68. . . . . . . . . . . . . . . . . . . . . . . . . . . . . . . . . . . . . . . . . . . . . . . . . . . . . . . . . . . . . . . . . . . . . . . . . . . . . .
Viewing the Internal Event Log 70. . . . . . . . . . . . . . . . . . . . . . . . . . . . . . . . . . . . . . . . . . . . . . . . . . . . . . . . . . . . . . . . . . . . . . . . . . . . . .
Configuring NFS Logging 71. . . . . . . . . . . . . . . . . . . . . . . . . . . . . . . . . . . . . . . . . . . . . . . . . . . . . . . . . . . . . . . . . . . . . . . . . . . . . . . . . . .
Configuring SMTP Logging 72. . . . . . . . . . . . . . . . . . . . . . . . . . . . . . . . . . . . . . . . . . . . . . . . . . . . . . . . . . . . . . . . . . . . . . . . . . . . . . . . .
Configuring SNMP Logging 73. . . . . . . . . . . . . . . . . . . . . . . . . . . . . . . . . . . . . . . . . . . . . . . . . . . . . . . . . . . . . . . . . . . . . . . . . . . . . . . . .
Configuring Syslog Forwarding 73. . . . . . . . . . . . . . . . . . . . . . . . . . . . . . . . . . . . . . . . . . . . . . . . . . . . . . . . . . . . . . . . . . . . . . . . . . . . . .
Managing the ePDU 74. . . . . . . . . . . . . . . . . . . . . . . . . . . . . . . . . . . . . . . . . . . . . . . . . . . . . . . . . . . . . . . . . . . . . . . . . . . . . . . . . . . . . . . . .
Displaying Basic Device Information 74. . . . . . . . . . . . . . . . . . . . . . . . . . . . . . . . . . . . . . . . . . . . . . . . . . . . . . . . . . . . . . . . . . . . . . . . . . .
Displaying Model Configuration 75. . . . . . . . . . . . . . . . . . . . . . . . . . . . . . . . . . . . . . . . . . . . . . . . . . . . . . . . . . . . . . . . . . . . . . . . . . . . . .
Displaying Connected Users 75. . . . . . . . . . . . . . . . . . . . . . . . . . . . . . . . . . . . . . . . . . . . . . . . . . . . . . . . . . . . . . . . . . . . . . . . . . . . . . . .
Naming the ePDU 75. . . . . . . . . . . . . . . . . . . . . . . . . . . . . . . . . . . . . . . . . . . . . . . . . . . . . . . . . . . . . . . . . . . . . . . . . . . . . . . . . . . . . . . .
Modifying the Network Settings 76. . . . . . . . . . . . . . . . . . . . . . . . . . . . . . . . . . . . . . . . . . . . . . . . . . . . . . . . . . . . . . . . . . . . . . . . . . . . .
Modifying the Communications, Port, and Bandwidth Settings 77. . . . . . . . . . . . . . . . . . . . . . . . . . . . . . . . . . . . . . . . . . . . . . . . . . . . . . . .
Modifying the LAN Interface Settings 78. . . . . . . . . . . . . . . . . . . . . . . . . . . . . . . . . . . . . . . . . . . . . . . . . . . . . . . . . . . . . . . . . . . . . . . . . .
Setting the Date and Time 79. . . . . . . . . . . . . . . . . . . . . . . . . . . . . . . . . . . . . . . . . . . . . . . . . . . . . . . . . . . . . . . . . . . . . . . . . . . . . . . . . .
Configuring the SMTP Settings 80. . . . . . . . . . . . . . . . . . . . . . . . . . . . . . . . . . . . . . . . . . . . . . . . . . . . . . . . . . . . . . . . . . . . . . . . . . . . . .
Configuring the SNMP Settings 81. . . . . . . . . . . . . . . . . . . . . . . . . . . . . . . . . . . . . . . . . . . . . . . . . . . . . . . . . . . . . . . . . . . . . . . . . . . . . .
Resetting the ePDU 82. . . . . . . . . . . . . . . . . . . . . . . . . . . . . . . . . . . . . . . . . . . . . . . . . . . . . . . . . . . . . . . . . . . . . . . . . . . . . . . . . . . . . .
Updating the Firmware 83. . . . . . . . . . . . . . . . . . . . . . . . . . . . . . . . . . . . . . . . . . . . . . . . . . . . . . . . . . . . . . . . . . . . . . . . . . . . . . . . . . . .

TABLE OF CONTENTS
EATON Managed ePDUt User’s Guide S 164201xxx Rev 1 DRAFT 10−OCT−2008
iv
Outlet Grouping 84. . . . . . . . . . . . . . . . . . . . . . . . . . . . . . . . . . . . . . . . . . . . . . . . . . . . . . . . . . . . . . . . . . . . . . . . . . . . . . . . . . . . . . . . . . . .
Identifying Other ePDUs 84. . . . . . . . . . . . . . . . . . . . . . . . . . . . . . . . . . . . . . . . . . . . . . . . . . . . . . . . . . . . . . . . . . . . . . . . . . . . . . . . . . .
Grouping Outlets Together 85. . . . . . . . . . . . . . . . . . . . . . . . . . . . . . . . . . . . . . . . . . . . . . . . . . . . . . . . . . . . . . . . . . . . . . . . . . . . . . . . .
Controlling Outlet Groups 86. . . . . . . . . . . . . . . . . . . . . . . . . . . . . . . . . . . . . . . . . . . . . . . . . . . . . . . . . . . . . . . . . . . . . . . . . . . . . . . . . .
Editing or Deleting Outlet Groups 87. . . . . . . . . . . . . . . . . . . . . . . . . . . . . . . . . . . . . . . . . . . . . . . . . . . . . . . . . . . . . . . . . . . . . . . . . . . . .
Deleting Outlet Group Devices 87. . . . . . . . . . . . . . . . . . . . . . . . . . . . . . . . . . . . . . . . . . . . . . . . . . . . . . . . . . . . . . . . . . . . . . . . . . . . . . .
7 Using the CLP Interface 89. . . . . . . . . . . . . . . . . . . . . . . . . . . . . . . . . . . . . . . . . . . . . . . . . . . . . . . . . . . . . . . . . . .
About the CLP Interface 89. . . . . . . . . . . . . . . . . . . . . . . . . . . . . . . . . . . . . . . . . . . . . . . . . . . . . . . . . . . . . . . . . . . . . . . . . . . . . . . . . . . . . .
Logging into the CLP Interface 89. . . . . . . . . . . . . . . . . . . . . . . . . . . . . . . . . . . . . . . . . . . . . . . . . . . . . . . . . . . . . . . . . . . . . . . . . . . . . . . . .
Using HyperTerminal 89. . . . . . . . . . . . . . . . . . . . . . . . . . . . . . . . . . . . . . . . . . . . . . . . . . . . . . . . . . . . . . . . . . . . . . . . . . . . . . . . . . . . .
Using SSH or Telnet 91. . . . . . . . . . . . . . . . . . . . . . . . . . . . . . . . . . . . . . . . . . . . . . . . . . . . . . . . . . . . . . . . . . . . . . . . . . . . . . . . . . . . . .
Showing Outlet Information 92. . . . . . . . . . . . . . . . . . . . . . . . . . . . . . . . . . . . . . . . . . . . . . . . . . . . . . . . . . . . . . . . . . . . . . . . . . . . . . . . . . .
Syntax 92. . . . . . . . . . . . . . . . . . . . . . . . . . . . . . . . . . . . . . . . . . . . . . . . . . . . . . . . . . . . . . . . . . . . . . . . . . . . . . . . . . . . . . . . . . . . . . . .
Attributes 92. . . . . . . . . . . . . . . . . . . . . . . . . . . . . . . . . . . . . . . . . . . . . . . . . . . . . . . . . . . . . . . . . . . . . . . . . . . . . . . . . . . . . . . . . . . . .
Examples 92. . . . . . . . . . . . . . . . . . . . . . . . . . . . . . . . . . . . . . . . . . . . . . . . . . . . . . . . . . . . . . . . . . . . . . . . . . . . . . . . . . . . . . . . . . . . . .
Turning an Outlet On or Off 93. . . . . . . . . . . . . . . . . . . . . . . . . . . . . . . . . . . . . . . . . . . . . . . . . . . . . . . . . . . . . . . . . . . . . . . . . . . . . . . . . . . .
Syntax 93. . . . . . . . . . . . . . . . . . . . . . . . . . . . . . . . . . . . . . . . . . . . . . . . . . . . . . . . . . . . . . . . . . . . . . . . . . . . . . . . . . . . . . . . . . . . . . . .
Querying an Outlet Sensor 93. . . . . . . . . . . . . . . . . . . . . . . . . . . . . . . . . . . . . . . . . . . . . . . . . . . . . . . . . . . . . . . . . . . . . . . . . . . . . . . . . . . .
8 Using the IPMI Tool Set 95. . . . . . . . . . . . . . . . . . . . . . . . . . . . . . . . . . . . . . . . . . . . . . . . . . . . . . . . . . . . . . . . . . .
Channel Commands 95. . . . . . . . . . . . . . . . . . . . . . . . . . . . . . . . . . . . . . . . . . . . . . . . . . . . . . . . . . . . . . . . . . . . . . . . . . . . . . . . . . . . . . . . .
authcap <channel number> <max priv> 95. . . . . . . . . . . . . . . . . . . . . . . . . . . . . . . . . . . . . . . . . . . . . . . . . . . . . . . . . . . . . . . . . . . . . . . . .
info [channel number] 96. . . . . . . . . . . . . . . . . . . . . . . . . . . . . . . . . . . . . . . . . . . . . . . . . . . . . . . . . . . . . . . . . . . . . . . . . . . . . . . . . . . . .
getaccess <channel number> [userid] 96. . . . . . . . . . . . . . . . . . . . . . . . . . . . . . . . . . . . . . . . . . . . . . . . . . . . . . . . . . . . . . . . . . . . . . . . . .
setaccess <channel number> <userid>[callin=on|off] [ipmi=on|off] [link=on|off] [privilege=level] 96. . . . . . . . . . . . . . . . . . . . . . . . . . . . . . . . .
getciphers <all | supported> <ipmi | sol> [channel] 97. . . . . . . . . . . . . . . . . . . . . . . . . . . . . . . . . . . . . . . . . . . . . . . . . . . . . . . . . . . . . . . . .
Event Commands 97. . . . . . . . . . . . . . . . . . . . . . . . . . . . . . . . . . . . . . . . . . . . . . . . . . . . . . . . . . . . . . . . . . . . . . . . . . . . . . . . . . . . . . . . . . .
<predefined event number> 97. . . . . . . . . . . . . . . . . . . . . . . . . . . . . . . . . . . . . . . . . . . . . . . . . . . . . . . . . . . . . . . . . . . . . . . . . . . . . . . . .
file <filename> 97. . . . . . . . . . . . . . . . . . . . . . . . . . . . . . . . . . . . . . . . . . . . . . . . . . . . . . . . . . . . . . . . . . . . . . . . . . . . . . . . . . . . . . . . . .
LAN Commands 98. . . . . . . . . . . . . . . . . . . . . . . . . . . . . . . . . . . . . . . . . . . . . . . . . . . . . . . . . . . . . . . . . . . . . . . . . . . . . . . . . . . . . . . . . . . .
print <channel> 98. . . . . . . . . . . . . . . . . . . . . . . . . . . . . . . . . . . . . . . . . . . . . . . . . . . . . . . . . . . . . . . . . . . . . . . . . . . . . . . . . . . . . . . . .
set <channel> <parameter> 98. . . . . . . . . . . . . . . . . . . . . . . . . . . . . . . . . . . . . . . . . . . . . . . . . . . . . . . . . . . . . . . . . . . . . . . . . . . . . . . . .
Sensor Commands 99. . . . . . . . . . . . . . . . . . . . . . . . . . . . . . . . . . . . . . . . . . . . . . . . . . . . . . . . . . . . . . . . . . . . . . . . . . . . . . . . . . . . . . . . . .
list 99. . . . . . . . . . . . . . . . . . . . . . . . . . . . . . . . . . . . . . . . . . . . . . . . . . . . . . . . . . . . . . . . . . . . . . . . . . . . . . . . . . . . . . . . . . . . . . . . . .
get 0 [<id>] 99. . . . . . . . . . . . . . . . . . . . . . . . . . . . . . . . . . . . . . . . . . . . . . . . . . . . . . . . . . . . . . . . . . . . . . . . . . . . . . . . . . . . . . . . . . . .
thresh <id> <threshold> <setting> 100. . . . . . . . . . . . . . . . . . . . . . . . . . . . . . . . . . . . . . . . . . . . . . . . . . . . . . . . . . . . . . . . . . . . . . . . . . . .

TABLE OF CONTENTS
EATON Managed ePDUt User’s Guide S 164201xxx Rev 1 DRAFT 10−OCT−2008
v
OEM Commands 100. . . . . . . . . . . . . . . . . . . . . . . . . . . . . . . . . . . . . . . . . . . . . . . . . . . . . . . . . . . . . . . . . . . . . . . . . . . . . . . . . . . . . . . . . . .
Set Power Set Delay Command 101. . . . . . . . . . . . . . . . . . . . . . . . . . . . . . . . . . . . . . . . . . . . . . . . . . . . . . . . . . . . . . . . . . . . . . . . . . . . . .
Get Power On Delay Command 101. . . . . . . . . . . . . . . . . . . . . . . . . . . . . . . . . . . . . . . . . . . . . . . . . . . . . . . . . . . . . . . . . . . . . . . . . . . . . .
Set Socket State Command 101. . . . . . . . . . . . . . . . . . . . . . . . . . . . . . . . . . . . . . . . . . . . . . . . . . . . . . . . . . . . . . . . . . . . . . . . . . . . . . . . .
Get Socket State Command 101. . . . . . . . . . . . . . . . . . . . . . . . . . . . . . . . . . . . . . . . . . . . . . . . . . . . . . . . . . . . . . . . . . . . . . . . . . . . . . . . .
Set Group State Command 102. . . . . . . . . . . . . . . . . . . . . . . . . . . . . . . . . . . . . . . . . . . . . . . . . . . . . . . . . . . . . . . . . . . . . . . . . . . . . . . . .
Set Group Membership Command 102. . . . . . . . . . . . . . . . . . . . . . . . . . . . . . . . . . . . . . . . . . . . . . . . . . . . . . . . . . . . . . . . . . . . . . . . . . . .
Get Group Membership Command 103. . . . . . . . . . . . . . . . . . . . . . . . . . . . . . . . . . . . . . . . . . . . . . . . . . . . . . . . . . . . . . . . . . . . . . . . . . . .
Set Group Power On Delay Command 103. . . . . . . . . . . . . . . . . . . . . . . . . . . . . . . . . . . . . . . . . . . . . . . . . . . . . . . . . . . . . . . . . . . . . . . . . .
Get Group Power On Delay Command 103. . . . . . . . . . . . . . . . . . . . . . . . . . . . . . . . . . . . . . . . . . . . . . . . . . . . . . . . . . . . . . . . . . . . . . . . . .
Set Socket ACL 104. . . . . . . . . . . . . . . . . . . . . . . . . . . . . . . . . . . . . . . . . . . . . . . . . . . . . . . . . . . . . . . . . . . . . . . . . . . . . . . . . . . . . . . . .
Get Socket ACL 104. . . . . . . . . . . . . . . . . . . . . . . . . . . . . . . . . . . . . . . . . . . . . . . . . . . . . . . . . . . . . . . . . . . . . . . . . . . . . . . . . . . . . . . . .
Set Sensor Calibration 104. . . . . . . . . . . . . . . . . . . . . . . . . . . . . . . . . . . . . . . . . . . . . . . . . . . . . . . . . . . . . . . . . . . . . . . . . . . . . . . . . . . .
Test Actors 104. . . . . . . . . . . . . . . . . . . . . . . . . . . . . . . . . . . . . . . . . . . . . . . . . . . . . . . . . . . . . . . . . . . . . . . . . . . . . . . . . . . . . . . . . . . .
Test Sensors 105. . . . . . . . . . . . . . . . . . . . . . . . . . . . . . . . . . . . . . . . . . . . . . . . . . . . . . . . . . . . . . . . . . . . . . . . . . . . . . . . . . . . . . . . . . .
Set Power Cycle Delay Command 105. . . . . . . . . . . . . . . . . . . . . . . . . . . . . . . . . . . . . . . . . . . . . . . . . . . . . . . . . . . . . . . . . . . . . . . . . . . . .
Get Power Cycle Delay Command 105. . . . . . . . . . . . . . . . . . . . . . . . . . . . . . . . . . . . . . . . . . . . . . . . . . . . . . . . . . . . . . . . . . . . . . . . . . . .
9 Appendix A: Equipment Setup Worksheet 107. . . . . . . . . . . . . . . . . . . . . . . . . . . . . . . . . . . . . . . . . . . . . . . . . . . .
10 Appendix B: Event Types 109. . . . . . . . . . . . . . . . . . . . . . . . . . . . . . . . . . . . . . . . . . . . . . . . . . . . . . . . . . . . . . . . .
11 Appendix C: Using SNMP 111. . . . . . . . . . . . . . . . . . . . . . . . . . . . . . . . . . . . . . . . . . . . . . . . . . . . . . . . . . . . . . . . .
Enabling SNMP 111. . . . . . . . . . . . . . . . . . . . . . . . . . . . . . . . . . . . . . . . . . . . . . . . . . . . . . . . . . . . . . . . . . . . . . . . . . . . . . . . . . . . . . . . . . . .
Configuring Users for Encrypted SNMP v3 112. . . . . . . . . . . . . . . . . . . . . . . . . . . . . . . . . . . . . . . . . . . . . . . . . . . . . . . . . . . . . . . . . . . . . . . . .
Configuring SNMP Traps 113. . . . . . . . . . . . . . . . . . . . . . . . . . . . . . . . . . . . . . . . . . . . . . . . . . . . . . . . . . . . . . . . . . . . . . . . . . . . . . . . . . . . .
SNMP Gets and Sets 115. . . . . . . . . . . . . . . . . . . . . . . . . . . . . . . . . . . . . . . . . . . . . . . . . . . . . . . . . . . . . . . . . . . . . . . . . . . . . . . . . . . . . . . .
ePDU MIB 115. . . . . . . . . . . . . . . . . . . . . . . . . . . . . . . . . . . . . . . . . . . . . . . . . . . . . . . . . . . . . . . . . . . . . . . . . . . . . . . . . . . . . . . . . . . . .
12 Appendix D: Specifications 117. . . . . . . . . . . . . . . . . . . . . . . . . . . . . . . . . . . . . . . . . . . . . . . . . . . . . . . . . . . . . . .

TABLE OF CONTENTS
EATON Managed ePDUt User’s Guide S 164201xxx Rev 1 DRAFT 10−OCT−2008
vi

EATON Managed ePDUt User’s Guide S 164201xxx Rev 1 DRAFT 10−OCT−2008
1
Chapter 1 Introduction
Eaton’s Managed ePDUt is an intelligent power distribution unit that allows you to
reboot remote servers and other network devices, and monitor power in the data
center through KVM switches and Secure Console Servers. From the office or from
anywhere, the ePDU can power on, power off, or reboot remote equipment, as well
as monitor current, voltage, power, and temperature.
The ePDU offers the ability to recover systems remotely in the event of system
failure and/or system lockup. It eliminates the need to perform manual intervention or
dispatch field personnel, reduces downtime and mean time to repair, and increases
productivity.
ePDU Models
The ePDU comes in several models that are built to stock and can be obtained almost
immediately. Eaton also offers custom models that are built to order and can only be
obtained on request.
ePDU Photos
The ePDU models are available in three sizes: zero U (0U), 1U, and 2U (see Figure 1
through Figure 3).
Figure 1. 0U Size

INTRODUCTION
EATON Managed ePDUt User’s Guide S 164201xxx Rev 1 DRAFT 10−OCT−2008
2
Front
Back
Figure 2. 1U Size
Front
Back
Figure 3. 2U Size

INTRODUCTION
EATON Managed ePDUt User’s Guide S 164201xxx Rev 1 DRAFT 10−OCT−2008
3
ePDU Features
All models and configurations of the ePDU provide the following features:
S The ability to control outlets collectively and individually
S The ability to power on, power off and reboot the devices connected to each outlet
S The ability to group outlets from multiple ePDUs as virtual outlets accessible from
a single session
S The ability to monitor the following at the outlet level:
− RMS Current
− Power Factor
− Maximum RMS Current
− RMS Voltage
− Active Power
− Apparent power
S The ability to monitor internal CPU temperature of the ePDU
S The ability to monitor environmental factors such as external temperature and
humidity
S An audible alarm (beeper) and a visual alarm (blinking LED) to indicate current
overload
S Configurable alarm thresholds
S Support for SNMP v1, v2 and V3
S The ability to send traps using SNMP protocol
S The ability to retrieve outlet specific data using SNMP, including outlet state,
current, voltage and power
S The ability to configure and set values through SNMP, including ePDU and outlet
threshold levels
S Fully shrouded local branch circuit breakers on products rated over 20A to protect
connected equipments against overload and short circuits
Package Contents
The following describes the equipment and other material included in each model
package.
0U Models
S ePDU including power cord 1.80m (6 ft)
S Bracket for 0U and screws
S Tool−less mounting bracket for 0U models
S Null modem cable with RJ−45 and DB−9F connectors on either end
1U Models
S ePDU including power cord 1.80m (6 ft)
S 1U bracket pack and screws
S Null modem cable with RJ−45 and DB−9F connectors on either end

INTRODUCTION
EATON Managed ePDUt User’s Guide S 164201xxx Rev 1 DRAFT 10−OCT−2008
4
2U Models
S ePDU including power cord 1.80m (6 ft)
S 2U bracket pack and screws
S Null modem cable with RJ−45 and DB−9F connectors on either end

EATON Managed ePDU User’s Guide 164201xxx Rev 1 DRAFT 10−OCT−2008
5
Chapter 2 Safety Warnings
IMPORTANT SAFETY INSTRUCTIONS
SAVE THESE INSTRUCTIONS
This manual contains important instructions that you should follow during installation and operation of the
ePDU. Please read all instructions before operating the equipment and save this manual for future reference.
D A N G E R
This ePDU contains LETHAL VOLTAGES. All repairs and service should be performed by AUTHORIZED
SERVICE PERSONNEL ONLY. There are NO USER SERVICEABLE PARTS inside the ePDU.
SYSTEMS SHOULD ONLY BE CONFIGURED BY A COMPETENT PERSON.
IT IS ESSENTIAL THAT THIS EQUIPMENT IS CONNECTED TO AN ELECTRICAL SUPPLY THAT HAS A
PROTECTIVE GROUND CONDUCTOR
WARNING: TO ISOLATE THIS EQUIPMENT DISCONNECT POWER SUPPLY PLUG.
ATTENTION: AFIN D’ISOLER TOTALEMENT CET APPAREIL DEBRANCHER FICHE D’ALIMENTATION.
CAUTION: USE ONLY IN DRY LOCATIONS.
ATTENTION: UTILISER UNIQUEMENT DANS DES EMPLACEMENTS SECS.
W A R N I N G
To avoid potentially fatal shock hazard and possible damage to Eaton equipment:
Do not use a 2−wire power cord in any product conguration.
Test AC outlets at your computer and monitor for proper polarity and grounding.
Use only with grounded outlets at both the computer and monitor. When using a backup UPS, power the
computer, monitor and appliance o the supply.
The installation socket outlet used for the power supply to this equipment must be installed near the
equipment and must be easily accessible.
When installing this product, it is essential that the distribution circuit supplying the product is protected
by a branch circuit protection device with a maximum rating to suit the product maximum rating.
TO ISOLATE THIS EQUIPMENT DISCONNECT POWER SUPPLY PLUG.
This power distribution unit is intended for power supply provision to equipment only. Secondary
(Satellite) power strips shall not be connected to the receptacles.
This product has been designed to conform to the latest safety requirements. In addition to compliance
with standards for general use, it has been factory congured for use in rack mounting environments
aiding the installer to provide systems compliant with relevant standards.

SAFETY WARNINGS
EATON Managed ePDUt User’s Guide S 164201xxx Rev 1 DRAFT 10−OCT−2008
6
EATON Managed ePDU User’s Guide 164201xxx Rev 1 DRAFT 10−OCT−2008
7
Chapter 3 Rack−Mounting the ePDU
Mount Safety Guidelines
In Eaton products which require rack mounting, please follow these precautions:
Operation temperature in a closed rack environment may be greater than 40°C .
Do not exceed the rated maximum ambient temperature of the
appliances (see Appendix E: Specications).
Ensure sucient airow through the rack environment.
Mount equipment in the rack carefully to avoid uneven mechanical loading.
Connect equipment to the supply circuit carefully to avoid overloading circuits.
Ground all equipment properly, especially supply connections, such as power strips
(other than direct connections), to the branch circuit.
Zero−U models are provided with high−grade engineering polycarbonate isolation
hardware to allow xing in a variety of positions within the rack.
For panel or ush mount, pull−out xing brackets are available on each end cap to
allow mounting on suitable rails (see Figure 4).
Figure 4. Pull−Out Fixing Brackets

RACK−MOUNTING THE EPDU
EATON Managed ePDUt User’s Guide S 164201xxx Rev 1 DRAFT 10−OCT−2008
8
See Figure 5 through Figure 7 for other options.
Figure 5. Side Fixing
Figure 6. End Fixing
Figure 7. Blind Fixing
NOTE For side and blind fixing:
S Do not repeatedly slide the bracket along the extrusion. This may degrade the support capability.
S For larger/heavier power strips more than one pair of clip fixings may be used.
RACK−MOUNTING THE EPDU
EATON Managed ePDU User’s Guide 164201xxx Rev 1 DRAFT 10−OCT−2008
9
Mounting Instructions
The 0U models also ship with a tool−less mounting kit consisting of a claw feet with a
silver button on one side. These work by attaching to the back side of a 0U ePDU (the
side opposite of the outlets) and tting the button into the mounting holes of the
cabinet. Note that not all racks allow the option of securing the ePDU in this way.
Before beginning:
Ensure that you have sucient space in the cabinet to mount the ePDU.
Approximately one inch of clearance is required at each end (top and bottom) of
the ePDU.
It may help to mark the back of the ePDU through the mounting holes you intend
to use. You can then use this mark to assist in aligning the silver buttons properly
when attaching the claw−feet.
To mount:
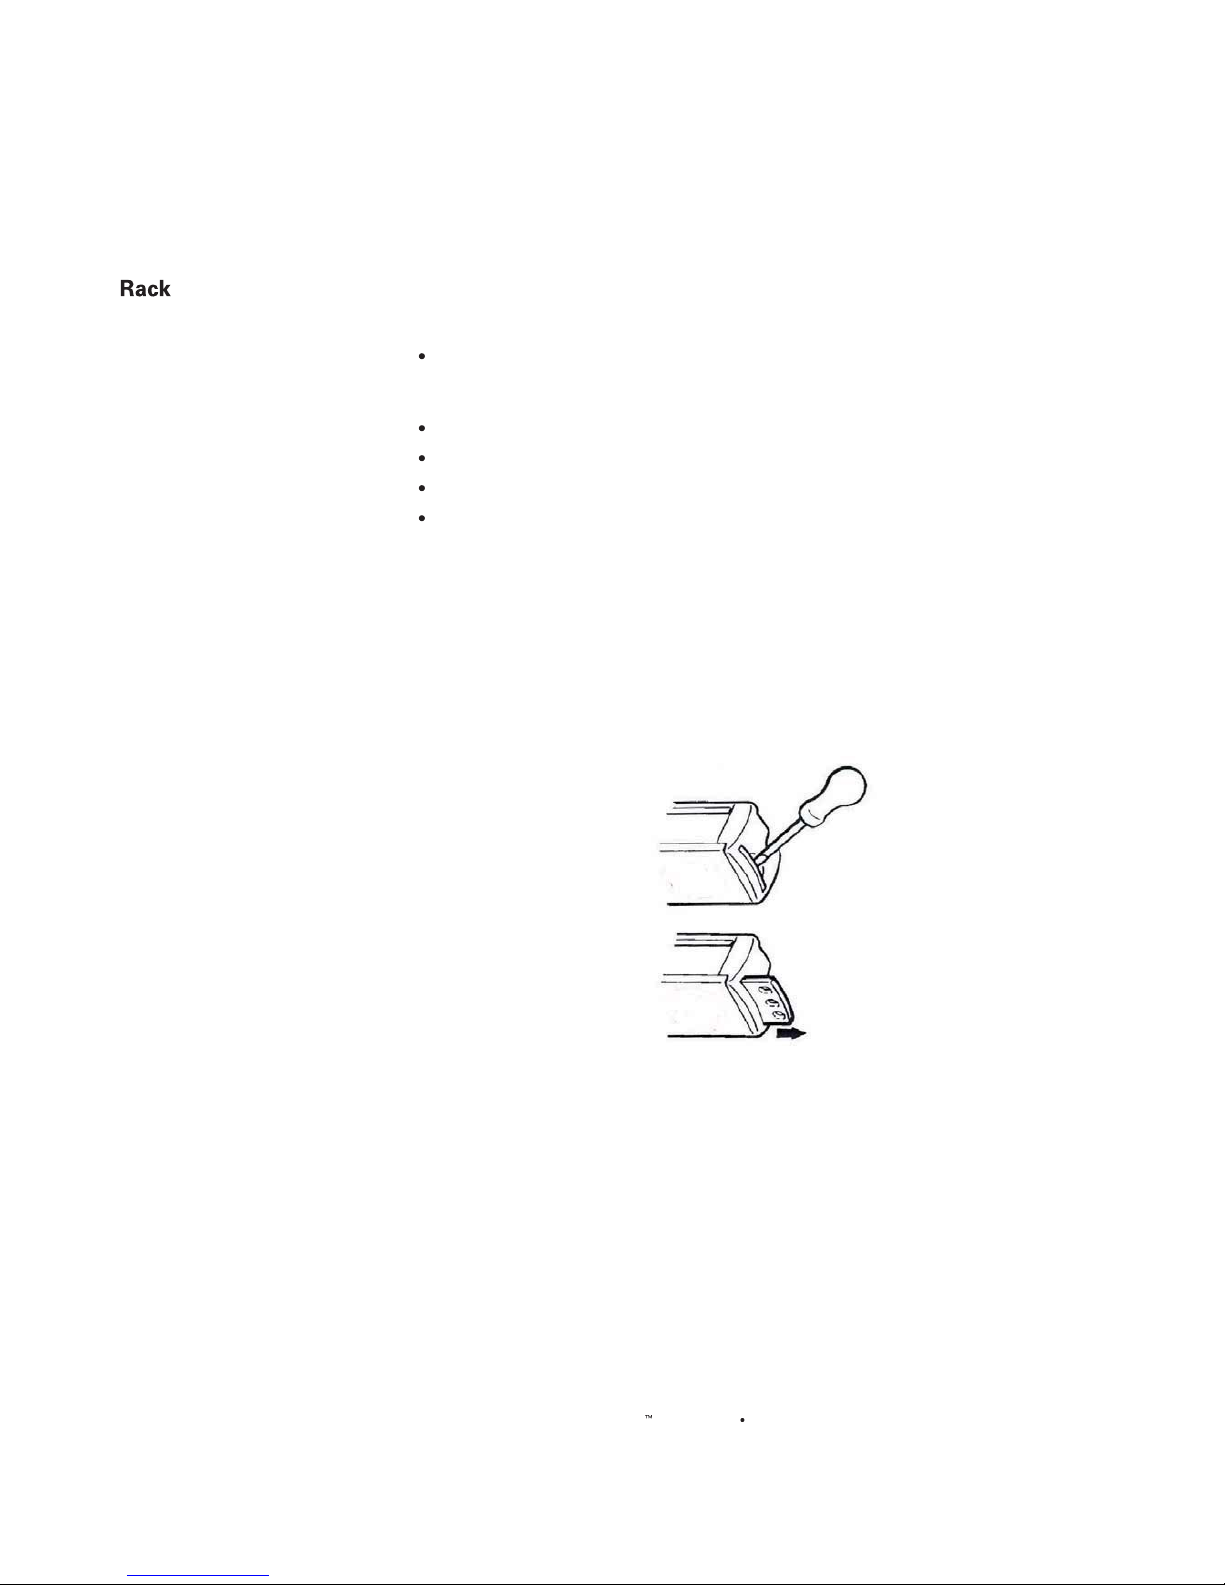
1. Snap t the claw feet mounts onto the back of the ePDU. Hook one side of the
ePDU body into one side of a claw foot rst, and then apply pressure to snap in
the second side. Figure 8 shows how rm pressure is applied to snap t the claw
feet to the ePDU 0U model.
Leave at least 610 mm between the buttons for stability. Once the claw feet
are mounted on the ePDU rail, they will not readily move. A at−head screwdriver
can be used to remove the feet if they need to be repositioned.
Firm Pressure
Click
Figure 8. Snap Fit to Claw Foot
2. Align the silver buttons with the mounting holes in the cabinet, and ensure that
both buttons can engage their mounting holes simultaneously.
3. Press the ePDU forward, pushing the silver buttons through the mounting holes,
then letting the ePDU drop about 16 mm. This secures the ePDU in
place and completes the installation.

RACK−MOUNTING THE EPDU
EATON Managed ePDUt User’s Guide S 164201xxx Rev 1 DRAFT 10−OCT−2008
10

EATON Managed ePDUt User’s Guide S 164201xxx Rev 1 DRAFT 10−OCT−2008
11
Chapter 4 Installation and Configuration
This chapter explains how to install a ePDU and configure it for network connectivity.
Before You Begin
Before beginning the installation, perform the activities listed below:
Unpack the ePDU and Components
1. Remove the ePDU and other equipment from the box in which they were
shipped. See Package Contents" on page 3 for a complete list of the contents
of the box.
2. Compare the model and serial number of the equipment with the number on the
packing slip located on the outside of the box and make sure they match.
3. Inspect the equipment carefully. If any of the equipment is damaged or missing,
contact your Eaton service representative for assistance.
Prepare the Installation Site
1. Make sure the installation area is clean and free of extreme temperatures and
humidity.
2. Allow sufficient space around the ePDU for cabling and outlet connections.
3. Review the Safety Instructions" in Chapter 2.
Fill Out the Equipment Setup Worksheet
An Equipment Setup Worksheet is provided in Chapter 9, Appendix A. Use this
worksheet to record the model, serial number, and use of each device connected to
the ePDU.
As you add and remove devices, keep the worksheet up to date.
INSTALLATION AND CONFIGURATION
EATON Managed ePDUt User’s Guide S 164201xxx Rev 1 DRAFT 10−OCT−2008
12
Connect the ePDU to a Computer
You must connect the ePDU to a computer to configure it. This is done by means of a
serial connection between the ePDU and the computer. If you plan to use this
connection to log into the CLP command line interface, leave the cable connected
after the configuration is complete.
The computer must have a communications program such as HyperTerminal
t,
Kermit, or PuTTy. You also need the null modem cable and connectors that were
shipped with the ePDU.
1. Take the null modem cable and connect the end with the RJ−45 connector to the
port labeled Serial" on the front of the ePDU (see Figure 9 through Figure 11).
Serial
LAN
Feature
Figure 9. 0U ePDU Ports
Serial
LAN
Feature
Figure 10. 1U ePDU Ports
Serial
LAN
Feature
Figure 11. 2U ePDU Ports
2. Plug the other end of the null modem cable (containing the DB−9 connector) into
the serial port (COM) of the computer.
INSTALLATION AND CONFIGURATION
EATON Managed ePDU User’s Guide 164201xxx Rev 1 DRAFT 10−OCT−2008
13
the ePDU to Your Network
To use the Web interface to administer the ePDU, you must connect the ePDU to
your local area network (LAN).
1. Take a standard Category 5e UTP cable and connect one end to the LAN port on
the front of the ePDU.
NOTE See Figure 9 through Figure 11 for the location of the LAN port on your size ePDU.
2. Connect the other end of the cable to your LAN.
the ePDU for Network Connectivity
You have two options:
Connect immediately to your LAN for the device to communicate with your DHCP server and
allocate an address. If using DHCP then this nishes the installation.
Or
Connect the serial conguration cable from the ePDU to the device and follow the below
1. Go to the computer that you connected to the ePDU and open a communications
program such as HyperTerminal or PuTTy. Make sure the port settings are
congured as follows:
Bits per second = 9600
Data bits = 8
Stop bits = 1
Parity = None
Flow control = None
NOTE The ˆFlow control˜ parameter must be set to ˆNone˜ for the communications program to work
correctly with the ePDU.
2. Point the communications program at the serial port connecting the ePDU and
open a terminal window.
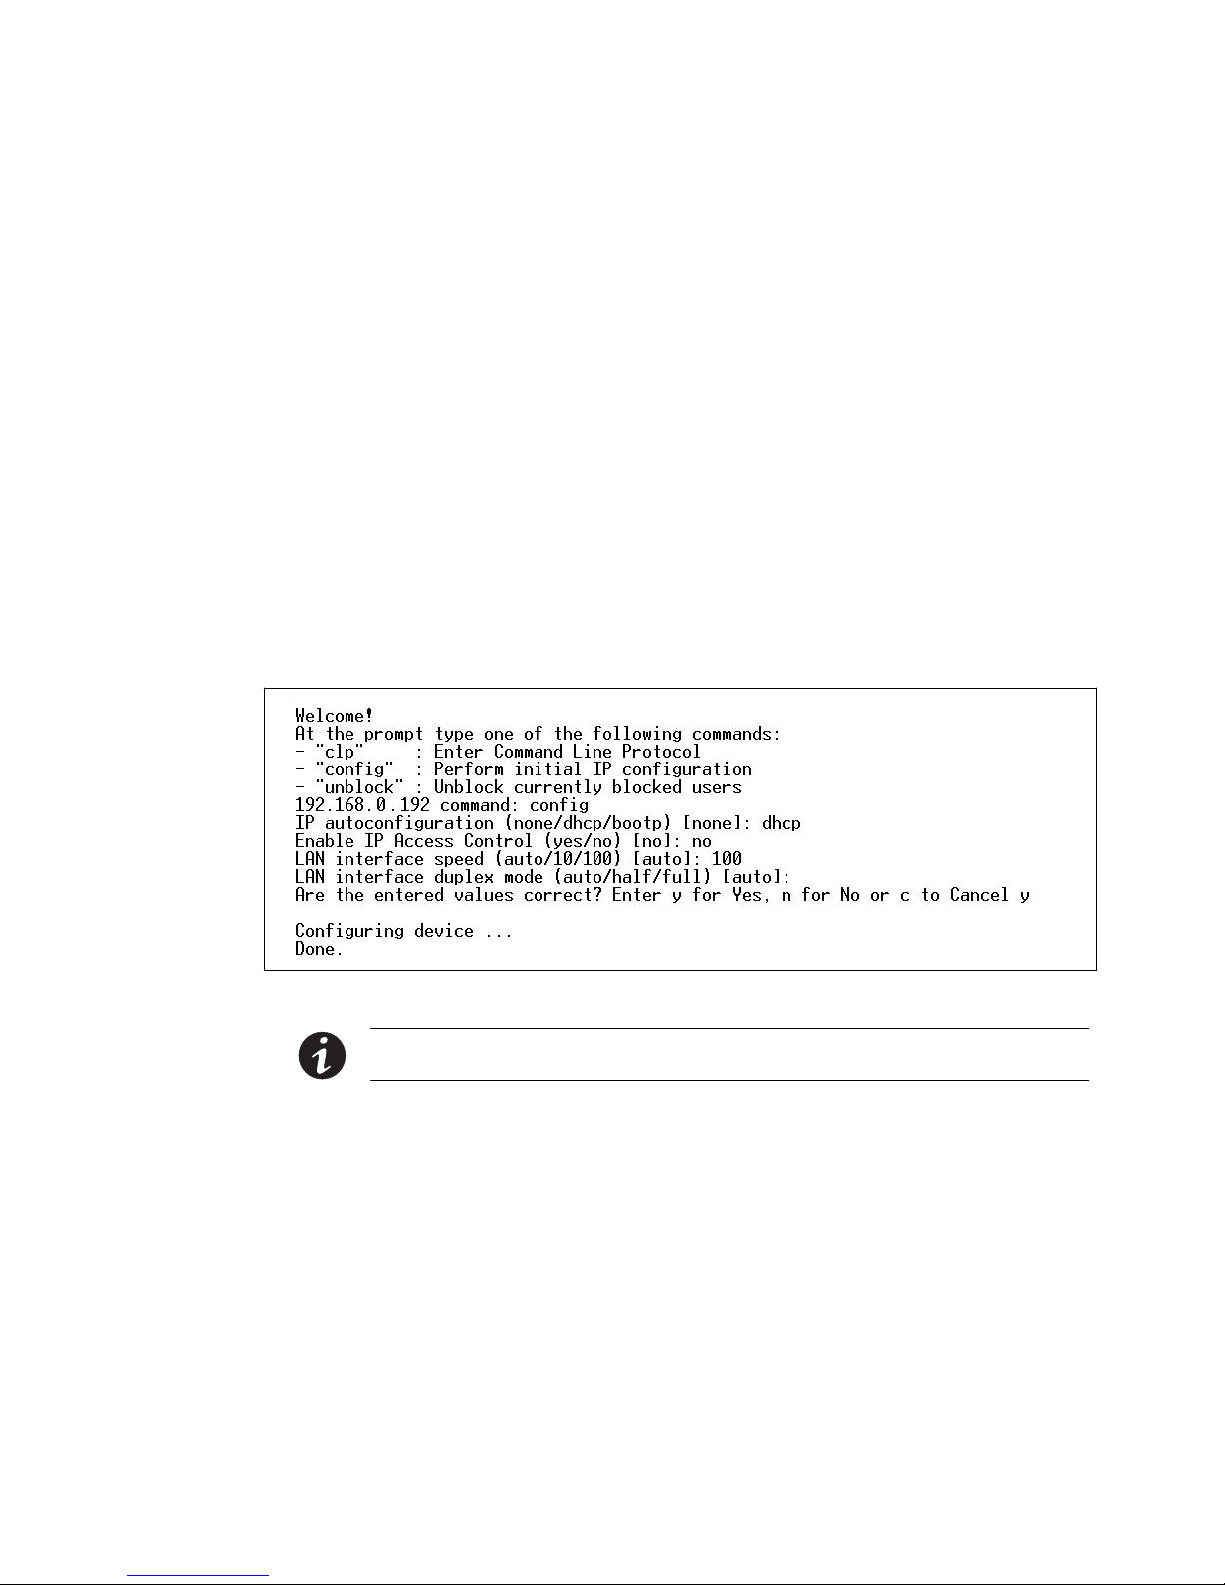
3. Press Enter to display the opening conguration prompt (see Figure 12).
Figure 12. Opening Conguration Prompt

INSTALLATION AND CONFIGURATION
EATON Managed ePDUt User’s Guide S 164201xxx Rev 1 DRAFT 10−OCT−2008
14
4. Type config and press Enter to begin the configuration process. You are prompted
to select an IP configuration method (see Figure 13).
Figure 13. IP Configuration Prompt
5. You must assign the ePDU an IP address. There are two ways to do this:
S Auto configuration: Select an autoconfiguration method such as dhcp or bootp
and let the DHCP or BOOTP server provide the IP address.
S Static IP address: Select None and assign the ePDU a static IP address. You
will be prompted for the address, network mask, and gateway.
NOTE The ePDU IP address displays automatically in the system prompt. The default IP address is
192.168.0.192. The default IP configuration method is DHCP, and the default IP address is replaced by the
address assigned by DHCP or BOOTP, or the static IP address you entered, as soon as the configuration
process is complete.
To use the factory default IP address, please type in none as the IP autoconfiguration command, and accept
the default value. The default IP address for static (none) configuration is 192.168.0.192.
6. Type your selection and press Enter. You are prompted to enable IP access
control (see Figure 14).
Figure 14. Access Control Prompt
NOTE By default, IP access control is NOT enabled. This disables the ePDU firewall. Leave the firewall
disabled for now. Later on, you can enable the firewall from the Web interface and create firewall rules (see
Configuring the Firewall" on page 39 for details).
NOTE If you accidentally create a rule that locks you out of the ePDU, you can rerun the configuration
program and reset this parameter to disabled to allow you to access the ePDU.

INSTALLATION AND CONFIGURATION
EATON Managed ePDUt User’s Guide S 164201xxx Rev 1 DRAFT 10−OCT−2008
15
7. Press Enter. You are prompted to set the LAN interface speed (see Figure 15).
Figure 15. LAN Interface Speed Prompt
8. By default, the LAN interface speed is set to Auto, which allows the system to
select the optimum speed. To keep the default, press Enter. To set the speed to
10 or 100 Mbps, type the speed you want and press Enter. You are prompted to
select the duplex mode for the LAN interface. See Figure 16.
Figure 16. Duplex Mode Prompt
By default, the LAN interface duplex mode is set to Auto, which allows the
system to pick the optimum mode. Half duplex allows data to be transmitted to
and from the ePDU, but not at the same time. Full duplex allows data to be
transmitted in both directions at the same time.
9. To keep the default, press Enter. To specify half or full duplex, type half or full and
press Enter. You are prompted to confirm the information you just entered
(see Figure 17).
Figure 17. Confirmation Prompt
INSTALLATION AND CONFIGURATION
EATON Managed ePDUt User’s Guide S 164201xxx Rev 1 DRAFT 10−OCT−2008
16
10. All the configuration parameters have now been entered. All the prompts are still
displayed, so you can check the information you entered. Do one of the
following:
S If the information is correct, type y and press Enter. The system completes the
configuration and displays a message when the configuration is done.
S If one or more parameters are not correct, type n and press Enter. You are
returned to the IP configuration prompt shown in Figure 13 on page 14 and
given the opportunity to correct each piece of information. When the
information is correct, type y and press Enter to complete the configuration
and return to the opening prompt shown in Figure 12 on page 13.
S If you want to terminate the configuration process, type c and press Enter. The
configuration is cancelled and you are returned to the opening prompt shown
in Figure 12 on page 13.
11. If you entered y to confirm the configuration, a message is displayed telling you
when the configuration is complete (see Figure 18). You are then returned to the
opening prompt shown in Figure 12 on page 13. You are now ready to begin
using your ePDU.
Figure 18. Configuration Complete
NOTE The configured IP address takes about 15 seconds to take effect for the device connected through
the serial line, or even longer if configured over DHCP.

INSTALLATION AND CONFIGURATION
EATON Managed ePDUt User’s Guide S 164201xxx Rev 1 DRAFT 10−OCT−2008
17
Resetting to Factory Defaults
C
A U T I O N
Exercise extreme caution before resetting the ePDU to the factory defaults. This wipes out any information
you have entered, including user profiles, user groups, thresholds, alert policies, and so forth.
For security reasons the ePDU may only be restored to defaults at the local serial
console. To do this:
1. Connect a computer to the serial port of the ePDU
2. Using a terminal emulation program such as HyperTerminal, Kermit, or PuTTY (at
a speed of 9600 bps), open a window on the ePDU.
NOTE About HyperTerminal and PuTTy terminal emulator applications:
S HyperTerminal is available on many of Windows
®
operating systems. But HyperTerminal is not available
on the Windows Vista
®
operating system.
S PuTTY is a free program you can download from the internet. Please refer to PuTTY documentation for
details on configuration.
Make sure the serial port settings are configured as follows:
S Baud rate (bits per second) = 9600
S Data bits = 8
S Stop bits = 1
S Parity = None
S Flow control = None
3. Press and release the Reset button of the ePDU while pressing the [Esc] key
several times in rapid succession. A prompt (=>) should appear after about
one second.
4. Execute the Defaults command to reset the ePDU to the factory defaults.
NOTE Enter help to show a list of available commands and a short description of each one.
Figure 19 shows the location of the reset hole for the 1U and 2U models.
Figure 20 shows the reset hole for the 0U model.
INSTALLATION AND CONFIGURATION
EATON Managed ePDUt User’s Guide S 164201xxx Rev 1 DRAFT 10−OCT−2008
18
Reset Hole
Figure 19. Reset Hole (1U and 2U Models)
Reset Hole
Figure 20. Reset Hole (0U Models)

EATON Managed ePDUt User’s Guide S 164201xxx Rev 1 DRAFT 10−OCT−2008
19
Chapter 5 Using the ePDU
This chapter explains how to use the ePDU. It describes the LEDs and ports on the
front and back panels of the ePDU, and explains how to use the display panel. It also
explains how the circuit breaker works and when the beeper goes off.
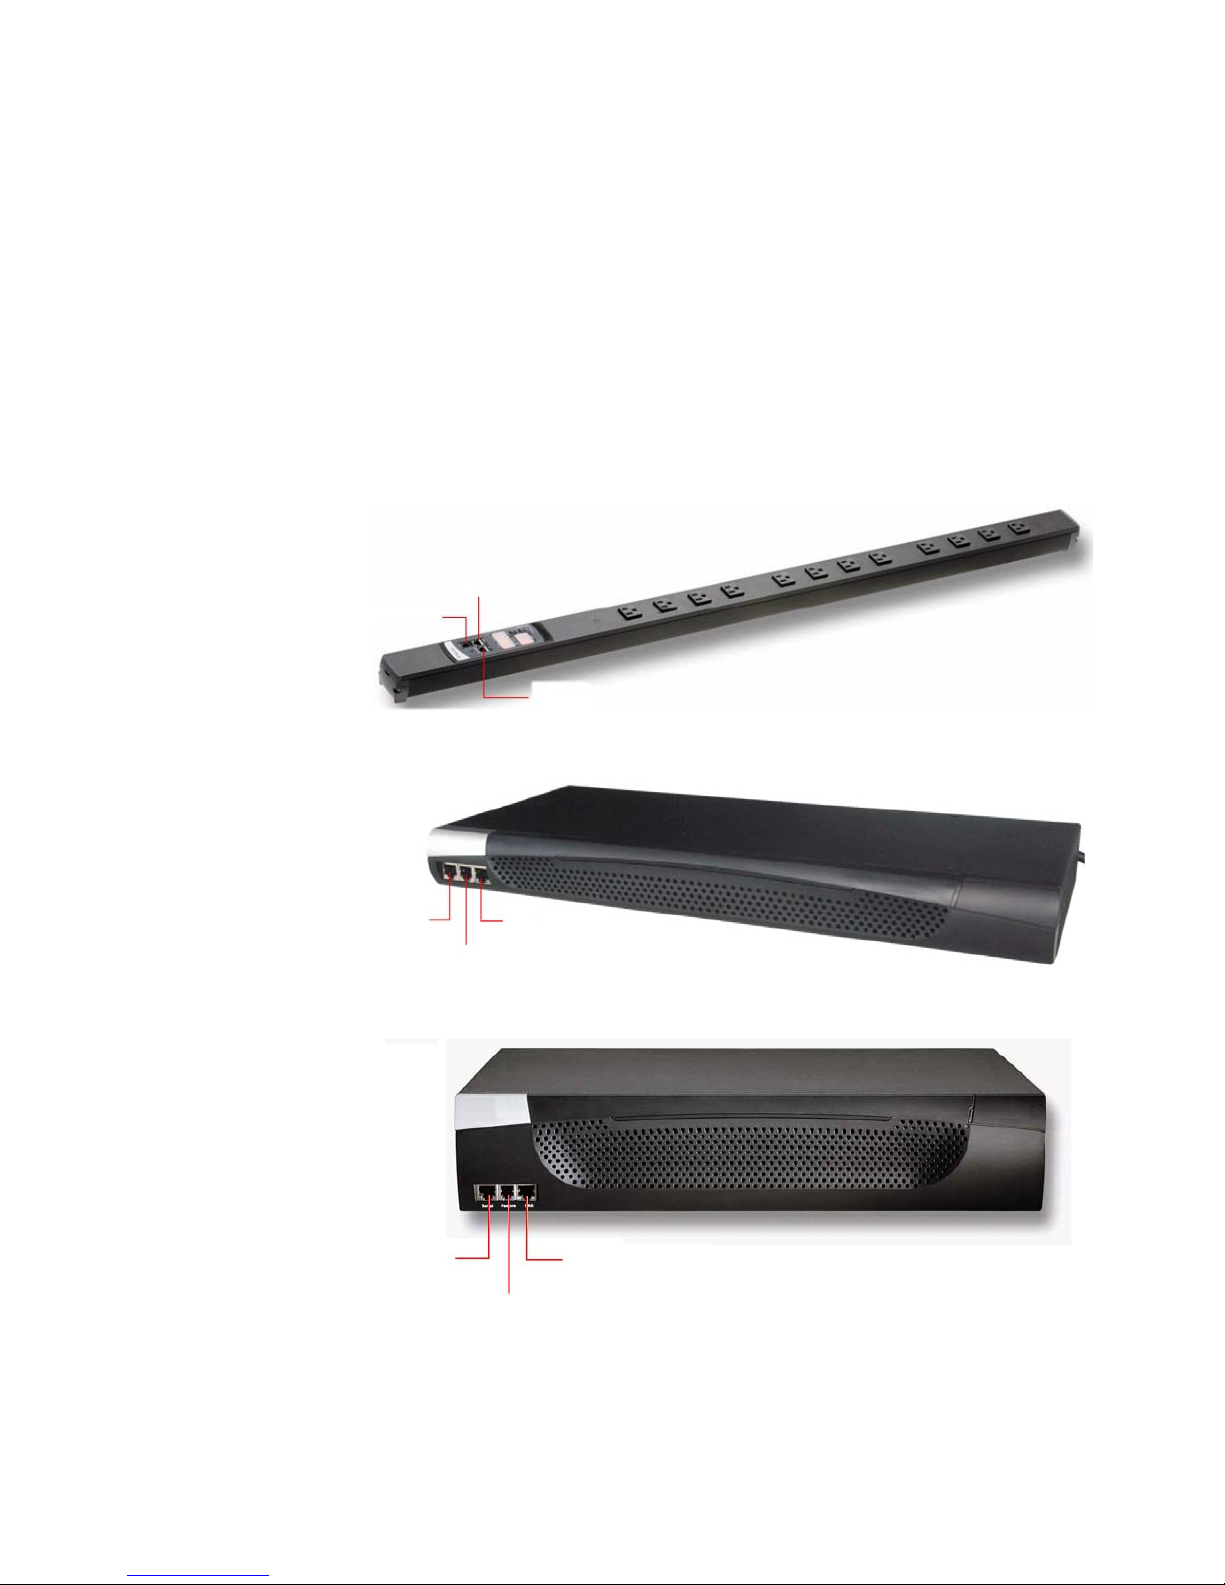
Front Panel
The front panel of the 1U and 2U ePDU models consists of a blue LED to the right
and three connection ports to the left. The front panel of the 0U model consists of
power outlets to connect devices to the ePDU, a display panel, a recessed reset
button, and three connection ports.
Ethernet Ports
The three RJ−45 Ethernet ports, from left to right, are labeled Serial, Feature, and
LAN. Table 1 explains what each port is used for.
Table 1. Ethernet Ports
Port Purpose
Serial Establishing a serial connection between a computer and the ePDU.
Take the null modem cable that was shipped with the ePDU , connect the end with the
RJ−45 connector to the port labeled Serial on the front of the ePDU, and connect the
end with the DB−9F connector to the serial (COM) port on the computer.
Feature For use with Eaton−provided environmental sensors.
LAN Connecting the ePDU to your company’s network.
Connect a standard Category 5e UTP cable to this port and connect the other end to
your network. This connection is necessary to administer the ePDU remotely using the
Web interface.
There are two small LEDs under the LAN port. Green indicates a physical link and
activity, and yellow indicates communication at 10/100 BaseT speeds.
Blue LED
Only the 1U and 2U models have a blue LED on the front panel. The blue LED on the
right side of the front panel is lit solid when the ePDU is plugged in.
NOTE If the blue LED is flashing, one of the two power supplies in the ePDU is not functional.
NOTE When the ePDU is powered on, the power−on self test and software loading takes approximately
40 seconds. Once the software has booted up, the outlet LEDs and the meter illuminate.

USING THE EPDU
EATON Managed ePDUt User’s Guide S 164201xxx Rev 1 DRAFT 10−OCT−2008
20
Back Panel
The back panel of the 1U and 2U ePDUs consist of, from left to right, a power cord,
power outlets to connect devices to the ePDU, and a display panel. Zero−U models do
not have a back panel.
Power Cord
The power cord that connects the ePDU to a power source is located on the far left of
the back panel, or on the end of the ePDU if the ePDU is a 0U model. All devices are
non−rewireable by the user.
NOTE Each ePDU should be plugged into an appropriately rated outlet for its type.
There is no power switch on the ePDU. On models rated at over 20A, there are
branch circuit breakers that are fully shrouded to prevent accidental operation. To
power cycle the ePDU, remove the power cord from the power source and then
re−connect it.
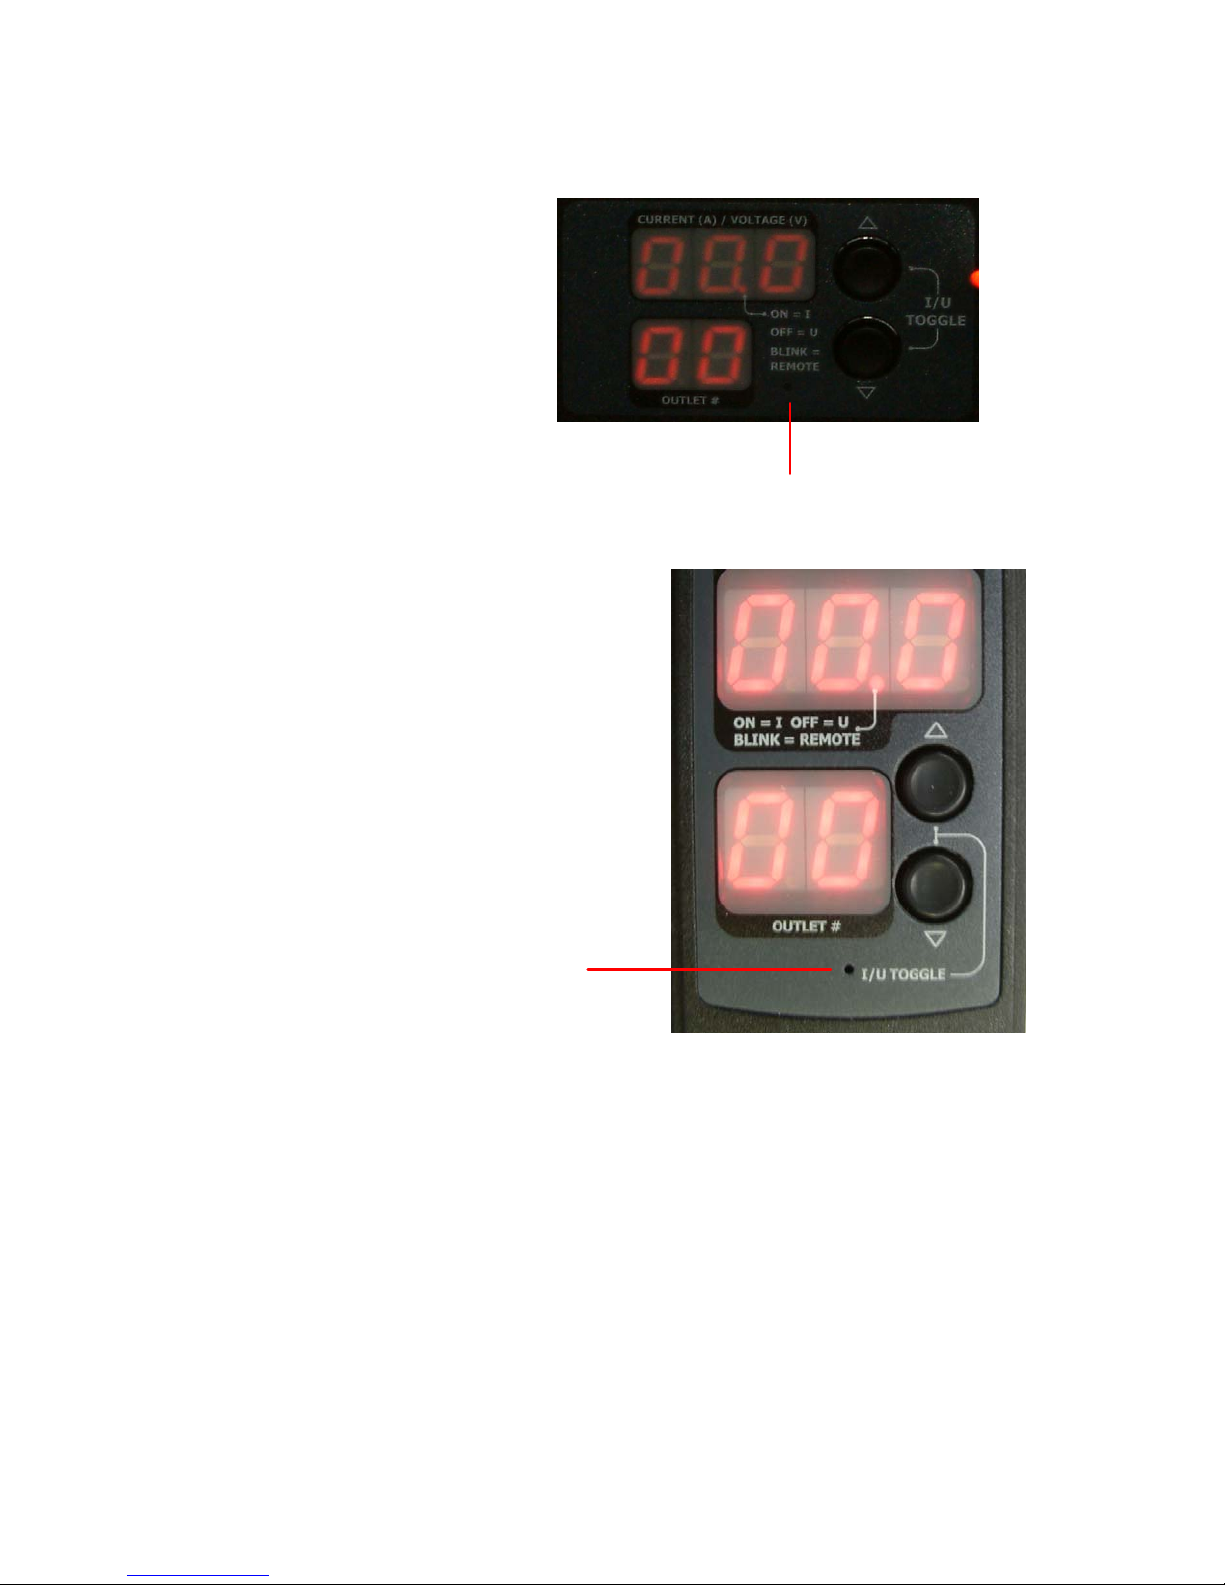
Outlets
The number of outlets on the back panel depends upon the ePDU model. To the
upper left of each outlet is a small LED. The ePDUs are shipped from the factory with
all outlets powered ON.
Table 2 explains how to interpret the different LED states.
Table 2. LED Status
LED State Outlet Status What it Means
Not lit ePDU OFF The outlet is not connected to power or the control circuitry’s
power supply is broken.
Red ON and LIVE The outlet is ON (relay closed) and LIVE (voltage present).
Red flashing ON and LIVE The outlet is ON and LIVE, but there is overload and the
current has crossed the non−critical threshold.
Green OFF and LIVE The outlet is OFF (relay open) and the ePDU is LIVE.
Green flashing OFF and NOT LIVE The outlet is OFF and the supply is not present.
Yellow flashing ON and NOT LIVE The outlet is ON but NOT LIVE (circuit breaker open or other
high voltage rail error).
Cycling through
Red, Green and
Yellow
Indicates one of two possibilities:
S The ePDU has just been plugged in and its management
software is loading.
S A firmware upgrade is being performed on the ePDU
NOTE When a ePDUis powered on, the power−on self−test and software loading takes a few moments. As
the ePDU boots up, the outlet LEDs cycle through red, green and yellow. When the software has completed
loading, the outlet LEDs displays a steady color and the meter illuminates.
 Loading...