

Eaton All-Pro MSLED300W, All-Pro MSLED300 Instruction Manual

MSLED300W
(White/Blanco/Blanc)
Instruction Manual/Manuel d’instructions/Instrucciones
Questions?/Des questions?/¿Preguntas? 1-800-334-6871 ConsumerProducts@eaton.com
PACKAGING CONTENTS/ CONTENIDO DEL PAQUETE
A. Light fixture
Accesorio
Luminaire
B. Snap-in mounting bracket
Soporte de montaje de sujeción a presión
Support de montage encastrable
C. (2) Fixture mounting screws
(2) Tornillos de montaje del accesorio
(2) Vis de montage du luminaire
MSLED300
(Black/Noir/Negro)
ENGLISH
ITEMS REQUIRED
(Purchase separately)
• Phillips screwdriver
HOW IT WORKS
During the daylight hours, the solar panel turns the sunlight
into energy that is stored in the rechargeable battery pack.
Your light features a motion sensor that turns the light ON
at night when motion is detected. This light is equipped
with a photocell, which only allows the fixture to turn ON
during the nighttime hours.
WARNINGS AND CAUTIONS
INSTRUCTIONS PERTAINING TO A RISK OF FIRE OR INJURY TO PERSONS.
To reduce the risk of fire or injury to persons, read and follow these instructions:
• DO NOT replace batteries.
• DO NOT dispose of this product in fire. Batteries inside this product may explode or leak.
• DO NOT puncture this battery pack. DO NOT work on this battery pack
• DO NOT disassemble fixture. The fixture does not have any user serviceable parts.
• Lithium-Ion batteries must be disposed of in accordance with local waste ordinances and
regulations.
• Do not operate luminaire with a missing or damaged lens.
• Fixture is suitable for wall mount only. NOT suitable for ground mount installation.
SAVE THESE INSTRUCTIONS.
FOR BEST RESULTS
• Allow fixture to receive four full days of sunlight before turning fixture ON.
• Locate fixture in an area that will receive the
maximum amount of sunlight during the daylight
hours. Panel must receive at least 3-4 hours of
direct sunlight daily.
• Test your charged unit before installing.
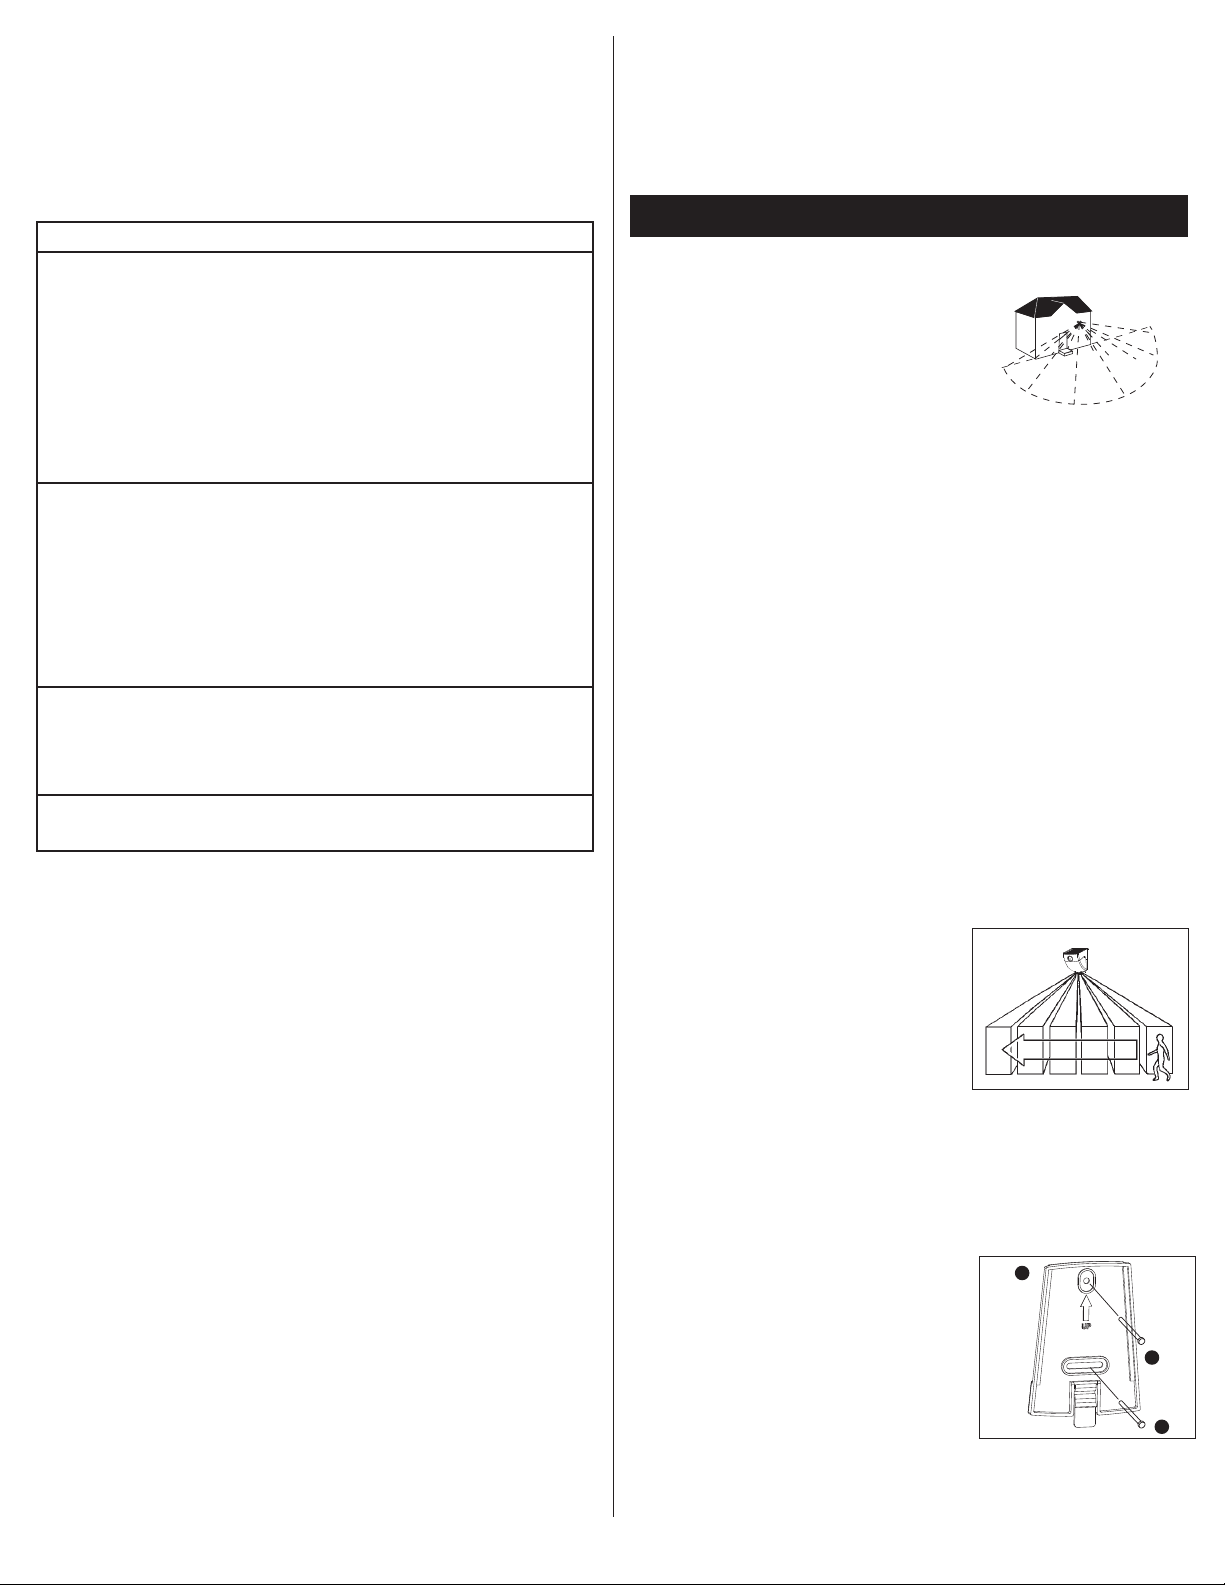
• Locate fixture so motion moves across the
detection zone (Fig. 1).
• Locate fixture away from heat producing sources to
prevent false triggering. Also be very careful not to
include objects such as windows, white walls and
water in the detection zone.
Up to
25 feet
120 degrees
Fig. 1
Quick Release Tab
Lengüeta de liberación rápida
Languette à dégagement rapide
• Locate fixture away from moving objects such as trees, large shrubs and street traffic.
• Keep solar panel clear of any objects that will block the sunlight. It will be necessary to
periodically clean the solar panel with soft wet cloth.
• During periods of several cloudy days, the battery may fall below the operating level and
will need to be recharged with sunlight.
MOUNTING YOUR FIXTURE
1. Locate area in which you would like to install your
light fixture.
NOTE: For fixture to operate properly, the fixture
must be located in an area that will receive the maximum
amount of sunlight and is free from obstructions.
2. Using the fixture mounting screws (C) provided,
mount the snap-in mounting bracket (B) to a solid
surface by placing the screws through the center
holes of the bracket. Make sure the tab on the
bracket is pointing down. (Fig. 2).
3. Slide power switch to AUTO.
4. Slide fixture down over the snap-in mounting
bracket, making sure that the fixture engages the
guide ribs. Continue sliding down until the fixture
snaps into the locking tab.
Fig. 2
B
C
C
Fig. 3
For Portable Use
1. Press the quick release tab on the mounting
bracket to remove fixture.
NOTE: Be sure to keep the fixture in the OFF position
when not in use to conserve the battery.
2. Slide fixture onto mounting bracket (Fig. 4) when
finished.
Fig. 4
A
A
1
PROPER BATTERY CARE
NOTE: Proper care should ensure the longest possible life for your battery.
• Make sure that your fixture is located in a sunny location.
• When battery is low, the fixture will automatically turn OFF. (The fixture will not turn ON until
the battery has recharged to the operating level.)
• To ensure proper recharge, slide power switch OFF and allow fixture to receive 4 full days of
sunlight before turning the fixture ON.
TROUBLESHOOTING
Problem Cause / Solution
Light Does Not
Come On With
Motion At Night
Light Comes On
For No Apparent
Reason At Night
Light Stays On At
Night And Does
Not Turn Off
Light Is On
During The Day
Surrounding external ambient light is too bright. (If so, the unit may
think it is daytime.)
• Relocate or reposition the unit away from the light source.
Fixture is not charging during the day.
• Solar panel must be receiving direct sunlight to charge during
day (reposition if shadowed).
• Solar panel must be clean and free from debris.
• Make sure batteries have been charged with 4 full days of
sunlight prior to turning the fixture ON.
• When battery is low, the fixture will automatically turn OFF until
the battery is charged to the operating level.
There is motion in the detection zone.
• Make sure the sensor is not picking up moving objects such as
trees, traffic, etc.
TEST FOR YOURSELF.
• Cover the sensor lens with black electrical tape to prevent
sensor from detecting motion. If the light stays off, something in
the detection zone is triggering the sensor.
• Reposition the fixture.
* If the light stays on with the sensor lens covered, contact
customer service.
There is motion in the detection zone.
• Make sure the fixture is not picking up moving objects such as
trees, traffic, etc.
• Reposition fixture.
* If the light continues to stay on, contact customer service.
The motion detector is shadowed.
• Reposition fixture.
1-YEAR LIMITED WARRANTY
THE FOLLOWING WARRANTY IS EXCLUSIVE AND IN LIEU OF ALL OTHER WARRANTIES,
WHETHER EXPRESS, IMPLIED OR STATUTORY INCLUDING, BUT NOT LIMITED TO, ANY
WARRANTY OF MERCHANTABILITY OR FITNESS FOR ANY PARTICULAR PURPOSE.
Eaton warrants to customers that, for a period of one year from the date of purchase,
Eaton products will be free from defects in materials and workmanship. The obligation of
Eaton under this warranty is expressly limited to the provision of replacement products. This
warranty is extended only to the original purchaser of the product. A purchaser’s receipt or
other proof of date of original purchase acceptable to Eaton. This is required before warranty
performance shall be rendered. This warranty does not apply to Eaton products that have been
altered or repaired that have been subjected to neglect, abuse, misuse or accident
(including shipping damages). This warranty does not apply to products not manufactured by
Eaton which have been supplied, installed, and/or used in conjunction with Eaton products.
Damage to the product caused by replacement bulbs or corrosion or discoloration of brass
components are not covered by this warranty.
LIMITATION OF LIABILITY:
IN NO EVENT SHALL EATON BE LIABLE FOR SPECIAL, INDIRECT, INCIDENTAL, OR
CONSEQUENTIAL DAMAGES (REGARDLESS OF THE FORM OF ACTION, WHETHER IN CONTRACT,
STRICT LIABILITY, OR IN TORT INCLUDING NEGLIGENCE), NOR FOR LOST PROFITS; NOR SHALL
THE LIABILITY OF EATON FOR ANY CLAIMS OR DAMAGE ARISING OUT OF OR CONNECTED
WITH THESE TERMS OR THE MANUFACTURE, SALE, DELIVERY, USE, MAINTENANCE, REPAIR OR
MODIFICATION OF EATON PRODUCTS, OR SUPPLY OF ANY REPLACEMENT PARTS THEREFORE,
EXCEED THE PURCHASE PRICE OF EATON PRODUCTS GIVING RISE TO A CLAIM. NO LABOR
CHARGES WILL BE ACCEPTED TO REMOVE OR INSTALL FIXTURES.
To obtain warranty service, please contact Eaton, at 1-800-334-6871, press option 2 for
Customer Service, or via e-mail ConsumerProducts@eaton.com and include the following
information:
• Name, address and telephone number
• Date and place of purchase
• Catalog and quantity purchase
• Detailed description of problem
All returned products must be accompanied by a Return Goods Authorization Number issued
by the Company and must be returned freight prepaid. Any product received without a Return
Goods Authorization Number from the Company will be refused. Eaton is not responsible for
merchandise damaged in transit. Repaired or replaced products shall be subject to the terms
of this warranty and are inspected when packed. Evident or concealed damage that is made
in transit should be reported at once to the carrier making the delivery and a claim filed with
them.
Reproductions of this document without prior written approval of Eaton are strictly prohibited.
For assistance, call 1-800-334-6871 or e-mail us at ConsumerProducts@eaton.com
Printed in China
ESPAÑOL
ARTÍCULOS NECESARIOS
(se compran por separado)
• Destornillador en cruz (Phillips)
CÓMO FUNCIONA
Durante las horas del día, el panel solar transforma la luz
solar en energía que queda almacenada en el paquete de
la bateríarecargable. Su luminaria cuenta con un sensor
de movimiento, que enciende la luz cuando es de noche
y se detecta algún movimiento. Esta luminaria está
equipada con una fotocélula, que sólo permite que el
artefacto se encienda durante las horas de la noche.
ADVERTENCIAS Y PRECAUCIONES
INSTRUCCIONES CONCERNIENTES AL RIESGO DE INCENDIO O LESIONES A
LAS PERSONAS:
ATENCIÓN: Para reducir el riesgo de incendio o lesiones personales:
• NO sustituya las baterías.
• NO deseche este producto por medio de métodos combustibles. Las baterías que se
encuentran dentro de este producto pueden explotar o tener pérdidas. Atienda todas
las advertencias.
• NO perfore este pack de baterías. NO trabaje sobre este pack de baterías.
• NO desarme la luminaria. La luminaria no contiene piezas que puedan recibir un servicio de
mantenimiento por el usuario.
• Las baterías de ión de litio deben desecharse de conformidad con las ordenanzas y
normas locales sobre disposición de desechos.
• No ponga en funcionamiento esta luminaria si le falta la lente o está dañada.
• La luminaria es apta para un montaje en paredes solamente. NO es apta para su instalación
por medio de su montaje en el suelo.
GUARDE ESTAS INSTRUCCIONES.
PARA OBTENER LOS MEJORES RESULTADOS
• Deje que el accesorio capte luz solar durante cuatro días completos antes de encenderlo.
• Ubique la luminaria en un área que reciba la
mayor cantidad de luz solar durante las horas
diurnas. El panel debe recibir, al menos,
de 3 a 4 horas de luz solar directa a diario.
• Pruebe su unidad cargada antes de instalarla.
• Ubique la luminaria de modo que el movimiento
se traslade por toda la zona de detección (Fig. 1).
• Ubique la luminaria lejos de fuentes caloríficas a
fin de evitar su activación por falsa alarma. Además,
medida de lo posible, tenga mucho cuidado de no
incluir objetos tales como ventanas, pare des blancas
y agua, en la zona de detección.
• Ubique la luminaria lejos de objetos móviles, tales como árboles, arbustos grandes y tráfico.
• Conserve el panel solar libre de cualquier objeto que pudiera interceptar la luz solar.
Es necesario limpiar periódicamente el panel solar con un paño suave humedecido.
• Durante aquellos períodos en los que haya varios días nublados, la batería caerá debajo
del nivel de carga suficiente y necesitará recargarse con la luz solar.
MONTAJE DEL ACCESORIO
1. Ubique la zona en la que desea instalar su
artefacto de luz.
NOTA: Para que la luminaria funcione correctamente,
debe estar ubicada en un área donde reciba la mayor
cantidad de luz solar y donde esté libre de obstrucciones.
2. Con los tornillos incluidos (C) de montaje de
la luminaria, monte el “soporte de montaje de
sujeción a presión” (B) a una superficie sólida
del suelo, colocando los tornillos a través
de los orificios centrales del soporte. Asegúrese
de que la lengüeta del soporte apunte en forma
descendente hacia (Fig. 2).
3. Deslice el interruptor de encendido al modo
AUTO (AUTOMÁTICO).
2
E
Hasta 25 pies
(7.62 metros)
120 grados
Fig. 1
Fig. 2
C
C
 Loading...