

Eaton All-Pro MS180BT, All-Pro MS180BTW Instruction Manual
Questions?/ Des questions?/ ¿Preguntas? 1-800-334-6871 ConsumerProducts@eaton.com
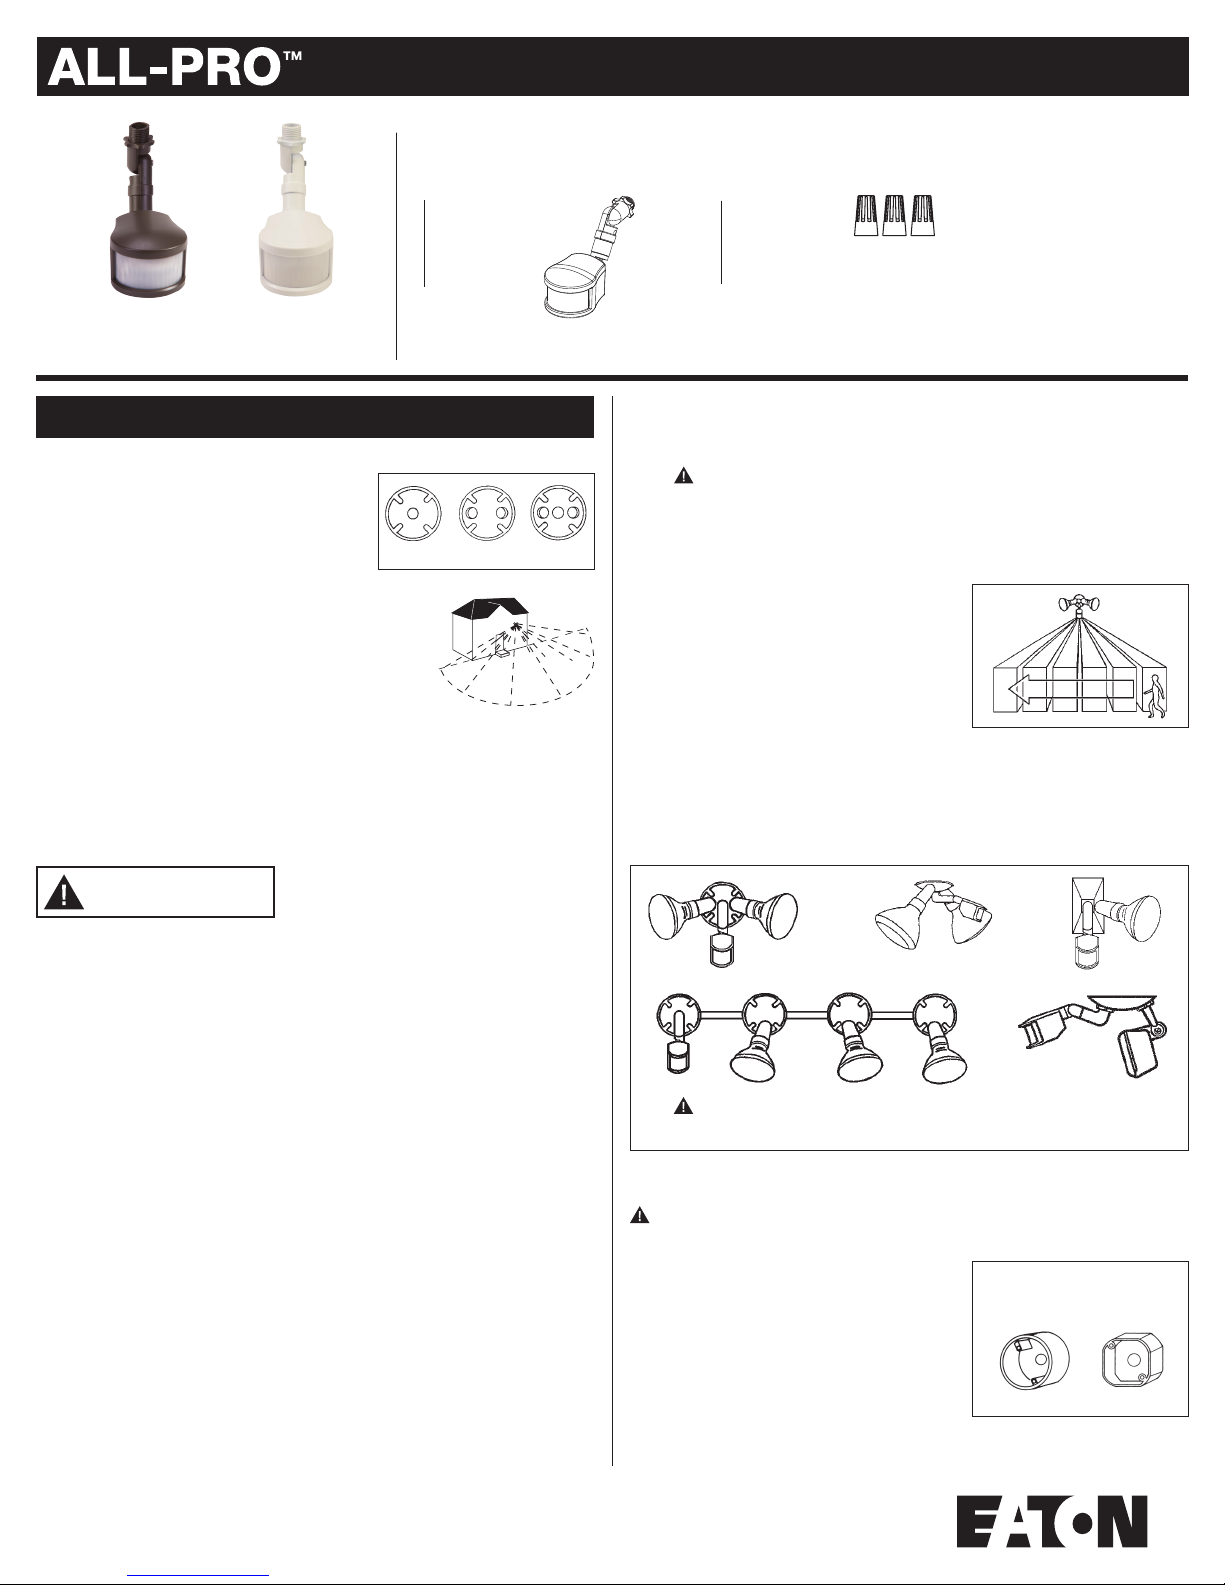
PACKAGING CONTENTS/ CONTENU DE L’EMBALLAGE/ CONTENIDO DEL PAQUETE
A. Motion detector
Detector de
movimiento
Détecteur
de mouvement
MS180BT (Bronze)
MS180BTW (White)
ENGLISH
ITEMS REQUIRED
(Purchase separately)
• Phillips screwdriver
• Outdoor weatherproof silicone caulking
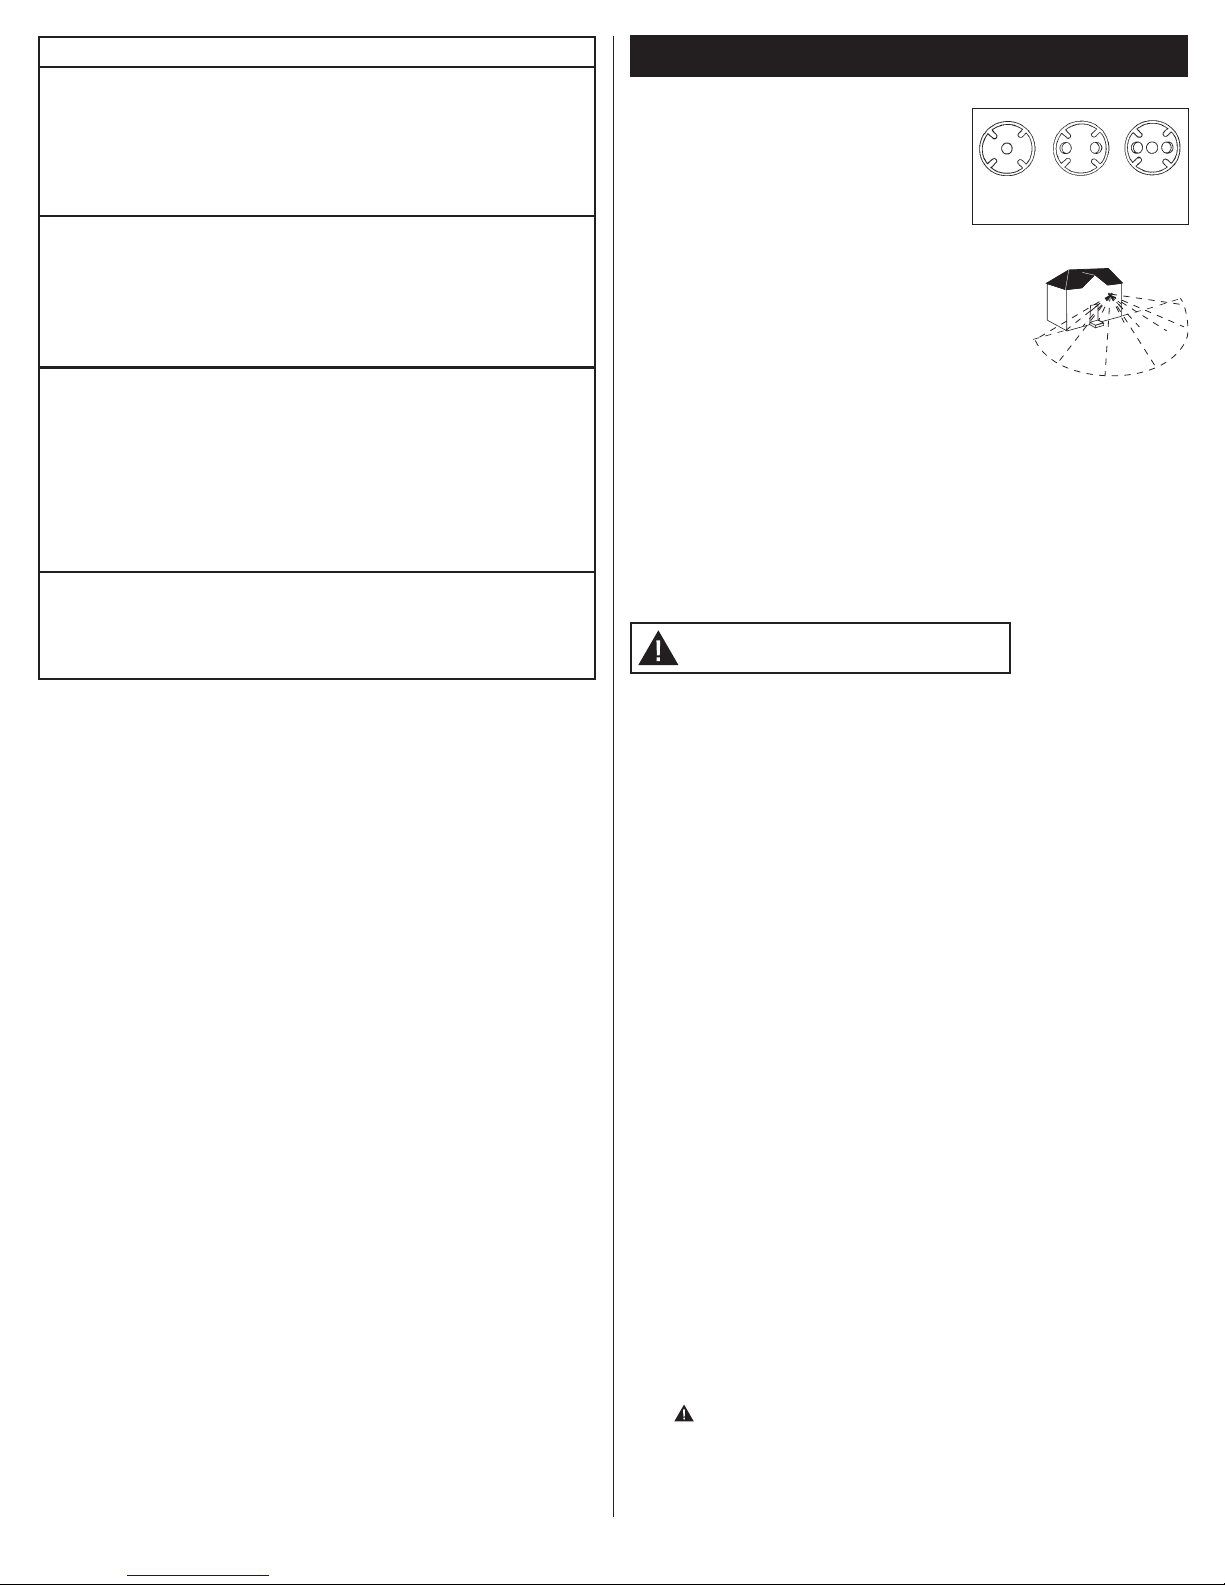
• 1-, 2- or 3-hole junction box coverplate (Fig. 1)
• Electrical Tape
Compatible coverplates
HOW IT WORKS
Your motion activated floodlight senses heat images from
objects such as people, large animals and automobile engines.
When motion is detected, the lights will automatically turn
on. Once motion has stopped, the lights will turn off after a
preselected time delay. Your motion activated floodlight may
also be used as a standard floodlight.
IMPORTANT SAFETY INSTRUCTIONS
When using product, basic precautions should always be followed, including the following:
• Heed all warnings, including below warnings AND those included on product.
• For outdoor use only.
• cULus LISTED for wet location.
• Disassembling your fixture will void the warranty.
Fig. 1
Up to
70 feet
180 degrees
Instruction Manual / Manuel d’instructions/ Instrucciones
B. (3) Wire nuts
(3) Conectores
del cables
(3) Capuchons
de connexion
- Connect the equipment into an outlet on a circuit different from that to which the
receiver is connected.
- Consult the dealer or an experienced radio/TV technician for help.
• This device contains transmitter module FCC ID: 2AKIWCC2541-HY1
WARNING: FCC Regulations state that any unauthorized changes or
modifications to this equipment not expressly approved by the manufacturer
could void the user’s authorization to operate this equipment.
SAVE THESE INSTRUCTIONS.
FOR BEST RESULTS
• Install your fixture 8-12 feet above the ground.
(Motion sensor is less sensitive above 12 feet.)
• Locate fixture so motion moves across
detection zone (Fig. 1).
• Locate sensor away from heat producing sources to
prevent false triggering. Also be very careful not to
include objects such as windows, white walls and
water in the detection zone.
• Locate sensor away from moving objects such as
trees, large shrubs and street traffic.
• Do not install more than one Bluetooth-equipped motion detector on one wall switch.
COMMON WALL AND EAVE
MOUNTING APPLICATIONS
Fig. 1
Fig. 2
WARNING
• Read and follow these instructions.
• Total wattage of light bulbs connected to the motion detector cannot exceed
500 watts incandescent/tungsten /halogen, or 50 Watts LED.
CAUTION
• Connect fixture to a 120 volt, 60 Hz power source. Any other connection voids
the warranty.
• Fixture should be installed by persons with experience in household wiring or by a
qualified electrician. The electrical system, and the method of electrically connecting
the fixture to it, must be in accordance with the National Electrical Code and local
building codes.
• For proper operation and protection against damage, the motion sensor head
adjustment knobs must be facing the ground.
• MINIMUM 90° C SUPPLY CONDUCTORS.
• This device complies with Part 15 of the FCC Rules. Operation is subject to the
following two conditions: (1) This device may not cause harmful interference, and
(2) this device must accept any interference received, including interference that may
cause undesired operation. Under Part 15 of the FCC Rules, any changes or
modifications to the motion detector described in this instruction sheet that are
not expressly approved by Eaton could void the user’s authority to
operate the equipment.
NOTE: This equipment has been tested and found to comply with the limits for
a Class B digital device, pursuant to Part 15 of the FCC Rules. These limits are
designed to provide reasonable protection against harmful interference in a
residential installation. This equipment generates, uses and can radiate radio
frequency energy and if not installed and used in accordance with the instructions,
may cause harmful interference to radio communications. However, there is no
guarantee that interference will not occur in a particular installation. If this equipment
does cause harmful interference to radio or television reception, which can be
determined by turning the equipment off and on, the user is encouraged to try to
correct the interference by one or more of the following measures:
- Reorient or relocate the receiving antenna.
- Increase the separation between the equipment and receiver.
WARNING: Total wattage of light bulbs connected to motion detector
cannot exceed 500 watts incandescent/tungsten/halogen, or 50 Watts LED.
ASSEMBLING AND WIRING YOUR
MOTION DETECTOR
WARNING: Risk of electric shock. Disconnect
power at fuse or circuit breaker before installing
or servicing.
1. Turn off the power at the main fuse/breaker box.
2. Screw motion sensor arm into the desired hole on
junction box or light fixture coverplate. The hole, or
fitting, must utilize standard ½” NPS threads to
ensure a water tight seal.
3. If required, attach all lampholders to the coverplate
following the instructions provided with your light
fixture (purchased separately).
1
Your fixture mounts
to the following
standard junction boxes:
Round Octagonal
4. Using the wire nuts provided, make the following
electrical connections, then wrapping and securing
each connection with electrical tape:
a. Connect all white (neutral) wires together, from
house side, fixture, and motion sensor.
b. Connect black wire(s) from fixture to red wire
(load) from motion sensor.
c. Connect black wire from house side to black wire
from motion sensor (Fig. 3).
5. Attach fixture to the junction box according to
instructions provided with your light fixture
(purchased separately).
6. Follow any and all other instructions provided with
your light fixture to complete the hardware portion
of this installation.
7. Turn on power at main fuse/ breaker box.
SETTING UP YOUR BLUETOOTH-ENABLED
MOTION SENSOR
This device is compatible with smart devices using
iOS v7.x or later, or Android v4.4 or later.
1. Ensure the Bluetooth setting is enabled on your
smart device.
2. Download and install the All-Pro Outdoor Security
Lighting application to your device (Fig. 4).
3. Ensure the power to the fixture is on, and you are
within range of the fixture with your device
(approx. 50 ft.).
4. From the main screen, find the fixture
icon you wish to setup and control.
If the fixture does not appear, use the
Refresh icon.
5. On the initial password screen, enter “0000” as
your password.
6. Your fixture will begin to flash on and off. Confirm
that this fixture is the one you want to
set up by selecting “Yes”.
7. On the Change Password screen, enter a new
4-digit password for your fixture (optional) (Fig. 5).
8. On the Name Your Fixture screen, enter a name for
your fixture using up to 16 characters .
9. Initial setup is now complete, and you are ready to
begin testing and using your device.
TESTING AND USING YOUR DEVICE
1. The four primary functions for this device are Auto,
On, Off and Test (Fig. 6).
a. Most users should begin with the “TEST”
mode, during which the fixture will activate
once it senses motion, day or night, turning
off after approximately 4 seconds. This
function allows you to quickly determine the
range and area coverage the sensor is detecting,
allowing you to aim the motion sensor and adjust
the sensitivity to best suit your particular
application. Once you’ve chosen the best
orientation and sensitivity setting, select “AUTO”
mode to put the sensor into normal operation.
b. “AUTO” mode is the most common mode, and
will cause the motion sensor to automatically
activate, during the night, using the other settings
you have chosen.
c. “ON” mode will bypass everything, including the
motion sensor and all of its settings, allowing you
to use the fixture as a flood light, day or night.
d. “OFF” mode turns the fixture off. Be aware
that this mode DOES NOT turn power off to
the fixture. Leaving this button activated will
keep your fixture off until you choose another
operating mode.
2. Flood Mode temporarily bypasses the motion
sensor, turning your fixture on for a set amount of
time at night (Fig. 7).
Junction
box
Fig. 3
White
B
Light
fixture
Red
B
Black
B
Fig. 4
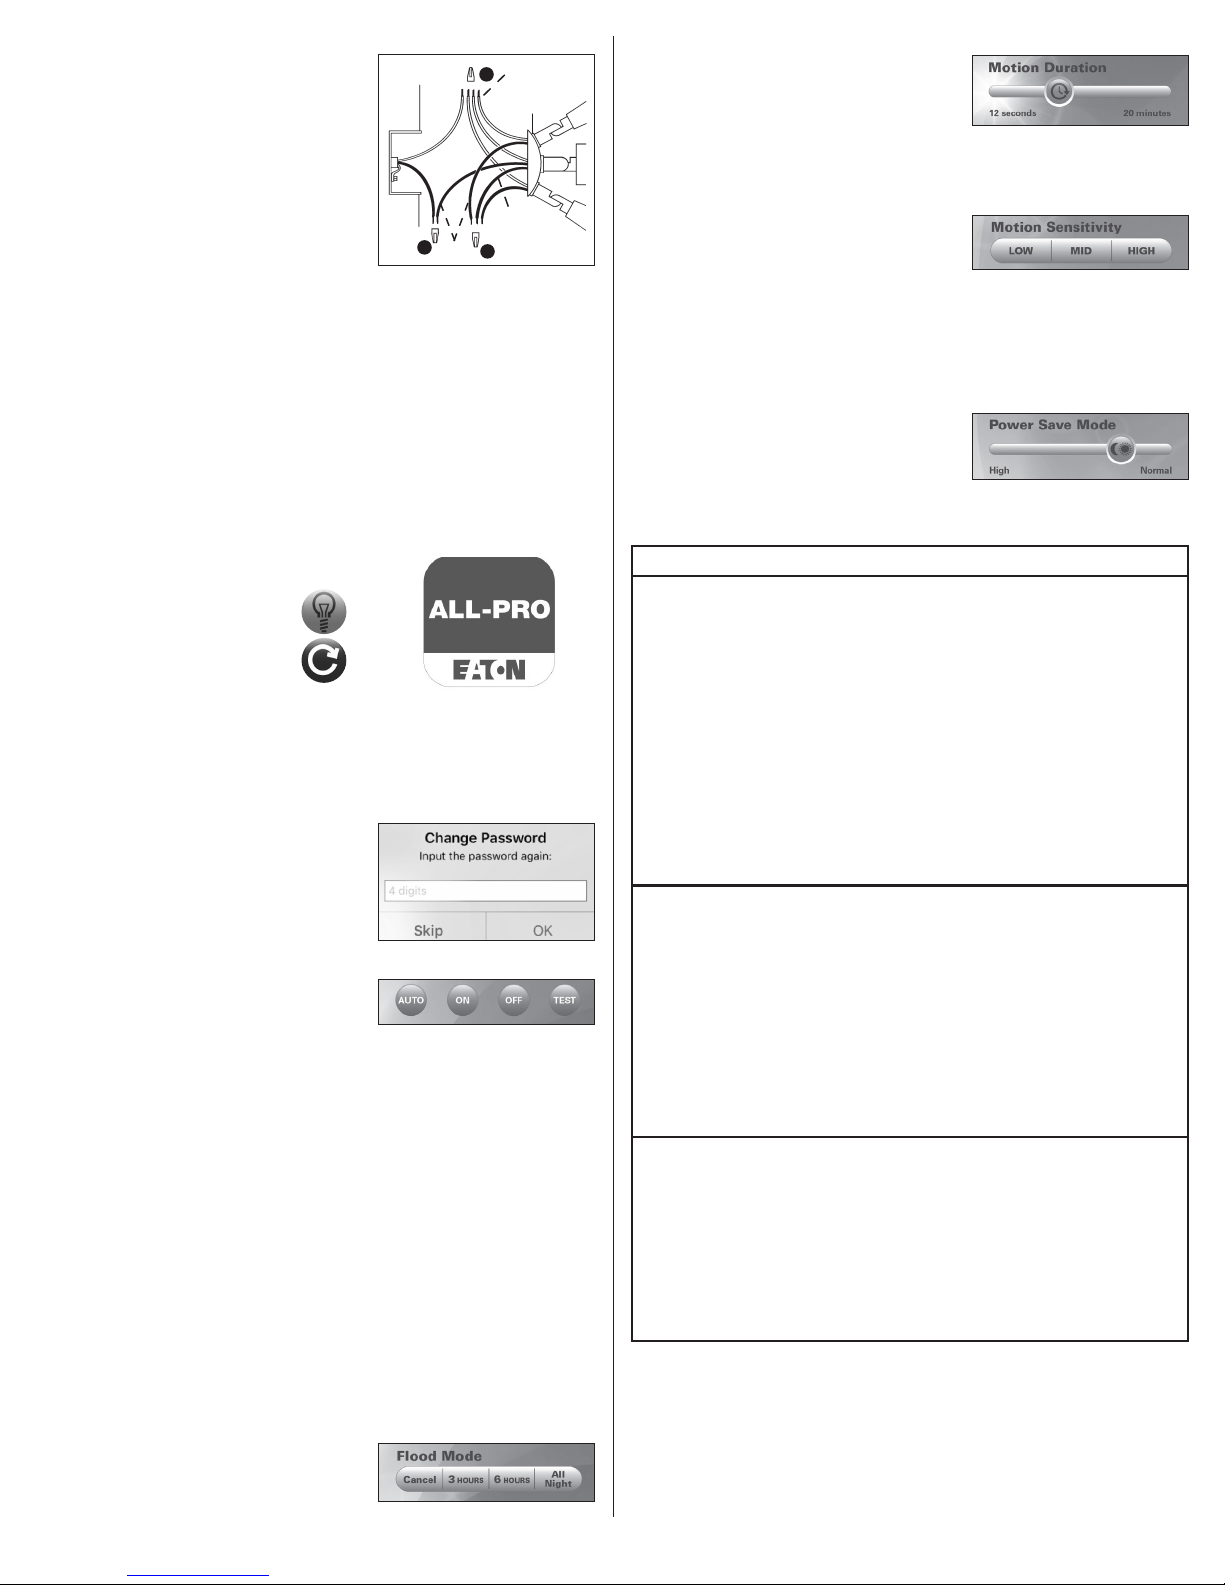
3. Motion Duration determines the amount of time
the fixture will remain on, from 12 seconds up to
20 minutes, after the last motion event is detected
by the motion sensor. Each time the sensor detects
motion, this internal ‘countdown timer’ is reset
(Fig. 8).
4. Motion Sensitivity determines the general range and
granularity of motion events needed to trigger the
motion sensor. “HIGH” will have the greatest range,
while “LOW” will have the shortest range and
require larger motion events to trigger the sensor.
(Fig. 9)
5. Power Save Mode determines the amount of
ambient light needed to activate the motion sensor.
The motion sensor only operates at night, and this
adjustment allows you to choose at which points
during evening/morning the fixture will begin/cease
to activate. Moving the slider bar to the right will
cause the fixture to activate sooner in the evening,
and will keep it on later in the morning. Moving the
bar to the left will cause the fixture to activate later
in the evening, and will turn it off earlier in the
morning (Fig. 10).
TROUBLESHOOTING
Fig. 8
Fig. 9
Fig. 10
Problem Cause / Solution
Fig. 5
Fig. 6
Fig. 7
Light does not
come ON with
motion at night
Light comes ON
for no apparent
reason at night
Light stays ON at
night and does
not turn OFF.
No power to the fixture
• Check circuit breaker
• Confirm wall switch is ON
Sensor is in “OFF” mode
• Within the app, select the fixture, then select “AUTO” mode
Bulb is faulty (incandescent or fluorescent bulbs)
• Replace bulb
Surrounding ambient light is too high
• Reduce Power Save Mode to Normal
(move slider bar towards the right)
• Relocate or reposition the sensor away from ambient light
sources
TURN OFF POWER BEFORE CONTINUING
Wiring to the unit is loose.
• Check wiring; reconnect if necessary
There is motion in the detection zone
• This motion sensor detects changes in heat signature; make
sure the sensor is not aimed toward moving objects such as
trees, traffic, etc.
• Reduce the sensitivity setting in the app
RECOMMENDED TEST:
• Cover the sensor lens with cardboard to prevent sensor from
detecting motion or heat. If the light stays off, something in the
detection zone is triggering the sensor. Reposition the sensor, or
reduce sensitivity
• If the light stays on with the sensor covered, and the light is in
“AUTO” mode, contact customer service
Sensor is not in AUTO mode
• Put sensor into AUTO mode in the app
• Alternative solution: turn light switch OFF-ON-OFF-ON to reset
motion sensor into AUTO mode
There is motion in the detection zone
• Reduce sensitivity in the app
• Reduce Motion Duration in the app
• Make sure the sensor is not picking up moving objects such as
trees, traffic, etc.
• Reposition the sensor
2
Problem Cause / Solution
Light
continuously
blinks ON and
OFF at night
Light is ON
during the day
Fixture icon does
not appear in app
Fixture does not
respond to input
from the App
The light given from the unit’s own light source is causing the sensor’s integrated photocontrol to cycle, or light is being reflected from
another reflective surface such as a pool, snow, concrete sidewalk,
etc. into the motion sensor
• Increase Power Save Mode by moving slider bar to the left
• Aim the fixture light source(s) away from the motion sensor
• Reposition the motion sensor
Sensor is not in AUTO mode
• Put sensor into AUTO mode in the app
• Alternative solution: turn light switch OFF-ON-OFF-ON to reset
motion sensor into AUTO mode
Sensor is in a dark area during the day
• Increase Power Save Mode by moving slider bar to the left
• Reposition the motion sensor
No power to the fixture
• Check circuit breaker
• Confirm wall switch is ON
Bluetooth is not activated on the smart device
• Activate Bluetooth through Settings on your smart device
Your smart device is out of range of the sensor
• Move to within 50’ line of sight of the sensor, closer if possible
• Walls, trees and electronic interference from other devices can
significantly reduce the effective range of Bluetooth
communication
• Perform a factory reset to the fixture by turning the light switch
OFF-ON three times.
NOTE: You will have to complete initial set up steps 4-8 found in this
instruction manual.
5-YEAR LIMITED WARRANTY
THE FOLLOWING WARRANTY IS EXCLUSIVE AND IN LIEU OF ALL OTHER WARRANTIES,
WHETHER EXPRESS, IMPLIED OR STATUTORY INCLUDING, BUT NOT LIMITED TO, ANY
WARRANTY OF MERCHANTABILITY OR FITNESS FOR ANY PARTICULAR PURPOSE.
Eaton warrants to customers that, for a period of five years from the date of purchase, Eaton
products will be free from defects in materials and workmanship. The obligation of Eaton
under this warranty is expressly limited to the provision of replacement products. This
warranty is extended only to the original purchaser of the product. A purchaser’s receipt or
other proof of date of original purchase acceptable to Eaton. This is required before warranty
performance shall be rendered.
This warranty does not apply to Eaton products that have been altered or repaired or that
have been subjected to neglect, abuse, misuse or accident (including shipping damages). This
warranty does not apply to products not manufactured by Eaton which have been supplied,
installed, and/or used in conjunction with Eaton products. Damage to the product caused by
replacement bulbs or corrosion or discoloration of brass components are not covered by this
warranty.
LIMITATION OF LIABILITY:
IN NO EVENT SHALL EATON BE LIABLE FOR SPECIAL, INDIRECT, INCIDENTAL, OR
CONSEQUENTIAL DAMAGES (REGARDLESS OF THE FORM OF ACTION, WHETHER IN CONTRACT,
STRICT LIABILITY, OR IN TORT INCLUDING NEGLIGENCE), NOR FOR LOST PROFITS; NOR SHALL
THE LIABILITY OF EATON FOR ANY CLAIMS OR DAMAGE ARISING OUT OF OR CONNECTED
WITH THESE TERMS OR THE MANUFACTURE, SALE, DELIVERY, USE, MAINTENANCE, REPAIR OR
MODIFICATION OF EATON PRODUCTS, OR SUPPLY OF ANY REPLACEMENT PARTS THEREFORE,
EXCEED THE PURCHASE PRICE OF COOPER LIGHTING PRODUCTS GIVING RISE TO A CLAIM. NO
LABOR CHARGES WILL BE ACCEPTED TO REMOVE OR INSTALL FIXTURES.
To obtain warranty service, please contact Eaton at 1-800-334-6871, press option 2 for
Customer Service, or via e-mail ConsumerProducts@eaton.com and include the following
information:
• Name, address and telephone number
• Date and place of purchase
• Catalog and quantity purchase
• Detailed description of problem
All returned products must be accompanied by a Return Goods Authorization Number issued
by the Company and must be returned freight prepaid. Any product received without a Return
Goods Authorization Number from the Company will be refused.
Eaton is not responsible for merchandise damaged in transit. Repaired or replaced products
shall be subject to the terms of this warranty and are inspected when packed. Evident or
concealed damage that is made in transit should be reported at once to
the carrier making the delivery and a claim filed with them.
Reproductions of this document without prior written approval of Eaton are strictly prohibited.
For assistance, call 1-800-334-6871 or e-mail us at ConsumerProducts@eaton.com.
Printed in China
FRANÇAIS
ARTICLES REQUIS
(à acheter séparément)
• Tournevis cruciforme (Phillips)
• Calfeutrage en silicone étanche pour l’extérieur
• Couverture de boîte de jonction à 1, 2 ou 3 trous
(Fig. 1)
• Ruban électrique
FONCTIONNEMENT
Votre projecteur détecteur de mouvements capte
l’image thermique émises par des objets comme les
personnes, les grands animaux et les moteurs automobiles. Les ampoules s’allument automatiquement dès
qu’un mouvement est détecté. Une fois le mouvement terminé, les lumières s’éteignent après un délai
présélectionné. Votre projecteur activé par détecteur
de mouvements peut également être utilisé comme
projecteur standard.
INSTRUCTIONS DE SÉCURITÉ IMPORTANTES
Lors de l’utilisation de ce produit, veuillez toujours suivre les précautions de base, y
compris ce qui suit:
• Le respect de tous les avertissements incluant les avertissements ci-dessous ET ceux
indiqués sur le produit.
• Pour une utilisation extérieure seulement.
• Homologation cULus pour l’utilisation dans des endroits humides.
• Le démontage du luminaire annule la garantie.
Fig. 1
Plaques de recouvrement
compatibles
Jusqu’à
70 pieds
180 degrés
AVERTISSEMENT
• Lire et suivre ces instructions.La puissance totale des ampoules électriques
connectées au détecteur de mouvements ne doit pas dépasser 500watts
incandescence/tungstène/halogène.
PRECAUCION
• Raccordez le luminaire à une source d’alimentation de 120V, 60Hz. Tous autres rac
cordements annuleront la garantie.
• Le luminaire doit être installé par des personnes possédant de l’expérience en câblage
domestique ou par un électricien qualifié. Le système électrique et la méthode de
raccordement électrique du luminaire doivent être conformes au Code national de
l’électricité et au Code du bâtiment local.
• Pour un fonctionnement et une protection contre les dommages corrects, les boutons
de réglage de la tête du détecteur de mouvements doivent être tournés vers le sol.
• CONDUCTEURS D’ALIMENTATION DE 90 °C MIN.
• Ce dispositif est conforme à la section 15 des règlements de la FCC. Le
fonctionnement est soumis aux deux conditions suivantes: 1)cet appareil ne doit
pas provoquer d’interférences nuisibles et 2)cet appareil doit accepter toutes les
interférences reçues, même celles qui pourraient provoquer un fonctionnement
indésirable. Conformément à la section 15 des règlements de la FCC, toute
modification ou altération apportée au détecteur de mouvements décrit dans les
présentes instructions et non approuvée explicitement par Eaton peut annuler le droit
de l’utilisateur à faire fonctionner l’équipement.
REMARQUE : Cet équipement a été évalué et déclaré conforme aux limites des appareils
numériques de classe B, conformément au point 15 du règlement de la FCC. Ces limites sont
conçues pour assurer une protection raisonnable contre toute interférence nuisible pour les
installations résidentielles. Cet équipement produit, utilise et peut émettre une énergie radioélectrique et s’il n’est pas installé et utilisé conformément aux instructions, peut entraîner
des interférences nuisibles aux communications radio. Cependant, il n’existe aucune garantie
que les interférences ne se produiront pas avec une installation particulière. Si cet équipement cause des parasites nuisibles à la réception radio ou d’émissions de télévision, ce qui
peut être vérifié en éteignant l’équipement et en le rallumant, il est conseillé à l’utilisateur
d’essayer de les éliminer en suivant l’une (ou plusieurs) des mesures suivantes :
- Réorientez ou déplacez l’antenne réceptrice.
- Augmentez la distance entre l’équipement et le récepteur.
- Branchez l’équipement sur la prise électrique d’un circuit autre que celui sur lequel
le récepteur est branché.
- Demandez de l’aide au distributeur ou à un technicien radio ou TV qualifié.
• Cet appareil contient un module émetteur FCC ID: 2AKIWCC2541-HY1
AVERTISSEMENT : Les règlements de la FCC stipulent que tout changement
et toute modification non autorisés sur cet équipement, qui n’ont pas été expressément
approuvés par le fabricant, peuvent annuler l’autorisation de l’utilisateur à utiliser cet
appareil.
CONSERVEZ CES INSTRUCTIONS.
3
 Loading...