

Eaton 500 Installation And User Manual

www.eaton.com
CE compliance contact: Eaton I.F. SAS - 110 rue Blaise Pascal - 38330 Montbonnot St Martin - France
Protection Station
500
Installation and
user manual
English
Français
Deutsch
Italiano
Español
Nederlands
Português
Polski
2
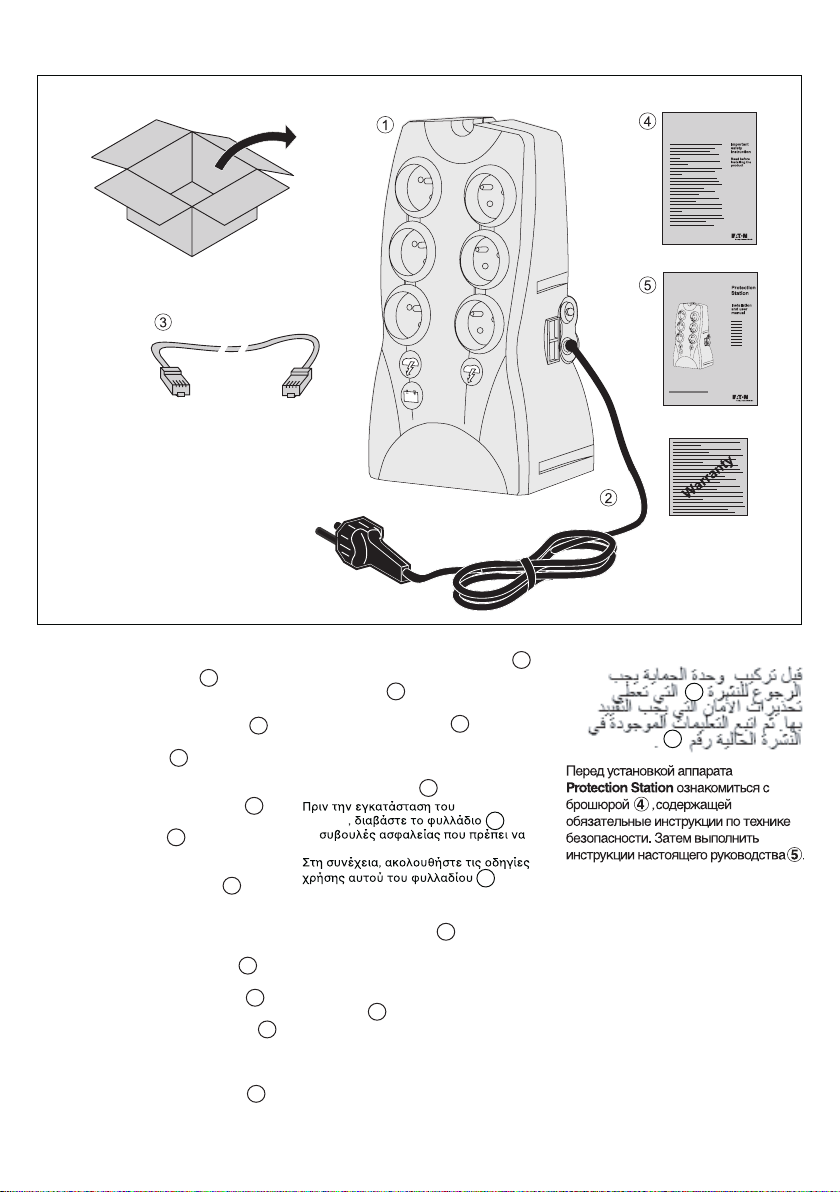
Packaging
5
4
Protection
Station 4 µε
τηρείτε.
5 .
τις
Caution!
◗ Before installing the Protection
Station, read the booklet 4
containing the safety instructions
to be respected. Then follow the
instructions given in this manual 5 .
◗ Avant l'installation de Protection
Station, lire le livret 4 qui
présente les consignes de sécurité
à respecter. Suivre ensuite les
instructions du présent manuel 5 .
◗ Vor Installation des Protection
Station die im Heft 4 genannten
Sicherheitsvorschriften lesen.
Anschließend die Anweisungen
im vorliegenden Handbuch 5
befolgen.
◗ Prima dell’installazione del
Protection Station, leggere
attentamente le istruzioni di
sicurezza riportate sul libretto 4 .
In seguito, attenersi alle istruzioni
riportate sul presente manuale 5 .
◗ Antes de la instalación del
Protection Station, leer el manual 4
que presenta las instrucciones de
seguridad a cumplir.
A continuación, seguir las
instrucciones del presente manual 5 .
◗ Lees voordat u het Protection
Station gaat installeren eerst de
veiligheidsinstructies in boekje 4 .
Volg daarna de instructies van deze
handleiding 5 .
◗ Antes da instalação do Protection
Station, ler o caderno 4 onde
constam as instruções de
segurança a respeitar.
Depois, seguir as instruções do
presente manual 5 .
◗ Przed zainstalowaniem
Protection Station, nale˝y
przeczytaç instrukcj´ 4 , która
zawiera niezb´dne zalecenia
bezpieczeƒstwa.
Nast´pnie nale˝y zapoznaç si´ z
zaleceniami zawartymi w niniejszej
instrukcji 5 .
3
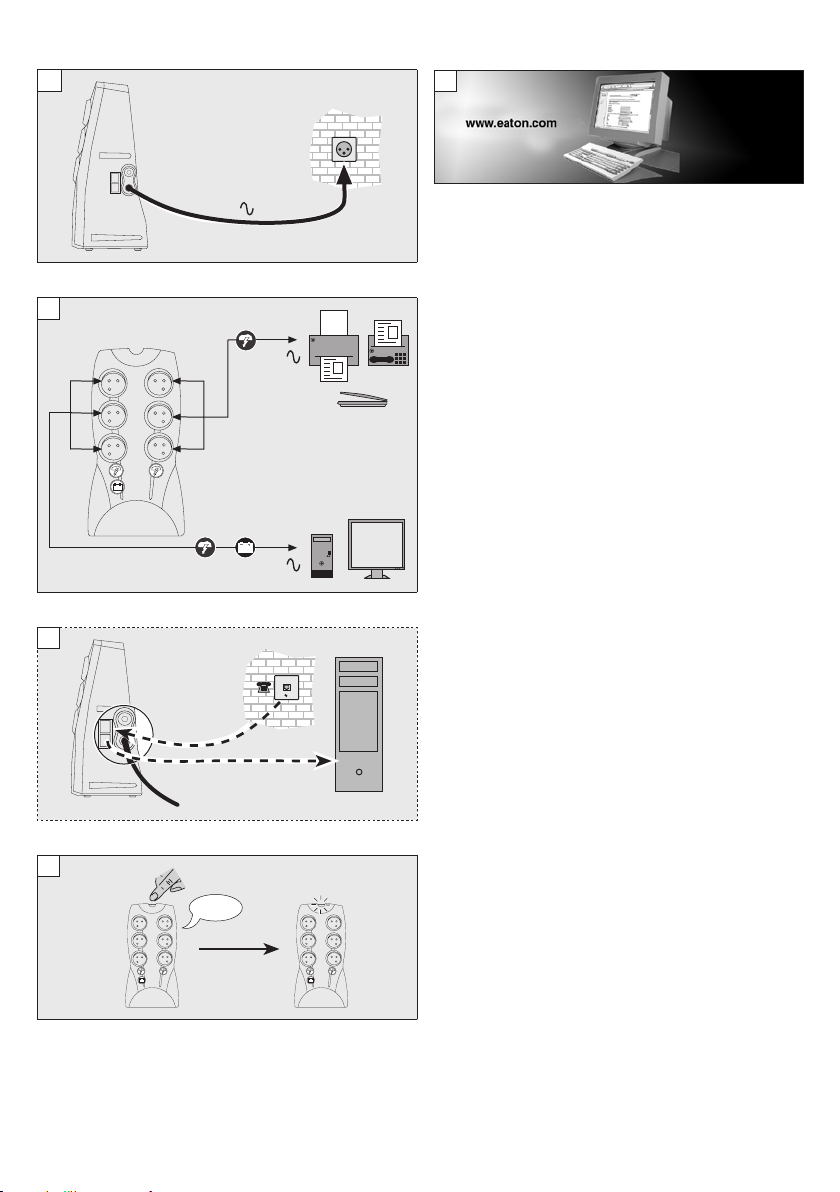
Quick start
A
E
B
C
D

4
Operating conditions
◗ This product is an Uninterruptible
Power Supply (UPS) for computers
and their peripherals, television
sets, stereo systems and video
recorders... It must not be used to
supply other electrical equipment
(lighting, heating, household
appliances, etc.).
ENGLISH
UPS connections
◗ Connect the UPS 1 to the AC-
power system via a wall outlet
with an earth connector, using the
supplied cord 2 (see gure A).
◗ Plug critical equipment
(computer, monitor, modem, etc.)
into the outlets 6 providing
battery backup power and surge
protection (see gure B), taking
care not to exceed the rated current
indicated in amperes.
◗ Other devices (printer, scanner,
fax, etc.) can be connected to the
ltered outlets 7 that provides
surge protection (see gure B). The
ltered outlets are not backed up
by battery power in the event of a
power outage.
◗ Fax/modem connection:
A telephone, fax, modem or
Ethernet data line can be protected
against surges by connecting it to
the telephone outlet via the UPS.
The device cable is used between
the telephone outlet and the UPS,
and the supplied cable 3 is used
between the UPS and the device,
as indicated in gure C.
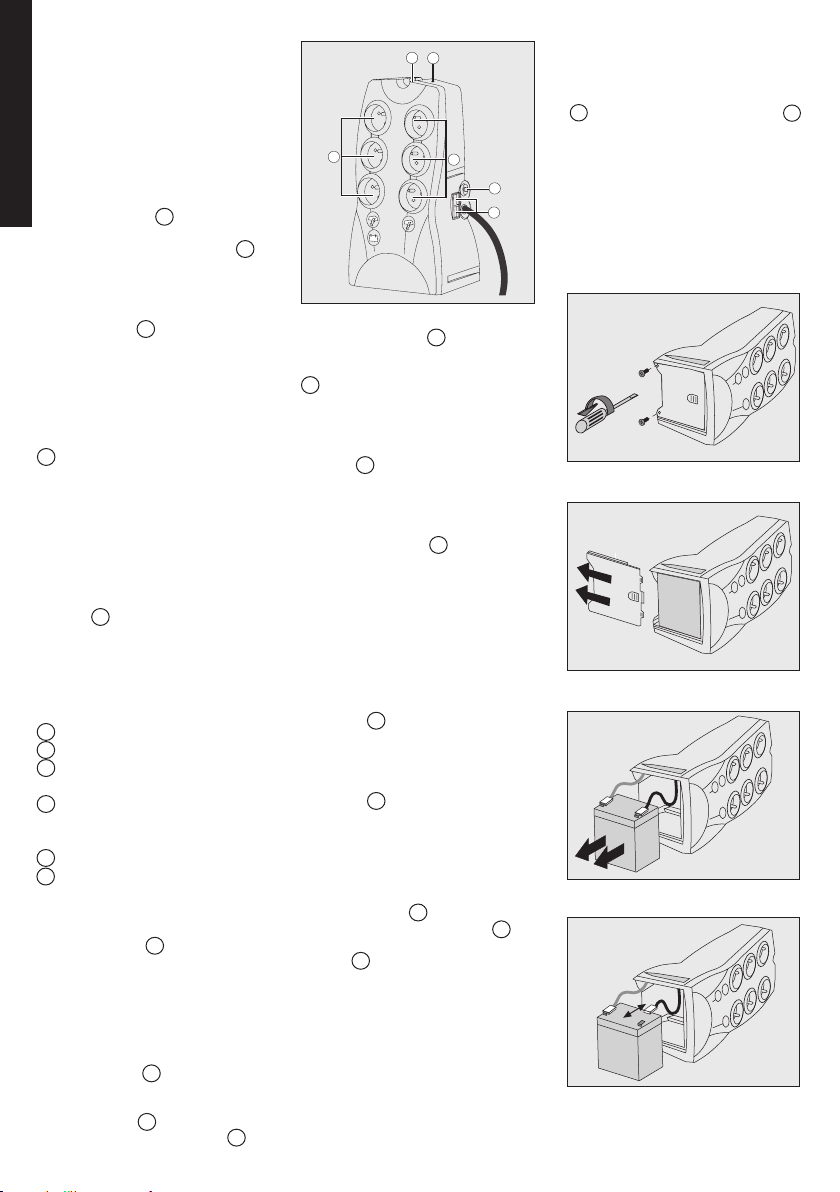
Operation
6 : Three battery backup outlets.
7 : Three ltered outlets.
8
: ON/OFF button for the battery
backup outlets.
9
: LED ON indicate that surge
protection is active on all six
outlets.
10 : Protection circuit breaker.
11 : Telephone outlet
◗ Battery charge: The UPS
charges the battery as soon as
it is connected to the AC outlet,
whether button 8 is pressed or
not. When used for the rst time,
the battery will only provide its
maximum autonomy after it has
been charged for 8 hours. It is
recommended that the UPS be
permanently connected to the AC
power supply to ensure the best
possible autonomy.
◗ Filtered outlets 7 without battery
backup: Equipment connected to
these outlets is supplied as soon as
the AC cord 2 is plugged in. They
are not affected by button 8 .
◗ Battery backup outlets 6 :
Equipment connected to these
outlets is supplied as soon as
button 8 is pressed and turns
green (see gure E). These outlets
can be turned on even if the UPS is
not connected to AC power
(button 8 ashes).
◗ AC-power disturbance: If AC
power is disturbed or fails, the UPS
continues to operate on battery
power. Button 8 ashes green.
The audio alarm beeps every ve
seconds, then every two seconds
when the end of battery backup
time is near.
◗ If the power outage lasts longer
than the battery backup time, the
UPS shuts down and must be
restarted by pressing button 8
when power is restored. Following
a complete discharge, a few hours
are required to recharge the battery
back to full backup time.
◗ To save battery power, it is
possible to press button 8 to cut
the supply of power to the devices
connected to the battery backup
outlets.
◗ Surge protection: All outlets,
whether backed up or simply
ltered, include surge protection,
whatever the position of button 8 .
◗ Shutdown of the battery backup
outlets 6 : Press button 8 for
more than two seconds.
Battery disposal and safety
◗ Caution. Battery service life is
reduced by 50% for every ten
degrees above 25°C.
◗ The battery must be replaced
exclusively by qualified personnel
(risk of electrocution), with a new
battery approved by EATON to
ensure correct operation of the
UPS.
◗ The battery must be disposed
of in accordance with applicable
regulations. To remove the battery,
shut down the UPS (button 8
OFF), remove the power cord 2
and proceed as indicated below.
Battery change
◗ Warning:take care not to inverse
the polarity + (red) and - (black)
when connecting the batteries as
this will destroy the device.

5
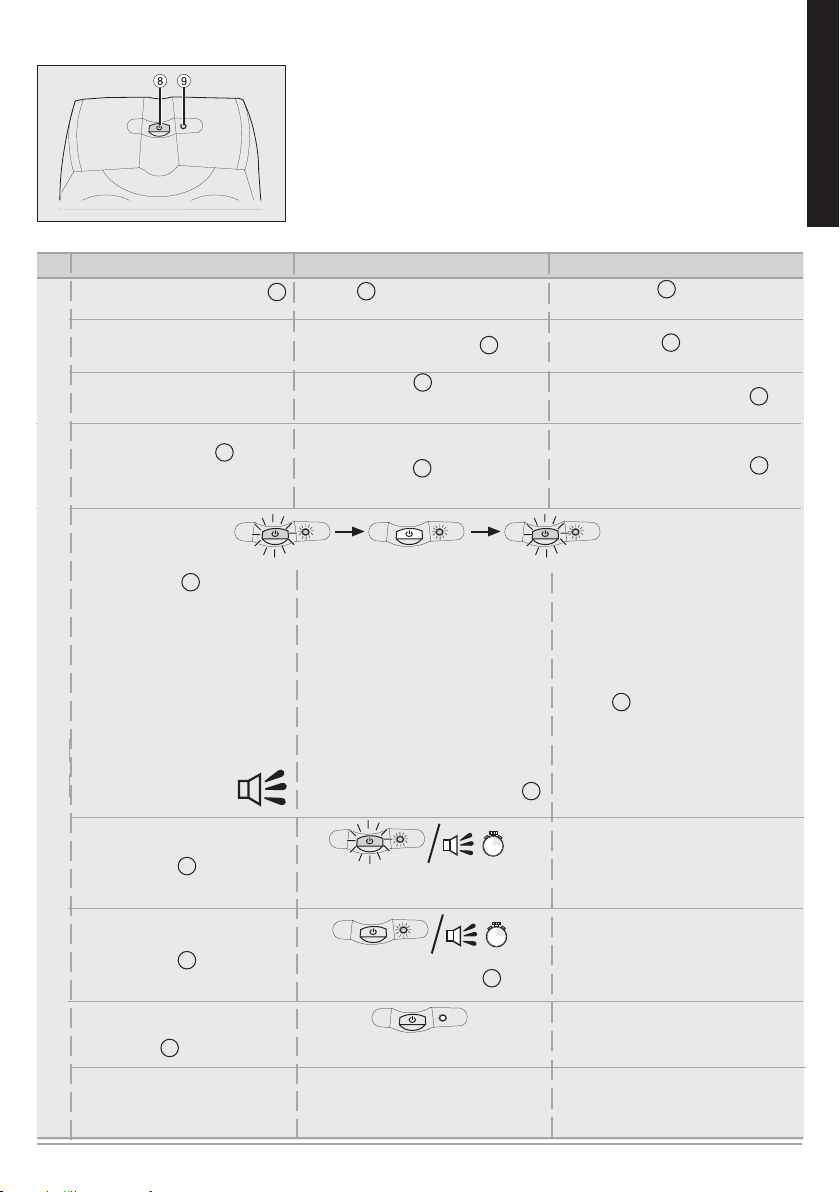
Troubleshooting (For further information, visit the www.eaton.com site or contact after-sales support.)
Problem Diagnostic Solution
1
◗ The battery backup outlets 6
are not supplied with power.
2
◗ The connected devices are not
supplied when AC power fails.
◗ Button 8 is not pressed.
◗ The devices are not connected to
the battery backup outlets 6 .
◗ Press button 8 and check that it
turns green.
◗ Connect the devices to the battery
backup outlets 6 .
ENGLISH
3
◗ AC power is available, but
the UPS operates on battery
power.
4
◗ The ltered outlets 7 are not
supplied.
5
◗ Green button 8 ashes:
- frequently.
-every 5 seconds
-every 2 seconds
-continually and the
audio alarm beeps
6
◗ Green button 8 is on and
the audio alarm beeps every
1 second.
7
◗ Green button 8 is off and
the audio alarm beeps every
1 second.
8
◗ Green LED 9 is off
◗ The telephone line is
9
disturbed or modem
access is not possible.
◗ Circuit breaker 10 , has been
tripped by an overload on the UPS
output.
◗ The wall outlet is not supplied.
◗ Circuit breaker 10 , has been
tripped by an overload on the UPS
output.
◗ The UPS frequently operates on
battery power because the AC
power source is of poor quality
◗ The UPS operates on battery
power, beginning of battery backup
time
◗ The UPS operates on battery
power, end of battery backup time.
◗ The UPS battery backup outlets 6
are overloaded.
◗ The battery has reached the end of
its service life.
◗ A fault has occurred on the UPS.
The battery backup outlets 6 are
no longer supplied.
◗ Surge protection is no longer
provided.
◗ Surge protection on the telephone
line is no longer provided.
◗ Disconnect excess equipment
and reset the circuit breaker 10 by
pressing the corresponding button.
◗ Supply power to the wall outlet.
◗ Disconnect excess equipment
and reset the circuit breaker 10 by
pressing the corresponding button.
◗ Have the electrical installation
checked by a professional or use
another wall outlet.
◗ Disconnect excess equipment
connected to the battery backup
outlets 6 .
◗ Have the battery replaced.
◗ Call after-sales support.
◗ Call after-sales support.
◗ Disconnect the telephone line from
the wall outlet.
◗ Call after-sales support.
6
Conditions d'utilisation
◗ Cet appareil est une Alimentation
Sans Interruption (ASI) conçue
pour alimenter un ordinateur et ses
périphériques, des appareils de TV,
HI-FI, Vidéo, à l’exclusion de tout
autre appareil électrique (éclairage,
chauffage, électroménager...).
Raccordement de l'ASI
FRANCAIS
◗ Raccorder l'ASI 1 au réseau
électrique sur une prise murale
avec terre, à l'aide du cordon 2
fourni (voir gure A).
◗ Connecter les prises des appareils
critiques (ordinateur, écran,
modem...) sur les prises secourues
par la batterie 6 et protégées
contre les surtensions (voir gure
B), en ne dépassant pas le courant
indiqué en Ampères.
◗ Les autres appareils (imprimante,
scanner, fax…) peuvent être
branchés sur les prises ltrées et
protégées contre les surtensions
7 (voir gure B); les prises ltrées
ne sont pas secourues en cas de
coupure de courant.
◗ Liaison Fax/Modem :
la ligne téléphone, fax, modem,
Ethernet… peut être protégée
contre les surtensions en la
raccordant de la prise téléphonique
murale à l'ASI avec le cordon de
l'appareil à protéger et à l'aide du
cordon 3 fourni de l'ASI vers cet
appareil, comme indiqué gure C.
◗ Procéder à l'enregistrement de
la carte de garantie sur le site web
www.eaton.com (voir gure G).
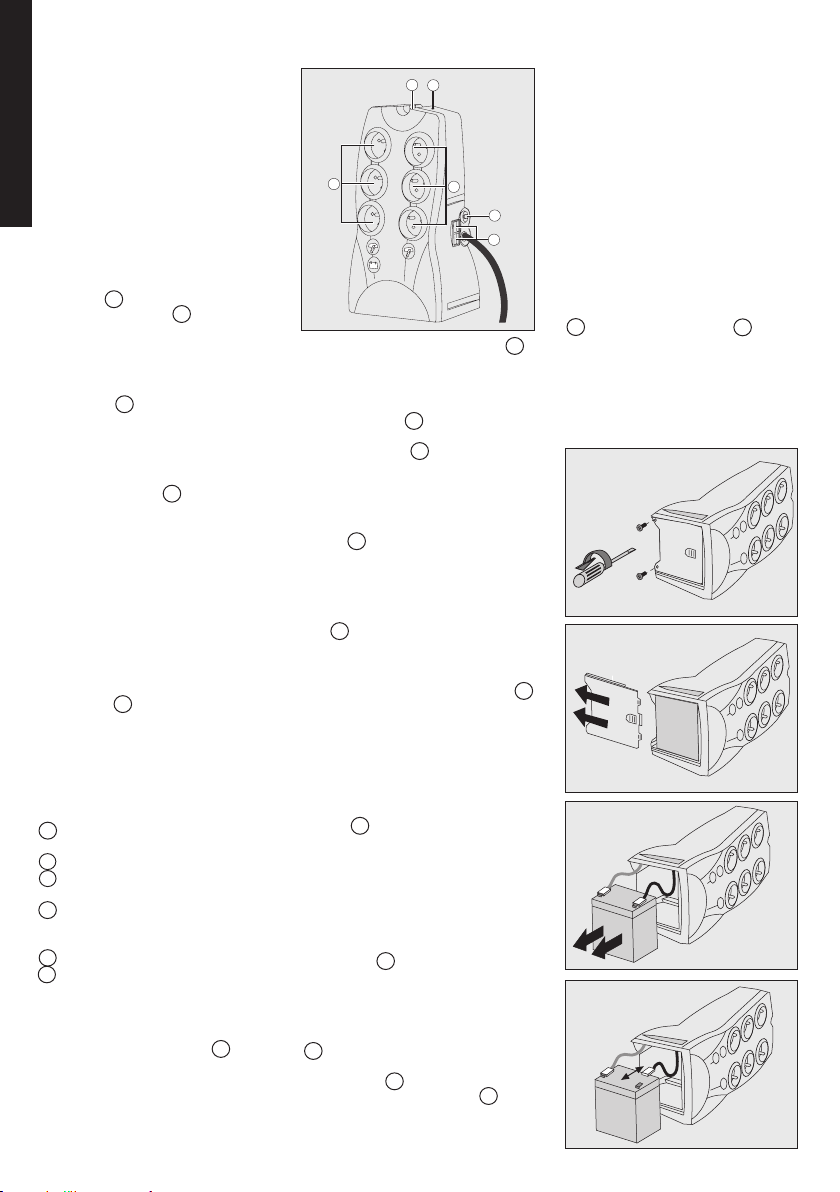
Utilisation
6 : 3 prises secourues par batterie.
7 : 3 prises ltrées.
: Bouton de mise en service ou
8
d'arrêt des prises secourues.
9 : Voyant allumé, protection anti-
surtensions active sur les 6
prises.
10 : Disjoncteur de protection.
11 : Prise téléphonique
◗ Charge batterie : l'ASI charge sa
batterie dès qu’elle est connectée
au réseau électrique quel que soit
l'état du bouton 8 . A la première
utilisation, la batterie ne donne
sa pleine autonomie qu'après
une recharge de 8 heures. Pour
conserver la meilleure autonomie,
il est conseillé de laisser l'ASI
branchée en permanence sur le
réseau électrique.
◗ Prises filtrées 7 non secourues
: les appareils raccordés sur ces
prises sont alimentés dès que le
câble d’entrée 2 est branché sur
une prise murale. Le bouton 8 ne
commande pas ces prises.
commande pas ces prises.
◗ Prises secourues 6 : les
appareils raccordés sur ces prises
sont alimentés dès que le bouton
8 est enfoncé (position marche)
et allumé en vert (voir gure E).
Ces prises peuvent être mises en
marche même si l'ASI n'est pas
connectée au réseau électrique
(bouton 8 clignotant).
◗ Perturbation du réseau électrique :
si la tension de ce réseau est
mauvaise ou absente, l'ASI
continue à fonctionner sur
batterie : le bouton 8 clignote en
vert. En mode normal, l’alarme
sonore émet un signal toutes
les 5 secondes, puis toutes
les 2 secondes lorsque la n
d'autonomie batterie approche.
◗ Si la durée de la coupure
du réseau électrique dépasse
l'autonomie batterie, l'ASI s'arrête
et doit être redémarré au retour du
réseau électrique en appuyant sur
le bouton 8 . Après une décharge
complète, quelques heures
sont nécessaires pour restaurer
l'autonomie complète.
◗ Par souci d'économie d'énergie,
le bouton 8 peut être utilisé pour
couper l’alimentation électrique
des appareils raccordés sur les
prises secourues.
◗ Protection contre les surtensions :
toutes les prises, secourues ou
non, en bénécient quel que soit
l’état du bouton 8 .
◗ Arrêt des prises secourues 6 :
appuyer plus de 2 secondes sur le
bouton 8 .
Rebut et sécurité batterie
◗ Attention : la durée de vie de la
batterie décroît de moitié tous les
10°C au-dessus de 25°C.
◗ La batterie ne peut être remplacée
que par du personnelqualifié
(risque d’électrocution) et par une
batterie autorisée par EATON an
de garantir le bon fonctionnement
de l'appareil.
◗ Le rebut de la batterie doit
être réalisé conformément à la
législation en vigueur. Pour extraire
la batterie, arrêter l'appareil (bouton
8 éteint), débrancher le cordon 2
, et procéder comme suit :
Changement de la batterie
◗ Attention : lors du raccordement
des éléments batterie, une inversion
des polarités + (rouge) et - (noir)
provoque la destruction de l'appareil.

8
Allgemeine
Betriebsbedingungen
◗ Bei diesem Gerät handelt es
sich um eine Unterbrechungsfreie
StromVersorgungsanlage (USV)
für die sichere Energieversorgung
eines Computers und der
dazugehörigen Peripheriegeräte,
Fernsehgeräte, HiFi-Anlagen,
Videorecorder usw. Das Gerät
DEUTSCH
dient nicht zum Anschluss
sonstiger elektrischer Verbraucher
(Beleuchtung, Heizgeräte,
Elektrohaushaltsgeräte usw.)
Anschluss der USV
◗ Die USV 1 mit Hilfe des
mitgelieferten Kabels 2 mittels einer
Wandsteckdose an das Stromnetz
anschließen (siehe Abb. A).
◗ Die zu schützenden Geräte
(Computer, Monitor, Modem
usw.) an die batteriegepufferten
Steckdosen 6 der USV anschließen
(siehe Abbildung B), wobei der
angegebene Nennstrom (in A) nicht
überschritten werden darf.
◗ Die übrigen Geräte (Drucker,
Scanner, Faxgerät usw.) können
an die Steckdosen 7 mit
Filter- und Überspannungsschutz
angeschlossen werden (siehe
Abbildung B); diese gelterten
Steckdosen sind bei Netzausfall
nicht gesichert.
◗ Verbindung Internet / Modem :
Die Daten-, Fax- und Modemleitung
und das Ethernet können ebenfalls
gegen Überspannungen geschützt
werden, indem die Netzsteckdose
mit der USV und dem Kabel des zu
schützenden Geräts verbunden und
die USV mit diesem Gerät mittels
des Kabels 3 verbunden wird,
wie in Abb. C dargestellt.
◗ Registrieren Sie Ihre Garantiekarte
Online unter www.eaton.com
(siehe Abbildung G).
Aufbauund
Funktionsumfang
6 : 3 Steckdosen mit
Batteriepufferung
7 : 3 Steckdosen mit Filterschutz.
8 : Ein- bzw. Ausschaltknopf der
gepufferten Steckdosen.
9 : Leuchtende Kontrolllampe,
Überspannungsschutz bei allen 6
Steckdosen aktiviert.
10 : Schutzschalter
11 : Telefonsteckdose
◗ Aufladen der Batterie: Die USV
wird aufgeladen, sobald sie an
das Stromnetz angeschlossen
ist, unabhängig von der
Schaltstellung des Tasters 8 .
Beim ersten Gebrauch steht die
volle Autonomiezeit erst nach
einer Auadezeit der Batterie von
8 Stunden zur Verfügung. Um
die optimale Batterieleistung zu
gewährleisten, wird empfohlen,
die USV ständig an das Stromnetz
angeschlossen zu lassen.
commande pas ces prises.
◗ Steckdosen mit Filterschutz 7
ohne Batteriepufferung : Die
Stromversorgung der an diese
Steckdosen angeschlossenen
Verbraucher erfolgt, sobald das
Eingangskabel 2 mit einer
Wandsteckdose verbunden wird.
Der Drucktaster 8 hat keinen
Einuss auf diese Steckdosen.
◗Steckdosen mit Batteriepufferung
6 : Die Stromversorgung der an
diese Steckdosen angeschlossenen
Verbraucher erfolgt, sobald der
Taster 8 gedrückt wird (Position
Ein) und grün leuchtet (siehe
Abbildung E). Diese Steckdosen
können auch eingeschaltet
werden, wenn die USV nicht mit
Netzspannung versorgt wird (Taster
LED 8 blinkt).
◗ Störung der Netzspannung:
Bei Ausfall oder Störung der
Netzspannung arbeitet die USV im
Batteriebetrieb weiter : der Taster 8
blinkt grün. Es ertönt alle 5 Sekunden
ein Warnsignal. Kurz vor Ablauf der
Batterieautonomiezeit verkürzt sich
das Tonintervall auf 2 Sekunden.
◗ Ist die Dauer des Netzausfalls länger
als die verfügbare Autonomiezeit,
schaltet die USV ab und muss bei
Netzrückkehr durch Drücken des
Tasters 8 neu gestartet werden.
Nach vollständiger Entladung sind
einige Stunden erforderlich, bis
die volle Autonomiezeit wieder zur
Verfügung steht.
◗ Werden im Batteriebetrieb die
gepufferten Verbraucher nicht
mehr benötigt, können diese zur
Einsparung der Batteriekapazität mit
dem Taster 8 abgeschaltet werden.
◗ Überspannungsschutz: Alles
Steckdosen der USV – gepufferte
wie ungepufferte – verfügen über
einen Überspannungsschutz, der
von der Schaltstellung des Tasters
8 unabhängig ist.
◗ Abschalten der gepufferten
Steckdosen 6 : Zum Abschalten
der Steckdosen den Taster 8 2
Sekunden drücken.
Betriebsbedingungen und
Entsorgung der Batterie
◗ Achtung: Bei einer Umgebungs-
temperatur über 25°C verringert
sich die Batterielebensdauer um
50% pro 10°C.
◗ Die Batterie darf nur von
hierfür qualifiziertem Personal
(Stromschlaggefahr) durch eine
von EATON autorisierte Batterie
ausgewechselt werden, um einen
einwandfreien Betriebs des Geräts zu
gewährleisten.
◗ Bei der Entsorgung der Batterie
müssen die zurzeit geltenden
gesetzlichen Vorschriften beachtet
werden. Zum Herausnehmen der
Batterie das Gerät ausschalten (Taster
8 erlischt), das Netzkabel 2 ziehen
und folgendermaßen vorgehen:
Auswechseln der Batterie
◗ Achtung: Beim Anschluss der
Batteriezellen würde ein
Vertauschen der Pole + (rot) und (schwarz) das Gerät beschädigen.
9
Fehlerbehebung (Weitere Informationen unter www.eaton.com oder bei Ihrem EATON-Kundendienst)
Problem Diagnostic Solution
1
◗ The battery backup outlets 6
are not supplied with power.
2
◗ The connected devices are not
supplied when AC power fails.
◗ Button 8 is not pressed.
◗ The devices are not connected to
the battery backup outlets 6 .
◗ Press button 8 and check that it
turns green.
◗ Connect the devices to the battery
backup outlets 6 .
DEUTSCH
3
◗ AC power is available, but
the UPS operates on battery
power.
4
◗ The ltered outlets 7 are not
supplied.
5
◗ Green button 8 ashes:
- frequently.
-every 5 seconds
-every 2 seconds
-continually and the audio
alarm beeps
6
◗ Green button 8 is on and the
audio alarm beeps every
1 second.
7
◗ Green button 8 is off and the
audio alarm beeps every
1 second.
8
◗ Green LED 9 is off
◗ The telephone line is
9
disturbed or modem
access is not possible.
◗ Circuit breaker 10 , has been
tripped by an overload on the UPS
output.
◗ The wall outlet is not supplied.
◗ Circuit breaker 10 , has been
tripped by an overload on the UPS
output.
◗ The UPS frequently operates on
battery power because the AC
power source is of poor quality
◗ The UPS operates on battery
power, beginning of battery backup
time
◗ The UPS operates on battery
power, end of battery backup time.
◗ The UPS battery backup outlets 6
are overloaded.
◗ The battery has reached the end of
its service life.
◗ A fault has occurred on the UPS.
The battery backup outlets 6 are
no longer supplied.
◗ Surge protection is no longer
provided.
◗ Surge protection on the telephone
line is no longer provided.
◗ Disconnect excess equipment
and reset the circuit breaker 10 by
pressing the corresponding button.
◗ Supply power to the wall outlet.
◗ Disconnect excess equipment
and reset the circuit breaker 10 by
pressing the corresponding button.
◗ Have the electrical installation
checked by a professional or use
another wall outlet.
◗ Disconnect excess equipment
connected to the battery backup
outlets 6 .
◗ Have the battery replaced.
◗ Call after-sales support.
◗ Call after-sales support.
◗ Disconnect the telephone line from
the wall outlet.
◗ Call after-sales support.
 Loading...