

Page 1

European Audio Team
INSTRUCTIONS FOR USE
EAT C-Sharp
Page 2

2
Dear Music Lover,
Welcome! Congratulations on your purchase of our EAT C-Sharp turntable. Your EAT C-Sharp
was hand-crafted by our team of skilled technicians. It has been tested rigorously and is
ready for your enjoyment.
Please take the time to read this manual carefully to ensure that you obtain the ultimate
performance from your EAT C-Sharp turntable. The tips contained within will ensure that
your C-Sharp will remain as-new condition for many years to come!
Your contribution to enviromental protection.
Disposal od packaging material:
Packaging protects the device from damage during the transportation. The packaging
materials were chosen with the regards to the enviromental protection and they are
therefore recyclable.
Disposal of old equipment:
For the disposal of old equipment use a junk place appointed for that purpose.
The device is shipped partially disassembled in order to avoid damage to sensitive parts.
Please, double-check immediately after receiving it if the packaging and the device were not
damage during the transportation.
If damaged please do not operate.
Warning of a hazard for the user, the unit or possible misuse.
!
Page 3

3
Contents
Describing pictures, part list 4-5
Set-up
1. Transport screws 5
2. Protective covers, sub-platter and drive belt instalation 5-6
3. Platter instalation 7-8
4. Tonearm assembly 8
a) Cartridge assembly 9
b) Counterweight assembly 9-10
c) Vertica tracking Force setting (VTF) 10-11
d) Tonearm output connection 11
e) Vertical Tracking Angle setting (VTA) 12
f) Azimuth setting 12-13
g) Anti-skatin assembly and adjustment 14-16
5. Turntable plane position 16
6. Starting the motor, changing the speed 17
Technical specifications 18
Waranty, service, troubleshooting 19
Page 4
4
Page 5

5
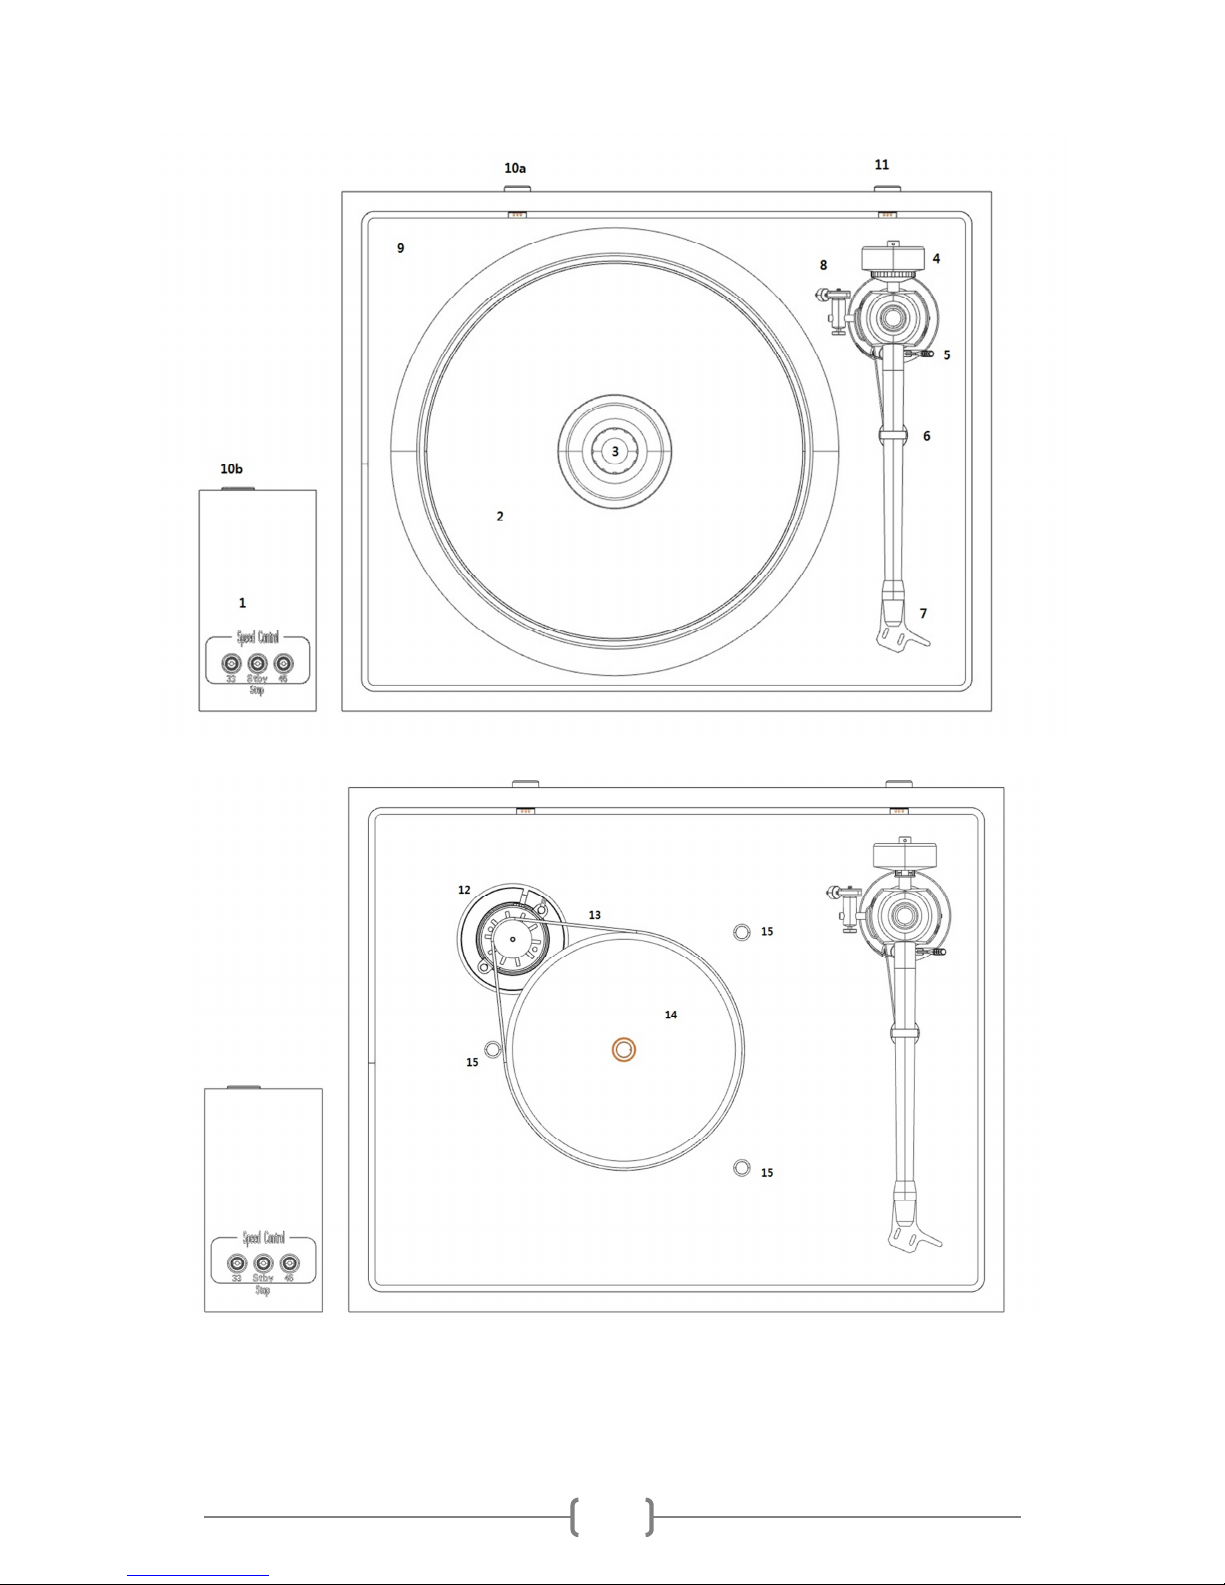
CONTROLS, FEATURES AND CONNECTIONS
1. Control panel with speed control
2. Platter with vinyl on the top
3. Screwable record clamp
4. Tonearm counterweight
5. Tonearm lift lever
6. Tonearm rest position
7. Headshell with finger lift
8. Anti-skating weight
9. Floating chassis
10. (a,b,) Connectors for speed control panel
11. 5-PIN tonearm output
12. Motor with motor pulley
13. Drive belt
14. Sub-platter
15. 3x Transport screws
16. Power supply connector
17. Damped adjustable feets
18. Sub-platter bearing shaft
Page 6
6
SETUP
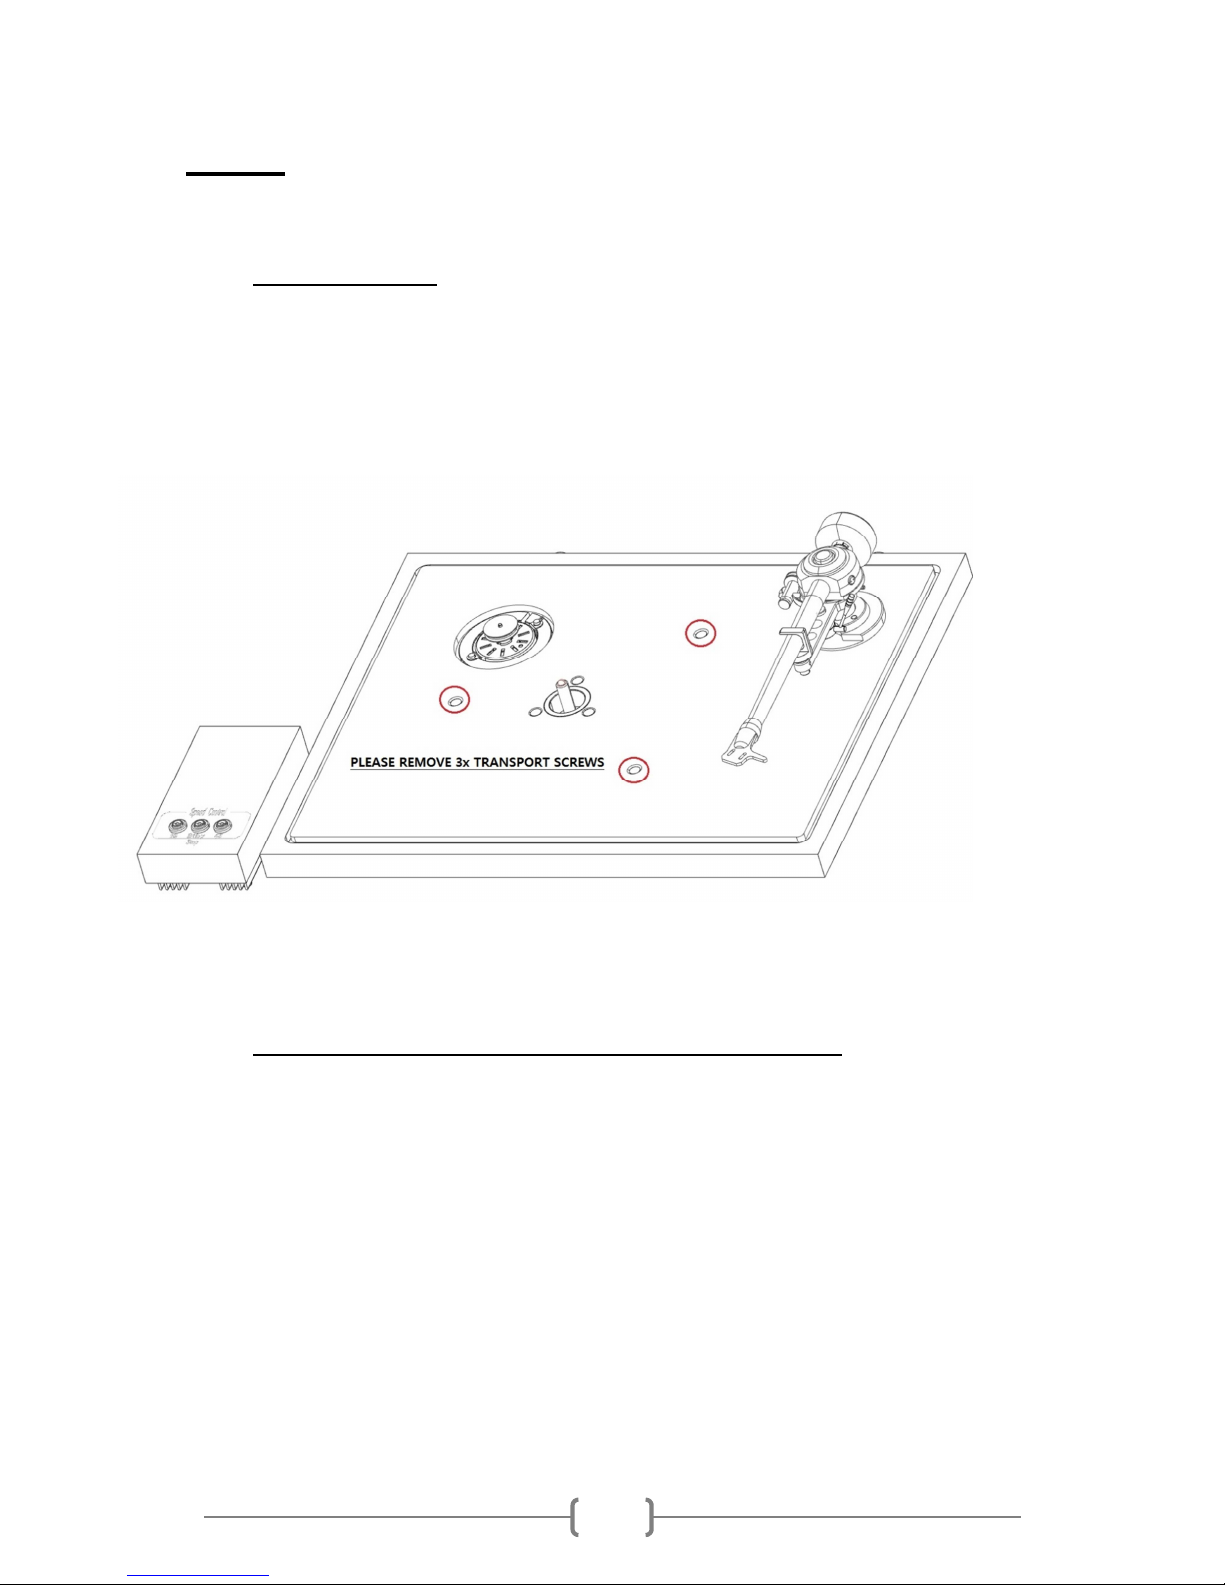
1. Transport screws
For the safe transport of the turntable with unique design where the motor and the tonearm
are mounted on a different part of floating chassis are used the transport screws (15).
Remove three transport screw from the carbon part of the chassis before installing the subplatter (14), the drive belt (13) and the platter (2).
2. Protective covers, sub-platter and drive belt instalation
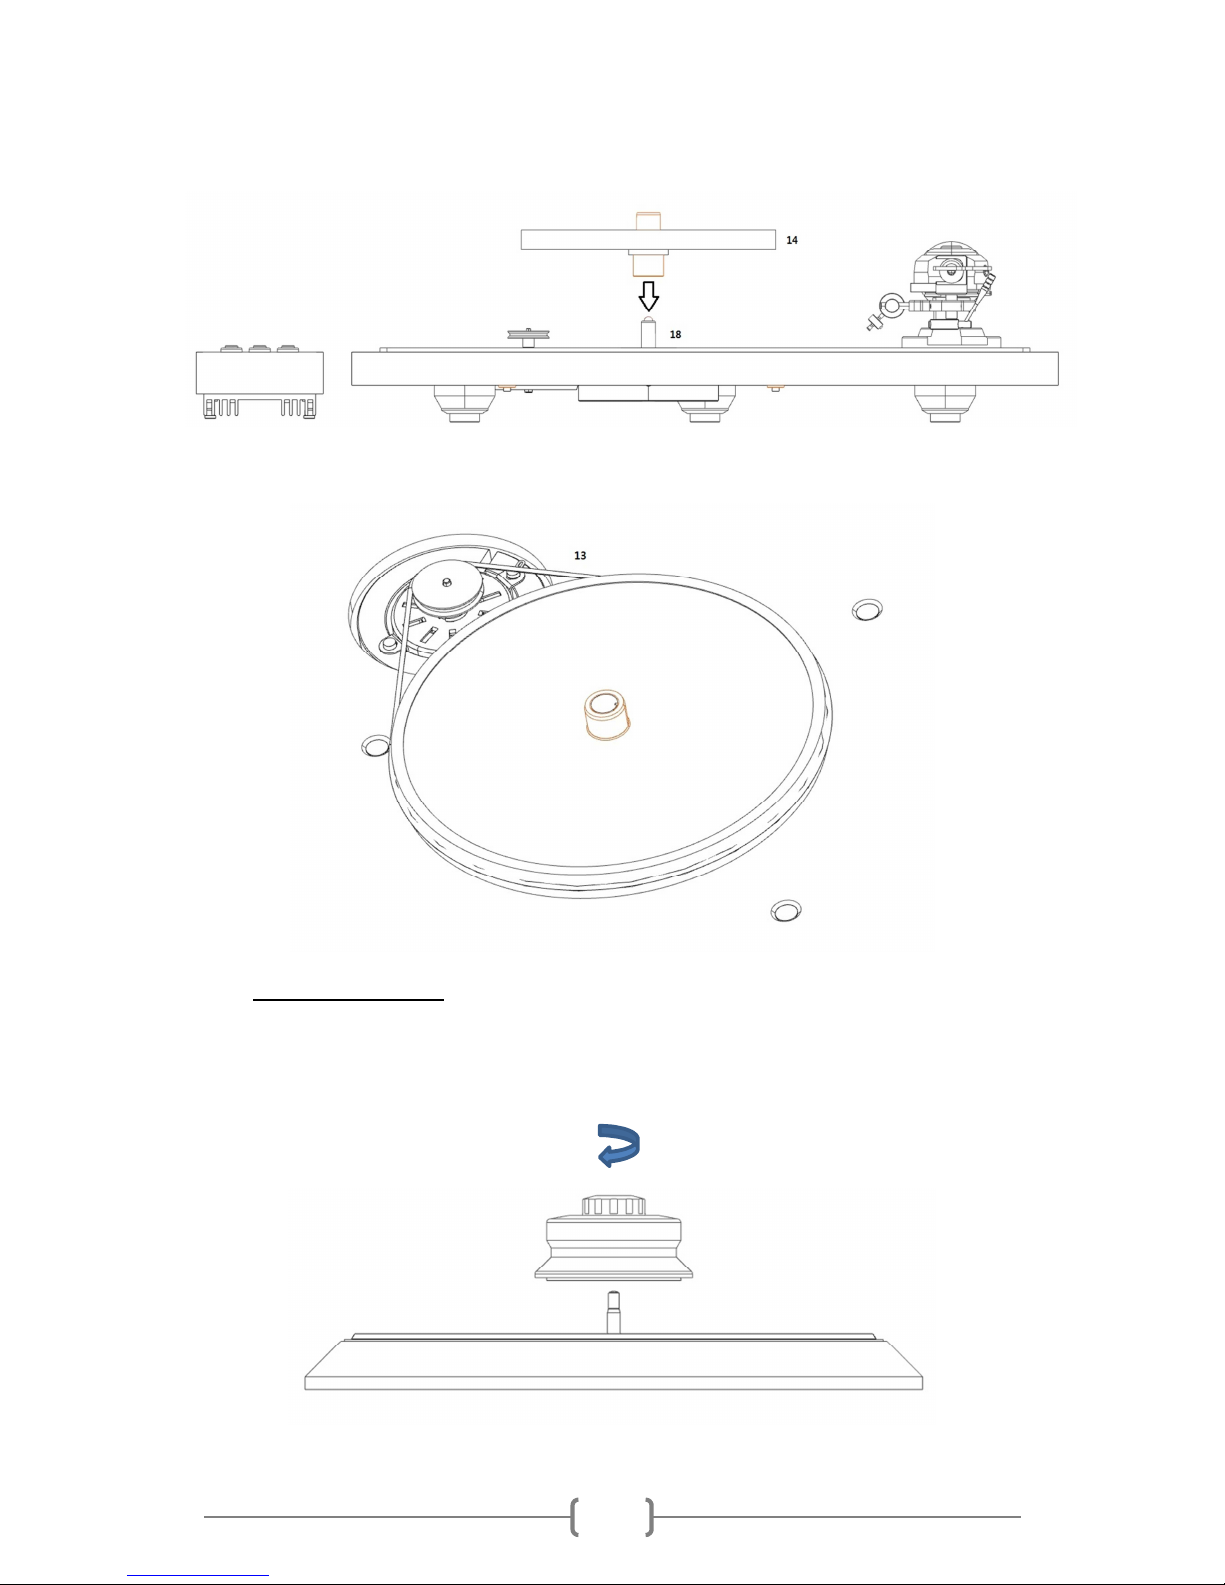
Main bearing shaft (18) and housing in the sub-platter (14) are covered by special plastic
protective covers. These covers serve as protection against dust and dirt and keeps the
bearing shaft and housing sufficiently lubricated. If necessary, lubricate the shaft with grease
from tha attached accessories. Maximum dose for greasing is 0,5ml. Deduct the quantity
from the scale on supplied syringe with grease.
Remove the protective covers from the main bearing shaft (18) and from the sub-platter
(14). Install the sub-platter and the drive belt as mentioned on the next pictures.
Page 7
7
3. Platter instalation
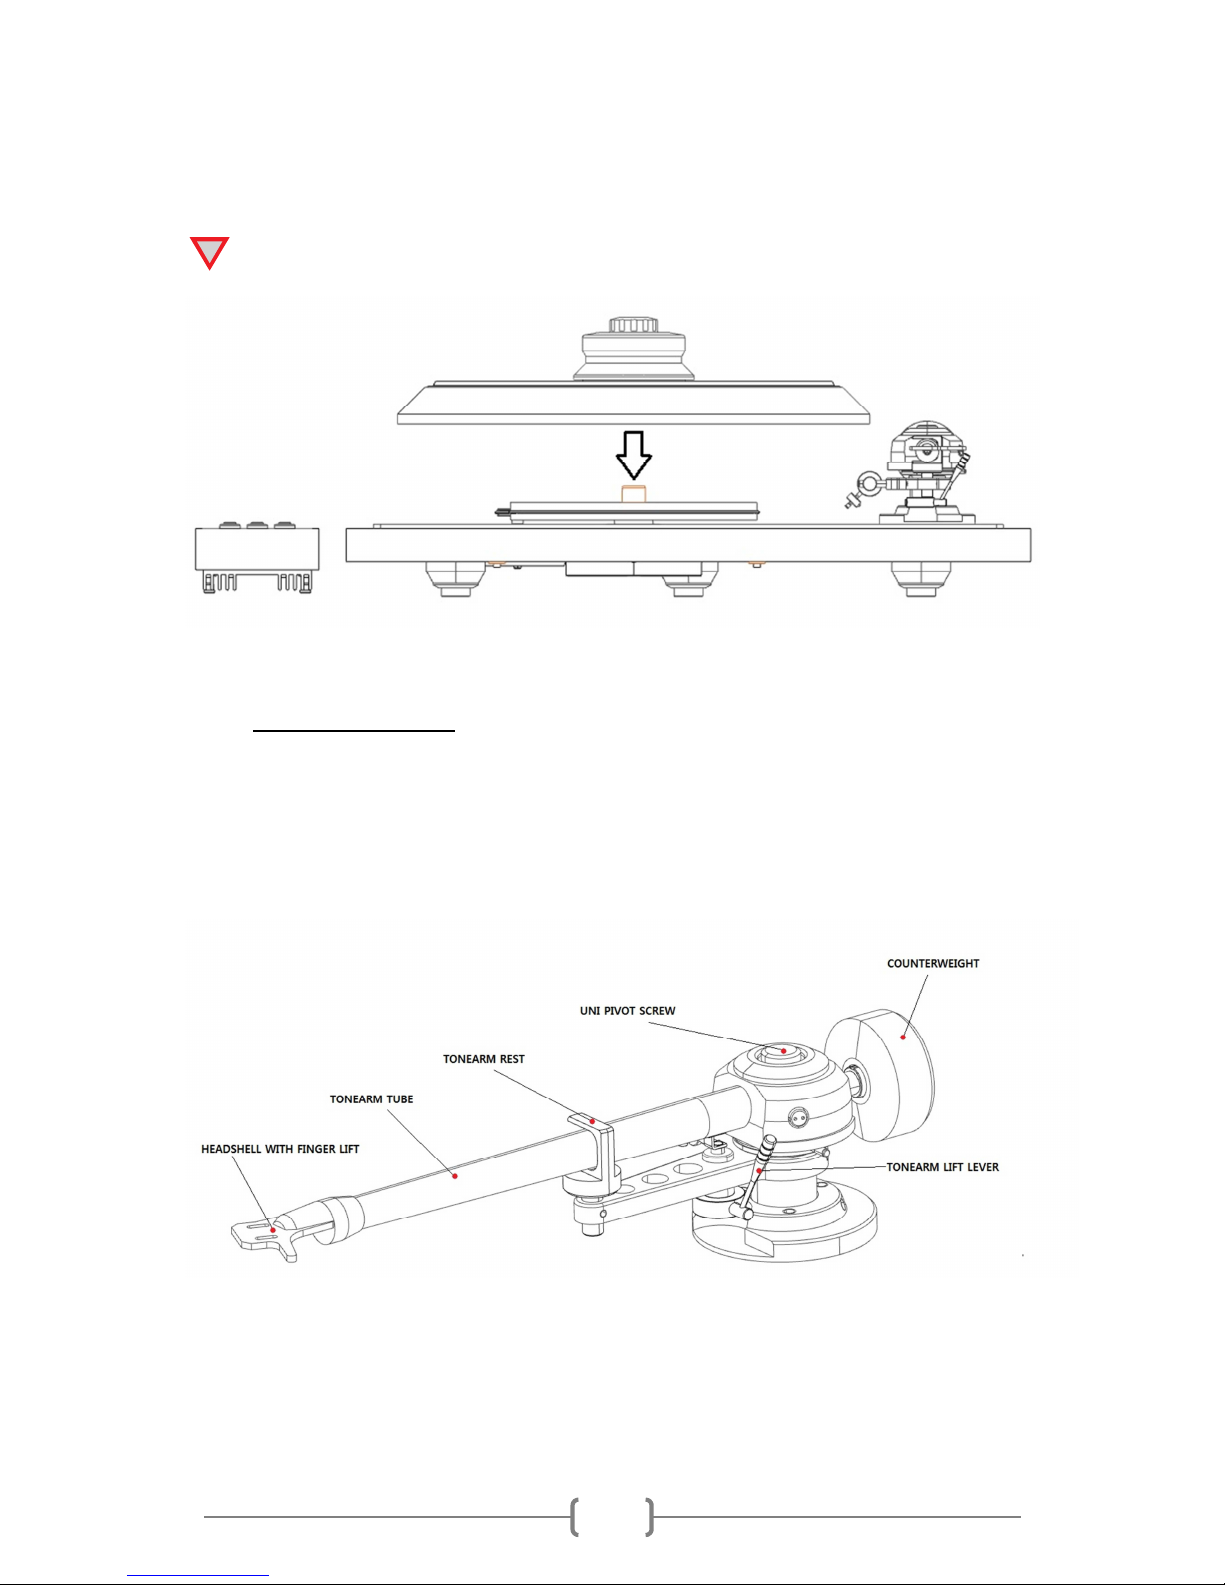
Tha platter (2) has a shaft with thread for screw-able Record Clapm (3). Before installing the
platter on the sub-platter, screw the Record Clamp onto the platter.
Page 8
8
After you successfully installed the Record Clamp on the platter, make sure that the Record
Clamp is holding firmly on the platter. Hold the Record Clamp when carefully centering the
platter onto the sub-platter.
NO GREASE BETWEEN SUB-PLATTER AND MAIN PLATTER
4. Tonearm assembly
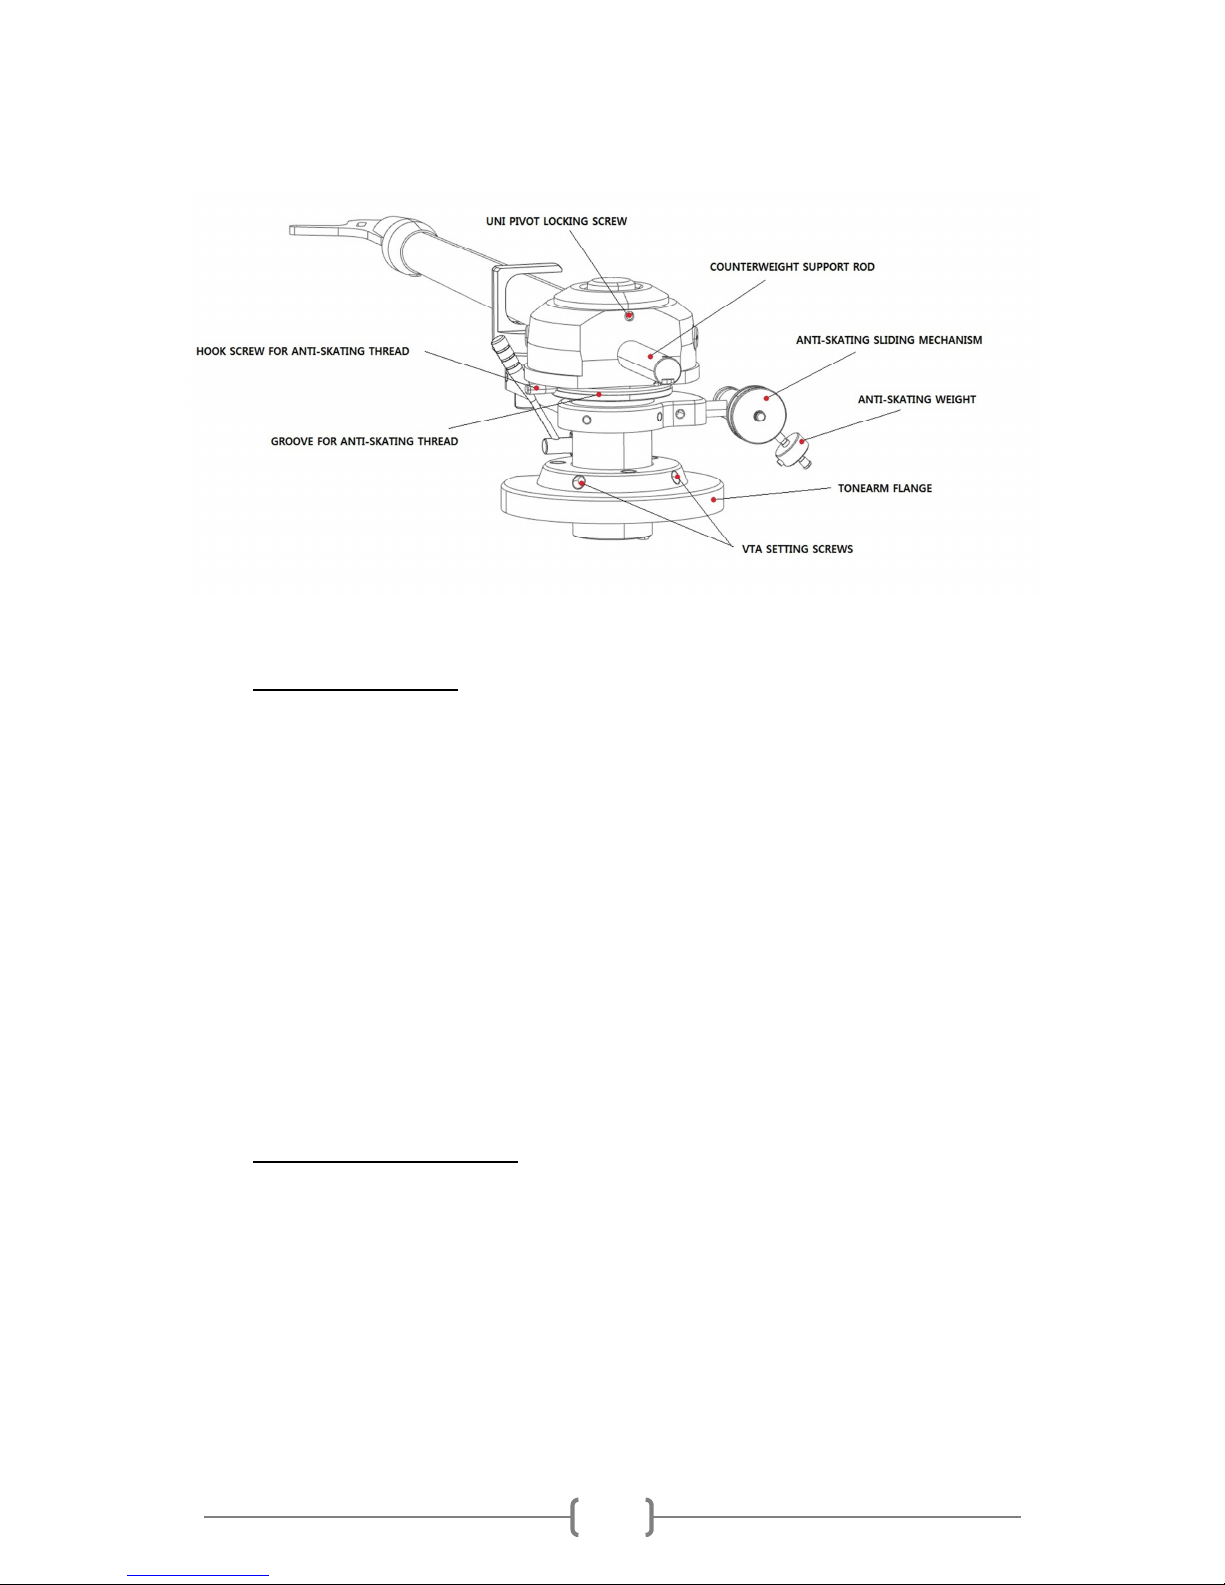
The tonearm is a combination of cardan bearings and as a special support is there also a uni
pivot tip which is submerged in special vaseline.
Setting of the tonearm will be described in next steps.
!
Page 9
9
a) Cartridge assembly
Install the cartridge into the aluminium headshell. Install screws that are part of the
cartridge box into the oval holes of the headshell and fix it into the cartridge holes from the
bottom side of the aluminium headshell.
Connect the cartridge as mentioned below:
• White left channel L+
• Red right channel R+
• Green right channel R-
• Blue left channel L-
For correct position of the cartridge, use the two point cartridge alignment protractor which
you find in the accessories.
b) Counterweight assembly
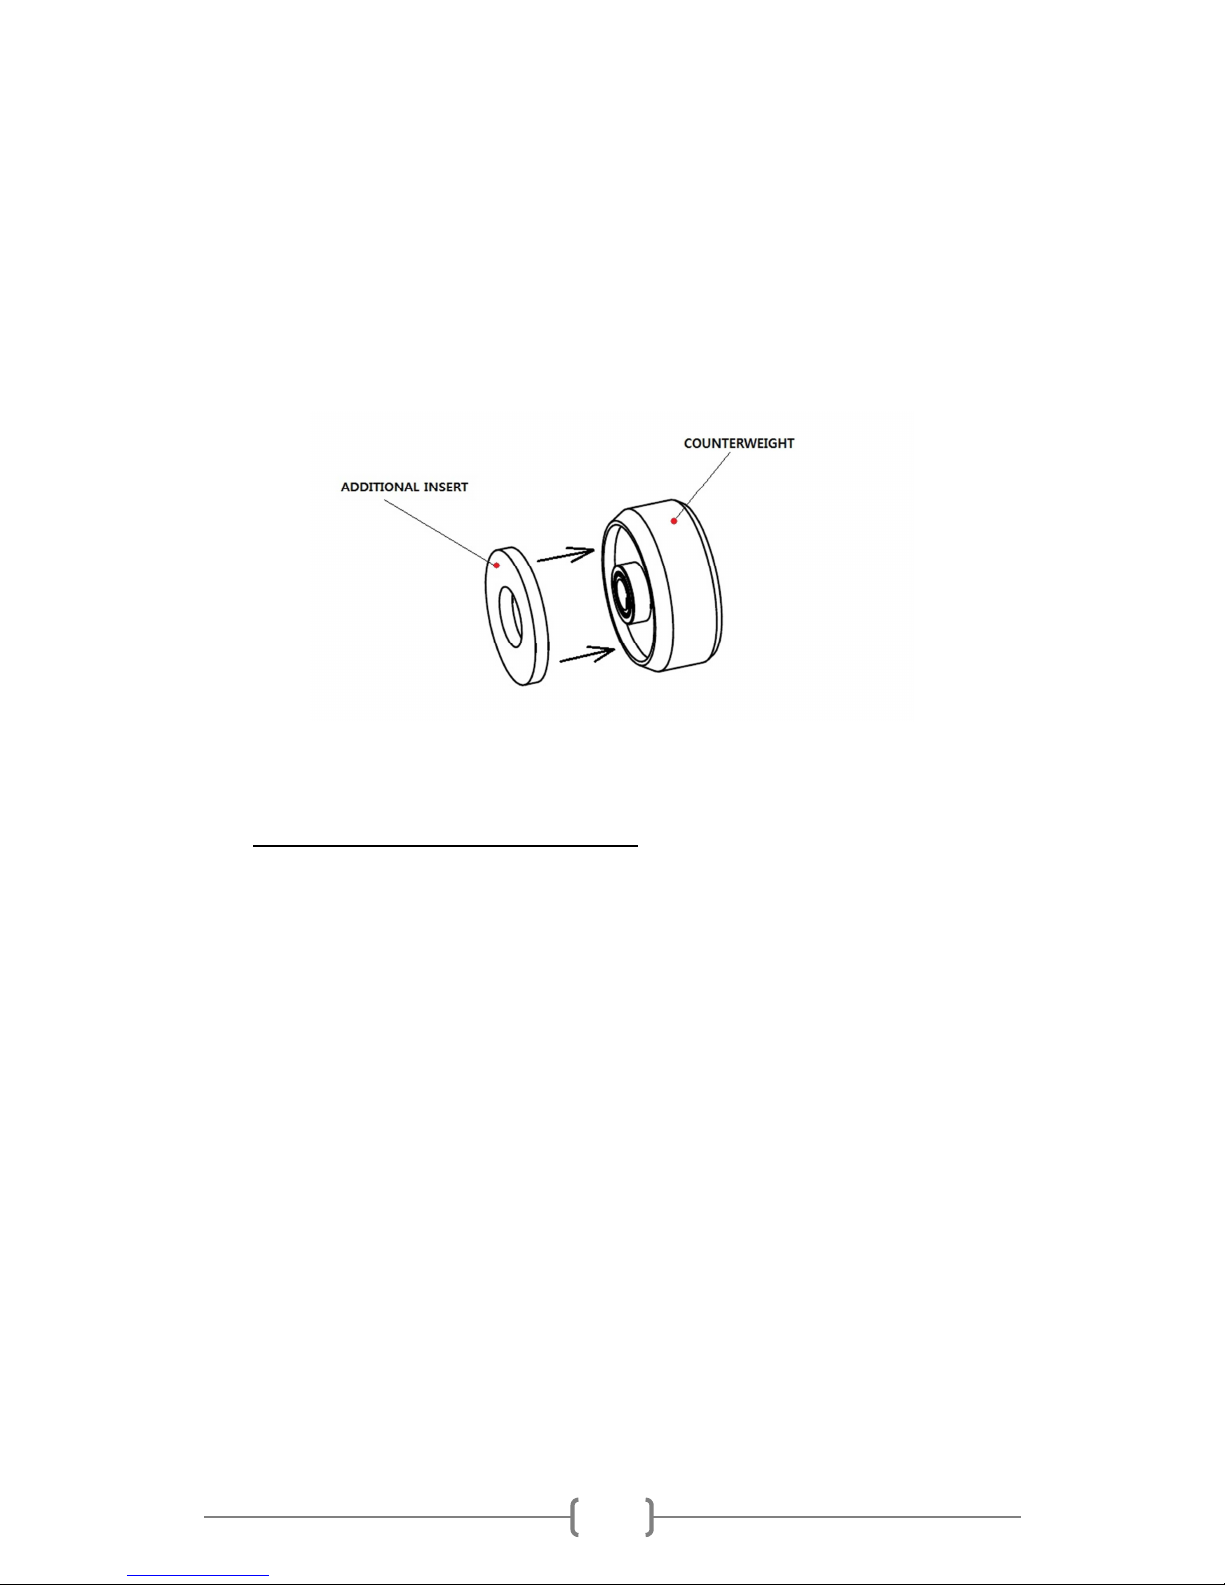
Supplied counterweight has special TPE (termo plastic elastomer) damping. This
counterweight has two separate parts.
First part is counterweight itself and second part is additional insert which allows to balance
heavier cartridges.
Page 10
10
Counterweight without additional insert can balance cartridges from 5 to 9g.
Weight of the counterweight itself is 125g.
Counterweight with additional insert can balance cartridges from 8,5 to 13g.
Weight of the counterweight with additional insert is 142g.
c) Vertical Tracking Force setting (VTF)
Before setting the Vertical Tracing Force, check out the exact weight of your cartridge.
Depending on the weight of your cartridge, choose the counterweight with or without
additional insert as is mentioned on page 9.
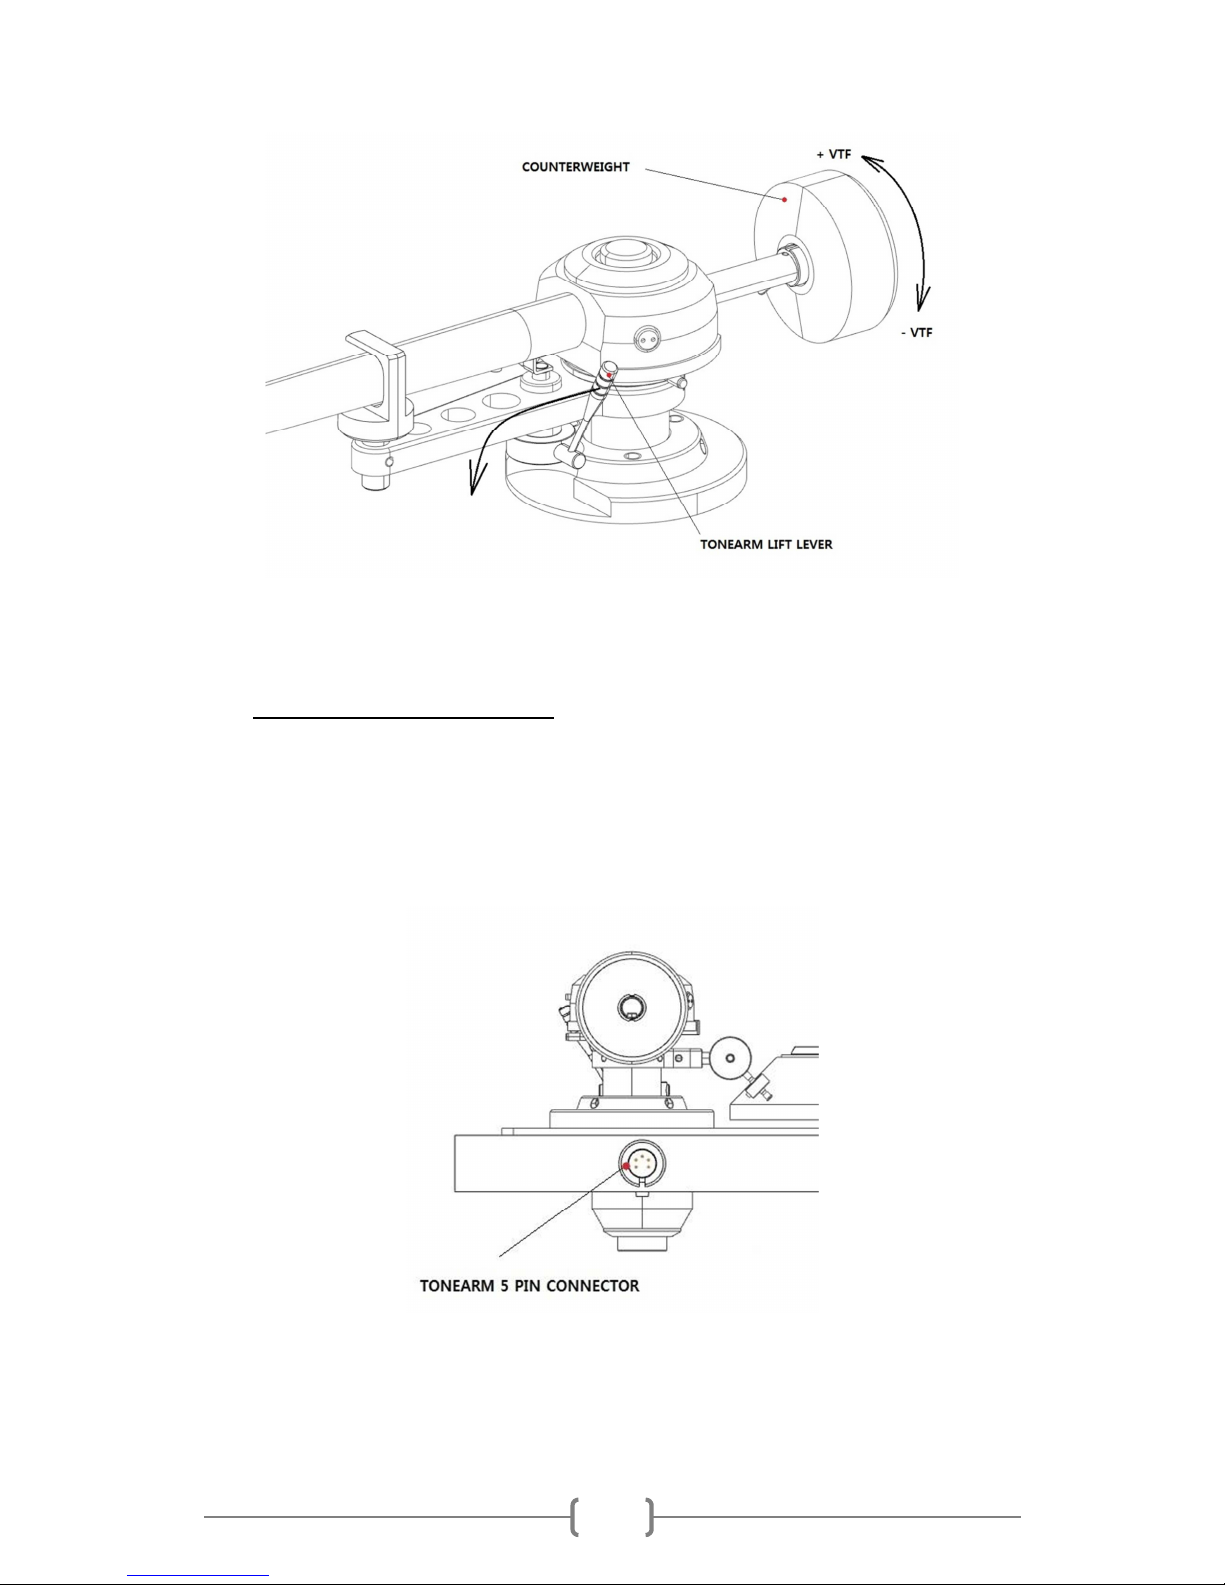
Pushing carefully, turn the counterweight (4) onto the rear end of the counterweight
support rod. Place the styus pressure gauge onto the platter. To set the required VTF, lower
the tonearm lift as mentioned on the picture and place the tip of the stylus on the pressure
gauge.
Turning the counterweight counterclockwise (towards to the tonearm) increases the VTF,
turning clockwise (away from the tonearm) reduce the VTF.
Page 11
11
d) Tonearm output connection
Connect the cable from the accessories to the connector which is located on the rear side of
the turntable behind the tonearm. Keep the right position of the connector!
Page 12
12
e) Vertical Tracking Angle settings (VTA)
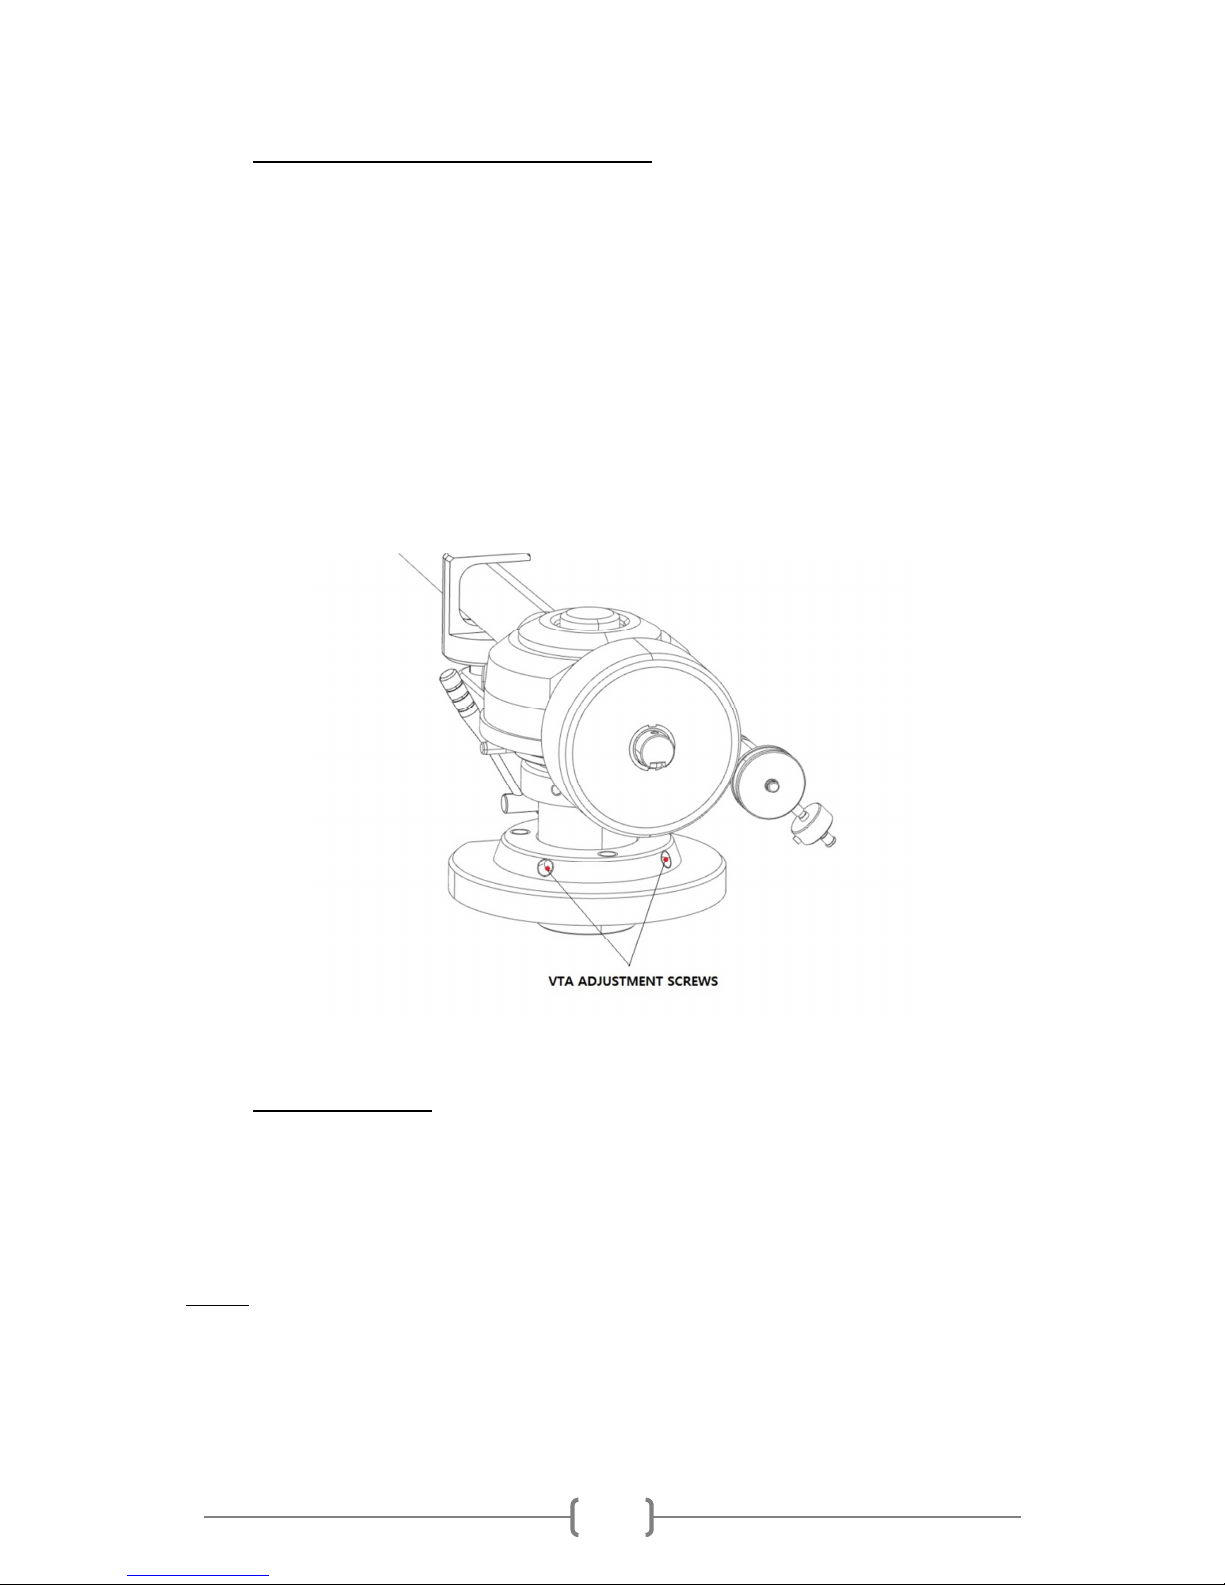
Put a record on the platter. When the needle is lowered into the record groove and the
tonearm is not resting on the tonearm rest, the tube of the tonerm should be parallel to the
surface of the record. If i tis not, loosen both hexagonal screws in the tonearm base just
enought to allow vertical movement of the arm pillar without force and slide the arm up or
down until i tis parallel.
Carefully retighten the hexagon screws without applying excessive force (which would
deform the arm pillar).
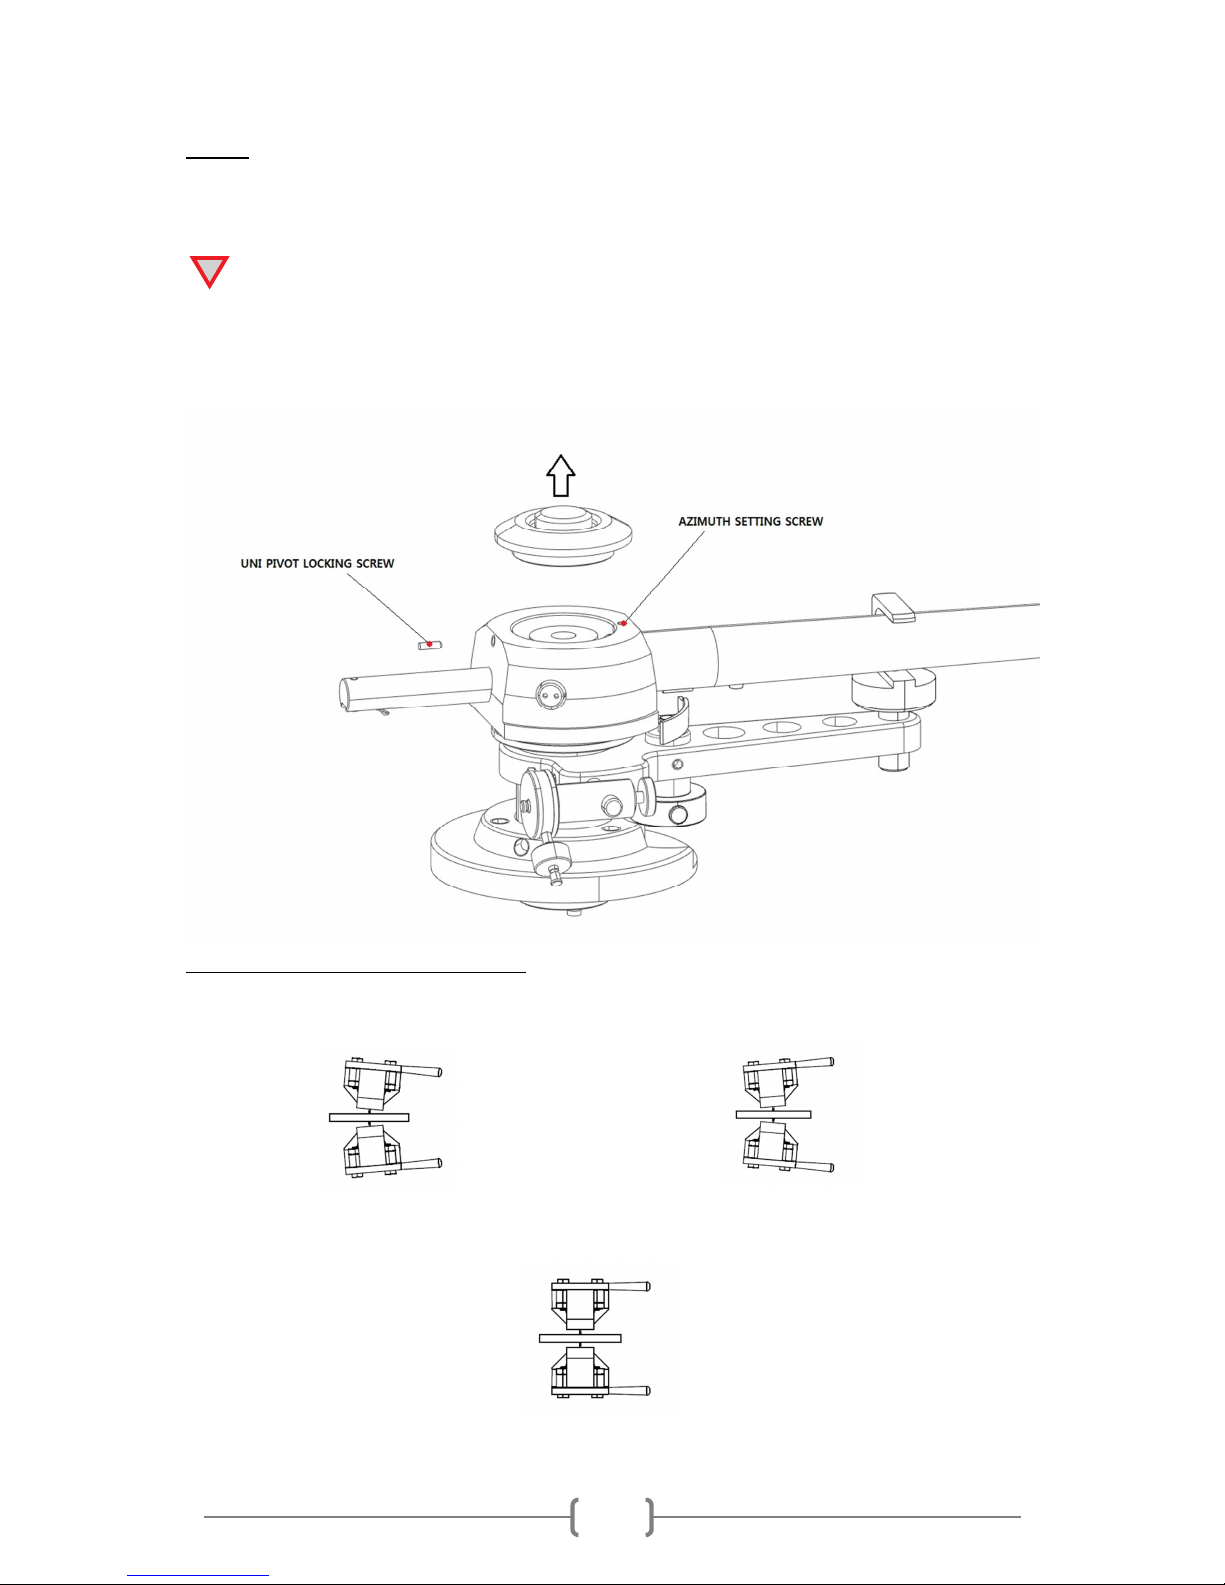
f) Azimuth settings
The cartridge needle must be vertical in the record groove in order to trace the groove wall
modulations correctly.
The azimut his precisely set from the factory. In case that you need to modify this setting,
follow instructions bellow.
Step 1:
Unscrew small UNI PIVOT LOCKING SCREW by 1,5mm hexagonal key from supplied
accessories. Then carefully lift the UNI PIVOT cover together with UNI PIVOT screw and place
in a safe and clean place.
Page 13
13
Step 2:
Unscrew small AZIMUTH SETTING SCREW by 1,5mm hexagonal key from supplied
accessories.
NOTE! DO NOT REMOVE THE SCREW COMPLETELY!
Slacken off the screw just enough to be able to revolve the arm tube without applying force
and set the azimuth to the correct possition. Correct position can be checked from the front
view, preferably with needle placed on a mirror which is placed on platter.
Examples of incorrect azimuth setup:
Too much left angle:
Too much right angle:
The correct position is 100% perpendicular to the record.
!
Page 14
14
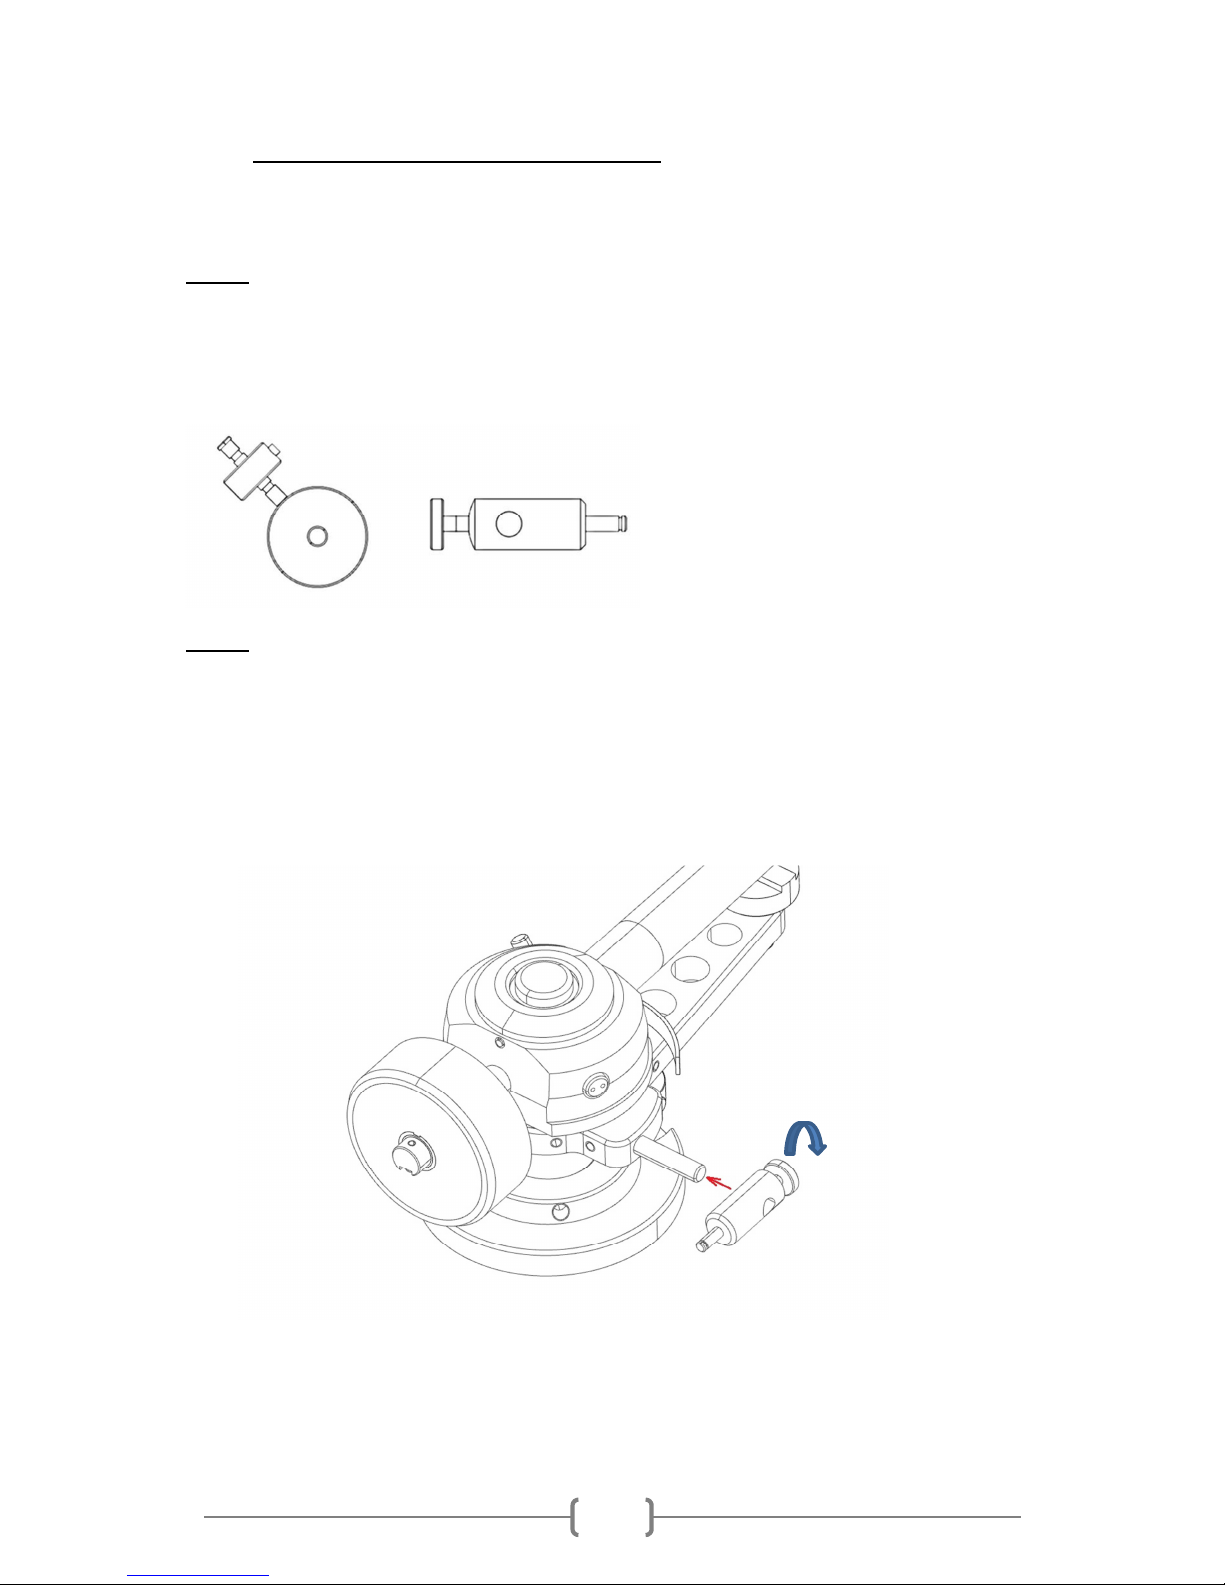
g) Anti-skating assembly and adjustment
Anti-skating mechanism is supplied partially disassembled to avoid damage during transport.
For exact installation please follow next steps described below.
Step 1:
Prepare all parts supplied from the accessories bag.
Anti-skating sliding mechanism with anti-skating weight and thread for mounting on the
tonearm and anti-skating support rod.
Step 2:
Put the anti-skating support rod in the middle of the shaft which is rigidly mounted on the
tonearm as is mentioned on the picture below. Then tighten the screw to prevent
movement on the shaft.
Page 15
15
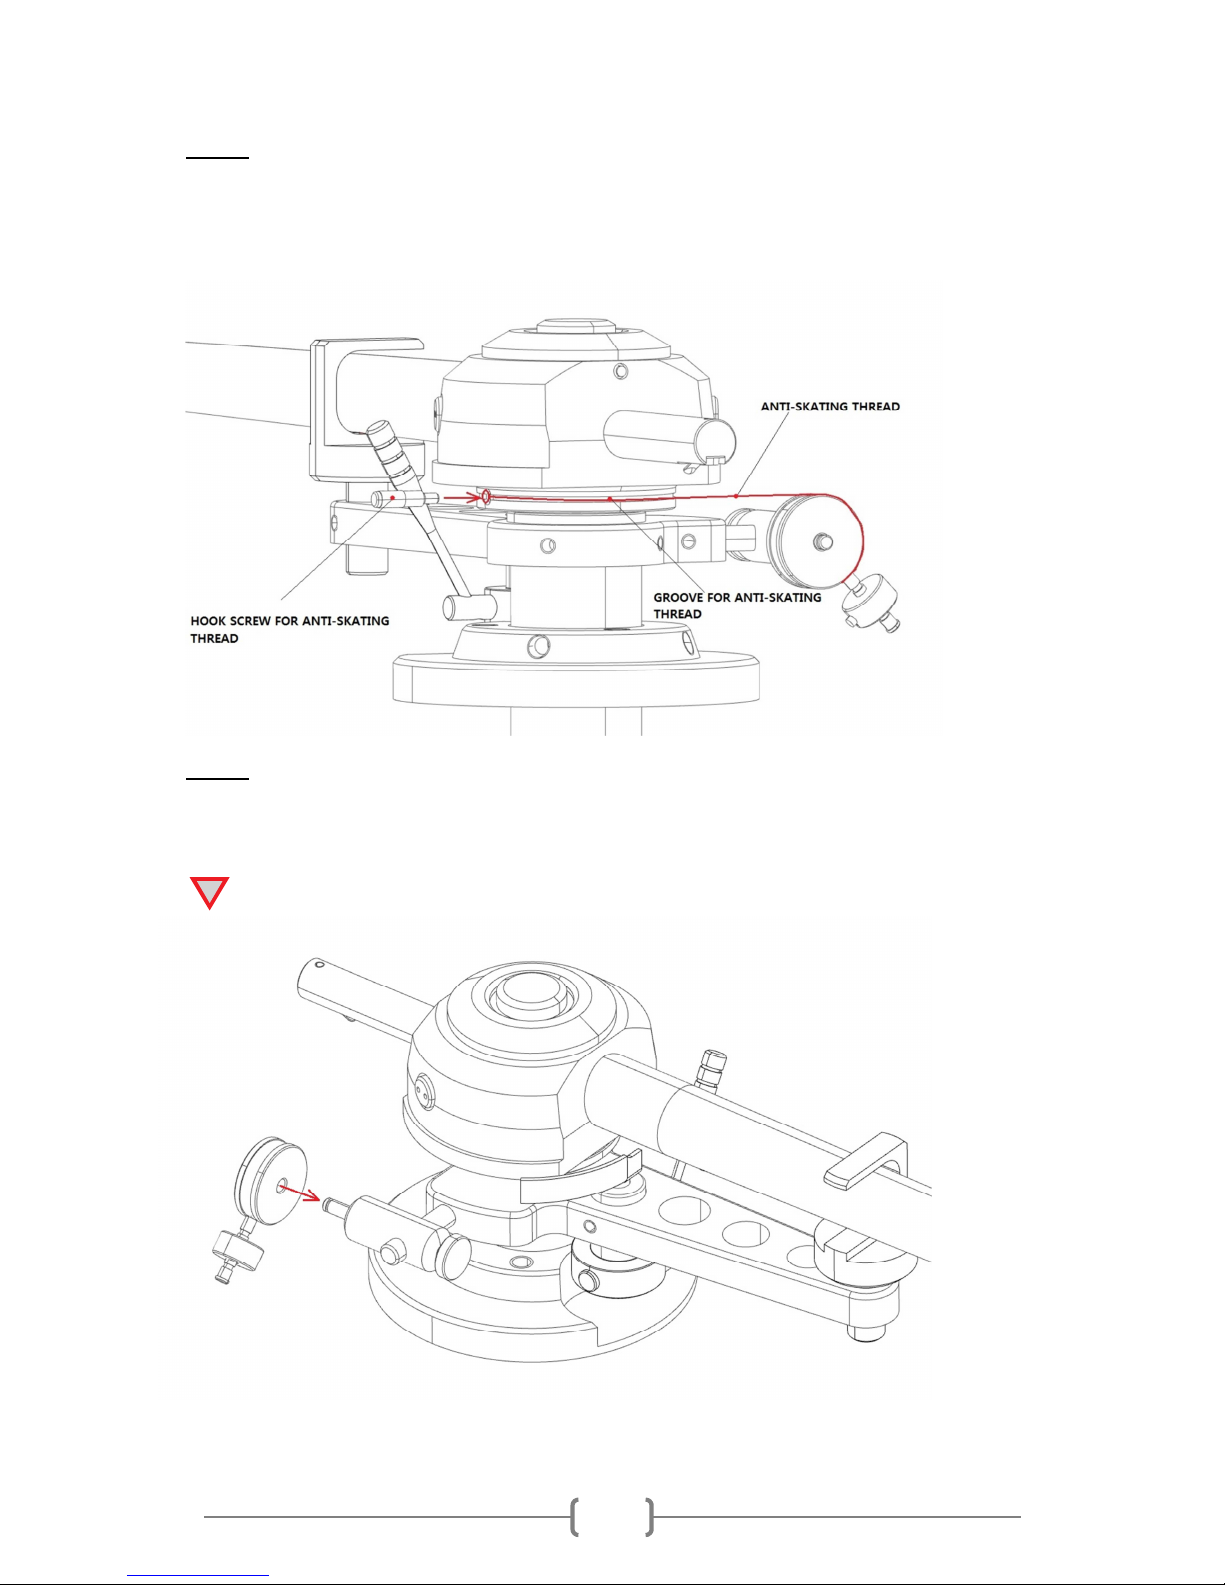
Step 3:
Anti-skating sliding mechanism is supplied with mounted anti-skating weight and also with
anti-skating thread. Put the eye of the anti-skating thread onto the hole for HOOK SCREW
and screw the HOOK SCREW into the tonearm as is mentioned on the picture below.
Step 4:
Put the anti-skating mechanism to the end of anti-skating support rod. Anti-skating thread
should fit into the groove in the tonearm.
Be careful, there is a danger to rip off thread by tensile force.
!
Page 16
16
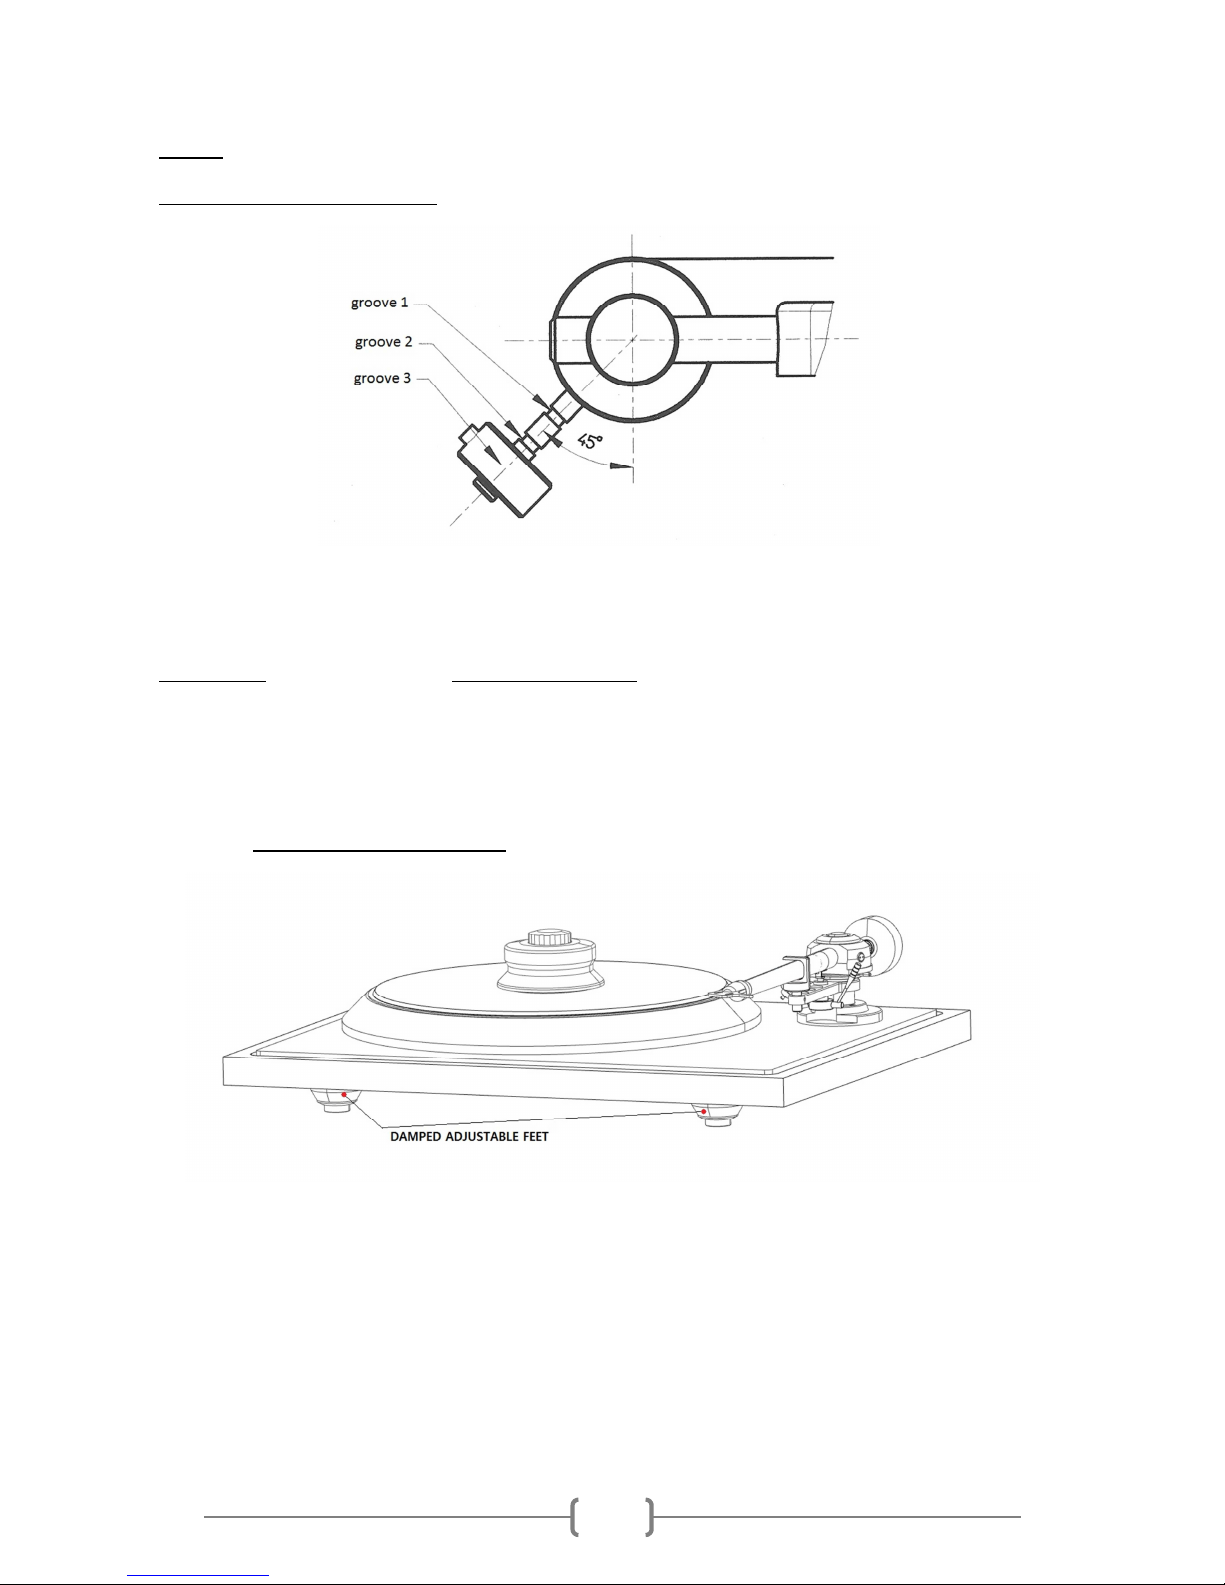
Step 5:
Anti-skating force adjustment:
Anti-skating downforce must be adjusted corresponding to the downforce as follows:
Downforce: Anti-skating groove:
Lower than 13mN 1
st
from bearing rings
13 - 18 mN 2nd from bearing rings
18 - 25mN 3rd from bearing ring
5. Turntable level position
On the turntable are mounted three precision adjustable damped feets for perfect setting of
the turntable plane. Put the spirit level on the carbon top plate balance the turntable by
screwing / unscrewing the feets . Check the plane from several perspectives.
Page 17
17
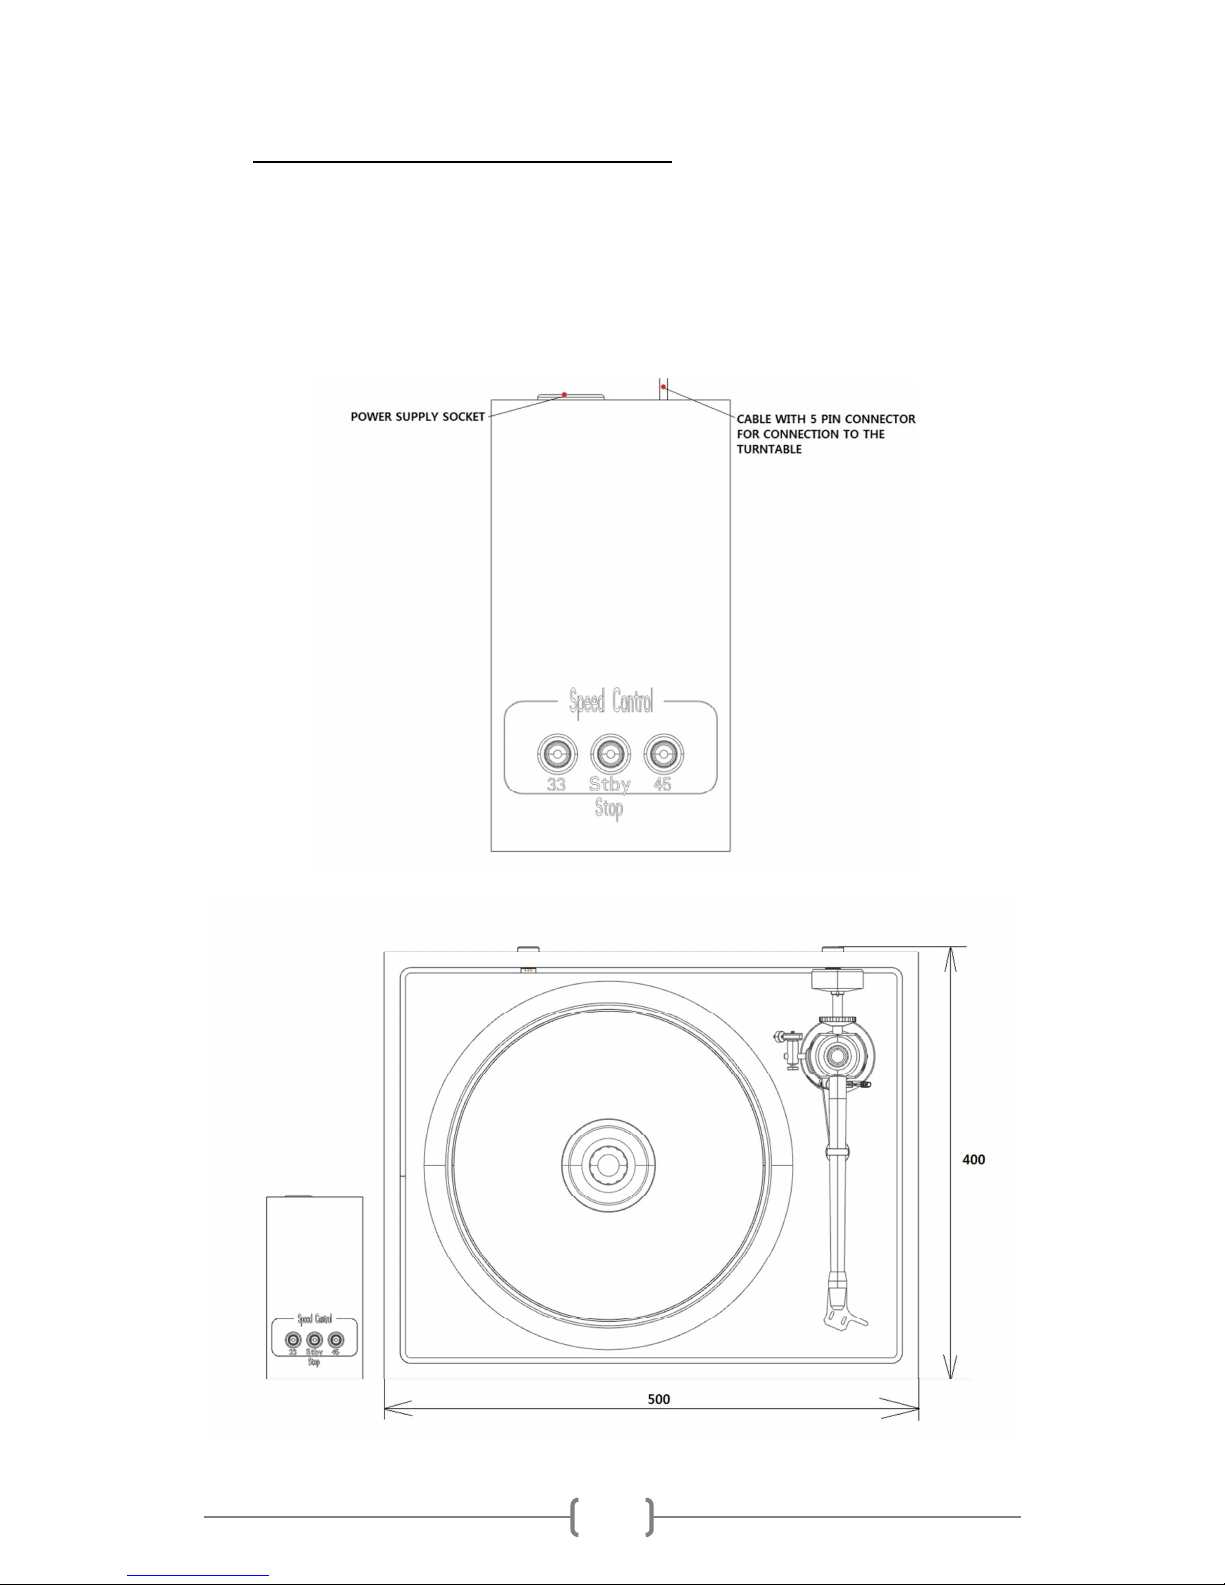
6. Starting the motor, changing the speed
Control of the turntable is performed by external control panel. Press button with 33 r.p.m.
to start the turntable. For cgange the speed from 33 r.p.m. to 45 r.p.m., press button with
45 r.p.m.
To swith turntable back to STAND BY mode, please press button Stby.
Page 18

18
7. Technical Specifications EAT C-Sharp
Model
C-Sharp
Modell
Nominal speed
33/45 rpm, driven by microprocessor,
separate control panel, lighted control
buttons
Geschwindigkeiten
Speed Variance
33rpm: ± < 0,08%, 45rpm: ± < 0,09%
Drehzahlabweichung
Signal to noise
S/N Ratio ( mechanical noise): - 40 dB,
Signal to noise (electrical noise): -70dB
Rumpeln
Downforce range
0 - 30 mN
Möglicher Auflagedruck
Supplied counterweights
without additional insert → for cartridge
5 - 9g (125g), with additional insert →
for cartridge 8,5 - 13g (142g)
Mitgeliefertes Gegengewichts
Effective tonearm mass
16,5g
Effektive Masse des Tonarmes
Effective tonearm lenght
254mm
Effektive Länge des tonarmes
Overhang
16mm
Überhang
Power consumption
8,5 W max/ 0,5W stanby
Leistunggsaufnahme
Voltage
Universal swith mode power supply 15V
DC/1,6 A, 90-264 V AC, 47 - 63Hz
Betriebsspannung
Dimensions (W x H x D)
500 x 400 x 115mm without connectors,
500 x 435 x 115mm with connectors in
the rear panel
Masse (B x H x T)
Weight (without box)
13,5kg + 0,5kg Separated control panel
Gewicht (ohne Verpackung)
Page 19

19
Potential incorrect use and fault conditions
EAT turntables are manufactured to the highest standards and undergo strict quality controls before
leaving the factory. Faults that may possibly occur are not necessarily due to material or production
faults but can sometimes be caused by incorrect use or unfortunate circumstances. Therefore the
following list of common fault symptoms is included.
The platter doesn’t turn although the unit is switched on:
The unit is not connected to the mains power supply.
No mains at the socket.
Drive belt is not fitted or has slipped off.
No signal through one or other channel or both channels:
No signal contact from the cartridge to the internal tonearm wiring or from that to the arm lead or
from that to the phono box or between that and the amplifier. This could be due to a faulty plug,
broken wire or solder joint loose plug/socket connection.
Phono input not selected at amplifier.
Amplifier not switched on.
Amplifier or speakers are defective or muted.
No connection to the loudspeakers.
Strong hum on phono input:
No earth connection from cartridge or arm or arm cable to amplifier, or earth loop.
Distorted or inconsistent sound from one or both channels:
Record player is connected to wrong input of amplifier, or MM/MC switch incorrectly set.
Needle or cantilever damaged.
Wrong r.p.m., drive belt overstretched or dirty, platter bearing without oil, dirty or damaged.
Service
Should you encounter a problem which you are not able to alleviate or identify despite the above
informations, please contact your dealer for further advice. Only when the problem cannot be
resolved there should the unit be sent to the responsible distributor in your country.
Guarantee repairs will only be effected if the unit is returned correctly packaged. For this reason we
recommend keeping the original packaging.
Never return a record player without making sure that is it safety disassembled and correctly
packaged in the original packaging according to the supplied diagram. Please remove these parts and
pack them separately:
feet, counterweight, platter, cartridge and belt. Fit the cartridge protection cap. Insert the transport
lock for the tonearm prior to carefully packaging the record player.
Warranty
The manufactured accepts no responsibility for damage caused by not adhering to these instructions
for use and/or by transportation without the original packaging. Modification or change to any part
of the product by unauthorized persons release the manufacturer from any liability over and above
the lawful rights of the customer.
The information was correct at the time of going
EAT European Audio Team is a Registred Trademark to press. The manufacturer reserves the right to of
Jozefina Lichtenegger. make changes to the technical specification
This guide was produced by: EAT European Audio Team without prior notice as deemed necessary to
Copyright © 2015. All rights reserved. uphold the ongoing process of technical
development.
 Loading...