

Easy Touch ET-47608 Instruction Manual
ENGLISH
6.54+(551)*36)*8)*8=62'?+8^='::9
ET-47608
INSTRUCTION MANUAL
Car Stereo CD/CDR/CDRW/MP3 Player
with PLL FM Stereo Radio
Radio Data System with PTY
USB / MMC / SD Card Input
Bluetooth Function in Phone Mode
Flip Down and Detachable Front Panel System

- 2 -
E2
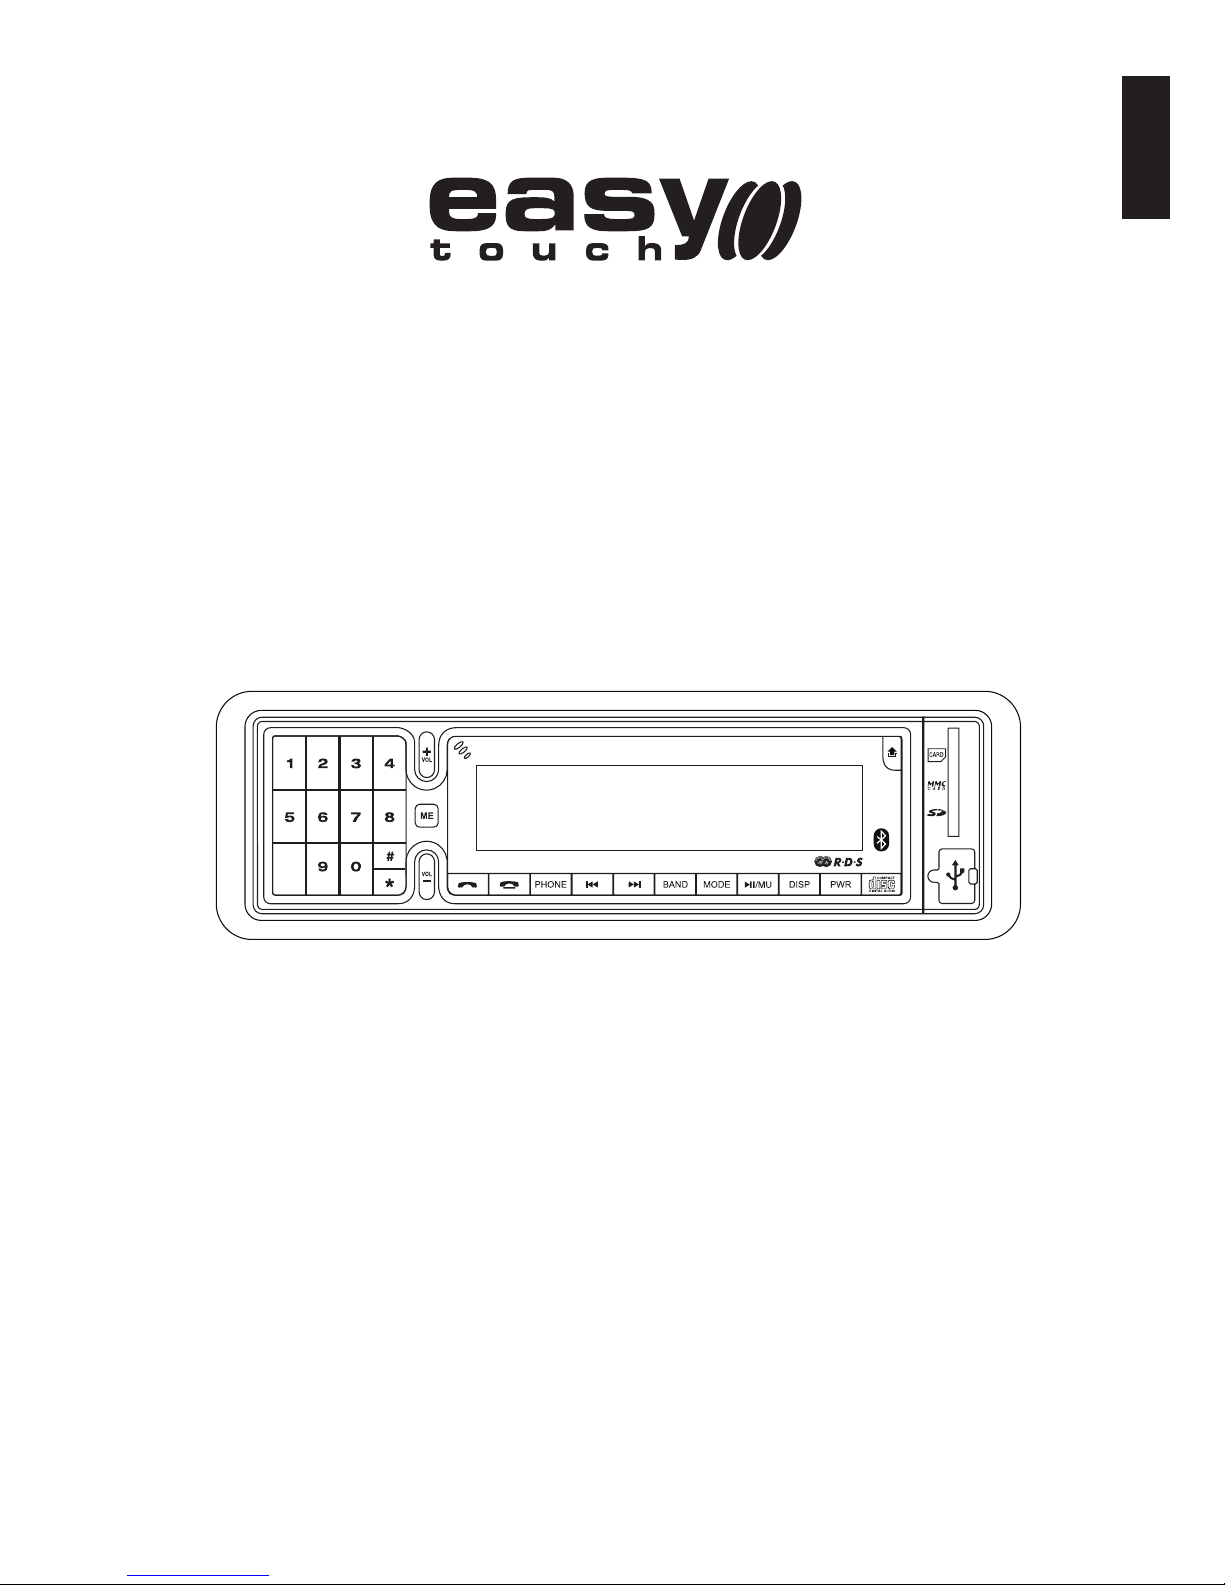
LOCATION OF PARTS AND CONTROLS
1. POWER ON/OFF (PWR)
2. FUNCTION SELECT/VOLUME BUTTON:
BASS/TREBLE/FADER/BALANCE/
EQUALIZER/LOUDNESS/SPOKEN MENU/BEEP
(VOL +/VOL -)
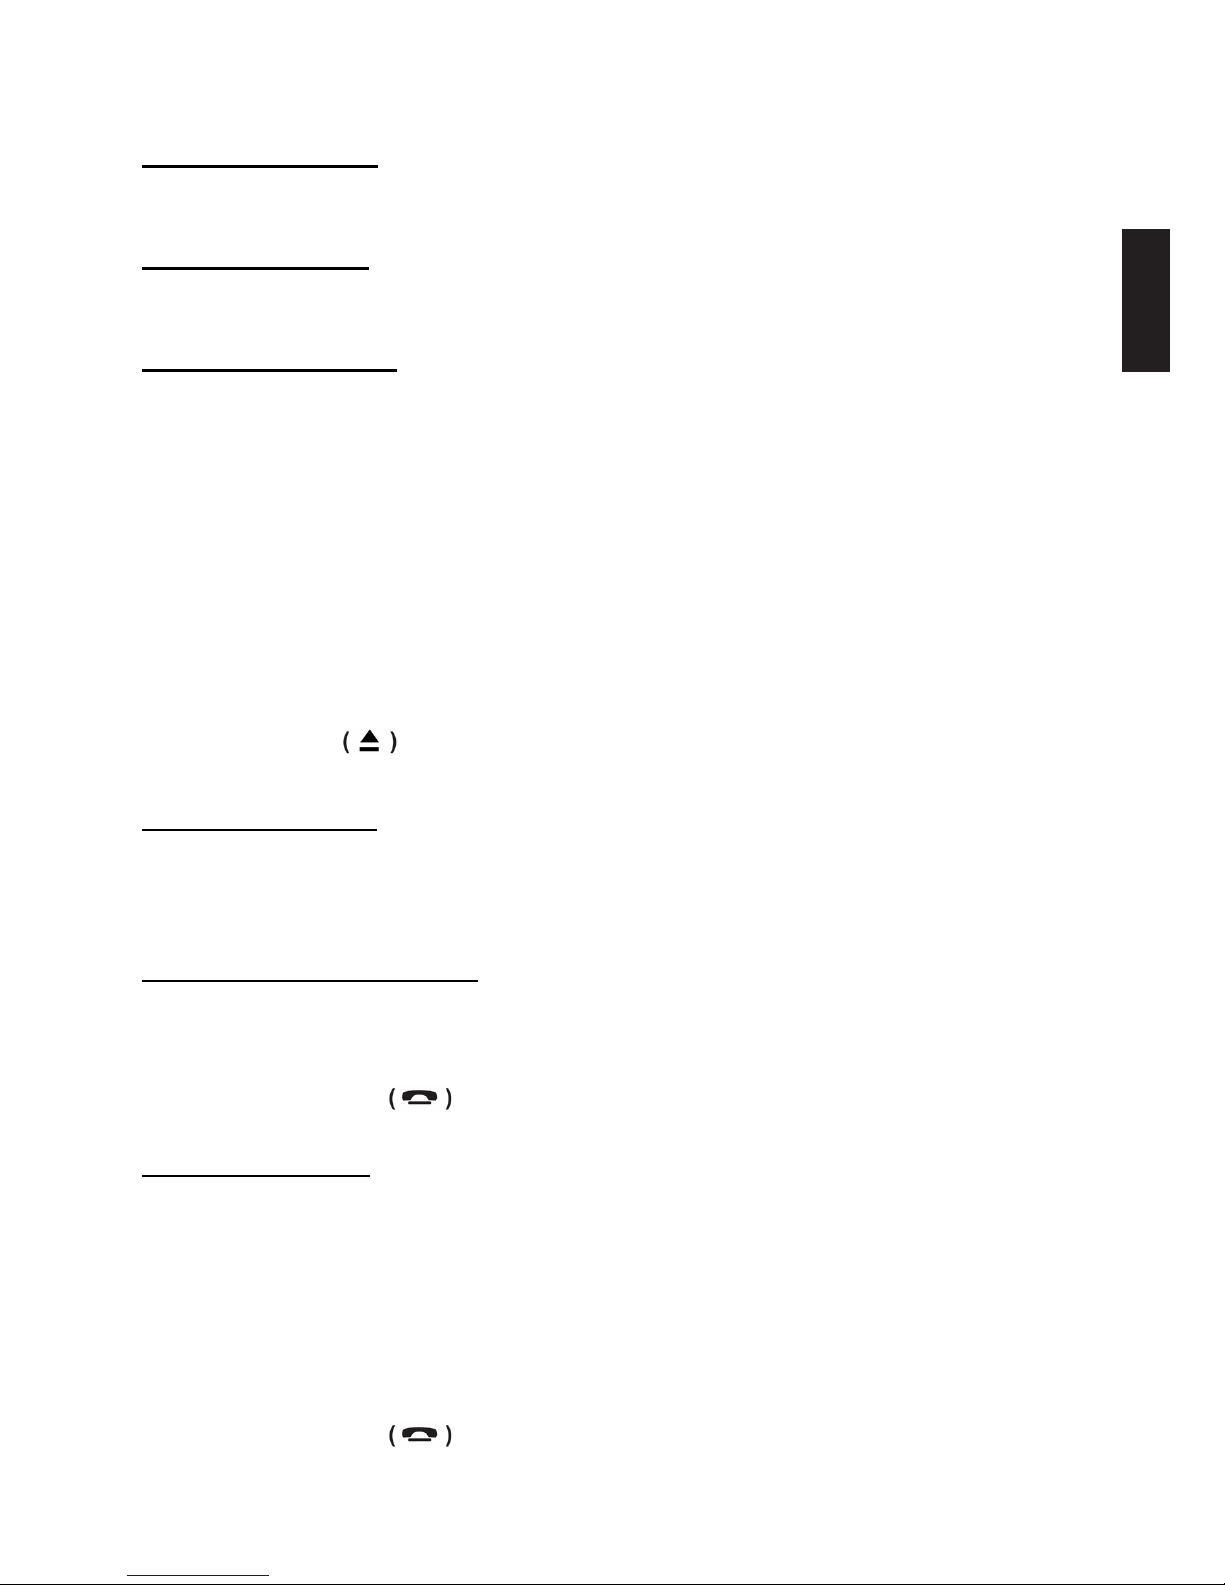
3. END A CALL / EXIT SETTING ( )
4. MODE BUTTON (MODE)
5. BAND BUTTON (BAND)
6. AUTOMATIC OR MANUAL TUNING
(FREQ UP OR FREQ DOWN )/
CD TRACK/SEARCH BUTTON
7. DISPLAY BUTTON (DISP)
8. ANSWER A CALL ( )
9. PHONE MODE (PHONE)
10. MENU / SELECT (ME)
11. PHONE NUMBER
12. LCD DISPLAY
13. OPEN PANEL BUTTON ( )
14. PLAY BUTTON ( )
15. CD SLOT
16. CD EJECT BUTTON ( )
17. USB PORT
18. MULTI-MEDIA CARD (MMC) / SD CARD SLOT
1516
6.54+(551)*36)*8)*8=62'?+8^='::9
11
8 3 9 5 4 14 7 1 176
13 1812102
4
1 8 32
6
11
10 5 14
3
POWER
PLAY
*
2
1
4 76
5
9
SEL
#
MODE
M/UP
VOL
VOL
TUNE/SEEK
T/MODE
BAND
0
8
- 3 -
ENGLISH
E3
53mm
182mm
3
2
182mm
53mm
1
2
1
3
4
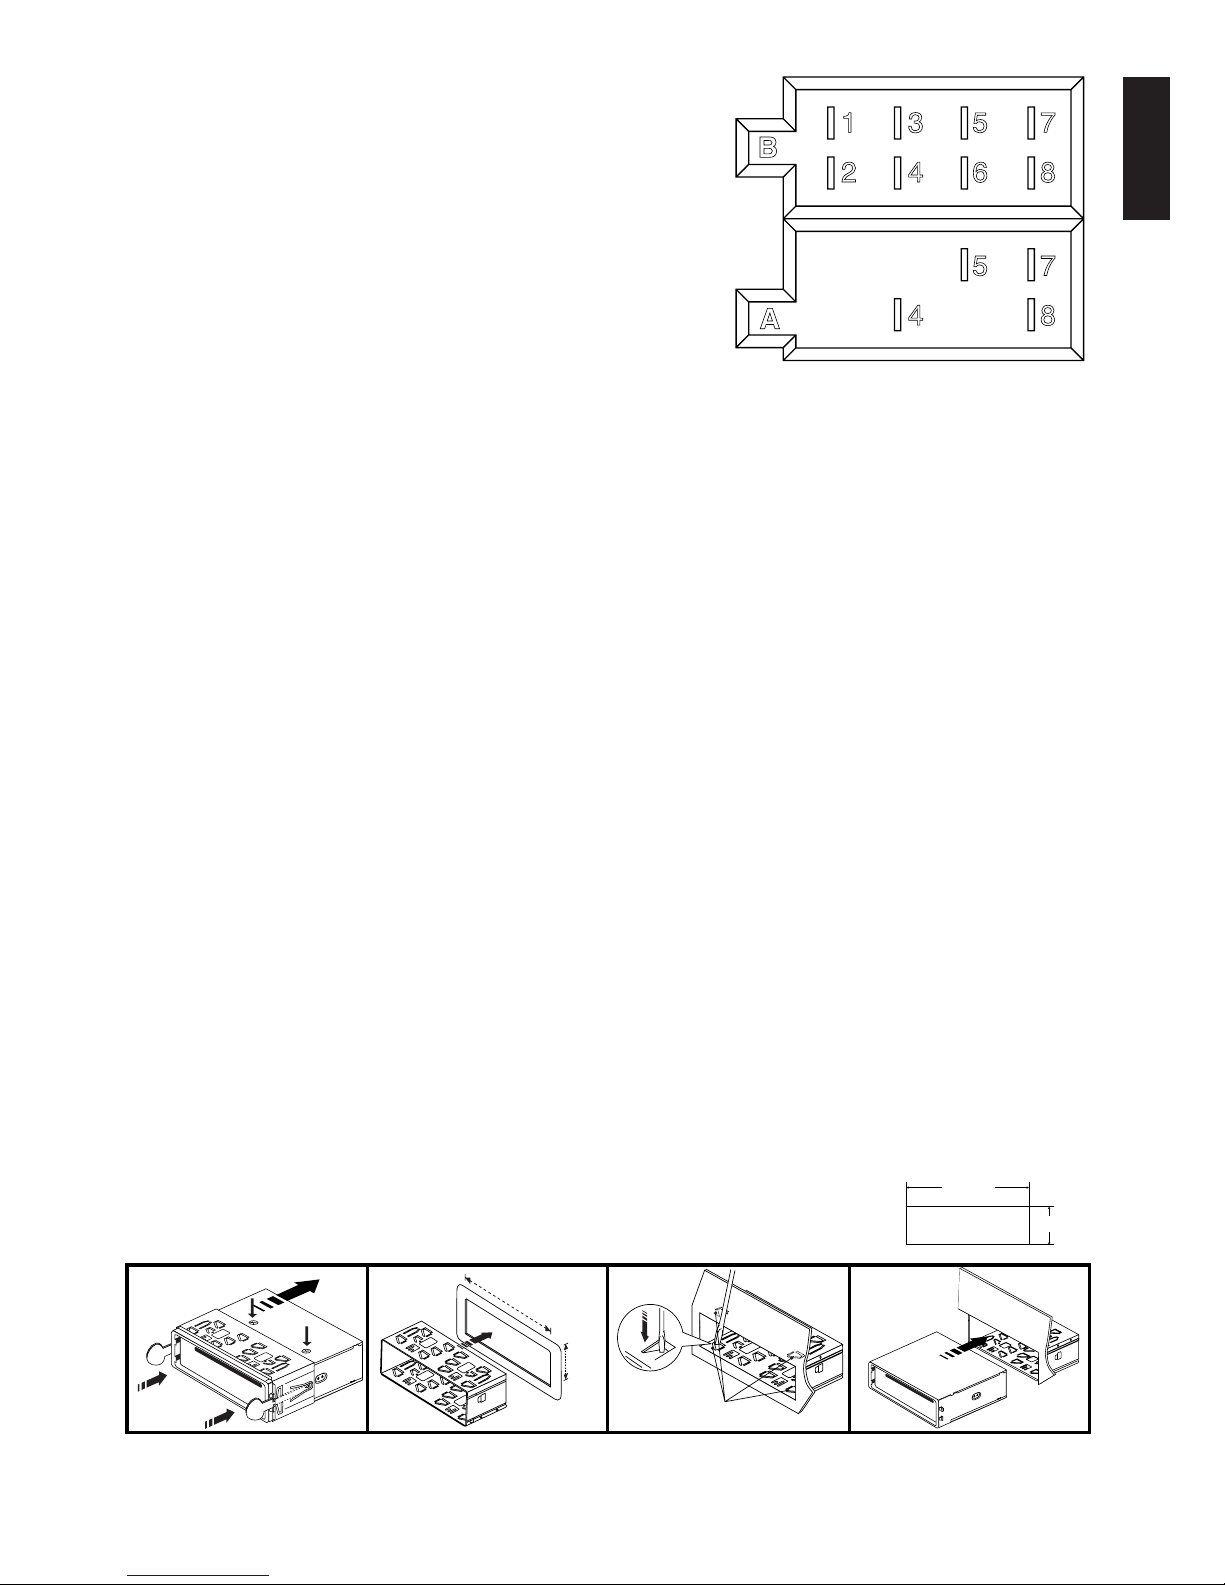
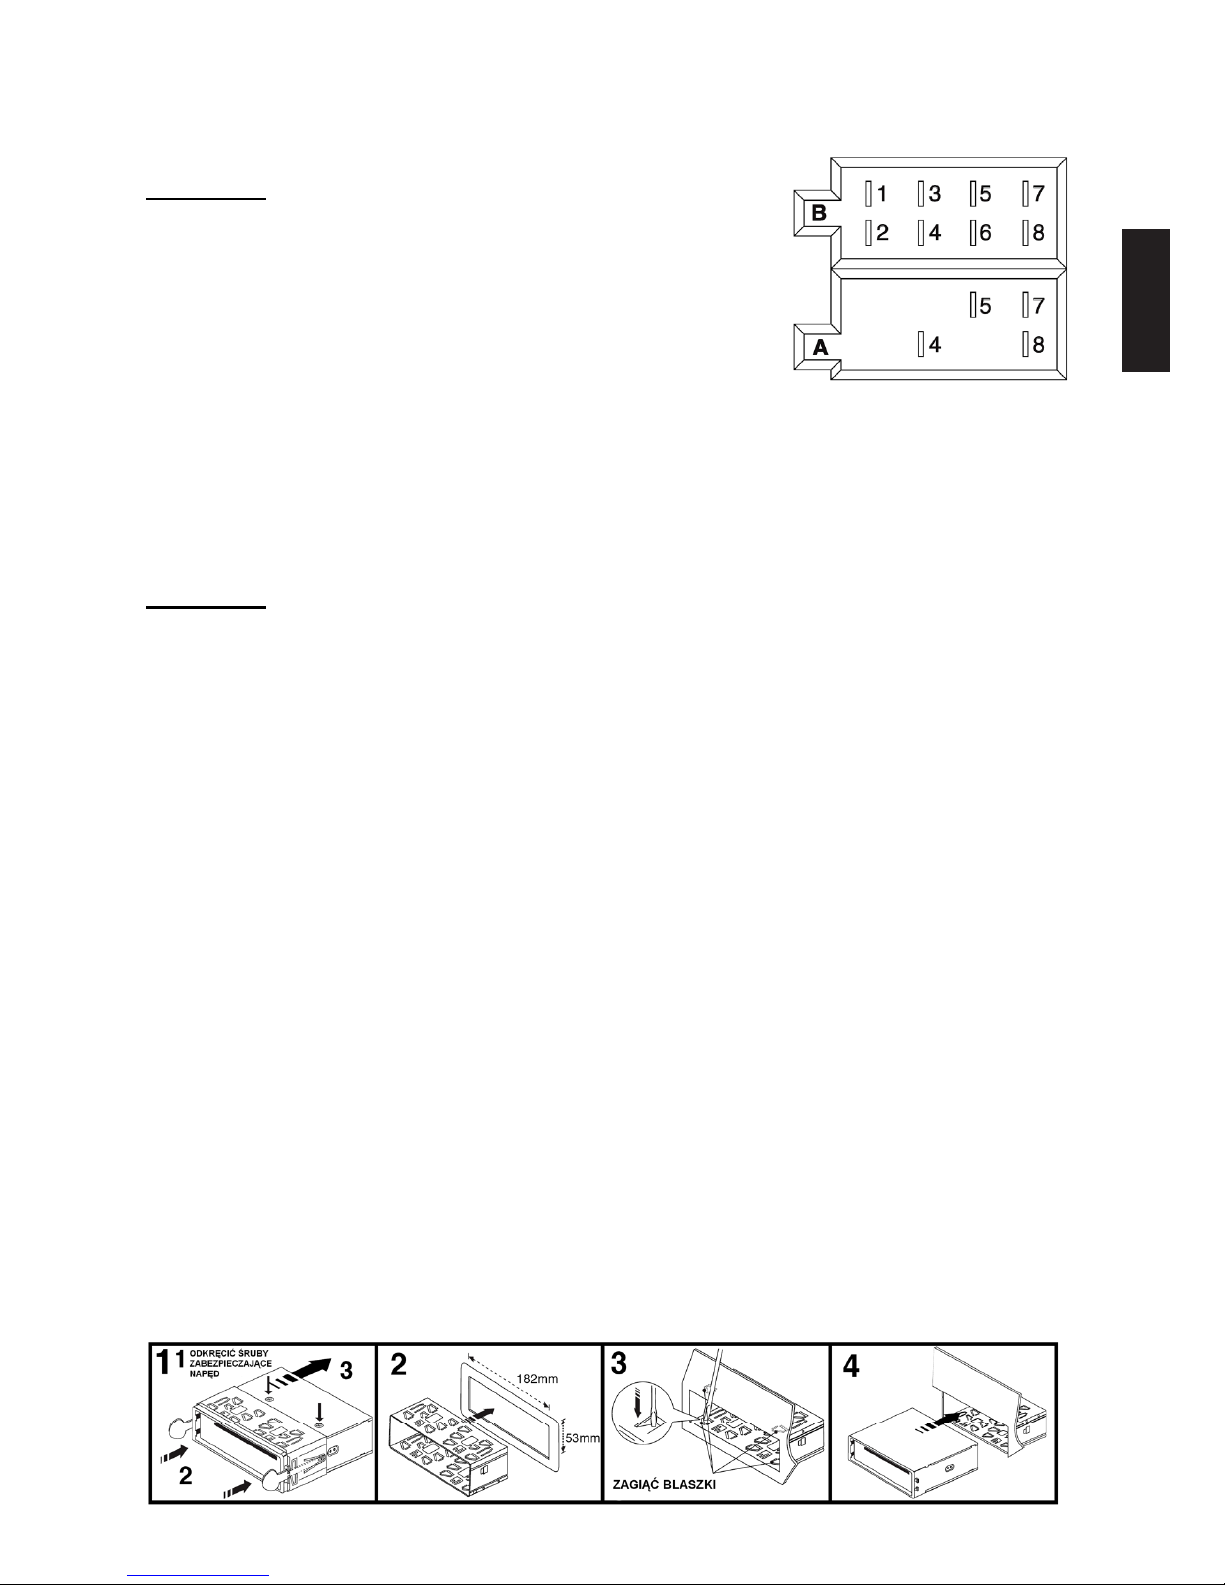
INSTALLATION
PRECAUTIONS
• Choose the mounting location carefully so that the unit will not interfere with the normal
driving functions of the driver.
• Avoid installing the unit where it would be subject to high temperatures, such as from direct
sunlight or hot air from the heater, or where it would be subject to dust, dirt or excessive
vibration.
• Use only the supplied mounting hardware for a safe and secure installation.
• Be sure to remove the front panel before installing the unit.
NOTE : Inclination angle for car radio installation must not
exceed 30˚ otherwise the front panel will not open.
Note: Keep the release key in a safe place as you may need it in future to remove the unit
from the car.
Bend these
claws, if necessary
release screw and
bracket
ISO CONNECTOR
RCA Jack Line Out: (Front) RCA Jack Line Out: (Rear)
Red (right) White (left) Red (right) White (left)
CONNECTOR A
1.
2.
3.
4. MEMORY +12V
5. AUTO ANTENNA OUTPUT
6.
7. +12V (TO IGNITION KEY)
8. GROUND
Note: (connector A no. 7) must be connected by car ignition key in order to avoid that car
battery becomes weak when the car will be not used for long period.
CONNECTOR B
1. REAR RIGHT SPEAKER (+)
2. REAR RIGHT SPEAKER (-)
3. FRONT RIGHT SPEAKER (+)
4. FRONT RIGHT SPEAKER (-)
5. FRONT LEFT SPEAKER (+)
6. FRONT LEFT SPEAKER (-)
7. REAR LEFT SPEAKER (+)
8. REAR LEFT SPEAKER (-)
Maintenance
FUSE REPLACEMENT
If the fuse blows, check the power connection and replace the fuse. If the fuse blows again after the
replacement, there may be an internal malfunction. In this case, consult your nearest repairing center.
Warning
Use the specied amperage fuse for each lead. Use of a higher amperage fuse may cause serious damage.
B
1 3 5 7
2 4 6 8
5 7
4 8
A
- 4 -
E4
10
7
1
2
3
4
4
4
5
5
6
6
8
9
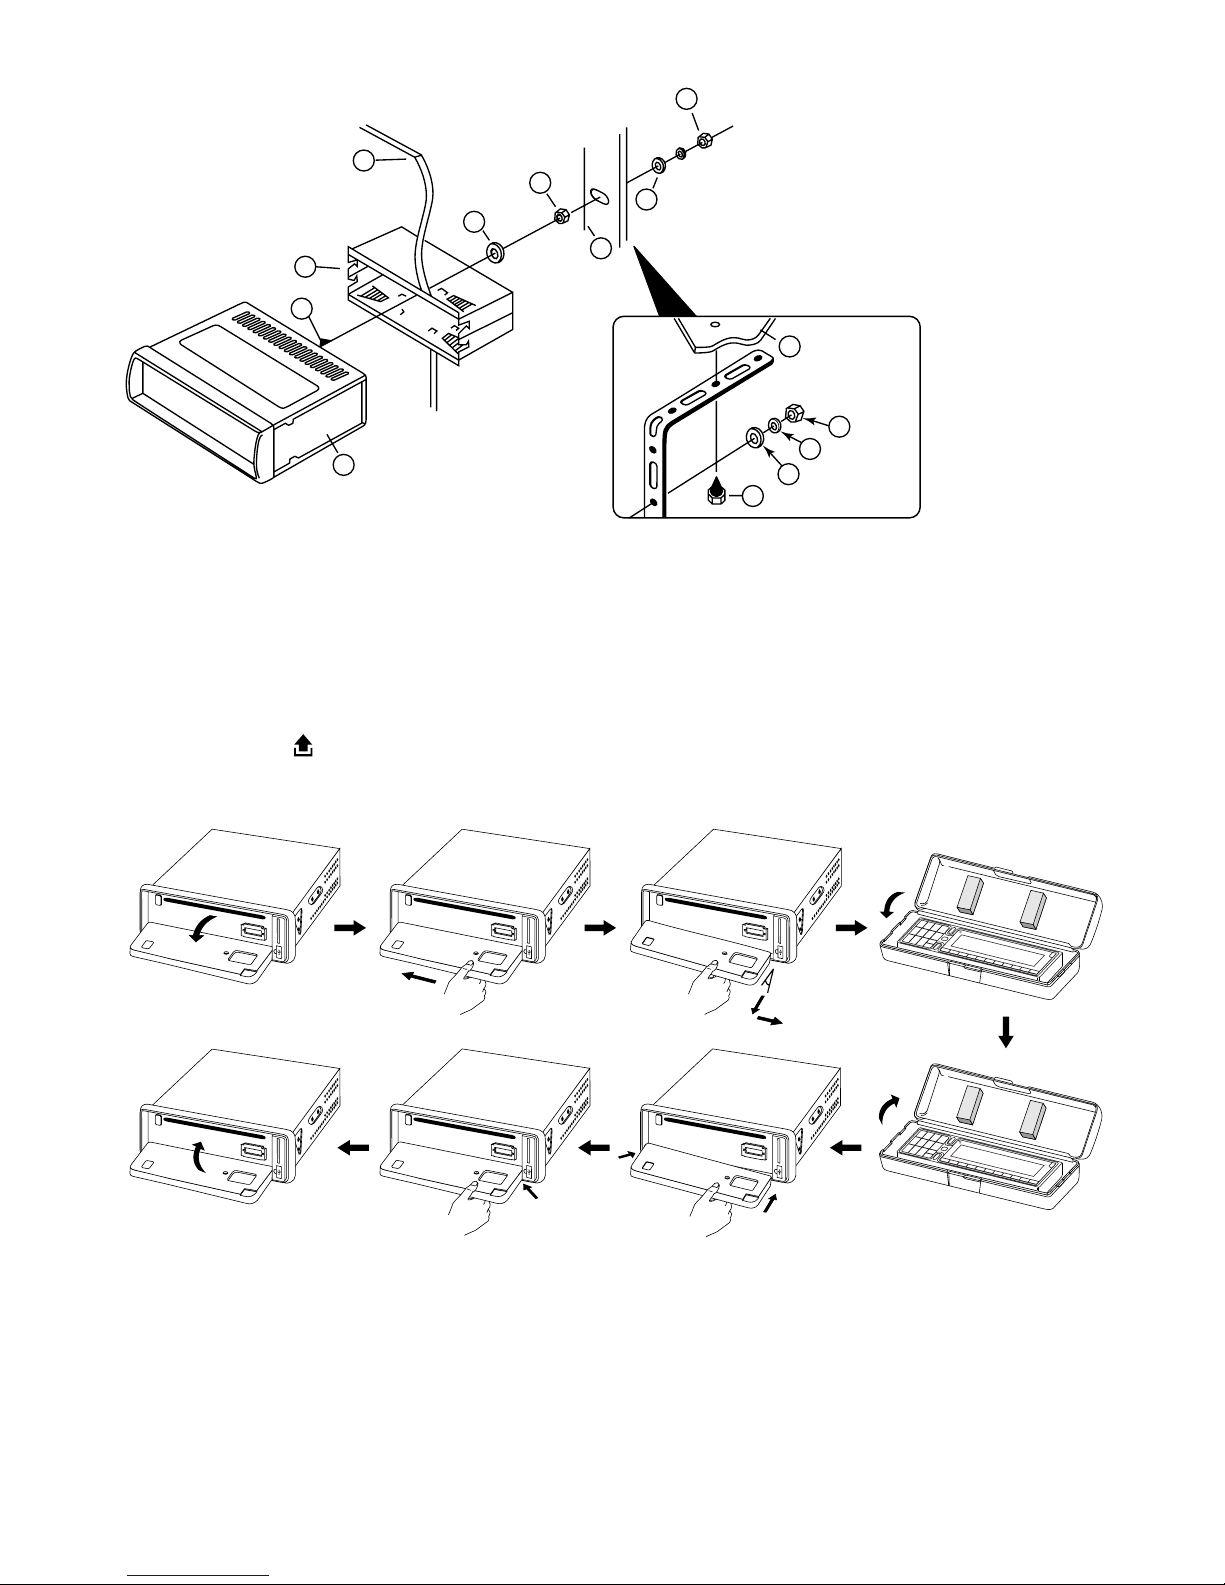
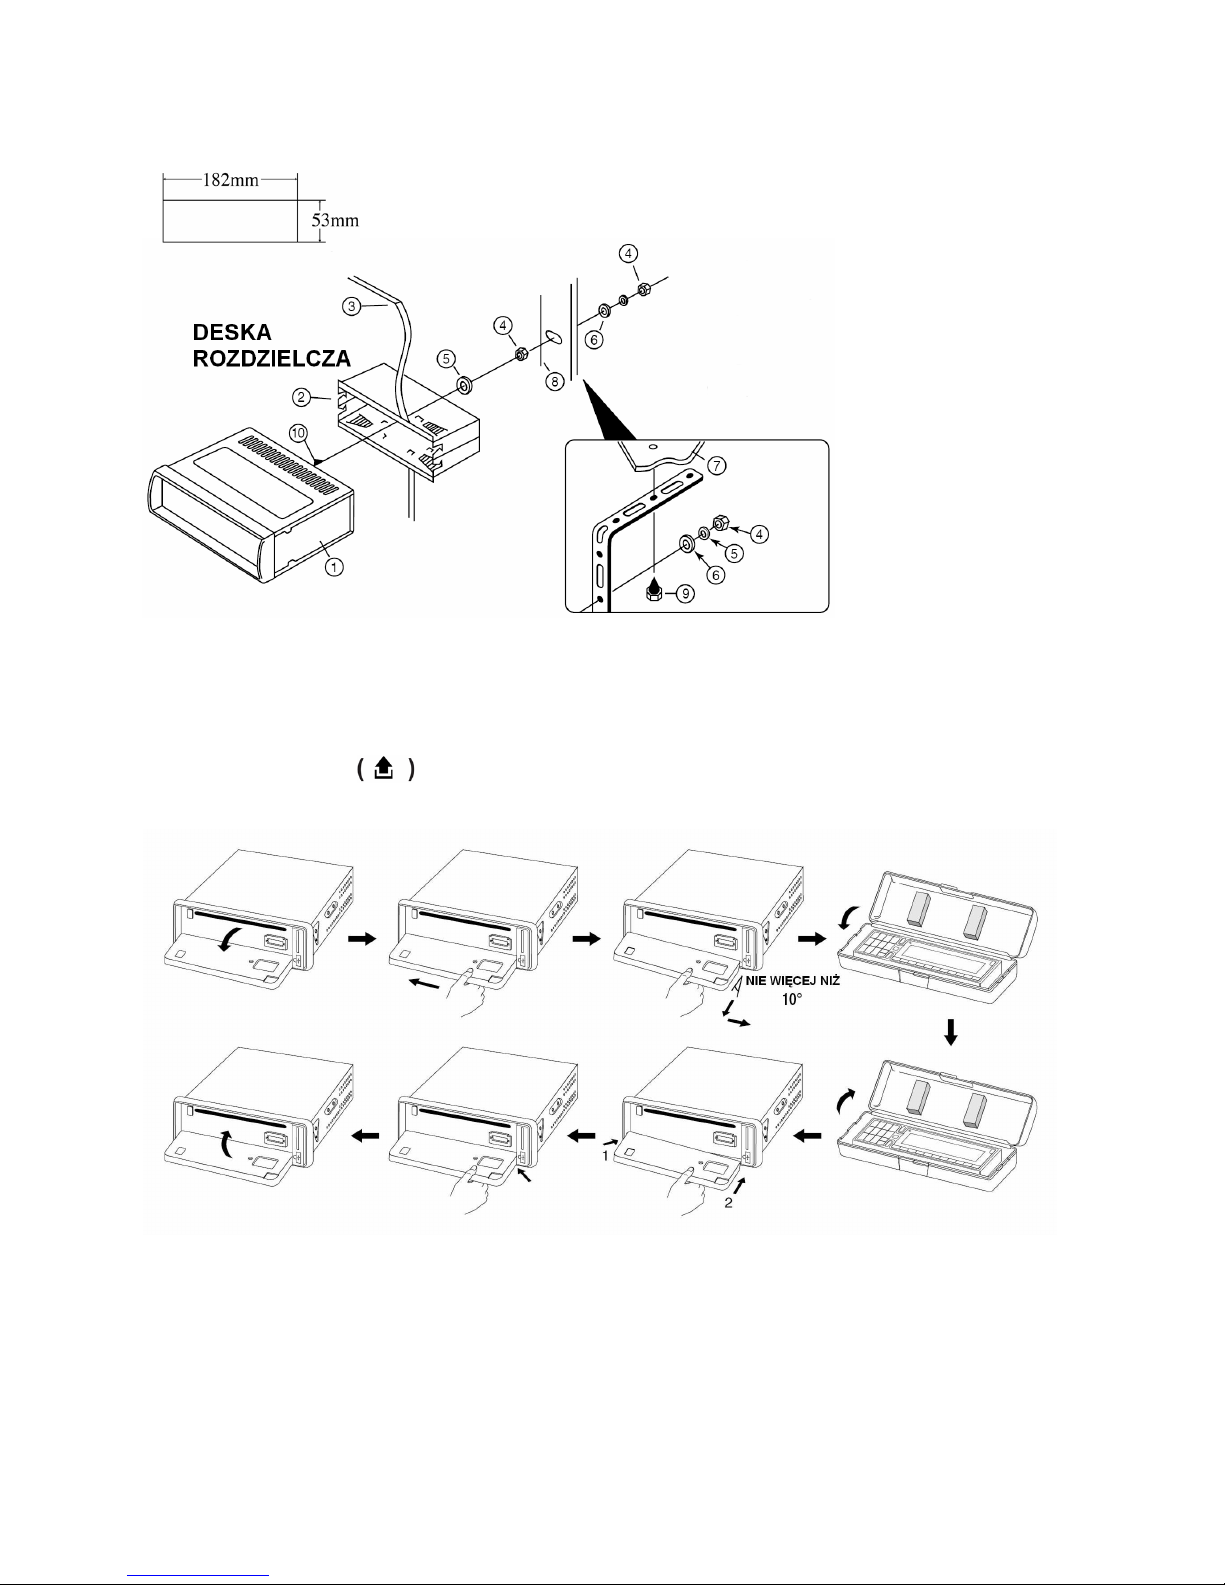
TO SUPPORT THE UNIT
Detaching and attaching the front panel
The front panel of this unit can be detached in order to prevent the unit from being stolen.
FOLDING DOWN AND DETACHING/ATTACHING THE FRONT PANEL
Before detaching the front panel, rst be sure to turn the POWER off, press the PWR button
to turn the power off.
Then press the button (13), let the Front Panel arrive in horizontal position and detach the
panel by pulling it towards you as illustrated.
Notes:
• Do not press the front panel hard against the unit when attaching it. It can be easily attached by pressing it lightly against the unit.
• When you carry the front panel with you, put it in the supplied front panel case.
• Do not press hard or give excessive pressure to the display window of the front panel when
attaching it to the unit.
1. UNIT
2. RELEASE CASE
3. DASH BOARD
4. HEX NUT
5. LOCK WASHER
6. PLAIN WASHER
7. CAR BODY
8. REAR SUPPORT STRAP
9. TAPPING SCREW
10. M5 X 15 HEX BOLT
Dashboard
1
not exceed 10°
2

- 5 -
ENGLISH
E5
BASIC OPERATIONS
Turning the Unit ON/OFF (PWR)
Press PWR to turn on the unit. To turn off, press and hold this button again.
Displaying Clock
Push DISP button and clock will be shown on the display. When the unit is turn off, clock will also be shown.
Selecting a Source (MODE)
Press MODE repeatedly to switch between TUNER - CD/MP3 - USB MEMORY - MEMORY CARD mode.
Note: The mode will only be available if the device is present and inserted.
Loading a Disc
1. Press REL button to open the front panel
2. Insert a disc into the disc loading slot with label facing up
3. Close the front panel
Ejecting a Disc
1. Press REL button to open the front panel
2. Press the EJECT button to eject disc
3. Close the front panel
Adjusting the Volume
Press VOL+ or VOL- to increase or decrease volume.
SETTINGS
Clock Settings
1. Press ME and then VOL- button until Clock displays. Press ME. Hour starts blinking.
2. Press VOL+ or VOL- to adjust hour. Press ME. Minutes starts blinking.
3. Press VOL+ or VOL- to adjust minutes. Press ME.
4. Press ( ) to exit one level. Press and hold to exit settings.
Audio Settings
1. Press ME and then VOL- button repeatedly until Audio appears. Press ME.
2. Press VOL+ or VOL- and select between the following settings: Press ME to enter.
• Bass – to adjust the low tone.
• TrebleTreble – to adjust the high range tone.
• FaderFader – to adjust the sound fade front or rear.
• BalanceBalance – to adjust the sound shift left or right.
• EqualizerEqualizer – Off/Pop/Rock/Classic/Flat
• LoudnessLoudness – to boost the sound quality
• Spoken MenuSpoken Menu – to adjust the volume level of the system’s voice
• BeepBeep - to activate/deactivate beep sound when pressing buttons
3. Press VOL+ or VOL- to set. Other settings just need to select Deactivate or Activate options. Press
ME to save.
4. Press ( ) to exit one level. Press and hold to exit settings.
Display Settings
1. Press ME and then VOL- button repeatedly until Display appears. Press ME.
2. Press VOL+/- and select between the following settings: Press ME to enter.
• Contrast – to adjust the contrast of the display.
• View – select between Positive / Negative view type.
• Color – to set the display color. Choose between White / Blue / Yellow / Red / Sky Blue / Purple
/ Green / Mixed color
3. Press VOL+/- button to set. Press ME to save.
4. Press ( ) to exit one level. Press and hold to exit settings.
Language Settings
1. Press ME and then VOL- button repeatedly until Language appears. Press ME.
2. Press VOL+ or VOL- and select between Automatic / English / Francais / Espanol / Italiano / Deautch /
Nederlands / Portugues languages.
3. Press ME to save.
4. Press ( ) to exit one level. Press and hold to exit settings.

- 6 -
E6
LISTENING TO RADIO
Band button (BAND)
Press BAND button to toggle cyclically between FM1---FM2---FM3.
Auto Search and Save
1. Press ME and then VOL- button repeatedly until Tuner appears. Press ME.
2. Select Search settings. Press ME.
3. Select Auto-store. Press ME.
Note:
The 6 strongest stations will be search and save on the preset number.
To listen to the station, simply press the preset number.
What is RDS?
The RDS (Radio Data System) is a digital information system developed by the EBU (European Broadcast
Union). Piggy-backed on normal FM broadcasts, RDS offers a variety of information services and automatic
retuning functions for RDS-compatible car stereos. In 1988, RDS became available in the United Kingdom,
France, West Germany, Ireland and Sweden. Test transmissions are being conducted in many other European countries. It is expected that RDS will be available in most western European countries in the near
future.
Auto Search RDS Program Types
1. Press ME and then VOL- button repeatedly until Tuner appears. Press ME.
2. Select Search settings. Press ME.
3. Select By type. Press ME.
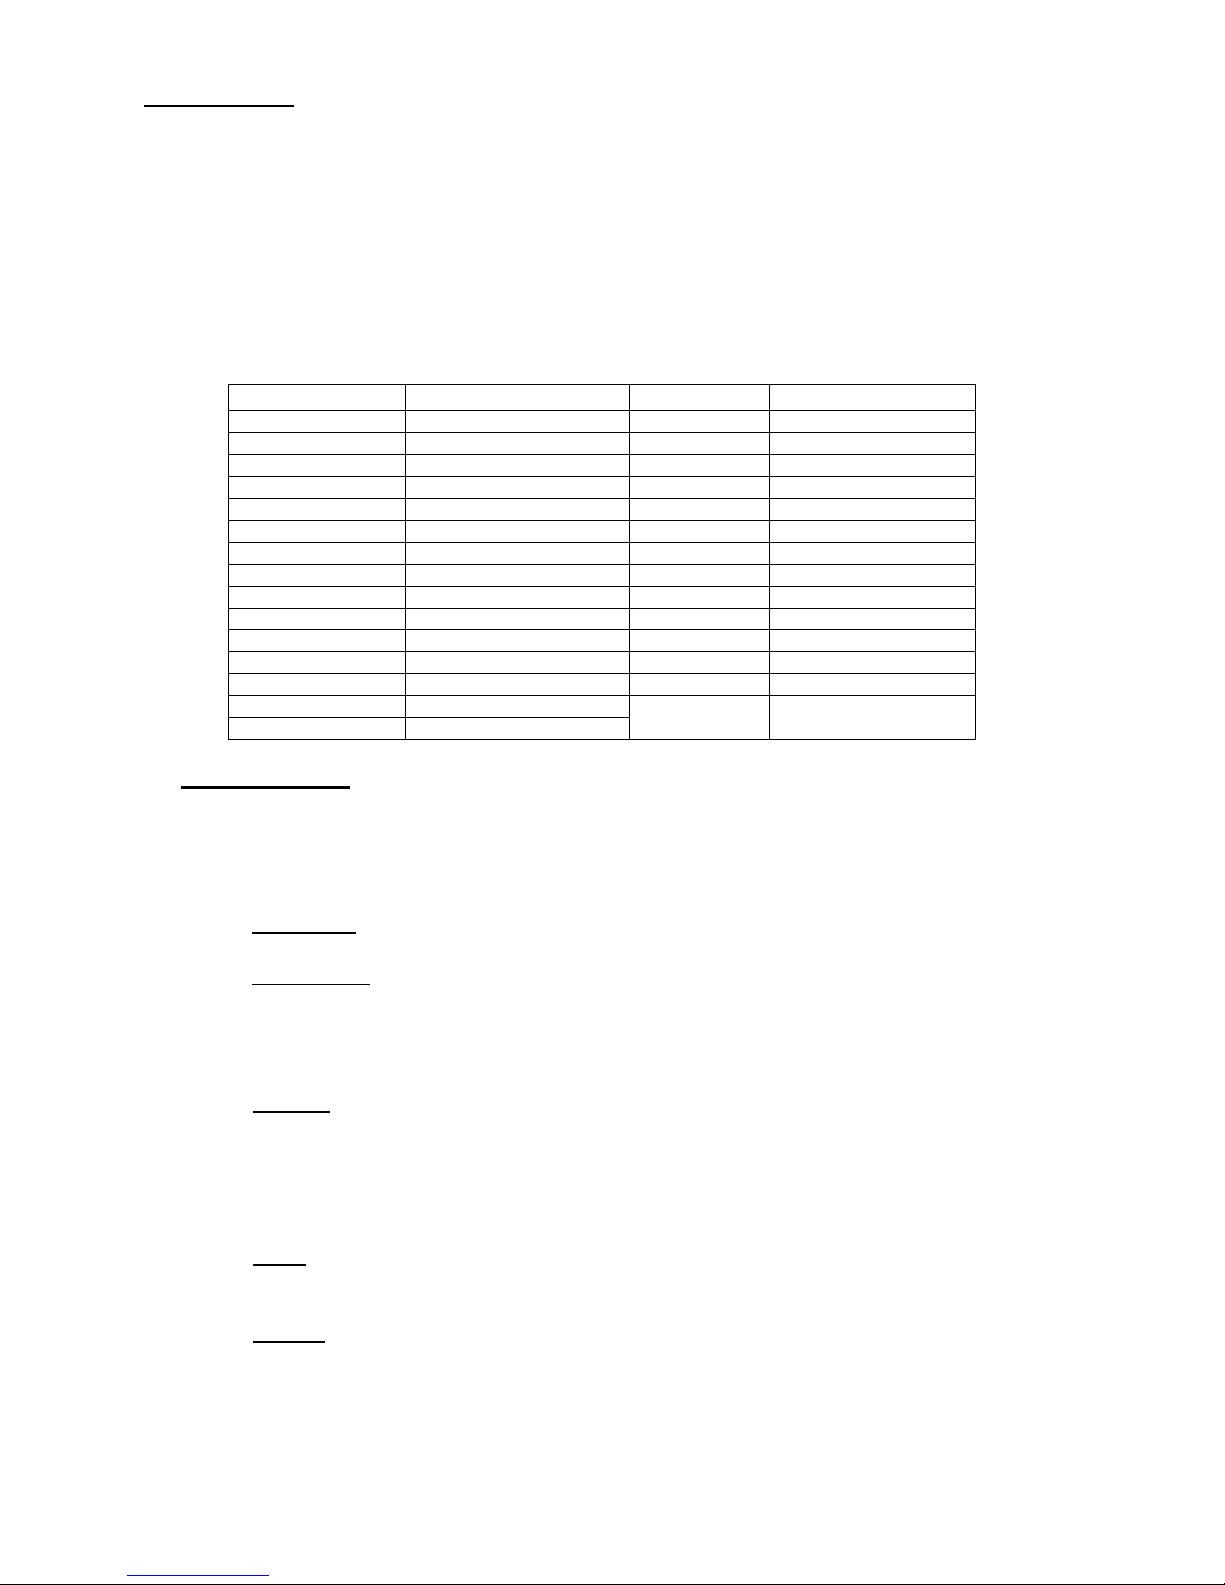
4. Press VOL+/- to select a program type from the table below. Press ME to select.
Specific Type of Program Specific Type of Program
Pop music Popular music Education Educational program
Rock music Contemporary modern music Drama Radio plays and serials
Easy Listening m. Easy Listening music Culture National or regional culture
Light Classical Light classical music Science Nature, science and technology
Serious Classical Serious Classical music Varied Light entertainment
Jazz music Jazz music Weather Weather reports
Country music Country music Finance
National music National music Children Children
Oldies music Oldies music Social Affairs Social affairs
Folk music Folk music Religion Religious affairs or services
Other music Non-categorized music Phone In Phone In
News News Travel Travel programs
Current Affairs Current Affairs Leisure Hobbies and recreational activities
Information General information and advice Documentary Documentary
Sport Sports
RDS Options
1. Press ME and then VOL- button repeatedly until Tuner appears. Press ME.
2. Press VOL+/– and select RDS options settings. Press ME to set.
RDS Scan
When set in active mode, the unit will scan for Alternative Frequencies and start playing.
Traffic alert
SEEK – when newly turned station does not receive TP information for 5 sec., the radio retunes to next
station which has not the same station (PI) as the last station, but has the TP information.
In TA seek mode, the current station can be changed to the completely different station because the
unit searches TP station when the field strength of the current station is very weak, or the current station
has no TP signal.
Alarm – turn on to receive announcements regarding emergencies such as natural disasters.

- 7 -
ENGLISH
E7
Region
Region ON: AF switching or PI SEEK is implemented to the station which have all PI codes same as
current station.
Region OFF: The regional code in the format of PI code is ignored when AF switching or PI SEEK is
implemented.
Mask (Difference PI/All PI)
Select whether the search for alternative frequencies covers all broadcasting stations available (ALL
DPI) or only those of the currently turned station (DPI).
Retune (Short Time/ Long Time)
Here you can determine the time period your device will wait before it seeks a substitute radio channel,
which broadcasts traffic reports is lost. You must activate the TA operating mode before automatic
seeking can start.
Stereo / Mono
1. Press ME and then VOL- button repeatedly until Tuner appears. Press ME.
2. Press VOL+/- and select Stereo-Mono settings. Press ME.
3. Select between Stereo / Mono settings. Press ME to save.
4. Press ( ) to exit one level. Press and hold to exit settings.
Tuner Sensibility
1. Press ME and then VOL- button repeatedly until Tuner appears. Press ME.
2. Press VOL+/- repeatedly and select Tuner sensibility settings. Press ME.
3. Select between Local / Distant settings. Press ME to save.
Local – tune only to those radio stations with sufficient strong signals for good reception.
Distant – to listen to all stations including the distant ones.
4. Press ( ) to exit one level. Press and hold to exit settings.
Automatic or Manual tuning (FREQ UP OR FREQ DOWN )
When pressed momentarily, these keys are operated as SEEK tuning mode.
When pressed longer than 1 sec., they are operated as MANUAL tuning mode.
Note: The unit automatically switches back to SEEK mode after 5 seconds if no input was detected during
MANUAL tuning mode.
Storing and Recalling Stations
If you press any of the NUMBER (1-6) you can easily store up to six broadcast frequencies for
later recall with the touch of a button.
1. Choose a desired BAND (FM1-FM2-FM3).
2. When you find a frequency that you want to store in memory, press and hold a NUMBER (1-6) until the
preset number shows and lit in the display.
3. The number you have pressed will remain lit. The selected radio station frequency has been stored in
memory. The next time you press the same NUMBER (1-6), the radio station’s frequency is recalled
from memory.
Note: Up to 18 FM stations can be stored in the memory.
LISTENING TO CD / MP3 / USB / MEMORY CARD
Basic operations
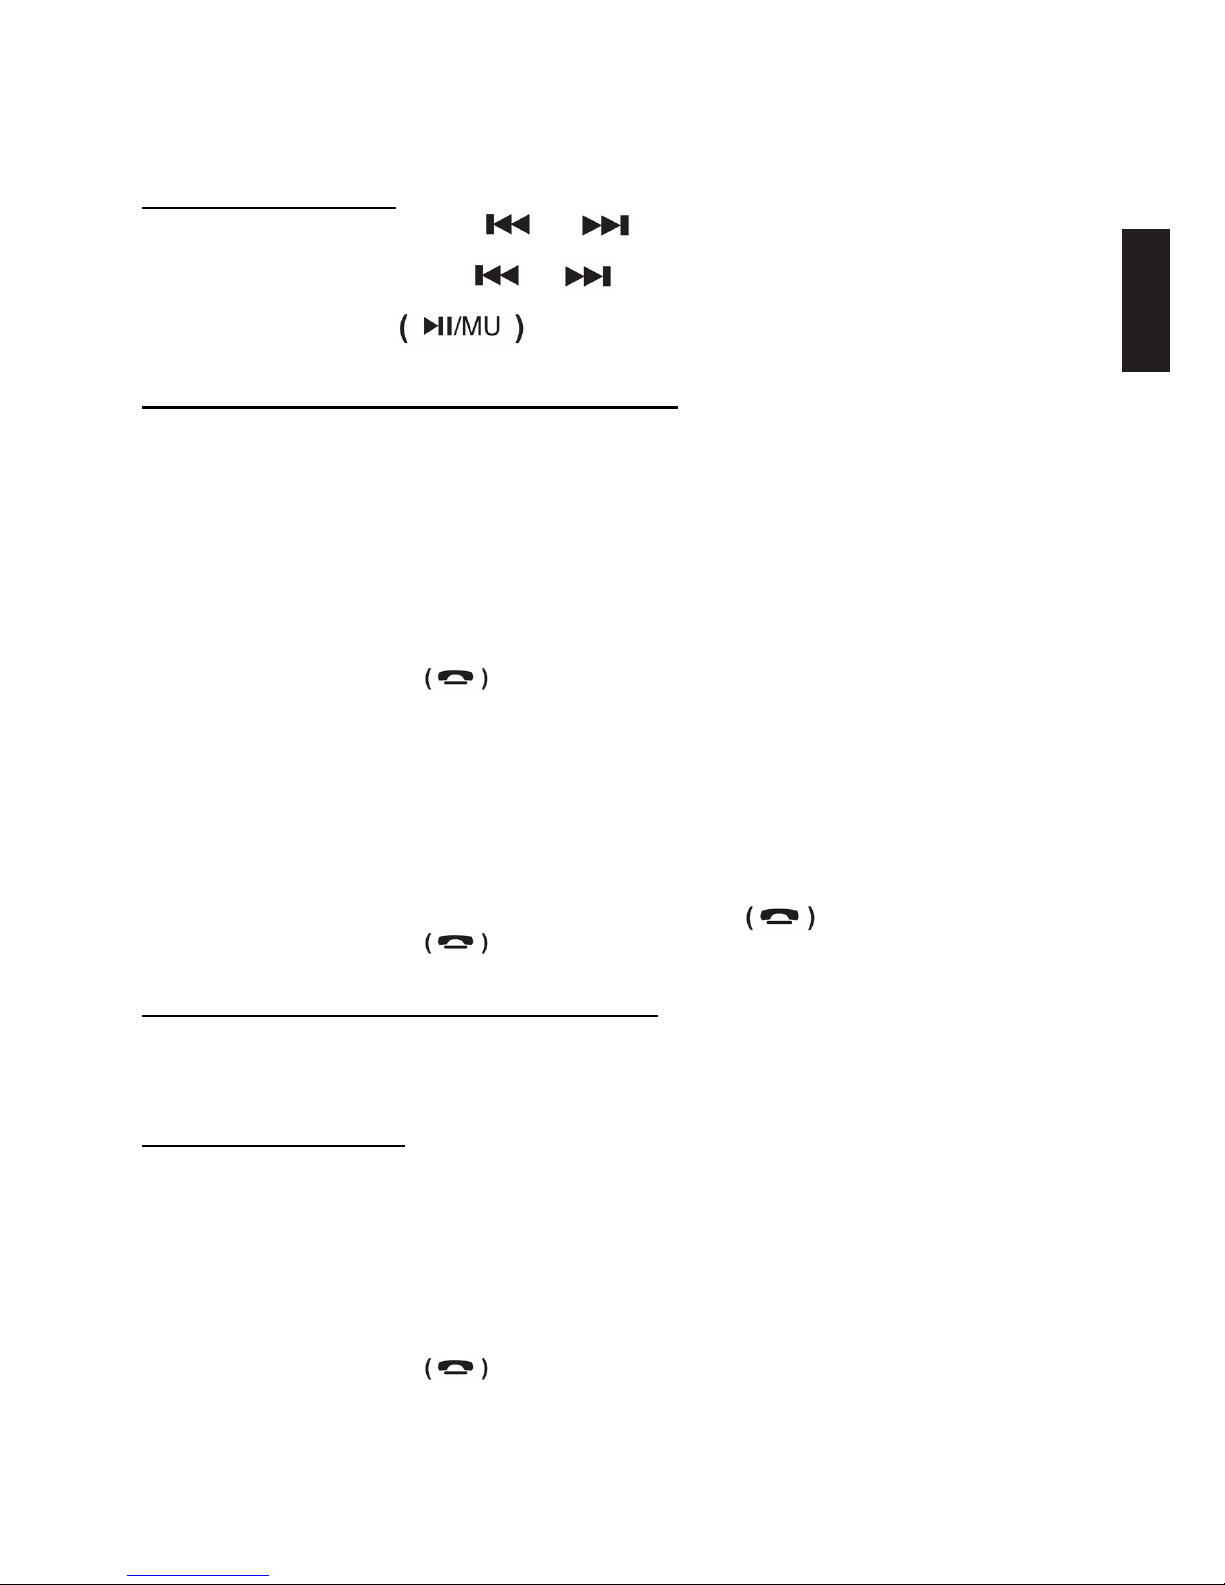
1. To perform fast forward or reverse, press and hold or . Release the button to resume normal
playback at a desired point,
2. Pressing skips to the start of the next chapter. Pressing skips to the beginning of the chapter.
Pressing repeatedly skips to the previous chapter.
3. To pause playback, press ( ) button. Press it again to resume.
Searching for particular track (MP3 only)
There are 2 modes to use for searching mp3 tracks to play.
1. Intelligent - This mode uses character searching. User enters the first character of the filename and
unit returns the search result.
2. Explorer - This mode uses list structure display. It lists all the filenames found under a folder.

- 8 -
E8
How to use Intelligent Mode
1. Press ME and then VOL- button repeatedly until CD/MP3/FLASH appears. Press ME.
2. Select Search settings. Press ME.
3. Select Intelligent options. Press ME to confirm.
4. Using the VOL+/- find the first character of the mp3 filename. Press ME to confirm.
5. If results were found, it will list all filenames. Press VOL+/- to the filename you want to play then press
it to start play.
6. Press ( ) to exit one level. Press and hold to exit settings.
How to use Explorer Mode
1. Press ME and then VOL- button repeatedly until CD/MP3/FLASH appears. Press ME.
2. Select Search settings. Press ME.
3. Select Explorer options. Press ME to confirm.
4. Unit list all filenames found under the folder. Using VOL+/- find the mp3 filename then press it to start
play.
5. To browse for other files in other folders, simply press ( ) button. It will list all folder names.
6. Press ( ) to exit one level. Press and hold to exit settings.
Playing a Particular Track
Using the number pad, you can directly enter the track number to start playback. A number can be found
on the left of the display indicating the total tracks on the disc.
Note: For track 90, press 9+0 . For track 100, press 1+0+0
Repeat tracks
You can choose between repeat playback of a single track or all tracks.
1. Press ME and then VOL- button repeatedly until CD/MP3/FLASH appears. Press ME.
2. Press VOL+/- repeatedly and select Repeat mode settings. Press ME.
3. Select between All / One options. Press ME to confirm.
All – repeat all tracks.
One – repeat the current playback track.
4. Press ( ) to exit one level. Press and hold to exit settings.
Random Playback
You can play the tracks in random/shuffle order instead of normal progression.
1. Press ME and then VOL- button repeatedly until CD/MP3/FLASH appears. Press ME.
2. Press VOL+/- repeatedly and select Random mode settings. Press ME.
3. Select Deactivate / Activate options. Press ME to confirm.
4. Press ( ) to exit one level. Press and hold to exit settings.
Electronic Shock Protection (ESP)
You can set the ESP seconds for CD playback for uninterrupted listening.
1. Press ME and then VOL- button repeatedly until CD/MP3/FLASH appears. Press ME.
2. Press VOL+/- repeatedly and select ESP settings. Press ME.
3. Select between ESP 10s / ESP 40s options. Press ME to confirm.
4. Press ( ) to exit one level. Press and hold to exit settings.
Playing Multi-session disc
You can set unit to play multi-session disc or not.
1. Press ME and then VOL- button repeatedly until CD/MP3/FLASH appears. Press ME.
2. Press VOL+/- repeatedly and select Multi-session settings. Press ME.
3. Select Deactivate / Activate options. Press ME to confirm.
4. Press ( ) to exit one level. Press and hold to exit settings.
- 9 -
ENGLISH
E9
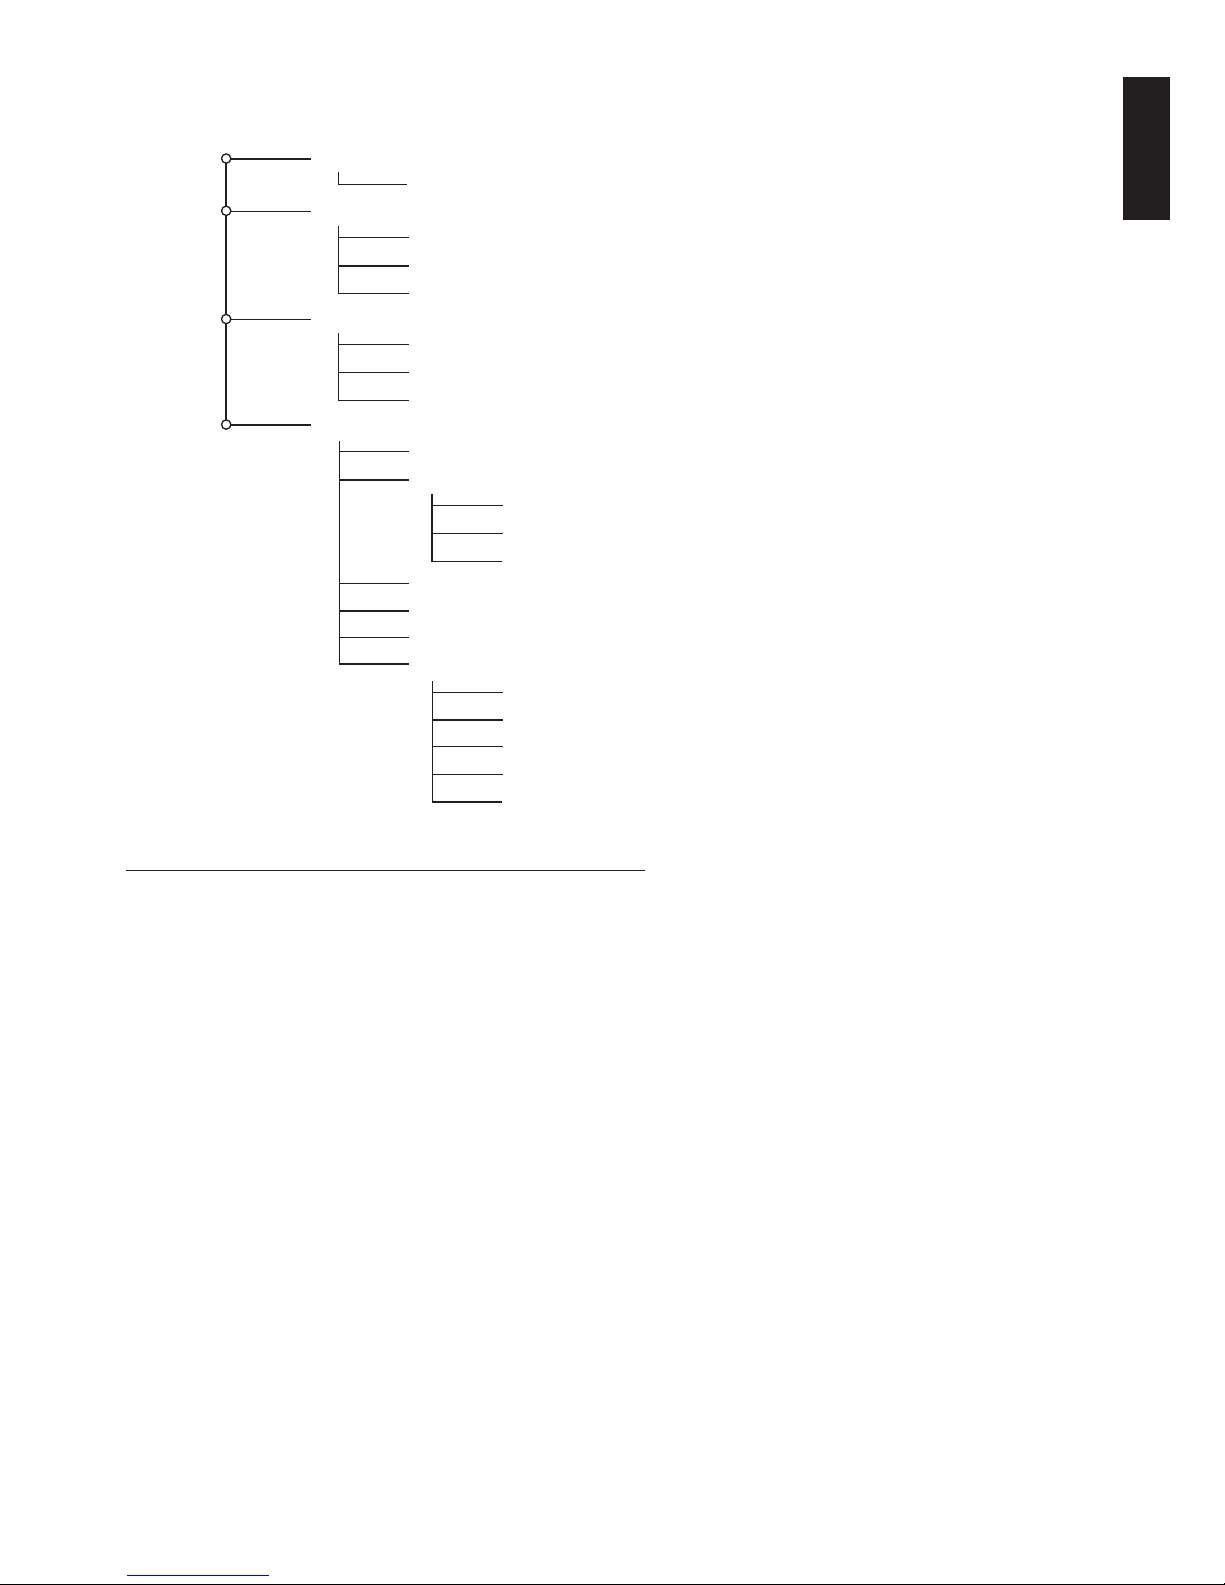
BLUETOOTH OPERATIONS
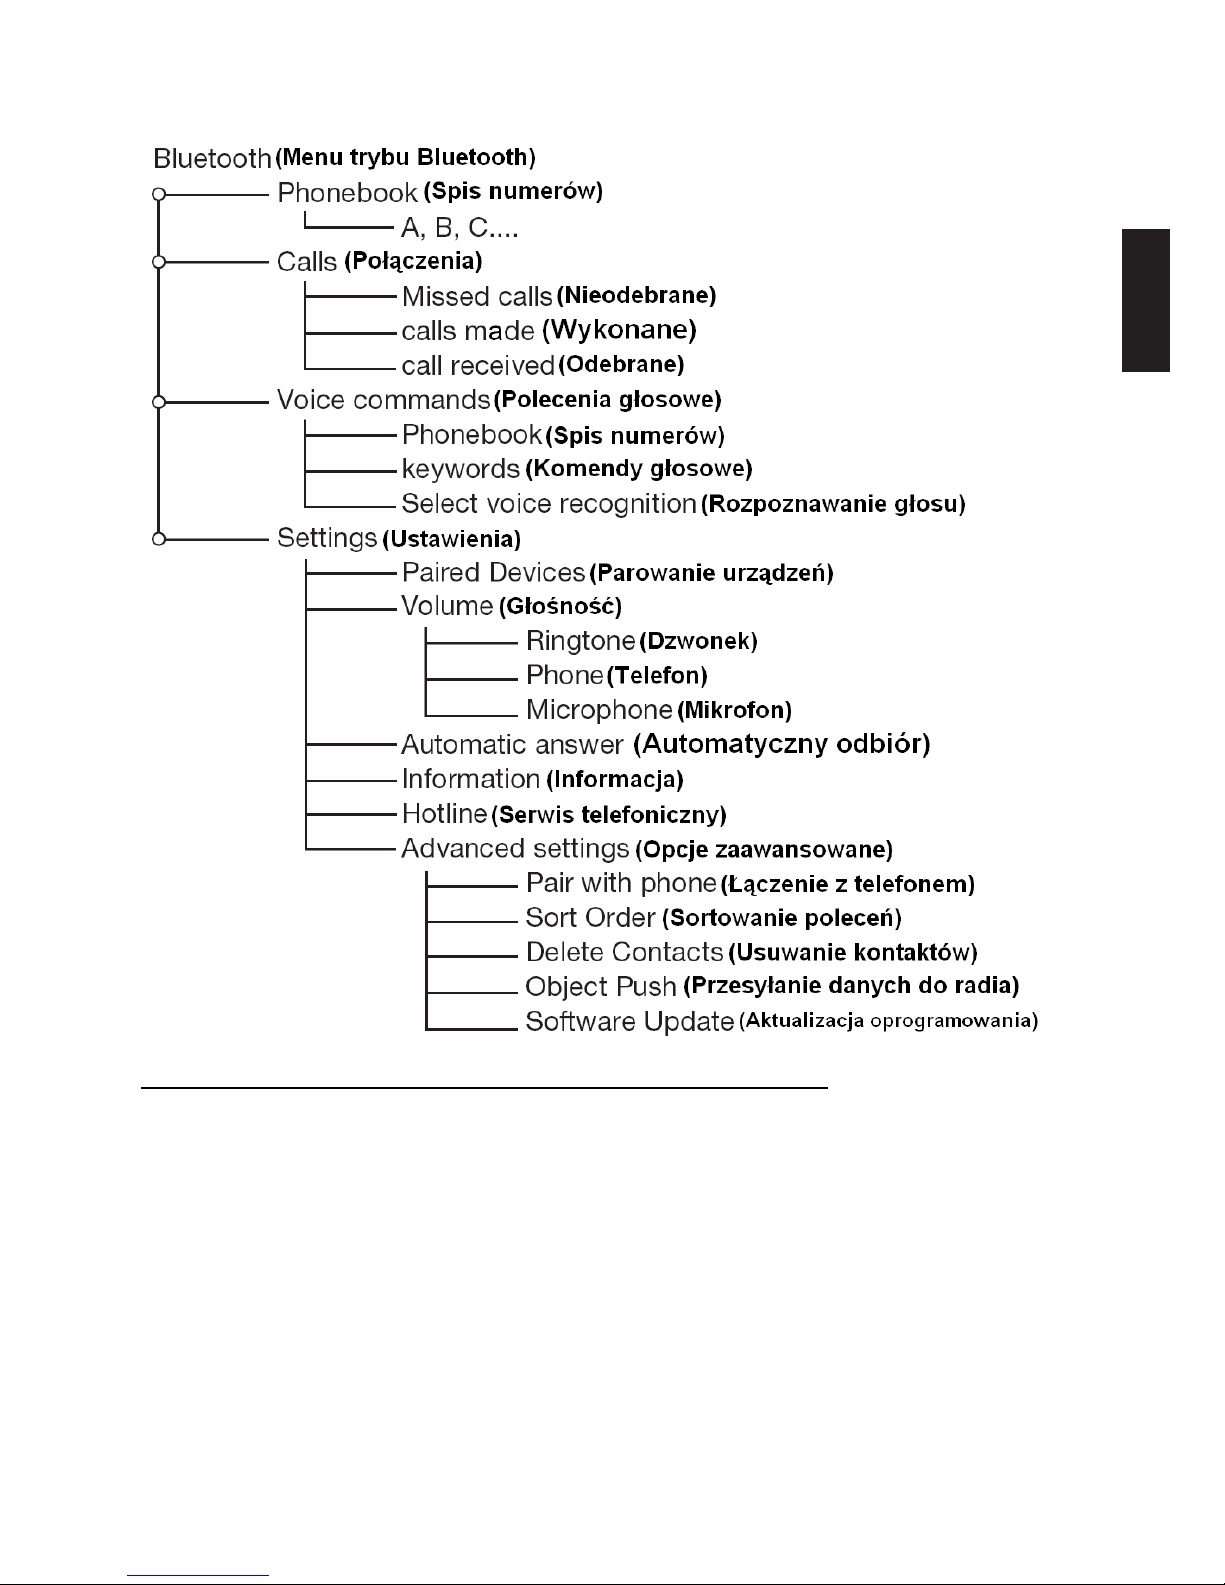
Bluetooth
Phonebook
A, B, C....
Calls
Missed calls
calls mode
call received
Voice commands
Phonebook
keywords
Select voice recognition
Settings
Paired Devices
Volume
Ringtone
Phone
Microphone
Automatic answer
Information
Hotline
Advanced settings
Pair with phone
Sort Order
Delete Contacts
Object Push
Software Update
FEATURES IN PHONE MODE: Hands-free (Bluetooth)
CAUTION:
Because of many kinds of Bluetooth Mobile Phones type and handling method, this unit may cause some
kind of malfunction or hang up. If such condition occurs, simply open and close the front panel, or press
RESET button, the head unit will operate normally again.
IMPORTANT:
There is a special method of performing pairing Bluetooth device with some cellular phone models. Please
goto Bluetooth -> Settings -> Advance Settings -> Pair with phone and check if your phone is in the lists. If
it is in the lists, select your phone model and Press VOL knob. A “Pair your phone” message appears on the
screen and kindly follow “How to Perform Pairing” to complete the process.
How to Perform Pairing
Before you can dial out from the car stereo, you must first perform PAIRING. Pairing is a procedure used to
connect 2 Bluetooth devices together.
1. Turn on the Bluetooth feature of your phone.
2. Perform a search for available Bluetooth devices. “Car Radio” should appear on your lists of devices
found.
3. Add “Car Radio” device. Enter “1234” if prompted for passkey.
4. A Bluetooth logo will appear on the upper right corner of the car unit indicating proper pairing. Press
PHONE button and the Bluetooth device name of the cellular phone will display on the screen.
5. For some phone models, the unit will auto perform synchronization. It will synchronize the phone-
book entries as well as the call entries of your phone into the unit. “Synchronizing” will display on the
screen.
Note:
• “Car Radio” is the Bluetooth device name of the car stereo.
• If the unit does not perform auto synchronization after paring, your have to do this step manually. Please
refer to your phone’s user manual on how to send Phonebook entries via Bluetooth.
• Refer to your cellular user manual for the proper procedures of pairing Bluetooth devices.

- 10 -
E10
Answering / Hanging Up
To answer a call, press the ( ) button. Once you have finished your conversation, press the (
) to hang up.
Discreet Mode
During a call, press the ( ) button to switch the conversation over to the phone. Press the (
) button again to return the call to hands-free mode. This feature is only available on phones
with a Hands-free profile.
Synchronizing the phone’s phonebook
With some Bluetooth phones, the phonebook is automatically synchronized in the kit’s memory. If your
phone does not support automatic synchronization, you can also use the Object Push feature on your
phone to send contacts from your phone to the car stereo by Bluetooth. When synchronizing the phonebook, the Bluetooth icon scrolls over the screen.
Making Calls Using the Car Stereo Interface
You can make calls directly from the car stereo. Before you make calls, make sure that the devices are
properly paired and connected.
1. Press PHONE button.
2. Enter the phone number via the keypad and press ( ) to dial out. Press ( ) to make corrections
when entering numbers.
3. Press ( ) to end call.
Making Calls Using Voice Command (without Keywords)
Before using this feature, make sure phone and car stereo is connected and you have set the contact’s
voice command. Please refer to “Voice Recognition”.
1. Press ( ) and the radio or CD is muted. You will hear a beep. Say the contact’s name after the beep
and if necessary, specify home, work or office (if available).
2. Press ( ) to end call.to end call.
Making Calls Using Voice Command (with Keywords)
Once you have recorded the names, keywords and magic word “phone”, you can call a contact as follows:
1. Activate Phone voice command keyword. You need to record Phone voice command first before you
can activate. To activate, goto Bluetooth -> Voice cmds -> keywords -> Phone -> Activate.
2. Press ( ) and the radio or CD is muted. You will hear a beep.
3. Say: Phone… (Beep)… Anna… (Beep)… Home… and the car stereo automatically dials Anna’s home
number. Similarly, if Anna calls you, you will hear “Anna”. Press ( ) button to answer the call. Press
( ) to end.
Making Calls using Phone Book
Phone Book contains all the contacts stored in your cellular phone. Use this feature to browse for contacts
and make calls.
1. Press ME and then press VOL- until “Bluetooth” menu appears. Press ME.
2. Select “Phone Book”. Press ME.
3. Press VOL+/VOL- and select the first letter of the contacts you are looking for. Press ME.
4. Press VOL+/VOL- to select between numbers and press ( ) button to dial out.
5. Press ( ) to end call.
Note: A shortcut way to enter Phone Book is simply by pressing PWR button.
Calls (Missed, Received, Calls Made)
After synchronizing, the unit have all the missed, received and calls made entries of the phone. Use this
feature to check the numbers and make calls from it.
1. Press ME and then press VOL- until “Bluetooth” menu appears. Press ME.
2. Press VOL- until “Calls” appears. Press ME.
3. Press VOL+/VOL- and select between “Missed Calls, Received Calls, Calls Made”. Press ME.
4. You will see all the entries for the selected feature. Press VOL+/VOL- to select between numbers and
press ( ) button to dial out.
5. Press ( ) to end call.
Voice Recognition
You can make calls using the car stereo’s voice recognition feature. To do so, contacts must be memorized
in the kit’s memory. You must have first recorded the keywords: home, work, office, and so on, as well as
the magic word “phone”.

- 11 -
ENGLISH
E11
Assigning Voice Recognition to Contacts
1. Press ME and then press VOL- until “Bluetooth” menu appears. Press ME.
2. Press VOL- until “Voice cmds” appears. Press ME.
3. Select “Phone book” and press ME.
4. Press VOL+/VOL- and select the first letter of the contact to assign a voice keyword to and press ME.
5. After the beep tone, say the contact name clearly. Press ME to say the voice command again. You have
to record it twice.
6. Press and hold ( ) to exit.
Assigning Keywords
1. Press ME and then press VOL- until “Bluetooth” menu appears. Press ME.
2. Press VOL- until “Voice cmds” appears. Press ME.
3. Press VOL- and select “Keywords”. Press ME.
4. Press VOL+/VOL- and select a field to assign a voice keyword to and press ME.
5. After the beep tone, say the keyword clearly. Press ME to say the keyword again. You have to record it
twice.
6. Do steps 4 and 5 for all fields.
7. Press and hold ( ) to exit.
Note: When recording the keywords and magic word, park your vehicle in a quiet place with the windows
closed and the heater/air conditioner off. This is necessary to obtain a higher recognition rate.
Connect Paired Devices
You can connect to an already paired Bluetooth device from your car stereo.
1. Press ME and then press VOL- until “Bluetooth” menu appears. Press ME.
2. Press VOL- until “Settings” appears and press ME.
3. Select “Paired devices” and press ME.
4. Press VOL+/VOL- and select the device you want to connect and then press ME.
5. Select “Connect” and press ME. “Connecting” will display on the screen.
6. Press and hold ( ) to exit.
Disconnect Paired Devices
You can disconnect to an already paired Bluetooth device from your car stereo.
1. Press ME and then press VOL- until “Bluetooth” menu appears. Press ME.
2. Press VOL- until “Settings” appears and press ME.
3. Select “Paired devices” and press ME.
4. Press VOL+/VOL- and select the device you want to disconnect and then press ME.
5. Press VOL- until “Disconnect” appears and press ME. “Disconnected” will display on the screen.
6. Press and hold ( ) to exit.
Delete Paired Devices
You can delete successfully paired Bluetooth devices from your car stereo.
1. Press ME and rotate it to the right until “Bluetooth” menu appears. Press ME.
2. Press VOL- until “Settings” appears. Press ME.
3. Select “Paired devices”. Press ME.
4. Press VOL+/VOL- and select the device you want to delete. Press ME.
5. Press VOL- until “delete” appears. Press ME.
6. A delete confirmation will display. Press ( ) to confirm.
7. Press and hold ( ) to exit.
Volume Settings
User can set the volume level for ringtone, telephone, and microphone.
1. Press ME and rotate it to the right until “Bluetooth” menu appears. Press ME.
2. Press VOL- until “Settings” appears. Press ME.
3. Press VOL- until “Volume”. Press ME.
4. Press VOL+/VOL- and select between ringtone, telephone and microphone settings, then press ME.
• RINGTONE - ring tone volume.
• TELEPHONE – conversation volume.
• MICROPHONE - microphone volume.
5. Press VOL+/VOL- to adjust volume level.
6. Press and hold ( ) to exit.
- 12 -
E12
Automatic Answer
If there is an incoming call, you can set the car stereo to automatic take the calls without pressing any button.
1. Press ME and rotate it to the right until “Bluetooth” menu appears. Press ME.
2. Press VOL- until “Settings” appears. Press ME.
3. Press VOL- until “Automatic answer” appears. Press ME.
4. Select “Activate” to turn on automatic answer, “Deactivate” to turn off. Press ME.
5. Press and hold ( ) to exit.
Sorting Contacts
You can set the order of the phone book according to First/Lastname or Last/Firstname.
1. Press ME and rotate it to the right until “Bluetooth” menu appears. Press ME.
2. Press VOL- until “Settings” appears. Press ME.
3. Press VOL- until “Advanced settings” appears. Press ME.
4. Press VOL- and select “sort order”, then press ME.
5. Select “First/Lastname” or “Last/Firstname” and press ME.
6. Press and hold ( ) to exit.
Deleting Contacts
1. Press ME and rotate it to the right until “Bluetooth” menu appears. Press ME.
2. Press VOL- until “Settings” appears. Press ME.
3. Press VOL- until “Advanced settings” appears. Press ME.
4. Press VOL- and select “delete contact”, then press ME.
5. Select “One by one” or “All” and press ME.
6. Press and hold ( ) to exit.
* IMPORTANT INFORMATION:
BECAUSE OF THE GREAT VARIETY OF PRODUCTS WITH USB,SD AND MMC CARD PORTS AND THEIR
SOMETIMES QUITE MANUFACTURER-SPECIFIC FUNCTIONS WE CAN NEITHER GUARANTEE THAT
ALL DEVICES WILL BE RECOGNIZED NOR THAT ALL OPERATING OPTIONS THAT ARE POSSIBLE IN
THEORY WILL ACTUALLY WORK
• RESET
Reset button is placed on the housing.
The reset button is to be activated for the following reason:
• Initial installation of the unit when all wiring is completed.
• All the function button do not operate.
• Error symbol on the display.
RESET
TECHNICAL SPECIFICATIONS
CD/MP3 PLAYER SECTION
Signal to Noise Ratio > 60 dB
Channel Separation > 50 dB (1kHz)
Frequency Response 20Hz - 20 kHz
TUNER (FM)
Frequency range 87.5-108 MHz
Intermediate frequency 10.7 MHz
Sensitivity 2.8 µV
Stereo separation 30 dB
Signal to noise ratio 50 dB
Channel step 50 kHz
LINE-OUT
Output 350 mV
Impedance 10k Ohm
GENERAL
Power Supply 12V DC (10.8-15.6V allowable)
Speaker impedance 4 or 8 ohm
Output power 40W x 4CH
Note: Specication and the design are subject to possible modication without notice due to improvements.
ET- 47608 Blue
INSTRUKCJA OBSŁUGI
V1.1
Radioodtwarzacz Samochodowy CD/MP3
z czytnikiem kart MMC/SD, gniazdem USB
oraz
wbudowanym zestawem głośnomówiącym
Bluetooth
®
POLSKI

- 2 -
1
LOKALIZACJA ELEMNTÓW STERUJĄCYCH
1. WŁĄCZANIE/WYŁĄCZANIE URZĄDZENIA (PWR)
2. REGULACJA GŁO�NO�CI/WYBÓR FUNKCJI*:
BASS/TREBLE/FADER/BALANCE/EQUALIZER/
LOUDNESS/SPOKEN MENU/BEEP (VOL+/VOL-)
3. KONIEC POŁĄCZENIA/WYJ�CIE Z MENU
4. ZMIANA TRYBU PRACY: TUNER/CD/MP3/USB/
CZYTNIK KART SD/MMC (MODE)
5. WYBÓR GRUPY FM (BAND)
6. W TRYBIE RADIO: ZMIANA STACJI/CZĘSTOTLIWO?CI
W TRYBIE CD: ZMIANA UTWORU ( )
7. ZMIANA TRYBU WY�WIETLACZA (DISP)
8. NAWIĄZANIE POŁĄCZENIA
9. TRYB TELEFONU (PHONE)
10. WEJSCIE DO MENU/ZATWIERDZANIE ZMIAN (ME)
11. KLAWIATURA NUMERYCZNA
12. WY�WIETLACZ
13. OTWIERANIE PANELA URZĄDZENIA
14. ODTWARZANIE/PAUZA
15. SZCZELINA NAPĘDU CD/CDR/CDRW
16. WYSÓWANIE PŁYTY CD/CDR/CDRW
17. GNIAZDO USB
18. CZYTNIK KART SD/MMC
*OBJAŚNIENIE:
BASS – regulacja natężenia tonów niskich,
TREBLE – regulacja natężenia tonów wysokich,
FADER – regulacja stosunku głośności tylnych i przednich gło�ników
BALANCE – regulacja stosunku głośności lewej i prawej strony,
EQUALIZER – regulacja charakterystyki dźwi�ku,
LOUDNESS – wzmocnienie dolnego pasma d�wi�ku (tonów niskich),
SPOKEN MENU – regulacja głośności komunikatów głosowych,
BEEP – potwierdzanie zmian sygnałem dźwi�kowym.
- 3 -
POLSKI
2
ZŁCZA ISO
ZŁCZE A
1. -
2. -
3. -
4. Stałe zasilanie +13,8V (np. z gniazda zapalniczki)
5. Sterowanie anteny automatycznej
6. -
7. +13,8V (zasilanie ze stacyjki)
8. Uziemienie
UWAGA !
Zaleca się podłączenie pinu 7 złącza A do zasilania odłączanego stacyjką. Zapobiega to
rozładowaniu się akumulatora w przypadku niezamierzonego pozostawienia urządzenia
włączonego na dłuŜszy czas w samochodzie.
ZŁCZE B
1. Tylny prawy gło
śnik +
2. Tylny prawy głośnik –
3. Przedni prawy gło
śnik +
4. Przedni prawy głośnik –
5. Przedni lewy głośnik +
6. Przedni lewy głośnik –
7. Tylny lewy głośnik +
8. Tylny lewy głośnik –
UWAGA !
W przypadku uszkodzenia bezpiecznika naleŜy wymienić go na nowy o identycznych
parametrach. Jeśli sytuacja się powtórzy proszę sprawdzić instalację elektryczną pojazdu w
celu wykluczenia jej wadliwego działania.
MONTA
• Radioodtwarzacz naleŜy zamontować w miejscu do tego przeznaczonym przez
producenta pojazdu. Urządzenie powinno zostać umiejscowione w taki sposób, aby nie
ograniczać w Ŝaden sposób funkcji samochodu.
• Produkt nie powinien być naraŜony na silne działanie promieni słonecznych, wysokich
temperatur oraz nadmiernych wibracji.
• Do montaŜu naleŜy uŜyć tylko elementów znajdujących się na wyposaŜeniu radia. Radzi
się przed tą czynnością zdjąć takŜe panel urządzenia.
• Radio nie moŜe być umiejscowione pod kątem większym niŜ 30 stopni do poziomu, w
przeciwnym wypadku panel urządzenia nie będzie się otwierał prawidłowo.
•
Przed instalacj naley odkrci ruby zabezpieczajce napd optyczny !
- 4 -
3
MOCOWANIE RADIA DO WSPORNIKA
1. Radioodtwarzacz
2. Metalowa ramka
3. Deska rozdzielcza pojazdu
4. Śruba
5. Nakrętka
6. Nakrętka
7. Kokpit
8. Wspornik pionowy
9. Śruba
10. Tylny trzpień urządzenia
ZDEJMOWANIE/ZAKŁADANIE PANELA
•
Przed zdjęciem panela przedniego naleŜy upewnić się, Ŝe urządzenie jest
wyłączone (wciśnij przycisk PWR aby je wyłączyć),
•
Wciśnij przycisk , aby opuścić panel. Aby zdjąć/załoŜyć element naleŜy
postąpić zgodnie z poniŜszą ilustracją.
• Nie powinno się mocno wciskać lub wyszarpywać panela z zaczepów. Wszystkie
operacje naleŜy wykonywać bez uŜycia siły.
• Panel naleŜy przechowywać oraz transportować w przeznaczonym do tego
futerale.
• Nale
Ŝy unikać mocnego ściskania panela. W przeciwnym wypadku moŜna
doprowadzić do jego uszkodzenia.
- 5 -
POLSKI
4
PODSTAWOWE OPERACJE
Włącznie urządzenia
Naciśnięcie przycisku PWR spowoduje włączenie się urządzenia. Powtórzenie
operacji będzie skutkowało jego wyłączeniem.
Wyświetlanie czasu
Naciśnięcie przycisku DISP spowoduje wyświetlenie zegara. Gdy radio znajduje się
w trybie czuwania aktualny czas jest równie
Ŝ widoczny.
Wybór źródła dźwięku
Naciśnięcie przycisku MODE pozwala na wybór źródła dźwięku. Dostępne są
następujące opcje: Radio (TUNER) – Płyta (CD/MP3) – Pamięć USB (USB
MEMORY) – Karta pami
ęci (MEMORY CARD).
UWAGA ! Wybranie określonego nośnika z plikami MP3 jest moŜliwe tylko w przypadku, gdy
jest ono podłączone/dostępne dla urządzenia.
WKŁADANIE PŁYTY CD/CDR/CDRW DO NAPĘDU
1. Wciśnij przycisk REL, aby opuścić panel przedni.
2. Wsuń płytę etykietą do góry w szczelinę napędu.
3. Zamknij ręcznie panel radia.
WKŁADANIE PŁYTY CD/CDR/CDRW DO NAPĘDU
1. Wciśnij przycisk REL, aby opuścić panel przedni,
2. Wciśnij przycisk , aby wysunąć płytę z napędu,
3. Zamknij ręcznie panel radia.
Regulacja głośności
Naciśnięcie przycisku VOL+ lub VOL- spowoduje zmianę natęŜenia dźwięku w
głośnikach.
USTAWIENIE URZĄDZENIA
Ustawianie aktualnego czasu
1. Wciśnij przycisk ME, następnie VOL- do chwili gdy wyświetli się Clock. Wciśnij przycisk
ME powtórnie. Godzina zacznie migać.
2. Przyciskiem VOL+ lub VOL- dokonaj zmian. Wciśnij przycisk ME. Minuty zaczną migać.
3. Przyciskiem VOL+ lub VOL- dokonaj zmian. Po zakończeniu wciśnij przycisk ME.
4. Wciśnięcie przycisku spowoduje przejście do wyŜszego poziomu menu.
Przytrzymanie tego przycisku przez dłuŜszy czas skutkuje wyjściem z trybu ustawień.
Ustawienia dźwięku
1. Wciśnij przycisk ME, następnie VOL- do chwili gdy wyświetli się Audio. Wciśnij przycisk
ME powtórnie.
2. Przyciskiem VOL+ lub VOL- dokonaj wyboru pomiędzy pozycjami: BASS, TREBLE,
FADER, BALANCE, EQUALIZER, LOUDNESS, SPOKEN MENU, BEEP*
(patrz str.1)
.
Wciśnięcie przycisku ME spowoduje wejście w ustawienia wybranej pozycji.
UWAGA ! Regulacja BASS i TREBLE jest moŜliwa tylko w przypadku, gdy pozycja
EQUALIZER jest nieaktywna (ustawienie OFF).
3. Przyciskiem VOL+ lub VOL- dokonaj odpowiednich ustawień. Wciśnięcie przycisku ME
spowoduje zapisanie dokonanych zmian.
4. Wciśnięcie przycisku spowoduje przejście do wyŜszego poziomu menu.
Przytrzymanie tego przycisku przez dłuŜszy czas skutkuje wyjściem z trybu ustawień.

- 6 -
5
Regulacja wyświetlacza
1. Wciśnij przycisk ME, następnie VOL- do chwili gdy wyświetli się Display. Wciśnij
przycisk ME powtórnie, aby zatwierdzić.
2. Przyciskiem VOL+ lub VOL- dokonaj wyboru pomiędzy pozycjami:
• CONTRAST – regulacja kontrastu wyświetlacza,
• VIEW – ustawienie wyświetlacza w tryb negatyw/pozytyw
• COLOR – wybór koloru podświetlenia wyświetlacza
Wciśnięcie przycisku ME spowoduje wejście w ustawienia wybranej pozycji.
3. Przyciskiem VOL+ lub VOL- dokonaj odpowiednich ustawień. Wciśnięcie przycisku ME
spowoduje zapisanie dokonanych zmian.
4. Wciśnięcie przycisku spowoduje przejście do wyŜszego poziomu menu.
Przytrzymanie tego przycisku przez dłuŜszy czas skutkuje wyjściem z trybu ustawień.
Wybór języka
1. Wciśnij przycisk ME, następnie VOL- do chwili gdy wyświetli się Language. Wciśnij
przycisk ME powtórnie, aby zatwierdzić
2. Przyciskiem VOL+ lub VOL- dokonaj wyboru pomiędzy pozycjami: AUTOMATIC,
ENGLISH, FRANCAIS, ESPANOL, ITALIANO, DEAUTCH, NEDERLANDS,
PORTUGES.
Wciśnięcie przycisku ME spowoduje ustawienie wybranej pozycji.
3. Wciśnięcie przycisku spowoduje przejście do wyŜszego poziomu menu.
Przytrzymanie tego przycisku przez dłuŜszy czas skutkuje wyjściem z trybu ustawień.

- 7 -
POLSKI
6
RADIO
Przycisk BAND
Wciśnięcie przycisku BAND spowoduje przełączenie grupy FM (FM1-FM2-FM3). KaŜda
grupa umoŜliwia zaprogramowanie 6 stacji radiowych.
Wyszukiwanie i zapamiętywanie stacji radiowych
AUTOMATYCZNE PROGRAMOWANIE STACJI RADIOWYCH
1. Wciśnij przycisk ME, następnie VOL- do chwili gdy wyświetli się Tuner. Wciśnij przycisk
ME powtórnie.
2. Przyciskiem VOL+ lub VOL- wybierz opcję SEARCH. Wciśnij przycisk ME powtórnie.
3. Wybierz opcję AUTO-STORE. Wciśnij przycisk ME powtórnie.
UWAGA ! Pod kolejnymi sześcioma numerami zostaną zapisane stacje o najsilniejszym
sygnale. Aby odsłuchać wybranej rozgłośni wciśnij odpowiadający jej numer.
RĘCZNA REGULACJA CZĘSTOTLIWOŚCI RADIOWEJ
Gdy urządzenie działa w trybie radia, dłuŜsze wciśnięcie przycisków ( ) spowoduje
zmianę częstotliwości w dół lub górę.
Krótsze wciśnięcie tych przycisków spowoduje automatyczne przeszukiwanie pasma do
momentu odnalezienia stacji radiowej.
ZAPAMIĘTYWANIE STACJI RADIOWYCH
1. Wybierz odpowiednią grupę FM (FM1-FM2-FM3),
2. Znajdź wybraną stację radiową za pomocą przycisków ( )
3. Przytrzymaj dłuŜej przycisk 1,2,3,4,5 lub 6 do momentu pojawienia się odpowiedniej cyfry
na wyświetlaczu. Częstotliwość stacji zostanie zapisana pod wybranym klawiszem.
Wybór trybu STEREO/MONO
1. Wciśnij przycisk ME, następnie VOL- do chwili gdy wyświetli się Tuner. Wciśnij przycisk
ME powtórnie, aby zatwierdzić.
2. Przyciskiem VOL+ lub VOL- wybierz pozycję STEREO-MONO. Wciśnij przycisk ME
powtórnie.
3. Wybierz odpowiednią opcję. Wciśnij przycisk ME powtórnie.
4. Wciśnięcie przycisku spowoduje przejście do wyŜszego poziomu menu.
Przytrzymanie tego przycisku przez dłuŜszy czas skutkuje wyjściem z trybu ustawień.
Czułość radioodbiornika
1. Wciśnij przycisk ME, następnie VOL- do chwili gdy wyświetli się Tuner. Wciśnij przycisk
ME powtórnie, aby zatwierdzić.
2. Przyciskiem VOL+ lub VOL- wybierz opcję TUNER SENSIBILITY. Wciśnij przycisk ME
powtórnie.
3. Przyciskiem VOL+ lub VOL- dokonaj odpowiednich zmian. Wciśnięcie przycisku ME
spowoduje zapis wybranych opcji.
• LOCAL – powoduje odbiór stacji tylko o silnym sygnale,
• DISTANT – powoduje odbiór stacji o kaŜdym poziomie sygnału.
4. Wciśnięcie przycisku spowoduje przejście do wyŜszego poziomu menu.
Przytrzymanie tego przycisku przez dłuŜszy czas skutkuje wyjściem z trybu ustawień.
- 8 -
7
Funkcje RDS
RDS (Radio Data System) to cyfrowy system informacyjny bazujący na przekazie sygnału
FM. Oferuje on wiele serwisów informacyjnych oraz funkcji automatycznego dostrajania dla
urządzeń współpracujących z tym systemem.
AUTOMATYCZNE PROGRAMOWANIE STACJI RADIOWYCH WG TEMATU RDS
1. Wciśnij przycisk ME, następnie VOL- do chwili gdy wyświetli się Tuner. Wciśnij przycisk
ME powtórnie.
2. Przyciskiem VOL+ lub VOL- wybierz pozycję SEARCH. Wciśnij przycisk ME powtórnie.
3. Wybierz opcję BY TYPE. Wciśnij przycisk ME powtórnie.
4. Przyciskiem VOL+ lub VOL- wybierz temat RDS. Wciśnij przycisk ME powtórnie aby
potwierdzić zmiany.
TEMAT OPIS TEMAT OPIS
Pop music
Muzyka popularna
Education
Programy edukacyjne
Rock music
Muzyka rockowa
Drama
Teatr radiowy
Easy Listening m.
Muzyka prosta
Culture
Programy kulturalne
Light Classical
Muzyka klasyczna prosta
Science
Programy naukowe
Serious Classical
Muzyka klasyczna
Varied
Tematyka ogólna
Jazz music
Jazz
Weather
Informacje pogodowe
Country music
Muzyka country
Finance
Info ekonomiczne
National music
Muzyka narodowa
Children
Programy dla dzieci
Oldies music
Stare przeboje
Social Affairs
Sprawy socjalne
Folk music
Muzyka ludowa
Religion
Audycje religijne
Other music
Inna muzyka
Phone In
Telefony słuchaczy
News
Wiadomości
Travel
Programy podróŜnicze
Current Affairs
Dyskusje
Leisure
Odpoczynek
Information
Informacje
Sport
Sport
Documentary
Audycje dokumentalne
Ustawianie RDS
1. Wciśnij przycisk ME, następnie VOL- do chwili gdy wyświetli się Tuner. Wciśnij
przycisk ME powtórnie.
2. Przyciskiem VOL+ lub VOL- wybierz RDS OPTIONS. Wciśnij przycisk ME powtórnie.
3. Przyciskiem VOL+ lub VOL- dokonaj wyboru pomiędzy pozycjami:
RDS Scan – gdy opcja jest aktywna, radio będzie skanować częstotliwość w
poszukiwaniu wybranego tematu RDS
Traffic alert:
SEEK – gdy stacja radiowa nie emituje komunikatów drogowych (TP) przez 5
sek. radio przeskanuje częstotliwość w poszukiwaniu rozgłośni o innym kodzie
(PI) nadających takie informacje.
Alarm – aktywowanie informacji o zagroŜeniach i kataklizmach.
Region:
REGION ON – gdy funkcje AF (automatyczne szukanie najsilniejszego
sygnału wybranej stacji) lub PI SEEK są aktywne, wyszukiwane będą stacje o
tym samym kodzie PI co rozgłośnia aktualnie wybrana.
REGION OFF - gdy funkcje AF (szukanie najsilniejszego sygnału wybranej
stacji) lub PI SEEK są aktywne, kod PI nie będzie brany pod uwagę.
Mask
Wybór metody wyszukiwania alternatywnych stacji - o tym samym kodzie PI
co stacja aktualna (DPI) lub wszystkich dostępnych (All DPI).
Retune
Wybór okresu oczekiwania (Short/Long Time) do rozpoczęcia szukania nowej
rozgłośni z informacjami drogowymi (TP) po ich zaniku w aktualnej stacji.
Wciśnięcie przycisku ME spowoduje wejście w ustawienia wybranej pozycji.
- 9 -
POLSKI
8
ODTWARZANIE UTWORÓW Z
PŁYTY CD, NOŚNIKA USB I KART SD/MMC
Podstawowe operacje
1. DłuŜsze naciśnięcie przycisku lub spowoduje przewinięcie utworu w
wybranym kierunku.
2. Krótkie naciśnięcie przycisku lub spowoduje zmianę utworu w wybranym
kierunku.
3. Naciśnięcie przycisku spowoduje zatrzymanie odtwarzania utworu
(PAUZĘ). Powtórne jego uŜycie wznowi proces.
Wyszukiwanie poŜądanego utworu (tylko MP3)
Urządzenie dysponuje dwoma trybami wyszukiwania utworów MP3:
INTELLIGENT – przeszukuje pliki na podstawie pierwszej litery nazwy pliku MP3.
1. Wciśnij przycisk ME, następnie VOL- do chwili gdy wyświetli się CD/MP3/FLASH.
Wciśnij przycisk ME powtórnie.
2. Wybierz opcję SEARCH i wciśnij przycisk ME
3. Wybierz opcję INTELLIGENT i wciśnij przycisk ME
4. Przyciskiem VOL+ lub VOL- wybierz pierwszą literę nazwy pliku MP3. Wciśnij
przycisk ME.
5. Urządzenie wyświetli listę znalezionych utworów. Przyciskiem VOL+ lub VOL-
wybierz z listy docelowy plik. Zatwierdź wybór przyciskiem ME.
6. Wciśnięcie przycisku spowoduje przejście do wyŜszego poziomu menu.
Przytrzymanie tego przycisku przez dłuŜszy czas skutkuje wyjściem z trybu ustawień.
EXPLORER – pozwala wybrać konkretny utwór z katalogu MP3
1. Wciśnij przycisk ME, następnie VOL- do chwili gdy wyświetli się CD/MP3/FLASH.
Wciśnij przycisk ME powtórnie.
2. Wybierz opcję SEARCH i wciśnij przycisk ME
3. Wybierz opcję EXPLORER i wciśnij przycisk ME
4. Urządzenie wyświetli listę utworów MP3. Przyciskiem VOL+ lub VOL- wybierz z listy
docelowy plik. Wciśnij przycisk ME.
5. Aby przejść z podkatalogu do katalogu uŜyj przycisku .
6. Wciśnięcie przycisku spowoduje przejście do wyŜszego poziomu menu.
Przytrzymanie tego przycisku przez dłuŜszy czas skutkuje wyjściem z trybu ustawień.
Wybieranie utworu z klawiatury numerycznej
UŜywając klawiatury numerycznej moŜna wprowadzić liczbę odpowiadającą utworowi wg
jego kolejności na nośniku.
Np. dla pliku numer 90 naleŜy wcisnąć 9 i 0, dla pliku numer 100 naleŜy wcisnąć 1,0 oraz 0.
Powtarzanie sekwencji
Opcja ta pozwala powtarzać wybrany utwór lub całą sekwencję nagrań.
1. Wciśnij przycisk ME, następnie VOL- do chwili gdy wyświetli się CD/MP3/FLASH.
Wciśnij przycisk ME powtórnie.
2. Wybierz opcję REPEAT MODE i wciśnij przycisk ME
3. Przyciskiem VOL+ lub VOL- dokonaj odpowiednich zmian. Wciśnięcie przycisku ME
spowoduje zapis wybranych opcji.
• ALL – powtarza odtwarzanie całego nośnika,
• ONE – powtarza odtwarzanie bieŜącego utworu.
4. Wciśnięcie przycisku spowoduje przejście do wyŜszego poziomu menu.
Przytrzymanie tego przycisku przez dłuŜszy czas skutkuje wyjściem z trybu ustawień.

- 10 -
9
Odtwarzanie losowe
Opcja ta pozwala na odsłuchiwanie utworów w przypadkowej kolejności.
1. Wciśnij przycisk ME, następnie VOL- do chwili gdy wyświetli się CD/MP3/FLASH.
Wciśnij przycisk ME powtórnie.
2. Wybierz opcję RANDOM MODE i wciśnij przycisk ME
3. Przyciskiem VOL+ lub VOL- dokonaj wyboru pomiędzy Deactivate (wyłączony), a
Activate (włączony). Wciśnięcie przycisku ME spowoduje zapis wybranych opcji.
4. Wciśnięcie przycisku spowoduje przejście do wyŜszego poziomu menu.
Przytrzymanie tego przycisku przez dłuŜszy czas skutkuje wyjściem z trybu ustawień.
System antywstrząsowy (ESP)
Opcja ta zapobiega przerwom w odtwarzaniu CD podczas wstrząsów urządzenia.
1. Wciśnij przycisk ME, następnie VOL- do chwili gdy wyświetli się CD/MP3/FLASH.
Wciśnij przycisk ME powtórnie.
2. Wybierz opcję ESP i wciśnij przycisk ME
3. Przyciskiem VOL+ lub VOL- dokonaj odpowiednich zmian. Wciśnięcie przycisku ME
spowoduje zapis wybranych opcji.
• ESP 10s – radio przechowuje w pamięci 10s odtwarzanego materiału,
• ESP 40s – radio przechowuje w pamięci 40s odtwarzanego materiału.
4. Wciśnięcie przycisku spowoduje przejście do wyŜszego poziomu menu.
Przytrzymanie tego przycisku przez dłuŜszy czas skutkuje wyjściem z trybu ustawień.
Odczyt płyt wielosesyjnych
Opcja ta pozwala na odczyt płyt nagranych w trybie Multi-Session
1. Wciśnij przycisk ME, następnie VOL- do chwili gdy wyświetli się CD/MP3/FLASH.
Wciśnij przycisk ME powtórnie.
2. Wybierz opcję MULTI-SESSION i wciśnij przycisk ME
3. Przyciskiem VOL+ lub VOL- dokonaj wyboru pomiędzy Deactivate (wyłączone), a
Activate (włączone). Wciśnięcie przycisku ME spowoduje zapis wybranych opcji.
4. Wciśnięcie przycisku spowoduje przejście do wyŜszego poziomu menu.
Przytrzymanie tego przycisku przez dłuŜszy czas skutkuje wyjściem z trybu ustawień.
UWAGA ! Z powodu stosowania wielu standardów komunikacji pomiędzy pamięciami USB i
kartami SD/MMC a urządzeniami odczytującymi, mogą wystąpić problemy z rozpoznaniem
niektórych nośników w odtwarzaczu ET- 47608 Blue.
Firma Easy Touch dołoŜyła wszelkich starań, aby radioodtwarzacz obsługiwał
najpopularniejsze typy pamięci przenośnych. Jeśli jednak nośnik nie jest rozpoznawany
przez radioodtwarzacz, moŜe okazać się konieczne uŜycie innego produktu do
magazynowania utworów MP3.
- 11 -
POLSKI
10
BLUETOOTH
®
UŜywanie radioodtwarzacza w trybie Hands-free (Bluetooth)
UWAGA !
Z powodu wielu standardów komunikacji Bluetooth w telefonach GSM mog wystpi
problemy z rozpoznaniem niektórych urzdze. Jeli podczas próby połczenia
radioodtwarzacz si zawiesi, naley otworzy i zamkn panel przedni lub wcisn przycisk
RESET znajdujcy si w radiu (umiejscowiony za panelem, na przedniej ciance).
WANE !
Aby połczy telefon GSM z urzdzeniem ET- 47608 Blue naley: wej do menu
BLUETOOTH -> SETTINGS -> ADVANCED SETTINGS -> PAIR WITH PHONE. Pojawi si
lista obsługiwanych modeli GSM. Naley wybra odpowiedni model. Na wywietlaczu pojawi
si komunikat „Pair your phone”. Nastpnie naley postpowa zgodnie z instrukcj z
akapitu ŁĄCZENIE TELEFONU Z RADIOODTWARZACZEM.
- 12 -
11
ŁĄCZENIE TELEFONU Z RADIOODTWARZACZEM
Zanim telefon GSM zacznie współdziałać z ET- 47608 Blue naleŜy połączyć (sparować)
obydwa urządzenia.
1. Włącz komunikację Bluetooth w menu telefonu GSM,
2. Rozpocznij wyszukiwanie urządzeń Bluetooth, telefon powinien odszukać Car Radio lub
Rhytm’n Blue.
3. Dodaj znalezione urządzenie. Gdy padnie pytanie o hasło, wpisz kod 1234.
4. Poprawnie przeprowadzona procedura zakończona zostanie komunikatem
SUCCESSFUL PAIRED, a w prawym górnym rogu wyświetlacza pojawi się logo .
ODBIERANIE/KOŃCZENIE POŁĄCZENIA
Aby odebrać połączenie, naleŜy wcisnąć . Zakończenie połączenia odbywa się po
uŜyciu przycisku .
TRYB DYSKRETNY
Ten tryb pozwala na przeprowadzanie rozmów telefonicznych tylko za pośrednictwem
telefonu GSM (tryb głośnomówiący zostaje wyłączony).
Podczas rozmowy naleŜy wcisnąć . Od tego momentu połączenie będzie moŜna
prowadzić tylko za pośrednictwem słuchawki telefonu GSM. Aby powrócić do trybu
głośnomówiącego, naleŜy ponownie uŜyć przycisku .
SYNCHRONIZACJA KSIĄśKI TELEFONICZNEJ
Niektóre telefony GSM automatycznie przesyłają dane ze Spisu numerów do
radioodtwarzacza. Jeśli jednak słuchawka nie obsługuje tej funkcji, moŜna ten proces
przeprowadzić samodzielnie wykorzystując funkcję OBJECT PUSH w telefonie
komórkowym.
WYKONYWANIE POŁĄCZEŃ ZA POŚREDNICTWEM RADIOODTWARZACZA.
Zanim wykonasz połączenie, upewnij się czy telefon GSM został prawidłowo połączony z
urządzeniem ET-47608 Blue za pośrednictwem transmisji Bluetooth.
1. Wciśnij przycisk PHONE,
2. Wybierz numer rozmówcy za pomocą klawiatury numerycznej radioodtwarzacza,
3. Wciśnij przycisk , aby nawiązać połączenie.
4. Wciśnij przycisk , aby zakończyć połączenie.
WYKONYWANIE POŁĄCZEŃ ZA POŚREDNICTWEM KOMEND GŁOSOWYCH
Zanim wykonasz połączenie w tym trybie, upewnij się czy telefon GSM został prawidłowo
połączony z urządzeniem ET-47608 Blue za pośrednictwem transmisji Bluetooth. Konieczne
jest takŜe przypisanie znaku głosowego do wybranego rekordu w Spisie numerów.
1. Wciśnij przycisk , radioodtwarzacz automatycznie ucichnie.
2. Po sygnale dźwiękowym wypowiedz nazwę kontaktu. Numer zapisany w Spisie numerów
zostanie automatycznie wybrany.
3. Wciśnij przycisk , aby zakończyć połączenie.
WYKONYWANIE POŁĄCZEŃ ZA POŚREDNICTWEM KOMEND GŁOSOWYCH I SŁÓW
KLUCZOWYCH
Kiedy zostaną zapisane głosowo nazwy kontaktów, komendy głosowe i słowo specjalne
„Phone (fon)” połączenia moŜna realizować w następujący sposób:
1. NaleŜy uaktywnić odpowiednią opcję w menu: BLUETOOTH -> VOICE CMDS (VOICE
COMMANDS) -> KEYWORDS -> PHONE -> Activate
2. Wciśnij przycisk , radioodtwarzacz automatycznie ucichnie. Słyszalny będzie
sygnał (BEEP)
3. Wypowiedz: „Phone (fon)”… usłyszysz BEEP… np. „Anna” … usłyszysz BEEP … „Home
(hołm)”. W tym momencie urządzenie powinno wybrać telefon domowy Anny.
4. Gdy Spis numerów jest prawidłowo skonfigurowany, podczas oczekiwania na odebranie
połączenia nadchodzącego powinien być słyszalny głos wymawiający nazwę
dzwoniącego.
- 13 -
POLSKI
12
WYKONYWANIE POŁĄCZEŃ ZA POŚREDNICTWEM SPISU NUMERÓW
Aby wykonać połączenie z osobą zapisaną w Spisie numerów postępuj w następujący
sposób:
1. Wciśnij przycisk ME, następnie VOL- do chwili gdy wyświetli się BLUETOOTH. Wciśnij
przycisk ME powtórnie, aby zatwierdzić.
2. Wybierz opcję PHONE BOOK i wciśnij przycisk ME
3. Przyciskiem VOL+ lub VOL- wybierz pierwszą literę szukanego kontaktu. Wciśnij
przycisk ME.
4. Przyciskiem VOL+ lub VOL- wybierz numer szukanego kontaktu. Wciśnij przycisk
, aby nawiązać połączenie.
5. Wciśnij przycisk , aby zakończyć połączenie.
UWAGA !
Istnieje moŜliwość szybkiego dostania się do Spisu numerów. W trybie Bluetooth wciśnij
przycisk PWR.
NUMERY POŁĄCZEŃ NIEODEBRANYCH, WYKONANYCH I ODEBRANYCH
Po synchronizacji radioodtwarzacza z telefonem zapamiętywane są numery dla połączeń
nieodebranych, wykonanych oraz odebranych. Aby je przeglądać i uŜywać w celu
nawiązania rozmowy naleŜy zastosować się do poniŜszej procedury:
1. Wciśnij przycisk ME, następnie VOL- do chwili gdy wyświetli się BLUETOOTH. Wciśnij
przycisk ME powtórnie, aby zatwierdzić.
2. Przyciskiem VOL+ lub VOL- wybierz opcję CALLS. Wciśnij przycisk ME powtórnie.
3. Przyciskiem VOL+ lub VOL- wybierz pomiędzy MISSED CALLS, RECEIVED CALLS,
CALLS MADE. Wciśnij przycisk ME, aby zatwierdzić.
4. Przyciskiem VOL+ lub VOL- wybierz odpowiedni numer telefonu. Wciśnij przycisk
, aby nawiązać połączenie.
5. Wciśnij przycisk , aby zakończyć połączenie.
ROZPOZNAWANIE KOMEND GŁOSOWYCH
Istnieje moŜliwość rozpoznawania komend głosowych przez radioodtwarzacz w trybie
głośnomówiącym Bluetooth. Aby opcja była aktywna, Spis numerów musi być
zaimportowany do urządzenia ET-47608 Blue. W pierwszej kolejności naleŜy nagrać słowa
odpowiadające pozycjom HOME (dom), WORK (praca), OFFICE (biuro) oraz słowo – klucz
PHONE (telefon).
WPROWADZANIE ZAPISU DŹWIĘKOWEGO REKORDÓW DO SPISU NUMERÓW
1. Wciśnij przycisk ME, następnie VOL- do chwili gdy wyświetli się BLUETOOTH. Wciśnij
przycisk ME powtórnie, aby zatwierdzić.
2. Przyciskiem VOL+ lub VOL- wybierz opcję VOICE CMDS (VOICE COMMANDS). Wciśnij
przycisk ME powtórnie.
3. Wybierz opcję PHONE BOOK i wciśnij przycisk ME
4. Przyciskiem VOL+ lub VOL- wybierz pierwszą literę szukanego kontaktu. Wciśnij
przycisk ME.
5. Przyciskiem VOL+ lub VOL- wybierz numer szukanego kontaktu. Po sygnale
dźwiękowym BEEP rozpocznij nagrywanie znaku głosowego dla tego rekordu. Wciśnij
przycisk ME, aby nagrać dźwięk ponownie (konieczna operacja).
6. UŜycie przycisku spowoduje wyjście z menu.
- 14 -
13
WPROWADZANIE ZAPISU DŹWIĘKOWEGO SŁÓW KLUCZOWYCH
1. Wciśnij przycisk ME, następnie VOL- do chwili gdy wyświetli się BLUETOOTH. Wciśnij
przycisk ME powtórnie, aby zatwierdzić.
2. Przyciskiem VOL+ lub VOL- wybierz opcję VOICE CMDS (VOICE COMMANDS). Wciśnij
przycisk ME powtórnie.
3. Wybierz opcję KEYWORDS i wciśnij przycisk ME
4. Przyciskiem VOL+ lub VOL- wybierz odpowiednie słowo do zapisu. Wciśnij przycisk ME.
5. Po sygnale dźwiękowym BEEP wypowiedź jego odpowiednik. Wciśnij przycisk ME, aby
nagrać dźwięk ponownie (konieczna operacja).
6. Wykonaj punkty 3-5 dla kaŜdej pozycji.
7. UŜycie przycisku spowoduje wyjście z menu.
REGULACJA POZIOMU GŁOŚNOŚCI
1. Wciśnij przycisk ME, następnie VOL- do chwili gdy wyświetli się BLUETOOTH. Wciśnij
przycisk ME powtórnie, aby zatwierdzić.
2. Przyciskiem VOL+ lub VOL- wybierz opcję SETTINGS. Wciśnij przycisk ME powtórnie.
3. Przyciskiem VOL+ lub VOL- wybierz opcję VOLUME. Wciśnij przycisk ME powtórnie.
5. Przyciskiem VOL+ lub VOL- dokonaj wyboru pomiędzy pozycjami:
• RINGTONE – regulacja głośności sygnału dzwonka,
• TELEPHONE – regulacja głośności rozmowy telefonicznej,
• MICROPHONE – regulacja czułości mikrofonu.
Wciśnięcie przycisku ME spowoduje wejście w ustawienia wybranej pozycji. Regulacja
poziomów odbywa się za pomocą klawiszy VOL+ i VOL- .
6. UŜycie przycisku spowoduje wyjście z menu.
AUTOMATYCZNY ODBIÓR POŁĄCZEŃ
MoŜna tak zaprogramować urządzenie, Ŝe kaŜde nadchodzące połączenie będzie
automatycznie odbierane, bez potrzeby uŜywania przycisków.
1. Wciśnij przycisk ME, następnie VOL- do chwili gdy wyświetli się BLUETOOTH. Wciśnij
przycisk ME powtórnie, aby zatwierdzić.
2. Przyciskiem VOL+ lub VOL- wybierz opcję SETTINGS. Wciśnij przycisk ME powtórnie.
3. Przyciskiem VOL+ lub VOL- wybierz opcję AUTOMATIC ANSWER. Wciśnij przycisk ME
powtórnie.
4. Wybierz Activate – aby aktywować opcję lub Deactivate – aby wyłączyć.
5. UŜycie przycisku spowoduje wyjście z menu.
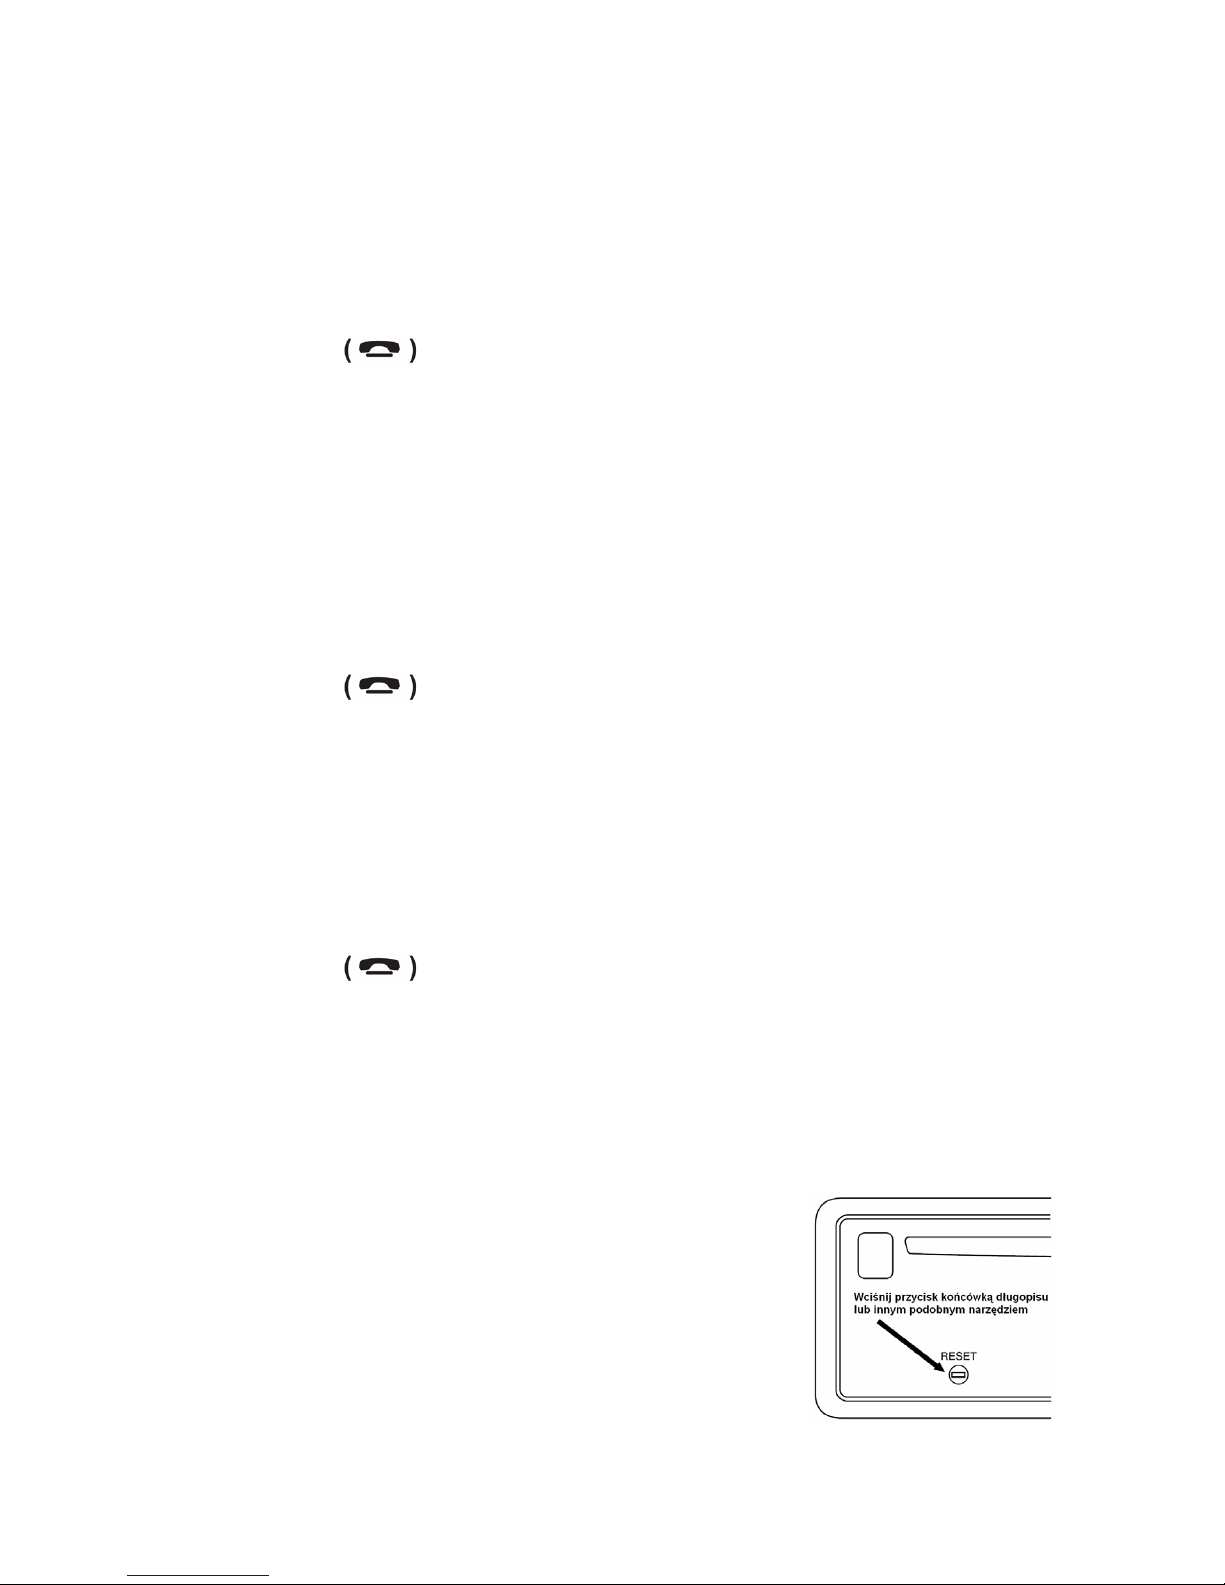
RESET USTAWIEŃ
Funkcja ta powoduje powrót do ustawień fabrycznych oraz wymazanie wszystkich zmian
dokonanych przez uŜytkownika urządzenia (wraz usunięciem wpisów w Spisie numerów
menu BLUETOOTH).
Opcja RESET moŜe okazać się uŜyteczna gdy:
• Przyciski na obudowie i panelu nie reagują
• Na wyświetlaczu widnieje napis/symbol ERROR
PRZYCISK RESET ZNAJDUJE SIĘ NA PRZEDNIEJ ŚCIANIE
OBUDOWY RADIOODBIORNIKA ET-47608 Blue
- 15 -
POLSKI
14
SPECYFIKACJA TECHNICZNA
ODTWARZACZ CD/MP3
Stosunek szumów do poziomu sygnału > 60 dB
Separacja kanałów > 50 dB (1kHz)
Zakres obsługiwanych częstotliwości audio 20Hz – 20kHz
TUNER FM
Zakres częstotliwości UKF 87,5 – 108 MHz
Częstotliwość pośrednia 10,7 MHz
Czułość odbiornika 2,8 µV
Separacja kanałów Stereo 30 dB
Stosunek szumów do poziomu sygnału 50 db
Krok kanału 50 kHz
WYJŚCIE LINE-OUT
Wyjście 350mV
Impedancja 10k Ohm
OGÓLNE
Zasilanie urządzenia 13,8V DC (10,8V do 15,6V)
Impedancja głośników 4 lub 8 ohm
Moc wzmacniacza 40W x 4CH
To oznakowanie oznacza, Ŝe produktu nie wolno wyrzucać razem z innymi
odpadami z gospodarstw domowych. Polskie prawo zabrania pod karą
grzywny łączenia zuŜytego sprzętu elektrycznego i elektronicznego wraz z
innymi odpadami.
Dbając o pozbycie się produktu w naleŜyty sposób, moŜna zapobiec
potencjalnym negatywnym skutkom dla środowiska naturalnego i zdrowia
ludzkiego, jakie mogłyby wyniknąć z niewłaściwego postępowania z
odpadami powstałymi ze zuŜytego sprzętu elektronicznego.
WSZELKIE PRAWA ZASTRZEśONE
www.easy-touch.com

- 16 -
 Loading...