

Page 1

User's manual OnCourse Navigator | 4
User's manual
OnCourse Navigator | 4
as on October 2004
Page 2

Impressum
Easy PocketNAV.com LLC.
6050 Peachtree PKWY
STE 240-328
Norcross, GA 30092
The information contained herein may be changed at any time witho ut prior notification. This manual nor any
parts thereof may not be reproduced for any purpose whatsoever without the express written consent of
Easy PocketNAV.com LLC, nor transmitted in any form either electronically or mechanically, including
photocopying and recording.
© Copyright 2004, Easy PocketNAV.com LLC
All rights reserved.
Page 3

Table of contents
1 Introduction................................................................3
1.1 Important safety information.............................................4
1.1.1 Safety information on navigation.............................4
1.1.2 Safety information on the GPS receiver ....................5
1.1.3 Safety information on the installation in the vehicle....5
1.2 Search facilities and conventions........................................6
1.3 Liability ..........................................................................6
1.3.1 Support ...............................................................7
1.4 Trademarks ....................................................................7
2 Installation and quick-start guide...............................9
2.1 Operating mode of your navigation system........................ 10
2.1.1 Hardware components at large.............................. 10
2.2 Installation of the navigation system ................................12
2.2.1 Software installation on your PC and on your Pocket PC
(Case A)....................................................................... 13
2.2.2 Software installation on your Pocket PC (Case B)..... 14
2.2.3 Transferring a map extract to your Pocket PC (Case A)
14
2.2.4 Software registration and activation....................... 15
2.2.5 Installation in the vehicle...................................... 16
2.2.6 Starting navigation.............................................. 20
User's manual OnCourse Navigator | 4
3 Operating the navigation software............................23
3.1 Starting OnCourse Navigator........................................... 24
3.1.1 Basic settings ..................................................... 25
3.2 User interface and basic functionality................................ 27
3.2.1 Icons................................................................. 27
3.3 Indicating destinations....................................................30
3.3.1 Entering a destination manually.............................31
3.3.2 Selecting a Point of Interest.................................. 33
3.3.3 Selecting destinations from the Outlook contacts list 37
3.3.4 Indicating destinations on the map ........................ 39
3.3.5 Saved destinations .............................................. 41
3.3.6 Recent destinations ............................................. 42
3.3.7 Save and use your home address .......................... 43
3.3.8 Voice command .................................................. 44
3.4 Working with the map .................................................... 45
3.4.1 Operating the map .............................................. 46
3.4.2 Representation of the map in navigation mode ........ 50
3.4.3 Displaying additional information on the map .......... 52
4 Navigation and Itinerary planning ............................55
4.1 General notes on navigation............................................ 56
4.2 Navigating to a destination.............................................. 57
4.3 Navigating to several destinations (Itinerary planning)........ 59
4.3.1 Working on itineraries, storage and management..... 61
4.3.2 Simulating the route............................................ 62
4.4 Functions which are useful for navigation .......................... 63
User's manual Table of contents i
Page 4

User's manual OnCourse Navigator | 4
4.4.1 Displaying the route list ....................................... 63
4.4.2 Adding a stage point during navigation................... 64
4.4.3 Blocking a route section ....................................... 65
4.4.4 Keeping the logbook............................................ 66
5 Additional software: MapExport................................69
5.1 Functionality of MapExport.............................................. 70
5.1.1 Map export and transfer....................................... 70
5.1.2 Transfer of Standard map extracts......................... 70
5.2 User’s interface and basic functionality.............................. 71
5.2.1 Starting MapExport.............................................. 71
5.2.2 Operating elements ............................................. 73
5.2.3 Hot keys ............................................................ 74
5.2.4 Structure of the windows...................................... 75
5.3 Working with maps ........................................................ 76
5.3.1 Loading and displaying maps ................................ 76
5.3.2 Icons................................................................. 78
5.4 Exporting segments of the map ....................................... 80
5.4.1 Corridor surrounding an itinerary........................... 80
5.4.2 Area.................................................................. 89
5.5 Transferring segments of the base map ............................ 93
6 Additional software: SkinEditor.................................97
6.1 Skin creation ................................................................. 98
6.2 Selecting a Skin in OnCourse Navigator............................. 99
7 Appendix.................................................................101
7.1 Annex A: Configuration of OnCourse Navigator ................ 102
7.1.1 Map information................................................ 102
7.1.2 Route information.............................................. 103
7.1.3 Volume............................................................ 103
7.1.4 Representation.................................................. 104
7.1.5 Auto mode ....................................................... 104
7.1.6 Speed profile .................................................... 104
7.1.7 Logbook........................................................... 105
7.1.8 Keypad............................................................ 105
7.1.9 Itinerary .......................................................... 105
7.1.10 Format........................................................... 105
7.1.11 GPS............................................................... 106
7.1.12 Home address................................................. 106
7.2 Annex B: Problem solutions........................................... 107
7.2.1 Installation....................................................... 107
7.2.2 Performance..................................................... 107
7.2.3 GPS receiver..................................................... 108
8 Glossary..................................................................109
9 Index ......................................................................111
Page 5

User's manual OnCourse Navigator | 4
1 Introduction
Topics covered in this chapter:
1.1 Important safety information page 4
Safety information on navigation
Safety information on the GPS receiver
Safety information on the installation in the vehicle
1.2 Search facilities and conventions page 6
1.3 Liability page 6
Support
1.4 Trademarks page 7
Introduction - 3 -
Page 6

User's manual OnCourse Navigator | 4
1.1 Important safety information
Note In your own interest, read the following notices and safety
information carefully before starting up your navigation system.
1.1.1 Safety information on navigation
The use of OnCourse Navigator may only be effected at your
own risk.
Attention: To protect yourself and others from accidents please
do not operate the navigation system while driving!
Attention: You must not look at the display except when it is
absolutely safe to do so!
Attention: The road layout and the traffic signs are absolutely
prior to the instructions of the navigation system.
Attention: You must not follow the instructions of OnCourse
Navigator except when the circumstances and the road traffic
regulations allow doing so. OnCourse Navigator will guide you
to your destination even when you have left your planned
itinerary..
Notice: We recommend to effect route planning before beginning
the journey. If you are on the road and you want to establish a
new itinerary, please drive to the next parking site!
Notice: If you have not understood the instructions or if you are
not sure about what to do next you may quickly refer to the map
or arrow view of your navigation system.
Introduction - 4 -
Page 7

User's manual OnCourse Navigator | 4
1.1.2 Safety information on the GPS receiver
Attention: As it is not waterproof, do not expose your GPS
receiver to water!
Attention: Do not install the cable next to security relevant
equipment and supply lines.
Attention: Please check the security relevant equipment when
you have installed the navigation system.
Attention: The GPS receiver should be disconnected from the
power supply while your car is parking. As it spends energy
permanently you might risk discharging the car battery.
Attention: The installation of the GPS receiver must not interfere
with the sure operation of your car.
Notice: Do not varnish the GPS receiver. Doing so might impede
the reception of GPS signals.
Notice: Do not use any harsh solvents for cleaning the GPS
receiver. A damp cloth is sufficient! You might damage the case
of the GPS receiver.
Notice: Do not unplug by pulling the cable. This might damage
the cable!
Notice: Do not fold the cable. Check that the cable may not be
damaged by any sharp object.
1.1.3 Safety information on the installation in the vehicle
Attention: Do not fix the holder within the deployment area of
airbags.
Attention: When you install the holder, please check that it may
not constitute any safety risk, even in case of an accident.
Introduction - 5 -
Page 8

User's manual OnCourse Navigator | 4
1.2 Search facilities and conventions
Find information
quickly
Conventions The conventions on the fonts and symbols used in this manual
This manual offers the following search facilities:
Ù In the footnote at the bottom of the page, you may check
which chapter and which section you are actually reading.
Ù A glossary at the end of the manual contains explanations
on the technical terms used in this manual.
Ù An index at the end of the manual allows precise search
for the information contained in this manual.
are explained in the two following tables:
Font Use
bold
bold italic Registered names and trademarks.
SMALL CAPITALS Window and dialogue box titles.
Symbol Use
Buttons, icons, names of entry fields,
and elements of the software’s user
interface. Also used for highlighting
warnings and notices.
Indicates hints and notices that may
ease the use of OnCourse Navigator.
Indicates additional information.
Warns against dangers that might cause
damage to objects and persons.
1.3 Liability
Limitation of liability The software and the manual are subject to change without
notice. Easy PocketNAV.com LLC may not be liable for the
correctness of the information contained in this manual nor for
damages resulting from the use of this manual.
To improve the quality of our products and our services, we
appreciate all suggestions for improvement and all error notices.
Introduction - 6 -
Page 9

1.3.1 Support
You need help? Send an email to
User's manual OnCourse Navigator | 4
support@OnCourseNavigator.com
You may also find further information on the web site of Easy
PocketNAV.com LLC (www.OnCourseNavigator.com
).
1.4 Trademarks
Registered
trademarks
Ù Outlook, Windows and ActiveSync are registered
All brands and trademarks mentioned in this document are
possibly registered by third party and subject to the current
legislation and to the rights of their respective owners without
reservation. All mentioned names of products, societies, or
brands may be registered trademarks of their respective owners.
Every right that is not explicitly accorded is reserved.
The absence of an explicit labeling of registered trademarks does
not allow the conclusion that this brand was not subject to the
rights of third party.
trademarks of the Microsoft Corporation.
Introduction - 7 -
Page 10

Page 11

User's manual OnCourse Navigator | 4
2 Installation and quick-start
guide
Topics covered in this chapter:
2.1 Operating mode of your navigation system page 10
Hardware components at large
2.2 Installation of the navigation system page 12
Software installation on your PC and on your Pocket PC (Case A)
Software installation on your Pocket PC (Case B)
Transferring a map extract to your Pocket PC (Case A)
Software registration and activation
Installation in the vehicle
Starting navigation
Installation and quick-start guide - 9 -
Page 12
User's manual OnCourse Navigator | 4
2.1 Operating mode of your navigation system
OnCourse Navigator The time of complicated and frustrating inquiries on the righ t way
in folded maps is over. From now on OnCourse Navigator, your
navigation system, will guide you, based on satellite information,
quickly and safely to your destination.
Scope of services With OnCourse Navigator you will not only arrive quickly and
safely at your destination. You may also
Ù record a logbook,
Ù use the addresses in Microsoft Outlook for navigation,
Ù enter several route points,
Ù define your own areas and corridors of the base map.
GPS-based
navigation
Based on satellites the Global Positioning System (GPS)
determines your current geographical position. The GPS has
originally been developed as a weapon guidance system for the
American forces.
Operating mode of
the GPS
The GPS is based on 24 satellites, which are in orbit round the
earth. They are permanently emitting the time and their current
position. The GPS receiver receives this information and
calculates the longitude and the latitude of its own actual
position.
The signals of at least three satellites are needed to determine
the longitude and the latitude. With the signals of at least four
satellites the elevation may be calculated, too. The determination
has an accuracy of about 3 yards.
2.1.1 Hardware components at large
Hardware
components of your
navigation system
Installation and quick-start guide - 10 -
Page 13

User's manual OnCourse Navigator | 4
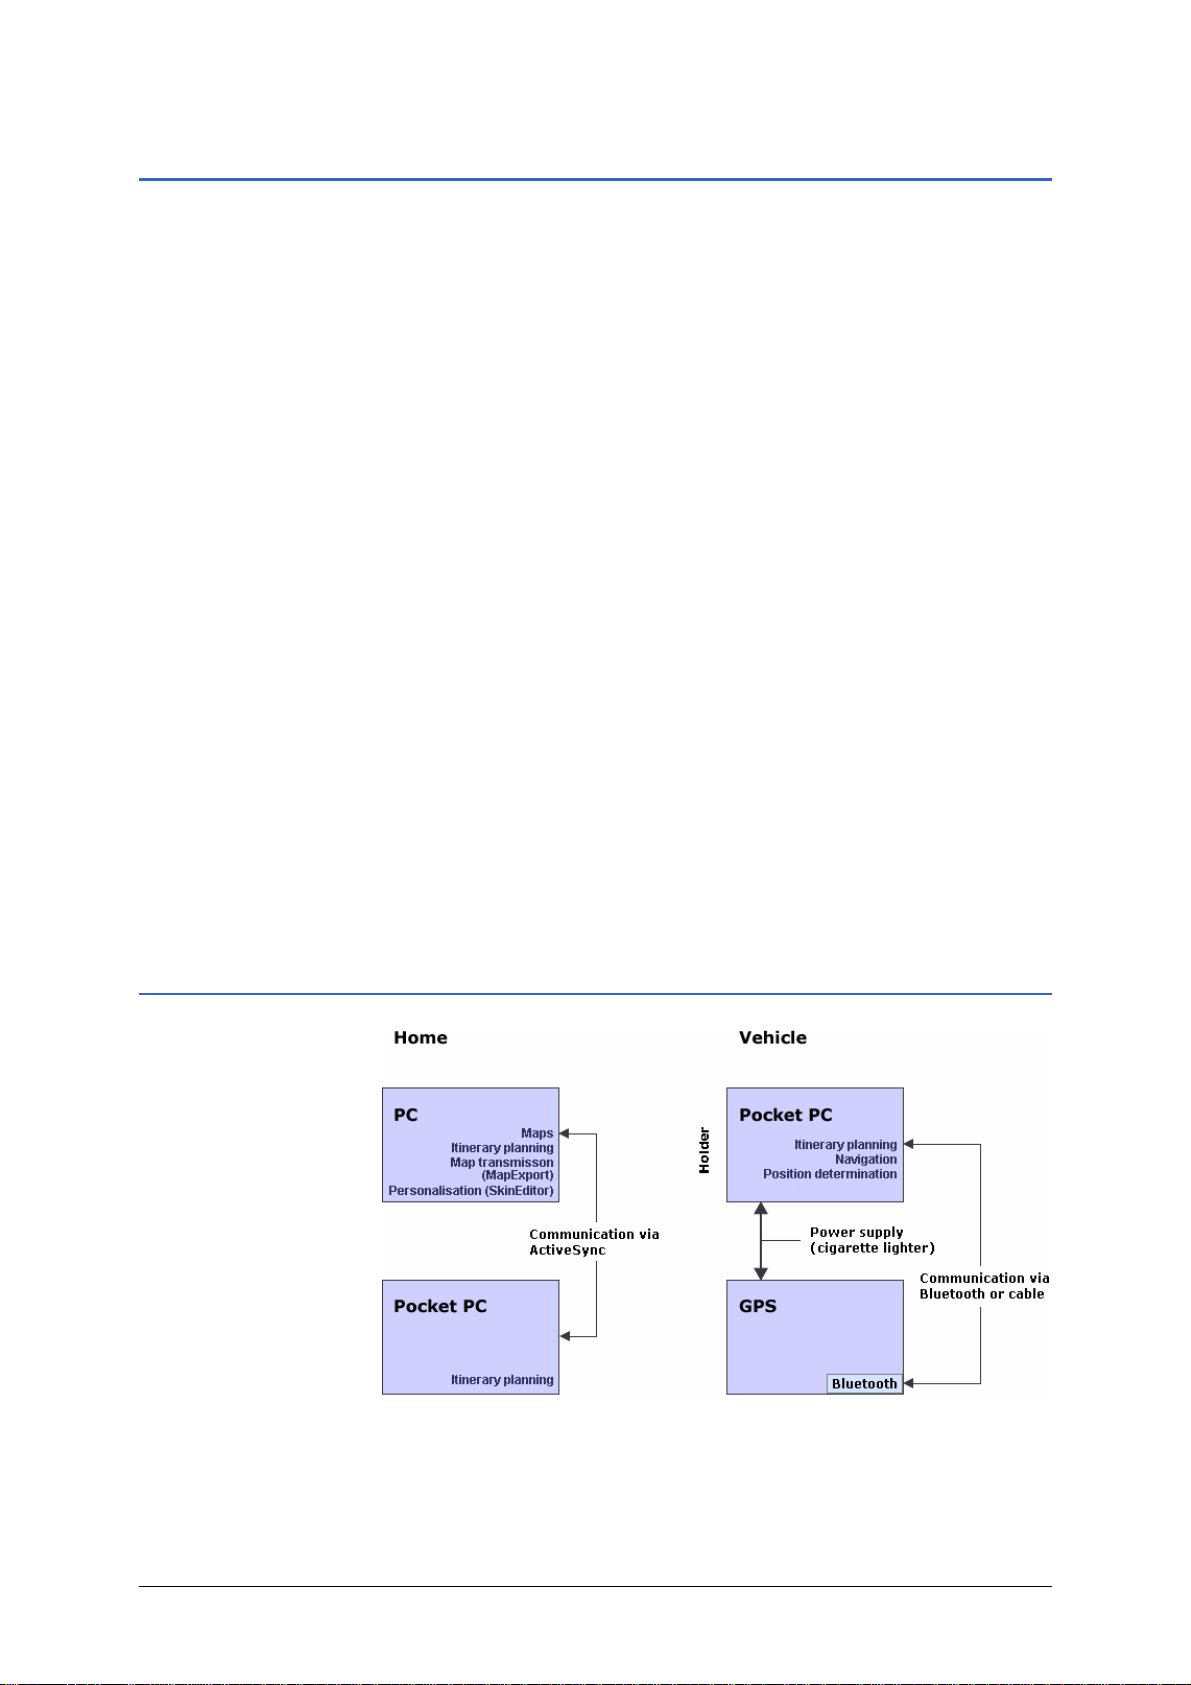
Operating mode of
your navigation
system
The so-called base map (e.g. of USA and Canada) and a software
designed for exporting extracts of this base map are installed on
your PC (if you have purchased the version with 4 CD-ROMs). Via
ActiveSync you may transmit areas of the base map to your
Pocket PC. Itinerary planning may be done as well on your PC as
on your Pocket PC.
Notice: As your Pocket PC disposes of limited memory (64MB in
most of the cases) you may transmit only areas of the base map.
If you dispose of a 256MB storage card you may transmit e.g. a
map that covers several Federal States of the United States to
your Pocket PC.
On your Pocket PC, you may use the map for navigation by
defining the destination. The software communicates with the
GPS receiver (via connection cable or via Bluetooth) to determine
your current position.
PC Storage of the base map (e.g. of USA and Canada)
Exportation of areas of the base map (MapExport)
Skin design (SkinEditor)
Itinerary planning
Transfer of segments of the base map to the Pocket PC
Pocket PC Itinerary planning based on the transferred areas of the base
map
Street navigation (with GPS receiver)
GPS Determination of the current position
Bluetooth: wireless communication (optional)
Installation and quick-start guide - 11 -
Page 14
User's manual OnCourse Navigator | 4
2.2 Installation of the navigation system
Quick-start guide… Depending on the version you have purchased, you must carry
out the following procedures before using OnCourse Navigator:
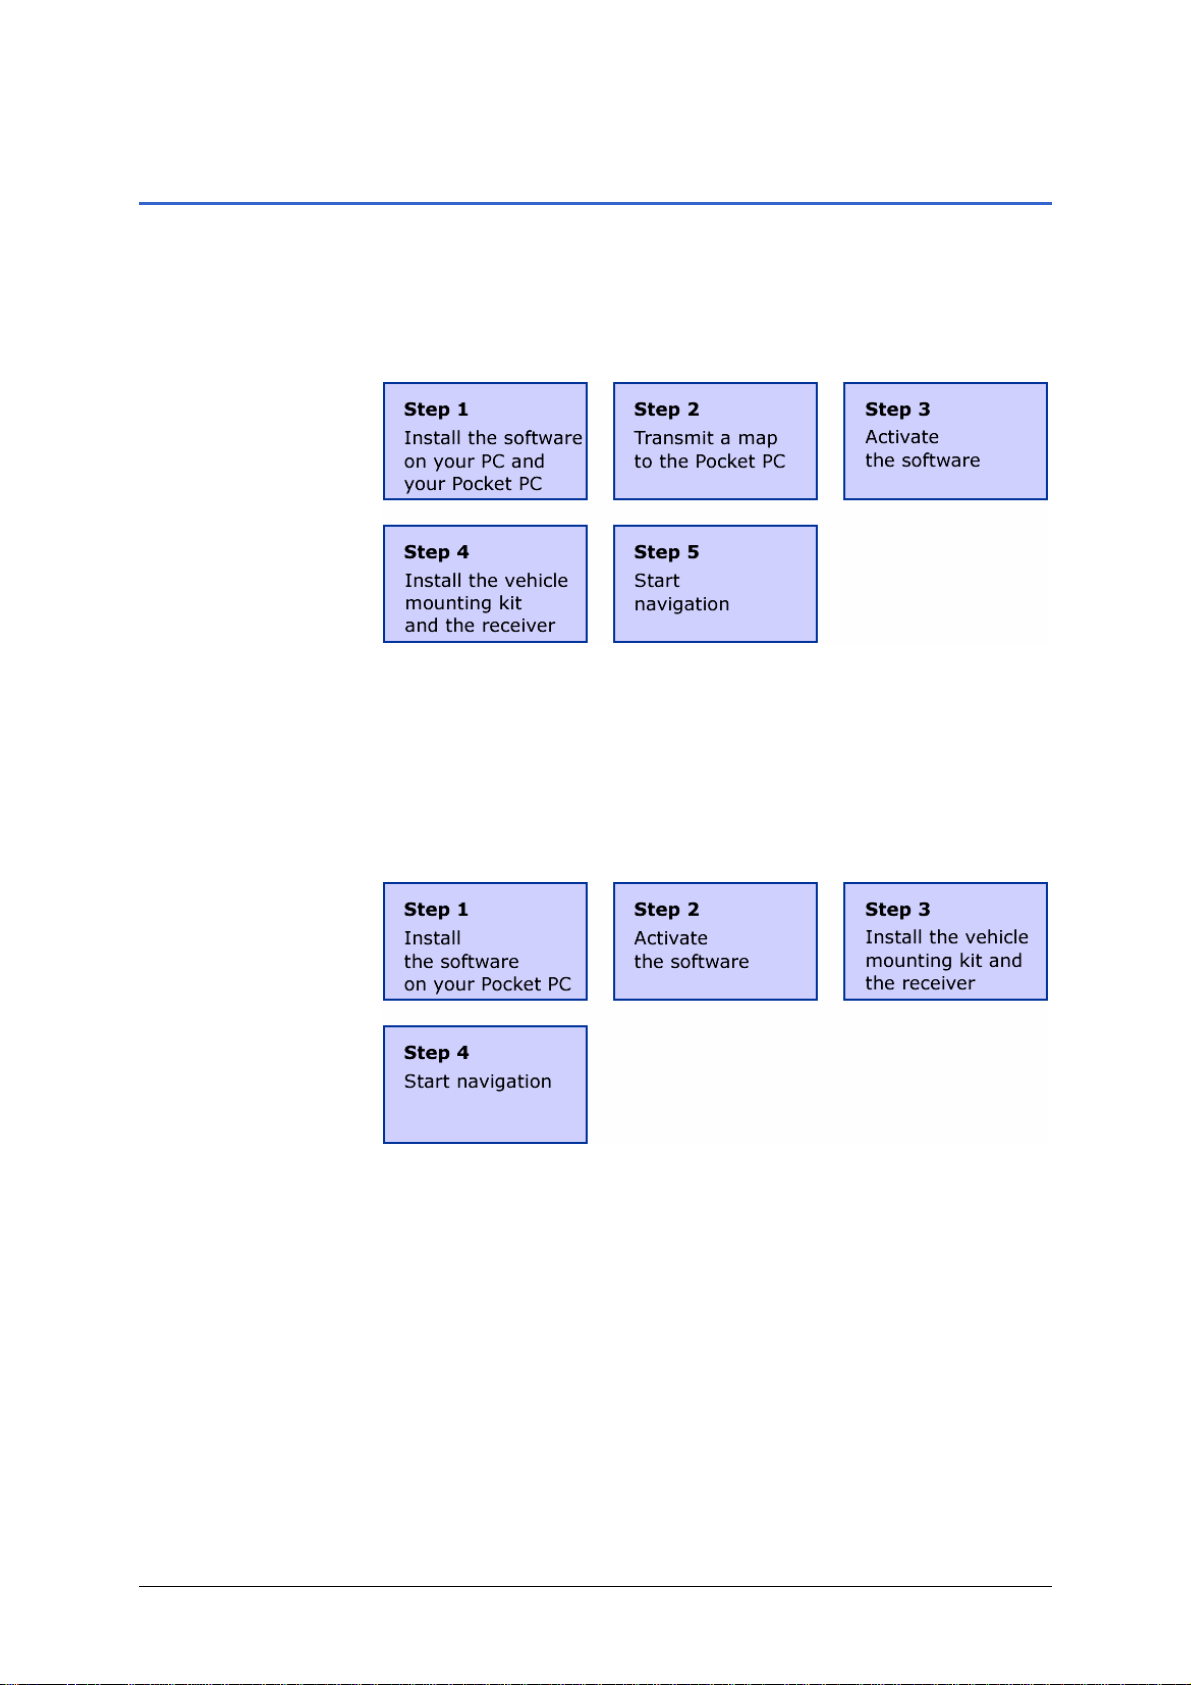
Case A: 4 CD-ROMs Case A: You have purchased 4 CD-ROMs. Proceed as follows:
You need a PC for installation. All software components necessary
for navigation will be installed on your Pocket PC. MapExport
(exportation and transfer of areas of the base map) and
SkinEditor (personalization of your navigation software) will be
installed on your PC.
Case B: storage
card, recovery CD
Case B: You have purchased a storage card (setup-file and one
map) and a recovery CD. Proceed as follows:
You do not need a PC for installation. All software components
necessary for navigation will be installed on your Pocket PC.
MapExport (exportation and transfer of areas of the base map)
and SkinEditor (personalization of your navigation software) will
not be installed.
Case C: 4 CD-ROMs,
storage card
Case C: You have purchased 4 CD-ROMs and a storage card
(setup-file and one map). Proceed as described in Case A or in
Case B.
Installation and quick-start guide - 12 -
Page 15
User's manual OnCourse Navigator | 4
2.2.1 Software installation on your PC and on your
Pocket PC (Case A)
Survey You must install the software on your PC and on your Pocket PC
before you can use your navigation system.
At the beginning of the installation process, the base map (e.g. of
USA and Canada) and the MapExport software (which is
designed for defining and exporting your own areas of the base
map and for transferring them to your Pocket PC) will be installed
on your PC. At the end of the same process, the OnCourse
Navigator navigation software will be installed on your Pocket
PC.
Installing the
software...
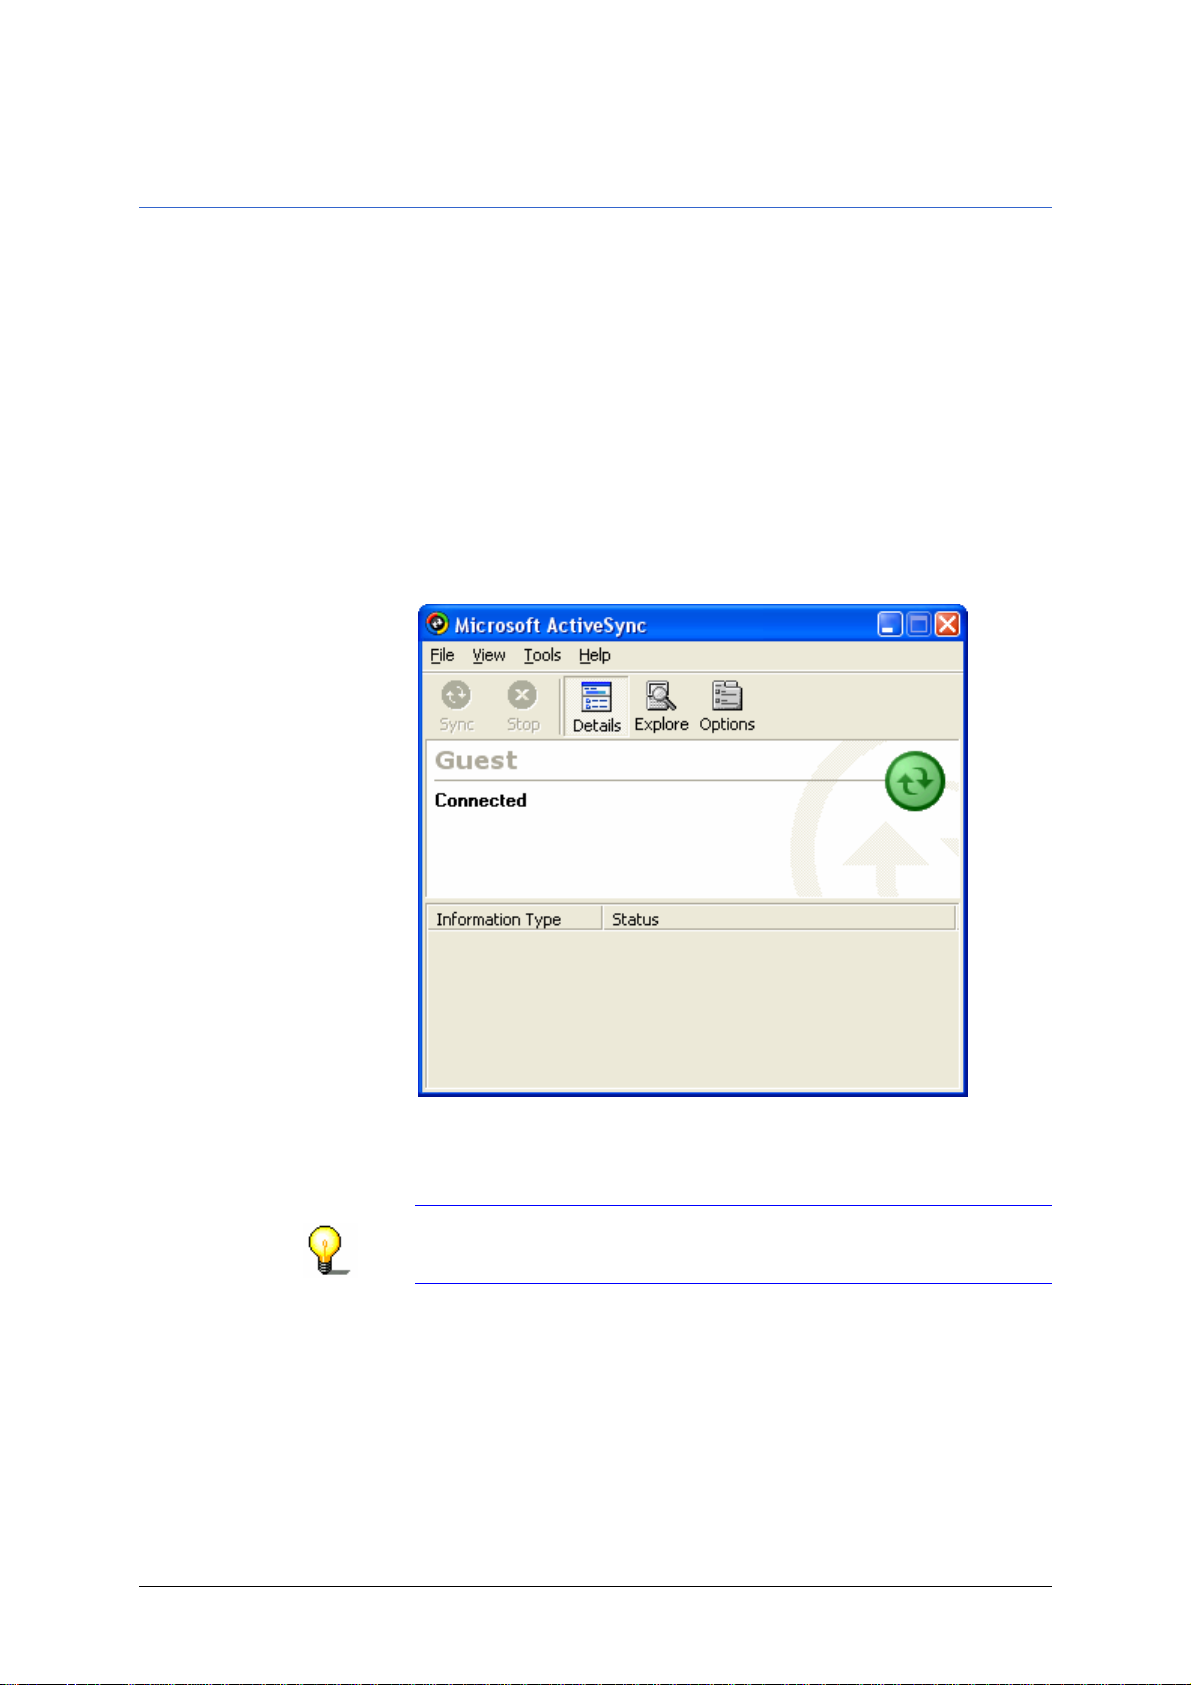
1. Establish an ActiveSync connection between your PC and
your Pocket PC (for details, please refer to the manual of your
Pocket PC).
2. Insert the OnCourse Navigator CD-ROM 1 into your CD-
ROM drive.
The installation process starts automatically.
Notice: If the installation process does not start
automatically, open the Windows Explorer, double-click the
3. Follow the instructions of the installation software.
The navigation software will be installed on your P o cket PC
Installation and quick-start guide - 13 -
entry of your CD-ROM drive and double-click Setup.exe.
when the installation process on your PC is finished.
Page 16

User's manual OnCourse Navigator | 4
2.2.2 Software installation on your Pocket PC (Case B)
Survey The OnCourse Navigator navigation software will be installed
on your Pocket PC.
Installing the
software...
1. Insert the storage card into your Pocket PC.
2. Turn on your Pocket PC.
3. Open the File Explorer via Start > Programs.
The installation of OnCourse Navigator begins.
4. Open the directory of your storage card.
5. Start the installation program OnCourse Navigator 4.cab
2.2.3 Transferring a map extract to your Pocket PC (Case A)
Notice: If you have purchased a storage card with a map for
your Pocket PC, you do not need to transmit a map extract. In
this case, proceed as described in “Software registration and
activation”, page 15.
Survey Before using your navigation software, you must export a map
extract to your PC and transmit it to your Pocket PC.
Exporting maps… Precondition:
ActiveSync connection.
1. On your PC, start the MapExport software by clicking on
Start > Programs > OnCourse Navigator 4 > MapExport.
For details on this software, please refer to “Additional
Installation and quick-start guide - 14 -
software: MapExport”, page 69.
2. Define the segment of the base map you want to transmit to
your Pocket PC:
your Pocket PC is connected to your PC via an
Page 17

User's manual OnCourse Navigator | 4
The software calculates the data and indicates the storage
3. Click the Via ActiveSync button to transmit the selected map
You want to... so...
select an already exported
map,
define a rectangular segment,
define a map corridor by
determining the stages of an
itinerary,
capacity required by the defined segment.
Notice: The size of the defined segment must not exceed the
available storage capacity on your Pocket PC.
to your pocket PC.
click the Map archive icon
click the Area icon
click the Corridor icon
The map will be transferred to the Pocket PC and then be
ready for navigation purposes.
2.2.4 Software registration and activation
Activation code At the first start of OnCourse Navigator you will be prompted
to enter an activation code. You cannot start the software without
entering this code.
To obtain the activation code, you will need the serial number,
which you find in the jewel case of the OnCourse Navigator CD
and the number, which is indicated at the first start of the
software.
With these two numbers you may obtain the activation code:
Ù in the web on www.OnCourseNavigator.com
Enter the activation code into the respective entry field and tap
the OK button or the ENTER-key of the on-screen keyboard.
Notice: Keep the activation code at a safe place. You might need
it later, e.g. when you reinstall the software on your Pocket PC.
.
Installation and quick-start guide - 15 -
Page 18
User's manual OnCourse Navigator | 4
2.2.5 Installation in the vehicle
Survey Mount the holder of the Pocket PC and the GPS receiver before
you use the navigation system. You will also have to initialize the
GPS receiver.
Notice: The holder and the adapter of the Pocket PC are not
supplied within the delivery.
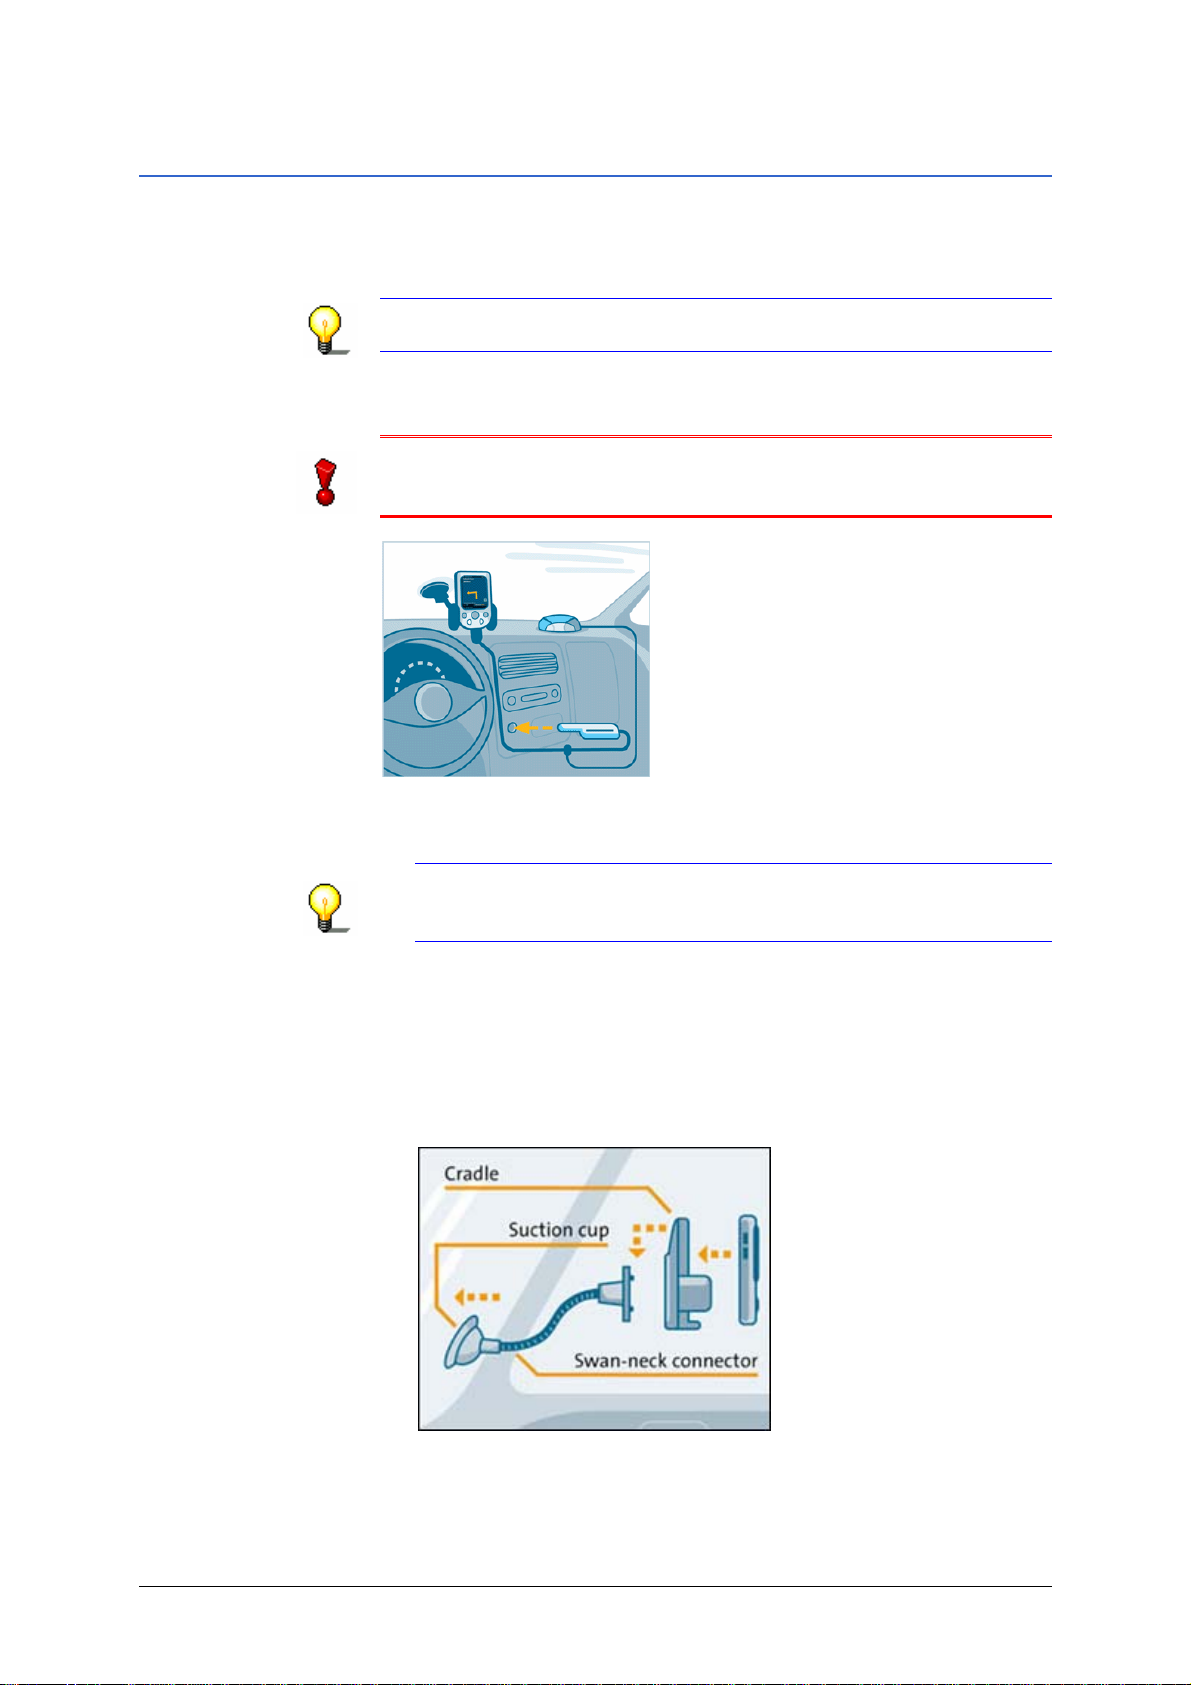
Mounting and connecting the Pocket PC
Attention: The mounted holder must not impede the driver’s
attention on the traffic. If this is not possible, mount the holder
somewhere else so that safe driving is granted.
Connecting the
Pocket PC...
1. Attach the cradle of the Pocket PC to the swan-neck mount.
Notice: Take notice of the inscription on the swan-neck
mount. The arrow with the inscription close must show in
snap-on direction. The connection must snap on audibly.
2. Place the suction cup on the windscreen. Press the lever
firmly to the windscreen before switching it.
3. Put the Pocket PC into the cradle. Make sure that it is held
safely!
4. Plug the adapter into the socket at the bottom of the
Pocket PC.
Installation and quick-start guide - 16 -
Page 19

User's manual OnCourse Navigator | 4
Mounting and connecting the GPS receiver
Attention: The mounted GPS receiver must not impede the
driver’s attention on traffic.
Connecting the GPS
receiver...
2. Plug the connection cable of the GPS receiver to the
1. Place the GPS receiver horizontally under the windscreen, as
far forwards as possible.
Notice: The reception of GPS-signals may be obstructed by
windscreen heating wires, by a windscreen aerial, or when the
windscreen is metallized. In this case you might use an
external vehicle antenna, which may be ordered from our
support team.
respective socket of the adapter, which connects the Pocket
PC to the power supply.
3. Plug the jack of the adaptor into the socket of the cigarette
lighter.
4. Turn the GPS receiver on.
Establishing a
Bluetooth-connection
4a If you are using a Bluetooth receiver, establish a Bluetooth
connection between the GPS receiver and the Pocket PC.
Notice: For detailed information on how to establish a
Bluetooth connection between your Pocket PC and other
Bluetooth-devices, please refer to the manual of your
Pocket PC.
4b At the first connection via Bluetooth, you will be prompted to
enter a code. Usually this code is 0000.
For information on the correct code, please refer also to the
manual of your Pocket PC or contact the manufacturer of your
device.
Installation and quick-start guide - 17 -
Page 20
5. Start OnCourse Navigator.
6. On the main screen, tap the Settings button.
ETTINGS screen opens.
The S
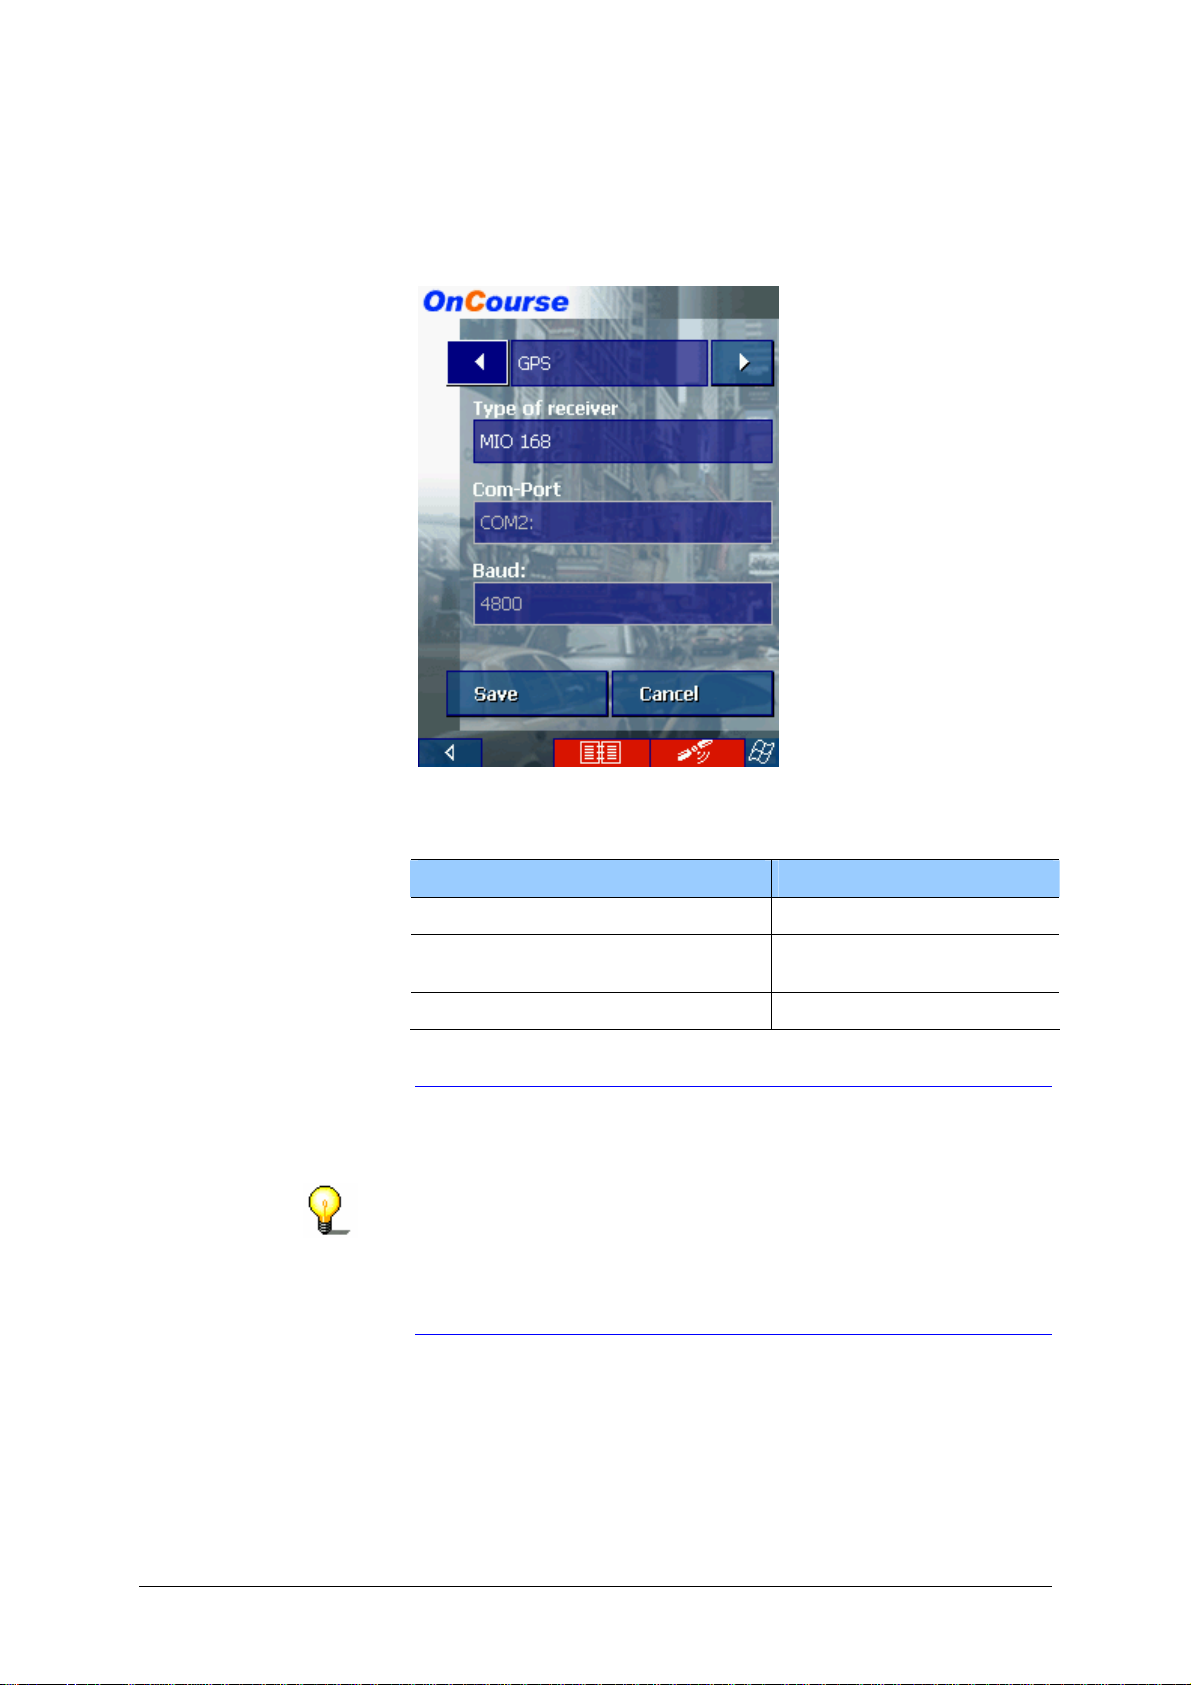
7. Via the arrow buttons, select GPS.
User's manual OnCourse Navigator | 4
8. Tap the Type of receiver field and indicate the type of your
GPS receiver.
You have… then…
the standard GPS receiver, select standard GPS.
the MIO 168 Pocket PC with built-
select MIO 168.
in GPS receiver
a GPS receiver of another brand, select Other receiver.
9. Tap the Com-Port field and indicate the COM-port.
Notice: If you have established a wire connection (Type:
standard GPS), it is normally COM-Port 1.
If you use the MIO 168, select COM-port 2.
When you establish a Bluetooth-connection for the first time,
you are normally prompted which COM-port is used. When
you connect a HP Ipaq 3870, 3970, 2210, 5450, or 5550, it is
COM-Port 8. For a HP Ipaq 1940 it is COM-Port 5 or 8. For a
HP Ipaq 4150 it is COM-Port 6 or 8. Asus 620 BT and Fujitsu
Siemens PocketLOOX 410 and 420 use COM-Port 6.
10. If you are using a GPS receiver of another brand (Type: Other
receiver), enter the respective Baud rate into the Baud field.
Installation and quick-start guide - 18 -
Page 21

Initializing the GPS receiver
User's manual OnCourse Navigator | 4
Initialization of the
GPS receiver
The initialization process of the GPS receiver starts automatically.
Within 15 seconds the color of the GPS icon in OnCourse
Navigator changes from red (No GPS signal) to orange (GPS
signals insufficient). The number on the GPS icon indicates the
number of satellites from which signals are being received. When
the signals of more than 3 satellites are being received, the GPS
icon becomes green (GPS ready). This process may take about
20 minutes. When the GPS icon becomes green earlier, it would
be good to leave the GPS receiver turned on for about 15 more
minutes in order to grant its correct operation.
The initialization process is finished when the reception of more
than 3 satellites is indicated after about 20 seconds.
Notice: This initialization process must be carried out only once.
The other times, the GPS receiver will be ready within about one
minute.
Notice: When the GPS receiver is connected to the power supply
for the first time, leave it connected for about 2 hours in order to
charge its battery.
Notice: A new initialization may become necessary when the
GPS receiver has not been in use. In this case, the initializa tion
process would take about 10 minutes.
Attention: Disconnect the receiver from the power supply when
you are leaving the car parked for a longer period. Failure to do
so might result in a flat battery as the receiver consumes
electricity permanently.
For details on the operation of your GPS receiver, please refer to
“Icons”, page 27.
Installation and quick-start guide - 19 -
Page 22
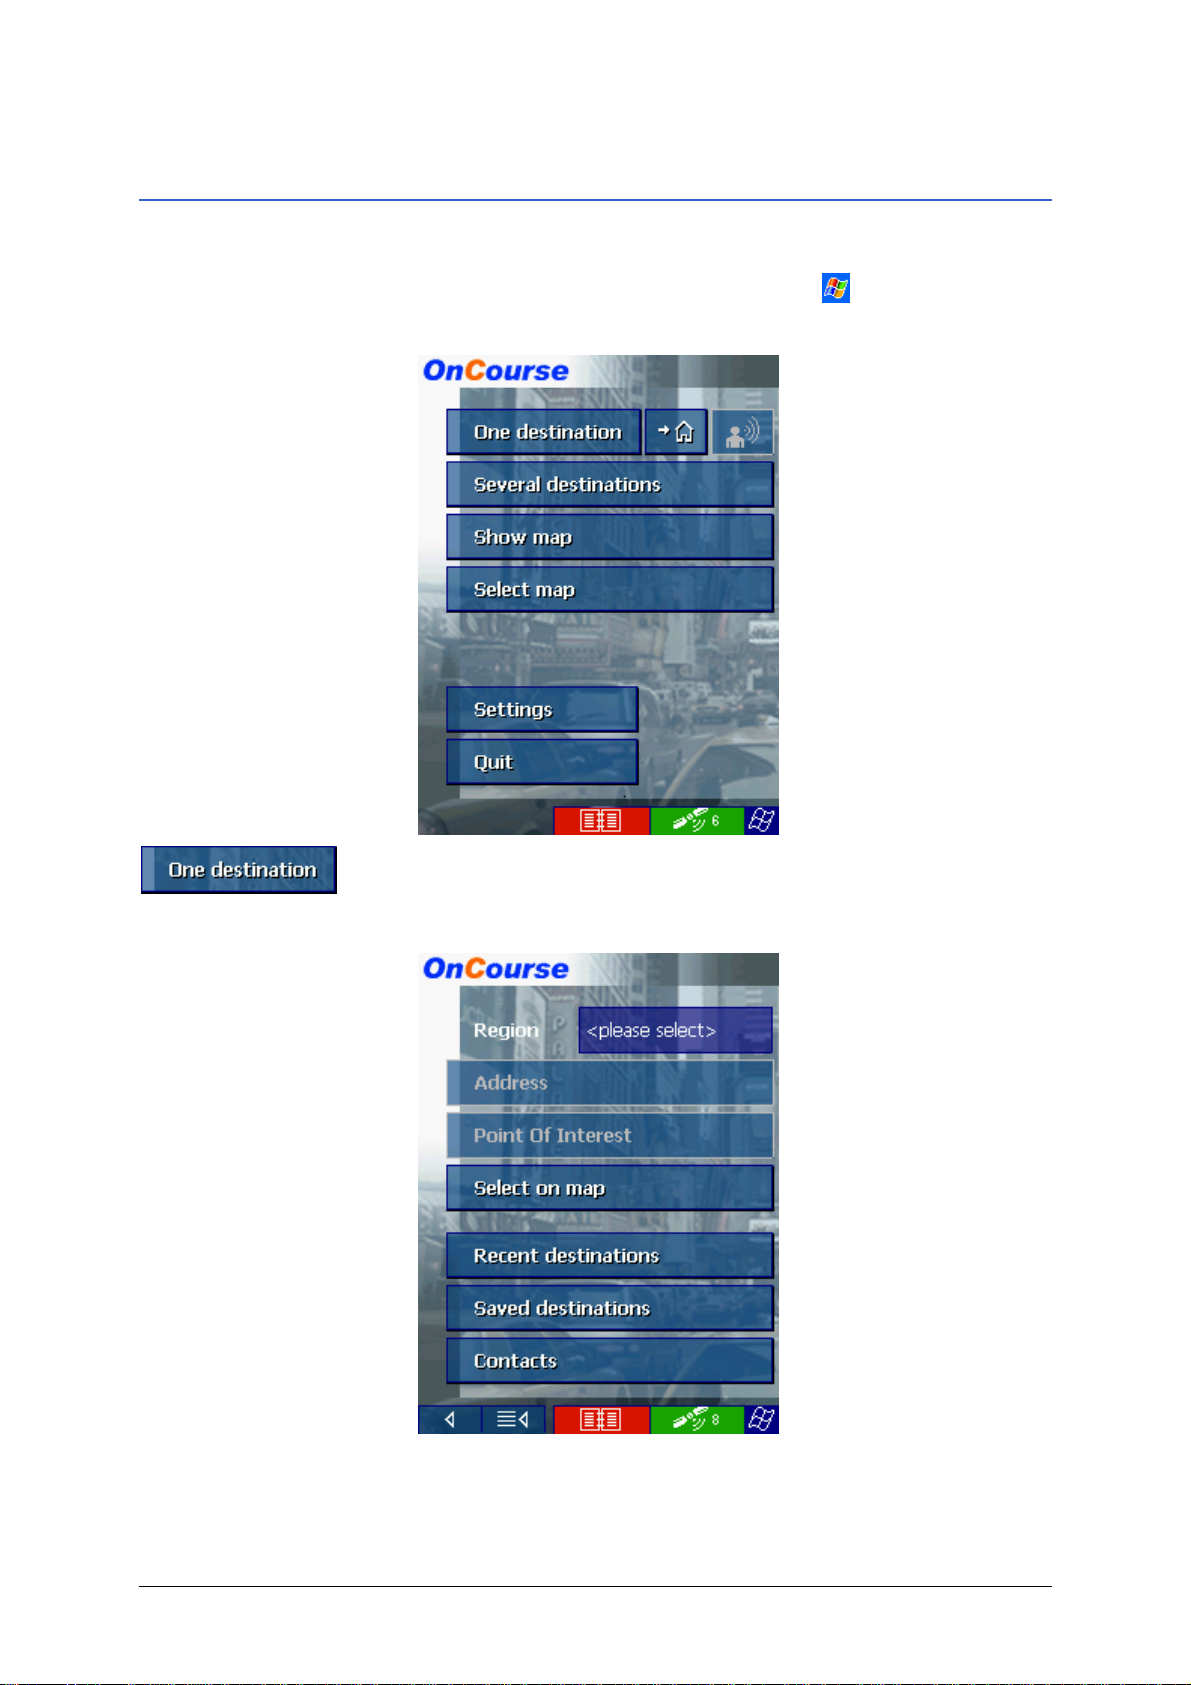
2.2.6 Starting navigation
User's manual OnCourse Navigator | 4
Use your navigation
1. Turn on your Pocket PC.
system…
2. Start OnCourse Navigator by tapping
OnCourse Navigator 4.
3. Tap the One destination button to ent e r your destination.
The D
> Programs >
ESTINATION screen opens:
4. Tap the Region entry field and select the destination state or
territory/province.
5. Tap the Address button.
Installation and quick-start guide - 20 -
Page 23
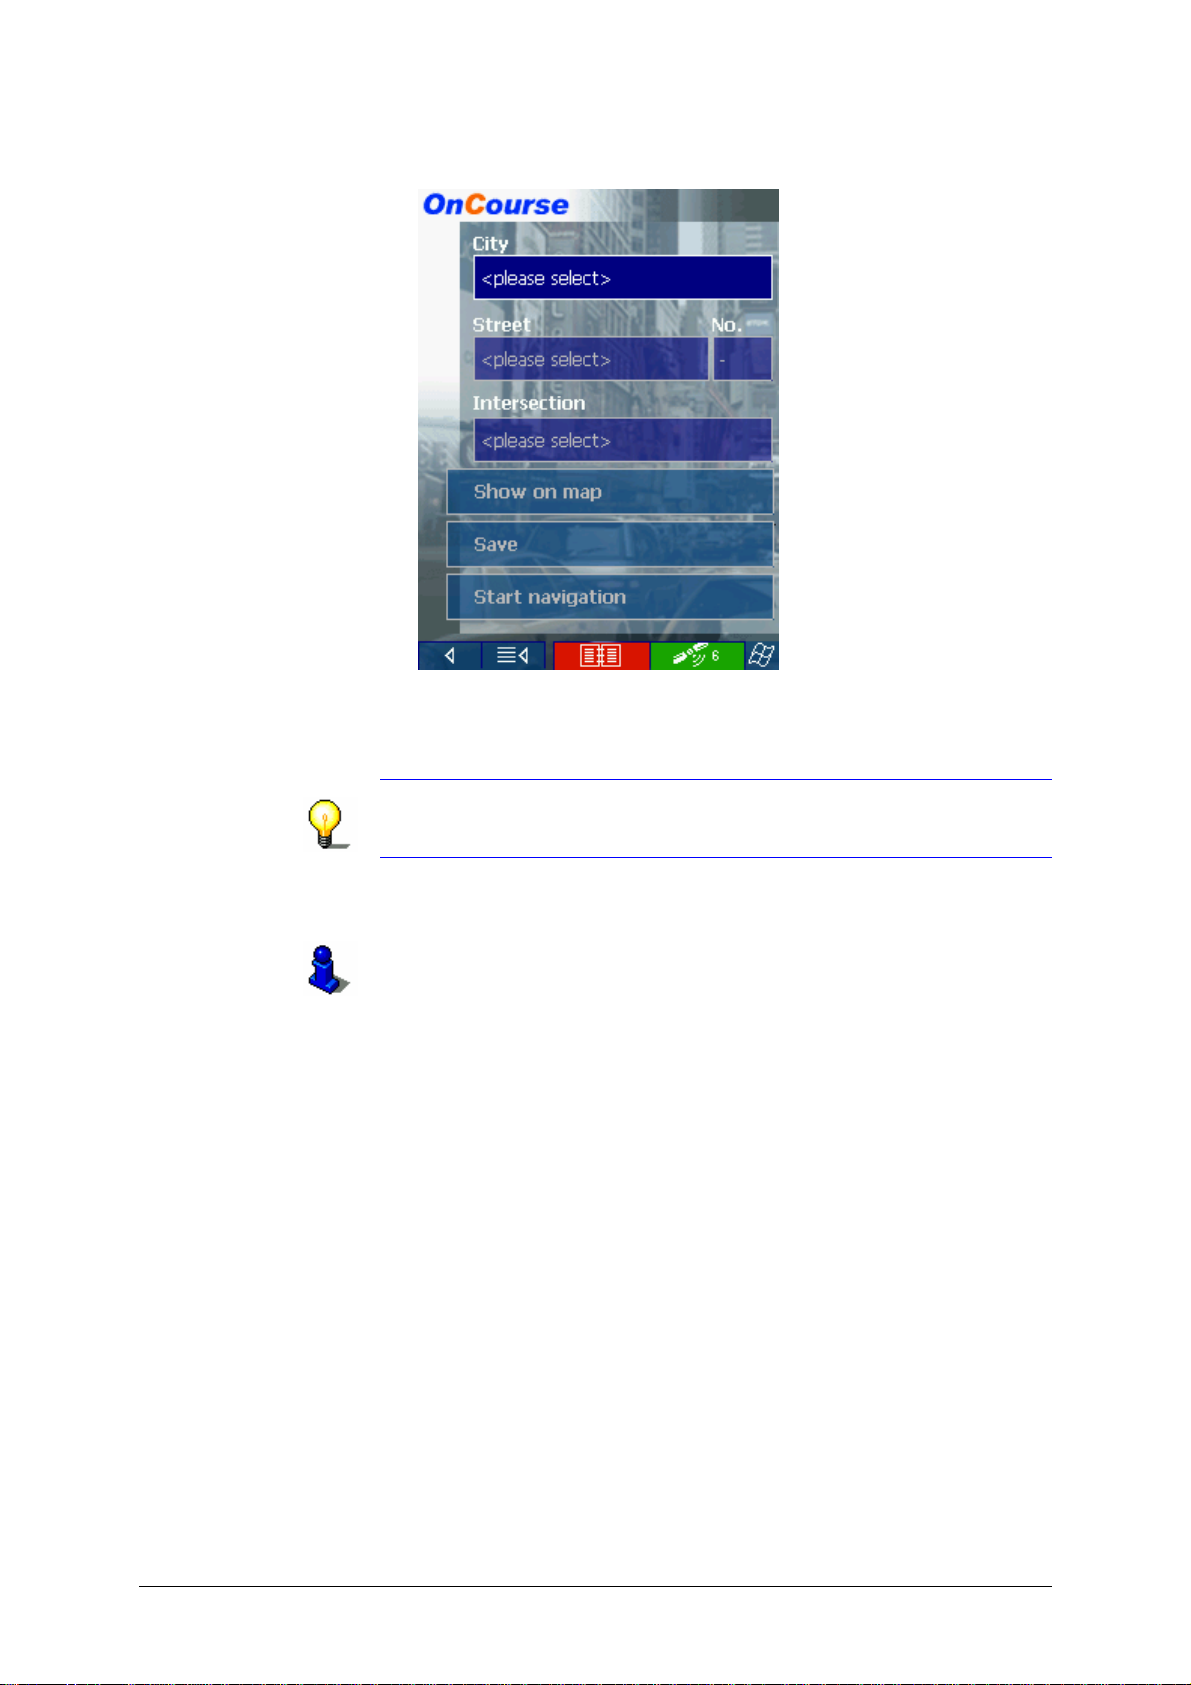
The ADDRESS screen opens:
User's manual OnCourse Navigator | 4
6. Enter the name of the destination town into the City field.
7. Enter the name of the destination street into the Street field.
Enter the house number if possible.
Notice: You do not need to enter a street suffix, or a street type
to get a search result. For example, if you are looking for a street
called "S Main Avenue", simply type in "main".
8. Tap the Start navigation button.
For details on the functions of your navigation system, please
refer to “Operating the navigation software”, page 23, and to
“Navigation and Itinerary planning”, page 55.
Installation and quick-start guide - 21 -
Page 24

Page 25

User's manual OnCourse Navigator | 4
3 Operating the navigation
software
Topics covered in this chapter:
3.1 Starting OnCourse Navigator page 24
Basic settings
3.2 User interface and basic functionality page 27
Icons
3.3 Indicating destinations page 30
Entering a destination manually
Selecting a
Selecting destinations fr om the Outlook contacts list
Indicating destinations on the map
Saved destinations
Recent destinations
Save and use your home address
Voice command
3.4 Working with the map page 45
Operating the map
Representation of the map
Displaying additional information on the map
Operating the navigation software - 23 -
Page 26
User's manual OnCourse Navigator | 4
3.1 Starting OnCourse Navigator
Precondition You have carried out installation and activation of OnCourse
Navigator as described in “Installation of the navigation
system”, page 12.
Starting the
navigation software…
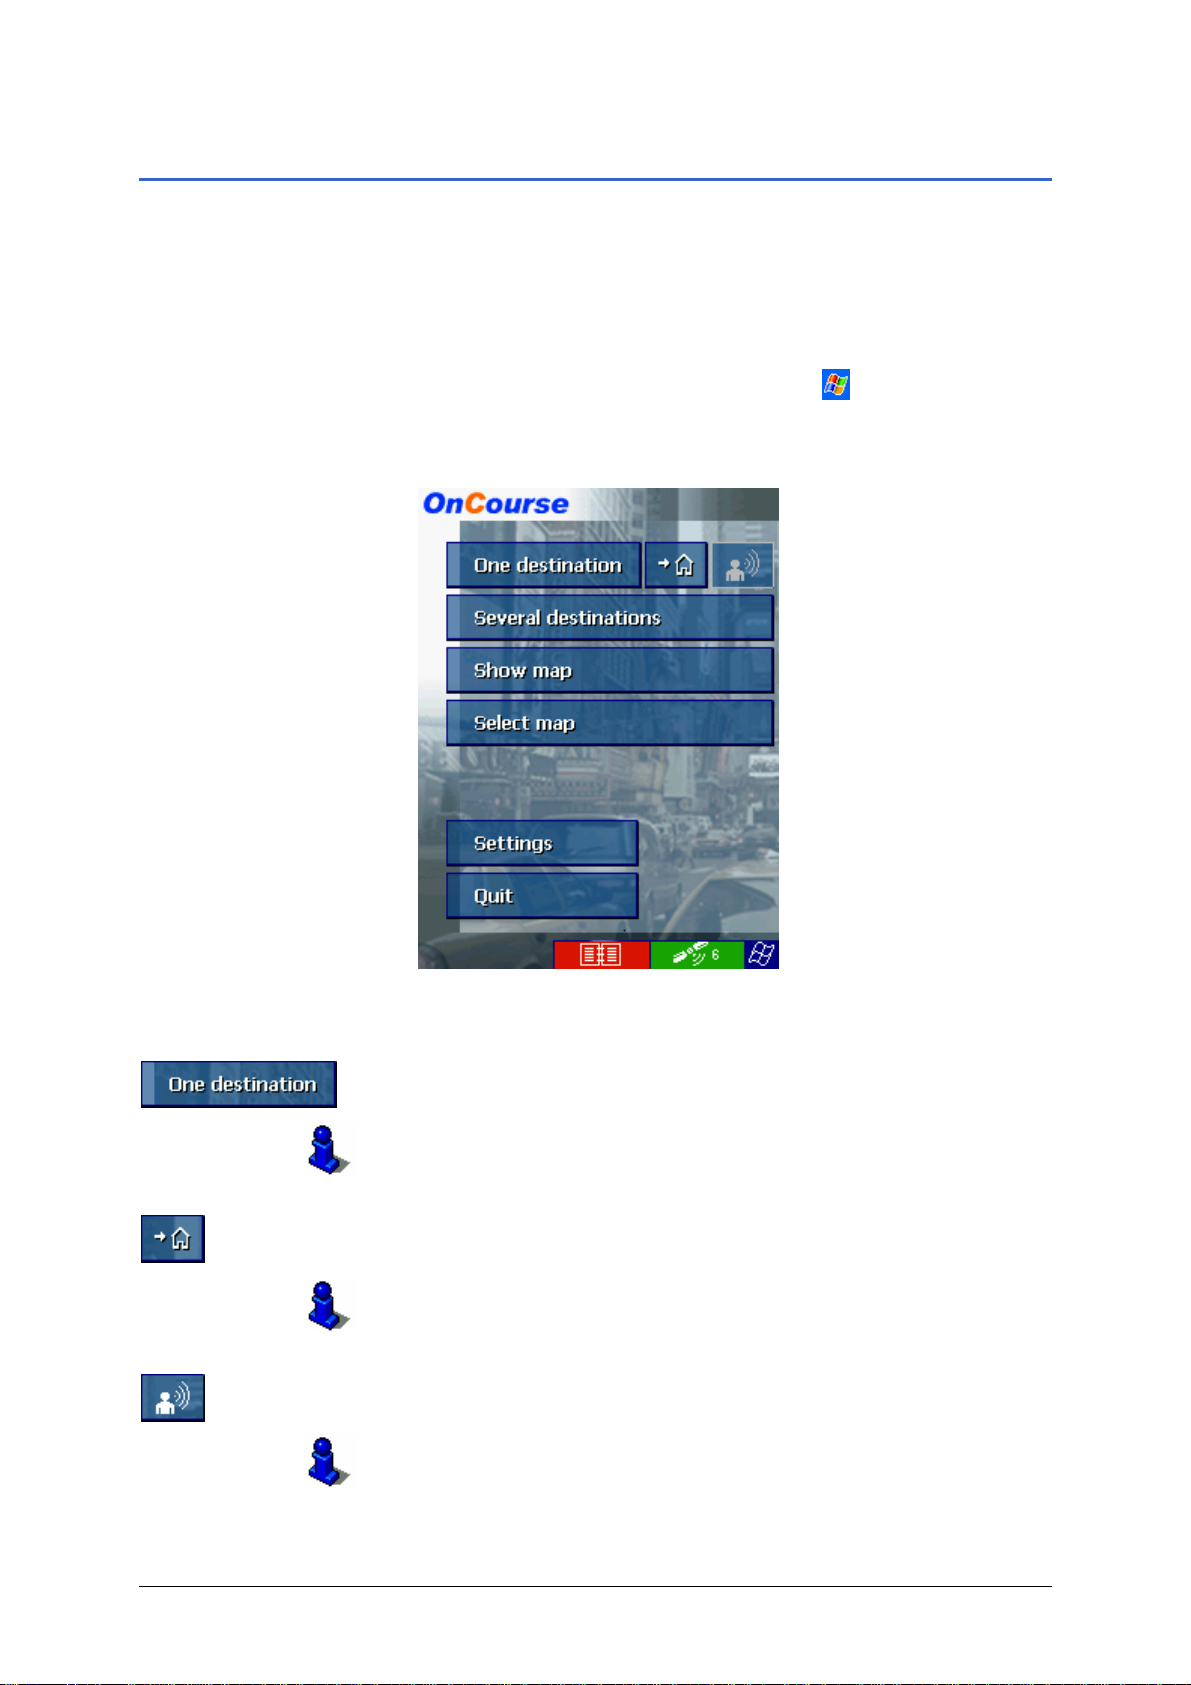
The Main screen opens:
Main screen
1. Turn on your Pocket PC.
2. Start OnCourse Navigator by tapping
OnCourse Navigator 4.
> Programs >
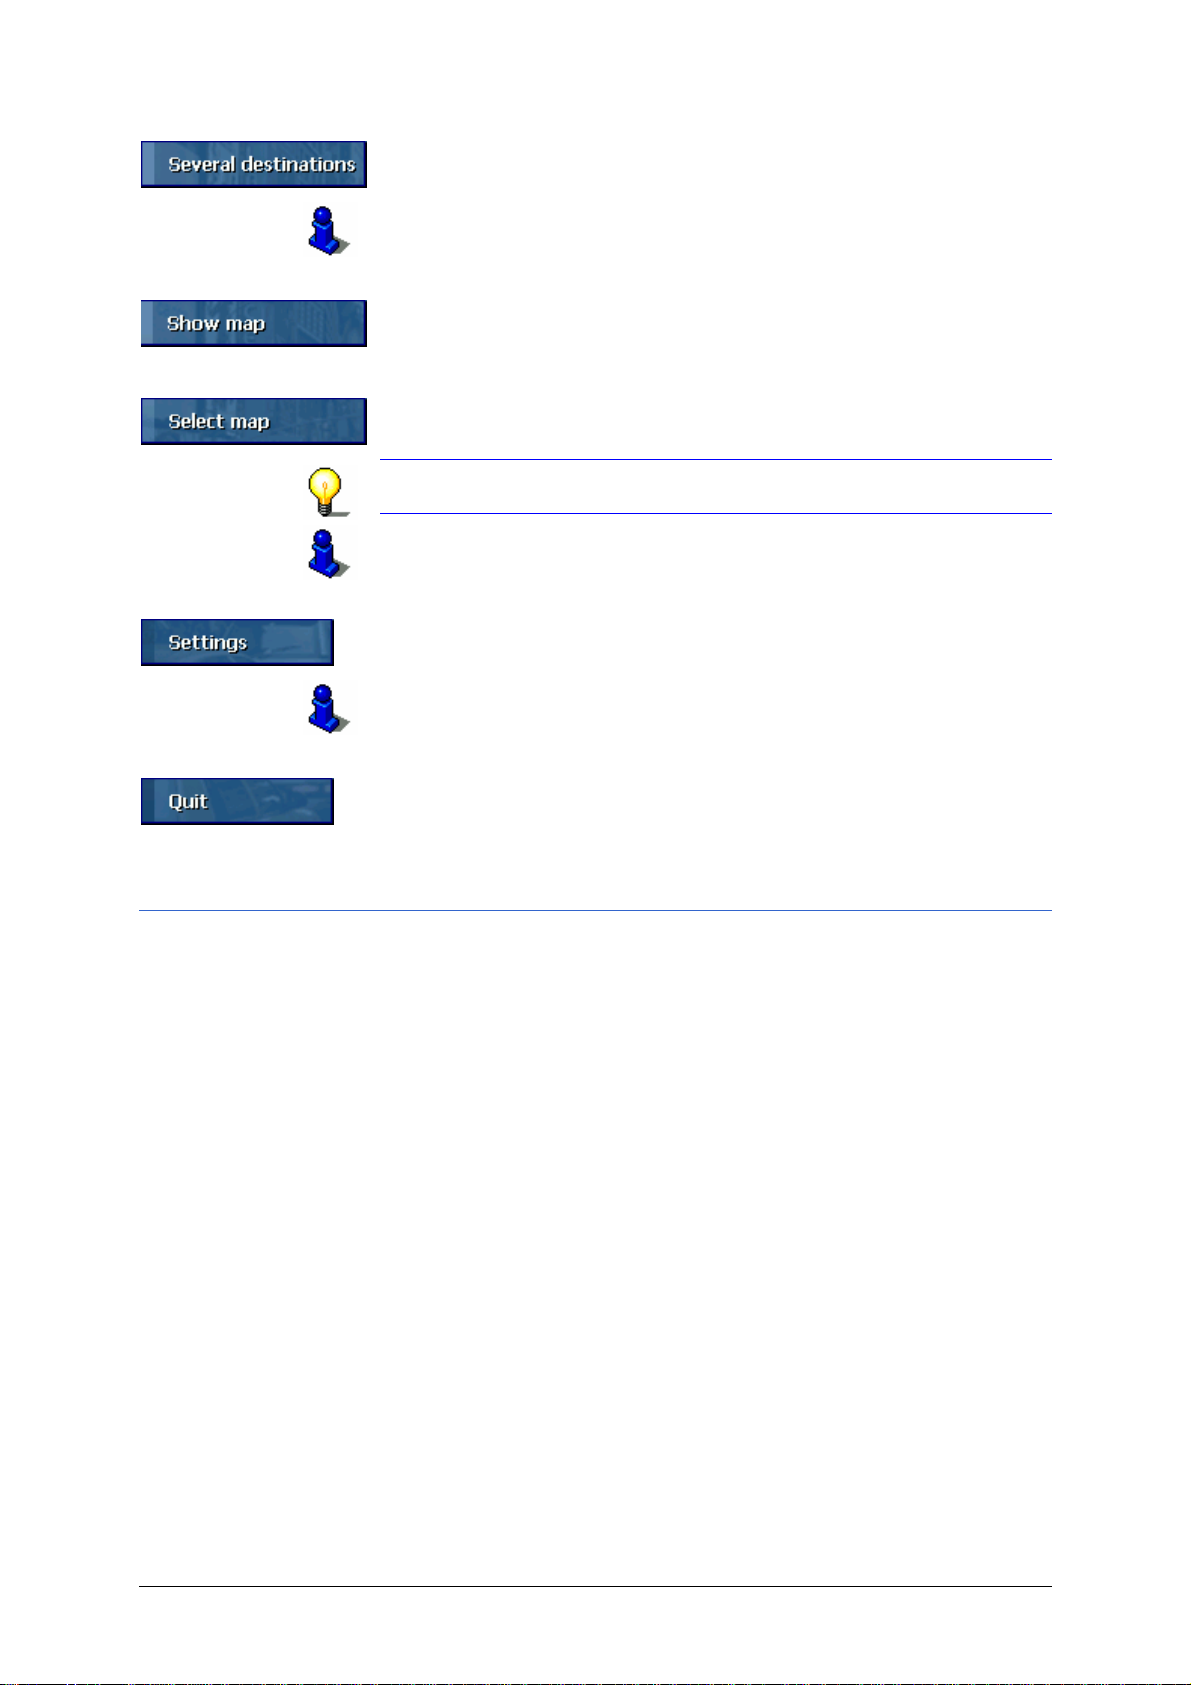
All functions of the program are accessible via the Main
screen.
Tap this button to indicate a destination for navigation (one
stage).
For details, please refer to “Indicating destinations”, page 30.
Tap this button to navigate to your home address.
For details, please refer to “Save and use your home address”,
page 43.
Tap this icon to indicate a stored destination by voice.
For details, please refer to “Voice command”, page 44.
Operating the navigation software - 24 -
Page 27
User's manual OnCourse Navigator | 4
Tap this button for itinerary planning purposes.
For details, please refer to “Navigating to several destination s
(Itinerary planning)”, page 59.
Tap this button to display the map currently in use.
Tap this button to select another map which is stored on your
Pocket PC.
Notice: You cannot profit from this function unless you have
installed MapExport on your PC.
For details, please refer to “Working with the map”, page 45.
Tap this button to modify the settings of OnCourse Navigator.
For details, please refer to “Annex A: Configuration of OnCourse
Navigator”, page 102.
Tap this button to quit OnCourse Navigator.
3.1.1 Basic settings
Basic settings Before working with OnCourse Navigator, we recommend
Ù configuring the keys of your Pocket PC. You may then
execute almost all functions without tapping.
Ù entering the home address. You may then navigate home
from anywhere.
Key configuration In OnCourse Navigator, you may configure the hardware keys
of your Pocket PC to execute the “up”, “down”, “left”, “right”,
“enter” and “return” actions. This enables convenient and easy
operation.
When you quit the navigation software, th e keys will have their
standard functionality.
1. On the main screen tap Settings.
The S
2. Via the arrow buttons, select the K
3. Tap Key assignment.
4. Select the keys for the respective actions.
ETTINGS screen opens.
EYPAD screen.
5. Tap the Save button.
Operating the navigation software - 25 -
Page 28
User's manual OnCourse Navigator | 4
Saving your home
address
In OnCourse Navigator, you may save your home address to
quickly start navigation homewards from anywhere.
1. On the main screen, tap Settings.
The S
2. Via the arrow buttons, select the H
ETTINGS screen opens.
OME ADDRESS screen.
3. Tap Enter your home address.
The D
ESTINATION screen opens.
4. Tap the Address button and enter your home address as
described in “Entering a destination manually”, page 31.
5. Tap the Set as home address button.
The address is indicated on the H
OME ADDRESS screen.
6. Tap Save.
Operating the navigation software - 26 -
Page 29

User's manual OnCourse Navigator | 4
3.2 User interface and basic functionality
Operation In order to offer a maximum of flexibility and convenience for the
operation of OnCourse Navigator there is three ways to make
entries:
Ù tapping with the stylus,
Ù tapping with your finger, or
Ù via the hardware keys of your Pocket PC.
Moreover, you may indicate a saved destination by voice to start
navigation to it.
3.2.1 Icons
Icons The following buttons appear on the bottom line of every
OnCourse Navigator screen:
Return
Tap this icon to return to the previous screen. This icon is only
available when you have opened another screen before.
Main screen
Tap this icon to open the main screen. This icon is not available
on the main screen.
Logbook
Tap this icon to access the logbook functions.
For details on the logbook functions, please refer to “Keeping the
logbook”, page 66.
Operating the navigation software - 27 -
Page 30
User's manual OnCourse Navigator | 4
GPS
The color of this icon and the number displayed on it have the
following significance:
Color/Number Significance
red
A GPS receiver is not connected or the
power supply is interrupted.
orange + number of
received satellites
A GPS receiver is connected, but the
received signals are not convenient
for navigation purposes (e.g. because
you are in a closed building).
green + number of
received satellites
The signals are convenient. Navigation
may begin.
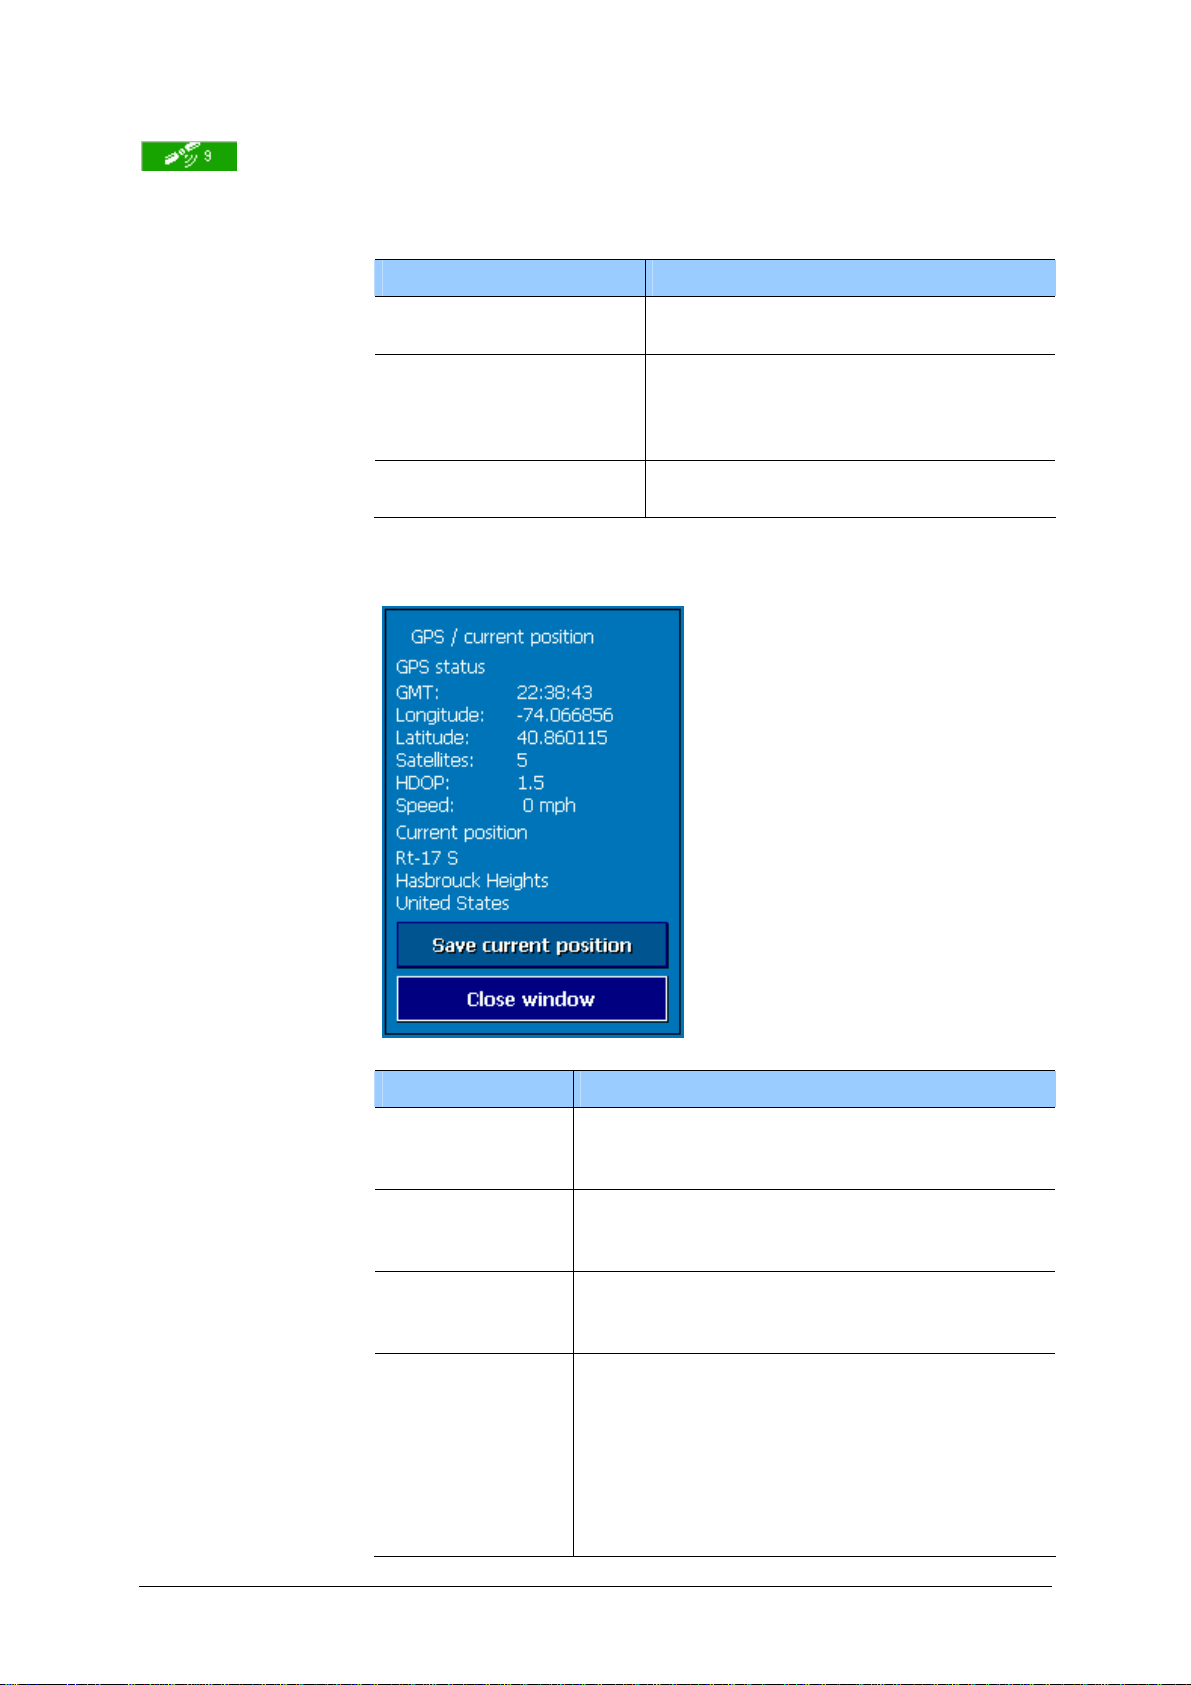
Tap the GPS icon to display the current GPS status:
Entry Significance
GMT
Greenwich Mean Time
Time of London ignoring daylight saving
time.
Longitude /
Latitude
Current position:
Indication of east longitude and north
latitude.
Satellites
Number of received satellites. At least three
satellites must be received for navigation
purposes.
HDOP
Horizontal Dilution of Precision:
Indicates the quality of position
determination. Theoretically any value from 0
to 50 may occur. The smaller the value, the
more accurate is the position determination
(value 0 = no deviation from the real
position). Values up to 8 are convenient for
navigation purposes.
Operating the navigation software - 28 -
Page 31

User's manual OnCourse Navigator | 4
Entry Significance
Speed Indicates your current speed.
Position
Indicates the address of your current
position.
Save current
position
Tap this button to add the current address to
the saved destinations list.
Close window Tap this button to quit the GPS screen.
Start
Tap this icon to start another program on your Pocket PC without
quitting OnCourse Navigator. This may be useful if, e.g., you
want to modify a contact’s address data without interrupting the
navigation. Tap this icon again to return to OnCourse
Navigator.
Operating the navigation software - 29 -
Page 32
3.3 Indicating destinations
User's manual OnCourse Navigator | 4
Basic principle of
navigation
The indication of destinations is the basis of navigation
respectively of itinerary planning. In this chapter, you will learn
about the possibilities to indicate and manage destinations in
OnCourse Navigator.
For details on destination management, please refer to
“Navigation and Itinerary planning”, page 55.
Indicating a
destination
In OnCourse Navigator there are several possibilities to enter
or to select destinations:
Ù Manual address entry, see page 31.
Ù Via the Points of Interest function, see page 33.
Ù Via the Outlook contacts folder, see page 37.
Ù By indication on the map, see page 39.
Ù By selection from the Saved destinations list, see page 41.
Ù By selection from the Recent destinations list, see
page 42.
Ù Via the Home icon, see page 43.
Ù By Voice command, see page 44.
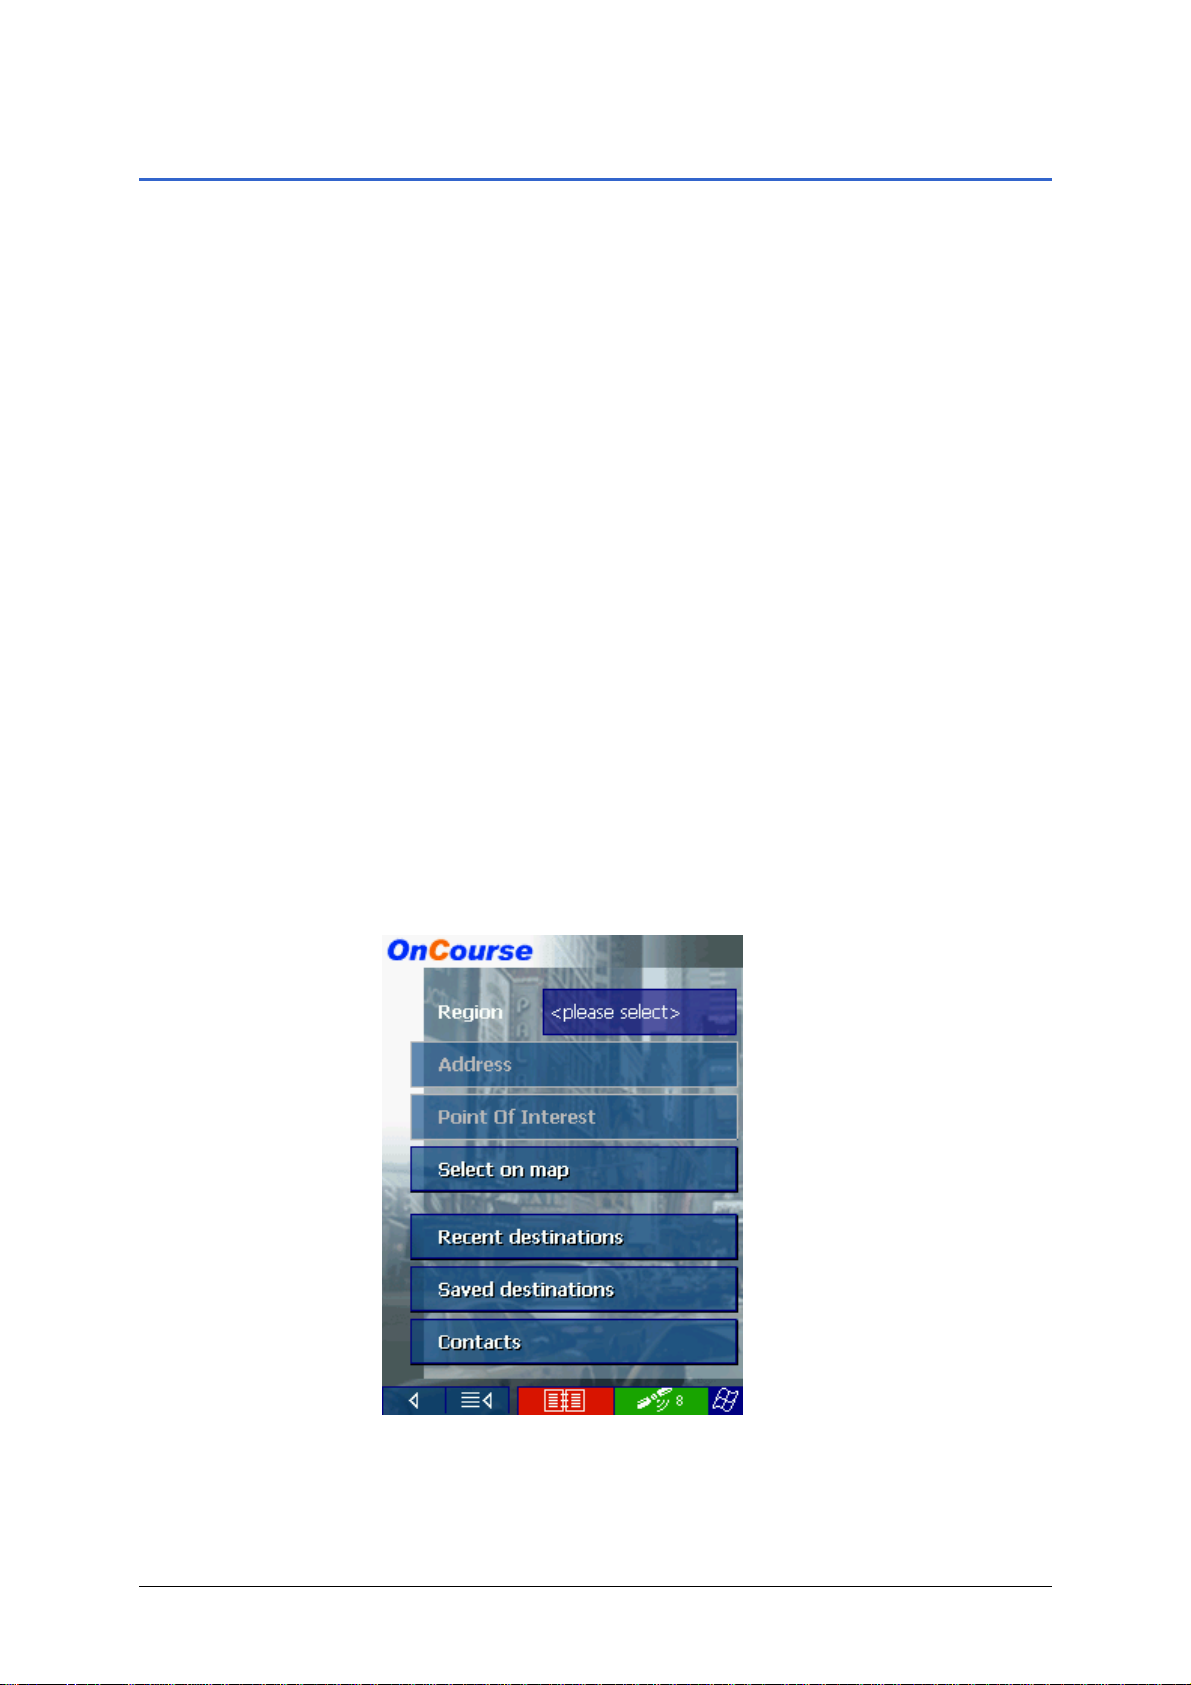
Destination screen If you want to plan an itinerary or to navigate to a certain
destination, you have to indicate destinations. The D
ESTINATION
screen is the starting point for the indication or selection of a
destination:
Operating the navigation software - 30 -
Page 33

User's manual OnCourse Navigator | 4
3.3.1 Entering a destination manually
Database of places The data of all places covered by the currently loaded map is
stored in the database of places. You need not enter the complete
names of towns and streets as OnCourse Navigator lists
automatically all names that match with your entry. If you enter
for example "ri" into the City entry field and tap the Ok button
you will obtain a list of all towns beginn ing with "ri" or having "ri"
into their names. You may then select the correct entry or enter
more letters to shorten the results list.
Selecting the screen
keyboard
You may carry out entries using the standard screen keyboard or
the mobile phone screen keyboard.
The mobile phone screen keyboard is designed to make entries
by tapping with the finger. You need not enter special characters
on the mobile phone screen keyboard. OnCourse Navigator will
recognize them automatically. Example: if you are looking for a
French town called “Héroïnès”, simply tap “Heroines” on the
mobile phone screen keyboard.
Select a screen keyboard by tapping the respective icon at the
bottom of the screen. The icon of the active screen keyboard is
highlighted in blue.
Operating the navigation software - 31 -
Page 34

User's manual OnCourse Navigator | 4
Indicating a
1. On the main screen tap One destination.
destination…
The D
ESTINATION screen opens.
2. Tap the Region entry field and select the destination state or
province/territory.
3. Tap the Address entry field.
The A
DDRESS screen opens:
4. Enter the name of the destination town into the City entry
field. For cities in the United States you may also enter the
postal code.
5. Enter the destination street into the Street entry field.
Notice: You do not need to enter a street suffix, or a street type
to get a search result. For example, if you are looking for a street
called "S Main Avenue", simply type in "main".
6. Enter a house number into the No. field at the right hand side
if possible.
Notice: If the house numbers of the respective street are
stored in the database of places, you may tap the field
besides the Street field.
If no house numbers are stored, the respective field is
deactivated. The software navigates to the respective street.
7. Tap the Intersection entry field and select a crossroad if you
want to define an intersection as destination point (e.g.
because the house number is not available).
8. Tap the Save button if you want to navigate more often to
the entered destination. You may then quickly select it fr om
the Saved destinations list.
Operating the navigation software - 32 -
Page 35

User's manual OnCourse Navigator | 4
3.3.2 Selecting a Point of Interest
Points of Interest Points of Interest are stored in the database of places and may
be displayed on the map. Ports, airports, restaurants, hotels,
petrol stations, public buildings, and oth ers belong to the Points
of Interest.
Indicate a Points of Interest by selecting one
Ù on the map, see “Indicating destinations on the map”,
page 39,
Ù nearby,
Ù of superregional interest, or
Ù in another town.
Selecting a Point of
Interest...
1. On the D
button.
ESTINATION screen, tap the Point of Interest
The P
OINT OF INTEREST screen opens:
Operating the navigation software - 33 -
Page 36

Points of Interest nearby
Notice: You may only display Points of Interest nearby when the
GPS receiver is connected and when your current position can be
determined.
Selecting a Point of
Interest nearby...
2. On the P
The P
User's manual OnCourse Navigator | 4
OINT OF INTEREST screen, tap the Nearby button.
OINT OF INTEREST NEARBY screen opens:
3. Enter the radius around your current position within which
you want to search for Points of Interest into the Radius
entry field.
4. Select the main category of Points of Interest to search for
from the left one of the two Category list fields, e.g.
“Garages”. Only Points of Interest situated within the
indicated radius will be displayed.
5. Select the sub-category of Points of Interest to search for into
the right one of the two Category list fields, e.g. "BMW",
"Ford", "DaimlerChrysler".
Notice: If you leave the Sub-category field empty, all Points
of Interest matching with the selected main category will be
listed in the Point of Interest list field.
6. Select the correct destination from the Point of Interest list
field.
All Points of Interest matching your entries are listed,
including their linear distance from your current position:
7. Tap the Save button if you want to navigate more often to
the selected destination. You may then quickly select it from
the Saved destinations list.
Operating the navigation software - 34 -
Page 37

Points of Interest of superregional interest
User's manual OnCourse Navigator | 4
Selecting a Point of
Interest of
superregional
interest...
8. On the P
OINT OF INTEREST screen, tap the Of superregional
significance button.
OINT OF INTEREST OF SUPERREGIONAL SIGNIFICANCE
The P
screen opens:
9. Select the main category of Points of Interest to search for
from the Category list field, e.g. "Airports".
10. Select the correct destination from the Point of Interest list
field.
11. Tap the Save button if you want to navigate more often to
the selected destination. You may then quickly select it from
the Saved destinations list.
Operating the navigation software - 35 -
Page 38

Point of Interest in another town
User's manual OnCourse Navigator | 4
Selecting a Point of
Interest in another
town...
2. On the P
button.
The P
OINT OF INTEREST screen, tap the In another city
OINT OF INTEREST IN ANOTHER CITY screen opens:
3. Enter the name of the city in which you want to search for
Points of Interest into the City field.
4. Select the main category of Points of Interest to search for
from the left one of the two Category list fields, e.g.
“Nightlife”. Only Points of Interest matching your City and
Category entries are listed.
5. Select the sub-category of Points of Interest to search for into
the right one of the two Category list fields, e.g. “Bar”,
“Cinema”, …
6. Select the correct destination from the Point of Interest list
field.
Notice: If you leave the Sub-category field empty, all Points
of Interest matching with the selected main category will be
listed in the Point of Interest list field.
If you leave both the Category and the Sub-category fields
empty, all Points of Interest situated in the selected city will
be listed in the Point of Interest list field.
7. Tap the Save button if you want to navigate more often to
the selected destination. You may then quickly select it from
the Saved destinations list.
Operating the navigation software - 36 -
Page 39

User's manual OnCourse Navigator | 4
3.3.3 Selecting destinations from the Outlook contacts list
Using Outlook
contacts as
destination…
Any address from the Outlook contacts list on your Pocket PC
may be used as destination for navigation or itinerary planning
purposes.
In order to identify an address clearly and without ambiguity,
town, postcode, street, and house number should be indicated.
Notice: Only contacts the address of which is covered by the
currently loaded map may be used for navigation or itinerary
planning purposes.
Incomplete address If an address cannot be identified without ambiguity e.g. because
there are two towns with the same name on the map, OnCourse
Navigator lists them all, indicating their postcodes and districts.
Select the respective town and tap OK.
If the town has been found but the street of the contact is not
indicated, you will be guided to the center of this town.
To avoid problems, the addresses from your Outlook contacts list
should be complete.
Selecting a contact’s
address…
1. On the D
Your Pocket PC’s contacts list opens.
ESTINATION screen, tap the Contacts button.
2. Tap the respective contact’s entry and hold until you get the
context menu:
3. Tap OnCourse Navigator.
Operating the navigation software - 37 -
Page 40

User's manual OnCourse Navigator | 4
3a The following screen opens when there was more than one
address to be found for the respective contact:
3b Tap the OK button, which belongs to the address you want to
use as destination.
OnCourse Navigator adopts the address.
4. Tap the Save button if you want to navigate more often to
this contact. You may then quickly select the address from
the Saved destinations list.
Operating the navigation software - 38 -
Page 41

User's manual OnCourse Navigator | 4
3.3.4 Indicating destinations on the map
You may indicate a destination directly on the map. In addition to
towns and streets, you may also select Point of Interest quickly..
Indicating a
destination on the
map...
The map screen opens:
1. On the main screen tap One destination.
The D
ESTINATION screen opens.
2. Tap the Select on map button.
3. Tap on the place you want to determine as destination and
hold.
A circle of red points appears round the selected place:
Operating the navigation software - 39 -
Page 42

User's manual OnCourse Navigator | 4
Database information on the respective place will be loaded
and displayed:
4. Tap the Task field.
The T
ASK screen opens where you may indicate how to
proceed:
5. Select Start navigation from the list to navigate to the
respective place.
Tap the Save button if you want to navigate more often to
the entered destination. You may then quickly select it fr om
the Saved destinations list.
The T
ASK screen closes and the task is indicated in the Task
field of the precedent screen.
6. Tap the Execute button.
Operating the navigation software - 40 -
Page 43

User's manual OnCourse Navigator | 4
3.3.5 Saved destinations
Saved destinations All destinations you have saved by tapping the Save button are
listed on the S
may:
Ù select destinations for navigation purposes,
Ù rename destinations, and
Ù delete destinations from the list.
AVED DESTINATIONS screen. On this screen you
Take over 1. On the main screen tap One destination.
The D
ESTINATION screen opens.
2. Tap the Saved destinations button.
3. Tap the entry of the respective destination.
Notice: The list may be scrolled via the “up” and “down”
icons. You may as well enter the first letter of the respective
destination. The list will then automatically scroll to the first
destination matching your entry.
4. Tap OK.
The destination will be taken over. The address is entered into
the respective fields.
Renaming a
destination
1. Tap the entry of the destination to be renamed.
2. Tap the Rename icon.
The N
AME OF DESTINATION dialog box opens.
3. Enter the new name.
4. Tap OK.
The destination is now renamed.
Operating the navigation software - 41 -
Page 44

Deleting a
destination
User's manual OnCourse Navigator | 4
1. Tap the entry of the destination to be deleted.
2. Tap the Delete icon.
The destination is now deleted.
3.3.6 Recent destinations
Recent destinations All destinations you have navigated to recently are listed on the
ECENT DESTINATIONS screen. On this screen you may:
R
Ù Select destinations for navigation purposes,
Ù Add destinations to the S
Ù Delete destinations from the list.
Taking over 1. On the main screen tap One destination.
The D
ESTINATION screen opens.
2. Tap the Recent destinations button.
3. Tap the entry of the desired destination.
Notice: The list may be scrolled via the "up" and "down"
icons. You may as well enter the first letter of the town of the
desired destination. The list will then automatically scroll to
the first destination matching your entry.
AVED DESTINATIONS list, and
4. Tap OK.
The destination will be taken over. The address is entered into
the respective fields.
Saving a destination
1. Tap the entry of the destination you want to save.
2. Tap the Save icon.
The N
AME OF DESTINATION dialog box opens.
3. Enter a name for the destination.
4. Tap OK.
The destination is now saved and will appear on the S
DESTINATIONS
list.
AVED
Deleting a
destination
1. Tap the entry of the destination to be deleted.
2. Tap the Delete icon.
The destination is now deleted.
Operating the navigation software - 42 -
Page 45

User's manual OnCourse Navigator | 4
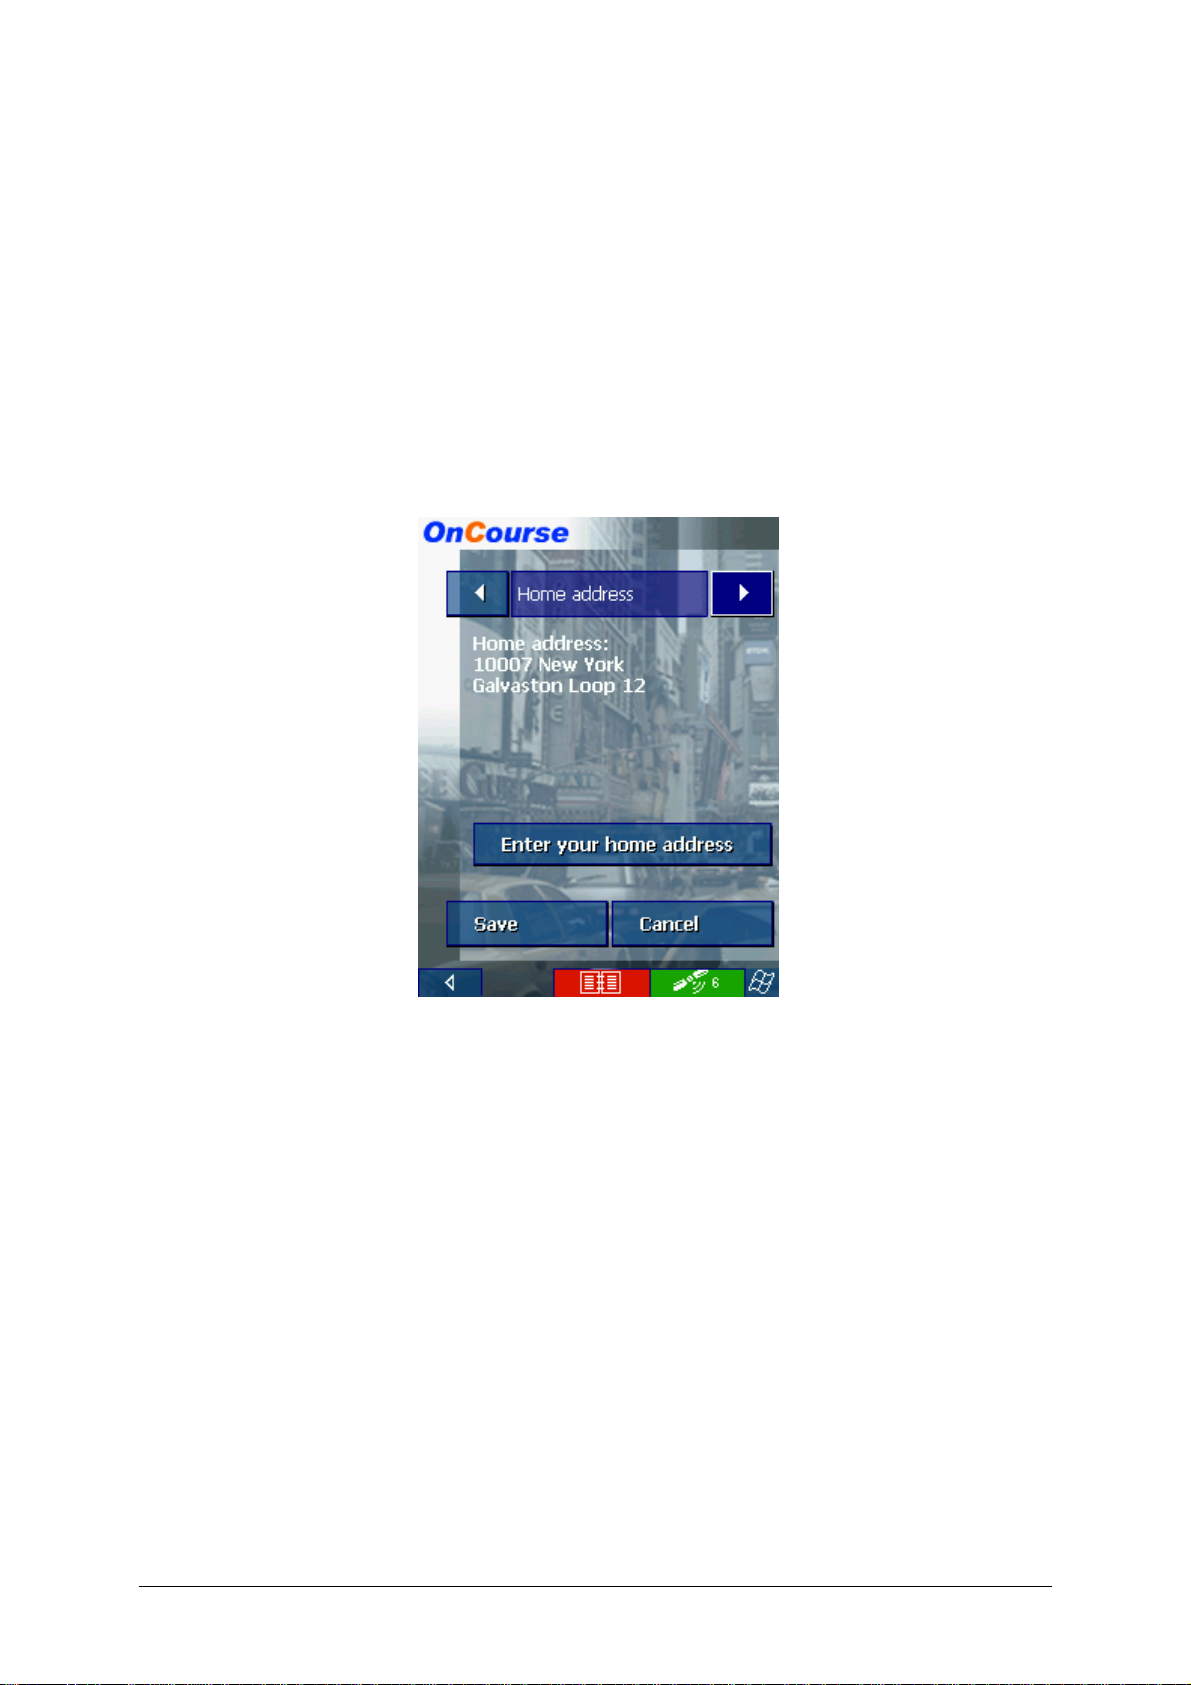
3.3.7 Save and use your home address
Survey You may store your home address in OnCourse Navigator in
order to quickly start navigation home at any place.
Saving your home
address…
1. On the main screen, tap the Settings button.
The S
ETTINGS screen opens.
2. Via the "Left" and "Right" icons, select Home address.
3. Tap the Enter your home address button.
The D
ESTINATION screen opens.
4. Tap the Address button and enter your address as described
in “Entering a destination manually”, page 31.
5. Tap the Set as home address button.
The address is taken over to the H
OME ADDRESS screen.
6. Tap the Save button.
Using your home
1. On the main screen, tap
address for
navigation...
.
The route is now being calculated and navigation starts.
Notice: When calculating the route to your home address always
the Fast Route is used as route option.
Operating the navigation software - 43 -
Page 46

User's manual OnCourse Navigator | 4
3.3.8 Voice command
Survey You may store a voice command with any saved destination. You
may then start navigation to this destination by speech.
Storing a voice
command...
1. Open the S
destination for which you want to store a voice command.
AVED DESTINATIONS screen and select the
2. Tap the Rename icon
.
The N
AME OF DESTINATION dialog box opens.
3. Tap Voice recording.
The following message appears:
4. Pronounce the name of the destination (into the Pocket PC).
5. Tap OK when you have heard the signal.
The voice command for this destination is now stored.
Navigating via Voice
Command...
1. Open the main screen.
2. Tap the Voice recording icon
.
3. Pronounce the name of the destination (into the Pocket PC).
The route is now being calculated and navigation starts. The
route options you have chosen for the last navigation are
applied.
Operating the navigation software - 44 -
Page 47

User's manual OnCourse Navigator | 4
3.4 Working with the map
Survey There are various pieces of information available on the MAP
screen. Learn in this chapter about the possibilities for working
with the map, which depend on whether you are in navigation
mode, or not.
If you have not purchased a map on a memory card, you have to
transmit one or more maps from your PC to your Pocket PC using
the MapExport software before you can display a map or start
navigation.
For details on map transfer, please refer to “Additional software:
MapExport”, page 69.
Displaying the map On the main screen, tap the Show map button to open the M
Selecting a map To load another map (which must be available on your
screen.
Pocket PC) proceed as follows:
AP
1. On the main screen, tap the Select map button.
The Available maps screen opens:
2. Tap the entry of the map you want to work with.
3. Tap OK.
The selected map is now loaded. The main screen opens.
Operating the navigation software - 45 -
Page 48

User's manual OnCourse Navigator | 4
3.4.1 Operating the map
Displaying the map You may display the map
Ù while planning an itinerary,
Ù in order to show destinations on the map, or
Ù in order to select destinations on the map.
You may display the map via the Show map button on the main
screen or via the Show on map and Select on map buttons,
which are available when you indicate a destination. Th e map is
being displayed automatically when you are navigating.
Tapping the map The icons appear when you tap the map.
If you tap a place on the map and hold information on this place
will be displayed and you may, e.g., take over the data for
navigation purposes. For details, please refer to “Indicating
destinations on the map”, page 39.
Operating the navigation software - 46 -
Page 49

User's manual OnCourse Navigator | 4
Icons
The following icons are displayed on the map:
Zoom / Scroll Tap the Scroll icon to switch between Zoom and Scroll mode.
Zoom
In Zoom mode (the icon appears white) you may scale the map
up or down. Zoom in by drawing a rectangle on the map,
beginning with the upper left corner. Zoom out by beginning with
the lower right corner.
Scrolling
In Scroll mode (the icon appears red) you may scroll the map.
Tap on the screen and drag to the desired direction.
Itinerary planning
This icon is active when a calculated itinerary is loaded. Tap the
Itinerary icon to display the whole itinerary. Tapping this icon
again will display the precedent representation of the map.
North orientation
Tap the Orientation icon to north orientate the map. (the icon
appears red). Tapping this icon again will orientate the map in
driving direction (the icon appears white).
3D view (GPS reception necessary)
Tap the 3D icon to display the map in 3D mode (bee flight view).
The icon becomes the 2D icon. Tap the 2D icon to return to the
2D mode (standard). The icon becomes the 3D icon.
Center (GPS reception necessary)
Tap the Center icon to center your current position on the map.
Auto mode (GPS reception necessary)
Tap the Auto icon to display the standard representation of the
map after you have modified the view. The settings of 3D view,
north orientation and auto zoom mode will be applied. Your
current position will be centered. The icons will not be displayed.
For details, please refer to “Annex A: Configuration of OnCourse
Navigator”, section “Auto mode”, page 104.
Zoom in
Tap Zoom in to scale the map down.
Zoom bar Zoom bar
Drag the control to the left or to the right in order to modify the
scale of the map.
Operating the navigation software - 47 -
Page 50

User's manual OnCourse Navigator | 4
Zoom out
Tap Zoom out to scale the map up.
Additional functions
Tap the Additional functions icon to display the A
FUNCTIONS
screen. The availability of some functions depends on
DDITIONAL
whether you are being in navigation mode or not.
DDITIONAL FUNCTIONS screen opens:
The A
Tap the Day icon to adapt the luminosity of the screen to
daylight conditions.
Tap the Night icon to adapt the luminosity of the screen to night
conditions.
Tap these icons to start / stop guidance by speech.
Show route list
This feature is only available in navigation mode or when a
calculated itinerary is loaded. Tap Show route list to display a
list of all important waypoints of the route. For deta ils, please
refer to “Displaying the route list”, page 63.
Operating the navigation software - 48 -
Page 51

Change preferences
User's manual OnCourse Navigator | 4
Tap Change preferences to display the S
details, please refer to “Annex A: Configuration of OnCou rse
Navigator”, page 102.
Quit navigation
This function is only available in navigation mode. Tap Quit
navigation to exit navigation mode.
Block road, Unblock, New block
These functions are only available in navigation mode.
For details, please refer to “Blocking a route section”, page 65.
Set interim destination
This function is only available in navigation mode. Tap Set
interim destination to add a new route point to your itinerary.
The route will be recalculated and the newly added route point
will be the first destination to navigate to. Navigation to the other
route points will be executed later.
For details, please refer to “Adding a stage point during
navigation”, page 64.
Change route options
ETTINGS screen. For
This function is only available in navigation mode. Tap Change
route options to modify them.
For details, please refer to “Navigating to a destination”, page 57.
Operating the navigation software - 49 -
Page 52

User's manual OnCourse Navigator | 4
3.4.2 Representation of the map in navigation mode
In navigation mode, there is some assistance for navigation,
some information on the itinerary and one more command bu tton
being displayed:
Assistance for
navigation
The following assistance for navigation is being displayed at the
left and at the bottom of the map:
Field Information
c
d
e
f
If there is two maneuvers to be executed quickly one
after the other, the small upper arrow field indicates
the next maneuver but one to be executed.
The red arrow indicates your current position on the
map. Since the displayed sector of the map changes
continually your current position is centered on the
map whenever possible (Moving Map).
The bigger arrow field indicates the next maneuver to
be executed.
The distance field indicates the distance to the next
maneuver. When you approach, the representations
changes into a distance bar:
The more light blue bars are displayed the nearer you
are to the place where the next maneuver must be
executed.
Operating the navigation software - 50 -
g
h
The upper street field indicates the name of the next
street to turn in.
The lower street field indicates the name of the street
you are currently in.
Page 53

User's manual OnCourse Navigator | 4
Information on the
itinerary
At the right of the map, the following information on the itinerary
is being displayed:
Field Information
This symbol means "stage". All information displayed
below refers to the next stage point.
ETA (Estimated time of arrival).
Remaining time to arrival (estimated).
Remaining distance to arrival (estimated).
Tap this icon to repeat the last spoken instruction. All available
information will be displayed.
The additional information will disappear after some seconds.
Operating the navigation software - 51 -
Page 54

User's manual OnCourse Navigator | 4
3.4.3 Displaying additional information on the map
In OnCourse Navigator you may determine which information
is to be displayed on the map. Modifying any configuration begins
ETTINGS screen.
tap the
icon on the map and select Change
preferences.
ETTINGS screen opens.
The S
Configuring the
display of additional
information…
on the S
1. On the main screen, tap Settings or
2. Select Map information using the arrow buttons:
Info bar 3. The Info bar at the bottom of the map displays the scale of
the map, the current gradient, the compass, the current
height above sea level, and the current speed.
Tap the respective command button to display (On) or not
(Off) the Info bar.
Points of Interest 4. Tap the respective command button to display (On) or not
(Off) Points of Interest on the map.
Street names 5. Tap the respective command button to display (On) or not
(Off) Street names on the map.
6. Via the arrow buttons select Route information:
Operating the navigation software - 52 -
Page 55

User's manual OnCourse Navigator | 4
7. Tap the command buttons to display (On) or not (Off) the
respective information on the map.
The desired information on the entire itinerary (upper section)
and on the current stage (lower section) will be displayed at
the right hand side of the map.
Section Information
This symbol means "itinerary". All information
displayed below refers to the final destination. This
section is only available if you have indicated more
than one destination to navigate to.
This symbol means "stage". All information
displayed below refers to the next stage point.
Line 2 ETA (Estimated time of arrival).
Line 3 Remaining time to arrival ( estimated).
Line 4 Remaining distance to arrival (est imated).
8. Tap Save to save the modifications.
The modifications will be taken over and displayed on the
map.
Operating the navigation software - 53 -
Page 56

Page 57

User's manual OnCourse Navigator | 4
4 Navigation and Itinerary
planning
Topics covered in this chapter:
4.1 General notes on navigation page 56
4.2 Navigating to a destination page 57
4.3 Navigating to several destinations (Itinerary planning) page 59
Working on itineraries, storage an d management
4.4 Functions which are useful for navigation page 63
Displaying the route list
Adding a stage point during navigation
Blocking a route section
Keeping the logbook
Navigation and Itinerary planning - 55 -
Page 58

User's manual OnCourse Navigator | 4
4.1 General notes on navigation
The use of OnCourse Navigator may only be effected at your
own risk.
Attention: To protect yourself and others from accidents please
do not operate the navigation system while driving!
Attention: You must not look at the display except when it is
absolutely safe to do so!
Attention: The road layout and the traffic signs are absolutely
prior to the instructions of the navigation system.
Attention: You must not follow the instructions of OnCourse
Navigator except when the circumstances and the road traffic
regulations allow doing so. OnCourse Navigator will guide you
to your destination even when you have left your planned
itinerary..
Obstructed GPS
reception
Quitting navigation
mode
Arriving at your
destination
When you turn off the GPS receiver or when the reception of
GPS-signals is obstructed OnCourse Navigator does not close
but navigation is interrupted.
As soon as the GPS receiver works again the navigation system
notices a possible change of your current position and
recalculates the route. You may simply continue navigation.
Notice: Navigation will always continue automatically when you
switch off your hardware without closing OnCourse Navigator
before.
When you quit navigation mode by command the main screen
appears. You may then indicate another destination or reassume
the by selecting the former destination from the Recent
destinations list.
When you have reached your destination the system pronounces
the message "You have reached your destination!"
The map is no more presented in navigation mode. A small red
arrow indicates your current position.
Navigation and Itinerary planning - 56 -
Page 59

4.2 Navigating to a destination
User's manual OnCourse Navigator | 4
Navigating to a
destination…
1. Enter your destination as described in “Indicating
destinations”, page 30.
2. Tap the Start navigation button.
The R
OUTE OPTIONS screen opens:
3. Tap the T
options:
Option Signification
Fast route The quickest route will be calculated.
Short route The shortest route will be calculated.
Pedestrian route
YPE OF ROUTING field and select one of the following
A route for pedestrians will be calculated.
One-way directives and prohibitions of
vehicular traffic will be disregarded.
Navigation and Itinerary planning - 57 -
Page 60

User's manual OnCourse Navigator | 4
4. Tap the Interstates, Ferries, and Tollways fields
successively and select one of the following options:
Option Signification
Permitted
The respective kind of street will be
regarded for route calculation.
Avoid
The respective kind of street will be
avoided if reasonable.
Forbidden
The respective kind of street will be
disregarded for route calculation.
Notice: The Route options settings will be saved. You will no
more need to enter them except if you want to navigate using
modified options.
5. Tap Start navigation.
The route is now being calculated. The map is being displayed
in navigation mode.
Navigation and Itinerary planning - 58 -
Page 61

User's manual OnCourse Navigator | 4
4.3 Navigating to several destinations (Itinerary
planning)
Itinerary planning You may plan itineraries without receiving GPS-signals, e.g.
comfortably at home. Planned itineraries may be stored. Thus
you may plan as many itineraries as you want, e.g. for holidays.
Navigating to several
destinations…
1. On the main screen, tap Several destinations.
The I
2. Tap the Add destination icon to indicate the first stage
point.
TINERARY screen opens:
The Destination screen opens.
3. Indicate the destination as described in “Indicating
destinations”, page 30.
4. Tap the Add to itinerary icon.
The I
5. Repeat steps 2-4 for every stage point you want to add to the
Navigation and Itinerary planning - 59 -
TINERARY screen opens. The destination is added as
Stage point 1.
itinerary.
Page 62

User's manual OnCourse Navigator | 4
6. Tap the entry of the stage point you want to navigate to first.
Notice: You have to select the stage point you want to
navigate to first. You may then continuer navigation when it
was interrupted. You may as well navigate to only some of
the stage points of a stored itinerary.
7. Tap Start navigation.
The route is now being calculated. The map is being displayed
in navigation mode.
Continuing
navigation after the
arrival at a stage
point…
If you have planned an itinerary with several stages,
navigation to the next stage point starts automatically when
you have reached a stage point. For details, please refer to
“Itinerary”, page 105.
Navigation and Itinerary planning - 60 -
Page 63

User's manual OnCourse Navigator | 4
4.3.1 Working on itineraries, storage and management
Survey You may plan as much itineraries as you want, e.g. for holidays.
You may save them and use them later for navigation purposes.
At any moment, you may add stage points, modify the order of
the stages, or display the itinerary on the map.
The following commands are available:
One place up
One place down
Add stage
Delete stage
Tap the One place up icon to navigate to the respective stage
point earlier (example: stage 3 becomes stage 2).
Tap the One place down icon to navigate to the respective
stage point later (example: stage 2 becomes stage 3).
Tap the Add destination icon to add a stage point. The new
stage point will be added at the end of the list. You may shift it
forward using the One place up icon.
Tap the Delete destination icon to delete the respective stage
point.
Calculate the route
Tap the Calculate the route icon to calculate the distance and
the estimated duration of the entire itinerary. The information will
be displayed after you have entered (or confirmed) the route
options.
Furthermore, the distance and the estimated duration of each
stage will be indicated with the stage entries.
Load an itinerary
Tap the Load itinerary icon to load a saved itinerary, e.g. to
modify it or for navigation purposes. If you had already entered
stage points, the stage points of the loaded itinerary will be
inserted after the stage point, which is currently select ed.
Save the itinerary
Tap the Save itinerary icon to save the itinerary. Enter an name
for the itinerary into the N
AME OF THE ITINERARY dialog box.
Navigation and Itinerary planning - 61 -
Page 64

User's manual OnCourse Navigator | 4
Tap Show on map to display the entire itinerary on the map.
The route will be highlighted in green:
4.3.2 Simulating the route
Simulation You may execute a simulated navigation along the itinerary when
the route has been calculated.
Notice: The reception of GPS-signals is not necessary for the
simulation.
Simulating the
route…
The route will be recalculated for simulation purposes
1. Tap the Show on map icon.
The itinerary is displayed on the map.
2. Tap the Additional functions icon.
3. Tap Start simulation.
and simulation starts when calculation is ready.
Stop simulation 1. To quit simulation, tap the Additional functions icon.
2. Tap Quit navigation.
Navigation and Itinerary planning - 62 -
Page 65

User's manual OnCourse Navigator | 4
4.4 Functions which are useful for navigation
Survey In OnCourse Navigator the following functions are available in
navigation mode:
Ù Adding a stage point during navigation, see page 64.
Ù Blocking route sections, see page 65.
Ù Keeping the logbook, see page 66.
4.4.1 Displaying the route list
Route sections During navigation (or just after the calculation of the route) you
may display the route list, which informs about the distance and
duration from one way point to the next.
Displaying the route
list…
Precondition
1. Tap the Additional functions icon
: The map is being displayed.
.
2. Tap Show route list.
The R
The route list informs about the distance to the next turn, the
type of the next maneuver, the name of the street in which
you are just before carrying out the described maneuver and
the name of the street into which you should turn next.
OUTE LIST screen opens.
Navigation and Itinerary planning - 63 -
Page 66

User's manual OnCourse Navigator | 4
4.4.2 Adding a stage point during navigation
Adding a stage point
during navigation…
At any moment during navigation you may add a new stage point
to your itinerary. The route will be recalculated in order to make
the new stage point the next destination to navigate to. The
other remaining stage points will be navigated to after the new
one.
Adding a stage
Precondition
: The map is being displayed in navigation mode.
point…
1. Tap the Additional functions icon.
2. Tap Set interim destination.
The D
ESTINATION screen opens.
3. Indicate the new stage point as described in “Indicating
destinations”, page 30.
4. Tap the Set as route point button.
The route will be recalculated in order to make the new stage
point the next destination to navigate to.
Notice: You may as well select the new stage point directly on
the map, just as described in “Indicating destinations on the
map”, page 39. Tap the respective place and hold. From the
context menu, select Add to route.
Navigation and Itinerary planning - 64 -
Page 67

4.4.3 Blocking a route section
User's manual OnCourse Navigator | 4
Blocking a route
section manually
You may block a route section manually in order to evade it.
Manual blocking forces a recalculation of the route.
Presume that you are driving on an interstate and a radio
message announces a traffic jam of 4 miles near your current
position. With the “Block route sections” function you may
instruct the navigation system to evade the announced traffic
jam.
Notice: If your GPS receiver disposes of the TMC module,
OnCourse Navigator notices and evades obstacles concerning
your itinerary automatically.
A manual blocking is only valid for the current navigation
process. The respective route section will be unblocked for the
next navigation or when you restart the software.
Blocking a route
section…
Precondition
the map is being displayed.
1. Tap the Additional functions icon.
: The navigation system is in navigation mode and
2. Tap Block road.
The B
LOCKING screen opens.
3. Enter how many miles (from your current position on) you
want to block.
4. Tap OK.
This forces a recalculation of the route. The indicated route
section will be evaded. On the map, it will be highlighted on
red.
Unblocking a route
section
1. Tap the Additional functions icon.
2. Tap Unblock.
The route section is now unblocked. The navigation system
uses the route, which had been calculated originally.
Navigation and Itinerary planning - 65 -
Page 68

User's manual OnCourse Navigator | 4
4.4.4 Keeping the logbook
Survey You may make OnCourse Navigator keep a logbook. Any start
of the logbook forces the creation of an Excel file in the root
directory of your Pocket PC. You may transmit this file to your PC
and open it with, e.g., Microsoft Excel.
Starting the
logbook…
1. Tap the Logbook icon
.
OGBOOK screen opens:
The L
2. Enter the reason of your journey into the Comment field.
3. Enter the mileage at the beginning of your trip into the
Mileage field.
4. Tap the Reason button and indicate whether it is a business
journey or a private journey.
5. Tap OK.
The system creates the first logbook entry. The Logbook icon
changes from red to green (Logbook enabled).
Exiting the logbook… Collecting data on your trip stops when you arrive at your
destination, when you quit navigation, or when you quit
OnCourse Navigator. A last entry for the point you have been
reaching now will be added. Alternatively you may tap the
Logbook icon. Tap the Action field and select Exit. The
Logbook icon changes from green to red (Logbook disabled).
Adding an entry… You may possibly want to add entries to the logbook, e.g. when
your car was refueled or when you have visited several clients
without using your car. In this case tap the Logbook icon. Tap
the Action field and select Add entry.
Navigation and Itinerary planning - 66 -
Page 69

User's manual OnCourse Navigator | 4
Working with the
logbook…
You may transmit the logbook file to your PC where y ou may
open it and modify the entries (if necessary).
1. Establish an ActiveSync connection between your PC and
your Pocket PC. (For details refer to the manual or your
Pocket PC)
2. In the root directory of your Pocket PC select the logbook file
named "Logbook.xls".
3. Copy the file to your PC and open them with Microsoft
Excel.
The following information is provided by the logbook file: the
mileage at the beginning of the journey, the reason of the
journey, town and street, the date, the distance and the
duration of the journey, and others like average and
maximum speed. You may print the logbook or, if necessary,
add them to the logbook you are keeping for tax purposes.
Navigation and Itinerary planning - 67 -
Page 70

Page 71

User's manual OnCourse Navigator | 4
5 Additional software:
MapExport
Topics covered in this chapter:
5.1 Functionality of MapExport page 70
Map export and transfer
Transfer of Standard map extracts
5.2 User’s interface and basic functionality page 71
Starting MapExport
Operating elements
Hot keys
Structure of the windows
5.3 Working with maps page 76
Loading and displaying maps
Icons
5.4 Exporting segments of the map page 80
Corridor surrounding an itinerary
Area
5.5 Transferring segments of the base map page 93
Additional software: MapExport - 69 -
Page 72

User's manual OnCourse Navigator | 4
5.1 Functionality of MapExport
5.1.1 Map export and transfer
Notice: You do not dispose of MapExport unless you have
purchased the 4-CD-version of OnCourse Navigator and
installed the software.
Survey The transfer of maps is divided into two independent steps:
Ù Map export:
The generation of determined map segments and their
storage on the hard disk of your PC.
For details, please refer to “Corridor surrounding an itinerary”,
page 80 and to “Area”, page 89.
Ù Map transfer:
Transfer of exported maps from your PC’s hard disk to your
Pocket PC.
There is no need to execute these two steps one after the other.
As exported maps are stored on your PC’s hard disk they may be
transferred to your Pocket PC at any moment.
Duration of both
map export and map
transfer
Depending of the quantity of data and the performance of your
PC, the exportation of a map segment may take several hours. It
is the same with the transfer of this segment to your Pocket PC
via an ActiveSync connection. We recommend using a card
reader to transmit large map segments.
5.1.2 Transfer of Standard map extracts
Transfer of Standard map extracts
If you have obtained two CDs containing ready-to-use map
segments with your navigation software, you may, with
MapExport, directly transmit them to your Pocket PC or to a
memory card.
For details, please refer to “Transferring segments of the base
map”, page 93.
Additional software: MapExport - 70 -
Page 73

User's manual OnCourse Navigator | 4
5.2 User’s interface and basic functionality
5.2.1 Starting MapExport
Starting MapExport… 1. Start MapExport on your PC by clicking Start >
Programs > OnCourse Navigator 4 > MapExport.
The M
Main menu
Via the M
software.
Click the Map archive icon to transmit provided or self-exported
map segments to your Pocket PC or to a memory card.
AIN MENU opens:
AIN MENU you may access all functions of the
For details, please refer to “Transferring segments of the base
map”, page 93.
Additional software: MapExport - 71 -
Click the Area icon to export a rectangular segment of the base
map.
For details, please refer to “Area”, page 89.
Click the Corridor icon to export a corridor segment based on an
itinerary.
For details, please refer to “Corridor surrounding an itinerary”,
page 80.
Page 74

User's manual OnCourse Navigator | 4
Standard directory
for the basic map
Standard directory
customized maps
Click the Select button on the “Basic map” section to determine
another folder for the base map.
For details, please refer to “Base map”, page 76.
Click the Select button on the Customized maps section to
determine another folder for maps you have exported yourself.
For details, please refer to “Customized maps”, page 76.
Click Quit to quit MapExport.
Click this icon to obtain information on the installed software
version.
Click this icon for Online help.
Additional software: MapExport - 72 -
Page 75

User's manual OnCourse Navigator | 4
5.2.2 Operating elements
Survey The operating elements of MapExport are listed below:
Element Function
Entry field Make entries into entry fields.
List field
Command button
Select between the entries listed in a
list field.
Click a command button to execute an
action, e.g. renaming a map.
Combo box
Option group Select one of the available options.
Checkbox
A combo box is a combination of both
entry field and list field. Make an
entry or select one of the listed
entries.
Select one or several options by
checking the respective checkboxes.
Additional software: MapExport - 73 -
Page 76

User's manual OnCourse Navigator | 4
5.2.3 Hot keys
Survey The hot keys which enable MapExport operation without mouse
are listed below:
Key Function
[TAB]
[SHIFT] + [TAB]
Arrow keys
[ENTER]
[SPACE]
[ALT] + [DOWN]
[ESC]
[F1] Calls Online help.
[ALT] + [F4]
Focuses the next field or button
Focuses the next menu item.
Focuses the previous field or button
Focuses the previous menu item.
[UP] – Selects the previous list item
or focuses the previous radio button
of an option group.
[DOWN] – Selects the next list item or
focuses the next radio button of an
option group.
Executes the action of the focused
command button.
Validates a town or street entry.
Activates / deactivates the focused
radio button of an option group
Checks / Unchecks the focused
checkbox.
Opens the list of the focused combo
box.
Closes the dialog box.
Closes the combo box list.
Quits Online help.
Quits MapExport.
Additional software: MapExport - 74 -
Page 77

User's manual OnCourse Navigator | 4
5.2.4 Structure of the windows
Main menu
Use and structure Ù Via the MAIN MENU you may access all functions of the
software.
Ù The paths of the standard directories for the basic map
and for Customized maps are indicated and may be
modified.
Corridor, Area, Map archive
Corridor, Area, Map
archive
These windows consist of two sections: a map section al the left
and a functional section at the right. Open these windows via the
AIN MENU.
M
Map section The map sector displays the currently loaded map (or a segment
of it). Any object which may be determined as destination may
also be displayed on the map: the towns, streets / roads and
Point of Interest contained in the database of places. At the
upper right corner of the map you may find icons with which you
may scroll the map and determine its scale.
Functional section Varying according to the displayed window, the functional sector
provides information and operating elements which are needed
for map exportation and transfer.
Command buttons The following command buttons are to be found on any of the
ORRIDOR, AREA, and MAP ARCHIVE windows:
C
Click the Main menu button to return to the M
AIN MENU. There
you may open another window or quit MapExport.
Click the Online help button to access Online help.
Additional software: MapExport - 75 -
Page 78

User's manual OnCourse Navigator | 4
5.3 Working with maps
5.3.1 Loading and displaying maps
Base map
Survey During the installation process the Base map has been stored on
your PC’s hard disk.
The path to the folder containing the Base map is indicated in the
AIN MENU and may be modified there.
REA and CORRIDOR windows.
Transferring the
Base map to another
folder of your hard
disk…
Base map field of the M
This map is the base for exporting map segments. It is displayed
in the Map section of the A
1. In the W
INDOWS EXPLORER, create a new folder for the Base
map.
2. Cut the current folder of the Base map and copy it into the
new folder.
3. In the M
AIN MENU of MapExport, click the Select command
at the right of the Basic map field.
The S
ELECT FOLDER dialog box opens.
4. Select the new folder for the Base map.
5. Click OK.
The new path is now indicated in the Basic map field.
Customized maps
Survey "Customized maps" are all areas and corridors of the Base map
you have exported. MapExport has stored them on the hard disk
of your PC.
The path to the folder containing the customized maps is
AIN MENU and
Loading a
Customized map…
indicated in the Customized maps field of the M
may be modified there (see below).
Customized maps may be transferred to the Pocket PC or to a
memory card.
Notice: A copy of the customized maps remains on the hard
disk, even after the transfer to the Pocket PC.
1. On the M
The M
AIN MENU, click the Map archive icon.
AP ARCHIVE window opens.
2. In the Customized maps list field of the functional section,
click the entry of the map to display.
The respective map is now being displayed in the Map section at
the left of the window.
Additional software: MapExport - 76 -
Page 79

User's manual OnCourse Navigator | 4
Standard folder for
customized maps
A standard folder for customized maps has been created during
the installation process. All customized maps you have exported
(areas and corridors) are stored therein.
Modifying the path to
the standard folder
for Customized
maps…
1. In the W
Customized maps.
2. In the M
at the right of the Customized maps field.
INDOWS EXPLORER, create a new folder for
AIN MENU of MapExport, click the Select command
The SELECT FOLDER dialog box opens.
3. Select the new folder for the Customized maps.
4. Click OK.
The new path is now indicated in the Customized maps
field.
Standard maps
Survey There are CDs with already exported map segments included in
the delivery, which are ready for use on your Pocket PC.
You may load these maps directly from the CD-ROM and as well
transmit them to your Pocket PC.
Loading a Standard
map…
The M
3. In the Standard maps list field of the functional section, click
The respective map is now being displayed in the Map section
1. Insert the CD containing the respective map into your CD-
ROM drive.
2. On the M
AIN MENU, click the Map archive button.
AP ARCHIVE window opens.
the entry of the map to display.
at the left of the window.
Notice: If you do not have inserted the right CD you will be
prompted to do so. The respective map will then be displayed in
the Map section at the left of the window.
Additional software: MapExport - 77 -
Page 80

User's manual OnCourse Navigator | 4
5.3.2 Icons
Survey At the upper right corner of the map, there are icons to scroll the
map, to determine the scale of the map, and to define segments
of the map in order to export them. Depending on which window
is active, some icons may be deactivated (for example the
segment definition icons on the M
Scrolling the map:
AP ARCHIVE window).
1. Click the Scroll map icon.
The mouse pointer becomes a hand.
2. Click on the map, keep the left mouse button pressed and
drag the map into the desired direction.
Click the arrow icons to scroll the map into the respective
direction.
Notice: Alternatively, you may scroll the map using the arrow
keys of your keyboard.
Zooming into the map:
Click the Zoom in icon to increase the scale of the map.
Notice: You may as well zoom in by pressing the NUM[+] key
(on the numeric keyboard) or by rolling the mouse wheel
upwards.
Zooming out of the map:
Click the Zoom out icon to reduce the scale of the map.
Notice: You may as well zoom out by pressing the NUM[-] key
(on the numeric keyboard) or by rolling the mouse wheel
downwards.
Displaying the entire map:
Click the Entire map icon to display the entire map.
Scaling the map to the size of a rectangle:
Click the Rectangle size icon to draw a rectangle and to scale
the map to its size.
Searching for a place or a Point of Interest:
Click the Search icon to search for a place or a Point of Interest.
Centering a determined area:
The Center icon is activated only on the A
REA window. Click this
icon to scale the map to the size of a marked rectangle and to
center it on the map.
For details, please refer to “Area”, page 89.
Additional software: MapExport - 78 -
Page 81

User's manual OnCourse Navigator | 4
Adding a stage point:
The Stage point icon is only activated on the C
ORRIDOR window.
Click this icon to add a stage point by clicking it on the map.
For details, please refer to “Corridor surrounding an itinerary”,
page 80.
Defining an area:
The Draw area icon is activated only on the A
REA window. Click
this icon to define a rectangular area which may be exported.
For details, please refer to “Area”, page 89.
Additional software: MapExport - 79 -
Page 82

User's manual OnCourse Navigator | 4
5.4 Exporting segments of the map
5.4.1 Corridor surrounding an itinerary
Survey You may cut a corridor of the base map and export it. The
definition is done by selecting stage points of an itinerary and by
indicating the width of the corridor and the radius round the
stage points. The stage points will be exported with the map. In
OnCourse Navigator, you may select them as destinations for
navigation purposes (For details, please refer to “Working on
itineraries, storage and management”, page 61).
Defining a corridor… 1. On the M
The C
The base map is being displayed in the map sector. The
functional sector shows a list of the stage points, informat ion,
and the needed operational elements.
AIN MENU, click the Corridor icon.
ORRIDOR window opens:
Procedure The definition of a corridor is divided into 6 steps:
Ù definition of the stage points of an itinerary, page 81,
Ù definition of the radius around the stage points, page 83,
Ù definition of the width of the corridor, page 83,
Ù definition of the route options, page 84,
Ù final control of the itinerary, page 85,
Ù export of the corridor, page 88.
Additional software: MapExport - 80 -
Page 83

User's manual OnCourse Navigator | 4
Defining the stage points of an itinerary
Survey Any town, street, or Point of Interest covered by the base map
may be selected as stage point. To determine a stage point, you
may
Ù enter it by keyboard or
Ù click it on the map.
Adding stage points… 1. Click the Search icon.
The S
EARCH FOR PLACE OR POINT OF INTEREST dialog window
opens.
2. Click the Country combo box and select the destination
country.
Notice: If you want to dispose of the destinations of all
countries covered by the currently loaded map, select All
countries. Note that in this case you may not enter a
postcode to indicate the destination town.
3. Click the State combo box and select the destination state.
4. Enter the stage point city into the Location/postal code
combo box. If United States is selected in the Country field,
you may also enter the ZIP code.
5. Activate the Street option button.
6. Enter the destination street into the Street combo box.
Notice: You do not need to enter a street suffix, or a street type
to get a search result. For example, if you are looking for a street
called "S Main Avenue", simply type in "main".
Additional software: MapExport - 81 -
Page 84

User's manual OnCourse Navigator | 4
7. Enter a house number into the No. field at the right hand side
if possible or enter the name of crossroad into the
Intersection entry field.
8. Click the Set route points button to determine the entered
address as stage point.
The address will be added to the list of stage points. On the
map, a small flag will indicate the stage point with th e
number of its position on the itinerary.
9. Repeat steps 2 to 6 for each address you want to add to the
list of stage points.
Adding a Point of
1. Click the Search icon.
Interest as stage
point…
The S
EARCH FOR PLACE OR POINT OF INTEREST dialog window
opens.
2. Click the Country combo box and select the destination
country.
Notice: If you want to dispose of the destinations of all
countries covered by the currently loaded map, select All
countries. Note that in this case you may not enter a
postcode to indicate the destination city.
3. Click the State combo box and select the destination state.
4. Enter the stage point city into the Location/postal code
combo box. For cities in the United States you may also enter
the ZIP code.
5. Activate the Point of Interest option button.
6. In the Point of Interest combo box, select the main
category of the Point of Interest (e.g. “Airports”).
7. In the Name combo box, select the desired Point of Interest.
8. Click the Set route points button to determine the selected
Point of Interest as stage point.
The Point of Interest will be added to the list of stage points.
On the map, a small flag will indicate the stage point with the
number of its position on the itinerary.
9. Repeat steps 2 to 7 for each Point of Interest you want to add
to the list of stage points.
Additional software: MapExport - 82 -
Page 85

User's manual OnCourse Navigator | 4
Selecting a stage
point on the map…
1. On the map, search for the place or Point of Interest you want
to set as stage point.
2. Click the Stage point icon.
The mouse pointer becomes an arrow with a small flag.
3. Click the desired place (or Point of Interest) to add it to the
list of stage points.
The address (or Point of Interest) will be added to the list of
stage points. On the map, a small flag will indicate the stage
point with the number of its position on the itinerary.
Notice: If you click a place which is not accessible by car, the
nearest accessible place will be taken over as stage point.
Defining the radius around the stage points and the corridor width
Defining the radius
around the stage
points…
A circle with a determined radius around the stage points will be
exported with the corridor. This grants navigation in the
neighborhood of the stage points, even outside the calculated
route.
1. Enter the desired value for the radius into the Radius entry
field. Values between 2 miles and 150 miles are allowed.
Defining the corridor
width…
2. Enter the desired value for the corridor width into the
Corridor width entry field. Values between 1 mile and 60
miles are allowed.
If you leave the calculated route, a new route may be calculated
within the selected corridor (and within the selected circles
around the stage points).
Additional software: MapExport - 83 -
Page 86

Defining the route options
User's manual OnCourse Navigator | 4
Defining the route
1. Click the Route options button.
options…
The R
OUTE OPTIONS dialog window opens:
Route options 2. Select one of the following options from the upper section:
Option Signification
Quick route The quickest route will be calculated.
Short route The shortest route will be calculated.
Pedestrian route
A route for pedestrians will be calculated.
One-way directives and prohibitions of
vehicular traffic will be disregarded.
Speed profile 3. Select the appropriate entry from the Speed profile combo
box.
This entry will have an effect on the calculation of the
remaining time and of the estimated time of arrival (ETA).
Roads to be avoided 4. Determine whether you want to Avoid interstates, to Avoid
ferries, and / or to Avoid tollways by checking the
respective checkboxes.
Even if you check the boxes, the respective roads will only be
avoided if it is possible with reasonable detour and
retardation.
5. Click OK.
Notice: The R
OUTE OPTIONS configuration will be saved. You
will not have to modify them except if you want to determine
other route options.
Additional software: MapExport - 84 -
Page 87

User's manual OnCourse Navigator | 4
Checking, displaying and exporting itineraries
Survey You may plan as much itineraries as you want, e.g. for holidays,
in order to use them later for navigation purposes.
At any moment, you may add stage points, change their order or
display an itinerary on the map.
The following commands are available:
One place up
One place down
Adding route points… Determine other route points and add them to the list of route
Click the One place up icon to navigate to the respective stage
point earlier (example: stage 3 becomes stage 2).
Click the One place down icon to navigate to the respective
stage point later (example: stage 2 becomes stage 3).
points.
Delete stage
Display stage point
Displaying and
calculating the
corridor…
For details, please refer to “Defining the stage points of an
itinerary”, page 81.
Click the Delete stage point icon to delete the respective stage
point.
Click the Display stage point icon to display the respective
stage point on the map.
Click the Display corridor icon to display and to calculate the
route with its corridor.
The route will be highlighted in blue, the corridor and the circles
around the stage points in transparent gray. The stage points will
be indicated by small flags.
Additional software: MapExport - 85 -
Page 88

User's manual OnCourse Navigator | 4
Route information When the route has been calculated, the following information is
being displayed on the functional section:
Ù In the Duration column, the distance and the estimated
duration to the next stage point are being indicated.
Ù In the Total field, the total distance and the total duration
are being indicated.
Ù In the Information on the selected corridor section,
the amount of required memory is being indicated.
Notice: If more than 150 MB of memory are required, you will be
prompted to reduce the map segment.
Additional software: MapExport - 86 -
Page 89

Loading the stage
points of a saved
itinerary…
Saving the itinerary…
User's manual OnCourse Navigator | 4
Click From PC to load the stage points of an itinerary wh ich is
saved on the hard disc of your PC.
Click From Pocket PC to load the stage points of an itinerary
which is saved on your Pocket PC.
The stage points will be added to the list of stage points and may
be modified.
Click To PC to save the itinerary to the hard disc of your PC.
Click To Pocket PC to save the itinerary to your Pocket PC.
On the S
AVE AS… dialog window, enter a name for the itinerary.
Additional software: MapExport - 87 -
Page 90

User's manual OnCourse Navigator | 4
Exporting the corridor
Survey Having entered stage points, radius and corridor width, you may
initiate the exportation of the corridor to the hard disc of your PC.
The new map may be transferred to the Pocket PC instantly after
exportation or at a later moment.
Entering the name of
the map…
1. Enter the name of the new map into the respective entry
field:
Starting
2. Click the Create map button.
exportation…
Exportation of the map begins. It will be stored into the
standard folder for Customized maps.
Notice: If the route has not been calculated yet, MapExport
will calculate it now in order to verify the size of requested
memory.
If more than 150 MB of memory are required, you will be
prompted to reduce the map segment.
The MAP EXPORT dialog window opens:
The approximate duration of the exportation process (less than
10 minutes, 10 to 30 minutes etc.) and the already elapsed time
are indicated. Two progress bars indicate the progress of
exportation.
Transferring the map
to the Pocket PC…
Having exported the map, you may transmit it to the Pocket PC
or export other segments of the base map and transmit them to
the Pocket PC at a later moment.
For details, please refer to “Transferring segments of the base
map”, page 93.
Additional software: MapExport - 88 -
Page 91

User's manual OnCourse Navigator | 4
5.4.2 Area
Survey You may cut a rectangle of the base map and export it. The map
segment may be exported to the hard disc and may then be
transferred to your Pocket PC.
Looking for Hawaii…? Hawaii is not covered by the base map. The delivery of
OnCourse Navigator includes, however, an already exported
map section of Hawaii, which you may directly transfer to your
Pocket PC.
1. To tran smit the map of Hawaii, click the Hawaii button.
The M
2. Proceed as described in “Transferring segments of the base
map”, page 93.
AP ARCHIVE window opens.
Determining an
1. On the M
area…
The A
AIN MENU, click the Area icon.
REA window opens:
The base map is being displayed in the map sector. The
functional sector shows information and the needed operational
elements.
Procedure 1. On the map, search for the area you want to export.
Additional software: MapExport - 89 -
Page 92

User's manual OnCourse Navigator | 4
If the area is to cover certain places or Points of Interest, you
may search for them in the database of places.
Click the Search icon.
For details, please refer to “Defining the stage points of an
itinerary”, page 81.
2. Click the Draw Area icon.
3. On the map, click one corner of the rectangle to define, keep
the left mouse button pressed and draw the desired
rectangle.
Limiting the
selection…
The determined rectangle is highlighted by black hatching.
In the Information on the area selected section, length,
width, and surface of the selected area are indicated.
If the selected zone contains parts of at least two countries or
two states or provinces/territories, the concerned countries
will be indicated in the upper Restrict the selected area to
box, the concerned states or provinces/territories in the lower
box.
Additional software: MapExport - 90 -
Page 93

User's manual OnCourse Navigator | 4
All concerned countries and/or states or provinces/territories
are selected (highlighted in blue). In order to deselect a
country or state or province/territory, click on it s entry.
Only the cartographic data of those regions, which are within
the rectangle and within the selected (highlighted in blue)
countries and/or states or provinces/territories w ill be
exported. This may be useful to minimize the memory
requirements of an exported area.
Calculating the size
of required memory
Determine whether the size of required memory is to be
calculated automatically.
automatically… Check the Calculate automatically check box.
The size of required memory will be calculated and indicated
automatically just after the determination (or modification) of the
area.
manually… Click the Calculate command button.
The size of required memory will be calculated and indicated.
Notice: If more than 150 MB of memory are required, you will be
prompted to reduce the map segment.
Checking and
modifying the area…
You may change the size and the position of the currently
indicated area.
Modifying the size… 1. With the mouse, point one of the little squares at the borders
of the area.
2. When the mouse pointer becomes an arrow with two tips
,
keep the left mouse button pressed and draw the rectangle to
the desired size.
Additional software: MapExport - 91 -
Page 94

User's manual OnCourse Navigator | 4
Shifting the area… 1. Point at the middle of the area.
2. Keep the left mouse button pressed and draw the rectangle to
the desired position.
Exporting the area
Survey Having made all necessary indications, you may initiate the
exportation of the area to the hard disc of your PC. The new map
may be transferred to the Pocket PC instantly after exportation or
at a later moment.
Entering the name of
the map…
1. Enter the name of the new map into the respective entry
field:
Starting
2. Click the Create map button.
exportation…
Exportation of the map begins. It will be stored into the
standard folder for Customized maps.
Notice: If the route has not been calculated yet, MapExport
will calculate it now in order to verify the size of requested
memory.
If more than 150 MB of memory are required, you will be
prompted to reduce the map segment.
The M
AP EXPORT dialog window opens.
The approximate duration of the exportation process (less
than 10 minutes, 10 to 30 minutes etc.) and the already
elapsed time are indicated. Two progress bars indicate the
progress of exportation.
Transferring the map
to the Pocket PC…
Having exported the map, you may transmit it to the Pocket PC
or export other segments of the base map and transmit them to
the Pocket PC at a later moment.
For details, please refer to “Transferring segments of the base
map”, page 93
Additional software: MapExport - 92 -
Page 95

User's manual OnCourse Navigator | 4
5.5 Transferring segments of the base map
Opening the Archive
window…
1. On the MAIN MENU, click the Map archive icon.
The M
AP ARCHIVE window opens.
On the functional sector, there are two list fields:
Ù The first list contains all customized maps which are
stored in the standard folder for Customized maps on the
hard disk of your PC.
Ù The second list contains Standard maps (exported
segments of the base map included in the delivery).
The size of requested memory is indicated behind the names of
the maps.
Checking customized
Customized maps may be displayed, renamed, or deleted.
maps…
Displaying a
customized map…
On the Customized maps list field, click the entry of the map to
be displayed.
The desired map will be displayed in the Map sector at the left
hand side of the window.
Renaming a map… 1. On the Customized maps list field, click the entry of the
map to be renamed.
2. Click the Rename command button.
3. On the NEW NAME dialogue window, enter the new name.
4. Click OK to save the new name of the map.
Additional software: MapExport - 93 -
Page 96

User's manual OnCourse Navigator | 4
Deleting a map… 1. On the Customized maps list field, click the entry of the
map to be deleted.
2. Click the Delete command button.
3. Confirm by clicking Yes.
The map and its entry on the Customized maps list field are
deleted.
Transferring maps… There is two ways to transmit a map:
Ù Via an ActiveSync connection.
Ù Via a card reader to a memory card.
1. To transmit a Standard map, insert the respective CD-ROM
into your CD-drive.
Transfer via an
ActiveSync
connection
2. Establish an ActiveSync connection between your PC and
your Pocket PC (for details, please consult the manual of your
Pocket PC).
3. Select the map to transmit from either the Customized
maps list field or the Standard maps list field.
The selected map is displayed on the map sector.
4. C lick the Via ActiveSync command button.
The S
ELECT DIRECTORY dialogue window opens. The size of
memory requested by the map is indicated.
5. Select the folder to which the map is to be transferred. This
folder must not be within the range of the “My documents”
folder.
5a Click the New folder icon to create a new folder for the map.
5b Enter the name of the new folder and click OK.
6. Click OK.
The M
AP TRANSFER dialogue window opens. Two progress bars
indicate the progress of transfer.
As soon as the map has been transferred to the Pocket PC, a
dialog box prompts that the transfer is complete.
Additional software: MapExport - 94 -
Page 97

User's manual OnCourse Navigator | 4
Transfer via a card
reader
1. Connect the card reader to your PC and insert the memory
card.
2. To transmit a Standard map, insert the respective CD-ROM
into your CD-drive.
3. Select the map to transmit from either the Customized
maps list field or the Standard maps list field.
The selected map is displayed on the map sector.
4. C lick the Via card reader command button.
The B
ROWSE FOR FOLDER dialogue window opens. The size of
memory requested by the map is indicated.
5. Select the directory of the memory card.
5a Click the Make new folder button to create a new folder for
the map.
5b Enter the name of the new folder and click OK.
6. Click OK.
The M
AP TRANSFER dialogue window opens. Two progress bars
indicate the progress of transfer.
As soon as the map has been transferred to the Pocket PC, a
dialog box prompts that the transfer is complete.
Additional software: MapExport - 95 -
Page 98

Page 99

User's manual OnCourse Navigator | 4
6 Additional software:
SkinEditor
Topics covered in this chapter:
6.1 Skin creation page 98
6.2 Selecting a Skin in OnCourse Navigator page.99
Additional software: SkinEditor - 97 -
Page 100

User's manual OnCourse Navigator | 4
6.1 Skin creation
Notice: You do not dispose of SkinEditor unless you have
purchased the 4-CD-version of OnCourse Navigator and
installed the software.
Survey With SkinEditor, you may personalize the user interface of
OnCourse Navigator.
You may determine the colors of the screen elements and the
background of the screens. Any modification will instantly be
displayed on the example screens at the right hand side of the
KINEDITOR window.
S
Personalizing... 1. Start SkinEditor by clicking Start > Programs > OnCourse
Navigator 4 > SkinEditor.
SkinEditor opens:
2. Via the combo boxes, determine the new skin.
Notice: The background image must be saved as bitmap (bmp).
Other formats are not supported. We recommend using bitmaps
with a resolution of 240 x 320 pixels. Bitmaps with lower or
higher resolutions will automatically be stretched to the size of
the screen.
3. Click Save Skin as… to save the new skin.
4. Click Transmit Skin to Pocket PC to provide the skin to
OnCourse Navigator.
Additional software: SkinEditor - 98 -
 Loading...