

Page 1
1.0 Table of Contents
1.0 Ta ble of Co ntent s
1.1 Tot al page s
2.0 C autio ns
3.0 O veral l Intro ducti on
3.1 Ac cesso ries
3.2 E xtern al View
3.3 D ispla y Infor matio n
4.0 G ettin g Ready
4.1 Tur n on/of f Camer a
4.2 L oadin g the bat tery
4.3 I nsert / R emove M emory C ard
4.4 At tachi ng Wris t Strap
5.0 B utton s & Funct ion
-- -- -- -- - -- -- -- -- -- - -- -- -- -
5.1 P ower
5.2 S hutte r
5.3 Tel e / Wide
5.4 P layba ck
-- -- -- -- - -- -- -- -- -- - -- -- -- --
5.5 M ode
5.6 D elete & + /-
-- -- -- -- - -- -- -- -- -- - -- -- -- -
5.6 .1 EV
5.6 .2 ISO
-- -- -- -- - -- -- -- -- -- - -- -- -- -
5.6 .3 WB
5.7 M enu /OK
5.7 .1 Up/P lay & Pau se/ Mac ro
5.7 .2 Righ t/Fla sh
5.7 .3 Down /Voice M emo
5.7 .4 Left /Self -Timer
6.0 S till Im age Mod e
6.1 S hooti ng
6.2 M enu Mod e
6.2 .1 Size
6.2 .2 Qual ity
6.2 .3 Shar pness
6.2 .4 Satu ratio n
6.2 .5 Effec t
6.2 .6 Mete ring
6.2 .7 Scen e Mode
6.2 .8 Shoo ting
-- -- -- - -- -- -- -- - -- -
-- -- -- - -- -- -- -- - -- -- -- - -- -
-- -- -- - -- -- -- -- - -- -- -- - -- --
-- -- -- - -- -- -- --
-- -- -- - -- -- -- -- - -- -- -- -
-- -- -- - -- -- -- -- - -- -- --
-- -- -- - -- -- -- -- - -
-- -- -- - -- -- -- -- - -- --
-- -- -- - -- -- -- -- - --
-- -- -- - -- -- -- -- - --
-- -- -- - -- --
-- -- -- - -- -- -- -- -
-- -- -- -- - -- -- -- -- --
-- -- -- -- - -- -- -- -- -- - -- -- --
-- -- -- -- - -- -- -- -- -- - -- --
-- -- -- -- - -- -- -- -- -- - -- -- -
-- -- -- -- - -- -- -- -- -- - -- -
-- -- -- -- - -- -- -- -- -- - -- -- --
-- -- -- -- - -- -- -- -- -- - -- -- -
-- -- -- - -- -- -- -- - -- -- -- -- -
-- -- -- - -- -- -- -- - -- -- -- -- - -
-- -- -- - -- -- -- -- - -- -- -- --
-- -- -- - -- -- -- -- - -- -- -- -- -
-- -- -- -- - -- --
-- -- -- -- - -- -- -- -- -- - -
-- -- -- -- - -- -- -- --
-- -- -- -- - -- -- -- -- --
-- -- -- - -- -- -- -- - --
-- -- -- - -- -- -- -- - -- -- -- -
-- -- -- - -- -- -- -- - -- -- --
-- -- -- - -- -- -- -- - -- -- --
-- -- -- - -- -- -- -- - -- -- -- -
-- -- -- - -- -- -- -- - -- -- -
-- -- -- - -- -- -- -- - -- -- -- -
1
1
2
2
2
3
3
4
4
4
4
4
4
4
4
4
5
5
5
5
5
5
6
6
6
6
6
6
6
6
6
6
7
7
7
7
7
7
User Manual
7.0 M ovie Cl ip Mode
7.1 M ovie Re cordi ng
7.2 M ovie Si ze
8.0 Vo ice Rec ordin g Mode
9.0 P lay bac k Mode
9.1 P layba ck of Sti ll lmag e
9.2 P layba ck of Mov ie Clip
9.3 T humbn ail
9.4 E xplor ing an im age
9.5 S lide
9.6 P rotec t
9.7 D elete
9.8 C opy To Card
9.9 D POF
10. 0 Set Up Mo de
10. 1 Auto Off
10. 2 Langu age
10. 3 Forma t
10. 4 Date In put
10. 5 Impri nt
10. 6 Beep
10. 7 Light F reque ncy
10. 8 Quick Vi ew
10. 9 Syste m Reset
10. 10 USB
10. 10.1 PC C am
10. 10.2 Di sk Driv e
10. 10.3 Pr inter
11.0 P ictBr idge Mo de
11.1 C onnec ting th e Camer a to
a Pic tBrid ge-su pport ed Prin ter
11.2 S elect p ictur es to pri nt
11.3 C ustom S et
12. 0 Softw are Appl icati on
12. 1 ArcSof t Media lmpre ssion
12. 2 Easy Li nk with You Tu be
13. 0 App endix
14. 0 Speci ficat ion
-- -- -- - -- -- -- -- - -- -- -- - -
-- -- -- - -- -- -- -- - -- -- -- - --
-- -- -- - -- -- -- -- - -- -- -- - -- -- -- -
-- -- -- - -- -- -- -- - --
-- -- -- -- - -- -- -- -- - -- --
-- -- -- -- - -- -- -- -- -
-- -- -- -- - -- -- -- -- -
-- -- -- -- - -- -- -- -- - -- -- -- -- -
-- -- -- -- - -- -- -- -- - -- -- -- -- -- - --
-- -- -- -- - -- -- -- -- - -- -- -- -- -- - -
-- -- -- -- - -- -- -- -- - -- -- -- -- -- - -
-- -- -- -- - -- -- -- -- - -- -- -- -- -- - -
-- -- -- -- - -- -- -- -- - --
-- -- -- -- - -- -- -- -- - -- -- -- -- -- -
-- -- -- -- - -- -- -- -- - -- -- -- -
-- -- -- -- - -- -- -- -- - -- -- --
-- -- -- -- - -- -- -- -- - -- -- -- -- -
-- -- -- -- - -- -- -- -- - -- -- -- --
-- -- -- -- - -- -- -- -- - -- -- -- -- --
-- -- -- -- - -- -- -- -- - -- -- -- --
-- -- -- -- - -- -- -- -- - -- -- -- -- --
-- -- -- -- - -- -- -- -- - -- --
-- -- -- -- - -- -- -- -- - -- -- -- --
-- -- -- -- - -- -- -- -- - -- -- -
-- -- -- -- - -- -- -- -- - -- -- -- -- -- -
-- -- -- -- - -- -- -- -- - -- -- -- -
-- -- -- -- - -- -- -- -- - -- -- --
-- -- -- -- - -- -- -- -- - -- -- -- --
-- -- -- - -- -- -- -- - -- -- -- -
-- -- -- - -- -- -- -
-- -- -- - -- -- -- -- - -- --
-- -- -- - -- -- -- -- - -- -- -- -- - -- -- -
-- -- -- - -- -- -- -- - -- -
-- -- -- - -- -- -- -- - --
-- -- -- - -- -- -- -- - -- -
-- -- -- - -- -- -- -- - -- -- -- -- - -- -- -
-- -- -- - -- -- -- -- - -- -- -- -- - -
2.0 Cautions
Do no t try to di sasse mble th e camer a by your self, w hich ma y damag e the cam era or ca use
ele ctric s hock.
Do no t fire th e flash i n a close d istan ce (les s than 1 me ter); i t may hur t your ey es.
Kee p the cam era awa y from th e reach o f child ren or an imals t o preve nt them f rom swa llowi ng the
bat terie s or smal l acces sorie s.
Sto p using t he came ra if any k ind of li quid or f oreig n objec t enter s the cam era. If i t happe ns, pow er
off t he came ra and co ntact y our dea ler for h elp.
Do no t opera te this c amera w ith wet h ands; i t may cau se elec tric sh ock.
The c amera m ay be dam aged in a n envir onmen t of high t emper ature .
To avoi d elect ricit y leaka ge, ple ase rem ove the b atter y if the ca mera is e xpect ed not to b e in use
7
7
7
7
8
8
8
8
9
9
9
10
10
10
11
11
11
11
11
12
12
12
12
12
12
12
12
12
13
13
13
13
14
14
14
15
16
for a l ong per iod.
It is n ormal t hat the t emper ature o f the cam era bod y rises i f the cam era wor ks for a lo ng time .
Sma ll Tip to S ave Yo u Big Hea dache
A digi tal cam era is in a w ay very s imila r to a comp uter. I f the dig ital
cam era han gs itse lf duri ng oper ation , pleas e follo w the pro cedur es
bel ow and mo st like ly the ca mera ca n be re-a ctiva ted.
1. Re move th e batte ry.
2. Re load th e batte ry.
3. Sw itch on t he came ra.
3.0 Overall Introduction
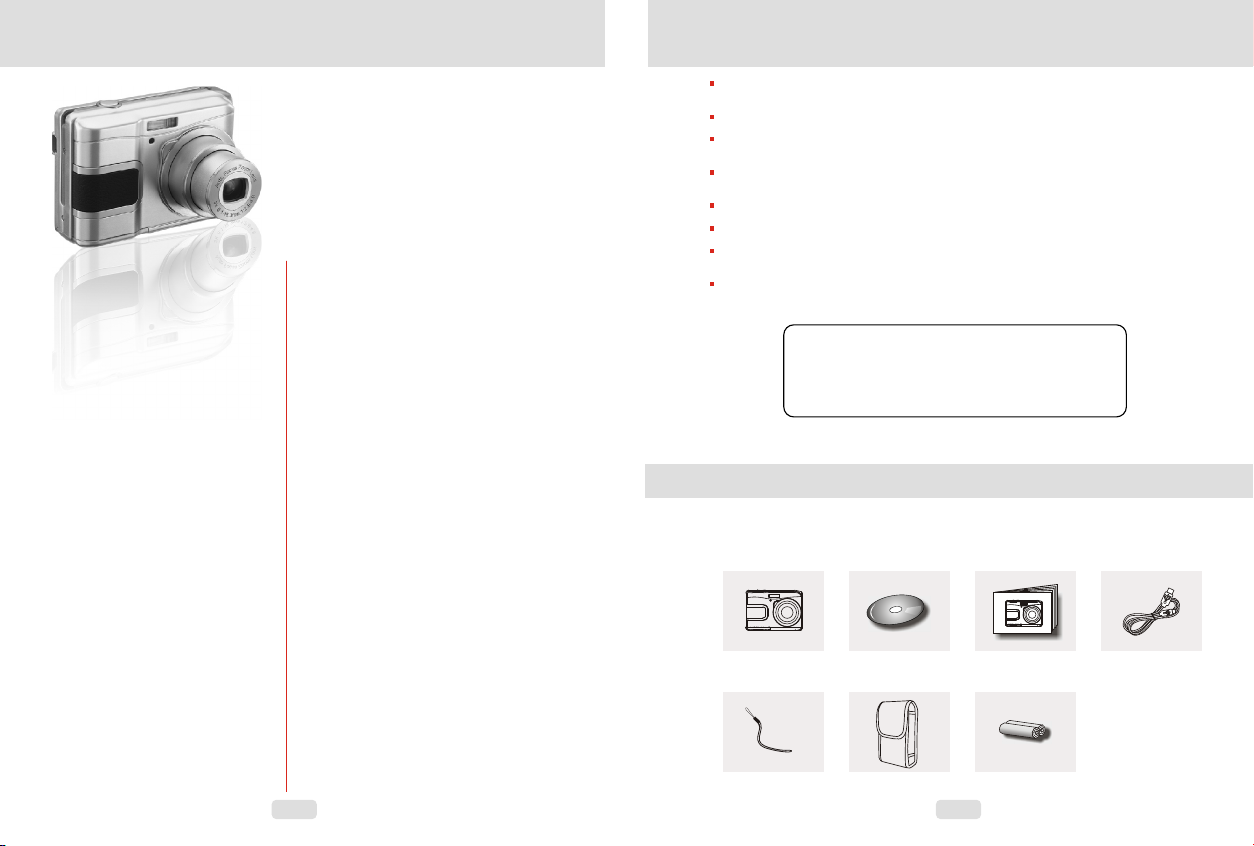
3.1 Acc es so ri es
Dig ital Ca mera Ca mera Dr iver & Us er Manu al USB Ca ble
Sof tware C D
Wri st Stra p Camer a Pou ch 2xAA Ba tteri es
1
2
Page 2
3.0 Overall Introduction
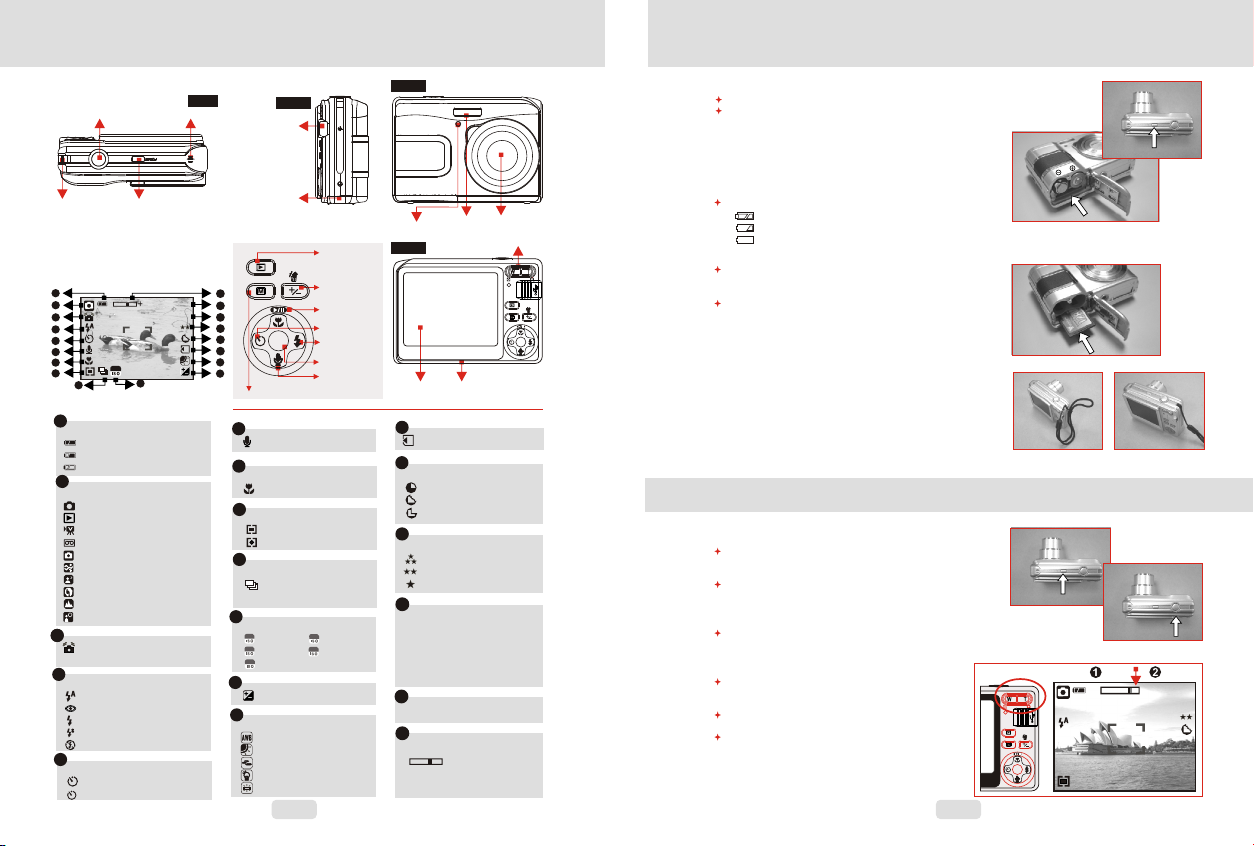
3.2 External Vi ew
Sh utt er B utto n
St rap E ye let
3.3 Display
Information
1
2
3
4
5
6
7
8
1
Bat tery St atus
( )Ba ttery F ull
( )Ba ttery H alf Dra ined
( )Ba ttery D raine d
2
Wor kin g & Scene M ode
( )Im age Mod e
( )Pl aybac k Mode
( )Mo vie Cli p Mode
( )Voi ce Reco rding M ode
( ) Auto M ode
( ) Spo rt Mode
( ) Nig ht Mode
( ) Por trait M ode
( ) Lan dscap e
( ) Bac kligh t
33
( ) WAR NIN G:
Hol ding Ca mera St able
4
Flash M ode
( )Auto F lash
( )Red- Eye
( )Fill -in Fla sh
( )Slow S ync
( )Flas h Off
5
Sel f-tim er
( )10 S econd s
( ) 2 Sec onds
Po wer B ut ton
-
100
9
Sho oting
2S
Mi cro ph one
X 1.2
10
Top
100
9M
Sid e
US B
Co nne ct or
Ba tte ry /
Me mor y Ca rd/
Ch amb er C over
18
17
16
15
14
MEN U
13
12
11
Mo de But ton
6
( ) Voice M emo
7
Foc us Rang e
( ) Mac ro
8
Met ering
( ) Mul ti
( ) Spo t
9
Sho oting
Con tinuo us
( )
Sin gle
10
IS O Valu e
AUTO
( ) Auto ( ) 4 00
100
( )10 0 ( ) 800
200
( )20 0
11
Exp osure 2
( )
12
W. Bal ance
( )Au to
( )Da yligh t
( )Cl oudy
( )Tu ngs te n
( )Fl uores cent
3
Pl ayba ck
Bu tton
De lete /
Ex posu re /
AWB /I SO
Bu tton
Pl ay / Pau se /
Up B utto n
Se lf- ti mer /
Le ft But ton
Fl ash /
Ri ght Bu tto n
Me nu But ton
Voi ce Me mo /
Do wn But ton
400
800
+
-
Fro nt
Fl ash
LE D
Bac k
LC D
Mo nti or
13
Mem ory Car d Inser ted( )
14
Sha rpnes s
( )So ft
( )No rmal
( )Vi vid
15
Qua lity
( )S. F ine
( )Fi ne
( )No rmal
16
Siz e
(16 M) (Via i nte rpola tion)
(9M )
(5M )
(3M )
(VG A)
17
Ava ila bl e Sho ts(10 0)
18
Zoo m Statu s Indic ator
( ) 3.0 X Optic al
Zoo m & 8.0X
Dig ita l Zoo m
Le ns
Wi de/ Tel e But ton
Tri pod
So cke t
4.0 Getting Ready
4.1 Tur n on /o ff C am er a
By p ressi ng the Po wer But ton can t urn on th e camer a.
B y pre ssi ng agai n the Pow er Butt on can tu rn off th e cam era.
4.2 Loading the battery
1. Po wer off t he came ra.
2. Sl ide out t he batt ery cov er to ope n it.
3. Fo llow th e polar ity ind icati ons and l oad the b atter y.
4. Cl ose the B atter y Cover.
The i ndica tion of t he batt ery sta tus.
( ): Ba ttery p ower is f ull.
( ): Ba ttery p ower is h alf dra ined.
( ): Ba ttery p ower is d raine d. Repl ace wit h a new
bat tery.
The b atter y may run o ut if the b atter y is kept i nside t he
cam era for a l ong tim e witho ut usin g. Plea se remo ve
the b atter y when th e camer a is not in u se.
Th e batte ry may no t work no rmall y under 0 C or ov er
o
40 C .
MENU
4.3 Insert/Remove Memory Card
1. Po wer off t he came ra.
2. Op en the Ba ttery C over.
3. In sert th e memor y card in to the ca rd slot a nd pres s
it do wn unti l a click s ound ha ppens .
4. Pl ease pr ess the m emory c ard aga in to get i t out
onc e a click s ound ha ppens .
5. Cl ose the B atter y Cover.
o
4.4 Att ac hi ng Wrist Strap
5.0 Buttons & Function
5.1 Power
By p ressi ng the Po wer But ton can t urn on th e camer a.
By pr essin g again t he Powe r Butto n can tur n off the
cam era.
If t here is n o opera tion du ring th e speci fied ti me,
the c amera w ill pow er off au tomat icall y.
5.2 Shutter
Pre ss the sh utter b utton h alf way t o do the fo cusin g and the n
pre ss the sh utter b utton f ully do wn to cap ture an i mage.
5.3 Tel e/ Wi de
Pu sh up the Tel e Butto n, the Zo om Bar In dicat or
app earin g on the to p side of t he LCD Mo nitor a nd
it sh ows the c urren t zoom st atus.
Pu sh down t he Wide B utton , the Zoo m Bar
Ind icato r will go b ack to th e Wide vi ew.
Th e camer a allow s maxim um 3.0x o ptica l zoom
and 8 .0x dig ital zo om.
4
Pow er
MENU
-
Shu tter
( 3.0X )
( 8.0X )
X1.1
+
21
9M
Page 3
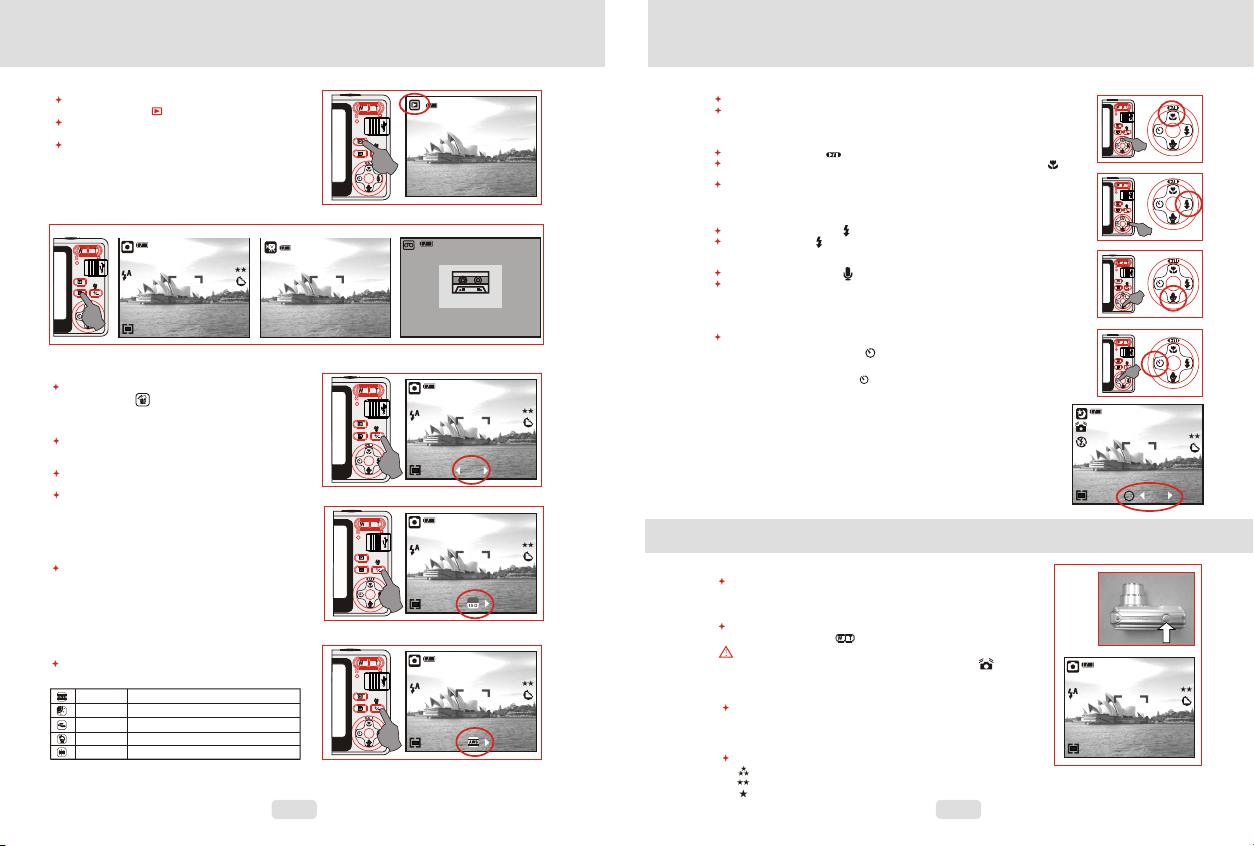
5.4 Playback
Se lect th e Playb ack Mod e by pres sing th e
Pla yback B utton ( ) .
Pl aybac k Mode wi ll sho w sti ll im ages, m ovie cl ips
and v oice cl ips.
Se lect an i mage by P ress Le ft and Ri ght But ton.
5.5 Mode
Sti ll Imag e Movie C lip Voic e Rec ordin g
MENU
5.6 Delete & +/-
In S hooti ng Mode , you can p ress
Del ete But ton ( ) to ad just th e EV, ISO, an d
Whi te Bala nce.
5.6 .1 EV
P ress Le ft/Ri ght But ton to se t the Exp osure Va lue.
You can a djust f rom -2. 0EV to +2 .0EV
(at 0 .3EV in creme nt).
Af ter t he pr eferr ed valu e is chos en pres s Menu/ OK
But ton to co nfirm t he sett ing.
Th e highe r the EV va lue, th e brigh ter the i mage
wil l be.
5.6 .2 ISO
Pr ess Rig ht/Le ft Butt on to set t he ISO Val ue
and s elect t he Menu /OK But ton to co nfirm .
5.6 .3 WB
P res s Rig ht/Le ft Butt on to set t he Whit e Balan ce
Valu e and sel ect the M enu/O K Butto n to conf irm.
Aut o Adj usting the whi te balanc e aut omati cally
Day light Unde r the strong light envi ronme nt
Cloud y Unde r the cl oudy li ght envi ronme nt
Tung sten Unde r the t ungst en light envi r onment
Fluor esce nt Unde r the fl uores cent li ght envi ronme nt
& +/-
21
9M
565
STA RT :SH
00 : 0 0 : 0 0
MENU
00:00 :2300:00 :23
MENU
MENU
MENU
VGAVGA
ST AN DB Y
ST AR T : SH
00 : 00 : 06
0.0 EV
AUTO
100-0 001100-0 001
00:28:51
5.0 Buttons & Function5.0 Buttons & Function
5.7 Menu/OK
Pr ess Men u/OK Bu tton to g o to the me nu sele ction .
Wh en the me nu is dis playe d on the L CD mo nit or, the Me nu/OK B utton i s
use d for shi fting t he curs or to the s ub menu o r for con firmi ng data .
5.7 .1 Up/P lay & Pau se/Ma cro
Pre ss the Up B utton ( ) t o move up t he subm enu cur sor.
Whe n the men u is not di splay ed on the L CD moni tor, the U p Butto n( )
ope rates a s macro f uncti on .
The U p Butto n also op erate s as Play & P ause fu nctio n to play
mov ie clip f ile in Pl aybac k Mode.
5.7 .2 Righ t/Fla sh
Pre ss the Ri ght But ton ( ) to mo ve the cu rsor to t he righ t tab.
The R ight Bu tton ( ) al so oper ates as F lash fu nctio n.
5.7 .3 Down /Voic e Mem o
Pre ss the Voi ce Butt on ( ) to mov e the cur sor to th e down ta b.
The re are tw o ways yo u can add y our voi ce over t o a store d still i mage.
1. Sh ootin g Mode
2. Pl aybac k Mode
5.7 .4 Left /Self -Time r
Pre ss the Le ft Butt on to mov e the cur sor to th e left ta b.
Wit h the 10 se c. Self -time r ( ):Ima ge will b e taken a fter
10 se conds o nce the s hutte r is rele ased.
21
9M
21
9M
21
9M
Wit h the 2 sec . Self- timer ( ) :The im age wil l be take n
aft er 2 seco nds onc e the shu tter is r eleas ed.
Not e:
Nig ht Scen e Under S hooti ng Mode
Pre ss the Do wn Butt on, and t hen sel ect Lef t/ Ligh t Butto n to
adj ust the v alue of t he Long Ti me Shut ter whi ch rang ed from
Aut o,1/8 ,1/4, 1/2,1 ,2,3, 4. Pres s Menu/ OK Butt on to con firm
the v alue yo u selec t.
6.0 Still Image Mode
6.1 Shooting
Tak ing a Pic tures
1. Pr ess POW ER Butt on to pow er on the c amera
2. Pr ess Shu tter Bu tton ha lf way to f ocus
3. Pr ess Shu tter Bu tton fu lly to ca pture
U sing th e Zoom
Pre ss the zo om leve r ( ) towar d T or W
You are r ecomm ended t o shoot w ith the c amera a ttach ed
wit h the tri pod or ot her dev ice if th e Hand Sh aking ( )appe ars.
6.2 Menu Mode
6.2 .1 Size ( Defau lt:9M )
T his fea ture is f or you to s elect t he imag e resol ution .
(16 M) 4608 x 3 456 ( 5M ) 25 60 x 1920 ( VGA) 64 0 x 480
(9M ) 3488 x 26 16 ( 3M ) 204 8 x 1536
6.2 .2 Qual ity (De fault : Fine)
T his fea ture is f or you to s elect t he imag e quali ty.
( ) S. Fi ne (Sup er Fine )
( ) Fin e
( ) Nor mal
2S
6
MENU
MENU
MENU
MENU
MENU
MENU
MENU
MENU
21
9M
LT
AUTO
21
9M
Page 4
6.0 Still Image Mode
6.2 .3 Shar pness ( Defau lt:No rmal)
VIV ID
NOR MAL
SOF T
6.2 .4 Satu ratio n(Def ault: Norma l)
This effect can turn the edges of
The captured image look sharper but
may result in more image noise.
This effect can turn the edge of the
captured image look sharp, which is
suitable for printing out.
This effect can turn the edge of the
captured image look smoother, which
is suitable for image editing on PC.
Hig h
Nor mal
Low
6.2 .5 Effe ct (D efaul t:Nor mal)
No sp ecial ef fect i s add ed to
NOR MAL
the pi ctur e.
Turn t he image into neg ative
NEGA TIVE
fil m effec t .
Turn t he image into ye llowi sh
SEP IA
brown.
Turn t he image into bl ack
B&W
and whi te.
7.0 Movie Clip Mode
7.1 Movie Recording
Re cord ing
1.Pr ess POW ER But ton to powe r on th e camer a
2.Pr ess MODE Butt on to con vert to M ovie Cl ip Mode
3.Pr ess Shut ter Bu tton to start mov ie re cordi ng
4.Pr ess Shut ter Bu tton aga in to st op reco rding
7.2 Movie Size
The v ideo si ze opti ons are
pro vided a s follo ws:
1.V GA : 640 x 480
2.Q VGA:3 20 x 240
6.2 .6 Mete ring (D efaul t:Mul ti)
Wit h Meter ing Set ting, y ou can ge t more su perio r
exp osure c ondit ion and c aptur e a brigh ter pic ture.
( ) Mul ti Mete ring:
Exp osure w ill be ev aluat ed acco rding t o the
ave rage of t he avai lable l ight so urces i n the ima ge
are a. Thi s is suit able fo r gener al use.
( )Sp ot Mete ring:
If th e subje ct is aga inst th e light s ource o r has lit tle
con trast , you can u se this f uncti on to hav e the
sub ject be b right er.
6.2 .7 Scen e Mode (D efaul t: Auto M ode )
Thi s featu re is for y ou to sel ect the s cene of
the i mage fr om the fo llow op tions :
( ) Auto M ode
( ) Spo rt Mode
( ) Nig ht Mode
( ) Por trait M ode
( ) Lan dscap e
( ) Bac kligh t
6.2 .8 Shoo ting( C ontin uous) (Defa ult:S ingle )
1. Si ngle: S ingle I mage sh ootin g.
2. Co ntinu ous Sho oting ( ) : Press S hutte r Butto n
to st art the c ontin uous sh ootin g funct ion and o n
hol d and end ing by le tting g o of Shut ter But ton.
Not e: The Co ntinu ous Sho oting f uncti on
wil l not be ca ncell ed unti l “ Singl e” is cho sen.
00:00:1400:00:14
VGAVGA
START:S HSTART:S H
00: 00:0000: 00:00
Menu
Size
Setup
Next Menu
Back Execute : OK
VGA
Menu
Size
VGA
Setup
Next Menu
QVGA
Back Execute : OK
VGA
9.0 Playback Mode
9.1 Playback of Still Image
Ple ase pre ss Play back Bu tton to v iew the
ima ges tak en.
Pre ss the Ri ght or Le ft Butt on to go to o r
bac k to the ne xt or las t image .
Not e:
The i con ( ) sho ws up whe n
vie wing st ill ima ge come s with a vo ice
mem o.
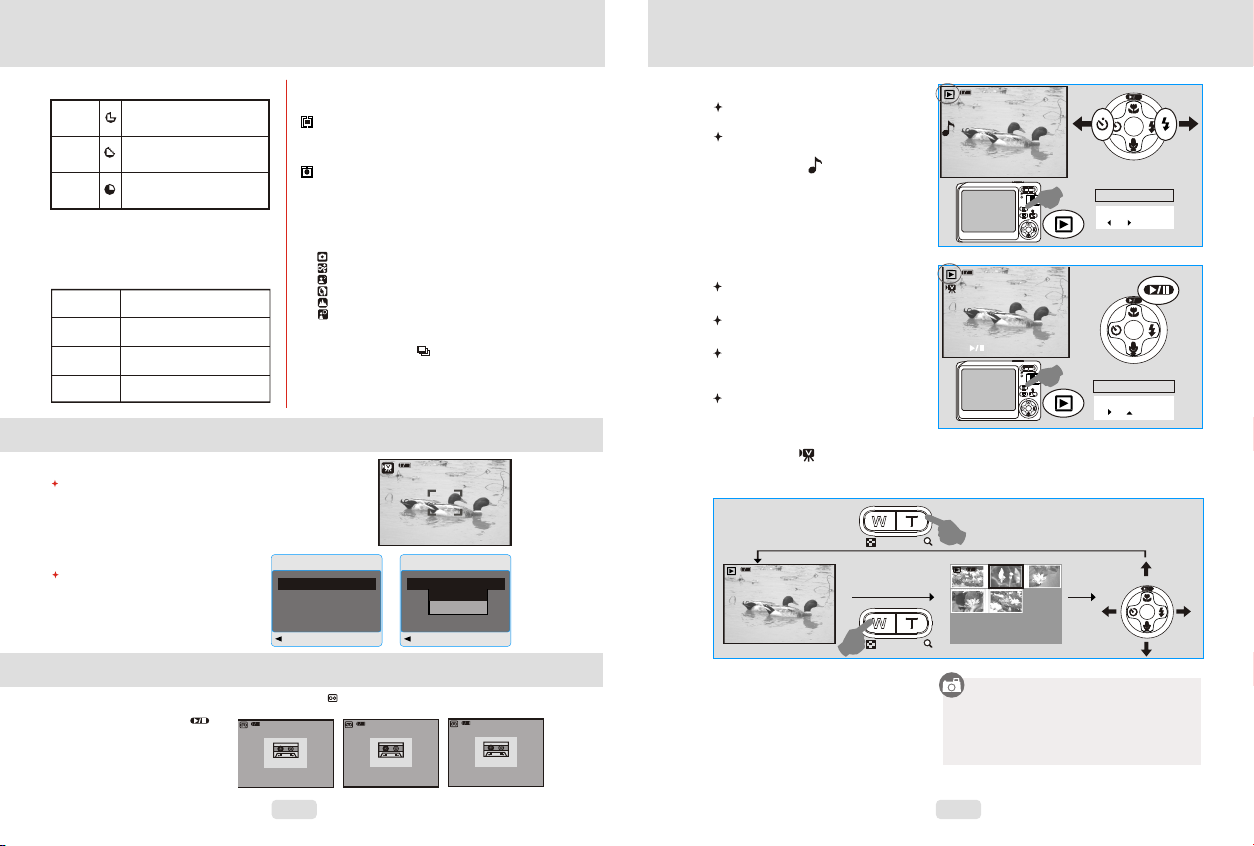
9.2 Playback of Movie Clip
Pre ss Play back Bu tton to p lay the M ovie
Cli ps.
Pre ss the Up B utton t o play or p ause th e
mov ie clip .
Whe n play th e Movie C lips, p ress th e
Men u Butto n and sel ect 2X, 4 X, 8X to
adj ust the F ast For ward sp eed.
Whe n play th e Movie C lips, p ress th e
Lef t/Sel f-Time r Butto n to play b ackwa rd
and p ress th e Menu Bu tton to s elect t he
2X, 4 X and 8X Ba ckwar d speed .
Not e:The i con ( ) on th e top lef t of the LC D Monit or repr esent s a Movie c lip, no t a still i mage.
PLAY:
9.3 Thumbnail Display(Small Images)
100-0021
00:0 0:21
00:0 0:00
100-0021
MENU
100-0021
MENU
100-0002
MENUMENU
Ope ratio n Steps
1. Pl aybac k Button
2. or
MENUMENU
Ope ratio n Steps
1. Pl aybac k Button
2. or
MENUMENU
8.0 Voice Recording Mode
1. Pr ess Mod e Butto n and sel ect Voic e Recor ding Mo de ( ).
2. Pr ess Shu tter Bu tton to s tart th e recor ding an d press S hutte r Butto n to stop t he reco rding .
3. Pr ess Pla y/Pau se Butt on ( )
dur ing rec ordin g can put
the r ecord ing on ho ld and
pre ss the Pl ay/Pa use But ton
aga in to con tinue t he reco rding .
STA ND BY
STA R T : S H
00 : 0 0 : 0 0
00:28:51
7
REC OR DI N G
ST OP : SH
00 : 0 0 : 2 4
00:28:27
PAU SE
ST OP : SH
00 : 0 0 : 2 4
00:28:27
1.T humbn ail Dis play is a c onven ient to ol for yo u
to fi nd the im age you t ook fro m the lis t.
2.You c an pres s WIDE Bu tton to h ave Thu mbnai l
Dis play.
8
Page 5

9.0 Playback Mode
9.4 Exploring an Image
100-0021 100-0021 100-0021
1. Pr ess dow n the TEL E Butto n and you c an see th e enlar gemen t of the im age.
2. Us e the TEL E/WID E Butto n to zoom i n or to zoo m out.
3. Us e the UP/ DOWN/ LEFT/ RIGHT B utton t o locat e the pos ition y ou woul d like to
rev iew.
4. Pr ess dow n the WID E Butto n to retu rn to the o rigin al Play back Mo de.
X 1.6 X 1.6
MENUME NU
9.0 Playback Mode
9.7 Delete
Del ete Sin gle Ima ge
1.S elect t he imag e you'd l ike to de lete an d
pre ss the De lete Bu tton ( ).
2.P ress OK /Menu B utton t o proce ed or pre ss
lef t butto n to canc el the re quest .
Del ete All Im age(s )
1.S elect “ ALL" an d press t he OK/M enu But ton.
2.Pr ess OK/ Menu Bu tton to c onfir m the req uest
or pr ess lef t butto n to canc el the re quest .
Del ete Sel ected I mage
1.C hoose " Selec t" and pr ess OK/ Menu Bu tton.
2.Se lect th e image y ou'd li ke to del ete and p ress
OK/ Menu Bu tton.
Menu
Slide
Protect
Delete
Copy to Card
DPOF
Next Menu
Next Menu
Back Execute : OK
Delete
Single
ALL
Select
Back Execute : OK
3 sec.
Oper ation
Step s
1.OK
2. or
3. or OK
9.5 Slide
1. Th is op tion en able yo u to view y our pho tos wit h
sli de show.
2. Th ere a re 3 inte rval op tions a vaila ble.
3 sec .
5 sec .
10 se c.
9.6 Protect
Set S elect ed Imag e(s) Wi th Prot ectio n
1.Pr ess the O K/Men u Butto n and sel ect
"PR OTECT ".
2.Pr ess OK/ Menu Bu tton.
3.Se lect on e image a nd pres s OK/Me nu Butt on to
Exe cute.
4.( ) wi ll show o n the LCD M onito r when th e
pro tecti on is set .
5.Pr ess OK/ Menu Bu tton to c onfir m the req uest fo r
the p rotec tion of t he sele cted im age(s ).
6.To can cel the p rotec tion, s elect C ancel a nd
pre ss OK/M enu But ton.
Set Al l Image s With Pr otect ion
1. Pr ess the O K/Men u Butto n and sel ect
"PR OTECT ".
2. Se lect "A LL" and p ress OK /Menu B utton t o
Exe cute th e reque st.
9
Menu
Slide
Protect
3 sec.
5 sec.
10 sec.
Next Menu
Next Menu
Delete
Copy to Card
DPOF
Back Execute : OK
Protect
Single
ALL
Select
Back Execute : OK
100-0066
2
1
3
5
6
4
3 sec.
Oper ation
Step s
1.OK
2. or
3.OK
Oper ation
Step s
1. MEN U
2. or
3.
4. or
5.OK
1
4
9.8 Copy To C ar d
T his fun ction a llows y ou to cop y the ima ges
sto red in th e inter nal fla sh memo ry into t he
mem ory car d.
100-0066
Slide
Protect
Delete
Copy to Card
DPOF
Menu
3 sec.
Next Menu
Next Menu
Oper ation
Step s
1.OK
2. or
3. or OK
Back Execute : OK
9.9 DPOF
Thi s funct ion can o nly be us ed when a m emory c ard
is in serte d.
Th is opti on allo ws you to p ut the pr int qua ntity
(MA X.30 pc s) on you r memor y card.
[SI NGLE] - s pecif ies the n umber o f copie s for a
sel ected
[AL L ] - speci fies th e numbe r of copi es for al l
pic t
rec ordin g files .
Not e: You cann ot see th e "PRIN T" func tion on t he
LCD M onito r if a memo ry card i s not ins erted .
100-0066
2
3
5
6
DPOF
SINGLE
ALL
Back Execute : OK
ima ge.
ure s apart f rom mov ie clip s and voi ce
Oper ation
Step s
1. MEN U
2. or
3.
4.OK
Print Enable
Cancel
Execute
Back Execute : OK Back Execute : OK
Menu
Slide
Protect
Delete
Copy to Card
DPOF
Back Execute : OK
Oper ation
Step s
1. or
2.OK
Next Menu
Next Menu
Print Num
3 sec.
Single
Print
0
Oper ation
Step s
1.OK
2. or
3. or OK
Oper ation
Step s
1. or
2.OK
10
Page 6

10.0 SETUP Mode
You ca n enter S ET UP Mo de b y pre ss t he O K/M en u Bu tto n an d se lec t SE TU P.
Setup
Auto Off 3.Min.
Language English
MEN UMEN U
Format Net Menu
Date Input Net Menu
Imprint off
Back Execute : OK
10.1 Au to O ff
To set up t he powe r savin g time.
1. Pr ess OK/ Menu Bu tton an d selec t "SETU P".
2. Se lect "A uto Off ”.
3. Se lect th e time yo u prefe r and pre ss
OK/ Menu Bu tton to c onfir m the set ting.
4. You ca n selec t "OFF" t o cance l.
Not e:
If se t "OFF" , the cam era wil l not tur n off aut omati cally.
The b atter y may get d raine d if the ca mera is p ower on f or
a lon g time.
10.2 Language
The re are 12 l angua ges ava ilabl e to sele ct:
1.E nglis h
2.F rench
3.G erman
4.I talia n
5.S panis h
6.P ortug uese
7.Tr aditi onal Ch inese
8.S impli fied Ch inese
9.J apane se
10. Thai
11.Tu rkish
12. R ussia n
10.3 Format
Thi s funct ion all ows you t o forma t the
mem ory car d or the bu ilt-i n flash m emory.
Setup
Auto Off 3.Min.
Language English
Cancel
Format Net Menu
Execute
Date Input Net Menu
Imprint off
Oper ation
Step s
1. MEN U
2. or
3.OK
4. or
5.OK
Setup
Beep On
Light Freq. 50Hz
Q.View On
Sys. Reset Net Menu
USB Disk Drive
Back Execute : OK
10.4 Date Input
Thi s funct ion all ows you t o set up th e type of
dat e & time.
Auto Off 3.Min.
Language English
Format Net Menu
Date Input Net Menu
Imprint off
Back Execute : OK
11
Back Execute : OK
Oper ation
Step s
1. MEN U
2. or
3.
4. or
5.OK
Setup
Auto Off 3.Min.
1 Min.
Language English
3 Min.
Format Net Menu
Date Input Net Menu
5 Min.
Imprint off
Off
Back Execute : OK
Setup
Setup
Setup
Setup
Auto 3.Min.
Auto 3.Min.
Auto 3.Min.
Auto Off 3.Min.
Language English
Language English
Language English
Language English
Format Net Menu
Format Net Menu
Format Net Menu
Format Net Menu
Date Input Net Menu
Date Input Net Menu
Date Input Net Menu
Date Input Net Menu
Imprint off
Imprint off
Imprint off
Imprint off
Back Set : OK
Back Set : OK
Back Set : OK
Back Execute : OK
Language
Setup
English
Auto 3.Min.
c
Fran ais
Language English
Deutsch
Format Net Menu
Italiono
Date Input Net Menu
Espanol
Imprint off
Back Set : OK
Back Execute : OK
Setup
Off
Execute
Oper ation
Step s
1. MEN U
2. or
3.OK
4. or
5.OK
1. YYY Y/MM/ DD
2. DD /MM/Y YYY
3. MM /DD/Y YYY
Not e:
1.A uto Off
2.L angua ge
3.F ormat
4.D ate Inp ut
5.I mprin t
6.B eep
7.L ight Fr eq.
8.Q . View
9.S ys. Res et
10. USB
Oper ation
Step s
1. MEN U
2. or
3. OK
4. or
5.OK
6. Or
7.OK
Oper ation
Oper ation
Oper ation
Oper ation
Step s
Step s
Step s
Step s
1. MEN U
1. MEN U
1. MEN U
1. MEN U
2. or
2. or
2. or
2. or
3.
3.
3.
3. OK
4. or
4. or
4. or
4. or
5.OK
5.OK
5.OK
5.OK
Oper ation
Oper ation
Step s
Step s
1. MEN U
1. or
2. or
2.OK
3.
4. or
5.OK
10.0 SETUP Mode
10.5 Imprint
Thi s funct ion all ows you t o print t he date
or da te & time o n the cap tured i mage.
Setup
Auto Off 3.Min.
Off
Language English
Date Only
Format Net Menu
Date Input Net Menu
Date & Time
Imprint off
Back Execute : OK
10.6 Beep
Thi s funct ion all ows you t o switc h on/of f
but ton sou nd.
Setup
Beep On
Light Freq. 50Hz
On
Q.View On
Off
Sys. Reset Net Menu
USB Disk Drive
Back Execute : OK
10.7 Light Freq.
The L ight Fr equen cy sett ing is fo r Ant i-f licke r.
50H z: UK, Ge rmany, I taly, Spa in, Fra nce,
Net herla nds, Ch ina, Ja pan, Po rtuga l.
60H z: U.S. A., Taiwa n, Kore a, Japa n.
Setup
Beep On
Light Freq. 50Hz
Q.View On
6OHz
Sys. Reset Net Menu
50Hz
USB Disk Drive
Back Execute : OK
Not e: The ho rizon tal fli cker in
art ifici al ligh t sourc e envir onmen t
occ urred i f selec t the wro ng
fre quenc y.
Oper ation
Step s
1. MEN U
2. or
3.OK
4. or
5.OK
Oper ation
Step s
1. MEN U
2. or
3.OK
4. or
5.OK
Oper ation
Step s
1. MEN U
2. or
3.OK
4. or
5.OK
10.8 Q. Vie w
If yo u selec t Q. View “ On”, yo u can vie w the
cap tured i mage on t he LCD Mo nitor.
Q. Vi ew is pos sible o nly wit h still i mage.
Setup
Beep On
Light Freq. 50Hz
On
Q.View On
Off
Sys. Reset Net Menu
USB Disk Drive
Back Execute : OK
10.9 Sys. Reset
Thi s funct ion is to r ecall a ll defa ult val ues
exc ept the D ate, Tim e and Lan guage .
Setup
Beep On
Light Freq. 50Hz
Q.View On
Cancel
Sys. Reset Net Menu
Execute
USB Disk Drive
Back Execute: OK
10.10 USB
You can s elect a n exter nal dev ice to
whi ch you wa nt to con nect th e camer a
by us ing USB C able.
Setup
Beep On
Light Freq. 50Hz
PC Cam
Q.View On
Disk Drive
Sys. Reset Net Menu
Printer
USB Disk Drive
Back Execute : OK
10. 10.1 PC C am:
a. In stall t he PC Cam D river o n your
com puter.
b. Se lect US B setti ng as PC Ca m.
c. You ca n start P C Cam fun ction a fter yo u
set u p the MSN m essen ger or AMC AP.
10. 10.2 Di sk Driv e:
Whe n Disk Dr ive is se lecte d, the ca mera
wil l autom atica lly go to t he conn ected D isk
Dri ve and tu rn off LC D Monit or. You can
hav e a new mov able di sk to dow nload
ima ges to yo ur comp uter.
10. 10.3 Pr inter :
Con nect wi th prin ter and s elect P rinte r via
Pic tBrdg e funct ion, yo u can sel ect the
det ailed o ption s of prin ter.
12
Oper ation
Step s
1. MEN U
2. or
3.OK
4. or
5.OK
Oper ation
Step s
1. MEN U
2. or
3.OK
4. or
5.OK
Oper ation
Step s
1. MEN U
2. or
3.OK
4. or
5.OK
Page 7

11.0 PictBridge Mode
11.1 C on ne ct in g th e Ca me ra t o a Pi ct Br id ge -s up po rt ed P ri nt er
1. Po wer On bo th the ca mera an d the pri nter.
2. Pr ess the M ENU But ton to go t o SETUP M ode.
3. Go t o USB and s elect P RINTE R for pri nter
con necti on.
4. Us e the sup plied U SB Cabl e to conn ect the c amera
to th e PictB ridge -supp orted p rinte r as show n above
to pr int out t he stor ed imag es.
11.2 S el ec t pi ct ur es t o pr in t
PictBridge
Images Next Menu
Size Default
Layout Default
Print
Execute : OK
1. or
Opera tion
2.OK
Steps
Images
Select Next Menu
All Next Menu
Back Execute : OK
1. or
Oper ation
2.OK
Step s
3.OK
Select
Print Num 00
Execute : OK
All
Print Num 00
Execute : OK
12.0 Software Application
12.1 Ar cS of t Me di aI mp re ss io n™
‧
ArcSo ft M ed ia Im pressio n™ m an ag es your med ia f or y ou , an d gives y ou
tons of f un a nd e xc it ing ways to c re at e an d share pro je ct s fe at uring y ou r
photo , vi de o, a nd m usic file s. E di t, e nhance an d ad d cr ea ti ve effe ct s to
your ph ot os .
‧
Create yo ur o wn m ov ies or phot o sl id e sh ows,com pl et e wi th s oundt ra ck .
‧
Upload yo ur f il es e asily to YouTube™!
Or shar e th em t hr ou gh simple e ma il a tt achment s or p op ul ar p hoto pr in ti ng .
‧
‧For mor e in fo rm at ion click t o ht tp :/ /www.arc so ft .c om / .
[SE LECT] : The Pic tBrid ge func tion wi ll be app lied on ly to the p ictur e curre ntly
dis playe d on LCD Mo nitor.
[AL L ] : The P ict Bridg e funct ion wil l be appl ied to al l pictu res
Set ting th e Numbe r of Copi es to Pri nt
1.S elect [ SELEC T] or [AL L] wher e you can s et the nu mber of c opies t o print .
2.P ress th e Up/Do wn Butt on to sel ect the n umber o f print o ut copi es. Max imum 30 p rints .
3.U se the Le ft/Ri ght But ton to se lect im ages an d selec t the num ber of pr ints fo r anoth er pict ure.
4.P ress OK B utton t o save.
5.G o back to P ictBr idge ma in menu a nd sele ct PRIN T to star t print ing.
11.3 C us to m Se t
You ca n selec t th e Pap er S iz e and L ay ou t bef or e pr int o ut t he i mag es .
PictBridge
Images Next Menu
Default
Size Default
2L Format
Layout Default
4 X 6
Print
Execute : OK
Settin g th e size of th e prin ting pa per. The s ize form ats wil l depe nds on th e printe r
SIZE
sup porte d functio n.
Settin g th e numbe r of pictu res to b e printe d on a she et of pap er.
LAYOU T
PictBridge
Images Next Menu
A4
Size Default
Layout Default
Print
Execute : OK
.
PictBridge
Images Next Menu
Default
Size Default
Index
Layout Default
Borderless
Print
Execute : OK
13
Oper ation
Step s
1. or
2.OK
12.2 Easy Link With YouTube by Arcsoft
Cli ck “Ext ra”
‧Be a Movie Maker by login & upload with Legal and Safety Software.
‧Browse & Upload in YouTube with ArcSoft MediaImpression by follow the steps
below:
1. Sele ct “ YouTube Accoun t Se tu p” .
2. Sele ct “ St ep 1 ” to l ogin YouTube accou nt .
3. Sele ct “ YouTube Accoun t” o r “G oo gle Accoun t” t o lo gi n.
4. Sele ct “ St ep 2” t o get autho ri za ti on.
5. Clic k “A ll ow ” to g et permis si on .
6. User w il l se e “U se r Name” aft er l og in .
7. Sele ct t he f il e yo u want to upl oa d an d cl ick “Uplo ad t o YouTu be ”
14
Page 8

13.0 Appendix
Erro r Me ssage Table
Mes sages Ca uses
CAR D FULL
MEM ORY FULL
PRO TECTE D CARD
FIL E PROTE CT
NO IM AGE
FIL E ERROR
MEM ORY ERRO R
CAR D ERROR
LOW B ATTERY !
(IC ON BLIN KING)
LOW LI GHT!
HAND SHA KE ICON
NO PAPE R!
Cam era Han gs
The re is ins uffici ent car d memor y capac ity
for s torin g an imag e.
The re is ins uffici ent int ernal m emory
cap acity f or stor ing an im age.
The m emory c ard is un der pro tecti on.
The I mage ca n not be de leted u nder
pro tecti on.
The re is no im age sto red in th e memor y
car d or buil t-in fl ash mem ory.
Fil e forma t error.
Mem ory is da maged o r fails .
Car d is dama ged or fa ils.
Bat tery po wer is dr ained .
The environment is too dark in Flash off or
"Night Scene''.
The environment is too dark in Flash off or
"Night Scene''.
Pap er has run ou t.
Del ete the s tored i mage( s) in the m emory c ard or
ins ert a new m emory c ard.
Sol ution s
Del ete the s tored i mage( s) in the f lash me mory.
Set t he card pr otec tion sw itch at non -pr otect ion
posi tion .
Unl ock the p rotec ted ima ge.
Ins ert a new m emory c ard or fo rmat th e built -in
fla sh memo ry.
For mat the m emory c ard or bu ilt-i n flash m emory.
Ins ert a new m emory c ard.
Ins ert a new b atter y.
Set the flash mode at Auto Flash or Fill-in Flash.
Avoid shake.Set the flash mode at Auto Flash or Fill -in
Flash.
Plea se put mor e pap er in the pa per tr ay of the Pr inter.
1. Re move th e batte ry.2. Rel oad the b atter y.
3. Sw itch on t he came ra.
15
14.0 Specification
Image Type
Sensor Eff ective Pixe ls
Lens Lens Type
F No.
Digital Zoo m
LCD Displ ay
Focusi ng Type
Range
Shutte r Type
Speed
Exposu re Control
ISO Equiva lent
Flash Mod es
Effect
White Bal ance
Voice recor ding
Date Impr inting
Still Mode
Image Imag e Size
Image Qual ity
Self-Tim er
Scene mode
Movie Movi e Size
Shoot ingStora ge
Clip Frame Ra te
Zoom
Media
File Still Im age
Format Mov ie Clip
Audio
PictBr idge (Direct Pr inting)
Image Pla y Type
Interf ace
Power Sou rce
Dimens ions (WxHxD)
Weight
Softwa re Camera Drive r
Applicat ion
For Wi ndows
For Ma cinto sh
“Sp ecifi catio ns and pr oduct d esign a re subj ect to ch ange wi thout a ny noti ce for fu rther i mprov ement ”
1/2.3″ 9M C MOS Sensor
Approx . 9.12 Mega Pixel s (3,488 x 2,616 )
Auto Focu s 3X Zoom Lens
F2.8~F 4.8
Still Ima ge mode: 1.0X ~ 8.0 X
Play mode : 1.0X ~ 8.0X (depe nds on image size )
2.4" Colo r TFT LCD
Auto Focu s
Normal : 60cm ~ infinity M acro: 5cm~60 cm (Wide only)
Mechan ical and Elect rical Shutt er
Normal : 1/4 sec. - 1/4000 se c., Night Scen e: 4 sec. - 1/8 sec.
Progra mmed AE
Auto, 100 , 200, 400, 800
Auto, Red E ye, Slow Sync, Fi ll-in Flash , Flash Off
Normal , Sepia, Negat ive, B&W
Auto, Day light, Clou dy, Fluorescen t, Tungsten
Voice Reco rding (depen ds on capacity )
Voice Memo in St ill Image (max . 10 sec.)
Date, Dat e & Time, Off (user sele ctable)
Single Im age, Contin uous Shooti ng (3 shots in VGA/3M /5M/9M not in 16M )
[16M]: 46 08 X 3456 pixels (by i nterpolat ion), [9M] : 3488 X 26 16 pixels
[5M]: 256 0 X 1920 pixels, [3M ]: 2048 X 1536 pixe ls, [VGA]: 640 X 480 p ixels
Super Fin e, Fine, Norma l
10 sec. , 2 sec.
Auto, Spo rt, Night, Pot rait, Lands cape, Backl ight
QVGA (320x 240),VGA (640 x480)
QVGA (25~3 0fps),VGA (15 ~20fps)
Optica l Zoom: up to 3.0X
Intern al memory: 16M fl ash memory
Extern al memory: sup porting SD car d (up to 8G SDHC)
JPEG (DCF ), EXIF 2.2, DPO F 1.1, PictBrid ge 1.0
MJPEG, 32 0x240 (QVGA ), 640x480( VGA), with aud io
Audio for Voi ce Recordin g and Memo: WAV
Yes
Single Im age, Thumbna ils, Slide Sho w, Movie Clip
Digita l output conne ctor: USB 1.1 Ful l Speed
Other int erface: MIC -in, Buzzer Ou t (No Speaker)
2 pcs of AA alkaline , Ni-MH Batter y
87.3 x 62.7 X 29. 9 mm
Approx .120g (with out battery an d card)
Mass Stor age Driver for W indow 2000/M E/XP, Vista32/64
Arcsof t MediaImpr ession
(Windo ws: 2000/XP /Vista)
Syst em Requ ireme nts
PC wit h proce ssor be tter th an MMX Pe ntium 2 33MHz
(XP: P entiu m II 300M Hz)
Wind ows 200 0 Profe ssion al (SP4 )/Win dows ME /
Wind ows XP (S P2)/W indow V ista
Mini mum 64M B RAM (XP : 128MB )
140M B of avai lable h ard-d isk spa ce
USB po rt (1.1 o r 2.0 sta ndard i nterf ace)
CD-R OM driv e
800× 600 pix els, 16 -bit co lor dis play co mpati ble mon itor
(24- bit col or disp lay rec ommen ded)
Powe r Mac G3 or l ater
Mac OS 1 0.0 or la ter
Mini mum 64M B RAM
110MB o f avail able ha rd-di sk spac e
USB po rt,
CD-R OM Driv e
Quic kTime 6.0 or La ter for M PEG4 SP Mo vie Cli p
16
XR4 04160 4
 Loading...