

Page 1

C
C
C
Foreword:
Thank you for purchasing this camera. With a compact and user-friendly
design, this product should meet all of your basic requirements for
processing digital pictures. This camera equips 3 Mega-pixel CMOS
resolution, and 4X digital zoom. It supports the Secure Digital card, TV-out
function, video and audio recording function. Moreover, it can be used as a
video camera head. This camera also allows you easily transmit your pictures
via a USB cable when connecting to a computer.
h
h
a
a
p
p
r
e
t
r
e
t
1
1
G
G
e
e
g
n
i
t
t
g
n
i
t
t
r
a
t
s
r
a
t
s
d
e
t
d
e
t
d
e
t
r
a
t
s
g
n
i
t
t
e
G
1
r
e
t
p
a
h
i
Page 2

Table of contents
1.1 Check the package ........................................................................ 1
1.2 Camera parts ................................................................................. 2
1.2.1 Front view...........................................................................2
1.2.2 Back view ...........................................................................2
1.2.3 Top view .............................................................................3
1.2.4 Bottom view........................................................................3
1.2.5 Right side view ...................................................................3
1.3 Installing the batteries and SD card ............................................... 4
1.3.1 Installing the batteries.........................................................4
1.3.2 Installing the SD card .........................................................4
2.1 Preparation before basic operation................................................ 5
2.1.1 Power on/off .......................................................................5
2.1.2 Setting the time/language...................................................5
2.1.3 Formatting the built-in memory and SD card ......................6
2.1.4 Video output format ............................................................6
2.1.5 USB connection..................................................................6
2.1.6 Auto power-off ....................................................................7
2.1.7 Default setting ....................................................................7
2.2 Starting the basic operation............................................................ 8
2.2.1. Camera modes...................................................................8
2.2.2. Video recording mode ......................................................10
2.2.3. Audio recording mode ......................................................11
2.2.4. Playback mode.................................................................11
2.2.5. Deleting pictures or videos ...............................................13
2.2.6. Image protection...............................................................14
2.2.7. DPOF print .......................................................................15
2.3 Advanced setup ........................................................................... 15
2.3.1 Under the
2.3.2 Press the button under the mode.........................17
3.1 Connecting to a PC or a TV set ................................................... 18
3.1.1 Installing the software.......................................................18
mode, press the button........................15
3.1.2 Change the USB setting ...................................................18
3.1.3 Connecting the USB cable ...............................................19
3.1.4 Transmitting the pictures and videos to a computer .........19
3.1.5 Connecting to a TV set .....................................................20
3.1.6 Viewing pictures or videos on a TV screen.......................21
ii
Page 3
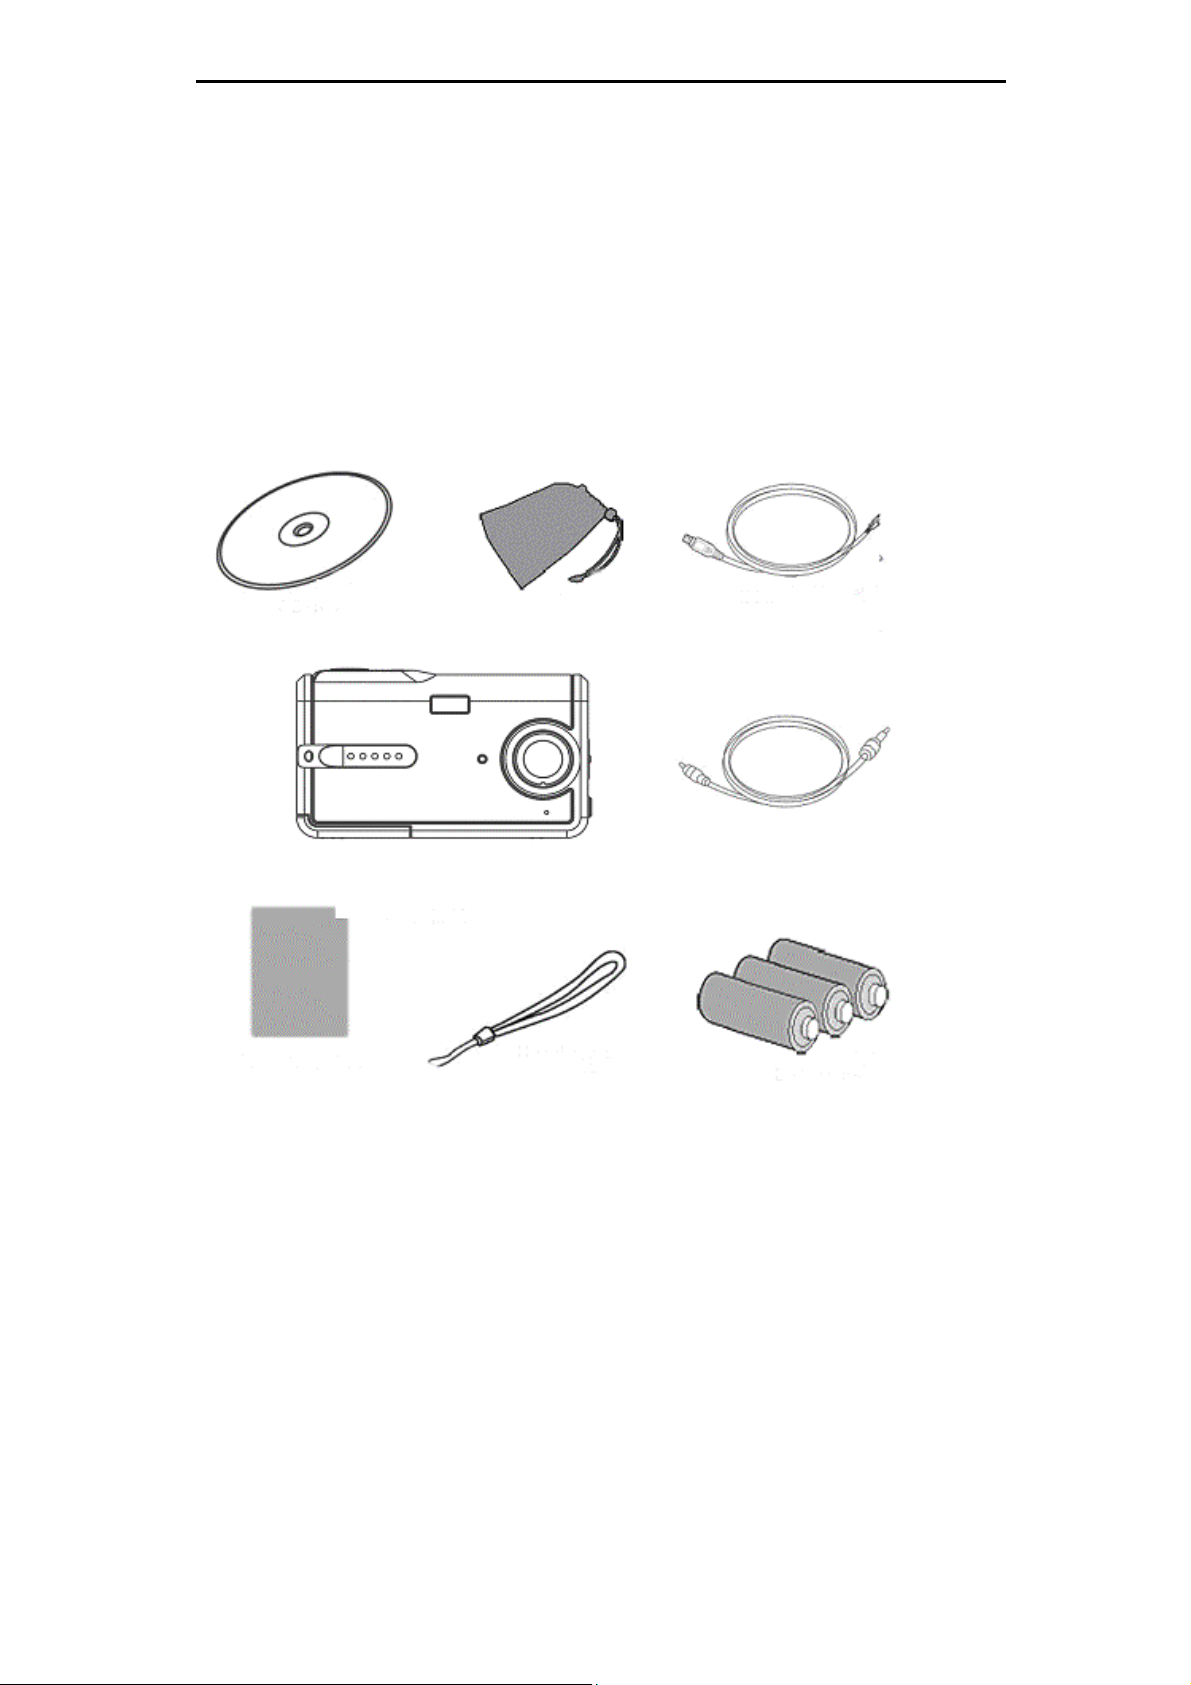
1.1 Check the package
Take out all items from the packaging box and make sure that the
listed items are included. (It is recommended that keeping
packing box and materials for future usage.)
Quick Start Guide
Quick Start Guide
CD-ROM
CD-ROM
Camera
Camera
Wrist strap
Pouch
Wrist strap
Mini USB cable
Video cable
Mini USB cable
Video cable
Batteries
Batteries
1
Page 4
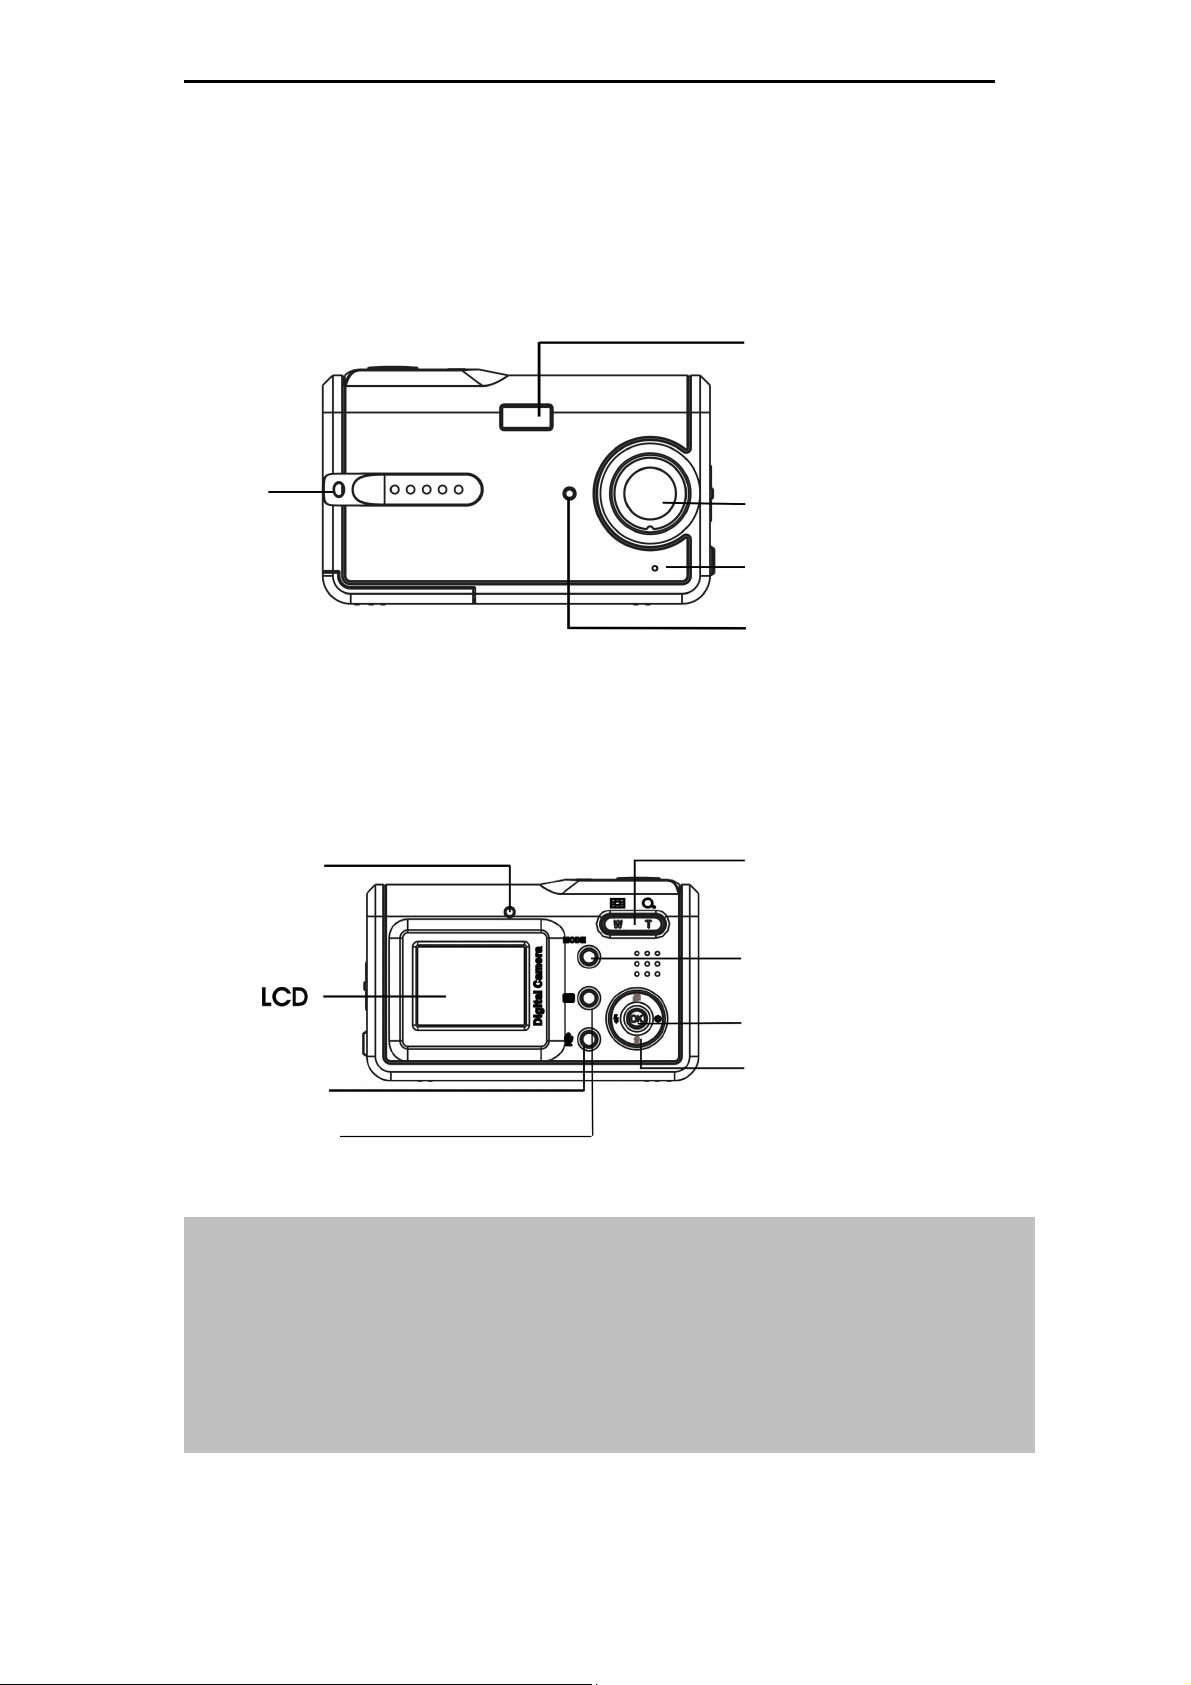
1.2 Camera parts
r
Get to know the camera with the following illustrations.
1.2.1 Front view
Flash window
Strap ba
Status LED
Record button
Lens
Microphone
Self-timer LED
1.2.2 Back view
Zoom button
Mode button
OK button
4-way button
(left /right /up /down)
Menu button
Note: Use 4-way button:
Press the 4-way button left: Use your thumb to turn the OK button to the left.
Press the 4-way button right: Use your thumb to turn the OK button to the right.
Press the 4-way button up: Use your thumb to turn the OK button to the up.
Press the 4-way button down: Use your thumb to turn the OK button to the down.
Press the 4-way button joystick in the center: Use your thumb to turn the OK button.
2
Page 5
C
C
C
h
t
p
a
h
t
p
a
h
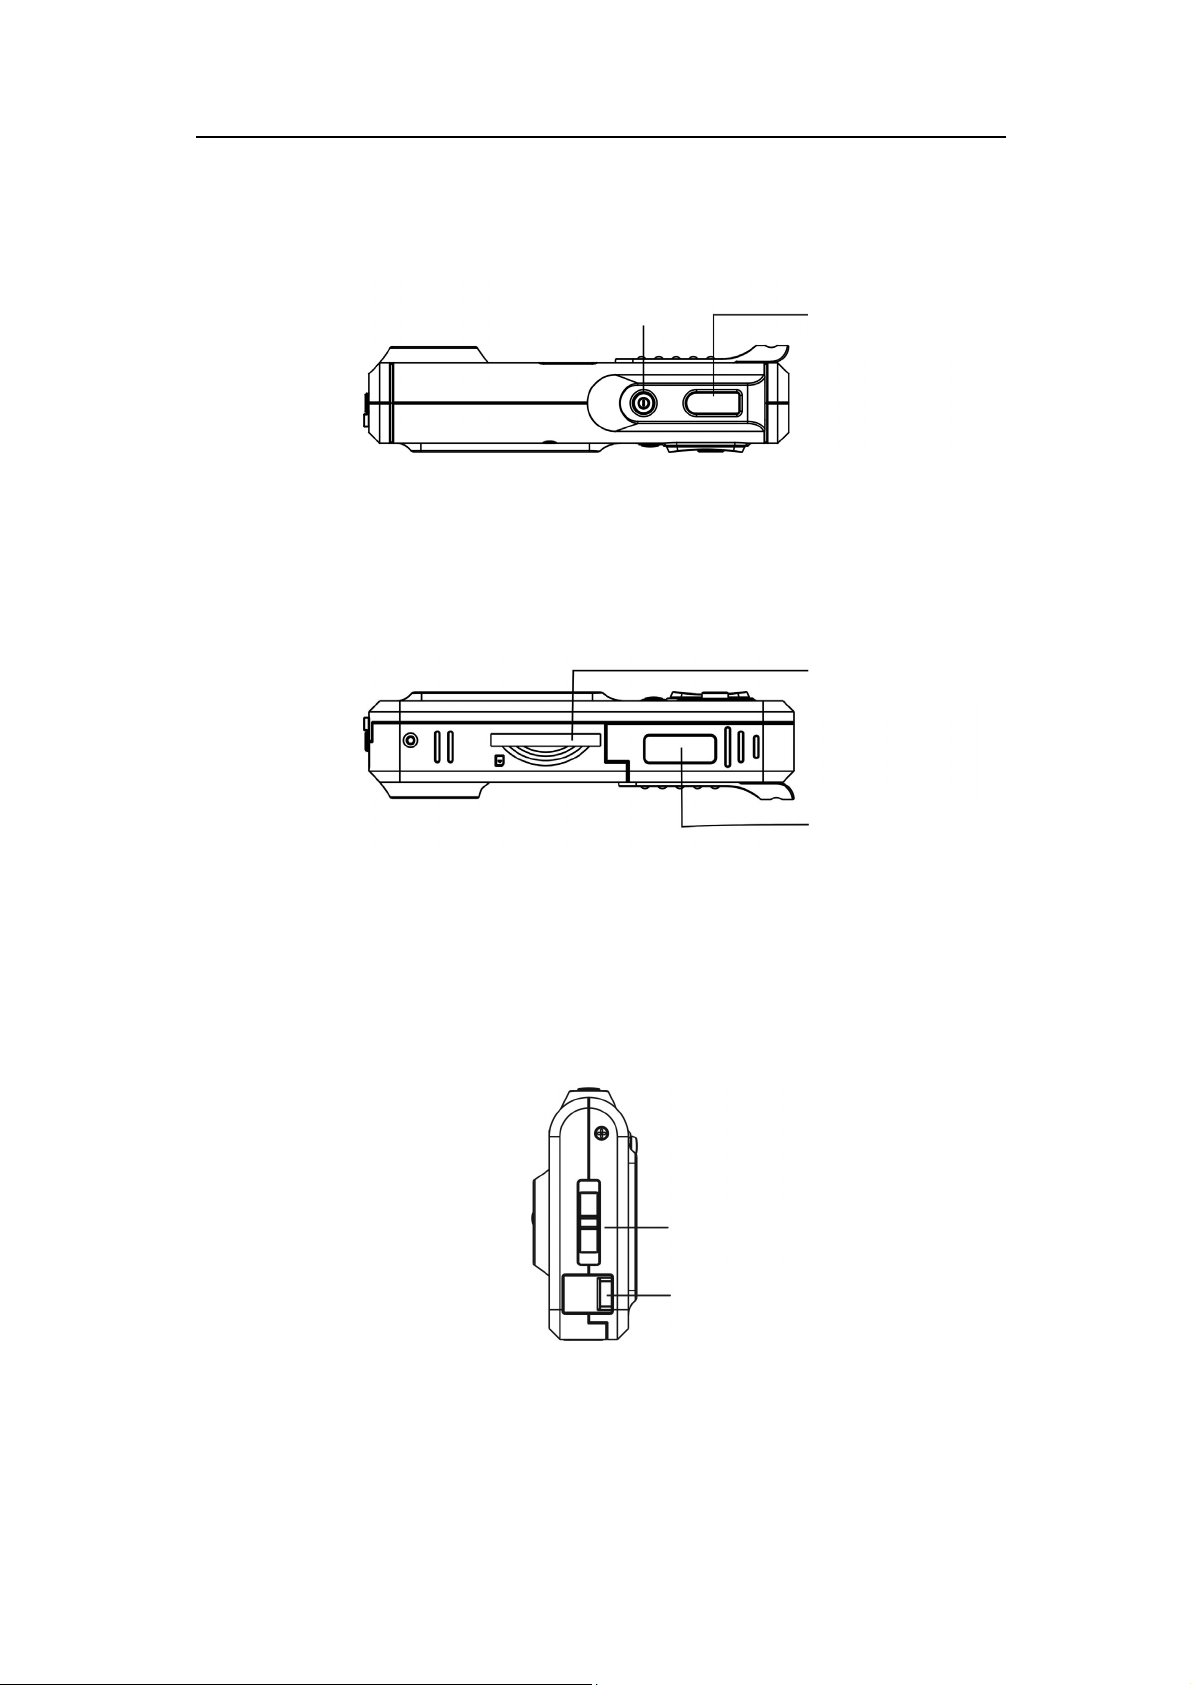
1.2.3 Top view
1.2.4 Bottom view
1
r
e
1
r
e
G
G
t
t
e
t
t
e
t
t
e
G
1
r
e
t
p
a
i
g
n
i
g
n
i
r
a
t
s
r
a
t
s
d
e
t
d
e
t
Power button
Shutter button
SD card door
d
e
t
r
a
t
s
g
n
1.2.5 Right side view
Battery door
Focus button
USB cover
3
Page 6

1.3 Installing the batteries and SD card
1.3.1 Installing the batteries
The camera uses 3 AAA 1.5V alkaline batteries.
Slide the battery door according to the instructed
direction as shown and open it.
Insert the batteries into the battery compartment.
(See page 22 for battery life)
Note: To improve performance, exhausted batteries should be replaced. If Ni-HM
rechargeable batteries are used, make sure they are fully recharged. Make sure that
the batteries are inserted in the battery compartment according to the correct polar
1.3.2 Installing the SD card
Insert the SD card according to the arrow direction
as shown. Push the memory card to the bottom of
the socket. Make sure the SD card is completely
inserted.
Push the SD card inward according to the arrow
direction as shown to eject the SD card.
Note: When the camera is powered on, do not open the battery/SD card compartment.
Please remove the battery or the SD card when not using the camera for long period.
The pictures will be stored on the SD card if the card is inserted. When the SD card is
not inserted, the shot information will be temporarily stored in the SDRAM in the
camera. When the battery is removed, the information will disappear automatically.
4
Page 7
C
C
C
2.1 Preparation before basic operation
p
a
h
p
a
h
2.1.1 Power on/off
Power button
Note: When the camera is powered on, the LED turns into green and “welcome
r
e
t
r
e
t
image” is displayed on the LCD. After 2 to 3 seconds, the interface for taking
pictures appears.
If no operation is activated within a certain amount of time, the camera will
power off automatically. (See page 7 for setup)
a
B
2
a
B
2
O
c
i
s
O
c
i
s
a
r
e
p
a
r
e
p
Press the power button. The camera powers
on or off after emitting two beeps.
n
o
i
t
n
o
i
t
n
o
i
t
a
r
e
p
O
c
i
s
a
B
2
r
e
t
p
a
h
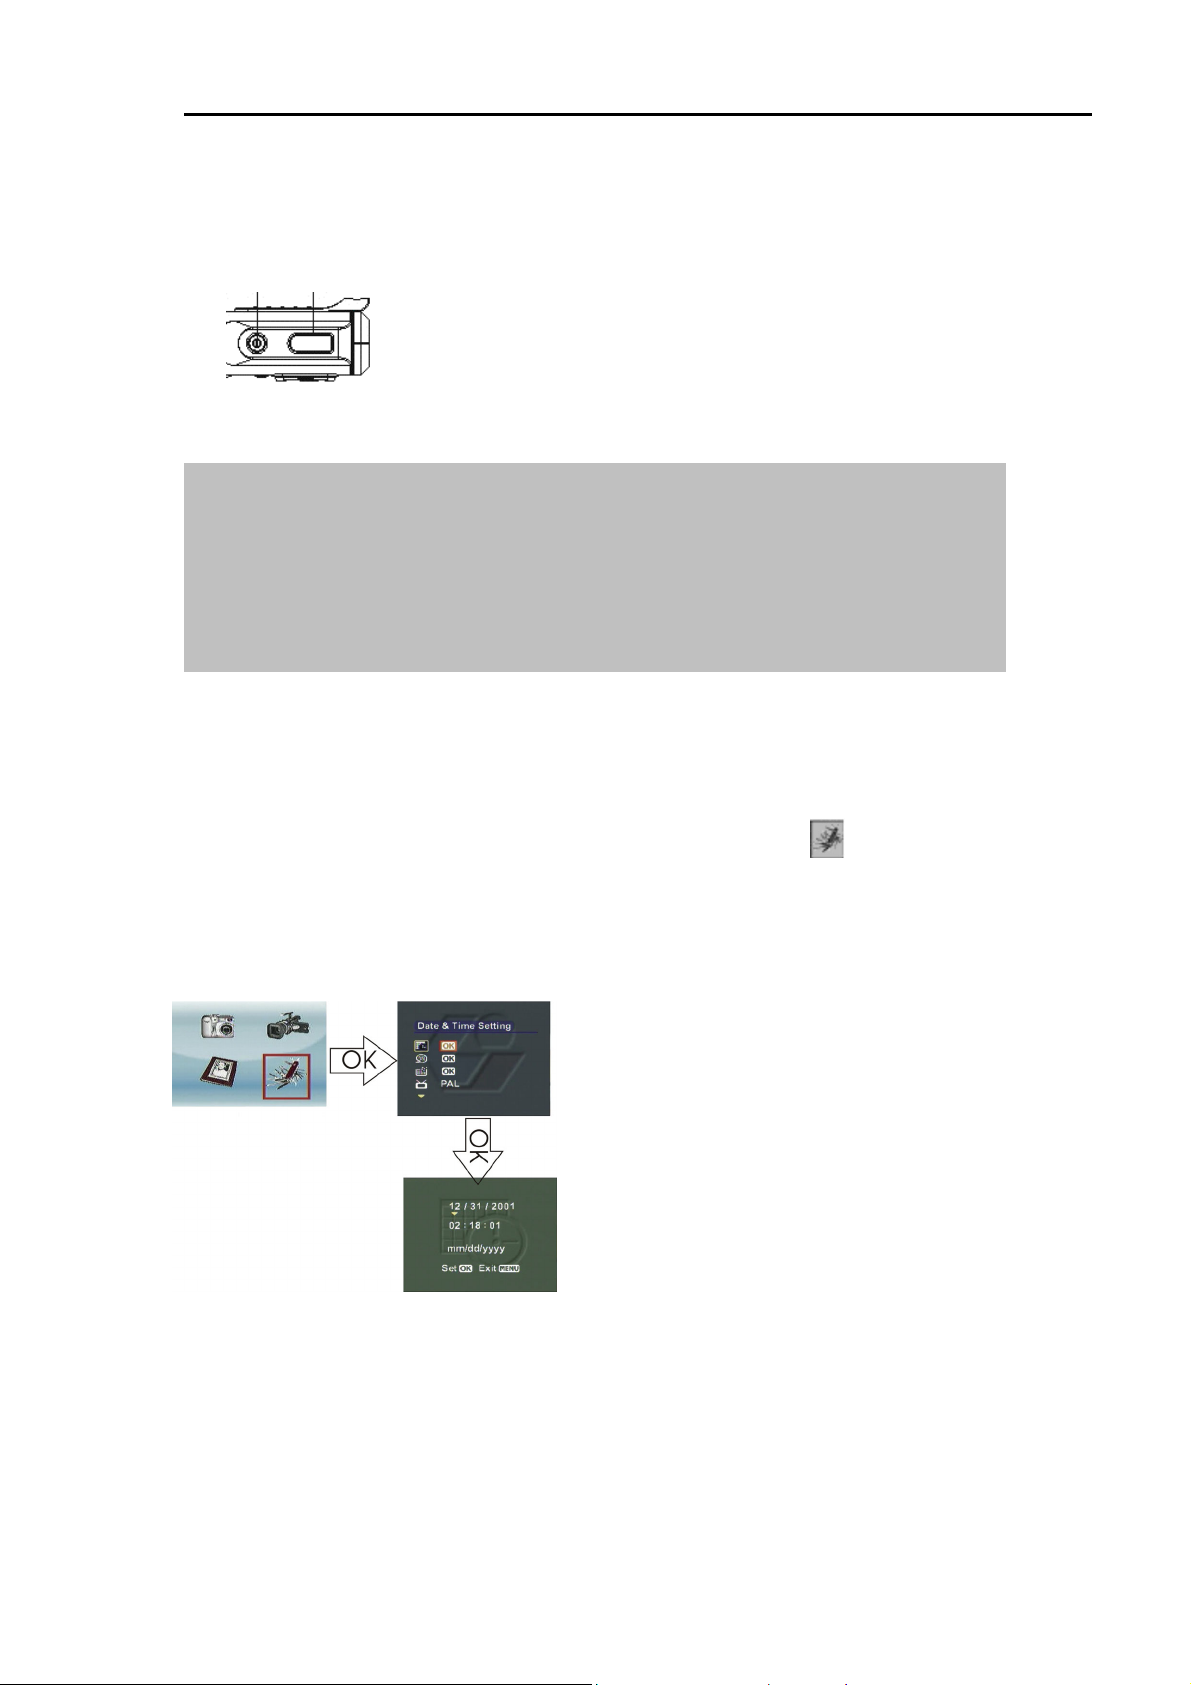
2.1.2 Setting the time/language
(1) Press the MODE button to enter the main menu. Using the
4-way button to highlight the time/language ; press the
center 4-way button to select it.
(2) Press the OK button to enter the Setup menu.
Press the Up/Down button to move the red
box and select "Date&Time setting".
Press the OK button to enter the submenu "
Date&Time setting".
Press the Left/Right button to move the
yellow arrow to select the time and date.
Press the Up/Down button to change the
date and time setting.
Press the OK button to save and exit. Press
the MENU button to exit without saving.
5
Page 8

(3) Press the OK button to enter the Language submenu.
Press the Up/Down button to move the red box to
select the language.
Press the OK button to save and exit. Press the
MENU button to exit without saving.
Note: Seven languages, including English, traditional Chinese, simplified Chinese,
French, German, Italian and Spanish, are available for the camera.
2.1.3 Formatting the built-in memory and SD card
(1) Press the OK button to enter the Formatting submenu.
(2) The LCD will show the "Formatting will delete all data.
Continue or not?" message.
(3) Press the OK button to save and exit. Press the MENU button
to exit without saving.
Note: Before formatting the SD card, please unlock the SD card’s write-protect
switch.
When an SD card is inserted in the camera, the built-in memory cannot be
formatted.
2.1.4 Video output format
(See page 20 for setup)
2.1.5 USB connection
(See page 19 for setup)
6
Page 9

C
C
C
p
a
h
p
a
h
2.1.6 Auto power-off
Press the OK button to enter the Setting menu:
r
e
t
r
e
t
a
B
2
a
B
2
O
c
i
s
O
c
i
s
a
r
e
p
a
r
e
p
Press the Up/Down button to move the red box
to select "Auto power-off".
Press the Left/Right button to select the
power-off time. Available options are:
n
o
i
t
n
o
i
t
n
o
i
t
a
r
e
p
O
c
i
s
a
B
2
r
e
t
p
a
h
2.1.7 Default setting
Press the OK button to enter the Setting menu:
Press the Up/Down button to move the red box
Press the OK button and the LCD shows "The
Press the OK button to restore the factory
30 seconds
1 MIN
3 MIN
5 MIN
and select "Default setting"
settings will be set to default values, continue
or not?" message.
settings.
7
Page 10

2.2 Starting the basic operation
2.2.1. Camera modes
Using this function to take pictures. You can also make use of the focus
adjustment, digital zoom and flash settings to get better image quality.
LCD icons:
Indicate low brightness.
To avoid blur
Battery status icon
Zoom icon
(1-4X zoom available)
Flash icon
Self-timer icon
Resolution
Continuous shot icon
Macro icon
Capture mode icon
Current date
Exposure Status Icon
Focusing
SD card icon
The icon shows there is a SD card inserted.
Empty means there is no SD card.
Number of pictures can be taken
It means 1 picture one time
It means 3 pictures one time
Basic camera modes:
Power on the camera and enter the mode directly. Or, press the MODE
button to enter the main menu. Move the red box to select . Press OK to
enter the
mode.
Hold the camera with your hands. Frame a subject
with the viewfinder and focus on the center of the
subject.
Press the shutter and two "beeps" will be heard.
The pictures taken will be kept on the screen for 1
to 3 seconds. The camera will then return to the
mode automatically.
Note: You should hold the camera steadily when taking a picture. If the camera is shaken,
the picture will be blurry.
Keep your hands or the wrist trap away from the lens.
Pictures will be saved in JPG format.
8
Page 11

C
h
C
h
C
Focus adjustment
e
t
p
a
e
t
p
a
Before taking a picture, the focus adjustment button may be moved up
or down to adjust the focus.
B
2
r
B
2
r
a
a
c
i
s
c
i
s
c
i
s
a
B
2
r
e
t
p
a
h
O
O
O
p
p
p
e
a
r
e
a
r
e
n
o
i
t
n
o
i
t
n
o
i
t
a
r
Digital zoom:
Under the mode, press W on the control key to zoom-in (to
magnify the subject). Press T to zoom-out (to shrink the subject). A
zoom indicator will appear on the screen. You may choose from 1 to 4 X
magnification of your subject.
Flash mode:
Under the mode, the camera can be shifted among 3 flash modes
according to different light conditions.
Far foucs
Normal focus
Near focus
155cm~infinite distance
78cm~15cm
155cm~infinite distance
No Flash Ideal for places where a picture with
natural effect will be taken even at
dusk or under weak light.
Auto flash Automatic light compensation.
Forced flash Ideal for taking a picture of a subject
in front of a light source.
9
Page 12

2.2.2. Video recording mode
r
LCD icons:
White balance icon
Zoom icon
(1-4X zoom available)
Time
(Show the length of recorded video)
Basic video recording mode:
Macro icon
Video resolution
Video mode icon
Current date
Exposure value icon
SD card icon
(1) Press the MODE to enter the main menu.
(2) Press the Left/Right button to move the red box and select
Press the OK button to enter the
Frame your subject with the viewfinder or LCD.
Press the shutter button and activate video
mode.
.
recording. A timer appears on the bottom of the
screen to indicate the recording time.
Press W or T of the button to zoom in
or out (W – zoom out, T – zoom in). A zoom
indicator will appear.
Press the shutter button again to terminate the
video recording.
Note: The video is saved as an AVI file.
The
button is disabled during video recording.
10
Page 13

C
C
C
h
p
a
h
p
a
h
2.2.3. Audio recording mode
Press the button to activate audio recording. The LCD shows the
following:
Please note that audio recording is activated as soon as the audio
r
e
t
r
e
t
a
B
2
a
B
2
O
c
i
s
O
c
i
s
a
r
e
p
a
r
e
p
Audio Recording Timer
(Showing the length of the recorded audio file)
n
o
i
t
n
o
i
t
Audio Recording Mode Icon
Current Date
n
o
i
t
a
r
e
p
O
c
i
s
a
B
2
r
e
t
p
a
recording mode is entered. The timer begins to indicate the recording
time. Press the
2.2.4. Playback mode
(1) Press the MODE button to enter the main menu.
(2) Press the Left/Right button to move the red box and select
Press the OK button to enter the Playback mode.
(3) Press the Left/Right button to select the picture or video clip to
display or play back.
Displaying pictures on the full screen
button to terminate audio recording.
Press the W or T of the button to zoom
in/out the display of a single picture (W – zoom
.
out, T – zoom out). A zoom indicator will appear
11
on the bottom of the screen.
Page 14

Press the OK button to enable a magnified view
of the picture according to the zooming
magnification.
Press the Up/Down/Left/Right button to view
different parts of the picture.
Playing the video on the full screen
Playback time indicator
Note: Press the "OK" button to shift between " " (Play) and " " (Pause).
The latest picture or video will be played back on the screen automatically.
When a video is being played, the zoom in/out function is disabled and the
is also disabled.
Playback status indicator
Press the OK button to play the image. The “ ”
(play) occurs on the left bottom of the screen to
indicate the playback status.
button
Slide show
To automatically display pictures or videos, enter the mode and then
press the button.
Press the Up/Down button to move the red box
and select the "Slide show" menu.
Press the OK button and system will play the
pictures or videos automatically and repeatedly.
12
Page 15

C
C
C
p
a
h
p
a
h
2.2.5. Deleting pictures or videos
Deleting a single picture or video
To delete a picture or video, select the picture or video to be deleted and
r
e
t
r
e
t
a
B
2
a
B
2
O
c
i
s
O
c
i
s
p
p
a
r
e
a
r
e
n
o
i
t
n
o
i
t
n
o
i
t
a
r
e
p
O
c
i
s
a
B
2
r
e
t
p
a
h
press the
Deleting all pictures or videos
button.
Press the Up/Down button to move the red box
and select the Delete menu.
Press the OK button and a message will appear
on the screen: “Are you sure you want to delete
the file?”
Press the OK button to confirm the deletion and
the next picture or video will appear on the
screen. Press the MENU button and exit without
saving.
To delete all pictures or videos, enter the playback interface and press the
button.
Press the Up/Down button to move the red box
and select the Delete All menu.
Press the OK button and a message will appear
Note: All pictures or videos that have not been protected will be deleted. A message will then appear on
the screen: “No image data.”
on the screen: “Are you sure you want to delete
all files?”
Press the OK button to confirm the deletion.
Press the MENU button to exit without saving.
13
Page 16

2.2.6. Image protection
Protecting a single picture or video
To protect a picture or video, select the picture or video to be protected and
press the button.
Press the Up/Down button to move the red box
and select the Protect menu.
Press the Up/Down button to move the red box
and select On to enable protection or select Off to
disable protection.
Protecting all pictures or videos
To protect all pictures and videos, enter the playback interface and press
the
Note: Before disabling the protection for protected pictures or videos, the Delete menu/ Delete All menu is
disabled. A protection icon will appear in the top right corner of a protected picture or video.
button.
Press the Up/Down button to move the red box
and select the Protect All Files menu.
Press the OK button and a message will appear
on the screen: “Protect all files?”
Press the OK button to confirm the protection.
Press the MENU button to exit without saving.
14
Page 17

C
C
C
h
p
a
h
p
a
h
2.2.7. DPOF print
DPOF (Digital Print Order Format) refers to a format in which the print
specifications for the picture taken by a digital camera are recorded in the
storage media, like an SD card. The recorded specifications include
information about which picture is to be printed.
To print a picture, the picture to be printed should be selected at first. Then
r
e
t
r
e
t
a
B
2
a
B
2
O
c
i
s
O
c
i
s
p
p
a
r
e
a
r
e
n
o
i
t
n
o
i
t
n
o
i
t
a
r
e
p
O
c
i
s
a
B
2
r
e
t
p
a
press the
2.3 Advanced setup
This chapter introduces various functions of the camera to facilitate your taking
better pictures.
2.3.1 Under the mode, press the button
Name Icon
button.
Press the Up/Down button to move the red box.
Select the Print menu.
Press the Left/Right button to move the red box.
Select the ON button to register the print
information on the storage media. Select the Off
button to cancel print information.
Options
Instruction
Resolution
Exposure value
status
15
VGA
3M
7M
11M
640X480
2048X1536(Default)
3072X2304
3840X2880
-2.0EV
-1.5EV
-1.0EV
-0.5EV
0EV (Default)
+0.5EV
+1.0EV
This option is used for changing the
resolution of a picture. For printing a
4x3 picture, the minimum resolution is
640x480. For printing a 14x10 picture,
the minimum is 2048x1536.
When the subject is too bright or dark in
contrast to the background, this
brightness setting is used for adjusting
the brightness of the images.
Rectification range: 9 levels with an
increment of 0.5.
+ Positive compensation: Darken the
picture.
- Negative compensation: Brighten the
picture.
Page 18

+1.5EV
+2.0EV
White balance
Burst Snapshot
Self timer
AWB
10
Auto (Default)
Sunny
Cloudy
Tungsten lamp
Incandescence
lamp 1
Incandescence
lamp 2
Single (default)
Multiple
Off(default)
2 SEC
10 SEC
The color of the subject changes due to
the color of reflected light. Pictures
taken under different light conditions will
have a different color temperature. If
you are familiar with color temperature
adjustments, you may change this
setting by yourself.
The setting for taking multiple pictures
enables burst snapshots for a series of
motions. With this setting activated, a
press on the shutter will activate 3
snapshots within a short time.
This is used to make a snapshot of
yourself when you are alone. You can
set the timer for taking the picture as a 2
second or 10 second delayed snapshot.
Time Stamp
OFF(Default)
Setting the date
Date and time
When the picture or video is printed or
stored in a computer, the date or time of
taking the picture or video will appear
on the lower right corner of the picture.
16
Page 19

C
C
C
h
p
a
h
p
a
h
2.3.2 Press the button under the mode
r
e
t
r
e
t
a
B
2
a
B
2
O
c
i
s
O
c
i
s
p
p
r
e
r
e
a
a
n
o
i
t
n
o
i
t
n
o
i
t
a
r
e
p
O
c
i
s
a
B
2
r
e
t
p
a
Video Resolution
Exposure Value
White balance
320X240 (10 frames/second)
640X480
AWB
-2.0EV
-1.5EV
-1.0EV
-0.5EV
0EV(default)
+0.5EV
+1.0EV
+1.5EV
+2.0EV
Auto(Default)
Sunny
Cloudy
Tungsten lamp
Incandescence lamp 1
Incandescence lamp 2
17
Page 20

3.1 Connecting to a PC or a TV set
This chapter discusses how to connect the camera to a PC to transmit files or to
a TV set to view pictures or videos.
3.1.1 Installing the software
The CD-ROM contains a driver program for using the camera as a
networked camera to transmit data and various programs helpful for you in
viewing and editing the pictures and videos. Follow the steps below:
Insert the CD-ROM in the CD drive of your PC and the system will
automatically read the disc. The following information will be displayed on
the screen:
—— Digital Camera Driver
—— Ulead Photo Explorer 8.0SE
—— Ulead Video Studio 7.0SE
—— Ulead Cool 360
—— Adobe Acrobat Reader
—— Camera User manual
Press Install to activate the installation. Follow
the instruction on the screen to complete the
installation.
3.1.2 Change the USB setting
Press the MODE button to enter the main menu and move the red box to
select
.
Press the Up/Down button to move the red box
and select the "USB connection" menu.
Press the Left/Right button to select:
Memory
Video camera head
18
Page 21

C
C
C
Plug the bigger end of the USB cable into the USB port.
Connect the smaller end of the USB
p
a
h
p
a
h
3.1.3 Connecting the USB cable
Execute the following operations to connect the camera to a PC:
cable into the camera. An icon for
storage will be displayed on the LCD
and then the LCD is powered off.
3.1.4 Transmitting the pictures and videos to a computer
3
r
e
t
3
r
e
t
C
C
o
o
n
n
n
n
t
c
e
c
e
P
o
t
P
o
t
t
C
C
r
o
r
o
V
T
V
T
V
T
r
o
C
P
o
t
t
c
e
n
n
o
C
3
r
e
t
p
a
h
This section describes how to copy the pictures and videos to a PC for
viewing on a Windows2000/ME/98SE operation system.
First, double click My Computer and then double click Removable Disk.
Double click to open the folder DCIM.
Double click to open the folder 100IMAGE.
19
Page 22

Drag the pictures or videos to be transmitted
into My Folder.
Note: How to remove the USB cable from the computer
Double click
Select
Make sure that the device is selected in the window “Stop the hardware
device” and then press “OK”. The screen will show that the hardware device
is now ready for being removed safely. You can now unplug the camera.
on the task bar.
(USB Disk) and then press “Stop”.
3.1.5 Connecting to a TV set
You can connect your camera to a TV set and view the pictures or videos
on the TV screen.
First, set the output mode.
Before connecting the camera to a TV set, you should follow the steps
below to activate the TV output mode and make sure that the output mode
matches the mode of the TV set:
Press the Up/Down button to move the red box
and select the Video Output Mode menu. You
may select the following settings according to
your requirements:
NTSC
PAL
20
Page 23

C
C
C
h
p
a
h
p
a
h
3.1.6 Viewing pictures or videos on a TV screen
To view the pictures or videos on the TV screen, you should do the
following:
3
r
e
t
3
r
e
t
C
C
o
o
n
n
n
n
t
c
e
c
e
P
o
t
P
o
t
t
C
C
r
o
r
o
V
T
V
T
V
T
r
o
C
P
o
t
t
c
e
n
n
o
C
3
r
e
t
p
a
Power on the camera and press the MODE button to shift to the
mode.
Use the AV cable to connect the output port of the camera to the video
input port of the TV set. The LCD will be turned off automatically. The
pictures or videos will be displayed on the TV screen.
Battery life:
Test data
Test
condition
2048 x 1536
pixels pictures
The number of the
The number of the
pictures taken
pictures taken when
(forced flash and then
no flash is available
no flash, every other 30
due to low power
seconds.)
126 pictures 170 pictures
Note: The pictures were taken under normal indoor temperatures. Three (3) standard
batteries were used. One picture with forced flash was taken every 30 seconds and
then one picture without flash was taken every other 30 seconds. The camera was
powered off and then powered back up again after 10 pictures were taken.
21
Page 24

Frequency
When the shipment of the camera is made, the light frequency of the camera
has been adjusted to meet the local standards. Different frequency causes
different picture/video effects. Please refer to the following specifications to
make frequency adjustment when you are traveling abroad or encounter
noise.
Countries
and regions
Setting 50Hz 50Hz 50Hz 50Hz 50Hz 50Hz
Countries
and regions
Setting 60Hz 60Hz 60Hz 60Hz/50Hz 60Hz 50Hz
UK Germany Italy Spain Holland Portugal
France US Taiw an Japan Korea China
22
Page 25

C
C
C
p
a
h
p
a
h
LED information
4
r
e
t
4
r
e
t
O
O
h
t
h
t
h
t
O
4
r
e
t
p
a
h
e
n
i
r
e
n
i
r
e
m
r
o
f
m
r
o
f
a
a
n
o
i
t
t
n
o
i
n
o
i
t
a
m
r
o
f
n
i
r
Status of the
camera
Green Red Green
Power-off Off Off Off
Stand-by On Flash(1Hz) Off
Recharging the
flash unit
Processing On Off Off
Low power Off Flash (1Hz) Off
USB connection On Off Off
Self-timer On Off Flash (1Hz)
Video recording On Off On
Troubleshooting
Trouble Cause Solution
Power LED Self-Timer LED
On On Off
Cannot power on the
camera
Picture taking or video
taking are not available
The flash can not be
activated
The images are blurry The camera shakes
No power in the
batteries.
The batteries are inserted
in wrong polar direction.
The memory is full.
The SD card is
write-protected.
Check whether the flash
is set to OFF.
when taking a picture.
Replace the batteries
with fully charged ones.
Orient the batteries in
the direction as
described in the
instructions.
1. Delete files to release
some memory.
2. Disable the
write-protection
Set the flash to auto/on
1. Securely fix the
camera so that it does
The subject is out of the
focus range.
23
not move.
2. Adjust the distance
between the camera and
Page 26

the subject.
The images are not
stored
The pictures cannot be
stored onto a computer
through a USB cable
The pictures can not be
Before storing the
images, the camera
turned itself off.
The driver program is
not installed.
Incorrect installation.
The data cable is not
If the Low power
message appears,
replace the batteries at
once.
1. Before connecting the
USB cable, install the
driver and power on the
camera.
2. Remove the driver
and related programs
and then reinstall them
in accordance with the
User’s Guide.
Use an AV cable to
viewed on a TV screen
The camera can not be
used as a PC camera
head.
The camera is down or
does not operate
properly.
connected properly.
The TV end of cable is
not plugged in properly
The camera is not set as
a video camera head
The flash has been used
continuously.
High humidity
The camera has been
used near a magnetic
field
connect with the TV.
Set the PAL/NTSC
mode properly.
Set the camera as a
video camera head
Take out the batteries to
power off the camera
completely. Power on it
again after 10 seconds.
24
Page 27

C
C
C
p
a
h
p
a
h
Important:
Using the camera under 0 ºC or above 40 ºC is not recommended.
Don’t leave the camera in direct sunlight. Don’t place the camera in extreme
temperatures, such as close to an air-conditioner or a heater.
Store the camera in a dry place.
For your own safety, avoid using the camera during an electrical storm.
Salt and alkali may cause serious damage to the camera.
Don’t clean the camera with ethanol.
Don’t use the camera in water or in a place where the camera can easily get
wet.
Don’t bump, drop or dismantle the camera.
If the camera becomes wet by accident, power it off and remove its batteries.
Don’t use your hands to directly wipe the lens. If the lens is blurred, please
4
r
e
t
4
r
e
t
O
O
h
t
h
t
n
i
r
e
n
i
r
e
m
r
o
f
m
r
o
f
a
a
n
o
i
t
t
n
o
i
n
o
i
t
a
m
r
o
f
n
i
r
e
h
t
O
4
r
e
t
p
a
h
clean it with special cleaning cloth.
Store pictures you have taken on a computer to avoid losing them.
25
 Loading...