

Eastman Outdoors Revolution 37059, Revolution 38024, Revolution 37068, Revolution 37069 Instruction And Safety Manual
Failure to follow these instructions could
Failure to follow these instructions could
Revolution Burner™ and
Outdoor Cooking Set
DANGER
If you smell gas:
1. Shut off gas to the appliance.
2. Extinguish any open flame.
3. If odor continues, keep away from the
appliance and immediately call your fire
department.
result in fire or explosion which could cause
property damage, personal injury or death.
DANGER
1. Never operate this appliance unattended.
2. Never operate this appliance within 10 ft
(3 m) of any structure, combustible
material or other gas cylinder..
3. Never operate this appliance within 25
feet (7.5m) of any flammable liquid.
4. Do not fill cooking vessel beyond
maximum fill line.
5. Never allow oil or grease to get hotter than
400ºF or 200ºC. If the temperature exceeds
400ºF (200ºC) or if oil begins to smoke,
immediately turn the burner or gas supply
OFF.
6. Heated liquids remain at scalding
temperatures long after the cooking
process. Never touch cooking appliance
until liquids have cooled to 115ºF (45ºC) or
less.
7. If a fire should occur, keep away from the
appliance and immediately call your fire
department. Do not attempt to extinguish
result in fire, explosion or burn hazard,
which could cause property damage,
personal injury or death.
Instruction and Safety Manual
WARNING AND SAFETY INFORMATION;
ASSEMBLY AND OPERATING
INSTRUCTIONS; MAINTENANCE &
COOKING INSTRUCTIONS FOR:
10 Piece Stainless Steel Outdoor
GourmetTM Cooking Set Model 37068
7 Piece Stainless Steel Outdoor
GourmetTM Cooking Set Model 37069
10 Piece Aluminum Outdoor GourmetTM
Cooking Set Model 37059
7 Piece Aluminum Outdoor GourmetTM
Cooking Set Model 38024
For a Safe Cooking Experience,
Follow All Instructions and Safety
Warnings in this Instruction
Manual
This Instruction Manual contains
important information necessary for the
prorper assembly and safe use of the
appliance.
Read and Follow all Warnings and
Instructions before assembling and
using the appliance.
Follow all warnings and instructions
when using the appliance.
KEEP THIS MANUAL FOR FUTURE
REFERENCE. The installer must leave the
instructions with the consumer.
Approximate assembly time is 14 minutes.
OUTDOOR USE ONLY / NEVER LEAVE UNATTENDED
Page 1 of 19

If you are unsure of anything in these instructions and
warnings, stop and contact Eastman Outdoors at 1-800-2414833 for assistance.
Failure to follow these instructions and warnings could result in
fire or explosion, which could cause property damage, personal
injury or death.
WARNINGS
•
The installation must conform with local codes or, in the absence of local codes, with the National Fuel Gas
Code, ANSI Z223.1/NFPA 54, Storage and Handling of Liquefied Petroleum Gases, ANSI/NFPA 58 or CSA
B149.1, Natural Gas and Propane Installation Code, CSA B149.1, Propane Storage and Handling, CSA
B149.2, or the Standard for Recreational Vehicles, ANSI A119.2/NFPA 1192, and the Recreational Vehicle
Code, CSA Z240 RV series, as applicable.
•
Fryer/boilers shall not be used on or under any apartment, or condominium balcony or deck.
•
This appliance is for OUTDOOR use only. Do NOT operate in a building, garage or any other enclosed area.
•
Do not leave the appliance unattended. Keep children and pets away from the appliance at all times.
•
Always perform the leak test as described in this manual before lighting this appliance. Do not light the
burner until after you have checked the hose, regulator control valve, QCC1, timer shutoff, and all LP gas
connections for leaks. Do NOT use the appliance if there is a leak. Contact Eastman Outdoors at 1-800-2414833 on how to obtain and replace the parts.
•
This appliance is not intended to be installed or used in or on recreational vehicles and/or boats.
•
Do not operate this appliance under ANY overhead construction, roof covering (car port), awning or
overhang. Keep a minimum clearance of 10 feet (3.05 m) from all sides, front and back of the appliance to
ANY structure or combustible material.
•
Keep the fuel supply hose away from any heated surfaces.
•
This appliance is not intended for commercial use. Do NOT use this product for anything other than its
intended purposes.
•
The use of alcohol, prescription or non-prescription drugs may impair the consumer’s ability to properly
assemble or safely operate this appliance.
•
When cooking with oil or grease, have a Type BC or ABC fire extinguisher readily available.
In the event of an oil or grease fire do not attempt to extinguish with water. Immediately call the fire
department. A Type BC or ABC fire extinguisher may, in some circumstances contain the fire.
•
In the event of rain, snow, hail, sleet or other forms of precipitation while cooking with oil or grease, cover the
cooking vessel immediately and turn off the appliance burner and gas supply. Do not attempt to move the
appliance or cooking vessel.
•
When cooking, the appliance must be on a level, stable noncombustible surface in an area clear of
combustible material. An asphalt surface (blacktop) may not be acceptable for this purpose.
•
Do not place an empty cooking vessel on the appliance while in operation except when using a wok. Use
caution when placing anything in the cooking vessel while the appliance is in operation.
•
Do not move appliance when in use. Allow cooking vessel to cool to 115ºF (45ºC) before moving or storing.
•
This appliance is not intended for and should never be used as a heater.
•
This appliance will be hot during and after use. Use insulated oven mitts or gloves for protection from hot
surfaces or splatter from cooking liquids.
•
When cooking with oil or grease, the Eastman Outdoors thermometer provided MUST be used. Follow
instructions in this manual for proper installation and use of the thermometer. If the thermometer supplied
with this fryer/boiler has been lost or damaged, contact Eastman Outdoors at 1-800-241-4833 on how to
obtain a replacement thermometer.
•
If the temperature exceeds 400ºF (200ºC) or if oil begins to smoke, immediately turn the burner or gas
supply OFF and wait for the temperature to decrease to less than 350ºF (175ºC) before relighting burner
according to the instructions in this manual. If there is lid (cover), do not remove the lid.
•
Never use a cooking vessel larger than 30 quarts and a diameter greater than 12.25 inches or woks larger
than 18 inch in diameter. Use only those accessories, such as cooking vessels and accessory attachments
manufactured and recommended for use by Eastman Outdoors with this appliance, to allow for safe and
proper performance of this appliance. Do NOT use glass, ceramic or plastic cooking vessels on the burner.
OUTDOOR USE ONLY / NEVER LEAVE UNATTENDED
Page 2 of 19

•
NEVER overfill the cooking vessel with oil, grease or water. Follow instructions in this manual for
establishing proper oil, grease or water levels.
•
When cooking with oil or grease, introduction of water or ice from any source into the cooking oil/grease
many cause overflow and severe burns from hot oil and water splatter. When frying with oil/grease, all food
products MUST be completely thawed and towel dried before being immersed in the fryer.
•
Avoid bumping of or impact with the appliance to prevent spillage or splashing of hot cooking liquid.
•
Never drop food or accessories into the hot cooking liquid. Lower food and accessories slowly into the
cooking liquid in order to prevent splashing or overflow. When removing food from the appliance, care shall
be taken to avoid burns from hot cooking liquids.
•
To avoid accidental burns from burner flame or hot oil, turn OFF the burner before removing food from the
cooking vessel. Use caution when removing food or basket from the pot to avoid pulling pot off the burner.
•
Do NOT modify or alter this appliance or its components. Modifications/alterations of this appliance or its
components will void warranty and could lead to serious personal injury, property damage, or death.
•
Do not tamper with or attempt repairs on the burner body, frame, valves, regulator hose assembly, or LP
tank. Repair should be done by a qualified service person. Please contact Eastman Outdoors at 1-800-2414833 for assistance.
•
Do NOT loosen or disconnect any gas fitting while the appliance is in use.
•
This appliance has an open flame so do NOT lean over the appliance and keep your hands, hair, face, and
clothing away from the burner at all times because they could catch on fire when lighting the burner or while
the burner is in operation. In sunlight or other bright light, the flame may be almost invisible.
FAILURE TO FOLLOW THESE INSTRUCTIONS AND WARNINGS COULD RESULT IN FIRE OR
EXPLOSION, WHICH COULD CAUSE PROPERTY DAMAGE, PERSONAL INJURY OR DEATH.
TABLE OF CONTENTS
Assembly
Warnings 1-3
Burner parts diagram 4
Burner assembly 4-5
Regulator hose assembly 5-6
Fuel safety 6
Connecting the LP gas tank 6-7
Leak testing 7-8
Operation
Maintenance Before every use 8-9
Lighting 9-10
Shut off 10
Using your Appliance 10
How to Determine Fill Level 11
Thermometer attachment instructions 11
Lighting and Placing Cooking Vessel on Burner 11
Heat Cooking Liquid 12
Insert Food into Cooking Vessel 12
Cooking Food 12-13
Clean Up 13
Packing and storage 13
Frequently asked questions 13-14
Fish/Hot Pot Assembly instructions 14
Cooking Instructions
Cooking with Wok 14-15
Cooking Deep-fried turkey 15-17
Frying Fish of Chicken Wings 17-18
Warranty
Warranty information 18-19
OUTDOOR USE ONLY / NEVER LEAVE UNATTENDED
Page 3 of 19
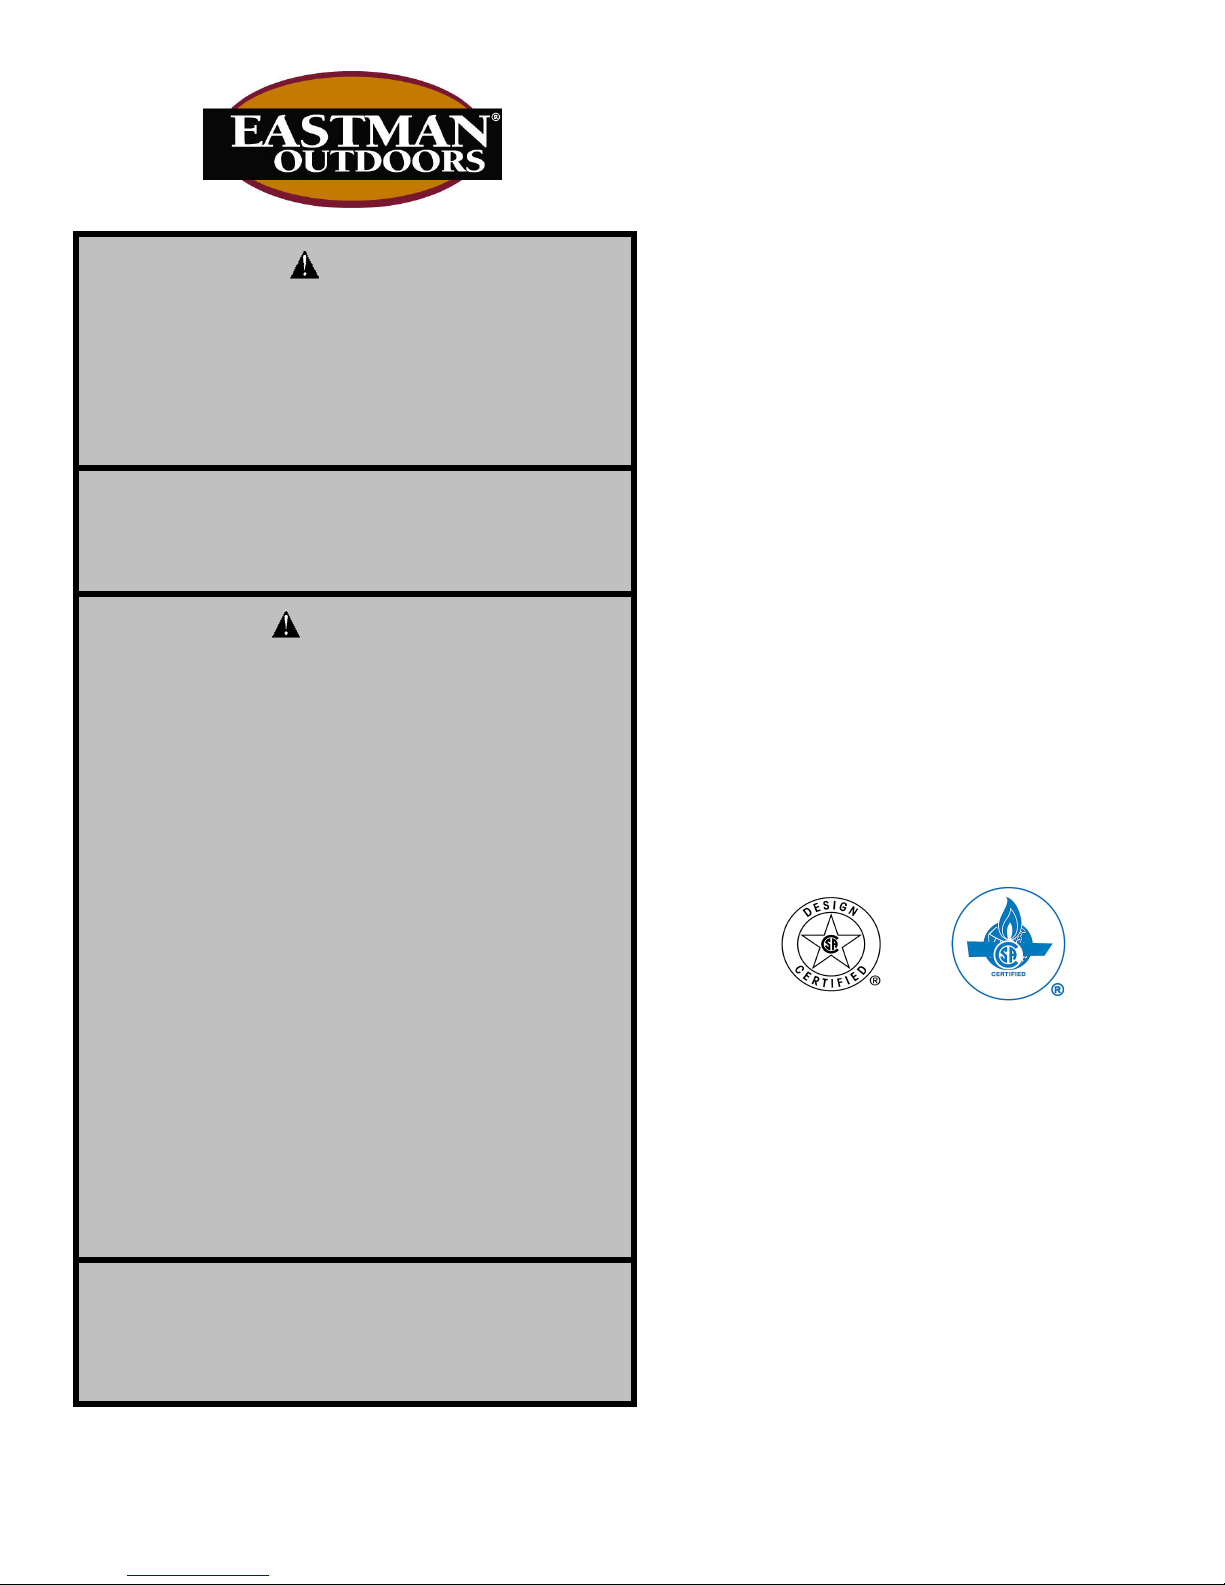
Step 1 ASSEMBLY
Burner Parts Diagram
QTY PARTS LIST
1 1. Burner Body
3 2. Legs
1 3. Burner Element
3 4. Burner Grate
1 5. Burner Orifice/Regulator
Hose Assembly
3 6. Burner Housing Bolt
1 7. Air Shutter
1 8. Shutter Spring
3 9. Short Square Bolts
12 10.Flat Washer
12 11. Lock Washers
9 12. Nuts
6 13. Long Square Bolts
1 14. Open End Wrench
1.
10.
11.
12.
SIDE VIEW
ASSEMBLED BURNER
TOP VIEW
DRAWINGS
Burner Orifice/Regulator
Hose Assembly Connection
(Tighten with Wrench)
Regulator
Control Valve
QCC1 (Type I) Fitting (Attach this end to
Propane Tank with a Type I Connection.)
(Do not use a Wrench to tighten.)
Tools required for assembly:
Air Shutter
(Air Shutter Can Be Rotated
To Adjust Flame Quality)
Timer Shutoff
Adjustable wrench
Water
Liquid detergent
Step 1.1 Burner Assembly
Before you begin, remove all packaging materials. Make sure you have all items shown in the assembly drawing
and parts list. Numbers in parentheses ( ) below refer to the numbers in the part list.
Take burner body (1) and turn it on its
side (figure 1). Attach one leg (2) to
side of burner body by aligning the two
holes on leg with the two holes on side
of burner body (figure 2).
OUTDOOR USE ONLY / NEVER LEAVE UNATTENDED
Fig. 1 Fig. 2
Page 4 of 19
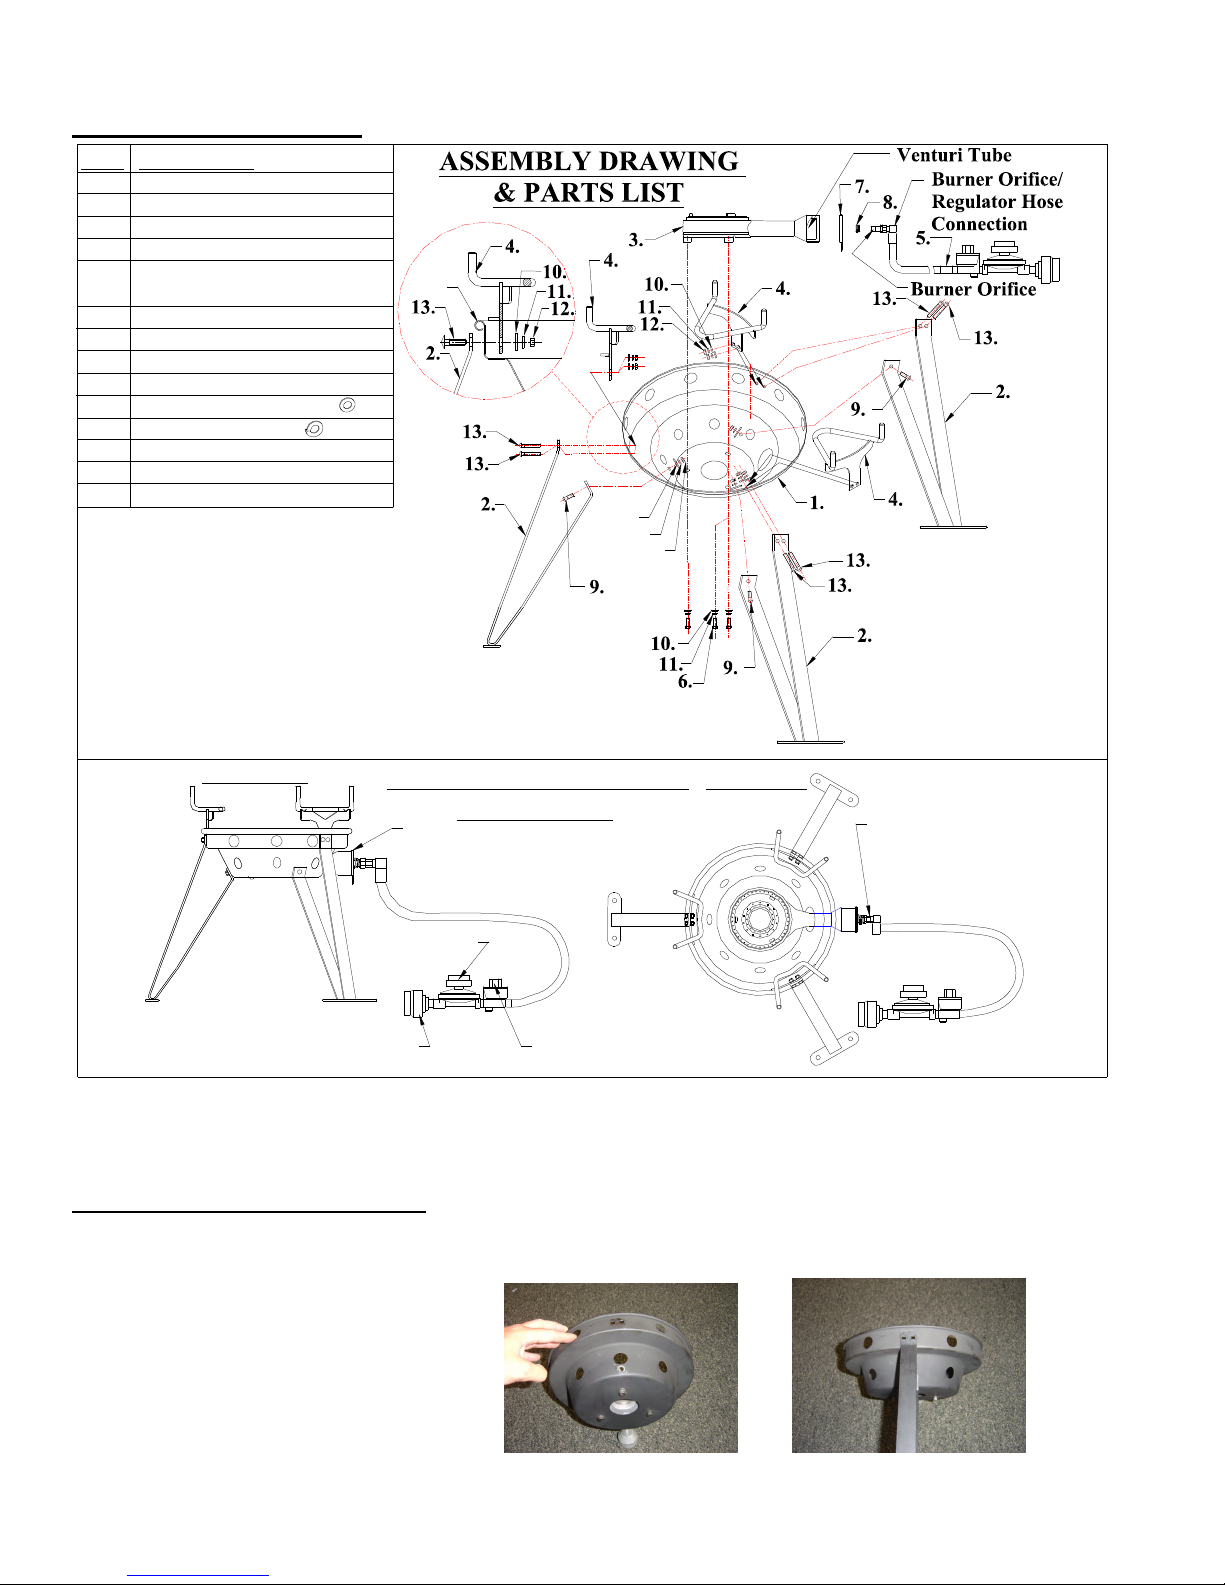
•
Place two long square bolts (13)
through holes on the leg and burner
body (figure 3). Place burner grate (4)
onto the two bolts (figure 4) making
sure that the vertical posts are on the
outside of the burner body.
Fig. 3 Fig. 4
Secure burner grate and leg to the
burner body using a flat washer (10),
lock washer (11), and nut (12) (figure
5). Tighten with provided wrench
(figure 6).
Fig. 5 Fig. 6
Place a short square bolt (9) through hole on the bottom of leg support (figure 7). Secure using a flat washer
(10), lock washer (11), and nut (12) (figure 8). Tighten with provided wrench. Repeat above steps to attach
remaining two legs and burner grates (figure 9).
Fig. 7 Fig. 8 Fig. 9
Step 1.2 Regulator Hose Assembly
Do not disassemble the regulator hose assembly or regulator. This is
a pre-assembled unit.
• The high pressure regulator hose assembly supplied must be used.
One adjustable wrench is needed when attaching the hose to the appliance.
Place the shutter spring (#8) onto burner
orifice/regulator hose assembly (#5) by sliding the
small end of the shutter spring onto the burner
orifice/regulator hose assembly (figure 10).
Set the air shutter (#7) onto the burner element (#3)
by placing it on the casting (figure 11).
IMPORTANT: Line up hose/orifice assembly (#5) with the hole in the burner element (#3) so the orifice is
perpendicular to the burner element (figure 12). Finger-tighten orifice into the hole and then wrench tighten
with an adjustable wrench 1 to 2 revolutions or until snug (figure 13). DO NOT OVER TIGHTEN. The
connection is tight enough when one cannot loosen the hose/orifice by hand. Proper connection is
critical for correct operation of the burner.
Replacement high pressure regulators assemblies must be those
specified by Eastman Outdoors.
Fig. 10
Fig. 11
OUTDOOR USE ONLY / NEVER LEAVE UNATTENDED
Page 5 of 19

Clean and Inspect hose before each use. If evidenc
e of abrasion, wear, cuts,
Fig. 12 Fig. 13
Use supplied wrench to make sure all nuts and bolts are tight before proceeding to the next section.
Step 1.3 Fuel Safety
Only use LP gas with this appliance.
Only use an approved 20 lb. LP gas tank with this appliance (same as those commonly used on gas grill with
Acme/Type 1/QCC1 Safety Valves). These can be quickly identified because valves have external threads.
LP gas is flammable, explosive under pressure, colorless, tasteless and heavier than air. It pools in low areas.
LP gas is naturally odorless, but a distinctive odor has been added by the LP gas supplier for your protection.
LP gas can cause skin to freeze on contact.
Burning LP gas consumes oxygen and produces carbon monoxide, a deadly gas. Never operate this
appliance inside a building or confined area.
Carefully read and follow all instructions on LP tank.
The LP-gas supply tank must be constructed and marked in accordance with the specifications for LP-gas
tanks of the U.S. Department of Transportation (DOT) CFR49 or the National Standard of Canada, CAN/CSAB339, Cylinders, Spheres and Tubes for the Transportation of Dangerous Goods.
Never use a LP tank with a damaged body, valve, collar or foot ring. A dented or rusty LP tank may be
hazardous and should be checked out by a LP gas supplier.
Use only LP tanks that include a collar to protect the tank valve.
Do not store spare LP gas tanks under or near this appliance. Never fill the tank beyond 80 percent full. If
these instructions are not followed exactly, a fire causing death or serious injury may occur.
When appliance is not in use, gas must be turned off at the supply cylinder. Storage of the appliance indoors
is permissible only if the cylinder is disconnected and removed from the appliance. Always use and store LP
tank in an upright position. Never store or transport LP tank in occupied enclosures. LP tanks must be stored
outdoors out of reach of children and must not be stored in a building, garage or any other enclosed area.
Always perform a leak test on all gas connections whenever a tank is connected. If bubbles form in the leak
test solution, do not use. Never use a flame to test for leaks.
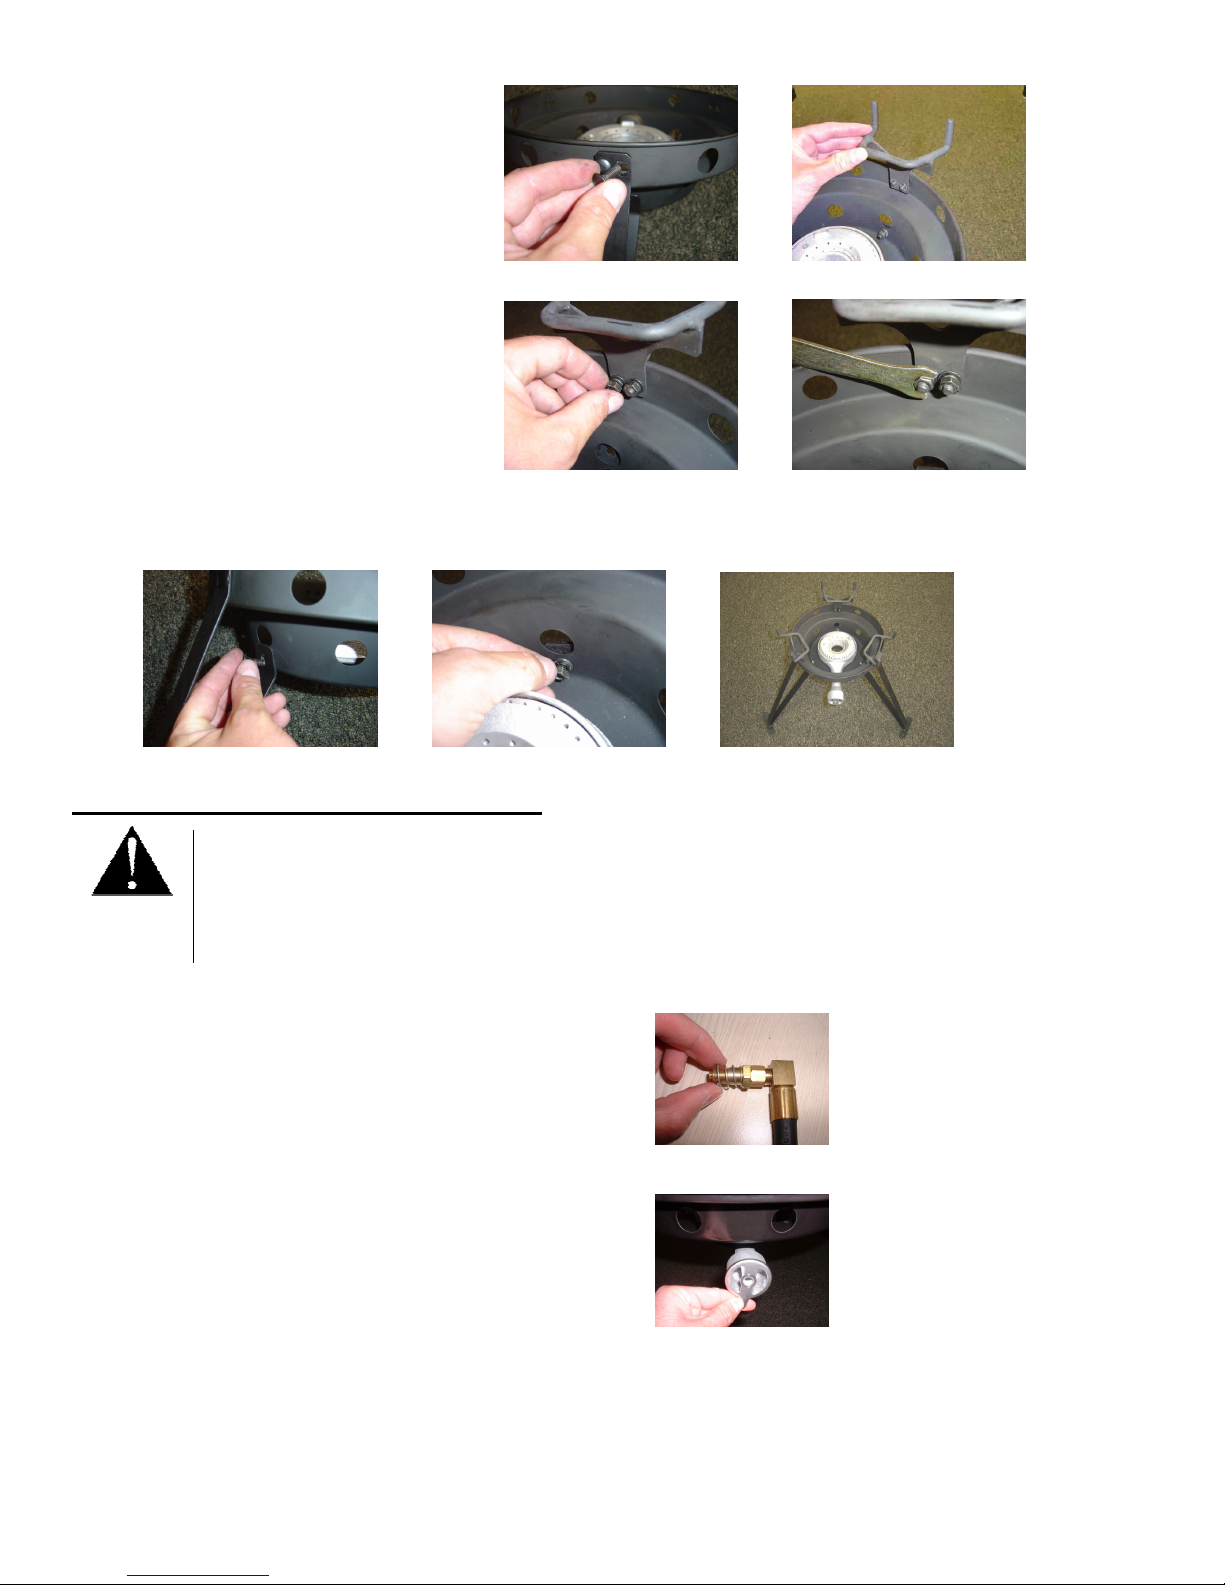
Step 1.4 Connecting the LP Gas Tank
See figure 14 for the regulator control valve on
right and the timer shutoff on the left. See figure
15 for the QCC1 fitting.
NOTE: The regulator control valve controls the flame intensity and acts as an On/Off valve when operating the
appliance. When finished cooking or in case of emergency, close the LP tank valve by turning LP tank valve
clockwise until tight (Closed Position). Be sure to close LP tank valve before disconnecting the hose.
OUTDOOR USE ONLY / NEVER LEAVE UNATTENDED
or leaks, replace hose prior to operation. Replace only with Eastman
Outdoors high pressure regulator hose assembly Model S90099.
High pressure regulator hose assembly supplied must be used. Do not use
high pressure regulator hose assembly with any other gas appliance.
Failure to follow these instructions can lead to fire or explosion, which
could cause property damage, serious personal injury or death.
Fig. 14
Fig. 15
Page 6 of 19
 Loading...