

Page 1

KODAK Baby Video Monitor / M240
Monitor every moment. Record every memory.
The recordable KODAK Baby Video Monitor–from the moment you
press Record, you get up to 20 seconds of previous action. You’ll always
capture memories from the moment they start.
Attach gift card here
User guide
www.kodak.com
For help:
www.kodak.com/go/M240support
Page 2

Eastman Kodak Company
Rochester, New York 14650
© Kodak, 2011
All screen images are simulated.
Kodak is a trademark of Eastman Kodak Company.
4H8787_en
Page 3
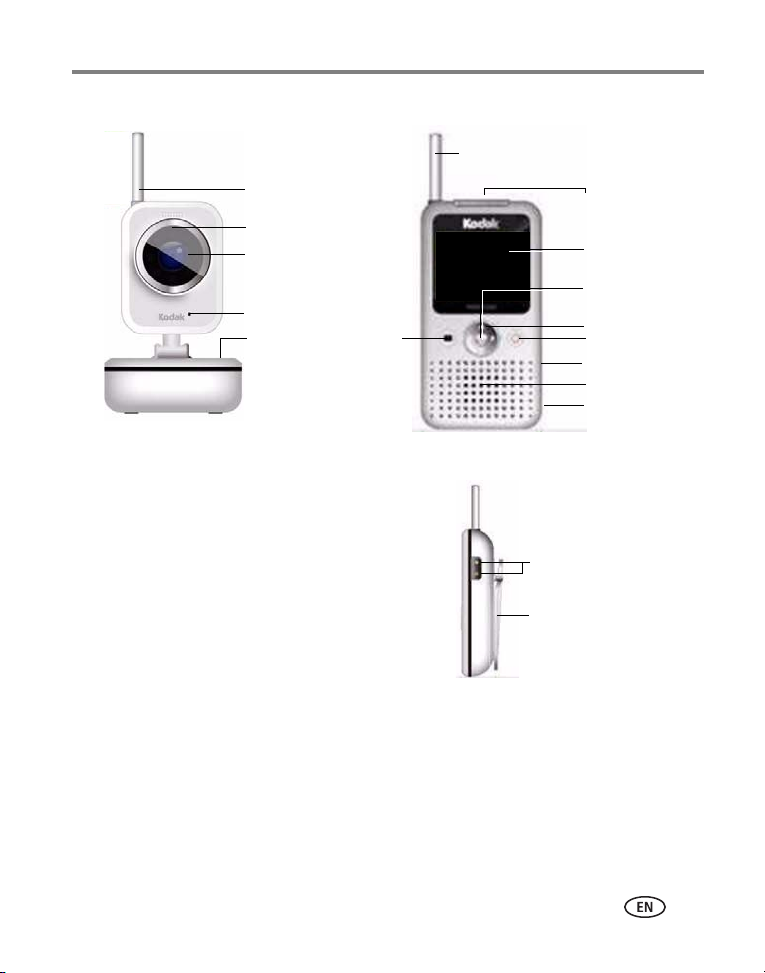
What’s in the box:
Speaker
OK/Menu
LCD
Review
Record
Navigation
C10 Camera
M240 Monitor
Rechargeable battery pack
(2) AC adapters: A longer, 11.8 ft (3.6 m) cord for the camera, and a
shorter, 6 ft (1.8 m) cord for the monitor
USB cable
Wall mounting accessories
*Stand / Belt Clip–Use the stand to position the monitor on a flat surface. For portability, fasten the
monitor to your belt with the clip.
Volume (+ / -)
Antenna
On/Off
Monitor (side view)
Stand / Belt Clip*
SD/SDHC card slot
USB Port
IR LEDs
Lens
Microphone
On/Off
Also included:
Antenna
You can also purchase a charging dock for
your monitor at the KODAK Store. Go to
(www.kodak.com/go/accessories).
Product features
www.kodak.com/go/support
i
Page 4

1 Product warning
CAUTION:
Strangulation Hazard–do not place the camera in the crib or
within 3 ft (1 m) of the baby.
■ You must regularly monitor your baby’s activity. This product cannot replace
responsible, adult supervision. This product will not alert parents to a baby’s silent
activities.
■ Never use extension cords with AC adapters. Use the AC adapters provided.
■ When an AC adapter is plugged into an electrical outlet, do not touch the exposed
end.
■ Test the monitor before first use, periodically, and when changing the location of
the camera.
■ Do not use the monitor near water (bathtub, sink, etc). Keep the monitor away
from heat sources (stoves, radiators, etc).
■ This monitor may pick up signals from similar devices. Signals broadcast by this
device may be picked up by other receivers.
■ Small parts can be a choking hazard. Do not allow children to play with the
camera or monitor.
■ Use only the original, rechargeable battery pack provided.
■ Install batteries correctly.
■ Remove alkaline batteries from the camera if the camera is stored for long periods
of time or when batteries are exhausted; do not mix old and new batteries; do not
mix alkaline, standard, or rechargeable batteries.
■ Keep all batteries away from children. Dispose of exhausted batteries properly.
■ Do not attempt to recharge non-rechargeable camera batteries.
1 www.kodak.com/go/M240support
Page 5

Quick Start Up
CAUTION:
2 Quick Start Up
Camera
Operate the camera with the AC adapter or with 4 AA-size alkaline batteries (not
provided).
1 If you choose to use AA-size alkaline batteries:
a Remove the screw on the back of the camera with a straight-blade screwdriver,
then remove the battery door.
b Insert 4 batteries.
c Place the battery door back on the camera, then secure with the screw.
2 Select a location for the camera that will best capture the baby.
Strangulation Hazard–do not place the camera in the crib or
within 3 ft (1 m) of the baby.
3 Place the camera on a flat surface, such as a dresser or shelf. To mount the camera
on a wall,
4 Connect the AC adapter with the longer cord to the back of the camera.
5 Plug the AC adapter into a standard electrical outlet, then secure the cord to the
wall using the mounting clips, if necessary.
6 Press the On/Off button for at least 2 seconds. The button glows when the camera
is turned on.
see page 4.
www.kodak.com/go/support
2
Page 6
Quick Start Up
Monitor
Your monitor and camera were linked during manufacture.
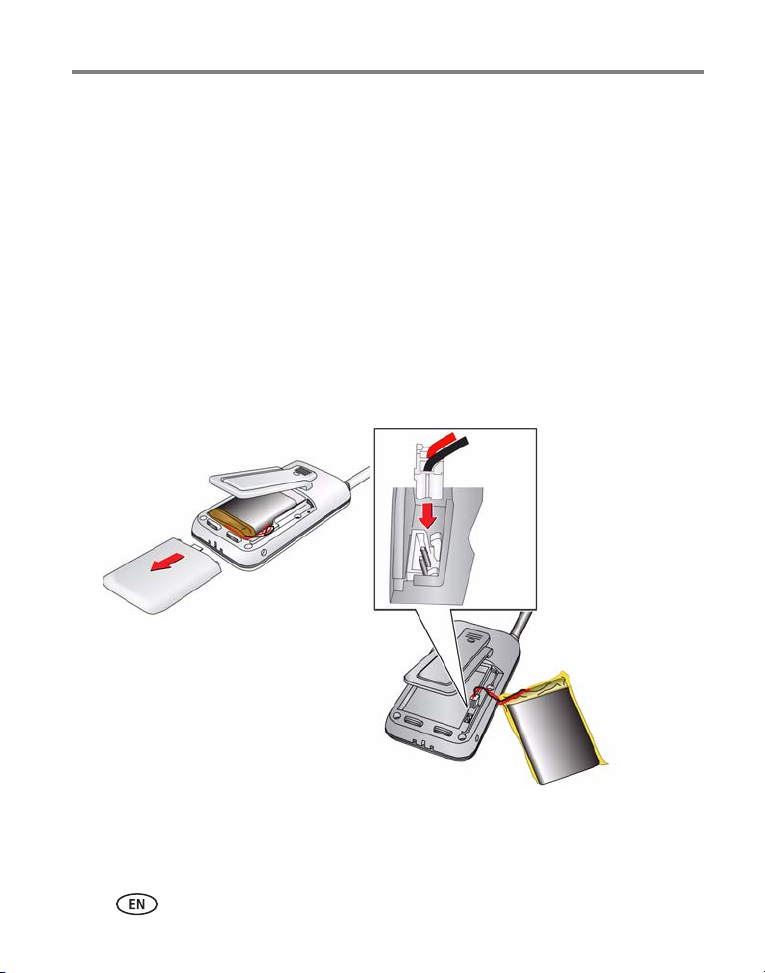
The monitor operates only when the rechargeable battery pack is installed. After
installing the battery pack, you can operate the monitor using the battery pack or
with the AC adapter.
NOTE: To maximize battery life, charge the battery pack for 3 hours before first use. You can operate the
monitor using the AC adapter during charging.
1 Select a convenient location for the monitor and dock that also provides optimal
viewing (a table near your chair or sofa, for instance).
2 Slide the battery compartment cover to remove it.
3 Insert the battery pack connector into the socket, then insert the battery pack.
4 Close the battery compartment cover.
5 Connect the AC adapter with the shorter cord to the back of the monitor.
3 www.kodak.com/go/support
Page 7

Quick Start Up
CAUTION:
6 Plug the AC adapter into a standard electrical outlet.
7 Press the On/Off button on the monitor for more than 2 seconds. A light on the top
of the monitor glows when the monitor is turned on.
8 Turn on the camera.
9 Verify that an image appears on the monitor.
Mount the Camera on a Wall
NOTE: Test monitor reception before mounting the camera on a wall. View the image on the monitor while
someone else adjusts the camera position. Optimal camera-to-subject distance for night viewing is
3 – 6 ft (0.9 – 1.8 m).
Strangulation Hazard–do not place the camera in the crib or
within 3 ft (1 m) of the baby.
1 Select a wall location for the camera, then drill 2 holes in that location using a
13/64 in. (5.2 mm) drill bit. Use the template provided (
2 Insert a wall anchor into each hole, then gently tap the anchors with a hammer
until they are seated (flush-mounted) in the wall.
3 Insert the screws into the anchors, then tighten the screws until
approximately 7/32 in. (5.6 mm) of each screw is exposed.
4 Slide the base of the camera over the screws until the camera locks into place.
5 Connect the AC adapter to the camera (or insert 4 AA-size alkaline batteries).
6 Secure the AC adapter cord to the wall with the mounting clips.
see page 18).
www.kodak.com/go/support
4
Page 8

Quick Start Up
Using the Camera
On / Off Button—Press for more than 2 seconds to turn camera On/Off.
Using the Monitor
On / Off Button—
Short Press–Press to turn the display On/Off.
Long Press–Press for more than 2 seconds to turn the monitor On/Off.
NOTE: When the monitor is turned on, sounds transmitted by the camera are heard even when the display
is turned off.
OK / Menu Button—Press to access features.
Volume Control—Press the + / - buttons to adjust the sound level.
Record Button—Press to Start / Stop video recording.
Review Button—Press to play a video.
Navigation Buttons —Press to select menu options.
Power / Low Battery / Link Indicator - White LED—
Constant–Normal operation
Flashing slowly–Battery level is low
Flashing fast (twice per second)–Monitor cannot establish link with the camera
NOTE: See Linking additional cameras to your monitor, page 8.
5 www.kodak.com/go/support
Page 9

LCD Indicators
Good signal from the
camera. Camera and
monitor are linked.
Diminished signal. Adjust
distance between camera
and monitor.
No signal. Link from
the camera is lost (see
Troubleshooting).
Camera-to-Monitor linking icons
Signal— Displays signal strength and link status.
Quick Start Up
Sound Level indicator—Up to 4 orange LEDs indicate the sound level
that the monitor is receiving.
www.kodak.com/go/support
Signal strength and battery status
as they appear on the LCD
6
Page 10
Quick Start Up
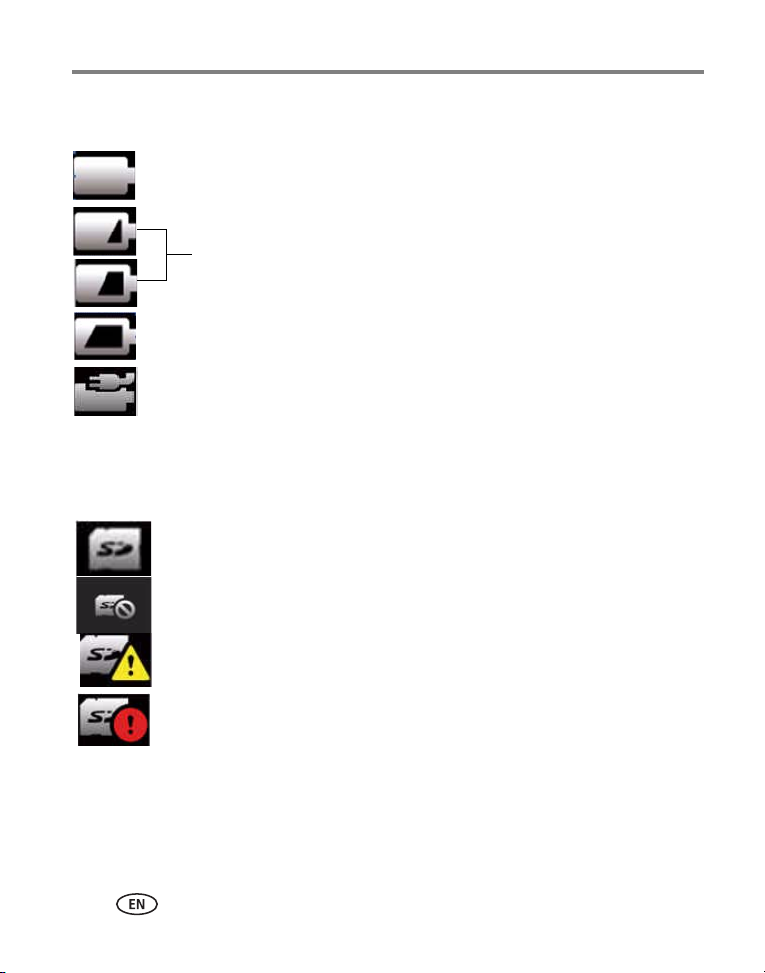
Fully Charged–Battery is fully charged.
Battery Charging–Battery symbol changes in
sequence.
Battery Low–Flashing symbol mean the battery needs charging.
NOTE: When the battery is low for more than 10 minutes, the monitor turns off.
AC Power–Device is powered by the AC adapter.
SD Card is installed in the monitor.
No card is installed.
SD Card is full. Replace the card or delete files on the card to create
space.
SD Card is locked. Remove the card, then slide up the small switch on
the side of the card (toward the top of the card).
Battery Status indicators—
SD Card Status—
7 www.kodak.com/go/support
Page 11
Quick Start Up
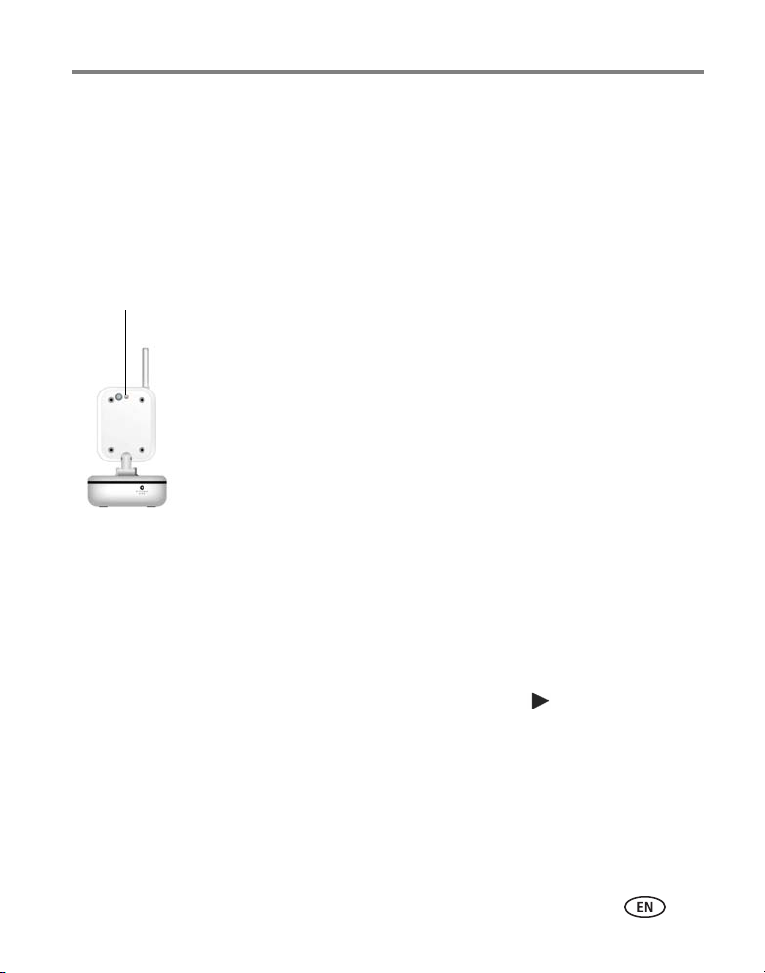
Your camera and monitor were linked during manufacture.
To purchase additional cameras and approved accessories such as a charging dock for
your monitor, go to the KODAK Store (www.kodak.com/go/accessories).
Linking button
To link additional cameras:
Use a paper clip to press and hold the linking button on
the back of the additional camera for more than 2
seconds (a white LED on the camera blinks twice per
second for 10 seconds).
Press and hold the OK button on the monitor for more
than 3 seconds (a linking icon appears on the LCD). After
camera No. 2 is successfully linked, the display will show
the image from the camera.
The image on the monitor switches from camera No. 2 to
camera No. 1 after 10 seconds.
NOTE: Repeat the procedure to link up to 4 cameras.
1
2
Linking additional cameras to your monitor
Camera Select
You can view video from the selected camera or from all cameras in sequence. The
default monitor setting displays video from each linked camera for up to 10 seconds
in sequence. To change to a different camera manually, press
then press OK.
www.kodak.com/go/support
to select a camera,
8
Page 12
Quick Start Up
Special Features
Buffered Recording—Insert a memory card into the monitor, then press Record.
The monitor records the current scene and up to 20 seconds of previous action.
IMPORTANT:
Night View—In a dark room, the monitor uses infrared LEDs to enable you to see
your baby at night.
Review/Play—Press the Review button on the monitor–the first frame of the most
recently recorded video appears. In the bottom of the screen, a counter displays the
number of saved videos. Press OK to Play. The recorded length, in minutes, appears
on the top, right side of the screen. To locate another video, press
Fast forward—While in Play mode, press to fast forward through the video at
2X speed (press twice for 4X and 3 times for 8X). Press to decrease the playing
speed or rewind to the beginning of the video.
Pause—While in Play mode, press the OK button to pause the video. Press OK again
to restart the video.
Live View Mode—Press Review to return to live view mode.
Delete a Video—While in Play or Review mode, press to select the delete
icon. To permanently delete the video, press the down arrow again, then press OK.
You must insert a memory card into the monitor to record video.
.
9 www.kodak.com/go/support
Page 13
Quick Start Up
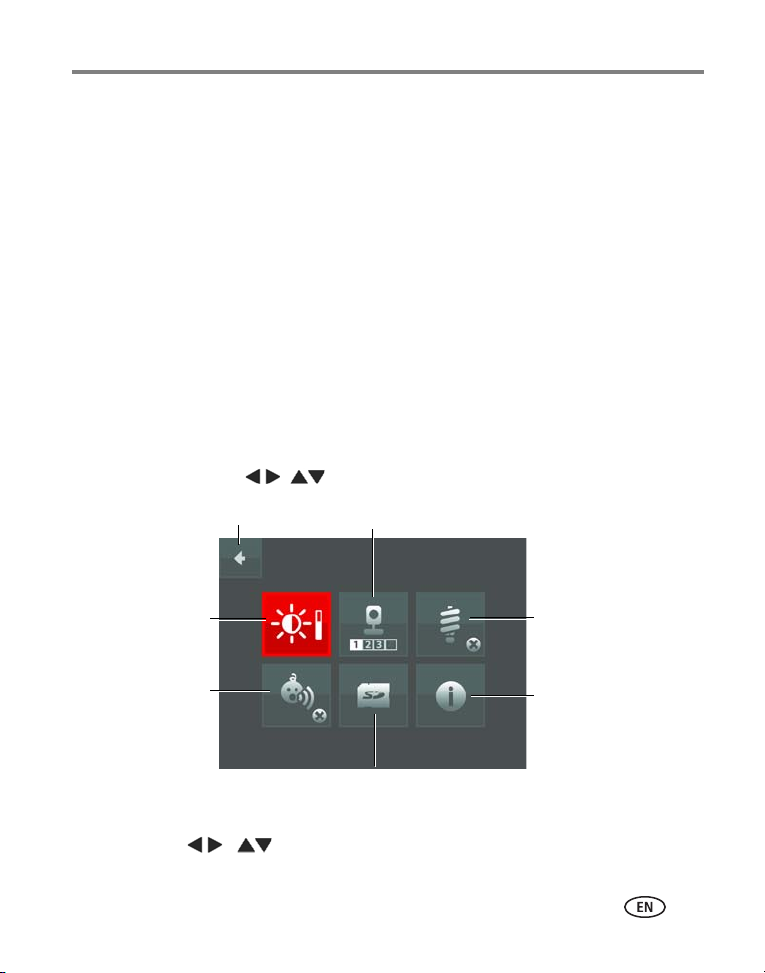
Power Saving
About
SD Card
Voice Activation
Brightness
Return
Camera Delete
(VOX)
Copying recorded videos to your computer
1 Turn on the monitor.
2 Connect the USB cable to the monitor and your computer.
“
Found Hardware” appears in your computer tray, and a new drive appears under
My Computer.
3 Open the new drive, then copy any saved videos from the SD Card in your monitor
to a new location on your computer. You may need to turn on the monitor after
disconnecting from your computer.
NOTE: You can also turn off the monitor, remove the SD Card, then insert the card into a card reader that is
connected to your computer.
Using the Menu to access more features
1 Press the OK button.
2 At the menu, press to select a feature.
Your selection appears in red.
3 Press the OK button to enter the sub-menu for your selection.
NOTE:
Press to return to the main menu at any time.
www.kodak.com/go/support
10
Page 14

Quick Start Up
CAUTION:
Sub-menus
Brightness—Press to adjust the brightness of your monitor image, then press
OK.
Camera Delete—While in Camera Delete, press OK. Press to select a camera
to delete, then press OK.
NOTE: If you only have one camera, you cannot delete it.
Power Saving—You can turn off the LCD to save power. Press to select 30
Seconds, 5 minutes, 30 minutes, or OFF. Press OK to return to the main menu.
Voice Activation (VOX)—The monitor screen turns on when a preset sound level is
detected from the camera for more than 10 seconds. If the detected sound drops
below the preset sound level, the monitor turns off after 15 seconds. Press
activate. The last setting is saved. Press OK to return to the Main menu.
SD Card—If an SD card is installed in the monitor, an icon appears in the main
menu. Press to select the icon, then press OK. To format the SD Card,
select again, then select OK. After formatting is complete, the main menu
appears.
to
Formatting deletes all information stored on the SD card.
11 www.kodak.com/go/support
Page 15
Quick Start Up
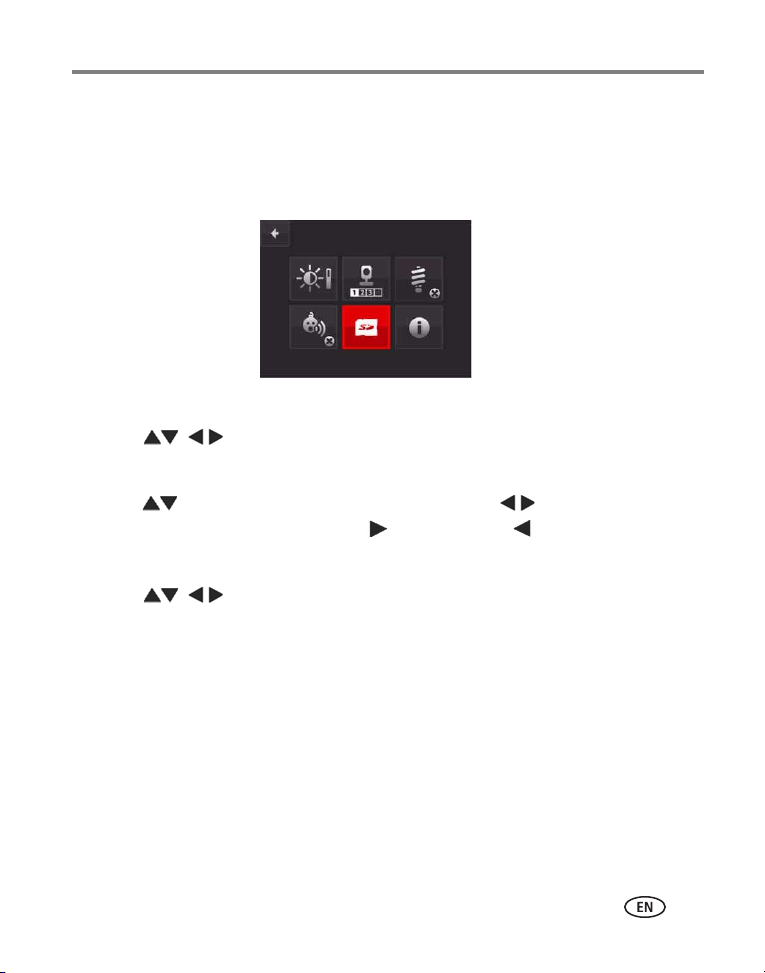
Set the Date and Time
IMPORTANT: You must install an SD Card in the monitor to set the date and time.
Date and time must be set so that recorded videos are sorted by date
and time.
1 At the Main menu, select the SD Card icon, then press OK.
2 Press to select Date/time, then press OK.
3 Select a Date format.
4 Press to change numbers from 0 to 9. Press the to move between
date format and time setting. Press to increase or to decrease numbers.
5 Press OK to return to the Date/time and SD Card Format menu.
6 Press select the Return arrow, then press OK to return to the Main
menu.
www.kodak.com/go/support
12
Page 16

Quick Start Up
Tips and Troubleshooting
■ To improve reception, adjust the distance between the camera and the monitor, or
move the monitor away from other devices (cordless phones, Wi-Fi devices, etc).
You can also extend the antenna on the monitor.
■ To conserve battery power, use the AC adapter.
■ If you installed alkaline batteries in the camera, remove them during long periods
of non-use.
No picture or sound–Verify that the:
■ Monitor is turned on
■ AC adapters are plugged into a working, standard electrical outlet
■ Camera is properly linked
Sound but no picture–Verify that the:
■ Power-Saving mode is deactivated (see page 11). Press the On/Off button quickly
to activate/deactivate the display.
■ Monitor brightness is adjusted properly (see page 11).
■ Device locations are acceptable. Move the camera and monitor to different
locations.
Picture but no sound–Increase the monitor volume.
Picture not clear–
■ For Night Vision, position the camera within 6 ft (1.8 m) of the baby.
■ Test reception by moving the monitor and/or camera to a different location.
■ Move the monitor away from other devices (cordless phones, Wi-Fi devices, etc).
■ Adjust the monitor brightness (see page 11).
■ Position the monitor closer to the camera, if necessary.
Squealing sound–Move the camera and the monitor farther away from each other.
13 www.kodak.com/go/support
Page 17

Appendix
3
Appendix
KODAK Baby Video Monitor / M240
Specifications
Monitor 2.4 in (6.1 cm) diagonal LCD, 480 x 234 pixels, 4:3 aspect ratio
Power supply
M240 System AC Adapter Model No. EFS00500590055OUL, Manufacturer: Eastern
Frontier. EIAJ Class 2 DC plug. Input: 100-240V AC 50/60 Hz. 0.2Amp
Output: 5.9 V DC, 0.55 Amp, 1.8 m cable
Size
Weight 1.1 lb (511 g)
C10 Camera AC Adapter Model No. EFS00500590055OUL, Manufacturer: Eastern
Size
Weight 0.46 lb (210 g)
Communication with USB devices
USB Full Speed Type A
Wireless network compatibility
2.4 GHz RF
Other features
Video formats AVI video file
Memory cards
(see page 7)
2.5 x 6.3 x 1.0 in (6.5 x 16 x 2.5 cm)
Frontier. EIAJ Class 2 DC plug. Input: 100-240V AC 50/60 Hz. 0.2Amp
Output: 5.9 V DC, 0.55 Amp, 3.6m cable
2.8 x 3.2 x 6.0 in (7.1 x 8.1 x 15.2 cm)
SD, SDHC up to 32 GB.
www.kodak.com/go/support
14
Page 18

Appendix
Temperature Operating: 32 to 104° F (0 to 40° C)
Storage: -25 to 160
Important safety instructions
Limited warranty
Kodak warrants KODAK Consumer Electronic Products and Accessories (“Products”), to be free from
malfunctions and defects in both materials and workmanship for one year from the date of purchase. Retain
the original dated sales receipt. Proof of the date of purchase will be required with any request for warranty
repair.
Limited warranty coverage
Warranty service is only available from within the country where the Products were originally purchased. You
may be required to ship Products, at your expense, to the authorized service facility for the country where the
Products were purchased. Kodak will repair or replace Products if they fail to function properly during the
warranty period, subject to any conditions and/or limitations stated herein. Warranty service will include all
labor as well as any necessary adjustments and/or replacement parts. If Kodak is unable to repair or replace a
Product, Kodak will, at its option, refund the purchase price paid for the Product provided the Product has
been returned to Kodak along with proof of the purchase price paid. Repair, replacement, or refund of the
purchase price are the sole remedies under the warranty. If replacement parts are used in making repairs,
those parts may be remanufactured, or may contain remanufactured materials. If it is necessary to replace the
entire Product, it may be replaced with a remanufactured Product. Remanufactured Products, parts and
materials are warranted for the remaining warranty term of the original Product, or 90 days after the date of
repair or replacement, whichever is longer.
Limitations
This warranty does not cover circumstances beyond Kodak's control. This warranty does not apply when
failure is due to shipping damage, accident, alteration, modification, unauthorized service, misuse, abuse, use
with incompatible accessories or attachments, failure to follow Kodak's operation, maintenance or repacking
instructions, failure to use items supplied by Kodak (such as adapters and cables), or claims made after the
duration of this warranty. Kodak makes no other express or implied warranty for this product, and disclaims
the implied warranties of merchantability and fitness for a particular purpose. In the event that the exclusion
of any implied warranty is ineffective under the law, the duration of the implied warranty will be one year
from the purchase date or such longer period as required by law. The option of repair, replacement, or refund
is Kodak's only obligation. Kodak will not be responsible for any special, consequential or incidental damages
resulting from the sale, purchase, or use of this product regardless of the cause. Liability for any special,
consequential or incidental damages (including but not limited to loss of revenue or profit, downtime costs,
loss of the use of the equipment, cost of substitute equipment, facilities or services, or claims of your
customers for such damages resulting from the purchase use or failure of the Product), regardless of cause or
for breach of any written or implied warranty is expressly disclaimed.
° F (-32 to 71° C)
15 www.kodak.com/go/support
Page 19

Appendix
Your rights
Some states or jurisdictions do not allow exclusion or limitation of incidental or consequential damages, so
the above limitation or exclusion may not apply to you. Some states or jurisdictions do not allow limitations
on how long an implied warranty lasts, so the above limitation may not apply to you. This warranty gives you
specific rights, and you may have other rights which vary from state to state or by jurisdiction.
Outside the United States and Canada
In countries other than the United States and Canada, the terms and conditions of this warranty may be
different. Unless a specific Kodak warranty is communicated to the purchaser in writing by a Kodak company,
no warranty or liability exists beyond any minimum requirements imposed by law, even though defect,
damage, or loss may be by negligence or other act.
Regulatory compliance and advisory
FCC compliance and advisory
This equipment has been tested and found to comply with the limits for a Class B digital device, pursuant to
Part 15 of the FCC Rules. These limits are designed to provide reasonable protection against harmful
interference in a residential installation.
This equipment generates, uses, and can radiate radio frequency energy and, if not installed or used in
accordance with the instructions, may cause harmful interference to radio communications. However, there is
no guarantee. that interference will not occur in a particular installation.
If this equipment does cause harmful interference to radio or television reception, which can be determined
by turning the equipment off and on, the user is encouraged to try to correct the interference by one or more
of the following measures: 1) reorient or relocate the receiving antenna; 2) increase the separation between
the equipment and the receiver; 3) connect the equipment to an outlet on a circuit different from that to
which the receiver is connected; 4) consult the dealer or an experienced radio/TV technician for additional
suggestions.
Any changes or modifications not expressly approved by the party responsible for compliance could void the
user’s authority to operate the equipment. Where shielded interface cables have been provided with the
product or specified additional components or accessories elsewhere defined to be used with the installation
of the product, they must be used in order to ensure compliance with FCC regulation.
FCC and Industry Canada
This device complies with Industry Canada RSS-210 and FCC Rules. Operation is subject to the following two
conditions: (1) this device may not cause harmful interference, and (2) this device must accept any
interference received, including interference that may cause undesired operation.
www.kodak.com/go/support
16
Page 20
Appendix
Canadian DOC statement
DOC Class B Compliance—This Class B digital apparatus complies with Canadian ICES-003.
Observation des normes-Classe B—Cet appareil numérique de la classe B est conforme à la norme
NMB-003 du Canada.
Notice
When the monitor is operating, it is possible to view images and other content directly from other sources.
Eastman Kodak Company, its subsidiaries and affiliates do not control and are not responsible for any content
displayed or viewed.
17 www.kodak.com/go/support
Page 21

Wall mounting Template
Select a wall location for the camera, then drill 2 holes in that location using a
13/64 in. (5.2 mm) drill bit. Use this template to determine hole placement.
1.2 in. (30 mm)
Top
Appendix
www.kodak.com/go/support
18
 Loading...