

Page 1
Kodak DryView 6800 Laser
Imager
User’s Guide
8F2927
Page 2

Eastman Kodak Company
343 State Street
Rochester, New York, 14650
© Eastman Kodak Company, 2006
Kodak and DryView are trademarks of Eastman Kodak Company.
Page 3

Table of Contents
1 Overview
6800 Laser Imager...........................................................................................................................................1-1
System Components .........................................................................................................................................1-1
How the Laser Imager Works...........................................................................................................................1-3
Film Throughput..............................................................................................................................................1-4
Specifications...................................................................................................................................................1-4
Agency Compliance..........................................................................................................................................1-4
User Guide Conventions ...................................................................................................................................1-4
2 Using and Maintaining the Imager
Operator Control of the Imager........................................................................................................................2-1
Turning Imager Power ON and OFF..................................................................................................................2-1
Power ON...................................................................................................................................................2-2
Normal Power OFF.....................................................................................................................................2-2
Emergency Power OFF ...............................................................................................................................2-2
Power Failures...........................................................................................................................................2-2
Power Save.................................................................................................................................................2-3
Using the Touch Screen....................................................................................................................................2-3
Touch Screen Functions.............................................................................................................................2-3
Touch Screen Help.....................................................................................................................................2-5
General Help........................................................................................................................................2-5
Specific Screen Help ............................................................................................................................2-5
Installation Road Map......................................................................................................................................2-6
Physical Setup............................................................................................................................................2-6
Configuration.............................................................................................................................................2-6
Loading and Removing Film Cartridges ............................................................................................................2-8
Filter Maintenance ...........................................................................................................................................2-9
Cleaning the Air Intake Screen ...................................................................................................................2-9
Changing the PMM...................................................................................................................................2-10
3 Troubleshooting
Overview..........................................................................................................................................................3-1
Error and Alarm Indications ............................................................................................................................3-1
Correcting Errors.......................................................................................................................................3-1
Correcting Film Jams..................................................................................................................................3-1
August 16, 2006 8F2927 i
Page 4

Table of Contents
Touch Screen not Functioning....................................................................................................................3-2
Calling for Support...........................................................................................................................................3-2
4 Adding Modalities and Selecting Image Quality Parameters
Adding a Modality ............................................................................................................................................4-1
Selecting the Image Quality Parameter Values ..................................................................................................4-2
5 Film Technical Information
General Description.........................................................................................................................................5-1
Spectral Sensitivity......................................................................................................................................5-1
Image Quality.............................................................................................................................................5-1
Environmental Impact................................................................................................................................5-2
Storing and Handling Undeveloped Film.....................................................................................................5-2
Handling Developed Film...........................................................................................................................5-3
Archiving Developed Film...........................................................................................................................5-3
Exposing to Moisture .................................................................................................................................5-3
Dissipating Odor........................................................................................................................................5-3
Dissipating Heat.........................................................................................................................................5-4
Recycling Film............................................................................................................................................5-4
Appendix A: Warranty and Limitation of Liability
Important Notice to Purchaser.........................................................................................................................A-1
End User License Agreement (EULA)................................................................................................................A-2
Eastman Kodak Company Health Group Software End User License Agreement..........................................A-2
License.................................................................................................................................................A-2
Limited Warranty..................................................................................................................................A-3
Limitation of Remedies.........................................................................................................................A-3
General................................................................................................................................................A-4
U.S. Government Restricted Rights .......................................................................................................A-4
End-User License Agreement for Microsoft Desktop Operating Systems......................................................A-4
Software Product License.....................................................................................................................A-5
Warranty/Special Provisions for Austria, New Zealand or Papua New Guinea - Express Limited Warranty..
A-10
Warranty/Special Provisions for England Scotland, Wales and Ireland - Limited Warranty..................A-11
Warranty/Special Provisions for Canada - Limited Warranty ...............................................................A-12
GARANTIE ET DISPOSITIONS PARTICULIÈRES POUR LE CANADA GARANTIE LIMITÉE........................A-13
Warranty/Special Provisions for the United States of America and any Other Country - Limited Warranty...
A-15
Glossary
ii 8F2927 August 16, 2006
Page 5
1
Overview
6800 Laser Imager
The Kodak DryView 6800 Laser Imager is a continuous-tone laser imager
with an internal photothermographic film processor. Heat, rather than photo
chemicals, is used to develop the film. The Laser Imager prints images on
Kodak DryView Laser Imaging Film which is packed in 125-sheet cartridges.
You can load three cartridges into the Laser Imager simultaneously.
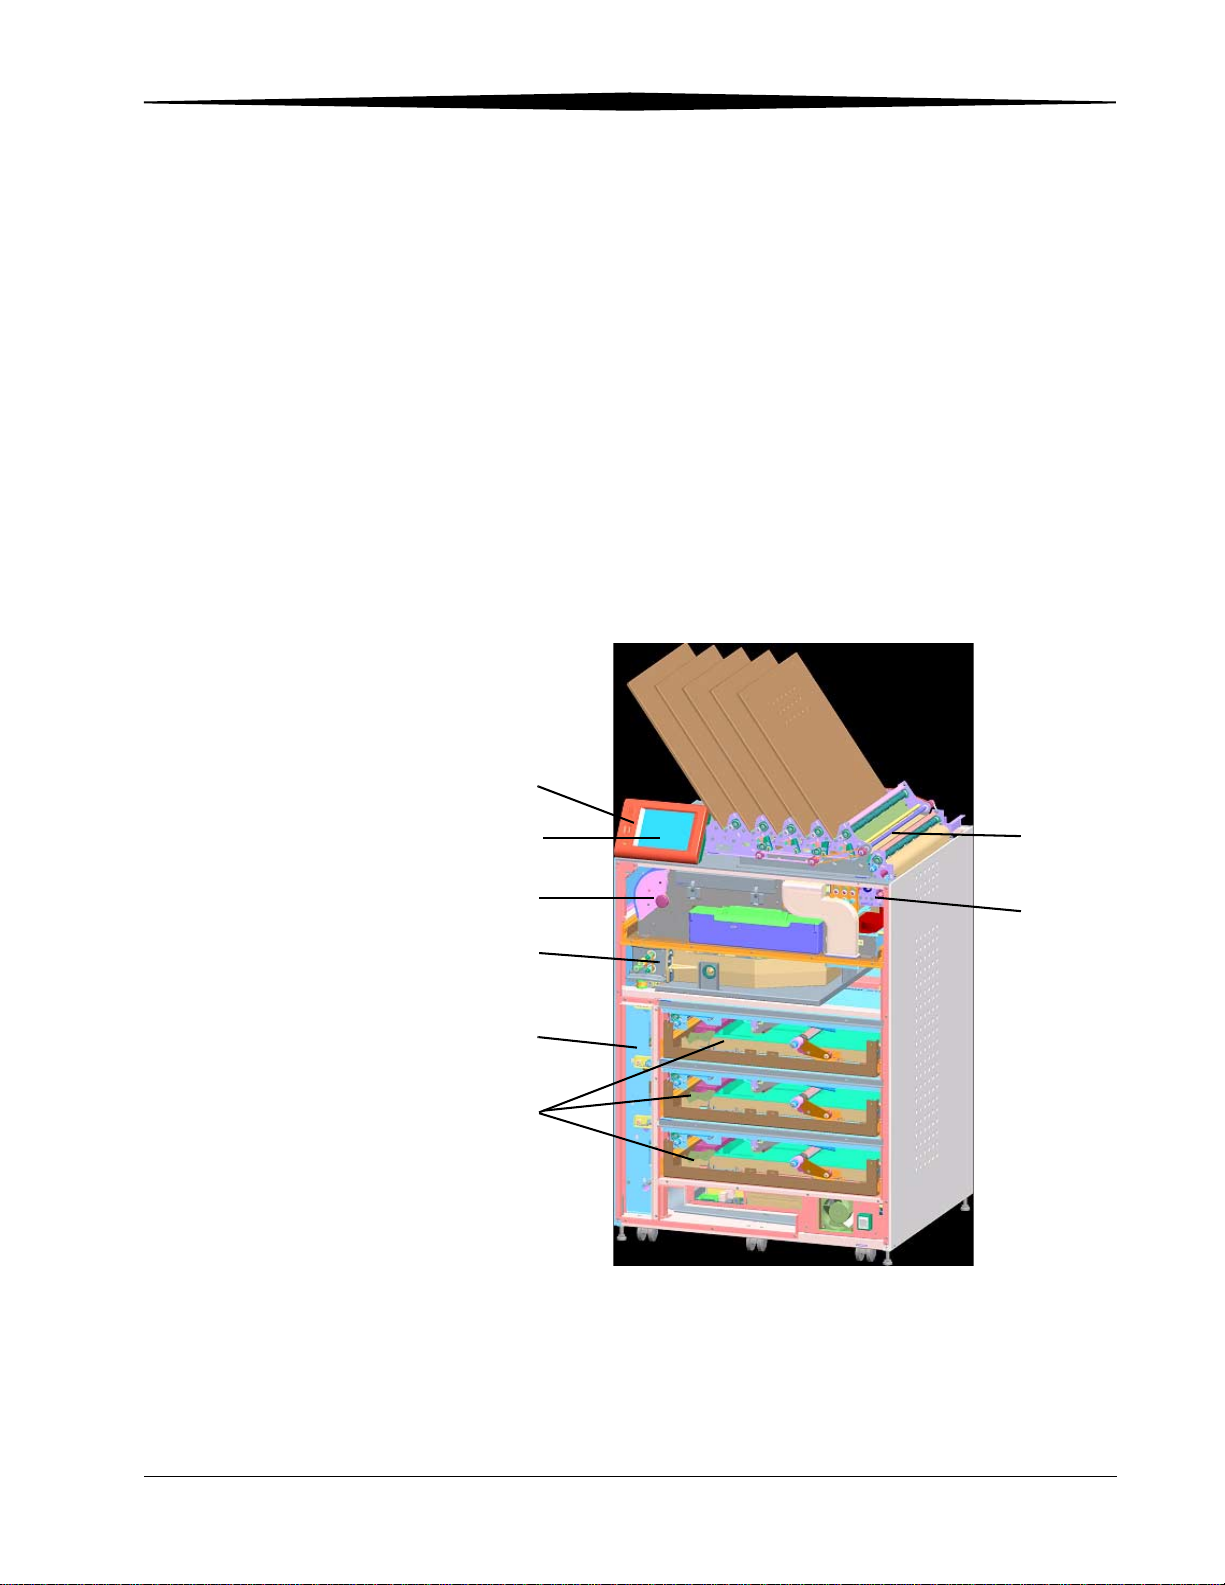
System Components
7
8
4
3
2
1
1. Film drawers
2. Film registration
3. Film imaging
4. Film processor
6
5
5. Densitometer
6. Film sorter
7. Local panel
8. Touch screen
August 16, 2006 8F2927 1-1
Page 6

Overview
1 Film drawers. Your Imager may be configured for one, two, or three
film drawers. Each film drawer can hold any of six different sizes of
DryView Laser Imaging Film. You can select the film cartridge in any
drawer for printing.
2 Film registration. The film registration orients and centers the film
while moving the film from the film drawers to the imaging portion of
the Imager.
3 Film imaging. The optics module scans the image onto the film while
the film is moved through the exposure transport.
4 Film processor. The film processor uses heat to develop the image
exposed onto the film by the laser in the optics module.
5 Densitometer. The densitometer receives the film after it passes
through the processor and performs a density check to confirm image
quality.
6 Film sorter. Your Imager may be configured without a sorter. The
film sorter receives the processed film and transports the film to the
selected film bin on top of the Laser Imager. The first bin holds 125
sheets of film. Each of the other four bins holds 30 sheets of film.
7 Local panel. The local panel contains the power button used to turn
power ON/OFF for the Imager during normal operations. It also
contains the touch screen.
8 Touch screen. The touch screen is your interface to the Laser
Imager. The screen accepts your commands and gives you status
information about Imager functions.
1-2 8F2927 August 16, 2006
Page 7
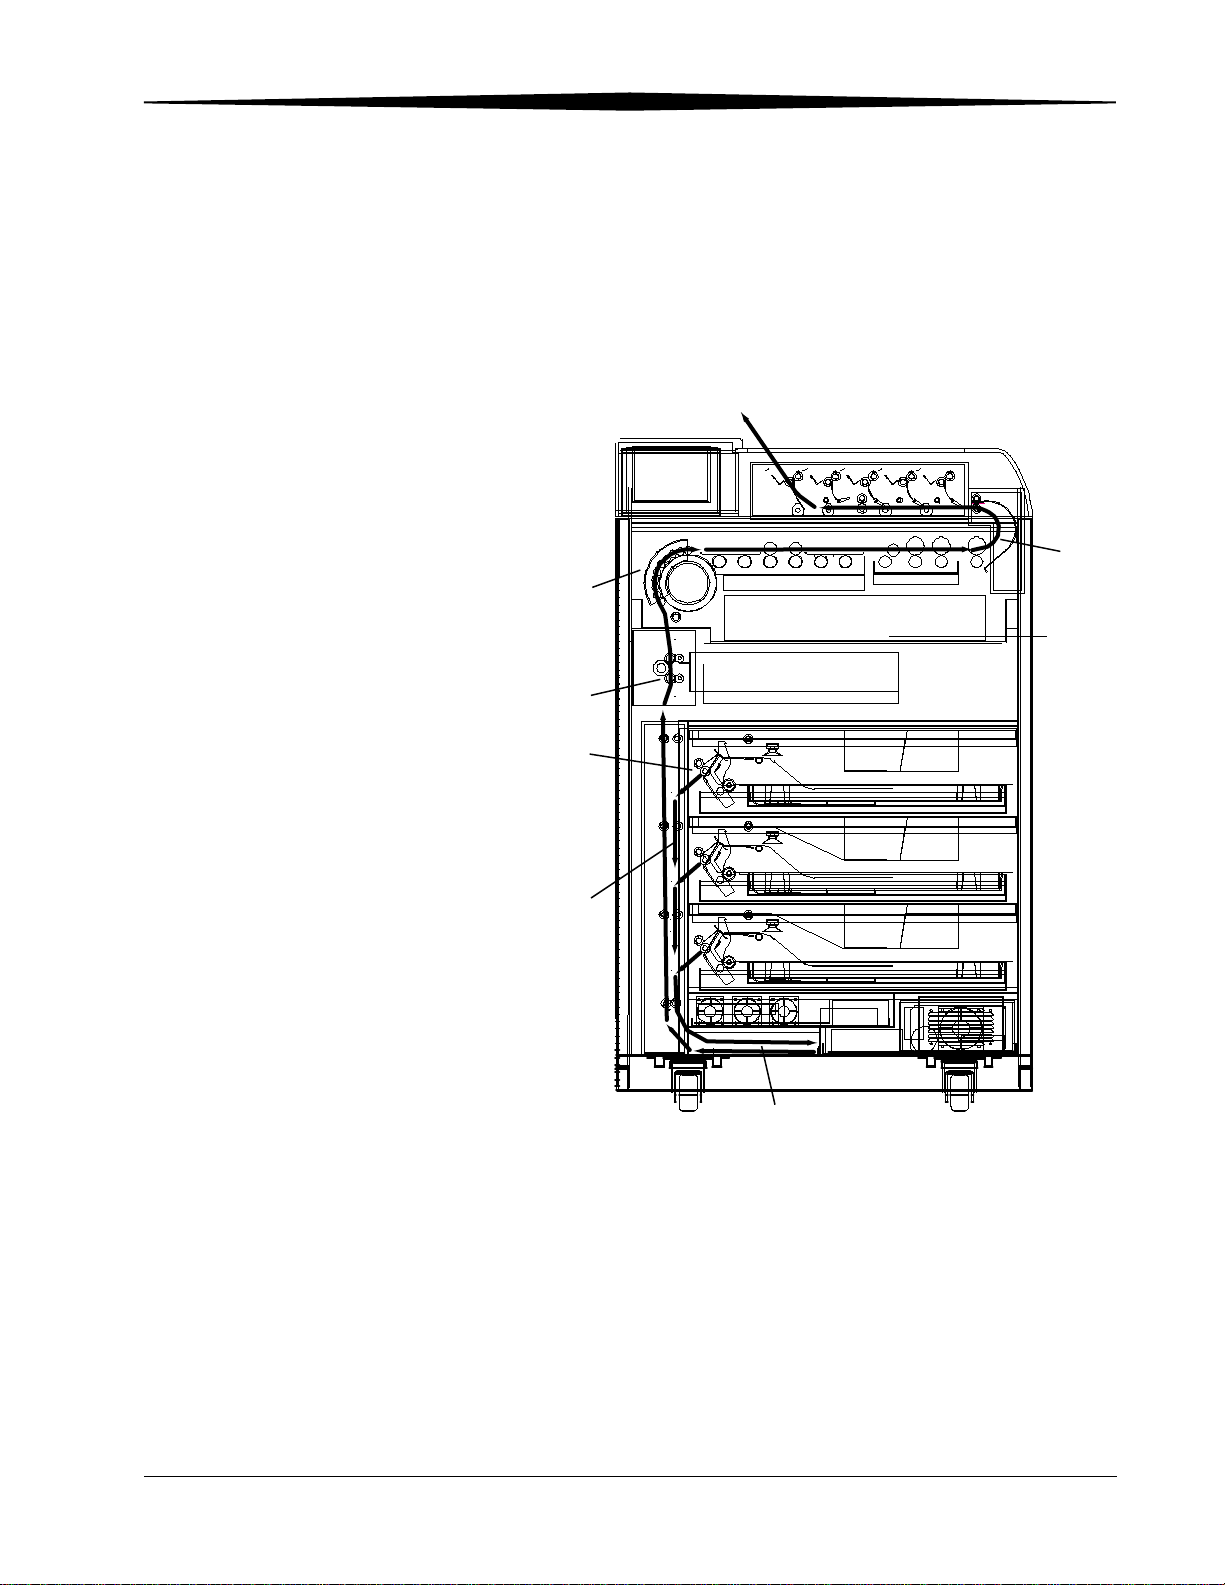
How the Laser Imager Works
When the Laser Imager receives a print request, it determines the requested
film size then selects the appropriate film cartridge.
Each time the Imager receives a print request, the following print sequence
occurs.
5
Overview
6
4
1
2
3
Print Sequence
1. Suction cups in the pickup area lift a single sheet of film out of the supply
cartridge and feed the film into the transport rollers.
2. The transport rollers move the film down into the registration transport
area, where film registration takes place.
August 16, 2006 8F2927 1-3
Page 8

Overview
Film Throughput
Specifications
3. The film registration transport then moves the film into the exposure
transport.
4. As the film moves through the exposure transport, the optics module
scans the image onto the film, then moves the film into the film
processor.
5. As the film passes over the processor drum, the heat generated by the
drum develops the film.
6. The film transport rollers move the exposed film through the
densitometer to the sorter and out to one of the bins.
Prints up to 160 films per hour.
See the Site Readiness for the Kodak DryView 6800 Laser Image, 8F2885.
Agency Compliance
See the Kodak DryView 6800 Laser Imager Safety Manual, 8F2823.
User Guide Conventions
The following special messages emphasize information or indicate potential
risks to personnel or equipment.
NOTE: Notes provide additional information, such as expanded
explanations, hints, or reminders.
IMPORTANT: Important notes highlight critical policy information that
CAUTION:
Cautions point out procedures that you must follow precisely
to avoid damage to the system or any of its components, loss of
data, or corruption of files in software applications.
DANGER: DANGER IDENTIFIES PROCEDURES THAT YOU MUST
affects how you use this guide and this product.
FOLLOW PRECISELY TO AVOID INJURY TO YOURSELF OR
OTHERS.
LASER WARNING:
Laser warnings warn personnel that access to laser radiation is
possible and all personnel must avoid direct exposure to the beam.
1-4 8F2927 August 16, 2006
Page 9

2
Using and Maintaining the Imager
Operator Control of the Imager
During normal operation, the 6800 Laser Imager receives and automatically
prints images sent by modalities over a network. Very little operator control is
required. The main responsibilities of the operator are:
• turning Imager power ON and OFF.
• loading film cartridges.
• taking recommended actions when preventive maintenance (PM) is
indicated on the touch screen.
• monitoring and controlling some Imager functions using the touch
screen.
Turning Imager Power ON and OFF
Power button
Power switch
There is a power switch and a power button on the 6800 Laser Imager. The
switch should only be used the first time the Imager is powered ON or when
an immediate shutdown is required. For normal operations, use the power
button.
August 16, 2006 8F2927 2-1
Page 10

Using and Maintaining the Imager
Power ON If this is the first time the Imager has been powered ON, set the power switch
to the "|" position. Otherwise, press the power button on the local panel. The
Imager performs a power -up self test that takes about 5 minutes. After the self
test, there are some initial boot-up screens before the local panel Main
Screen appears.
After the power-up test, the Imager begins a warm-up period that lasts up to
35 minutes. The warm-up period varies depending on how long the Imager
has been turned OFF. During warm-up, the Imager can receive and store
images, but cannot print films. When the Imager reaches operating
temperature, it starts printing any images accumulated during the warm-up
period.
During warm-up, you can use the touch screen to check the contents of the
film drawers and to open the film drawers to load new film cartridges if
necessary.
Normal Power OFF IMPORTANT: The local panel should be used to turn off power to the
imager, except in an emergency. Using the main power
switch could cause the imager to shutdown incorrectly and
possibly cause some corruption of the operating system.
Turn the Imager OFF if you do not expect to use it for an extended period of
time.
1. On the local panel, press the power button.
2. On the touch screen, touch:
• Power OFF
• OK
The Imager will perform a controlled shutdown.
Emergency Power OFF If an emergency arises that requires the immediate shutdown of the Imager,
press the power switch located at the lower right front of the Imager. The
Imager will be shut down. Films in process will not be completed and will
remain where they are until power is restored.
To restart the Imager turn ON the power switch. After warming up, the Imager
automatically reprints any films that were in process when power was
interrupted.
Power Failures In the event of a power loss, the 6800 Laser Imager shuts down. Films in
process will not be completed and will remain where they are until power is
restored.
To restart the Imager after power is restored, turn OFF the power switch on
the Imager and then turn it ON. After warming up, the Imager automatically
reprints any films that were in process when power was interrupted.
2-2 8F2927 August 16, 2006
Page 11
Using and Maintaining the Imager
Power Save The Imager has a Power Save option, which lets you reduce the power
consumption of the Imager during periods of inactivity. To learn more about
the Power Save option, see the general help information on the touch screen
(see “General Help” on page 2-5).
Using the Touch Screen
Unlock icon
Help button
Film drawer icons
Use the touch screen to monitor Imager operations and to control some
Imager functions.
Touch Screen Functions
How To Touch
Add a modality Utilities>Configuration>Installation Assistant>Configure Modality
Adjust brightness Utilities>User Operations>Display brightness
Adjust volume Utilities>User Operations>Speaker volume
Assign sorter bins Utilities>User Operations>Sorter bin
August 16, 2006 8F2927 2-3
Use the following table to navigate the touch screen. All functions begin at the
Main Screen.
Page 12

Using and Maintaining the Imager
How To Touch
Backup system Utilities>Configuration>Backup
Calibrate film Film drawer icon>Calibrate Film Supply
Calibrate touch screen Utilities>Configuration>Calibrate touch
Change date/time Utilities>Configuration>Date & Time
Change PMM Utilities>User Operations>Change Filter
Change language Utilities>Configuration>Change language
Change passcode Utilities>Service>Change passcode
Change service number Utilities>Service>Service number
Clean electronics filter Utilities>User Operations>Change Filter
Configure Imager Utilities>Configuration>Installation assistant
Configure modality Utilities>Configuration>Configure modality
Configure network Utilities>Configuration>Network
Configure Remote Management Services Utilities>Configuration>Remote management
Disable printing Utilities>Service>Printing enabled
Enable printing Utilities>Service>Printing disabled
Log filter change Utilities>User Operations>Change Filter
or
Utilities>Service>Preventive Maintenance
Log PM done Utilities>Service>Preventive Maintenance
Ping Utilities>Service>Ping
Reset modality Utilities>Configuration>Reset modality
Restore from backup file Utilities>Configuration>Restore
Run mammo test patterns Film drawer icon>Mammo test patterns
Run test patterns Film drawer icon>Test Patterns
Schedule power save Utilities>User Operations>Power save schedules
Start power save Utilities>User Operations>Start power save
Switch the Imager offline Utilities>User Operations>Imager Online
Switch the Imager online Utilities>User Operations>Imager Offline
Unlock doors/drawers Unlock icon>Unlock Film Supply
Unlock processor Unlock icon>Unlock Processor
2-4 8F2927 August 16, 2006
Page 13
Using and Maintaining the Imager
How To Touch
Update MPDB Utilities>Service>Update Modality DB
Update software Utilities>Service>Update software
View DICOM associations Utilities>Service>Diagnostic data
View error history Utilities>View System Info>Error history
View Imager system information Utilities>View System Info>System info
View Imager temperature/RH Utilities>Service>Diagnostic data
View jobs View Jobs
View network information Utilities>View System Info>System info>Network
View print counts Utilities>View System Info>Print counts
View print counts by modality Utilities>View System Info>Modality counts
View prints to filter change due Utilities>View System Info>Print counts
View prints to PM due Utilities>View System Info>Print counts
View software versions Utilities>View System Info>System info>Versions
View tutorials Help button on Main Screen>More help>Tutorials
Touch Screen Help Most screens contain a help button located in the upper right corner of the
screen.
There are two types of help screens on the Laser Imager: general help and
screen specific help.
General Help The general help provides basic information about the Laser Imager and its
functions.
1. On the Main Screen, touch the help button.
2. Select:
• a topic heading
• a specific topic
3. Touch View Topic.
Specific Screen Help This type of help provides information and/or instructions concerning the
screen on which the help button was touched.
August 16, 2006 8F2927 2-5
Page 14

Using and Maintaining the Imager
Installation Road Map
The following sections provide a quick guide to the installation process.
There are two parts to the installation process: physical setup and
configuration.
Physical Setup This process includes:
• uncrating the Imager (see the uncrating instructions affixed to the crate)
• moving the Imager to its location (see Getting Started with the Kodak
DryView 6800 Laser Imager, 8F2901)
• installing film trays (see Getting Started with the Kodak DryView 6800
Laser Imager, 8F2901)
• connecting to the network (see Getting Started with the Kodak DryView
6800 Laser Imager, 8F2901)
• turning on power to the Imager (see Getting Started with the Kodak
DryView 6800 Laser Imager, 8F2901)
Configuration "Configuration" is the process of setting parameter values in the Laser Imager
to customize it to produce quality prints from images sent from the modalities
at this site.
Configure the Imager using the touch screen. From the Main Screen, touch
Utilities>Configuration>Installation Assistant.
You can exit the Installation Assistant any time and return to it later.
The following list outlines the basic configuration process.
• Select your language
• Select a service phone number
• Set up the date and time
– Select your time zone
– Select the current date and date format
– Enter the current time and select for daylight savings
– Review date/time information
2-6 8F2927 August 16, 2006
Page 15

Using and Maintaining the Imager
• Set up film
– Unlock film drawers
– Load film
– Calibrate film
• Configure the network
– Enter the network name
– Enter the Imager IP address
– Enter the subnet mask
– Enter the gateway address
– Review the network information
• Configure the Kodak Remote Management Services
• Edit modality information/parameters
• Save/backup configuration information
• Exit the Installation Assistant
August 16, 2006 8F2927 2-7
Page 16

Using and Maintaining the Imager
Loading and Removing Film Cartridges
The Film Drawer icon on the touch screen displays the number of sheets left
in a film cartridge. When a film cartridge is empty, the appropriate film
drawer icon flashes, and a large zero appears in the drawer icon.
CAUTION:
To avoid injury, do not leave the Laser Imager unattended
when the film drawers are open.
To load or unload a film cartridge:
1. On the touch screen, touch:
a. the Unlock icon
b. Unlock Film Supply
c. OK
2. Pull the drawer out to its furthest extension.
3. To remove a film cartridge, hold the edges of the cartridge and lift the
cartridge out of the drawer.
4. To load a new or different cartridge, insert the cartridge into the film
drawer with the DryView label up and the perforations to the left.
5. Close the drawer.
2-8 8F2927 August 16, 2006
Page 17

Filter Maintenance
There are two filters in the Laser Imager that must be attended to during the
preventive maintenance process.
Using and Maintaining the Imager
Cleaning the Air Intake Screen
The air intake screen should be cleaned every 20,000 print cycles.
1. On the touch screen, touch:
• the Unlock icon
• Unlock Film Supply
• OK
Air intake door
Screen
2. Open the air intake door.
3. Vacuum the screen.
4. Close the air intake door.
August 16, 2006 8F2927 2-9
Page 18

Using and Maintaining the Imager
Changing the PMM The Preventive Maintenance Module (PMM) must be changed every 20,000
film cycles.
1. On the touch screen, touch:
•the Unlock icon
• Unlock Film Supply
• OK
PMM
Main door
Clips
2. Open the main door.
3. INFORMATION NOT YET AVAILABLE.
4. Remove the PMM.
5. Install the new PMM.
6. Close the main door.
7. Log the change in the Imager. On the touch screen, touch:
• Utilities
• Change filter
• Log Filter Change
• Yes
• OK
8. Touch:
• Close to return to the Utilities screen, or
• Main to return to the Main Screen.
2-10 8F2927 August 16, 2006
Page 19

3
Troubleshooting
Overview
Occasionally, error conditions, such as film jams, may occur in the 6800
Laser Imager. You can easily correct minor problems. If more serious
conditions occur, contact a trained Authorized Service Provider of Kodak
Products (see “Calling for Support” on page 3-2).
Error and Alarm Indications
The 6800 Laser Imager can detect errors and other conditions that require
operator action. These errors or abnormal conditions are reported on the
touch screen. Error indications can also be found on the following:
• Error History screen - lists the last 5 errors that have occurred in the
Imager. From the Main Screen, touch:
Utilities>View System Info>Error history
• Troubleshooting screen - lets you view all errors by error number or to
view all jams that have occurred in the Imager. From the Main Screen
touch the Help button, then select the Troubleshooting tab.
For more information on troubleshooting see, “Correcting Errors” on
page 3-1 and “Correcting Film Jams” on page 3-1.
Correcting Errors Do the following from the Troubleshooting screen on the local panel.
1. Select View errors by number.
2. Touch OK.
3. Select the error.
4. Touch View.
5. Follow the directions in the Error Correction box.
NOTE: If available, touch the Show Me button to view a video of the
corrective action.
Correcting Film Jams Do the following from the Troubleshooting screen on the local panel.
1. Select Film jam list.
2. Touch OK.
3. Select the error.
August 16, 2006 8F2927 3-1
Page 20

Troubleshooting
4. Touch View.
5. Follow the directions in the Error Correction box.
NOTE: If available, touch the Show Me button to view a video of the
corrective action.
Touch Screen not Functioning
If the touch screen is non-responsive, use the power switch on the lower right
front of the Imager to turn power OFF, then ON. If the touch screen is still
non-responsive, turn the Imager OFF and contact your service provider.
Calling for Support
If you cannot correct a condition and need help, call for support. Before you
call, have the following information ready:
• Model Number: 6800
• K-Number: Displayed on the System Information screen
• Error code and error message if they are displayed on the touch screen
Service Phone Numbers
Country Phone Number
Argentina 54-3327-458-195
54-3327-458-163
Australia 1 800 034 487
Austria 43.800291332
Azerbaijan 00 99412 410856
Belgium 32.27194116
Bolivia 54-3327-458-195
54-3327-458-163
Brazil 0800 15003
Canada 1-800-268-1567
Peoples Republic of China 800 820 5800
Cyprus 00 352 497777
Czech Republic 420 236 100 307
420 62 335 426
Denmark 45 70206129
Finland 35.88001214
France 01 4001 4705
Germany 49.180.3000.307
3-2 8F2927 August 16, 2006
Page 21

Troubleshooting
Service Phone Numbers
Country Phone Number
India 1600 118989
Iran 00 98 216 950821
00 98 216 402105
00 98 21 256 9741
00 98 21 256 9097
Ireland 44.01442 845775
Israel 00 972 3 9254040
Italy 39.02.66028000
Japan 0120-45-1881
Jordan 00 962 6 4545845
00 962 6 4543354
Netherlands 31.347.363900
Norway 47.23120682
Pakistan 00 92 21 2638881
Palestinian Territory 00 970 92387421
Paraguay 54-3327-458-195
54-3327-458-163
Portugal 351 21 414 7642
Qatar 00 974 4469 830
00 974 4360 820
Romania 00 40 1210 3854
Saudi Arabia 00 966 2 682 8219
00 966 1 464 5064
Spain 902 19 03 99
Sweden 46200119494
Switzerland 41.0800.804807 (Italian)
41.0800.838587 (French)
41.0800.804805 (German)
Syria 00 963 112128600
Tajikistan 00 90 216 578 2600
Turkey 90 216 572 54 33
Turkmenistan 00 90 216 578 2600
August 16, 2006 8F2927 3-3
Page 22

Troubleshooting
Service Phone Numbers
Country Phone Number
United Arab Emirates 00 971 6 746 6751
00 971 6 746 6285
United Kingdom 00 44870 6000245
The Republic of Ireland 00353 16772799
United States 800-328-2910
3-4 8F2927 August 16, 2006
Page 23

4
Adding Modalities and
Selecting Image Quality
Parameters
Adding a Modality
After the Imager has been placed into service, you can later configure it to
print images from additional modalities. The Imager can receive images from
12 DICOM-compatible modalities concurrently.
Adding a modality involves adjusting some of the image quality settings in the
Imager to match the new modality.
Before you begin, make sure that the new modality has been set up to print to
the Imager. The Imager must be available as a print destination in the
modality print command.
You will need the following information about the modality:
• manufacturer
• type (CT, MR, etc.)
• model designation
• type and size of film to be used
• whether the modality is GSDF-compliant
• if GSDF-compliant, does the modality use PLUTs for all images it sends or
only for some images
You should also decide on a screen name for the modality. This name will be
used only on the Imager touch screen to identify the modality.
The following procedure explains how to add one new modality.
IMPORTANT: You must have the service passcode to perform this
procedure.
1. Send a print request from the modality to the Imager.
2. From the Main Screen, select:
Utilities>Configuration>Installation Assistant>Install Modality
3. Touch OK.
4. Follow the on-screen prompts to install and configure the modality.
August 16, 2006 8F2927 4-1
Page 24

Adding Modalities and Selecting Image Quality Parameters
Selecting the Image Quality Parameter Values
The parameter selections are based on modality type. They also depend on
whether the modality is Grayscale Standard Display Function (GSDF)
compliant.
IMPORTANT: If the modality is GSDF-compliant and uses Presentation
Look-Up Tables (PLUT s) for all images, it is not necessary to
change the image quality parameters in the Imager.
To select the parameters:
1. From the Main Screen, select:
Utilities>Configuration>Configure Modality
2. Select the modality.
3. Touch Select.
4. Select the Contrast tab.
5. Touch:
•the Help button.
• the button for the modality being edited.
IMPORTANT: Make sure you select values based on whether the modality
is GSDF-compliant or non GSDF-compliant.
6. Write down the values for:
• TFT Set
• Image Density
• Contrast Table
• Smoothing
7. Close the Help screens.
8. On the Contrast tab screen, select the values for Contrast Table and
TFT Set.
9. Select the Image tab.
10. Select the values for Image Density and Smoothing.
11. For Border Density on the film, choose a low density for a clear border
and a high density for a black border . Typically this density is matched to
the Image Density.
12. For Polarity of the film, choose either Positive or Negative. Positive is
used for most applications. Negative is used by Nuclear Medicine
modalities.
NOTE: Some DICOM GSDF-modalities may direct the use of DICOM
Presentation Look-Up Tables (PLUTs) for some or all images. If the
PLUT capability in the 6800 Imager is enabled, a PLUT sent from the
4-2 8F2927 August 16, 2006
Page 25

Adding Modalities and Selecting Image Quality Parameters
modality overrides the GSDF0 TF T set (used for GSDF modalities) and
associated parameter settings. The DICOM PLUT capability in the
Imager is normally enabled but can be disabled by your Service
Provider.
August 16, 2006 8F2927 4-3
Page 26

Page 27

5
Film Technical Information
General Description
This section describes the characteristics of Kodak DryView Laser Imaging
Film, not the operation of the 6800 Laser Imager. DryView Laser Imaging
Film is a high-resolution, infrared-sensitive, photothermographic film
designed specifically for the family of DryView Laser Imagers. DryView Laser
Imaging Film is packaged in daylight-load packages and is available in blue or
clear, 7-mil polyester base.
Spectral Sensitivity DryView Laser Imaging Film is infrared sensitive and has been sensitized to
the infrared laser diode of DryView Laser Imagers. When handled according
to instructions on the daylight-load film package, safelights are not needed. If
you remove undeveloped film from the daylight-load package, you will need a
darkroom setting and a green safelight.
3.5
3
2.5
2
1.5
1
0.5
0
0 0.5 1 1.5 2 2.5 3
Relative Log Exposure (Example)
Image Quality DryView Laser Imaging Film delivers diagnostic-quality, continuous-tone
images along with sharp alphanumerics and optimum contrast. This
high-quality, silver-based film provides radiologists with the same diagnostic
information they are accustomed to viewing - including the spatial resolution,
contrast, and grey levels. Because it is a totally dry imaging process, there is
no image quality variability due to “wet” chemistry.
August 16, 2006 8F927 5-1
Page 28

Film Technical Information
Environmental Impact Tests show that DryView Laser Imaging Film is not considered hazardous to
the environment. As a result, you can develop, recycle, and dispose of film
with less impact on the environment than if you were using wet-developed
silver halide films.
DryView Laser Imaging Film
US Environmental Regulations Comparison
Wet Silver Halide DryView Film
Developer Fixer Wash Film Film
Product Regulations
OSHA MSDS Required Required Not required Not required Provided
DOT Hazardous Hazardous No limits No limits No limits
Use permits Local Local None None None
Disposal* Regulations
EPA Hazardous Hazardous No No No
DOT Hazardous Hazardous No No No
Note: There is no SUPERFUND liability with DryView Laser Imaging Film.
* State and local laws vary. Consult appropriate regulations or authorities prior to disposal.
Storing and Handling Undeveloped Film
To achieve consistent results up to the expiration date indicated on the film
package, DryView Laser Imaging Film must be stored in a cool, dry place
(41° to 77°F / 5° to 25°C) and protected from radiation and chemistry
fumes.
The film can withstand short-term temperature spikes (up to 95°F/35°C) for
several hours during transit without any significant effect on film quality or
performance. Transit temperatures above 95°F/35°C will gradually diminish
shelf life.
5-2 8F927 August 16, 2006
Page 29

Film Technical Information
Handling Developed Film
Handling DryView Laser Imaging Film requires reasonable care. Spills,
humidity, and other moisture typically have no significant effect on developed
films. However, prolonged exposure to intense light or excessive heat
(130°F/54.4°C) for more than 3 hours may cause some gradual darkening of
images. Leaving films in vehicles in hot climates for extended periods of time
is not recommended.
For best results, store film in sleeves when not being reviewed. DryView Laser
Imaging Film can be left on a light box for more than 24 hours; in extreme
cases in which light boxes are exceptionally hot (120° F/49°C), Kodak
recommends removing them prior to 8 hours of continuous exposure.
Take care when using spotlight viewing for more than 30 seconds because
temperatures near the light source may exceed 180° F/82.2°C. Use in slide
projectors is not recommended due to the high temperatures generally found
in these devices.
With DryView technology, a small amount of final development occurs when
the film exits the laser imager and is initially exposed to ambient or view-box
lighting. This is virtually undetectable and has no effect on image quality (i.e.,
typically 0.02 change in density). This small density increase is uniform and
permanent upon full exposure of the film under normal handling conditions
(i.e., room light or view box).
Archiving Developed Film
DryView Laser Imaging Film has been tested and can be archived for more
than 100 years when stored at American National Standards Institute (ANSI)
recommended storage conditions (77°F/25°C). Developed films may be
stored at higher temperatures; however, that may reduce the number of years
the film can be stored. For example, storing films at a constant elevated
temperature of 90°F/32.2°C may reduce archive capability to 30 years.
Exposing to Moisture DryView Laser Imaging Films typically withstand humidity, spills and other
forms of water without any significant effect on image quality or film integrity.
If needed, film can be cleaned with a clean, damp cloth.
Dissipating Odor DryView technology eliminates virtually all unpleasant odors. While some
low-level odors are produced during the development process, they pose no
known adverse health risks. Processing odor levels are further reduced by a
non-hazardous, recyclable filter in the laser imager. This filter traps most
low-level odors and prevents them from dissipating into the work
environment. To help maintain optimum performance, the filter requires
periodic replacement. DryView Laser Imagers require no special venting.
August 16, 2006 8F927 5-3
Page 30

Film Technical Information
Dissipating Heat DryView Laser Imagers use controlled heat to develop DryView Laser
Imaging Film. The heat has virtually no effect on the air temperature of the
work area. The amount of heat dissipated into an area during a day is typically
less than the heat generated by four 100-watt light bulbs.
Recycling Film According to the Environmental Protection Agency (EP A ) standards, DryView
Laser Imaging Film is not considered hazardous and requires no special
disposal procedures. However, the film does contain silver and polyester that
may be recovered by using one of several recycling processes.
Call your local Kodak sales representative or go to the Kodak Web site and
refer to Publication J700 and see the End-of-Life-Management section.
1. Launch Microsoft Internet Explorer.
2. In the Address field, type: www.kodak.com/go/KES
3. On the left side under Product Safety, Recycling & Disposal, click
Film.
4. Under Film, click Medical/Dental.
5. Under Medical/Dental Film Disposal, click Dryview Film.
6. When the PDF file is displayed, scroll to the heading
End-of-Life-Management for DryView Film.
5-4 8F927 August 16, 2006
Page 31

Appendix A: Warranty and
Limitation of
Liability
Important Notice to Purchaser
Kodak warrants that Kodak hardware products will be free from defects in
parts, materials and manufacture. For defects occurring during the warranty
period and about which Kodak has received notice during the warranty
period, Kodak will provide Customer with free replacement parts and labor to
replace warranty-covered items.
THIS WARRANTY IS MADE IN LIEU OF ALL OTHER PRODUCT
WARRANTIES, EXPRESS AND IMPLIED, INCLUDING THE IMPLIED
WARRANTIES OF MERCHANTABILITY AND FITNESS FOR A
PARTICULAR PURPOSE AND THOSE ARISING FROM A COURSE OF
DEALING OR USAGE OF TRADE. The express warranty does not apply to
the following: expendable parts; defects or damage due to neglect, misuse,
operator error, improper installation or alteration of Kodak hardware
products or operation of Kodak hardware products out of specification.
EXCEPT FOR THE EXCLUSIVE REMEDY STATED ABOVE, KODAK IS
NOT LIABLE FOR ANY DIRECT, INDIRECT, INCIDENTAL OR
CONSEQUENTIAL DAMAGES, HOWEVER OCCURRING AND
REGARDLESS OF THE LEGAL THEORY ASSERTED, INCLUDING
NEGLIGENCE AND STRICT LIABILITY. Kodak shall in no event be
liable for any of the following:
• Performance or non-performance of any network utilized by the
Customer.
• Performance or non-performance of any third party equipment or
software.
• Impact of any Kodak product upon a network or third party equipment
or software.
• Malicious software infections caused by others.
Virus Policy: In accordance with the Health Group Digital Solutions Virus
Policy, document 3E4111, Kodak’s time to install patches and other changes
to our products, toward cure of vulnerabilities to and effects of malicious
software attacks, and additional professional services to assist customers to
eliminate attack consequences and/or harden their information technology
August 16, 2006 8F2927 A-1
Page 32

Warranty and Limitation of Liability
infrastructure against future attacks, is billable unless a clear and specific
contractual agreement states otherwise.
End User License Agreement (EULA)
Eastman Kodak
Company Health
Group Software End
User License
Read the following terms and conditions carefully before using this Software.
Use of this Software indicates your acceptance of these terms and conditions.
If you do not agree with them, you should promptly return the package in its
entirety for a full refund.
Agreement
License Grant of License. Subject to payment of any fees set forth in any related
Quotation or Invoice, Eastman Kodak Company ("Kodak") grants to Customer
a nonexclusive license to use one copy of the software on the equipment (the
"Software"). Kodak represents that it has title to or has the right to license the
Software. Customer agrees to use the Software only in conjunction with the
normal operation of the equipment, but not to use any of the diagnostic
software included with the Software to perform maintenance service or for
any other purpose without entering into a separate license agreement with
Kodak. Customer may not transfer the Software, or any of their rights in the
Software, to any other party without the prior written consent of Kodak. The
term Software as used in this Agreement does not include, and this license
does not apply to, any Microsoft Operating System software provided with the
equipment. Any Microsoft Operating System software provided with the
equipment is governed by a separate software end user license agreement.
Improved or Modified Versions. This license also applies to any improved or
modified versions of the Software supplied to the Customer by Kodak during
the term of this Agreement.
Copying and Nondisclosure. Nothing in this Agreement will be deemed to
grant the Customer any proprietary rights in the computer program or any
other work embodied in the Software. Customer may not copy or alter, and
must take reasonable care to ensure that others do not copy or alter, the
Software, in whole or in part, in any media for any purpose, except that
Customer may make a copy as an essential step in the use of the Software with
their CPU. To every copy (whether in whole or in part) made by the Customer
for the purposes stated above, the Customer must affix the same copyright or
other proprietary rights notice as was originally affixed to the Software when
delivered by Kodak. Customer may not otherwise reverse engineer,
decompile, or otherwise derive the source code for the Software program.
Copyright. The Software is owned by Kodak or its suppliers and protected by
copyright laws and international treaties. You may not copy the Software other
than as expressly provided in this license. You may not reverse engineer,
decompile, or disassemble the Software. If this Software is used within a
A-2 8F2927 August 16, 2006
Page 33

Warranty and Limitation of Liability
country of the European Union, nothing in this Agreement shall be construed
as restricting any rights available under the European Community Software
Directive (91/250/EEC).
Term and Termination. This Software license will remain in effect for as long
as the Customer rightfully retains possession of the Software as delivered by
Kodak. However, this license will terminate immediately (i) if the Customer
transfers or modifies the Software except as provided under this Agreement,
(ii) upon an uncured default by the Customer of this Agreement, or (iii) if the
Customer becomes insolvent, makes an arrangement for the benefit of
creditors, or becomes subject to bankruptcy proceedings. Within thirty (30)
days after any expiration or termination of this license, in whole or in part, the
Customer agrees to deliver to Kodak all copies of the Software or media
(whether in whole or in part) in the Customer's possession, or as to any copy
not in the Customer's possession, Customer agrees to certify in writing that the
copy is either lost or has been destroyed.
Software Upgrades. Enhancements and/or upgrades will be made available to
the Customer at a price not greater than the said item's list price and may or
may not be discounted according to Kodak's pricing structure at the time of
purchase.
Limited Warranty For a period of one year from and after installation of Software, Kodak
warrants that the Software will substantially conform to Kodak's specifications
and that the media on which the software is furnished will be free from defects
in materials and workmanship under normal use. Kodak's sole obligation
under this warranty will be limited to using reasonable efforts to ensure such
conformity and to supply Customer with a corrected version of the Software as
soon as practical after Customer has notified Kodak of any non-conformity.
Kodak does not warrant that: (i) operation of any of the Software will be
uninterrupted or error free, or (ii) functions contained in the Software will
operate in the combinations which may be selected for use by, or meet
Customer's requirements. This warranty will be void if the Software is
modified without the written consent of Kodak.
Subject to any applicable legislation which prohibits the following exclusions,
KODAK MAKES NO OTHER WARRANTIES OF ANY KIND, EITHER EXPRESS OR
IMPLIED, INCLUDING THE IMPLIED WARRANTIES OF MERCHANT ABILITY
AND FITNESS FOR A PARTICULAR PURPOSE. Some states and countries,
including Australia, do not allow the exclusion of implied warranties, or have
legislation that imposes certain statutory warranties that cannot be excluded,
so the above exclusion may not apply to you. This warranty gives you specific
legal rights and you may also have other rights.
Limitation of Remedies The remedies set forth above are Kodak's only obligation under the warranty.
IN NO EVENT WILL KODAK OR ITS SUPPLIERS OR DEALERS BE LIABLE TO
YOU FOR ANY INCIDENTAL OR CONSEQUENTIAL DAMAGES, INCLUDING ANY
August 16, 2006 8F2927 A-3
Page 34

Warranty and Limitation of Liability
LOST REVENUES OR PROFITS, DOWNTIME COSTS, COST OF SUBSTITUTE
EQUIPMENT OR SOFTWARE OR OTHER DAMAGES ARISING OUT OF THE USE
OR INABILITY TO USE THE SOFTWARE EVEN IF ADVISED OF THE
POSSIBILITY OF SUCH DAMAGES. Some states and countries, including
Australia, do not allow the limitation or exclusion of liability for incidental or
consequential damages, or have legislation which restricts the limitation or
exclusion of liability, so the above limitation may not apply to you.
General If the Software was purchased in the United States, this Agreement is governed
by the laws of the State of New York. If purchased outside the United States,
this Agreement is governed by the laws of the country in which it was
purchased.
U.S. Government Restricted Rights
End-User License Agreement for Microsoft Desktop Operating Systems
The SOFTWARE and documentation are provided with RESTRICTED RIGHTS.
Use, duplication, or disclosure by the Government is subject to restrictions as
set forth in subdivision (c)(1)(ii) of The Rights in Technical Data and
Computer Software clause DFAR 252.227-7013 or such other applicable
government or agency regulation providing equivalent protection. Contractor
/ manufacturer is Eastman Kodak Company, 343 State Street, Rochester, New
York, 14650.
IMPORTANT-READ CAREFULLY: THIS END-USER LICENSE AGREEMENT
("EULA") IS A LEGAL AGREEMENT BETWEEN YOU (EITHER AN INDIVIDUAL
OR A SINGLE ENTITY) AND THE MANUFACTURER ("MANUFACTURER") OF
THE COMPUTER SYSTEM OR COMPUTER SYSTEM COMPONENT
("HARDWA RE") WITH WHICH YOU ACQUIRED THE MICROSOFT SOFTWARE
PRODUCT(S) IDENTIFIED ABOVE ("SOF TWARE PRODUCT" OR "SOFTWARE").
IF THE SOFTWARE PRODUCT IS NOT ACCOMPANIED BY NEW HARDWARE,
YOU MAY NOT USE OR COPY THE SOFTWARE PRODUCT. THE SOFTWARE
PRODUCT INCLUDES COMPUTER SOFTWARE, THE ASSOCIATED MEDIA, ANY
PRINTED MATERIALS, AND ANY "ONLINE" OR ELECTRONIC
DOCUMENTATION. THIS EULA IS VALID AND GRANTS THE END-USER
LICENSE RIGHTS ONLY IF THE SOFTWARE PRODUCT IS GENUINE AND A
GENUINE CERTIFICATE OF AUTHENTICITY FOR THE PRODUCT SOFTWARE IS
PROVIDED WITH THE SOFTWARE PRODUCT. ANY SOFTWARE PROVIDED
ALONG WITH THE SOFTWARE PRODUCT THAT IS ASSOCIATED WITH A
SEPARATE END-USER LICENSE AGREEMENT IS LICENSED TO YOU UNDER
THE TERMS OF THAT LICENSE AGREEMENT. BY INSTALLING, COPYING,
DOWNLOADING, ACCESSING OR OTHERWISE USING THE SOFTWARE
PRODUCT, YOU AGREE TO BE BOUND BY THE TERMS OF THIS EULA. IF YOU
DO NOT AGREE TO THE TERMS OF THIS EULA, MANUFACTURER AND
MICROSOFT LICENSING, INC. ("MS") ARE UNWILLING TO LICENSE THE
SOFTWARE PRODUCT TO YOU. IN SUCH EVENT, YOU MAY NOT USE OR COPY
THE SOFTWARE PRODUCT, AND YOU SHOULD PROMPTLY CONTACT
A-4 8F2927 August 16, 2006
Page 35

Warranty and Limitation of Liability
MANUFACTURER FOR INSTRUCTIONS ON RETURN OF THE UNUSED
PRODUCT(S) IN ACCORDANCE WITH MANUFACTURER'S RETURN POLICIES.
Software Product License The SOFTWARE PRODUCT is protected by copyright laws and international
copyright treaties, as well as other intellectual property laws and treaties. The
SOFTWARE PRODUCT is licensed, not sold. The term "COMPUTER" as used
herein shall mean the HARDWARE, if the HARDWARE is a single computer
system, or shall mean the computer system with which the HARDWARE
operates, if the HARDWARE is a computer system component.
1. GRANT OF LICENSE. This EULA grants you the following rights:
– Software Installation and Use. You may only install, use, access,
display and run one (1) copy of the SOFTWARE PRODUCT on the
COMPUTER.
– Storage/Network Use. The SOFTWARE PRODUCT may not be installed,
accessed, displayed, run, shared or used concurrently on or from
different computers, including a workstation, terminal or other digital
electronic device ("Devices"). Notwithstanding the foregoing and
except as otherwise provided below, any number of Devices, may
access or otherwise utilize the file and print services and Internet
information services of the SOFTWARE PRODUCT, if included.
If the SOFTWARE PRODUCT is NT Workstation 4, Windows 95,
Windows 98, or Windows 2000 Operating Systems, you may use the
SOF TWARE PRODUCT on a single COMPUTER as interactive workstation
software, but not as server software. However, you may permit a
maximum of ten (10) Devices to connect to the COMPUTER to access
and use services of the SOFTWARE PRODUCT, such as file and print
services and Internet information services. The ten-connection
maximum includes any indirect connections made through other
software or hardware which pools or aggregates connections.
– Limitation on Software Programs Used on the Device. If the SOFTWARE
PRODUCT is NT Workstation, Windows 95, Windows 98, or Windows
2000 Operating Systems, the combination of software programs you
use on the COMPUTER shall address not more than two (2) general
office automation or consumer computing functions. Such functions
include, but are not limited to: e-mail, word processing, spreadsheets,
database, network browsing, scheduling, and personal finance.
– Back-up Copy. If Manufacturer has not included a back-up copy of the
SOFTWARE PRODUCT with the COMPUTER, you may make a single
back-up copy of the SOFTWARE PRODUCT. You may use the back-up
copy solely for archival purposes.
Back-up Utility. If the SOFTWARE PRODUCT includes a Microsoft
back-up utility , you may use the utility to make the single back-up copy.
After the single back-up copy is made, the backup utility will be
August 16, 2006 8F2927 A-5
Page 36

Warranty and Limitation of Liability
2. DESCRIPTION OF OTHER RIGHTS AND LIMITATIONS:
permanently disabled. Except as expressly provided in this EULA, you
may not otherwise make copies of the SOFTWARE PRODUCT, including
the printed materials accompanying the SOFTWARE.
– Reservation of Rights. Manufacturer, MS and its suppliers (including
Microsoft Corporation) reserve all rights not expressly granted to you
in this EULA.
– Windows 2000 Operating System. If the SOFTWARE PRODUCT is
Windows 2000 Operating System, it may not be used by more than
two (2) processors on the COMPUTER unless a higher number of
processors is indicated on the Certificate of Authenticity that
accompanies the SOFTWARE PRODUCT.
– Multiple Processor Version Selection. The CD or diskette(s) on which
the SOFTWARE PRODUCT resides may contain several copies of the
SOFTWARE PRODUCT, each of which is compatible with a different
microprocessor architecture, such as the x86 architecture or various
RISC architectures ("Processor Version(s)"). Y o u may install and use
only one copy of one Processor Version of the SOFTWA RE PRODUCT
on the COMPUTER.
– Language Version Selection. Manufacturer may have elected to
provide you with a selection of language versions of the SOFTWARE
PRODUCT. In such event, you are licensed to use only one of the
language versions provided. As part of the setup process for the
SOFTWARE PRODUCT you will be given a one-time option to select a
language version. Upon selection, the language version selected by
you will be set up on the COMPUTER, and the language version(s) not
selected by you will be automatically and permanently deleted from
the hard disk of the COMPUTER.
– Operating System Selection. Manufacturer may have elected to
provide you with a selection of Microsoft Operating System software
for the COMPUTER. If the SOFTWARE PRODUCT includes more than
one (1) Microsoft Operating System ("Microsoft OS"), you are
licensed to use only one of the Microsoft OS selections provided. As
part of the setup process for the SOFTWARE you will be given a
one-time option to select one (1) Microsoft OS. Upon selection, the
one Microsoft OS selected by you will be set up on the COMPUTER,
and the other Microsoft OS(s) not selected by you will be
automatically and permanently deleted from the hard disk of the
COMPUTER.
– Additional Software. Any SOFTWARE PRODUCT provided to you by
Manufacturer, MS or Microsoft Corporation which updates or
supplements the original SOFTWARE PRODUCT is governed by this
EULA unless alternative terms are provided with such updates or
A-6 8F2927 August 16, 2006
Page 37

Warranty and Limitation of Liability
supplements.
– Limitations on Reverse Engineering, Decompilation and Disassembly.
You may not reverse engineer, decompile, or disassemble the
SOF TWARE PRODUCT , except and only to the extent that such activity is
expressly permitted by applicable law notwithstanding this limitation.
– Separation of Components. The SOFTWARE PRODUCT is licensed as a
single product. Its component parts may not be separated for use on
more than one computer.
– Single COMPUTER. The SOFTWARE PRODUCT is licensed with the
HARDWARE as a single integrated product. The SOFTWARE PRODUCT
may only be used with the HARDWARE as set forth in this EULA.
– Single EULA. The package for the SOFTWARE PRODUCT may contain
multiple versions of this EULA, such as multiple translations and/or
multiple media versions (e.g., in the user documentation and in the
software). In this case, you are only licensed to use one (1) copy of
the SOFTWARE PRODUCT.
– Rental. You may not rent, lease or lend the SOFTWARE PRODUCT to
another user.
– Software Product Transfer. You may permanently transfer all of your
rights under this EULA only as part of a permanent sale or transfer of
the HARDWARE, provided you retain no copies, you transfer all of the
SOFTWARE PRODUCT (including all component parts, the media and
printed materials, any upgrades, this EULA and, if applicable, the
Certificate(s) of Authenticity), and the recipient agrees to the terms of
this EULA. If the SOFTWARE PRODUCT is an upgrade, any transfer
must also include all prior versions of the SOFTWARE PRODUCT.
– Termination. Without prejudice to any other rights, Manufacturer or
MS may cancel this EULA if you do not abide by the terms and
conditions contained herein. In such event, you must destroy all
copies of the SOFTWARE PRODUCT and all of its component parts.
– Trademarks. This EULA does not grant you any rights in connection
with any trademarks or service marks of Manufacturer, MS or its
suppliers (including Microsoft Corporation).
– Application Sharing. The SOFTWARE PRODUCT may contain Microsoft
NetMeeting, a product that enables applications to be shared between
two or more computers, even if an application is installed on only one
of the computers. You may use this technology with all Microsoft
application products for multi-party conferences. For non-Microsoft
applications, you should consult the accompanying license agreement
or contact the licensor to determine whether application sharing is
permitted by the licensor.
3. UPGRADES. If the SOFTWARE PRODUCT is labeled as an upgrade, you
August 16, 2006 8F2927 A-7
Page 38

Warranty and Limitation of Liability
4. COPYRIGHT. All title and intellectual property rights in and to the
must be properly licensed to use a product identified by Manufacturer,
MS or Microsoft Corporation as being eligible for the upgrade in order
to use the SOFTWARE PRODUCT ("Eligible Product"). For the purpose of
upgrade products only , "HARDWARE" shall mean the computer system or
computer system component with which you received the Eligible
Product. A SOFTWARE PRODUCT labeled as an upgrade replaces and/or
supplements the Eligible Product which came with the HARDWARE. After
upgrading, you may no longer use the SOFTWARE PRODUCT that formed
the basis for your upgrade eligibility . Y ou may use the resulting upgraded
product only in accordance with the terms of this EULA and only with the
HARDWARE. If the SOFT WARE PRODUCT is an upgrade of a component
of a package of software programs that you licensed as a single product,
the SOFTWARE PRODUCT may be used and transferred only as part of
that single product package and may not be separated for use on more
than one computer.
SOFTWARE PRODUCT (including but not limited to any images,
photographs, animations, video, audio, music, text and "applets,"
incorporated into the SOFTWARE PRODUCT), the accompanying printed
materials, and any copies of the SOFTWARE PRODUCT, are owned by MS
or its suppliers (including Microsoft Corporation). You may not copy the
printed materials accompanying the SOFTWARE PRODUCT. All title and
intellectual property rights in and to the content which may be accessed
through use of the SOFTWARE PRODUCT is the property of the respective
content owner and may be protected by applicable copyright or other
intellectual property laws and treaties. This EULA grants you no rights to
use such content. All rights not expressly granted under this EULA are
reserved by MS and its suppliers (including Microsoft Corporation).
5. DUAL-MEDIA SOFTWARE PRODUCT. You may receive the SOFTWARE
PRODUCT in more than one medium. Regardless of the type or size of
medium you receive, you may use only one medium that is appropriate
for the COMPUTER. You may not use or install the other medium on
another computer. You may not loan, rent, lease, lend or otherwise
transfer the other medium to another user, except as part of the
permanent transfer (as provided above) of the SOFTWARE PRODUCT.
6. LEASED HARDWARE. In the event that you receive the HARDWARE under
the terms of a lease from Manufacturer or Manufacturer's third-party
representative, the following additional terms shall apply: (i) you may
not transfer the SOFTWARE PRODUCT to another user as part of the
transfer of the HARDWARE, whether or not the SOFTWARE PRODUCT
transferred with the HARDWARE is otherwise allowed in this EULA; (ii)
your rights with respect to any SOF TWARE PRODUCT upgrades shall be as
determined by the lease you signed for the HARDWARE; and (iii) you
may not use the SOFTWARE PRODUCT after your lease terminates, unless
A-8 8F2927 August 16, 2006
Page 39

Warranty and Limitation of Liability
you purchase the HARDWARE from Manufacturer.
7. PRODUCT SUPPORT . PRODUCT SUPPORT FOR THE SOF TWARE PRODUCT
IS NOT PROVIDED BY MICROSOFT, MICROSOFT CORPORATION, OR
THEIR AFFILIATES OR SUBSIDIARIES. FOR PRODUCT SUPPORT, PLEASE
REFER TO MANUFACTURER'S SUPPORT NUMBER PROVIDED IN THE
DOCUMENTATION FOR THE HARDWARE. SHOULD YOU HAVE ANY
QUESTIONS CONCERNING THIS EULA, OR IF YOU DESIRE TO CONTACT
MANUFACTURER FOR ANY OTHER REASON, PLEASE REFER TO THE
ADDRESS PROVIDED IN THE DOCUMENTATION FOR THE HARDWARE.
8. EXPORT RESTRICTIONS. If this EULA is not labeled and the SOFTWA RE
PRODUCT is not identified as "North America Only Version" above, on the
Product Identification Card, or on the SOF TWARE PRODUCT packaging or
other written materials, then the following terms apply: You agree that
you will not export or re-export the SOFTWARE PRODUCT (or portions
thereof) to any country, person or entity subject to U.S. export
restrictions. You specifically agree not to export or re-export the
SOFTWARE PRODUCT (or portions thereof): (i) to any country subject to
a U.S. embargo or trade restriction; (ii) to any person or entity who you
know or have reason to know will utilize the SOFTWARE PRODUCT (or
portions thereof) in the design, development or production of nuclear,
chemical or biological weapons; or (iii) to any person or entity who has
been denied export privileges by the U.S. government. For additional
information see http://www.microsoft.com/exporting/.
If SOFTWARE PRODUCT is labeled "North America Only Version" above,
on the Product Identification Card, or on the SOFTWARE PRODUCT
packaging or other written materials, then the following applies: The
SOF TWARE PRODUCT contains strong encryption and cannot be exported
outside of the United States (including Puerto Rico, Guam and all other
territories, dependencies and possessions of the United States) or
Canada without a U.S. Commerce Department export license or an
applicable license exception. You agree that you will not directly or
indirectly export or re-export the SOFTWARE PRODUCT (or portions
thereof), other than to Canada, without first obtaining an export license
or determining that a license exception is applicable. For additional
information see http://www.microsoft.com/exporting/.
9. NOTE ON JAVA SUPPORT. THE SOFTWARE PRODUCT MAY CONTAIN
SUPPORT FOR PROGRAMS WRITTEN IN JAVA. JAVA TECHNOLOGY IS NOT
FAULT TOLERANT AND IS NOT DESIGNED, MANUFACTURED, OR
INTENDED FOR USE OR RESALE AS ON-LINE CONTROL EQUIPMENT IN
HAZARDOUS ENVIRONMENTS REQUIRING FAIL-SAFE PERFORMANCE,
SUCH AS IN THE OPERATION OF NUCLEAR FACILITIES, AIRCRAFT
NAVIGATION OR COMMUNICATION SYSTEMS, AIR TRAFFIC CONTROL,
DIRECT LIFE SUPPORT MACHINES, OR WEAPONS SYSTEMS, IN WHICH
THE FAILURE OF JAVA TECHNOLOGY COULD LEAD DIRECTLY TO DEA TH,
August 16, 2006 8F2927 A-9
Page 40

Warranty and Limitation of Liability
FOR THE LIMITED WARRANTIES AND SPECIAL PROVISIONS PERTAINING TO
YOUR PARTICULAR JURISDICTION, PLEASE REFER TO THE WARRANTIES
INCLUDED BELOW OR PROVIDED WITH THE SOFTWARE PRODUCT PRINTED
MATERIALS.
PERSONAL INJURY, OR SEVERE PHYSICAL OR ENVIRONMENTAL
DAMAGE. Sun Microsystems, Inc. has contractually obligated Microsoft
to make this disclaimer.
Warranty/Special Provisions for Austria, New Zealand or Papua New Guinea - Express Limited Warranty
CONSUMER RIGHTS. CONSUMERS MAY HAVE THE BENEFIT OF CERTAIN
RIGHTS OR REMEDIES PURSUANT TO THE TRADE PRACTICES ACT AND
SIMILAR STATE AND TERRITORY LAWS IN AUSTRALIA OR THE CONSUMER
GUARANTEES ACT IN NEW ZEALAND, IN RESPECT OF WHICH CERTAIN
LIABILITY MAY NOT BE EXCLUDED.
LIMITED EXPRESS WARRANTY. Manufacturer warrants that: (a) the
SOFTWARE will perform substantially in accordance with the accompanying
Product Manual(s) for a period of 90 days from the date of receipt; and (b)
any Microsoft hardware accompanying SOFTWARE will be free from defects in
materials and workmanship under normal use and service for a period of 1
year from the date of receipt.
CUSTOMER REMEDIES. To the maximum extent permitted under applicable
law, Manufacturer's and its supplier's entire liability and your exclusive
remedy under the express warranty is, at Manufacturer's option, either (a)
return of the price paid; or (b) repair or replacement of the SOFTWARE or
Microsoft hardware which does not meet the warranty and which is returned
to Manufacturer with a copy of your receipt. The warranty is void if failure of
the SOFTWARE or Microsoft hardware has resulted from accident, abuse or
misapplication. Any replacement SOFTWA RE and/or Microsoft hardware will
be warranted for the remainder of the original warranty period or 30 days,
whichever is longer.
LIMITATION OF LIABILITY. To the maximum extent permitted by applicable
law, any conditions or warranties imposed or implied by law are hereby
excluded. Consumers may nevertheless have the benefit of certain rights or
remedies pursuant to the Trade Practices Act and similar state and territory
laws in Australia or the Consumer Guarantees Act in New Zealand, in respect
of which liability may not be excluded. Insofar as such liability may not be
excluded, then to the maximum extent permitted by law, such liability is
limited, at the exclusive option of Manufacturer, to either (a) replacement of
the SOFTWARE (and any accompanying hardware supplied); or (b)
correction of defects in the SOFTWARE; or (c) payment of the cost of having
defects in the SOFTWARE (and any accompanying hardware supplied).
EXCLUSION OF LIABILITY/DAMAGES. THE FOLLOWING IS WITHOUT
PREJUDICE TO ANY RIGHTS YOU MAY HAVE AT LAW WHICH CANNOT LEGALLY
BE EXCLUDED OR RESTRICTED. YOU ACKNOWLEDGE THAT NO PROMISE,
A-10 8F2927 August 16, 2006
Page 41

Warranty and Limitation of Liability
REPRESENTA TION, WARRANTY OR UNDERTAKING HAS BEEN MADE OR GIVEN
BY MANUFACTURER AND/OR MICROSOFT CORPORATION (OR RELATED
COMPANY OF EITHER) TO ANY PERSON OR COMPANY ON ITS BEHALF IN
RELATION TO THE PROFITABILITY OF OR ANY OTHER CONSEQUENCES OR
BENEFITS TO BE OBTAINED FROM THE DELIVERY OR USE OF THE
SOFTWARE AND ANY ACCOMPANYING MICROSOFT HARDWARE, SOFTWARE,
MANUALS OR WRITTEN MATERIALS. YOU HAVE RELIED UPON YOUR OWN
SKILL AND JUDGEMENT IN DECIDING TO ACQUIRE THE SOFTWARE AND ANY
ACCOMPANYING HARDWARE, MANUALS AND WRITTEN MATERIALS FOR USE
BY YOU. EXCEPT AS AND TO THE EXTENT PROVIDED IN THIS AGREEMENT,
NEITHER MANUFACTURER AND/OR MICROSOFT CORPORATION (OR
RELATED COMPANY OF EITHER) WILL IN ANY CIRCUMSTANCES BE LIABLE
FOR ANY OTHER DAMAGES WHATSOEVER (INCLUDING, WITHOUT
LIMITATION, DAMAGES FOR LOSS OF BUSINESS, BUSINESS INTERRUPTION,
LOSS OF BUSINESS INFORMATION OR OTHER INDIRECT OR CONSEQUENTIAL
LOSS) ARISING OUT OF THE USE OR INABILITY TO USE OR SUPPLY OR
NON-SUPPLY OF THE SOFTWARE AND ANY ACCOMPANYING HARDWARE AND
WRITTEN MATERIALS. MANUFACTURER'S AND/OR MICROSOFT
CORPORATION (OR RELATED COMPANY OF EITHER) TOTAL LIABILITY
UNDER ANY PROVISION OF THIS AGREEMENT IS IN ANY CASE LIMITED TO
THE AMOUNT ACTUALLY PAID BY YOU FOR THE SOFTWARE AND/OR
MICROSOFT HARDWARE.
Warranty/Special Provisions for England Scotland, Wales and Ireland - Limited Warranty
This agreement is governed by the laws of New South Wales, Australia or,
where supplies are made in New Zealand, by the laws of New Zealand.
LIMITED WARRANTY. Manufacturer warrants that (a) the SOFTWARE will
perform substantially in accordance with the accompanying written materials
for a period of ninety (90) days from the date of receipt, and (b) any
Microsoft hardware accompanying the SOF TWARE will be free from defects in
materials and workmanship under normal use and service for a period of one
(1) year from the date of receipt. Any implied warranties on the SOFTWARE
and Microsoft hardware are limited to ninety (90) days and one (1) year,
respectively. Some states/jurisdictions do not allow limitations on duration of
an implied warranty, so the above limitation may not apply to you.
CUSTOMER REMEDIES. Manufacturer's and its suppliers' entire liability and
your exclusive remedy shall be, at Manufacturer's option, either (a) return of
the price paid, or (b) repair or replacement of the SOFTWARE or hardware
that does not meet this Limited Warranty and which is returned to
Manufacturer with a copy of your receipt. This Limited Warranty is void if
failure of the SOFTWARE or hardware has resulted from accident, abuse, or
misapplication. Any replacement SOFTWARE or hardware will be warranted
for the remainder of the original warranty period or thirty (30) days,
whichever is longer.
NO OTHER WARRANTIES. TO THE MAXIMUM EXTENT PERMITTED BY
August 16, 2006 8F2927 A-11
Page 42

Warranty and Limitation of Liability
APPLICABLE LAW, MANUFACTURER AND ITS SUPPLIERS DISCLAIM ALL
OTHER REPRESENTATIONS, WARRANTIES, CONDITIONS OR OTHER TERMS,
EITHER EXPRESS OR IMPLIED, INCLUDING, BUT NOT LIMITED TO IMPLIED
WARRANTIES AND/OR CONDITIONS OF MERCHANTABILITY AND FITNESS
FOR A PARTICULAR PURPOSE, WITH REGARD TO THE SOFTWARE, THE
ACCOMPANYING WRITTEN MATERIALS, AND ANY ACCOMPANYING
HARDWARE. THIS LIMITED WARRANTY GIVES YOU SPECIFIC LEGAL RIGHTS.
YOU MAY HAVE OTHERS WHICH VARY FROM STATE/JURISDICTION TO
STATE/JURISDICTION.
NO LIABILITY FOR CONSEQUENTIAL DAMAGES. TO THE MAXIMUM EXTENT
PERMITTED BY APPLICABLE LAW, IN NO EVENT SHALL MANUFACTURER OR
ITS SUPPLIERS BE LIABLE FOR ANY DAMAGES WHATSOEVER (INCLUDING
WITHOUT LIMITATION, DIRECT OR INDIRECT DAMAGES FOR PERSONAL
INJURY, LOSS OF BUSINESS PROFITS, BUSINESS INTERRUPTION, LOSS OF
BUSINESS INFORMATION, OR ANY OTHER PECUNIARY LOSS) ARISING OUT
OF THE USE OF OR INABILITY TO USE THIS PRODUCT, EVEN IF
MANUFACTURER HAS BEEN ADVISED OF THE POSSIBILITY OF SUCH
DAMAGES. IN ANY CASE, MANUFACTURER'S AND ITS SUPPLIERS' ENTIRE
LIABILITY UNDER ANY PROVISION OF THIS AGREEMENT SHALL BE LIMITED
TO THE AMOUNT ACTUALLY PAID BY YOU FOR THE SOFTWARE AND/OR
MICROSOFT HARDWARE. BECAUSE SOME STATES/JURISDICTIONS DO NOT
ALLOW THE EXCLUSION OR LIMITATION OF LIABILITY FOR CONSEQUENTIAL
OR INCIDENTAL DAMAGES, THE ABOVE LIMITATION MAY NOT APPLY TO
YOU.
Warranty/Special
Provisions for Canada Limited Warranty
SPECIAL PROVISIONS:
Reverse Engineering: If you acquired the SOFTWARE in the European
Community, you may not reverse engineer, decompile, or disassemble the
SOFTWARE except to the extent and for the express purposes authorized by
applicable law.
This Software License Agreement is governed by the laws of England.
LIMITED WARRANTY. Manufacturer warrants that (a) the SOFTWARE will
perform substantially in accordance with the accompanying written materials
for a period of ninety (90) days from the date of receipt, and (b) any
Microsoft hardware accompanying the SOF TWARE will be free from defects in
materials and workmanship under normal use and service for a period of one
(1) year from the date of receipt. Any implied warranties or conditions on the
SOFTWARE and Microsoft hardware are limited to ninety (90) days and one
(1) year, respectively. Some states/jurisdictions do not allow limitations on
duration of an implied warranty, so the above limitation may not apply to you.
CUSTOMER REMEDIES. Manufacturer's and its suppliers' entire liability and
your exclusive remedy shall be, at Manufacturer's option, either (a) return of
the price paid, or (b) repair or replacement of the SOFTWA RE or hardware
A-12 8F2927 August 16, 2006
Page 43

Warranty and Limitation of Liability
that does not meet this Limited Warranty and which is returned to
Manufacturer with a copy of your receipt. This Limited Warranty is void if
failure of the SOFTWARE or hardware has resulted from accident, abuse, or
misapplication. Any replacement SOFTWARE or hardware will be warranted
for the remainder of the original warranty period or thirty (30) days,
whichever is longer.
NO OTHER WARRANTIES. TO THE MAXIMUM EXTENT PERMITTED BY
APPLICABLE LAW, MANUFACTURER AND ITS SUPPLIERS DISCLAIM ALL
OTHER WARRANTIES, EITHER EXPRESS OR IMPLIED, INCLUDING, BUT NOT
LIMITED TO IMPLIED WARRANTIES OF MERCHANT ABILITY AND FITNESS
FOR A PARTICULAR PURPOSE, WITH REGARD TO THE SOFTWARE, THE
ACCOMPANYING WRITTEN MATERIALS, AND ANY ACCOMPANYING
HARDWARE. THIS LIMITED WARRANTY GIVES YOU SPECIFIC LEGAL RIGHTS.
YOU MAY HAVE OTHERS WHICH VARY FROM STATE/JURISDICTION TO
STATE/JURISDICTION.
NO LIABILITY FOR CONSEQUENTIAL DAMAGES. TO THE MAXIMUM EXTENT
PERMITTED BY APPLICABLE LAW, IN NO EVENT SHALL MANUFACTURER OR
ITS SUPPLIERS BE LIABLE FOR ANY DAMAGES WHATSOEVER (INCLUDING
WITHOUT LIMITATION, DIRECT OR INDIRECT DAMAGES FOR PERSONAL
INJURY, LOSS OF BUSINESS PROFITS, BUSINESS INTERRUPTION, LOSS OF
BUSINESS INFORMATION, OR ANY OTHER PECUNIARY LOSS) ARISING OUT
OF THE USE OF OR INABILITY TO USE THIS PRODUCT, EVEN IF
MANUFACTURER HAS BEEN ADVISED OF THE POSSIBILITY OF SUCH
DAMAGES. IN ANY CASE, MANUFACTURER'S AND ITS SUPPLIERS' ENTIRE
LIABILITY UNDER ANY PROVISION OF THIS AGREEMENT SHALL BE LIMITED
TO THE AMOUNT ACTUALLY PAID BY YOU FOR THE SOFTWARE AND/OR
MICROSOFT HARDWARE. BECAUSE SOME STATES/JURISDICTIONS DO NOT
ALLOW THE EXCLUSION OR LIMITATION OF LIABILITY FOR CONSEQUENTIAL
OR INCIDENTAL DAMAGES, THE ABOVE LIMITATION MAY NOT APPLY TO
YOU.
This Software License Agreement is governed by the laws of the Province of
Ontario, Canada. Each of the parties hereto irrevocably attorns to the
jurisdiction of the courts of the Province of Ontario and further agrees to
commence any litigation which may arise hereunder in the courts located in
the Judicial District of York, Province of Ontario.
GARANTIE ET DISPOSITIONS PARTICULIÈRES POUR LE CANADA GARANTIE LIMITÉE
Si vous vous êtes procuré ce produit Microsoft(r) ou ce matériel
Microsoft(r) au CANADA, la garantie suivante s'adresse à vous.
GARANTIE LIMITÉE. Le Fabricant garantit que (a) la performance du
LOGICIEL sera substantiellement en conformité avec les documents écrits qui
l'accompagnent pour une période de quatre-vingt-dix (90) jours à compter
de la date de réception, et que (b) tout matériel de Microsoft fourni avec le
LOGICIEL sera exempt de défaut de matière première ou de vice de
August 16, 2006 8F2927 A-13
Page 44

Warranty and Limitation of Liability
fabrication dans des conditions normales d'utilisation et d'entretien pour une
période d'un (1) an à compter de la date de réception. Toutes garanties ou
conditions implicites concernant le LOGICIEL et le matériel Microsoft sont
limitées à quatre-vingt-dix (90) jours et un (1) an, respectivement.
RECOURS DU CLIENT. La seule obligation du Fabricant et de ses fournisseurs
et votre recours exclusif seront, au choix du Fabricant, soit (a) le
remboursement du prix payé ou (b) la réparation ou le remplacement du
LOGICIEL ou du matériel qui n'est pas conforme à la Garantie limitée et qui
est retourné au Fabricant avec une copie de votre reçu. Cette Garantie limitée
est nulle si la défectuosité du LOGICIEL ou du matériel est causée par un
accident, un traitement abusif ou une mauvaise application. Tout LOGICIEL
ou matériel de remplacement sera garanti pour le reste de la période de
garantie initiale ou pour trente (30) jours, selon laquelle de ces deux
périodes est la plus longue.
EXCLUSION DE TOUTE AUTRE GARANTIE. Selon la portée maximale
autorisée par la loi applicable, le Fabricant et ses fournisseurs renoncent à
toutes autres garanties ou conditions, expresses ou implicites, y compris mais
ne se limitant pas aux garanties implicites de la qualité marchande ou un
usage particulier en ce qui concerne le LOGICIEL, la documentation écrite et
tout matériel qui l'accompagnent. Cette garantie limitée vous accorde des
droits spécifiques reconnus par la loi.
ABSENCE DE RESPONSABILITÉ POUR LES DOMMAGES INDIRECTS. Selon la
portée maximale autorisée par la loi applicable, le Fabricant ou ses
fournisseurs ne pourront être tenus responsables en aucune circonstance de
tous dommages quels qu'ils soient (y compris mais non de façon limitative
les dommages directs ou indirects causés par des lésions corporelles, la
perte de bénéfices commerciaux, l'interruption des affaires, la perte
d'information commerciale ou toute autre perte pécuniaire) découlant de
l'utilisation ou de l'impossibilité d'utilisation de ce produit, et ce même si le
Fabricant a été avisé de l'éventualité de tels dommages. En tout état de cause,
la seule responsabilité du Fabricant et de ses fournisseurs en vertu de toute
disposition de cette Convention se limitera au montant que vous aurez
effectivement payé pour l'achat du LOGICIEL et/ou du matériel Microsoft.
La présente Convention de droits d'utilisation de logiciel est régie par les lois
de la province d'Ontario, Canada. Chacune des parties aux présentes
reconnaît irrévocablement la compétence des tribunaux de la province
d'Ontario et consent à instituer tout litige qui pourrait découler des présentes
auprès des tribunaux situés dans le district judiciaire de York, province
d'Ontario.
A-14 8F2927 August 16, 2006
Page 45

Warranty and Limitation of Liability
Warranty/Special
Provisions for the United
States of America and
any Other Country Limited Warranty
LIMITED WARRANTY. Manufacturer warrants that (a) the SOFTWARE will
perform substantially in accordance with the accompanying written materials
for a period of ninety (90) days from the date of receipt, and (b) any
Microsoft hardware accompanying the SOF TWARE will be free from defects in
materials and workmanship under normal use and service for a period of one
(1) year from the date of receipt. Any implied warranties on the SOFTWARE
and Microsoft hardware are limited to ninety (90) days and one (1) year,
respectively. Some states/jurisdictions do not allow limitations on duration of
an implied warranty, so the above limitation may not apply to you.
CUSTOMER REMEDIES. Manufacturer's and its suppliers' entire liability and
your exclusive remedy shall be, at Manufacturer's option, either (a) return of
the price paid, or (b) repair or replacement of the SOFTWARE or hardware
that does not meet this Limited Warranty and which is returned to
Manufacturer with a copy of your receipt. This Limited Warranty is void if
failure of the SOFTWARE or hardware has resulted from accident, abuse, or
misapplication. Any replacement SOFTWARE or hardware will be warranted
for the remainder of the original warranty period or thirty (30) days,
whichever is longer.
NO OTHER WARRANTIES. TO THE MAXIMUM EXTENT PERMITTED BY
APPLICABLE LAW, MANUFACTURER AND ITS SUPPLIERS DISCLAIM ALL
OTHER WARRANTIES, EITHER EXPRESS OR IMPLIED, INCLUDING, BUT NOT
LIMITED TO IMPLIED WARRANTIES OF MERCHANT ABILITY AND FITNESS
FOR A PARTICULAR PURPOSE, WITH REGARD TO THE SOFTWARE, THE
ACCOMPANYING WRITTEN MATERIALS, AND ANY ACCOMPANYING
HARDWARE. THIS LIMITED WARRANTY GIVES YOU SPECIFIC LEGAL RIGHTS.
YOU MAY HAVE OTHERS WHICH VARY FROM STATE/JURISDICTION TO
STATE/JURISDICTION.
NO LIABILITY FOR CONSEQUENTIAL DAMAGES. TO THE MAXIMUM EXTENT
PERMITTED BY APPLICABLE LAW, IN NO EVENT SHALL MANUFACTURER OR
ITS SUPPLIERS BE LIABLE FOR ANY DAMAGES WHATSOEVER (INCLUDING
WITHOUT LIMITATION, SPECIAL, INCIDENTAL, CONSEQUENTIAL, OR
INDIRECT DAMAGES FOR PERSONAL INJURY, LOSS OF BUSINESS PROFITS,
BUSINESS INTERRUPTION, LOSS OF BUSINESS INFORMATION, OR ANY
OTHER PECUNIARY LOSS) ARISING OUT OF THE USE OF OR INABILITY TO
USE THIS PRODUCT, EVEN IF MANUFACTURER HAS BEEN ADVISED OF THE
POSSIBILITY OF SUCH DAMAGES. IN ANY CASE, MANUFACTURER'S AND ITS
SUPPLIERS' ENTIRE LIABILITY UNDER ANY PROVISION OF THIS AGREEMENT
SHALL BE LIMITED TO THE AMOUNT ACTUALLY PAID BY YOU FOR THE
SOFTWARE AND/OR MICROSOFT HARDWARE. BECAUSE SOME
STATES/JURISDICTIONS DO NOT ALLOW THE EXCLUSION OR LIMITATION OF
LIABILITY FOR CONSEQUENTIAL OR INCIDENTAL DAMAGES, THE ABOVE
LIMITATION MAY NOT APPLY TO YOU.
August 16, 2006 8F2927 A-15
Page 46

Warranty and Limitation of Liability
SPECIAL PROVISIONS
U.S. GOVERNMENT LICENSE RIGHTS. All SOFTWARE provided to the U.S.
Government pursuant to solicitations issued on or after December 1, 1995 is
provided with the commercial license rights and restrictions described in this
EULA. All SOFTWARE provided to the U.S. Government pursuant to
solicitations issued prior to December 1, 1995 is provided with "Restricted
Rights" as provided for in FAR, 48 CFR 52.227-14 (JUNE 1987) or DFAR, 48
CFR 252.227-7013 (OCT 1988), as applicable. Manufacturer is responsible
for ensuring the SOFTWARE is marked with the "Restricted Rights Notice" or
"Restricted Rights Legend," as required. All rights not expressly granted are
reserved.
If you acquired the SOFTWARE in the United States of America, this Software
License Agreement and Warranty are governed by the laws of the State of
Washington, U.S.A. If you acquired the SOFTWARE outside the United States of
America, local law may apply.
A-16 8F2927 August 16, 2006
Page 47

Glossary
CR Computed Radiography, the process of creating digital radiographic images.
CT Computed Tomography, the process of creating digital tomographic images.
Cycle power Cycle power means to shut down and power up the Laser Imager.
DICOM Digital Imaging and Communications in Medicine. A TCP/IP-based protocol
for transmitting and receiving medical imaging and related data over a
network.
Dmax Dmax means maximum density . Dmax is the density of an area on the film that
has received maximum exposure.
Dmin Dmin means minimum density. Dmin is the density of an unexposed area on
the film.
dPatch dPatch means density patch. This is a small patch of specified density in the
trailing edge of each film that AIQC uses to monitor density change on film.
The dPatch is only available as an option on 35 x 43 cm (14 x 17 in.) film.
DR Digital radiography, the process of creating digital radiographic images.
DRE DICOM Raster Engine.
DSA Digital Subtraction Angiography.
GSDF Grayscale Standard Display Function.
GSM Gray Scale Manager.
Film model The film model defines the print characteristics for a particular lot of film.
Key operator The person(s) designated by the department manager to receive applications
training and allowed access to password-protected areas to make system
changes.
LED Light Emitting Diode.
Modality Medical equipment that actually generates medical images (for example, an
MRI).
Monotonic Continuously increasing. When a calibration sheet, which consists of strips of
increasing density (Dmin) to maximum density (Dmax), is read by the
densitometer, the density values must be monotonic (continuously
increasing). If they are not, an error message is generated.
MPDB Modality Preferences Database.
MR Magnetic Resonance.
N/A Not available or not applicable
Platen The metal surface on which the film rests as it is exposed.
August 16, 2006 8F2927 Glossary-1
Page 48

PLUT Presentation Look-Up Table.
PMM Processor Preventive Maintenance Module, one of two replaceable filters on
the Imager.
QC step wedge Mammography Quality Control Test Pattern.
RF Tag Radio frequency tag.
Service image An image used by service personnel for troubleshooting.
Shutdown The process of exiting current tasks and applications and turning the power
off.
SMPTE test pattern A Society of Motion Picture and Television Engineering monitor test pattern
that is used for analyzing image-quality problems.
SST Synergy Service Tool.
Test type The type of test film that will be printed. Two film test types are available: a
density test film (SMPTE pattern) and a calibration film.
TFT Transfer Function Tables.
Undelivered queue The queue of jobs that cannot be printed because of problems with the job
description.
Version A different rendition of an image. A second version of an image is processed
using a second set of image processing parameters.
Glossary-2 8F2927 August 16, 2006
Page 49

Index
A
Add modalities, 2-3
Adjust
Backlight, 2-3
Volume, 2-3
Agency compliance, 1-4
Assign sorter bins, 2-3
B
Backup system, 2-4
Border density, 4-2
C
Calibrate
Film, 2-4
Touch screen, 2-4
Calling for support, 3-2
Change
Date/time, 2-4
Filter, 2-4
Language, 2-4
Passcode, 2-4
Service number, 2-4
Configuration, 2-6
Configure
Imager, 2-4
Modality, 2-4
Network, 2-4
Remote Management Services, 2-4
Correcting
Errors, 3-1
Film jams, 3-1
D
Disable printing, 2-4
E
Electronics filter, 2-9
Enable printing, 2-4
End user license agreement, A-2
Error history screen, 3-1
Errors, 3-1
F
Film
Archiving, 5-3
Environmental impact, 5-2
Jams, 3-1
Loading/unloading, 2-8
Recycling, 5-4
Spectral sensitivity, 5-1
Storing, 5-2
Technical information, 5-1
Throughput, 1-4
Types, 1-1
Filters, 2-9
H
Help button, 2-5
How to, 2-3
I
Image quality, 5-1
Image quality parameters, 4-2
Installation process
Imager configuration, 2-6
Physical setup, 2-6
Roadmap, 2-6
L
Language, change, 2-4
Limited warranty, A-3
Loading film cartridges, 2-8
Log
Filter change, 2-4
PM done, 2-4
M
Mammo test patterns, 2-4
Modality
August 16, 2006 8F2927 I-1
Page 50

Index
Adding, 4-1
Border density, 4-2
Optimizing image quality, 4-2
Polarity, 4-2
O
Opening film drawers, 2-8
Operator controls, 2-1
Optimizing image quality, 4-1
P
Passcode
Change, 2-4
Ping, 2-4
PMM, 2-10
Polarity, 4-2
Power
Emergency shut down, 2-2
Failures, 2-2
On/off button, 2-1
On/off switch, 2-1
Save option, 2-3
Power save
Schedule, 2-4
Start, 2-4
Preventive maintenance module, 2-10
Print sequence, 1-3
R
T
Touch screen
Functions, 2-3
Using, 2-3
Troubleshooting, 3-1
Troubleshooting screen, 3-1
U
Unloading film cartridges, 2-8
Unlock doors/drawers, 2-4
Unlock processor, 2-4
Update
MPDB, 2-5
Software, 2-5
V
View
DICOM associations, 2-5
Error history, 2-5
Imager information, 2-5
Imager temperature/RH, 2-5
Jobs, 2-5
Network information, 2-5
Print counts by modality, 2-5
Prints to filter change due, 2-5
Prints to PM due, 2-5
Software versions, 2-5
Tutorials, 2-5
Recycling film, 5-4
Remote Management Services, configure, 2-4
W
Warranty, A-1
Removing film cartridges, 2-8
Reset modality, 2-4
Restore from backup file, 2-4
Run test patterns, 2-4
S
Schedule power save, 2-4
Service number, 2-4
Service numbers, 3-2
Software product license, A-5
Sorter bins, 2-3
Spectral sensitivity, 5-1
Start power save, 2-4
Storing undeveloped film, 5-2
Switch Imager offline, 2-4
Switch Imager online, 2-4
System components, 1-1
I-2 8F2927 August 16, 2006
Page 51

Page 52

Eastman Kodak Company
343 State Street
Rochester, New York, 14650
Kodak and DryView are trademarks of Eastman Kodak Company.
© Eastman Kodak Company, 2006
 Loading...