

EarthWise LST05815 Operator's Manual

OPERATOR’S MANUAL
CORDLESS STRING TRIMMER 58 VOLT LITHIUM
BRUSHLESS MOTOR
This product is covered by U.S. patents and other international patents
Copyright. All Rights Reserved.
LST05815
244026
CA Compliant charger included, Model No. CHL80058
Your string trimmer has been engineered and manufactured to our high standard for dependability, ease of operation,
and operator safety. Properly cared for, it will give you years of rugged, trouble-free performance.
WARNING: To reduce the risk of injury, the user must read and understand the operator’s manual before
using this product.
BATTERY MUST BE CHARGED BEFORE FIRST USE.
Thank you for your purchase.
DO NOT RETURN THIS PRODUCT TO THE STORE. OPERATING, ASSEMBLY, PART, SERVICE QUESTIONS?
Call 1-800-313-5111 BETWEEN 8:00AM-5:00PM EST FOR ASSISTANCE.
SAVE THIS MANUAL FOR FUTURE REFERENCE

IMPORTANT SAFETY WARNINGS
TO REDUCE RISK OF INJURY:
Before any use, be sure everyone using this tool reads and
understands all safety instructions and other information contained
in this manual.
CAUTION: Wear appropriate personal hearing protection during
use. Under some conditions and duration of use, noise from this
product may contribute to hearing loss.
GENERAL SAFETY
Save these instructions and review frequently prior to use and in
instructing others.
WARNING: When using electric gardening appliances, basic
safety precautions should always be followed to reduce risk of fire,
electric shock, and personal injury, including the following:
READ ALL INSTRUCTIONS
KEEP CHILDREN AWAY - All visitors, children and pets should
stay at a safe distance from the work area.
DRESS PROPERLY – Don’t wear loose clothing or jewelry. Wear
protective hair covering to contain long hair. They can be caught in
moving parts. Use of rubber gloves and substantial footwear is
recommended when working outdoors. Always wear long pants
while operating this string trimmer.
USE SAFETY GLASSES –Wear safety glasses with side shields
or goggles that are marked to comply with ANSI Z87.1 standard
when operating this product. Use face or dust mask if operation is
dusty.
USE RIGHT APPLIANCE – Do not use appliance for any job
except that for which it is intended.
REMOVE THE BATTERY FROM THE STRING TRIMMER
when not in use or when servicing or cleaning. Do not leave
unattended.
CHECK DAMAGED PARTS – Before further use of the string
trimmer, a guard or other part that is damaged should be carefully
checked to determine that it will operate properly and perform its
intended function. Check for alignment of moving parts, binding of
moving parts, breakage of parts, mounting and any other condition
that may affect its operation. A guard or other part that is damaged
should be properly repaired or replaced. Call our customer service
help line at 1-800-313-5111 for assistance.
LIGHTING - Only operate trimmer in daylight or good artificial
light.
DON’T OVERREACH – Keep proper footing and balance at
all times.
WARNING: Do Not use the string trimmer with any type of
accessory or attachment. Such usage might be hazardous.
AVOID DANGEROUS ENVIRONMENTS – Don’t use trimmer in
rain, damp or wet locations. Do not operate trimmer in gaseous or
explosive atmospheres. Motors in these tools normally spark, and
the sparks might ignite fumes.
AVOID UNINTENTIONAL STARTING – Be sure switch trigger is in
the locked or off position before inserting battery pack. Carrying
tools with your finger on the switch trigger or inserting the battery
pack into a tool with the switch on invites accidents.
DANGER: Risk of cut. Keep hands away from lines. Keep both
hands on handles when power is on.
DANGER: Don’t use tool if switch trigger does not turn it on or off.
Call Customer Service for assistance.
DANGER: Do not dispose of the batteries in a fire. The cell may
explode. Check with local codes for possible special disposal
instructions.
DANGER: Do not open or mutilate the batteries. Released
electrolyte is corrosive and may cause damage to the eyes or skin.
It may be toxic if swallowed.
DO NOT ATTEMPT to remove cut material or hold material to be
cut when lines are moving. Make sure trimmer switch is off when
clearing jammed material from guard. Do not grasp the guard or
lines when picking up or holding the trimmer.
CAUTION: Lines coast after turned off.
DON’T FORCE STRING TRIMMER – It will do the job better and
with less likelihood of a risk of injury at the rate for which it was
designed.
STAY ALERT – Watch what you are doing. Use common sense.
Do not operate string trimmer when you are tired or under the
influence of medications, drugs or alcohol.
STORE IDLE STRING TRIMMER INDOORS – When not in use,
your string trimmer should be stored indoors in a dry and high or
locked-up place, out of reach of children.
WARNING: Do not operate the equipment while barefoot or when
wearing sandals or similar lightweight footwear. Wear protective
footwear that will protect your feet and improve your footing on
slippery surfaces.
WARNING: Use only identical manufacturer’s replacement parts.
Use of any other parts may create a hazard or cause product
damage.
WARNING: Use only the manufacturer’s replacement string in the
cutting head when using a string trimmer attachment. Do not use
any other cutting attachment, for example, metal wire, rope, or the
like. To install any other brand of cutting head to the string trimmer
attachment can result in serious personal injury.
MAINTAIN TRIMMER WITH CARE – Keep guard and handles
clean for best performance and to reduce the risk of injury. Keep
handles dry and free from oil and grease.
WARNING: California Proposition 65: This product contains
chemicals known to the State of California to cause cancer, birth
defects or other reproductive harm.
WARNING: Some dust created by this product could contain
chemicals known to the State of California to cause cancer and
birth defects or other reproductive harm. Some examples of these
chemicals are:
-chemicals in fertilizers
-compounds in insecticides, herbicides and pesticides
-arsenic and chromium from chemically treated lumber
Your risk from exposure to these chemicals varies, depending on
how often you do this type of work. To reduce your exposure to
these chemicals, wear approved safety equipment such as dust
masks that are specially designed to filter out microscopic particles.
CAUTION: Use only the following type and size battery(ies):
BL85820, BL85840.
CAUTION: Exercise care in handling batteries in order not to short
the battery with conducting materials such as rings, bracelets, and
keys. The battery or conductor may overheat and cause burns.
2

FEATURES
PRODUCT SPECIFICATIONS
LST05815
Input . . . . . . . . . . . . . . . . . . . . . . . . . . . . . . . . . . . . . . . . . . . . . . . . . . . . . . 58V, DC only
Speed . . . . . . . . . . . . . . . . . . . . . . . . . . . . . . . . . . . . . . . . . . . . . . . . . . .5100/6000 RPM
Cutting Width . . . . . . . . . . . . . . . . . . . . . . . . . . . . . . . . . . . . . . . . . . . . . . . . . .13 or 15 in.
Weight . . . . . . . . . . . . . . . . . . . . . . . . . . . . . . w/ 2 Ah battery11lbs,w/ 4Ah battery 12.6lb
.080 Dual Twisted Line - Bump Feed
8
6
7
5
4
1
13
2
3
9
10
No. Description No. Description
1 Lock out button 8 Steel Spacer
2 Switch trigger 9 Spool knob
3 Two Speed Button 10 String
4 Auxiliary handle 11 Battery
5 Connection Assy. 12 Charger
6 Guard 13 Battery release button
7 Line cutting blade
11
3
12
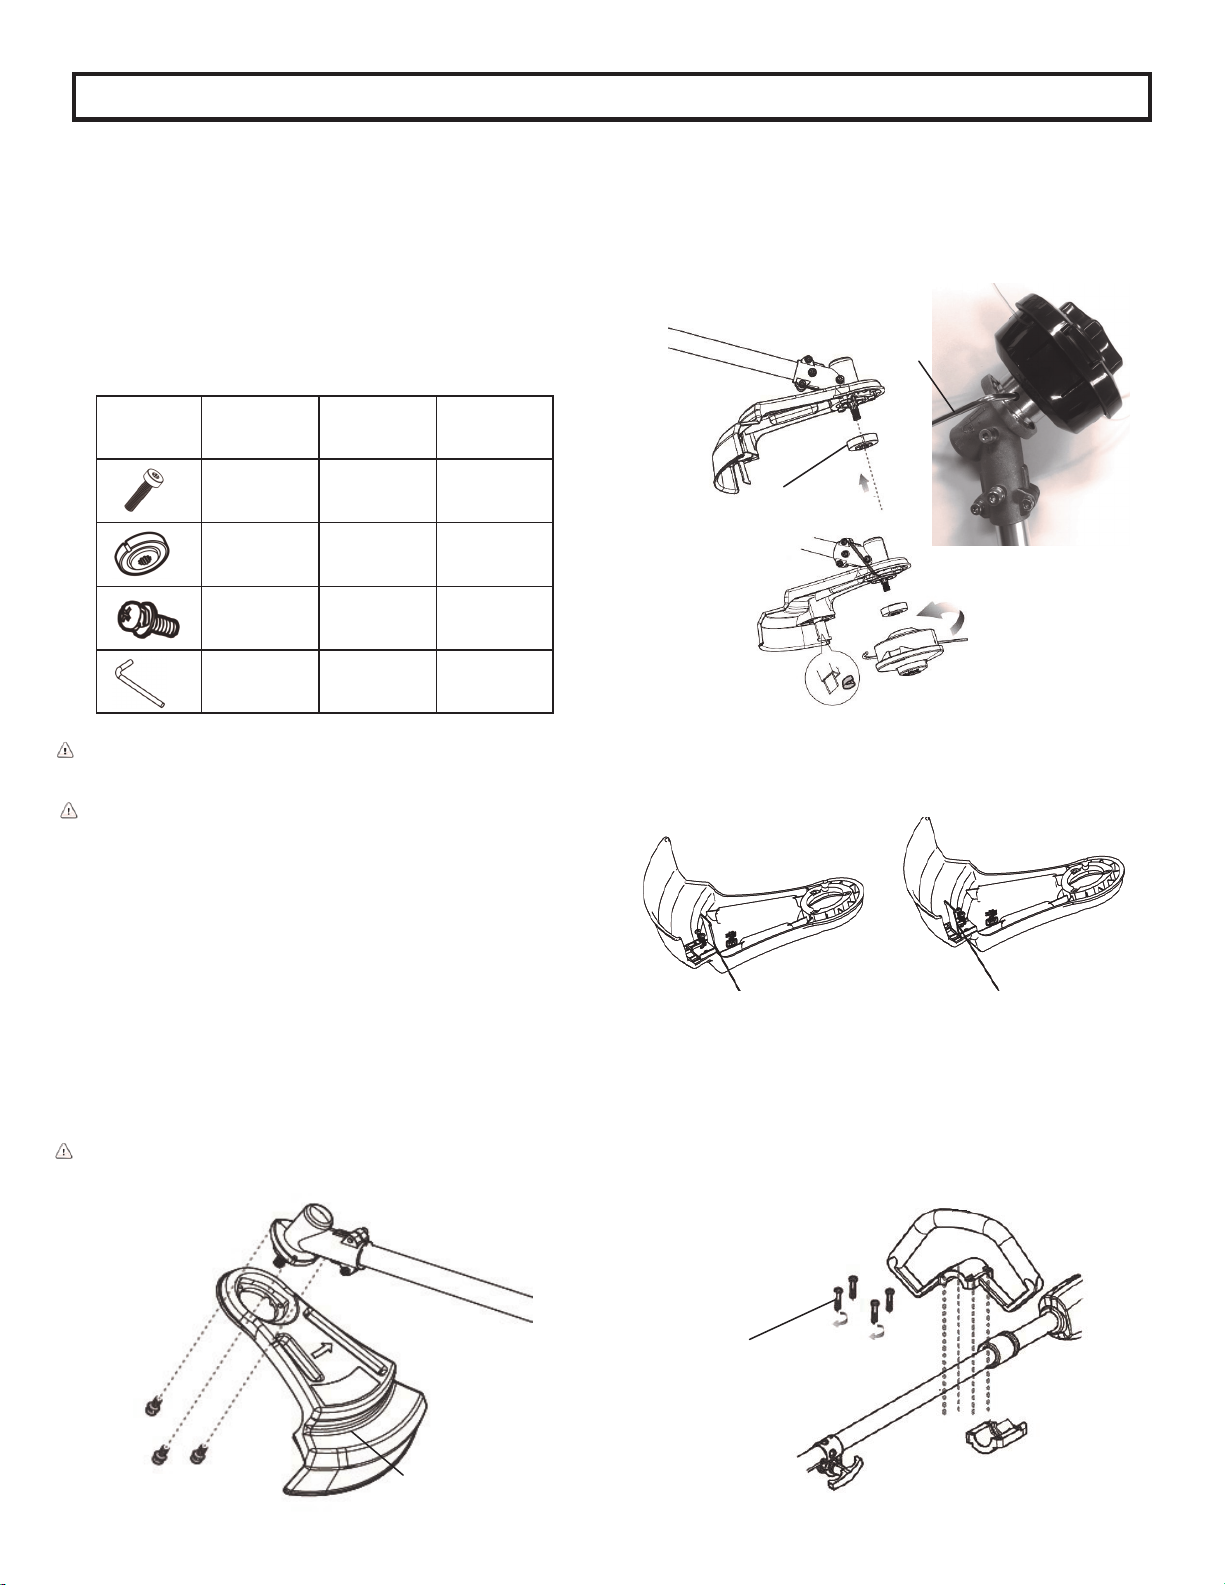
ATTACHING THE AUXILIARY HANDLE
Install the auxiliary handle and bottom bracket around the shaft of the
power head, at a comfortable distance from the switch trigger. Insert the
four M5.0*0.8*35 bolts into each the four holes. Using the combo tool
provided, tighten the bolts securely so the handle is stationary on the
shaft.
Bolt
Safety Guard
ATTACHING THE GUARD
Assemble the guard as shown below by positioning it onto the trimmer
attachment. Using a Phillips screw driver, secure the guard by installing
three (3) screws into the die cast head. Remove blade cover.
WARNING: Do not operate the trimmer without the guard attached.
INSTALLING THE STRING SPOOL
Ensure battery pack is removed. Place the steel spacer onto the cutting
head shaft. Align the hole in the spacer with the notched area of the
casting. Insert the wrench provided through the hole in the spacer and
casting to secure the spacer while installing the spool. Twist the spool
onto the bolt in a counter clockwise direction. Make sure the spool is
firmly connected.
Steel Spacer
Wrench
ASSEMBLY
UNPACKING
This product requires some assembly.
PACKING LIST
- Power Head
- String Trimmer Attachment
- Safety Guard
- Charger and Battery Pack
- Spool Assembly
- Auxiliary Handle
- Hardware Bag, containing parts as below:
Image Name Size Quantity
Bolt M5.0*0.8*35 4 PCS
Steel
Spacer
Socket
Screw
N/A 1 PC
M5.0*0.8*12 3 PCS
Wrench T25&+ 1 PC
WARNING: Do not install battery until assembly is complete. Failure to
comply could result in accidental starting and possible serious personal
injury.
WARNING: If any parts are damaged or missing do not operate this
product until the parts are replaced. Failure to heed this warning could
result in serious personal injury.
Carefully remove the product and any accessories from the box. Make sure
that all items listed in the packing list are included.
Inspect the product carefully to make sure no breakage or damage
occurred during shipping.
Do not discard the packing material until you have carefully inspected
and satisfactorily operated the product.
If any parts are damaged or missing, please call 1-800-313-5111 for
assistance.
CUTTING WIDTH ADJUSTMENT
Cutting width can be adjusted to 13‖ or 15‖ by positioning the line
cutting blade as shown.
Blade positioned
inside for 13”cut
Blade positioned
outside for 15”cut
4

ASSEMBLY
INSTALLING STRING TRIMMER ATTACHMENT TO POWER HEAD
The attachment connects to the power head by means of a
coupler device.
● Remove the battery pack.
● Loosen the wingnut on the coupler of the power head shaft.
● Pull the retaining pin located on the power head shaft and rotate
1/4 turn. Rotating allows the pin to lock out of the shaft even when
released.
● Align the hole in the attachment shaft with the retaining pin on the
power head shaft and slide the two shafts together.
● Rotate the retaining pin 1/4 turn to allow
the pin to fully seat through the hole in
the attachment shaft.
NOTE: If the pin does not release
completely in the positioning hole, the
shafts are not locked into place. Slightly
rotate from side to side until the pin is
locked into place.
● Tighten the wingnut securely.
WARNING: Be certain the wingnut is fully tightened before operating
equipment; check it periodically for tightness during use to avoid
serious personal injury.
Removing the Attachment From the Power Head
INSTALLING/REMOVING BATTERY PACK
To install battery pack:
● Align grooves on battery pack with raised ribs in the tool’s
battery port and place the battery pack in the tool.
Warning: Make sure the latch on the tool snaps in place and the
battery pack is fully seated and secure in the battery port before
beginning operation. Failure to securely seat the battery pack could
cause the battery pack to fall out, resulting in serious personal injury.
To remove battery pack:
● Press the battery latch button on the tool and pull the battery
pack out of the battery port.
Warning: To avoid serious personal injury, always remove the
battery pack and keep hands clear of the trigger lock-out when
carrying or transporting the tool.
● Stop the motor and remove the battery pack.
● Loosen the wingnut.
● Pull the retaining pin and twist the shafts to remove and separate
ends.
OPERATING
TO TURN THE TOOL ON
Select the desired operating speed (Hi or Low). Press and hold the
trigger lock out button at the top of the front handle and squeeze the
switch trigger with your fingers.
TO TURN THE TOOL OFF
Release the switch trigger.
Before you start the unit, make sure the trimmer is not contacting any
object.
WARNING: Stones, pieces of metal and other objects can be thrown out
at high speed by the line. The unit and guard are designed to reduce the
danger.
WARNING: To guard against injury, observe the following:
Read instruction manual before using, save instruction manual.
Keep hands away from lines.
Keep hands on handles. Don’t overreach.
Battery release button
If you strike or become entangled with a foreign object, stop tool
immediately, check for damage and have any damage repaired before
further operation is attempted. Do not operate with a broken hub or
spool.
High Speed
Low Speed
Two Speed Button
5

CUTTING INSTRUCTIONS
CAUTION: Lines coasts after turn off.
Do not use under wet conditions.
CAUTION: Inspect area to be trimmed and remove any wire, cord,
or string-like objects which could become entangled in the rotating
line or spool. Be particularly careful to avoid any wire which might be
bent outwardly into the path of the tool, such as barbs at the base of
a chain link fence.
OPERATING THE POWER HEAD
Hold the power head with your right hand on the rear handle and
your left hand on the front handle. Keep a firm grip with both hands
while in operation. Power head should be held at a comfortable
position with the rear handle about hip height.
If debris becomes wrapped around the attachment, RELEASE THE
SWITCH TRIGGER, remove the battery pack, and remove the
debris.
Proper Cutting Stance
Weight should be balanced with both feet on solid ground.
Basic Cutting Procedure
Slowly swing trimmer side-to-side as shown.
OPERATING
LINE FEEDING/ BUMP FEEDING
Your trimmer uses .080” diameter twisted nylon line to cut grass and
weeds quickly and easily. In time, the tip of the nylon line will become
worn. To release line, position cutting head parallel to the ground and
bump the head 2 or 3 times on the ground when the trimmer is
running. When enough line is released, you will hear the sound of the
blade cutting the line. The cutting line will wear faster if the cutting is
done along sidewalks or other abrasive surfaces or heavier weeds are
being cut.
MANUALLY EXTENDED LINE
If your trimmer line hits sharp or abrasive objects, such as stones,
metal pieces, or concrete, the trimmer line can be cut too short to
continue trimming. In this case, you can manually extend the line:
1. REMOVE THE BATTERY PACK.
2. Push the spool knob in and rotate in a counter clockwise
direction. Pull the lines out after every quater turn to achieve the
proper length. (Note: Release only enough line to extend just
beyond the blade. If too much line is released, the blade will be
unable to cut it to the correct working length and it may become
tangled on the rotating shaft.)
3. Install the battery pack.
4. Restart the trimmer and return to normal operation.
WARNING: Do not trim near electrical wires or buildings.
WARNING: Do not allow familiarity with this type of product to make
you careless. Remember that a careless fraction of a second is
sufficient to inflict serious injury.
Do not operate a string trimmer in a tree, on a ladder, or on a
scaffold; this is extremely dangerous.
Wear non-slip gloves for maximum grip and protection.
6
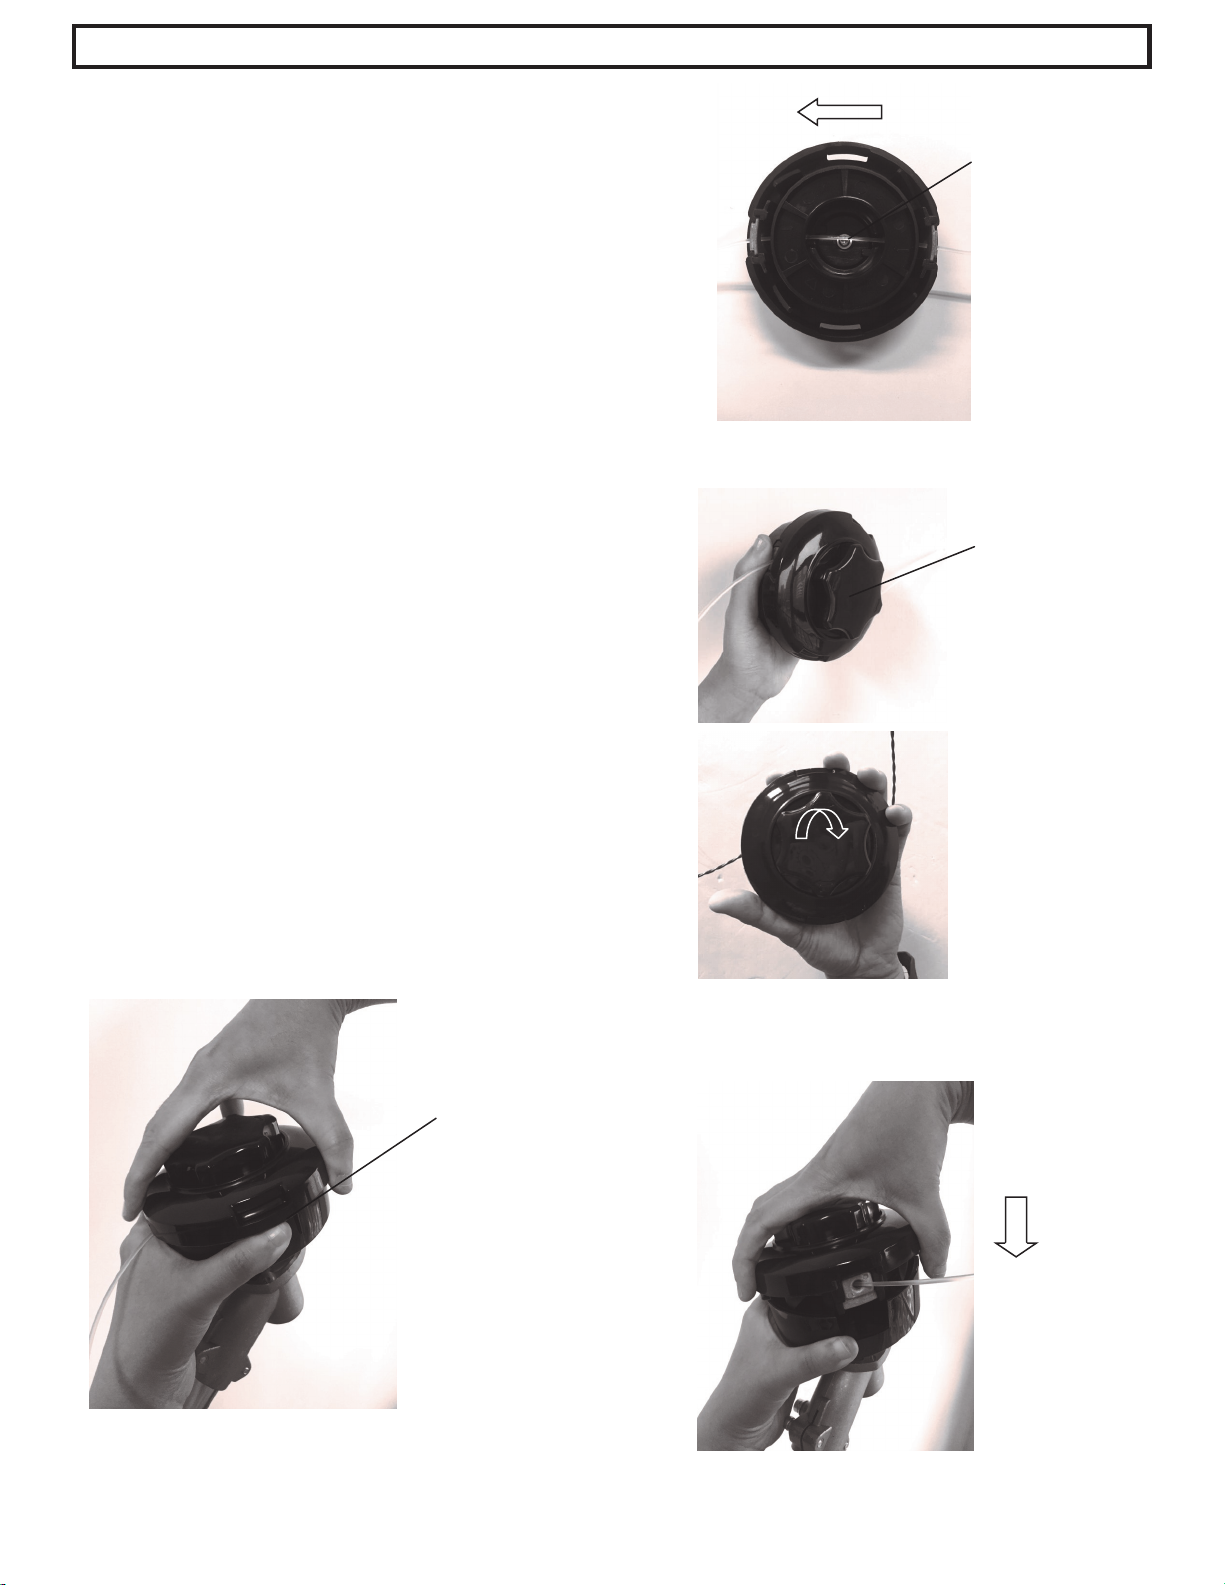
REWINDING SPOOL FROM BULK LINE
OPERATING
(USE ONLY .080” DIAMETER LINE)
Bulk line for your trimmer is available at extra cost
from your local dealer. To install bulk line, follow these
steps:
Turn off the trimmer and remove the battery.
Cut line to a length of 14.7 feet.
Press the release tabs on the line spool cover as
shown in Fig. 1, and remove the spool by pulling it
straight off. Remove and discard all line on the
spool.
Rotate the spool knob so that the 2 holes in the
spool hub are aligned with the holes in the 2 metal
eyelets.
Insert the line through all four holes. Pull the line
until there is an equal length of the line on each
side of the spool. (See Fig. 2)
Line
Fig. 2
Spool knob
Turn the spool knob in a clockwise direction (see
arrows on the top of the knob) until the line is
wound to the proper cutting length. (See Fig. 3)
Install the spool back into the spool cover making
sure it is firmly locked in place. (See Fig. 4)
Release tab
Fig. 3
Fig.1
Fig. 4
7
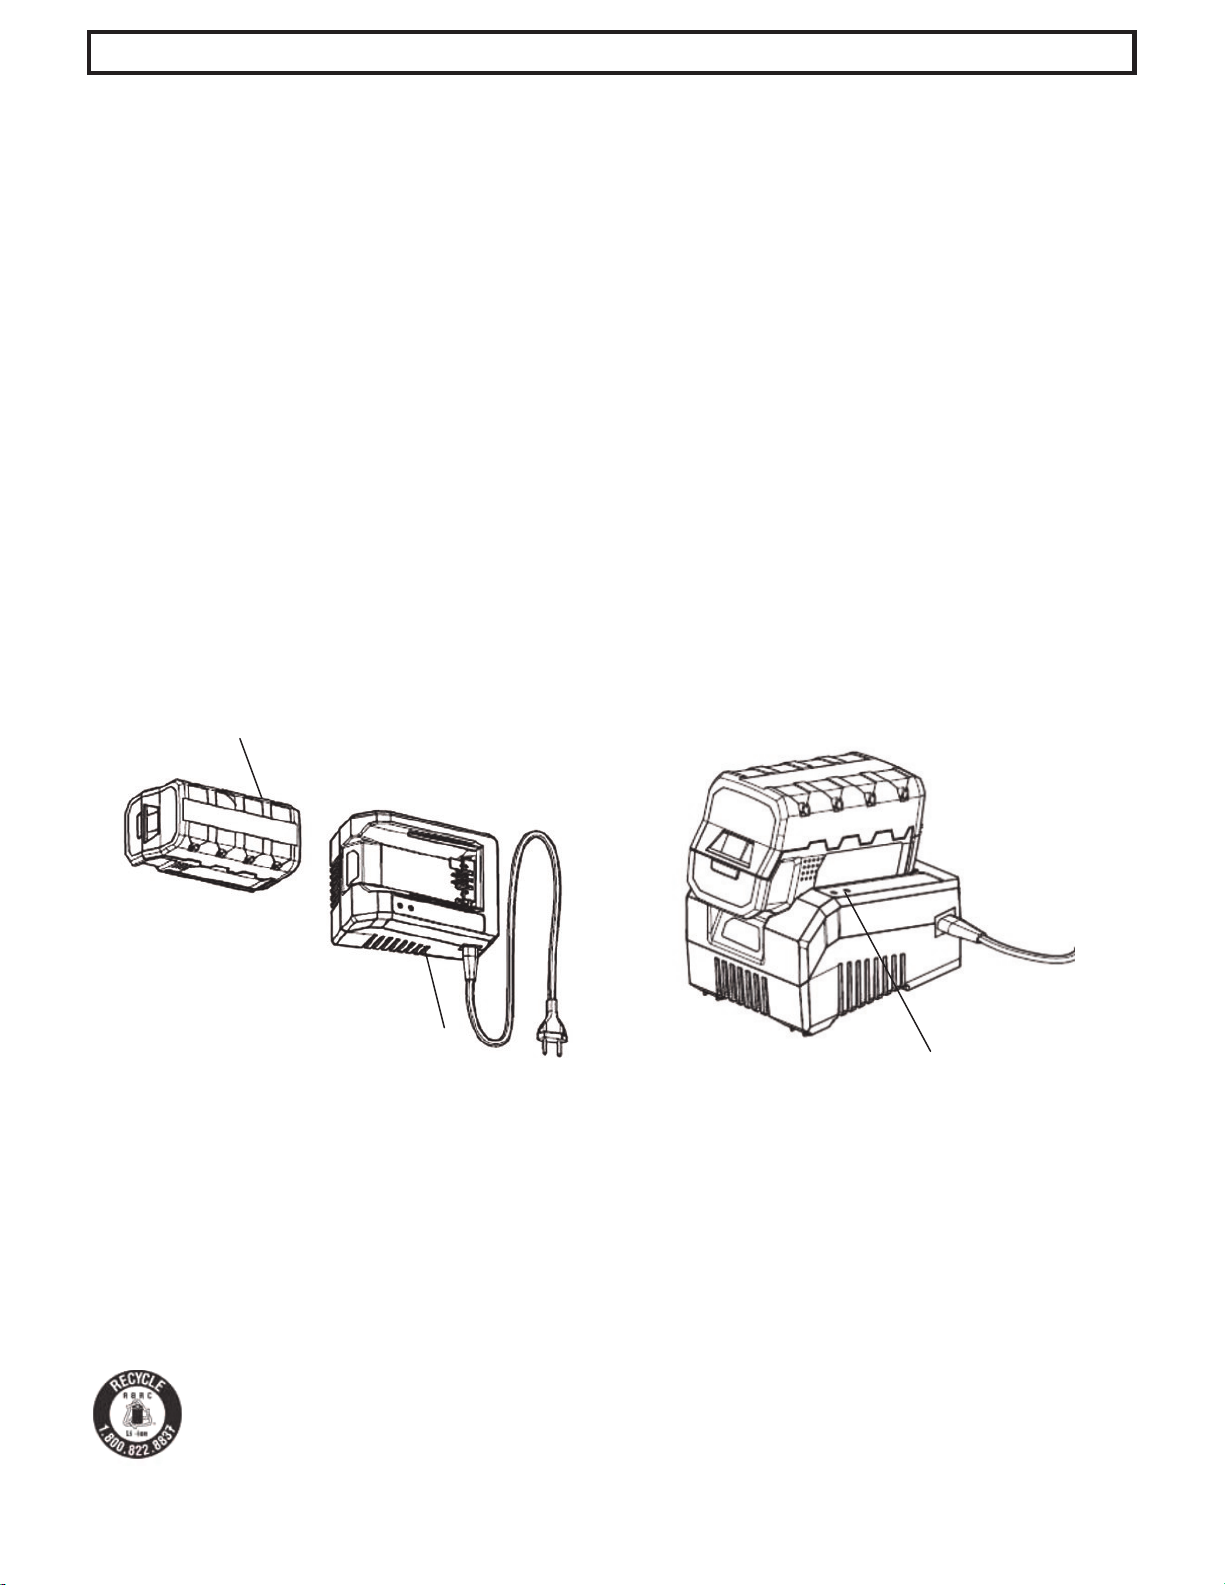
CHARGING THE BATTERY PACK
SEE CHARGER MANUAL FOR COMPLETE
INSTRUCTIONS
Charge the battery pack only with the charger provided.
Allow at least 75 minutes of charge time before initial use of
the string trimmer.
Make sure the power supply is normal household voltage,
120volts, 60Hz, AC only.
The battery charger should be operated in temperatures
between 32 and 100 degrees F.
The battery should be charged in a cool, dry place.
2 to 3 initial charging/discharging cycles may be required to
achieve maximum run time/capacity.
Do not attempt to open the charger or the unit. There are no
customer serviceable parts inside. Call the customer service
help line at 1-800-313-5111 for assistance.
DO NOT incinerate battery packs even if they are severely
damaged or completely worn out. They can explode in a fire
causing injury.
Use the battery charger indoors only.
Disconnect charger from the power supply when not in use to
prevent damage to the charger during a power surge.
When fully charged, the battery can be safety stored in
temperatures down to –4° degrees F for a period of up to
four weeks, before requiring charging.
Fully charge battery pack every 90 days.
If over a period of time the battery pack quickly runs down
after a full 75 minutes charging period, a replacement battery
pack is needed.
To prevent permanent damage to the battery, never store in a
discharged condition.
WINTER STORAGE— Fully recharge before storage and
then again every 90 days.
Since the battery will not develop a memory, it does not have
to be fully discharged before recharging.
A small leakage of liquid from the battery cells may occur
under extreme usage, charging or temperature conditions.
This does not indicate a failure. However, if the outer seal is
broken and this leakage gets on your skin.
a. Wash quickly with soap and water.
b. Neutralize with a mild acid such as lemon juice or
vinegar.
c. If the battery liquid gets in your eyes, flush them with
clean water for a minimum of 10 minutes and seek
immediate medical attention.
Battery Pack
Charger
Constant Red + Flash Green = Battery is charging
Constant Red + Constant Green = Battery is fully charged.
―99%‖ shows on LED screen when fully charged.
BATTERY DISPOSAL
Remove the battery pack from the string trimmer. Cover the terminals with heavy duty adhesive tape. Do not attempt to destroy or disassemble
battery pack or remove any components. This product contains lithium-ion batteries which must be recycled or disposed of properly. Local, state
or federal laws may prohibit disposal of these batteries in ordinary trash.
The RBRC seal on the li-ion battery pack indicates that the costs to recycle the battery pack at the end of its useful life has already
been paid by The Great States Corporation American Lawn Mower Company. It is illegal to place spent li-ion batteries in the local
municipal solid waste or in the trash. RBRC in cooperation with The Great States Corporation American Lawn Mower Company
has provided an environmentally friendly and easy way to recycle spent li-ion batteries. Just contact your local recycling center or
call 1-800-8BATTERY for information on where to drop off the spent battery.
8

CAUTION: Do not at any time let brake fluids, gasoline,
petroleum based products, penetrating oils, etc., come in
contact with plastic parts. They contain chemicals that can
MAINTENANCE
IMPORTANT: To assure product SAFETY and RELIABILITY,
repairs, maintenance and adjustment should be performed by
a qualified individual using only identical replacement parts.
damage, weaken or destroy plastic.
If you drop the trimmer, carefully inspect it for damage. If the
Make sure the battery is detached from the unit, then use
only mild soap and a damp cloth to clean the tool. Never let
any liquid get inside the tool; never immerse any part of the
tool into a liquid.
guard is bent or cracked, handles broken or if you see any
other condition that may affect the trimmer’s operation, it must
be repaired before putting it back into use. Call our customer
service help line at 1-800-313-5111 for assistance.
Fertilizers and other garden chemicals contain agents which
greatly accelerate the corrosion of metals Do not store the
tool on or adjacent to fertilizers or chemicals.
TROUBLESHOOTING
Problem Possible Couse Possible Solution
-Unit does not Run -Battery not making contact -Check battery is fully inserted
-Tripper switch not operational -Check that lock off button is fully forward prior to moving trigger
-Battery not installed properly -Check battery installation
-Battery not charged -Check battery charging requirements
-Line won't feed
-Line fails to cut off
-Battery will not charge -Battery not inserted into charger
-Charger not plugged in -Plug charger into a working outlet
-Check current at receptacle by plugging in a lamp or other appliance
-Check to see if receptacle is connected to a light switch which turns
-Surrounding air temperature too hot or too cold -Move charger and tool to a surrounding air temperature of about 32
-Line tangled in spool
-Line cutter in guard is damaged or missing -Replace guard
-Unwrap 24" of line and re-wind
-Insert battery into charger until red LED appears
power off when you turn out the lights
degree F (0 degree C) or below 100 degree F (+37.8 degree c)
CALL US FIRST !!
Call us first with questions about operating or maintaining your string trimmer
at 1.800.313.5111 between 8:00AM-5:00PM Eastern Standard Time,
or send emails to earthwise@reelin.com.
9
 Loading...