

Page 1
OPERATION MANUAL
Page 2
<<< English >>>
<<< Installation >>>
Welcome to your Afterneath™ otherworldly reverberation machine from EarthQuaker Devices®!
The Afterneath sounds a lot like it looks – a wizard in a cave in a Eurorack module. You are
the wizard or sorceress, control voltage is your wand and the cave is your instrument’s vast,
expansive, and magical signal. Do you go inside?
The Afterneath module brings the otherworldly sounds from the effects pedal world right into
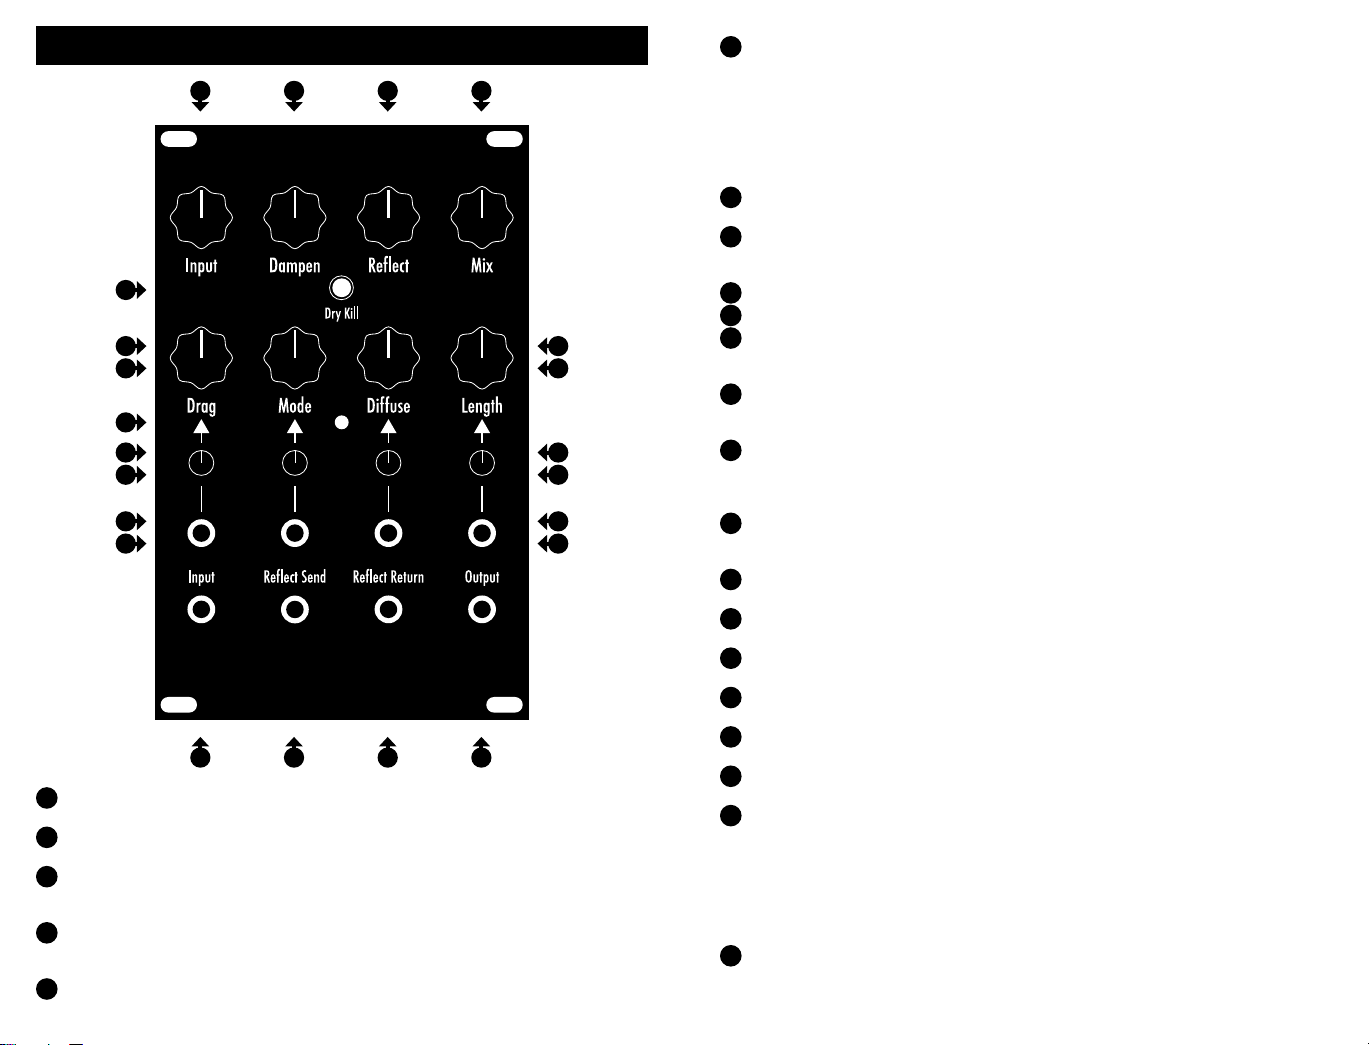
your modular synthesizer with an expanded feature set. The Afterneath module features one
main audio input, one main audio output, an audio send and return for the Reect feedback path,
and nine controls. Four of the parameters are controllable via CV, and each has been equipped
with a dedicated inverting attenuator to process the incoming CV. The Afterneath module has a
completely analog dry signal path and a totally digital wet signal path. Each and every Afterneath
module is built by a mix of robots and human beans in the torch-lit cave community of Akron, Ohio.
<<< Warnings >>>
ELECTRICAL HAZARD! IMPROPER INSTALLATION OR HANDLING MAY RESULT IN ELECTROCUTION OR DAMAGE TO
YOUR MODULE, EURORACK CASE OR OTHER MODULES. ALWAYS BE CERTAIN TO POWER OFF AND UNPLUG YOUR
EURORACK CASE OR POWER SUPPLY BEFORE INSTALLING A MODULE. ALSO, PLEASE BE CERTAIN TO COVER ANY
EMPT Y RACK SPACES WITH B LANK PANELS.
HIGH SIGNAL LEVELS! THIS DE VICE IS CAPAB LE OF PRODUC ING MODUL AR SIGN AL LEVELS. P LEASE USE CA RE WHEN
OPER ATING THIS EQ UIPMENT, AS HIGH SI GNAL LEVELS C AN DAMAGE YOUR AUD IO EQUIPMENT O R YOUR HEARIN G!
*EARTHQUAKER DEVICES DOES NOT IMPLY NOR ASSUME ANY RESPONSIBILITY FOR HARM TO ANY PERSON OR
DAMAGE TO A NY DEVICE OR O BJECT AS A RESULT OF THE U SE OF THIS MOD ULE.*
THIS DEVICE COMPLIES WITH PART 15 OF THE FCC RULES. OPERATION IS SUBJECT TO THE FOLLOWING TWO
CONDITIONS: (1) THIS DEVICE MAY NOT CAUSE HARMFUL INTERFERENCE, AND (2) THIS DEVICE MUST ACCEPT ANY
INTERFERENCE RECEIVED, INCLUDING INTERFERENCE THAT MAY CAUSE UNDESIRED OPERATION. CHANGES/
MODIFI CATIONS NOT APPROV ED BY EARTHQUA KER DEVICES L LC COULD VOID TH E USER’S AUTHO RITY TO OPER ATE
THE EQUIPMENT.
THIS EQUIPMENT HAS BEEN TESTED AND FOUND TO COMPLY WITH THE LIMITS FOR A CLASS A DIGITAL DEVICE,
PURSUANT TO PART 15 OF THE FCC RULES. THESE LIMITS ARE DESIGNED TO PROVIDE REASONABLE PROTECTION
AGAINST HARMFUL INTERFERENCE WHEN THE EQUIPMENT IS OPERATED IN A COMMERCIAL ENVIRONMENT.
THIS EQUIPMENT GENERATES, USES, AND CAN RADIATE RADIO FREQUENCY ENERGY AND, IF NOT INSTALLED
AND USED IN ACCORDANCE WITH THE INSTRUCTION MANUAL, MAY CAUSE HARMFUL INTERFERENCE TO RADIO
COMMUNICATIONS.
1. Power off and unplug your Eurorack case or power supply, and locate 16hp of empty space
within your system.
2. Connect the 10-pin end of the included ribbon cable to the power pin header on the back of
your Afterneath module so the red stripe on the cable is oriented towards the words “Red
Stripe” that are printed on the circuit board. Connect the 16-pin end of the ribbon cable to the
bus board of your Eurorack case according to the specications of your case or bus board
manufacturer. Be cer tain that you have oriented your cable properly or you may cause damage
to your module or system.
3. Afx the module to your case with mounting screws that are compatible with your case, and
cover any remaining open space with blank panels.
<<< Tech Specs >>>
• Width: 16HP / Max Depth: 31.75 mm
• Current Draw: 95 mA from the +12v rail, 0 mA from both the -12v and +5v rails
• Standard 10-pin Eurorack power connector with a marking to notate the negative pins
• Skiff friendly – protrudes less than 1.25 inches (31.75 mm) behind the panel with the power
header installed
• Audio input capable of handling input signals ranging from instrument-level to modular-level,
depending on the setting of the Input knob
We recommend the use of a high quality, low noise power supply.
<<< Warranty >>>
We will x any of our devices for as long as we are in business. There is never a charge
unless the circuit board needs to be replaced due to user damage such as a failed non-factory
repair, incorrect power supply, reverse-voltage, modication, water damage, etc. Please email
info@earthquakerdevices.com for any questions or to initiate a warranty claim.
WWW.EARTHQUAKERDEVICES.COM
EARTH QUAKER DEV ICES LLC, 350 W. BOWERY ST., AKRO N OH 44307
2 3
Page 3

<<< Controls >>>
1
5
6
7
10
11
12
15
16
19 20 21 22
Input: Adjusts the level of the incoming signal to allow for signals ranging from instrument-
1
level (clockwise) to modular-level (counterclockwise).
Dampen: Controls the tone of the wet signal. Clockwise for darker tones, counterclockwise
2
for brighter tones.
Reect: Controls the regeneration of the reverb, turn clockwise for more wash and echoes,
3
counterclockwise for less. This will self-oscillate if turned up high. Acts as an attenuator when
there is a signal patched into the Reect Return jack.
Mix: Controls the amount of wet signal that is mixed with the dry signal. Though it does not
4
actually go completely wet, you can achieve a fully wet signal by engaging the Dry Kill switch.
Dry Kill: Eliminates the dry signal from the output, leaving only the wet signal.
5
2 3 4
8
9
13
14
17
18
Drag: This digital reverb is made up of a bunch of short delays. Drag separates the delay
6
lines creating a stuttering, pingy effect. This is the coolest control on the Afterneath. We
highly advise slowly turning (or modulating) this while you let notes ring out for a cool warped
speed effect. The effect is more delay-like as you turn it counter clockwise, and it is more
reverb-like as you turn it clockwise. You will achieve shorter delay times as you move the
control clockwise, and longer delay times when you turn the control counterclockwise. You
will notice a change in pitch when adjusting this control with sound present in the effects
buffer, or when the effect is self-oscillating.
Mode: Controls the behavior of the Drag control as well as how it responds to control voltage.
7
There are 9 different modes (see the following Modes section for explanations).
Diffuse: Smooths and diffuses the delay repeats. Sharper transients with more attack
8
counterclockwise, more ambient, reverb-like and washy as you turn it clockwise.
Length: Controls the decay length of the reverb.
9
Mode LED: Visually indicates the current mode.
10
Drag CV Inver ting Attenuator: Attenuates or inverts the incoming CV. The CV is at unity
11
gain when the attenuator is fully clockwise, inverted when it is fully counterclockwise and the
CV is completely attenuated when the attenuator is in the 12 o’clock position.
Mode CV Inverting Attenuator: Attenuates or inverts the incoming CV. The CV is at unity
12
gain when the attenuator is fully clockwise, inverted when it is fully counterclockwise and the
CV is completely attenuated when the attenuator is in the 12 o’clock position.
Diffuse CV Inverting Attenuator: Attenuates or inverts the incoming CV. The CV is at unity
13
gain when the attenuator is fully clockwise, inverted when it is fully counterclockwise and the
CV is completely attenuated when the attenuator is in the 12 o’clock position.
Length CV Inverting Attenuator: Attenuates or inverts the incoming CV. The CV is at unity
14
gain when the attenuator is fully clockwise, inverted when it is fully counterclockwise and the
CV is completely attenuated when the attenuator is in the 12 o’clock position.
Drag CV Input: Allows modulation of the Drag control using external CV.
15
Mode CV Input: Allows modulation of the Mode control using external CV.
16
Diffuse CV Input: Allows modulation of the Diffuse control using external CV.
17
Length CV Input: Allows modulation of the Length control using external CV.
18
Audio Input: Accepts audio signals ranging from instrument-level to modular-level, using the
19
Input knob to adjust the level.
Reect Send: Allows external patching and processing of the Reect feedback path. Patching
20
from this output does not interrupt the internal feedback path.
Reect Return: Allows return of the externally patched and processed Reect feedback
21
path. Also, it can be used as an additional audio input if you wish to forgo the feedback.
The Reect knob acts as an attenuator for the audio that is patched to this input. Please
note that processing of the Reect feedback path can easily result in self-oscillation when
processing with effects such as distortion or a resonant lter. The Reect knob can be
used to compensate for this factor. Patching a cable to this input will disconnect the internal
feedback path, but the Reect Send will still be active.
Audio Output
22
4 5
Page 4
<<< Pro Tip >>>
You can patch both the main Audio Output and Reect Send to your audio output module for a
pseudo-stereo effect. You can add even more complexity and variation by patching the Reect
Send to a multiple, patching one copy of the signal to one of your audio outputs along with the
main out (for example, Main out to your left output and a mult of the Reect Send signal to your
right output). Then, patch another copy of the Reect Send signal to some external processing
such as a lter or VCA and then back into the Reect Return.
((((
Ambient Stereo Ritual
))))
<<< Modes >>>
1. Unquantized: Smooth, unquantized response
over the operating range
2. Unquantized with Slew: Smooth,
unquantized response over the entire
operating range, but with a musical slew
that is reminiscent of turning the varispeed
knob on a vintage British tape delay. The
“Drag” will lag behind the knob or CV
changes, but then quickly catch up.
3. Unquantized Volt/Octave: Smooth and
unquantized, yet scaled to align with
the 1v/octave curve to allow melodic
modulation of audio in the buffer, or control
the frequency of self-oscillation like a
voltage controlled oscillator
4. Chromatic Scale: Quantized 1v/octave to
the chromatic scale
5. Major Scale: Quantized 1v/octave to the
major scale
6. Minor Scale: Quantized 1v/octave to the
minor scale
7. Pentatonic Scale: Quantized 1v/octave to
the pentatonic scale
8. Octaves & Fifths: Quantized 1v/octave to
omit all but octaves and fths
9. Octaves: Quantized 1v/octave to omit all
but octaves
<<< Voltage Control >>>
When using control voltage, the knob associated with that parameter will act as an offset.
Therefore, you will want to adjust the knob and the dedicated inver ting attenuator to bring the
control voltage to the desired operating range for the parameter. It is helpful to start with the knob
in the 12 o’clock position and the inverting attenuator fully clockwise, and adjust as necessary.
<<< Self-Oscillation >>>
It is normal for the Afterneath Module to self-oscillate when using higher settings of the Length
and Reect controls – especially when both controls are set above the 12 o’clock position. When
you combine the self-oscillation with CV control over the Drag parameter you have an interesting
voltage controlled oscillator. Modes 3-9 will allow the self-oscillation to track volt/octave scaling.
When using an external control voltage, the Drag knob acts as an offset control for the incoming
voltage. Due to the nature of the effect, the Drag parameter responds to only positive voltages
between 1.6 and 4.1 volts. When using a voltage between 0 and 1.6 volts, you can turn the Drag
knob clockwise to offset the incoming voltage to the response range. Please note that bipolar
signals may need additional offset voltage from an external source to bring the entire control
signal within the response range.
Keep in mind that the Afterneath is not intended to be a precision oscillator. When self-oscillating,
it’s pitch is mostly based upon the note that is played into it. While feeding back, the original
note will transform through various harmonic and enharmonic frequencies, depending on the
levels of the Length, Reect and Dampen controls. Careful adjustment of the Length and
Reect controls can allow you to sustain sounds in the buffer for longer periods of time without
it becoming unstable.
<<< For Volt/Octave Tracking During Self-Oscillation >>>
1. Turn the inverting attenuator for the Drag CV input fully clockwise, and the Drag knob to
12 o’clock.
2. Select one of Modes 3-9.
3. Turn the Length and Reect knobs past 12 o’clock until self-oscillation is heard.
4. Find the range of your CV source (Volt/Octave keyboard, for example) that is having an
effect on the drag control. Pick the highest note that you wish to play in that range and play
it repeatedly while turning the Drag knob back and forth until you nd the upper limit of the
control (This is the point where turning it any further will not have an effect). Place the Drag
knob at the point at which it just passes the point where it no longer has an effect on the scale.
5. Lower the Length and Reect knobs until the self-oscillation is no longer present.
Now, you have scaled the range of the Afterneath module to your CV source. Notes played into
the Afterneath will now be scaled according to the CV present at the Drag CV input. For example,
if you press the “C” key on your Volt/Octave keyboard, and then play a C note from an external
source into the input of the Afterneath module, subsequent key presses on your keyboard will
result in the correct scaling of the sound that is in the buffer of the Afterneath. Turning the Length
and Reect knobs clockwise will result in the sound being sustained in the buffer for longer
periods of time. Higher settings of the Length and Reect parameters will result in self-oscillation
wherein the original sound will transform through various harmonic and enharmonic frequencies
of the original sound that was in the buffer.
Modes 5 -9 are an excellent choice for non-keyboard CV tracking to impart cyclical or random
scaled control of the Drag parameter. For example, connecting a source of random voltages to the
Drag CV input will result in the generation of random melodies based upon the scale associated
with the mode that you have selected.
We recommend lots of experimentation!
6 7
Page 5
<<< Deutsch >>>
<<< Installation >>>
Willkommen beim Afterneath™ – einem Reverb von EarthQuaker Devices®, das nicht von dieser
Welt ist! Das Afterneath klingt ziemlich genau so, wie es aussieht: Ein Zauberer in einer Höhle
in einem Eurorack-Modul. Sie sind der Zauberer oder die Zauberin, die Steuerspannung ist Ihr
Zauberstab – und die Höhle ist das riesige, ausladende und magische Signal Ihres Instruments.
Werden Sie eintreten?
Mit dem Afterneath-Modul nden interstellare Klänge aus der Welt der klassischen Ef fektpedale
den Weg in Ihr en modularen Sy nthesizer – und das b ei deutlich er weitertem Fun ktionsumfan g. Das
Afterneath-Modul verfügt über einen Haupt-Audioeingang, einen Haupt-Audioausgang, Audio-
Send- und -Return-Buchsen für den Reect-Feedbacksignalweg sowie neun Bedienelemente.
Vier Parameter können mit Steuerspannungen (CV) gesteuert werden. Außerdem ist jeder
dieser Parameter mit einem eigenen invertierenden Dämpfungsglied für die Verarbeitung der
eingehenden Steuerspannung ausgestattet. Das Afterneath-Modul verfügt über einen vollständig
analogen Signalweg für das unbearbeitete Signal und einen vollständig digitalen Signalweg
für das Effektsignal. Jedes Afterneath-Modul wird in einer von Fackeln beleuchteten Höhle in
Akron im amerikanischen Bundesstaat Ohio von einem Team aus Robotern und Menschen
zusammengebaut.
<<< Warnhinweise >>>
STROMSCHLAGGEFAHR! EINE UNSACHGEMÄSSE INSTALLATION ODER HANDHABUNG K ANN ZU
STROMSCHLÄGEN ODER SCHÄDEN AN DIESEM MODUL, DEM EURORACK-GEHÄUSE ODER AN ANDEREN
MODULEN FÜHREN. SCHALTEN SIE IMMER DAS EURORACK-GEHÄUSE ODER DAS NETZTEIL AUS UND
ZIEHEN SIE DEN NETZSTECKER, BEVOR SIE EIN NEUES MODUL INSTALLIEREN. AUSSERDEM SOLLTEN
NICHT VERWENDETE BEREICHE DES RACKS MIT LEERBLENDEN ABGEDECKT SIND.
HOHE SIGNALPEGEL! DIESES GER ÄT KANN MODULARE SIGNALPEGEL ERZEUGEN. SEIEN SIE BITTE
VORSICHTIG, WENN SIE DIESES GERÄT BEDIENEN, DA HOHE SIGNALPEGEL IHR AUDIOGERÄT ODER IHR
GEHÖR BESCHÄDIGEN KÖNNEN!
* EARTHQUAKER DEVICES ÜBERNIMMT KEINE VERANTWORTUNG FÜR PERSONENSCHÄDEN ODER
SCHÄDEN AN GERÄTEN ODER OBJEKTEN, DIE DURCH DIE VERWENDUNG DIESES MODULS VERURSACHT
WURDEN. *
DIESES GERÄT ENTSPRICHT TEIL 15 DER FCC-BESTIMMUNGEN. DER BETRIEB UNTERLIEGT DEN
BEIDEN FOLGENDEN BEDINGUNGEN: (1) DIESES GERÄT DARF KEINE SCHÄDLICHEN INTERFERENZEN
VERURSACHEN, UND (2) DIESES GERÄT MUSS ALLE EMPFANGENEN INTERFERENZEN AKZEPTIEREN,
AUCH SOLCHE INTERFERENZEN, DIE EINEN UNERWÜNSCHTEN BETRIEB VERURSACHEN KÖNNEN.
ÄNDERUNGEN / MODIFIKATIONEN, DIE NICHT VON EARTHQUAKER DEVICES LLC GENEHMIGT WURDEN,
KÖNNEN DAZU FÜHREN, DASS DIE BERECHTIGUNG ZUR VERWENDUNG DIESES GERÄTES ERLISCHT.
1. Schalten Sie Ihr Eurorack-Gehäuse oder Netzteil aus, ziehen Sie den Netzstecker und nden
Sie einen 16 TE (Teilungseinheiten) breiten freien Bereich in Ihrem System.
2. Verbinden Sie das 10-polige Ende des mitgelieferten Flachbandkabels mit dem
Stromanschluss auf der Rückseite des Afterneath-Moduls. Dabei muss die rote Markierung
am Kabel in Richtung der auf die Platine gedruckten Worte „Red Stripe“ zeigen. Verbinden
Sie das 16-polige Ende des Flachbandkabels mit der Busplatine Ihres Eurorack-Gehäuses.
Befolgen Sie dabei die Angaben des Gehäuse- oder Busplatinenherstellers. Achten Sie
darauf, das Kabel korrekt anzubringen, da es ansonsten zu Schäden an Ihrem Modul oder
dem Eurorack-System kommen kann.
3. Befestigen Sie das Modul mit Montageschrauben, die für Ihr Eurorack-Gehäuse geeignet
sind, an dem Gehäuse und decken Sie die verbleibenden offenen Bereiche mit Blindplatten
Leerblenden ab.
<<< Technische Daten >>>
• Breite: 16 TE / Maximale Tiefe: 31,75 mm
• Stromaufnahme: 95 mA von der +12v-Schiene, 0 mA von den -12v- und +5v-Schienen
• Regulärer 10-poliger Eurorack-Stromanschluss mit einer Markierung zur Kennzeichnung der
negativen Kontakte
• Skiff-geeignet – ragt bei installiertem Stromanschluss weniger als 31,75 mm (1,25 Zoll) hinter
dem Panel heraus
• Audioeingang, der je nach Einstellung des Input-Reglers Eingangssignale von
Instrumentenpegel bis zu Modular-Pegel verarbeiten kann
Wir empfehlen die Verwendung eines hochwertigen, rauscharmen Netzteils.
<<< Garantie >>>
Wir werden jedes unserer Produkte reparieren, solange unser Unternehmen existiert. Es wird
keine Gebühr erhoben, es sei denn, die Platine muss aufgrund von Schäden ersetzt werden, die
der Benutzer verursacht hat (z.B. durch einen nicht in unserem Werk erfolgten, fehlgeschlagenen
Reparaturversuch, Verwendung eines nicht geeigneten Netzteils, Rückspannung, Modikationen
oder Wasserschäden). Bitte senden Sie eine E-Mail an info@earthquakerdevices.com, wenn Sie
Fragen haben oder einen Garantieanspruch anmelden möchten.
DIESES GERÄT WURDE GETESTET UND ENTSPRICHT DEN GRENZWERTEN FÜR DIGITALE GERÄTE
DER KLASSE A GEMÄSS TEIL 15 DER FCC-BESTIMMUNGEN. DIESE GRENZWERTE SOLLEN EINEN
ANGEMESSENEN SCHUTZ GEGEN SCHÄDLICHE INTERFERENZEN BIETEN, WENN DAS GERÄT IN
EINER GEWERBLICHEN UMGEBUNG BETRIEBEN WIRD. DIESES GERÄT ERZEUGT UND VERWENDET
HOCHFREQUENZENERGIE . ES STRAHLT MÖGLICHERWEISE HOCHFREQUENZENERGIE AUS UND KANN,
WENN ES NICHT IN ÜBEREINSTIMMUNG MIT DER BEDIENUNGSANLEITUNG INSTALLIERT UND VERWEN DET
WIRD, FUNKSTÖRUNGEN VERURSACHEN.
WWW.EARTHQUAKERDEVICES.COM
EARTHQUAKER DEVICES LLC, 350 W. BOWERY ST., AKRON OH 44307
8 9
Page 6
<<< Bedienelemente >>>
1
5
6
7
10
11
12
15
16
19 20 21 22
Input-Regler: Zur Anpassung an den Pegel des eingehenden Audiosignals. Im Uhrzeigersinn
1
drehen für Signale mit Instrumentenpegel und gegen den Uhrzeigersinn für Modularpegel.
Dampen-Regler: Zur Einstellung der Klangfarbe des Effektanteils. Im Uhrzeigersinn drehen für
2
weniger hohe Frequenzen; gegen den Uhrzeigersinn für mehr hohe Frequenzen.
Reect-Regler: Steuert die Regenerierung des Halls. Im Uhrzeigersinn drehen für längere
3
Hallfahnen und Echos; gegen den Uhrzeigersinn für weniger. Bei hohen Einstellungen kommt es
zur Selbstoszillation. Fungiert als Dämpfer, wenn an der Buchse Reect Return ein Signal anliegt.
Mix-Regler: Bestimmt den Effektanteil, der dem unbearbeiteten Signal hinzugemischt wird. Auch
4
bei maximaler Reglerstellung erhalten Sie kein reines Effektsignal. Wenn Sie ein reines Effektsignal
wünschen, aktivieren Sie den Schalter Dry Kill.
Dry Kill-Schalter: Unterbindet die Ausgabe des unbearbeiteten Signals an der Output-Buchse,
5
sodass nur der Effektanteil ausgegeben wird.
10 11
2 3 4
8
9
13
14
17
18
Drag-Regler: Der digitale Hall dieses Moduls wird durch mehrere kurze Delays erzeugt. Mit dem
6
Drag-Regler können Sie diese Delays separieren, sodass ein stotternder, an Echolote erinnernder
Effekt entsteht. Dies ist der coolste Regler des Afterneath. Wir empfehlen, ihn langsam zu drehen
(oder modulieren zu lassen), während die damit bearbeiteten Noten ausklingen. Es entsteht ein
wirklich cooler, verzerrter Warp Speed-Effekt. Drehen Sie den Regler gegen den Uhrzeigersinn, um
Delay-artige Effekte zu erzielen. Drehen Sie ihn im Uhrzeigersinn, um Halleffekte zu erzeugen. Beim
Drehen im Uhrzeigersinn werden die Delays kürzer. Beim Drehen gegen den Uhrzeigersinn werden
die Delays länger. Wenn sich im Effektpuffer ein Audiosignal bendet oder eine Selbstoszillation
erfolgt, werden Sie eine Änderung der Tonhöhe bemerken.
Mode-Regler: Steuert das Verhalten des Drag-Reglers sowie dessen Umsetzung der
7
Steuerspannung. Es gibt 9 verschiedene Modi, die im folgenden Abschnitt „Modi“ erläutert werden.
Diffuse-Regler: Glättet und „streut“ die Delay-Wiederholungen. Drehen Sie den Regler gegen
8
den Uhrzeigersinn, um „knackigere“ Transienten (mehr Attack) zu erhalten. Drehen Sie ihn im
Uhrzeigersinn, um Reverb-artige Ambient-Effekte zu erhalten.
Length-Regler: Steuert die Ausklingzeit des Halls.
9
Mode-Leuchtdiode: Zeigt den aktuellen Modus an.
10
Invertierender Dämpfer für Drag CV: Dämpft oder invertiert die eingehende Steuerspannung. Am
11
rechten Anschlag hat die Steuerspannung Unity Gain (Verstärkungsfaktor Eins). Am linken Anschlag ist sie
invertiert. Wenn sich der Regler in der Mittelstellung bendet, ist die Steuerspannung komplett gedämpft.
Invertierender Dämpfer für Mode CV: Dämpft oder invertiert die eingehende Steuerspannung. Am
12
rechten Anschlag hat die Steuerspannung Unity Gain (Verstärkungsfaktor Eins). Am linken Anschlag ist sie
invertiert. Wenn sich der Regler in der Mittelstellung bendet, ist die Steuerspannung komplett gedämpft.
Invertierender Dämpfer für Diffuse CV: Dämpft oder invertiert die eingehende Steuerspannung.
13
Am rechten Anschlag hat die Steuerspannung Unity Gain (Verstärkungsfaktor Eins). Am linken
Ans chla g ist si e inve r tier t. Wen n sich de r Reg ler in der Mi t t elste llu n g bend et, is t di e Steue rspa nnu n g
komplett gedämpft.
Invertierender Dämpfer für Length CV: Dämpft oder invertiert die eingehende Steuerspannung. Am
14
rechten Anschlag hat die Steuerspannung Unity Gain (Verstärkungsfaktor Eins). Am linken Anschlag ist sie
invertiert. Wenn sich der Regler in der Mittelstellung bendet, ist die Steuerspannung komplett gedämpft.
Drag-Steuerspannungseingang: Ermöglicht die Modulation des Drag-Reglers mit einer
15
externen Steuerspannung.
Mode-Steuerspannungseingang: Ermöglicht die Modulation des Mode-Reglers mit einer
16
externen Steuerspannung.
Diffuse-Steuerspannungseingang: Ermöglicht die Modulation des Diffuse-Reglers mit einer
17
externen Steuerspannung.
Length-Steuerspannungseingang: Ermöglicht die Modulation des Length-Reglers mit einer
18
externen Steuerspannung.
Input-Buchse (Audioeingang): Akzeptiert Audiosignale vom Instrumentenpegel bis zum Modulpegel.
19
Die Pegeleinstellung erfolgt mit dem Input-Regler.
Reflect Send-Buchse: Ermöglic ht das extern e Patchen und Verar beiten des Si gnals des Reflect-Feedback-
20
Pfades. Das Patchen dieses Au sgangs führt nicht zu einer Unterbrechung d es internen Feedback-Weges.
Reect Return-Buchse: zur Verarbeitung des auf ein externes Gerät gepatchten und bearbeiteten
21
Reect-Feedback-Signals. Diese Buchse kann auch als zusätzlicher Audioeingang verwendet
werden, wenn Sie auf das Feedback-Signal verzichten möchten. Der Reect-Regler fungiert als
Abschwächer für das Audiosignal, das diesem Eingang zugeordnet ist. Bitte beachten Sie, dass das
Signal des Reect-Feedback-Pfades zur Selbstoszillation führen kann, wenn dieses mit Verzerrern,
Resonanzltern und ähnlichen Effekten bearbeitet wird. Mit dem Reect-Regler können Sie diesen
Faktor ausgleichen. Wenn Sie ein Kabel an diesen Eingang anschließen, wird der interne FeedbackPfad getrennt, die Buchse Reect Send bleibt jedoch weiterhin aktiv.
Audioausgang
22
Page 7
<<< Pro-Tipp >>>
Um einen Pseudo-Stereoeffekt zu erzielen, können Sie den Haupt-Audioausgang (Output) und
die Reect Send-Buchse auf Ihr Audio-Ausgangsmodul patchen. Für noch komplexere Sounds
und Variationen können Sie die Reect Send-Buchse auf ein Mult(iple)-Modul patchen. Führen
Sie dann eine Kopie des Signals zusammen mit dem Signal vom Haupt-Audioausgang zu einem
der Audioausgänge. Legen Sie zum Beispiel das Signal vom Haupt-Audioausgang auf den linken
Ausgang und eine Mult-Kopie des Reect Send-Signals auf den rechten Ausgang. Patchen Sie
dann eine weitere Kopie des Reect Send-Signals auf einen externen Prozessor – z.B. einem Filter
oder VCA – und führen Sie dann das bearbeitete Signal an die Reect Return-Buchse zurück.
Offset-Spannung von einer externen Quelle erforderlich ist, um das gesamte Steuersignal in den
Ansprechbereich zu verschieben.
Beachten Sie, dass der Afterneath nicht zur Verwendung als Präzisionsoszillator gedacht ist. Bei
der Selbstoszillation basier t die Tonhöhe hauptsächlich auf der zugespielten Note. Im Rahmen
des Feedbacks wird die ursprüngliche Note durch verschiedene harmonische und enharmonische
Frequenzen transformiert- Dies hängt von den Einstellungen der Length-, Reect- und DampenRegler ab. Durch sorgfältiges Einstellen der Length- und Reect-Regler können Sie das
Audiosignal im Puffer über längere Zeiträume halten, ohne dass es instabil wird.
<<< Modi >>>
1. Nicht quantisiert: Nicht quantizierte,
gleitende Umsetzung über den gesamten
Einstellbereich.
2. Nicht quantisiert mit „Dreh“: Nicht
quantizierte, gleitende Umsetzung über
den gesamten Einstellbereich, jedoch mit
einem musikalischen Effekt, der an das
Drehen des Varispeed-Reglers an einem
klassischen britischen Tape-Delay erinnert.
Die „Drag“-Anpassung bleibt zeitlich hinter
den per Drehknopf oder Steuerspannung
vorgenommenen Änderungen zurück, holt
dann aber schnell auf.
3. Nicht quantisiert, Volt/Oktave: Nicht
quantizierte, gleitende Umsetzung,
jedoch zur Übereinstimmung mit der 1V/
Oktave-Kurve skaliert. Damit werden eine
melodische Modulation des Audiosignals
im Puffer oder die Steuerung der Frequenz
der Selbstoszillation wie bei einem VCO
ermöglicht.
4. Chromatische Skala: 1V / Oktave quantisiert
auf die chromatische Skala
5. Dur-Tonleiter: 1V / Oktave quantisiert auf
die Dur-Tonleiter
6. Moll-Tonleiter: 1V / Oktave quantisiert auf
die Moll-Tonleiter
7. Pentatonische Skala: 1V / Oktave
quantisiert auf die pentatonische Skala
8. Oktaven & Quinten: So auf 1V / Oktave
quantisiert, dass als einzige Teilungen
Oktaven und Quinten übrig bleiben
9. Oktaven: So auf 1V / Oktave quantisiert,
dass als einzige Teilung die Oktave übrig
bleibt.
<<< Spannungsregelung >>>
Bei der Verwendung von Steuerspannungen fungiert der dem jeweiligen Parameter zugeordnete
Regler als Offset. Sie sollten als den Regler und den zugehörigen invertierenden Dämpfer so
einstellen, dass die Steuerspannung den gewünschten Arbeitsbereich für den Parameter abdeckt.
Am besten stellen Sie den Regler auf die Mittelstellung und drehen Sie den invertierenden
Dämpfer zum rechten Anschlag. Passen Sie dann die Einstellung nach Bedarf an.
<<< Selbstoszillation >>>
Bei höheren Einstellungen der Regler Length und Reect ist eine Selbstoszillation des Afterneath-
Moduls normal. Dies gilt vor allem, wenn beide Regler höher als auf die Mittelstellung eingestellt
werden. Wenn Sie die Selbstoszillation und die CV-Steuerung des Drag-Parameters kombinieren,
steht Ihnen ein interessanter spannungsgesteuerten Oszillator zur Verfügung. In den Modi 3-9
kann die Selbstoszillation der Volt-/ Oktav-Skalierung folgen. Bei Verwendung einer externen
Steuerspannung fungiert der Drag-Regler als Offset-Regler für die eingehende Spannung.
Aufgrund der Art des Effekts reagiert der Drag-Parameter nur auf positive Spannungen zwischen
1,6 und 4,1 Volt. Wenn Sie eine Spannung zwischen 0 und 1,6 Volt verwenden, können Sie den
Drag-Regler im Uhrzeigersinn drehen, um diese eingehende Spannung in den Antwortbereich
zu verschieben. Bitte beachten Sie, dass für bipolare Signale möglicherweise eine zusätzliche
<<< Volt-/Oktav-Tracking bei der Selbstoszillation >>>
1. Drehen Sie den invertierenden Dämpfer für den Drag-Steuerspannungseingang bis zum
rechten Anschlag und stellen Sie den Drag-Regler auf die Mittelstellung.
2. Wählen Sie einen der Modi 3 bis 9.
3. Drehen Sie die Length- und Reect-Regler über die Mittelstellung hinaus, bis es zur
Selbstoszillation kommt.
4. Ermitteln Sie den Bereich Ihrer Steuerspannungsquelle (z. B. eine Volt-/Oktave-Tastatur), der
sich auf die Drag-Steuerung auswirkt. Wählen Sie die höchste Note, die Sie in diesem Bereich
spielen möchten, und spielen Sie diese Note wiederholt, während Sie den Drag-Regler hinund her drehen, bis Sie die Obergrenze nden (Dies ist der Punkt, an dem weiteres Drehen
keine Wirkung hat). Stellen Sie den Drag-Regler auf den Wert kurz vor dem Punkt, an dem er
keinen Einuss mehr auf die Tonleiter hat.
5. Drehen Sie die Length- und Reect-Regler herunter, bis keine Selbstoszillation mehr erfolgt.
Damit haben Sie den Ansprechbereich des Afterneath-Moduls an Ihre Steuerspannungsquelle
angepasst. Dem Afterneath-Modul zugespielte Noten werden nun entsprechend der am DragSteuerspannungseingang anliegenden Spannung skaliert. Wenn Sie z.B. die Taste „C“ auf Ihrer
Volt/ Oktave-Tastatur drücken und dann ein „C“ von einer externen Quelle in den Eingang des
Afterneath-Moduls einspielen, können Sie mit anschließend gespielte Noten auf der Tastatur den
Klang im Puffer des Afterneath korrekt skaliert spielen. Wenn Sie die Regler Length und Reect
im Uhrzeigersinn drehen, wird der Klang im Puffer längere Zeit gehalten. Höhere Einstellungen
der Parameter Length und Reect führen zu einer Selbstoszillation, wobei das ursprüngliche
Audiosignal durch verschiedene harmonische und enharmonische Frequenzen des im Puffer
bendlichen Signals umgewandelt wird.
Die Mod i 5 bis 9 eign en sich he rvor ragen d für die CV-Tracking o hne Tastatur, um den Drag-Parameter
zyklisch oder zufallsbasiert zu variieren. Sie können z.B. einen Zufallsspannungsgenerator an
den Drag-Steuerspannungseingang anschließen, um zufällige Melodien erzeugen zu lassen.
Diese folgen der Tonleiter, die Sie mit dem Drag-Regler ausgewählt haben.
Wir empfehlen intensives Experimentieren!
12 13
Page 8

<<< Italiano >>>
<<< Installazione >>>
Benvenuti in Afterneath™ – una “macchina da riverbero” veramente fuori dall’ordinario, progettata
da EarthQuaker Devices®! Afterneath suona effettivamente come appare: una stregoneria
concepita nell’antro di una caverna, racchiusa a sua volta in un modulo Eurorack. Che tu sia una
maga o uno stregone, con Afterneath il voltaggio di controllo sarà la tua bacchetta magica, mentre
la caverna non sarà altro che l’immenso, espansivo, magico segnale del tuo strumento. Intendi
addentrarti al suo interno?
Il modulo Afterneath trasferisce le sonorità eteree appartenenti al mondo degli effetti a
pedale direttamente all’interno del tuo sintetizzatore modulare, appor tando un ampio set di
caratteristiche. È dotato di un ingresso e un’uscita audio principali, una mandata e un ritorno
audio per il percorso del segnale di feedback (Reect), oltre a ben nove controlli. Quattro dei
parametri sono controllabili via voltaggio di controllo (o CV), ciascuno dotato di attenuatore di
inversione utile a processare il CV in ingresso. Il modulo Afterneath include un percorso del
segnale diretto interamente analogico e un percorso del segnale processato interamente digitale.
Ogni modulo Afterneath è stato realizzato da un insieme di robot e esseri umani, alla luce di una
torcia, nei meandri delle grotte in Akron, Ohio.
<<< Avver tenze >>>
PERICOLO CORRENTE ELETTRICA! UN’IN STALLAZI ONE O UNA M ANIPOL AZIO NE INAD EGUATE POSSONO P ROVOCARE
UN’ELETTROCUZIONE O DANNEGGIARE IL MODULO STESSO, IL CASE EURORACK O ALTRI MODULI. ACCERTARSI
SEMPRE DI SPEGNERE E SCOLLEGARE IL CASE EURORACK E LA SUA ALIMENTAZIONE PRIMA DI INSTALLARE UN
MODULO. INOLTRE, ASSICURARSI DI COPRIRE EVENTUALI SPAZI VUOTI DEL RACK MEDIANTE APPOSITI PANNELLI
CIECHI.
LIVELLI ELEVATI DI SEG NALE! QUESTO DISPOSITIVO È IN GRADO DI PRODU RRE SEGNALI CO N LIVELLI MODULARI. S I
PREGA QUI NDI DI PRESTARE ATTE NZIONE DUR ANTE IL SU O UTILIZZO, POI CHÉ ELEVATI LIVELLI D I SEGNALE PO SSONO
CAUSAR E DANNI ALL’UDITO O ALLE A PPARECCHIATURE AU DIO!
* EARTH QUAKER DEVI CES NON SI ASSUME , ESPRESSAMENT E O IN MODO IMPLICITO, ALCUNA R ESPONSABILITÀ PER
DANNI A PER SONE O A QUALSIA SI DISPOSITI VO O OGGETTO RISU LTANTI DALL’USO DI QUESTO M ODULO. *
QUESTO DIS POSITIVO È CON FORME ALL A PARTE 15 DELL E NORME FCC. L’OPERATIVI TÀ È SOGGET TA ALLE SEGUENTI
DUE CON DIZIONI: (1) IL DISPOSITIVO NON DEVE CAUSARE INTERFERENZE NOCIVE, E (2) IL DISPO SITIVO DEVE POTER
ACCETTARE QUALSIASI INTERFERENZA ESTERNA, COMPRESE QUELLE CHE POTREBBERO COMPROMETTERNE
IL FUNZIONAMENTO. CAMBIAMENTI/MODIFICHE APPORTATE ALL’APPARECCHIATURA NON APPROVATE DA
EARTH QUAKER DEV ICES LLC POSSONO I NVALIDARE L’AUTORITÀ DELL’UTENTE ALL’UTILI ZZO DELLA STES SA.
1. Spegnere e scollegare il case Eurorack o la sua alimentazione, e localizzare uno spazio vuoto
da 16hp all’interno del sistema.
2. Collegare l’estremità a 10-pin del cavo a nastro fornito in dotazione al connettore pin di
alimentazione posto sul retro del modulo Afterneath, in modo tale da orientare la striscia rossa
del cavo verso le parole “Red Stripe” stampate sul circuito. Collegare l’estremità a 16-pin
del cavo a nastro alla scheda bus del case Eurorack, in base alle speciche del case o del
produttore della scheda bus. Assicurarsi di aver orientato correttamente il cavo, altrimenti
potrebbero vericarsi dei danni al modulo o al sistema.
3. Fis sare il modulo nel c ase usando viti di montaggio ad esso compatibili, e chiudere gli eventuali
spazi modulari rimasti vuoti usando dei pannelli ciechi.
<<< Speciche tecniche >>>
• Larghezza: 16 HP / Profondità massima: 31.75 mm
• Assorbimento di corrente: 95 mA dal canale di alimentazione a +12v, 0 mA da entrambi i
canali di alimentazione a -12v e +5v
• Connettore di alimentazione Eurorack standard a 10-pin, con marcatura dei pin negativi
• “Skiff-friendly”: sporgenza inferiore a 31,75 mm (1,25 pollici) posteriormente al pannello, con
terminale di alimentazione installato
• Ingresso audio in grado di accogliere segnali con livelli di tipo strumentale e modulare, in base
all’impostazione della manopola Input
Si raccomanda l’uso di un alimentatore di alta qualità e a basso rumore.
<<< Garanzia >>>
Fin tanto che resteremo in attività, provvederemo alla riparazione di tutti i nostri dispositivi.
Non si applicheranno addebiti a meno che non si renda necessaria la sostituzione della scheda
elettronica a causa di danni causati dall’utente, quali le riparazioni non eseguite in fabbrica e non
andate a buon ne, fornitura di alimentazione errata, tensione inversa, modiche, danni causati
dall’acqua, ecc. Per qualsiasi domanda o per avviare le procedure con coper tura della garanzia,
si prega di scrivere all’indirizzo email info@earthquakerdevices.com.
LA PRESENTE APPARECCHIATURA È STATA TESTATA E TROVATA CONFORME AI LIMITI PREVISTI PER I DISPOSITIVI
DIGITALI DI CLASSE A, AI SENSI DELLA PARTE 15 DELLE NORME FCC. TALI LIMITI SONO STATI PREDISPOSTI AL FINE DI
FORNIR E UNA PROTEZION E RAGIONE VOLE DALLE POSSI BILI INTERFERE NZE NOCIVE IN I NSTALLA ZIONI NELL’AMBITO
DI ZONE ABITATE. ESSENDO L’UNITÀ IN GRADO DI GENERARE, UTILIZZARE E IRR ADIARE DELLE RADIO FREQUENZE,
SE NON IN STALLATA E UTILIZ ZATA SECONDO LE ISTR UZIONI, POTREB BE CAUSARE DEL LE INTERFERENZ E DELETERIE
PER I SISTEM I DI RADIOC OMUNICA ZIONE.
WWW.EARTHQUAKERDEVICES.COM
EARTH QUAKER DEV ICES LLC, 350 W. BOWERY ST., AKRO N OH 44307
14 15
Page 9

<<< Controlli >>>
1
5
6
7
10
11
12
15
16
19 20 21 22
Input: Regola il livello del segnale in ingresso, per accogliere livelli compresi tra quello strumentale
1
(in senso orario) a quello modulare (in senso antiorario).
Dampen: Controlla il tono del segnale processato. Ruotare in senso orario per toni più scuri, in
2
senso antiorario per toni più chiari.
Reect: Controll a la rigenerazi one del riverbe ro; ruotare in sens o orario o antior ario rispettivamente
3
per una maggiore o minore quantità di eco. Alle impostazioni più elevate si ottiene l’autooscillazione. In presenza di un segnale inoltrato al connettore Reect Return tramite cavo patch,
questo controllo agisce come un attenuatore.
Mix: Controlla la quantità di segnale processato da miscelare al segnale diretto/non processato. È
4
possibile ottenere un segnale completamente processato attivando l’interruttore Dry Kill (sebbene
in realtà non si avrà un segnale composto interamente della sola componente processata).
Dry Kill: Elimina il segnale diretto (“dry”) dall’uscita, lasciando solo il segnale processato (“wet”).
5
16 17
2 3 4
8
9
13
14
17
18
Drag: Questo riverbero digitale è costituito da una moltitudine di delay di breve durata. Il controllo
6
Drag separa le linee di delay creando un effetto balbettante e di tipo “ping-pong”. Si tratta del
controllo più interessante del modulo Afterneath. Consigliamo caldamente di ruotare lentamente
(o di modulare) la manopola mentre si lasciano risuonare le note, per ottenere un esaltante effetto
di velocità deformata. L’effetto diventa più simile a un delay quando si ruota la manopola in senso
antiorario, oppure a un riverbero ruotando in senso orario. Ruotando in senso orario si ottengono
dei tempi di delay più brevi, mentre ruotando in senso antiorario i tempi di delay si allungano. Si
noterà un cambiamento di tono quando si regola questo controllo in presenza di un suono nel buffer
dell’effetto, o quando l’effetto entra in auto-oscillazione.
Mode: Determina il comportamento del controllo Drag e come questo risponderà al voltaggio
7
di controllo. Esistono 9 diverse modalità (per le spiegazioni, consultare la successiva sezione
“Modalità”).
Diffuse: Ammorbidisce e diffonde le ripetizioni del delay. Ruotando in senso antiorario si ottiene
8
una sonorità dei transienti più netta e con un maggiore attacco; ruotando in senso orario l’effetto
risulta più riverberante, con maggior ambiente e uidità.
Length: Controlla la lunghezza di decadimento del riverbero.
9
Mode LED: Indicatore che segnala visivamente la modalità in uso.
10
Attenuatore di inversione per l’ingresso CV del parametro Drag: Attenua o inverte il CV in
11
ingresso. Il CV può essere tarato al guadagno unitario (attenuatore ruotato completamente in senso
orario), invertito (attenuatore ruotato completamente in senso antiorario) o interamente attenuato
(attenuatore posizionato “a ore 12”).
Attenuatore di inversione per l’ingresso CV del parametro Mode: Attenua o inverte il CV in
12
ingresso. Il CV può essere tarato al guadagno unitario (attenuatore ruotato completamente in senso
orario), invertito (attenuatore ruotato completamente in senso antiorario) o interamente attenuato
(attenuatore posizionato “a ore 12”).
Attenuatore di inversione per l’ingresso CV del parametro Diffuse: Attenua o inverte il CV in
13
ingresso. Il CV può essere tarato al guadagno unitario (attenuatore ruotato completamente in senso
orario), invertito (attenuatore ruotato completamente in senso antiorario) o interamente attenuato
(attenuatore posizionato “a ore 12”).
Attenuatore di inversione per l’ingresso CV del parametro Length: Attenua o inverte il CV in
14
ingresso. Il CV può essere tarato al guadagno unitario (attenuatore ruotato completamente in senso
orario), invertito (attenuatore ruotato completamente in senso antiorario) o interamente attenuato
(attenuatore posizionato “a ore 12”).
Ingresso CV Drag: Permette la modulazione del controllo Drag usando un CV esterno.
15
Ingresso CV Mode: Permette la modulazione del controllo Mode usando un CV esterno.
16
Ingresso CV Diffuse: Permette la modulazione del controllo Diffuse usando un CV esterno.
17
Ingresso CV Length: Permette la modulazione del controllo Length usando un CV esterno.
18
Input (ingresso audio): Accetta segnali audio con livelli compresi tra strumentale e modulare,
19
usando la manopola Input per regolare il livello.
Reect Send: Mandata che permette l’inoltro esterno e l’elaborazione del percorso di feedback
20
Reect. L’inoltro da questa uscita non interrompe il percorso di feedback interno.
Reect Return: Consente il ritorno del percorso di feedback Reect inoltrato e elaborato
21
esternamente. Può essere utilizzato anche come ingresso audio aggiuntivo, se si desidera
rinunciare al feedback. La manopola Reect funge da attenuatore per il segnale audio inoltrato a
questo ingresso. È bene notare che l’elaborazione del percorso di feedback Reect può facilmente
condurre all’auto-oscillazione, quando si processa insieme ad effetti quali la distorsione o i ltri di
risonanza. La manopola Reect può essere impiegata per compensare tale fattore. L’inoltro tramite
un cavo patch a questo ingresso disconnetterà il percorso di feedback interno, tuttavia la mandata
Reect Send risulterà ancora attiva.
Output (uscita audio)
22
Page 10

<<< Suggerimento Pro >>>
È possibile inoltrare l’uscita audio principale (Output) e la mandata Reect Send all’uscita
audio del modulo, per ottenere un effetto pseudo-stereo. Si può conferire ulteriore complessità e
capacità di variazione del suono, inoltrando (con un cavo patch) l’uscita Reect Send a un modulo
moltiplicatore; da qui, inoltrare una copia del segnale a una delle uscite audio insieme a quella
principale – ad esempio, l’uscita Main all’uscita Left e un’uscita del moltiplicatore (con una replica
del segnale Reect Send) all’uscita Right. Quindi, inoltrare dal modulo moltiplicatore un’altra copia
del segnale Reect Send ad altri moduli esterni, per eseguire ulteriori elaborazioni (ad esempio un
ltro o un VCA), dopodiché far rientrare il segnale risultante all’ingresso Reect Return.
È bene tenere presente che Afterneath non è progettato per funzionare come un oscillatore di
precisione. Quando si innesca l’auto-oscillazione, il tono si baserà principalmente sulla nota che
viene suonata e inviata al suo interno. Quando reintrodotta in feedback, la nota originale subirà
delle trasformazioni attraverso l’introduzione di diverse frequenze armoniche ed enarmoniche, a
seconda dei livelli dei controlli Length, Reect e Dampen. Un’attenta regolazione dei controlli
Length e Reect può consentire di sostenere il suono nel buffer per periodi di tempo più lunghi,
senza che diventi instabile.
<<< Per il tracciamento volt/ottava durante l’auto-oscillazione >>>
<<< Modalità >>>
1. Non quantizzato: Risposta omogenea e
non quantizzata sulla gamma operativa
2. Non quantizzato, con Slew: Risposta
omogenea e non quantizzata sull’intera
gamma operativa, ma con uno slew musicale che ricorda l’azione della manopola
varispeed di un delay a nastro British vintage. Il “Drag” rimarrà in ritardo rispetto alle
regolazioni della manopola o alle variazioni CV, per poi recuperare rapidamente.
3. Volt/Ottava non quantizzato: Omogeneo
e non quantizzato ma ridimensionato per
allinearsi con la curva da 1v/ottava, onde
consentire una modulazione melodica
dell’audio nel buffer, oppure per controllare la frequenza dell’auto-oscillazione alla
stregua di un oscillatore controllato in tensione (VCO).
4. Scala cromatica: 1v/ottava quantizzato
alla scala cromatica
5. Scala maggiore: 1v/ottava quantizzato
alla scala maggiore
6. Scala minore: 1v/ottava quantizzato alla
scala minore
7. Scala pentatonica: 1v/ottava quantizzato
alla scala pentatonica
8. Ottave e quinte: 1v/ottava quantizzato
omettendo ogni grado tranne le quinte e le
ottave
9. Ottave: 1v/ottava quantizzato omettendo
ogni grado tranne le ottave
<<< Voltaggio di controllo >>>
Quando si utilizza il voltaggio di controllo, la manopola associata a quel dato parametro agirà
come una regolazione di compensazione (offset). Pertanto, sarà necessario regolare la manopola
e l’attenuatore di inversione dedicato per portare il voltaggio di controllo nell’intervallo operativo
deside rato per il paramet ro. È utile iniziar e tenendo la manop ola posizionat a “a ore 12” e l’attenuato re
di inversione ruotato completamente in senso orario, quindi regolare in base alle esigenze.
<<< Auto-oscillazione >>>
È normale che il modulo Afterneath entri in auto-oscillazione quando si utilizzano livelli elevati dei
controlli Length e Reect – in particolare quando le impostazioni di entrambi i controlli superano la
posizione centrale (“a ore 12”). Quando si combina l’auto-oscillazione al controllo CV sul parametro
Drag, si ottiene un interessante oscillatore controllato in tensione (VCO). Le modalità 3-9 consentono
all’auto- oscillazione di tenere traccia del ridimensionamento in scala volt/ottava. Quando si utilizza un
voltaggio di controllo esterno, la manopola Drag funge da controllo di offset del voltaggio in ingresso.
A causa della natura dell’effetto, il parametro Drag risponde solo alle tensioni positive comprese
tra 1,6 e 4,1 volt. Quando si utilizza una tensione compresa tra 0 e 1,6 volt, è possibile ruotare la
manopola Drag in senso orario per compensare la tensione in entrata nell’intervallo di risposta. Si noti
che i segnali bipolari potrebbero richiedere una compensazione del voltaggio aggiuntiva da una fonte
esterna, per portare l’intero segnale di controllo entro l’intervallo di risposta.
1. Ruotare l’attenuatore di inversione per l’ingresso CV del parametro Drag completamente in
senso orario, e impostare la manopola Drag “a ore 12”.
2. Selezionare una delle modalità 3-9.
3. Ruotare le manopole Length e Reect oltre la posizione centrale (“a ore 12”), no a quando
non si avverte l’auto-oscillazione.
4. Individuare l’intervallo della sorgente CV (ad esempio, una tastiera volt/ottava) che sta agendo
sul controllo Drag. Scegliere la nota più alta che si desidera suonare in quella gamma e
suonarla ripetutamente, mentre si ruota avanti e indietro la manopola Drag no a individuare
il limite superiore del controllo (questo equivarrà al punto in cui, proseguendo nella rotazione
del controllo, non si avrà alcun effetto). Posizionare la regolazione della manopola Drag
oltrepassando appena il punto in cui questo non risulta avere più alcun effetto sulla scala.
5. Abbassare le manopole Length e Reect no a quando l’auto-oscillazione non risulta più
presente.
In questo modo, l’intervallo del modulo Afterneath è stato scalato alla sorgente CV. Le note
suonate e immesse nel modulo Afterneath ora verranno scalate in base al voltaggio di controllo
presente all’ingresso CV del parametro Drag. Ad esempio, se si preme il tasto “Do” sulla tastiera
volt/ottava, e quindi si suona un Do da una sorgente esterna collegata all’ingresso del modulo
Afterneath, le successive pressioni dei tasti sulla tastiera comporteranno il corretto scaling del
suono presente nel buffer di Afterneath. Ruotando le manopole Length e Reect in senso orario,
si otterrà un suono che sarà sostenuto nel buffer per periodi di tempo più lunghi. Impostazioni più
elevate dei parametri Length e Reect comporteranno l’auto-oscillazione, in cui il suono originale
si trasformerà attraverso varie frequenze armoniche ed enarmoniche del suono originale che era
presente nel buffer.
Le modalità 5- 9 costituiscono una scelta eccellente per il trac king CV non generato da tastiera, per
impartire al parametro Drag un controllo ciclico o scalato casualmente. Ad esempio, collegando
all’ingresso CV del parametro Drag una sorgente a tensione casuale, si otterrà la generazione di
melodie altrettanto casuali ma basate sulla scala associata alla modalità selezionata.
Suggeriamo caldamente tanta sperimentazione!
18 19
Page 11

<<< Español >>>
<<< Instalación >>>
¡Bienvenido a su nueva máquina de reverberación de otro mundo Afterneath ™ de EarthQuaker
Devices ®! El Afterneath produce el sonido que uno puede esperar por su aspecto – como el de un
mago en una cueva en un módulo Eurorack. Usted es el mago o la hechicera, el voltaje de control
es su varita y la cueva es la señal amplia, expansiva y mágica de su instrumento. ¿Quiere entrar?
El módulo Afterneath trae los sonidos de otro mundo de los pedales de efectos directamente
a su sintetizador modular con un grupo de funciones ampliado. El módulo Afterneath le ofrece
una entrada audio principal, una salida audio principal, un envío y retorno audio para la ruta de
retroalimentación Reect y nueve controles. Cuatro de los parámetros son controlables a vía
CV (control por voltaje) y cada uno ha sido equipado con un atenuador de inversión especíco
para procesar el CV entrante. El módulo Afterneath tiene una ruta de señal seca completamente
analógica y una ruta de señal húmeda totalmente digital. Todos y cada uno de los módulos
Afterneath han sido construidos por una combinación de robots y frijoles humanos en el laberinto
de cuevas iluminadas por antorchas de Akron, Ohio.
<<< Precauciones >>>
RIESGO D E DESCARGA ELÉCT RICA! UNA INSTAL ACIÓN O MANE JO INCORRECTOS P UEDEN PROVOCAR DES CARGAS
ELÉCTRIC AS O DAÑOS EN SU MÓDU LO, UNIDAD EURORACK U OTROS MÓ DULOS. ASEGÚRES E SIEMPRE DE APAGAR
Y DESCON ECTAR SU TORRE EUROR ACK O LA FUEN TE DE ALIMEN TACIÓN AN TES DE INSTALA R UN MÓDULO. AD EMÁS,
ASEGÚR ESE DE CUBRIR LOS ES PACIOS VACÍOS DEL RACK C ON PANELES LISOS.
¡ALTOS NIVELES DE SEÑAL! ESTE DISPOSITIVO ES CAPAZ DE PRODUCIR NIVELES DE SEÑAL MODULARES. ¡TENGA
CUIDADO AL USAR ESTE EQUIPO, DADO QUE LOS ALTOS NIVELES DE SEÑAL PUEDEN DAÑAR SU EQUIPO AUDIO O
SUS OÍDOS!
*EAR THQUAKER DE VICES NO ACEPTA NI ASU ME NINGUN A RESPONSA BILIDAD POR PO SIBLES DAÑO S A PERSONAS O
A CUALQUI ER DISPOSITIVO U O BJETO PRODUC IDOS POR EL USO DE ES TE MÓDULO.*
ESTE DISPOSITIVO CUMPLE CON LA SECCIÓN 15 DE LAS REGLAS FCC. SU FUNCIONAMIENTO ESTÁ SUJETO A LAS
DOS CON DICIONES SIGU IENTES: (1) ESTE DISPOSITI VO NO PUEDE PRODUCIR INTER FERENCIA MOLESTAS, Y (2) EST E
DISPOSITIVO DEBE ACEPTAR CUALQUIER INTERFERENCIA RECIBIDA, INCLUIDAS AQUELLAS QUE PUEDAN CAUSAR
UN FUNCIONAMIENTO NO DESEADO. CUALQUIER CAMBIO/MODIFICACIÓN NO APROBADO POR EARTHQUAKER
DEVIC ES LLC PODRÍA AN ULAR LA AUTO RIZACIÓN DE L USUARIO PARA SEG UIR USANDO EST E EQUIPO.
SE HA VERI FICADO QUE EST E EQUIPO CUMP LE CON LOS LÍMITES E STABLECI DOS PARA LOS DIS POSITIVOS DIG ITALES
DE CLASE A, DE CO NFORMIDAD CON LO ESTABLECIDO EN L A SECCIÓN 15 DE LAS REGLAS FCC. ESTOS LÍMITES HAN
SIDO DISEÑADOS PARA OFRECER UNA PROTECCIÓN R AZONABLE CONTRA INTERFERENCIAS MOLESTAS AL USAR
ESTE EQUIPO EN UN ENTORNO NO PROFESIONAL. ESTE EQUIPO GENERA, UTILIZA Y PUEDE IRRADIAR ENERGÍA DE
RADIOFRECUENCIA Y, SI NO ES INSTALADO Y USADO DE ACUERDO CON EL MANUAL DE INSTRUCCIONES, PUEDE
CAUSAR I NTERFERENCIA S MOLESTAS EN LAS COM UNICACION ES DE RADIO.
1. Apague y desconecte su torre Eurorack o la fuente de alimentación y deje 16 hp de espacio
vacío en su torre.
2. Conecte el extremo de 10 puntas del cable plano incluido en la cabecera de la punta de
alimentación de la parte posterior del módulo Afterneath para que la franja roja del cable
quede orientada hacia las palabras «Red Stripe» impresas en la placa de circuito. Conecte
el extremo de 16 puntas del cable plano a la placa de bus de su torre Eurorack de acuerdo
con las especicaciones de su fabricante de la torre o placa de bus. Asegúrese de orientar el
cable correctamente, ya que en caso contrario puede causar daños a su módulo o sistema.
3. Asegure el módulo en la torre con tornillos de montaje que sean compatibles con su torre y
cierre cualquier espacio vacío restante con paneles planos.
<<< Especicaciones técnicas >>>
• Anchura: 16HP / Profundidad máxima: 31,75 mm
• Amperaje: 95 mA en el riel +12v, 0 mA en los rieles -12v y + 5v
• Conector de alimentación Eurorack standard de 10 puntas con una marca para controlar las
puntas negativas
• Skiff cómodo: sobresale menos de 31.75 mm (1.25 pulgadas) por detrás del panel con el
cabezal de alimentación instalado
• Entrada de audio capaz de admitir señales de entrada desde nivel de instrumento hasta nivel
modular, dependiendo de la conguración del mando Input
Le recomendamos que utilice una fuente de alimentación de alta calidad y bajo nivel de
ruido.
<<< Garantía >>>
Nos comprometemos a reparar cualquiera de nuestros dispositivos mientras sigamos en activo.
Nunca habrá costes a menos que la placa de circuito deba ser sustituida debido a daños
producidos por el usuario, como una reparación incorrecta por personal no autorizado, conexión
a un voltaje incorrecto, inversión de voltaje, modicaciones o alteraciones, daños por agua, etc.
Envíe un correo electrónico a info@earthquakerdevices.com para cualquier consulta o para
iniciar una reclamación de reparación en garantía.
WWW.EARTHQUAKERDEVICES.COM
EARTH QUAKER DEV ICES LLC, 350 W. BOWERY ST., AKRO N OH 44307
20 21
Page 12

<<< Controles >>>
1
5
6
7
10
11
12
15
16
19 20 21 22
Input: Ajusta el niv el de la señal entra nte para acepta r señales que van de sde el nivel de instr umento
1
(a la derecha) hasta el nivel modular (a la izquierda).
Dampen: Controla el tono de la señal húmeda. Gire el mando a la derecha para conseguir tonos
2
más oscuros y a la izquierda para más brillantes.
Reect: Controla la regeneración de la reverb; gírelo a la derecha para un mayor lavado y ecos y la
3
izquierda para menos. Esto pro ducirá un efecto de auto- oscilación si lo ajusta muy alto. Actúa como
un atenuador cuando hay una señal conectada a la toma Reect Return.
Mix: Controla la cantidad de señal hú meda que se mezcla c on la señal seca. Aunque en realidad no
4
hace que sea señal totalmente húmeda (con efectos), puede c onseguir esto activando el interruptor
Dry Kill.
2 3 4
8
9
13
14
17
18
Dry Kill: Elimina la señal seca de la salida, dejando solo la señal húmeda.
5
Drag: Esta reverberación digital está formada por un montón de pequeños retardos. Drag separa
6
las líneas de retardo creando un efecto de tartamudeo o ping-pong. Este es el c ontrol más genial en
After neath. Le aconse jamos que lo gire (o module) lentamente mientra s deja que las notas repiquen
para obtener un bonito efecto de deformación de la velocidad. El efecto es más similar a un retardo
cuando lo gire hacia la izquierda, y más parecido a la reverberación cuando lo gire a la derecha.
Conforme más gire el control hacia la derecha conseguirá tiempos de retardo más cortos y, a la
inversa, más largos cuando lo gire a la izquierda. Observará un cambio en el tono cuando ajuste
este control con el sonido presente en el búfer de efectos, o cuando el efecto esté auto-oscilando.
Mode: C ontrola el comportamiento del control Drag y la forma en que re sponde al voltaj e de control.
7
Hay 9 modos diferentes (consulte la siguiente sección de Modos para ver más explicaciones).
Diffuse: Suaviza y hace más difusas las repeticiones del retardo. Conseguirá reverbs más nítidas
8
y con más ataque al girar el mando a la izquierda y con más ambiente y suaves conforme más lo
gire a la derecha.
Length: Controla la duración del decaimiento de la reverberación.
9
LED Mode: Le indica visualmente el modo activo.
10
Drag CV Inverting At tenuator: Atenúa o invierte el CV entrante. El CV estará en ganancia unitaria
11
cuand o el atenuador esté en el tope der ec ho y la invertirá cuando esté en el tope izquierdo. Cua ndo
el mando esté en la posición de las 12 en punto (centro), el CV estará completamente atenuado.
Mode CV Inverting Attenuator: Atenúa o invier te el CV entrante. El CV estará en ganancia
12
unitaria cuando el atenuador esté en el tope derecho y la inver tirá cuando esté en el tope izquierdo.
Cuando el mando esté en la posición de las 12 en punto (centro), el CV estará completamente
atenuado.
Diffuse CV Inverting Attenuator: Atenúa o invierte el CV entrante. El CV estará en ganancia
13
unitaria cuando el atenuador esté en el tope derecho y la inver tirá cuando esté en el tope izquierdo.
Cuando el mando esté en la posición de las 12 en punto (centro), el CV estará completamente
atenuado.
Length CV Inverting Attenuator: Atenúa o invierte el CV entrante. El CV estará en ganancia
14
unitaria cuando el atenuador esté en el tope derecho y la inver tirá cuando esté en el tope izquierdo.
Cuando el mando esté en la posición de las 12 en punto (centro), el CV estará completamente
atenuado.
Drag CV Input: Permite la modulación del control Drag utilizando CV externo.
15
Mode CV Input: Permite la modulación del control Mode utilizando CV externo.
16
Diffuse CV Input: Permite la modulación del control Diffuse utilizando CV externo.
17
Length CV Input: Permite la modulación del control Length utilizando CV externo.
18
Audio Input: Acepta señales audio en el rango desde nivel de instrumento hasta nivel modular,
19
utilizando el mando Input para ajustar el nivel.
Reect Send: Permite la interconexión externa y el procesado de la ruta de realimentación
20
Reect. La interconexión de esta salida no interrumpe la ruta de realimentación interna.
Reect Return: Permite el retorno de la ruta de realimentación Reect interconectada y procesada
21
externamente. Además, puede usarla como una entrada audio adicional si quiere renunciar a la
realimentación. El mando Reect actúa como un atenuador para la señal audio interconectada a
esta entrada. Tenga en cuenta que el procesado de la ruta de realimentación Reect puede dar lugar
fácilmente a auto-oscilación cuando realice un procesado con efectos como distorsión o un ltro
resonante. Puede usar el mando Reect para compensar este factor. La interconexión de un cable a
esta entrada desconectará la ruta de realimentación interna, pero Reect Send seguirá activo.
Audio Output
22
22 23
Page 13

<<< Consejo para profesionales >>>
<<< Auto-oscilación >>>
Puede interconectar tanto la salida principal Audio Output como Reect Send a su módulo de
salida audio para conseguir un efecto pseudoestéreo. Puede crear incluso una mayor complejidad
y variación al sonido creado por este módulo. Aquí tiene la forma de conseguirlo:
1. Conecte la toma de salida del Afterneath con la señal Reect Send a la entrada de un
módulo Multiplicador independiente en su sistema Eurorack.
2. Conecte una salida audio de este módulo Multiplicador a la un canal de la salida audio
principal stereo de su sistema – por ejemplo, la salida audio derecha.
3. Conecte la toma de salida audio principal del módulo Afterneath a un canal de la salida
audio stereo de su sistema – por ejemplo, a la salida audio izquierda.
4. Ahora, conecte otra salida audio del módulo Multiplicador a un módulo de procesado de
señal externo independiente – por ejemplo a un ltro controlado por voltaje (VCF) o a un
amplicador controlado por voltaje (VCA).
5. Conecte la toma de salida audio de dicho módulo de procesado de señal externo a la
entrada Reect Send del Afterneath. Después, conecte otra copia de la señal Reect
Send a algún tipo de procesado externo, como un ltro o VCA, y después de vuelta a
Reect Return.
<<< Modos >>>
1. Unquantized: Respuesta suave y no
cuantizada a lo largo del rango operativo
2. Unquantized with Slew: Respuesta suave
y no cuantizada en todo el rango operativo,
pero con un gran toque musical que recuerda a lo que ocurría al girar el mando de
velocidad variable en un retardo de tipo cinta de fabricación británica de hace años. El
efecto de «arrastre» se quedará por detrás
del cambio del mando o CV, pero después
lo alcanzará rápidamente.
3. Unquantized Volt/Octave: Suave y sin
cuanticar, pero escalado para alinearse con
la curva de 1 v/octava para permitir la modulación melódica del audio en el búfer, o controlar la frecuencia de auto-oscilación como
un oscilador controlado por voltaje
4. Chromatic Scale: Cuantizado 1 v/octava
a la escala cromática
5. Major Scale: Cuantizado 1 v/octava a la
escala mayor
6. Minor Scale: Cuantizado 1 v/octava a la
escala menor
7. Pentatonic Scale: Cuantizado 1 v/octava
a la escala pentatónica
8. Octaves & Fifths: Cuantizado 1 v/octa-
va para omitir todo excepto las octavas y
quintas
9. Octavas: Cuantizado 1 v/octava para
omitir todo excepto las octavas
<<< Control por voltaje >>>
Cuando usa el control por voltaje, el mando asociado con ese parámetro actuará como un desfase
u offset. Por lo tanto, le interesará ajustar dicho mando y el atenuador de inversión especíco
para derivar ese voltaje de control al rango operativo deseado para el parámetro. Resulta útil
comenzar con el mando en la posición de las 12 en punto y el atenuador de inversión en su tope
derecho y ajustar a partir de ahí según sea necesario.
Es normal que el módulo Afterneath auto-oscile cuando utilice los ajustes más altos de los
controles Length y Reect – especialmente cuando ambos controles estén ajustados por encima
de la posición de las 12 en punto. Cuando combine la auto-oscilación con el control CV sobre
el parámetro Drag, obtendrá un oscilador controlado por voltaje muy interesante. Los modos
3-9 permitirán que la auto-oscilación controle el escalado voltios/octavas. Cuando use control
por voltaje externo, el mando Drag actuará como un control de desfase para el voltaje entrante.
Debido a la naturaleza del efecto, el parámetro Drag responde solo a voltajes positivos entre 1.6 y
4.1 voltios. Cuando use un voltaje entre 0 y 1.6 voltios, podrá girar el mando Drag hacia la derecha
para compensar o aplicar un desfase al voltaje entrante y adaptarlo al rango de respuesta. Tenga
en cuenta que las señales bipolares pueden necesitar un voltaje de compensación adicional de
una fuente externa para hacer que toda la señal de control quede dentro del rango de respuesta.
Tenga en cuenta que el Afterneath no pretende ser un oscilador de precisión. Cuando auto-oscile,
su tono se basará principalmente en la nota que esté reproduciendo a través suyo. Durante
la realimentación, la nota original se transformará a través de varias frecuencias armónicas y
enarmónicas, dependiendo de los niveles de los controles Length, Reect y Dampen. Un ajuste
cuidadoso de los controles Length y Reect puede permitirle mantener los sonidos en el búfer
durante períodos más largos sin que se vuelvan inestables.
<<< Para control por voltaje/octava durante la auto-oscilación >>>
1. Gire el atenuador inversor para la entrada de CV Drag hasta su tope derecho y el mando Drag
hasta la posición de las 12 en punto.
2. Elija uno de los modos 3-9.
3. Gire los mandos Length y Reect más allá de la posición de las 12 en punto hasta que se
escuche la auto-oscilación.
4. Encuentre el rango de su fuente de CV (teclado Volt/Octava, por ejemplo) que produciendo
efecto sobre el control Drag. Elija la nota más alta que quiera tocar en ese rango y tóquela
repetidamente mientras gira el mando Drag hacia adelante y atrás hasta que encuentre el
límite superior del control (este será el punto en el que girarlo más no tendrá ningún efecto).
Coloque el mando Drag en el punto que esté justo antes de aquel donde ya no tiene un efecto
en la escala.
5. Reduzca la posición de los mandos las perillas Length y Reect hasta que la auto-oscilación
ya no esté presente.
Ahora, ha ampliado el rango del módulo Afterneath a su fuente de CV. Las notas reproducidas en
el Afterneath ahora serán escaladas de acuerdo con el CV presente en la entrada de CV Drag.
Por ejemplo, si pulsa la tecla «C» (do) en su teclado Volt/Octava y después reproduce una nota C
desde una fuente externa en la entrada del módulo Afterneath, las pulsaciones siguientes de las
teclas en el teclado darán como resultado el escalado correcto del sonido que está en el búfer del
Afterneath. El girar a la derecha los mandos Length y Reect hará que el sonido se mantenga en
el búfer durante períodos de tiempo más largos. Los ajustes más altos de los parámetros Length
y Reect darán como resultado una auto-oscilación en la que el sonido original será transformado
a través de varias frecuencias armónicas y enarmónicas del sonido original que estaba en el búfer.
Los modos 5-9 son una excelente opción para el un control de CV sin teclado para conseguir un
control escalado cíclico o aleatorio del parámetro Drag. Por ejemplo, la conexión de una fuente
de voltajes aleatorios a la entrada CV Drag dará como resultado la generación de melodías
aleatorias basadas en la escala asociada con el modo que haya elegido.
¡Le recomendamos que no tenga miedo a experimentar!
24 25
Page 14

<<< Français >>>
<<< Installation >>>
Bienvenue dans votre machine à réverbération venue d’ailleurs Afterneath™ de EarthQuaker Devices®!
Afterneath ressemble beaucoup à son apparence: un sorcier des cavernes dans un module Eurorack.
Vous êtes le sorcier ou la sorcière, le contrôle de tension est votre baguette magique et la caverne est
le signal vaste, expansif et magique de votre instrument. Veuillez entrer.
Le module Afterneath intègre dans votre synthétiseur modulaire des sons extraterrestres issus
du monde de la pédale d’effets, avec un jeu de fonctionnalités étendu. Le module Afterneath
comporte une entrée audio principale, une sortie audio principale, un envoi et un retour audio
pour le ux de signal Reect et neuf commandes. Quatre des paramètres sont contrôlables via
CV (contrôle de tension) et chacun d’eux a été équipé d’un atténuateur inverseur dédié pour
traiter le CV entrant. Le module Afterneath a un chemin de signal direct complètement analogique
et un chemin de signal traité totalement numérique. Chaque module Afterneath est assemblé
partiellement par des robots et partiellement par des humains dans les cavernes éclairées à la
torche de la communauté d’Akron, dans l’Ohio.
<<< Aver tissements >>>
DANGER ÉLECTRIQUE! UNE INSTALLATION OU UNE MANIPULATION INCORRECTE PEUT PROVOQUER UNE
ÉLECTROCUTION OU DES DOMMAGES À VOTRE MODULE, À VOTRE BOÎTIER EURORACK OU À D’AUTRES MODULES.
ASSUR EZ-VOUS TOUJ OURS D’ÉTEIN DRE ET DE DÉBR ANCHER VOTRE BO ÎTIER OU VOTRE ALIM ENTATION EURO RACK
AVANT D’INSTALLER UN MODULE. ASSUREZ-VOUS ÉGALEMENT DE COUVRIR TOUS LES ESPACES VIDES AVEC DES
PANNEAUX VIERGES.
NIVEAUX DE SIGNAL ÉLEVÉS! CET APPAREIL EST CAPABLE DE PRODUIRE DES NIVEAUX DE SIGNAL MODULAIRES.
FAITES ATTENTION LORSQUE VOUS UTILISEZ CET ÉQUIPEMENT, CAR DES NIVEAUX DE SIGNAL ÉLEVÉS PEUVENT
ENDOM MAGER VOTRE ÉQUIP EMENT AUDIO OU VOTR E AUDITION!
* EARTHQUAKER DEVICES NE SOUS ENTEND NI N’ASSUME AUCUNE RESPONSABILITÉ POUR LES DOMMAGES
CAUSÉS À DES PERSONNES OU POUR LES DOMMAGES CAUSÉS À UN APPAREIL OU À UN OBJET PAR L’UTILISATION
DE CE MOD ULE. *
1. Eteignez et débranchez votre boîtier ou votre alimentation Eurorack et localisez 16HP
d’espace vide dans votre système.
2. Branchez l’extrémité à 10 broches du câble ruban fourni sur l’en-tête de broche d’alimentation
située à l’arrière de votre module Afterneath, de sorte que la bande rouge du câble soit
orientée vers les mots «Red Stripe» imprimés sur la carte de circuit imprimé. Connectez
l’extrémité à 16 broches du câble ruban à la carte bus de votre boîtier Eurorack conformément
aux spécications du fabricant de votre boîtier ou de votre carte bus. Assurez-vous d’avoir
orienté votre câble correctement, sinon vous risquez d’endommager votre module ou votre
système.
3. Fixez le module sur votre boîtier avec des vis de montage compatibles avec votre boîtier et
couvrez tout espace libre restant avec des panneaux vierges.
<<< Caractéristiques techniques >>>
• Largeur : 16HP / Profondeur Max: 31,75 mm
• Consommation : 95 mA du rail + 12v, 0 mA des deux rails -12v et + 5v
• Connecteur d’alimentation Eurorack standard à 10 broches avec un marquage pour localiser
les broches négatives
• Compatible Skiff - dépasse de moins de 1,25 pouces (31,75 mm) derrière le panneau avec la
tête d’alimentation installée
• Entrée audio capable de gérer des signaux d’entrée allant du niveau instrument au niveau
modulaire, en fonction du réglage du bouton d’entrée Input
Nous recommandons l’utilisation d’une alimentation de haute qualité et à faible bruit.
CET APPAREIL EST CONFORME À LA SECTION 15 DE LA RÉGLEMENTATION DE LA FCC. LE FONCTIONNEMENT EST
<<< Garantie >>>
SOUMIS AUX DEUX CONDITIONS SUIVANTES: (1) CET APPAREIL NE DOIT PAS CAUSER D’INTERFÉRENCES NUISIBLES
ET (2) IL DOIT ACCEPTER TOUTES LES INTERFÉRENCES REÇUES, Y COMPRIS CELLES POUVANT ENTRAÎNER UN
FONCTIONNEMENT INDÉSIRABLE. LES MODIFICATIONS / MODIFICATIONS NON APPROUVÉES PAR EARTHQUAKER
DEVIC ES LLC PEUVENT ANN ULER LE DROIT DE L’UTILI SATEUR À UTIL ISER L’ÉQUIPEM ENT.
CET ÉQUIPEMENT A ÉTÉ TESTÉ ET DÉCLARÉ CONFORME AUX LIMITES IMPOSÉES AUX APPAREILS NUMÉRIQUES DE
CLAS SE A, CO NFORM ÉMENT À L A SECTION 15 D U RÈGLEM ENT DE LA FC C. CES LIMI TES SONT CO NÇUES P OUR FOU RNIR
UNE PROTECTION RAISONNABLE CONTRE LES INTERFÉRENCES NUISIBLES LORSQUE L’ÉQUIPEMENT EST UTILISÉ
DANS UN EN VIRONNEMENT C OMMERCIAL. C ET ÉQUIPEMENT GÉNÈRE, UTI LISE ET PEUT ÉMETTRE DE L’ÉNERGIE D E
FRÉQUENCE RADIO. S’IL N’EST PAS INSTALLÉ ET UTILISÉ CONFORMÉMENT AU MANUEL D’INSTRUCTIONS, IL PEUT
CAUSER DES I NTERFÉRENCES N UISIBLES AUX CO MMUNICATION S RADIO.
WWW.EARTHQUAKERDEVICES.COM
EARTH QUAKER DEV ICES LLC, 350 W. BOWERY ST., AKRO N OH 44307
26 27
Nous réparerons tous nos appareils aussi longtemps que notre entreprise existera. Il n’y a jamais
de frais à moins que la carte de circuit imprimé doive être remplacée en raison d’un dommage
causé par l’utilisateur, tel qu’une réparation non effectuée en usine, une alimentation incorrecte,
une tension inversée, une modication, des dégâts d’eau, etc. Veuillez envoyer un e-mail à
info@earthquakerdevices.com pour toute question ou pour faire une demande de garantie.
Page 15

<<< Contrôles >>>
1
5
6
7
10
11
12
15
16
19 20 21 22
Input : Ajuste le niveau du signal entrant pour accepter des signaux allant du niveau instrument
1
(sens horaire) au niveau modulaire (sens antihoraire).
Dampen : Cont rôle la tonalité du signal traité. Dans le sens des aiguilles d’une montre pour les tons
2
les plus sombres, dans le sens inverse pour les tons les plus clairs.
Reect : Contrôle la régénération de la réverbération; tournez dans le sens des aiguilles pour plus
3
de réexion et d’écho, dans le sens inverse pour en obtenir moins. S’il est monté haut on obtient une
auto-oscillation. Agit comme un atténuateur lorsqu’un signal est raccordé à l’entrée Reect Return.
Mix : Contrôle la quantité de signal traité qui est mixée avec le signal direct. Bien qu’il ne permette
4
pas d’avoir un signal complètement traité, vous pouvez l’obtenir en activant le commutateur Dry Kill.
Dry Kill : Élimine le signal direct de la sortie, ne laissant que le signal traité.
5
2 3 4
8
9
13
14
17
18
Dr a g : Cette rév erbé r ati o n nu méri q ue est co m posé e de plu s ieur s dé l ais cour ts. Drag s é par e les lign es
6
de délais en créant un effet cliquetant et saccadé. C’est la commande la plus cool de l’Afterneath.
Nous vous conseillons vivement de la tourner lentement (ou de la moduler) tout en laissant les notes
sonner pour obtenir un effet de vitesse déformé. L’effet ressemble davantage à un délai lorsque
vous le tournez dans le sens contraire des aiguilles d’une montre, et il ressemble davantage à une
réverbération lorsque vous le tournez dans le sens des aiguilles. Vous obtiendrez des temps de retard
plus courts en déplaçant le bouton de commande dans le sens des aiguilles d’une montre, et des
temps de retard plus longs en le tournant dans le sens contraire des aiguilles d’une montre. Vous
remarquerez un changement de hauteur lors du réglage de cette commande avec le son présent dans
le buffer d’effets ou lorsque l’effet est auto-oscillant.
Mo de : Contrôle le com portement de la comman de Drag a insi que la faç on dont elle réagit au co nt rôle
7
de la tension. Il existe 9 mod es différents (voir la section sui vante sur les modes pour des explic atio ns).
Diffuse : Adoucit et diffuse les répétitions de délai. on obtient des transitoires plus nets avec plus
8
d’attaque dans le sens inverse des aiguilles, et lorsque vous le tournez dans le sens des aiguilles
d’une montre, vous obtenez des répétitions avec plus d’ambiance, plus réverbérées et diffuses.
Length : Contrôle la durée de déclin de la réverbération.
9
LED Mode : Indique visuellement le mode actif.
10
Atténuateur inverseur de CV pour Drag : Atténue ou inverse le CV (contrôle de tension) entrant.
11
Le CV est à gain unitaire lorsque l’atténuateur est au maximum dans le sens des aiguilles, inversé
quand il est au maximum dans le sens inverse des aiguilles et le CV est complètement atténué
lorsque l’atténuateur est à la position 12 heures.
Att énuateur inverseur de CV pour Mode : Atténue ou inverse le CV (contrôle de tension) entrant.
12
Le CV est à gain unitaire lorsque l’atténuateur est au maximum dans le sens des aiguilles, inversé
quand il est au maximum dans le sens inverse des aiguilles et le CV est complètement atténué
lorsque l’atténuateur est à la position 12 heures.
Atténuateur inverseur de CV pour Diffuse : Atténue ou inverse le CV (contrôle de tension)
13
entrant. Le CV est à gain unitaire lorsque l’atténuateur est au maximum dans le sens des aiguilles,
inversé quand il est au maximum dans le sens inverse des aiguilles et le CV est complètement
atténué lorsque l’atténuateur est à la position 12 heures.
Atténuateur inverseur de CV pour Length : Atténue ou inverse le CV (contrôle de tension)
14
entrant. Le CV est à gain unitaire lorsque l’atténuateur est au maximum dans le sens des aiguilles,
inversé quand il est au maximum dans le sens inverse des aiguilles et le CV est complètement
atténué lorsque l’atténuateur est à la position 12 heures.
Entrée CV pour Drag : Permet la modulation du contrôle Drag en utilisant un CV externe.
15
Entrée CV pour Mode : Permet la modulation du contrôle Mode en utilisant un CV externe.
16
Entrée CV pour Diffuse : Permet la modulation du contrôle Diffuse en utilisant un CV externe.
17
Entrée CV pour Length : Permet la modulation du contrôle Length en utilisant un CV externe.
18
Entrée audio : Accepte des signaux audio allant du niveau instrument au niveau modulaire, en
19
utilisant le bouton Input pour régler le niveau.
Reect Send : Permet une connexion et un traitement externe pour le signal de retour de Reect.
20
La connexion à partir de cette sortie n’interrompt pas le chemin de retour interne.
Reect Return : Permet de connecter le signal de retour de Reect corrigé et traité en externe.
21
En outre, il peut être utilisé comme entrée audio supplémentaire si vous souhaitez renoncer au
retour d’effet (feedback). Le bouton Reect agit comme un atténuateur pour l’audio assigné à cette
entrée. Veuillez noter que le traitement du signal de retour Reect peut facilement entraîner une
auto-oscillation en appliquant un traitement d’effets tels qu’une distorsion ou un ltre résonant. Le
bouton Reect peut être utilisé pour compenser ce facteur. Le fait de brancher un câble à cette
entrée déconnectera le chemin de retour interne, mais l’envoi de Reect sera toujours actif.
Sortie audio
22
28 29
Page 16

<<< Astuce Pro >>>
Vous pouvez assigner à la fois la sortie audio principale et l’envoi Reect Send à votre module de
sortie audio pour obtenir un ef fet pseudo-stéréo. Vous pouvez ajouter encore plus de complexité
et de variation en assignant l’envoi Reect Send à un module multiple. Envoyez une copie du
signal à l’une de vos sorties audio principales (par exemple, Main out vers la sortie gauche et un
multiple de l’envoi Reect send vers la sortie droite). Ensuite, assignez une autre copie du signal
d’envoi Reect Send à un traite ment exte rne tel qu’un ltre ou un VCA, puis ramen ez le à l’entrée
Reect Return.
<<< Modes >>>
1. Non quantié : Réponse douce et non
quantiée sur la plage de fonctionnement
2. Non quantié avec Slew (balayage) :
Une réponse douce et non quantiée sur
toute la plage de fonctionnement, mais
avec un balayage musical qui rappelle la
rotation du bouton varispeed sur un délai
de bande vintage britannique. Le «Drag»
a un retard sur la rotation du potentiomètre
ou le changement de CV, mais le rattrape
rapidement.
3. Volt/Octave non quantié : Doux et non
quantié, mais calibré pour s’aligner sur
la courbe 1v / octave an de permettre
la modulation mélodique de l’audio dans
la mémoire tampon, ou pour contrôler la
fréquence d’auto-oscillation comme un
oscillateur contrôlé en tension
4. Gamme Chromatique : Quantié 1v/
octave pour la gamme chromatique
5. Gamme majeure : Quantié 1v/octave
pour la gamme majeure
6. Gamme mineure : Quantié 1v/octave
pour la gamme mineure
7. Gamme Pentatonique : Quantié 1v/
octave pour la gamme pentatonique
8. Octaves et Quintes : Quantié 1v/octave
pour omettre tout sauf les octaves et les
quintes
9. Octaves : Quantié 1v/octave pour
omettre tout sauf les octaves
<<< Contrôle de la tension >>>
Lors de l’utilisation du contrôle de la tension, le bouton associé à ce paramètre agira comme
un offset (compensation). Par conséquent, vous pouvez ajuster le bouton et son atténuateur
inverseur dédié pour amener le contrôle de tension à la plage de fonctionnement souhaitée pour
le paramètre. Il est utile de démarrer en positionnant le bouton rotatif à 12 heures et l’atténuateur
inverseur au maximum dans le sens des aiguilles d’une montre, puis d’ajuster selon les besoins.
<<< Auto-oscillation >>>
Gardez à l’esprit que Afterneath n’est pas conçu pour être un oscillateur de précision. Lorsqu’il
auto-oscille, sa hauteur est principalement basée sur la note jouée et entrée. Lors de la
réinjection (feedback), la note originale se transforme en diverses fréquences harmoniques et
enharmoniques, en fonction des niveaux des contrôles Length, Reect et Dampen. Un réglage
soigneux des commandes Length et Reect peut vous permettre de maintenir les sons dans la
mémoire tampon pendant de longues périodes sans que cela ne devienne instable.
<<< Pour l’alignement volt/octave pendant l’auto-oscillation >>>
1. Tournez l’atténuateur inverseur pour l’entrée Drag CV à fond dans le sens des aiguilles d’une
montre, et positionnez le bouton Drag sur midi.
2. Sélectionnez l’un des Modes 3-9.
3. Tournez les boutons Length et Reect au-delà de la position midi jusqu’à ce que vous
entendiez une auto-oscillation.
4. Recherchez la plage de votre source de CV (clavier Volt/Octave, par exemple) qui a un effet
sur la commande drag. Choisissez la note la plus haute que vous souhaitez jouer dans cette
plage et jouez-la à plusieurs reprises tout en tournant le bouton Drag jusqu’à trouver la limite
supérieure du contrôle (c’est le point où le fait de le tourner davantage n’aura aucun effet).
Placez le bouton Drag à l’endroit où il vient de dépasser le point où il n’a plus d’effet sur la
gamme.
5. Baissez les valeurs des boutons Length et Reect jusqu’à ce que l’auto-oscillation ne soit
plus présente.
Vous avez maintenant aligné la plage du module Afterneath à votre source de CV. Les notes
jouées dans l’Afterneath seront maintenant accordées en fonction du CV présent à l’entrée Drag
CV. Par exemple, si vous appuyez sur la touche “Do” de votre clavier Volt /Octave, puis vous
jouez une note en Do d’une source externe dans l’entrée du module Afterneath, toute pression
ultérieure sur votre clavier entraînera un accordage en hauteur correct du son qui est dans la
mémoire tampon de l’Afterneath. En tournant les boutons Length et Reect dans le sens des
aiguilles d’une montre, le son sera maintenu dans la mémoire tampon pendant de plus longues
périodes. Des réglages plus élevés des paramètres Length et Reect entraîneront une autooscillation dans laquelle le son d’origine se transforme en diverses fréquences harmoniques et
enharmoniques du son d’origine qui était dans la mémoire tampon.
Les modes 5 à 9 sont un excellent choix d’accordage du CV sans clavier pour conférer un contrôle
cyclique ou aléatoire du paramètre Drag. Par exemple, la connexion d’une source de tensions
aléatoires à l’entrée Drag CV entraîne la génération de mélodies aléatoires en fonction de la
gamme associée au mode que vous avez sélectionné.
Il est normal que le module Afterneath auto-oscille lorsqu’on utilise des réglages plus élevés pour
les commandes Length et Reect, en particulier lorsque les deux commandes sont réglées au-
dessus de la position midi. Lorsque vous combinez l’auto-oscillation avec le contrôle de tension
(CV) sur le paramètre Drag, vous obtenez un oscillateur contrôlé en tension très intéressant. Les
modes 3 à 9 permettront à l’auto-oscillation de suivre la gamme volt/octave. Lorsque vous utilisez
un contrôleur de tension externe, le bouton Drag sert de commande de compensation (offset)
pour la tension en volt entrante. En raison de la nature de l’effet, le paramètre Drag ne répond
qu’aux tensions positives comprises entre 1,6 et 4,1 volts. Lorsque vous utilisez une tension
comprise entre 0 et 1,6 volts, vous pouvez tourner le bouton Drag dans le sens des aiguilles
d’une montre pour compenser la tension entrante dans la plage de réponse. Veuillez noter que les
signaux bipolaires peuvent nécessiter une compensation de tension supplémentaire provenant
d’une source externe pour amener l’ensemble du signal de commande dans la plage de réponse.
30 31
Nous recommandons de beaucoup expérimenter !
Page 17

<<< Po polsku >>>
<<< Instalacja >>>
Przy witaj si ę ze swoim ni eziemskim efektem pog łosowym Afterneath™ od EarthQuaker Devices®!
Afterneath brzmi bardzo podobnie jak wygląda – jak czarodziej w jaskini wewnątrz modułu
Eurorack. To ty jesteś czarodziejem (lub czarodziejką), napięcie sterujące to twoja różdżka, a
jaskinią jest bogaty, ekspansywny i magiczny sygnał Twojego instrumentu. Wchodzisz w to?
Moduł Afterneath przenosi nieziemskie dźwięki ze świata efektów nożnych bezpośrednio do
syntetyzatora modularnego, wzbogacając je o dodatkowe funkcje. Moduł Afterneath wyposażony
jest w jedno główne wejście audio, jedno główne wyjście audio, wyjście i powrót dźwięku na
potrzeby toru sprzężenia zwrotnego Reect oraz dziewięć regulatorów. Cztery parametry można
kontrolować za pomocą napięcia sterującego, a każdy z nich wyposażono w dedykowany tłumik
odwracający, który przetwarza wejściowe napięcie sterujące. Modu ł After neath posiada całkowicie
analogowy tor sygnał u suchego i całkowicie cyfrowy tor sygnału mokrego. Każdy moduł Afterneath
wykonuje mieszanina robotów i ludzi w oświetlonej pochodniami jaskini Akron w Ohio.
<<< Ostrzeżenia >>>
ZAGROŻENIE ELEKTRYCZNE! NIEWŁAŚCIWA INSTALACJA LUB OBSŁUGA GROZI PORAŻENIEM PRĄDEM
ELEKTRYCZNYM ALBO USZKODZENIEM TEGO MODUŁU, SKRZYNI EURORACK LUB INNYCH MODUŁÓW. PRZED
PRZYSTĄPIENIEM DO INSTALACJI MODUŁU NALEŻY WYŁĄCZYĆ ZASILANIE I ODŁĄCZ YĆ SKRZYNIĘ EUROR ACK
LUB ZASIL ACZ OD ŹRÓDŁ A ZASILANIA. NALEŻY TEŻ PAMIĘTAĆ O TYM, ABY ZAKRYWAĆ PUSTE, NIEUŻYWANE
PRZEST RZENIE W SKR ZYNI PRZ EWIDZIANY MI DO TEGO POKRY WKAMI.
WYSOKI POZIOM SYGNAŁU! URZĄDZENIE MOŻE WYTWARZAĆ SYGNAŁY NA POZIOMIE MODULARNYM. NALEŻY
ZACHOWAĆ OSTROŻNOŚĆ PODCZAS UŻYTKOWANIA TEGO URZĄDZENIA, PONIEWAŻ WYSOKI POZIOM SYGNAŁU
GROZI USZKODZENIEM SPRZĘTU AUDIO LUB SŁUCHU!
*FIRMA EARTHQUAKER DEVICES NIE PONOSI ŻADNEJ ODPOWIEDZIALNOŚCI ZA JAKIEKOLWIEK USZCZERBKI NA
ZDROWIU ANI USZKODZENIA URZ ĄDZEŃ I PRZEDMIOTÓW WYNIK AJĄCE Z UŻYWANIA TEGO MODUŁU.*
NINIEJSZE URZĄDZENIE JEST ZGODNE Z CZĘŚCIĄ 15 ZASAD FCC. UŻYTKOWANIE TEGO URZĄDZENIA PODLEGA
NASTĘPUJĄCYM DWÓM WARUNKOM: (1) URZĄDZENIE NIE MOŻE WYTARZAĆ SZKODLIWYCH Z AKŁÓCEŃ I (2)
URZĄDZENIE MUSI BYĆ ODPORNE NA WSZELKIE ODBIERANE ZAKŁÓCENIA, ŁĄCZNIE Z ZAKŁÓCENIAMI, KTÓRE
MOGŁYBY POWODOWAĆ NIEPOŻĄDANE DZIAŁANIE. ZMIANY/MODYFIKACJE NIEZATWIERDZONE PRZEZ FIRMĘ
EARTHQUAKER DEVICES LLC GROŻĄ UTRATĄ PRAWA UŻYTKOWNIKA DO EKSPLOATOWANIA TEGO URZĄDZENIA.
NINIEJSZE URZĄDZENIE PRZESZŁO TESTY POTWIERDZAJĄCE JEGO ZGODNOŚĆ Z OGRANICZENIAMI DOTYCZ ĄCYMI
URZĄDZEŃ CYFROWYCH KLASY A, ZGODNIE Z CZĘŚCIĄ 15 ZASAD FCC. OGRANICZENIA TE WPROWADZONO W CELU
ZAPEWNIENIA UZASADNIONEJ OCHRONY PRZED SZKODLIWYMI ZAKŁÓCENIAMI PODCZAS EKSPLOATOWANIA
URZĄDZENIA W ŚRODOWISKU KOMERCYJNYM. NINIEJSZE URZĄDZENI WYTWARZA, UŻYWA I MOŻE
WY PROM IENIOW YWAĆ ENERGI Ę O CZĘSTOTLIWOŚCI RADIOWEJ I JEŻ ELI NIE ZOSTANIE ZAINSTALOWAN E I NIE BĘDZIE
EKSPLOATOWANE ZGODNIE Z INSTRUKCJĄ OBSŁUGI, MOŻE WYTWARZ AĆ SZKODLIWE ZAKŁÓCENIA KOMUNIKACJI
RADIOWEJ.
1. Wyłącz i odłącz obudowę Eurorack lub zasilacz i znajdź 16hp wolnego miejsca w systemie.
2. Podłącz wtyk 10-stykowy kabla taśmowego do rozdzielacza zasilania z tyłu modułu Afterneath
tak, aby czerwony pasek na kablu skierowany był w stronę napisu „Red Stripe” znajdującego
się na płycie drukowanej. Podłącz wtyk 16-stykowy przewodu kablowego do płyty magistrali w
obudowie Eurorack zgodnie ze specykacją producenta obudowy lub płyty magistrali. Przed
podłączeniem sprawdź orientację kabla, pomyłka grozi uszkodzeniem modułu lub całego
systemu.
3. Zamontuj moduł w obudowie za pomocą wkrętów montażowych pasujących do obudowy, a
pozostałe wolne przestrzenie zakryj odpowiednimi pokrywami.
<<< Dane techniczne >>>
• Szerokość: 16HP / Maksymalna głębokość: 31,75 mm
• Pobór prądu: 95 mA z szyny +12 V, 0 mA zarówno z szyny -12 V, jak i +5 V
• Standardowe 10-stykowe złącze zasilania Eurorack z oznaczeniem biegunów ujemnych
• Przystosowany do obudowy typu skiff - wystaje o mniej niż 1,25 cala (31,75 mm) zza panela
przy zainstalowanym rozdzielaczu zasilania
• Wejście audio obsługujące sygnały wejściowe w zakresie od poziomu instrumentów po
poziom modularny, w zależności od ustawienia pokrętła Input.
Zalecamy, aby stosować wysokiej jakości zasilacz o niskim poziomie zakłóceń.
<<< Gwarancja >>>
Naprawimy każde z naszych urządzeń tak długo, jak będziemy działać. Jest to zawsze usługa
bezpłatna, chyba że zachodzi konieczność wymiany pł yty drukowanej wynikająca z uszkodzenia
spowodowanego przez użytkownika przez np. niewłaściwą naprawę poza producentem,
nieprawidłowe zasilanie, zamienienie biegunów zasilania, modykacje, zalanie wodą itp. W
razie jakichkolwiek pytań lub w celu przesłania zgłoszenia gwarancyjnego prosimy o kontakt pod
adresem poczty elektronicznej info@earthquakerdevices.com.
WWW.EARTHQUAKERDEVICES.COM
EARTH QUAKER DEV ICES LLC, 350 W. BOWERY ST., AKRO N OH 44307
32 33
Page 18

<<< Regulatory >>>
1
5
6
7
10
11
12
15
16
19 20 21 22
Input: Reguluje poziom sygnału wejściowego, umożliwiając doprowadzenie sygnału wejściowego
1
od poziomu instrumentu (położenie w prawo) do poziomu modularnego (położenie w lewo).
Dampen: Steruje brzmieniem dźwięku mokrego. W prawo - brzmienie ciemniejsze, w lewo -
2
jaśniejsze.
Reect: Pozwala kontrolować regenerację pogłosu, obrót w prawo zwiększa rozmycie i echo,
3
obrót w prawo - zmniejsza. Ustawienie wysokiego poziomu tego efektu spowoduje wzbudzenie
samooscylacji. Działa jako tłumik w przypadku podłączenia sygnału do gniazda Reect Return.
Mix: Kontroluje ilość sygnału mokrego mieszanego z sygnałem suchym. Chociaż tak naprawdę nie
4
jest on całkowicie mokry, możesz uzyskać całkowicie mokry sygnał, naciskając przełącznik Dry Kill.
Dry Kill: Eliminuje sygnał suchy z wyjścia, pozostawiając tylko sygnał mokry.
5
34 35
2 3 4
8
9
13
14
17
18
Drag: Jest to pogłos cyfrowy składający się z kilku krótkich opóźnień. Drag oddziela linie opóźnień
6
twor ząc efekt jąkania, pingowania. To najciekawszy regulator w module Afterneath. Zdecydowanie
zalecamy, aby kręcić (lub modulować) nim powoli, nadając dźwiękom fantastyczny efekt zmiennej
prędkości. Uzyskiwany efekt przypomina bardziej opóźnienie po przekręceniu w lewo, a bardziej
pogłos po przekręceniu w prawo. Przekręcenie w prawo skraca czas opóźnienia, a przekręcenie
w prawo go wydłuża. Kręcąc tym pokrętłem zauważysz zmianę wysokości dźwięku obecnego w
buforze efektów lub w przypadku efektu samooscylacyjnego.
Mode: Odpowiada za zachowanie regulatora Drag oraz jego reakcji na napięcie sterujące.
7
Dostępne jest 9 trybów pracy (ich objaśnienie znajdziesz w dalszej części tego dokumentu,
zatytułowanej Tryby pracy).
Diffuse: Wygładza i rozprasza powtórzenia efektu opóźnienia. Pokrętło skręcone w lewo daje
8
ostrzejsze przejścia z silniejszym atakiem, natomiast skręcone w prawo nadaje więcej nastroju,
efektu zbliżonego do pogłosu i rozmycia.
Length: Określa długość zanikania pogłosu.
9
Dioda LED trybu pracy: Wskazuje aktualnie wybrany tryb pracy.
10
Tłumik odwracający napięcia sterującego parametrem Drag: Tłumi lub odwraca wejściowe
11
napięcie sterujące. Napięcie sterujące osiąga pełną wartość w położeniu pokrętła całkowicie w prawo,
zostaje odwrócone w położeniu całkowicie w lewo i całkowicie wytłumione w położeniu godziny 12-tej.
Tłumik odwracający napięcia sterującego parametrem Mode: Tłumi lub odwraca wejściowe
12
napięcie sterujące. Napięcie sterujące osiąga pełną wartość w położeniu pokrętła całkowicie w prawo,
zostaje odwrócone w położeniu całkowicie w lewo i całkowicie wytłumione w położeniu godziny 12-tej.
Tłumik odwracający napięcia sterującego parametrem Diffuse: Tłumi lub odwraca wejściowe
13
napięcie sterujące. Napięcie sterujące osiąga pełną wartość w położeniu pokrętła całkowicie w prawo,
zostaje odwrócone w położeniu całkowicie w lewo i całkowicie wytłumione w położeniu godziny 12-tej.
Tłumik odwracający napięcia sterującego parametrem Length: Tłumi lub odwraca wejściowe
14
napięcie sterujące. Napięcie sterujące osiąga pełną wartość w położeniu pokrętła całkowicie w prawo,
zostaje odwrócone w położeniu całkowicie w lewo i całkowicie wytłumione w położeniu godziny 12-tej.
Wejście napięcia sterującego regulatora Drag: Służy do modulowania regulatora Drag za
15
pomocą zewnętrznego napięcia sterującego.
Wejście napięcia sterującego regulatorem Mode: Służy do modulowania regulatora Mode za
16
pomocą zewnętrznego napięcia sterującego.
Wejście napięcia sterującego regulatorem Diffuse: Służy do modulowania regulatora Diffuse
17
za pomocą zewnętrznego napięcia sterującego.
Wejście napięcia sterującego regulatora Length: Służy do modulowania regulatora Length za
18
pomocą zewnętrznego napięcia sterującego.
Wejście audio: Obsługuje sygnały audio od poziomu instrumentu po poziom modularny, dzięki
19
możliwości wyboru poziomu za pomocą pokrętła Input.
Reect Send: Pozwala na wypro wadzan ie na zewnąt r z i przet w ar z anie toru sp r z ę żenia
20
zwrotnego Reect. Podłączenie tego wyjścia nie powoduje przerwania toru wewnętrznego
sprzężenia zwrotnego.
Reect Return: Pozwala na powrót wyprowadzonego na zewnętrz i przetworzonego toru
21
sprzężenia zwrotnego Reect. Może też służyć jako dodatkowe wejście audio, jeśli chcesz
zrezygnować ze sprzężenia zwrotnego. Pokrętło Reect d z i a ła jak tł um i k dź w i ę k u do p r o w a d z o n e g o
do tego wejścia. Należy pamiętać o tym, że przetwarzanie toru sprzężenia zwrotnego Reect
może łatwo doprowadzić do wzbudzenia samooscylacji podczas przetwarzania takich efektów, jak
zniekształcenie, czy też ltr rezonansowy. Za pomocą pokrętła Reect można skompensować ten
czynnik. Podłączenie kabla do tego wejścia spowoduje odłączenie wewnętrznego toru sprzężenia
zwrotnego, jednak wyjście Reect Send będzie nadal aktywne.
Wyjście dźwięku
22
Page 19

<<< Porady eksper tów >>>
Główne wyjście dźwięku i wyjście Reect Send można podłączyć do modułu wyjściowego
dźwięku uzyskując efekt pseudo-stereo. Można jeszcze zwiększyć złożoność i zróżnicowanie
podłączając wyjście Reect Send do multiplikatora (rozdzielacza), gdzie jedna kopia sygnału
podłączona będzie do jednego z wyjść audio wraz z wyjściem głównym (np. wyjście główne
podłączone do wyjścia lewego a sygnał Reect Send z multiplikatora do wyjścia prawego).
Następnie drugą kopię sygnału Reect Send można podłączyć do procesora zewnętrznego,
takiego jak ltr lub VCA, a następnie z powrotem do wejścia Reect Return.
Na l e ży pa mi ę ta ć o ty m , że mo du ł Af te r ne a th ni e z o st a ł za p ro j ek to w a ny do pe łn i en i a ro l i p r ec y zy jn e go
oscylatora. Po wzbudzeniu samooscylacji ich wysokość zależy przede wszystkim od wysokości
zagranego dźwięku. W torze sprzężenia zwrotnego oryginalny ton zostanie przetworzony z
uż yciem różn orodnyc h czę stotl iwości har mon icz nych i enharmoni cznyc h, w zależności od ustawie ń
regulatorów Length, Reect oraz Dampen. Precyzyjne dostosowanie regulatorów Length i
Reect pozwoli na dłuższe wybrzmiewanie dźwięków w buforze bez utraty stabilności.
<<< Śledzenie V/oktawę podczas samooscylacji >>>
<<< Tryby pracy >>>
1. Bez kwantyzacji: Płynna, nieskwantowana
odpowiedź w całym zakresie roboczym.
2. Bez kwantyzacji, z efektem Slew: Płynna,
nieskwantowana odpowiedź w całym zakresie
roboczym, jednak z dodatkiem efektu
muzycznego Slew, który przypomina kręcenie
pokrętłem regulacji szybkości w starych
brytyjskich opóźnieniach taśmowych. Działanie
efektu “Drag” będzie początkowo opóźnione
w stosunku do zmian pokrętła lub napięcia
sterującego, jednak to opóźnienie będzie
szybko nadrabiane.
3. Bez kwantyzacji, 1 V/oktawę: Płynny i
nieskwantowany efekt, skalowany do krzywej
1 V/oktawę, co umożliwia melodyczne
modulowanie dźwięku w buforze lub
sterowanie częstotliwością samooscylacji w
sposób podobny jak w przypadku oscylatora
sterowanego napięciem.
4. Skala chromatyczna: Z kwantyzacją, 1 V/
oktawę, do skali chromatycznej
5. Skala durowa: Z kwantyzacją, 1 V/oktawę, do
skali durowej
6. Skala molowa: Z kwantyzacją, 1 V/oktawę, do
skali molowej
7. Skala pentatoniczna: Z kwantyzacją, 1 V/
oktawę, do skali pentatonicznej
8. Oktaw y i kwinty: Z kwant yzacją, 1 V/oktawę, z
pomijaniem wszystkich tonów poza oktawami i
kwintami
9. Oktawy: Z kwantyzacją, 1 V/oktawę, z
pomijaniem wszystkich tonów poza oktawami
<<< Sterowanie napięciem >>>
W przypadku korzystania z napięcia sterującego, pokrętło związane z danym parametrem będzie
służyło do przesuwania zakresu. Dlatego też, w celu uzyskania żądanego zakresu roboczego
napięcia sterującego dla danego parametru konieczne będzie regulowanie położenia pokrętła
i dedykowanego tłumika odwracającego. Dobrze jest zaczynać od pokrętła ustawionego na
godzinę 12-tą i tłumika odwracającego ustawionego w położeniu skrajnym w prawo, a następnie
dostosować ustawienia stosownie do potrzeb.
<<< Samooscylacje >>>
1. Przekręć tłumik odwracający wejścia napięcia sterującego parametrem Drag CV cał ko wic ie w
prawo, a pokrętło Drag ustaw na godzinę 12-tą.
2. Wybierz jeden z trybów 3-9.
3. Ustaw pokrętła Length i Reect za godzinę 12-tą, aż do wzbudzenia samooscylacji.
4. Wyszukaj zakres źródła napięcia sterującego (np. klawiatura sterująca V/oktawę) efektem Drag.
Wybierz najwyższy ton, któr y ma być odtwarzany w danym zakresie i odtwarzaj go wielokrotnie,
jednocześnie przekręcając pokrętło Drag w jedną i w drugą stronę aż do ustalenia limitu górnego
napięcia sterującego (jest to punkt, w którym dalsze przekręcanie regulatora nie daje żadnego efektu).
Ustaw pokrętło Drag w położeniu nieco tylko dalszym od punktu, w którym brak efektu na skali.
5. Skręć pokrętła Length i Reect tak, aby zanikły samooscylacje.
Proces skalowania zakresu roboczego modułu Afterneath w celu dopasowania go do źródła
napięcia sterującego został ukończony. Dźwięki odtwarzane przez moduł Afterneath będą teraz
skalowane odpowiednio do napięcia sterującego obecnego na wejściu Drag. Na przykład po
naciśnięciu klawisza „C” na klawiaturze sterującej V/oktawa, a następnie odtworzeniu dźwięku C
z zewnętrznego źródła podłączonego do wejścia modułu Afterneath, kolejne naciśnięcia klawiszy
na klawiaturze sterującej będą powodowały odpowiednie skalowanie dźwięku przechowywanego
w buforze modułu Afterneath. Przekręcenie pokręteł Length i Reect w prawo spowoduje
dłuższe wybrzmiewanie dźwięku przechowywanego w buforze. Wyższe ustawienie parametrów
Length i Reect spowoduje wzbudzenie samooscylacji, podczas gdy oryginalny dźwięk będzie
przetwarzany przy użyciu różnorodnych częstotliwości harmonicznych i enharmonicznych
dźwięku oryginalnego przechowywanego w buforze.
Tryby pracy od 5 do 9 to doskonały wybór w przypadku śledzenia napięcia sterującego bez użycia
klawiatury w celu cyklicznego lub losowego, skalowanego kontrolowania parametru Drag. Na
przykład podłączenie źródła napięć losowych do wejścia napięcia sterującego Drag spowoduje
generowanie losowych melodii w oparciu o skalę powiązaną z wybranym trybem.
Zalecamy, aby dużo eksperymentować!
Zjawisko samowzbudzania się modułu Afterneath przy wyższym poziomie ustawień regulatorów
Length i Reect jest normalne – szczególnie w przypadku, gdy obydwa regulatory ustawione
są poza godzinę 12-tą. W przypadku połączenia samooscylacji ze sterowaniem napięciowym
parametru Drag można uzyskać interesujący oscylator sterowany napięciem. Tryby pracy od 3
do 9 pozwalają samooscylacjom śledzić skalowanie napięcie/oktawę. W przypadku korzystania
z zewnętrznego napięcia sterującego, pokrętło Drag działa jako regulator przesunięcia zakresu
napięcia wejściowego. Ze względu na charakter tego efektu, parametr Drag reaguje wyłącznie na
napięcia dodatnie z zakresu od 1,6 do 4,1 V. Jeśli używasz napięć z zakresu od 0 do 1,6 V, możesz
przekręcić pokrętło Drag w prawo, przesuwając zakres napięcia wejściowego do zakresu reakcji.
Sygnały bipolarne mogą wymagać dodatkowego napięcia przesuwającego z zewnętrznego źródła,
aby przesunąć cały zakres sygnału sterującego do zakresu reakcji.
36 37
Page 20

<<< Čeština >>>
<<< Instalace >>>
Máme pro tebe naprosto jedinečný dozvukový efekt Afterneath™ od EarthQuaker Devices®!
Afterneath zní hodně podobně, tak jak vypadá – jako čaroděj z jeskyně v modulu Eurorack. Ty
jsi čaroděj nebo čarodějnice, řídící napětí je tvá kouzelná hůlka a jeskyně je hutný, působivý a
magický signál tvého nástroje. Hodláš vstoupit dovnitř?
Modul Afterneath přináší do vašeho modulárního syntezátoru další jedinečné zvuky ze světa
efektových pedálů s rozšířenou sadou funkcí. Modul Afterneath je vybaven jedním hlavním
zvukovým vstupem, jedním hlavním zvukovým výstupem, efektovou smyčkou Reect s výst up em
a návratem a devíti ovládacími prvky. Čtyři z parametrů lze kontrolovat prostřednictvím řídícího
napětí a každý z nich je vybaven vyhrazeným invertujícím atenuátorem určeným ke zpracování
příchozího řídícího napětí. Modul Afterneath má pro původní neupravený signál plně analogovou
cestu a plně digitální cestu pro signál upravený. Každý modul Afterneath je společným dílem
robotů a lidských bytostí z jeskynního komplexu v Akronu ve státě Ohio.
<<< Varování >>>
NEBEZPEČÍ ÚRAZU ELEKTRICKÝM PROUDEM! NESPRÁVNÁ INSTALACE NEBO MANIPULACE MŮŽE MÍT ZA NÁSLEDEK
ÚRAZ ELEKTRICKÝM PROUDEM NEBO POŠKOZENÍ MODULU, SKŘÍŇKY EURORACK NEBO JINÝCH MODULŮ. PŘED
KAŽDOU INSTALACÍ MODULU NEZAPOMEŇTE VYPNOUT NAPÁJENÍ A SKŘÍŇKU EURORACK ODPOJIT. PRÁZDNÁ MÍSTA
V RACKU NEZAPOMEŇTE ZAKRÝT SLEPÝMI PANELY.
VYSOKÉ ÚROVNĚ SIGNÁLU! TOTO ZAŘÍZENÍ MŮŽE SCHOPNÉ PRODUKOVAT MODULÁRNÍ ÚROVNĚ SIGNÁLU. PŘI
OBSLUZE TOHOTO ZAŘÍZENÍ BUĎTE OPATRNÍ, PROTOŽE VYSOKÉ ÚROVNĚ SIGNÁLU MOHOU POŠKODIT VAŠE
ZVUKOVÉ ZAŘÍZENÍ NEBO VÁŠ SLUCH!
*SPOLEČNOST EARTHQUAKER DEVICES EARTHQUAKER NEPŘEDPOKLÁDÁ ANI NEPŘIJÍMÁ ŽÁDNOU ODPOVĚDNOST
ZA ŠKODU ZPŮSOBENOU JAKÉKOLI OSOBĚ NEBO POŠKOZENÍ JAKÉHOKOLI ZAŘÍZENÍ NEBO PŘEDMĚTU V DŮSLEDKU
POUŽITÍ TOHOTO MODULU.*
TOTO ZAŘÍZENÍ VYHOVUJE PODMÍNKÁM ČLÁNKU 15 SMĚRNIC FCC. PROVOZ MUSÍ SPLŇOVAT NÁSLEDUJÍCÍ DVĚ
PODMÍNKY: (1) TENTO PŘÍSTROJ NESMÍ ZPŮSOBOVAT ŠKODLIVÉ RUŠENÍ, A (2) TENTO PŘÍSTROJ MUSÍ AKCEPTOVAT
VEŠKERÉ PŘIJÍMANÉ RUŠENÍ, VČETNĚ RUŠENÍ, KTERÉ BY MOHLO ZPŮSOBIT NEŽÁDOUCÍ PROVOZ. ZMĚNY / ÚPRAVY
NESCHVÁLENÉ SPOLEČNOSTÍ EARTHQUAKER DEVICES LLC MOHOU MÍT ZA NÁSLEDEK ZTRÁTU UŽIVATELSKÉHO
OPRÁVNĚNÍ K PROVOZU TOHOTO ZAŘÍZENÍ.
TOTO ZAŘÍZENÍ BYLO PROVĚŘENO A V YHOVUJE PODMÍNKÁM PRO DIGITÁLNÍ ZAŘÍZENÍ TŘÍDY A, VE SHODĚ
S ČLÁNKEM 15 SMĚRNICE FCC. T YTO LIMITY JSOU NAVRŽENY TAK, ABY POSKYTOVALY PŘIMĚŘENOU OCHRANU
PROTI ŠKODLIVÉMU RUŠENÍ, POKUD JE ZAŘÍZENÍ VYUŽÍVÁNO V KOMERČNÍM PROSTŘEDÍ. ZAŘÍZENÍ VYTVÁŘÍ,
POUŽÍVÁ A MŮŽE VYZAŘOVAT VYSOKOFREKVENČNÍ ENERGII, KTERÁ MŮŽE PŘI NEDODRŽENÍ POKYNŮ K INSTALACI
ZPŮSOBOVAT ŠKODLIVÉ RUŠENÍ RÁDIOV ÝCH KOMUNIKACÍ.
1. Vypněte a odpojte skříňku Eurorack nebo napájecí zdroj a najděte v ní volný prostor o rozměru
16hp.
2. 10pinový konektor přiloženého plochého kabelu připojte k napájecímu konektoru na zadní
straně modulu Afterneath tak, aby červený proužek na kabelu byl orientován směrem k nápisu
„Red Stripe“, který je vytištěn na desce s plošnými spoji. 16pinový konec plochého kabelu
připojte k desce sběrnic ve vaší Eurorack skříňce podle specikací této skříňky nebo výrobce
desky. Přesvědčte se o správné orientaci kabelu. Jinak může dojít k poškození modulu nebo
systému.
3. Pomocí montážních šroubů, které jsou s vaší skříňkou kompatibilní, připevněte modul ke
skříňce a veškerý zbývající volný prostor zakryjte slepými panely.
<<< Technické údaje >>>
• Šířka: 16HP (80,9 mm)/ Max. hloubka: 31,75 mm
• Odběr proudu: 95 mA ze sběrnice +12 V, 0 mA ze sběrnice -12V a +5 V
• Standardní 10pinový napájecí konektor Eurorack s označením záporných kontaktů
• Příjemné ploché provedení - vyčnívá méně než 31,75 mm (1,25 palce) za panelem
s nainstalovaným napájecím konektorem
• Audiovstup schopný zpracovat vstupní signály od nástrojové úrovně až po úroveň modulární,
v závislosti na nastavení ovladače Input
Doporučujeme použít vysoce kvalitní nízkošumový napájecí zdroj.
<<< Záruka >>>
Jakékoli zařízení naší produkce opravíme po celou dobu, kdy budeme působit v podnikání.
Oprava je vždy bezplatná, pokud není nutné vyměnit desku s obvody kvůli poškození, které
bylo způsobeno uživatelem, například neodbornou opravou závady, nesprávným napájením,
inverzním napětím, úpravou, poškozením vodou atd. Pokud máte jakékoli dotazy nebo chcete
uplatnit záruku, zašlete e-mail na adresu info@earthquakerdevices.com.
WWW.EARTHQUAKERDEVICES.COM
EARTH QUAKER DEV ICES LLC, 350 W. BOWERY ST., AKRO N OH 44307
38 39
Page 21

<<< Ovládací prvky >>>
1
5
6
7
10
11
12
15
16
19 20 21 22
Input: Potenciometr slouží k nastavení úrovně příchozího signálu v rozsahu od nástrojové úrovně
1
(ve směru hodinových ručiček) po modulární úroveň (proti směru hodinových ručiček).
Dampen: Nastavení barvy upraveného signálu. Ve směru hodinových ručiček je barva tmavší, proti
2
směru hodinových ručiček je jasnější.
Reect: Upravuj e oži vení dozvu ko vého efekt u. Chcete-li doz vuk živější s větším ec hem , ot áčej te ve
3
směru hodinových ručiček, chcete-li méně, otáčejte proti směru hodinových ručiček. Při nastavení
příliš velké úrovně oživení dojde k samovolné oscilaci. Pokud je signál zapojen do konektoru
Reect Return, chová se jako atenuátor.
Mix: Nastavení poměru upraveného signálu, který se míchá s původním neupraveným signálem. Výhradně
4
upraveného signálu nelze nastavením poměru dosáhnout. Ten lze získat stiskem tlačítka Dry Kill.
5
Dry Kill: Zcela eliminuje původní neupravený signál a na výstupu ponechává signál upravený.
40 41
2 3 4
8
9
13
14
17
18
Drag: Tento digitální reverb je tvořen řadou krátkých zpoždění. Potenciometrem Drag se jednotlivé zpožděné
6
zázněje oddělí a vznikne koktavý, pleskající efekt. Jedná se o nejzajímavější funkci modulu Af terneath. Důrazně
doporučujeme pomalé otáčení (nebo modulaci), které nechá zaznít noty a dosáhnout skvělý efekt deformovaných
otáček. Při otoč ení proti sm ěr u hod in ov ých ruč iček připomín á spí še delay, při otáče ní ve sm ěr u hod inových ruč iček
spíše reverb. Při otáčení ve směru hodinov ých ručiček dosáhnete kratších časů zpoždění, při otáčení ovladačem
pr ot i sm ěr u hodinový ch ruč iče k delš íc h ča sů zpo žd ění. Při otá čení tímto potenci om et rem si všimnete změny lad ění,
když je zvuk přítomen ve vyrovnávací paměti efektu nebo když dochází k samovolné oscilaci.
Mode: Nastavení určuje chování potenciometru Drag a jeho reakci na řídící napětí. K dispozici je
7
9 různých režimů (jejich popisy naleznete v odstavci Režimy).
Diffuse: Vyhlazuje a rozptyluje opakovaná zpoždění. Ostřejší přechody s větším náběhem
8
proti směru hodinových ručiček, větší ambience a jemná simulace reverbu při otáčení ve směru
hodinových ručiček.
Length: Řídí délku doznění reverbu.
9
LED indikátor režimu: Vizuální znázornění aktuálního režimu.
10
Invertující atenuátor pro řídící napětí Drag: Zeslabuje nebo invertuje příchozí řídící napětí.
11
Pokud je ovládací prvek v krajní poloze ve směru hod. ručiček, řídící napětí je na úrovni jednotného
zisku, v krajní poloze proti směru hodinových ručiček je invertováno, a pokud je ovladač v poloze 12
hodin, řídící napětí je zcela utlumeno.
Invertující atenuátor pro řídící napětí Mode: Zeslabuje nebo invertuje příchozí řídící napětí.
12
Pokud je ovládací prvek v krajní poloze ve směru hod. ručiček, řídící napětí je na úrovni jednotného
zisku, v krajní poloze proti směru hodinových ručiček je invertováno, a pokud je ovladač v poloze 12
hodin, řídící napětí je zcela utlumeno.
Invertující atenuátor pro řídící napětí Diffuse: Zeslabuje nebo invertuje příchozí řídící napětí.
13
Pokud je ovládací prvek v krajní poloze ve směru hod. ručiček, řídící napětí je na úrovni jednotného
zisku, v krajní poloze proti směru hodinových ručiček je invertováno, a pokud je ovladač v poloze 12
hodin, řídící napětí je zcela utlumeno.
Invertující atenuátor pro řídící napětí Length: Zeslabuje nebo invertuje příchozí řídící napětí.
14
Pokud je ovládací prvek v krajní poloze ve směru hod. ručiček, řídící napětí je na úrovni jednotného
zisku, v krajní poloze proti směru hodinových ručiček je invertováno, a pokud je ovladač v poloze 12
hodin, řídící napětí je zcela utlumeno.
Vstup řídícího napětí pro funkci Drag: Umožňuje modulaci ovládání Drag pomocí externího
15
řídícího napětí.
Vstup řídícího napětí pro funkce režimu Mode: Umožňuje modulaci ovládání Mode pomocí
16
externího řídícího napětí.
Vstu p ří díc ího nap ětí pro funkci Dif fuse: Umožňuje modulaci ovládání Diffuse pomocí externího
17
řídícího napětí.
Vstup řídícího napětí pro funkci Length: Umožňuje modulaci ovládání Length pomocí externího
18
řídícího napětí.
Konektor Audio Input: Slouží k připojení audiosignálů od nástrojové až po modulární úroveň. K
19
nastavení jejich úrovně slouží potenciometr Input.
Konektor Reect Send: Výstup pro externí připojení a zpracování signálu zpětnovazební cesty
20
Reect. Připojení z tohoto výstupu nepřeruší zpětnovazební cestu interního signálu.
Konektor Reect Return: Připojení návratu externě připojeného a zpracovaného signálu
21
zpětnovazebního cesty Reect. Může sloužit také jako další audiovstup, pokud nebudete
zpětnovazební signál potřebovat. Potenciometr Reect funguje pro signál připojený do tohoto
vstupu jako atenuátor. Pamatujte si, že při zpracování zpětnovazebního signálu Reect může při
zpracování efektů, jako je např. zkreslení nebo rezonanční ltr, snadno dojít k samovolné oscilaci.
Potenciometrem Reect lze tento faktor kompenzovat. Po připojení kabelu do tohoto vstupu se
zpětnovazební cesta interního signálu odpojí, ale funkce Reect Send bude stále aktivní.
Výstupní konektor Audio Output
22
Page 22

<<< Profesionální tipy a triky >>>
Pokud připojíte signál z hlavního výstupu Audio Output a z výstupu Reect Send do výstupního
audio-modulu, vytvoříte pseudo-stereo efekt. Ještě složitější a rozmanitější úpravy signálu lze
vytvořit tak, že signál z výstupu Reect Send připojíte do rozbočovače a použijete ho spolu
se signálem hlavního výstupu (například hlavní signál zapojíte do levého výstupu audiosystému
a rozbočený signál Reect Send do výstupu pravého). Další rozbočený signál Reect Send
zapojíte do některého externího procesoru, jako je např. ltr nebo VCA (napěťově řízený
zesilovač), a poté nazpět do vstupu Reect Return.
<<< Režimy >>>
1. Bez kvantizace: Plynulá a nekvantikova-
ná odezva v celém provozním rozsahu
2. Bez kvantizace s funkcí Slew: Plynulá a
nekvantikovaná odezva v celém provozním rozsahu, ale s hudebním efektem, který
připomíná otáčení potenciometru Varispeed
na starých modelech britských páskových
efektů. Efekt „Drag“ se bude za potenciometrem nebo řídícím napětím zpožďovat,
ale poté se vždycky rychle chytne.
3. Volt/Oktáva bez kvantizace : Plynulý a ne-
kvantizovaný průběh, ale přesto přizpůsobený průběhu 1 V/oktáva tak, aby umožnil
melodickou modulaci zvuku ve vyrovnávací
paměti nebo jako napěťově řízený oscilátor
řízení kmitočtu samovolné oscilace
4. Chromatická stupnice: Kvantizovaný prů-
běh 1 V/oktáva na chromatickou stupnici
5. Durová stupnice: Kvantizovaný průběh
1 V/oktáva na durovou stupnici
6. Mollová stupnice: Kvantizovaný průběh
1 V/oktáva na mollovou stupnici
7. Pentatonická stupnice: Kvantizovaný prů-
běh 1 V/oktáva na pentatonickou stupnici
8. Oktávy a kvinty: Kvantizovaný průběh 1 V/
oktáva s ponecháním pouze oktáv a kvint
9. Oktávy: Kvantizovaný průběh 1 V/oktáva
s ponecháním pouze oktáv
<<< Napěťové řízení >>>
Při použití řídícího napětí bude potenciometr přiřazený tomuto parametru fungovat jako offset.
Proto budete chtít upravit potenciometr a vyhrazený invertující atenuátor tak, aby se řídící napětí
dostalo do požadovaného provozního rozsahu pro parametr. Je vhodné začít s potenciometrem
v poloze 12 hodin a invertujícím atenuátorem v krajní poloze ve směru hodinových ručiček a podle
potřeby nastavení upravit.
A nezapomínejte, že modul Afterneath nelze považovat za přesný oscilátor. Ladění samovolné
oscilace je dáno především notou, která se do něj hraje. Při využití zpětné vazby se původní nota
transformuje prostřednictvím různých harmonických a enharmonických kmitočtů, v závislosti na
nastavení potenciometrů Length, Reect a Dampen. Při pečlivém nastavení parametrů Length a
Reect lze udržet dlouze doznívající zvuky ve vyrovnávací paměti po delší dobu bez ztráty stability.
<<< Sledování Volt/Oktáva během samovolné oscilace >>>
1. Invertující atenuátor pro napětím řízený vstup Drag otočte zcela ve směru hodinových ruč ič ek
a potenciometr Drag do polohy 12 hodin.
2. Vyberte jeden z režimů 3-9.
3. Potenciometry Length a Reect otočte přes polohu 12 hodin, dokud se neozvou samovolné
oscilace.
4. Vyhledejte rozsah zdroje řídícího napětí (například klávesnice Volt/Oktáva), který má vliv na
ovládání parametru přetažení. Vyberte nejvyšší notu, kterou chcete v tomto rozsahu použít, a
hrajte ji opakovaně během otáčení potenciometru Drag tam a zpět, dokud nenaleznete horní
limit tohoto ovládacího prvku (jedná se o polohu, v níž další otáčení nebude mít žádný vliv).
Potenciometr Drag nastavte do polohy, v níž bude pouze procházet bodem, který již nemá na
stupnici žádný vliv.
5. Potenciometry Length a Reect stáhněte, dokud samovolné oscilace zcela nepominou.
Nyní jste upravili rozsah modulu Afterneath vzhledem ke zdroji řídícího napětí. Noty hrané do
modulu Afterneath budou uspořádány podle řídícího napětí přítomném na vstupu Drag. Pokud
například stisknete klávesu „C“ na své Volt/Oktáva klávesnici a poté zahrajete notu C na externím
zdroji do vstupu modulu Afterneath, při následném stisknutí kláves na klávesnici dojde ke
správnému uspořádání zvuku, který je ve vyrovnávací paměti modulu Afterneath. Při otáčení
potenciometrů Length a Reect ve směru hodinov ých ručič ek bud e zvuk v mez ip am ět i ud ržován
delší dobu. Výsledkem vyšší úrovně nastavení parametrů Length a Reect bude samovolná
oscilace, při které se původní zvuk transformuje různými harmonickými a enharmonickými
kmitočty původního zvuku, kter ý byl uložen ve vyrovnávací paměti.
Režimy 5-9 jsou vynikající volbou pro sledování řídícího napětí bez klávesnice, a jejich účelem
je cyklické nebo náhodně uspořádané řízení parametru Drag. Například při připojení zdroje
náhodných napětí do vstupu Drag dojde ke generování náhodných melodií na základě stupnice
přiřazené k vybranému režimu.
<<< Samovolná oscilace >>>
Při použití vyšších úrovní nastavení potenciometrů Length a Reect je obvyklé, že modul
Afterneath začne samovolně oscilovat – zejména pokud jsou oba potenciometry nastaveny nad
pozicí 12hodin. Když budete kombinovat vlastní oscilaci s napěťovým řízením parametru Drag,
získáte zajímavý napěťově řízený oscilátor. Režimy 3-9 umožní samovolnou oscilaci při stanovení
rozsahu volt / oktáva. Při použití externího řídícího napětí funguje potenciometr Drag jako ofsetová
kontrola příchozího napětí. Vzhledem k povaze efektu reaguje parametr Dragpouze na kladné
napětí ve velikost od 1,6 do 4,1 voltu. Pokud používáte napětí mezi 0 a 1,6 voltu, můžete otáčením
potenciometru Drag ve směru hodinových ručiček upravit offset příchozího napětí vzhledem
k rozsahu odezvy. Pamatujte si, že bipolární signály mohou vyžadovat dodatečné kompenzační
napětí z externího zdroje, aby se do rozsahu odezvy dostal celý řídící signál.
42 43
Doporučujeme hodně experimentovat!
Page 23

www.earthquakerdevices.com
EQDAFTEEUROV1USA-R0
©2019 Ear thQuaker Devices LLC
 Loading...