

Page 1
Earthquake
Tactile Transducers
Sound That Will Move You.
Q10B MQB-1
Users Manual
www.earthquakesound.com
Page 2
Earthquake Tactile Transducers Basic Information
®
By now, you may have some knowledge about Tactile Transducers. To help clarify this application further, please read on:
What is a Tactile Transducer?
A tactile transducer or "bass shaker" is a device which is made on the
principle that low bass frequencies can be felt as well as heard. A
shaker transmits low-frequency vibrations into various surfaces so that
they can be felt by people. This is called tactile sound. Tactile
transducers may augment or in some cases, substitute for a
subwoofer.
Tactile transducers may be used in a home theater, a commercial
movie theater, or for special effects in an arcade game, amusement
park ride or other application.
In Home Theater and Music Applications:
A surround sound audio system complements a video action movie by
responding to the events that are unfolding on the screen. The
surround sound extends from 30 Hz (if you are lucky) and up to 20Khz.
For the most part, it is the low frequency response that brings you
closer to the action. A tactile transducer system will tap into the low
frequency signal that is emanating for LFE output, which is typically
located in the back of your receivers. This signal is amplified through a
resilient power amplifier and then used to drive the tactile transducer;
Thus, picking up and enhancing everything your subwoofer lacks.
In Gaming Applications:
Tactile transducers are an explosive way to generate massive
vibration, which brings players into the video game. Mounting an MQB1 in a gamer seat will lead to an incredible interactive experience unlike
any other.
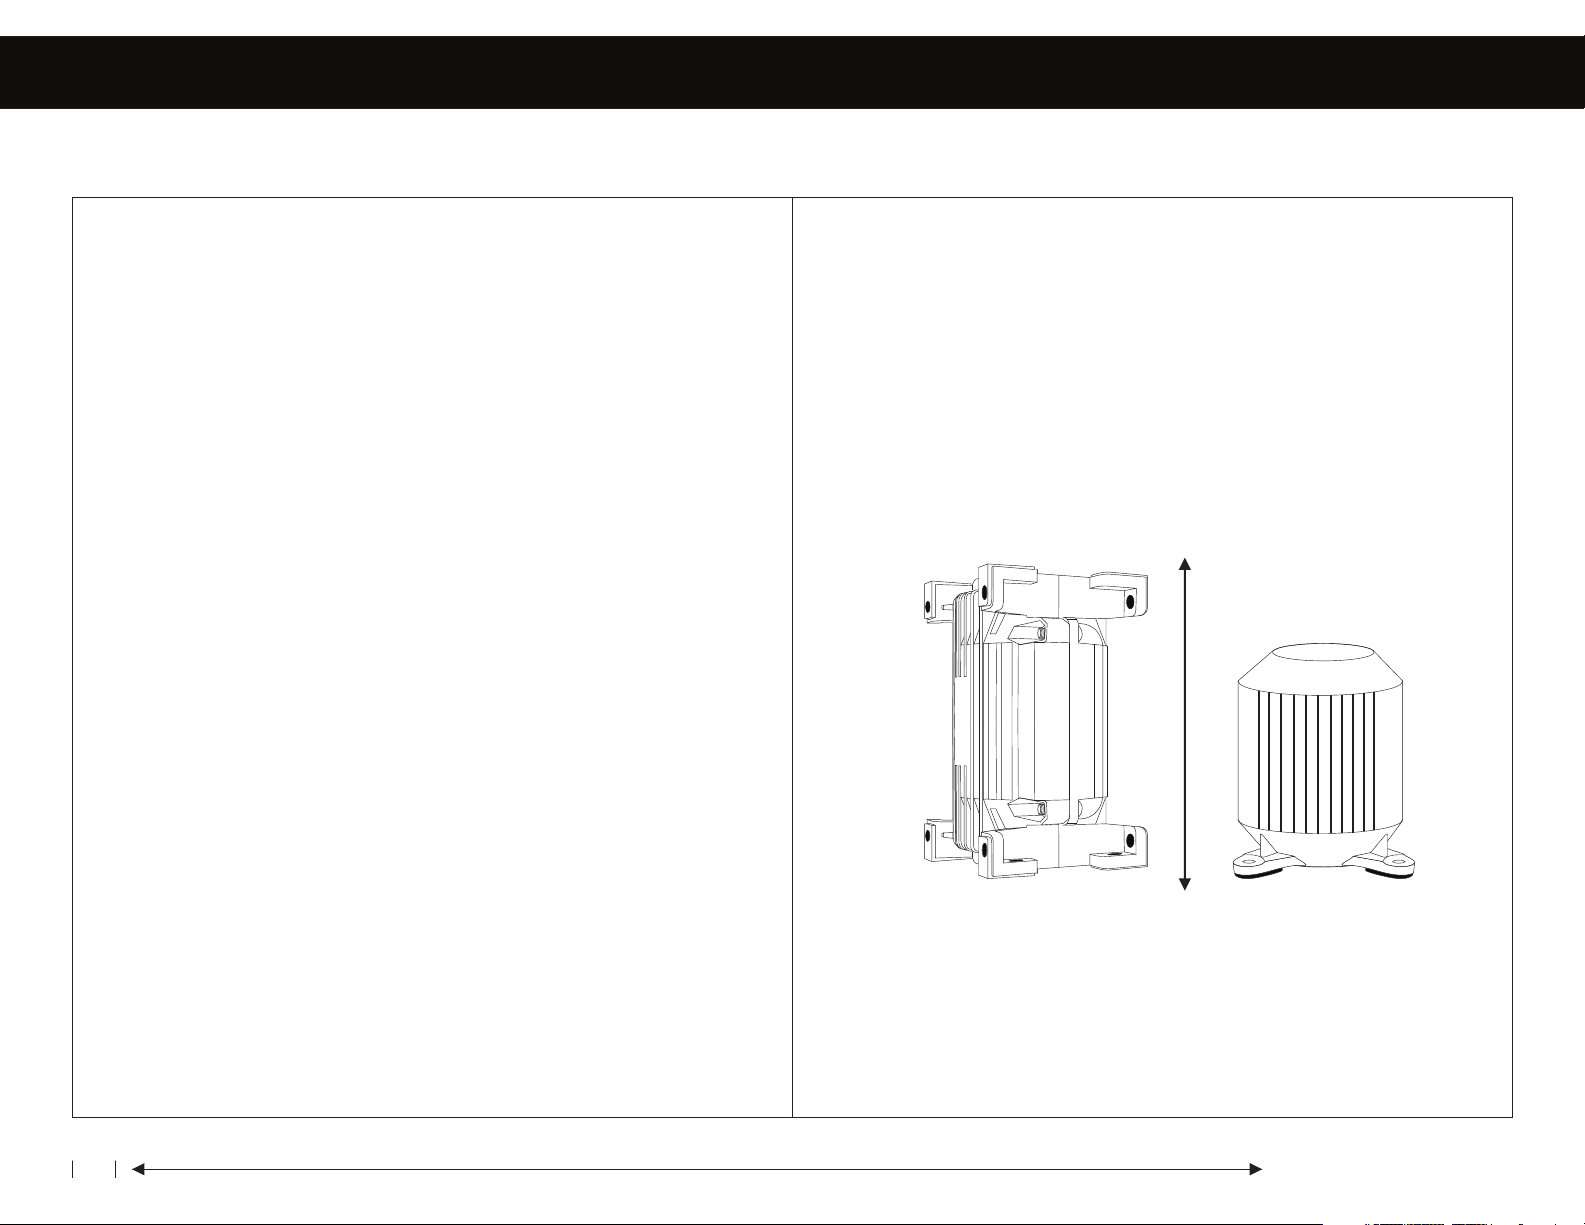
Mounting Quake Tactile Transducers
The Earthquake Q10B and MQB-1 need to be mounted
®
vertically at all times. Mounting them vertically maximizes
the output and increases the over all tactile experience.
Horizontally mounting the units will diminish the output and
may damage them over time.
The MQB-1 may be
mounted upside down by
hanging it from its feet.
In Music Applications:
Music recording can be immensely enhanced by allowing musicians
(drummers in particular) who rely on sound and impact to literally feel
their progress while recording. Now, musicians can rely on tactile
transducers to transmit vibrations through their seats. This vibration
allows them to feel the beat more naturally and confidently
synchronize it with others in the band.
2
www.earthquakesound.com
Page 3
How To Connect to an Amplifier
Tools that will be needed for installation:
- 16 to 12-gauge speaker cable
- a pair of pliers
- a powered screw driver
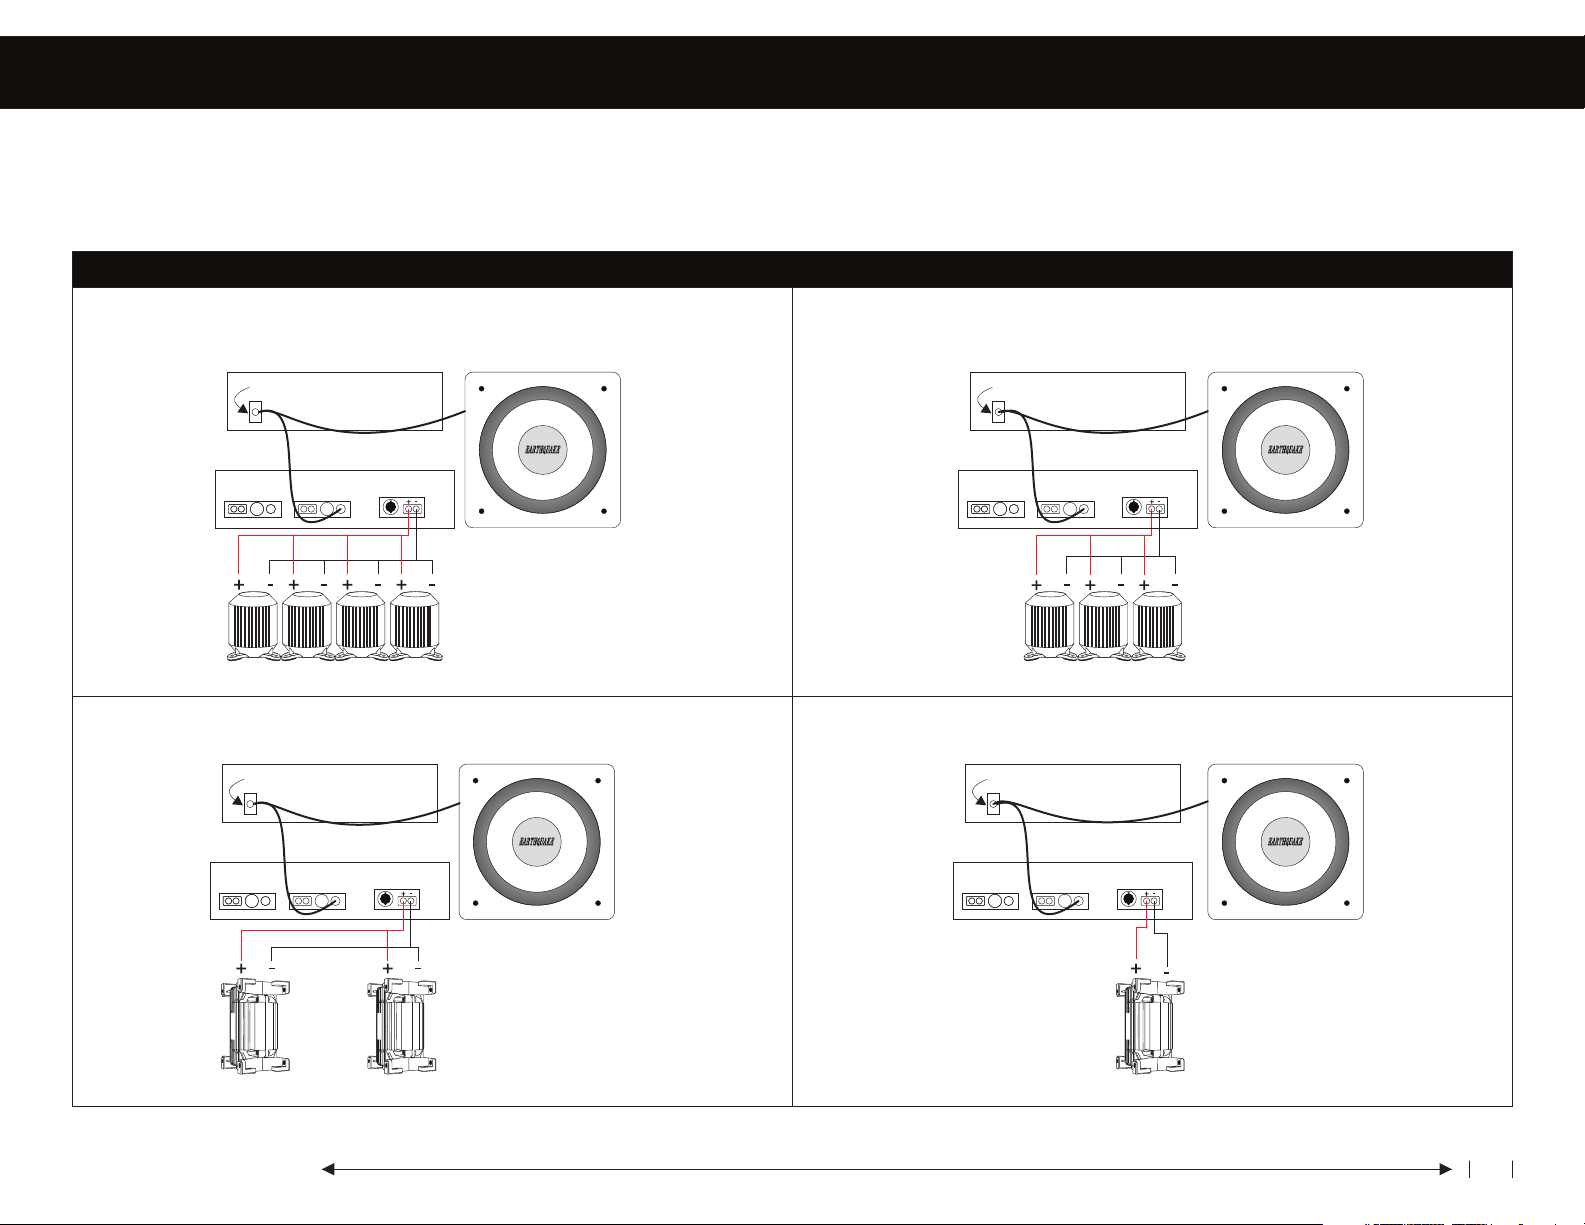
XJ-600R CONNECTION OPTIONS
Receiver or Pre-amp
LFE / Subwoofer Out
XJ-600R
Speaker Outputs
CH1 CH2
MQB-1
2-Ohm Parallel
Application
- measuring tape
- two (2) wing nut wire connectors or electrical tape
Receiver or Pre-amp
LFE / Subwoofer Out
XJ-600R
Speaker Outputs
CH1 CH2
3-Ohm Parallel
MQB-1
Application
Receiver or Pre-amp
LFE / Subwoofer Out
www.earthquakesound.com
XJ-600R
Speaker Outputs
CH1 CH2
Q10B
4-Ohm Parallel
Application
Receiver or Pre-amp
LFE / Subwoofer Out
XJ-600R
Speaker Outputs
CH1 CH2
Q10B
8-Ohm Standard
Application
3
Page 4
How To Connect to an Amplifier
Tools that will be needed for installation:
- 16 to 12-gauge speaker cable
- a pair of pliers
- a powered screw driver
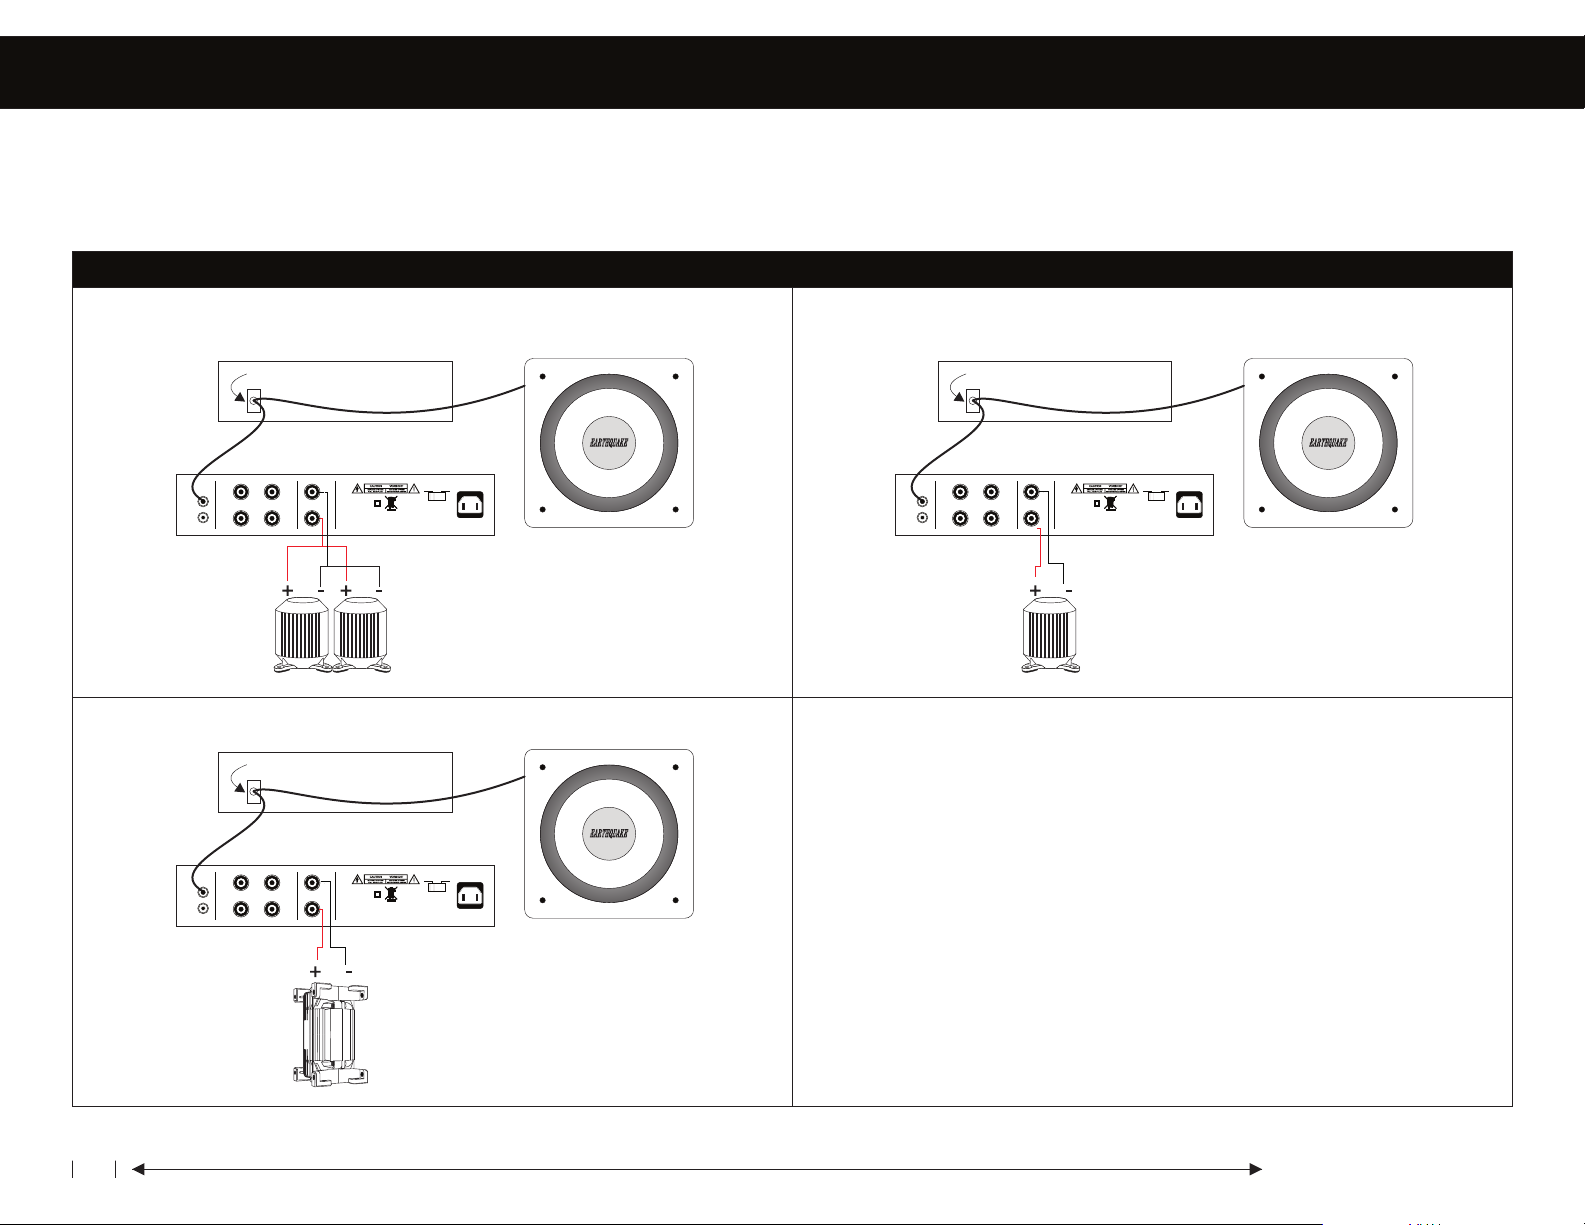
XJ-300R CONNECTION OPTIONS
Receiver or Pre-amp
LFE / Subwoofer Out
XJ-300R
110 - 220~/60Hz
220 - 240~/50Hz
110-120V 220-240V
LINE IN
L+
L
R
R-
R-
L+
HIGH LEVEL INPUT
WARNING
+
TO REDUCE THE RISK OF ELECTRICAL SHOCK. DO NOT EXPOSE
THIS APPLIANCE TO RAIN OR MOISTURE NO USER SERVICEABLE
SPEAKER OUTPUT
PARTS INSIDE. REFER SERVICING TO QUALIFIED SERVICE PERSONAL
180 WATTS
110 - 220, FUSE T3.15AL/250V
220 - 240, FUSE T1.6AL/250V
MQB-1
4-Ohm Parallel
Application
- measuring tape
- two (2) wing nut wire connectors or electrical tape
Receiver or Pre-amp
LFE / Subwoofer Out
XJ-300R
110 - 220~/60Hz
220 - 240~/50Hz
110-120V 220-240V
LINE IN
L+
L
R
R-
R-
L+
HIGH LEVEL INPUT
WARNING
+
TO REDUCE THE RISK OF ELECTRICAL SHOCK. DO NOT EXPOSE
THIS APPLIANCE TO RAIN OR MOISTURE NO USER SERVICEABLE
SPEAKER OUTPUT
PARTS INSIDE. REFER SERVICING TO QUALIFIED SERVICE PERSONAL
180 WATTS
110 - 220, FUSE T3.15AL/250V
220 - 240, FUSE T1.6AL/250V
8-Ohm Standard
MQB-1
Application
Receiver or Pre-amp
LFE / Subwoofer Out
XJ-300R
110 - 220~/60Hz
220 - 240~/50Hz
110-120V 220-240V
LINE IN
L+
L
R
R-
R-
L+
HIGH LEVEL INPUT
WARNING
+
TO REDUCE THE RISK OF ELECTRICAL SHOCK. DO NOT EXPOSE
THIS APPLIANCE TO RAIN OR MOISTURE NO USER SERVICEABLE
SPEAKER OUTPUT
PARTS INSIDE. REFER SERVICING TO QUALIFIED SERVICE PERSONAL
180 WATTS
110 - 220, FUSE T3.15AL/250V
220 - 240, FUSE T1.6AL/250V
Q10B
8-Ohm Standard
Application
4
www.earthquakesound.com
Page 5

Recommended XJ-600R / XJ-300R Front Panel Settings
SUBSONIC
XJ -300 R
ON
The Subsonic Filter
Should Be Set To
The OFF Position
OFF
POW ER
XJ -6 00R
DUAL INPUT - MONO BL OCK - CLASS "J" POWER AMPLIF IER
ON
AUT O
OFF
PHASE SHIFT GAIN
PHASE
0°
0
180
180 °
ON
OFF
PHASE DELAYSUBSONIC
0 2 0ms
CROSSOVER
50Hz 160 Hz
The 20Hz Setting
Should Be Set
To Max +6dB
ROOM CORRECTION
20Hz 30Hz 40Hz
-6dB +6dB -6dB +6dB
ROO M CORRE CTION
20H z 30H z 40H z
-6d B +6 dB -6 dB + 6dB
VOLUME
Digital Switching Power Supply
Class "J" Subwoofer Amplifier
MAX
MIN
-6d B +6dB
Set to -6dB
Minimum
-6dB +6dB
IN
OUT
Set to -6dB
Minimum
IN
OUT
CROSSOVER
40Hz
The IN/OUT
Switch Should
Be Set To "IN"
ON
BYPASS
200Hz
This Setting Can
Be Set To Personal
Preference.
ON
AUTO
OFF
POWER
MAI N
CH2
CH1
Phase Control - Since your subwoofer is at some distance
from your chair, the sound will take a certain amount of time to
reach your ears. The signal arriving at the shaker is
instantaneous by comparison. The Phase Control lets you delay
the signal reaching the Quake shaker so that it will shake at
exactly the same time as the low frequency sound from your
subwoofer arrives at your ears. To make the adjustment, simply
play a low frequency test tone through your subwoofer and
shaker (most receivers have test tone generators for adjusting
the volume of all the channels, including the subwoofer). Then,
sit in the chair or couch where you have attached the shaker,
with the XJ-300 amplifier close at hand, and adjust the Phase
Control so that the sound and the tactile sensations appear to
be synchronized. Note that you can get an “additional channel
effect” by simply adjusting the phase control so the sound and
the tactile sensations are as out of synchrony as possible. In
other words, adjust the Phase Control so that it gives you the
effect you want.
www.earthquakesound.com
Crossover Control - The idea is to have your chair or
couch shake with certain movie special effects, but
not with someone slamming a door (unless you want
it to). This is where the Crossover Control comes into
play. Depending on how high you have set the
Volume Control, you should adjust the Crossover
Control so that it is only shaking with the sound
effects that you want, and not with every loud noise
that occurs on screen. Start by setting the Crossover
Control at its lowest point, i.e., 50 Hz, which is fully
counter clockwise. Then, with some special effects
scenes from one of your favorite movies (the attack
scene from Pearl Harbor is great for this purpose),
adjust the Crossover Control so that you get the
shaking effect just with the explosions, crashes, and
gunfire. If you adjust the Crossover Control too high,
you will be shaking with such things as deep voices,
and that may or may not be what you want.
Volume Control - First of all, when you turn
on your new XJ-300 amplifier, make sure
the Volume Control is at the lowest setting
possible (fully counter clockwise). Then, as
you play test tones or watch movies, adjust
the Volume Control so that you feel the
Quake shaking your chair or couch with the
test tone, or in the case of movies, when
special low frequency effects such as
explosions, machine guns, or such large
machines as army tanks (isn't it great to be
a guy?) occur on-screen. Note that the XJ300 is very powerful, and you will probably
not need to turn the volume up all the way
(you may need to adjust the volume of the
subwoofer output on your receiver so that
the input on the XJ-300 receives enough
signal to drive it properly).
5
Page 6

How To Mount Directly To Furniture
Applications
3 Sofas
3 Theater Chairs
3 Recliners
Mounting
3 Direct
3 Multiplier
3 Internally
3 Externally
Enhancements
MQB-1 Side Mount Multiplier
Back of Sofa
MQB-1
MQB-1
Side Mount Multiplier
Strongest Joist / Brace
in Sofa or Chair
Q10B Side Mount Multiplier
Back of Sofa
Q10B
Q10B
Side Mount Multiplier
3 Home Theater
3 Music
Multiplier Options
6
Strongest Joist / Brace
in Sofa or Chair
MQB-1
Side Mount Multiplier
Q10B
Side Mount Multiplier
www.earthquakesound.com
Page 7

Applications
3 Sofas
3 Theater Chairs
3 Recliners
Mounting
3 Direct
3 Multiplier
3 Internally
3 Externally
Enhancements
How To Mount To a Platform
When designing your custom platform, be sure to allow 11/2 to 2 feet of space around the outer perimeter of the
chairs or couch. This much space is not required in
between the chairs.
All platforms should be constructed with no less than 1/2"
plywood and built sturdy for some seriously high speed
entertainment. Also, the use of rubber stabilizers is an
excellent way to eliminate rattles and vibrations that may
cause valuables to fall off the walls or shelves. In addition,
the rubber feet will provide a great suspension, allowing
the Q10B to really shine.
The optional Platform Mount Multiplier can be installed
underneath or inside couches or chairs as in previous
illustrations, but it is more effective when mounted directly
to the platform. Once the Multiplier is mounted to the
platform, you may then move a chair or couch over it for a
more plush cosmetic appearance.
Platform
Top View One Chair
GAMER STYLE
Typical Two Chair Setup
front
Chair
back
One
Q10B
1 1/2' to 2' Feet
of Space
3 Home Theater
3 Music
Multiplier Options
www.earthquakesound.com
Q10B
Platform Multiplier
Reduce intensity by
mounting the Q10B
here.
Get a higher intensity
by mounting the Q10B
here.
7
Page 8

How To Mount To a Throne or a Game Chair
Applications
3 Office Chairs
3 Thrones
3 Game Chairs
Mounting
3 Direct
3 Multiplier
Enhancements
3 Gaming
3 Music
3 Music Recording
MQB-1 Gaming Multiplier
Rotating Chair
or Throne
Rotating Chair Pole Piece
MQB-1
MQB-1
Gaming Multiplier
MQB-1 Gaming Multiplier
Pre-built gaming chairs come in all different shapes and
sizes. The illustration to the right is only a demonstration
on how you may install a MQB-1 to this type of application.
Always be sure that what you are mounting the bracket to
is very solid and won't pierce any pre-existing wiring or
damage the chair's upholstery.
In addition, please keep in mind that the MQB-1 is very
powerful and will deteriorate poorly constructed chairs,
thrones, etc. You may even need to modify existing
construction.
Pre-built Gamer Chair
MQB-1,
Gaming Multiplier
(Minus the Second Half of
The Bracket)
MQB-1
Strongest,
Mountable
Area on Chair (This
Will Vary From Chair to Chair)
Multiplier Options
8
MQB-1 Gaming Multiplier
First Half Second Half
www.earthquakesound.com
Page 9

Specifications and Support
MQB-1 Specifications:
• 15 - 50Hz frequency response
• 8Ω impedance
• 20-500 Watts
• Dimensions:
H = 3 1/2" • 88.9mm
W = 3 1/8" • 79.375mm
D = 3 1/8" • 79.375mm
Q10B Specifications:
• 5 - 40Hz frequency response
• 8Ω impedance
• 40-1000 Watts
• Dimensions:
H = 3 9/16" • 90.4875mm
W = 6 3/16" • 157.1625mm
D = 3 9/16" • 90.4875mm
Patent No: US 7,449,803 B2
PRODUCT SUPPORT:
Please contact Earthquake Sound Technical Support Department at
toll free number 1-800-576-7944 for questions regarding your Tactile
Transducer.
PRODUCT REGISTRATION
This product can be registered by returning the Product Registration
card attached to this manual or by visiting:
www.earthquakesound.com/form_reg.htm
Please retain the purchase receipt, which represents proof of purchase.
Also, keep in mind that any products purchased via an
UNAUTHORIZED EARTHQUAKE DEALER will not be honored any
warranty. You will have to pay full service pricing, these guidelines are
outlined in the warranty section of this manual.
Earthquake Sound Corporation
2727 McCone Avenue, Hayward, CA 94545. USA
Call us at toll free: 1-800-576-7944 or
E-mail us at:
Monday - Friday between 9:00 AM - 5:00 PM, Pacific Time
tech@earthquakesound.com
www.earthquakesound.com
9
Page 10

5-Year Limited Warranty
Earthquake warrants the original purchaser that all Factory Sealed New Audio Products to be free from defects in material and workmanship under normal and proper use for a period of
five (5) years from the date of purchase (as shown on the original purchase receipt with serial number affixed/written on it). The five (5) year warranty period is valid only if an authorized
Earthquake dealer properly installs the product and the warranty registration card is properly filled out and sent to Earthquake Sound Corporation. If a non-authorized party installs the
product, a ninety (90) day warranty period will be applied.
(A) Five (5) years limited warranty plan coverage guidelines:
!
First year: Earthquake pays for labor, parts, and ground freight (only in US mainland, not including Alaska and Hawaii. Shipping to us is not covered).
!
Second year: Earthquake pays for labor and parts only, customer must pay freight both ways.
!
Third, fourth & fifth year: Earthquake pays labor only. Customer must pay for parts and freight both ways.
(B) Warning:
Products (sent for repair) that are tested by Earthquake technicians and deemed to have no problem(s) will not be covered by the five (5) year limited warranty. Customer will be
charged a minimum of one (1) hour of labor (at the ongoing rates) plus shipping charges back to customer.
(C) Earthquake will repair or replace at our option all defective products/parts subject to the following provisions:
!
Defective products/parts have not been altered or repaired by other than an Earthquake factory-approved technicians.
!
Products/parts are not subjected to negligence, misuse, improper use or accident, damaged by improper line voltage, used with incompatible products or have its serial
number or any part of it altered, defaced or removed, or have been used in any way that is contrary to Earthquake's written instructions.
(D) Warranty Limitations:
Warranty does not cover products that have been modified or abused, including but not limited to the following:
!
Damages to speaker cabinet and cabinet finish due to misuse, abuse or improper use of cleaning materials/methods.
!
Bent speaker frame, broken speaker connectors, holes in speaker cone, surround & dust cap, burnt speaker voice coil.
!
Fading and/or deterioration of speaker components & finish due to improper exposure to elements.
!
Bent amplifier casing, damaged finish on the casing due to abuse, misuse or improper use of cleaning material.
!
Burnt tracers on PCB.
!
Product/part damaged due to poor packaging or abusive shipping conditions.
!
Subsequent damage to other products.
A warranty claim will not be valid if the warranty registration card is not properly filled & returned to Earthquake with a copy of the sales invoice. Warranty card is located on the
last page of this manual.
(E) Service Request:
To receive product service, contact Earthquake Service Department at (510) 732-1000 and request an RMA number (Return Material Authorization). Items shipped without a valid
RMA number will be refused. Make sure you provide us with your complete/correct shipping address, a valid phone number, and a brief description of the problem you are experiencing
with the product. In most cases, our technicians might be able to resolve the problem over the phone; Thus, eliminating the need to ship the product.
(F) Shipping Instructions:
Product(s) must be packaged in its original protective box(es) to minimize transport damage and prevent repackaging cost (at the ongoing rates). Shipper claims regarding items
damaged in transit must be presented to carrier. Earthquake Sound Corporation reserves the right to refuse improperly packed product. Original bill of sale must accompany product
returned to service. We encourage you to include with the package a written description of the problem. Ship product to: Earthquake Sound Corp. 2727 McCone Avenue, Hayward, CA
94545. Ph: (510) 732-1000. You are responsible for the cost of shipping the product to Earthquake Sound Corporation.
(G) Disputes Resolution:
All disputes between clients and Earthquake Sound Corporation resulting from the five (5) year limited warranty policy must be resolved according to the laws & registration of the
county of Alameda California.
10
www.earthquakesound.com
Page 11

Page 12

Sound That Will Move You.
Earthquake Sound Corporation
1-800-576-7944, 9:00 am - 5:00 pm Mon-Fri, Pacific Time
2727 McCone Avenue Hayward, CA 94545, USA
www.earthquakesound.com
 Loading...