

1
D Art.-Nr. 21067
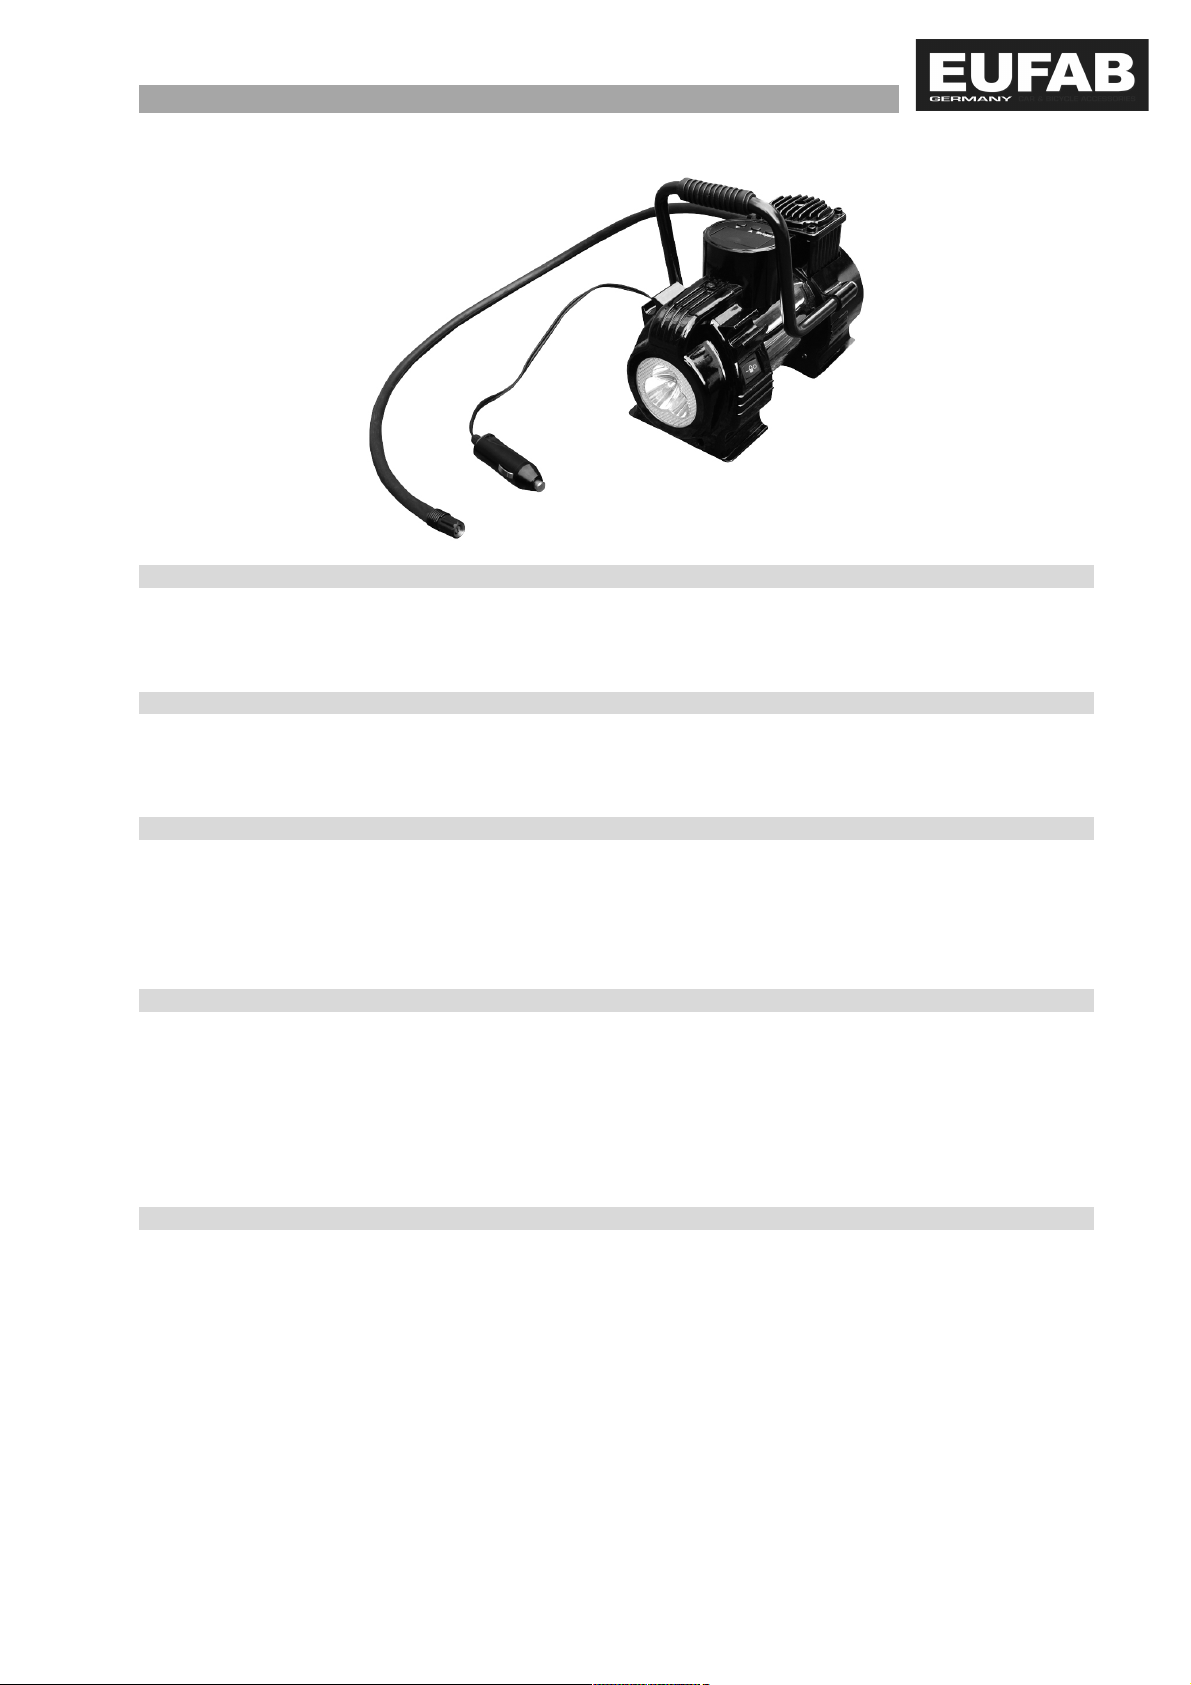
Programmierbarer Kompressor
Inhaltsverzeichnis
1. Bestimmungszweck 1
2. Spezifikationen 1
3. Sicherheitshinweise 1-2
4. Bedienung 2-3
5. Wartung 3
6. Kontaktinformationen 3
Einleitung
Vielen Dank das Sie sich für den programmierbaren Kompressor der Marke Eufab entschieden haben.
Dieser programmierbare Kompressor dient Ihnen dazu präzise und komfortabel Autoreifen, Fahrradreifen,
Sportgeräte und Ballons mit Luft zu füllen.
1. Bestimmungszweck
Der programmierbare Kompressor ist universell einsetzbar z.B. für das Aufpumpen von Auto-, Motorradund Fahrradreifen, Sportbällen, Luftspielzeugen, Luftmatratzen und Schlauchbooten.
Durch seine programmierbare Abschaltautomatik können die Objekte mit Luft aufgepumpt werden ohne
ihren optimalen Betriebsdruck zu überschreiten. Die Digitalanzeige kann während des Füllvorgangs als
Überwachung genutzt werden.
2. Spezifikationen
Bezeichnung programmierbarer Kompressor
Betriebsspannung 12V DC
Maximaler Druck 7 bar / 100 PSI
Leistung: 0 – 2 bar in ca. 3 Minuten (Referenz: Autoreifen 195/65 R15, bei anderen
Reifengrößen können sich andere Zeiten ergeben)
Display 3 stellig
Gewicht 2,170 kg
3. Sicherheitshinweise
1. Erhöhen Sie den Luftdruck für die aufzublasenden Objekte nicht über die Herstellerempfehlung!
2. Schützen Sie den Kompressor und dessen Komponenten vor Feuchtigkeit!
3. Lassen Sie den Kompressor in Betrieb nicht unbeaufsichtigt!
4. Halten Sie Kinder fern und lassen Sie Kinder dieses Gerät nicht bedienen!
5. Benutzen Sie dieses Produkt nur für die dafür vorgesehene Verwendung!
6. Manipulieren oder zerlegen Sie den Kompressor nicht!
7. Sollte der Kompressor ungewöhnliche Geräusche abgeben oder überhitzen, schalten Sie ihn sofort
aus und lassen ihn mindestens 30 Minuten abkühlen!
8. Überprüfen Sie den Kompressor vor Inbetriebnahme. Beschädigte, gerissene oder gebrochene
Bauteile sollten ausschließlich durch qualifizierte Techniker instandgesetzt werden!
9. Setzen Sie den Kompressor niemals Frost, Regen oder Temperaturen über 30°C oder
unter - 30°C aus!
10. Niemals an Menschen oder Tieren anwenden!
11. Stellen Sie sicher, dass Schlauch und Kabel keinen scharfen Kanten, Öl oder zu heißen
Gegenständen ausgesetzt werden!
2
12. Verwenden Sie zu Ihrer eigenen Sicherheit ausschließlich Zubehör oder Ersatzteile, die in der
Anleitung angegeben sind, oder deren Verwendung durch den Hersteller empfohlen wird!
4. Bedienungsanleitung
WARNUNG
Lesen Sie die Bedienungsanleitung vor Inbetriebnahme sorgfältig durch und beachten Sie alle
Sicherheitshinweise! Bewahren Sie die Originalverpackung, den Kaufbeleg sowie diese
Anleitung zum späteren Nachschlagen auf!
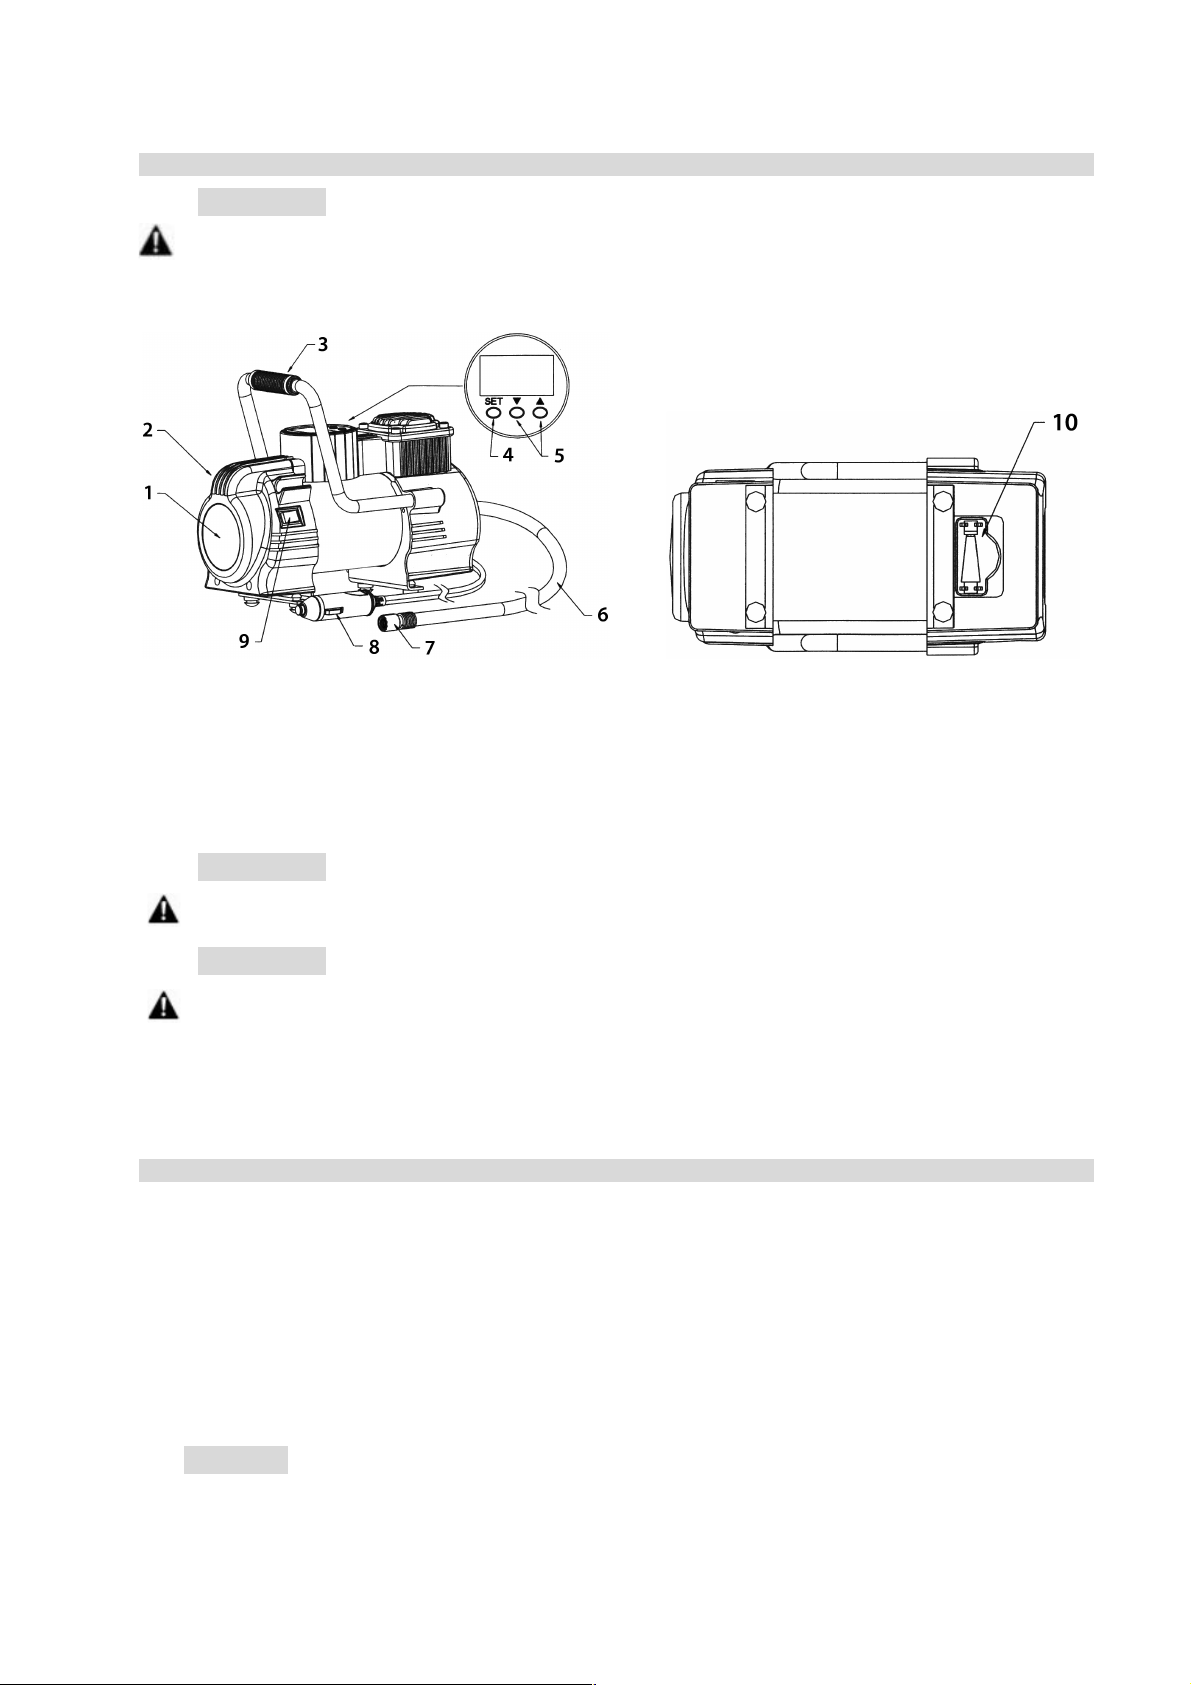
1 LED Arbeitsleuchte 2 EIN/AUS-Schalter für Kompressor
3 Tragegriff 4 Schalter Druckvoreinstellung
5 Schalter zum Einstellen des Drucks 6 Luftschlauch
7 Schraubanschluß 8 12V Stecker
9 Schalter für LED Arbeitsleuchte 10 Ball / Ballon Adapter
WARNUNG
Lesen Sie diese Bedienungsanleitung vor Inbetriebnahme sorgfältig durch! Nichtbeachtung
kann zu Personenschäden, Schäden am Gerät oder Ihrem Eigentum führen!
WARNUNG
Diese Anleitung soll Ihnen Informationen zu Funktion und Leistung geben. Bewahren Sie
diese Anleitung als Nachschlagewerk für die Zukunft auf. Prüfen Sie vor Inbetriebnahme den
Inhalt der Verpackung auf Unversehrtheit und Vollständigkeit!
Dieser Kompressor ist mit einer digitalen Druckanzeige ausgestattet. Mit dieser Digitalanzeige kann
während des Füllvorgangs der aktuelle Druck überwacht werden, außerdem dient sie zum Einstellen des
Abschaltdrucks.
Einstellen des Abschaltdrucks
1. Wickeln Sie das 12 Volt Kabel ab und verbinden Sie den 12 Volt Adapter mit dem 12 Volt Anschluß
Ihres Fahrzeuges.
2. Drücken Sie den SET-Schalter (4) um die Anzeige auf PSI / BAR einzustellen.
3. Drücken Sie den SET-Schalter (4) für drei Sekunden um den eingestellten Abschaltdruck zu
kontrollieren, die Anzeige blinkt fünfmal. Werkseitig ist der Druck auf 40 PSI eingestellt.
Um den gewünschten Abschaltdruck einzustellen drücken Sie den SET-Schalter (4) für drei Sekunden
bis die Anzeige blinkt, mit den ! / " Schaltern (5) stellen Sie den Druck ein.
! erhöht den Druck, " vermindert den Druck
4. Danach blinkt die Anzeige noch viermal und zeigt 0,0. Dies bedeutet, daß Sie den Abschaltdruck
erfolgreich eingestellt haben.
WICHTIG
1. Das Gerät speichert den zuletzt eingestellten Wert. Beispiel, wenn Sie den Druck auf 2,0 bar
eingestellt haben, beträgt der Abschaltdruck beim nächsten Einsatz 2,0 bar.
2. Der Kompressor kann vor Erreichen des eingestellten Abschaltdrucks manuell mit dem Schalter (2)
ausgeschaltet werden, Schalter auf Position (0).
3
Aufpumpen eines PKW- oder Fahrradreifens
1. Wickeln Sie das 12 Volt Kabel ab und verbinden Sie den 12 Volt Adapter mit dem 12 Volt Anschluß
Ihres Fahrzeuges.
2. Schrauben Sie die Gewindebuchse des Füllschlauchs auf das Reifenventil.
3. Stellen Sie den gewünschten Abschaltdruck ein (siehe Einstellen des Abschaltdrucks)
4. Starten Sie den Kompressor durch Betätigen des Schalters (2), wenn der eingestellte Reifendruck
erreicht ist schaltet sich der Kompressor automatisch ab.
5. Trennen Sie den 12 Volt Anschluß vom Fahrzeug und entfernen Sie den Füllschlauch vom
Reifenventil.
WICHTIG
Wenn Sie während des Füllvorgangs die Voreinstellung des Abschaltdrucks ändern, schaltet der
Kompressor sofort ab. Sie können dann den Kompressor mit dem Schalter (2) aus/ein neu starten.
BEMERKUNG
Um eine Überschreitung des zulässigen Maximaldrucks des Reifens zu vermeiden lesen Sie das
Handbuch Ihres Fahrzeugs oder schauen Sie in der Reifendrucktabelle (z. B. im Rahmen der Fahrertür)
nach. Bei Fahrradreifen kontrollieren Sie den Aufdruck auf dem Reifen.
Aufpumpen von Sportgeräten (z.B. Basketball) oder Luftballons
1. Wickeln Sie das 12 Volt Kabel ab und verbinden Sie den 12 Volt Adapter mit dem 12 Volt Anschluß
Ihres Fahrzeuges.
2. Schrauben Sie den Ball/Ballon- Adapter in die Gewindebuchse des Füllschlauchs.
3. Fügen Sie den Ball/Ballon- Adapter in das Ventil des aufzublasenden Objekts ein.
4. Stellen Sie den gewünschten Abschaltdruck ein (siehe Einstellen des Abschaltdrucks).
5. Starten Sie den Kompressor durch Betätigen des Schalters (2), wenn der eingestellte Druck erreicht ist
schaltet sich der Kompressor automatisch ab.
6. Entfernen Sie den Adapter aus dem Ventil des aufgeblasenen Objekts und schrauben Sie ihn von der
Gewindebuchse des Füllschlauchs ab.
7. Trennen Sie den 12 Volt Anschluß vom Fahrzeug.
ACHTUNG
Schalten sie den Kompressor nach 10 Minuten Dauerbetrieb für 10 Minuten ab um ihn abkühlen zu
lassen.
Ersetzten der Sicherung
1. Um die Sicherung zu ersetzten, schrauben Sie die Kappe des 12V Steckers ab.
2. Ersetzten Sie die defekte Sicherung durch eine neue (15A 250V)
3. Schrauben Sie die Kappe wieder auf.
5. Wartung
Reinigen Sie das Gerät nach Gebrauch mit einem weichen, trockenen Tuch
Hinweise zum Umweltschutz
Elektrogeräte dürfen nicht über den normalen Hausmüll entsorgt werden! Bitte entsorgen Sie
dieses Gerät über die öffentlichen/ kommunalen Sammelstellen.
Die Materialien sind recycelbar, wie durch die Kennzeichnung angegeben. Durch Recycling,
stoffliche Verwertung oder andere Formen der Wiederverwendung von Altgeräten leisten Sie
einen wichtigen Beitrag zum Schutz unserer Umwelt!
6. Kontaktinformationen
EAL GmbH
Otto-Hausmann-Ring 107
42115 Wuppertal
Deutschland
Telefon: +49 (0)202 42 92 83 0
Telefax: +49 (0)202 2 65 57 98
Internet: www.eal-vertrieb.com
E-Mail: info@eal-vertrieb.com

4
GB Art. No. 21067
Programmable Compressor
Table of Contents
1. Intended purpose 4
2. Specifications 4
3. Safety instructions 4
4. Operation 4-6
5. Maintenance 6
6. Contact information 6
Introduction
Thank you very much for deciding on the programmable compressor of Eufab brand. This programmable
compressor is used for inflating car tyres, bicycle tyres, sports equipment and balloons accurately and
conveniently.
1. Intended purpose
The programmable compressor is designed for universal use, e.g. for the inflation of car, motorcycle and
bicycle tyres, sports balls, air toys, air mattresses and inflatable boats.
Due to its programmable automatic switch-off, the objects can be inflated with air without exceeding their
optimum operating pressure. During the filling process, the digital display can be used for monitoring
purposes.
2. Specifications
Designation Programmable compressor
Operating voltage 12V DC
Maximum pressure 7 bar / 100 PSI
Performance 0 – 2 bar in approx. 3 minutes (Reference: Auto tyre 195/65 R15, other tyre sizes
may produce different times)
Display 3-digit
Weight 2.170 kg
3. Safety instructions
1. Do not increase the air pressure for the objects to be inflated beyond the manufacturer's
recommendations!
2. Protect the compressor and its components against damp and moisture!
3. Never leave the compressor unattended during operation!
4. Keep children away and do not allow children to operate this machine!
5. Use this product only for the intended purpose!
6. Do not modify or dismantle the compressor!
7. If the compressor makes unusual noises or overheats, switch it off immediately and allow it to cool
down for at least 30 minutes!
8. Check the compressor before start-up. Damaged, cracked or broken parts should be repaired only by
qualified technicians!
9. Do not expose the compressor to frost, rain or temperatures above 30 °C or below -30 °C!
10. Never use on people or animals!
11. Ensure that the hose and cable are not exposed to any sharp edges, oil or hot objects!
12. For your own safety, use only accessories or spare parts specified in the instructions or recommended
by the manufacturer!
4. Operation
WARNING
Read these operating instructions carefully before start-up and observe all the safety
instructions! Keep the original packaging, your receipt and these instructions for future
reference!
5
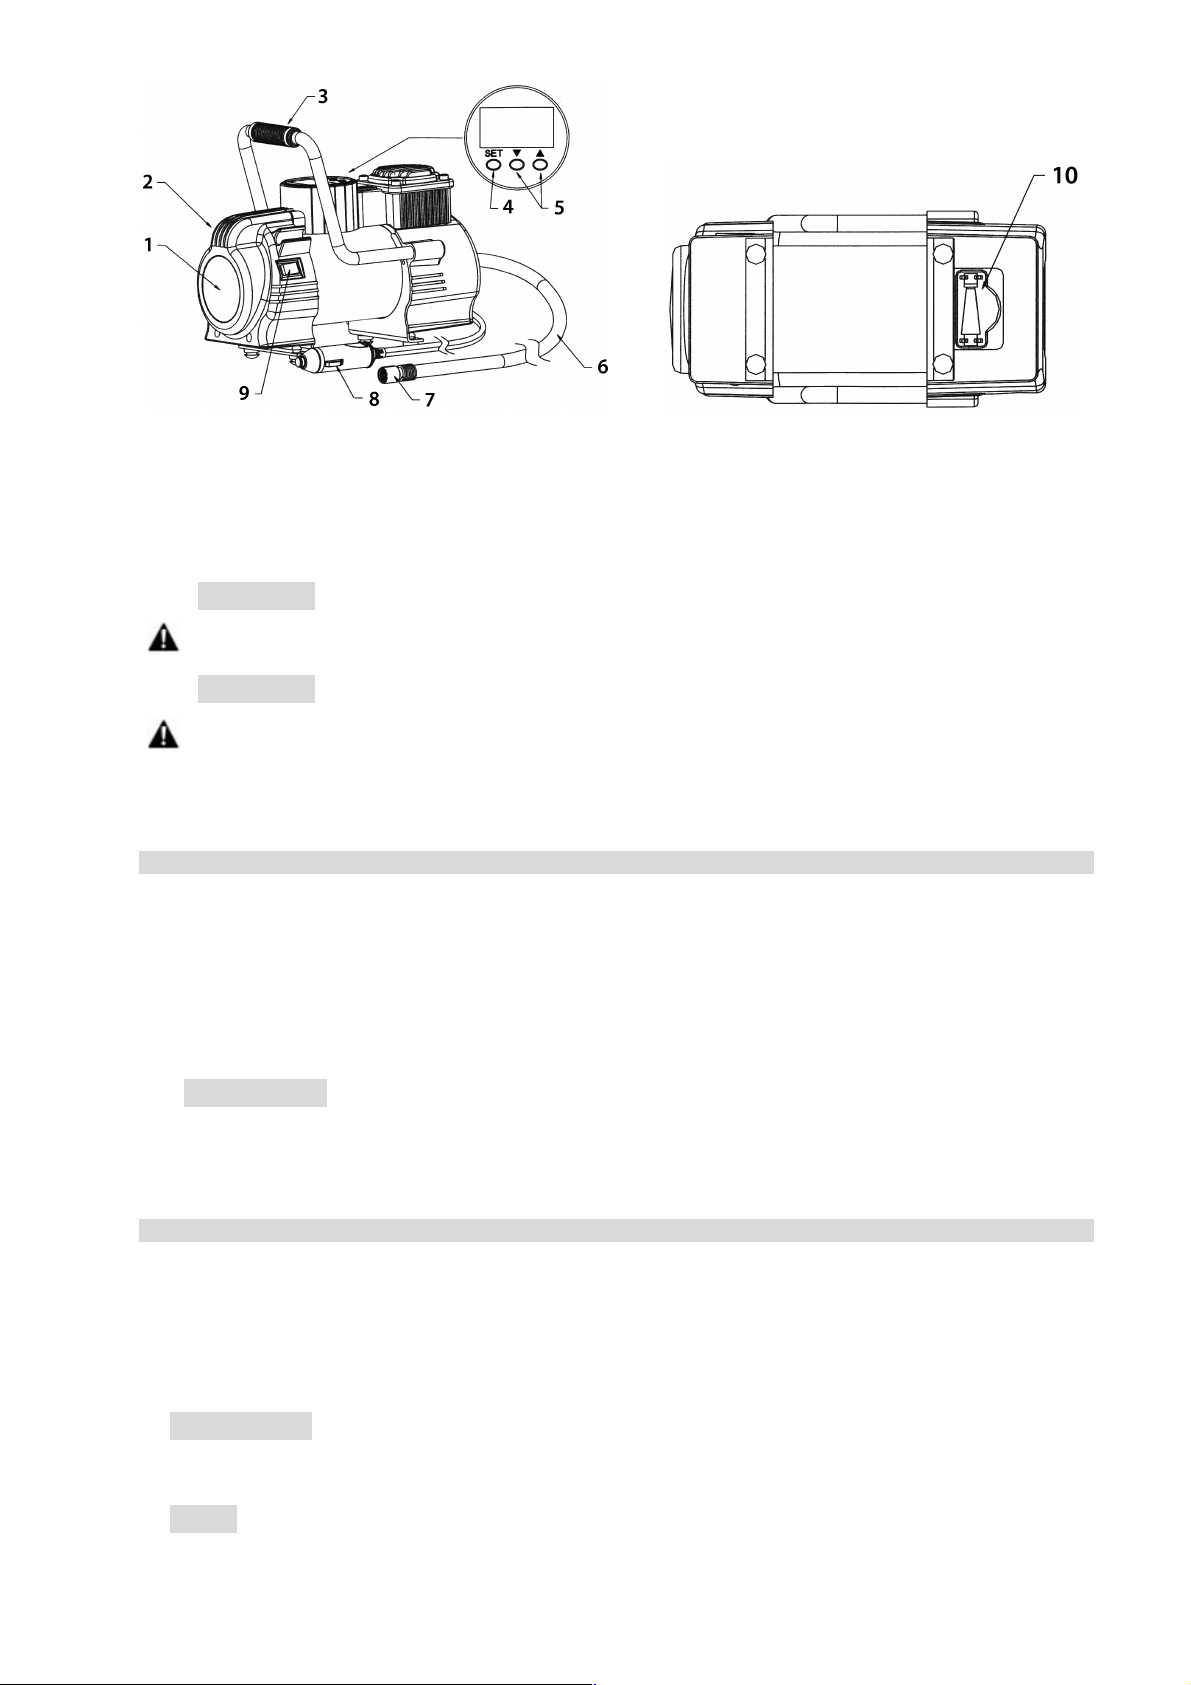
1 LED work lamp 2 ON/OFF switch for compressor
3 Carrying handle 4 Button for pre-setting of pressure
5 Buttons for setting the pressure 6 Air hose
7 Screw connection 8 12V connector
9 Switch for LED work lamp 10 Ball / balloon adapter
WARNING
Read these operating instructions carefully before start-up! Failure to observe the
instructions can lead to personal injury, damage to the compressor or other property!
WARNING
These instructions are intended to provide you with information on the function and
performance. Keep these instructions for future reference. Check the contents of the
packaging before start-up for completeness and absence of damage!
This compressor is equipped with a digital pressure display. With this digital display the current pressure
can be monitored during the inflation process; it also serves to set the switch-off pressure.
Setting the switch-off pressure
1. Unwind the 12 Volt cable and connect the 12 Volt adapter to the 12 Volt connection of your vehicle.
2. Press the SET button (4) to set the display to PSI or BAR.
3. Press the SET button (4) for three seconds in order to check the set switch-off pressure, the display
flashes five times. The pressure is set at the point of manufacture to 40 PSI. To set the required switchoff pressure, press the SET button (4) for three seconds until the display flashes, and then set the
pressure using the ! / " buttons (5). ! increases the pressure, " reduces the pressure.
4. The display then flashes again four times, then shows 0.0. This means that you have successfully set
the shut-off pressure.
IMPORTANT
1. The device saves the last set value. For example, if you have set the pressure to 2.0 bar, the switch-off
pressure when next used is 2.0 bar.
2. The compressor can be switched off manually before reaching the set switch-off pressure with the
switch (2), switch to position (0).
Inflating a vehicle or bicycle tyre
1. Unwind the 12 Volt cable and connect the 12 Volt adapter to the 12 Volt connection of your vehicle.
2. Screw the threaded socket of the inflation hose onto the tyre valve.
3. Set the required switch-off pressure (see “Setting the switch-off pressure”).
4. Start the compressor by operating the switch (2); when the set tyre pressure is reached, the
compressor switches itself off automatically.
5. Disconnect the 12 Volt connection from the vehicle and remove the inflation hose from the tyre valve.
IMPORTANT
If you change the pre-setting of the switch-off pressure during the inflation process, the compressor
switches off immediately. You can then start the compressor again with the ON/OFF switch (2).
NOTE
In order to avoid exceeding the permissible maximum pressure of the tyre, read your vehicle manual or
check it in the tyre pressure table (e.g. in the frame of the driver’s door). For bicycle tyres, check the
imprint on the tyre.
6
Inflating sports equipment (e.g. basketball) or balloons
1. Unwind the 12 Volt cable and connect the 12 Volt adapter to the 12 Volt connection of your vehicle.
2. Screw the ball/balloon adapter into the threaded socket of the inflation hose.
3. Insert the ball/balloon adapter into the valve of the object to be inflated.
4. Set the required switch-off pressure (see “Setting the switch-off pressure”).
5. Start the compressor by operating the switch (2); when the set pressure is reached, the compressor
switches itself off automatically.
6. Remove the adapter from the valve of the inflated object and unscrew it from the threaded socket of
the inflation hose.
7. Disconnect the 12 Volt connection from the vehicle.
ATTENTION
Switch the compressor off after 10 minutes of operation for 10 minutes in order to let it cool down.
Replacing the fuse
1. To replace the fuse, screw off the cap of the 12V connector.
2. Replace the defective fuse with a new one (15A 250V)
3. Screw the cap back on.
5. Maintenance
Clean the compressor after use with a soft, dry cloth
Instructions on environmental protection
Electrical equipment must not be disposed of as normal household waste! Please dispose of this
equipment at public / communal collection points.
The materials are recyclable, as specified by the designation. By recycling, material recycling or
other forms of reuse, you are making an important contribution to the protection of our
environment!
6. Contact information
EAL GmbH
Otto-Hausmann-Ring 107
42115 Wuppertal
Germany
Telephone: +49 (0)202 42 92 83 0
Telefax: +49 (0)202 2 65 57 98
Internet: www.eal-vertrieb.com
E-mail: info@eal-vertrieb.com
FR Article n° 21067
Compresseur programmable
Table des matières
1. Emploi prévu 6
2. Spécifications 7
3. Consignes de sécurité 7
4. Utilisation 7-8
5. Maintenance 9
6. Informations pour contact 9
Introduction
Nous vous remercions d'avoir choisi le compresseur programmable de la marque Eufab. Ce compresseur
programmable vous permet de gonfler avec de l'air, facilement et avec précision, les pneus d'autos et de
vélos, les articles de sport et les ballons.
1. Emploi prévu
Le compresseur programmable a une utilisation universelle, par exemple pour gonfler des pneus d'auto, de
moto et de vélos, des ballons de sport, des jouets gonflables, des matelas pneumatiques et des canots
pneumatiques.
Grâce à son dispositif programmable automatique d’arrêt, les objets peuvent être gonflés sans dépasser
leur pression normale d'utilisation optimale. L'affichage numérique peut être utilisé pour exercer une
surveillance pendant le gonflage.

7
2. Spécifications
Description Compresseur programmable
Tension de service 12 V DC
Pression maximale 7 bars / 100 PSI
Puissance : 0 - 2 bars en environ 3 minutes (référence : pneus auto 195/65 R15, pour
d'autres dimensions de pneus, le temps peut être différent)
Ecran 3 chiffres
Poids 2,170 kg
3. Consignes de sécurité
1. Ne dépassez pas la pression de l'air recommandée par le fabricant des objets à gonfler !
2. Protégez de l'humidité le compresseur et ses composants !
3. Ne laissez pas le compresseur en service sans surveillance !
4. Tenez les enfants à distance de l'appareil et ne les laissez pas se servir de cet appareil !
5. Utilisez cet appareil seulement pour l'application prévue !
6. Ne modifiez pas et ne démontez pas le compresseur !
7. Si le compresseur fait un bruit inhabituel ou surchauffe, éteignez-le immédiatement et laissez le
refroidir pendant au moins 30 minutes !
8. Avant sa mise en service, contrôlez le compresseur. Les composants endommagés, arrachés ou
cassés ne peuvent être réparés que par des techniciens qualifiés!
9. N'exposez jamais le compresseur au froid, à la pluie ou à des températures supérieures ou inférieures
à 30° !
10. N'utilisez jamais le compresseur sur des personnes ou des animaux!
11. Assurez-vous que le tuyau flexible et le câble ne viennent pas en contact avec un bord aiguisé, de
huile ou des objets chauds !
12. Pour votre propre sécurité, utilisez exclusivement des accessoires ou des pièces de rechange qui sont
citées dans cette directive, ou dont l'emploi est recommandé par le fabricant !
4. Mode d’emploi
AVERTISSEMENT
Avant la mise en service, lisez attentivement le manuel de l'opérateur et respectez toutes les
consignes de sécurité ! Conservez l'emballage d'origine, le document d'achat ainsi que cette
directive afin de pouvoir la consulter ultérieurement !
1 Voyant DEL lampe de travail 2 Commutateur MARCHE/ARRET du compresseur
3 Poignée de transport 4 Commutateur préréglage de pression
5 Commutateur réglage de la pression 6 Tuyau flexible
7 Raccord à vis 8 Prise 12 V
9 Commutateur voyant DEL lampe de travail 10 Adaptateur balle / ballon
AVERTISSEMENT
Avant la mise en service, lisez attentivement ce manuel de l'opérateur ! Le non-respect des
consignes peut nuire aux personnes, endommager l'appareil ou vos biens !

8
AVERTISSEMENT
Cette directive a pour but de vous donner des renseignements relatifs au fonctionnement et à
la puissance. Conservez cette directive comme ouvrage de référence pour l'avenir. Avant la
mise en service, vérifiez le contenu de l'emballage et son intégrité !
Ce compresseur est équipé d'un affichage de pression numérique. Cet affichage vous permet de surveiller
la pression pendant le gonflage. De plus cet affichage sert à régler la pression de coupure.
Réglage de la pression de coupure
1. Déroulez le câble 12 volts et connectez l'adaptateur 12 volts d'adaptateur avec le raccord 12 volts de
votre véhicule.
2. Appuyez sur le commutateur SET (4) afin de régler l'affichage sur PSI / BAR.
3. Appuyez sur le commutateur SET (4) pendant trois secondes pour contrôler la pression de coupure
réglée, l'affichage clignote cinq fois. En usine la pression est réglée sur 40 PSI.
Pour régler la pression de coupure souhaitée appuyez sur le commutateur SET (4) pendant trois
secondes jusqu'à ce que l'affichage clignote, avec les touches ! / " (5) réglez la pression désirée.
! augmente la pression, " réduit la pression
4. L'affichage clignote ensuite encore quatre fois et indique 0,0. Cela signifie que vous avez réglé
correctement la pression de coupure.
IMPORTANT
1. L'appareil sauvegarde la valeur réglée en dernier. Par exemple, si vous avez réglé la pression sur
2,0 bars, lors de la prochaine à l'utilisation, la pression de coupure sera de 2,0 bars.
2. Avant d'avoir atteint la pression de coupure réglée, il est possible, avec le commutateur (2),
d'arrêter manuellement le compresseur (2) en plaçant le commutateur sur la position (0).
Gonflage d’un pneu de voiture ou de vélo
1. Déroulez le câble 12 volts et connectez l'adaptateur 12 volts avec le raccord 12 volts de votre véhicule.
2. Vissez la douille filetée du tuyau de remplissage à la valve de pneu.
3. Réglez la pression de coupure souhaitée (cf. réglage de la pression de coupure)
4. Démarrez le compresseur en actionnant le commutateur (2), lorsque la pression de gonflage réglée est
atteinte, le compresseur s'arrête automatiquement.
5. Déconnectez le raccord 12 volts du véhicule et déconnectez le tuyau de remplissage de la valve de
pneu.
IMPORTANT
Si vous changez la pression de coupure pendant le gonflage, le compresseur s'arrête immédiatement.
Vous pouvez alors redémarrer le compresseur avec le commutateur (2) Marche/Arrêt.
REMARQUE
Pour éviter un dépassement de la pression maximale admissible du pneu, consultez le manuel de votre
véhicule ou vérifiez dans le tableau de pression de gonflage (par exemple dans le cadre de la porte de
conducteur). Pour les pneus de vélo, contrôlez l'impression sur le pneu.
Gonflage d’articles de sport (par exemple ballon de basket) ou de ballons
1. Déroulez le câble 12 volts et connectez l'adaptateur 12 volts avec le raccord 12 volts de votre véhicule.
2. Vissez l'adaptateur de la balle / du ballon dans la douille filetée du tuyau de remplissage.
3. Insérez l'adaptateur de la balle / du ballon dans la soupape de l'objet à gonfler.
4. Réglez la pression de coupure souhaitée (cf. réglage de la pression de coupure).
5. Démarrez le compresseur en actionnant le commutateur (2), lorsque la pression de gonflage réglée est
atteinte le compresseur s'arrête automatiquement.
6. Retirez l'adaptateur de la soupape de l'objet gonflé et séparez-le d'avec la douille filetée du tuyau de
remplissage.
7. Déconnectez le raccord 12 volts du véhicule.
ATTENTION
Après 10 minutes de fonctionnement continu du compresseur, arrêtez-le pendant 10 minutes pour le
laisser se refroidir.
Remplacement du fusible
1. Pour remplacer le fusible, dévissez le couvercle 12 V de la prise.
2. Remplacez le fusible défectueux par un fusible neuf (15 A 250 V)
3. Revissez le couvercle.

9
5. Maintenance
Après utilisation, nettoyez l'appareil avec un chiffon doux et sec.
Consignes relatives à la protection de l’environnement
Les appareils électriques ne doivent pas être jetés avec les ordures ménagères ! Veuillez
déposer cet appareil dans une déchèterie communale.
Les matériaux employés sont recyclables comme l'indique l'étiquette. Grâce au recyclage, à la
réutilisation des matériaux ou d'autres formes de réemploi de vieux appareils, vous contribuez
de façon importante à la protection de notre environnement !
6. Informations pour contact
EAL GmbH
Otto-Hausmann-Ring 107
42115 Wuppertal
Allemagne
Téléphone : +49 (0)202 42 92 83 0
Fax : +49 (0)202 2 65 57 98
Internet : www.eal-vertrieb.com
E-Mail : info@eal-vertrieb.com
I N. art. 21067
Compressore programmabile
Indice
1. Uso previsto 9
2. Specificazioni 9
3. Avvertenze sulla sicurezza 9-10
4. Uso 10-11
5. Manutenzione 11
6. Informazioni per il contatto 11
Introduzione
La ringraziamo per aver optato per il compressore programmabile della Eufab, progettato per gonfiare in
modo preciso e confortevole pneumatici di auto e biciclette, attrezzi sportivi e palloni/palloncini.
1. Uso previsto
Il compressore programmabile è utilizzabile universalmente, p.es. per gonfiare pneumatici di auto, moto e
biciclette, palloni sportivi, giocattoli gonfiabili, materassini e gommoni. Grazie al suo dispositivo automatico
di disattivazione programmabile, gli oggetti possono essere gonfiati senza superare la loro pressione
d’esercizio ottimale. Il display digitale può essere usato per il monitoraggio durante il processo di
gonfiamento.
2. Specificazioni
Denominazione compressore programmabile
Tensione d’esercizio 12V DC
Pressione massima 7 bar / 100 PSI
Portata: 0 – 2 bar in ca. 3 minuti (riferimento: pneumatici d’auto 195/65 R15, per
pneumatici di altre dimensioni i tempi possono variare)
Display a 3 cifre
Peso 2,170 kg
3. Avvertenze sulla sicurezza
1. Non superare la pressione dell’aria consigliata dal produttore per gli oggetti da gonfiare!
2. Proteggere il compressore e i suoi componenti dall’umidità!
3. Non lasciare il compressore in funzione incustodito!
4. Tenere il compressore lontano dalla portata dei bambini e impedire che usino l’apparecchio!
5. Usare questo prodotto solo per l’impiego previsto!
6. Non manipolare o smontare il compressore!
7. Se il compressore dovesse emettere rumori insoliti o surriscaldarsi, spegnerlo immediatamente e
lasciarlo raffreddare per almeno 30 minuti!
8. Controllare il compressore prima della messa in funzione. Parti danneggiate, strappate o rotte
dovrebbero essere riparate esclusivamente da tecnici qualificati!
9. Non esporre mai il compressore al gelo, alla pioggia oppure a temperature superiori a 30°C o inferiori
a -30°C!

10
10. Non usare mai su persone o animali!
11. Assicurarsi che il tubo flessibile e il cavo non vengano in contatto con spigoli vivi, olio od oggetti caldi!
12. Per la Sua sicurezza personale utilizzi esclusivamente gli accessori o i ricambi indicati nelle istruzioni
o consigliati dal produttore!
4. Istruzioni per l’uso
AVVERTENZA
Prima della messa in funzione leggere attentamente le istruzioni per l’uso e osservare tutte le
avvertenze sulla sicurezza! Conservare la confezione originale, lo scontrino d’acquisto e
queste istruzioni per l’uso per consultazioni successive!
1 Lampada LED da lavoro 2 Interruttore ON/OFF per il compressore
3 Manico 4 Interruttore preimpostazione pressione
5 Interruttore per la regolazione della pressione 6 Manichetta dell’aria
7 Raccordo a vite 8 Connettore da 12V
9 Interruttore per la lampada LED di lavoro 10 Adattatore per palloni/palloncini
AVVERTENZA
Prima della messa in funzione leggere attentamente queste istruzioni per l’uso!
L’inosservanza può causare danni alle persone, all’apparecchio o alla Sua proprietà!
AVVERTENZA
Queste istruzioni hanno il compito di fornire informazioni su funzionamento e prestazioni.
Conservare queste istruzioni per consultazioni successive. Prima della messa in funzione
controllare se il contenuto della confezione è intatto e completo!
Questo compressore è dotato di un indicatore digitale della pressione, con il quale è possibile monitorare la
pressione attuale durante il processo di gonfiamento. Serve inoltre per impostare la pressione di
disinnesto.
Impostazione della pressione di disinnesto
1. Svolgere il cavo da 12 V e collegare l’adattatore da 12 V con il connettore da 12 V della vettura.
2. Premere l’interruttore SET (4) per impostare l’indicazione su PSI / BAR.
3. Premere l’interruttore SET (4) per 3 secondi per controllare la pressione di disinnesto impostata,
l’indicazione lampeggia cinque volte. La pressione è impostata dalla fabbrica su 40 PSI. Per impostare
la pressione di disinnesto desiderata, premere per tre secondi l’interruttore SET (4) finché l’indicazione
lampeggia, con gli interruttori ! / " (5) impostare la pressione.
4. ! aumenta la pressione, " la diminuisce.
5. Inseguito l’indicazione lampeggia ancora quattro volte e indica 0,0. Questo significa che l’impostazione
della pressione di disinnesto è riuscita.
IMPORTANTE
1. L’apparecchio memorizza il valore impostato per ultimo. Esempio: se la pressione è stata
impostata su 2,0 bar, al prossimo impiego la pressione di disinnesto sarà di 2,0 bar.
2. Prima del raggiungimento della pressione di disinnesto impostata, il compressore può essere
spento manualmente posizionando l’interruttore (2) su (0).

11
Gonfiamento di un pneumatico d’auto o di bicicletta
1. Svolgere il cavo da 12 V e collegare l’adattatore da 12 V con il connettore da 12 V della vettura.
2. Avvitare la boccola filettata del tubo di gonfiamento sulla valvola del pneumatico.
3. Impostare la pressione di disinnesto desiderata (vedi impostazione della pressione di disinnesto).
4. Avviare il compressore azionando l’interruttore (2). Quando la pressione del pneumatico impostata è
stata raggiunta, il compressore si spegne automaticamente.
5. Staccare il collegamento da 12 V dalla vettura e togliere il tubo di gonfiamento dalla valvola del
pneumatico.
IMPORTANTE
Se durante il processo di gonfiamento si modifica la preimpostazione della pressione di disinnesto, il
compressore si spegne immediatamente. In seguito può essere riavviato con l’interruttore (2) OFF/ON.
NOTA
Per evitare un superamento della pressione massima consentita del pneumatico, consultare il manuale
della propria vettura o la tabella della pressione dei pneumatici (p.es. nel telaio della portiera del
conducente). Per i pneumatici di biciclette controllare la stampigliatura sul pneumatico.
Gonfiamento di attrezzi sportivi, (p.es. palla da pallacanestro) o palloncini
1. Svolgere il cavo da 12 V e collegare l’adattatore da 12 V con il connettore da 12 V della vettura.
2. Avvitare l’adattatore per palloni/palloncini nella boccola filettata del tubo di gonfiamento.
3. Inserire l’adattatore per palloni/palloncini nella valvola dell’oggetto da gonfiare.
4. Impostare la pressione di disinnesto desiderata (vedi impostazione della pressione di disinnesto).
5. Avviare il compressore azionando l’interruttore (2). Quando la pressione impostata è stata raggiunta, il
compressore si spegne automaticamente.
6. Togliere l’adattatore dalla valvola dell’oggetto da gonfiare e svitarlo dalla boccola filettata del tubo di
gonfiamento.
7. Staccare il collegamento da 12 V dalla vettura.
ATTENZIONE
Dopo un funzionamento continuo di 10 minuti spegnere il compressore per 10 minuti per farlo
raffreddare.
Sostituzione del fusibile
1. Per sostituire il fusibile, svitare il cappuccio del connettore da 12 V.
2. Sostituire il fusibile difettoso con uno nuovo (15A 250V).
3. Riavvitare il cappuccio.
5. Manutenzione
Dopo l’uso pulire l’apparecchio con un panno morbido asciutto.
Indicazioni per la protezione dell’ambiente
Gli apparecchi elettrici non devono essere smaltiti con i normali rifiuti domestici! Portare questo
apparecchio ai punti di raccolta pubblici/comunali.
I materiali sono riciclabili, come indicato sul contrassegno. Con il riciclaggio, il ricupero del
materiale e altre forme di riutilizzo di apparecchi vecchi fornisce un contributo importante per la
protezione del nostro ambiente!
6. Informazioni per il contatto
EAL GmbH
Otto-Hausmann-Ring 107
D - 42115 Wuppertal
Germania
Telefono: +49 (0)202 42 92 83 0
Fax: +49 (0)202 2 65 57 98
Internet: www.eal-vertrieb.com
E-mail: info@eal-vertrieb.com

12
NL Art.-nr. 21067
Programmeerbare compressor
Inhoud
1. Gebruiksdoel 12
2. Specificaties 12
3. Veiligheidsvoorschriften 12
4. Bediening 12-14
5. Onderhoud 14
6. Contactinformatie 14
Inleiding
Hartelijk dank dat u voor de programmeerbare compressor van het merk Eufab gekozen hebt. Deze
programmeerbare compressor dient om precies en comfortabel autobanden, fietsbanden, sporttoestellen
en ballonnen met lucht te vullen.
1. Gebruiksdoel
De programmeerbare compressor is universeel bruikbaar bijv. voor het oppompen van auto-, motorfiets- en
fietsbanden, sportballen, opblaasbaar speelgoed, luchtmatrassen en rubberboten.
Door het programmeerbare en automatische uitschakelmechanisme kunnen de objecten met lucht
opgepompt worden zonder hun optimale gebruiksdruk te overschrijden. Het digitale display kan tijdens het
vullen als bewaking gebruikt worden.
2. Specificaties
Benaming programmeerbare compressor
Bedrijfsspanning 12V DC
Maximale druk 7 bar / 100 PSI
Vermogen: 0 – 2 bar in ca. 3 minuten (referentie: autobanden 195/65 R15, bij andere
bandgroottes kunnen andere tijden gelden)
Display 3 cijfers
Gewicht 2,170 kg
3. Veiligheidsvoorschriften
1. Overschrijd bij het verhogen van de luchtdruk de aanbevelingen van de fabrikant van de op te blazen
voorwerpen niet.
2. Bescherm de compressor en de componenten tegen vocht.
3. Laat de compressor tijdens de werking niet onbeheerd achter.
4. Houd kinderen op een afstand en laat kinderen het apparaat niet bedienen.
5. Gebruik dit product uitsluitend voor de voorziene doeleinden.
6. Manipuleer of demonteer de compressor niet.
7. Indien de compressor ongewone geluiden maakt of oververhit raakt, schakelt u hem onmiddellijk uit
en laat u hem ten minste 30 minuten afkoelen.
8. Controleer de compressor voor de ingebruikneming. Beschadigde, gebarsten of gebroken onderdelen
mogen uitsluitend door gekwalificeerde technici gerepareerd worden.
9. Stel de compressor nooit bloot aan vorst, regen of temperaturen boven 30 °C of
onder -30°C.
10. Nooit bij mensen of dieren gebruiken.
11. Zorg ervoor, dat de slang en kabel niet in contact komen met scherpe randen, olie of te warme
voorwerpen.
12. Gebruik voor uw eigen veiligheid uitsluitend toebehoren of vervangonderdelen die in de handleiding
vermeld worden of die door de fabrikant aanbevolen worden.
4. Bediening
WAARSCHUWING
Lees de handleiding voor de ingebruikneming aandachtig door en neem alle
veiligheidsvoorschriften in acht! Bewaar de originele verpakking, het aankoopbewijs en deze
handleiding voor latere raadpleging!

13
1 LED-werklamp 2 IN/UIT-schakelaar voor compressor
3 Draaggreep 4 Schakelaar drukvoorinstelling
5 Schakelaar om de druk in te stellen 6 Luchtslang
7 Schroefaansluiting 8 12V stekker
9 Schakelaar voor LED-werklamp 10 Bal / ballonadapter
WAARSCHUWING
Lees deze handleiding voor de ingebruikneming aandachtig door! Niet-naleving kan tot
lichamelijke letsels, schade aan het apparaat of uw eigendom leiden!
WAARSCHUWING
Deze handleiding geeft u informatie over de werking en het vermogen. Bewaar deze
handleiding als naslagwerk. Controleer voor de ingebruikneming de inhoud van de
verpakking op beschadigingen en volledigheid!
Deze compressor is met een digitaal drukdisplay uitgerust. Met dit digitale display kan de actuele druk
tijdens het vullen bewaakt worden, bovendien dient het display voor het instellen van de uitschakeldruk.
Instellen van de uitschakeldruk
1. Rol de 12-volt-kabel af en verbind de 12-volt-adapter met de 12-volt-aansluiting van uw voertuig.
2. Druk de SET-schakelaar (4) in om het display op PSI / BAR in te stellen.
3. Druk de SET-schakelaar (4) gedurende drie seconden in om de ingestelde uitschakeldruk te
controleren. Het display knippert vijf keer. In de fabriek is de druk op 40 PSI ingesteld.
Om de gewenste uitschakeldruk in te stellen, drukt u gedurende drie seconden op de SET-schakelaar
(4) tot het display knippert, met de ! / " knoppen (5) stelt u de druk in. ! verhoogt de druk, "
verlaagt de druk.
4. Daarna knippert de weergave nog vier keer en toont 0,0. Dit betekent, dat u de uitschakeldruk
succesvol ingesteld hebt.
BELANGRIJK
1. Het apparaat bewaart de laatst ingestelde waarde. Bijvoorbeeld: als u de druk op 2,0 bar ingesteld
hebt, bedraagt de uitschakeldruk bij het volgende gebruik 2,0 bar.
2. De compressor kan voor het bereiken van de ingestelde uitschakeldruk manueel met de schakelaar (2)
uitgeschakeld worden, schakelaar op positie (0).
Oppompen van een auto- of fietsband
1. Rol de 12-volt-kabel af en verbind de 12-volt-adapter met de 12-volt-aansluiting van uw voertuig.
2. Draai de schroefdraadbus van de vulslang op het bandventiel.
3. Stel de gewenste uitschakeldruk in (zie instellen van de uitschakeldruk).
4. Start de compressor door de schakelaar (2) te bedienen. Als de ingestelde bandendruk bereikt is,
schakelt de compressor automatisch uit.
5. Koppel de 12-volt-aansluiting van het voertuig los en verwijder de vulslang van het bandventiel.
BELANGRIJK
Als u tijdens het vullen de voorinstelling van de uitschakeldruk wijzigt, schakelt de compressor
onmiddellijk uit. U kunt dan de compressor met de in/uit-schakelaar (2) opnieuw starten.

14
OPMERKING
Om een overschrijding van de toegelaten maximale druk van de band te vermijden, leest u het
handboek van uw voertuig of raadpleegt u de bandendruktabel (bijv. in het kader van de chauffeurdeur).
Bij fietsbanden controleert u de opwaartse druk op de band.
Oppompen van sportuitrusting (bijv. basketbal) of luchtballonnen
1. Rol de 12-volt-kabel af en verbind de 12-volt-adapter met de 12-volt-aansluiting van uw voertuig.
2. Draai de bal/ballon-adapter in de schroefdraadbus van de vulslang.
3. Steek de bal/ballon-adapter in het ventiel van het op te blazen voorwerp.
4. Stel de gewenste uitschakeldruk in (zie instellen van de uitschakeldruk).
5. Start de compressor door bedienen van de schakelaar (2). Als de ingestelde druk bereikt is, schakelt
de compressor automatisch uit.
6. Verwijder de adapter uit het ventiel van het opgeblazen voorwerp en draai hem van de
schroefdraadbus van de vulslang.
7. Koppel de 12-volt-aansluiting los.
OPGELET
Schakel de compressor na 10 minuten ononderbroken gebruik voor 10 minuten uit om hem te laten
afkoelen.
Vervangen van de zekering
1. Om de zekering te vervangen, draait u de kap van de 12V stekker.
2. Vervang de defecte zekering door een nieuwe zekering (15A 250V).
3. Draai de kap weer op de stekker.
5. Onderhoud
Reinig het apparaat na gebruik met een zachte, droge doek.
Opmerkingen over milieubescherming
Elektrische apparaten mogen niet samen met het huishoudelijke afval verwijderd worden!
Verwijder dit apparaat via de gemeentelijke afvalverzamelplaatsen.
De materialen zijn recyclebaar, zoals door het label aangegeven. Door recycling of andere
vormen van verwerking van oude apparaten levert u een belangrijke bijdrage tot de
bescherming van ons milieu!
6. Contactinformatie
EAL GmbH
Otto-Hausmann-Ring 107
42115 Wuppertal
Duitsland
Telefoon: +49 (0)202 42 92 83 0
Fax: +49 (0)202 2 65 57 98
Internet: www.eal-vertrieb.com
E-mail: info@eal-vertrieb.com
CZ Č. výr. 21067
Programovatelný kompresor
Obsah
1. Účel použití 14-15
2. Specifikace 15
3. Bezpečnostní upozornění 15
4. Obsluha 15-16
5. Údržba 16-17
6. Kontaktní informace 17
Úvod
Děkujeme vám, že jste se rozhodli pro zakoupení programovatelného kompresoru značky Eufab. Tento
programovatelný kompresor se používá pro přesné a pohodlné huštění pneumatik automobilů a jízdních
kol, sportovního náčiní a míčů vzduchem.
1. Účel použití
Programovatelný kompresor lze univerzálně používat na huštění pneumatik automobilů, motocyklů a
jízdních kol, sportovních míčů, nafukovacích hraček, matrací a člunů.

15
Díky programovatelné automatice vypnutí lze předměty hustit vzduchem, aniž by se překročil jejich
optimální provozní tlak. Digitální ukazovatel se během procesu huštění dá použít na monitorování.
2. Specifikace
Název programovatelný kompresor
Provozní napětí 12V DC
Maximální tlak 7 bar / 100 PSI
Výkon: 0 – 2 bar cca za 3 minuty (reference: pneumatiky automobilů 195/65 R15, u
jiných velikostí pneumatik se mohou výsledné časy odlišovat)
Displej trojmístný
Hmotnost 2,170 kg
3. Bezpečnostní upozornění
1. Tlak vzduchu pro huštěné předměty nesmí překročit doporučení výrobce!
2. Kompresor a jeho komponenty chraňte před vlhkem!
3. Kompresor nenechávejte v provozu bez dozoru!
4. Přístroj držte mimo dosah dětí a nedovolte jim, aby ho obsluhovaly!
5. Tento výrobek používejte pouze na vyhrazený účel!
6. S kompresorem nemanipulujte a nerozebírejte ho!
7. Pokud by kompresor vydával neobvyklé zvuky nebo se přehříval, okamžitě kompresor vypněte a
nechte ho minimálně 30 minut ochladit!
8. Kompresor zkontrolujte před uvedením do provozu. Poškozené, popraskané nebo zlomené
konstrukční díly by měl opravovat pouze kvalifikovaný technik!
9. Nikdy nevystavujte kompresor mrazu, dešti nebo teplotám nad 30 °C nebo pod - 30 °C!
10. Nikdy ho nezkoušejte na lidech nebo zvířatech!
11. Ujistěte se, že hadice a kabel nevedou přes ostré hrany, nejsou vystaveny působení oleje nebo
horkých předmětů!
12. Pro vlastní bezpečnost používejte pouze příslušenství nebo náhradní díly, které jsou uvedeny v
návodu nebo jejichž použití výrobce doporučuje!
4. Návod k obsluze
VAROVÁNÍ
Před uvedením do provozu si pozorně přečtěte návod k obsluze a dodržujte všechna
bezpečnostní upozornění! Originální obal, nákupní doklad a tento návod uschovejte pro
případ použití v budoucnu!
1 LED pracovní svítidlo 2 zapínač/vypínač kompresoru
3 držadlo 4 spínač přednastavení tlaku
5 spínač k nastavení tlaku 6 vzduchová hadice
7 šroubová přípojka 8 zástrčka 12V
9 spínač LED pracovního svítidla 10 adaptér na míč/balón
VAROVÁNÍ
Před uvedením do provozu si pozorně přečtěte tento návod k obsluze! Nerespektování může
mít za následek újmy na zdraví, poškození přístroje nebo vašeho majetku!

16
VAROVÁNÍ
Tento návod vám má poskytnou informace o funkci a výkonu. Návod si uschovejte pro případ
použití v budoucnu. Před uvedením do provozu zkontrolujte neporušenost a úplnost balení!
Tento kompresor je vybaven digitálním ukazatelem tlaku. Pomocí tohoto digitálního ukazatele tlaku
lze během huštění monitorovat aktuální tlak, navíc slouží na nastavení vypínacího tlaku.
Nastavení vypínacího tlaku
1. Odviňte 12 V kabel a spojte 12 V adaptér s 12 V přípojkou vašeho vozidla.
2. Stiskněte spínač SET (4) pro nastavení ukazatele na PSI / BAR.
3. Stiskněte na tři sekundy spínač SET (4) pro kontrolu nastaveného vypínacího tlaku, ukazatel pětkrát
zabliká. Z výroby je tlak nastavený na 40 PSI. Pro nastavení požadovaného vypínacího tlaku stiskněte
na tři sekundy spínač SET (4), dokud ukazatel nezačne blikat, pomocí spínačů (5) ! / " nastavte
tlak. ! zvyšuje tlak, " snižuje tlak
4. Ukazatel následně ještě čtyřikrát zabliká a zobrazí se údaj 0,0. Znamená to, že jste úspěšně nastavili
vypínací tlak.
DŮLEŽITÁ UPOZORNĚNÍ
1. Přístroj uloží do paměti naposledy nastavenou hodnotu. Pokud jste například nastavili tlak na 2,0
bar, bude hodnota vypínacího tlaku při nejbližším použití 2,0 bar.
2. Kompresor lze před dosažením nastaveného vypínacího tlaku manuálně vypnout pomocí spínače
(2) přepnutím do polohy (0).
Huštění pneumatiky osobního motorového vozidla nebo jízdního kola
1. Odviňte 12 V kabel a spojte 12 V adaptér s 12 V přípojkou vašeho vozidla.
2. Pouzdro husticí koncovky se závitem našroubujte na ventil pneumatiky.
3. Nastavte požadovaný vypínací tlak (viz Nastavování vypínacího tlaku)
4. Spusťte kompresor stisknutím spínač e (2), po dosažení nastaveného tlaku pneumatiky se kompresor
automaticky vypne.
5. Odpojte 12 V přípojku od vozidla a sejměte husticí koncovku z ventilu pneumatiky.
DŮLEŽITÁ UPOZORNĚNÍ
Pokud během huštění změníte přednastavení vypínacího tlaku, kompresor se ihned vypne. Následně
můžete kompresor znovu spustit pomocí vypínače/zapínače (2).
POZNÁMKA
Abyste zabránili překročení maximálního povoleného tlaku pneumatiky, přečtěte si příručku vašeho
vozidla nebo se podívejte do tabulky tlaků pneumatik (např. na rámu dveří řidiče). V případě pneumatik
jízdního kola zkontrolujte nápis na pneumatice.
Huštění sportovního náčiní (např. basketbalového míče) nebo balónu
1. Odviňte 12 V kabel a spojte 12 V adaptér s 12 V přípojkou vašeho vozidla.
2. Našroubujte adaptér míče/balónu do pouzdra husticí koncovky se závitem.
3. Adaptér míče/balónu zasuňte do ventilu nafukovaného předmětu.
4. Nastavte požadovaný vypínací tlak (viz Nastavování vypínacího tlaku).
5. Spusťte kompresor stisknutím spínače (2), po dosažení nastaveného tlaku se kompresor automaticky
vypne.
6. Sejměte adaptér z ventilu nafukovaného předmětu a odšroubujte jej z pouzdra husticí koncovky se
závitem.
7. Odpojte 12 V přípojku od vozidla.
POZOR
Po 10 minutách nepřetržitého provozu vypněte kompresor na 10 minut, aby se mohl ochladit.
Výměna pojistky
1. Při výměně pojistky odšroubujte krytku 12 V zástrčky.
2. Vadnou pojistku vyměňte za novou (15A 250V)
3. Krytku znovu našroubujte.
5. Údržba
Po použití očistěte přístroj měkkou, suchou utěrkou.

17
Pokyny k ochraně životního prostředí
Elektrické přístroje se nesmějí likvidovat s běžným domácím odpadem! Tento přístroj odevzdejte
za účelem likvidace do veřejné/komunální sběrny.
Materiály se dají recyklovat, jak je uvedeno na označení. Recyklací, zhodnocením materiálů
nebo jinými formami opětovného zužitkování použitých přístrojů výrazně přispíváte k ochraně
našeho životního prostředí!
6. Kontaktní informace
EAL GmbH
Otto-Hausmann-Ring 107
42115 Wuppertal
Deutschland
Telefon: +49 (0)202 42 92 83 0
Telefax: +49 (0)202 2 65 57 98
Internet: www.eal-vertrieb.com
E-mail: info@eal-vertrieb.com
SK Č. výr. 21067
Programovateľný kompresor
Obsah
1. Účel použitia 17
2. Špecifikácie 17
3. Bezpečnostné upozornenia 17
4. Obsluha 18-19
5. Údržba 19
6. Kontaktné informácie 19
Úvod
Ďakujeme vám, že ste sa rozhodli pre zakúpenie programovateľného kompresora značky Eufab. Tento
programovateľný kompresor slúži na presné a pohodlné hustenie pneumatík automobilov a bicyklov,
športového náčinia a balónov vzduchom.
1. Účel použitia
Programovateľný kompresor sa dá univerzálne použiť napr. na hustenie pneumatík automobilov,
motocyklov a bicyklov, športových lôpt, nafukovacích hračiek, matracov a člnov.
Vďaka programovateľnej automatike vypnutia sa predmety dajú hustiť vzduchom bez toho, aby sa prekročil
ich optimálny prevádzkový tlak. Digitálny ukazovateľ sa počas procesu hustenia dá použiť na
monitorovanie.
2. Špecifikácie
Názov programovateľný kompresor
Prevádzkové napätie 12V DC
Maximálny tlak 7 bar / 100 PSI
Výkon: 0 – 2 bar cca za 3 minúty (referencia: pneumatiky automobilov 195/65 R15, pri
iných veľkostiach pneumatík môžu byť výsledné časy odlišné)
Displej trojmiestny
Hmotnosť 2,170 kg
3. Bezpečnostné upozornenia
1. Tlak vzduchu pre hustené predmety nesmie prekročiť odporúčanie výrobcu!
2. Kompresor a jeho komponenty chráňte pred vlhkom!
3. Kompresor nenechávajte v prevádzke bez dozoru!
4. Prístroj držte mimo dosahu detí a nedovoľte im, aby ho obsluhovali!
5. Tento výrobok používajte len na vyhradený účel!
6. S kompresorom nemanipulujte a nerozoberajte ho!
7. Ak kompresor vydáva neobvyklé zvuky alebo ak sa prehrieva, ihneď ho vypnite a nechajte ho
minimálne 30 minút ochladiť!
8. Pred uvedením do prevádzky kompresor skontrolujte. Poškodené, popraskané alebo zlomené
konštrukčné diely by mal opravovať výlučne kvalifikovaný technik!
9. Kompresor nikdy nevystavujte mrazu, dažďu, ani teplotám nad 30 °C alebo pod -30 °C!
10. Nikdy ho neskúšajte na ľuďoch alebo zvieratách!
11. Uistite sa, že hadica a kábel neprechádzajú cez ostré hrany, nie sú vystavené oleju alebo horúcim
predmetom!
12. Pre vlastnú bezpečnosť používajte výlučne príslušenstvo alebo náhradné diely, ktoré sú uvedené v
návode alebo ktorých používanie odporúča výrobca!

18
4. Návod na obsluhu
VAROVANIE
Pred uvedením do prevádzky si pozorne prečítajte návod na obsluhu a riaďte sa všetkými
bezpečnostnými upozorneniami! Originálny obal, doklad o zakúpení a tento návod uschovajte
pre prípad neskoršieho použitia!
1 LED pracovné svietidlo 2 zapínač/vypínač kompresora
3 držadlo 4 spínač prednastavenia tlaku
5 spínač na nastavenie tlaku 6 vzduchová hadica
7 skrutková prípojka 8 zástrčka 12 V
9 spínač LED pracovného svietidla 10 adaptér na loptu/balón
VAROVANIE
Pred uvedením do prevádzky si pozorne prečítajte tento návod na obsluhu! Nerešpektovanie
môže mať za následok ujmu na zdraví, poškodenie prístroja alebo vášho majetku!
VAROVANIE
Tento návod vám má poskytnúť informácie o funkcii a výkone. Návod uschovajte pre prípad
potreby použitia v budúcnosti. Pred uvedením do prevádzky skontrolujte neporušenosť a
úplnosť obsahu balenia!
Tento kompresor je vybavený digitálnym ukazovateľom tlaku. Pomocou tohto digitálneho ukazovateľa sa
počas hustenia dá monitorovať aktuálny tlak, navyše slúži na nastavenie vypínacieho tlaku.
Nastavenie vypínacieho tlaku
1. Odviňte 12 V kábel a spojte 12 V adaptér s 12 V prípojkou vášho vozidla.
2. Stlačte spínač SET (4) pre nastavenie ukazovateľa na PSI / BAR.
3. Stlačte na tri sekundy spínač SET (4) pre kontrolu nastaveného vypínacieho tlaku, ukazovateľ päťkrát
zabliká. Vo výrobe je tlak nastavený na 40 PSI . Pre nastavenie požadovaného vypínacieho tlaku
stlačte na tri sekundy spínač SET (4), kým ukazovateľ nezačne blikať, pomocou spínačov (5) ! / "
nastavte tlak. ! zvyšuje tlak, " znižuje tlak
4. Ukazovateľ následne ešte štyrikrát zabliká a zobrazí sa údaj 0,0. Znamená to, že ste úspešne nastavili
vypínací tlak.
DÔLEŽITÉ UPOZORNENIA
1. Prístroj uloží do pamäte poslednú nastavenú hodnotu. Ak ste napríklad nastavili tlak na 2,0 bar,
bude hodnota vypínacieho tlaku pri najbližšom použití 2,0 bar.
2. Kompresor sa dá pred dosiahnutím nastaveného vypínacieho tlaku manuálne vypnúť pomocou
spínača (2) prepnutím do polohy (0).
Hustenie pneumatiky osobného motorového vozidla alebo bicykla
1. Odviňte 12 V kábel a spojte 12 V adaptér s 12 V prípojkou vášho vozidla.
2. Puzdro hustiacej koncovky so závitom naskrutkujte na ventil pneumatiky.
3. Nastavte požadovaný vypínací tlak (pozri Nastavovanie vypínacieho tlaku)
4. Spustite kompresor stlačením spínača (2), po dosiahnutí nastaveného tlaku pneumatiky sa kompresor
automaticky vypne.
5. Odpojte 12 V prípojku od vozidla a zložte hustiacu koncovku z ventilu pneumatiky.

19
DÔLEŽITÉ UPOZORNENIA
Ak počas hustenia zmeníte prednastavenie vypínacieho tlaku, kompresor sa ihneď vypne. Následne
môžete kompresor znovu spustiť pomocou vypínača/zapínača (2).
POZNÁMKA
Aby ste zabránili prekročeniu maximálneho povoleného tlaku pneumatiky, prečítajte si príručku vášho
vozidla alebo sa pozrite do tabuľky tlakov pneumatík (napr. v ráme dverí vodiča). V prípade pneumatiky
bicykla skontrolujte nápis na pneumatike.
Nafukovanie športového náč inia (napr. basketbalovej lopty) alebo balóna
1. Odviňte 12 V kábel a spojte 12 V adaptér s 12 V prípojkou vášho vozidla.
2. Naskrutkujte adaptér na loptu/balón do puzdra hustiacej koncovky so závitom.
3. Adaptér na loptu/balón zasuňte do ventilu nafukovaného predmetu.
4. Nastavte požadovaný vypínací tlak (pozri Nastavovanie vypínacieho tlaku).
5. Spustite kompresor stlačením spínača (2), po dosiahnutí nastaveného tlaku sa kompresor automaticky
vypne.
6. Zložte adaptér z ventilu nafukovaného predmetu a odskrutkujte ho z puzdra hustiacej koncovky so
závitom.
7. Odpojte 12 V prípojku od vozidla.
POZOR
Po 10 minútach nepretržitej prevádzky vypnite kompresor na 10 minút, aby sa mohol ochladiť.
Výmena poistky
1. Pri výmene poistky odskrutkujte uzáver 12 V zástrčky.
2. Chybnú poistku vymeňte za novú (15A 250V)
3. Uzáver znovu naskrutkujte.
5. Údržba
Prístroj po použití očistite jemnou, suchou handrou.
Pokyny pre ochranu životného prostredia
Elektrické prístroje sa nesmú likvidovať spolu s bežným domovým odpadom! Tento prístroj
odovzdajte na likvidáciu vo verejných/komunálnych zberniach.
Materiály sa dajú recyklovať, tak ako je to uvedené na označení. Recykláciou, zhodnotením
materiálov alebo inými formami opätovného zužitkovania použitých prístrojov výrazným
spôsobom prispievate k ochrane nášho životného prostredia!
6. Kontaktné informácie
EAL GmbH
Otto-Hausmann-Ring 107
42115 Wuppertal
Deutschland
Telefon: +49 (0)202 42 92 83 0
Telefax: +49 (0)202 2 65 57 98
Internet: www.eal-vertrieb.com
E-mail: info@eal-vertrieb.com
© EAL GmbH, 21067, Ma13

20
 Loading...