


www.eagletone.com
Manuel de l’utilisateur

Manuel de l’utilisateur EAGLETONE clavier électronique MPW300 USB
SOMMAIRE
Guide général
Façade ............................................................................................4
Face arrière ...................................................................................4
ÉCRAN LCD ...................................................................................4
Préparation
Alimentation électrique ................................................................5
Montage du pupitre .......................................................................5
Connexionn
Prise casque ..................................................................................5
Prise SUSTAIN...............................................................................5
Port USB ........................................................................................5
Opérations de base
Interrupteur d’alimentation .........................................................6
Volume générale (Master) ............................................................6
Demo ..............................................................................................6
Sons et effets
Sélection d’un son .........................................................................6
Double son (DUAL) ....................................................................6–7
Sustain ...........................................................................................7
Toucher dynamique (TOUCH) .......................................................7
Métronome ....................................................................................7
Piano ...............................................................................................7
Contrôle du style
Sélection d’un style .......................................................................8
La section accompagnement .......................................................8
lancement d’un style ....................................................................8
Thème principal / Transition (MAIN/FILL).................................9
Arrêt d’un style ........................................................................9–10
Tempo ...........................................................................................10
Détection d’accord ................................................................10 –11
Memoires .....................................................................................12
Touche de rappel de présélection immédiate (O.T.S.) ..........12
Enregistrement
Lancement de l’enregistrement ................................................12
Arrêt de l’enregistrement ....................................................12–13
Lecture de l’enregistrement ......................................................13
Menu des fonctions
Transposition ...............................................................................13
Octave ...........................................................................................13
Mesure (Beat) ..............................................................................13
Point de partage (Splits) .............................................................13
Canale de réception MIDI ...........................................................14
Canal de transmission MIDI .......................................................14
Volume d’accompagnement .......................................................14
Sélection de banque ...................................................................14
Morceau (Song)
Mode leçon ...................................................................................14
Leçon 1 – Travail rythmique .......................................................15
Leçon 2 – Travail mélodique ......................................................15
Lesson 3 – Sans mélodie ......................................................15–16
Fonction d’évaluation .................................................................16
Dictionnaire d’accords ...............................................................16
Fonction MIDI
Qu’est-ce que le MIDI? ................................................................16
Connexion USB ............................................................................16
Applications MIDI ........................................................................17
Caractéristiques téchniques ....................................................17
Guide de dépannage ...................................................................17
Annexe
Annexe 1 : Liste des sons ...........................................................18
Annexe 2 : Liste des styles .........................................................19
Annexe 3 : Liste des morceaux ................................................. 20
Annexe 4 : Liste des démonstrations ........................................21
Annexe 5 : Liste des accord .......................................................21
Annexe 6 : Tableau d’implémentation MIDI ............................. 22
2
eagletone.com
EAGLETONE clavier électronique MPW300 USB Manuel de l’utilisateur
PRESENTATION
Félicitations pour votre achat de ce clavier électronique.
Ce clavier est simple d’emploi, avec des fonctions sophistiquées
convenant particulièrement aux débutants autodidactes.
Les enfants comme les adultes aimeront jouer sur ce clavier
car il offre des styles d’accompagnement remarquables,
des sonorités expressives et il permet de s’enregistrer en
temps réel. D’autres fonctions comme l’affichage en notation
musicale numérotée, le dictionnaire d’accords et une variété
de morceaux aident à maîtriser les différents aspects de la
technique de jeu.
Nous vous recommandons de lire attentivement ce manuel
avant d’utiliser le clavier.
A L’INTERIEUR DE L’EMBALLAGE
Vérifiez que l’emballage contient bien :
• L’instrument
• Le pupitre
• L’adaptateur 12 V
• Le mode d’emploi
REMARQUES IMPORTANTES
Votre clavier vous apportera plus de satisfaction si vous
suivez les règles simples ci-dessous :
Emplacement
Pour éviter toute déformation, décoloration ou des
dommages plus importants, n’exposez pas l’appareil aux
conditions suivantes :
• Lumière directe du soleil,
• Température élevée (près d’une source de chaleur ou dans
un véhicule en plein soleil),
• Humidité excessive,
• Poussière excessive,
• Forte vibration.
Alimentation électrique
• Veillez à utiliser un adaptateur secteur délivrant le voltage
et le type de courant exacts spécifiés sur l’instrument.
Vérifiez également que la tension d’entrée indiquée sur
l’adaptateur secteur correspond à la tension secteur de
votre pays.
• Éteignez l’instrument à l’aide de l’interrupteur POWER
lorsqu’il n’est pas utilisé.
• L’adaptateur secteur doit être débranché de la prise
secteur lors d’une période de non-utilisation prolongée de
l’instrument.
• Débranchez l’adaptateur secteur en cas d’orage.
• Évitez de brancher l’adaptateur secteur sur une prise
déjà utilisée par d’autres appareils à forte consommation
électrique, tels que radiateurs ou fours. Évitez également
l’emploi de multiprises car elles risquent d’entraîner une
dégradation de la qualité du signal sonore, des erreurs de
manipulation et d’éventuels dommages.
Mise hors tension des appareils avant toute connexion
• Afin d’éviter d’endommager l’instrument ainsi que tout
autre appareil auquel il pourrait être connecté, veillez à
les mettre tous hors tension avant de procéder à toute
connexion ou déconnexion de câbles.
Nettoyage
• Nettoyez l’instrument avec un chiffon sec et doux.
• Un chiffon légèrement humidifié peut être utilisé pour ôter
les taches et les salissures incrustées.
• N’utilisez jamais de nettoyant tel que de l’alcool ou du
diluant.
• Evitez de placer des objets en vinyle sur l’instrument (le
vinyle peut coller et décolorer la surface).
Maniement et transport
• N’appliquez jamais de force excessive aux commandes,
connecteurs ou autres parties de l’instrument.
• Débranchez toujours les câbles en les tenant fermement
par leurs fiches et non en tirant sur leur cordon.
• Débranchez tous les câbles avant de déplacer l’instrument.
• Une chute, un choc ou le dépôt d’un objet lourd sur
l’instrument peuvent laisser des traces d’impact ou
des éraflures sur ses surfaces, voire occasionner des
dommages plus importants.
Interférences électriques
Cet instrument contient un circuit numérique qui peut
causer des interférences s’il est placé trop près de
récepteurs de radio ou de télévision. Si cela se produit,
éloignez l’instrument de l’équipement affecté.
CARACTÉRISTIQUES PRINCIPALES
CLAVIER
Clavier dynamique à 61 touches.
FONCTIONNEMENT
Le pavé numérique et les touches
à sélectionner les sons, les styles et les morceaux.Les
fonctions comprennent la transposition, le changement
d’octave, le choix de mesure, le point de partage du clavier, le
MIDI, le volume d’accompagnement, la sélection de banque..
SONS
157 sons au total, dont 128 sons GM, 6 sons de percussion et
23 sons de synthé.
STYLES
100 styles au total, dont 10 styles PIANO.
MORCEAUX
100 morceaux au total, chaque morceau dispose de son mode
d’apprentissage.
LEÇONS DE MORCEAU
Il y a trois façons différentes d’étudier les morceaux. Leçon
1, Leçon 2, Leçon 3. Ce clavier offre aussi une fonction
d’évaluation dans les trois modes d’apprentissage pour vous
aider à juger de vos progrès.
MODES D’ACCORD
Les accords sont reconnus en mode simplifié et en mode
doigté normal.
DICTIONNAIRE D’ACCORDS
Fournit aux utilisateurs les informations sur les accords.
FONCTION D’ENREGISTREMENT
Un morceau peut être enregistré comme le 101
dans la liste des morceaux.
CONTRÔLE DU STYLE
Démarrage synchronisé, lancement/arrêt, thème principal/
transition, introduction/final.
AUTRES FONCTIONS
Piano. Double son. Sustain. Touche de rappel de présélection
immédiate (O.T.S.). Enregistrement. Démonstration. Touché
dynamique. Métronome. USB etc.
[+/YES] [-/NO] servent
e
morceau
eagletone.com
3
Manuel de l’utilisateur EAGLETONE clavier électronique MPW300 USB
GENERAL GUIDE
Façade
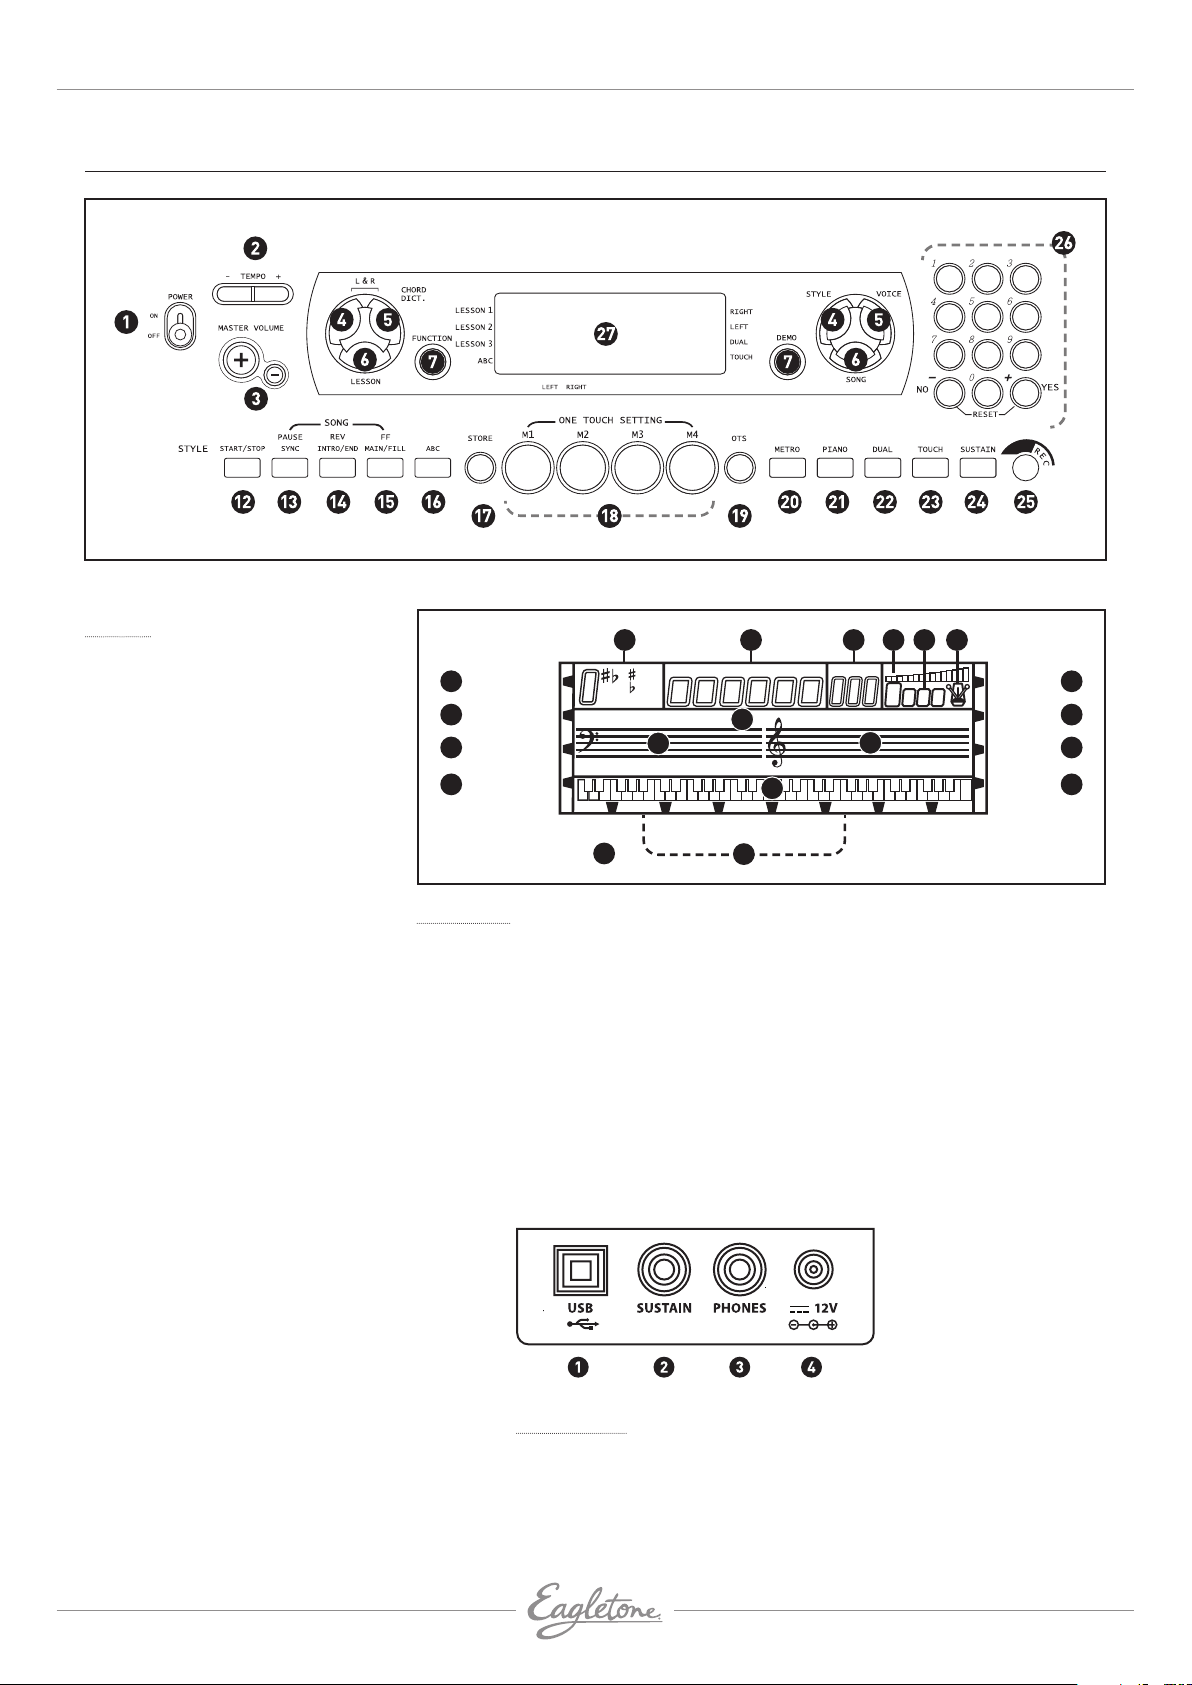
1. Interrupteur d’alimentation
2. Tempo
3. Volume générale
4. Mode leçon main gauche
5. Mode leçon main droite /
Dictionnaire d’accords
6. Leçon
7. Fonction
8. Démonstration
9. Style
10. Son
11. Morceau
En mode style
12. Démarrage / Arrêt
13. Synchronisation
14. Introduction / Finale
15. Thème principal / Transition
16. Basse / Accords automatiques
En mode Song (morceau)
17. Démarrage / Arrêt
18. Pause
19. retour rapide
20. Avance rapide
21. Sauvegarde
22. Mémorisation / M1-M5
23. Rappel de présélection immédiate O.T.S
24. Métronome
25. Piano
26. Double son
27. Toucher
28. Sustain
29. Enregistrement
30. Clavier numérique
31. Écran à cristaux liquide (LCD).
9 10 11 14 12 13
STYLE SONG SCORE VOICE 12LOWER12
1
2 6
3 7
4 8
110
()
dim6
513
mM7angus4
–12–24 +12+24NOR VAR
15
18
17
TEMPOCOUNT
16
1
2 3 4
RIGHTLESSON 1
LEFTLESSON 2
DUALLESSON 3
TOUCHA.B.C.
O.T.S.M1M2M3M4
19
20
Écran LCD
1. Leçon 1
2. Leçon 2
3. Leçon 3
4. Basse / Accords automatiques
5. Droite
6. Gauche
7. Double son
8. Toucher
9. Accord
10. Son / Style / Démo / Morceau
11. Tempo / Décompte
12. Temps
13. Métronome
14. Volume
15. Clé de Fa
16. Clé de Sol
17. Clavier 61 touches
18. Normal / Variation
19. Rappel de présélection immédiate
20. M1–M4
5
Face arrière
1. Prise USB
2. Prise pour pédale de sustain
3. Prise casque
4. Prise d’entrée d’alimentation
4
eagletone.com
EAGLETONE clavier électronique MPW300 USB Manuel de l’utilisateur
PRÉPARATION
Alimentation électrique
Ce clavier électronique peut être alimenté par une prise
secteur domestique standard (à l’aide de l’adaptateur secteur
spécifié) ou par piles.
EMPLOI DE L’ADAPTATEUR SECTEUR
Veillez à n’utiliser que l’adaptateur secteur spécifié pour
ce clavier électronique. L’adaptateur doit avoir une sortie
CC 12 V, 1000 mA et une broche centrale positive. Veillez à
éteindre le clavier avant de brancher l’adaptateur dans la
prise secteur et son cordon dans l’unité.
EMPLOI DES PILES
Veillez toujours à éteindre le clavier avant d’insérer de
nouvelles piles ou de remplacer les anciennes.
Pour insérer les piles
1. Ouvrez le compartiment des piles sous le clavier.
2. Insérez 8 piles de taille D (SUM1, R-20) dans le
compartiment en respectant la polarité correcte.
3. Replacez le capot du compartiment des piles et vérifiez
qu’il est bien bloqué.
Indications de faiblesse des piles
N’importe lequel des symptômes suivants signale une
faiblesse de l’alimentation par piles. Remplacez les piles dès
que possible lorsqu’un des événements suivants se produit.
• Ecran LCD faible et difficile à lire.
• Volume anormalement faible des haut-parleurs/casque.
• Baisse soudaine de puissance en jeu à haut volume.
• Distorsion du son produit.
• Lecture anormale des rythmes ou morceaux de démo.
• Atténuation de l’affichage en jeu à haut volume.
ATTENTION!
• N’utilisez que l’adaptateur secteur spécifié. L’emploi de tout
autre type d’adaptateur entraînerait un risque de danger
d’incendie et d’électrocution.
• Pour plus de sécurité, veillez à débrancher l’adaptateur
secteur de la prise murale quand vous laissez le clavier
électronique sans surveillance durant une période
prolongée.
ATTENTION!
Quand vous insérez des piles, veillez à respec ter la polarité indiquée.
•
• Ne mélangez jamais des piles de types différents.
• Ne mélangez jamais des piles anciennes avec des neuves.
• Remplacez les piles aussitôt que possible dès
manifestation d’un signe de décharge.
• Retirez toujours les piles du compartiment des piles du
clavier quand ce dernier ne doit pas être utilisé durant une
période prolongée.
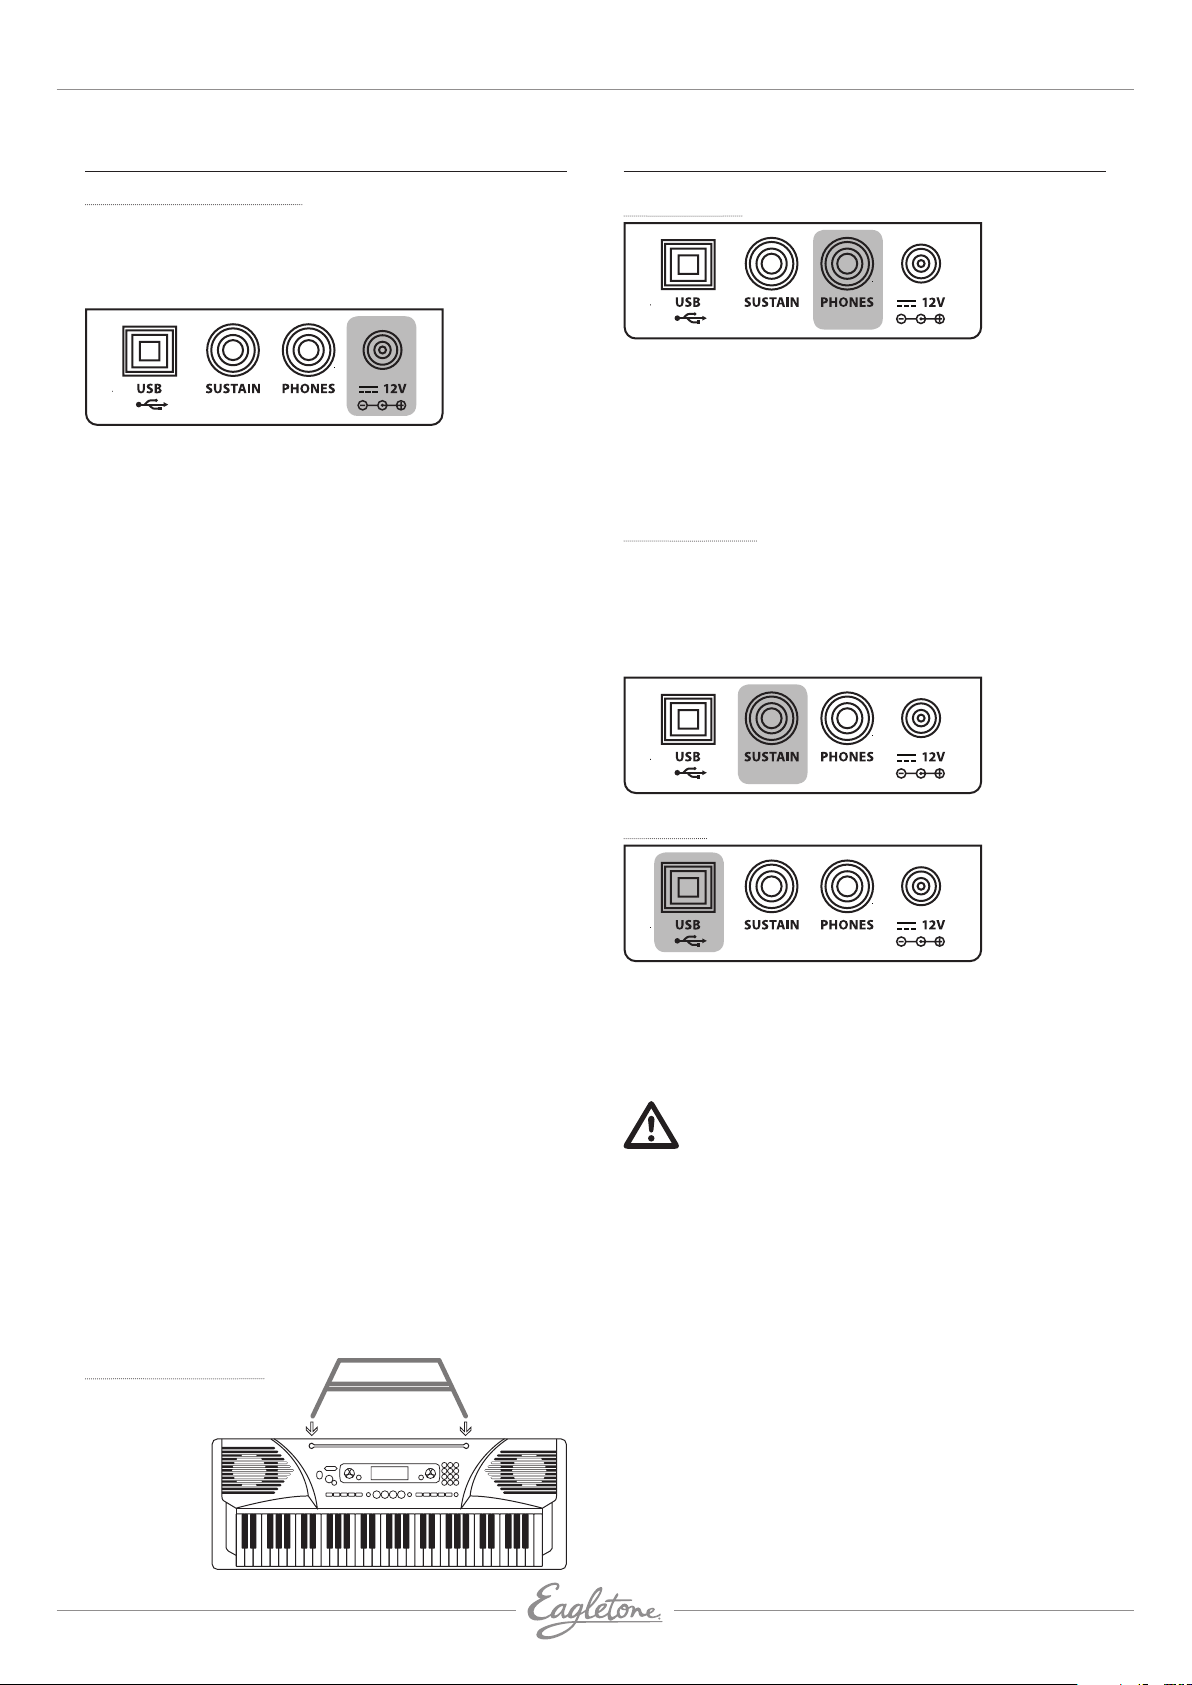
CONNEXIONS
Prise casque
• Si vous préférez jouer au casque pour une écoute
personnelle de haute qualité, branchez un casque stéréo
dans la prise PHONES de la face arrière.
• Brancher un casque dans la prise PHONES coupe
automatiquement les haut-parleurs.
REMARQUE : N’utilisez jamais un casque à haut volume car
cela pourrait endommager votre audition.
Prise SUSTAIN
• Une pédale commutateur optionnelle peut être branchée
dans la prise SUSTAIN pour contrôler le maintien des
notes.
• La pédale commutateur fonctionne comme la pédale
forte d’un piano. Pressez-la pour maintenir les notes et
relâchez-la pour retrouver un son normal.
Port USB
• Raccordez un PC ou tout autre hôte compatible audio USB à
l’aide de ce port.
• Pour les appareils raccordés par câble USB, une fois le
pilote installé et l’initialisation terminée, choisissez l’option
Périphérique audio USB (USB Audio Device) dans le menu
Périphériques du logiciel pour transférer les données MIDI.
AVERTISSEMENT!
Pour éviter des dommages, éteignez ce clavier et tous les
appareils connectés si vous voulez faire des branchements
ou au contraire débrancher cet instrument et les appareils
connectés.
Montage du pupitre
Veuillez installer le pupitre
conformément aux
instructions.
eagletone.com
5
Manuel de l’utilisateur EAGLETONE clavier électronique MPW300 USB
OPÉRATIONS DE BASE
Intérupteur d’alimentation
VOICE1
TEMPO
070
1. Assurez-vous préalablement que les connexions ont été
correctement effectuées, conformément aux instructions
précédentes.
2. Réglez l’interrupteur [POWER] sur ON. L’écran LCD
s’allume.
REMARQUE : Si l’écran LCD ne s’allume pas après mise sous
tension du clavier, veuillez vérifier l’alimentation secteur.
Volume général (master)
MASTER VOLUME
MVL21
MASTER VOLUME
MVL24
TEMPO
070
TEMPO
070
SONS ET EFFETS
Il y a au total 157 sons (voir l’Annexe 1), dont 128 sons GM, 6
sons de percussion et 23 sons de synthé.
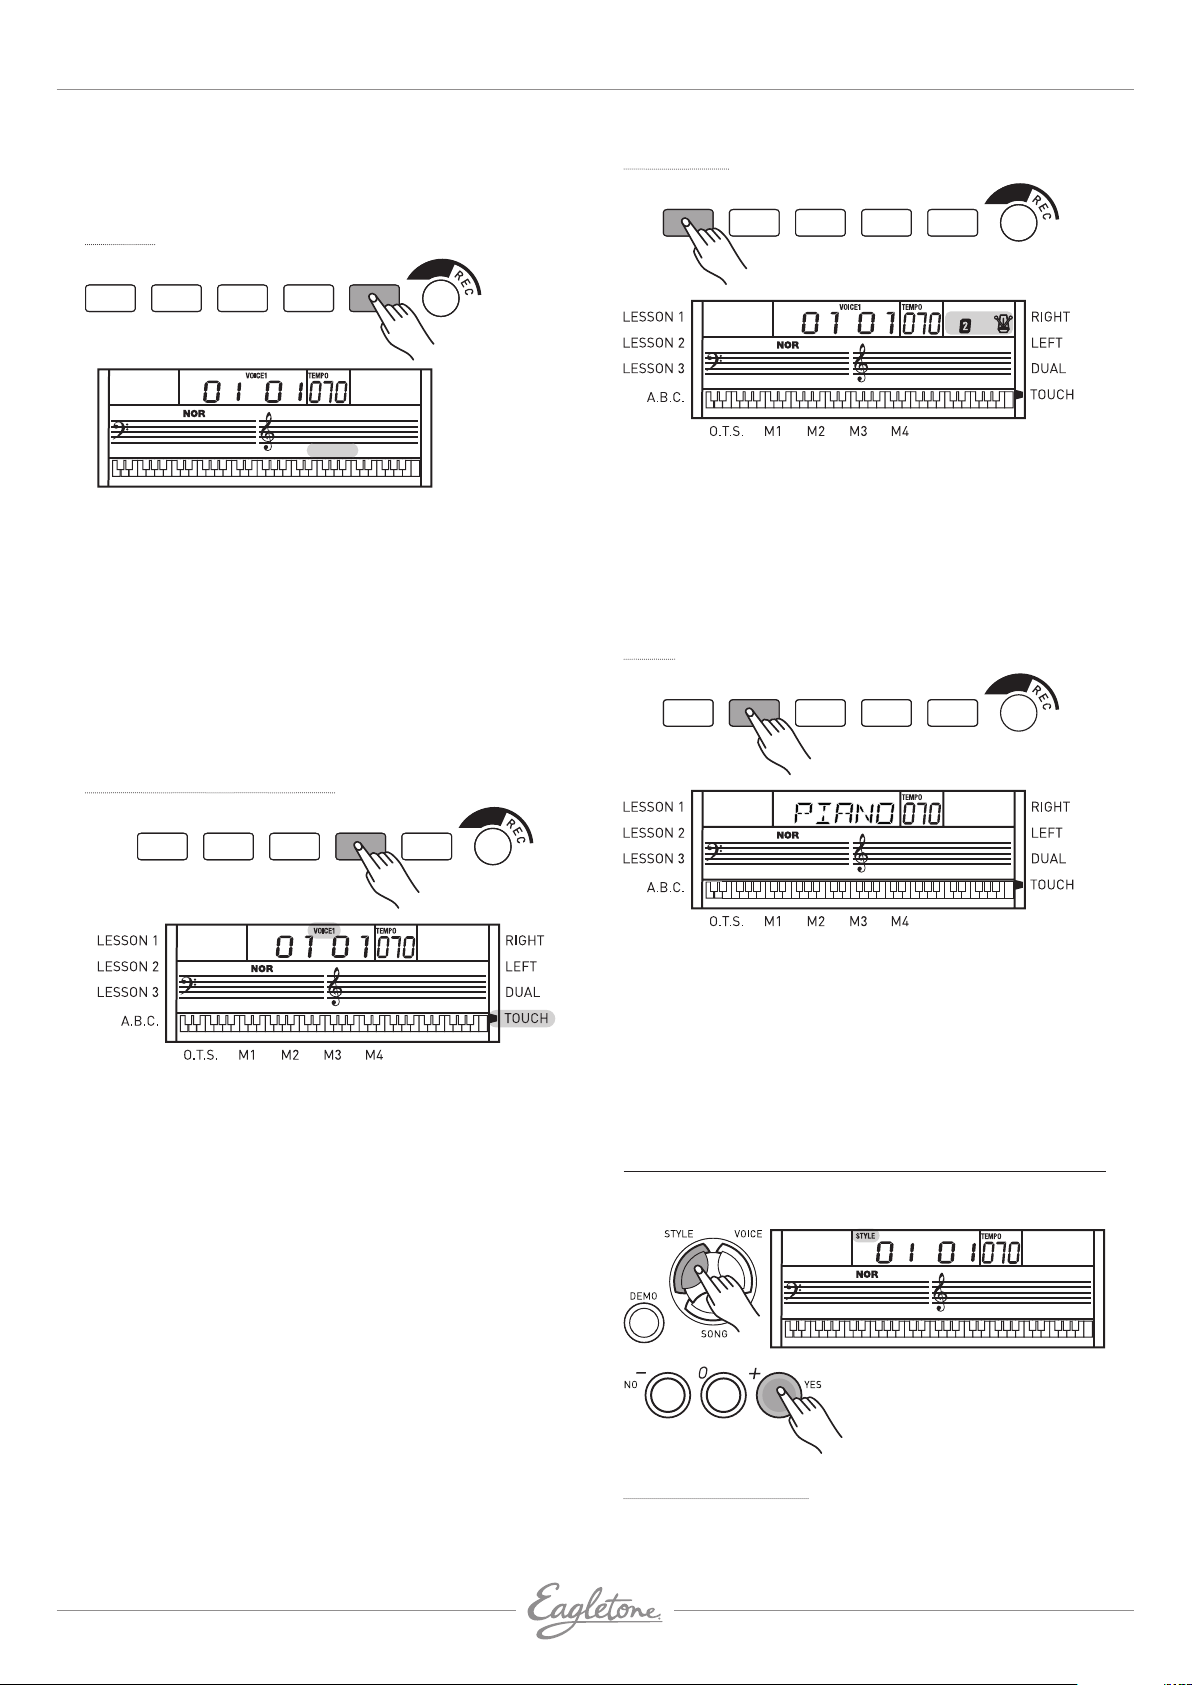
Sélection d’un son
1. Pressez le bouton [VOICE] pour passer en mode son. Le
son par défaut est le numéro 01; l’écran LCD affichera
VOICE 1 et son numéro.
2. Sélectionnez le son désiré à l’aide des boutons [+/YES] et
[-/NO]. Le numéro du son sélectionné s’affiche à l’écran.
Vous pouvez aussi sélectionner le son que vous désirez en
tapant directement son numéro sur le pavé numérique.
3. Vous pouvez à présent jouer avec le son que vous venez de
sélectionner.
Double son (Dual)
METROPIANO DUAL TOUCH SUSTAIN
1. Le volume du clavier peut être réglé de 0 à 31 en pressant
le bouton [MASTER VOLUME +/-], l’écran LCD affichant
alors MVLXX.
2. Pressez simultanément les boutons [MASTER VOLUME +]
et [MASTER VOLUME -] pour ramener le niveau général à la
valeur par défaut de 24.
REMARQUE : Si le clavier est muet, cela signifie que le
volume est réglé au minimum.
Démo
STYLE VOICE
COUNT
020
DEMO
SONG
Ce clavier comprend 2 morceaux de démonstration
classiques.
1. Pressez la touche [DEMO] pour passer en mode DEMO.
2. Sélectionnez un morceau de démonstration avec [+/ YES],
[-/NO] ou une touche numérique [1], [2].
3. Pressez la touche [START/STOP] ou [DEMO] pour quitter le
mode de démonstration.
NOTE : En mode de démonstration, toutes les touches qui
ont des fonctions sont désactivées exceptées DEMO, START/
STOP, TEMPO, +/YES, -/NO, NUMERO 1, NUMERO 2, MASTER
VOLUME.
Deux sons se font entendre
en même temps.
Par exemple Piano
Par exemple Violoncelle
Ce clavier possède une fonction de double son “DUAL”.
Cette fonction permet d’étoffer votre musique en
produisant simultanément le son de deux instruments
différents. Ainsi, de nouvelles combinaisons de sons
peuvent être créées. Quand la fonction DUAL est
désactivée, le son affiché est VOICE 1, quand elle est
activée le son affiché est VOICE 2.
1. En mode VOICE 1, pressez le bouton [DUAL] pour passer
en fonction de double son. Les témoins “VOICE 2” et
“DUAL” s’allument simultanément. Le numéro du second
son s’affiche à l’écran. A présent, deux sons sont joués
lorsque vous pressez une touche.
2. Utilisez les boutons [+/YES]/[-/NO] ou le pavé numérique
pour sélectionner le deuxième son. La sélection par
défaut est N°50, Strings2.
3.
Pressez à nouveau le bouton
[DUAL] pour désactiver le
double son. VOICE 2 disparaît
de l’écran et les notes que
vous jouez ne déclenchent plus
que le son VOICE 1.
6
eagletone.com
EAGLETONE clavier électronique MPW300 USB Manuel de l’utilisateur
REMARQUE : En mode Dual (double son), seule la
section située à droite du point de partage joue deux sons
simultanément.
Sustain
METROPIANO DUAL TOUCH SUSTAIN
SUSTAIN
Cette fonction donne un effet de maintien aux notes que vous
jouez au clavier.
1. Pressez le bouton [SUSTAIN] pour activer l’effet de
maintien. Le témoin SUSTAIN s’allume dans l’écran LCD.
Le clavier jouera avec un effet de maintien.
2. Pressez à nouveau le bouton
l’effet. Le témoin SUSTAIN disparaît.
3. Par défaut, le sustain est désactivé.
REMARQUE : Quand vous appuyez sur la pédale de sustain,
l’effet obtenu est plus fort que celui produit par le bouton
[SUSTAIN].
[SUSTAIN] pour désactiver
Métronome
METROPIANO DUAL TOUCH SUSTAIN
1. Pressez le bouton [METRO] pour activer le métronome.
2. Pressez à nouveau le bouton [METRO] pour le désactiver.
3. Le métronome ne peut pas jouer en mode SONG/CHORD
DICT (morceau/dictionnaire d’accords).
REMARQUE : Le métronome peut être utilisé pour indiquer le
tempo de l’accompagnement lorsqu’un style est activé. Il peut
aussi être activé en mode d’enregistrement, mais il ne sera
pas enregistré.
Piano
METROPIANO DUAL TOUCH SUSTAIN
Toucher dynamique (Touch)
METROPIANO DUAL TOUCH SUSTAIN
Cette fonctionnalité vous permet d’activer la fonction de
réponse au toucher du clavier : les niveaux de volume et de
vélocité des notes jouées au clavier sont proportionnels à
la pression que vous exercez sur les touches.
1. Pressez le bouton [TOUCH] pour désactiver le mode
dynamique. L’écran LCD effacera le témoin TOUCH,
signifiant que le toucher dynamique est désactivé.
2. Pressez à nouveau le bouton [TOUCH] pour activer le
toucher dynamique. L’écran LCD allume le témoin
TOUCH.
3. Par défaut, le toucher dynamique est activé.
4. Pour tester son effet, jouez une note avec plusieurs
niveaux de force sur le clavier après avoir activé cette
fonction.
1. Pressez le bouton [PIANO] pour passer en mode
piano. L’écran LCD affiche PIANO et le son devient
immédiatement celui d’un piano. Dans ce mode, l’accords
de basse automatiques (A.B.C.) sont désactivés.
2. Pour quitter ce mode pressez à nouveau le bouton
[PIANO].
3. Le mode Piano est automatiquement désactivé dès qu’un
des boutons [FUNCTION] / [VOICE] / [DEMO] / [SONG] /
[STYLE] est pressé.
CONTRÔLE DE STYLE
Le clavier a un total de 100 styles, de 01 à 100, dont 10
styles de piano.
Sélection d’un Style
1. Pressez le bouton [STYLE] pour activer le mode Style. Le
style par défaut est le numéro 01. Le témoin STYLE et le
numéro du style s’affichent à l’écran.
eagletone.com
7
Manuel de l’utilisateur EAGLETONE clavier électronique MPW300 USB
SONG
SONG
SONG
SONG
2. Pressez [+/ YES] ou [-/NO] pour choisir le style désiré. Le
nouveau numéro de style sélectionné s’affiche a l’écran.
Vous pouvez taper directement sur le pavé numérique
le numéro du style que vous souhaitez utiliser pour le
sélectionner.
3. Après avoir sélectionné un style, vous pouvez commencer
à jouer au clavier.
4. Quand un style joue, vous pouvez en changer à tout
moment. Le numéro du nouveau style s’affichera
immédiatement dans l’écran LCD. Si le style est
changé sur le premier temps, le nouveau style est
immédiatement joué ; si le style est changé sur les autres
temps, le nouveau style démarre à la mesure suivante.
Le nouveau style sera joué avec le même tempo que le
précédent.
Section d’accompagnement
L’accompagnement est constitué de segments intitulés
Intro (introduction), Main (thème principal), Variation, Fill
(transition) et Ending (final). Utiliser différentes sections
basées sur les différentes structures de style disponibles
vous permet d’améliorer l’interprétation musicale globale.
STYLE
A.B.C.MAIN/FILLINTRO/ENDSTART/STOP SYNC
MODE A.B.C. (Accord de basse automatique)
STYLE
STYLE
Point de partage (Split)
Zone d’accompagnement
STYLE
A.B.C.MAIN/FILLINTRO/ENDSTART/STOP SYNC
INTRO
Pressez le bouton [INTRO/END] pour insérer une section
d’introduction avant de commencer à jouer. Le rythme
commencera avec une introduction de 2 à 4 mesures qui sera
suivie par une section principale Main.
MAIN ET VARIATION
Il y a deux sections principales : Main et Variation. Chaque
section est constituée de 2 à 4 mesures.
FILL (TRANSITION)
Pendant que l’accompagnement joue, vous pouvez effectuer
une transition de rythme/accompagnement en pressant
le bouton
[MAIN/FILL]. Cela insère automatiquement une
transition.
ENDING (FINAL)
Quand vous pressez le bouton
[INTRO/END], cela lance un
final d’accompagnement rythmique et votre interprétation se
termine après une conclusion de 2 à 4 mesures.
Lancement d’un Style
DÉMARRAGE IMMÉDIAT
STYLE
A.B.C.MAIN/FILLINTRO/ENDSTART/STOP SYNC
Par défaut, l’A.B.C. (Accord de basse automatique) est
désactivé. Pressez le bouton [A.B.C.] pour activer le mode
Accord de basse automatique ; le témoin A.B.C. s’affiche à
l’écran.
Le côté gauche du point de partage (Split) est appelé zone
des accords ou zone d’accompagnement. Quand vous jouez
l’accord, le son de basse et le son de l’accord sont produits.
DÉMARRAGE SYNCHRONISÉ (SYNC)
STYLE
Clignottent simultanément
STYLE
A.B.C.MAIN/FILLINTRO/ENDSTART/STOP SYNC
STYLE
Pressez le bouton [START/STOP] pour lancer le style,
le rythme du style est joué immédiatement. Les temps
s’affichent tour à tour à l’écran.
8
Point de partage (Split)v
Accompaniment range
Pressez le bouton [SYNC] pour passer en mode d’attente de
démarrage synchronisé. Les 4 temps clignotent ensemble
dans l’écran LCD.
eagletone.com
EAGLETONE clavier électronique MPW300 USB Manuel de l’utilisateur
SONG
SONG
STYLE
SONG
A.B.C.MAIN/FILLINTRO/ENDSTART/STOP SYNC
SONG
STYLE
SONG
A.B.C.MAIN/FILLINTRO/ENDSTART/STOP SYNC
STYLE
SONG
A.B.C.MAIN/FILLINTRO/ENDSTART/STOP SYNC
STYLE
Si le mode A.B.C. est activé, jouez n’importe quelle touche
dans la section gauche du clavier et le style démarrera avec
la basse et l’accord.
Si le mode A.B.C. est désactivé, jouez n’importe quelle
touche sur le clavier et le style démarrera avec seulement la
batterie.
DÉMARRAGE AVEC INTRODUCTION
STYLE
Clignotant
STYLE
SONG
STYLE
A.B.C.MAIN/FILLINTRO/ENDSTART/STOP SYNC
A.B.C.MAIN/FILLINTRO/ENDSTART/STOP SYNC
• Pressez le bouton [INTRO/END] alors que le style est arrêté,
le témoin NOR (normal) ou VAR (variation) clignote à l’écran
LCD, indiquant que la section d’introduction est prête à être
jouée. La longueur de l’intro varie en fonction du style.
• Pressez le bouton
[START/STOP] et le style démarre avec
une section d’introduction suivie de la section principale.
Main/Fill
SONG
STYLE
A.B.C.MAIN/FILLINTRO/ENDSTART/STOP SYNC
1. En mode Main (section principale), pressez le bouton
[MAIN/FILL] pour insérer une transition d’une mesure.
Le témoin VAR clignote à l’écran. Une fois la mesure de
transition exécutée, le clavier passe au style VARIATION.
2. En mode VARIATION, pressez le bouton [MAIN/FILL]
pour insérer une transition d’une mesure. Le témoin
NOR clignote à l’écran. Une fois la mesure de transition
exécutée, le clavier revient au style principal MAIN.
3. Maintenez le bouton [MAIN/FILL] enfoncé pendant
l’exécution du style pour que le motif de transition (FILL)
sélectionné soit répété jusqu’au relâchement du bouton.
REMARQUE : Pendant que le style est arrêté, pressez le
[MAIN/FILL] pour alterner entre VAR et NOR. Le
bouton
témoin correspondant s’allumera à l’écran.
Arrêt d’un Style
ARRÊT IMMÉDIAT
STYLE
L’accompagnement peut être stoppé à tout moment en
pressant le bouton [START/STOP].
ARRÊT FINAL
STYLE
Appuyez sur le bouton [INTRO/END] pour que le style s’arrête
après l’ajout d’une section finale.
La section finale (Ending) commence à la mesure suivante.
ARRÊT SYNCHRONISÉ
SONG
A.B.C.MAIN/FILLINTRO/ENDSTART/STOP SYNC
A.B.C.MAIN/FILLINTRO/ENDSTART/STOP SYNC
Clignotant
STYLE
STYLE A.B.C.MAIN/FILLINTRO/ENDSTART/STOP SYNC
Clignote jusqu’à ce que
le bouton soit relâché
STYLE
Pressez et
tenez enfoncé
STYLE
A.B.C.MAIN/FILLINTRO/ENDSTART/STOP SYNC
Pressez le bouton [SYNC] pour stopper le jeu du style quand
vous relâchez l’accord; le mode de démarrage synchronisé
sera activé.
Tempo
STYLE
1. Pressez le bouton [TEMPO +] ou [TEMPO -] pour changer le
tempo.
STYLE
2. Pressez simultanément les boutons [TEMPO +] et [TEMPO-]
pour ramener le tempo à sa valeur par défaut.
eagletone.com
9
Manuel de l’utilisateur EAGLETONE clavier électronique MPW300 USB
SONG
C
C
CM
C
C
3. Le clavier passera au tempo par défaut du style si vous
changez de style en cours de jeu.
REMARQUE : Quand la fonction A.B.C. est en service, jouez sur
les touches à gauche du point de partage. Le doigté simplifié
des accords sera reconnu.
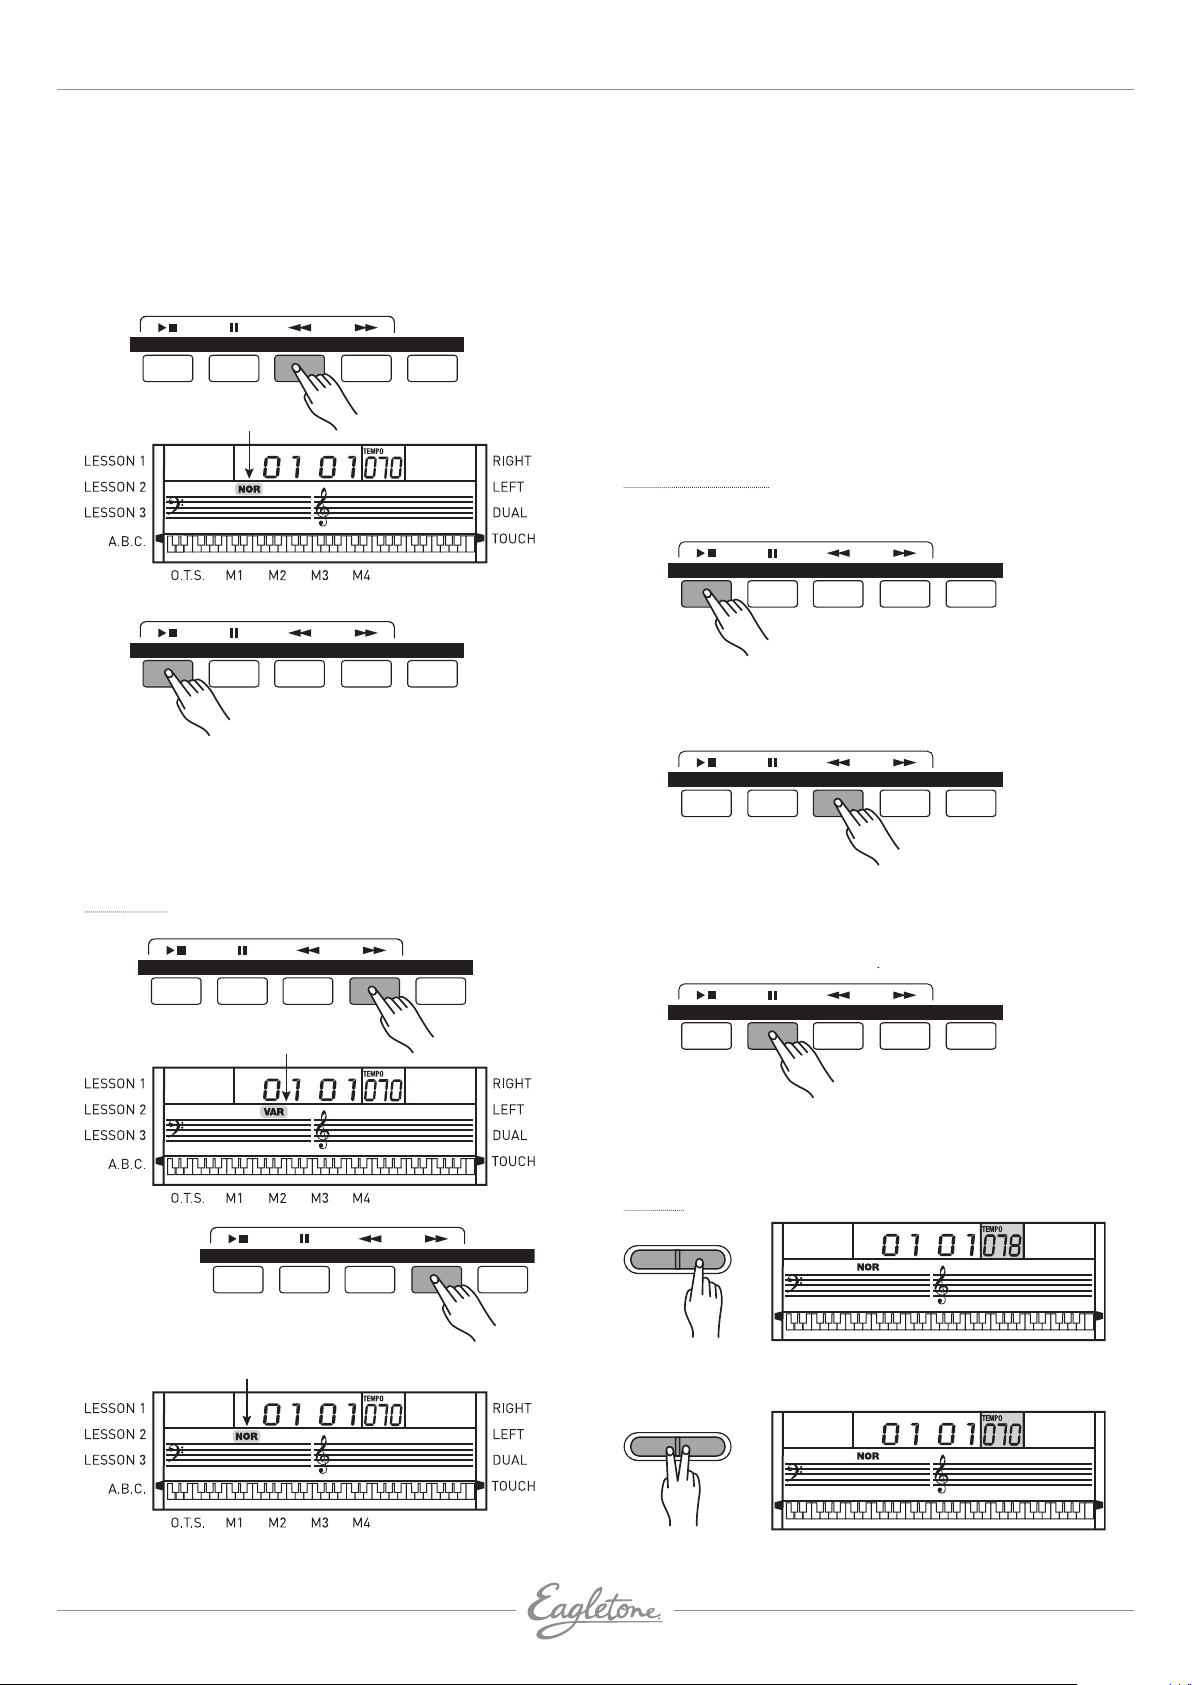
Détection d’accords
”A.B.C.” est par défaut désactivé. Pressez le bouton [A.B.C.]
pour activer la fonction “basse/accords automatiques”. Le
témoin A.B.C. apparaît dans l’écran LCD. La section gauche du
clavier est la “zone des accords” où le fait de jouer un accord
produit à la fois la basse et l’accord.
STYLE
STYLE
Point de partage
Zone d’accompagnement
D
EBFDEF
G
CDEFGABCDEF
Notes toniques et touches correspondantes
NOTE : Comme la détection d’accords de la fonction A.B.C. donne
priorité à la tonique, certains accords du dictionnaire d’accords
ne sont pas reconnus par la fonction A.B.C., par ex. B6, B6, B6(9),
B6(9), B aug, Baug, Bm6, Bm6, A dim7, Bdim7, B dim. Rappelons
A.B.C.MAIN/FILLINTRO/ENDSTART/STOP SYNC
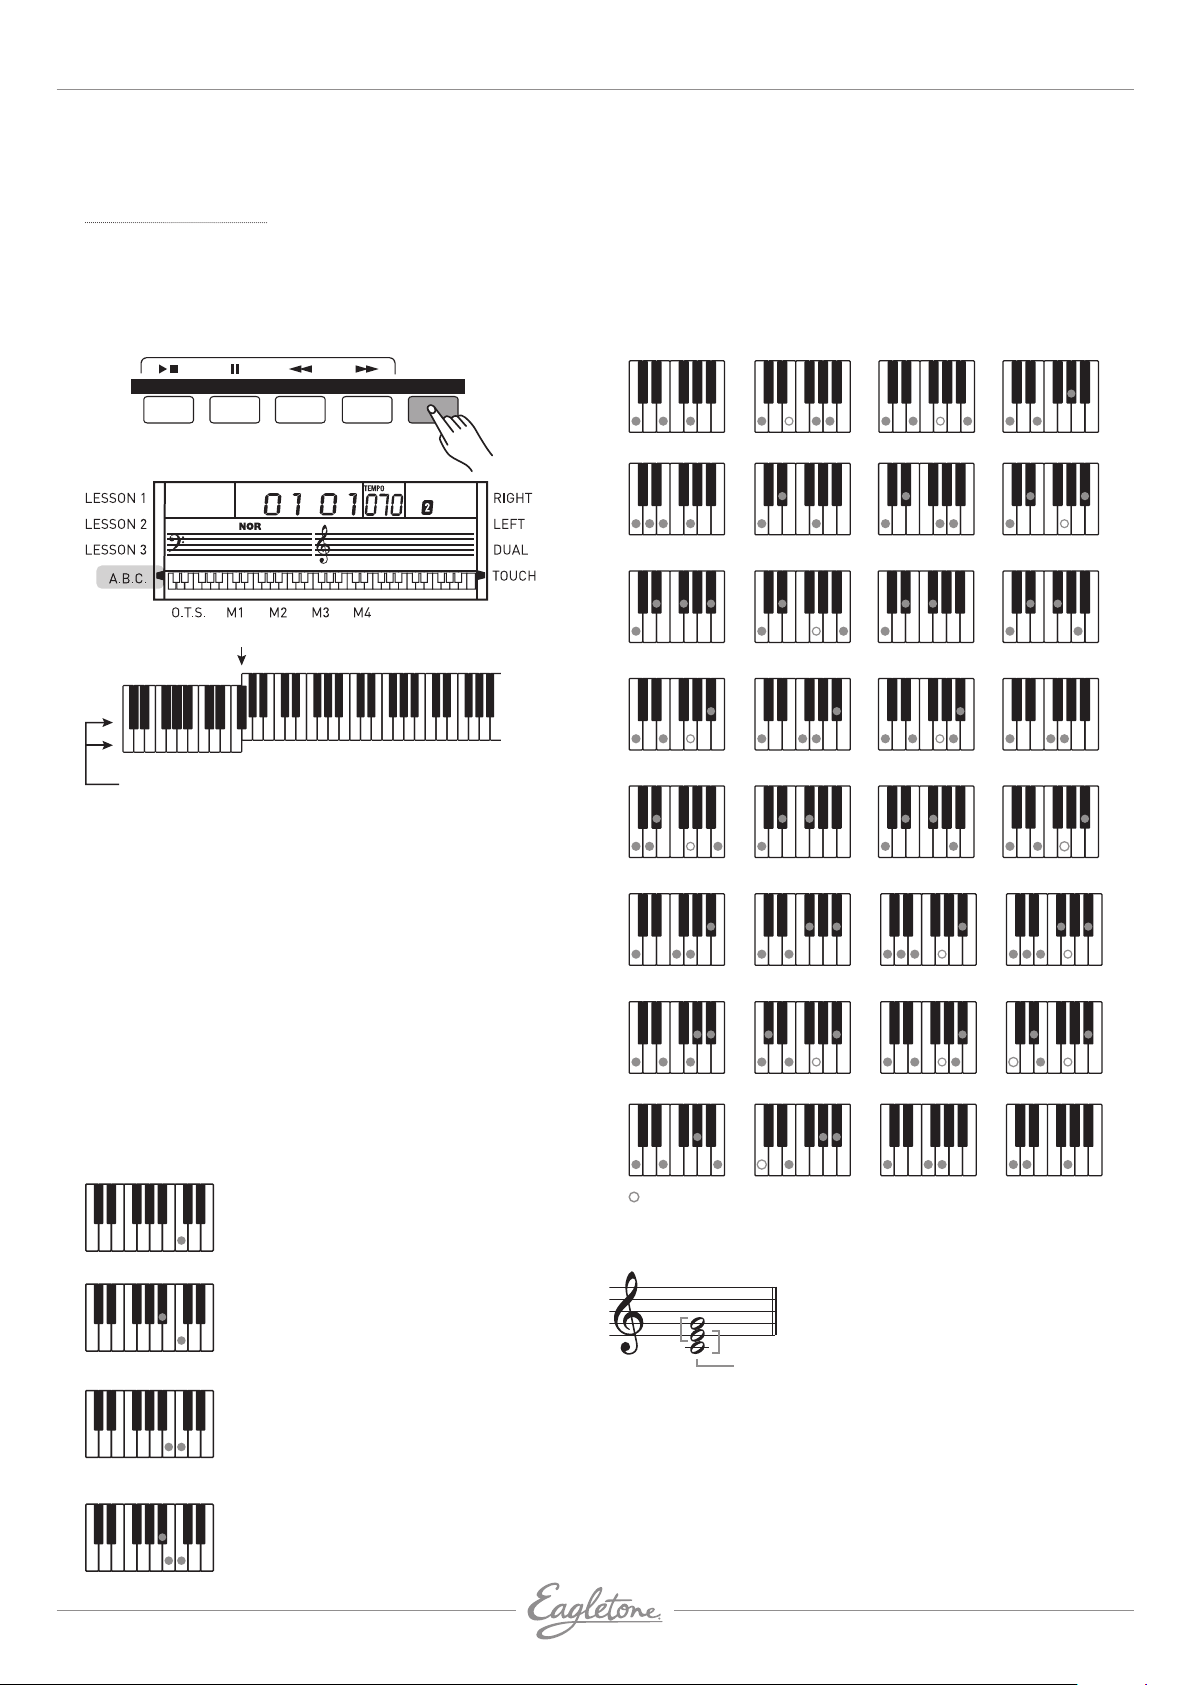
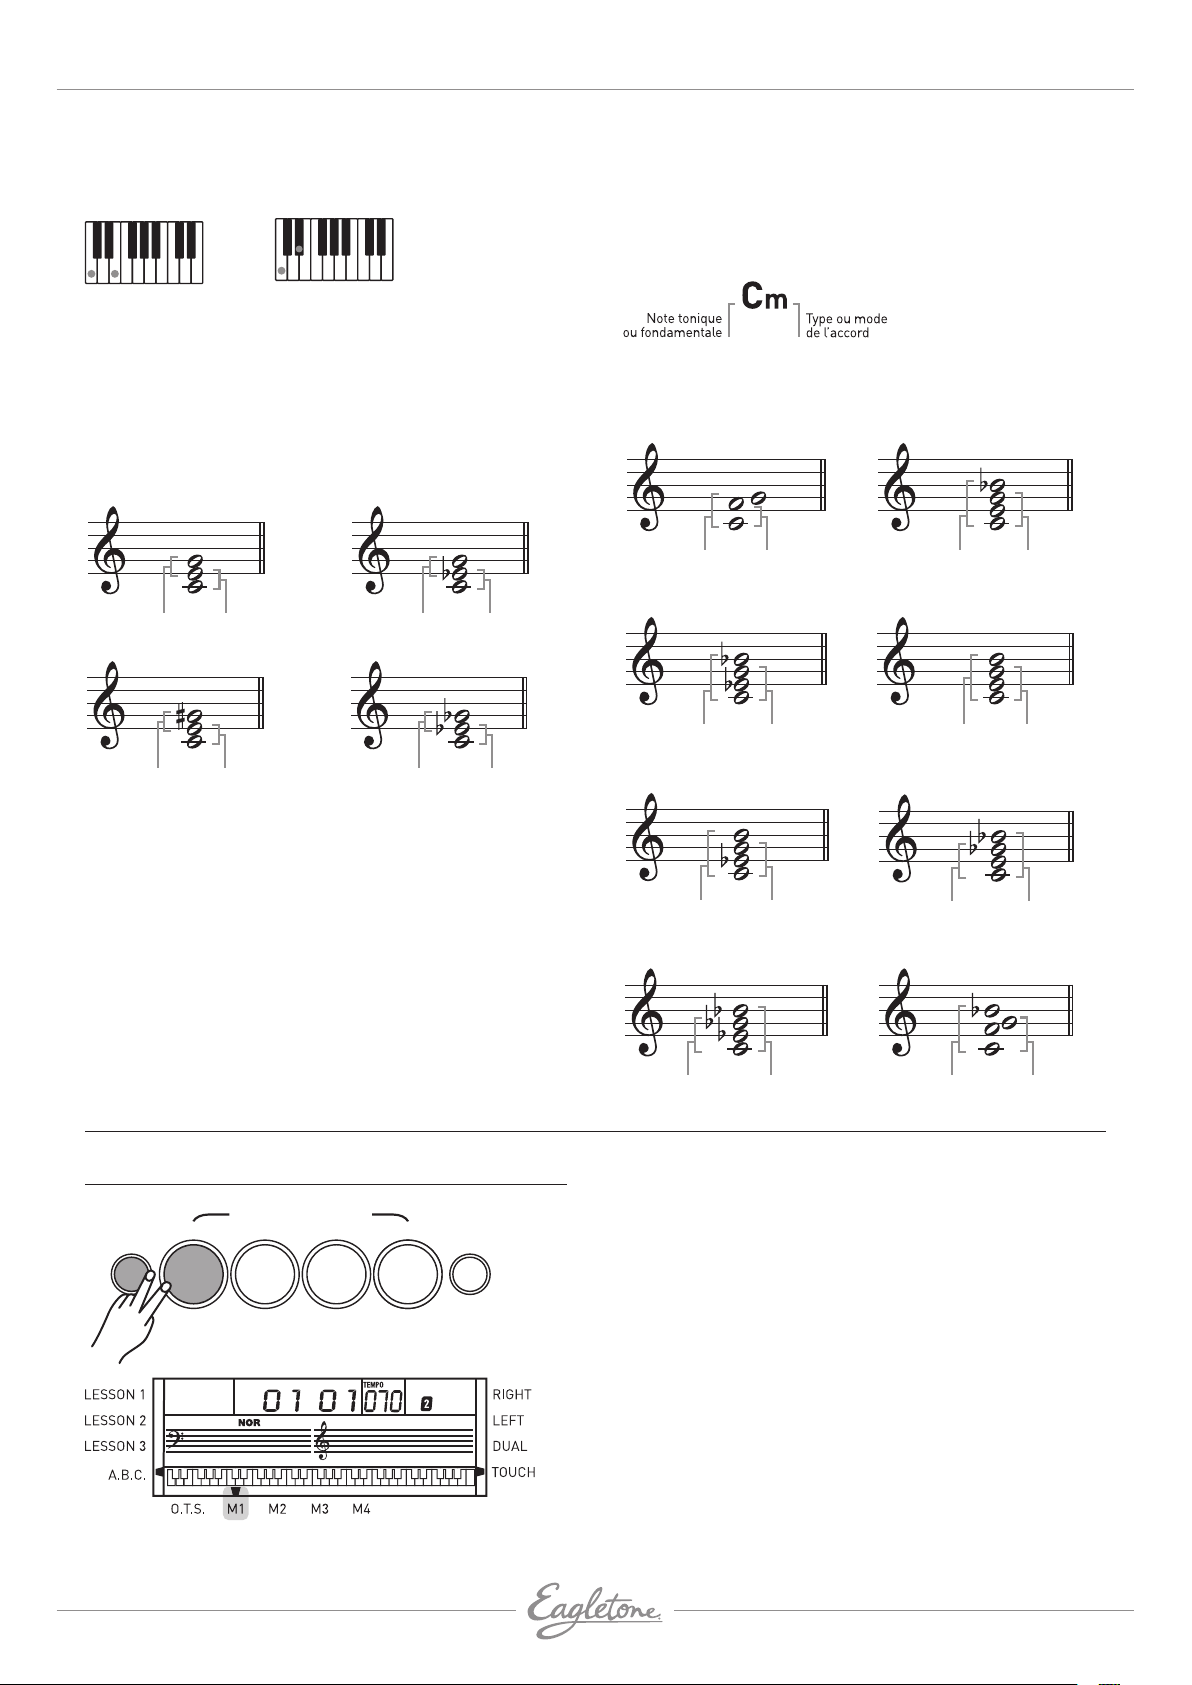
ACCORDS À DOIGTÉ NORMAL
Cette méthode vous permet de produire un accompagnement
en jouant normalement les accords dans la zone
d’accompagnement du clavier. Un total de 32 accords est
possible par tonique, les exemples ci-dessous concernant les
accords de Do (C) :
0
CM(9)
4
Cm7
8
C7
12
CmM7
16
C7sus4
(b5)
2
6
10
14
18
Cm6
Cdim
(13)
C7
Cdim7
(9)
C7
7
6
1
Cm
5
CmM7
9
C7sus4
13
(9)
17
Cdim
(5)
C7
3
7
11
15
19
aug
Cm7
Cdim7
Csus4
C7
(11)
C7
que A=La,B=Si, C=Do, D=Ré, E=Mi, F=Fa et G=Sol.
Il existe 2 modes de détection de l’accord : “doigté simplifié” et
“doigté standard”.
Si l’accord est joué normalement avec toutes ses notes, il
20
(13)
C7
21
(9)
C7
22
(13)
C7
23
(9)
C7
est reconnu comme joué avec un doigté normal. Sinon, il est
interprété comme ayant été joué à l’aide du doigté simplifié.
ACCORDS À DOIGTÉ SIMPLIFIÉ
Cette méthode vous permet de facilement jouer des accords
dans la zone d’accompagnement du clavier avec seulement 1, 2
24
CM7aug
25
C7aug
26
Csus4
27
C1+2+5
ou 3 doigts. Les exemples de doigté simplifié pour “C, Cm, C7 et
Cm7” sont représentés ci-dessous:
28
Pour jouer un accord majeur
Pressez la tonique de l’accord.
Cm
Pour jouer un accord mineur
Ces notes ne sont pas nécessaires à la reconnaissance de l’accord.
BASES DES ACCORDS
Trois notes ou plus jouées ensemble constituent un “accord”.
Pressez la tonique et la plus proche
touche noir à sa gauche.
3ce
C7
Cm7
Pour jouer un accord septième
Pressez la tonique et la plus proche
touche blanche à sa gauche.
Pour jouer un accord septième mineur
Pressez la tonique et les plus proches
touches blanche et noire à sa gauche
(les trois touches ensemble).
constituée du Do (la tonique), du Mi (3ème degré de la gamme
de Do majeur) et du Sol (5ème degré de la gamme de Do
majeur).
Dans la triade de Do majeur représentée ci-dessus, la plus
basse note est la “tonique” de l’accord (la“fondamentale”
utiliser une autre note pour la position la plus basse donne un
“renversement”). La tonique est le son central de l’accord, qui
3ce
29
tonique
30
31
Le type d’accord le plus basique est
la “triade” constituée de trois notes :
la tonique, la tierce et la quinte de la
gamme correspondante. Une “triade
de Do majeur”, par exemple, est
10
eagletone.com
EAGLETONE clavier électronique MPW300 USB Manuel de l’utilisateur
e
soutient et ancre les autres notes de l’accord. L’intervalle
entre notes adjacentes d’une triade en position fondamentale
est une tierce (majeure ou mineure).
Tierce majeure :
quatre demi-tons
Tierce mineure :
trois demi-tons
L’intervalle du bas de notre triade en position fondamentale
(entre tonique et tierce) détermine si la triade est un accord
majeur ou mineur, et nous pouvons décaler d’un demi-ton vers
le haut ou le bas la note du haut pour produire deux accords
supplémentaires, comme représenté ci-dessous :
Accord majeur - CM
3ce majeure3ce mineure
Accord augmenté - Caug
Accord mineur - Cm
3ce mineure3ce majeure
Accord diminué - Cdim
LECTURE DES NOMS D’ACCORDS
Le nom d’un accord vous dit tout ce que vous devez savoir sur
cet accord (en dehors du renversement). Un nom d’accord
vous donne la tonique, le mode (majeur, mineur ou diminué),
la présence d’une septième et son type, les altérations ou
tensions qu’il emploie... tout cela en un coup d’œil.
QUELQUES TYPES D’ACCORDS
Quarte suspendue - Csus
Quarte justeQuinte juste
Mineur 7e - Cm7
Accord
min.7e min.
7e - C7
e
min.
7
Majeur 7e - CM7
Accord maj.
Accord
maj.7e maj.
3ce majeure3ce majeure
3ce mineure
3ce mineur
Les caractéristiques de base du son de l’accord restent
intactes même si l’ordre des notes est modifié pour créer des
renversements. Les différents accords dans une progression
d’accords peuvent ainsi être enchaînés en douceur en
effectuant les renversements appropriés.
MÉMOIRE
ONE TOUCH SETTING
STORE
M1 M2 M3 M4
STYLE
OTS
Mineur/7e majeure - CmM7
Accord
min.7e maj.
Mineur 7e , 5te diminuée - Cm7
Accord
5te dimin.
min. 7
e
te
7
, quinte diminuée - C7
5te dimin.
(5)
7e , quarte suspendue - C7sus4
7e min.
(5)
Accord 7
Accord
sus. 4
Il y a 4 mémoires pour conserver les réglages.
1. Pressez et maintenez [STORE], puis pressez pendant
ce temps [M1] (ou [M2]-[M4]). Les données seront
mémorisées en M1(M2-M4).
2. Les données qui peuvent être mémorisées sont les
suivantes :
• DONNÉES DE SON :
PREMIER SON (VOICE 1) ET DEUXIÈME SON (VOICE 2).
• EFFET DE VOIX :
TOUCHER DYNAMIQUE ON/OFF, SUSTAIN ON/OFF,
TRANSPOSITION, OCTAVE, POINT DE PARTAGE DU
CLAVIER.
• DONNÉES D’ACCOMPAGNEMENT :
NUMÉRO DE STYLE, TEMPO, A.B.C. ON/OFF, STATUT
NORMAL/VARIATIONS.
NOTE : Si les réglages actuels ne sont pas les mêmes que
ceux en mémoire, le témoin de mémoire correspondant
clignote à l’écran. Les données de la mémoire reviendront
aux valeurs par défaut après extinction.
e
e
eagletone.com
11
Manuel de l’utilisateur EAGLETONE clavier électronique MPW300 USB
5-- 10 1
RÉGLAGE PAR UNE TOUCHE (O.T.S)
La fonction de rappel de présélection immédiate (One
Touch Setting ou O.T.S.) est très pratique : elle vous permet
de reconfigurer instantanément tous vos réglages d’une
simple pression sur une touche. Vous pouvez ainsi charger 4
configurations de paramètres (M1-M4) pour correspondre au
style en cours d’exécution.
ONE TOUCH SETTING
STORE
1. Pressez le bouton [O.T.S.] pour activer ce mode et afficher
le témoin O.T.S. dans l’écran.
2. Pressez n’importe lequel des boutons [M1] – [M4] pour
charger les paramètres correspondant en fonction du
style actuel.
3. En mode O.T.S., l’accompagnement automatique A.B.C.
est toujours activé.
4. Pressez n’importe lequel des boutons [M1] – [M4], selon
celui correspondant au réglage désiré.
5. Pressez à nouveau le bouton [O.T.S.] pour désactiver le
mode O.T.S..
M1 M2 M3 M4
STYLE
OTS
3. Une fois tous les réglages faits en attente
d’enregistrement, jouez sur le clavier (en zone d’accords
si vous enregistrez l’accompagnement) ou pressez le
bouton [START/STOP] : cela lancera l’enregistrement et la
cadence s‘affichera en fonction du tempo actuel.
Arrêter l’enregistrement
METROPIANO DUAL TOUCH SUSTAIN
SONG
STYLE
A.B.C.MAIN/FILLINTRO/ENDSTART/STOP SYNC
1. ARRÊT AUTOMATIQUE
2. L’enregistrement s’arrête automatiquement si la mémoire
est saturée et “FULL” (plein) s’affiche dans l’écran LCD.
3. ARRÊT MANUEL
4. Pressez à nouveau
[RECORD] durant l’enregistrement
pour arrêter immédiatement celui-ci.
5. Quand un style joue, pressez le bouton [INTRO/END] pour
que l’enregistrement s’arrête automatiquementaprès le
motif final ou “ending”.
Lire l’enregistrement
5-- 10 1
ENREGISTREMENT
Lancer l’enregistrement
1. Pressez le bouton [RECORD] et les quatre témoins de
temps clignoteront simultanément dans l’écran pour
indiquer l’attente d’enregistrement.
2. Vous pouvez alors sélectionner un son, un style et une
mémoire. La piste d’accompagnement et celle de mélodie
peuvent être enregistrées en même temps.
METROPIANO DUAL TOUCH SUSTAIN
Clignotent simultanément
STYLE
SONG
STYLE
A.B.C.MAIN/FILLINTRO/ENDSTART/STOP SYNC
Pressez le bouton [SONG], utilisez les touches numériques ou
les boutons [+/YES]/[-/NO] pour sélectionner le 101e morceau.
Les données enregistrées seront lues.
REMARQUE : Si vous éteignez le clavier, les données
enregistrées seront effacées. Si vous voulez quitter le mode
de lecture de morceau enregistré, vous pouvez utiliser les
touches numériques ou les boutons [+/YES]/[-/NO] pour choisir
les autres morceaux. Vous passerez alors automatiquement
en mode morceau.
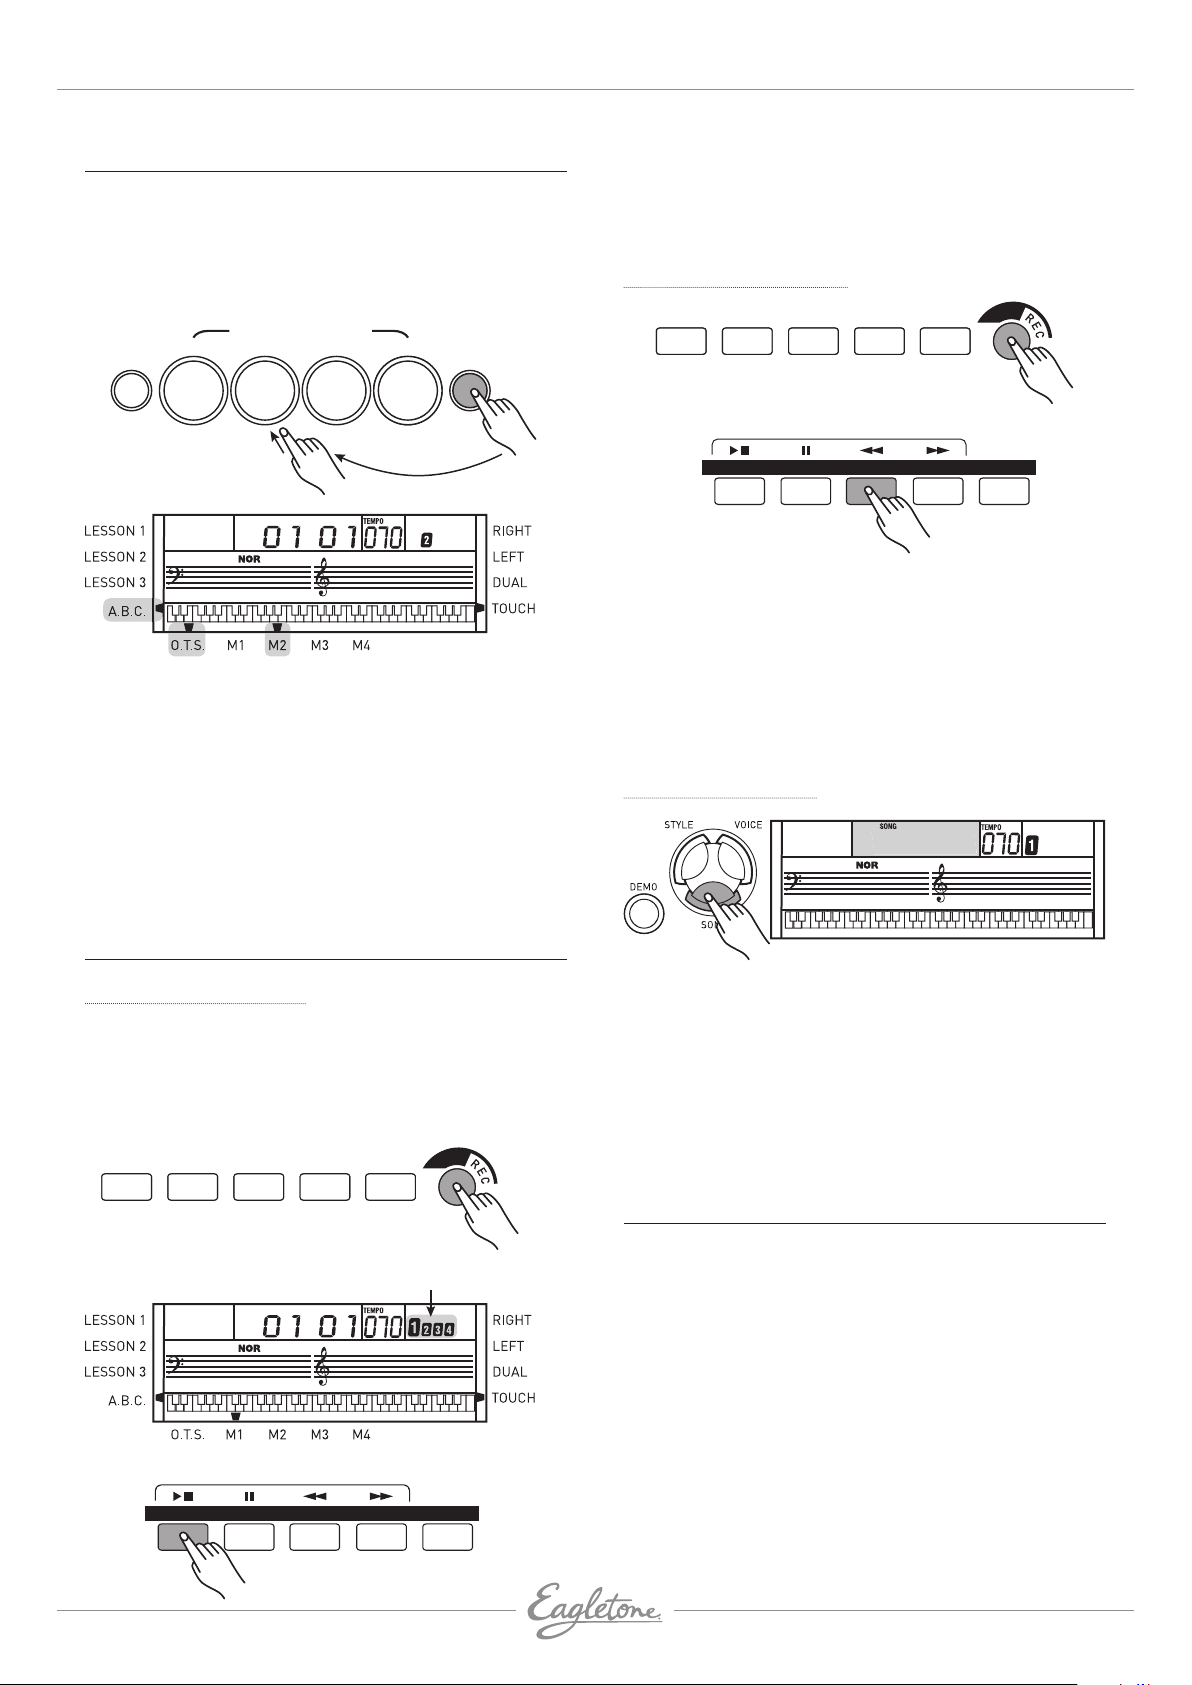
MENU DES FONCTIONS (FUNCTION)
• Pressez la touche [FUNCTION] pour accéder au menu des
fonctions. L’option par défaut du menu est “TRANSPOSE”.
Chaque fois que vous entrez dans le menu, vous retrouvez
la dernière option sélectionnée.
• Pressez la touche [FUNCTION] pour sélectionner l’option
que vous souhaitez régler.
• Utilisez les boutons [+/YES]/[-/NO] pour régler le
paramètre.
• L’option et ses réglages sont indiqués sur la droite :
12
eagletone.com
EAGLETONE clavier électronique MPW300 USB Manuel de l’utilisateur
L & R
L & R
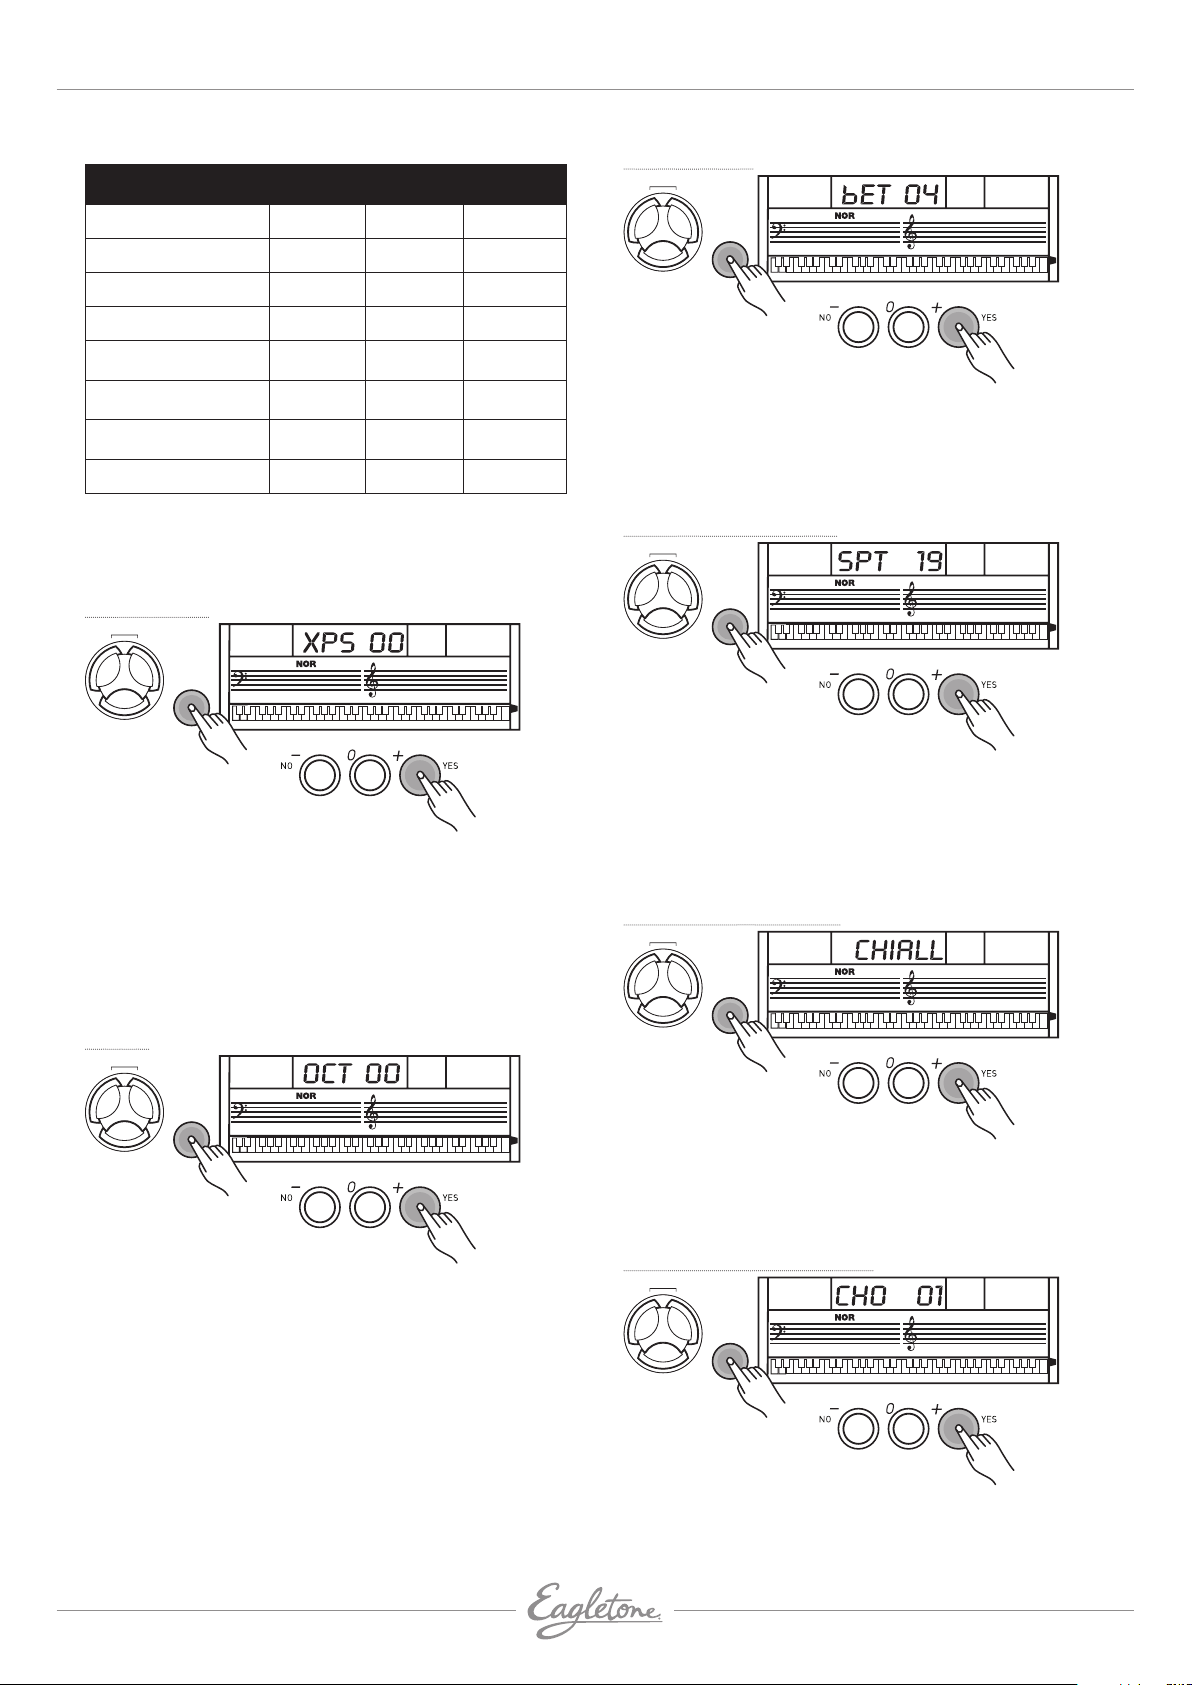
Mesure (Beat)
Option
Affichage
Plage
par
defaut
Transposition XPS 00 -6…6 0
Octave OCT 00 -1…1 0
Mesure BET 04 0, 2…9 4
Point de partage SPT 19 1…61 19 (#F3)
Canal de réception.
MIDI
Canal de
transmission MIDI
Volume
D’accompagnement
CHI ALL
CH0 01 01…16 01
AVL 20 00…31 20
01…16,
ALL
ALL
Sélection de banque BAK 01 01…128 01
L & R
CHORD
DICT.
FUNCTION
LESSON
Pressez le bouton [FUNCTION] pour accéder au sous-menu
mesure (beat). L’écran LCD affiche la valeur de mesure
actuelle.
Utilisez [+/YES]/[-/NO] pour sélectionner le nombre de temps.
Les valeurs possibles sont : 0, 2-9, soit 9 types de valeur.
TEMPO
070
Remarque : Sans action durant 5 secondes après avoir pressé
la touche
[FUNCTION]
, l’appareil quitte automatiquement le
menu des fonctions.
Transposition
L & R
CHORD
DICT.
FUNCTION
LESSON
• Pressez le bouton [FUNCTION] pour accéder au sousmenu transposition. L’écran LCD affiche la valeur de
transposition actuelle.
• Utilisez les boutons [+/YES]/[-/NO] pour régler la
transposition de -6 à +6 demi-tons, uniquement pour la
partie droite du clavier.
• Pressez simultanément sur les boutons [+/YES] ET [-/NO]
pour ramener la transposition à sa valeur par défaut.
TEMPO
070
Octave
L & R
CHORD
DICT.
FUNCTION
TEMPO
070
Point de partage (Split)
CHORD
DICT.
FUNCTION
LESSON
Pressez le bouton [FUNCTION] pour accéder au sous-menu
point de partage (Split). L’écran LCD affiche le point de split
actuel. Utilisez les boutons [+/YES]/[-/NO] pour sélectionner
le point de partage. Le clavier peut également servir à cela.
La touche choisie comme point de partage appartient à la
zone gauche.
TEMPO
070
Canal de réception midi
L & R
LESSON
CHORD
DICT.
FUNCTION
TEMPO
070
LESSON
• Pressez le bouton [FUNCTION] pour accéder au sous-menu
octave. L’écran LCD affiche la valeur d’octave actuelle.
• Utilisez les boutons [+/YES]/[-/NO] pour régler la valeur
d’octave de -1 à +1 octave, uniquement pour la partie droite
du clavier.
• Pressez ensemble les boutons [+/ YES] et [-/NO] pour
ramener l’octave à sa valeur par défaut.
Sert à régler le canal de réception MIDI (MIDI IN).Les canaux
1-16 peuvent être sélectionnés en pressant les boutons
[+/YES] / [-/NO]. Le réglage par défaut est ALL (tous les
canaux).
Canal de transmission midi
CHORD
DICT.
FUNCTION
LESSON
Sert à régler le canal de transmission MIDI (MIDI OUT).
Les canaux 1-16 peuvent être sélectionnés en pressant les
boutons
eagletone.com
[+/YES]/[-/NO]. Le réglage par défaut est 001.
TEMPO
070
13
Manuel de l’utilisateur EAGLETONE clavier électronique MPW300 USB
Volume d’accompagnement
L & R
CHORD
DICT.
FUNCTION
LESSON
• Pressez le bouton [FUNCTION] pour accéder au sous-menu
volume d’accompagnement. L’écran LCD affiche le volume
d’accompagnement entre 0 et 31 (par défaut, 20).
• Utilisez les boutons [+/YES]/[-/NO] pour sélectionner la
valeur du volume d’accompagnement.
• Pressez ensemble [+/YES]ET [-/NO] pour couper
l’accompagnement et l’écran LCD affichera “ACC OFF”.
TEMPO
070
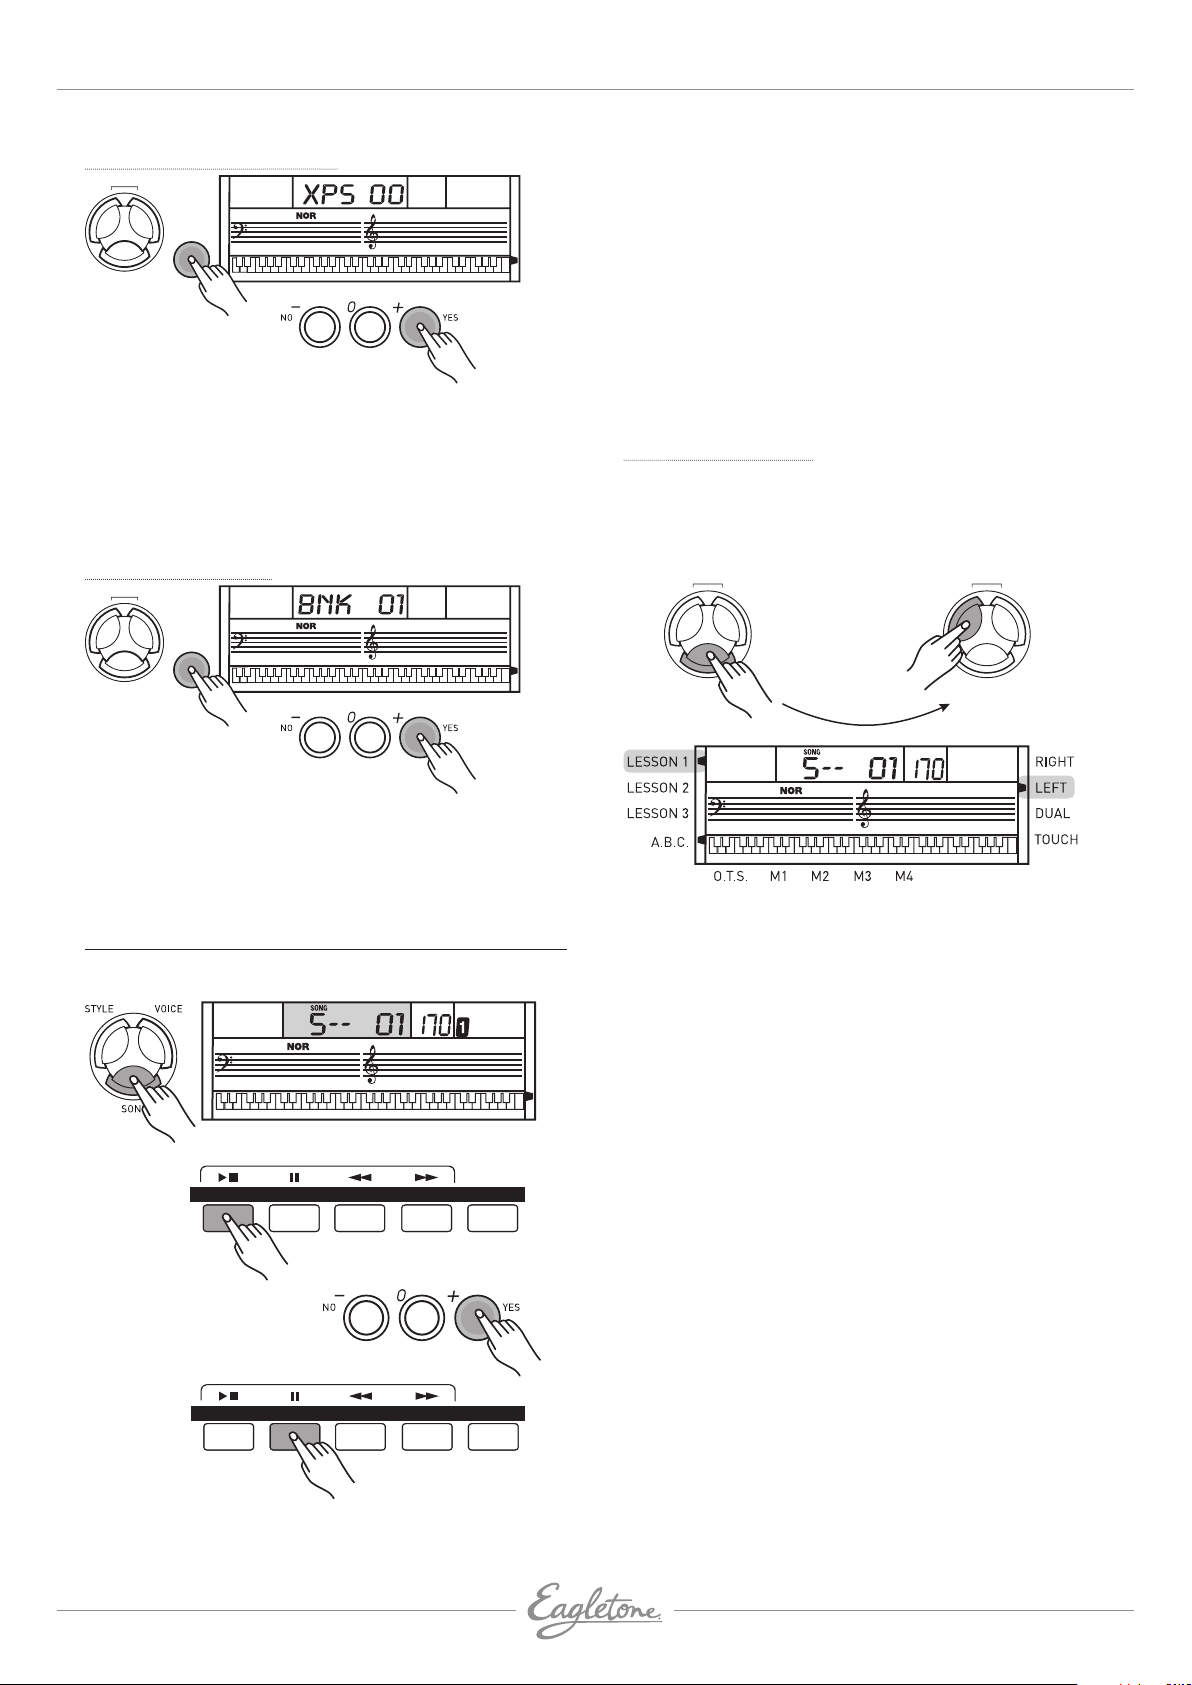
Sélection de banque
L & R
LESSON
CHORD
DICT.
FUNCTION
TEMPO
070
Pressez le bouton [START/STOP] pour arrêter le morceau.
Cette opération ne fait pas quitter le mode Morceau.
2. Bouclage.
Pressez une deuxième fois le bouton [START/STOP] pour le
lire en boucle.
3. Sélectionnez le morceau.
Retour rapide [«], avance rapide [»] et pause [II]
Quand un morceau est lu, pressez le bouton d’avance
rapide [»] pour avancer rapidement dans le morceau.
Pressez
[«] pour revenir en arrière dans le morceau (par
mesure). Pressez [II] pour mettre en pause le morceau.
Quand le morceau est arrêté, pressez
[DUAL] pour quitter le mode de morceau
[STYLE], [VOICE], ou
Mode leçon (Lesson)
Apprendre un nouveau morceau implique principalement de
jouer les bonnes notes au bon moment. Par conséquent, la
fonction d’apprentissage se concentre sur ces deux éléments
pour vous aider à mieux jouer un morceau.
L & R
LESSON
CHORD
DICT.
L & R
LESSON
CHORD
DICT.
• Pressez le bouton [FUNCTION] pour accéder au sous-menu
sélection de banque.
• L’écran LCD affiche BNK01.
• La banque de sons MIDI transmise peut être réglée de 1 à
128.
MORCEAU (SONG)
Il existe au total 100 morceaux (voir annexe). Chacun peut
être travaillé en mode SANS MÉLODIE.
SONG
STYLE
TEMPO
A.B.C.MAIN/FILLINTRO/ENDSTART/STOP SYNC
TEMPO
1. En mode morceau (mais à l’arrêt), pressez le bouton
[LESSON] pour passer en mode leçon.
2. Trois niveaux évaluent votre interprétation. Vous pouvez
utiliser le bouton [R] ou [L] pour sélectionner la main à
travailler. Si aucune main n’est sélectionnée, le clavier
choisira automatiquement la main droite (R).
3. Si [L] et [R] sont tous deux sélectionnés, vous pouvez
utiliser les deux mains pour travailler la leçon.
REMARQUE : Le contenu du travail avec la main gauche varie
en fonction des morceaux. Si vous choisissez un morceau
à accords, la main gauche fait travailler les accords, sinon
elle servira à travailler la mélodie. Quand un morceau est
lu, les notes et le clavier affichés dans l’écran LCD indiquent
la position des notes mélodiques et de l’accord, la notation
musicale chiffrée affichant la dernière note jouée par la piste
droite (R), ce qui est pratique pour étudier.
SONG
STYLE
1. Lecture et arrêt d’un morceau
Pressez le bouton
[SONG] pour activer le mode Morceau.
Le témoin SONG apparaît à l’écran. Tous les morceaux
sont joués à la suite.
14
A.B.C.MAIN/FILLINTRO/ENDSTART/STOP SYNC
eagletone.com

EAGLETONE clavier électronique MPW300 USB Manuel de l’utilisateur
L & R
CHORD
DICT.
SONG
A.B.C.MAIN/FILLINTRO/ENDSTART/STOP SYNC
7. Leçon 3 – sans mélodie
1. Pressez le bouton [LESSON] alors que vous êtes en
mode LESSON 2 pour passer en mode LESSON 3. Dans
ce mode, l’évaluation se fait à partir de l’exactitude
LESSON
temporelle et du jeu des notes correctes.
2. Pressez le bouton [START/STOP] pour commencer.
3. Si [R] est sélectionné, la mélodie de la main droite est
COUNT
coupée. Contrairement à LESSON 1, les notes correctes
doivent être jouées pour produire correctement la
mélodie.
4. Si [L] est sélectionné, les accords/mélodie de la main
gauche sont coupés. Contrairement à LESSON 1, les
accords ou mélodie corrects doivent être jouées pour
produire des accords ou une mélodie corrects.
5. Si [L] et [R] sont tous deux sélectionnés, les deux mains
Leçon 1 – travail du timing
1. Pressez le bouton [LESSON] pour passer en mode
LESSON 1, dont le témoin s’allume dans l’écran LCD.
L’évaluation est basée sur l’exactitude temporelle de
votre jeu, le fait que la bonne note soit jouée n’est pas pris
en compte.
2. Pressez [START/STOP] pour commencer.
3. Si [R] est sélectionné, cela coupe la mélodie de la main
droite et vous devrez suivre le timing de la main droite.
Tant que le timing est correct, la mélodie se fait entendre.
4. Si [L] est sélectionné, cela coupe les accords et la mélodie
joués par la main gauche. Vous devrez suivre le timing
sont coupées, seul l’accompagnement étant produit.
Les deux mains doivent être jouées correctement pour
produire fidèlement un morceau.
6. Une fois la leçon terminée, une évaluation vous est
fournie.
Fonction d’évaluation
Les trois leçons ont une fonction d’évaluation à quatre
niveaux : OK, GOOD (bon), VERY GOOD (très bon),
EXCELLENT.
Une fois la note donnée, le morceau est lu à nouveau et le
mode leçon demeure.
de la main gauche. Tant qu’il est correct, les accords/
mélodie sont entendus.
5. Si [L] et [R] sont tous deux sélectionnés, le jeu des deux
mains est coupé. Vous devez suivre le timing des deux
mains et le morceau sera produit en conséquence.
6. Une fois la leçon terminée, une évaluation vous est
fournie.
Leçon 2 – travail des notes
1. Pressez à nouveau le bouton [LESSON] pour passer au
mode LESSON 2. L’évaluation se fait sur l’exactitude des
notes jouées. L’exactitude du timing n’est pas prise en
compte puisque le morceau ne se poursuivra que lorsque
la bonne note aura été jouée.
2. Pressez le bouton [START/STOP] pour commencer.
3. Si [R] est sélectionné, seule la main gauche est jouée
automatiquement jusqu’à ce que la première note pour
la main droite soit jouée. Le morceau ne se poursuivra
qu’une fois la note correcte jouée.
4. Si [L] est sélectionné, seule la main droite est jouée. Le
morceau ne se poursuivra qu’une fois les notes de la main
gauche correctement jouées.
5. Si [L] et [R] sont tous deux sélectionnés, le morceau
ne se poursuivra qu’une fois les notes des deux mains
correctement jouées.
6. Une fois la leçon terminée, une évaluation vous est
fournie.
eagletone.com
15

Manuel de l’utilisateur EAGLETONE clavier électronique MPW300 USB
L & R
LESSON
Chord type
Chord type
CHORD
DICT.
Chord root
C
M7
Chord root
Zone d’accompagnement
Point de partage
Chord type Chord root
Nom d’accord (tonique et type)
Note constituant
l’accord (clavier)
Dictionnaire d’accords (Chord dictionary)
Le dictionnaire d’accords est un “livre d’accords” intégré
vous affichant les notes composant les accords. C’est
idéal pour apprendre le nom de certains accords et savoir
instantanément comment les jouer.
1. Pressez le bouton [CHORDDICT./R] pour passer en mode
dictionnaire. L’écran LCD affiche “dict”. Dans ce mode, les
notes de la partie droite du clavier peuvent servir à définir
un type d’accord et sa tonique.
2. Par exemple, si vous voulez jouer un accord CM7, pressez
la touche C (Do) dans la section du clavier intitulée (Chord
root) (la note ne sera pas entendue). La tonique que vous
venez ainsi de définir s’affiche à l’écran.
3. Pressez la touche [M7] dans la section du clavier intitulée
Chord type (la note ne sera pas entendue). Les notes que
vous devriez jouer pour obtenir l’accord spécifié (par la
tonique et le type d’accord) sont affichées dans l’écran sur
la portée et représentées sur le clavier.
4. Quand le type et la tonique de l’accord sont confirmés,
l’écran LCD affiche le nom de l’accord et sa position sur le
clavier. Un son de cloche se fait entendre si vous le jouez
correctement.
5. Pressez à nouveau le bouton [CHORDDICT./R] pour quitter
le mode dictionnaire d’accords.
6. Spécifiez et jouez le type et la tonique de l’accord que vous
aimeriez produire au clavier comme indiqué à droite.
7. Certains doigtés peuvent être reconnus comme des
accords différents par la fonction A.B.C., par exemple :
B6, B6, B6(9), B6(9), Baug, Baug, Bm6, Bm6, Adim7,
Bdim7, Bdim.
REMARQUE : Les notes que vous jouez en vue de définir
la tonique et le type de l’accord ne sont pas entendues.
Si vous jouez l’accord correctement, vous entendrez des
applaudissements. Si l’accord n’est pas joué correctement,
un son de basse sera entendu. L’accord doit être joué sous le
point de partage (dans la zone d’accompagnement).
Notation musicale de l’accord
FONCTION MIDI
Qu’est-ce que le MIDI?
1. MIDI signifie “Musical Instrument Digital Interface”. C’est
l’interface numérique standard pour instruments de
musique électronique et ordinateurs.
2. La connexion USB peut servir au transfert de données
MIDI avec un ordinateur ou autre hôte USB compatible
avec les périphériques USB audio via un câble USB.
3. Le clavier ne peut être branché qu’à un PC.
4. Vous pouvez utiliser le clavier comme un générateur de
sons, les données enregistrées sur l’ordinateur ou un
hôte USB pouvant être reproduites par le clavier.
REMARQUE : Quand un enregistrement est reproduit et
quand un style joue, vous ne pouvez pas employer l’entrée
MIDI IN sous peine d’erreur sur le même canal du morceau
joué.
Connexion USB
Configuration requise
• Processeur : 300 MHz ou supérieur, Pentium 2
• Mémoire : 64 Mo ou plus
• Lecteur : CD-ROM 24X
• Système d’exploitation : WINDOWS 2000/XP
Méthode de connexion
• Branchez un câble USB standard entre la prise USB en face
arrière de l’instrument et la prise USB de votre ordinateur
(câble USB vendu séparément).
Précautions pour l’USB
Veuillez observer les précautions suivantes pour brancher
l’instrument à un ordinateur par câble USB. Ne pas les
respecter peut bloquer l’instrument et/ou l’ordinateur,
avec éventuellement des altérations ou pertes de données.
Si l’instrument ou l’ordinateur se bloque, éteignez les deux
appareils et rallumez-les après quelques secondes.
ATTENTION !
• Faites quitter le mode de veille à votre ordinateur avant de
brancher le câble USB.
• Branchez le câble USB à l’instrument et à l’ordinateur
avant de mettre sous tension l’instrument.
16
eagletone.com

EAGLETONE clavier électronique MPW300 USB Manuel de l’utilisateur
Applications MIDI
1. Des données (MIDI) enregistrées sur ordinateur peuvent être jouées par le clavier.
2. Pour transférer des morceaux entre votre clavier et votre ordinateur, vous devrez installer d’autres applications.
3. Vous n’avez pas à installer de pilote USB pour WINDOWS2000/XP.
CARACTÉRISTIQUE TECHNIQUE (Caractéristiques et aspect sont sujets à modifications sans préavis.)
Ecran à cristaux liquides (LCD) .......................................................... LCD multi-fonctionnel
Touches ................................................................................................. 61 touches dynamiques
Polyphonie ............................................................................................ 32-notes de polyphonie
Sons ....................................................................................................... 157
Styles ..................................................................................................... 100
Morceaux de démonstration ............................................................... 100 morceaux ; 2 démonstrations
Commandes ......................................................................................... Master Volume, Tempo+/-, R/Chord Dictionary, L, Lesson, Voice,
Style, Song, O.T.S., M1-M4, Store, Start/Stop, Sync, Intro/End,
Main/Fill, A.B.C., Record, Dual, Touch, Sustain, Métronome,
Demo, +/YES, -/NO, Piano
Commandes d’accompagnement....................................................... Start/Stop, Sync, Intro/End, Main/Fill
Commandes de morceau .................................................................... Start/Stop, Pause, Rew, FF
Fonction d’enregistrement ................................................................. Record
Mémoires de façade ............................................................................ 4 emplacements
Alimentation électrique ....................................................................... 12V
Connecteurs ......................................................................................... Alimentation secteur, casque, Sustain, USB
Haut-parleurs ....................................................................................... 4Ω 3W x 2
Dimensions ........................................................................................... 948,2 (L) x 347,8 (W) x 136,2 (H) mm
poids ...................................................................................................... 4,7 kg (sans les piles)
Accessoires .......................................................................................... Adapteur secteur, pupitre à partitions, Mode d’emploi
Guide de dépannage
Problème Cause possible et solution
Que l’instrument soit allumé ou non, un bruit de “pop” est parfois produit.
Il n’y a aucun son même quand on joue sur le clavier ou quand un morceau
ou style est reproduit.
Le volume est trop faible.
La qualité du son est moins bonne.
Le rythme s’arrête intempestivement ou ne répond pas.Les données de
morceau enregistrées ne jouent pas correctement.
L’écran LCD s’assombrit brutalement et tous les réglages de façade sont
réinitialisés.
C’est normal et cela indique que l’instrument
reçoit une alimentation électrique.
Vérifiez qu’aucun câble ou casque n’est branché à
la prise casque (PHONES) de la face arrière. Si un
casque est branché dans cette prise, aucun son
n’est produit par les haut-parleurs.
Les piles sont faibles ou déchargées. Remplacez
toutes les piles par des neuves, ou utilisez
l’adaptateur secteur optionnel.
eagletone.com
17

Manuel de l’utilisateur EAGLETONE clavier électronique MPW300 USB
ANNEXE 1 - LISTE DES SONS
PIANO
01 Grand Piano
02 Bright Piano
03 El Grd Piano
04 Honky-Tonk Piano
05 Elec Piano 1
06 Elec Piano 2
07 Harpsichord
08 Clavi
MALLET
09 Celesta
10 Glockenspiel
11 Music Box
12 Vibraphone
13 Marimba
14 Xylophone
15 Tubular Bell
16 Dulcimer
ORGAN
17 Drawbar Organ
18 Jazz Organ
19 Rock Organ
20 Church Organ
21 Reed Organ
22 Accordion
23 Harmonica
24 Tango Accordi
GUITAR
25 Classic Guitar
26 Steel Guitar
27 Jazz Guitar
28 Clean Guitar
29 Muted Guitar
30 Overdriven Guitar
31 Distortion Guitar
32 Guitar Harmonic
BASS
33 Acoustic Bass
34 Finger Bass
35 Picked Bass
36 Fretless Bass
37 Slap Bass 1
38 Slap Bass 2
39 Synth Bass 1
40 Synth Bass 2
STRINGS
41 Violin
42 Viola
43 Cello
44 Contrabass
45 Tremolo Strings
46 Pizzcato Strings
47 Harp
48 Timpani
STRING ENSEMBLE
49 Strings 1
50 Strings 2
51 Synth Strings 1
52 Synth Strings 2
53 Choir Aahs
54 Voice Ooh
55 Synth Voice
56 Orchestra Hit
BRASS
57 Trumpet
58 Trombone
59 Tuba
60 Muted Trumpet
61 Hor n
62 Brass Ensemble
63 Synth Brass 1
64 Synth Brass 2
REED
65 Soprano Sax
66 Alto Sax
67 Tenor Sax
68 Baritone Sax
69 Oboe
70 English Horn
71 Bassoon
72 Clarinet
PIPE
73 Piccolo
74 Flute
75 Recorder
76 Pan Flute
77 Blown Bottle
78 Shakuhachi
79 Whistle
80 Ocarina
LEAD
81 Square
82 Sawtooth
83 Calliope
84 Chiff
85 Charang
86 Voice
87 Fifths
88 Bass Lead
PAD
89 Fantasia
90 Warm
91 Poly Synth
92 Choir
93 Bowed
94 Metallic
95 Halo
96 Sweep
EFFECTS
97 Rain
98 SoundTrk
99 Crystal
100 Atmosphr
101 Bright
102 Goblins
103 Echoes
104 Sci-Fi
ETHNIC
105 Sitar
106 Banjo
107 Shamisen
108 Koto
109 Kalimba
110 Bag Pipe
111 Fiddle
112 Shanai
PERCUSSIVE
113 Tinkle Bell
114 Agogo
115 Steel Drums
116 Woodblock
117 Taiko Drum
118 Melodic Tom
119 Synth Drum
120 Reverse Cymbal
SOUND EFFECTS
121 Gt Fret Noise
122 Breath Noise
123 Seashore
124 Bird Tweet
125 Telephone Ring
126 Helicopter
127 Applause
128 Gunshot
SYNTH VOICE
129 0elep
130 Fzpiano
131 Ep3
132 Ep4
133 Ep5
134 Harppian
135 Clavr2
136 Clavr3
137 Organbox
138 Elorgan
139 Churc2
140 Synorgan
141 Altoel
142 Fzguitar
143 Synelgt
144 Picelbas
145 Elviolin
146 Brassfm
147 Fmlead
148 Fantalfo
149 Polyaa2
150 Bowedg2
151 70elpad
DRUMKIT
152 StdKit
153 PowerKit
154 DanceKit
155 808Kit
156 BrushKit
157 OrchKit
18
eagletone.com

EAGLETONE clavier électronique MPW300 USB Manuel de l’utilisateur
ANNEXE 2 - LISTE DES STYLES
8/16 BEAT
01 8 Beat 1
02 8 Beat 2
03 8 Beat 3
04 8 Beat 4
05 60’s 8 Beat
06 8 Beat Ballad
07 8 Beat Rock
08 16 Beat 1
09 16 Beat 2
10 16 Beat Pop
11 16 Beat Shuffle
12 Ballad
13 Slow Ballad
14 16 Beat Ballad
15 Unplugged
ROCK
16 Rock
17 Pop Rock
18 Fast Rock
19 Slow Rock 1
20 Slow Rock 2
21 Rock & Roll
22 Heavy Metal
23 Blues Boogie
24 Blues
25 Shuffle
26 Blues Shuffle
27 Rock Shuffle
28 Charlston
DANCE
29 Disco 1
30 Disco 2
31 Disco Funk
32 Dance
33 House 1
34 House 2
35 Rap
36 Euro Beat
37 Hip Hop
38 Techno
SOUL & FUNK
39 Funky Pop
40 Jazz Funk
41 Cool Funky
42 Soul 1
43 Soul 2
44 Soul Shuffle
45 Soul Blues
46 R & B
47 6/8 Gospel
48 Pop Groove
JAZZ
49 Swing
50 Cool Jazz
51 Pop Swing
52 Swing Fox
53 Big Band
54 Big Band Meduim
55 Jazz Waltz
56 Ragtime
57 Dixeland
58 Quick Step
COUNTRY
59 Country 1
60 Country 2
61 Pop Country
62 Country Rock
63 Country Folk
64 3/4 Country
65 Country Waltz
66 Country Shuffle
67 Country Boogie
68 Country Blues
69 Country Quick Step
70 Bluegrass
LATIN
71 Bossa Nova 1
72 Bossa Nova 2
73 Rhumba
74 Pop Rhumba
75 Cha Cha
76 Pop Cha Cha
77 Tango
78 Jazz Samba
79 Reggae
80 Pop Reggae
TRADITIONAL
81 March 1
82 March 2
83 German March
84 6/8 March
85 Polka
86 Pop Polka
87 Waltz
88 Slow Waltz
89 Vienna Waltz
90 Musette
PIANO
91 8 Beat
92 Ballad
93 Boogie
94 Jazz
95 Swing
96 Jazz Waltz
97 Twist
98 March
99 6/8 March
100 Waltz
eagletone.com
19

Manuel de l’utilisateur EAGLETONE clavier électronique MPW300 USB
ANNEXE 3 - LISTE DES MORCEAUX
01 -14 CLASSICAL
01 Cannon
02 Thais Meditation
03 Old France
04 Minuet
05 Ode to Joy
06 Wiegenlled
07 ”the Surprise“ Symphony
08 Swan Lake
09 Spring from “the Four Seasons“
10 Habanera from “Carmen”
11 Joy to the World
12 Toy Symphony
13 Humoreske
14 Kuckuckswalzer
15-40 FAVORITE
15 Long, Long Ago
16 Old Folks At Home
17 Oh! Susanna
18 Jeannie With the Light Brown Hair
19 Bill Bailey Won’t You Come Home
20 Annie Laurie
21 From the New World
22 The Yellow Rose of Texas
23 Ave Maria
24 My Old KentuckY Home
25 Turkey In the Straw
26 Deck the Halls
27 Grandfather’s Clock
28 America the Beautiful
29 The Sideway
30 The Entertainer
31 The Old Gray Mare
32 Aloha Oe
33 Solvelg’s Song
34 Camptown Races
35 Carrv Me Back to Old Viainia
36 The Blue-Bells of Scotland
37 O’Solo Mio
38 Jingle Bells
39 Battle Hymne of the Republic
40 Silent Night
41-66 FOLK
41 OroneK
42 Aula Lee
43 House of the Rising Sun
44 Danny Boy
45 I’ve Been Working on the Railroad
46 In the Rain
47 She Wore a Yellow Ribbon
48 My Bonnie
49 Yankee Doodle
50 Red River Valley
51 Auld Lang Syne
52 When the Saints Go Marching In
53 Twinkle Twinkle Little Star
54 Happy Birthday to You
55 Little Brown Jug
56 Michael Row the Boat Ashore
57 Old King Cote
58 Jamaica Farewell
59 TPORKA
60 Cielito Lindo
61 If You’re Happy And You Know it, Clap Your Hands
62 American Patrol
63 When Johnny Comes Marching Home
64 Green Sleeves
65 Santa Lucla
66 Szla Dzleweczka
67-80 KID
67 Angels We Have Heard on High
68 Skip to My Lou
69 London Bridge is Falling Down
70 Humpty Dumpty
71 Home on the Range
72 This Old Man
73 Butterfly
74 Ten Little Indians
75 Polly-Wolly-Doodle
76 Santa Claus is Coming to Town
77 Sippin’ Cider Through a Straw
78 La Cucaracha
79 Home Sweet Home
80 Up on the House Top
81-85 BALLROOM
81 Examine one Gram of Dance Musical in the storehouse
82 Samba
83 Tango of Cuba
84 Russian
85 Polka
86-100 PIANO & KEYBOARD
86 Four Little Swans
87 Did You Ever See a Lassie
88 Spring
89 Impromptu
90 Gavotte
91 Nocturne
92 Pizzicato Polka
93 Musical Moments
94 Reggae
95 All Kind of My Everything
96 Valse No. 6 ”Petit Chien”
97 Rondeau
98 Chrysanf
99 Invention à Deux Voix
100 Jesus, Saviour Pilot me
20
eagletone.com

EAGLETONE clavier électronique MPW300 USB Manuel de l’utilisateur
ANNEXE 4 - LISTE DES DÉMONSTRATIONS
Numéro Nom
01 Little Brown Jug
02 CHA CHA
ANNEXE 5 - LISTE DES ACCORDS
Nom de l’accord Abréviation Composition Accord (C) Affichage
Majeur [M] 1-3-5 C C
Sixième [6] 1-(3)-5-6 C6 C6
Majeur septième [M7] 1-3-(5)-7 CM7 CM7
Majeur, neuvième [M(9)] 1-2-3-5 CM(9) CM(9)
Augmenté [aug] 1-3-#5 Caug Caug
Mineur [m]
Mineur sixième [m6]
Mineur septième [m7] 1-
Mineur septième quint
diminuée
Mineur septième majeure
seventh
Diminué [dim] 1Diminué septième [dim7] 1Septième [7] 1-3-(5)Septième suspendu quatre [7sus4] 1-4-5Septième treizième [7 (13)] 1-3-(5)-6Suspendu quatre [sus4] 1-4-5 Csus4 Csus4
[m7
b5] 1- b3-b5-b7 Cm7 b5 Cm7b5
[mM7] 1-
b3-5
11-
b3-5-6
b3-(5)-b7 Cm7 Cm7
b3-(5)-7 CmM7 CmM7
b3-b5 Cdim Cdim
b3-b5-6 Cdim7 Cdim7
b7 C7 C7
b7 C7sus4 C7sus4
b7 C7 (13) C7 (13)
Cm Cm
Cm6 Cm6
eagletone.com
21

Manuel de l’utilisateur EAGLETONE clavier électronique MPW300 USB
TABLEAU D’IMPLÉMEANTATION MIDI
FONCTION TRANSMIS RECONU REMARQUE
Canal de par Défaut
base Modifié
Mode Par défaut
Messages
Altéré
Numéro
de note : Vraiment jouée
Dynamique Enfoncement
Relâchement
Aftertouch poliphonique
par canal
Pitch Bend
Changemenrt de commande 0
1
5
6
7
10
11
64
65
66
67
80
81
91
93
120
121
123
Changement de
programme : N° réels #
Messages exclusifs
Messages : Pos. ds morceau
commun : sél. morceau
: accord
Message : Horloge
en Tps réel : Commandes
Messages: LOCAL ON/OFF
auxilliaires : All Notes Off
: Active sensing
: Réinitialisationt
Remarque :
1
1-16
***********
18-114
***********
9nH,d=1-127
(9nH,d=0)
*********** 0-127
*1 *1
*1 1 Un message FAH est transmis quand on lance l’accompagnement
et un message FCH quand on l’arrête. A réception d’un message FAH,
l’accompagnement démarre. A réception d’un message FCH, l’accompagnement
s’arrête.
Tous
1-16
3
3
0-127
0-127
9nH,d=1-127
(9nH,d=0; 8nHn,
d= 0-127)
Sél. de banque
Modulation
Durée de Portamento
Entrée de donnée
Volume
Panoramique
Expression
Pédale de Sustain
Portamento On/Off
Pédale tonale
Pédale de sourdine
Reverb
Chorus
Niveau de Reverb
Niveau de Chorus
All Sound Off
Réinit. des comm.
All Notes Off
= oui
= Non
Mode 1: OMNI ON, POLY Mode 2: OMNI ON, MONO
Mode 3: OMNI OFF, POLY Mode 4: OMNI OFF, MONO
22
eagletone.com

www.eagletone.com
User’s manual

User’s manual EAGLETONE electronic keyboard MPW300 USB
CONTENTS
General Guide
Front panel .....................................................................................4
Rear panel ......................................................................................4
LCD .................................................................................................4
Getting prepared
Power Supply .................................................................................5
Setting up the Music Stand ..........................................................5
Connections
Headphones Jack ..........................................................................5
SUSTAIN Jack ................................................................................5
USB port .........................................................................................5
Basic Operations
Power Switch .................................................................................6
Master Volume ..............................................................................6
Demo ..............................................................................................6
Voices and Effects
Selecting a Voice ...........................................................................7
Dual Voice.......................................................................................7
Sustain ...........................................................................................7
Touch Response ............................................................................7
Metronome ....................................................................................7
Piano ...............................................................................................7
Style Control
Selecting a Style ............................................................................8
Accompaniment Section ..............................................................8
Starting a Style ..............................................................................8
Main/Fill .........................................................................................9
Stopping a Style .............................................................................9
Tempo ...........................................................................................10
Chord recognition .......................................................................10
Memory ........................................................................................12
One Touch Setting (O.T.S.) .........................................................12
Record
Starting Recording ......................................................................13
Stopping Recording .....................................................................13
Playing the Recording .................................................................13
Function Menu
Transposing .................................................................................13
Octave ...........................................................................................14
Beat ..............................................................................................14
Split point .....................................................................................14
MIDI Reception Channel .............................................................14
MIDI Send Channel ......................................................................14
Accompaniment Volume ............................................................14
Bank Selection ............................................................................14
Song
Lesson Mode ...............................................................................14
Lesson 1 – Practicing the rhythm .............................................15
Lesson 2 – Practicing the melody .............................................15
Lesson 3 – Melody Off .................................................................15
Grading .........................................................................................15
Chord Dictionary ........................................................................16
MIDI Function
What is MIDI? ...................................................................................
USB Connection ..............................................................................
MIDI Applications ............................................................................
Specifications ..............................................................................17
Troubleshooting .........................................................................17
Appendix
Voice List ......................................................................................18
Style List ......................................................................................19
Song List ..................................................................................... 20
Demo List .....................................................................................21
Chord List.....................................................................................21
MIDI Implementation Chart ...................................................... 22
2
eagletone.com

EAGLETONE electronic keyboard MPW300 USB User’s manual
PRESENTATION
Congratulations on your purchase of this electronic
keyboard!
This user-friendly keyboard features advanced functionalities
particularly suited to self-taught beginners. Whatever your
age, you will appreciate playing this keyboard as it offers you
outstanding accompaniment styles, expressive sounds and voices
and real-time recording. Other functionalities like numbered
musical notation display, a chord dictionary and a variety of
songs will help you master the skills of the keyboard.
We recommend that you read this manual carefully before
using the unit.
INSIDE THIS PACKAGE
Please make sure the package contains the following items:
• The instrument
• The music stand
• 12 V adaptor
• The user’s manual
IMPORTANT NOTES
Your keyboard will give you years of satisfaction if you follow
the simple rules stated below:
Location
Do not expose the unit to the following conditions to avoid
deformation, discoloration or more serious damage:
• Direct sunlight,
• High temperature (near a heat source or in a car during the
day time),
• Excessive humidity,
• Excessive dust,
• Strong vibrations.
Power Supply
• Make sure to use the suitable AC adaptor matching exactly
the voltage and type of current specified on the instrument.
Also make sure the AC outlet voltage in your country
matches the input voltage specified on the AC adaptor’s
label.
• Turn the power switch OFF when the instrument is not in
use.
• The AC adaptor should be unplugged from the AC outlet if
the instrument is not to be used for an extended period of
time.
• Unplug the AC adaptor during electric storms.
• Avoid plugging the AC adaptor into the same AC outlets as
appliances with high power consumption, such as electric
heaters or ovens. Avoid also using multi-plug adaptors
since this could result in a reduction in sound quality, cause
operation errors and possible damage.
Turn the Power Off When Making Connections
• To avoid damaging the instrument and other devices to
which it is connected, turn off the power switches of all
related devices prior to connecting or disconnecting cables.
Cleaning
• Clean the unit with a soft dry cloth.
• A slightly dampened cloth can help to remove stubborn
grime and dirt.
• Never use cleaners such as alcohol or thinners.
• Avoid placing vinyl objects on top of the unit (vinyl might
stick and discolor the surface).
Handling and Transporting
• Never apply excessive force to the controls, connectors or
other parts of the instrument.
• Always unplug cables by gripping the plug firmly, not by
pulling the cables.
• Disconnect all cables before moving the instrument.
• Physical shocks caused by dropping, bumping or placing
heavy objects on the instrument could result in scratches
or more serious damage.
Electrical Interference
This instrument contains digital circuitry and may cause
interference if it is placed too close to radio or television
receivers. If this occurs, move the instrument further away
from the receivers.
MAIN FEATURES
KEYBOARD
61-key touch response keyboard.
OPERATION
Voices, styles and songs are selected via the keypad and the
[+/YES] and [-/ NO] buttons.
Functions include Transpose, Octave, Beat, Split point, MIDI,
Accompaniment Volume and Bank Selection.
VOICES
157 in total, including 128 GM voices, 6 percussion voices and
23 synth voices.
STYLES
100 styles in total, including 10 PIANO styles.
SONGS
100 songs in total. Each song features a learning mode.
SONG LEARNING MODE
Three different ways of learning the songs are offered to you:
Lesson 1, Lesson 2 and Lesson 3. These three lessons also
offer a grading mode to help you evaluate your progression.
CHORD MODE
Chords are recognized in simplified fingering mode and standard
fingering mode.
CHORD DICTIONARY
Provides the user with information on the chords.
RECORDING
You can record a song as the 101
STYLE CONTROLS
Synchronized (Sync) Start, Start/Stop, Main/Fill, Intro/End.
MISCELLANEOUS
Piano. Layer voice. Sustain. One Touch Setting (O.T.S.). Recording.
Demo. Touch response. Metronome. USB etc.
st
song in the Song List.
eagletone.com
3

User’s manual EAGLETONE electronic keyboard MPW300 USB
GENERAL GUIDE
Front Panel
1. Power Switch
2. Tempo
3. Master Volume
4. Lesson Mode: Left Hand
5. Lesson Mode: Right Hand /
Chord Dictionary
6. Lesson Mode
7. Function
8. Demo
9. Style
10. Voice
11. Song
In Style Mode
12. Start / Stop
13. Synchronization
14. Intro / End
15. Main / Fill
16. Auto Bass Chord
In Song Mode
17. Start / Stop
18. Pause
19. Rewind
20. Fast Forward
21. Store
22. Memory / M1-M5
23. One Touch Setting
24. Metronome
25. Piano
26. Dual Voice
27. Touch response
28. Sustain
29. Record
30. Keypad
31. Liquid Cristal Display
9 10 11 14 12 13
STYLE SONG SCORE VOICE 12LOWER12
1
2 6
3 7
4 8
110
()
dim6
513
mM7angus4
–12–24 +12+24NOR VAR
15
18
17
TEMPOCOUNT
16
1
2 3 4
RIGHTLESSON 1
LEFTLESSON 2
DUALLESSON 3
TOUCHA.B.C.
O.T.S.M1M2M3M4
19
20
LCD
1. Lesson 1
2. Lesson 2
3. Lesson 3
4. Auto Bass Chord
5. Right
6. Left
7. Dual Voice
8. Touch Response
9. Chord
10. Voice / Style / Demo / Song
11. Tempo / Count
12. Beat
13. Metronome
14. Volume
15. Bass Clef
16. Treble Clef
17. 61-key Keyboard
18. Normal / Variation
19. One Touch Setting
20. M1–M4
Rear Panel
1. USB Port
2. Sustain Footswitch Jack
3. Headphones Jack
4. Power Supply Jack
5
4
eagletone.com

EAGLETONE electronic keyboard MPW300 USB User’s manual
GETTING PREPARED
Power Supply
This keyboard can be powered with a standard domestic
outlet (using the specified AC adaptor) or with batteries.
USING THE AC ADAPTOR
Make sure to only use the specified type of adaptor with this
keyboard. The adaptor must have a 12V CC, 1000mA output
and a positive central pin. Make sure the keyboard is turned
off before connecting the AC adaptor in the wall outlet and its
supply cord to the unit.
USING BATTERIES
Make sure the keyboard is switched off before inserting new
batteries or replacing the old ones.
Inserting the Batteries
1. Open the battery holder located under the keyboard.
2. Insert 8 D-size (SUM1, R-20) in the battery holder making
sure you respect the polarity.
3. Put the battery cover back on and make sure it is closed
correctly.
Signs indicating discharged batteries
Any of the following symptoms signals that the batteries are
discharged. Replace batteries as soon as possible when one
of these events occurs.
• The LCD is dim and difficult to read.
• Abnormally low volume from the loudspeakers or the
headphones.
• Distorted sound.
• Sudden drop in power while playing at high volume.
• Anomalous playback of rhythms and demo songs.
• Dimming of the display while playing at high volume.
CAUTION!
• Use only the specified AC adaptor. Using another type of
adaptor can cause risks of fire or electric shock.
• For security reasons, unplug the AC adaptor from the wall
outlet when the electronic keyboard is left unattended for
an extended period of time.
CAUTION!
• Respect polarity when inserting the batteries.
• Never mix different types of batteries.
• Never mix old and new batteries.
• Replace batteries as soon as possible when you observe
signs of discharging.
• Always take the batteries out of the instrument when it is
not to be used for an extended period of time.
CONNECTIONS
Headphones Jack
• If you prefer to play the keyboard with headphones for
high quality personal monitoring, plug a set of stereo
headphones in the PHONES jack located on the rear panel.
• Plugging in a set of headphones into the PHONES jack will
automatically deactivate the speakers.
NOTE: Never use headphones at high volume as it may
damage your hearing.
Sustain jack
• An optional footswitch can be plugged into the SUSTAIN
jack for sustain control.
• The footswitch functions like the damper pedal on a piano.
Using the footswitch will give a sustain effect to all notes
played on the keyboard, the sound will return to normal
when the footswitch is released.
USB Port
• Use this USB port to connect a PC or other USB host
devices that support USB audio communication.
• For devices using USB cables, once the driver is installed
and setup is complete, you can then select USB Audio
Device in the Device menu of the software to transfer MIDI
data.
WARNING!
To avoid causing damage to the unit or to any of the
devices that may be connected to it, make sure you switch
off the unit and all the devices prior to connecting or
disconnecting cables.
Setting up the music stand
The music stand
can be set up as follows:
eagletone.com
5

User’s manual EAGLETONE electronic keyboard MPW300 USB
BASIC OPERATIONS
Power Switch
VOICE1
TEMPO
070
1. First, make sure previous instructions pertaining to basic
power connections have been observed.
2. Place the POWER switch in the ON position. The LCD
lights up.
NOTE: If the LCD does not light up after switching the power
on, check the mains power supply.
Master Volume
MASTER VOLUME
MVL21
MASTER VOLUME
MVL24
TEMPO
070
TEMPO
070
VOICES AND EFFECTS
There are 157 voices in total (see Appendix 1), including
128 GM voices, 6 percussion voices and 23 synth voices.
Selecting a Voice
1. Press the [VOICE] button to activate the Voice mode. The
default voice is Voice 01. VOICE 1 and its number appear
on the display.
2. Use the
want to use. Its number appears on the display
3. You can also select the voice you want to use by typing its
number directly on the keypad.
4. You can now play the keyboard with the voice you have
selected.
[+/YES] and [-/NO] buttons to select the voice you
Dual Voice
METROPIANO DUAL TOUCH SUSTAIN
1. The keyboard Master Volume can be set between 0 and
31 by pressing the [MASTER VOLUME+/-] button. MVLXX
appears on the display.
2. Press the [MASTER VOLUME+] and [MASTER VOLUME-]
buttons simultaneously to reset the volume to its default
value, 24.
NOTE: If no sound comes out of the keyboard, this means the
Master Volume is set to its minimum.
Demo
STYLE VOICE
COUNT
020
DEMO
SONG
The keyboard has 2 classic demo songs.
1. Press the [DEMO] button to activate the DEMO mode.
2. Select a demo song by using the [+/YES] / [-/NO] buttons or
the [1], [2] keys on the keypad.
3. Press the [START/STOP] or [DEMO] button to exit the DEMO
mode.
NOTE: In DEMO mode, the ONLY operational buttons are:
[DEMO], [START/STOP], [TEMPO], [+/YES], [-/NO], [KEY NO 1],
[KEY NO 2] and [MASTER VOLUME].
Two voices can be heard
Eg. Piano
Eg. Cello
This keyboard offers a Dual Voice feature. This allows you
to improve the subtlety of your music by playing the voice of
two different instruments simultaneously when you press a
key. New combinations in voices and music are thus created.
When the Dual feature is off, the voice indicated on the LCD is
VOICE 1, when on, it is VOICE 2.
1. In VOICE 1 mode, press the
Dual voice mode. «VOICE 2» and «DUAL» icons will light
up simultaneously. The number of the second voice will
be displayed on the LCD. You now get two different voices
when pressing one key.
2. Use the [+/YES] / [-/NO] buttons on the keypad to select the
second voice you want to use. By default, the loaded voice
is No 50, Strings2.
simultaneously
[DUAL] button to activate the
6
eagletone.com

EAGLETONE electronic keyboard MPW300 USB User’s manual
3. Press the [DUAL] button again to turn it off. VOICE 2
disappears from the LCD and the keys you press revert to
playing a single VOICE 1.
NOTE: In Dual mode, only the section to the right of the split
point plays two voices simultaneously.
Sustain
METROPIANO DUAL TOUCH SUSTAIN
SUSTAIN
This function gives your sound a sustained effect while playing
the keyboard.
1. Press the
The SUSTAIN icon appears on the display. The keyboard
plays notes with a sustained effect.
2. Press the [SUSTAIN] button again to deactivate the effect.
The SUSTAIN icon disappears.
3. By default, the sustain effect is deactivated.
NOTE: When you press the Sustain pedal, the effect is
stronger than when you use the SUSTAIN button.
[SUSTAIN] button to activate the sustain effect.
Metronome
METROPIANO DUAL TOUCH SUSTAIN
1. Press the [METRO] button to activate the metronome.
2. Press the [METRO] button again to deactivate it.
3. The metronome cannot play in SONG/CHORD DICT mode.
NOTE: The metronome can be used to give the tempo of the
accompaniment while in Style mode. It can also be used in
Record mode, but its sound will not be recorded.
Piano
METROPIANO DUAL TOUCH SUSTAIN
Touch Response
METROPIANO DUAL TOUCH SUSTAIN
This function allows you to modify the type of response to the
touch of the keyboard: depending on the way you press a key,
its volume and dynamic levels are affected.
1. Press the [TOUCH] button to deactivate the touch response
mode. The TOUCH icon disappears from the LCD,
meaning it is deactivated.
2. Press the
icon appears on the LCD.
3. By default, Touch response is activated.
4. To check if the effect is to your liking, apply different levels
of force when playing any note while the feature is on.
[TOUCH] button again to activate it. The TOUCH
1. Press the [PIANO] button to enter the Piano mode. PIANO
appears on the display and the voice is changed to piano
immediately. In this mode, Auto Bass Chord (A.B.C.) is
deactivated.
2. Press the [PIANO] button again to exit the Piano mode.
3. Pressing any of the [FUNCTION] / [VOICE] / [DEMO] / [SONG]
/ [STYLE] buttons to recall the memory deactivates
automatically the Piano mode.
STYLE CONTROL
The keyboard offers 100 styles in total, listed from 01 to
100 and including 10 Piano styles.
Selecting a Style
1. Press the [STYLE] button to set the keyboard in Style
mode. The default style is No 01. The STYLE icon and the
corresponding style number appear on the display.
2. [+/YES] / [-/NO] buttons
3. Use the [+/YES] / [-/NO] buttons to select the style you
want to use. The newly selected style is displayed.
eagletone.com
7

User’s manual EAGLETONE electronic keyboard MPW300 USB
SONG
SONG
SONG
SONG
4. Keypad
5. You can type directly the number of the desired style on
the keypad to select it.
6. Once the desired style selected, you can play the
keyboard.
7. You can change style anytime during style playback. The
number of the new style appears immediately on the LCD.
If the style is changed on the first beat of the bar, the new
style starts immediately. If the style change is triggered
on another beat of the measure, the new style starts at
the following bar. The new style will be played at the same
tempo as its predecessor.
Accompaniment Section
The accompaniment consists of different sections called
Intro, Main, Variation, Fill and Ending. Using different
sections based on the various structures of the available
styles enables you to enhance your musical performance.
STYLE
INTRO
Press the [INTRO/END] button to insert an intro section before
you start to play. The rhythm will begin with 2 to 4 measures
which will be followed by a Main section.
MAIN AND VARIATION
There are two main sections: Main and Variation. Each
section consists of 2 to 4 measures.
FILL
While the accompaniment is playing, you can fill in the
rhythm/accompaniment by pressing the
[MAIN/FILL] button.
This will automatically insert a Fill section.
ENDING
When you press the
[INTRO/END] button, this activates a
rhythm/accompaniment ending consisting of 2 to 4 measures
that comes as a conclusion to your performance.
A.B.C.MAIN/FILLINTRO/ENDSTART/STOP SYNC
A.B.C. MODE
STYLE
STYLE
Split point
Accompaniment range
STYLE
A.B.C.MAIN/FILLINTRO/ENDSTART/STOP SYNC
By default, Auto Bass Chord (A.B.C.) is off. Press the A.B.C.
button to activate this mode. The A.B.C. indicator lights up on
the LCD.
The area to the left of the split point is called the Chord area
or Accompaniment range. When you play the chord, both the
bass and the chord voice sound.
SYNCHRONIzED START (SYNC)
Starting a Style
STARTING IMMEDIATELY
STYLE
STYLE
A.B.C.MAIN/FILLINTRO/ENDSTART/STOP SYNC
Press the [START/STOP] to start the style immediately. The
rhythm of the style starts playing immediately.
Beats in the bar will be displayed one after the other on the
LCD.
STYLE
STYLE
Split point
Accompaniment range
A.B.C.MAIN/FILLINTRO/ENDSTART/STOP SYNC
Flash simultaneously
Press the [SYNC] button to enter the Sync Start waiting mode.
The 4 beats on the LCD flash simultaneously.
8
eagletone.com

EAGLETONE electronic keyboard MPW300 USB User’s manual
SONG
SONG
SONG
STYLE
SONG
A.B.C.MAIN/FILLINTRO/ENDSTART/STOP SYNC
SONG
STYLE
SONG
A.B.C.MAIN/FILLINTRO/ENDSTART/STOP SYNC
STYLE
SONG
A.B.C.MAIN/FILLINTRO/ENDSTART/STOP SYNC
STYLE
If the A.B.C. mode is on, play any key in the chord area (to the
left of the split point) and the style starts playing with both
bass and chord.
If the A.B.C. mode is off, play any key on the keyboard and the
style only plays the drum voice.
INTRO START
STYLE
Flashing
STYLE
SONG
STYLE
A.B.C.MAIN/FILLINTRO/ENDSTART/STOP SYNC
A.B.C.MAIN/FILLINTRO/ENDSTART/STOP SYNC
1. In Main mode, press the [MAIN/FILL] button to insert a
one measure fill. The VAR icon flashes on the LCD. Once
one measure is over, the VARIATION style will begin.
2. In VARIATION mode, press the [MAIN/FILL] button to insert
a one measure fill. The VAR icon flashes on the LCD. Once
one measure is over, the style returns to MAIN.
3. Hold down the [MAIN/FILL] button when the style is
playing, the selected FILL pattern repeats continuously
until the button is released.
NOTE: Press the
[MAIN/FILL] button when the style is stopped
to alternate between VAR and NOR. The VAR or NOR icon will
light up on the LCD.
Stopping a Style
IMMEDIATE STOP
STYLE
The accompaniment can be stopped at any time by pressing
the [START/STOP] button.
ENDING STOP
A.B.C.MAIN/FILLINTRO/ENDSTART/STOP SYNC
• Press the [INTRO/END] button when the style is not playing.
The NOR (Normal) or VAR (Variation) icon flashes on the
LCD, indicating the intro section is ready to play. The length
of the intro varies according to the style.
• Press the
[START/STOP] button and the style starts playing
with an intro section, followed by the main section.
Main/Fill
STYLE
Flashing
STYLE
STYLE A.B.C.MAIN/FILLINTRO/ENDSTART/STOP SYNC
Flashing until button
is released
STYLE
A.B.C.MAIN/FILLINTRO/ENDSTART/STOP SYNC
Press and
hold down
STYLE
A.B.C.MAIN/FILLINTRO/ENDSTART/STOP SYNC
Press the [INTRO/END] button to end the style with an ENDING
section. The Ending section will start at the next measure.
SYNCHRONIzED STOP
SONG
STYLE
A.B.C.MAIN/FILLINTRO/ENDSTART/STOP SYNC
Press the [SYNC] button to stop the style playing when you
release the keys forming the chord. SYNC START will be
enabled.
Tempo
STYLE
1. Press the [TEMPO+] or [TEMPO-] button to modify the
tempo.
STYLE
2. Press the [TEMPO+] and [TEMPO-] buttons simultaneously
to reset the tempo to its default value.
3. The keyboard will revert to the new style’s default tempo
if you change style while playing.
eagletone.com
9

User’s manual EAGLETONE electronic keyboard MPW300 USB
SONG
C
Chord recognition
By default, the A.B.C. mode is off. Press the A.B.C. button
to activate the “Auto Bass Chord” function. The A.B.C. icon
appears on the LCD. The left-hand area of the keyboard is
called the “chord area”. When you play a chord in that area,
both the bass and the chord sound.
STYLE
STYLE
Split point
Accompaniment range
D
EBFDEF
G
CDEFGABCDEF
Root notes and the corresponding keys
NOTE: Since the chord detection of the A.B.C. feature is
based on the chord root priority, some chords that could be
played under the Chord Dictionary may not be recognized by
it, e.g. B6, Bb6, B6(9), Bb 6(9), B aug, Bbaug, Bm6, Bbm6, Adim7,
Bbdim7, Bdim.
Chords can be detected in two different ways: with «single
finger detect» or «Standard finger detect» method.
If the chord is played with all its constituting notes, it is
recognized as played with the Standard fingering. Otherwise,
it is detected following the single finger detection mode.
SINGLE FINGER CHORDS
This method allo w s you to play chords ea sily in the accompaniment
range of the keyboard using only one, two or three fingers.
The examples of Single Finger Chord for “C, Cm, C7 and Cm7”
are as follows:
A.B.C.MAIN/FILLINTRO/ENDSTART/STOP SYNC
left of the split point. The chords played will be recognized as
Single Finger chords.
STANDARD FINGER CHORDS
This method allows you to produce an accompaniment by
playing chords with standard fingering in the accompaniment
range of the keyboard. You can play up to 32 chords per root
note. The examples below are given for the key of C:
C
0
CM(9)
4
C
8
C7
12
CmM7
16
C7sus4
20
C7
24
CM7aug
m7
(b13)
(b5)
C6
1
Cm
5
CmM
7
9
C7sus4
13
(9)
17
21
25
Cdim
(b5)
C7
(b9)
C7
C7aug
2
6
10
14
18
22
26
CM7
Cm6
C
dim
(13)
C7
Cdim7
(9)
C7
(13)
C7
Csus4
3
7
11
15
19
23
27
Caug
Cm7
C
dim7
Csus4
C7
(#11)
C7
(#9)
C7
C1+2+5
To play a major chord
Press the root note of the chord.
28
These notes are optional; the chords could be recognized without them.
29
30
31
Cm
To play a minor chord
Press the root note together with
the nearest black key to its left.
C7
To play a seventh chord
Press the root note together with
the nearest white key to its left.
Cm7
To play a minor seventh chord
Press the root note together with
CHORD BASICS
Three notes played together constitute a “chord”.
The most basic kind of chord is the
“triad”, consisting of three notes:
3rd
3rd
the root note along with the third
and fifth notes of the corresponding
root
scale. A “C major triad”, for
example, is made up of the following notes: C (the root), E (the
third note of the C major scale) and G (the fifth note of the C
major scale).
the nearest white and black keys to its left
(i.e. the three keys together).
In the C major triad mentioned above, the lowest note is the
“root” of the chord (this is the chord’s “root position”). Using
NOTE: When the A.B.C. function is on, play the keys on the
10
other chord notes for the lowest note position results in an
“inversion”. The root is the central sound of the chord, which
eagletone.com

EAGLETONE electronic keyboard MPW300 USB User’s manual
Major chord - C
Minor chord - C
uspended 4
th
supports and anchors the other chord notes. The distance (or
interval) between adjacent notes of a triad in root position is
either a major or a minor third.
Major third:
four semitones
Minor third:
three semitones
The lowest interval in our root-position triad (between the root
and the third) determines whether the triad is a major or minor
chord, and we can shift the highest note up or dow n by a semitone
to produce two additional chords, the augmented and diminished
chord, as shown below:
M
Minor 3
rd
Major 3
Augmented chord - Caug
rd
Major 3
Diminished chord - Cdim
m
rd
Minor 3
rd
SOME CHORD TYPES
Suspended 4th - C
Perfect 5
Minor 7th - Cm7
Minor/major 7th - CmM7
th
th
Minor 7
sus
th
th
Perfect 4
Minor
chordFlatted 7
Minor
chordMajor 7
, flatted 5th - Cm7
th
(5)
7
7th - C
th
Major 7th - CM7
th
th
7
, flatted 5th - C7
th
th
7
, suspended 4th - C7sus4
(5)
Major
chordFlatted 7
Major
chordMajor 7
7th chordFlatted 5
The basic characteristics of the chord sound remain intact
even if we change the order of the notes to create different
inversions. For example, successive chords in a chord
progression can be connected smoothly by choosing the
appropriate inversions.
READING CHORD NAMES
Chord names tell you all you need to know about them
(apart from inversion/voicing). The chord name tells you
what the root of a chord is, whether it is a major, a minor or
a diminished one, whether it requires a major or a flatted
seventh, what alterations or tension it uses, and all that at a
glance.
Major 3
rd
Major 3
rd
Minor 3
rd
Minor 3
rd
th
th
Minor 7
chordFlatted 5
th
S
chordFlatted 7
MEMORY
ONE TOUCH SETTING
M1 M2 M3 M4
STYLE
OTS
TRANSPOSE, OCTAVE, SPLIT POINT
STYLE NUMBER, TEMPO, A.B.C. ON/OFF, NORMAL/
VARIATION STATUS
STORE
1. 4 memory banks are provided for you to store your
personal settings.
2. While holding down the [STORE] button, press the [M1]
button (or [M2]-[M4] buttons) to store the data into the M1
(or M2-M4) bank.
The data stored in the memory are as follows:
• VOICE DATA: VOICE 1, VOICE 2
• VOICE EFFECTS: TOUCH ON/OFF, SUSTAIN ON/OFF,
• ACCOMPANIMENT DATA:
eagletone.com
11

User’s manual EAGLETONE electronic keyboard MPW300 USB
5-- 10 1
ONE TOUCH SETTING
One Touch Setting is a powerful and convenient function that
allows you to reconfigure all settings instantly with the touch
of a single button. In this function, 4 types of settings (M1-M4)
can be loaded to match the current style.
ONE TOUCH SETTING
STORE
1. Press the [O.T.S.] button to turn this mode on. The O.T.S.
indicator lights up on the LCD.
2. Press any of the [M1]-[M4] buttons to load the relative type
of parameters suitable for the current style.
3. When the O.T.S. mode is on, the A.B.C mode is
automatically activated.
4. Press any of the [M1]-[M4] buttons which correspond to
your desired setting.
5. Press the [O.T.S.] button again to turn the mode off.
M1 M2 M3 M4
STYLE
OTS
3. Still in waiting mode, and once all your parameters
are set or revised, play the keyboard directly (in the
accompaniment range if you start by recording the
accompaniment) or press the [START/STOP] button to
start recording. The rhythm is indicated according to the
current tempo.
Stopping recording
METROPIANO DUAL TOUCH SUSTAIN
SONG
STYLE
A.B.C.MAIN/FILLINTRO/ENDSTART/STOP SYNC
1. STOPPING AUTOMATICALLY
2. The recording stops automatically if the memory is full.
The message «FULL» will then appear on the LCD.
3. STOPPING MANUALLY
4. While recording, press the
[RECORD] button again to stop
recording immediately.
5. When a style is playing, press the [INTRO/END] button if
you want the recording to stop automatically at the end of
the Ending pattern.
Playing back the recording
RECORDING
Starting recording
1. Press the [REC] button. The 4 beat icons flash
simultaneously to indicate recording is in waiting mode.
2. You can then select a voice, a style and a memory. The
accompaniment and the melody tracks can be recorded
simultaneously.
METROPIANO DUAL TOUCH SUSTAIN
Flash simultaneously
STYLE
SONG
STYLE
A.B.C.MAIN/FILLINTRO/ENDSTART/STOP SYNC
5-- 10 1
Press the [SONG] button, use the keypad or the
[+/YES] / [-/NO] buttons to select the 101
the recorded data.
NOTE: If you power off the keyboard, the recorded data would
be erased. If you would like to quit the recorded song play
mode, you could use numeric keypads or the [+/YES] / [-/NO]
button to choose other songs. Then it will enter to song mode
automatically.
st
song to play back
12
eagletone.com

EAGLETONE electronic keyboard MPW300 USB User’s manual
L & R
L & R
L & R
L & R
FUNCTION MENU
• Press the [FUNCTION] button to access the Function
menu. By default, the first option to appear in the list is
“TRANSPOSE”. You enter the menu on the option that was
last selected.
• Press the [FUNCTION] button repeatedly to select the option
you wish to set.
• Use the [+/YES]/[-/NO] buttons to set the parameter.
• Options and their parameters are given in the table here
below:
Option Display Range
Transpose XPS 00 -6…6 0
Octave OCT 00 -1…1 0
Beat BET 04 0, 2…9 4
Split Point SPT 19 1…61 19 (#F3)
MIDI Receive Channel
MIDI Transmit
Channel
Accompaniment
Volume
CHI
ALL
01…16, ALL ALL
CH0 01 01…16 01
AVL 20 00…31 20
Bank Selection BAK 01 01…12 8 01
Default
value
• Use the [+/YES]/[-/NO] buttons to set the octave value from
-1 to +1 semitones, only for the right-hand section of the
keyboard.
• Press the [+/YES] and [-/NO] buttons together to reset the
octave to its default value.
Beat
L & R
CHORD
DICT.
FUNCTION
LESSON
Press the [FUNCTION] button to enter the Beat submenu. The
current beat value appears on the LCD.
Use the
[+/YES]/[-/NO] buttons to set the number of beats per
bar. The values are 0, 2 to 9, that is to say a total of 9 values.
TEMPO
070
Split Point
L & R
CHORD
DICT.
FUNCTION
TEMPO
070
NOTE: If you do not press any button for 5 seconds after
having pressed the
[FUNCTION]
button, this mode will be quit
automatically.
Transposing
CHORD
DICT.
FUNCTION
LESSON
• Press the [FUNCTION] button to enter the Transpose
submenu. The current transposition value appears on the
LCD.
• Use the [+/YES]/[-/NO] buttons to set the transposition value
from -6 to +6 semitones, only for the right-hand section of
the keyboard.
• Press the [+/YES] and [-/NO] buttons together to reset the
transposition to its default value.
TEMPO
070
Octave
TEMPO
070
LESSON
CHORD
DICT.
FUNCTION
LESSON
Press the [FUNCTION] button to enter the Split Point submenu.
The current split point appears on the LCD.
Use the [+/YES]/[-/NO] buttons to set the split point. You may
also do this directly using the keyboard.
The key selected as the split point belongs to the left section
(accompaniment range).
MIDI Receive Channel
CHORD
DICT.
FUNCTION
LESSON
This allows you to set the MIDI reception channel (MIDI IN).
Use the [+/YES]/[-/NO] buttons to select one of the channels
1-16. The default value is ALL.
TEMPO
070
MIDI Transmit Channel
CHORD
DICT.
FUNCTION
TEMPO
070
• Press the [FUNCTION] button to enter the Octave submenu.
The current octave value appears on the LCD.
LESSON
eagletone.com
13

User’s manual EAGLETONE electronic keyboard MPW300 USB
L & R
This allows you to set the MIDI transmission channel (MIDI
OUT).
Use the [+/YES]/[-/NO] buttons to select one of the channels
1-16. The default value is 001.
Accompaniment Volume
CHORD
DICT.
FUNCTION
LESSON
• Press the [FUNCTION] button to enter the Accompaniment
Volume submenu. The current accompaniment volume
value appears on the LCD, ranging between 0 and 31
(default is 20).
• Use the
[+/YES]/[-/NO] buttons to set the accompaniment
volume value.
• Press the [+/YES]/[-/NO] buttons together to switch the
accompaniment off and the message “ACC OFF” will
appear on the LCD.
TEMPO
070
Bank Selection
L & R
CHORD
DICT.
FUNCTION
LESSON
• Press the [FUNCTION] button to enter the Bank Selection
submenu.
• The message “BNK01” appears on the LCD.
• The transmitted MIDI sound bank value can be set between
1 and 128.
TEMPO
070
SONG
There are 100 songs in total (see Appendix 3 – Song list).
Each song can be practiced in MELODY OFF mode.
SONG
STYLE
SONG
STYLE
1. Starting/stopping a song
Press the [SONG] button to activate the Song mode. The
SONG icon appears on the LCD. All the songs are played
one after the other.
Press the [START/STOP] button again to stop the song.
Doing so does not exit the Song mode.
2. Loop mode
Press a second time the [START/STOP] button to read the
song in loop.
3. Select a song.
4. Rewind [«], Fast Forward [»] and Pause [ıı]
During song playback, press the [»] button to fastforward the song.
Press the [«] to rewind the song (based on measure).
Press [II] to pause the song.
When the song is stopped, press the [STYLE], [VOICE] or
[DUAL] button to exit the Song mode.
TEMPO
A.B.C.MAIN/FILLINTRO/ENDSTART/STOP SYNC
A.B.C.MAIN/FILLINTRO/ENDSTART/STOP SYNC
14
Lesson Mode
Learning a new song implies mainly playing the right notes at
the right time. Therefore, the learning mode focuses on these
two aspects to help you to play a song.
eagletone.com
L & R
LESSON
CHORD
DICT.
TEMPO
L & R
LESSON
CHORD
DICT.

EAGLETONE electronic keyboard MPW300 USB User’s manual
L & R
1. While in Song mode (but on stop), press the [LESSON]
button to activate the Lesson mode.
2. Three levels allow you to evaluate your performance.
You can use the [R] or [L] button to select which hand
to practice. If neither hand is selected, the keyboard will
choose the right hand automatically.
3. If both [R] and [L] are selected, you can practice the
lesson with both hands.
NOTE: The contents for practising with left hand varied
according to different types of songs. If you choose a chord
song, the left hand practices the chord, otherwise, the left
hand will be used to practise the melody.
When a song is playing, the notes and keyboard displayed
on the LCD indicate the melody and chord position, the
numbered musical notation displayed on the LCD shows the
last note played by the RIGHT track, and it will be convenient
for you to practice.
Lesson 1 – Practicing the rhythm
LESSON
CHORD
DICT.
SONG
A.B.C.MAIN/FILLINTRO/ENDSTART/STOP SYNC
COUNT
4. If [L] is selected, only the right hand is played. The song
proceeds to the next note only when the notes of the left
hand are played correctly.
5. If [R] and [L] are selected, the song keeps playing only
when the notes of both hands are played correctly.
6. Once the lesson is over, you receive a grade for your
performance.
Lesson 3 – Melody Off
1. While in LESSON 2 mode, press the [LESSON] button to
activate the LESSON 3 mode. In this mode, the grading
takes into account both rhythm and melody.
2. Press the [START/STOP] button to start practicing.
3. If [R] is selected, the right hand melody is muted.
Contrarily to LESSON 1, the right notes must be played to
produce the correct melody.
4. If [L] is selected, the left hand chords and melody are
muted. Contrarily to LESSON 1, the right chords or
melody must be played to produce the correct chords or
melody.
5. If [R] and [L] are selected, both hands are muted and only
the accompaniment can be herd. Both hands must be
played correctly to produce the song.
6. Once the lesson is over, you receive a grade for your
performance.
Grading
The three lessons offer a four-level grade: OK, GOOD, VERY
GOOD and EXCELLENT.
Once the grade is attributed, the song is played again in
LESSON mode.
1. Press the [LESSON] button to activate the Lesson 1 mode.
The Lesson 1 indicator lights up on the LCD. In this mode,
the grading is based solely on your rhythmic accuracy and
does not pay attention to the accuracy of the note.
2. Press the [START/STOP] button to start practicing.
3. If [R] is selected, the melody of the right hand will be
muted and you will have to follow the time value of the
right hand. As long as the time value is correct, the
melody will be heard.
4. If [L] is selected, the melody and the chords of the left
hand will be muted and you will have to follow the time
value of the left hand. As long as the time value is correct,
the melody/chords will be heard.
5. If [R] and [L] are selected, the melody of both the left and
right hands will be muted. You will have to follow the time
value of both the left and right hands and as long as the
time value is correct, the melody will be heard.
6. Once the lesson is over, you receive a grade for your
performance.
Lesson 2 – Practicing the melody
1. Press the [LESSON] button again to activate the Lesson 2
mode. In this mode, the grading is based on your melodic
accuracy and does not take into account the accuracy of
the rhythm. The song proceeds to the next note as long as
you play the correct note.
2. Press the [START/STOP] button to start practicing.
3. If [R] is selected, only the left hand is played automatically
until the first note of the right hand is played. The song
proceeds to the next note only when the correct note is
played.
eagletone.com
15

User’s manual EAGLETONE electronic keyboard MPW300 USB
L & R
LESSON
Chord type
Chord type
CHORD
DICT.
Chord root
C
M7
Chord root
Accompaniment range
Split point
Chord type Chord root
Chord name (root and type)
Individual notes
of chord (keyboard)
Notation of chord
Chord dictionary
The Chord Dictionary is a built-in “chord book” that displays
the notes which make up the chords. This is a perfect tool
to learn the names of certain chords and how to play them
instantly.
1. Press the [CHORD DICT./R] button to activate the dictionary
mode. “dict” appears on the LCD. In this mode, the keys
on the right-hand section of the keyboard can help define
a chord type and its root note.
2. For example, if you want to play a CM7 chord, press the
C key in the Chord Root section of the keyboard (the note
will not sound). The root note thus defined is displayed on
the LCD.
3. Press the M7 key in the Chord type section of the
keyboard (the note will not sound). The notes that you
should play to obtain the specified chord (by defining the
root and chord type notes) are displayed on the LCD on
the staff area and placed on the keyboard area.
4. Once the type of chord and its root note are confirmed, the
name of the chord and its fingering on the keyboard are
displayed on the LCD. A bell rings if you play it correctly.
5. Press the [CHORD DICT./R] button again to quit the Chord
Dictionary mode.
6. Specify and play the type and root note of the chord you
would like to produce on the keyboard as indicated on the
right:
7. The A.B.C. functionality might recognize the following
fingerings as other chords: B6, Bb6, B6(9), Bb6(9), B aug,
Bbaug, Bm6, Bbm6, Adim7, Bb dim7, Bdim.
NOTE: The notes you play to define the root note and the
chord type are not heard.
If you play the chord correctly, you will hear applause. If you
do not play it correctly, you will hear a bass sound.
The chord must be played to the left of the split point (in the
Accompaniment range).
MIDI FUNCTION
What is MIDI?
1. MIDI stands for «Musical Instrument Digital Interface».
This is the universal digital standard that allows
computers and digital musical instruments to
communicate.
2. USB connection can be used to exchange MIDI data with a
computer or any other USB host supporting audio USB via
a USB cable.
3. The keyboard can only be connected to a PC.
4. You can use the keyboard as a sound generator: data
recorded on the PC or a USB host can be reproduced by
the keyboard.
NOTE: During the playback of a recorded song and when a
style is playing, the MIDI IN function cannot be used as errors
will occur on the song you are playing.
USB Connection
System requirements
• CPU: 300MHz or higher, Pentium 2
• Memory: 64MB or more
• CD Drive: 24X CD-ROM
• Operating System: WINDOWS 2000/XP
Connection method
• Connect a standard USB cable (not provided) between the
USB port on the rear panel of the instrument and the USB
port on your computer.
Precautions for USB connection
Please observe the following precautions when connecting
the instrument to a PC with a USB cable. Failing to do so
might cause the instrument and/or the computer to crash
or freeze, and possibly cause data corruption or loss. If the
instrument or the computer crashes or freezes, turn off both
devices and turn them back on after a couple of seconds.
CAUTION!
• Activate the computer from a sleep/suspended mode
before connecting the USB cable.
• Connect the USB cable to the instrument before turning the
instrument on.
16
eagletone.com

EAGLETONE electronic keyboard MPW300 USB User’s manual
MIDI Applications
1. MIDI data recorded on a computer can be played by the keyboard.
2. In order to transfer songs between your keyboard and your computer, you will have to install third party applications.
3. You do not have to install any USB drivers in WINDOWS 2000/XP environments.
SPECIFICATIONS (All specifications and design are subject to change without prior notice.)
Liquid Crystal Display screen Multi-functional LCD
Keys 61 keys with Touch Response
Polyphony 32-note polyphony (max)
Voices 157
Styles 100
Demo songs 100 songs; 2 demos
Control buttons Master Volume, Tempo+/-, R/Chord Dictionary, L, Lesson, Voice, Style, Song, O.T.S., M1-M4,
Store, Start/Stop, Sync, Intro/End, Main/Fill, A.B.C., Record, Dual, Touch, Sustain, Metronome,
Demo, +/YES, -/NO, Piano
Accompaniment Control Start/Stop, Sync, Intro/End, Main/Fill
Song Control Start/Stop, Pause, Rew, FF
Record Function Record
Panel Memory 4 Memory storage
Power supply 12V
Connectors DC Power, Headphones, Sustain, USB
Speakers 4Ω 3W x 2
Dimensions 948.2 (L) x 347.8 (W) x 136.2 (H)mm
Weight 4.7kg (without batteries)
Accessories Adaptor, Music Rest, Manual
TROUBLESHOOTING
Problem Likely cause and solution
Whether the instrument is turned on or off, a popping sound is
sometimes heard.
There is no sound even when the keyboard is played or when a
song or style is being played.
The volume is too low.
The sound quality is poor.
The rhythm stops unexpectedly or is not responding.
The recorded data of the song are not played correctly.
The LCD goes suddenly dark, and all panel settings are reset.
This is normal and indicates that the instrument is receiving
electrical power.
Check if any cable or headphones set is connected to the
PHONES jack on the rear panel. When a set of headphones is
plugged into this jack, no sound comes out of the speakers.
Check whether the AC supply voltage is low.
eagletone.com
17

User’s manual EAGLETONE electronic keyboard MPW300 USB
VOICE LIST
PIANO
01 Grand Piano
02 Bright Piano
03 El Grd Piano
04 Honky-Tonk Piano
05 Elec Piano 1
06 Elec Piano 2
07 Harpsichord
08 Clavi
MALLET
09 Celesta
10 Glockenspiel
11 Music Box
12 Vibraphone
13 Marimba
14 Xylophone
15 Tubular Bell
16 Dulcimer
ORGAN
17 Drawbar Organ
18 Jazz Organ
19 Rock Organ
20 Church Organ
21 Reed Organ
22 Accordion
23 Harmonica
24 Tango Accordi
GUITAR
25 Classic Guitar
26 Steel Guitar
27 Jazz Guitar
28 Clean Guitar
29 Muted Guitar
30 Overdriven Guitar
31 Distortion Guitar
32 Guitar Harmonic
BASS
33 Acoustic Bass
34 Finger Bass
35 Picked Bass
36 Fretless Bass
37 Slap Bass 1
38 Slap Bass 2
39 Synth Bass 1
40 Synth Bass 2
STRINGS
41 Violin
42 Viola
43 Cello
44 Contrabass
45 Tremolo Strings
46 Pizzcato Strings
47 Harp
48 Timpani
STRING ENSEMBLE
49 Strings 1
50 Strings 2
51 Synth Strings 1
52 Synth Strings 2
53 Choir Aahs
54 Voice Ooh
55 Synth Voice
56 Orchestra Hit
BRASS
57 Trumpet
58 Trombone
59 Tuba
60 Muted Trumpet
61 Hor n
62 Brass Ensemble
63 Synth Brass 1
64 Synth Brass 2
REED
65 Soprano Sax
66 Alto Sax
67 Tenor Sax
68 Baritone Sax
69 Oboe
70 English Horn
71 Bassoon
72 Clarinet
PIPE
73 Piccolo
74 Flute
75 Recorder
76 Pan Flute
77 Blown Bottle
78 Shakuhachi
79 Whistle
80 Ocarina
LEAD
81 Square
82 Sawtooth
83 Calliope
84 Chiff
85 Charang
86 Voice
87 Fifths
88 Bass Lead
PAD
89 Fantasia
90 Warm
91 Poly Synth
92 Choir
93 Bowed
94 Metallic
95 Halo
96 Sweep
EFFECTS
97 Rain
98 SoundTrk
99 Crystal
100 Atmosphr
101 Bright
102 Goblins
103 Echoes
104 Sci-Fi
ETHNIC
105 Sitar
106 Banjo
107 Shamisen
108 Koto
109 Kalimba
110 Bag Pipe
111 Fiddle
112 Shanai
PERCUSSIVE
113 Tinkle Bell
114 Agogo
115 Steel Drums
116 Woodblock
117 Taiko Drum
118 Melodic Tom
119 Synth Drum
120 Reverse Cymbal
SOUND EFFECTS
121 Gt Fret Noise
122 Breath Noise
123 Seashore
124 Bird Tweet
125 Telephone Ring
126 Helicopter
127 Applause
128 Gunshot
SYNTH VOICE
129 0elep
130 Fzpiano
131 Ep3
132 Ep4
133 Ep5
134 Harppian
135 Clavr2
136 Clavr3
137 Organbox
138 Elorgan
139 Churc2
140 Synorgan
141 Altoel
142 Fzguitar
143 Synelgt
144 Picelbas
145 Elviolin
146 Brassfm
147 Fmlead
148 Fantalfo
149 Polyaa2
150 Bowedg2
151 70elpad
DRUMKIT
152 StdKit
153 PowerKit
154 DanceKit
155 808Kit
156 BrushKit
157 OrchKit
18
eagletone.com

EAGLETONE electronic keyboard MPW300 USB User’s manual
STYLE LIST
8/16 BEAT
01 8 Beat 1
02 8 Beat 2
03 8 Beat 3
04 8 Beat 4
05 60’s 8 Beat
06 8 Beat Ballad
07 8 Beat Rock
08 16 Beat 1
09 16 Beat 2
10 16 Beat Pop
11 16 Beat Shuffle
12 Ballad
13 Slow Ballad
14 16 Beat Ballad
15 Unplugged
ROCK
16 Rock
17 Pop Rock
18 Fast Rock
19 Slow Rock 1
20 Slow Rock 2
21 Rock & Roll
22 Heavy Metal
23 Blues Boogie
24 Blues
25 Shuffle
26 Blues Shuffle
27 Rock Shuffle
28 Charlston
DANCE
29 Disco 1
30 Disco 2
31 Disco Funk
32 Dance
33 House 1
34 House 2
35 Rap
36 Euro Beat
37 Hip Hop
38 Techno
SOUL & FUNK
39 Funky Pop
40 Jazz Funk
41 Cool Funky
42 Soul 1
43 Soul 2
44 Soul Shuffle
45 Soul Blues
46 R & B
47 6/8 Gospel
48 Pop Groove
JAzz
49 Swing
50 Cool Jazz
51 Pop Swing
52 Swing Fox
53 Big Band
54 Big Band Meduim
55 Jazz Waltz
56 Ragtime
57 Dixeland
58 Quick Step
COUNTRY
59 Country 1
60 Country 2
61 Pop Country
62 Country Rock
63 Country Folk
64 3/4 Country
65 Country Waltz
66 Country Shuffle
67 Country Boogie
68 Country Blues
69 Country Quick Step
70 Bluegrass
LATIN
71 Bossa Nova 1
72 Bossa Nova 2
73 Rhumba
74 Pop Rhumba
75 Cha Cha
76 Pop Cha Cha
77 Tango
78 Jazz Samba
79 Reggae
80 Pop Reggae
TRADITIONAL
81 March 1
82 March 2
83 German March
84 6/8 March
85 Polka
86 Pop Polka
87 Waltz
88 Slow Waltz
89 Vienna Waltz
90 Musette
PIANO
91 8 Beat
92 Ballad
93 Boogie
94 Jazz
95 Swing
96 Jazz Waltz
97 Twist
98 March
99 6/8 March
100 Waltz
eagletone.com
19

User’s manual EAGLETONE electronic keyboard MPW300 USB
SONG LIST
01 -14 CLASSICAL
01 Cannon
02 Thais Meditation
03 Old France
04 Minuet
05 Ode to Joy
06 Wiegenlled
07 ”the Surprise“ Symphony
08 Swan Lake
09 Spring from “the Four Seasons“
10 Habanera from “Carmen”
11 Joy to the World
12 Toy Symphony
13 Humoreske
14 Kuckuckswalzer
15-40 FAVORITE
15 Long, Long Ago
16 Old Folks At Home
17 Oh! Susanna
18 Jeannie With the Light Brown Hair
19 Bill Bailey Won’t You Come Home
20 Annie Laurie
21 From the New World
22 The Yellow Rose of Texas
23 Ave Maria
24 My Old KentuckY Home
25 Turkey In the Straw
26 Deck the Halls
27 Grandfather’s Clock
28 America the Beautiful
29 The Sideway
30 The Entertainer
31 The Old Gray Mare
32 Aloha Oe
33 Solvelg’s Song
34 Camptown Races
35 Carrv Me Back to Old Viainia
36 The Blue-Bells of Scotland
37 O’Solo Mio
38 Jingle Bells
39 Battle Hymne of the Republic
40 Silent Night
41-66 FOLK
41 OroneK
42 Aula Lee
43 House of the Rising Sun
44 Danny Boy
45 I’ve Been Working on the Railroad
46 In the Rain
47 She Wore a Yellow Ribbon
48 My Bonnie
49 Yankee Doodle
50 Red River Valley
51 Auld Lang Syne
52 When the Saints Go Marching In
53 Twinkle Twinkle Little Star
54 Happy Birthday to You
55 Little Brown Jug
56 Michael Row the Boat Ashore
57 Old King Cote
58 Jamaica Farewell
59 TPORKA
60 Cielito Lindo
61 If You’re Happy And You Know it, Clap Your Hands
62 American Patrol
63 When Johnny Comes Marching Home
64 Green Sleeves
65 Santa Lucla
66 Szla Dzleweczka
67-80 KID
67 Angels We Have Heard on High
68 Skip to My Lou
69 London Bridge is Falling Down
70 Humpty Dumpty
71 Home on the Range
72 This Old Man
73 Butterfly
74 Ten Little Indians
75 Polly-Wolly-Doodle
76 Santa Claus is Coming to Town
77 Sippin’ Cider Through a Straw
78 La Cucaracha
79 Home Sweet Home
80 Up on the House Top
81-85 BALLROOM
81 Examine one Gram of Dance Musical in the storehouse
82 Samba
83 Tango of Cuba
84 Russian
85 Polka
86-100 PIANO & KEYBOARD
86 Four Little Swans
87 Did You Ever See a Lassie
88 Spring
89 Impromptu
90 Gavotte
91 Nocturne
92 Pizzicato Polka
93 Musical Moments
94 Reggae
95 All Kind of My Everything
96 Valse No. 6 ”Petit Chien”
97 Rondeau
98 Chrysanf
99 Invention à Deux Voix
100 Jesus, Saviour Pilot me
20
eagletone.com

EAGLETONE electronic keyboard MPW300 USB User’s manual
DEMO LIST
Number Name
01 POP
02 CHA CHA
CHORD LIST
Chord name Abbreviation Normal Voicing Chord (C) Display
Major [M] 1-3-5 C C
Major sixth [6] 1-(3)-5-6 C6 C6
Major seventh [M7] 1-3-(5)-7 CM7 CM7
Major ninth [M(9)] 1-2-3-5 CM(9) CM(9)
Augmented [aug] 1-3Minor [m] 1Minor sixth [m6] 1Minor seventh [m7] 1Minor seventh flatted fifth [m7
Minor major seventh [mM7] 1Diminished [dim] 1Diminished seventh [dim7] 1Seventh [7] 1-3-(5)Seventh suspended fourth [7sus4] 1-4-5Seventh thirteenth [7 (13)] 1-3-(5)-6Suspended fourth [sus4] 1-4-5 Csus4 Csus4
b5] 1- b3-b5-b7 Cm7 b5 Cm7b5
b5 Caug Caug
b3-5 Cm Cm
b3-5-6 Cm6 Cm6
b3-(5)-b7 Cm7 Cm7
b3-(5)-7 CmM7 CmM7
b3-b5 Cdim Cdim
b3-b5-6 Cdim7 Cdim7
b7 C7 C7
b7 C7sus4 C7sus4
b7 C7 (13) C7 (13)
eagletone.com
21

User’s manual EAGLETONE electronic keyboard MPW300 USB
MIDI IMPLEMENTATION CHART
FUNCTION TRANSMITTED RECOGNIzED REMARK
Basic Default
Channel Changed
Mode Default
Messages
Altered
Note
Number: True voice
Velocity Note on
Note off
Aftertouch Keys
Chs
Pitch Bend
Control Change 0
1
5
6
7
10
11
64
65
66
67
80
81
91
93
120
121
123
Program
Change: True #
System exclusive
Common : Song Position
Messages : Song Select
: Tune
Real Time : Clock
messages : Commands
AUX Messages: LOCAL ON/OFF
: All Notes Off
: Active sensing
: Reset
Note:
1
1-16
***********
18-114
***********
9nH,d=1-127
(9nH,d=0)
*********** 0-127
*1 *1
*1 A FAH message is transmitted when the accompaniment is started.
A FCH message is transmitted when the accompaniment is stopped.
When a FAH message is received, the accompaniment is started.
When a FCH message is received, the accompaniment is stopped.
All
1-16
3
3
0-127
0-127
9nH,d=1-127
(9nH,d=0; 8nHn,
d= 0-127)
Bank Select
Modulation
Portamento Time
Data Entry
Volume
Pan
Expression
Sustain Pedal
Portamento On/Off
Sostenuto Pedal
Soft Pedal
Reverb program
Chorus program
Reverb Level
Chorus Level
All Sound Off
Reset All Controllers
All Notes Off
= Yes
= No
Mode 1: OMNI ON, POLY Mode 2: OMNI ON, MONO
Mode 3: OMNI OFF, POLY Mode 4: OMNI OFF, MONO
22
eagletone.com
 Loading...