

Page 1
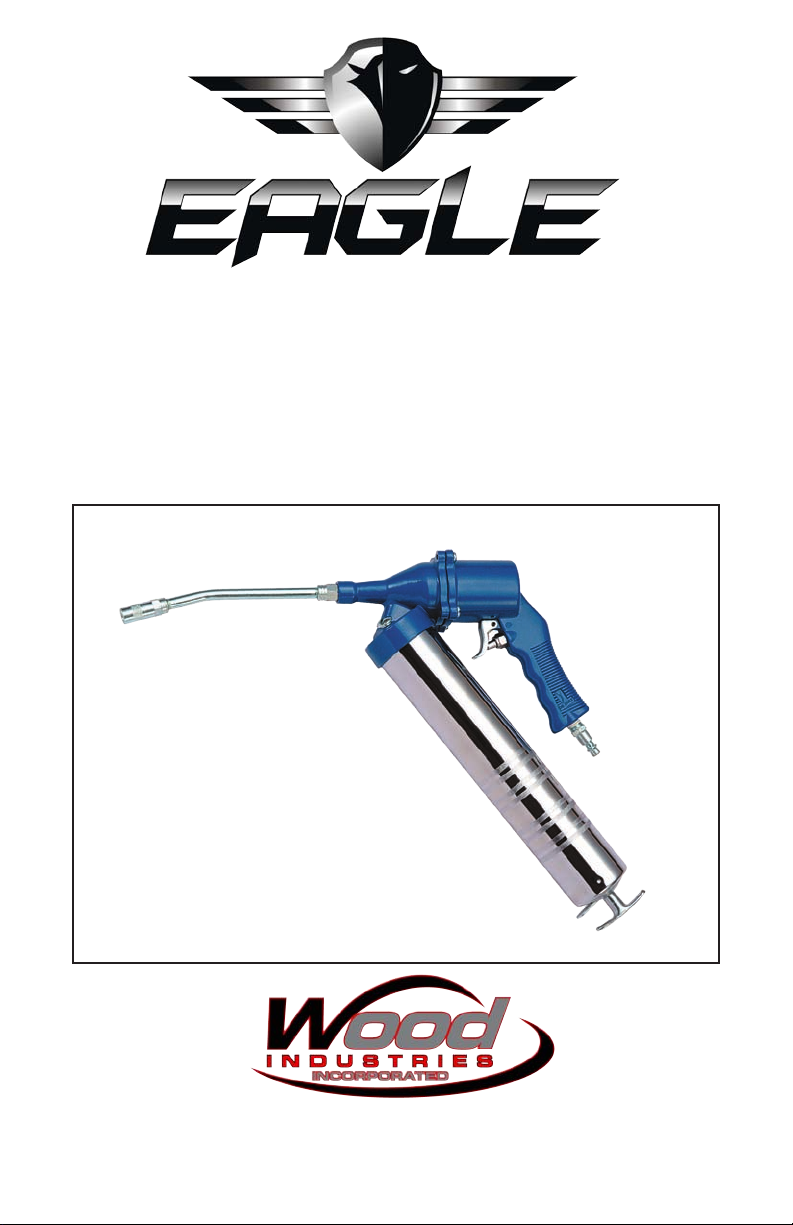
Single Shot
AiR oPeRAteD gReASe gUn
MODEL EGA700
OWNERS MANUAL
www.eaglecompressor.com
1-800-551-2406
Page 2
ReAD the entiRe MAnUAl
BeFoRe PUtting thiS tool
in SeRViCe
Limited Air Tool Warranty
Eagle warrants air tools of its own manufacture against defects in workmanship and
materials under normal use and service for twelve(12) months from date of purchase by
original purchaser. Parts are covered by this warranty for ninety(90) days from date of
purchase.
The following expandable items are warranted against defects in workmanship and
materials for ninety(90) days from date of purchase: sockets, screw driver bits and
accessories, sanding and back-up pads, impact mechanism, chisels and their retain-
ers, cutting and grinding accessories and any other expandable items not specically
mentioned.
Normal wear and tear, service or maintenance items such as O-rings, springs, gaskets,
packing or seals, uid needles and nozzles, motor vanes or blades, collets, chucks or
any such item not specically mentioned are covered for ninety(90) days from date of
purchase warranty only.
Eagle will, at its sole discretion, repair or replace the tool or parts that have failed within
the warranty period. If repairs are considered, they will be scheduled in the normal
course of the workow at its service centre.
Not covered under this warranty:
• Indirect or consequential loss or damage or expenses resulting from the
failure or malfunction of this tool.
• Accidents or failures resulting from owners neglect, abuse or failure to operate and maintain the tool in accordance with the instructions provided in the
owner’s manual.
• Tampering, removal or alterations of safety devices will void this warranty.
• Blemishes or cosmetic defects which do not effect the tool’s operation.
• Tools used industrially, commercially or in rental applications.
To claim warranty the owner/purchasers must provide proof of purchase and maintenance records, and when requested ship or deliver at owner/purchasers expense and
cost to Eagle’s factory or service centre
Wear hearing protection.
Wear eye protection.
Wear respiratory protection.
2
2
Read the instruction manual
Page 3
TABLE OF CONTENTS
Limited Warranty ...............................................................................................2
Description.........................................................................................................3
Inspection ..........................................................................................................3
Before Using This Air Tool .................................................................................3
Safety Instructions .............................................................................................4
Tool Specications .............................................................................................4
Instructions for lling grease gun .......................................................................5
Parts Breakdown ...............................................................................................6
Troubleshooting .................................................................................................7
DESCRIPTION
Eagle Air tools are manufactured in accordance with our strict specications and designed
to be used in light duty professional or serious DIY applications. When used in accordance
with warnings and instructions given in this manual, and when properly applied and maintained they should give you many years of productive and trouble free service.
This tool is NOT designed for professional, production or industrial use, when used in these
applications its life expectancy will be signicantly shortened and the warranty will be void.
INSPECTION
Upon receipt of your new tool, carefully check for any shipping damage. If your new tool is
damaged in shipping you need to le a claim with the carrier at once, and before contacting
Eagle’s customer service department.
Also carefully check to make sure all accessories (if included) are with the tool. Make sure
any loose bolts, ttings etc. are tightened before you put this tool into service.
BEFORE USING THIS AIR TOOL
To ensure long life be sure to oil the tool daily. Pour 4 drops of Eagle air tool (SEA 20 non
detergent) oil into the air inlet, and then run the tool for a few seconds to clean.
PLEASE USE EAGLE SEA 20 NON DETERGENT OIL
Wear hearing protection.
Wear eye protection.
Wear respiratory protection.
Read the instruction manual
3
3
Page 4
SAFETY INSTRUCTIONS
You should operate this air tool only if you have read this entire manual, and understand
its content, and you are familiar with safety and proper use when operating this equipment.
This air tool is part of a high pressure compressed air system, the following safety precautions must be followed at all times.
1) Always wear protective goggles or safety glasses, hearing protection, protective gloves
and footwear.
2) Do not wear loose clothing or jewelry, and ensure long hair is protected with a proper
cover.
3) Do not exceed the maximum operating pressure of this tool or any component in the
air delivery system.
4) Do not depress the trigger when connecting this tool to the air supply system.
disconnect the tool from the air supply system when changing attachments.
5) Do not point the air tool at yourself or any other person.
6) Never use Oxygen or combustible gases to operate this tool. Use only lubricated compressed air regulated to the recommended operating pressure for this tool.
7) Disconnect this tool from its air supply before attempting to install or change attachments or before attempting any service. Also disconnect the air tool from the compressed air system when not in use.
8) Excessive use of this tool can cause injury due to vibration and fatigue. Do not use this
tool in awkward positions, and avoid repetitive work motions. When feeling discomfort,
numbness, fatigue, tingling or pain stop work immediately and seek medical treatment
and advice.
9) Inspect air hoses, and discard if in worn, weak or damaged condition. Make sure all air
connections are tight and secure.
10) Keep hands away from moving parts
11) Do not use this air tool if intoxicated, if you are using drugs or medication causing
drowsiness or if you are tired.
12) Do not leave this air tool unattended, and disconnect from the air delivery system when
not in use. Children must be supervised in the proximity of any air tool or work area.
3) Follow air supply manufacturer
1
and other accessories. Do not install quick couplers directly on air tool, it puts unnecessary strain on the air inlet threads, instead install a short length of air hose to the tool.
Do not over tighten tting connecting to the air tool; this could cause the housing to
crack. Use Teon tape or pipe sealant carefully to prevent excess from entering the air
tool.
’s recommendation for connection of regulators, lters
Always
TOOL SPECIFICATIONS
Pressure Range.................................................................................................30-150 PSI
Recommended Working Pressure ............................................................................90 PSI
Pressure Ratio ..........................................................................................................40 to 1
Output Pressure Range ...........................................................................1200 to 6000 PSI
Air inlet (NPT) ................................................................................................................1/4”
Hose size (ID) ................................................................................................................3/8”
Wear hearing protection.
Wear eye protection.
Wear respiratory protection.
4
Read the instruction manual
Page 5
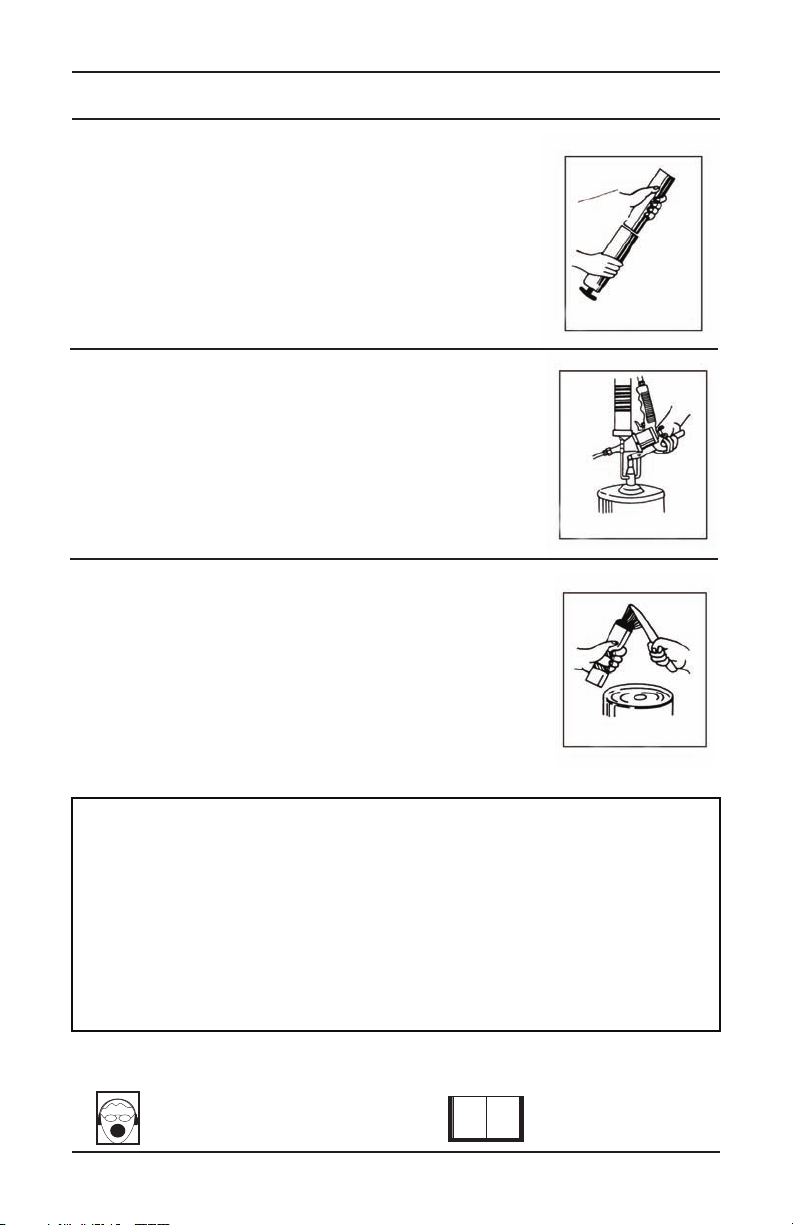
INSTRUCTIONS FOR FILLING GREASE GUN
CARTRIDGE LOADING:
A) Remove the gun head from the container tube.
B) Draw back the plunger handle entirely.
C) Insert open end of cartridge into container tube and push
all the way in. Remove the seal or pull tab end from the
cartridge.
D) Reassemble the gun head to the container tube. Press
the catch plate and release the piston rod. Pull down the
plunger handle.
LOADING WITH FILLER PUMP:
A) Draw back the plunger handle entirely.
B) Unscrew the round plug. Insert ller spout from the ller
pump.
C) Operate the ller pump to ll the container tube.
D) Disconnect the grease gun from the ller pump.
E) Press the catch plate and release the piston rod. Pull down
the plunger handle.
BULK FILLING:
A) Remove the gun head from the container tube.
B) Draw back the plunger handle entirely. Fill bulk grease into
empty container tube.
C) Reassemble the gun head to the container tube. Press
the catch plate and release the piston rod. Pull down the
plunger handle.
IMPORTANT:
If cartridge loading is used, it could cause the rubber plunger to deform and to dry-out.
If you change to a different loading method, it is normal for a small amount of grease to
seep out of the bottom of the container tube.
In order to avoid this problem, determine which method of load will be most frequently
used, and if loading methods are changed regularly, please have spare plungers on
hand and replace when loading method is changed.
Wear hearing protection.
Wear eye protection.
Wear respiratory protection.
Read the instruction manual
5
Page 6
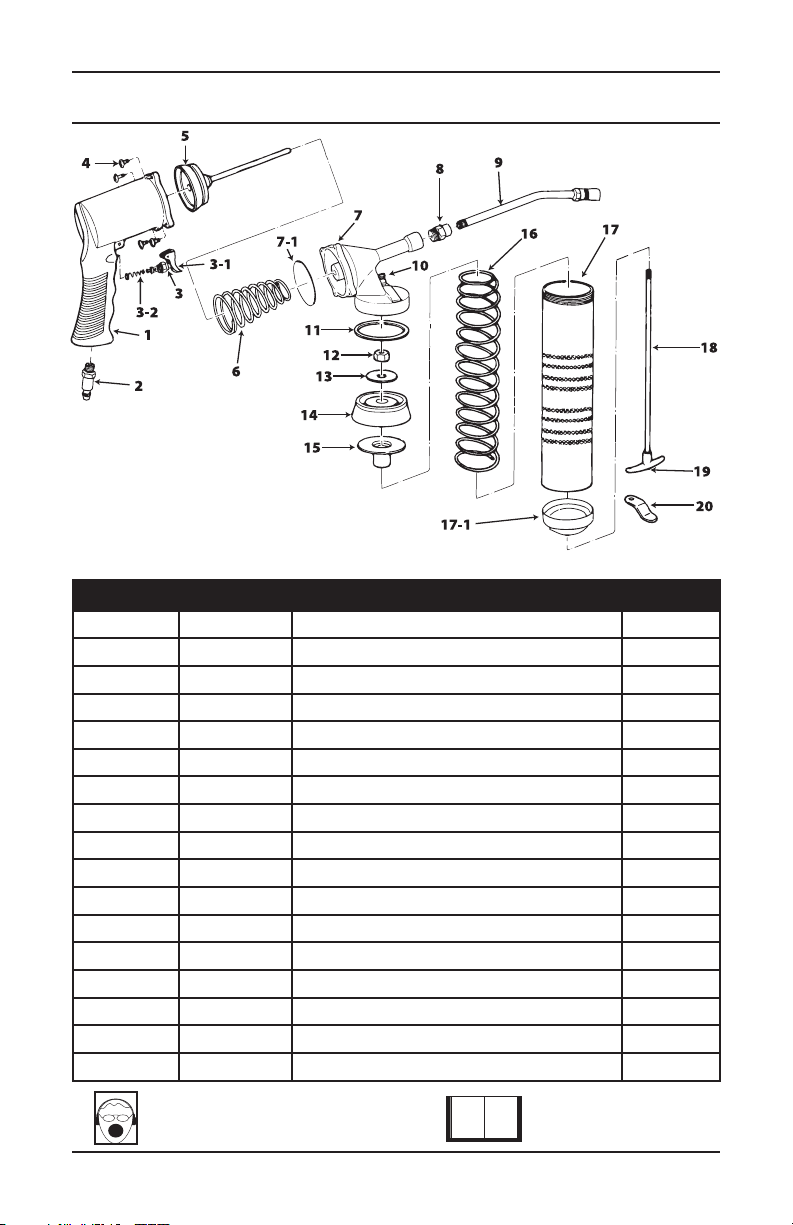
PARTS BREAKDOWN
INDEX PART DESCRIPTION QTY
1 700-1 Grip 1
2 700-2 Fitting 1
3 700-3 Switch 1
3-1 7003-2 700-
4 700-4 Body screw 4
5 700-5 Air plunger 1
6 700-6 Piston spring 1
7 700-1 Housing cap 1
7-1 700-1-1 Housing O-ring 1
8 700-8 Adapter 1
9 700-9 Spout 1
10 700-10 Round plug 1
11 700-11 Gasket 1
12 700-12 Plunger nut 1
13 700-13 Plunger washer 1
14
Wear hearing protection.
Wear eye protection.
Wear respiratory protection.
3-1 Trigger and pin 1
3-2 Switch spring 1
700-14 Plunger 1
Read the instruction manual
6
Page 7
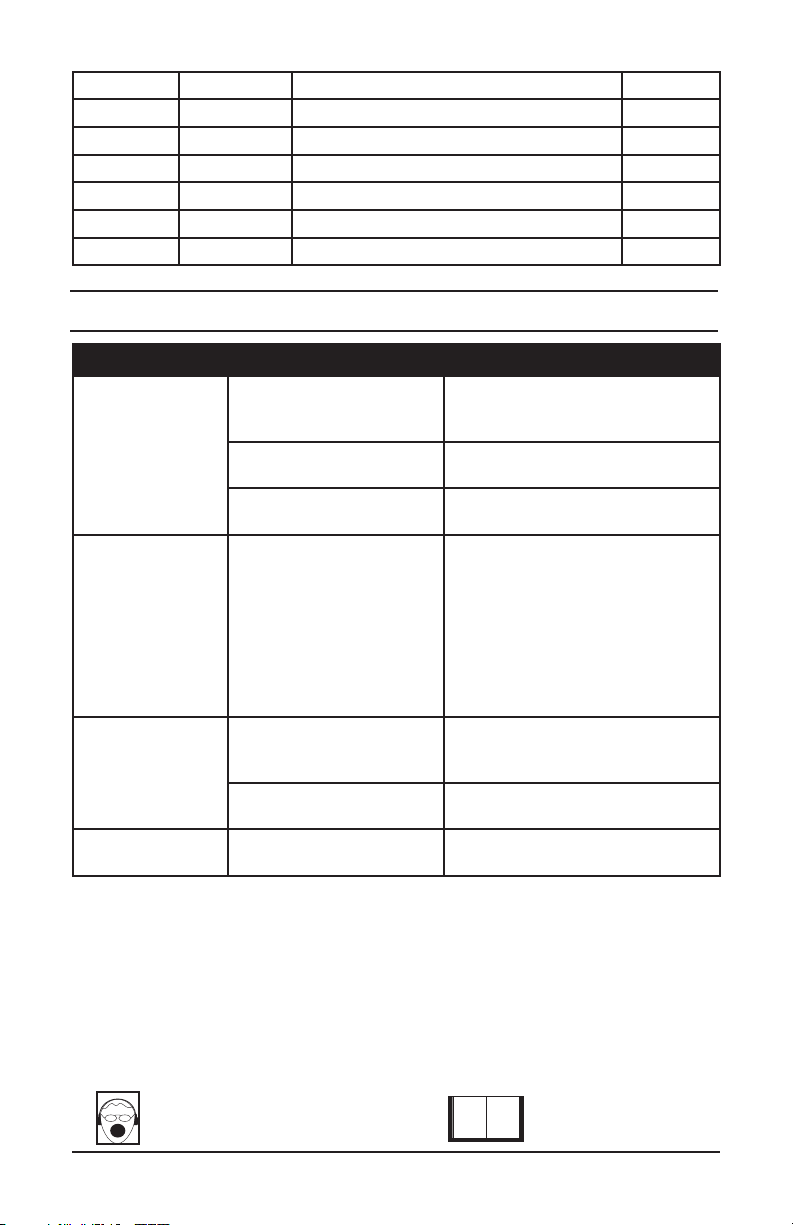
15 700-15 Plunger Gasket 1
16 700-16 Tube spring 1
17 700-17 Container tube 1
17-1 700-17-1 Bottom cap 1
18 700-18 Plunger rod 1
19 700-19 Plunger handle 1
20 700-20 Catch plate 1
TROUBLESHOOTING
SYMPTOMS CAUSE REMEDY
Grease gun does
not run smoothly or
loses its prime.
Grease gun operates normally, but
no output.
Plunger does not
operate grease
cartridge.
Grease leaks from
spout.
Lack of lubrication. Lubricate as per instructions.
Dirt in tool. Clean tool and lubricate after clean-
Rotor blades worn or motor
bearing worn or dirty.
Air pockets inside container
tube.
Size of the cartridge not
standard.
The end of cartridge tube
damaged or irregular.
Spout not tightened securely.
ing.
Replace blades, inspect clean or
replace bearing.
Unscrew spout from grease gun
and unscrew container tube 1 or 2
turns, draw back plunger and rotate.
release plunger into the container
to help expel air pockets. Press
trigger to check for grease ow
repeat above steps in necessary.
Re-tighten container tube re-attach
spout securely.
Check size of cartridge and replace
if necessary.
Check end of cartridge and x or
replace cartridge.
Tighten Spout securely.
Wear hearing protection.
Wear eye protection.
Wear respiratory protection.
Read the instruction manual
7
Page 8

Wood Industries, Inc.
manufactures and distributes
top of the line, high quality
AIR COMPRESSORS
AIR COMPRESSOR PARTS
AIR POWERED ACCESSORIES
1-800-551-2406
www.eaglecompressor.com
 Loading...