

Page 1
Portable 1080P High Definition Multimedia Player
X5
User Manual
1
Page 2

Table of Contents
1. Introduction of Product. . . . . . . . . . . . . . . . . . . . . . . . . . . . . . . . . . . . . . . . . . . . . 3
1.1 Preface. . . . . . . . . . . . . . . . . . . . . . . . . . . . . . . . . . . . . . . . . . . . . . . . . . . . . . . . . . . . 3
1.2 Packing List. . . . . . . . . . . . . . . . . . . . . . . . . . . . . . . . . . . . . . . . . . . . . . . . . . . . . . . . 3
1.3 Cautions. . . . . . . . . . . . . . . . . . . . . . . . . . . . . . . . . . . . . . . . . . . . . . . . . . . . . . . . . . . 3
1.3.1 Usage Cautions. . . . . . . . . . . . . . . . . . . . . . . . . . . . . . . . . . . . . . . . . . . . . . . . . . . 3
1.3.2 Power. . . . . . . . . . . . . . . . . . . . . . . . . . . . . . . . . . . . . . . . . . . . . . . . . . . . . . . . . 4
1.3.3 Radio Interference. . . . . . . . . . . . . . . . . . . . . . . . . . . . . . . . . . . . . . . . . . . . . . . 4
1.3.4 Repair. . . . . . . . . . . . . . . . . . . . . . . . . . . . . . . . . . . . . . . . . . . . . . . . . . . . . . . . . . 4
1.3.5 Disposing of the Player. . . . . . . . . . . . . . . . . . . . . . . . . . . . . . . . . . . . . . . . . . . 4
1.3.6 Others. . . . . . . . . . . . . . . . . . . . . . . . . . . . . . . . . . . . . . . . . . . . . . . . . . . . . . . . 4
2. Connection. . . . . . . . . . . . . . . . . . . . . . . . . . . . . . . . . . . . . . . . . . . . . . . . . . . . . . . . . . . 5
2.1 Connecting the Power Supply. . . . . . . . . . . . . . . . . . . . . . . . . . . . . . . . . . . . . . . . . 5
2.2 A/V output. . . . . . . . . . . . . . . . . . . . . . . . . . . . . . . . . . . . . . . . . . . . . . . . . . . . . . . . . . . . 5
2.3 Y/Pb/Pr Component OUT. . . . . . . . . . . . . . . . . . . . . . . . . . . . . . . . . . . . . . . . . . . . . . . . 5
2.4 Digtal audio output . . . . . . . . . . . . . . . . . . . . . . . . . . . . . . . . . . . . . . . . . . . . . . . . . . . . 6
2.5 HDMI OUT . . . . . . . . . . . . . . . . . . . . . . . . . . . . . . . . . . . . . . . . . . . . . . . . . . . . . . . . . . . 6
2.6 Connecting a USB Device. . . . . . . . . . . . . . . . . . . . . . . . . . . . . . . . . . . . . . . . . . . . . 7
2.7 Connecting a Memory Card. . . . . . . . . . . . . . . . . . . . . . . . . . . . . . . . . . . . . . . . . . . 7
3. About the player. . . . . . . . . . . . . . . . . . . . . . . . . . . . . . . . . . . . . . . . . . . . . . . . . . . . 8
3.1 Remoter. . . . . . . . . . . . . . . . . . . . . . . . . . . . . . . . . . . . . . . . . . . . . . . . . . . . . . . . . . . . 8
3.2 Front Panel. . . . . . . . . . . . . . . . . . . . . . . . . . . . . . . . . . . . . . . . . . . . . . . . . . . . . . . . . 10
3.3 Side Panel. . . . . . . . . . . . . . . . . . . . . . . . . . . . . . . . . . . . . . . . . . . . . . . . . . . . . . . . . 10
4. Power On / Off
. . . . . . . . . . . . . . . . . . . . . . . . . . . . . . . . . . . . . . . . . . .. . . . . . . . . . . . . 11
4.1 Power On. . . . . . . . . . . . . . . . . . . . . . . . .. . . . . . . . . . . . . . . . . . . . . . . . . . . . . . . . . 11
4.2 Power Off. . . . . . . . . . . . . . . . . . . . . . . .. . . . . . . . . . . . . . . . . . . . . . . . . . . . . . . . . 11
5. Setup menu. . . . . . . . . . . . . . . . . . . . . . . . . . . . . . . . . . . . . . . . . . . . . . . . . . . . . . . . . . 11
6. Browsing movie
. . . . . . . . . . . . . . . . . . . . . . . . . . . . . . . . . . . . . . . . . . . . . . . . . . . . . 12
7.Browsing Music. . . . . . . . . . . . . . . . . . . . . . . . . . . . . . . . . . . . . . . . . . . . . . . . . . . . . . 14
8.Browsing photo. . . . . . . . . . . . . . . . . . . . . . . . . . . . . . . . . . . . . . . . . . . . . . . . . . . . . . 15
9. Browsing files
. . . . . . . . . . . . . . . . . . . . . . . . . . . . . . . . . . . . . . . . . . . . . . . . . . . . . . . 16
10. Upgrading Firmware. . . . . . . . . . . . . . . . . . . . . . . . . . . . . . . . . . . . . . . . . . . . . . . 16
11. S pecifications . . . . . . . . . . . . . . . . . . . . . . . . . . . . . . . . . . . . . . . . . . . . . . . . . . . . . . 17
2
Page 3

1.Introduction of Product
1.1 Preface
Thank you for purchasing the exciting portable high definition multimedia player with powerful
functions. This player adopts the latest chipset whi ch supports 1080P output.
By connecting this player to high definition TV, you can enjoy your favorite movies, music, and
photos which stored on external storage such as USB flash drives, SD/MMC memory cards,
portable hard drives and so on.
HDMI, YPbPr, SPDIF and comp osite audio/video out put ports which provide you with the most
useful connections to TV, projector, audio system and etc.
User friendly UI, easy to operate and all functions/settings are accessible by attached remote
control, nice and neat. This player has very powerful playback functions; it supports almost all
the conventional multimedia files.
Elegant and simple industrial design, portable size for easy carrying. All metal enclosure, solid
protection and more stable performance in high-temperature environment. It’s really a nice
choice for personal multimedia enjoyment or home entertainment!
1.2 Packing list
Before you make using the product, please check whether the colorful box packing has
the following parts. If there is shortage, please contact the dealer from who you buy the
product in time to guarantee your rights and interests.
Item Quantity
The Media Player 1
A/V Cable 1
Remote Control 1
AAA Batteries 2
Power Adapter 1
User Manual 1
1.3 Cautions
This player’s design and manufacture has your safety in mind. In order to safely and effectively
use this player, please read the following before usage.
1.3.1 Usage Cautions
User should not modify this player. If commercial hard disk is being used, the environmental
3
Page 4

temperature should be within +5 ~+35 . ℃℃
1.3.2 Power
The player’s power voltage: DC 5V.
When using this player, please connect the supplied AC adapter or AC adapter cable to the
player’s power jack. When placing the adapter cable, make sure it can not get damaged or be
subject to pressure. To reduce the risk of electric shock, unplug the adapter first before
cleaning it.
Never connect the adapter to the player in a humid or dusty area. Do not replace the adapter
or cable’s wire or connector.
1.3.3 Radio Interference
If not properly shielded, almost all electronic devices will get radio interference. Under some
conditions, your player might get interference.
The design of this player has followed the FCC/CE standard, and has followed the following
rules:
(1) This player may not cause harmful interference;
(2) This player could accept some interference received including interference that may
cause undesired operation.
1.3.4 Repair
If the player has a problem, you should take it to an appointed repair center and let the
specialists do the repair, never repair the player yourself, you might damage the player or
endanger yourself or your data.
1.3.5 Disposing of the Player
When you dispose of the player, be sure to dispose it appropriately. Some countries may
regulate disposal of electrical device, please consult with your local authority.
1.3.6 Others
1. When using this player, please do not let the player come into contact with water or other
liquid, if water is accidentally spilled on the player, please use a dry cloth to absorb the
spillage.
2. All electronics device are very sensitive and may be brittle, never vibrate or impact this
product violently during use, nor apply too much force on pressing the keys on this product.
Do not let the player contacting with water or other liquid.
Never disassemble, repair or refit this player by yourself. any damage done will not be
included in the repair range.
Do not press the buttons with too much force.
Avoid hitting the player with hard object, avoid shaking, and keep away from magnetic
fields.
During in static and the strong electromagnetic magnetic field, the product will be fail to
function, then unplug the power cable and then plug the power cable again,the product
will return to normal performance.
4
Page 5
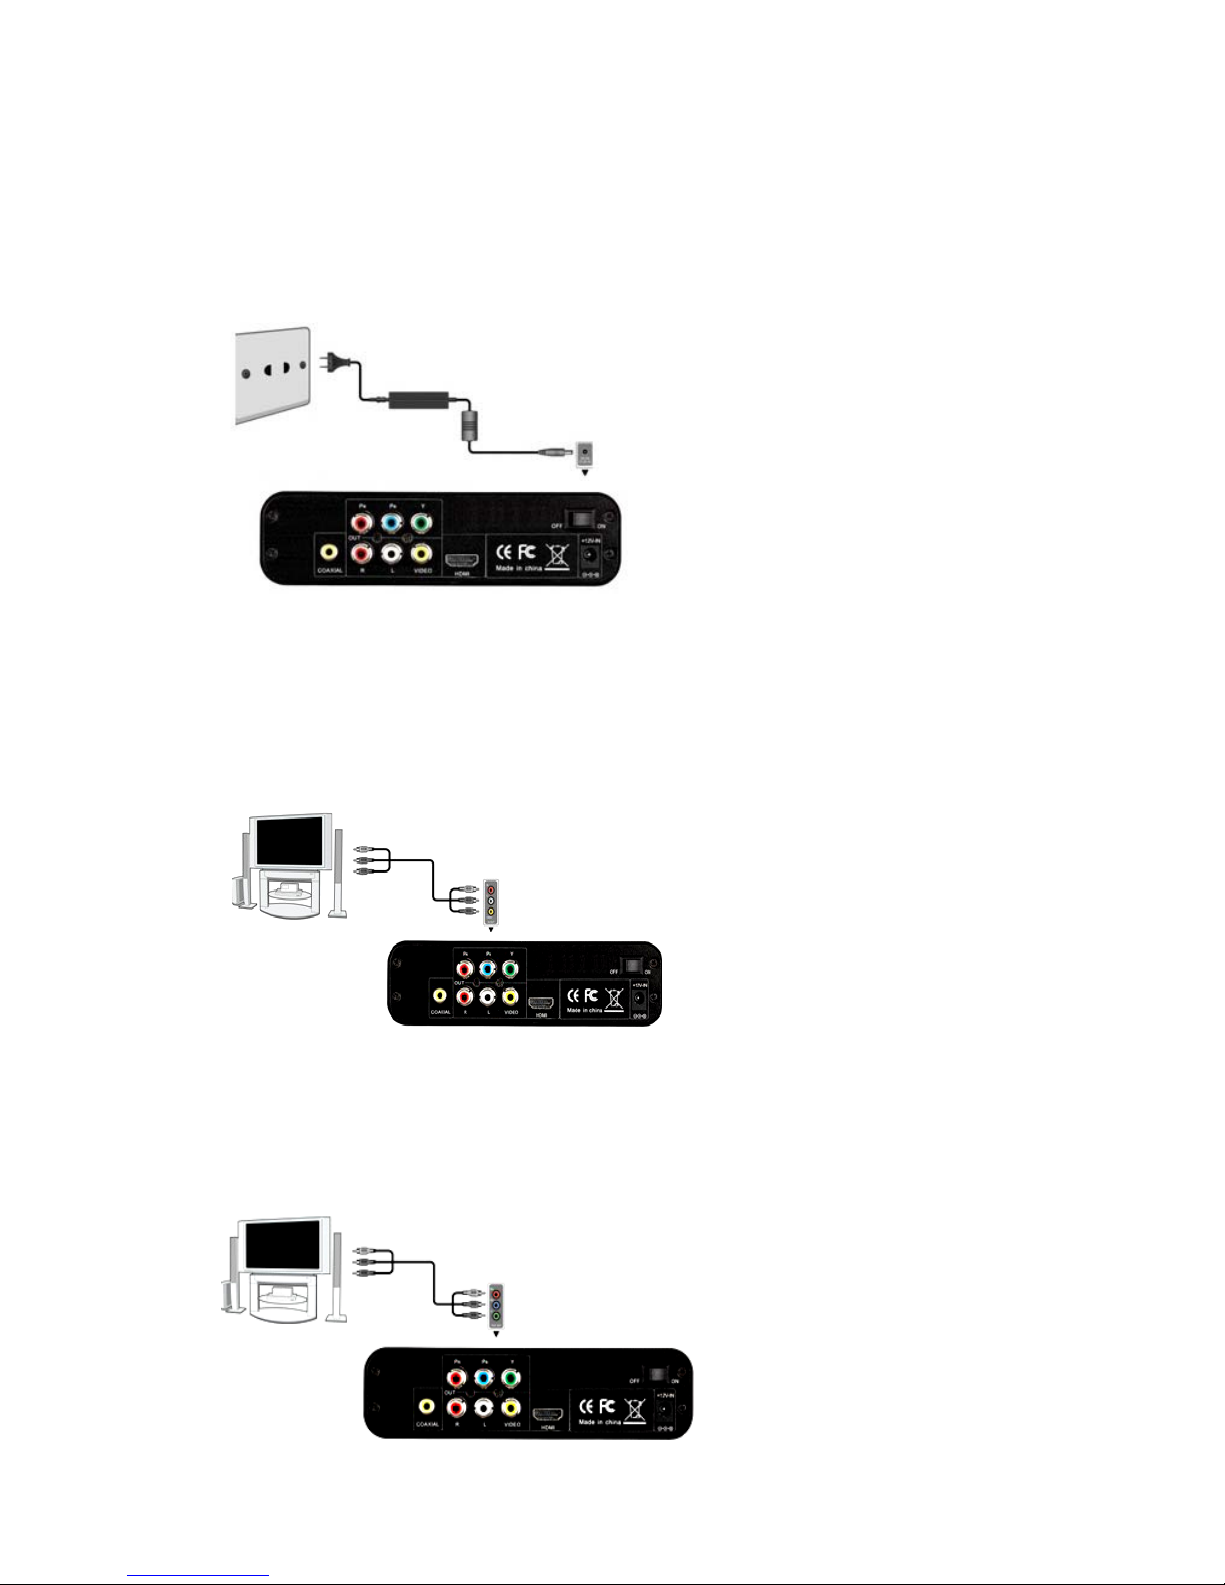
2. Connection
2.1 Connecting the Power Supply
(1) Follow the picture and connect the AC adaptor to the player’s DC IN jack;
(2) Follow the picture and plug in the AC adaptor to the power outlet.
2.2 A/V output
(1) Follow the picture and plug in the 3 color connector to the player’s A/V out jack;
(2) Follow the picture and plug in the 3 color connector to the TV’s A/V IN jack.
In this way, you can enjoy the content in the player on TV or other display devices.
2.3 Y/Pb/Pr Component OUT
(1) Follow the picture and plug in the 3 color connector to the player’s Y/Pb/Pr jack;
(2) Follow the picture and plug in the 3 color connector to the TV’s Y/Pb/Pr jack.
5
Page 6
He
lpful tips:As only the video signals and no audio signals are outputted in Y/PB/PR mode,
so please make audio output when using Y/PB/PR mode.
First method: use the audio output from the A/V OUT jack;
Second method: use the audio output from the S/PDIF Coaxial jack.
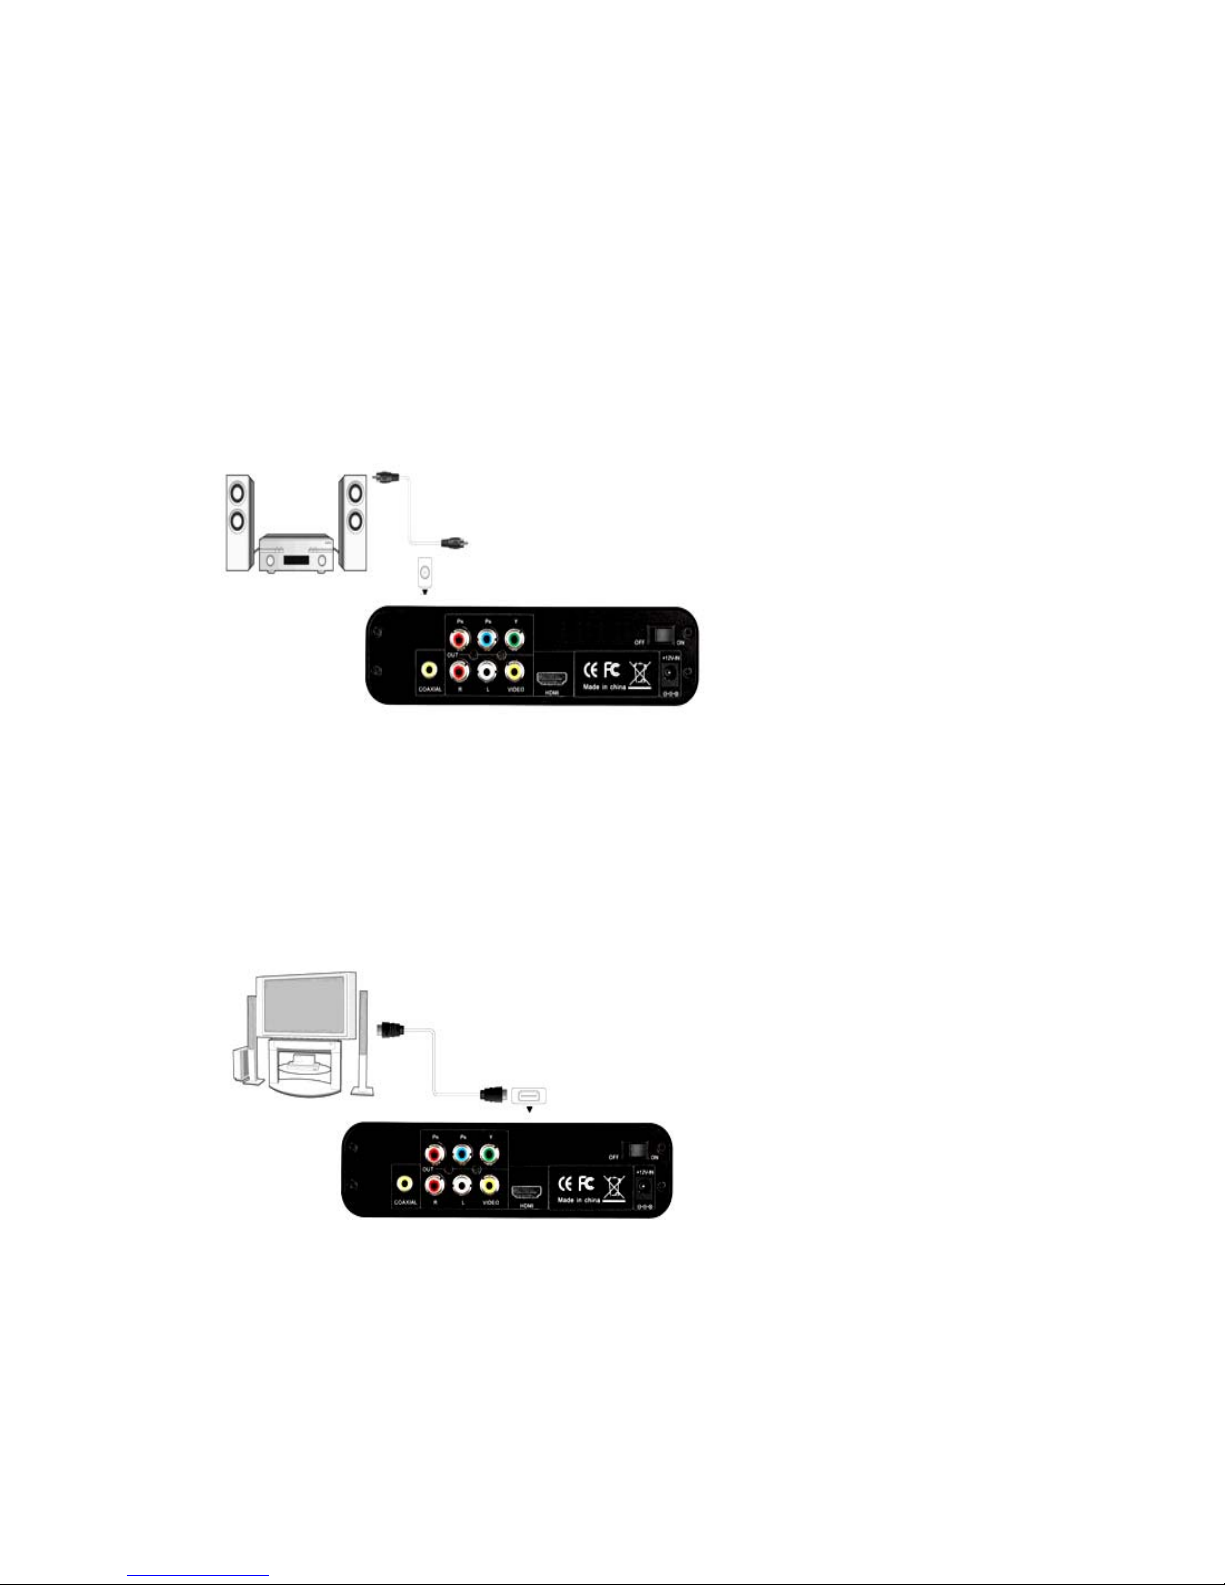
2.4 Digtal audio output
(1) Follow the picture and connect one end of coaxial cable to the coaxial output port of this
product(Not included in the Accessories)
(2) Follow the picture and connect the other end of coaxial cable to the coaxial input port of
corresponding power amplifier.(Not included in the Accessories)
Helpful tips: To use the power amplifier to output the audio information, please set OUTPUT in
settings as SPDIF LPCM”.
2.5 HDMI OUT
(1) Follow the picture and plug one connector on your HDMI cable to the player’s HDMI jack;
(2) Follow the picture and plug the other connector on your HDMI cable to the TV’s HDMI jack.
In this way, you can have the highest quality video and audio via a single cable.
Note:
1. The above three connecte ways(AV output, Y/Pb/Pr, HDMI) are all to connected to the display
device.you
can connect it based on your actual device.We are recommended that you use the
HDMI connection methods, which output the signal is best.
2. And the connection ways can not used at same time, you need to switch to approp riate mode
when you use it.
6
Page 7

2.6 Connecting a USB Device
Include:U-Disk,removable HDD ect.
(1) Make sure the player is powered on;
(2) Plug in the USB stick or USB HDD etc. to the USB HOST of this player.
2.7 Connecting a Memory Card
Memory card can be used by inserting to the card slot
(1) The player is in on stutas.
(2) Follow the picture to insert the memory card to the card slot properly;
7
Page 8

3. About the player
3.1 Remoter
1.Power 2.CVBS
3. OSD 4.Goto
5.Play/Pause 6. Menu
7. Navigation 8. Ok
9. Moive 10. Music
11.Previous/
Next
12.Volume +/-
13. Mute 14.YUV
15. HDMI 16. ROTA TE
17. ZOOM 18. SETUP
19. 16:9 20. STOP
21. ESC 22.BROWSE
23. PHOTO 24.FF/FR
8
Page 9

NO. Button FEATURES
1
Power
Press to standby or wake up.
2
CVBS
Press to turn to cvbs signal output.
3
OSD
Press to bring up the File menu
4
GOTO
Press it during video play to select a time period to be played back.
5
Play/Pause
Press to pause/ restore current playback.
6
Menu
Return to the Main Interface.
7
Navigation
Up, down, left and right move the cursor.
When playing movie,press left/right key to Fast Forward/ Fast
Rewind the playing file.
8
OK
Press to comfirm current operate.
When playing movie,press to play/pause the playing file.
9
Movie
Press to enter into movie application.
10
Music
Press to enter into music application.
11
Previous/ Next
Playback the Previous/ Next files.
12
Volume+/-
Increase or decrease the volume.
13
Mute
Open/close the sound output.
14
YUV
Press to turn to YUV signal output.
15
HDMI
Press to turn to HDMI signal output.
16
ROTATE
Press to rotate the picture when browsing pictures.
17
ZOOM
Press to zoom in or out the picture when browsing pictures.
18
SETUP
Press to enter into setup menu.
19
16:9
Press to 16:9 video output.
20
Stop
Press to stop playback file,then access to playback it again,it will
prompt you resume playback or not.
21
ESC
Exit current operate.
22
Browse
Press to enter into browse application.
23
Photo
Press to enter into photo application.
24
FF/FR
Fast Forward/ Fast Rewind the playing media file.
9
Page 10

3.2 Front Panel
Interface Description:
No. Item
Description
1
Infrared receiver
window
Receive remote signal.
2 Power
In standby as red, in working state as
blue.
3 Card slot
Read the data from SD/MMC card by
this jack.
4 USB HOST
The player can read the external USB
storage device by this jack.
3.3 Side Panel
Interface Description:
No. Item
Description
1 DC-IN 5V Power input:DC 5V.
10
Page 11

2 Switch Open/Close the power.
3 HDMI jack
Connect with video device with this
interface and output HDMI audio and
video signals.
4 YpbPr jack
Connect with video device and output
YPbPr video with this interface.
5 AV jack
Connect to audio and video devices with
this interface.
6 COAXIAL SPDIF coaxially output s digital audio.
4. Power On / Off
4.1 Power On
After connecting the DC IN jack, the player will soon enter the home screen, and the power
indicator will turn blue.
4.2 Power Off
Press the power button on the Side Panel, the player will soon enter standby mode, and the
power indicator will turn red.and press the switch on the
side panel,Then unplug the power
cord to cut off the power supply.
5. Setup menu
Selected settings option on the main interface or press the setup button on the remote
control to enter into the Setup menu.
11
Page 12

Output
Select among P AL,NTSC,480P,720P(50HZ), 720P(60HZ), HDMI-480P,
HDMI-720P(50HZ),HDMI-720P(60HZ),HDMI-1080I(50HZ),
HDMI-1080I(60HZ), HDMI-1080P(50HZ), HDMI-1080P(60HZ)
Langage
Select to choose the OSD (On-Screen Display) language.
Include:SimplifiedChinese,English,TraditionalChinese.
Audio output
Select from digtal audio and SPDIF.
Subtitle code
Select to set the text encoding option (subtitle display),
Include:ISO_8895_1,-- ,ISO_8895_16,CP874,CP1250,CP1251,
CP1253,CP1255,CP1256,CP1257GB2312,UTF8,UTF16BE,
UTF16LE,BIG5,GBK,SJIS,EUC_JP,EUC_KR,KIO_R
System
information
View the current system information.
Restore
default
Select to restore factory defaults.
6. Browsing movie
Selected movie option on the main interface or press the movie button on the remote
control to enter into the movie menu.
12
Page 13

Browsing Movies
Instructions of Operations
There are two location for you choose:USB
extenal device and memory card, Select the
location where you stored the movies, click
OK to enter.
Through the up/down keys to select the
folder or the files you want to playing back,
then press the OK to enter into full-screen
playback mode.
The following buttons can be used to control video playback.
PLAY/PAUSE or OK key
Begin/pause playback.
FF/FR or left/right key FF (X1,X2,X4,X8) or FR (X1,X2,X4,X8)
Previous/ Next
Playback the Previous/ Next files.
GOTO
Press it during video play to select a time
period to be played back.
16:9
Press to 16:9 video output.
Mute
Open/close the sound output.
Volume+/-
increase or decrease the volume.
OSD
Bring up the File menu
Audio track: press to switch the audio
tracks.;
Subtitle: Press to activate available
subtitles when play the DIVX file.
If the files
have no subtilte it will display as No sub.
Video scale: select among video full
screen, screen full screen,default,
4:3,16:9,fit view
Play mode:select among rotate one,rotate
all,sequence,random,only once.
Sound channel:select among stereo left
channel,right channel.
Stop
Press to stop playback file,then access to
playback it again,it will prompt you resume
playback or not.
13
Page 14

7.Browsing Music
Selected movie option on the main interface or press the music button on the remote
control to enter into the movie menu.
Browsing Music
Instructions of Operations
There are two location for you choose:USB
extenal device and memory card, Select the
location where you stored the music, click
OK to enter.
Through the up/down keys to select the
folder or the files you want to playing back,
then press the OK to enter into playback
mode.
The following buttons can be used to control music playback:
PLAY/PAUSE or OK key
Begin/pause playback.
FF/FR or left/right key
Fast Forward/ Fast Rewind the playing
media file.
OSD
Play mode:select among rotate
all,sequence,random,only once,rotate one.
equalizer:nature,DBB,pop,rock,classic,
jazz,vocal,dance,soft.
Show mode: select from spectrum,lyric.
Lyrics colors: select among
red,yellow,green,orang,blue.
For song files have lyrics, select lyrics on
show mode,then it will displayed as lyrics
way on the screen.
Previous/ Next
Playback the Previous/ Next files.
14
Page 15

Mute
Open/close the sound output.
Volume+/-
Increase or decrease the volume.
Stop
Press to stop playback file.
8.Browsing photo
Selected photo option on the main interface or press the photo button on the remote
control to enter into the movie menu.
Browsing Photos
Instructions of Operations
There are two location for you choose:USB
extenal device and memory card, Select the
location where you stored the photo, click
OK to enter.
Through the up/down keys to select the
folder or the files you want to playing back,
then press the OK to enter into full-screen
playback mode.
The following buttons can be used to control photo playback.
Up/down key
Playback the Previous/ Next files.
Zoom
Zoom in/out photos.
Rotate
Rotate the photos when playback.
OSD Switch: select among default,fade in fade
out,persian blindsH,persian blinds V,slid
up,slid down,slid left,slid right,stretch up,
stretch down, stretch left, stretch
right,mosaic,zoom in,zoom out,random
switch.
Time slot:1s,3s,5s,10s.
Esc
Press to stop playback file.
15
Page 16

9. Browsing files
Selected file option on the main interface to enter into the movie menu.
All suppported files are displayed in this interface.
10. Upgrading Firmware
Step 1:
Prepare the external storage devices (such as SD card/removable HDD/U-disk) ect. And copy
firmware to it.
Step 2: Connect the external storage devices
Connect the prepared external storage devices onto the USB HOST or the card slot of the
player.
Step 3:
Use the remote controller to select the firware on file application, then press ok, the system
upgrade may beginning automactically.
The whole installation will last for approximately 2 minutes; please wait for it patiently.
Note:
The upgrade process will as blue screen appears, do not disconnect the power supply
during installation;
Never unplug the external storage devices during installation .
Different Model of player cannot use the same firmware, please upgrading it with
serious cautious.
16
Page 17

17
11. Specifications
DC IN
DC 5V/2A
Support HDD formats
FAT16/FAT32/NTFS
USB HOST
Recognize standard USB device.
Support Card formats
SD,MMC
Support video formats
TS/TP、RM/RMVB、AVI、MKV、MOV、MP4/M4V、PMP、
FLV、VOB、MPG、WMV、M2TS
Video codes
supported
MPEG1、MPEG2、MPEG4-XVID、DIVX、H.264、H.263、
WMV9/VC-1、RMVB
Audio codes
MP3、WMA、OGG、FLAC、APE、DTS、AAC、AC3、
ATRA
Photo formats
BMP、JPEG、PNG、GIF
Subtitle formats
supported
UTF8、ASS、SSA、SCSII、SUB
Video output port
HDMI/ YPbPr/AV
Display mode
Cvbs/YPbPr/HDMI output
 Loading...