


Wählen Sie:
Select:
Выберите:
请选择语言:
Deutsch English Русский 中文
Bedienungsanleitung EA Power Control Software
Software-Version: 1.52 beta
Technische Voraussetzungen für Installation und Betrieb:
- PC mit mind. 2 GHz CPU und 1 GB Speicher
- Windows 7 (32 bit / 64 bit) oder neuer
- Microsoft .NET Framework 4.5.2 oder neuer (im Installer enthalten)
- Kompatibel zu den Geräteserien:
o PSI 9000 2U
o PSI 9000 3U
o PS 9000 1U
o PS 9000 2U
o PS 9000 3U
o PS 5000
o PSI 5000
o ELR 9000
o ELM 5000
o EL 9000 B
- Kompatibel zu folgenden Schnittstellen:
o USB (virtueller COM-Port)
o Ethernet/LAN

Inhaltsverzeichnis
1. Rechtliches .............................................................................................................................................................. 3
2. Einleitung ................................................................................................................................................................. 3
3. Vorbereitung ............................................................................................................................................................ 3
3.1 EA Power Control installieren ......................................................................................................................... 3
4. Programmstart / Suche nach Geräten ..................................................................................................................... 4
5. Bedingungen für die Fernsteuerung eines Gerätes ................................................................................................ 5
5.1 Gleichzeitige Fernsteuerung mehrerer Geräte ............................................................................................... 5
6. Bedienoberfläche ..................................................................................................................................................... 6
6.1 Hauptfenster ................................................................................................................................................... 6
6.2 Bedienung im Hauptfenster ............................................................................................................................ 7
6.2.1 Bedienung per Doppelklick ......................................................................................................................... 7
6.2.2 Bedienung per Drag’n‘drop ......................................................................................................................... 7
6.3 Informationen über ein Gerät abrufen............................................................................................................. 7
6.4 Menü ............................................................................................................................................................... 8
7. App „Terminal“ ......................................................................................................................................................... 9
7.1 Istwerte ........................................................................................................................................................... 9
7.2 Sollwerte ......................................................................................................................................................... 9
7.3 Schutzwerte .................................................................................................................................................. 10
7.4 Status ............................................................................................................................................................ 10
7.5 Commands (Befehlseingabe) ....................................................................................................................... 11
7.5.1 Einschränkungen ...................................................................................................................................... 11
8. App „SeqLog“ (Sequencing und Logging) ............................................................................................................. 12
8.1 Sequencing ................................................................................................................................................... 13
8.1.1 Einstellungen für Sequencing ................................................................................................................... 14
8.1.2 Das Sequenzdateiformat .......................................................................................................................... 15
8.2 Logging ......................................................................................................................................................... 15
8.2.1 Einstellungen für Logging ......................................................................................................................... 16
9. App „Settings“ ........................................................................................................................................................ 18
10. App „Update“ ..................................................................................................................................................... 18
11. Lizenz-Management ......................................................................................................................................... 19
12. App „Multi Control“ ............................................................................................................................................ 21
12.1 Einschränkungen .......................................................................................................................................... 21
12.2 Funktionalitäten im App-Fenster ................................................................................................................... 22
12.2.1 Oberer Fensterteil ................................................................................................................................. 22
12.2.2 Mittlerer Fensterteil ............................................................................................................................... 22
12.2.3 Unterer Fensterteil ................................................................................................................................ 23
12.2.3.1 Kontextmenü ..................................................................................................................................... 24
Doc-ID: EAPCDE Seite 2
Stand: 16.12.2015
1. Rechtliches
Diese Software ist nur kompatibel zu Netzgeräten bzw. elektronischen Lasten der oben genannten Serien und wird
auch nur mit diesen zusammen ausgeliefert bzw. steht als Download für die genannten Serien zur Verfügung. Jegliche
Änderung der Software und ihrer Dokumentation ist untersagt und Bedarf im Einzelfall der Genehmigung des Herstellers. Weiterverkauf oder Vermietung sind verboten. Weitergabe der Software und deren Dokumentation an Dritte,
sofern unverändert, ist erlaubt.
2. Einleitung
EA Power Control ist eine Windows™-Software, mit dem ein oder mehrere Netzgeräte oder elektronische Lasten
über eine digitale Schnittstelle (USB, Ethernet) fernbedient werden können. Andere Gerätetypen, Geräteserien bzw.
andere Schnittstellen werden derzeit nicht unterstützt.
Das Programm basiert auf der Programmierumgebung Visual C# und benötigt das Microsoft .NET Framework ab einer
bestimmten Version, die entweder bereits installiert sein kann oder durch den Installer des Softwareprodukts wahlweise mitinstalliert werden kann.
3. Vorbereitung
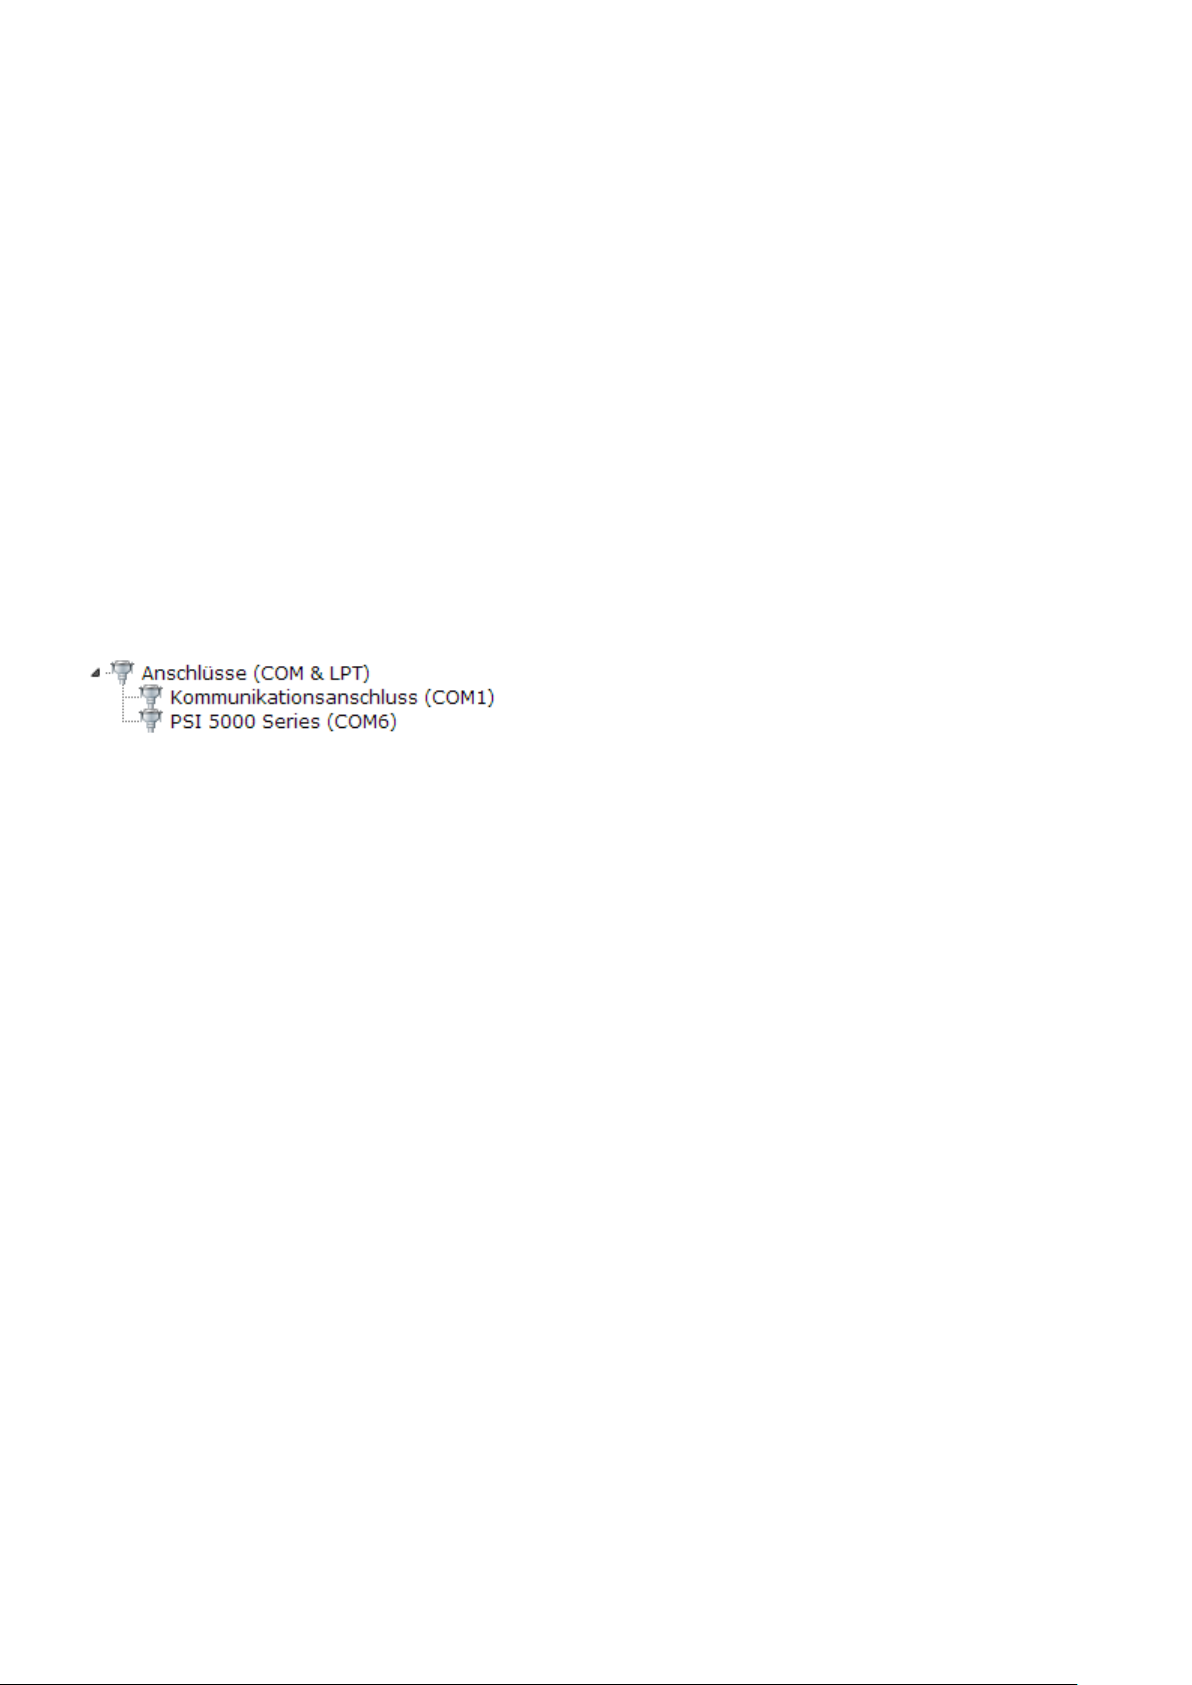
Bevor Sie EA Power Control starten, sollte mindestens ein Gerät angeschlossen und bei Verwendung eines USBPorts dessen Treiber richtig installiert sein. „Richtig“ bedeutet, daß möglichst der mitgelieferte Treiber verwendet wird,
der das Gerät als COM-Port installiert, welcher dann im Windows Gerätemanager bei „Anschlüsse (COM&LPT)“ zu
finden sein sollte. Beispiel:
Hinweis: der Treiber muß normalerweise nur einmal auf dem System installiert werden. Wird jedoch ein dem Betriebssystem bisher unbekanntes Gerät verbunden bzw. ein bekanntes in einen anderen USB-Port gesteckt, dann wird das
Gerät erneut vom System installiert. Dabei werden neuen Geräten freie, nicht reservierte COM-Ports zugewiesen.
3.1 EA Power Control installieren
Hinweis: diese Software läßt sich nur für den Benutzer installieren, über dessen Benutzerkonto der Installer gestartet
wird. Dabei sind Administratorrechte erforderlich.
Die Installation des Programms erfolgt über einen typischen Installer. Während der Installation können Sie zusätzliche
Pakete hinzuwählen, falls nicht bereits installiert:
Microsoft .NET Framework 4.5.2 oder neuer
Treiber für USB (nicht erforderlich, wenn nur über Ethernet kommuniziert wird)
Microsoft Visual C++ Runtime-Paket
Nach der Installation kann das Programm aus dem Startmenü oder vom Desktop aus aufgerufen werden. Pfad:
Start\Alle Programme\EA Power Control\
Doc-ID: EAPCDE Seite 3
Stand: 16.12.2015

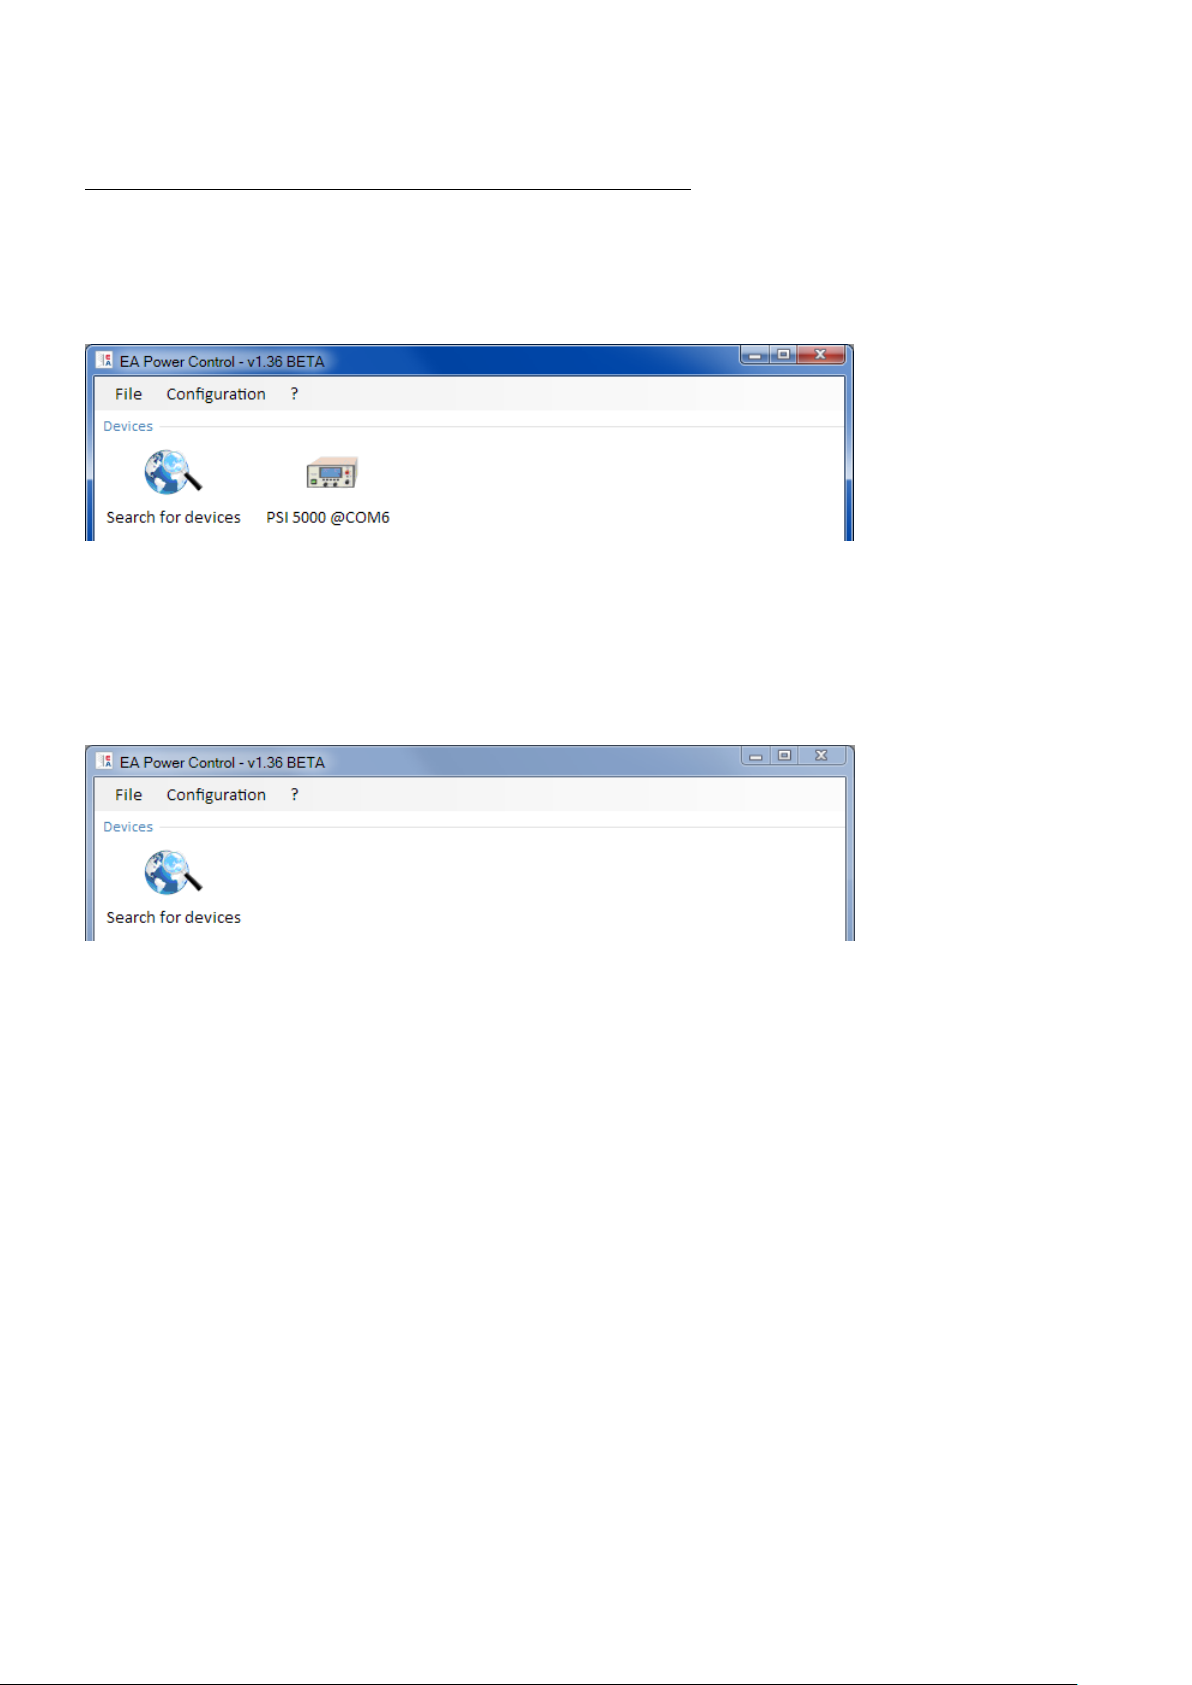
4. Programmstart / Suche nach Geräten
Nach dem Start kann das Programm automatisch die Hardware-Ports „COM“ und „Ethernet“ nach angeschlossenen,
kompatiblen Geräten durchsuchen. Welche von beiden benutzt werden sollen für die weitere Verwendung von EA
Power Control kann in den Optionen festgelegt werden. So kann z. B. der Scan nach Geräten an COM-Ports eingespart werden, wenn Geräte nur per LAN angeschlossen sind.
Die Suche nach Geräten kann jederzeit über die App „Seach for devices“ wiederholt werden, sofern der Zugriff auf
das Hauptfenster momentan möglich ist.
Alle erkannten kompatiblen Geräte werden in der Geräteliste (hier: „Devices“) mittels eines Icons, der Serienbezeichnung, dem Port bzw. der zugewiesenen IP über die sie verbunden sind und dem sog. Benutzertest (wenn gesetzt),
aufgelistet. Dabei steht COM für einen virtuellen COM-Port eines USB-Anschlusses und eine IP-Adresse für Ethernet.
Beispiel mit einem Gerät:
Abbildung 1
Hinweis: wenn ein Gerät gleichzeitig über zwei seiner Schnittstellen (USB und LAN) mit dem PC verbunden sein sollte,
dann hat USB Priorität. Das Gerät wird dann nur einmal in „Devices“ angezeigt.
Wird kein Gerät gefunden, bleibt die Geräteliste leer:
Abbildung 2
Es kann verschiedene Ursachen haben, falls ein Gerät wider Erwarten nicht erkannt wird:
Wenn ein Gerät über USB gesteuert werden soll:
a. Das Gerät ist zwar über USB angeschlossen, der USB-Treiber aber nicht oder nicht richtig installiert
(siehe dazu auch Abschnitt „3. Vorbereitung“)
b. Ein Kabel ist nicht angeschlossen bzw. nicht richtig gesteckt
c. Die Version von EA Power Control ist älteren Datums und unterstützt eine neue Geräteserie noch
nicht. Hier hilft eine Aktualisierung des Programms.
Wenn das Gerät über Ethernet gesteuert werden soll:
a. Der Ethernet-Port des Gerätes ist nicht der gleiche, wie in den Programmeinstellungen „Configuration“
b. Eine oder mehrere IPs wurden doppelt vergeben bzw. gar nicht konfiguriert (Geräte mit Ethernetport
haben bei Auslieferung alle dieselbe IP-Adresse)
c. Der Netzwerkserver hat ein oder mehrere Geräte nicht richtig konfiguriert, so daß diese gar nicht im
Netzwerk erreichbar sind
d. Bei Verwendung von DHCP wurde dem Gerät eine IP-Adresse zugewiesen, die außerhalb des in
Programmeinstellungen „Configuration“ eingestellten Suchbereiches liegt.
Doc-ID: EAPCDE Seite 4
Stand: 16.12.2015

5. Bedingungen für die Fernsteuerung eines Gerätes
Das für die Fernsteuerung auszuwählende Gerät kann verschiedene Bedienzustände haben:
1) Das Gerät ist über seine analoge Schnittstelle (wo vorhanden) geführt und ist somit nicht digital fernsteuerbar.
2) Das Gerät ist im lokalen Betrieb (Status zeigt „Lokal“ oder „Local“ auf der Anzeige) und daher gegen jegliche
Fernsteuerung gesperrt.
3) Das Gerät ist frei, so daß der Rechner sich mit dem Gerät verbinden und es direkt in den Fernsteuerbetrieb
(Remote) umschalten kann.
4) Das Gerät ist bereits über eine andere digitale Schnittstelle in Fernsteuerung oder am Gerät wurde das SetupMenü aufgerufen (wo vorhanden)
Ist der Zustand des Gerätes nach 3), so kann es von EA Power Control ferngesteuert werden. Ansonsten werden
lediglich die Istwerte, wie z.B. Spannung, Strom und Leistung und Betriebszustände in EA Power Control angezeigt.
Ist der Zustand nach 1) oder 2) und man möchte das Gerät dennoch fernsteuern, so muß der Zugriff am Gerät freigegeben bzw. die Fernsteuerung über die andere Schnittstelle zuerst beendet werden. Im Anschluß kann das Gerät über
das Programm in den Fernsteuerbetrieb (Taste „Remote on“ in App „Terminal“, siehe unten) gesetzt werden.
Genaueres über Gerätezustände entnehmen sie dem jeweiligen Geräte-Handbuch.
5.1 Gleichzeitige Fernsteuerung mehrerer Geräte
Ab Version 1.52 gibt es für die Steuerung und Überwachung zwei unterschiedliche Möglichkeiten:
Mehrere Geräte in einzelnen Fenstern getrennt bedienen
Mehrere Geräte in einem Fenster bedienen („Multi-Control“) (kostenpflichtig, optional)
Die beiden Methoden sind unterschiedlich zu handhaben. Die separate Bedienung in einzelnen Terminal-Fenstern
empfiehlt nur bei einer geringen Anzahl Geräte, beispielsweise bis zu 5. Bei mehr als 5 oder sogar mehr als 10 Geräten
gleichzeitig würde ob der ganzen geöffneten Fenster die Übersicht verlorengehen. Daher empfiehlt sich hier die Ver-
wendung von „Multi-Control“, das in einem Fenster die Bedienung und Überwachung von bis 20 Geräten bietet. Eine
der Hauptfunktionen von „Multi-Control“ ist es, bei den gewählten Geräten Werte und Status gleichzeitig zu setzen.
Hinweis: Die Funktion „Multi-Control“ ist ab der Version 1.52 in EA Power Control enthalten, kann aber nicht ohne
vorherige Freischaltung über einen kostenpflichtig zu erwerbenden Lizenzcode genutzt werden. Mehr dazu siehe 11.
Lizenz-Management und 12. App „Multi Control“.
Bei Einzelbedienung kann das Programm bis zu 10 Geräte gleichzeitig bedienen. Es ist dazu erforderlich, für jedes
Gerät ein Steuerungsfenster (hier: „Terminal“) zu öffnen. Diese Fenster können auf dem Bildschirm des PC manuell
angeordnet werden. Näheres dazu weiter unten.
Hinweis: Fernsteuerung bzw. das Anzeigen von Istwerten, Alarmen und Status erfordert ständige Kommunikation mit
den Geräten. Je mehr davon gleichzeitig aktiv sind, desto mehr Belastung erfährt die CPU des Rechners. Jenachdem,
welche weiteren Anwendungen am PC laufen und welche Leistung diese von der CPU fordern, kann es sein, daß EA
Power Control verlangsamt wird, was die Reaktion auf Klicks oder die Aktualisierung von Anzeigewerten angeht.
Doc-ID: EAPCDE Seite 5
Stand: 16.12.2015
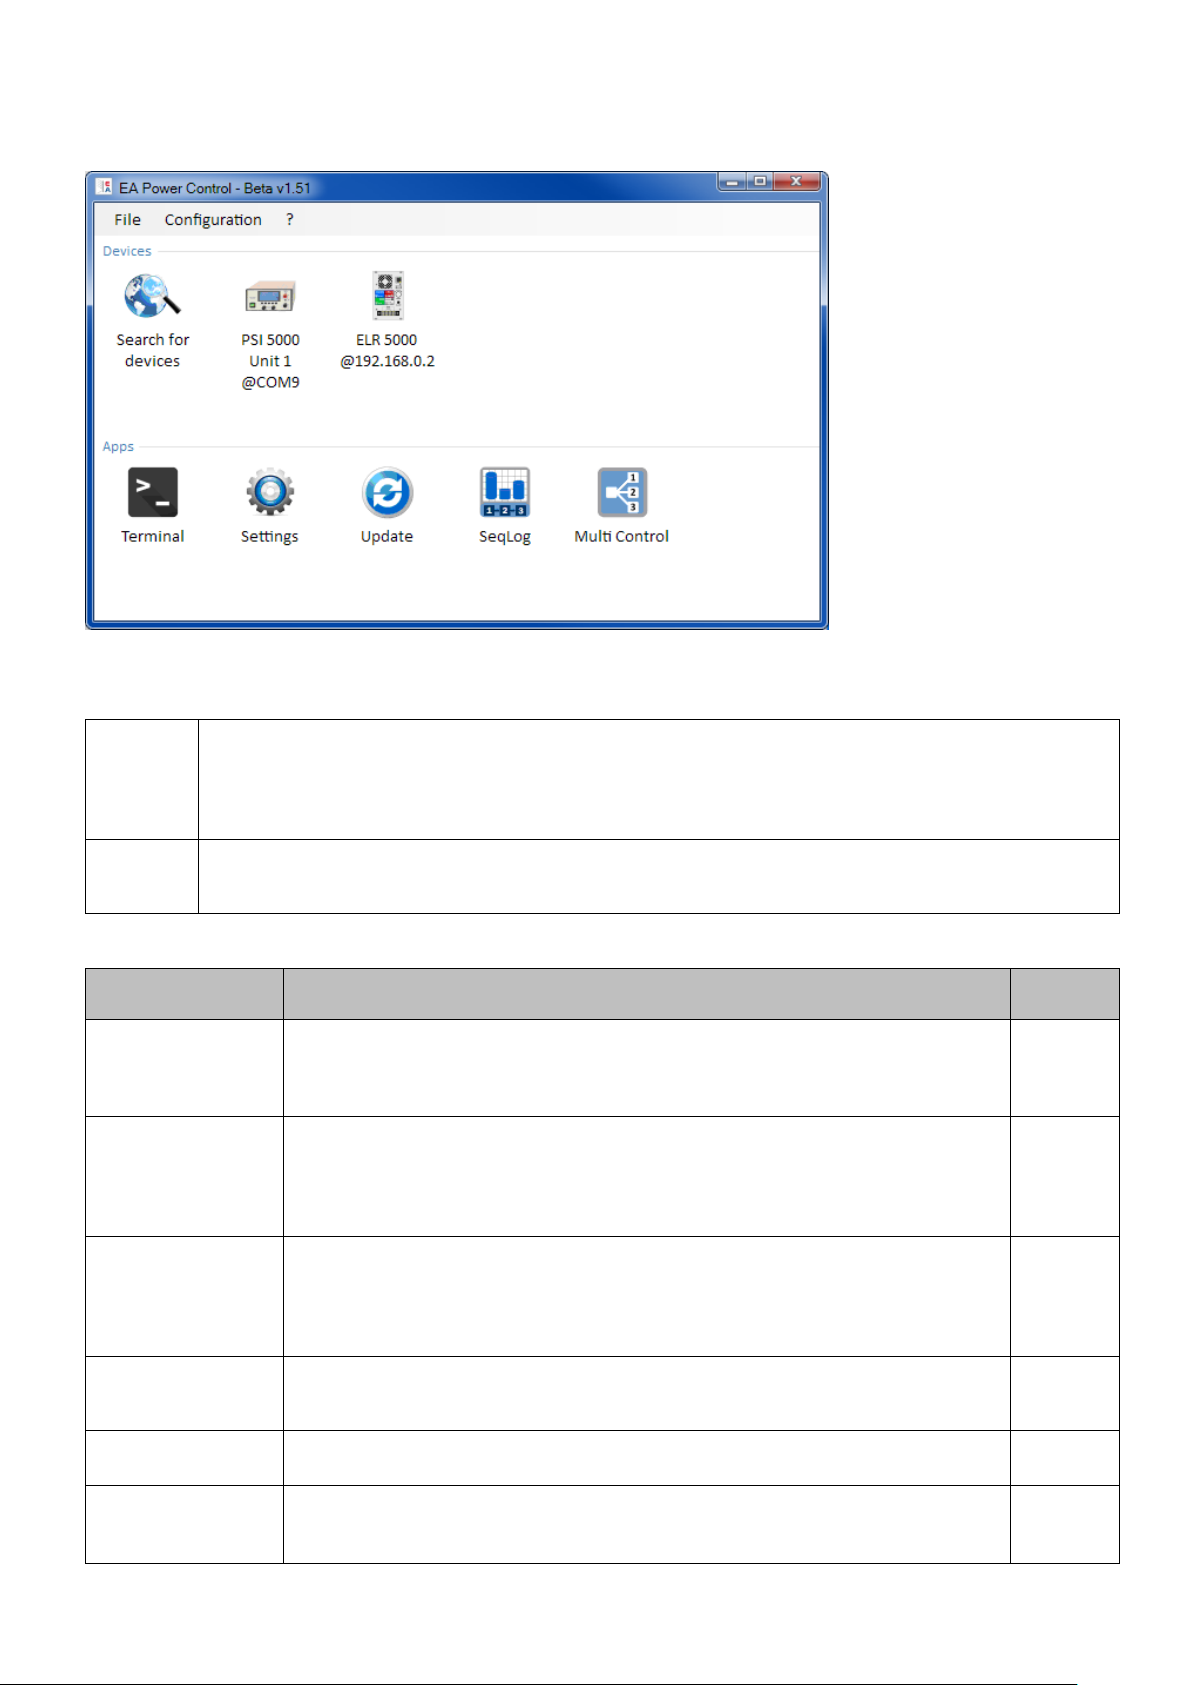
6. Bedienoberfläche
Devices
Hier werden durch die Suche erkannte, kompatible Geräte als Icon aufgelistet. Sollten mehr Geräte
gefunden werden, als Icons in eine Zeile passen, wird das Fenster entsprechend in seiner Höhe erweitert. Das Programm überwacht die gefundenen Geräte dahingehend, daß es merkt, wenn die Verbindung zu einem Gerät nicht mehr besteht (z. B. Kabel abgezogen) und entfernt es dann nach kurzer
Zeit aus der Liste. Wird die Verbindung wieder hergestellt, wird die Liste nicht automatisch aktualisiert.
Apps
Hier werden installierte Apps (kurz für: Applikationen) aufgelistet. Jede App stellt eine bestimmte Anzahl von Funktionen zur Verfügung. Apps können durch neue Versionen von EA Power Control ergänzt werden, um dem Programm neue Funktionen hinzuzufügen.
App-Name
Beschreibung der Funktion
Mehrfach
startbar?
Search for devices
Startet nach Doppelklick die Suche nach kompatiblen Geräten. Dient zur Aktualisierung der Geräteliste nach dem Einschalten eines weiteren Gerätes oder z.
B. nachdem die Verbindung zu einem Gerät unterbrochen war. Während der Suche wird ein kleines Fenster eingeblendet.
-
Terminal
Hauptsteuerungs-Applikation für die Geräte aus der Geräteliste. Öffnet ein Fenster für das gewählte Gerät, in dem die Istwerte, Alarm, Status und Sollwerte
angezeigt werden. Das Fenster „Terminal“ kann mehrfach, für bis zu 6 Geräte,
geöffnet werden. Es bietet weiterhin Direktzugriff auf die Geräte mittels einer Befehlsauswahl für Kommunikationsprotokolle SCPI (außer PS 5000) und ModBus.
Ja, bis zu
10-mal
Settings
Öffnet ein Fenster, in dem Einstellungen für das Gerät getroffen werden können,
wie am Gerät selbst im Setup-Menü (wo vorhanden). Das ist besonders bei den
Serien PS 5000 und PSI 5000 hilfreich, die kein eigenes Setup-Menü haben. Die
„Settings“ bieten auch Einstellungen an, die mit der Fernsteuerung über EA
Power Control nichts zu tun haben.
Ja, bis zu
10-mal
Update
Öffnet ein Fenster, über das Firmware-Aktualisierungen auf das gewählte Gerät
übertragen werden können. Die dazu benötigten UPD-Dateien (*.upd) sind separat auf der Webseite des Geräteherstellers bzw. auf Anfrage erhältlich.
Nein
SeqLog
Öffnet das Fenster für Sequencing und Logging. Siehe
„8.App „SeqLog“ (Sequencing und Logging)“
Ja, bis zu
10-mal
Multi Control
Freischaltbare Funktion (kostenpflichtige Lizenz). Siehe 12. App „Multi Control“.
Steuerung und Überwachung von bis zu 20 gleichen oder unterschiedlichen Ge-
räten auf einmal, zeitgleiches Setzen von Sollwerten und Status
Nein
6.1 Hauptfenster
Nach dem Start und der Suche nach Geräten, sofern diese aktiviert ist, erscheint das Hauptfenster:
Abbildung 3
Es ist unterteilt in zwei Bereiche:
Übersicht der Apps (Stand: Dezember 2015):
Doc-ID: EAPCDE Seite 6
Stand: 16.12.2015
6.2 Bedienung im Hauptfenster
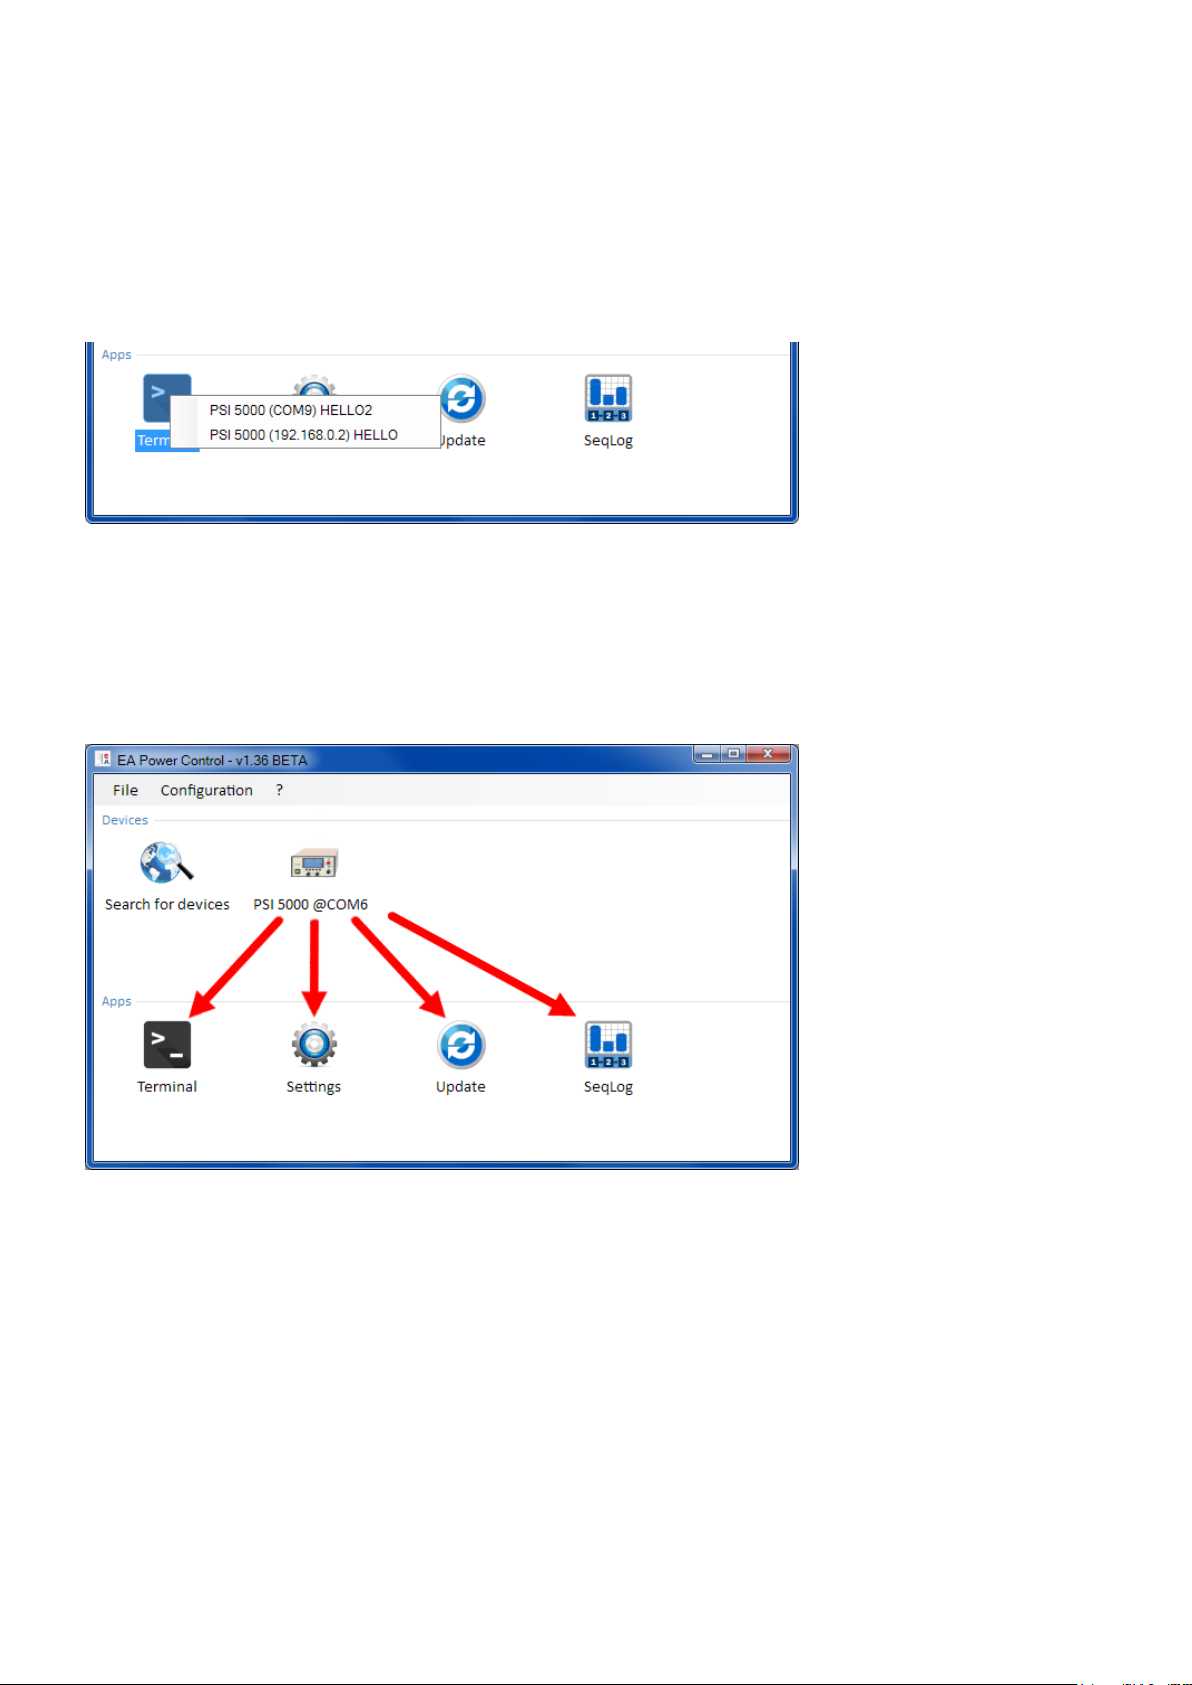
Die Bedienung im Hauptfenster, in Bezug auf die Verwendung der Geräte-Icons und der Apps kann auf zwei Arten
erfolgen:
Per Doppelklick
Per Ziehen und Fallenlassen (Drag’n’drop)
6.2.1 Bedienung per Doppelklick
Wenn man doppelt auf eins der App-Icons klickt wird in Form eines Kontextmenüs eine Liste der gefundenen Geräte
eingeblendet, aus der man dann eins auswählen, damit die App als Fenster auf dieses Gerät angewendet und gestartet
wird:
Hinweis: Manche Apps können nur dann gestartet werden, wenn die Verbindung zum Gerät über USB besteht.
Abbildung 4 - App öffnen per Doppelklick
6.2.2 Bedienung per Drag’n‘drop
Um eine App auf ein Gerät aus der Liste „Devices“ anzuwenden, klicken Sie einfach das Icon an und ziehen es bei
gedrückter Maustaste auf die App und lassen es fallen. Sofern momentan zulässig, wird sich das gewünschte Fenster
dadurch öffnen. Ansonsten sollte eine Meldung angezeigt werden, die darauf hinweist, wieso die App nicht geöffnet
werden konnte.
Abbildung 5 - App öffnen per Drag’n‘drop
6.3 Informationen über ein Gerät abrufen
Die Icons der gelisteten Geräte in „Devices“ öffnen bei Rechtsklick (rechte Maustaste) auf das Icon ein kleines Fenster,
das Informationen über das Gerät auflistet. Beispiel:
Doc-ID: EAPCDE Seite 7
Stand: 16.12.2015
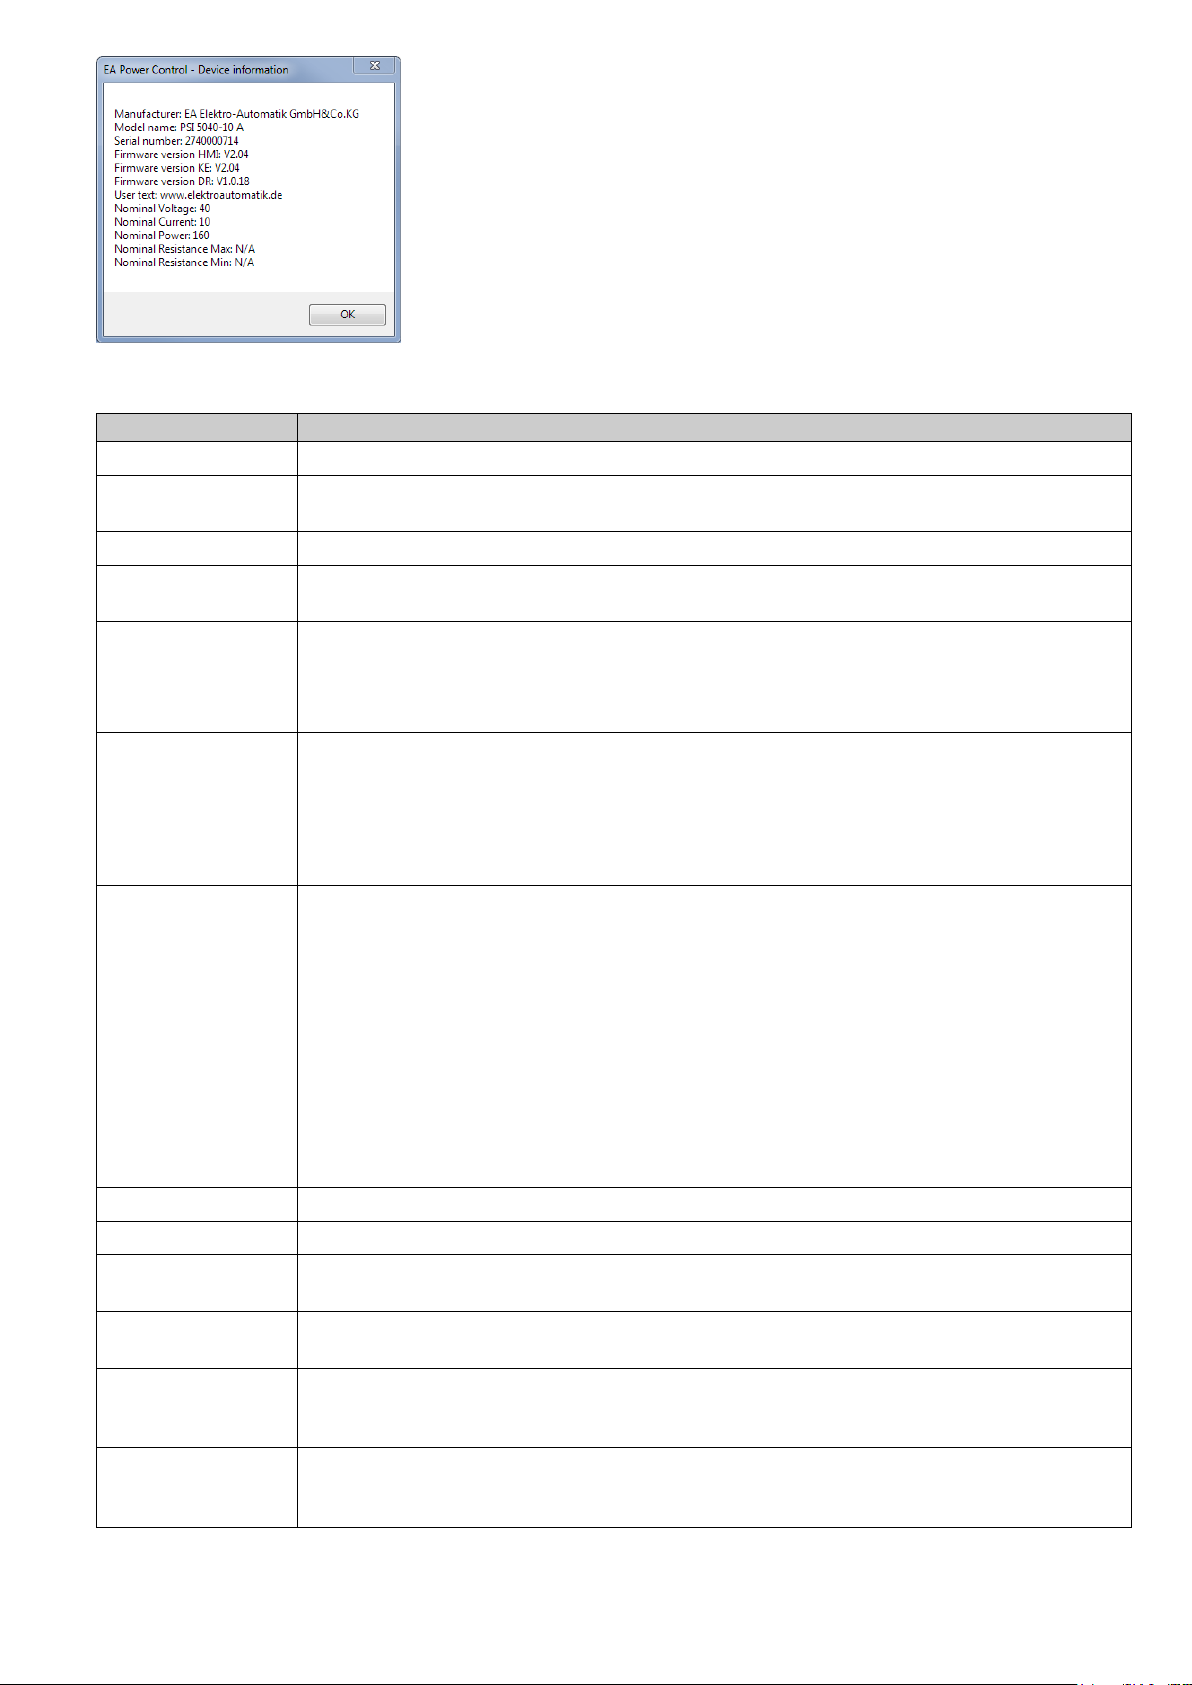
In dem Beispiel eines Netzgerätes der Serie PSI 5000 ist dann u. A. ersichtlich,
daß das Gerät keinen Widerstandsmodus bietet, weil kein max. und min. Widerstand definiert ist. Oder daß kein Benutzertext (hier: User text) vergeben
wurde, der dazu dient, mehrere identische Geräte unterscheiden zu können.
6.4 Menü
Eintrag
Beschreibung
File
Close
Schließt das Programm. Das Hauptfenster und somit das Menü sind nicht immer zugänglich,
z. B. nicht, wenn das Update-Fenster geöffnet ist.
Configuration
Öffnet das Fenster „Configuration“, in dem diverse Einstellungen zur Kommunikation mit den
Geräten bzw. für das Programm selbst getroffen werden.
Tab „General“
Aktiviert bzw. deaktiviert über „Interfaces“ die Verwendung der Schnittstellen USB und/oder
LAN für das Programm.
Standardeinstellung: beide aktiviert
Hinweis: Wenn beide deaktiviert sind, kann die Suche keine Geräte finden!
Tab „USB“
Hier kann gewählt werden, ob Geräte mit USB-Schnittstelle beim Start des Programms gesucht werden sollen. Sofern man nur über Ethernet/LAN mit den Geräten kommunizieren
will, spart es bei der Suche nach Geräten etwas Zeit, diesen Parameter zu deaktivieren. Ist
dieser Parameter abgewählt, können Geräte mit USB trotzdem über die App „Search for devices“ gesucht und erkannt werden, wenn Parameter „Interfaces: USB“ aktiviert wurde.
Standardeinstellung: aktiviert
Tab „Ethernet“
Dient zur Festlegung, in welchem IP-Bereich und über welchen Port Geräte im Netzwerk
gesucht werden sollen. Damit der Suchbereich nicht aus Versehen zu groß eingestellt wird
und die Suche dann sehr lange dauern könnte, kann bei der Endadresse nur das letzte Oktett
verändert werden.
Weiterhin kann gewählt werden, ob Geräte mit Ethernet-Port beim Start des Programms gesucht werden sollen. Sofern man nur über USB mit den Geräten kommunizieren will, spart
es bei der Suche nach Geräten etwas Zeit, diesen Parameter zu deaktivieren. Ist dieser Parameter abgewählt, können Geräte mit Ethernet-Port trotzdem über die App „Search for de-
vices“ gesucht und erkannt werden, wenn Parameter „Interfaces: LAN“ aktiviert wurde.
Standardeinstellung „Search at startup“: deaktiviert
Standard-Port: 5025 (siehe auch Gerätehandbuch)
Standard-IP-Suchbereich: 192.168.0.2 … 192.168.0.100
? Help
Öffnet diese Hilfedatei (PDF)
About
Öffnet ein kleines Fenster, das Information zum Programm sowie Kontaktdaten des Herstellers anzeigt
Enable debug
Für interne Zwecke. Sollte nicht aktiviert werden, weil die Leistungsfähigkeit des Programms
in puncto „gleichzeitige Kommunikation mit mehreren Geräten“ zurückgeht.
Load patch file
Dient zum Laden von später verfügbaren Programm-Updates wie andere Beispielsquenzen
für Sequencing oder eine aktualisierte Version dieses Handbuchs. Diese „Patch files“ werden
auf der Webseite des Geräteherstellers oder auf Anfrage verfügbar.
License Managment
Dient zur Überprüfung und Übersicht über per Lizenzcode freigeschaltete, erweiterte Funktionen. Hierüber kann auch eine Lizenz bestellt bzw. erneuert, sowie über einen Lizenzcode
neue Funktionen freigeschaltet werden. Siehe 11. Lizenz-Management.
Doc-ID: EAPCDE Seite 8
Stand: 16.12.2015
7. App „Terminal“
Modell, Seriennummer, Port
Istwerte
Sollwerte
Schutzwerte
Abbildung 6
Status
Bedienknöpfe
Ähnlich der Farbgebung auf der Anzeige bei Geräten mit
TFT-Farbdisplay sind die vier Istwerte farblich voneinander
abgegrenzt und werden in den Feldern jeweils oben dargestellt (große Zahlen). Dieser Bereich zeigt immer mindestens die drei Istwerte von Spannung, Strom und Leistung
an. Bei elektronischen Lasten zeigt es zusätzlich noch den
Widerstands-Istwert an.
Die Felder für Sollwerte sind Anzeige- und Eingabefelder.
Eingeben kann man Werte jedoch nur, wenn sich das Gerät
zurzeit in Fernsteuerung über EA Power Control befindet.
Der Zustand wird u. A. im Statusfeld mittels „Access:“ ange-
zeigt. Nach Umschalten auf Fernsteuerung werden die Eingabefelder weiß und man Werte im zulässigen Bereich per
Tastatur eintippen oder auch in das Feld hineinkopieren
(Copy & Paste).
Die App „Terminal“ ist die Hauptsteuerungs-Applikation für die Geräte. Sie kann für bis zu 6 Geräte je einmal geöffnet
werden, um diese Geräte unabhängig, aber gewissermaßen parallel zu bedienen. Eine Verknüpfung der App-Fenster
untereinander, um eine synchrone Bedienung und Einstellung von Werten zu erreichen, ist nicht möglich.
Nach dem Öffnen des Fensters kann das Gerät mit Mausklicks bedient werden, was Zustände wie DC-Eingang/Ausgang ein/aus angeht. Weiterhin können Sollwerte über die PC-Tastatur eingegeben werden.
Der obere Teil des Fensters zeigt alle wichtigen Werte und Status auf einen Blick.
Für tiefergehende Funktionen kann man den unteren Teil des Terminal-Fensters über den Knopf „Show command“
ausklappen. Dann öffnet sich eine Auswahl von vordefinierten Befehlen für SCPI (außer Serie PS 5000) oder ModBus,
die per Knopf „Send“ an das Gerät geschickt werden können. Siehe 7. App „Terminal“.
7.1 Istwerte
Die Istwerte werden zyklisch aktualisiert. Der Zyklus sollte konstant sein, kann aber durch hohe Rechenbelastung des
PC und viel Kommunikation (6 Terminal-Fenster gleichzeitig offen) ausgebremst und dadurch langsamer werden.
Die Darstellung der Werte stimmt hier nicht immer mit der Darstellung auf der Anzeige des Gerätes überein, vor Allem
was Dezimalstellen angeht. Durch die interne Umrechnung von Prozentwert in Realwert kann die letzte Stelle zudem
abweichen. Das gilt dann auch für Aufzeichnungen (Logging, siehe unten).
Hinweis: Istwerte werden nur vom Gerät gelesen und ansonsten von anderen Bedienmöglichkeiten beeinflußt. Sie
sind daher immer verfügbar, auch wenn das Gerät nicht in Fernsteuerung durch EA Power Control ist.
7.2 Sollwerte
Der zulässige Bereich für alle Eingabefelder ist identisch mit dem, was das Gerät bei manueller Bedienung zuläßt. Der
Einstellbereich eines Sollwertes liegt normalerweise bei 0…102% Nennwert, kann jedoch durch Einstellgrenzen („Limits“, siehe Gerätehandbuch) eingeschränkt sein. Werte außerhalb des zulässigen Bereiches werden einfach verworfen. Nach der Eingabe steht dann wieder der vorherige Wert im Eingabefeld.
Hinweis: Sollwerte werden erst übernommen und an das Gerät gesendet, wenn man die Eingabe mit Taster ENTER
oder RETURN abschließt.
Doc-ID: EAPCDE Seite 9
Stand: 16.12.2015
7.3 Schutzwerte
Die Felder für die sog. Schutzwerte (Protection) sind Anzeige- und Eingabefelder. Eingeben kann man Werte jedoch nur, wenn sich das Gerät zurzeit in Fernsteuerung
über EA Power Control befindet. Der Zustand wird u. A. im
Statusfeld mittels „Access:“ angezeigt. Nach Umschalten
auf Fernsteuerung werden die Eingabefelder freigegeben,
um Werte im zulässigen Bereich per Tastatur eintippen oder
auch in das Feld hineinkopieren (Copy & Paste) zu können.
Der Bereich für Status zeigt eine Kopie des Status‘ an, den
das Gerät in seiner eigenen Anzeige darstellt. Hierbei kann
es leichte Unterschiede in der Benennung geben.
So zeigt ein Netzgerät der Serie PSI 5000 z. B. in seiner
Anzeige nur ganz allgemein „Remote“, wenn es sich in
Fernsteuerung befindet, das Statusfeld hier im Fenster
„Terminal“ gibt jedoch eindeutig die Schnittstelle an.
Der zulässige Bereich für alle Eingabefelder ist identisch mit dem, was das Gerät bei manueller Bedienung am Bedienfeld zuläßt. Der Einstellbereich eines Schutzwertes liegt immer bei 0…110% des zugehörigen Nennwertes. Werte
außerhalb des zulässigen Bereiches werden einfach verworfen. Nach der Eingabe eines unzulässigen Wertes steht
dann wieder der vorherige im Eingabefeld.
Hinweis: Die Schutzwerte werden erst übernommen und an das Gerät gesendet, wenn man die Eingabe mit Taste
ENTER oder RETURN abschließt.
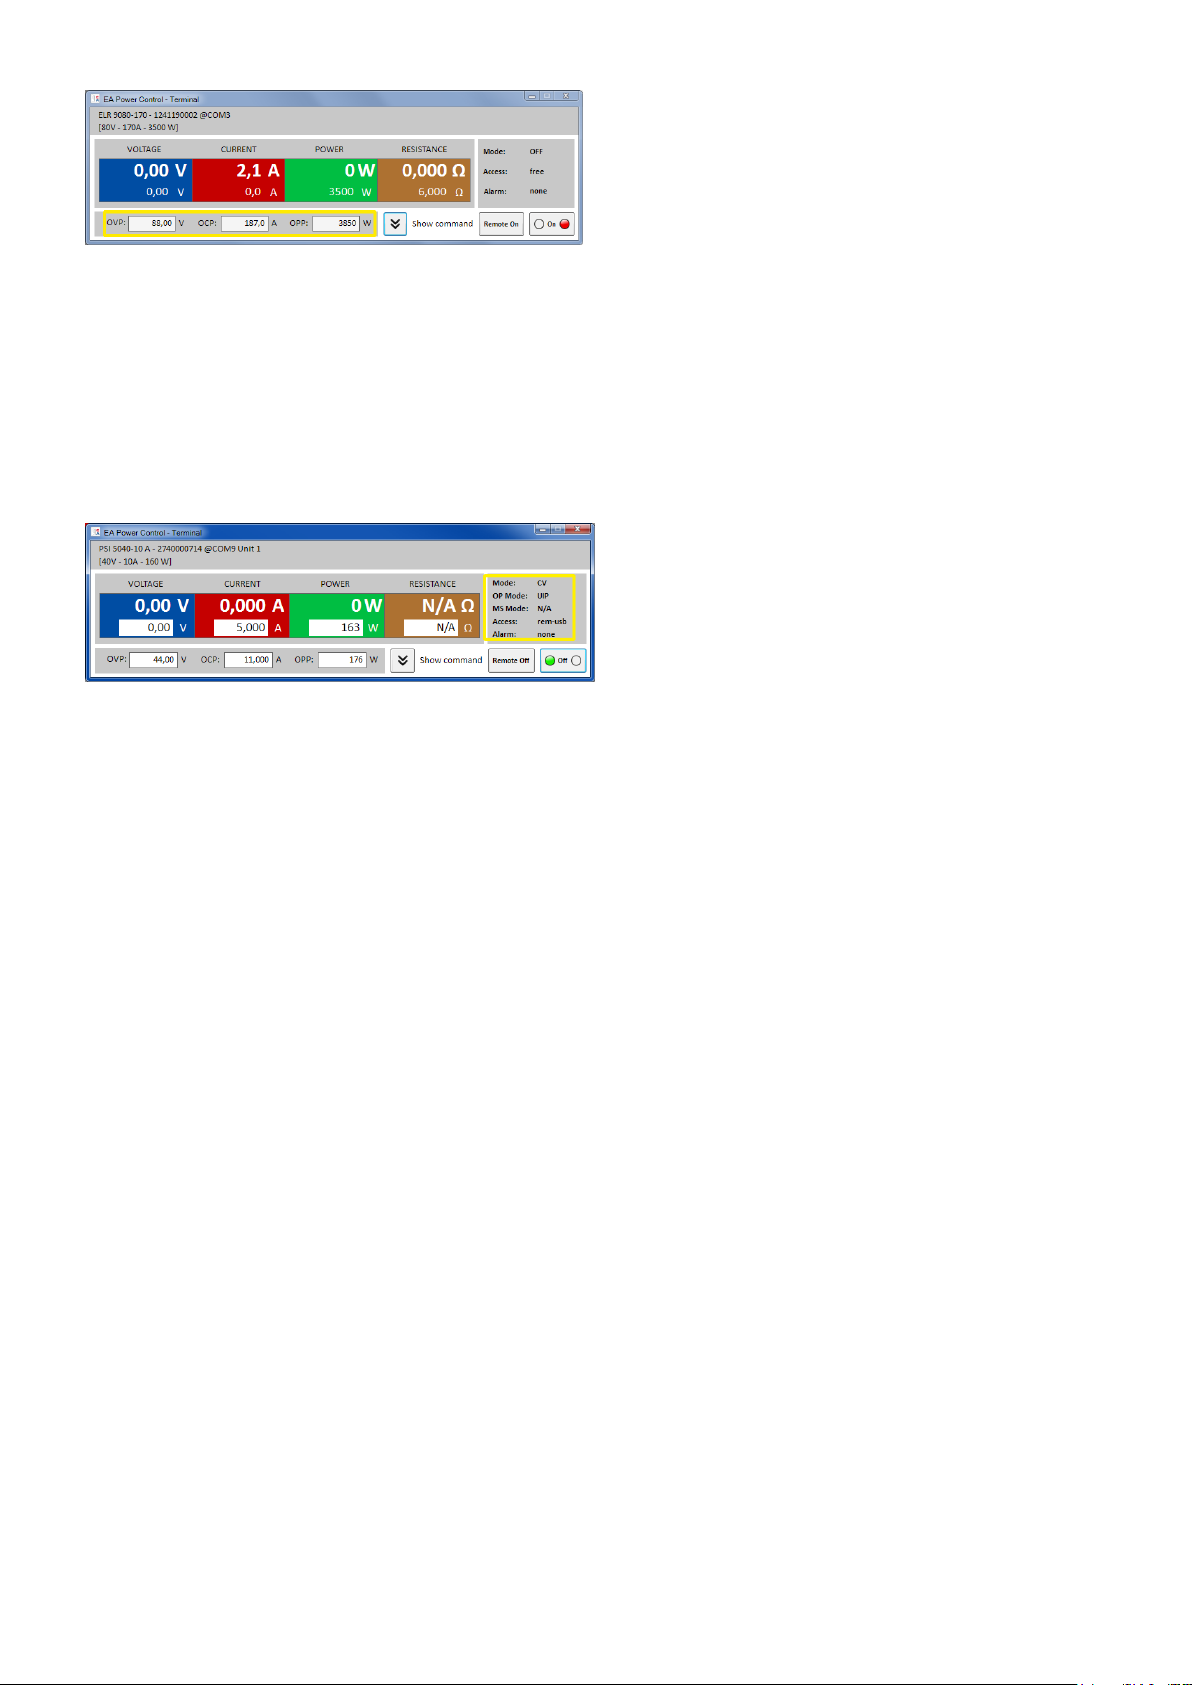
7.4 Status
Statusindikatoren:
Mode: Zeigt den Zustand des ausgeschalteten DC-Eingangs/Ausgangs mit „OFF“ an bzw. bei eingeschaltetem DC-
Eingang/Ausgang die aktuelle Regelungsart (CV, CC, CP, CR). Für Einzelheiten zu den Regelungsarten bitte das
Gerätehandbuch konsultieren.
OP Mode: Zeigt mit „UIR“ an, ob das Gerät die Widerstandsregelung (wo vorhanden) aktiviert hat bzw. mit „UIP“,
daß kein Widerstandsmodus aktiv ist.
MS Mode: Ein möglicherweise aktivierter Master-Slave-Modus (wo vorhanden) wird angezeigt durch:
N/A = Gerät verfügt nicht über die Funktion „Master-Slave“
Off = Master-Slave (MS) verfügbar, aber momentan ausgeschaltet
Slave = Master-Slave (MS) aktiviert, Gerät ist ein Slave (nicht fernsteuerbar)
Master = Master-Slave (MS) aktiviert, Gerät ist ein Master (fernsteuerbar)
Access: Zeigt den Zugriff auf das Gerät über eine Schnittstelle an („rem“ = remote = ferngesteuert) oder mit
„free“, daß sich das Gerät momentan nicht in Fernsteuerung befindet.
Alarm: Hier werden Gerätealarme angezeigt, wie im Display des Gerätes. Manche müssen, ähnlich wie bei manueller
Bedienung, bestätigt werden. Dazu wechseln die Taste „ON/OFF“, die sich unter dem Statusfeld befindet, in die Darstellung „ACK alarm“. Ein Klick darauf bestätigt den Alarm, sofern dieser nicht immer noch anliegt und bestätigt wer-
den kann. Erst nachdem alle Alarme bestätigt sind, wechselt die Taste wieder in die normale Darstellung zurück.
Hinweis: Der Status wird nur vom Gerät gelesen und ansonsten von anderen Bedienmöglichkeiten beeinflußt. Er ist
daher immer verfügbar, auch wenn das Gerät nicht in Fernsteuerung durch EA Power Control ist.
Doc-ID: EAPCDE Seite 10
Stand: 16.12.2015
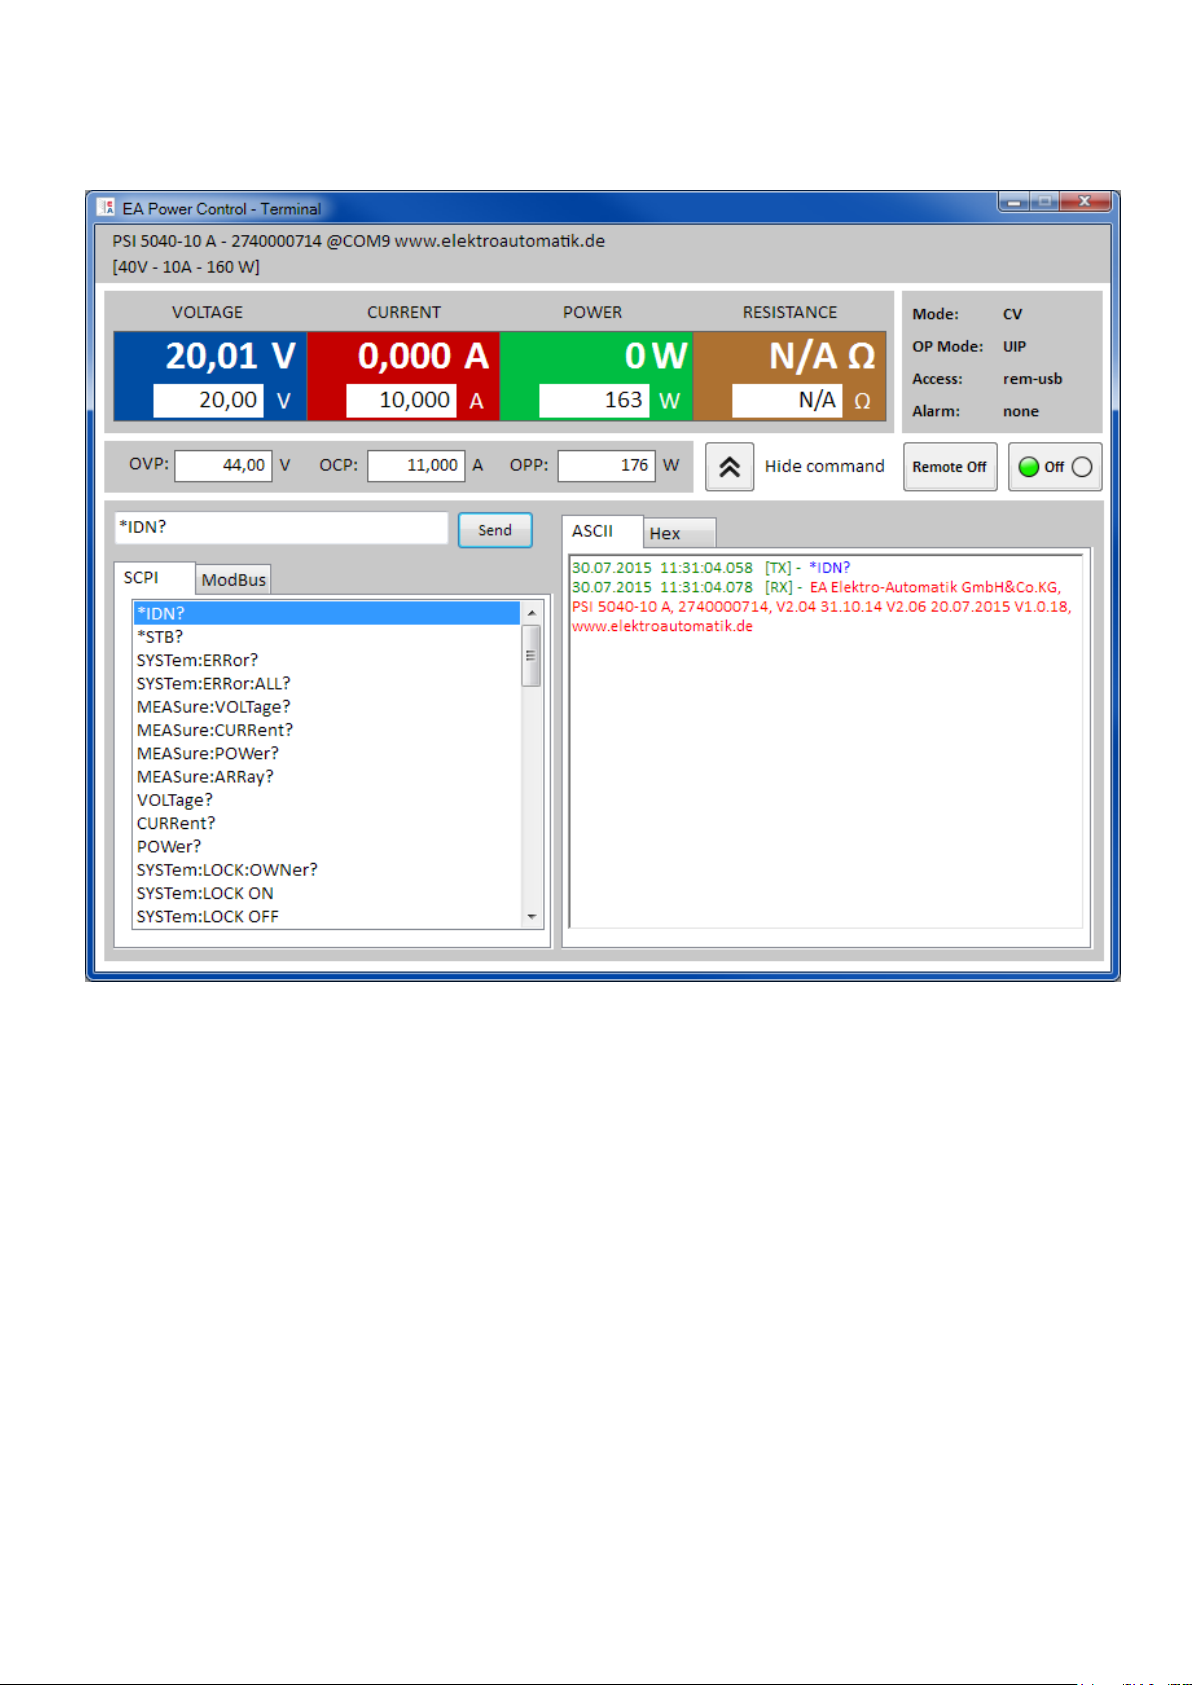
7.5 Commands (Befehlseingabe)
Im unteren Teil des App-Fenster kann der Anwender direkte Befehle in entweder ModBus-Format oder SCPI (wo
vorhanden) an das Gerät schicken kann, um so z. B. Informationen abzurufen oder weitere Steuerungsoptionen zu
nutzen, die im oberen Teil des Fensters nicht zugänglich sind.
Abbildung 7 - Direkte Befehlseingabe
Dazu ist in den beiden Tabs „ModBus“ und „SCPI“ eine Auswahl fertiger Befehle durch Klick direkt auswählbar. Wei-
tere Befehle (siehe allgemeine externe Dokumentation „Programming ModBus & SCPI“, die auch mit dem Gerät auf
CD oder USB-Stick mitgeliefert wird) können bei SCPI direkt in die Befehlszeile eingetippt bzw. bei ModBus durch
Auswahl von Funktionscodes und Registern nach ModBus-Standard im Tab „Free work“ zusammengeklickt und über
Knopf „Send“ an das jeweilige Gerät geschickt werden.
Der abgeschickte Befehl und eine eventuelle Antwort werden in einer Art Log im Fenster rechts mit Zeitstempel festgehalten. Im Beispielbild oben wurde z. B. der SCPI-Befehl *IDN? an ein PSI 5000 Gerät geschickt, was ca. 20 ms
später vom Gerät beantwortet wurde.
Während SCPI textbasiert ist und daher im ASCII-Tab des Log-Fensters aufgelistet wird, ist ModBus ein binäres Protokoll und wird daher im Hex-Tab aufgezeichnet.
7.5.1 Einschränkungen
Das Log zeichnet nicht alles im Hex- und ASCII-Tab parallel auf
Durch die Umschaltung zwischen Tab „SCPI“ und „ModBus“ wird auch der Eingabemodus für die Befehlszeile
von Text zu Hexwerten (und umgekehrt) umgeschaltet , so daß man bei ModBus-Modus zwar SCPI-Befehle
per Hand eintippen könnte, die aber nicht oder nicht richtig verarbeitet oder gesendet werden. Umgekehrt
genauso beim SCPI-Modus und ModBus-Befehlen als Hex-String
Doc-ID: EAPCDE Seite 11
Stand: 16.12.2015
8. App „SeqLog“ (Sequencing und Logging)
Abbildung 8
Ein wichtiges Feature der EA Power Control ist das Abarbeiten von Sequenzen (hier: Sequencing) und das Aufzeich-
nen (hier: Logging) von Gerätedaten. Eine Sequenz ist dabei ein Satz von Zeilen mit Sollwerten zusammen mit einer
Zeit x, die in einer Textdatei vom Typ CSV (Werte getrennt mit Semikolon, in Excel bearbeitbar) definiert werden.
Das Programm liest diese Werte zeilenweise aus und schickt die Sollwerte für Spannung/Strom/Leistung/Widerstand
sowie den Status des DC-Ausgangs/Eingangs für die gegebene Zeit x an das Gerät und arbeitet danach die nächste
Zeile ab usw. Es werden keine Sequenzen an das Gerät übertragen und darin gespeichert. Das ist mit EA Power
Control nicht möglich.
Beim „Daten-Logging“ funktioniert das ähnlich, nur andersherum. Hier wird ein Satz von Istwerten (Spannung, Strom,
Leistung), Sollwerten (dito), Datum, Zeit, Gerätestatus und Fehler in eine Textdatei vom Typ CSV (Werte durch Semikolon getrennt) geschrieben. Das Intervall kann vorgegeben werden (500 ms…99 h:59 m:59 s), bei einer Schrittweite
von 100 ms. Die Aufzeichnungsdauer und die Anzahl der aufgezeichneten Werte sind praktisch nur durch den Speicherplatz des PCs begrenzt.
Achtung! Die Sequenz-Abarbeitung in EA Power Control unterscheidet sich von dem in den Serien PSI 9000 und
ELR 9000 im Gerät vorhandenen, arbiträren Funktionsgenerator und seinen Sequenzen dahingehend, daß hier keine
Rampen oder Sinuskurven erzeugt werden. Das bedeutet, daß z. B. der Spannungswechsel zwischen zwei Schritten
abrupt erfolgt und während der Zeit x keine gerade Rampe durch das Gerät erzeugt wird.
Konfiguriert werden Logging und Sequencing in den Optionen (Knopf „ Options“). Für beide Funktionen muß der
Anwender eine Datei wählen, ohne die das Starten der jeweiligen Funktion nicht möglich ist. Für das Logging muß der
Anwender lediglich einen Dateinamen und Speicherort für die Datei festlegen, in die das Programm die aufgezeichneten Daten schreibt. Das gilt für jedes Gerät separat, für das Aufzeichnungen gemacht werden sollen. Das Logging von
Daten mehrerer Geräte in eine einzige Logdatei ist nicht möglich.
Für Sequencing muß eine bereits bestehende Sequenzdatei gewählt werden, die nach der Auswahl auf Gültigkeit
geprüft wird. Das Format ist vorgegeben und wird mit einer mitinstallierten Beispiel-Sequenzdatei aufgezeigt. Diese
Sequenzdatei oder weitere können außerhalb des Programms z. B. mit Excel erstellt und bearbeitet werden.
Doc-ID: EAPCDE Seite 12
Stand: 16.12.2015

8.1 Sequencing
1
Für das Abarbeiten der Sequenzen muß eine gültige Sequenzdatei erzeugt und im Programm gewählt werden. Mit
dem Programm wird im Pfad "C:\Users\<user>\Documents\EAPowerControl" eine Beispielsequenz „example_se-
quence_file.csv“ installiert, die nach der Installation und dem ersten Start als Standardsequenzdatei gewählt ist.
Diese Datei kann zum Bearbeiten geöffnet werden, entweder außerhalb von EA Power Control oder über den Knopf
„Edit sequence file“ im Fenster „Options“ oder im Fenster „Sequencing / Logging“. Wird eine neue Sequenzdatei
gewählt oder mit der bereits gewählten, aber außerhalb von EA Power Control bearbeiteten das Fenster „Options“
verlassen, wird die Sequenzdatei erneut auf Gültigkeit überprüft und eventuelle Fehler in einem Meldungs-Fenster
angezeigt.
Generell gilt:
Sämtliche Sollwerte (U, I, P und R1) der gewählten Sequenzdatei dürfen die Nennwerte des momentan ge-
wählten Gerätes nicht übersteigen. Wenn man also eine Sequenzdatei, die ursprünglich mal für ein 200 VGerät erstellt wurde, ohne weiteres für ein 80 V-Modell öffnen wollte, würde ein einziger Spannungssollwert
in irgendeiner Zeile, der 80 V übersteigt, die Ablehnung der Datei bewirken.
Die Zeitwerte müssen die Minimumvorgabe (500 ms), Maximumvorgabe (99 h 59 m 59s) und die Schrittweite
(100 ms) einhalten. Es sind demnach Zeitwerte von z. B. 1,25 s nicht möglich.
Eine Sequenzdatei kann gleichzeitig für mehrere Geräte benutzt werden, die gleiche Nennwerte haben. Das
ist z. B. bei PSI 9080-170 und ELR 9080-170 nicht der Fall, da beide Modelle eine unterschiedliche Nennleistung haben. Bei PSI 9080-170 und PS 9080-170 deckt sich das dagegen. Sogar trotz der Tatsache, daß das
PS 9000-Modell keinen Widerstandsmodus aufweist.
Die App „SeqLog“ kann für bis zu 10 Geräte gleichzeitig geöffnet werden. Für jedes Gerät kann eine separate
Sequenzdatei gewählt und abgefahren werden. Es ist nicht möglich, das Sequencing in allen Fenstern gleichzeitig zu starten. Das ist nur in der App „Multi Control“ möglich. Siehe 12. App „Multi Control“.
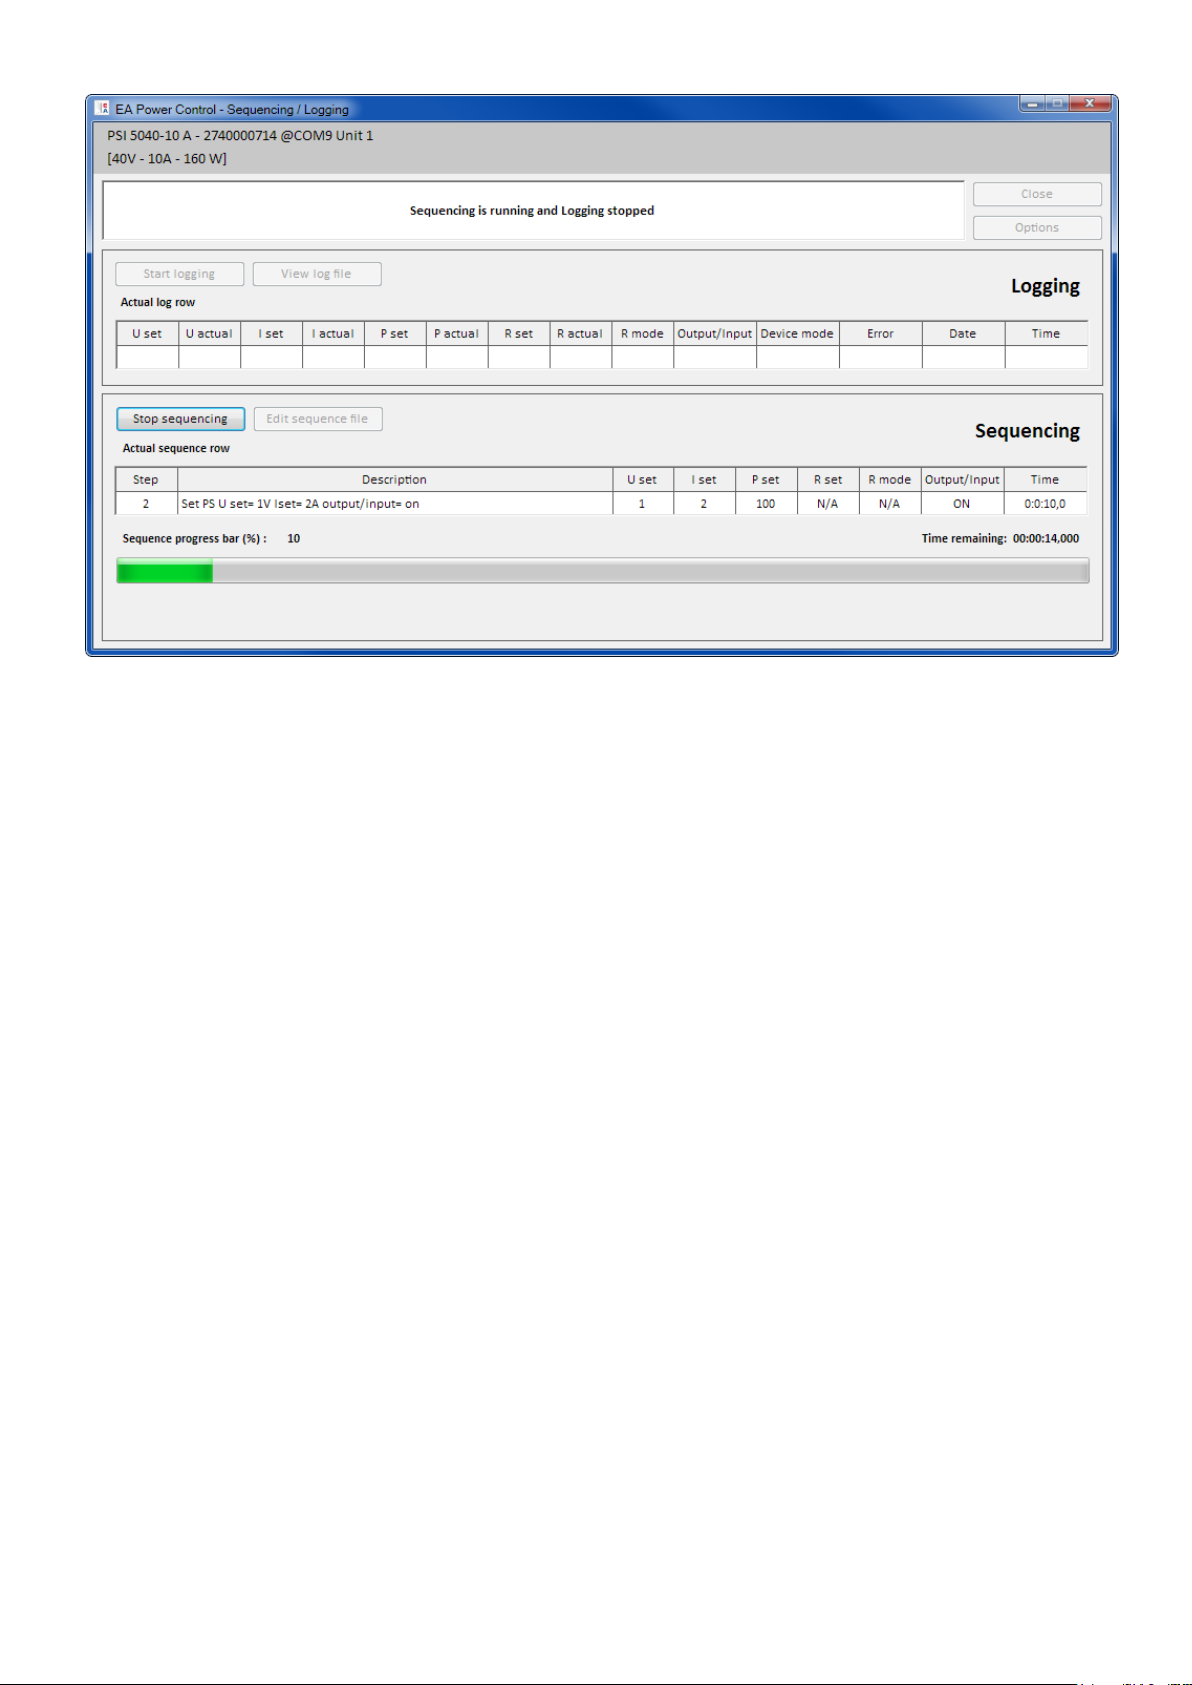
Sofern eine gültige Sequenzdatei in den Optionen gewählt wurde, kann im Fenster „Sequencing / Logging“ die Se-
quenz gestartet werden. Dabei wird der aktuell in der Tabelle abzuarbeitende Schritt in das Fenster kopiert. Der Fortschrittsbalken zeigt den Fortschritt eines Durchlaufs durch die Sequenz in % an, sowie die Restzeit bezogen auf die
Gesamtzeit der Sequenzzeilen. Ist in den Optionen „Repetition“ (Wiederholung) aktiviert worden, wird unter dem
Fortschrittsbalken ein Zähler für Wiederholungen angezeigt. Bei unendlicher Wiederholung („Endless loop“) wird
keine Restzeit angezeigt.
Folgendes gilt zusätzlich:
Sequencing stoppt automatisch am Ende einer Sequenz bzw. wenn die Anzahl der gewünschten Wiederholungen
erreicht wurde, oder bei Gerätefehlern wie OV
Sequencing kann nicht pausiert. Jeder Start nach einem Stopp, sei es durch den Anwender oder durch einen
Gerätealarm, läßt die Abarbeitung der Sequenzdatei von vorn beginnen
Logging kann mit Sequencing zusammen automatisch gestartet und auch gestoppt werden. In den Optionen finden
sich dazu entsprechende Einstellungen.
Logging kann nur gestartet werden, manuell oder automatisch, wenn auch eine Logdatei festgelegt wurde. Die
Logdatei muß für das Programm uneingeschränkt zugreifbar sein.
Die für ein bestimmtes Gerät zuletzt zugewiesenen Sequenz- und Logdateien werden in einer zu dem Gerät gehö-
rigen INI-Datei gespeichert, die bei erneuter Auswahl des Gerätes die beiden Dateien weiterverwendet.
Wenn eine Sequenzdatei für ein Gerät geöffnet wird, das keinen Widerstandsmodus bietet, werden die Einträge in
den Spalten „R set“ und „R mode“ als „N/A“ (not available, nicht verfügbar) angezeigt
Hinweise zum Sequencing-Betrieb:
Beim Start von Sequencing wird gemäß der Vorgabe der 1. Zeile eventuell der DC-Ausgang/Eingang ein- bzw.
ausgeschaltet und Sollwerte gesetzt. Das kann zu Spannungssprüngen am DC-Ausgang von Netzgeräten führen.
Nicht nur bei Fernsteuerung sondern generell verhält sich ein Netzgerät am Ausgang anders, wenn zuerst die
Sollwerte ungleich 0 gesetzt und dann der Ausgang eingeschaltet wird, als umgekehrt. Empfehlung: bei Anwendung einer Sequenz auf Netzgeräte für einen definierten Start den Spannungswert der ersten Zeile auf 0V setzen.
Nur für Netzgeräte: der Spannungswert einer Sequenzzeile kann einen stark unterschiedlichen Wert zu vorherigen
oder nachfolgenden Zeile haben. Ist die Ausgangsspannung eines Netzgerätes durch die vorherige Zeile viel höher
gesetzt worden als der Spannungswert der aktuellen Sequenzzeile, muß die Ausgangsspannung erst auf den Wert
der aktuellen Zeile absinken. Das kann, je nach angeschlossener Last, zeitlich länger dauern als die Zeit der aktuellen Zeile vorgibt und führt u. U. dazu, daß die nächste Zeile bzw. weitere nicht wie erwartet resultieren
Widerstandsregelung (R-Modus) nicht in allen Serien vorhanden. Der R-Wert bzw. die Aktivierung des R-Modus‘ in
der Sequenzdatei werden bei Serien, die keinen R-Modus bieten, vom Programm ignoriert.
Doc-ID: EAPCDE Seite 13
Stand: 16.12.2015
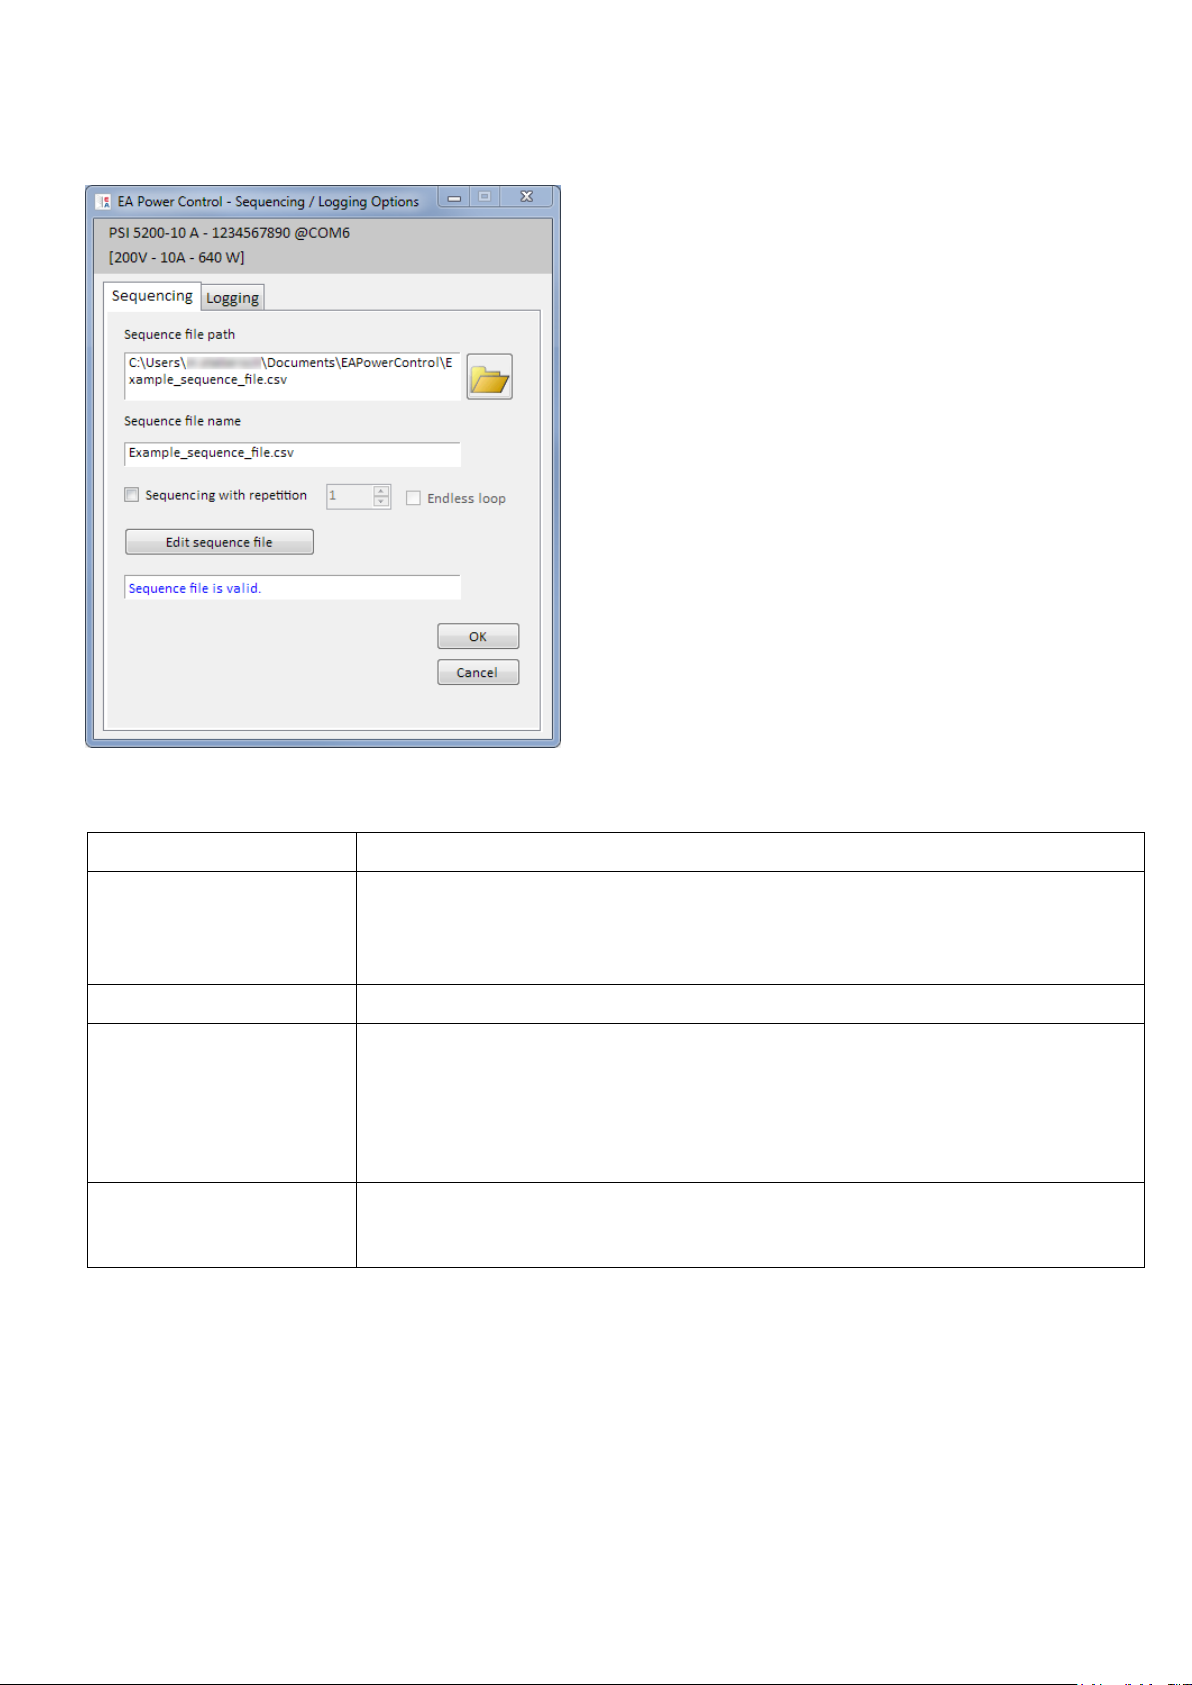
8.1.1 Einstellungen für Sequencing
Element
Beschreibung
Sequence file path
Mit dem Knopf rechts wird eine Sequenzdatei vom Typ CSV gewählt, die gültiges Format
haben muß. Standardmäßig ist eine Beispielsequenz von der Installation des Programmes hier eingetragen.
Standardeinstellung: example_sequence_file.csv
Sequence file name
Zeigt den Sequenzdateinamen separat an.
Sequencing with repetition
Aktiviert die Wiederholung der gewählten Sequenz mit der vom Anwender gegebenen
Anzahl Wiederholungen (Zähler im Fenster „Sequencing/Logging“ wird angezeigt). Ein-
stellbarer Bereich: 1...65500. Die zusätzliche Option „Endless loop“ aktiviert unendliche
Wiederholung der Sequenz und hat Vorrang vor der gewählten Anzahl von Wiederholungen.
Standardeinstellung: beide aus
Edit sequence file
Startet das einer CSV-Datei vom Betriebssystem her zugehörige Programm, z. B. MS
Excel, um die Datei außerhalb von EA Power Control zu bearbeiten. Die Datei muß vor
dem Start des Sequencing wieder geschlossen sein.
Hinweis: Die Einstellungen für das Sequencing sind auf das gewählte Gerät bezogen und werden gespeichert. Das
Gerät wird anhand seiner Seriennummer identifiziert und die Einstellungen beim nächsten Start des Programms wieder aktiv.
Abbildung 9
Doc-ID: EAPCDE Seite 14
Stand: 16.12.2015

8.1.2 Das Sequenzdateiformat
Die Sequenzdatei selbst muß im Datei-Format CSV sein, allerdings mit Semikolons statt Kommas als Trennzeichen
zwischen den Werten, so wie z. B. von Excel verwendet. Das liegt in der Tatsache begründet, daß in den meisten
europäischen Ländern das Komma als Dezimaltrennzeichen für Zahlen verwendet wird.
Das mitinstallierte Beispiel example_sequence_file.csv (siehe Fenster „Options“) zeigt den erforderlichen Aufbau der
Sequenzdatei. Falls eine neue Sequenz erstellt werden soll, wird empfohlen, eine bereits bestehende zu kopieren und
zu editieren.
Die Sequenzdatei ist ab EA Power Control Version 1.52 folgendermaßen aufgebaut (Beispiel):
Hinweis: im Vergleich zu vorherigen Versionen von EA Power Control wird nun Widerstandsmodus unterstützt (wo
vorhanden) und die Sequenzdatei um zwei Spalten rechts erweitert. Kompatibilität ist gegeben, ältere Sequenzdateien
können problemlos geladen werden kann, weil die zwei extra Spalten nicht zwingend erforderlich sind.
Für die Sequenzdatei gilt generell:
Zeile 1 wird als Kopfzeile benutzt und darf nicht für den ersten Sequenzschritt verwendet werden
Die Texte in Spalte A und B sind nicht erforderlich, aber hilfreich für die Anzeige der Sequenzschritte im Sequen-
cing/Logging-Fenster, sowie für das Verständnis des Lesers der Sequenzdatei
Werte in den Spalten C bis E, sofern eingetragen, dürfen die Nennwerte des momentan gewählten Gerätes nicht
übersteigen, ansonsten wird die Sequenzdatei für das Gerät nicht akzeptiert. Wenn man beispielsweise eine Sequenz für ein 80 V-Gerät erstellt, wo in einer Zeile 50 V vorgegeben wird und in allen anderen die Spannung mit
weniger als 30 V, dann würde diese Sequenz für ein 40 V-Gerät wegen der einen Zeile nicht akzeptiert werden
Die Spalten G bis J müssen Zahlen enthalten und dürfen nicht leer sein
Spalte K wird nur geprüft und benutzt, wenn die Sequenzdatei für ein Gerät geladen wird, das Widerstandsmodus
bietet. Einträge in den Zeilen dürfen dann leer sein oder ON (Widerstandsmodus UIR = ein) oder OFF enthalten.
Kein Eintrag (leer) bedeutet, es findet keine Änderung des Modus‘ statt
Spalte L wird nur geprüft und benutzt, wenn die Sequenzdatei für ein Gerät geladen wird, das Widerstandsmodus
bietet. Einträge in den Zeilen dürfen dann leer sein und falls nicht leer, müssen sie einen Wert enthalten, der zwischen dem minimalen und maximalen Widerstandsnennwert des Gerätes liegen muß.
8.2 Logging
Daten vom Gerät können nahezu jederzeit aufgezeichnet, auch wenn es sich nicht in Fernsteuerung befindet. Man
könnte so z. B. das Gerät über die analoge Schnittstelle steuern und über eine digitale Schnittstelle und via EA Power
Control die Istwerte aufzeichnen.
Die Aufzeichnung kann manuell oder automatisch, zusammen mit Sequencing, gestartet werden, sofern in den Optionen eine Logdatei festgelegt wurde. Dazu sind in den Optionen diverse Einstellungen vorhanden, siehe unten.
Folgendes gilt allgemein für Logging:
Logging kann, sofern eine Logdatei festgelegt wurde, jederzeit manuell für das gerade gewählte Gerät gestartet
werden
Wird Logging zusammen mit Sequencing automatisch gestartet, kann es trotzdem jederzeit manuell beendet wer-
den oder stoppt ggf. automatisch zusammen mit Sequencing oder bei einem Fehler, jenachdem wie die Einstellungen es festlegen.
Im Fenster “Optionen” kann entweder eine neue Logdatei erzeugt oder eine bereits bestehende zum Überschreiben
oder Anhängen von weiteren Daten geöffnet werden.
o Achtung! Vorsicht ist geboten bei Aufzeichnungs-Modus „Überschreiben“! Wenn Sie eine neue Logda-
tei erstellen, dann Logging starten und wieder stoppen und später erneut starten, werden die zuvor
aufgezeichneten Daten überschrieben!
Logintervalle können sich mit den Zeitwerten einer Sequenzdatei decken. Dann können die aufgezeichneten Ist-
werte in der Logdatei zu den entsprechenden Sollwerten in der Sequenzdatei mindestens erst in der nächsten Zeile
eingetragen werden. Beispiel: alle Sequenzzeilen haben einen Zeitwert von 1 s, das Intervall für Logging wurde
auch auf 1 s festgelegt und beides zusammen gestartet. In Zeile 5 der Sequenz steht „30 V“ als Spannungssollwert
für ein Netzgerät. Bei der Abarbeitung setzt das Gerät bei Erreichen von Zeile 5 dann 30 V für mindestens eine
Sekunde. Im gleichen Augenblick schreibt EA Power Control einen ausgelesene Spannungsistwert in die Logdatei- Zeile 5, aber einen anderen, weil die 30 V noch nicht gesetzt sind. Den dazu passenden Istwert kann es erst in
Zeile 6 des Logfiles eintragen.
Doc-ID: EAPCDE Seite 15
Stand: 16.12.2015
Da für ältere Excel-Versionen und ev. auch für ähnliche Programme eine max. Zeilenanzahl von 65536 besteht,
Element
Beschreibung
Log file path, Log file name,
Taste „New“, Taste „Open“
Hier werden Dateipfad und –name der Logdatei eingetragen, sofern eine mit „Neu“
erstellt wurde (Typ CSV) oder eine bereits bestehende mit „Öffnen“ geöffnet wurde,
um die alten Daten zu überschreiben oder neue Daten an die alten anzuhängen.
Log file action
Legt fest, ob bei Verwendung einer bereits bestehenden Logdatei die neuen Daten die
alten Daten überschreiben („Overwrite“) oder neue Daten an die bisherigen angehängt
werden („Attach“). Bei „Overwrite“ ist Vorsicht geboten, da ab der ersten Logdatei-Zeile
alle alten Daten gelöscht werden.
Standardeinstellung: „Überschreiben“
Log interval
Definiert den zeitlichen Abstand zwischen zwei Logdateizeilen und kann, während Logging läuft, nicht geändert werden. Bereich: 500 ms...99 h, 59 m, 59 s in 100 ms Schritten
Standardwert: 500 ms
Start logging automatically
with sequencing
Wenn aktiviert und falls eine Logdatei festgelegt wurde, wird Logging jedesmal automatisch gestartet, wenn man Sequencing startet, jedoch nicht automatisch gestoppt.
Stoppen muß bzw. kann jederzeit manuell erfolgen oder automatisch wenn „Stop log-
ging automatically with sequencing“ aktiviert ist.
Standardeinstellung: nicht aktiviert
Stop logging automatically
with sequencing
Wenn aktiviert, wird Logging jedesmal automatisch gestoppt, wenn auch Sequencing
stoppt, auf welche Weise auch immer (Ende der Sequenzdatei, Ende der festgelegten
Anzahl Wiederholungen, Gerätefehler)
Standardeinstellung: nicht aktiviert
wird bei Erreichen von 65500 Zeilen eine weitere Datei, eine Überlaufdatei erzeugt, in der das Logging weitergeht.
Diese erhält den Zusatz _001 im Dateinamen und wenn diese voll ist, dann _002 usw. Die zuletzt beschriebene
Datei wird in den Optionen von Sequencing/Logging eingetragen und das nächste Mal wieder verwendet. Sollte es
einmal vorkommen, daß der Zähler 1000 erreicht, wird das Logging automatisch gestoppt und eine entsprechende
Meldung erscheint.
8.2.1 Einstellungen für Logging
Abbildung 10
Doc-ID: EAPCDE Seite 16
Stand: 16.12.2015

Stop logging on error
Stoppt die Datenaufzeichnung wenn Gerätefehler wie OV oder OT passieren, die üblicherweise dazu führen, daß das Gerät keine Leistung mehr liefert und wo die aufgezeichneten Istwerte dann für die Dauer des Fehlers alle 0 wären. Wenn man jedoch
auftretende Fehler und deren Dauer (betrifft z. B. OT) aufzeichnen möchte, sollte diese
Option desaktiviert bleiben. Diese Funktion kann durch „Stop logging automatically
with sequencing“ ersetzt werden, wenn Sequencing parallel laufen soll, welches im
Falle eines Fehlers immer stoppt.
Standardeinstellung: nicht aktiviert
Doc-ID: EAPCDE Seite 17
Stand: 16.12.2015

9. App „Settings“
Die App „Settings“ bietet eine alternative Möglichkeit zur Einstellung diverser Betriebsparameter zu den Setup-Menüs
(wo vorhanden) der diversen Geräte. Im Gegensatz zur manuellen Bedienung des Setup-Menüs an der Bedieneinheit
des Gerätes erfordert diese App den Fernsteuerungsbetrieb. Sollte dieser momentan nicht möglich sein, kann die App
nicht gestartet werden.
Bei Geräteserien, die kein Setup-Menü haben, wie PS/PSI 5000, ist dies sogar die einzige Möglichkeit, um z. B. den
Eingangsspannungsbereich der Analogschnittstelle (außer PS 5000) zwischen 0…5 V und 0…10 V zu wählen.
Nicht alle im Fenster verfügbaren Parameter sind von jeder Serie unterstützt. Diese Parameter werden dann ggf.
gesperrt bzw. ausgegraut. Die Parameter selbst sind den Setup-Menüs der Geräte entnommen. Einzelheiten sind in
den Gerätehandbüchern zu finden.
Hinweis: bis zur aktuellen Version 1.52 beta kann die Settings-App nur geöffnet werden, wenn das Gerät über ein
USB-Kabel verbunden und von EA Power Control darüber erkannt wurde.
10. App „Update“
Die App dient zur Aktualisierung der Firmware der Microcontroller in den Geräten. Das können bis zu drei Stück sein.
Die für eine Aktualisierung benötigte Update-Datei (*.upd) kann von der Webseite des Geräteherstellers separat geladen oder auf Anfrage per Email zugeschickt werden.
Bevor man überhaupt eine Aktualisierung eines Gerätes startet, sollten man sich im Klaren sein, ob man das wirklich
tun möchte bzw. ob es überhaupt nötig ist. Generell gilt:
Aktualisieren Sie die Firmware eines Gerätes nur falls unbedingt nötig bzw. wenn Sie dazu aufgefordert werden.
Weitere wichtige Dinge, die man zu einer Aktualisierung wissen sollte:
Eine Aktualisierung kann fehlschlagen, wenn z. B. mittendrin ein Stromausfall auftritt. Jenachdem, welcher
Microcontroller bzw. Teil des Gerätes davon betroffen ist, kann es sein, daß das Gerät danach vorerst nicht
mehr gebrauchsfähig ist. Eine Wiederholung bzw. Wiederherstellung mittels EA Power Control ist dann nur
bedingt oder gar nicht möglich.
Man sollte möglichst niemals von einer höheren Version der Firmware auf eine geringere („Downgrade“) ak-
tualisieren, es sei denn, dies ist z. B. zu Testzwecken erforderlich. Das Programm wird in einem solchen Fall
extra Zustimmung anfordern. Nach einem Downgrade ist eine Aktualisierung auf eine neuere Version jedoch
wieder möglich.
Es kann vorkommen, daß ein neues Modell einer Geräteserie, die generell in der Software unterstützt wird,
nicht aktualisiert werden kann. Besteht irgendeine Art von Konflikt, sollte das Programm das mitteilen.
Im Update-Fenster kann die Update-Datei geöffnet werden (Taste „Browse“) und zeigt nach Gültigkeitsprüfung einige
Informationen an, wie die aktuell in der Datei enthaltenen Firmwareversionen für die einzelnen Komponenten und eine
Historie (nur englisch) der Änderungen der jeweiligen Firmware.
Dazu gibt es ein Ampelsystem, das den Anwender informiert, ob die Firmware-Aktualisierung der Komponenten
sinnvoll (Ampel grün)
nicht nötig (Ampel weiß)
nicht möglich (Ampel rot)
möglich, aber nicht ratsam (Ampel gelb)
ist. Nur bei grüner Ampel sollte man aktualisieren.
Der Anwender kann hier selbst entscheiden, ob einzelne oder alle Komponenten aktualisiert werden sollen. Das ergibt
sich schon allein aus dem Ampelsystem, kann aber zu Testzwecken auch dazu dienen, z. B. nur die Komponente KE
mit einer älteren Firmwareversion herunterzustufen. Um eine oder mehrere Komponenten zu aktualisieren muß explizit
der Haken in der Spalte „Install“ gesetzt werden, ansonsten wird der Schritt übersprungen.
Wurde mindestens eine Komponente zum Update ausgewählt, kann mit Klick auf „Update“ die Aktualisierung gestartet
werden. Der Rest geschieht weitgehend automatisch. Das kann einige Minuten dauern. Sorgen Sie während dieser
Zeit für ununterbrochene Spannungsversorgung.
Doc-ID: EAPCDE Seite 18
Stand: 16.12.2015

11. Lizenz-Management
Zusatzfunktion
Enthalten ab
Version
Kurzbeschreibung
Multi Control
1.52
App zur gleichzeitigen Steuerung und Überwachung von bis zu 20 Geräten.
Details über Multi Control finden Sie in 12. App „Multi Control“.
Abbildung 11 - Lizenzmanager
Ab Software-Version 1.52 ist ein Lizenzmanager in der Software enthalten, über den eine Lizenz in Form eines Lizenzcodes installiert werden kann, um zusätzliche Funktionen der Software freizuschalten. Diese zusätzlichen Inhalte
können optional und kostenpflichtig erworben werden, wahlweise bei der Bestellung eines Gerätes oder nachträglich.
Der Lizenzcode ist generell an den PC gebunden, auf dem die erworbene Lizenz installiert werden soll.
Fragen & Antworten:
Was ist zu tun, bevor Sie eine Lizenz benötigen?
Informieren Sie sich zunächst (Beratung durch den Vertrieb, Webseite, dieses Handbuch), welche zusätzliche Funktionen freigeschaltet werden können und ob eine oder mehrere davon für Sie interessant sind. Installieren Sie dann
die jeweils aktuellste Version von EA Power Control von unserer Webseite, auch um gegebenenfalls weitere neue,
teils kostenlose Funktionen zu erhalten. Wenn Sie sich entschieden haben, die Lizenz für eine oder mehrere freischaltbare Funktionen zu erwerben, kontaktieren Sie unseren Vertrieb zunächst für ein Preisangebot und führen alle gewünschten, freizuschaltenden Features mit ihrer Bezeichnung einzeln auf.
Momentan (Stand: 16.12.2015) sind folgende freischaltbare Zusatzfunktionen verfügbar, weitere werden folgen:
Wie komme ich an eine Lizenz?
Öffnen Sie in EA Power Control den Lizenzmanager (ab Version 1.52) über das Menü „„? -> License Management“
und klicken dort auf „Get License ID code“. Das öffnet ein Fenster mit weiteren Informationen. Klicken Sie dort auf
die angegebene E-Mailadresse, um Ihr Standard-E-Mail-Programm zu öffnen und eine Anfrage-E-Mail zu schicken.
Wie installiere ich einen Lizenzcode?
Nach dem Erhalt des Lizenzcodes (E-Mail, Text), der an einen bestimmten PC und seine einzigartige Computer-ID
(kurz: CID) gebunden ist, vergleichen Sie zur Sicherheit nochmals die CID des PCs mit der CID in der E-Mail mit dem
Lizenzcode. Die CID wird Ihnen in EA Power Control angezeigt über Menü „? -> License Management“ und im
Lizenzmanager-Fenster dann durch Klick auf „Get License ID code“. Nach dem Vergleich schließen Sie das Fenster
einfach. Sollten die beiden CIDs nicht identisch sein, hat sich die CID möglicherweise geändert bzw. die Lizenz wurde
für einen anderen PC erworben. Im ersteren Fall lesen Sie bitte unten bei „Was ist zu tun, wenn die Lizenz plötzlich
nicht mehr gültig sein sollte?“ nach.
Zum Installieren der Lizenz durch Eingabe des Lizenzcodes öffnen Sie den Lizenzmanager über das Menü „? ->
License Manager“. Geben Sie den Lizenzcode dann in die Eingabezeile „New License ID Code (LIC)“ ein bzw.
benutzen Sie Kopieren & Einfügen (Copy & Paste) aus der E-Mail mit dem Lizenzcode heraus. Wird der Lizenzcode
akzeptiert und die Lizenz installiert, wird sie im Lizenzmanager-Fenster angezeigt, sowie die durch die Lizenz freigeschalteten Zusatzfunktionen. Eine Lizenz kann mehrere Funktionen freischalten.
Hinweis: Speichern Sie die E-Mail bzw. den Kaufnachweis für eventuell späteren, erneuten Gebrauch sicher
und an einem Ort ab, der leicht wiederzufinden ist oder drucken Sie sie aus.
Doc-ID: EAPCDE Seite 19
Stand: 16.12.2015

Wie kann ich nachträglich weitere Funktionen freischalten?
Eine bereits installierte Lizenz schaltet nur bestimmte Zusatzfunktionen frei. Sollen weitere Funktionen freigeschaltet
werden, benötigen Sie einen anderen Lizenzcode. Diesen können auch über den Lizenzmanager und „Get License
ID code“ und eine E-Mail anfragen. Da ein Lizenzcode mehrere Zusatzfunktionen freischalten kann, müssen Sie auch
den Kaufnachweis für vorher erworbene Lizenzcodes mitschicken, damit der neue Lizenzcode auch diese wieder
freischaltet, plus den/die neuen.
Kann eine Lizenz auf einen anderen PC übertragen werden?
Nein. Es ist allerdings ein Mehrfachlizenz-Paket verfügbar. Bitte kontaktieren Sie unseren Vertrieb für ein Angebot
bzw. Hilfestellung. Besonders für den Fall, daß der PC, auf dem eine Lizenz installiert wurde, irreparabel defekt gegangen ist oder der PC nur zu Testzwecken vor Ort war und vielleicht an einen anderen Endbenutzer weitergegeben
wird.
Was ist zu tun, wenn die Lizenz plötzlich nicht mehr gültig sein sollte?
Es kann vorkommen, daß die installierte Lizenz plötzlich ungültig wird, z. B. weil sich die Konfiguration des PCs und
somit seine Computer-ID (kurz: CID) geändert hat. In diesem Fall vergleichen Sie zunächst die aktuelle CID mit der
zum Lizenzcode gehörigen. Diese sind zusammen in der E-Mail aufgeführt, die Sie nach dem Erwerb des Lizenzcodes
erhalten haben sollten. Die aktuelle CID wird Ihnen in EA Power Control angezeigt über Menü „? -> License Ma-
nagement“ und im Lizenzmanager-Fenster dann durch Klick auf „Get License ID Code“.
a) Sind die CIDs identisch, installieren Sie den Lizenzcode erneut. Siehe oben bei „Wie installiere ich eine Lizenz?“.
b) Im Fall, daß die sich die CID geändert hat, fragen Sie einen neuen Lizenzcode bei uns an. Schicken Sie uns
dazu eine E-Mail mit der neuen, geänderten CID zusammen mit dem Kaufnachweis, der die CID enthält, für die
der Lizenzcode mal erworben wurde. Wir werden dann eine neue Lizenz erzeugen und per E-Mail zuschicken.
Doc-ID: EAPCDE Seite 20
Stand: 16.12.2015
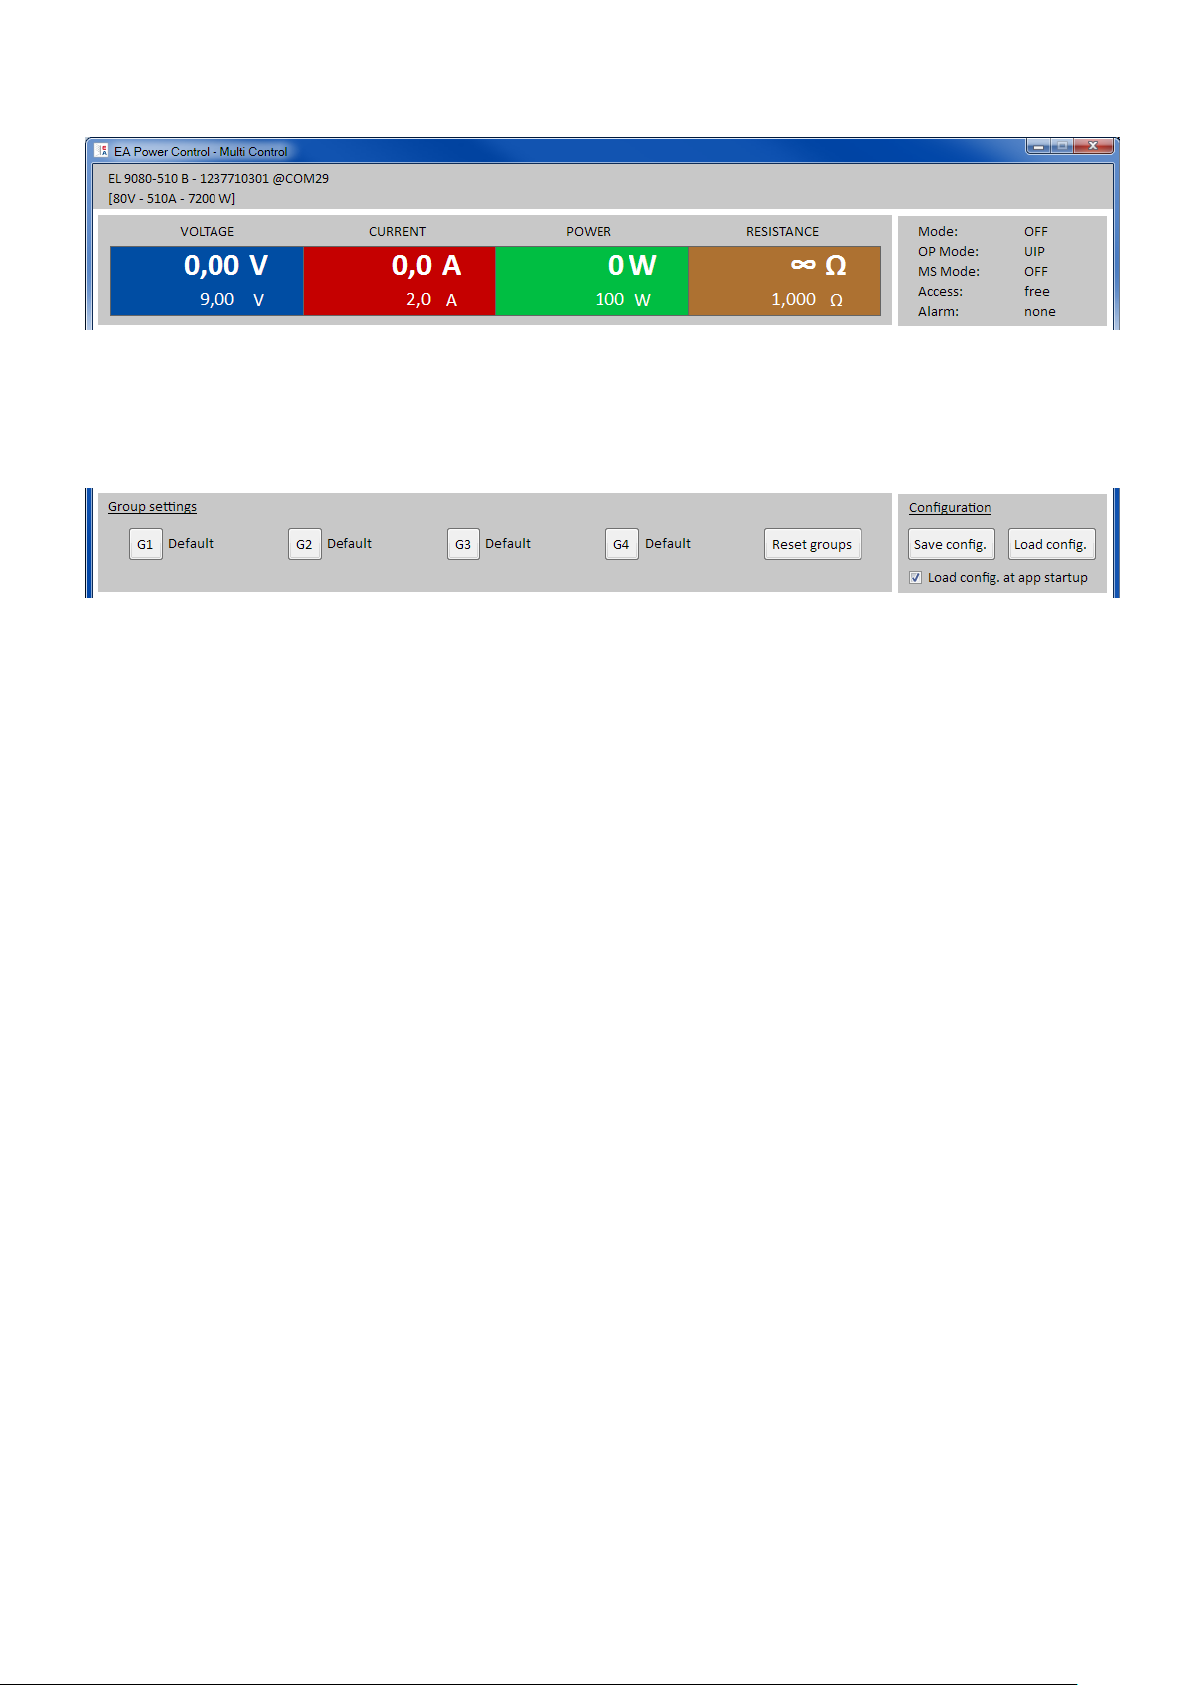
12. App „Multi Control“
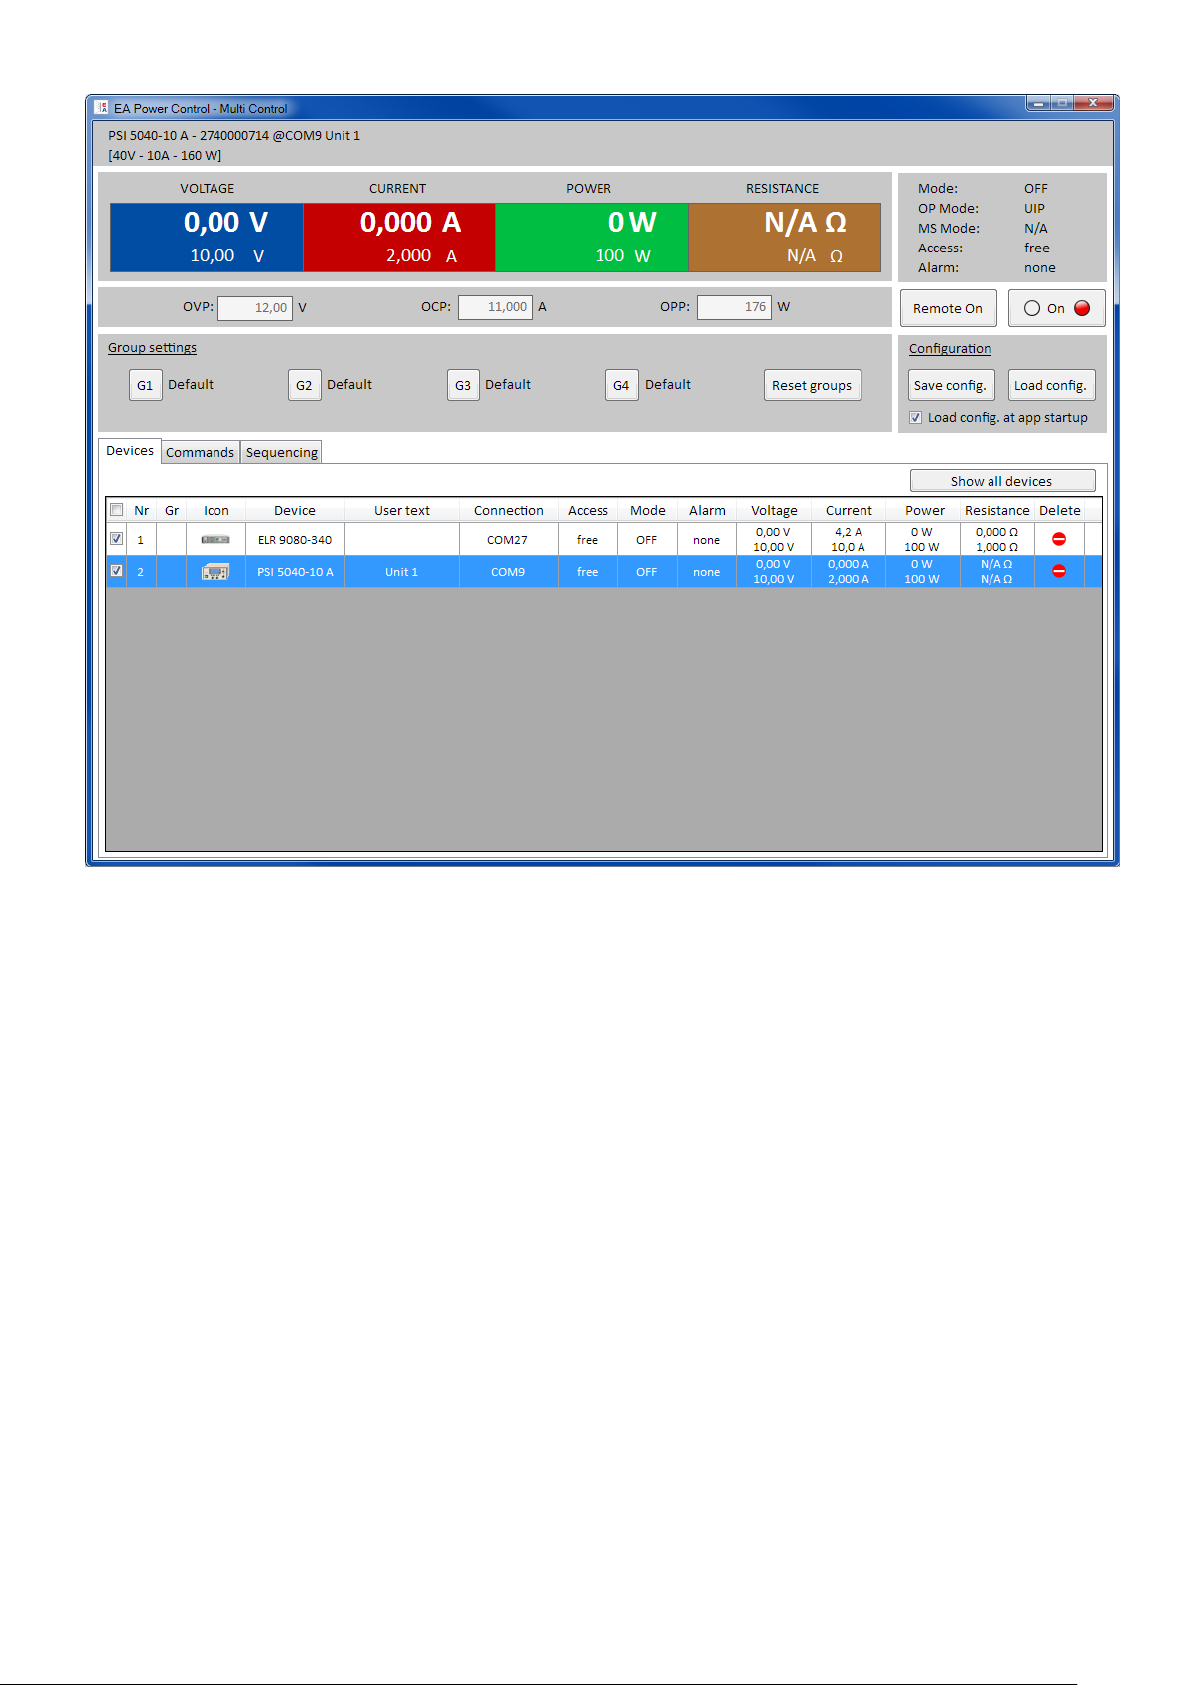
Abbildung 12 - Hauptansicht von Multi Control
Ab Version 1.52 der Software EA Power Control ist die App „Multi Control“ verfügbar, die optional und kostenpflichtig
erworben werden kann. Diese App ist nach der Installation der Version 1.52 zunächst nicht verfügbar bzw. gesperrt.
Zur Entsperrung muß eine Lizenz installiert werden. Näheres finden Sie in „11. Lizenz-Management“.
Die App dient zur gleichzeitigen Ansteuerung von bis zu 20 Geräten gleichen oder unterschiedlichen Modells und
Typs. Alle von EA Power Control erkannten und im Hauptfenster aufgelisteten Geräte werden auch hier angezeigt,
um sie für die Fernsteuerung direkt verwenden zu können, ohne in die App „Terminal“ wechseln zu müssen. Eventuell
nicht benötigte Geräte können aus der Liste entfernt bzw. auch wieder hervorgeholt werden, sofern noch mit dem PC
verbunden.
12.1 Einschränkungen
Es können bis zu 20 Geräte aufgelistet und bedient werden. Sollten mehr als 20 Geräte am PC angeschlossen
oder über das Netzwerk erreichbar sein, werden zuerst die über USB (COM-Port) gefundenen Geräte mit
aufsteigender COM-Portnummer aufgeführt, danach Netzwerkgeräte mit aufsteigender IP)
Sequencing kann nur auf die gewählten Geräte angewendet werden
Logging ist nicht verfügbar
Geräte, zu denen die Verbindung abgebrochen wird, können nicht automatisch wieder in der Geräteliste er-
scheinen
Einstellungen über die App „Settings“ können nicht für mehrere Geräte auf einmal gesetzt werden
Doc-ID: EAPCDE Seite 21
Stand: 16.12.2015
12.2 Funktionalitäten im App-Fenster
12.2.1 Oberer Fensterteil
Im oberen Teil des App-Fensters werden immer die Sollwerte, Istwerte, Status und Schutzwerte des gewählten Gerätes (blau markiert in Geräteliste) angezeigt. Dieser Fensterteil ist von der Anordnung und der Funktion der Elemente
her identisch mit dem Fenster „Terminal“. Näheres siehe 7. App „Terminal“.
12.2.2 Mittlerer Fensterteil
Der mittlere Fensterteil dient zur Verwaltung der Gerätegruppe. Alle max. 20 Geräte können irgendeiner der vier Gruppen zugewiesen werden, pro Gruppe sind max. 20 Geräte möglich. Die Zuweisung geschieht jedoch in der Geräteliste
an sich, mehr dazu siehe unten bei „Tab „Devices““. Die Knöpfe dienen nur zur Auswahl der Geräte, die zu der jeweiligen Gruppen zugeordnet wurden. „Auswahl“ heißt hier, daß in der Geräteliste in Spalte 1 der Haken vor den Geräten
gesetzt wird. Ebenso umgekehrt verhält es sich bei der Abwahl. Die Knöpfe sind, wenn aktiviert, blau überlagert.
Alle nach der Auswahl erfolgenden Aktionen, wie Sollwerte setzen oder DC-Eingang/Ausgang schalten, werden nur
auf die Geräte der gewählten Gruppe(n) angewendet. Man kann so den unterschiedlichen Gruppen unterschiedliche
Werte zuweisen. Generell gilt für die Gruppen:
Ein Gerät aus der Geräteliste kann immer nur einer der 4 Gruppen zugewiesen sein oder gar keiner
Die Gruppenkonfiguration wird nicht automatisch gespeichert, kann aber manuell gespeichert („Save config.“)
und danach auch automatisch aus der zuletzt geladenen Konfiguration wiederhergestellt werden
Geräte, die in einer Gruppenkonfiguration gespeichert wurden und mittlerweile nicht mehr verfügbar sind, wer-
den nach dem Laden einer Konfiguration in der Geräteliste zunächst als „getrennt“ und ausgegraut dargestellt,
können aber manuell gelöscht oder automatisch durch Klick auf „Show all devices“ entfernt werden
Bereich „Group settings“
Knöpfe G1 – G4 Auswahl/Abwahl einer oder mehrerer Gerätegruppen
Knopf Reset groups Löscht die Zuordnung der Geräte zu allen Gruppen, setzt den Gruppennamen
aller Gruppen auf „Default“ zurück
Gruppennamen Die Gruppennamen rechts neben den Knöpfen G1 – G4 können umbenannt
werden (Doppelklick auf den Namen) und werden mit der Konfiguration gespeichert
Bereich „Configuration“
Knopf Save config. Speichert die aktuell gesetzte Gruppenkonfiguration in eine *.ini Datei. Diese
kann nach Bedarf oder durch die Option „Load config. at app startup“ automatisch geladen werden
Knopf Load config. Lädt eine zuvor mal gespeichert Gruppenkonfiguration (*.ini) vom Datenträger
und setzt diese auch als die zu ladende Konfiguration für die Option „Load
config. at app startup“
Option Load config. at app startup Eingeschaltet bewirkt die Option, daß die zuletzt mal über “Load config.” ge-
ladene oder über „Save config.“ gespeicherte (was davon als letztes ge-
schah) Konfiguration automatisch beim Start der App geladen wird, um die
Gruppen wiederherstellen.
Doc-ID: EAPCDE Seite 22
Stand: 16.12.2015
12.2.3 Unterer Fensterteil
Spalte
Spaltenname
Spalteninformation
1 - Haken für Einzel- und Mehrfachauswahl von Geräten für gemeinsame Aktionen
2
Nr
Gerätenummer in der Liste
3
Gr
Gruppenzuweisung (G1 ... G4, ohne Gruppe wenn leer)
4
Icon
Geräte-Icon wie im Hauptfenster, dient zur Erkennung
5
Device
Bezeichnung des Gerätes
6
User text
Zeigt den vom Anwender definierbaren Benutzertext in abgekürzter Form
7
Connection
Kennung der Schnittstelle über die das Gerät verbunden ist (COM-Port oder IP)
8
Access
Status des Fernsteuerungs-Modus‘. free/local = nicht ferngesteuert, remote = ferngesteu-
ert
9
Mode
Status des DC-Eingangs/-Ausgangs des Gerätes
2
Tab „Devices“ (Geräteliste)
EA Power Control listet hier nach dem Start der App „Multi Control“ alle momentan bekannten Geräte auf. Die Liste
kann später verändert werden, indem nicht benutzte Geräte entfernt werden. Für diese Liste gilt:
Sollte die Verbindung zu einem Gerät mal abbrechen, wird dieses zunächst in der Liste ausgegraut dargestellt
und bei Betätigung des Knopfes „Show all devices“ gelöscht
Die Liste kann nur mit neu hinzugefügten oder wieder zu verbindenden Geräten aktualisiert werden, indem
die App „Multi Control“ geschlossen und im Hauptfenster über App „Search devices“ wieder nach Geräten
gesucht wird
Geräte, zu denen noch eine Verbindung besteht (Spalte „Connection“) und die aus der Liste gelöscht werden
(Klick in Spalte „Delete“) können durch den Knopf „Show all devices“ wieder angezeigt werden
In der Geräteliste können Sie...
ein Gerät auswählen (Zeile), um dessen Werte und Status im oberen Fensterteil angezeigt zu bekommen
ein, mehrere oder alle Geräte durch Hakensetzen auswählen, um
o diesen nahezu gleichzeitig2 denselben Sollwert oder Status zu schicken
o mit diesen paralleles Sequencing ablaufen zu lassen
ein oder mehrere Geräte einer oder mehreren Gruppen zuweisen, um
o schneller bestimmte Gerätetypen auswählen zu können
o den Gruppen unterschiedliche Sollwerte und Status zuzuweisen
ausgewählte Geräte aus der Liste entfernen
vormals gelöschte Geräte wieder hervorholen
für ein gewähltes Gerät die App „Settings“ aufrufen, um Betriebsparameter anzupassen
Sofern mindestens ein Gerät in der Liste angezeigt wird, ist immer eins davon ausgewählt (blau markiert). Von diesem
Gerät werden die Sollwerte, Istwerte, Schutzwerte und Status im oberen Fensterteil angezeigt. Per Klick auf ein anderes Gerät wechseln die Auswahl und die Anzeige.
Die Gerätliste zeigt in kompakter Ansicht viele Informationen:
Durch die verwendeten Schnittstellen (USB, Ethernet) ist es rein von der Verbindung der Geräte zum PC nicht möglich, einen Befehl an alle Geräte gleichzeitig zu schicken. Stattdessen wird derselbe Befehl an die gewählten Geräte
nacheinander mit dem kurzmöglichsten zeitlichen Abstand geschickt.
Doc-ID: EAPCDE Seite 23
Stand: 16.12.2015

10
Alarm
Zuletzt aufgetretener Alarm (Kopie aus der Anzeige am Gerät)
11-14
U, I, P, R
Die drei bzw. vier aktuellen Istwert (oben) bzw. die momentan aktiven Sollwerte (unten)
des Gerätes
15
Delete
Dient zum Entfernen eines Gerätes aus der Liste durch Klick auf das Symbol in der Spalte
Menüpunkt
Parameter
Effekt
Open in
Settings
Öffnet die App „Settings“ für das Gerät der markier-
ten Zeile. Siehe auch „9. App „Settings““
Set group
G1, G2, G3, G4, None
Weist ein Gerät einer Gruppe (G1...G4) zu bzw. hebt
die Zuweisung auf (none).
Send CMD
ACK alarm
Alternative Methode um einen Alarm bei einem Gerät zurückzusetzen (Zeile rot markiert)
Set group for all marked devices
Durch einen gesetzten Haken gewählte Geräte auf
einmal einer Gruppe zuweisen bzw. die Zuweisung
aufheben
Set values for all marked devices
Schickt die im oberen Fensterteil gesetzten Sollwerte U, I, P, R an die durch einen gesetzten Haken
gewählten Geräte
Try to connect
Versucht, Verbindung zu einem in der Liste ausgegrauten Gerät („disconnected“) wiederherzustellen.
Ist das erfolgreich, kann es wieder verwendet werden
Hinweis: Werte oder Status in den Spalten können nicht geändert werden.
12.2.3.1 Kontextmenü
In der Geräteliste kann man für einzelne Geräte per Rechtsklick folgendes aus einem Kontextmenü ausführen:
Doc-ID: EAPCDE Seite 24
Stand: 16.12.2015
Tab „Commands“
Ähnlich wie bei der Steuerung von einzelnen Geräten über die App „Terminal“ (siehe „7.5 Commands (Befehlsein-
gabe)“), können hier weitere Dinge gesteuert und abgefragt werden, die im oberen Teil des Bedienfensters nicht zu-
gänglich sind.
Der hauptsächliche Unterschied hier ist, daß man den gewählten Befehl an ein Gerät oder die ganze Gruppen auf
einmal schicken kann, was bei einer Anfrage dann in einer gewissen Anzahl von Antworten resultiert, die der Anzahl
der momentan gewählten Geräte entspricht. Um die einzelnen Antworten im Logfenster zu den Geräten zuordnen zu
können, sind diese mit einem Präfix versehen, der aus dem Benutzertext des Gerätes besteht, sofern gesetzt. Siehe
Beispiel oben.
Tab „Sequencing
Die Möglichkeiten hier sind nahezu identisch mit den Sequencing-Funktionen der App „SeqLog“ für Einzelgerätesteue-
rung (siehe „8. App „SeqLog“ (Sequencing und Logging)“), mit ein paar Unterschieden:
Die gewählte Sequenz-Datei wird auf alle momentan gewählten Geräte angewendet
Die gewählte Sequenz-Datei wird auf Kompatibilität für alle momentan gewählten Geräte geprüft
Doc-ID: EAPCDE Seite 25
Stand: 16.12.2015
User guide to EA Power Control Software
Software version: 1.52 beta
Requirements for installation and operation:
- PC with min. 2GHz and 1GB RAM
- Windows 7 (32bit/64bit) or newer
- Microsoft .NET Framework 4.5.2 (included in the installer)
- This software is compatible to these device series:
o PSI 9000 2U
o PSI 9000 3U
o PS 9000 1U
o PS 9000 2U
o PS 9000 3U
o PS 5000
o PSI 5000
o ELR 9000
o ELM 5000
o EL 9000 B
- This software is compatible to these interface types:
o USB with virtual COM port driver
o Ethernet/LAN

Table of contents
1. Copyright .................................................................................................................................................................... 3
2. Introduction ................................................................................................................................................................. 3
3. Preparation ................................................................................................................................................................. 3
3.1 Install EA Power Control .................................................................................................................................... 3
4. Starting the software / Search for devices .................................................................................................................. 4
5. Conditions for remote control ..................................................................................................................................... 5
5.1 Controlling multiple units at once ....................................................................................................................... 5
6. Graphical user interface (GUI).................................................................................................................................... 6
6.1 Main window ...................................................................................................................................................... 6
6.2 Handling in the main window ............................................................................................................................. 7
6.2.1 Handling by double-click ................................................................................................................................ 7
6.2.2 Handling by drag & drop ................................................................................................................................ 7
6.3 Show device related information ........................................................................................................................ 7
6.4 Menu .................................................................................................................................................................. 8
7. App „Terminal“ ............................................................................................................................................................ 9
7.1 Actual values ...................................................................................................................................................... 9
7.2 Set values .......................................................................................................................................................... 9
7.3 Protection thresholds ....................................................................................................................................... 10
7.4 Status ............................................................................................................................................................... 10
7.5 Commands ....................................................................................................................................................... 11
7.5.1 Limitations .................................................................................................................................................... 11
8. App „SeqLog“ (Sequencing and Logging) ................................................................................................................ 12
8.1 Sequencing ...................................................................................................................................................... 13
8.1.1 Settings for Sequencing ............................................................................................................................... 14
8.1.2 The sequence file format ............................................................................................................................. 15
8.2 Logging ............................................................................................................................................................ 15
8.2.1 Settings for Logging ..................................................................................................................................... 16
9. App „Settings“ ........................................................................................................................................................... 18
10. App „Update“ ........................................................................................................................................................ 18
11. License Management .......................................................................................................................................... 19
12. App „Multi Control“ ............................................................................................................................................... 21
12.1 Limitations ........................................................................................................................................................ 21
12.2 Functions in the app window ........................................................................................................................... 22
12.2.1 Upper window area .................................................................................................................................. 22
12.2.2 Middle window area ................................................................................................................................. 22
12.2.3 Lower windows area ................................................................................................................................ 23
12.2.3.1 Context menu ....................................................................................................................................... 24
Doc-ID: EAPCEN Page 2
Date: 16.12.2015

1. Copyright
This software is only compatible to power supply and electronic load devices of the above listed series and to the listed
interfaces. Any changes to the software and its documentation are prohibited. Exceptions require permission of the
owner. Resale or rent are prohibited. Dissemination to third parties is permitted, if software and documentation remain
unaltered.
2. Introduction
EA Power Control is a Windows™ software to remotely control one or multiple units of compatible power supplies
and/or electronic loads. This happens via digital interfaces only. Currently supported are USB and Ethernet.
This software is based upon the programming language Visual C# and requires the Microsoft .NET Framework with a
certain minimum version which might be already installed on the PC system or will be installed by the installer of the
software product.
3. Preparation
Before you start using EA Power Control, at least one compatible device should be connected to the PC. If the device
is connected via USB cable, it requires a USB driver to be correctly installed and running. The installed USB device can
be found in the Windows Device Manager, in section “Ports (COM & LPT)”. Example:
Note: the driver file is usually installed on the system only once. In case a new device is connected the first time or a
known device is connected to a different USB port of the PC, the device will be installed again. New devices will be
assigned an unused and unreserved COM port.
3.1 Install EA Power Control
Note: this software can only be installed for the user account in which the installer is started. Administrator permissions
are required for the installation.
The installation of the software is done via a standard installer setup. During installation you can select additional packages if these are not already installed:
Microsoft .NET Framework 4.5.2 or newer
USB driver (not needed for devices which are used via Ethernet only)
Microsoft Visual C++ run time package
After the installation you can start the software from desktop or via the Windows start menu in path:
Start\All Programs\EA Power Control\
Doc-ID: EAPCEN Page 3
Date: 16.12.2015
4. Starting the software / Search for devices
After the start of the software it can automatically search for connected, compatible devices on COM and Ethernet ports.
Which of both are included in the search can be defined in the “Configuration” app. This makes it possible to spare
searching for COM port devices if only Ethernet connection is used or vice versa.
The search can be repeated any time with app „Search for devices“, as long as the access to the main window is not
blocked.
After the search, detected and compatible devices are listed in the device list (“Devices”) as icons. The icons are cap-
tioned with the series name and the COM port resp. assigned IP they are connected to, as well as an user definable
text. Example with one detected device:
Figure 1
Note: In case a device is connected to the PC by two of its interfaces at the same time, USB has priority. The device is
then listed only once as connected via COM port.
If there are no devices found, the device list will be empty:
Figure 2
There are several reasons why a device is not detected by the search.
If the device shall be controlled via USB cable:
a. The USB driver is not installed or not correctly (see section „3. Preparation“)
b. The USB cable is not plugged or not plugged correctly
c. You have a device of a brand-new series and the currently installed version of EA Power Control
doesn’t support it yet. Updating the software can help here.
If the device shall be controlled via Ethernet:
a. The Ethernet port which is set on the device does not match the one in “Configuration”
b. One or more double IPs have been assigned or the default IP of the device has not yet been changed
to meet the local requirements (all devices are shipped with the same standard IP)
c. If DHCP is activated, the network server might have configured one or multiple units with totally different
IPs outside of the search range, which is defined in “Configuration”
Doc-ID: EAPCEN Page 4
Date: 16.12.2015

5. Conditions for remote control
The device you intend to use in remote control can be in different control states:
1). It is currently controlled by the analogue interface (where featured) and thus not controllable via digital interface.
2). It is in local state (display shows “Local”) and thus locked from remote control in terms of writing to it.
3). It is freely accessible. Then the PC can take over remote control.
If the situation is according to 3), the device will accept remote control commands (write access). Otherwise, only the
actual values of voltage, current and power are read and displayed (resistance is calculated). In order to set the device
into remote control, any other external control or local state has to be canceled manually at the device. Afterwards, it
can be set to remote control with button “Remote on” in the app “Terminal” (see below). Details about device states ng
can be found in the user manual of the device.
5.1 Controlling multiple units at once
Since version 1.52 of this software there are two separate ways to control and monitor multiple devices:
Control and monitoring in separate windows, one for each unit (feature included)
Control and monitoring in one window (“Multi control”) (not free of charge, optional)
Both ways work differently. The separate handling in single windows for each unit is only recommended for a small
number of devices, let’s say up to 5. When wanting to control and/or monitor more units, the overview would be lost with
that many windows open at the same time. This is what to use “Multi control” for, which offers the option to have up to
20 units of different devices in a clear overview in a single window. One of the primary functions of “Multi control” is to
set values or status of output/input on the selected device at the same.
Note: the feature “Multi control” is included in EA Power Control from version 1.52, but cannot be used without prior
installation of a license code which is not free of charge. For more information refer to 11. License Management and 12.
App „Multi Control“.
Single window operation mode allows for up to 10 devices at once. This can be achieved by opening the control app
“Terminal” for every unit and switch between the windows. Those windows can be arranged at will on the PC screen. All
units and windows work separately, there is no interconnection. More details below.
Note: Remote control or even just monitoring devices on their actual values requires constant communication. The more
devices are controlled/monitored, the more communication traffic will be generated and depending on the overall load
of the PC with background tasks and other software running, EA Power Control might slow down because of too little
CPU time. This can result in delayed response to buttons clicks or delayed refreshing of actual values and status.
Doc-ID: EAPCEN Page 5
Date: 16.12.2015

6. Graphical user interface (GUI)
Devices
This part will list the detected devices as icons. In case more devices were detected than would fit in
one row, the window will be expanded. The max. number of devices in the list can be 20. The software
supervises the devices and in case the connection to a device is lot, probably due to a removed cable,
the device will also be removed from the list after a short time. After re-establishing the connection
again, the device list is not automatically refreshed.
Apps
This part will show the available apps (short for: application). Every app offers a set of distinct features.
More apps can be installed for use within this software, once available.
App name
Functional description
Can be
started
several
times?
Search for devices
After double-click, it will start searching for compatible devices on the selected
interfaces. This is also used to refresh the device list. During the search a small
windows is opened in front.
-
Terminal
This app is the control application for the devices. It opens a window in which
actual values, set values, protection thresholds and status are shown. It can be
opened up to 6 times for any 6 devices from the device list. Furthermore, there is
direct access to almost every device feature by using commands in SCPI language (except for PS 5000 series) or ModBus protocol.
Yes, up to
10 times
Settings
Opens a window for comfortable access to device settings as they can be set up
in the MENU of the devices. For series which don’t have a setup menu, like PS
5000 and PSI 5000, this is the only way to access certain settings related to the
device operation.
Yes, up to
10 times
Update
Opens a window in which device firmware can be comfortably updated. Updates
require to load a special update file (*.upd), which can be obtained from the manufacturers website or upon request.
No
SeqLog
Opens the sequencing and logging window. See „8. App „SeqLog“ (Sequencing
and Logging)“ for more information.
Yes, up to
10 times
Multi Control
Unlockable feature (license with costs). See 12. App „Multi Control“.
Control and monitor up to 20 devices of same or different type at the same time,
with synchronous setting of values and status
No
6.1 Main window
After the start and search for devices (if search on start is activated), the main window will appear:
Figure 3
The windows is separated into two parts:
Apps overview (date: December, 2015):
Doc-ID: EAPCEN Page 6
Date: 16.12.2015

6.2 Handling in the main window
In the example with a PSI 5000 series power supply it becomes clear, that this
device does not feature resistance mode (R mode). You can also see that the
unit has no user text assigned (yet). The user text is intended to be used to
distinguish multiple identical devices.
The handling of the software, concerning the use of the device icons and app icons, can be done in two ways:
By double-click
By drag’n’drop
6.2.1 Handling by double-click
If you double-click an app icon it displays a device list in form of a context menu from which you can select a device to
start the app for.
Note: Some apps may restrict the use to a connection via USB cable only. A corresponding pop-up will notify you.
Figure 4 - Open apps by double-click
6.2.2 Handling by drag & drop
In order to open an app for a device from the device list, you can simply click the device icon, hold the mouse button
and drag the icon onto the wanted app and then drop it. Unless the current situation disallows opening the app, it will
be started. Otherwise it should pop up a message about why the app couldn’t be started.
Figure 5 - Open an app by drag & drop
6.3 Show device related information
In the device list you can right-click the device icons one to make a window pop up with device information. Example:
Doc-ID: EAPCEN Page 7
Date: 16.12.2015

6.4 Menu
Menu item
Description
File
Close
Closes the software immediately, no matter what other windows are still open yet.
Configuration
Opens the „Configuration“ window where you can set device communication related
settings and/or settings for the software itself
Tab „General“
The checkmarks in this tab enable or disable the support of device connection via
USB or LAN interface in this software. When using either one of them, disabling the
other can have positive impact on the performance of the software
Default setting: both enabled
Note: as long as both are disabled, search for devices can’t find anything!
Tab „USB“
Here you can choose to include (=checkmark set) the search for USB devices during the startup of the software. If no USB shall be used, it is recommended to turn
off both, this settings and the global interface USB setting in tab “General”. This
decreases search time.
In case the global interface USB setting is enabled and this parameter is disabled,
you can still start searching for USB devices with app “Search for devices”.
Default setting: enabled
Tab „Ethernet“
This tab is used to define the IP search range and the port for devices connected
via Ethernet. The search range is limited to the last octet. The default port 5025,
such as it is default on the devices with Ethernet socket, can be changed at will, but
only devices matching this port settings can be found within the IP range.
You can furthermore choose to include (=checkmark set) the search for Ethernet
devices during the startup of the software. If no Ethernet shall be used, it is recommended to turn off both, this settings and the global interface Ethernet setting in tab
“General”. This decreases search time.
In case the global interface Ethernet setting is enabled and this parameter is disabled, you can still start searching for Ethernet devices with app “Search for devices”.
Default setting „Search at startup“: disabled
Default port: 5025 (also see device manual)
Default IP range: 192.168.0.2 … 192.168.0.100
?
Help
Opens this help file (PDF)
About
Opens a small windows with information about the software and manufacturer details
Enable debug
For internal use only. Do not enable debug mode, as this will slow down the software
more or less, depending on the number of devices used in parallel.
Load patch file
This is used to load updates for EA Power Control itself, such as new and other
example sequence files or a newer version of this help document. Such patches will
be available as download from the manufacturer’s website once they become available or are sent via email upon request.
License Management
This window is used to give an overview about installed licenses and unlocked,
extended features. It can also be used to order a license or renew it, as well as
install a license code to unlock new functions. See 11. License Management.
Doc-ID: EAPCEN Page 8
Date: 16.12.2015

7. App „Terminal“
Model, serial
number, port
Actual values
Set values
Protection
Figure 6
Status
Buttons
Similar to the value coloring on the devices with color TFT
display, the actual values are separated from each other. In
the single fields, they are located at the top (big digits). The
colored area always shows at least three actual values. With
electronic loads, it also shows actual resistance.
The lower parts of the colored areas show the set values
(smaller digits). Those are input boxes, which are enabled for
putting in values via keyboard after the device has been
switched to remote control via any digital interface. This can
happen from within the Terminal window by using button “Re-
mote on” or the corresponding command.
After the input boxes have been enabled, they turn white and
you can enter values either by typing or by copy & paste.
The app “Terminal” is the main control application window for devices. It can be opened several times for up to 6 devices,
in order to control the device separately and sort of in parallel. There is no link or connection between these windows.
The window is used to control the device state (remote, on/off) by mouse clicks, while values have to be entered via
keyboard. Copy and paste is possible.
The upper part of the windows is for actual values, set values, protection thresholds and status.
In order to remote control any other function of the particular device, the upper part can be revealed by clicking the
“Show command” button. The tabs for SCPI command language (except for PS 5000 series) and ModBus protocol offer
predefined selections of commands which can be sent to the device by clicking the “Send” button. See 7. App „Terminal“.
7.1 Actual values
Refreshing of actual values is cyclic. High CPU load can, however, delay cyclic refreshing. Especially if there are multiple
Terminal windows open. The value format does not always match the format on the display of your device(s), primarily
regarding decimal places. Due to the internal translation from per cent values to real values the last digit can be different.
This also applies for data recording (i.e. logging, see below).
Note: Actual value are only read from the device(s) and are influenced by any operation on the device (manual or via
analog interface). They are always available, even if the device is not in remote control by EA Power Control.
7.2 Set values
The allowed range of value per input box is identical to what the device allows on the front panel for manual use. The
adjustment range of a set value is by default 0…102%, which can be narrowed by the so-called adjustment limits (here
short: Limits). These can be defined manually in the MENU of the device or via EA Power Control in app “Settings”.
In case, any value you enter is too high or too low, it is not accepted and the former value will be displayed again.
Note: Set values are only submitted to the device after pressing key ENTER or RETURN as confirmation.
Doc-ID: EAPCEN Page 9
Date: 16.12.2015

7.3 Protection thresholds
The so-called protection thresholds are display boxes and input boxes. There are only enabled for entering values while
the device is in remote control via digital interface.
Remote control condition is displayed in the status area by
parameter “Access:”. After the input boxes have been enabled, you can enter values either by typing or by copy & paste.
The status area shows a copy of the device status as indi-
cated on the device’s display. There can be slight differ-
ences. For example, a PSI 5000 device only shows “Remote” in the display, no matter if remotely controlled via an-
alog or digital interface. The status area clearly shows the
type of interface in charge (see below).
The allowed value range per input box is identical to what the device allows to adjust on the front panel for manual use.
The adjustment range of a protection threshold always is 0…110% of the related nominal value.
In case, any value you enter is too high or too low, it is not accepted and the former value will be displayed again.
Note: Set values are only submitted to the device after pressing key ENTER or RETURN as confirmation.
7.4 Status
Status indicators:
Mode: Displays the condition of the DC output/input as “OFF” while it’s off and while it is switched on, the actual
regulation mode (CC, CV, CP, CR) is indicated here. For details about regulation modes please refer to
the device manual.
OP Mode: Indicates with “UIR” that resistance mode (where featured) or normal mode with “OP Mode = UIP” is
active.
MS Mode: Shows the status of master-slave mode (where featured) with:
N/A = Device does not feature „Master-Slave“
Off = Master-Slave (MS) is available, but deactivated at the moment
Slave = Master-Slave (MS) is available, device is set as Slave (remote control not possible)
Master = Master-Slave (MS) is available, device is set as Slave Master (remote control possible)
Access: Shows the access to the device via interface as available for remote control with “free” or while the device
is in remote control, the type of interface in charge (“rem” = remote control).
Alarm: Shows the last device alarm of the device. Some device alarms switch off the DC output/input and have
to be acknowledged before the device can be used again. In such a situation, the button ON/OFF below
the status area changes to “ACK alarm”. It has be used to clear the alarm condition and to enable the
ON/OFF button again, but only after there is no alarm present anymore.
Note: Statuses are only read from the device(s) and are influenced by any operation (manual or via analog interface).
They are always indicated, even if the device is not in remote control by EA Power Control.
Doc-ID: EAPCEN Page 10
Date: 16.12.2015

7.5 Commands
The app window can reveal an extra part by clicking on the “Show command” button. This allows the user to directly
access the device with commands in either ModBus or SCPI (where featured) protocol/language format, in order to
query other information from the device or to access functions which are not available in the upper window part.
Figure 7 - Direct commands
The tabs “SCPI” and “ModBus” both offer a selected set of commands to choose from and send by click on the “Send”
button. Further SCPI commands can be directly typed into the input box (see external documentation “Programming
ModBus & SCPI”, which is also delivered with the device on CD or USB stick), while further ModBus commands can be
created in tab “Free work” by selecting registers and function codes according to ModBus RTU standard.
All commands sent and answers received in the selected mode are logged with time stamp in the window part on the
right-hand side. The example screenshot above shows that SCPI command *IDN? has been sent to a PSI 5000 device
and the device responded after approx. 20 ms.
While SCPI is a text based command language it is logged in the ASCII tab, ModBus is a binary format and thus logged
in the Hex tab.
7.5.1 Limitations
The log does not record all commands in parallel in ASCII and Hex tabs
When switching between tab “SCPI” and tab “ModBus”, the input mode for the command input box also
changes, meaning that typing a SCPI command while ModBus mode is selected won’t result in correct trans-
fer and execution and vice versa, if SCPI mode is active
Doc-ID: EAPCEN Page 11
Date: 16.12.2015

8. App „SeqLog“ (Sequencing and Logging)
Figure 8
A very important feature of EA Power Control is the ability to process sequence files (here: Sequencing) and to record
device data (here: Logging). A sequence is a set of rows with set values and a time x, which are stored in a text file of
type CSV (values separated by semicolon, not comma, due to Excel using the comma as decimal separator in most
european countries).
The software reads these sequence files row by row and send the values and status from the currently processed row
to the device, then waits for a certain time to achieve the period until the next step is processed. The period range is
quite big with 500 ms…99 h:59 m:59 s (step width: 100 ms).
Logging works similar, but vice versa. In selectable intervals (same definition as for sequencing), the software reads
actual values and statuses from the device and writes them step by step into a log file (text file, CSV format). The total
recording time and number of recorded entries is limited to a max. number of continuous log files of 1000.
Important! Sequencing of EA Power Control is different to what you can do with the sequences of the arbitrary
generator as featured in series ELR 9000 and PSI 9000s. Sequence file processing always sends the next values
as entered in the sequence file and thus the device cannot generate ramps to have a linear rise or fall between
two set values.
Logging and sequencing are configured in the “Options” window, which can be accessed from the “SeqLog” app window.
For both features it is required to select a separate file for EA Power Control to work with. Both, the sequencing and
the logging file, are also set separately for every unit used with sequencing & logging. It is not possible to record data of
multiple devices into one log file.
The log file doesn’t contain information to uniquely identify for what device it was created. Thus it is very important to
use file names which clearly assign a file to a device, perhaps by including the same user text in the file name.
For Sequencing you have to select an existing sequence file, which is checked for validity after every selection. The
sequence file format is defined (see below) and shown by an example file which is included in the installation and which
is the default sequence file when opening the SeqLog app the first time. Sequence file in arbitrary number can be created
outside of EA Power Control, with popular tools like Excel, other CSV tools or even text editors.
Doc-ID: EAPCEN Page 12
Date: 16.12.2015

8.1 Sequencing
Sequencing requires to select a sequence file for a device, which is tested for compatibility. In case there are errors in
the file they are pointed out in a pop-up window. The installation of this software includes an example sequence file in
path “C:\Users\<user>\Documents\EAPowerControl\example_sequence_file.csv“ which is preselected after in the software. You can use this file as a start and edit it according to your requirements.
Editing can done outside of EA Power Control or started from within the app window “SeqLog” or the “Options” win-
dow.
Before the start of sequencing the file is checked again in order to cover unnoticed external editing.
Basic rules:
All set values (U, I, P and R) must match the nominal values of the device for which the sequence file is going
to be opened. If you just open a sequence which was originally made for a 200 V model for an 80 V model, a
single voltage value in any row which exceeds 80 V will cause rejection of the file.
Time values have a minimum of 500 ms and vary in steps of 100 ms. Thus values of e.g. 1.25 s would not be
accepted.
A single sequence file can be opened for multiple identical devices to have parallel sequencing, as long as the
nominal values match. This is true for models PS 9080-170 and PSI 9080-170, even if the PS model does not
feature resistance mode, but would be true for ELR 9080-170 and PSI 9080-170, because they have a different
nominal power.
The app “SeqLog” can be started multiple times for up to 10 devices. For every device, a separate sequence
file can be selected. It is not possible to start Sequencing in all open SeqLog windows at once. For this, app
“Multi Control” can be used. See 12. App „Multi Control“.
After a valid sequence file has been opened and the device is in remote control, sequencing can be started in the app
window “SeqLog”. The current processed step is copied from the sequence file to the lower part of the window. The
progress bar indicates progression of one cycle of the sequence file. A countdown shows the remaining time of the
sequence (number of repetitions x total time of all rows in the sequence file), while a repetition counter counts the number
of repetitions, unless repetition was set to “Infinite loop”.
Following applies additionally:
Sequencing either stops automatically at the end of a sequence resp. if the desired number of repetitions has been
reached or because of device alarms like OV.
Sequencing cannot be paused. Every start after a stop, no matter if manually or due to a device alarm, will start the
sequence file all over
Logging can be started and also stopped automatically with sequencing. There are separate settings in the “Option”
windows, in tab “Logging”.
Logging can only be started, no matter if manually or automatically, if a log file has been defined, which must be
completely accessible for the software, i.e. not locked.
Paths and file names of sequence and logging files, once selected and assigned for a specific device, are stored in
an INI file and recalled the next time the device if detected by search for devices.
When opening a sequence file for a device which doesn’t feature resistance mode, the entries in columns “R set”
and “R mode” are shown as “N/A” (not available)
Tips for sequenced operation:
With the start of sequencing, the DC output/input of the device can be switched on or off and values are set as defined
by the 1st sequence row. This can lead to unexpected voltage steps on the DC output of a power supply. To avoid
this you might want to add another row as 1st row where the voltage set value is 0 and the DC input/output is set to
off.
With power supplies only: the voltage setting of in a sequence row can be very different to the voltage setting of the
previous or next row. In such a case, where the voltage has been set in the previous row to much higher than in the
current row, the voltage would have to sink first, which can take more time than defined for the current row, depending
on the load. This can even result in the next row not working as expected regarding voltage level and period of step.
Doc-ID: EAPCEN Page 13
Date: 16.12.2015

8.1.1 Settings for Sequencing
Element
Description
Sequence file path
The button with the folder icon opens a dialog to select a sequence file of type CSV,
which must contain data in a certain format, as explained below. By default, an example
sequence file is given here.
Default selection: example_sequence_file.csv
Sequence file name
Separately shows the name of the sequence file
Sequencing with repetition
Enables repetition of the entire sequence after it has been completely processed. You
can set a certain number of extra rounds. Range: 1…65500. The additional option “Infi-
nite loop” will repeat the sequence infinitely, until manually stopped or due to a device
alarm.
Default setting: both disabled
Edit sequence file
Tries to start the application (if there is any) which is assigned to open CSV files, in order
to open the sequence file in edit mode. It is required to save the changes and close the
file in the external application to be able to use the file for Sequencing.
Note: the settings for sequencing are per device. It means, the software distinguished devices by their serial number
and restores the settings after the next start.
Figure 9
Doc-ID: EAPCEN Page 14
Date: 16.12.2015

8.1.2 The sequence file format
The sequence file has to be in file format CSV, but with values separated by semicolons instead of commas, as MS
Excel creates them. The reason to use semicolons here is because commas are used for decimal places of numbers in
most european countries.
The installed example_sequence_file.csv depicts the required format of the sequence file.
It’s recommended to store the example sequence file as template for any new sequence file to be made.
The sequence file format (example) is built like this:
Note: compared to previous versions of EA Power Control, Sequencing now supports resistance mode (where featured)
and the sequence file has been extended by two columns. Older sequence files are compatible and can be used, because the two columns are not required.
The sequence file also has to follow these rules:
Row 1 is used as headline and must not be used as 1st sequence step.
The texts in columns A and B are not required, but are intended to help describing (column B) and counting (column
A) the steps.
All values in columns C thru E, unless left empty – which is allowed, must not exceed the corresponding nominal
values of the device which the file is opened for, else the sequence is rejected and the software will pop up an error
list. Example: you create a sequence file for an 80 V model and in one row you define 50 V. This sequence file could
not be loaded for a 40 V model.
Columns G thru J must only not be empty and must only contains number.
Column K is only checked for validity if the sequence is loaded for a device which features resistance mode. Entries
in this column can be empty or contain the string OFF (=resistance mode UIR not active) or ON.
Column L is only checked for validity if the sequence is loaded for a device which features resistance mode. Entries
in this column can be empty or if they’re not empty, the must contain a value which has to be within the minimum and
maximum resistance definition for the particular device model.
8.2 Logging
Device data can be recorded at almost any time, also while the device is not in remote control. It means, it is possible
to control a device via its analog interface (except for PS 5000 series) and record data through a digital interface in EA
Power Control, to do logging that is.
Logging can be started manually by pressing a button or automatically along with Sequencing, if this option is enabled
and a log file has been defined. The “Options” windows offers the necessary settings.
Following generally applies for Logging:
Logging can be started anytime if a log file has been defined and set up for the particular device.
In case Logging is started automatically with Sequencing, it also can be stopped anytime manually or it stops auto-
matically once Sequencing stops or if “Stop Logging on error” is enabled and an error occurs.
The “Options” window gives the choice to either create a new log file or open one for reuse.
o Attention! Be careful with the record mode “Overwrite” when opening existing files from disk! Previously rec-
orded data is lost if the setting is “Overwrite” and Logging is started the next time.
If Logging is automatically started with Sequencing and the log interval matches the time values in the sequence file,
the device has to receive and set the values of the current sequence row first. Afterwards, the device can be read by
Logging to record the updated values. This will cause the log file to have at least one row offset regarding the set
values and related actual values. The bigger the log interval, the bigger the time difference between sequence file
row and corresponding log file row.
o Example: the time values in the sequence file are all 1 s, the log interval also is 1 s. Sequencing and Logging
are started simultaneously. In row 5 it defines a voltage value of 30, which will cause a power supply to set 30
V as soon as row 5 is processed. In the same moment, the log file receives an entry in row 5, but probably a
different actual value, because the 30 V are not yet set. So the log file will record the actual value corresponding
to 30 V at least one row later.
Doc-ID: EAPCEN Page 15
Date: 16.12.2015

Older Excel versions which might still be in use and probably also similar tools can have a max. row limit of 65536
Element
Description
Log file path
Log file name
Button „New“
Button „Open“
These are used to define path and file name of the log file. You can either create a new file
with “New” button or open an existing one with “Open”.
Mind the option “Log file action”, especially when opening existing log files where data shall
be attached at the end!
Log file action
Selects the record mode for the log file between “Overwrite” and “Attached”. Caution! With
“Overwrite” chosen, previously recorded data is overwritten every time you start Logging
again, no matter if manually or automatically with Sequencing
Default setting: “Overwrite”
Log interval
Defines the time between two log file entries of a logging session. This value can’t be
changed while logging is running. Adjustable range: 500 ms...99 h 59 m 59 s in 100 ms
steps
Default value: 500 ms
Start logging automatically
with sequencing
If this setting is enabled and there is a log file defined, a new logging session is started
automatically every time sequencing is started with the corresponding button. The selected
log file action also applies! You may stop logging manually at any time else it will continue
until stopped by an event, or automatically if the other setting „Stop logging automatically
with sequencing“ is enabled, too.
Default setting: disabled
Stop logging automatically
with sequencing
If this setting is enabled and logging has been started either manually or automatically with
sequencing (see other setting „Start logging automatically with sequencing”), it can stop
automatically with sequencing, no matter what reason made sequencing stop (reached end
of sequence file, end of repetitions, device alarm).
Default setting: disabled
per sheet. In order to record beyond this limit, the software will create an overflow file once 65500 rows have been
reached. The overflow file will be added _001 in the file name. This number is a counter which can go up 999, so
that after recording 1000 log files, logging will automatically stop and the software will pop up a message.
8.2.1 Settings for Logging
Figure 10
Doc-ID: EAPCEN Page 16
Date: 16.12.2015

Stop logging on error
Normally, logging would continue logging during device alarm situations where the DC input/output of the device is switched off and the actual values are all zero (except for voltage
on an electronic load). Then the log file would be filled with zeros. You can enable this
settings to avoid logging to continue recording values during errors/alarms.
Default setting: disabled
Doc-ID: EAPCEN Page 17
Date: 16.12.2015

9. App „Settings“
The app “Settings” offers you to adjust device related parameters and settings as they are also available in the setup
menu of your device. Contrary to manual operation on the front panel (i.e. HMI) of the device, the app requires remote
control. In case the app can’t switch the device into remote control, it won’t open the window.
Some device series do not even have a setup menu, such as PS/PSI 5000. For these, this settings window is the only
way to access some extra settings, such as the effective voltage range (0…5 V or 0…10 V) of the analog interface (PSI
5000 only). Not all available setting is supported by all device series. Those will be greyed out.
Details about the settings in this window can be found in the device manuals, as they are identical to those described
there.
Note: up to the current version 1.52 beta the Settings app can only be started as long as the selected device is connected
and detected via USB cable.
10. App „Update“
This app is used to update firmware of microcontrollers inside the devices. This part of EA Power Control is considered
as an update tool for the current device series. In order to update any compatible and supported device, you need to
first download an update file (*.upd) from our website or obtain it from us upon request. The file will always contain the
most recent firmware versions. Note:
Only install updates on your device if absolutely necessary or after you have been requested to do so!
Further facts you should be aware of before installing firmware updates:
Installing updates can fail due to several reasons, for example because of a supply blackout. Depending on
which component was being updated while the interruption occurred, the device can be recovered or has become unusable. Recovery is partly possible, but not in every situation. In such a case contact our support staff.
Do not downgrade your device, i.e. install an older version than currently installed, unless you are definitely
requested by us. The software will ask for permission to do the downgrade. Upgrading to a newer version after
a downgrade should be possible without restrictions.
It might happen, that particular models of a compatible device series or a device of a series yet unknown to your
currently installed version of EA Power Control can’t be updated by this app. In such a conflict situation, the
software should pop up a message.
In the window of the “Update” app you can open the update file with button “Browse”. The file is check for validity and
later it will show some information in the log file box. The information is per component. It means, if you select any of
the max. three components (HMI, KE or DR) in the list “Firmware Update”, the display history information changes.
Along with the information in the log window the list also displays the firmware versions, as installed in the device, and
the update versions, as contained in the update file. There is furthermore a traffic light telling you if an update is
recommended (green)
not required (white)
refused (red)
possible, but not recommend, i. e. downgrade (yellow)
Normally, you should only install updates on components with green light.
The user can decide to update every component or just one. The selection is done by manually setting a checkmark in
the list view, in column “Install”. Components not check-marked here will be skipped during the update process.
After enabling at least one component for update and clicking button “Update”, the update will start and do the rest
automatically until finished. This can take a couple of minutes. Make sure the device is permanently powered during this
time.
Doc-ID: EAPCEN Page 18
Date: 16.12.2015

11. License Management
Feature name
Included
since version
Short description
Multi Control
1.52
App for parallel and synchronous control and monitoring of up to 20 devices in
one window. For details about this features refer to 12. App „Multi Control“
Figure 11 - License manager
Since version 1.52 the software contains a license manager. It is used to install optionally obtainable license codes to
unlock extended features in the software. Those extended features are not free of charge. The license code can be
purchased together with a device (which is supported by this software) or later.
The license is tied to the PC on which it shall be installed.
Questions & answers:
What to do before requesting a license code?
First, gather information about the unlockable features by calling our sales department or visiting our website or reading
this document. If one or multiple of these features are of interest for you, download the most recent version of EA Power
Control from our website and install it. If you have decided to order the license code for one or multiple unlockable
features, you can request a quote from our sales department, best done via e-mail, and list all desired unlockable features separately by their name.
At current date () following unlockable features are available in this version of EA Power Control:
How to obtain a license?
Open the license manager in EA Power Control via menu “? -> License Management” and in the manager click on
“Get License ID code”. This will open another window with some information. Click on the display e-mail address to
open your default e-mail software and to send a request mail for a quote and/or other information.
How to install a license code?
After receipt of the license (as e-mail, text form), which is tied to a specific PC and it unique computer ID number (short:
CID), compare the CID of the PC you are going to install the license on with the CID in the license code e-mail. The CID
of the current PC is displayed in the “Get License ID code” window. Access it via menu “? -> License Management -
> Get License ID code”. In case the compared CIDs didn’t match, the PC may be the wrong one or the CID has changed
in between. Then read below at “What to do if the license should suddenly become invalid?”.
After successful comparison, close the window and either type the license code into the text box “New License ID Code
(LIC)” or copy & paste it from the e-mail. If the license code is accepted, the license will be installed and the correspond-
ing features unlocked. The license manager windows will show the status as often as you open it.
One license code can unlock multiple extended features.
Note: Save the e-mail with the license code for later use at a secure and easy to find location or print it.
Doc-ID: EAPCEN Page 19
Date: 16.12.2015

How to unlock more features?
Once a license is installed it unlocks a certain number of extended features, but at least one. In case you want to unlock
more features as soon as they become available, you a) need to request for a new license code and b) install it as
described above. You can request the new license code via the “Get License ID code” button in the license manager,
which eventually will you cause to write an e-mail. In this e-mail please clearly state all new features you wish to unlock
with their names, including already unlocked features, so these can be included in the new license code.
For previously purchased unlockable features please include the proof of purchase.
Can a license be transferred to a different PC?
No. But there is a multi-license package available. Please contact out sales team for advice on how to proceed or a
quote. This is especially required in case a PC with an installed license suddenly fails and becomes unusable or the
license was only installed on the PC for temporary use and test and that PC is going to be forwarded to the end user.
What to do if the license should suddenly become invalid?
It may happen that a license suddenly becomes invalid, for example because the PC configuration has changed and its
computer ID (short: CID) too. In such a case, please first compare the current CID with the one in the e-mail you should
have received after purchasing the license. The current CID is shown to you when accessing the menu “? -> License
Management” and then by clicking on “Get License ID Code”.
a) If both CIDs are identical, simply install the license again. See above “How to install a license code?
b) If the CID has changed, please request a new license code. You can do this by sending us an e-mail which should
contain the new and old CID and the proof of purchase. We will then generate a new code and mail it to you.
Doc-ID: EAPCEN Page 20
Date: 16.12.2015

12. App „Multi Control“
Figure 12 - Multi Control main view
Since version 1.52 of EA Power Control the app “Multi Control” is featured. After the first installation of this version, the
app is locked and hidden. To unlock it, an optionally purchasable license has to be installed. For more information about
getting a license and unlocking the app refer to “11. License Management”.
This app can be used to control and monitor up to 20 devices of identical or different model and type at once and in one
window. All devices recognised by EA Power Control are listed in this window to access them for remote control without
the need to switch to app “Terminal”. The device list can be managed by deleting devices from it resp. insert them again,
as long as they are still connected to the PC.
12.1 Limitations
The app can manage, access and control up to 20 devices. In case a higher number is directly connected to
the PC or accessible via a network, a rule applies to first list USB devices according to their incrementing
COM port number, then list Ethernet devices according to their incrementing IP
Sequencing can only be done in one instance and only for the selected devices
Logging is not available
Devices to which the connection has been lost cannot be inserted automatically into the device list again
A configuration via app “Settings” cannot be written to multiple devices at once
Doc-ID: EAPCEN Page 21
Date: 16.12.2015

12.2 Functions in the app window
12.2.1 Upper window area
The upper window area always show the actual and set values, as well as status of one currently selected device from
the device list (blue, single device selection). This window part is identical to the upper window part of app “Terminal”.
Also see 7. App „Terminal“.
12.2.2 Middle window area
The middle part of the window is used to manage groups of devices. Every of the max. 20 devices can be assigned to
any of the four groups, while every group can have a max. of 20 devices. The actual assignment to a group is done in
the device list (see below at “Tab “Devices””). The buttons are used to select devices which are assigned to a particular
group. “Select” here means to put the checkmark next to the devices in column 1 of the device list. It works the same
way the other way round when deselecting groups.
All actions after group selection, like setting status (input/output on/off) or values, are applied to the selected devices
only. It means you can assign different set values to every group. General rules:
A device from the device list can only be assigned to one of the four group or none
The group configuration is not stored automatically, but you can do this manually (button “Save config.”) and
then let the software load the last save configuration automatically when opening the app
Devices, which have been stored in a group configuration but are now disconnected, are listed in the device,
but are greyed out and can be deleted manually or are cleaned up when using button “Show all devices”
Area “Group settings”
Buttons G1 – G4 Select/unselect one or multiple device groups
Button Reset groups Deletes all device assignments to all groups, unselects all groups
Group names The text next to the group buttons, the group name, can be changed to your
custom name when double-clicking on them
Area “Configuration”
Button Save config. Save the current group configuration into a config file (*.ini). Different groups
configs can be loaded and saved this way, while the most recently loaded config can be loaded automatically at app start-up by ticking the option “Load
config. at app startup”
Button Load config. Loads any formerly save group config file (*.ini) from storage and also set the
most recently loaded file to load for option “Load config. at app startup”
Option Load config at app startup When activated, this option will try to load the most recently saved or loaded
group config file from storage when starting this app, to restore groups
Doc-ID: EAPCEN Page 22
Date: 16.12.2015

Column
Column title
Information in the column
1 - Checkmark for selection of single or multiple device for group action
2
Nr
Incrementing position number for the device in the list
3
Gr
Group assignment (G1 ... G4, empty when no group)
4
Icon
Device icon like in the main window, used for easier device type recognition
5
Device
Device name
6
User text
Show the user text you probably have given the device
7
Connection
Interface identifier (COM port or IP)
8
Access
Status of remote control: free/local = not in remote control, remote = in remote control
9
Mode
Status of the DC input/output of the device
10
Alarm
Most recently occurred alarm (copy from device display)
1
12.2.3 Lower windows area
Tab “Devices” (device list)
When starting the app “Multi Control”, EA Power Control will list all known devices here. This list can later be modi-
fied by deleting unnecessary units. General rules for this list:
In case the connection to any device on the list drops, it will be detected and greyed out, but can also be
cleared from the list by clicking “Show all devices”
The list can only be refreshed with newly added or re-connected device by closing the app window and doing
device search in the main window
Devices, which have been deleted from the list with a button click into column “Delete”, but are still connected
and online can be put into the list again by clicking on “Show all devices”
In the device list you can…
select one device (row), in order to have the upper window are show its values and status
select one or multiple device by setting the checkmark to
o send these device values and/or status almost1 synchronously
o run parallel Sequencing on them
assign one or multiple devices to device groups, in order to
o quicker select certain device types
o send different settings (values, status) to different groups
delete (hide) devices from the device list
undelete (unhide) formerly deleted devices again
run the app “Settings” for the selected device, in order to adjust operation parameters
In the device list, at least one device row is selected and marked blue. The values and status of this device will be
shown in the upper part of the window for direct access. Clicking another device switches the display.
The device list show a lot of information in compact view:
Due to the nature of the supported interfaces (USB, Ethernet) it is physically not possible to send a command to all units at once. Instead the same command is sent to
all selected devices subsequently, with the shortest possible delay
Doc-ID: EAPCEN Page 23
Date: 16.12.2015

11-14
U, I, P, R
The three resp. four actual values (upper) and the set values (lower) which are currently
in effect (
15
Delete
This column is used to delete, i. e. hide a device from the list
Menu item
Parameter
Effect
Open in
Settings
Opens app „Settings“ for the device in the selected
row. Also see „9. App „Settings““
Set group
G1, G2, G3, G4, None
Assigns the device in the selected row to a group
(G1...G4) resp. revokes an assignment (none).
Send CMD
ACK alarm
Alternative method to clear an alarm (row marked
red)
Set group for all checked devices
Assign devices with checkmark to a group resp. revoke assignment
Set values for all checked devices
Set values of U, I, P and R to all devices with
checkmark
Try to connect
Tries to re-connect with a disconnected device
(greyed out). If successful, the device can be used
again.
Note: values or status cannot be changed in these columns
12.2.3.1 Context menu
There is a context menu (right-click) in the device list to perform extra actions for a single device or multiple selected
devices:
Doc-ID: EAPCEN Page 24
Date: 16.12.2015

Tab “Commands”
Similar to single device control in the app “Terminal” (refer to “7.5 Commands”), you can control further functions or
query information which are not available in the device list or upper window part.
The difference here is that the selected command can be sent to one device or groups, resulting in as much responses
as devices are currently selected when querying something. In order to connect responses in the log window to devices,
the entries are prefixed with the device’s user text (unless not given). See example above.
Tab “Sequencing”
The sequencing action in this tab is very much the same as in the app “SeqLog” for single device control (refer to “8.
App „SeqLog“ (Sequencing and Logging)“), but with some differences:
The sequence file will be applied to all currently selected devices at once
The sequence file will be checked for compatibility to all currently selected devices
Doc-ID: EAPCEN Page 25
Date: 16.12.2015

Руководство пользователя EA Power Control
Версия программы: 1.52 beta
Требования для установки и работы:
- ПК с мин. 2 ГГц и 1 Гб ОЗУ
- Windows 7 (32бит/64бит) или новее
- Microsoft .NET Framework 4.5.2
- Эта программа совместима со следующими сериями устройств:
o PSI 9000 2U
o PSI 9000 3U
o PS 9000 1U
o PS 9000 2U
o PS 9000 3U
o PS 5000
o PSI 5000
o ELR 9000
o ELM 5000
o EL 9000 B
- Эта программа совместима со следующими типами интерфейсов:
o USB с виртуальным драйвером COM порта
o Ethernet/LAN

Содержание
1. Авторское право .................................................................................................................................................... 3
2. Представление ...................................................................................................................................................... 3
3. Подготовка .............................................................................................................................................................. 3
3.1 Установка EA Power Control ......................................................................................................................... 3
4. Запуск программы / Поиск устройств ................................................................................................................... 4
5. Условия для удаленного контроля ....................................................................................................................... 5
5.1 Контроль сразу нескольких устройств ........................................................................................................ 5
6. Графический интерфейс пользователя (GUI) ..................................................................................................... 6
6.1 Главное окно ................................................................................................................................................. 6
6.2 Обращение с главным окном ....................................................................................................................... 7
6.2.1 Обращение двойным кликом ................................................................................................................... 7
6.2.2 Обращение с помощью перемещения и размещения ........................................................................... 7
6.3 Отображение информации об устройстве.................................................................................................. 7
6.4 Меню .............................................................................................................................................................. 8
7. Приложение „Terminal“ .......................................................................................................................................... 9
7.1 Актуальные значения ................................................................................................................................... 9
7.2 Устанавливаемые значения ......................................................................................................................... 9
7.3 Пороги защиты ............................................................................................................................................ 10
7.4 Статус ........................................................................................................................................................... 10
7.5 Команды ....................................................................................................................................................... 11
7.5.1 Ограничения ............................................................................................................................................ 11
8. Приложение „SeqLog“ (Секвенирование и Регистрация) ................................................................................. 12
8.1 Секвенирование .......................................................................................................................................... 13
8.1.1 Настройки Секвенирования ................................................................................................................... 14
8.1.2 Формат файла секвенсора ..................................................................................................................... 15
8.2 Регистрация ................................................................................................................................................. 15
8.2.1 Настройки Регистрации .......................................................................................................................... 16
9. Приложение „Settings“ ......................................................................................................................................... 17
10. Приложение „Update“ ...................................................................................................................................... 17
11. License Management (Менеджер Лицензий) ................................................................................................. 19
12. Приложение “Multi Control” ............................................................................................................................. 21
12.1 Ограничения ................................................................................................................................................ 21
12.2 Функции в окне приложения ....................................................................................................................... 22
12.2.1 Участок верха окна ............................................................................................................................. 22
12.2.2 Участок середины окна ....................................................................................................................... 22
12.2.3 Участок нижнего окна ......................................................................................................................... 23
12.2.3.1 Контекстное меню ........................................................................................................................... 24
Doc-ID: EAPCRU Страница 2
Дата: 07.01.2016

1. Авторское право
Это программное обеспечение совместимо только с сериями источников питания и электронных нагрузок, и
интерфейсами списком выше. Любые изменения в программе и ее документации запрещены. Исключения
требуют разрешения владельца. Перепродажа или аренда запрещены. Распространение третьим лицам
разрешается, если программное обеспечение и документация не изменяются.
2. Представление
EA Power Control это программа для Windows™ для удаленного контроля одного или нескольких блоков
совместимых источников питания и/или электронных нагрузок. Контроль осуществляется только посредством
цифровых интерфейсов. В настоящий момент поддерживаются USB и Ethernet.
Это программное обеспечение основано на программном языке Visual C# и требует Microsoft .NET Framework
определенной минимальной версии, которая может быть уже установлена на ПК или его можно установить
через инсталлятор этого программного продукта.
3. Подготовка
Перед началом использования EA Power Control минимум одно совместимое устройство должно быть
подключено к ПК. Если устройство подключено через кабель USB, потребуется корректно установленный и
запущенный драйвер USB. Установленное устройство USB может быть найдено в менеджере устройств
Windows, в секции "Порты (COM и LPT)". Пример:
Пометка: файл с драйвером обычно устанавливается в систему только раз. В случае, если новое
устройство подключается первый раз или известное устройство подключается к отличному порту USB
на ПК, то устройство будет установлено заново. Новые устройства будут обозначены как
неиспользуемый и нерезервированный СОМ порт.
3.1 Установка EA Power Control
Пометка: эта программа устанавливается только на ту учётную запись, которая в данный момент
запущена. Потребуется разрешение администратора для установки.
Установка программы выполняется через стандартный инсталлятор. Во время установки вы можете снять
выбор дополнительных пакетов, если они уже установлены:
Microsoft .NET Framework 4.5.2 или новее
USB драйвер (не требуется для устройств, которые используются только через Ethernet)
Microsoft Visual C++ run time package
После установки вы можете запустить программу с рабочего стола или через начальное меню Windows по
пути:
Пуск\Все Программы\EA Power Control\
Doc-ID: EAPCRU Страница 3
Дата: 07.01.2016

4. Запуск программы / Поиск устройств
После запуска программы, автоматически начнется поиск подключенных, совместимых устройств на портах
СОМ и Ethernet. Оба включены в поиск и могут быть определены в приложении "Configuration". Что делает
возможным не искать на порту СОМ, если используется только подключение Ethernet или наоборот.
Поиск может быть повторен в любое время приложением „Search for devices“, пока доступ к главному окну не
блокирован.
После поиска, обнаруженные и совместимые устройства появятся в списке устройств как иконки. Иконки
подписываются именем серии и портом СОМ соответственно назначенному IP, к которому они подключены, а
так же заданным пользователем текстом. Пример с одним определенным устройством:
Рисунок 1
Пометка: если устройство подключается к ПК одновременно двумя интерфейсами, USB будет иметь
приоритет. Устройство тогда только отображается как подключенное через порт СОМ.
Если не найдено ни одного устройства, список с устройствами будет пуст:
Рисунок 2
Существует несколько причин почему при поиске устройство не определяется:
Если устройство будет контролироваться через кабель USB:
Драйвер USB установлен некорректно или не установлен (смотрите секцию 3. Подготовка“)
Кабель USB не подключен или подключен неверно
Ваше устройство является новой серией и текущая установленная версия EA Power Control не
поддерживает его. В этом случае поможет обновление программы.
Если устройство будет контролироваться через Ethernet:
Порт Ethernet, который установлен на устройстве, не соответствует тому, что в “Конфигурации”
Назначены один или более двойных IP или IP по умолчанию устройства не был изменен для
соответствия локальным требованиям (все устройства поставляются с одинаковым
стандартным IP)
Если DHCP активирован, сетевой сервер может сконфигурировать один или несколько блоков
с полностью отличными IP вне диапазона поиска, которые определены в "Configuration".
Doc-ID: EAPCRU Страница 4
Дата: 07.01.2016

5. Условия для удаленного контроля
Устройство, которое вы намереваетесь использовать в удаленном управлении, может быть в различных
режимах контроля:
1). Оно контролируется аналоговым интерфейсом (если он установлен) и не подлежит управлению через
цифровой интерфейс.
2). Оно в локальном состоянии (дисплей показывает Local) и тогда блокировано от удаленного управления
из-за предписания.
3). Оно полностью доступно. Тогда ПК может перенять на себя удаленный контроль.
При ситуации под номером 3, устройство сможет получать команды удаленного контроля. Иначе, будут
считываться и отображаться только актуальные значения напряжения, тока и мощности (сопротивление
рассчитывается). Чтобы установить устройство в удаленный контроль, любое другое внешнее управление или
локальное состояние должны быть отменены мануально на устройстве. После этого, можно установить его в
удаленное управление кнопкой “Remote on” в приложении “Terminal” (смотрите ниже). Подробности о
состояниях устройства вы можете узнать в руководствах к устройствам.
5.1 Контроль сразу нескольких устройств
С версии 1.52 этой программы существуют два различных способа контроля и мониторинга нескольких
устройств:
Контроль и мониторинг в отдельных окнах, одно для каждого блока (включено)
Контроль и мониторинг в одном окне (“Multi control”) (платно, опционально)
Оба способа работают по-разному. Отдельное оперирование в одном окне для каждого блока рекомендуется
для небольшого числа устройств, скажем до 5. При необходимости контроля и/или мониторинга множества
блоков, обозрение будет потеряно из-за множества окон открытых сразу. Для этого используется “Multi control”,
который даёт опцию иметь до 20 устройств в обозрении в одном окне. Одна из главных функций “Multi control”
задание значений и статуса выхода/входа выбранных устройств в один момент времени.
Пометка: приложение “Multi control” включено в EA Power Control с версии 1.52, но оно не модет быть
использовано без предварительной установки кода лицензии, который является платным. Подробности
смотрите в 11. License Management и 12. Приложение “Multi Control.
При удаленном контроле в одном окне, программа позволяет управлять сразу до 10 устройствами. Это может
быть достигнуто открытием контрольного приложения “Terminal” для каждого блока и переключением между
окнами. Эти окна можно расположить на экране компьютера. Все блоки и окна работают по отдельности, между
ними нет связи. Подробности ниже.
Пометка: Удалённый контроль или простой мониторинг устройств по их актуальным значениям
требует постоянной коммуникации. Чем чаще устройства управляются/мониторятся, тем больше
коммуникационного трафика генерируется, и в зависимости от загруженности ПК фоновыми задачами и
другими запушенными программами, EA Power Control может замедляться из-за низкого расчетного
времени ЦПУ. Это может привести к задержкам отклика на нажатие кнопок или обновления актуальных
значений и статуса.
Doc-ID: EAPCRU Страница 5
Дата: 07.01.2016

6. Графический интерфейс пользователя (GUI)
Devices
Эта часть отобразит обнаруженные устройства как иконки. Если будет опознано больше
устройств, чем вмещается в один ряд, окно будет расширено. Макс. число устройств в списке
- 20. Программа наблюдает за устройствами и если соединение с одним из них будет потеряно,
из-за удаленного кабеля, то устройство будет удалено из списка через короткое время. После
восстановления соединения, список устройств автоматически не обновится.
Apps
Эта часть покажет доступные приложения. Каждое из них имеет свои характеристики. Другие
приложения могут быть установлены для использования с этой программой по мере их
доступности.
Название
приложения
Функциональное описание
Может быть
запущено
несколько раз?
Search for devices
По двойному клику, оно начнет поиск совместимых устройств на
выбранных интерфейсах. Так же используется для обновления
списка устройств. Во время поиска маленькое окно откроется на
переднем плане.
-
Terminal
Это приложение является контрольным для устройств. Оно
открывает окно, в котором отображаются актуальные и
установленные значения, пороги защиты и статусы. Его можно
открывать до 6 раз для любого из 6 устройств из списка. Кроме того,
имеется прямой доступ почти к каждой функции устройства через
команды языка SCPI (за искл. серии PS 5000) или протокол ModBus.
Да, до 10 раз
Settings
Открывает окно доступа к настройкам устройства, которые могут
задаваться из МЕНЮ устройств. Для серий, у которых нет
установочного меню, как PS 5000 и PSI 5000, это единственный путь
задать определенные настройки, относящиеся к работе устройства.
Да, до 10 раз
Update
Открывает окно, в котором прошивка устройства может быть
обновлена. Для обновлений потребуется загрузить специальный
файл (*.upd), который можно получить с сайта производителя или по
запросу.
Нет
SeqLog
Открывает окно секвенирования и регистрации. Подробности
смотрите в „8. Приложение „SeqLog“ (Секвенирование и
Регистрация“).
Да, до 10 раз
Multi Control
Разблокируемая опция (платная лицензия). Смотрите 12.
Приложение “Multi Control.
Контроль и мониторинг до 20 устройств одного или разных типов в
одно время, с синхронным заданием значений и статуса
Нет
6.1 Главное окно
После запуска и поиска устройств (если активирован поиск при запуске), появится главное окно:
Рисунок 3
Окно разделено на две части:
Обзор приложений (дата: январь, 2016):
Doc-ID: EAPCRU Страница 6
Дата: 07.01.2016

6.2 Обращение с главным окном
В этом примере с источником питания серии PSI 5000 видно, что устройство
не имеет режима сопротивления (режим R). Вы так же можете видеть, что
блок пока не имеет пользовательского текста. Пользовательский текст
предназначен для идентификации нескольких идентичных устройств.
Обращение с программой, касательно использования иконок устройства и приложений, может исполняться
двумя путями:
Двойным кликом мышью
Перемещением и размещением мышью
6.2.1 Обращение двойным кликом
Когда вы кликните два раза по иконке приложения, отобразится список устройств в виде контекстного меню,
из которого вы сможете выбрать устройство, для которого запускается приложение.
Пометка: Некоторые приложения могут иметь связь только через кабель USB. Соответствующее
всплывающее окно сообщит вам это.
Рисунок 4 - Открытие приложения двойным нажатием
6.2.2 Обращение с помощью перемещения и размещения
Чтобы открыть приложение для устройства из списка, вы просто кликаете иконку устройства, удерживаете
кнопку мыши и перемещаете иконку на желаемое приложение и размещаете ее на нем. Если текущая ситуация
не отвергнет открытие приложения, оно будет запущено. Иначе появится всплывающее сообщение, почему
приложение не может быть запущено.
Рисунок 5 - Открытие приложения перетаскиванием и размещением
6.3 Отображение информации об устройстве
В списке устройств кликните правой кнопкой на иконке и появится всплывающее окно с информацией об
устройстве. Пример:
Doc-ID: EAPCRU Страница 7
Дата: 07.01.2016

6.4 Меню
Пункт меню
Описание
File
Close
Незамедлительно закрывает программу, неважно какие окна были при том
открыты.
Configuration
Открыв окно „Configuration“, вы сможете задать настройки коммуникации
устройств и/или настройки программы.
Табуляция „General“
Объекты в этой табуляции у этой программы включают или отключают
поддержку соединения устройств через интефейсы USB и LAN. При
использовании одного из них, отключение другого может иметь позитивное
воздействие на производительность программы.
Настройка по умолчанию: both enabled
Пометка: если оба отключены, поиск устройств ничего не обнаружит!
Табуляция „USB“
Здесь вы можете включить поиск устройств USB при запуске программы. Если
не планируется использовать USB, рекомендуется отключить оба пункта, т.е.
эту настройку и установку глобального интерфейса USB в табуляции
“General”. Это сократит время поиска.
Если глобальная установка интерфейса USB включена и этот параметр
отключен, вы можете по-прежнему искать устройства с USB приложением
“Search for devices”.
Настройка по умолчанию: enabled
Табуляция „Ethernet“
Эта табуляция используется для определения диапазона поиска IP и порта
устройства подключенного через Ethernet. Диапазон поиска ограничен до
последнего октета. Порт по умолчанию 5025, так же как и это порт умолчания
на устройствах с сокетом Ethernet, он может быть изменен по желанию, но
только устройства согласованные с этой настройкой порта могут быть
обнаружены внутри диапазона IP.
Здесь вы можете включить поиск устройств Ethernet при запуске программы.
Если не планируется использовать Ethernet, рекомендуется отключить оба
пункта, т.е. эту настройку и установку глобального интерфейса Ethernet в
табуляции “General”. Это сократит время поиска.
Если глобальная установка интерфейса Ethernet включена и этот параметр
отключен, вы можете по-прежнему искать устройства с Ethernet приложением
“Search for devices”.
Настройка „Search at startup“ по умолчанию: disabled
Порт умолчанию: 5025 (так же смотрите инструкцию к устройству)
Диапазон IP по умолчанию: 192.168.0.2 … 192.168.0.100
?
Help
Открывает файл помощи (PDF)
About
Открывает маленькое окошко с детальной информацией о программе и
производителе
Enable debug
Только для внутреннего использования. Не включайте режим отладки, так как
это замедлит программу, в зависимости от числа устройств, используемых
параллельно.
Load patch file
Используется для загрузки обновлений EA Power Control, таких как новые и
другие файлы с примерами секвенций или новые версии этого
вспомогательного руководства. Такие патчи будут доступны для загрузки с
сайта производителя по мере их появления или будут отправлены на почту по
запросу.
License Management
Это окно используется для обзора установленных лицензий и
разблокированных, расширенных функций. Оно может служить для заказа
лицензии или её обновления, а также для установки кода лицензии для
разблокировки новых функций. Смотрите 11. License Management.
Doc-ID: EAPCRU Страница 8
Дата: 07.01.2016

7. Приложение „Terminal“
Модель, сер.
номер, порт
Акт. значения
Уст. значения
Защита
Рисунок 6
Статус
Кнопки
Схоже с значениями на устройствах с цветными TFT
дисплеями, актуальные значения разделены по цвету в
ячейках, расположенных вверху (большие цифры).
Цветные участки всегда показывают минимум три
актуальных значения. На электронных нагрузках
отображается еще и актуальное сопротивление.
Нижняя часть цветных участков показывает
устанавливаемые значения (маленькие цифры). Это
вводные ячейки, в которые задаются значения с
клавиатуры после того как устройство было переведено
в удаленный контроль через любой из цифровых
интерфейсов. Это же можно сделать из окна "Terminal"
нажатем кнопки “Remote on” или соответствующей
команды.
После запуска вводных ячеек, они становятся белыми,
и вы можете вводить значения печатанием или
копированием и вставкой.
Приложение “Terminal” является окном главного контрольного приложения для устройств. Оно может быть
открыто несколько раз для до 6 устройств, чтобы управлять ими по отдельности, как бы в параллельном
режиме. Здесь нет связи или соединения между окнами.
Окно используется для контроля состояния устройства (удаленность, вкл/выкл) кликом мышки, тогда как
значения вводятся клавиатурой. Копирование и вставка возможны.
Верхняя часть окон предназначена для актуальны и установленных значений, порогов защиты и статуса.
Чтобы удаленно контролировать любую другую функцию отдельного устройства, верхняя часть может быть
открыта кликом кнопки “Show command”. Табуляция для командного языка SCPI (за искл. серии PS 5000) и
протокола ModBus предлагает выбор команд, которые могут быть отправлены на устройство, кликнув кнопку
“Send”. Смотрите 7. Приложение „Terminal“.
7.1 Актуальные значения
Обновление актуальных значений циклическое. Высокая загруженность ЦПУ может задерживать циклическое
обновление. Особенно, если открыты несколько окон "Terminal". Формат значений не всегда совпадает с
форматом на дисплее вашего устройства, в основном касательно десятичных чисел. Из-за внутренней
трансляции от процентных значений в реальные, последние цифры могут разниться. Это же применяется к
записи данных (т.е. регистрации, смотрите ниже).
Пометка: Актуальные значения только считываются из устройства и подвержены влиянию при любой
операции на нем (мануальное или аналоговым интерфейсом). Они всегда доступны, даже если устройство
не находится в удаленном контроле от EA Power Control.
7.2 Устанавливаемые значения
Допустимый диапазон значений на вводную ячейку идентичен тому, что устройство имеет на передней панели
при мануальном использовании. Настраиваемый диапазон устанавливаемых значений по умолчанию 0...102%,
который можно ограничить лимитами настройки. Они могут быть определены вручную в МЕНЮ устройства или
через EA Power Control в приложении “Settings”.
Если значение слишком большое или маленькое, то оно не будет принято и предыдущее будет возвращено.
Пометка: Устанавливаемые значения задаются устройству только после нажатия кнопки ENTER или
RETURN, как подтверждение.
Doc-ID: EAPCRU Страница 9
Дата: 07.01.2016

7.3 Пороги защиты
Пороги защиты представлены ячейками и вводными
ячейками. Они доступны для ввода значений, когда
устройство находится в удаленном контроле через
цифровой интерфейс.
Состояние удаленного контроля отображается на
участке статуса параметром “Access:”. После запуска
вводных ячеек, вы можете вводить значения
печатанием или копированием и вставкой.
Участок статуса показывает копию статуса устройства,
что отображен на его дисплее. Но здесь может быть
небольшая разница. Например, устройство PSI 5000
показывает на дисплее Remote, неважно
контролируется ли оно через аналоговый или
цифровой интерфейс. Участок статуса отображает тип
интерфейса в действии (смотрите ниже).
Допустимый диапазон значений на вводную ячейку идентичен тому, что устройство имеет на передней панели
при мануальном использовании. Настраиваемый диапазон устанавливаемых значений всегда 0...102%
относительно номинальных значений.
Если значение слишком большое или маленькое, то оно не будет принято и предыдущее будет возвращено.
Пометка: Устанавливаемые значения задаются устройству только после нажатия кнопки ENTER или
RETURN, как подтверждение.
7.4 Статус
Индикаторы статуса:
Mode: Отображает состояние входа/выхода DC как "OFF", если он выключен, а если включен, то
актуальный режим регулирования (CC, CV, CP, CR). Подробности о режимах регулирования
смотрите в руководстве по эксплуатации к устройству.
OP Mode: Обозначается как “UIR” что означает режим сопротивления (если возможен) или нормальный
режим с активным “OP Mode = UIP”.
MS Mode: Показывает статус режима ведущий-ведомый (если возможен) как:
N/A = Устройство не имеет функцию „Master-Slave“
Off = Master-Slave (MS) доступен, но деактивирован
Slave = Master-Slave (MS) доступен, устройство установлено как Ведомое (удалённый контроль
невозможен)
Master = Master-Slave (MS) доступен, устройство установлено как Ведущее (удалённый контроль
возможен)
Access: Показывает доступ к устройству через интерфейс как доступный для удаленного контроля с
пометкой “free” или, если устройство находится уже в нем, тип интерфейса в действии (“rem” =
удаленный контроль).
Alarm: Отображает последние сигналы тревоги устройства. Некоторые сигналы отключают вход/выход
DC и должны быть ознакомлены прежде, чем устройство будет использоваться снова. В такой
ситуации, кнопка ON/OFF ниже участка статуса изменится на ACK alarm. Она должны быть
использована для очистки состояние сигнала и появления кнопки ON/OFF, но только, если этот
сигнал тревоги более не присутствует.
Пометка: Статусы считываются только от устройства и подвержены влиянию при любой операции на
них (мануальное или аналоговым интерфейсом). Они всегда отображаются, даже если устройство не
находится в удаленном контроле от EA Power Control.
Doc-ID: EAPCRU Страница 10
Дата: 07.01.2016

7.5 Команды
Окном приложения можно открыть дополнительную часть нажатием кнопки “Show command”. Это позволяет
иметь прямой доступ к устройству через команды протокола ModBus или языка SCPI (если возможно), чтобы
запросить иную информацию от устройства, либо доступ к функциям, которых нет в верхней части окна.
Рисунок 7 – Прямые команды
Табуляции “SCPI” и “ModBus” предоставляют набор команд на выбор и возможность их отправки кнопкой
“Send”.
Другие команды SCPI можно напрямую внести в вводную ячейку (смотрите внешнюю документацию
“Programming ModBus & SCPI”, которая поставляется с устройством на CD или на флэшке USB), тогда как
команды ModBus можно создавать в табуляции “Free work” выбором регистров и кодов функций в
соответствии со стандартом ModBus RTU.
Все отправленные команды и принятые ответы в выбранном режиме регистрируются со штампом времени в
правой части окна. Пример экрана сверху показывает, как команда SCPI *IDN? отправлена на устройство PSI
5000 и устройство ответило через 20 мс.
SCPI это текст основанный на командном языке и он регистрируется в табуляции ASCII, ModBus является
бинарным форматом и регистрируется в табуляции Hex.
7.5.1 Ограничения
Запись событий всех команд не идёт параллельно в табуляциях ASCII и Hex
При переключениях между табуляциями SCPI и ModBus, режим ввода для командной ячейки также
изменяется, это значит при наборе команды SCPI пока выбран режим ModBus не произойдёт её
корректного переноса и исполнения
Doc-ID: EAPCRU Страница 11
Дата: 07.01.2016

8. Приложение „SeqLog“ (Секвенирование и Регистрация)
Рисунок 8
Очень важная функция EA Power Control это способность обрабатывать файлы секвенций (Секвенирование)
и записывать данные устройства (Регистрация). Секвенция — это набор строк с устанавливаемыми
значениями и временем х, которые хранятся в текстовом файле типа CSV (значения отделены точкой с
запятой).
Программа считывает эти файлы секвенций строка за строкой и отправляет значения и статус из текущей
обрабатываемой строки на устройство, затем ожидает определенное время, пока следующий шаг
обрабатывается. Диапазон периода составляет 500 мс...99 ч:59 м:59 с (ширина шага: 100 мс).
Регистрация работает похоже, но только наоборот. В выбранных интервалах (такое же описание как для
секвенций), программа считывает актуальные значения и статусы от устройства и записывает их шаг за шагом
в файл событий (текстовый файл, формат CVS). Общее время записи и число записей ограничены
максимальным числом файлов событий в 1000.
Важно! Секвенирование EA Power Control отличается от того, что вы можете сделать с секвенциями в
произвольном генераторе серий ELR 9000 и PSI 9000. Обработка файла секвенции всегда отсылает
следующее значением как введенное в файл секвенции и таким образом устройство не может
генерировать уклоны для линейного возрастания или спада между двумя значениями.
Регистрация и секвенирование конфигурируются в окне “Options”, которое доступно из окна приложения
“SeqLog”. Для обеих функций требуется выбрать отдельный файл для работы с EA Power Control. Оба файла
секвенции и событий задаются отдельно для каждого блока, использующего секвенирование и регистрацию.
Невозможно записывать данные нескольких устройств в один файл событий.
Файл регистрации не содержит информацию о том, какое устройство его создало. Очень важно использовать
имена файлов, что даёт привязку файла к устройству, включая такой текст пользователя в имя файла.
Для Секвенирования вам необходимо выбрать существующий файл секвенции, который проверяется на
пригодность после каждого выбора. Файл формата секвенции определяется (смотрите ниже) и отображается
в образцовом файле, который включен в установку, и который является файлом по умолчанию при первом
открытии приложения SeqLog. Файл секвенции с произвольным числом можно создавать вне EA Power
Control, популярными инструментами как Excel, другие инструменты CSV и текстовыми редакторами.
Doc-ID: EAPCRU Страница 12
Дата: 07.01.2016

8.1 Секвенирование
Секвенирование требует выбора файла секвенции для устройства, которое протестировано на совместимость.
Если в нем есть ошибки, то появится всплывающее окно, указывающее на них. Установка этой программы
включает в себя файл с примером секвенции по пути
C:\Users\<user>\Documents\EAPowerControl\example_sequence_file.csv, который заранее выбирается в
программе. Вы можете выбрать этот файл как начальный и редактировать его по вашим потребностям.
Редактирование можно производить вне EA Power Control и запускать в окне приложения “SeqLog” или окне
“Options”.
Перед стартом секвенирования файл еще раз проверяется на незамеченное внешнее редактирование.
Основные правила:
Все устанавливаемые значения (U, I, P and R) должны совпадать с номинальными значениями
устройства, для которого файл секвенции будет открыт. Если вы откроете секвенцию, которая
изначально была сделана для модели 200 В на модели 80 В, значение напряжения в любом ряде,
превышающее 80 В вызовет отклонение файла.
Значение времени должно быть минимум 500 мс и варьироваться с шагом 100 мс. Таким образом, как
пример, значение 1,25 с невозможно задать.
Один файл секвенции может быть открыт для нескольких идентичных устройств для параллельного
секвенирования, пока номинальные значения совпадают. Это верно для моделей PS 9080-170 и PSI
9080-170, даже если модель PS не имеет режима сопротивления.
Приложение “SeqLog” можно запускать несколько раз для до 10 устройств. Для каждого устройства
можно выбрать отдельный файл секвенции. Нельзя запускать Секвенирование во всех открытых окнах
SeqLog сразу. Для этого имеется приложение “Multi Control”. Сморите 12. Приложение “Multi Control.
После открытия действенного файла секвенции и нахождения устройства в удаленном контроле,
секвенирование можно запустить в окне приложения “SeqLog”. Текущий шаг процесса копируется из файла
секвенции в нижнюю часть окна. Панель процесса отображает прогрессию одного цикла файла. Обратный
отсчет показывает оставшееся время секвенции (число повторов х, общее время всех рядов в файле), а
счетчик повторов отсчитывает их число, если повторы не были установлены в “Infinite loop”.
Дополнительно применяется следующее:
Секвенирование либо останавливается в конце автоматически или, если желаемое число повторений
достигнуто или из-за сигнала тревоги устройства, как OV.
Секвенирование нельзя приостановить. Каждый запуск после остановки, вручную или из-за сигнала
тревоги, будет начинать по кругу.
Регистрирование может быть запущено и остановлено автоматически секвенированием. Имеются
отдельные настройки в окне “Option”, в табуляции “Logging”.
Регистрирование может быть запущено вручную или автоматически, если определен файл событий, к
которому должен быть полный доступ для программы.
Пути и имена файлов секвенций и файлов событий, однажды выбранные и назначенные для
индивидуального устройства, хранятся в файле INI и вспоминаются в следующий раз, если это устройство
найдется при поиске.
При открытии файла секвенции для устройства, которое не имеет режима сопротивления, все колонки R
set и R mode будут показаны как N/A (недоступно).
Советы при работе с секвенциями:
С запуском секвенции, вход/выход DC устройства может быть включен или выключен и любое значение
задано в первой строке секвенции. Это может привести к неожиданностям на выходе DC источника питания.
Чтобы избежать этого, будет лучше добавить один ряд как первый, где значение напряжения 0 и вход/выход
DC выключен.
Только с источниками питания: настройка напряжения в ряде секвенции может сильно отличаться от
настройки предыдущего или следующего ряда. В таком случае, в предыдущем ряде, где напряжение было
дано гораздо выше, чем в текущем, напряжение сперва упадет, на что потребуется больше времени, чем
для текущего ряда, в зависимости от нагрузки. Это может привести к тому, что следующий ряд не сработает
как ожидается из-за уровня напряжения и шага периода.
Doc-ID: EAPCRU Страница 13
Дата: 07.01.2016

8.1.1 Настройки Секвенирования
Элемент
Описание
Sequence file path
Кнопка с иконкой папки отрывает диалог выбора файла секвенции типа CSV,
который должен содержать данные в определенном формате, как разъяснено
ниже. По умолчанию, пример файла секвенции дается здесь.
Выбор умолчания: example_sequence_file.csv
Sequence file name
Отдельно показывает имя файла секвенции
Sequencing with repetition
Включает повтор всей секвенции после того как она была полностью выполнена.
Вы можете задать определенное количество кругов. Диапазон: 1...65500.
Дополнительная опция “Infinite loop” будет бесконечно повторять секвенцию, пока
ее не остановят мануально или сигналом тревоги устройства.
Выбор по умолчанию: оба отключены
Edit sequence file
Попытается запустить приложение (если оно есть), которое назначено на открытие
файлов CSV, чтобы сделать это в режиме редактирования. Это требуется для
сохранения изменений и закрытия файла во внешнем приложении для
возможности использования файла для Секвенирования.
Пометка: настройки производятся по каждому устройству. Это значит, что программа различает
устройства по их серийным номерам и восстанавливает настройки после следующего запуска.
Рисунок 9
Doc-ID: EAPCRU Страница 14
Дата: 07.01.2016

8.1.2 Формат файла секвенсора
Файл секвенции должен быть в формате CSV, и со значениями, разделенными точкой с запятой вместо
запятой, как создает их MS Excel. Использование точки с запятой здесь обуславливается использованием
запятой для десятичных чисел в большинстве европейских стран.
Установленный файл example_sequence_file.csv изображает требуемый формат файла секвенции.
Рекомендуется хранить примерный файл секвенции как образец для создания нового файла.
Формат файла секвенции (пример) строится так:
Пометка: сравнивая предыдущие версии EA Power Control, Секвенирование теперь поддерживает режим
сопротивления (если доступно) и файл секвенции расширен на две колонки. Ранние файлы секвенций
совместимы и их можно использовать потому что эти две колонки необязательны.
Необходимо последовать следующим правилам:
Ряд 1 используется как оглавление и не должен быть использован как первый шаг секвенции.
Колонки от G до J не должны быть пустыми, а содержать числа.
Текст в колонках А и В не требуется, но он предназначается для помощи в описании (колонка В) и счете
(колонка А) шагов.
Все значения в колонках от С до Е могут остаться пустыми - что допустимо, они не должны превысить
соответствующие номинальные значения устройства, для которого открыт файл, иначе секвенция будет
отклонена и программа отобразит всплывающее окно с листом ошибок. Пример: вы создали файл
секвенции для модели 80 В и в один ряд задали 50 В. Этот файл секвенции не может быть загружен для
модели 40 В.
8.2 Регистрация
Данные устройства могут быть записаны почти в любой время, так же при нахождении его не в удаленном
контроле. Это означает, что возможно управлять устройством через его аналоговый интерфейс (за
исключением серии PS 5000) и записывать данные через цифровой интерфейс в EA Power Control.
Регистрация может быть начата нажатием кнопки или автоматически секвенированием, если эта опция
включена и файл событий определен. Окно “Options” предлагает сделать необходимые установки.
Следующее применимо к Регистрации:
Регистрация может быть запущена и остановлена в любое время, если файл событий был определен и
задан для определенного устройства.
Если Регистрация запускается автоматически Секвенированием, она может быть остановлена в любое
время вручную или автоматически при остановке Секвенирования или, если включено “Stop Logging on error”
и появилась ошибка.
Окно “Options” дает на выбор, создать новый файл для использования или открыть имеющийся.
o Будьте осторожны с режимом записи “Overwrite” при открытии существующего файла с диска!
Предыдущие записанные данные утрачиваются, если установлено “Overwrite” и в следующий раз
запускается Регистрация.
Если Регистрация запускается автоматически с Секвенированием и интервалы событий совпадают со
временем значений в файле секвенции, устройство должно принять и задать значения текущего ряда
секвенции первым. После этого, устройство может считываться Регистрацией для записи обновленных
значений. Это приведет к тому, что файл событий будет иметь по меньшей мере один ряд смещения
касательно установленных и относительных актуальных значений. Чем больше интервал событий, тем
больше время между рядом файла секвенции и соответствующим рядом файла событий.
o Пример: все времена значений в файле секвенции 1 с, интервалы событий тоже 1 с. Секвенирование
и Регистрация запускаются одновременно. В ряде 5 определяется значение напряжения 30, что
заставит источник питания установить 30 В пока ряд 5 обрабатывается. В этот же момент, файл
событий получает заход в ряд 5, но вероятно другим актуальным значением, потому что 30 В еще не
установлено. Таким образом, файл событий запишет актуальное значение, соответствующее 30 В
одним рядом позднее.
Doc-ID: EAPCRU Страница 15
Дата: 07.01.2016

Ранние версии Excel, которые могут еще использоваться, могут иметь ограничение рядов в 65536 на
Элемент
Описание
Log file path
Log file name
Кнопка „New“
Кнопка „Open“
Используется для определения пути и имени файла событий. Вы можете создать
новый файл (тип CSV), кнопкой “New” или открыть существующий, кнопкой “Open”.
Обратите внимание на опцию “Log file action”, особенно при открытии существующего
файла событий, где данные будут присоединены в конце!
Log file action
Выбирает режим записи файла событий между “Overwrite” и “Attached”. Внимание! С
выбором “Overwrite”, ранее записанные данные перезаписываются каждый раз как
вы начинаете Регистрацию, неважно мануально или Секвенированием.
Настройка по умолчанию: “Overwrite”
Log interval
Определяет время между двумя ячейками файлов собитый сессии. Это значение не
может измениться, когда регистрация в процессе. Настраиваемый диапазон: 500
мс...99 ч 59 м 59 с, с шагом 100 мс.
Настройка по умолчанию: 500 мс
Start logging automatically
with sequencing
Если эта настройка включена и файл событий определен, новая сессия регистрации
запускается автоматически, каждый раз как начинается секвенирование,
соответствующей кнопкой. Применяется выбранное действие файла событий! Вы
можете остановить регистрацию в любое время вручную, иначе они продолжится
пока ее не остановит какое-либо событие, или автоматически, если другая настройка
„Stop logging automatically with sequencing“ также включена.
Настройка по умолчанию: disabled
Stop logging automatically
with sequencing
Если эта настройка включена и регистрация запущена вручную или автоматически
секвенированием (смотрите другую настройку „Start logging automatically with
sequencing”), она может остановиться автоматически вместе с секвенированием,
неважно по какой причине оно прервано (достигнут конец файла секвенции, конец
повторов, сигнал тревоги устройства).
Настройка по умолчанию: disabled
страницу. Для записи свыше этого лимита, программа создаст файл переполнения, как только 65500 ряд
будет достигнут. Имя файла переполнения будет дополнено _001. Это счетное число, которое может идти
до 999, так при записи в 1000 файлов, регистрация автоматически остановится, и программа выдаст
всплывающее окно с сообщением.
8.2.1 Настройки Регистрации
Рисунок 10
Doc-ID: EAPCRU Страница 16
Дата: 07.01.2016

Stop logging on error
Регистрация, как правило, продолжается при появлении сигнала тревоги, когда
вход/выход DC устройства отключается и все актуальные значения становятся
нулями (кроме напряжения у электронных нагрузок). Тогда файл событий
заполняется нулями. Вы можете включить эту настройку, чтобы избежать записи
значений во время ошибок/сигналов.
Настройка по умолчанию: disabled
9. Приложение „Settings“
Приложение “Settings” предлагает вам установить параметры и настройки относительно устройства, как если
бы они были доступны в установочном меню на вашем блоке. Противоположно мануальной операции на
передней панели (т. е. HMI) устройства, приложению необходим удаленный контроль. Если приложение не
может переключить устройство в такое управление, то окно не откроется.
Некоторые серии устройств не имеют установочного меню, как PS/PSI 5000. Поэтому это окно настроек
является единственным доступом к некоторым дополнительным установкам, как эффективный диапазон
напряжения (0...5 В или 0...10 В) аналогового интерфейса (только PSI 5000). Не все доступные настройки
поддерживаются всеми сериями устройств. Это параметры будут серыми.
Подробности о настройках в этом окне могут быть найдены в руководствах к приборам, так как они идентичны
описанным здесь.
Пометка: в текущей версии 2.01, это приложение может быть запущено только, если выбранное
устройство подключено и определено через кабель USB.
10. Приложение „Update“
Это приложение использует прошивку обновления микроконтроллеров внутри устройства. Эта часть EA Power
Control рассматривается как инструмент обновления серий устройств. Чтобы обновить любое совместимое и
поддерживаемое устройство, вам необходимо сперва загрузить файл обновления (*.upd) с сайта
производителя или получить его от нас, по предварительному запросу. Файл всегда содержит наиболее
последние версии прошивок. Пометка:
Устанавливайте обновления на ваше устройство только по мере необходимости или после просьбы
его произвести!
Примите во внимание следующие факты прежде, чем вы установите прошивки обновления:
Установка обновлений может оборваться по нескольким причинам, например, из-за исчезновения
питания сети. В зависимости от компонентов, обновляющихся при появлении задержки, устройство
может быть восстановлено, либо стать непригодным. Возможно частичное восстановление, но не при
каждой ситуации. В таком случае свяжитесь с нашей поддержкой.
Не устанавливайте на ваше устройство более раннюю версию, чем уже установлена, пока мы вас не
попросим об этом. Программа запросит разрешение на проведение установки ранней версии.
Обновление версии после установки ранней возможно без ограничений.
Может случиться, что некоторые модели совместимых серий устройств или серии устройств еще
неизвестны вашей текущей установленной версии EA Power Control и не смогут быть обновлены этим
приложением. При такой конфликтной ситуации программа покажет всплывающее сообщение.
В окне приложения “Update” вы можете открыть файл обновления кнопкой “Browse”. Файл проверяется на
пригодность и позднее отобразится некоторая информация в ячейке файла. Информация распределена по
компонентам. Это значит, если вы выбрали любой из трех компонентов (HMI, KE или DR) в списке “Firmware
Update”, дисплей истории информации изменится.
Вместе с информацией в окне события, список покажет версии прошивок, установленных на устройстве, и
обновленные версии, что были в файле обновления. Кроме того, светофор подскажет вам, что обновление
рекомендуется (зеленый)
не требуется (белый)
отклонено (красный)
возможно, но не рекомендуется (желтый)
Вам следует устанавливать обновления только на компоненты с зеленым светом.
Пользователь может решить, обновлять ли каждый компонент или только один. Выбор осуществляется
мануальной установкой галочки в обзорном списке, в колонке “Install”. Непомеченные компоненты будут
пропущены во время процесса обновления.
Doc-ID: EAPCRU Страница 17
Дата: 07.01.2016

После пометки минимум одного компонента для обновления и нажатия кнопки “Update”, обновление начнется
и будет выполняться автоматически пока не завершится. Это может продлиться пару минут. Убедитесь, что в
это время на устройство постоянно подается электропитание.
Doc-ID: EAPCRU Страница 18
Дата: 07.01.2016

11. License Management (Менеджер Лицензий)
Имя функции
Включена с
версии
Краткое описание
Multi Control
1.52
Приложение для параллельного и синхронного контроля и мониторинга до
20 устройств в одном окне. Подробности об этой функции смотрите в 12.
Приложение “Multi Control
Рисунок 11 - License manager
С версии 1.52 программа имеет менеджер лицензий. Он используется для установки опционального кода
лицензии для разблокировки расширенных функций в программе. Эти расширенные функции не являются
бесплатными. Код лицензии приобретается вместе с устройством (если оно поддерживается) или позднее.
Лицензия привязывается к компьютеру, на котором она будет установлена.
Вопросы и ответы:
Что делать перед запросом кода лицензии?
Сначала соберите информацию о не разблокированных функциях на нашем веб-сайте или прочитав этот
документ. Если такие функции вызовут у вас интерес, загрузите последнюю версию EA Power Control с нашего
веб сайта и установите её. Если вы решили заказать ко лицензии для одной или нескольких функций,
запросите об этом наш отдел продаж, лучше по электронной почте и укажите список таких функций поименно.
На текущую дату () доступны следующие не разблокированные функции в этой версии EA Power Control:
Как получить лизенцию?
Откройте менеджер лицензий в EA Power Control через меню “? -> License Management” и в нём кликните на
“Get License ID code”. Откроется другое окно с некоторой информацией. Кликните на дисплее адрес почты,
чтобы открыть вашу почту программы по умолчанию и отправить запрос на почту для квотирования или другой
информации.
Как установить код лицензии?
После получения лицензии (по почте, в форме текста), которая привязывается к определённому ПК по
уникальному ID номер компьютера (кратко: CID), сверяется CID компьютера, на который вы будете
устанавливать код лицензии и код лицензии почты. CID текущего ПК отображается в окне “Get License ID
code”. Доступ к этому через меню “? -> License Management -> Get License ID code”. Если сверяемый CID не
совпадёт, то это может быть признаком установки на неверный ПК или CID изменялся. Тогда прочтите ниже
“Что делать если лицензия неожиданно перестала действовать?”.
После успешной сверки, закройте окно и впишите код лицензии в текстовую ячейку New License ID Code (LIC)”
либо скопируйте и вставьте его из почты. Если код лицензии одобрен, то он будет установлен и
соответственные функции будут разблокированы. Окна менеджера лицензий отобразят статус при их
открытии.
Одним кодом лицензии можно разблокировать несколько расширенных функций.
Пометка: Сохраните электронную почту с кодом лицензии для дальнейшего использования в надёжном и
легком в поиске месте или распечатайте его.
Doc-ID: EAPCRU Страница 19
Дата: 07.01.2016

Как разблокировать больше функций?
Как только лицензия установлена, разблокируется определённое число расширенных функций. Если вы
пожелаете разблокировать их больше по мере их выхода, то вам а) необходимо будет запросить новый код
лицензии и б) установить его как описывалось выше. Вы можете запросить новый код лицензии через кнопку
“Get License ID code” в менеджере лицензий, что приведёт к созданию сообщения. В этом сообщении укажите
все новые функции с их именами, которые вы хотите установить, включая уже разблокированные функции,
всё это будет содержаться в новом коде лицензии.
Для ранее купленных разблокированных функций, пожалуйста приведите доказательства покупки.
Может ли лицензия быть перенесена на другой компьютер?
Нет, но доступен пакет мульти-лицензий. Пожалуйста, свяжитесь с нашим отделом продаж на предмет его
получения. Это ещё потребуется, если ПК с установленной лицензией неожиданно вышел из строя и стал
непригодным или лицензия устанавливалась на компьютер для временного использования и тестирования,
или ПК будет передан другому пользователю.
Что делать если лицензия перестала действовать?
Может случиться так, что лицензия неожиданно перестанет действовать, например, из-за того, что
конфигурация ПК изменилась и ID компьютера также (сокр. CID). В таком случае, сверьте CID с тем, что пришёл
на вашу почту при покупке кода лицензии. Текущий CID будет показан вам при доступе к меню “? -> License
Management” и затем кликните на “Get License ID Code”.
i. Если оба CID идентичны, просто заново установите лицензию. Смотрите выше “Как установить код
лицензии?”
ii. Если CID изменён, запросите новый код лицензии. Вы можете это сделать отправкой нам сообщения,
которое будет содержать новый и старый CID и доказательство покупки. Мы сгенерируем новый код и
отправим его вам.
Doc-ID: EAPCRU Страница 20
Дата: 07.01.2016

12. Приложение “Multi Control”
Рисунок 12 - Multi Control главный экран
С версии 1.52 EA Power Control имеется приложение “Multi Control”.
После первой установки этой версии, приложение будет блокировано и скрыто. Для его разблокировки
необходимо приобрести лицензию. Подробности о получении лицензии и разблокировке приложения смотрите
в “11. License Management”.
Это приложение используется для контроля и мониторинга сразу до 20 устройств идентичных или различных
моделей и типов. Все устройства, распознанные EA Power Control, можно увидеть в списке в этом окне для
удалённого доступа к ним без перехода к приложению “Terminal”. Списком устройств можно управлять
удалением или добавлением, если она подключены к компьютеру.
12.1 Ограничения
Это приложение может управлять, иметь доступ и контролировать до 20 устройств. В случае
большого числа устройств, подключенных напрямую к компьютеру или через сеть, применяется к
первым в списке USB устройств в соответствии с их возрастающими номерами портов COM, затем к
списку устройств Ethernet, в соответствии с возрастающим IP
Секвенирование может производиться только в одном наборе и только для выбранных устройств
Регистрация данных недоступна
Устройства, с которыми было потеряно соединение не могут быть снова установлены автоматически
в список устройств
Конфигурация через приложение “Settings” не может быть записана сразу ко множеству устройств
Doc-ID: EAPCRU Страница 21
Дата: 07.01.2016

12.2 Функции в окне приложения
12.2.1 Участок верха окна
Участок верха окна всегда отображает актуальные и установленные значения, а также статус одного текущего
из выбранных устройств из списка (синий, выбор одиночного блока). Эта часть окна идентична верхней части
окна приложения “Terminal”. Смотрите также 7. Приложение „Terminal“.
12.2.2 Участок середины окна
Средняя часть окна используется для управления группами устройств. Каждое из макс. 20 устройств можно
назначить на любую из четырех групп, и каждая группа может иметь макс. 20 устройств. Актуальное
назначение в группу выполняется в списке устройств (смотрите ниже в “Tab “Devices””). Кнопки используются
для выбора устройств, которые назначаются в определённую группу. Select” здесь означает установку галочки
рядом с устройствами в колонке 1 списка устройств. Это работает тем же путём и для отмены выбора групп.
Все действия после выбора групп, как установка статуса (вход/выход вкл./выкл.) или значения, применяются
только к выбранным группам. Это значит, что вы можете назначить разные значения каждой группе. Общие
правила:
Устройство из списка можно назначить только в одну из четырёх групп
Конфигурация группы не сохраняется автоматически, это выполняется вручную (кнопка “Save config.”)
и затем позвольте программе загрузить последнее сохранение конфигурации автоматически при
открытии приложения
Устройства, которые сохранены в конфигурации группы, но отключены и есть в списке, будут иметь
серый цвет и их можно удалить вручную или очистить от них использованием кнопки “Show all devices”
Участок “Group settings”
Кнопки G1 – G4 Выбор/отмена выбора одного или нескольких групп устройств
Кнопка Reset groups Удаляет все назначения устройств всех групп, отменяет выбор групп
Имена групп Текст рядом с кнопками групп, имя группы, может быть изменён на
другое при двойном клике на нём
Участок “Configuration”
Кнопка Save config. Сохраните текущую конфигурации группы в файл конфигурации (*.ini).
Конфигурации групп можно сохранить и загрузить таким же путём, тогда
как наиболее последние можно загрузить автоматически при запуске
приложения, отметив опцию “Load config. at app startup”
Кнопка Load config. Загрузки ранее сохраненных файлов конфигураций (*.ini) из памяти и
также установка ранее загруженного файла в загрузку для опции “Load
config. at app startup”
Опция Load config at app startup Если активировано, эта опция попытается загрузить недавний
сохранённый и загруженный файл конфигурации групп из памяти при
запуске этого приложения, чтобы восстановить группы
Doc-ID: EAPCRU Страница 22
Дата: 07.01.2016

12.2.3 Участок нижнего окна
Колонка
Титл
Информация в колонке
1 - Галочка выбора одного или нескольких устройств для группового действия
2
Nr
Возрастание номера позиции устройств в списке
3
Gr
Назначение групп (G1 ... G4, пусто если нет групп)
4
Icon
Иконка устройства как в главном окне, используется для более простого различия
5
Device
Имя устройства
6
User text
Показ текста пользователя, который можно задать устройству
7
Connection
Идентификатор интерфейса (COM порт или IP)
8
Access
Статус удалённого контроля: free/local = значит не в нём, remote = в удалённом
9
Mode
Статус входа/выхода DC устройства
10
Alarm
Последние появившиеся сигналы тревоги (копия дисплея устройства)
11-14
U, I, P, R
Три или четыре актуальных значения (верх) и установленные значения (низ),
которые в данный момент действительны
15
Delete
Эта колонка используется для удаления, то есть скрытия устройства из списка
Табуляция “Devices” (список устройств)
При запуске приложения “Multi Control”, EA Power Control здесь выдаст перечень всех известных устройств.
Этот список может быть позднее модифицирован удалением лишних блоков. Общие правила для этого списка:
Если соединение с устройством из списка пропадёт, это будет обнаружено и показано серым, также
его можно очистить из списка, кликнув “Show all devices”
Список можно обновить добавленными или переподключёнными устройствами закрытием окна
приложения и выполнив поиск устройства в главном окне
Устройства, которые были удалены из списка в колонке кликом кнопки “Delete” и если они еще
подключены, могут быть снова добавлены в перечень кликом на “Show all devices”
В списке устройств вы можете…
выбрать одно устройства (ряд), чтобы увидеть в верхнем окне его значения и статус
выбрать одно или несколько устройств установкой галочки, чтобы
o отправить этим устройствам значения и/или статусы почти1 синхронно
o запустить параллельное Секвенирование на них
назначить одно или несколько устройств на группу устройств, чтобы
o быстро выбирать определённый тип устройств
o отправлять различные установки (значения, статус) разным группам
удалять (скрывать) устройства из списка
отменить удаление (показать) раннее удалённые устройства
запустить приложение “Settings” для выбранных устройств, чтобы настроить рабочие параметры
В списке устройств, минимум один ряд выбран и помечен синим цветом. Значения и статус этого устройства
будут показаны в верхней части окна для прямого доступа. Клик на другое устройство переключит дисплей.
Перечень устройств показывает компактную информацию:
Пометка: значения или статус в этих колонках нельзя изменить
Doc-ID: EAPCRU Страница 23
Дата: 07.01.2016

12.2.3.1 Контекстное меню
Пункт меню
Параметр
Воздействие
Open in
Settings
Открывает приложение „Settings“ для устройства в
выбранном ряде. Так же смотрите 9. Приложение
„Settings“
Set group
G1, G2, G3,
G4, None
Назначает устройства в выбранном ряде в группу
(G1...G4) соотв. Отменяет назначение (none).
Send CMD
ACK alarm
Альтернативный метод очистки сигнала тревоги (ряд
обозначается красным)
Set group for all checked devices
Назначает устройства с галочкой в группе
соответственно отменяет назначение
Set values for all checked devices
Устанавливает значения U, I, P и R на все устройства с
галочками
Try to connect
Пытается соединиться с отключённым устройством
(серым цветом). Если успешно, устройство можно
использовать снова.
Имеется контекстное меню (правый клик) в списке устройств для выполнения дополнительных действий для
одного или нескольких выбранных устройств:
Табуляция “Commands”
Схоже с контролем одного устройства в приложении “Terminal” (ссылка “Fehler! Verweisquelle konnte nicht
gefunden werden. Команды”), вы можете управлять другими функциями или запрос информации, которые
недоступны в списке устройств или верхней части окна.
Разница здесь в том, что выбранная команда может быть отправлена на одно или группу устройств, что
имеет результатом множество откликов, к тому моменту, выбранных устройств. Чтобы соединить ответы в
окно их регистрации с устройствами, записям даётся префикс текстом пользователя устройства. Смотрите
пример выше.
Doc-ID: EAPCRU Страница 24
Дата: 07.01.2016

Табуляция “Sequencing”
Секвенирование в этой табуляции очень схоже с тем как оно производится в приложении “SeqLog” для
контроля одного устройства (ссылка “Fehler! Verweisquelle konnte nicht gefunden werden.. Fehler! Verweis-
quelle konnte nicht gefunden werden.“), но имеются некоторые отличия:
Файл секвенции будет применён ко всем выбранный устройствам сразу
Файл секвенции будет проверяться на совместимость ко всем выбранным устройствам
Doc-ID: EAPCRU Страница 25
Дата: 07.01.2016

EA Power Control 软件操作指南
软件版本: 1.52 beta
安装与操作配置需求:
- 电脑一台,最低配置为 2GHz 处理器,1GB RAM(内存)
- Windows 7 (32 位/64 位)操作系统
- Microsoft .NET Framework 4.5.2 (包含在此安装档内)
- 本软件与下面这些系列产品兼容:
o PSI 9000 2U
o PSI 9000 3U
o PS 9000 1U
o PS 9000 2U
o PS 9000 3U
o PS 5000
o PSI 5000
o ELR 9000
o ELM 5000
o EL 9000 B
- 本软件与下面这些接口卡类型兼容:
o 带虚拟 COM 口的 USB 接口卡
o Ethernet/LAN-以太网卡

Doc-ID: EAPCCN
: 07.01.2016
日期
第2页

目录
1. 版权所有 .................................................................................................................................................................. 5
2. 简介 .......................................................................................................................................................................... 5
3. 操作前的准备 ........................................................................................................................................................... 5
3.1 安装 EA Power Control 软件 ........................................................................................................................... 5
4. 启动软件 / 搜索产品 ................................................................................................................................................. 6
5. 远程控制的条件 ....................................................................................................................................................... 7
5.1 一次性控制多台产品........................................................................................................................................ 7
6. 图形化用户界面 (GUI) .............................................................................................................................................. 8
6.1 主窗口 ............................................................................................................................................................. 8
6.2 主窗口的操作 .................................................................................................................................................. 9
6.2.1 双击操作 .................................................................................................................................................. 9
6.2.2 拖放操作 .................................................................................................................................................. 9
6.3 显示产品相关信息 ......................................................................................................................................... 10
6.4 菜单 ............................................................................................................................................................... 10
7. „Terminal“应用程序 ................................................................................................................................................ 12
7.1 实际值 ........................................................................................................................................................... 12
7.2 设定值 ........................................................................................................................................................... 12
7.3 保护极限 ........................................................................................................................................................ 13
7.4 状态 ............................................................................................................................................................... 13
7.5 Commands .................................................................................................................................................... 14
7.5.1 限制 ....................................................................................................................................................... 14
8. „SeqLog“ (排序与数据记录)应用程序 ..................................................................................................................... 15
8.1 排序 ............................................................................................................................................................... 16
8.1.1 排序的设定 ............................................................................................................................................ 17
8.1.2 序列文件格式 ........................................................................................................................................ 18
8.2 数据记录 ........................................................................................................................................................ 18
8.2.1 数据记录的设置 ..................................................................................................................................... 19
9. „Settings“应用 ........................................................................................................................................................ 20
10. „Update“应用 ..................................................................................................................................................... 20
11. 注册管理 ............................................................................................................................................................ 21
12. „多台控制“应用 .................................................................................................................................................. 23
12.1 限制 ............................................................................................................................................................... 23
Doc-ID: EAPCCN
: 07.01.2016
日期
第3页

12.2 窗口中的功能 ................................................................................................................................................ 24
12.2.1 窗口顶部区域 ........................................................................................................................................ 24
12.2.2 窗口中间区域 ........................................................................................................................................ 24
12.2.3 窗口下方区域 ........................................................................................................................................ 25
12.2.3.1 文字选单 ............................................................................................................................................ 26
Doc-ID: EAPCCN
: 07.01.2016
日期
第4页

1. 版权所有
本软件仅能跟上述所列电源与电子负载系列,以及所列接口卡兼容。禁止对本软件及所含文档进行更改。除非获得所
有者的书面允许才例外。禁止对其转售或出租。如未对本软件做过任何变更,允许向第三方进行宣传。
2. 简介
EA Power Control 是一个 Windows™ 软件,用它可远程控制一台或多台可兼容电源与/或负载。但是只有经数字接口
方能实现。目前支持的接口卡为 USB 卡与以太网卡。
本软件基于 Visual C#编程语言,并需最低版本的 Microsoft .NET Framework 程序,这可能早已安装于电脑系统中,或
将由软件安装用户进行安装。
3. 操作前的准备
在开始使用 EA Power Control 前,应有至少一台可兼容产品已连到电脑上。如果产品经 USB 线连接的,需正确安装并
运行 USB 驱动程序。安装好后可在 Windows 设备管理器下的“端口(COM&LPT)”下找到已安装的 USB 设备。图
例如下:
注意:这个驱动器文件仅能在系统上安装一次。如果是第一次连接新的产品,或者已知产品连接到电脑上不同的
端口,都会要求重新安装。新产品将会赋予一个未使用的
COM
口。
USB
3.1 安装 EA Power Control 软件
提示:本软件只能用用户账号启动了安装器后才能安装。安装需要管理员授权。
本软件的安装通过一标准的安装装置完成。安装过程中如果已安装了下面的软件包则不用再选择它:
Microsoft .NET Framework 4.5.2 或更新版本
USB 驱动程序(如果只能使用以太网卡的产品则不需要)
Microsoft Visual C++运行时程序包
安装完后可从桌面或 Windows 开始菜单的下列路径启动本它:
开始\所有程序\EA Power Control\
Doc-ID: EAPCCN
: 07.01.2016
日期
第5页

4. 启动软件 / 搜索产品
启动软件后会自动搜索 COM口与以太网端口上是否有已连接且兼容的产品。在“配置”应用程序下可定义两端口上产
品的搜索设置。这样如果只连接了以太网端口也能搜索 COM 口下的设备,反之亦然。
只要可以访问主窗口,可随时重复“搜索产品”应用程序进行搜索。
搜索完后,被检测到的兼容产品都以图标陈列于设备清单下。图标配以系列名称与 IP 地址赋予的 COM 口,以及用户
可定义文本进行说明。举例如下:
图 1
提示:假如一台电脑的两个端口同时都连有产品,则
若未找到任何产品,该设备清单为空,如下图:
图 2
通过搜索未能检测到产品,原因有很多。
如果产品经 USB 线连接并控制:
a. 未安装 USB 驱动程序或安装不正确(见章节 „3. 操作前的准备“)
b. 未接上 USB 线或连接不正确
USB
端口优先操作。经
COM
口连接的产品只能被陈列一次。
c. 您的产品为最新系列,而当前安装的 EA Power Control 版本暂不支持它。此时可更新本软件。
如果设备经以太网端口连接并控制:
a. 产品上的以太网端口与“配置”下的端口不匹配。
b. 分配了一个或多个双 IP 地址,或者产品的默认 IP 未做变更以符合当前要求(所有产品出厂时都配备
为相同的标准 IP)
c. 如果 DHCP被激活,网络服务器可能已经用完全不同于“配置”下定义的并超出搜索范围的 IP来设置
一台或多台产品。
Doc-ID: EAPCCN
: 07.01.2016
日期
第6页

5. 远程控制的条件
将要在远程控制下使用的产品可以是不同的控制状态:
1). 当前正由模拟接口控制,故不可经数字接口进行控制。
2). 当前为本机状态(显示器指示为“Local”),故会阻止远程控制操作。
3). 可自由访问。然后电脑将接手产品的远程控制。
如果实际情况为 3),产品会接受远程控制指令(写入)。否则,只能读取并显示实际电压、电流与功率(内阻是计算
出来的)。要将产品设置为远程控制模式,需先手动取消产品的所有外部控制或本机模式。然后才能使用“Terminal”
(见下面)程序下的“Remote on”按钮设置远程控制。关于产品的状态详情可参考其用户说明书。
5.1 一次性控制多台产品
本软件自 1.52 版开始支援两种不同方式来控制并监视多台仪器
在个別的视窗控制并监视 每一个视窗代表一台仪器(基本功能)
在单一视窗控制并监视(多台控制)(须付费的功能 可选择的)
这两种方式以不同方式运作, 建议在仪器数量少时, 例如 5 台, 使用个別视窗控制. 当要控制并监视多台仪器时, 就要使用
单一视窗控制并监视(多台控制). 它可以让你最多控制 20 台不同型号的仪器. 多台控制中的一个主要功能就是同时设定
多台仪器的参数或状态.
提示:“多台控制”在 EA Power Control 的 1.52 版之后才有支援, 但必须要付费取得注册码后才能使用. 更多详情见
11.注册管理和 12. „多台控制“应用.
在远程控制模式下,本软件允许一次控制多达 10 台产品。打开每台产品的控制程序“Terminal”,然后在各个窗口之
间转换。这些窗口都可分布在电脑屏幕上。所有产品与窗口分开工作,相互无任何联系。更多详情见下面描述。
提示:远程控制产品,或者即使只是监控产品的实际值都需保持通讯不断。控制/监控的产品越多,通讯堵塞也会更严
重,根据电脑后台任务的整体运载,以及其它软件的运行,
这会使按钮的反应延迟,或实际值与状态更新延迟。
EA Power Control
可能因为
CPU
运行时间太少而慢下来。
Doc-ID: EAPCCN
: 07.01.2016
日期
第7页

6. 图形化用户界面 (GUI)
产品
这部分会以图标列出检测到的产品。如果检测到更多产品,将排成一排,窗口会随之扩大。本软件会监控
产品,若发现有产品由于连接线被拔下而掉线,会在短时间内从列表下移除它。重新连接后,产品清单不
会自动刷新。
应用程序
这部分会显示可使用的应用程序。每个应用程序都有不同的功能。可在该软件下安装更多应用来使用。
应用程序名称
功能描述
是否可启动
多次?
Search for devices
-搜索设备
双击后,它将在选定的接口上搜索兼容的设备。也可用它来刷新产品清单。搜
索期间,会有一个小窗口出现在屏幕前面。
-
Terminal
-终端
该应用为产品控制应用。它将打开一个显示实际值、设定值、保护极限与状态
的窗口。可对产品清单下的任意 10 台打开 10 次。而且,在 SCPI 语言(PS
5000 系列除外)或 ModBus 协议下,通过指令几乎可直接访问产品的每个功
能。
是,最多可
启 10 次。
Settings
-设置
打开一个更方便访问产品设置的窗口,因为可在产品菜单下设置。如果是没有
设置菜单的产品系列,如 PS 5000 与 PSI 5000,这是访问与产品操作相关设
定的唯一方法。
是,最多可
启 10 次。
Update
-更新
打开产品固件更新的窗口。固件更新需上传一特殊的更新文档(*.upd),该
文档可从制造商网站获取或向制造商申请获得。
否
SeqLog
-序列日志
打开排序与日志记录窗口。更多详情可见 8. „SeqLog“ (排序与数据记录)应用
程序。
是,最多可
启 10 次。
Multi Control
-多台控制
需要被解锁的功能(付费取得注册号). 更多详情可见 12. APP “Multi Control”
应用.
可同时控制并监看 20 台相同或不同型号的机器.
可同步设定参数值及状态.
否
6.1 主窗口
软件启动并搜索产品(如果激活启动即开始搜索功能)后,主窗口将出现如下:
图 3
该窗口被分为两个部分:
应用程序概览(日期:January, 2016):
Doc-ID: EAPCCN
: 07.01.2016
日期
第8页

6.2 主窗口的操作
关于产品图标与应用图标的操作可通过两种方式完成:
双击
拖放
6.2.1 双击操作
如果双击一个应用图标,将会以文本菜单格式显示产品清单,可从中选择一个产品启动应用程序。
提示:有些应用仅限为经
USB
线的连接方能使用。一般会跳出一对话框提醒您。
图 4 - 双击打开应用
6.2.2 拖放操作
为给产品清单下某一产品打开应用,只要点击产品图标,按住鼠标,然后拖曳到想要打开的应用图标上,然后放开。
除非当前状态不允许打开该应用,否则会被启动。不然会跳出一个信息,说明该应用为什么不能启动。
图 5 - 拖放打开应用
Doc-ID: EAPCCN
: 07.01.2016
日期
第9页

6.3 显示产品相关信息
这个范例中明显地指示出这是一台 PSI 5000 系列电源,而且它不具有内阻模
式(R 模式)。还可看见这台产品没有指定用户文本。用户文本旨在与其它
同型号的产品区分开来。
菜单名称
描述
File-文件
Close-关
立即关闭软件,不管其它窗口任然还打开着。
Configuration-配置
打开“Configuration”窗口,可设定产品通讯相关的设置,与/或软件本身的设置。
Tab „General“
-“General” 标签
该标签的勾选标记能允许或阻止经 USB 或 LAN 接口与产品连接。启动其中一项,
禁用另外一项,都对本软件的性能产生积极的影响。
默认设定:两个都启用
提示:只要两个选项都禁用,则无法找到任何产品!
Tab „USB“
-“USB”标签
选择在软件启动的时候加入(=勾选设定)USB 设备搜索。若未使用 USB,则建议
关闭“Gerneral”标签下的两个选项:这个设定以及通用接口 USB 设定。
这可减少搜索时间。
如果启用了通用接口 USB 设定,且该参数被禁用,仍可用“Search for devices—
搜索设备”程序开始 USB 设备的搜索。
默认设定:启用
Tab „Ethernet“
- “Ethernet”标签
该标签用来定义 IP 搜索范围以及产品经以太网连接的端口设置。这个搜索范围限定
于最后的八位字节。默认端口为 5025,如果是经以太网插座的默认端口,则可随意
更改,但是只有符合该端口设定的产品才可在 IP范围内找到。
还可在启动本软件时加入(勾选设定)以太网的搜索。如果未使用以太网,则建议
关闭这两个设定:该设定以及“General”标签下的通用接口以太网设定。因为这
可减少搜索时间。
如果启用了通用接口以太网设定,且该参数被禁用,仍可用“Search for devices—
搜索设备”程序开始以太网设备的搜索。
默认设定:禁用
默认端口:5025(也可见产品说明书)
默认 IP范围:192.168.0.2 … 192.168.0.100
?
Help-帮助
打开帮助文件 (PDF)
About-关于
打开一个关于本软件与制造商详情的小窗口
在产品清单下,右击产品图标会跳出一个显示产品信息的窗口。例如:
6.4 菜单
Doc-ID: EAPCCN
日期
: 07.01.2016
第10页

Enable debug
-允许调试
仅作内部使用。一般不要启用调试模式,因为多台产品并联,多少会减慢本软件的
运行速度。
Load patch file
-上传 patch 文件
这个用来上传 EA Power Control 软件的更新文件,比如新的序列范例文件或更新版
的帮助文件。这些文件如果可供用户使用,则可从制造商网站下载,或者给制造商
发送请求获取。
License Management
- 注册管理
此视窗是用来显示注册资讯及已经解锁的高阶功能, 它可以协助你购买或更新注册
码, 也可以用来安装注册码并解锁新功能. 请参阅 11.注册管理
Doc-ID: EAPCCN
日期
: 07.01.2016
第11页

7. „Terminal“应用程序
型号,系列号,
端口
实际值
设定值
保护极限值
图 6
状态
按钮
如产品上彩色 TFT 显示器所示,实际值之间是相互隔开
的。在每一个单区,它们都位于上面一行(大字体)。彩
色区域一般显示至少三组实际值。对于电子负载产品,它
还显示实际内阻。
彩色区域下面一行显示的是设定值(小字体)。它们为输入
框,产品经任意数字接口转换至远程控制后,可通过键盘
输入参数。用“Remote on”按钮,或者对应指令在终端
窗口内使产品转换至远程控制模式。
输入框激活后会变白色,即可通过打字输入, 或复制&粘
贴输入参数。
“Terminal”应用程序是产品的主控应用窗口。它可对多达 6 台产品多次打开,从而分开控制产品或并列控制。这些窗口
相互之间无任何链接或联系。
鼠标点击操作该窗口可控制产品状态(远程模式,开/关),而通过键盘可输入数值。还可进行复制与粘贴。
该窗口上半部分显示的是实际值、设定值、保护极限值与状态。
要远程控制某特定产品的任意功能,可点击“Show command”按钮显示上半部分。SCPI 指令语言用标签与 ModBus
协议,提供预先设定的指令,点击“Send”按钮可发送给产品。见章节 7. “Terminal”应用程序。
7.1 实际值
实际值的刷新是有周期性的。高负荷的 CPU 可能会延迟其刷新。特别是当打开了多个终端窗口时会延迟更多。参数的
格式不总会与产品显示器格式相符。因为百分比数转到实际值是从内部转换过来的,最后一个数位可能会出现不同。
这同样适用于数据记录(即:日志记录,见下面)。
提示:实际值只能从产品上读取,且受产品上任何操作(手动或经模拟接口)的影响。即使不通过
进行远程控制,这些参数也一直存在。
EA Power Control
7.2 设定值
每个输入框内允许的参数范围与产品前板手动操作允许输入的范围一样。设定值的可调范围默认为 0…102%,可以被
可调极限值缩减(缩写为:极限值)。这些参数即可通过产品的 MENU-菜单手动定义,也可通过 EA Power Control软
件的“Settings”应用程序定义。
如果输入参数太高或太低,则不会被接受,而是再次显示之前旧的参数。
提示:只有按下
Doc-ID: EAPCCN
: 07.01.2016
日期
ENTER或RETURN
按键确认后,才会提交设定值。
第12页

7.3 保护极限
保护极限为显示框与输入框。当产品经数字接口处于远程
控制模式时,仅允许输入参数。用“Access”可显示状态
区下的远程控制状态。输入框被激活后,即可通过打字输
入,亦或复制&粘贴输入参数。
状态区复制出产品显示器上所示的产品状态。但也可有些
许不同。例如:PSI 5000 产品不论是经模拟或数字接转
换至远程控制,显示器仅显示“Remote”,而其状态区
则清楚显示控制的接口类型(如下)。
每个输入框的允许范围与产品前板手动操作允许输入的范围一样。保护极限的可调范围默认为对应额定值的 0…110%。
如果输入参数太高或太低,则不会被接受,而是再次显示之前旧的参数。
提示:只有按下
ENTER或RETURN
按键确认后,才会将设定值提交给产品。
7.4 状态
状态指示元素:
Mode: 显示直流输出/输入的状态,当它关闭时显示“OFF”;当它打开时,此处显示实际的调整模式(CC, CV, CP,
CR)。调整模式的详细介绍请参考产品说明书。
OP Mode: 显示电阻模式 “UIR”或正常模式(若仪器有支援) “OP Mode = UIP”
MS Mode: 显示主從模式的狀態(若仪器有支援):
N/A = 仪器沒有支援 „主从模式“
Off =有支援主从模式(MS), 但目前没有启用
Slave =有支援主从模式(MS), 仪器被设为仆从模式(无法以远端控制)
Master =有支援主从模式(MS), 仪器被设为主导模式(可以远端控制)
Access: 显示经接口可自由访问产品,并远程控制产品,或当产品处于远程控制模式所受控的接口类型(“rem”=远
程控制)
Alarm: 显示产品的最后报警状态。有些设备报警会关闭直流输出/输入,并需在再次使用前确认。在此情况下,状态
区下的 ON/OFF 按钮变为“ACK alarm”。必须用它清除报警条件,然后再按下 ON/OFF 按钮,但是必须在
没有了报警条件后才能这样操作。
提示:产品状态只能从产品上读取,且受产品上任何操作(手动或经模拟接口)的影响。及时不通过
trol
进行远程控制,这些参数也一直存在。
Doc-ID: EAPCCN
: 07.01.2016
日期
EA Power Con-
第13页

7.5 Commands
按下“Show command”按钮, 可显示此窗口额外的部分. 此额外窗口可以让使用者直接以 ModBus 或 SCPI(若仪器有支援)
通 讯协定来控制仪器. 若上半部的窗口没有您所需的功能, 也可以用此额外窗口来询问仪器的其他资讯或设定功能
图 7 - 直接指令
“SCPI”和“ModBus”这两个页签各提供了一组指令供您选择, 可按下“Send”按钮把指令送出. 更多的 SCPI 指令可以在输
入栏内打入(请参阅额外文件“Programming ModBus & SCPI”. 此文件会放在随仪器的 CD 或 USB 随身碟内) 借着设定
ModBus RTU 的注册器和功能码, 您也可以使用“Free work”来造出更多的 ModBus 指令
所有送出的指令及仪器回覆的资料都被记录在右边的窗口内, 并附上传收的时间. 以上的例子是送一个 SCPI 指令*IDN?
给一台 PSI 5000 仪器, 仪器约在 20ms 后回覆指令
SCPI 是一种文字指令, 所以纪录在 ASCII 页签下. ModBus 是二进位格式, 所以纪录在 Hex 页签下
.
7.5.1 限制
并不是所有指令的传送纪录都同时记在 ASCII 和 Hex 页签下
当切换 ASCII 和 Hex 页签时, 指令输入栏的模式也跟著变更. 也就是说 在 ModBus 模式下 输入 SCPI 指令不会
得到正确的结果. 反之在 SCPI 模式下也是如此
Doc-ID: EAPCCN
: 07.01.2016
日期
第14页

8. „SeqLog“ (排序与数据记录)应用程序
图 8
EA Power Control 的一个重要特征是,它可以运行序列文档(这儿指:排序),并记录产品数据(这儿指:数据记
录)。一个序列是以 CSV 文本格式存储的一行行设定值与一个时间值 x(数值以分号隔开,而非逗号,因为在多数欧
洲国家 EXCEL 表用逗号当作小数位分隔符)组成的表。
该软件会逐行地读取序列文档,并将当前已处理行内的数值与状态发送给产品,然后等待一定的时间,直到 处理下一
步为止。这个间隔时间可以很长,为 500 ms…99 h:59 m:59 s(步宽为:100ms)。
数据记录运行原理与之类似,但是顺序颠倒了。在可选间隔时间内(定义与排序一样),该软件读取产品上的实际数
值与状态,然后逐步地写入日志文档内(文本文件,CSV 格式)。总记录时间与记录数次限定为 1000 个连续日志文
档的最大数。
重点!EA Power Control 的排序与 ELR 9000 与 PSI 9000 系列下任意函数发生器的排序不同。序列文件的处理就是
按照序列文档下输入的数值发送给产品,因此产品不能产生阶跃,以便在两个设定值之间形成一个线性上升或下降的
曲线。
进入“SeqLog”应用程序窗口,在“Options”窗口下可配置数据记录与排序。这需为 EA Power Control 软件选择一
个单独的文档来操作。每台产品的排序与记录文档要分开设定。不可在一个日志文档下记录多台产品的数据。这种日
志文档不支持用额外栏来区分产品。
Doc-ID: EAPCCN
: 07.01.2016
日期
第15页

8.1 排序
排序前需为产品选择一个用来测试兼容性的序列文件。如果文件中有错误,会跳出一对话框提示。软件安装时会在这
个路径:“C:\Users\<user>\Documents\EAPowerControl\example_sequence_file.csv“下存储一个范例序列文件,作后
续预选用。该文件可作为启动操作,也可根据客户需求进行编辑。
可在 EA Power Control 软件外编辑,或者在应用程序窗口“SeqLog”或“Options”窗口内启动。
开始排序前,再次检查这个文档,以便检测未发现的外部编辑。
基本原则为:
所有设定值(U,I,P 与 R1)必须符合即将打开序列文件的产品的额定值。如果打开的序列原本是 200V 型号
的产品,却为 80V 型号所用,则所有超过 80V 的参数行都会被改文档拒绝。
时间值的最小值为 500ms,并以每 100ms 步宽而变化。因此,比如 1.25s 这样的数值是不可能存在的。
一个序列文档可为多台同型号产品所用,形成并列排序,只要额定值相符即可。比如 PS 9080-170 与 PSI
9080-170 两台产品就可以,虽然 PS 型号没有内阻模式。
“SeqLog” 應用可以同时控制 10 台仪器, 每一台仪器可以使用自己的排序指令档. 排序指令功能无法同时启动所
有的仪器, 若是要同时启动, 请参阅 12. App „Multi Control“
打开一个有效的序列文档,且产品位于远程控制模式时,可在应用程序窗口“SeqLog”下启动排序功能。可将当前已
处理过的步骤从序列文档复制到窗口下面。进程条指示序列文档一个循环的进程。倒计时则显示序列剩余用时(重复
次数 x 序列文档内所有行总用时),而重复计数器记录重复次数,重复设置设为“无限循环”则除外。
另外还适应如下规则:
排序开始后,可打开或关闭产品的直流输出/输入,并按照第一个序列行定义的设置参数。这有可能给电源直流输出
传送一意外的电压阶跃。为了避免发生这个,可以加一行作为第一行,并将设定电压设为 0,直流输入/输出设为关
闭。
仅针对电源:一个序列行下的电压设定可能会跟前面行或后面行下的很不同。如果上一行的电压设定要大大高于当
前行,电压首先会下降,且用时可能会比预定时间要长,才能到达当前行的参数,这个时间取决于负载的大小。有
时还可能会导致下一行不能按预设水平与时间运行。
排序会运行完最后一个序列会自动停止,或达到所需重复次数时停止,亦或出现如 OV 这样的设备报警而停止。
数据记录可与排序自动开始与停止。在“Option”窗口,“Logging”标签下有另外设定。
只有定义了日志文件,方可启动数据记录功能,无论是通过手动还是自动。而且必须能完全访问该软件,即不可锁
定。
序列与数据记录文件的路径与文件名一旦被选定且分配给某一特定产品后,将存储于一个 INI 文件下,下次搜索到
该产品时可调出来使用。
Doc-ID: EAPCCN
: 07.01.2016
日期
第16页

8.1.1 排序的设定
要素
描述
Sequence file path
-序列文件路径
点击该文件夹图标会打开一对话框,要求选择序列文件类型-CSV,该文件必须包含具某
特定格式的数据,下面章节有详细解释。默认条件下,这里会有一个序列范例文件。
默认选项为: example_sequence_file.csv
Sequence file name
-序列文件名称
分开显示序列文件名称
Sequencing with repetition
-带循环的排序
整个序列全部处理完后再次重复运行。用户可设置循环的次数。范围为 1…65500。还有
个选项“Infinite loop”,可以无限制地重复序列,直到它被手动停止,或者出现设备报
警而终止。
默认设定:两个选项都未启用
Edit sequence file
-编辑序列文件
尝试启动已分配为打开 CSV 文件的应用(如果有的话),从而在编辑模式下打开序列文
件。这要求保存所有更改,并在外部应用下关闭文件,方能用它进行排序。
注意: 此排序的设定是针对每一台仪器. 也就是说, 软体会以每台仪器的序号作为区別, 将个別的设定存下来, 并在下次使
用时自动载入设定
图 9
Doc-ID: EAPCCN
: 07.01.2016
日期
第17页

8.1.2 序列文件格式
序列文件必须为 CSV 格式,但是其参数以分号隔开,而不像 EXCEL 表格那样用逗号。原因是逗号在多数欧洲国家用
来作为数值的小数位符号。
已安装的范例文件- example_sequence_file.csv 描述了序列文件的格式要求。
一般建议将范例序列文件存储为模板,方便创建任意新的序列文档。
序列文档格式(范例)组成如下:
提示: 和之前的
EA Power Control
版本相比, 排序现在支援电阻模式(若仪器有支援
),
排序指令档也增加了两个字段, 旧
的指令档仍然可以使用, 因为这两个额外的字段并非必要
.
且需遵循如下原则:
第 1 行为标题,不能用作序列的第 1 步。
G 至 J 列不能为空,必须填充数字。
A 与 B 列下的文本可以不做要求,但是填写后可以对描述(B 列)与计算步数(A 列)有帮助。
C 至 E 列下的所有数值都不能超过打开产品对应的额定值,除非允许留空,否则序列会被拒绝,本软件会跳出错误
清单。举例:为一台 80V 产品创建一个序列文档,然后在某一行定义为 50V 的参数。则该序列文件只能带载 40V
的产品。
8.2 数据记录
产品数据可随时记录下来,只要产品不是在远程控制模式。意思是,可以经模拟接口(PS 5000 系列产品除外)控制
产品,并经数字接口用 EA Power Control 软件记录数据。
可手动按下按钮启动记录,或者随排序自动启动,只要选择了该选项,且定义了日志文件。“Options”窗口还有一些
必要的设定。
数据记录遵循如下基本原则:
只要定义了日志文件,且设置为某特定产品,就可随时启动或停止数据记录。
如果数据记录是随排序自动开始的,也可随时手动终止它,或者当排序终止时自动终止,或者勾选了“出现错误时
停止数据记录”后终止。
“Options”窗口提供的选项为:创建新的日志文档,或者打开旧的重新使用
o 从移动盘上打开现有文档时,特别注意“Overwrite”记录模式!如果选择了“Overwrite”选项,之前记录
的数据会丢失,下次才开始记录。
如果数据记录是随排序自动开始的,且记录间隔时间符合序列文件的时间值,产品首先会接受并设置当前序列行的
数值。然后才能通过记录功能读取产品,并记录更新值。这会使日志文档下至少有一行的设定值与对应实际值出现
偏移。记录间隔时间越大,序列文件行与对应日志文件行的时间差越大。
o 举例:序列文件下的时间值全部为 1s,日志间隔时间也为 1s。排序与数据记录同时开始。在第 5 行定义的电
压值为 30,当处理到第 5 行时会给电源设定 30V。与此同时,日志文档在第 5 行收到一个记录,但有可能为
一不同的实际值,因为 30V 还未设定下来。因此日志文档会晚一行记录 30V 的实际值。
Doc-ID: EAPCCN
: 07.01.2016
日期
第18页

旧版的 EXCEL 软件或类似工具也可以使用,每个表格的行数最多限定为 65536 行。想要记录超出这个极限的数据,
要素
描述
Log file path
Log file name
Button „New“
Button „Open“
这些用于定义日志文件的路径与文件名。可以点击“New”按钮创建新的文档,或者点
击“Open”打开现有文档。
注意“Log file action”选项,特别是打开现有文档时。因为它里面的数据可能会附于文
档最后!
Log file action
为日志文档选择记录模式,“Overwrite”还是“Attached”。注意!选择“Overwrite”
后,每次启动数据记录会覆盖之前记录的数据,不管是手动记录还是随排序自动开始记
录。
默认设定:“Overwrite”
Log interval
定义数据记录期间两个日志文档输入的时间。数据记录运行时不可更改此数值。可调范
围为:在 100ms 步内为 500 ms...99 h 59 m 59 s。
默认值:500 ms
Start logging automatically
with sequencing
如果启动该设定,且有定义了一个日志文件,则每次用对应按钮启动排序时,会自动启
动新的记录期间。已选定的日志文档动作也适用!用户可以随时手动终止记录,否则会
一直持续到因为出现事件而终止,或因启动“自动停止数据记录与排序”设定而自动终
止。
默认设定:禁用
Stop logging automatically
with sequencing
如果启用该设定,并且手动开始了数据记录或者随排序自动开始记录(见其它设定“数
据记录随排序自动开始”),则它会随排序自动停止,不管排序是什么原因而停止(到
达序列文件尾端,到达循环尾端,产品报警)。
默认设定:禁用
本软件可以在表格到达 65500行后创建一个溢出文档。溢出文档的文件名后面会加_001。这个数字为计数号,可以
累加到 999。所以直到记录了 1000 个日志文件后,才会自动停止记录,然后软件会跳出一个信息。
8.2.1 数据记录的设置
图 10
Doc-ID: EAPCCN
: 07.01.2016
日期
第19页

9. „Settings“应用
Stop logging on error
一般情况下,当直流输入/输出关闭时,产品报警期间数据记录也将继续,但是实际值全
部为零(电子负载上有电压除外)。于是日志文件就全部以零填充。在出现错误/报警时
启动该设定可以避免继续记录数值。
默认设定:禁用
“Settings”应用可以让用户调节产品相关的参数与设定,也可在产品的设置菜单下操作。跟产品前板上的手动操作相比,
该应用要求设置为远程控制模式。如果它不能将产品转入远程控制,则不能打开该窗口。
有些产品系列甚至没有设置菜单,比如 PS/PSI 5000 系列。针对这些型号,设置窗口是唯一进入一些额外设定的途径,
比如:模拟接口(仅针对 PSI 5000 系列)的有效电压范围(0…5 V 或 0…10 V)。而且不会支持所有系列的所有设
定。不支持的将变为灰色。该窗口下的设置详情可在产品说明书中找到,那里的描述跟这是一样的。
提示:在当前版本
1.42 beta
下,设置应用只有经
USB
线连上了选定产品,并检测到后,方可启动设置应用程序。
10. „Update“应用
这个应用程序用来更新产品上微处理器芯片的固件版本。这个部分被认为是当前产品系列的更新工具。为了更新可兼
容且支持的产品,用户需先从我公司网站下载一更新文档(*.upd),或发邮件向我们申请获取。该文档一般包含最新
版本的固件。提示:
只有当绝对有这个必要时,或者您被要求这样做时,才将更新文档安装到您的产品上!
安装固件更新前需明了如下事实:
更新安装失败可能有几个原因,比如断电。当更新被打断时看正处于那个阶段的更新,然后才知道产品是否已
恢复或者不可用。产品可以进行部分恢复,但不是每种情况都可以。这时需联络我们的技术人员给予支持。
不要给您的产品降级,即:安装一个比当前产品更低的版本,除非我们绝对要求这样操作。本软件会询问是否
准予降级。而降级之后再升级为更新的版本则不受任何限制。
还有可能出现这样的情况,某兼容系列的某一个特殊型号,或者一个系列的一台产品不识别 EA Power Control
软件当前安装的版本,则不能用该应用更新。在此有冲突的情况下,本软件应会跳出一条信息。
在 “Update” 应用窗口下,用“Browse”按钮可打开更新文档。检查文档的有效性,然后会在日志文件筐下显示一些信
息。这个信息随更新要素而会不同。意思是,假如你选择了“Firmware Update”清单内三个最大要素(HMI,KE 或
DR)中的一个,显示的历史信息将会改变。
连同日志窗口下的信息,清单还会显示产品安装的固件版本,以及更新文件下包含的更新版本。 另外还有一交通灯会
告诉你更新的状态:
建议更新(绿色)
不要求更新(白色)
拒绝更新(红色)
可以,但不建议,比如:降级(黄色)
通常情况下,只有出现绿灯时才应安装要素的更新。
用户要决定更新所有要素还是一个要素。可在清单窗口下,在“Install”列下手动勾选,完成选择。运行更新程序时,
未勾选的要素会被忽略。当可以进行一个要素的更新时,点击“Update”按钮,将启动更新,剩余操作会自动执行,
直至完成更新。这可能会花几分钟。更新期间,请确保产品一直保持通电状态。
Doc-ID: EAPCCN
: 07.01.2016
日期
第20页

11. 注册管理
功能名称
开始支援版本
简述
多台控制
1.52
在一个视窗下可同时控制并监测最多 20 台仪器, 详情请参阅 12. „
多台控制
“
图 11 - 注册管理窗口
此软件自 1.52 版以后有注册管理功能, 它可以被用来安装注册码以啟動此软件的高阶功能. 高阶功能是需要付费的. 注册
码可以和仪器(若软件有支援此仪器)一起购买或分开购买.
注册码是依据特定 PC 硬体资讯所建立的, 其它 PC 无法使用.
问题与解答:
取的注册码之前要作什麼
首先, 您要打电话给我们的销售部门, 或造访我们的网站, 或阅读此文件取得高阶功能的相关资讯. 如果您对我们的高阶
功能有兴趣, 请至我们的网站下载最新版本的 EA Power Control 并安装它. 如果您决定要购买一个或多个高阶功能, 您可
以跟我们的采购部门取得估价. 建议您使用电子邮件, 并写下所有您想要的高阶功能及他们的名称.
目前的 EA Power Control 版本有以下的高阶功能:
如何取得註冊
在 EA Power Control 的选单开启注册管理员“? -> License Management”. 在注册管理员内按下“Get License ID code”
?
?
之后会显示一个讯息窗口, 点选窗口上的电子邮件地址, 预设的电子邮件软件就会启动, 之后送出您的信件询问估价并其
它的资讯.
如何安装注册码
在收到电子邮件内的文字注册码后, (此注册码只适用于一台特定的 PC 及它的电脑识別码), 比对您电脑上及电子邮件内
的识別码. 电脑目前的识別码显示在“Get License ID code”窗口上, 是在选单“? -> License Management -> Get Li-
cense ID code”之下. 若是电脑识別码不同, 表示安装的电脑有误或电脑识別码被更改过. 请参阅以下“当注册码突然失效
该怎么办?”.
Doc-ID: EAPCCN
: 07.01.2016
日期
?
第21页

在比对成功之后, 关掉窗口, 或者在“New License ID Code (LIC)”的文字字段内输入注册码, 也可以从邮件内复制再贴上.
若是注册码正确, 此注册码会被安装并会解开相关的高阶功能. 当你打开注册管理员窗口, 其上会显示注册的状态.. 壹个
注册码可以解开数个高阶功能.
注意: 请把电子邮件和注册码保存在一个安全并容易找到的地方或印出来
如何解开更多功能
?
安装注册码之后, 至少会有一个高阶功能会被解开, 若是您想解开更多新增的高阶功能, 您需要 a)申请一个新的注册码 b)
如上述安装此注册码, 您可以按下注册管理员中的“Get License ID code”写电子邮件申请一个新的注册码, 在此电子邮
件内清楚的写下您想要的新高阶功能及它们的名称, 也要写下您旧有的高阶功能, 我们就会在新的注册码中开启您想要
的新旧高阶功能.
也请您附上旧有高阶功能的购买证明
購買的注册码是否可以轉至別台
PC?
不行, 但是您可以一次购买多个注册码. 请与我们的行销部门联络, 我们会告诉您如何购买及报价. 在以下的情况您会需
要购买多个注册码. 当安装注册码的 PC 突然无法使用时. 当您需要安装此软体在某台 PC 作暂时的测试而此台 PC 将会
转交给客户.
当注册码突然失效要怎么办
?
注册码有可能会突然失效, 例如当电脑的配置改变时, 电脑识別码也会跟著改变. 发生这个情况时, 先比对目前的电脑识
別码跟您之前购买注册码时收到的电子邮件内的电脑识別码. 您可以在选单“? -> License Management”内按下“Get Li-
cense ID Code”, 就可以看到目前的电脑识別码
a) 如果两个电脑识別码相同, 只要再安装一次注册码. 请参阅之前的(如何安装注册码)
b) 如果两个电脑识別码不同, 请申请一个新的注册码. 您可以寄电子邮件给我们, 内容注明新旧的电脑识別码并您的购
买证明, 之后我们就会产生一组新的注册码再寄给您.
Doc-ID: EAPCCN
: 07.01.2016
日期
第22页

12. „多台控制“应用
图 12 - 多台控制主窗口
自 EA Power Control 的 1.52 版开始, 有多台控制的功能. 在第一次安装之后, 多台控制的功能会被隐藏, 您可以购买注册码
来打开此功能. 若是您想要取得注册码来解开此功能, 请参阅”
此功能可以在同一个窗口同时控制并监测最多 20 台相同或不同型号的仪器, 所有可以被 EA Power Control 识別的仪器会
被条列在窗口的列表上, 并可以在此窗口远端遥控这些仪器, 不需要切换到“Terminal”功能. 在此列表上, 只要这些仪器仍
然与 PC 相连, 您可以任意删除或新增任何仪器.
11. 注册管理“
.
12.1 限制
此功能可以管理, 控制最多 20 台仪器, 若是您连接了 20 台以上的仪器, 此软件会依序列埠的号码大小先显示
USB 仪器, 再依 IP 位址大小显示乙太网的仪器.
排序应用只有一个窗口来控制选取的仪器
没有数据记录功能
中断连线的仪器无法自动再加回仪器清单列表
“Settings” 的设定无法一次写入多台仪器中
Doc-ID: EAPCCN
: 07.01.2016
日期
第23页

12.2 窗口中的功能
12.2.1 窗口顶部区域
窗口 顶部区域会显示被使用者在仪器列表上选定的仪器(蓝色, 单一选定仪器) 的实际值与设定值, 这个窗口区域和
“Terminal”的窗口顶部区域相同.请参阅 7. “Terminal” 应用程序..
12.2.2 窗口中间区域
这个区域是用来管理仪器的群组设定, 每 20 台仪器最多可以被分为 4 个群组, 每一个群组最多可以有 20 台. 您可以在仪
器清单列表上做群组的设定 (请参阅以下“Devices 页籤”) 这些按钮可以用来选择特定群组的多台仪器, 选择的意思是指
在仪器清单上的特定仪器列的第一栏的框内勾选, 同样的您也可以用相同方式取消勾选
在选择群组之后的任何动作, 例如仪器状态(输入/输出 开/关)设定, 就会被套用在被选择的仪器上. 也就是说, 您可以对每
一个群组做不同的设定, 一般的规则如下:
在清单上的任何一台仪器只允许被指定为某一个群组或没有任何群组
群组的设定不会自动储存, 但是您可以手动储存(按钮“Save config.”) 之后当您执行软体时, 您可以让软体自动
载入之前储存的设定..
被设定为某个群组的仪器失去连线时, 会以灰色显示在清单上. 您可以手动将它删除, 或是按下按钮“Show all
devices”将它清除
“群组设定” 区域
按钮 G1 – G4 选取或取消一个或多个仪器群组
重设群组按钮 删除所有仪器的群组设定, 并清除所有的群组选取
群组名称 在群组按钮旁的文字, 当您在上面双击时, 可以输入您自订的群组名称
“设定” 区域
Save config. 按钮 把目前的群组设定存到一个设定档(*.ini). 您可以用同样的方式储存或载入不同
的群组设定. 若是您勾选“Load config. at app startup”选项, 最近一次使用的
设定可以在软体执行时被自动载入
Load config. 按钮 载入之前储存的群组设定(*.ini), 并且将其设为“Load config. at app startup”
选项最近一次使用的设定
Load config at app startup 选项 当选取这个选项, 最近一次载入或储存的设定可以在软体执行时被自动载入
Doc-ID: EAPCCN
: 07.01.2016
日期
第24页
 Loading...