

Page 1

Page 2

Important Statement and Safety Guidelines
Thank you for choosing this product, in order to help you use this drone more easily, please read this manual carefully before
operating it, and please keep this manual properly for future adjustment and maintenance.
Important Statement
● This product is not a toy, it integrates expertise in mechanics, electronics, aerodynamics, high-frequency launching, etc.
This drone integrates precise equipment, which requires proper assembly and commissioning to avoid accidents. The drone
holder must operate the drone in a safe way; improper handling will cause serious personal injury or property damage.
● This product is suitable for people who have experience in operating drone and over 14 years old.
● If you have any questions about use, operation and maintenance, please contact your local dealer or the relevant staff of
the company. We and the seller are not responsible for any injury or damage caused by improper use or operation.
● The product contains tiny parts, so keep them out of reach of children to avoid eating or suffocating.
Safety Precautions
The RC drone is a dangerous commodity, please stay away from the crowd while flying. Improper assembly or damage to
the drone, poor electronic control, and unfamiliar operation can cause unpredictable accidents such as drone damage or
personal injury. Pilots should pay attention to flight safety, and understand the responsibility of the accident caused by
negligence.
● Stay away from obstacles and people
The flying drone has an uncertain flight speed and state, there is a potential danger. Keep away from crowds, high-rise
buildings, high-voltage power lines, etc., and avoid flying in windy, rainy and lightning weather. Commissioning and installing
the drone must be strictly in accordance with the instruction, the distance between the drone and the people should
maintain in 1-2 meters. Avoiding the drone hit the head, face, and body when flying and landing.
drone hit the head, face, and body when flying and landing.
● Keep away from the humid environment
The interior of the drone is composed of many sophisticated electronic components and mechanical parts. Therefore, it is
necessary to prevent the drone from getting wet or moisture, so as to avoid accidents caused by mechanical and electronic
components. Use a clean rag to clean the surface stains during maintenance.
● Guided by an experienced pilot
The control skills have certain difficulties in the early stage of learning. Try to avoid flying alone, and you need to be guided
by experienced people.
● Use this product correctly
Please repair the drone with original parts to ensure the safety of the flight. Please operate the product within the scope
permitted by the product features and may not be used for illegal purposes other than the safety laws.
● Safe operation
1. Please operate the drone only you are in good status and have flying skills. Fatigue, trance or improper operation will
increase unexpected risks.
2. Don't use it near your ears! Misuse can cause hearing damage.
● Keep away from high speed rotating parts
When the motors of the drone are rotating at high speed, please keep the motors away from the pilot, surrounding crowd,
and objects to avoid personal injury and damage to the drone.
● Keep the drone away from heat
The drone is made of metal, fiber, plastic, electronic components, and other materials, so it should be kept away from heat
sources, and avoid direct sunlight and high temperature to avoid deformation of the drone.
● Environmental requirements
Discarding this product at will may pollute the environment. Please dispose properly according to the local laws and
regulations.
Product Description
Package includes
EX5 drone x 1 Blades x 2 Screwdriver x 1 USB charging cable x 1 Remote control x 1 Battery x 1
Basic parameters
Wheelbase: 230mm Fuselage height: 52mm Fuselage weight: about 225g Battery: 7.4V 2200mAh 25C
Charging time: about 4 hours Flight time: about 25-30 minutes
-1-
Page 3

Product Assembly
Blade installation / demolition
Blade installation:
Install the A blade on the fixed position of the arm A, install the B blade on the fixed position of the arm B. Use a
screwdriver to unscrew the screw and remove the blade, then replace a new one (included in the package), lock the screw
and lock it in place.
Blade demolition :
Please turn the screw counterclockwise to remove the screw on the blade, and then remove the blade
Tips: Please install the accessories properly in the order shown in the figure below, the blade have front and back
!
sides, be care the direction of rotation. be careful to tighten the screws.
A
B
● Make sure that the A and B blades are installed in the correct position. If install the blades improperly, it can't be
taken off.
!
● Since the blade is thin, be careful to prevent accidental scratches when installing.
● Please use the original blade provided by our factory.
● Blade is consumable. If necessary, please purchase separately.
Charge the drone battery
Pull the battery out of the main body of the aircraft, plug the USB into the charger, and insert the battery into the USB
output terminal. The red light of the battery is always on and the green light is flashing to start charging. When the charging
is completed, the red and green lights are on for a long time, and the charging time is about 240 minutes.
USB
Battery
USB charging cable Adapter (Not included)
Warning:
!
●Do not charge the battery on the carpet to avoid fire. We will not take any responsibility for injury and damage, caused
by the improper charging.
●Insert the plug correctly. Do not insert in the reverse direction.
●It is recommended to use the 5V 1-2A adapter for charging.
It is not recommended to use the computer USB port for charging.
B
A
-2-
Page 4

Installation of Drone Battery
Push the battery into the battery slot of the drone, and the battery is fully clamped in the drone, The cover fully buckles the
drone shell. Check to make sure the battery is in place.
Warning: If the battery is not installed properly or lock tightly, it may cause the drone to lose power and accidentally fall.
!
●When charging the rechargeable battery, please keep away from children, it must be carried out under adult
!
supervision, and must be kept away from flammable materials during charging, and the guardian should not leave the
battery outside the monitoring range when charging.
● Please do not short circuit or squeeze the battery to avoid accident.
●Do not place the battery in a high-temperature place (such as a fire or an electric heat source near the device).
●The battery can only charge by the recommended charger, the battery and charger can't get wet, The drone can be
wiped with clean rag, pulling out the battery and disconnect from the charger before cleaning, periodically check the
chargers wires, plugs, housing and others. If the part is damaged, stop using it when it is found to be damaged until it
!
is repaired.
●The charger is not a toy; the charger can only be used indoors.
!
●The battery after the flight needs to be recharged before stored. If you don't use the battery, it is recommended to
charge the battery once at least in every 3 months to prevent the battery from being over-discharged and permanently
damaging the battery.
Introduction of drone fuselage
Blade
Switch
-3-
Drone shell
Drone bottomCamera
Drone arm
Page 5

Controller function introduction
Take picture
Record video
Surround
mode
Speed
adjustment
Geomagnetic
calibration
(Compass
calibration)
Throttle
joystick
Camera up
Camera down
Switch
Remote control
power Indicator
One key return
Direction joystick
Headless mode
One key take-off
Install the remote control battery
Remove the remote control battery cover, install the 4 Pcs AAA batteries(Not provided in the package) correctly according to
the positive and negative terminals indicated by the remote control, and then re-install the battery cover.
1.5V AAA
1.5V AAA
1.5V AAA
1.5V AAA
1.5V AAA
1.5V AAA
1.5V AAA
1.5V AAA
● The remote control uses 4 “AAA” non-rechargeable batteries or “AAA” rechargeable batteries. (Not provided in the
!
package)
● Pay attention to the polarity of the battery when installing or replacing the battery.
● Do not mix different conditions or types of batteries.
● Used batteries should be removed in time, and discarded batteries should be thrown properly.
● If you do not use it for a long time, please remove the battery to avoid damage to the product caused by battery
leakage.
Synchronize the drone with the remote control.
Step 1 :Insert the battery into the battery slot of the drone. Press the power button of the drone for two seconds to turn it on.
The indicator light of the drone flashes quickly and then flashes slowly. Put the drone on the horizontal ground or glass. (Do
not place the drone on the grass or on uneven ground to prevent the grass or sand from getting into the motor and causing
damage to the motor.)
Step 2 :Turn on the remote control power switch, the indicator light of remote control and drone turn solid, the synchronization
is completed.
Tips: Long press the speed control button and turn on the remote control switch at the same time.The left joystick will become
the direction joystick, and the right joystick will become the throttle joystick. (right-hand mode)
Power Switch
-4-
Page 6

● If the drone is not synchronized with other remote controllers, as long as the synchronization is successful, you do
!
not need to synchronize the remote controller and the drone again.
● When the remote control is synchronized with the drone, make sure that the other remote control and drone are
not powered on at the same time, otherwise, the synchronization may fail.
Drone Initialization Detection
After the synchronizing procedure is finished, it will automatically begin the initialization detection. In the meantime, and the
drone needs about 8 seconds to complete the initialization detection on the horizontal ground. Next, the drone needs to begin
the Gyro Calibration.
Gyro Calibration
After the synchronization is successful and drone initialization detection is completed, keep the drone on the horizontal
ground, push the left and right joysticks 45° to the lower right corner at the same time, as shown in the figure below. Then
the front and back indicators of the drone flash quickly, and the gyroscope is being calibrated. Finally, the indicator light
changes from flashing to steady. The gyroscope calibration is completed.
● When performing the gyroscope calibration procedure, make sure to put the drone on a level surface, otherwise, the
!
drone can't fly in balance.
● Performing the gyroscope calibration procedure each time before taking off.
Compass Calibration
After the drone and the remote controller are successfully synchronized, complete the initialization test and perform the gyro
calibration, then the drone can begin the compass calibration.
Every time before the drone takes off, it must be performed compass calibration, otherwise, the drone will not be able to fly
normally.
Compass calibration is divided into two steps:
Step 1: Compass horizontal calibration (Figure 1)
Press the compass calibration button
Then spin the drone by hand as shown below and
rotate it counterclockwise horizontally for about 3
times until the remote control beeps and the rear
indicator light of the drone stays on., the horizontal
calibration is completed.
Step 2: Compass vertical calibration (Figure 2)
Erecting the drone and rotate the drone by hand , as shown in the figure 2 below, rotate the
fuselage clockwise about 3 times until the remote control beeps and the rear indicator light of
the drone stays on.. The compass calibration is complete.
-5-
Page 7

Note: The best distance between the ground and the drone should be more than 1 meter during calibration.
!
●Do not perform compass calibration in areas with strong magnetic fields, such as magnetite, parking lot, building area,
electric tower, etc.
!
●During calibration, please do not carry ferromagnetic materials with you, such as keys or mobile phones.
!
●Do not perform compass calibration near bulk metal.
Search satellite signals:After the compass calibration procedure is completed,
put the drone on the flat ground, the drone will automatically search for the
satellite signal, the rear indicator light of the drone will change from slow flashing
to steady light and the remote control beeps, then the search satellite signal
procedure is completed. Unlock the drone by pushing the left joystick to left
45°and the right joystick to the right 45°at the same time(as the picture is shown),
the motors will spin, then push the throttle stick up, the drone will take off.
then the search satellite signal procedure is completed. Unlock the drone by
pushing the left joystick to left 45°and the right joystick to the right 45°at the same
time(as the picture is shown), the motors will spin, then push the throttle stick up,
the drone will take off.
Tips: Please make sure that the drone flies in wide-open space and the satellite signal is more than 7 stars show in the app
before take-off
Application installation instructions
Step 1: Please scan the QR code below
to download the App name EACHINE PRO.
Recommended mobile device models and configurations
IOS system
model and
configuration
Product type
Operating
system version
Recommended model Best model
iPhone 6 and newer models
IOS 8.0 and newer system IOS 9.0 and newer system
iPhone 7 and newer models
Android system
Step 2: Connect the drone with your mobile device
follow the steps below
① Turn on the drone.
② Go to WLAN setting in your mobile device and
search the wifi name:
WiFi-5G4K-GPS -EX5-XXXXXX
③ Connect the mobile device with the drone via wifi.
④ Launch the EACHINE PRO app, the you can
control the drone from your mobile device
Warning:Your mobile phone Wi-Fi require support
IEEE 802.11a/b/g/n/ac, which is 5G band WLAN
model and
configuration
CPU model
Operating
system version
RAM
CPU usage
Recommended model Best model
Snapdragon 630 and newer
models
Samsung Exynos 7420 and
newer models
Helio X25 and newer models
Kirin 950 and newer models
Android 5.0 and newer models
CPU usage 25% and below CPU usage 10% and below
3G and above
Snapdragon 835 and newer
models
Samsung Exynos 8895 and
newer models
Helio 970 and newer models
Kirin 970 and newer models
Android 8.0 and newer models
6G and above
Tips:
Only one mobile device is allowed to connect to a drone via wifi at a time
Note: When the drone is flying in the following environment,the optical flow
positioning function of the bottom camera is not good, resulting in unstable hovering
and the drone is difficult to fly smoothly, and even the drone drifting.
On the water Dim light
Large gap
between high
and low
Smooth
reflective
ground
Two-tone
stripes
When the drone is flying
indoors and cannot receive
satellite signals, the drone
will automatically turn on
the optical flow mode.
When the drone is flying
outdoors and can receive
satellite signals, the drone
turns on the GPS mode.
-6-
Page 8
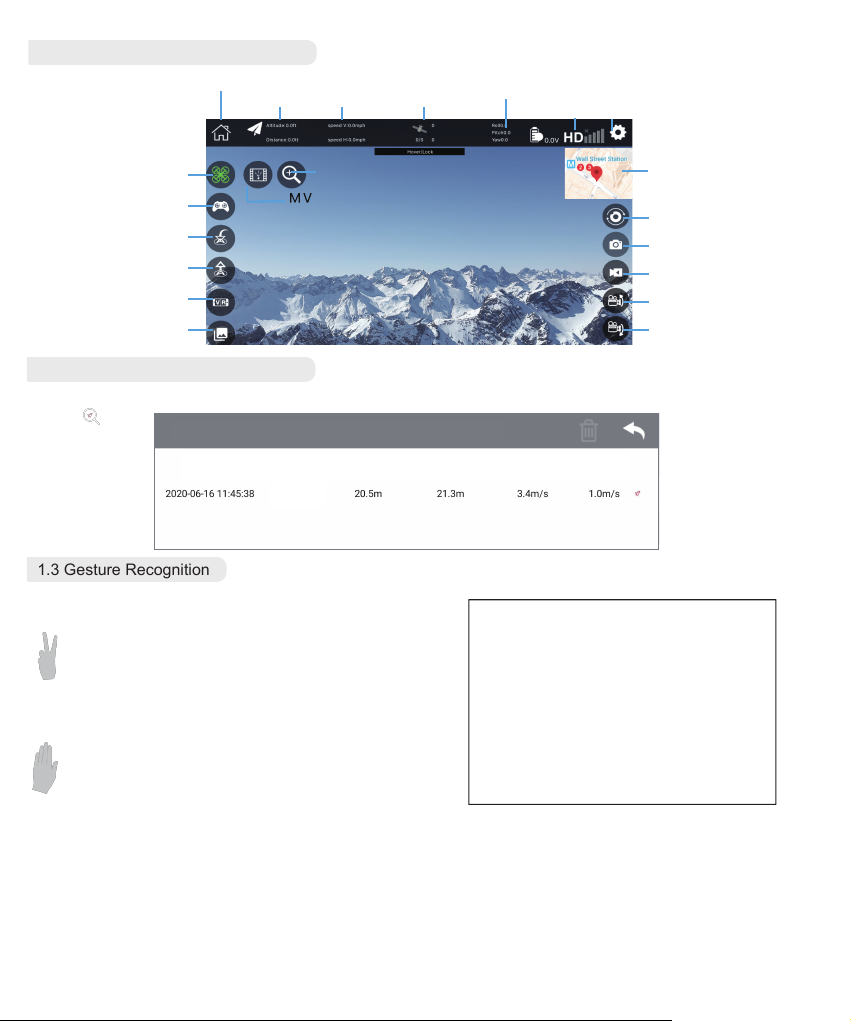
1.1 Application interface introduction
Return
Altitude /
Distance
flight speed
Vertical speed
Horizontal speed
GPS Signal
Click 3 times to enter
the Flight Recording
Interface
Drone power
Wifi signal Settings
Flight mode switching
Virtual joystick switch
One key return
Take off / Landing
3D VR Mode
Media gallery
50x zoom
Map preview switch
Switch camera
Take photo
Record video
Camera up
Camera down
1.2 Flight Recording Interface
Record drone flight parameters, tap You can switch to the map, you can check the last position of the drone according to the
route
select all Flight record
Date Flight time Maximum
5 minutes
5 minutes
6 seconds
6 seconds
flight distance
1.3 Gesture Recognition
Facing the front camera, the following gestures can trigger the
drone to automatically take pictures or record videos:
Yeah gesture trigger the drone to take photo
In front of the drone's front camera about 2 meters, make
Yeah gesture with one hand raised;
Make sure the drone clearly captures the gesture. When
the drone successfully recognizes the gesture, it will count
down 3 seconds and start taking pictures,You can see the
application interface countdown for 3 seconds.
Palm gesture trigger the drone to record video
In front of the drone's front camera about 2 meters, close
up your five fingers and lift with one hand:
After the drone successfully recognizes the gesture, it will
start recording, and when the gesture is recognized again,
the recording will end (the time between the two recognition should be greater than 3 seconds) .
Maximum
flight altitude
Maximum
lifting speed
Tips:
In order to ensure that the lens obtains a high
recognition rate:
1.Please aim at the lens.
2.Please fly in a well-lit environment.
3.Please perform gesture recognition operation
at a position about 2m away from the lens.
In the following cases, the lens recognition rate
will decrease:
1.Weak light or backlight environment
2.The Wi-Fi signal is weak or the signal is
interfered
Maximum
speed
-7-
Page 9
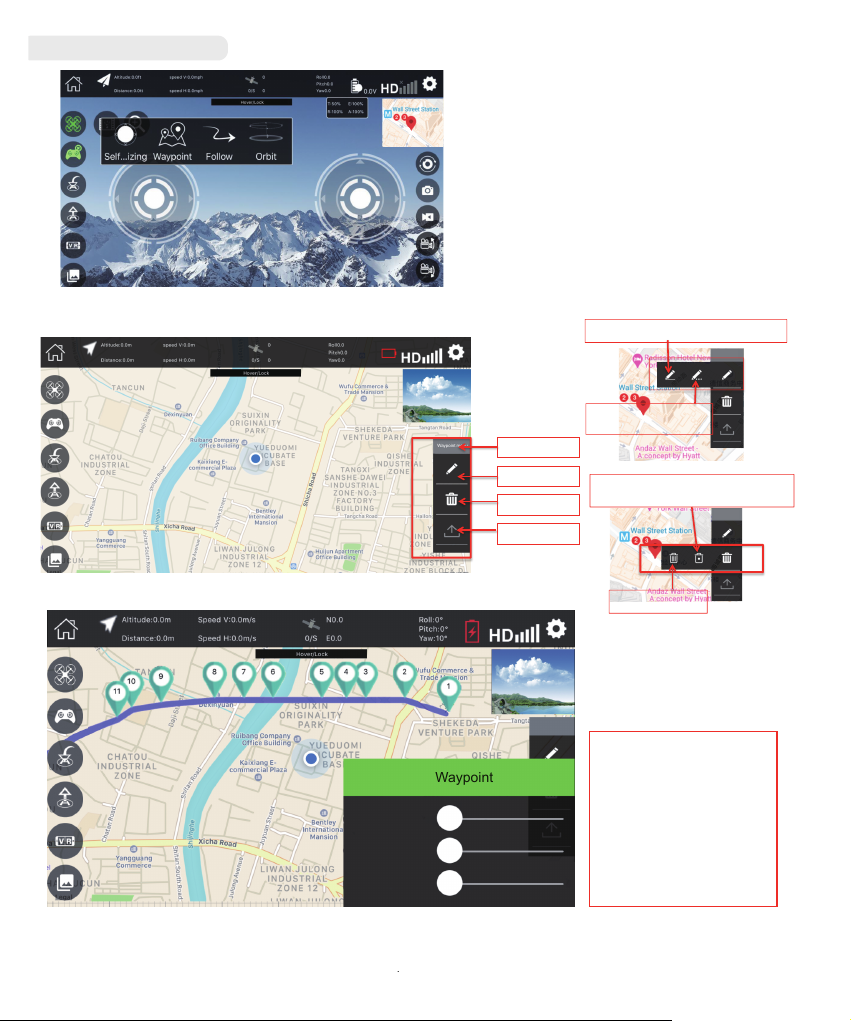
1.4 Flight mode switching
Waypoint
Support 4 flight modes
1.Self-stability mode: The drone automatically hover and
stable flight, the joystick can be used to control the drone.
Waypoint mode: The drone is flying along the route you
set. You can set each waypoint to plan the flight route of
the drone.
3.Follow me mode:
1. When the drone is flying outdoors. The drone can
receive GPS signals. In GPS mode, the drone will follow
the coordinates of the mobile device.
2. When the drone is flying indoors, the drone will
recognize the portrait, so as to follow the person forward
and backward, or even turn left and right.
4.Surround mode, the drone circle around the remote
control in the surround mode.
Waypoint mode: The drone is flying along the route you set. You can set each waypoint to plan the flight route of the drone.
Set waypoints by continuously drawing
Waypoint menu
Waypoint menu
Draw waypoints
Waypoint deletion
Send to drone
lines
Click this icon to set the
waypoint
Delete a single waypoint: Tab this icon and
then click the waypoint you want to delete
Delete all waypoint
Waypoint
Waypoint
height
0 m
Residence time
0s
speed
0 m / s
Press the Self-stabilizing mode , the waypoint mode will exit.
-8-
Waypoint parameter
setting
Click the waypoint to
be set, and the setting
menu will pop up.
Hold down the ball
and slide to modify the
parameters.
Page 10

2. MV Interface introduction
Joystick
Filter
Album
switch
Music select
2.1 Filter Interface introduction
Filter
Music select
Rotate the picture
Take photo
Record video
Tap this icon which located in the upper left corner of
the main interface, you will enter the MV Interface, in
this interface, you can take the video and add
background music to the video.
Rotate the picture
Click this icon to enable the rotating picture function.
Meanwhile, your finger slides the screen, the image
can be rotated; if you double-tap anywhere on the
screen with your finger, you can zoom in the image.
Tap this icon which located in the upper left
corner of the MV interface, you can launch
the filer function. There are 9 kinds of filters
to choose.
Color
Invert
Color
filter
Fade
Nature
Grayscale
Beautify
2.2 Music selection interface
Tap the music icon of the MV interface, you can choose the music of the video.
music 1 music 2 music 3 music 4 music 5
apply apply apply apply apply
-9-
Music list, slide left and right to choose
Page 11

Setting
Mode 1: The throttle joystick on the right side, Mode 2: the throttle joystick on the left side.
Accelerometer calibrate means the Gyro calibration.
Magnetometer calibrate means the Compass Calibration.
Attention, when you activate the waypoint function and orbit mode, the drone will automatically ascend to the default height,
please do not set the altitude too much.
Warning: The factory has already set the parameters, it is generally not recommended that you modify it by
yourself.
Flight
Basic Flight Step
1. Synchronize the remote control and the drone, then the drone will automatically finish initializing.
2. Perform the Gyro Calibration procedure.
3. Download the APP and pair the drone with the mobile phone by Wifi.
4. Performing the Compass Calibration procedure. Waiting for the drone automatically search satellite signals, usually 60-80
seconds (check the main interface of app, signals should be more than 7 stars ), until the rear light of the drone is steady on,
signals receiving finish.
5. Unlock the drone, then push up the throttle stick of the remote control, the drone takes off, could use the APP to controls
the drone.
Pre-Flight Inspection
1. Ensure the battery of remote control and drone are fully charged.
2. Ensure the blades installed correctly
3. Ensure the motor works fine.
4. Make sure the compass calibration is successful.
5. Make sure the GPS signal is more than 7 stars.
-10-
Page 12

Flight Control
Remote control Drone
Rise
Remote control Drone
Front
Spin
Clockwise
Spin
Counterclockwise
Back
Decline
Go ahead
Turn left
Front
Retreat
Back
Turn right
Flight Mode
One key take off
● After the drone is unlocked, press the " "button and the drone will automatically take off and raise about 1.5 meters to
hover.
Surround mode
The drone flies 20 meters or higher from the ground. Press the surround button and the direction of rotation of the drone
will turn to the north. When the head turns back to the previous flight direction and hover in the air, push the remote control
direction joystick to the left , the drone will circle around you counterclockwise, push the remote control direction joystick to
the right , the drone will circle around you clockwise.
In the surround mode, press and hold the direction joystick,
the drone will accelerate to the fastest 2.5M/S according to
the current speed. Push up the direction joystick to expand
the circle radius. The maximum radius is about 20 meters.
Pull down the direction joystick to reduce the circle radius,
the minimum radius is about 5 meters, press the surround
button again to exit the surround mode.
Surround mode
-11-
Page 13

Headless Mode
Before using the headless mode, the drone should rise 5
meters from the ground.
Pressing the headless mode button to activate the headless
mode, Then the rear indicator light of the drone will flash
quickly and the remote control beeps , headless mode on.
Pressing the headless mode button again to exit.
Press to enter
headless mode
Return
Return
The drone has a return function. if the starting point is successfully recorded before take off,
When the signal between the remote control and the drone is lost or the return button is pressed, the drone will automatically
return to the starting point and land to prevent accidents.
The drone has three different return modes:
1. One-key return (the drone will automatically return to the starting point by pressed the One-key return button)
2. Out of control return (the drone will automatically return to the starting point, when it beyond the remote control range or
loses connection)
3. Low power return. (The drone will automatically return to the starting point, when drone is in low power)
Starting point:
During the take-off or flight, when the GPS signal strength is more than 7 stars for the first time, the current position of the
drone will be recorded as the starting point.
One-key Return
When the GPS signal strength is more than 7 stars,
the drone can be returned by pressing the one-key
return button of the remote control. The one-key
return process is the same as the out of control
return, but the user can control the drone through
the joystick to avoid obstacles, when the drone
returns near to the landing. Press the one key return
button again, you can exit automatic flight and the
user can regain control.
Press one-key return
Out of control return
When the GPS signal strength is more than 7 stars and the compass works fine, after the drone successfully records the
starting point, if the remote control signal is lost for more than 6 seconds, the flight control system will take over control of the
drone and control the drone to fly back to the starting point. If the remote control signal is restored during the flight, the return
flight process will continue, but the user can exit the flight control system and regain control of the drone by press one-key
return button of the remote control.
Precautions:
!
● The drone cannot dodge obstacles during the automatic return flight.
● When the GPS signal is not good or the GPS function is not working, it cannot be returned.
● If the drone does not receive the GPS signal and the remote control signal is lost more than 6 seconds, the drone will
not be able to return to the starting point, and it will slowly descend, land and lock.
Low Power Return
● The rear indicator light of the drone flashes slowly. At this time, the remote control continuously emits “beep beep beep..”
As long as the drone is fly higher than 20 meters or the distance is farther than 20 meters, the drone will automatically
perform the return function. Fly back to the starting point.
● When the voltage of drone below the safe value, the drone will automatically fall to the starting point.
-12-
Page 14

Tips: When the drone is in a low-power state and returns to the starting point, the remote control cannot cancel the
!
returning.
Take Photo / Record Video
During the flight, the camera can adjust the angle up or down, press the camera up button of the remote control each time,
the camera lens ascends about 10 degrees and the controller emits a beep. When the camera is at the maximum angle, no
matter how many times you press the button, the controller will remain silent, the camera will not rise, the camera down
button is the same.
During the flight, you can use the camera or video button of the remote control to capture the aerial image or video. Press the
camera button and the remote control emits “beep” and the APP emits “KA”, the camera will take a photo. Long press the
video button, the remote control beeps twice, and the camera will start recording video. Long press this button again to exit
the recording video mode.
Camera up
Record
video
Camera down
Trouble shooting
Number
1
2
3
4
5
6
Problem
When the drone power on
, the indicator light keeps
flash rapidly
After the drone takes off
,it can’t hover in the air
and drifts to the side.
The drone shakes badly
The drone cannot be
unlocked, the rear indicator
light flashes rapidly
Drone flying unstable in
windy weather.
Can't hover in the air and
keep circle around
Take
picture
solution
The drone is in the gyro calibration status,
please place the drone in the flat ground.
Place the drone on the flat ground and
recalibrate the gyro.
Indicates that the blade is deformed and
needs to be replaced
Drone battery has low voltage and needs
to be charged
Before flying the drone, Wait until the wind
is at level 4-5.(Breeze)
Compass calibration failed, please
recalibrate the compass.
-13-
 Loading...