

10.0. Flying environment
9.2 One key return
One key return
Press the button to return to the channel, you can correct the way through
the right joystick to correct the channel (to the front of the frequency before
the start in order to return to normal), the aircraft will automatically return.
During the return process, press the function key combination on the remote
control or push the right joystick "forward" to return the aircraft.
Do not use this product in the following environments to
avoid accidental injury or damage to the aircraft.
1) high-voltage line lots, park lots, railway lots, highway lots and so on
2) thunderstorms weather, windy weather, rain and snow weather.
Decline
上升
Rise
Forward
Backwards
Turn right
Turn left
Fly on
the right
Fly on
the left
10
12
14
08
9
11
13
07
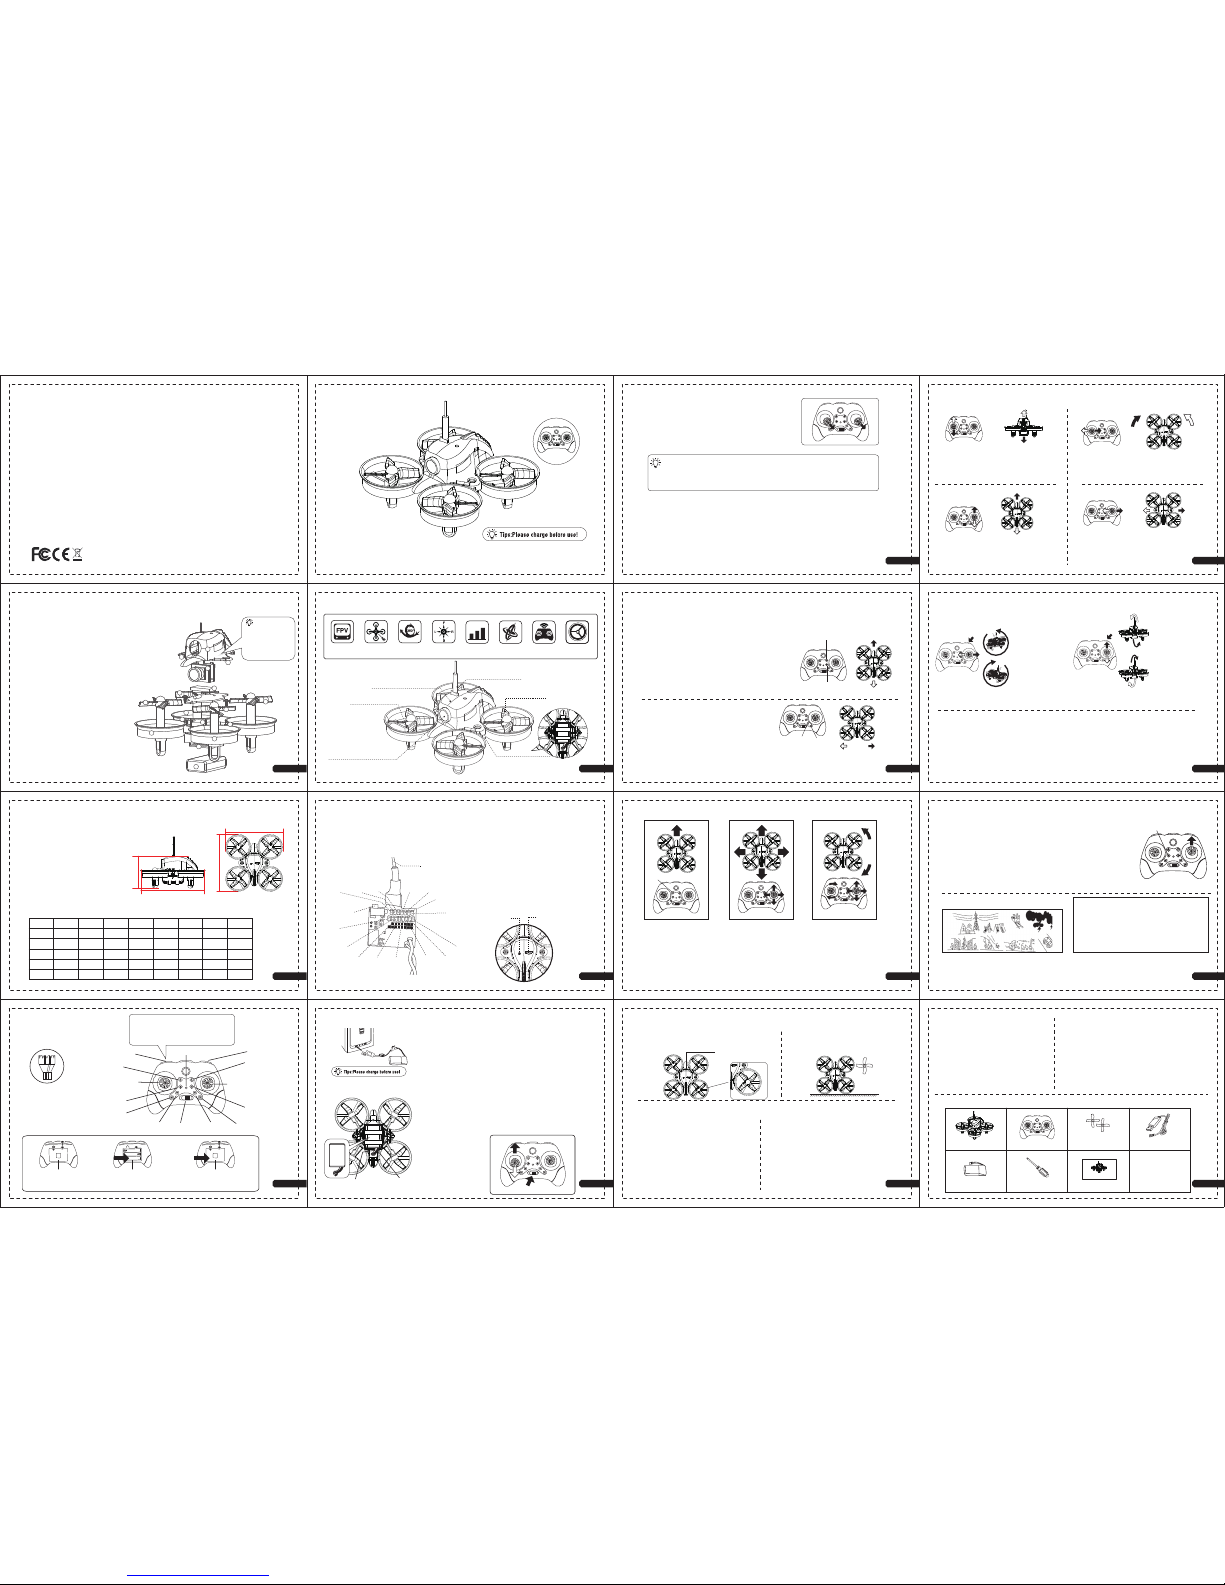
15.0. Accessories list
INSTRUCTION MANUAL
Aircraft x1 USB charging cable x1
Propeller Ax3
Propeller Bx3
A
B
LiPo battery x1
Remote control x1
Manual x1Screwdriver x1
7.2 Operation mode
Up
Down
Forward
Backwards
Left
Right
Fly on
the left
Fly on
the right
Aircraft movements fine-tuning
Slowly raise the throttle stick, when the aircraft to
leave the ground, if the aircraft tend to different
directions, you can use fine-tuning correction action.
1. Adjust the front and rear fine adjustment
When the aircraft leaves the ground, the aircraft is
moved forward / backward, forward, and the fine
adjustment is adjusted downward.
When you move backwards, fine tune upwards.
2. Adjust the aircraft side fly fine tuning
When the aircraft leaves the ground, flying
to the left / right side of the side fly.
Fly to the right, fine-tune the left to adjust.
Fly to the left, fine-tune the right to adjust.
Tips: Before the aircraft take off, be sure to place the aircraft in the
horizontal plane proofreading, to ensure that the aircraft after the smooth
flight. When the aircraft by the impact or collision after the deviation, you can
also use this method to calibrate the gyroscope.
7.0. Operation and control
7.1 mode of operation
As sensitive, for beginners, it is recommended to slow operation of the rocker.
Such as the operation of the aircraft during the process of a slight decline, but
also slowly push the left rocker to climb to a certain height. Operation to avoid
a significant push of the throttle.
8.0. 360 ° rollover
8.1 Left 360 ° roll
Short press the scroll
key, and then push the
right lever to the left, the
corresponding aircraft to
the left flip 360 °
8.2 Right 360 ° roll
Short press the scroll key,
and then push the right
lever to the right, the
corresponding aircraft to
the right flip 360 °
8.4 Back 360 °roll
Short press the right scroll
key, and then push the
right lever down, the
corresponding rear side of
the aircraft turned 360 °
8.3 Forward 360 °roll
Short press the scroll
key, and then push the
right lever up, the
corresponding forward
side of the aircraft
9.0. Headless mode
9.1 Headless mode switching
Start and set: After the completion of the aircraft frequency, the aircraft placed in the
flat level, or hover in the air to ensure that the head of the aircraft and the remote
control in front of the same direction, press the headless mode button (aircraft LED
lights flash) Start headless mode.
Exit the headless mode: Press the headless mode button again (the aircraft LED is
lit), then exit the headless mode.
Note: Keep the aircraft at a height of 2-3 meters when rolling, so that the aircraft is
easier to maintain the height after rolling.
Operating
F
B
R
L
Before and after
Orientation
Headless mode
F
As shown in the figure above, in the headless mode (the aircraft LED is in a flashing
state), regardless of where the aircraft is located in front of the location, now the
remote control is located in the rear of the aircraft, then pull down the direction of the
operating lever You can recall the aircraft, push up the direction of the rod so the
aircraft will fly farther away.
12.0. Propeller installation method
13.0. roubleshooting
A
A
B
B
Camera
A
13.1 remote control and the aircraft did not
respond to the solution:
1) Make sure the code is successful. See page
4 for the code method.
2) whether the battery is low.
3) Make sure the remote control is the
original match.
13.2 Can not roll the solution:
1) Restart the rollover function key.
2) Check whether the lithium battery is too low,
re-charge.
13.3 aircraft fuselage solution:
1) Check if the propeller is deformed and replace
the new propeller.
2) turn off the aircraft power to restart.
3) Place the aircraft in the horizontal plane to
recalibrate the gyroscope.
13.4 Aircraft can not take off the solution:
1) Check that the screw is installed correctly.
2) whether the aircraft crash cover is loose, hinder
the propeller rotation.
3) whether the aircraft has electricity,
low power, the lights flashing.
Install the propeller: Hold the small hat of the
propeller, press the motor shaft to press it, be
careful not to deform the propeller.
14.0. FPV Troubleshooting
14.2 Goggle received the image signal quality is poor or
wireless transmission distance near:
1) whether the same frequency of radio transmission
equipment interference, FPV system should choose other
frequencies, to avoid the interference frequency or to
avoid the use of the same site.
2) Whether the goggle antenna is installed.
3) whether the goggle and the aircraft between the
mountains, houses, trees and other obstacles, please
use the FPV system in the open space.
14.1 Goggle display screen No image:
1) Check to see if the power supply of the
goggle and the power supply of the aircraft
is normal, battery power is sufficient.
2) Check whether the goggle receive channel
and transmitter channel is consistent.
3) Check the transmitter and the end of the
goggle N / P standard is consistent.
FPV six-axis aircraft operating instructions
The main structure of the ABS material, the new
industrial and modular design, improve product
development, easy installation and maintenance,
replacement upgrades.
Equipped with FPV 5.8G map transmission
real-time transmission system, bring you not the
same visual effects.
1. Aircraft shell
2. Cover the screw hole
3. FPV system
4. EVA pad (fixed camera)
5. Rack
6. Rack cap screw hole
7. Forward rotation propeller
8. Reversing the propeller
9. Propeller guardrail
10. Body battery compartment
11. Battery
1.0 Know your aircraft
1.1 The architecture of the aircraft
4.0. remote control
4.1 Remote control function
introduction
4.2 Remote control
battery installed
H/M/L Speed
Metal joystick
Headless mode
Throttle putter
(up and down left and
right steering function)
One key return button
Left rotation fine tuning
Right spin fine tuning Switch Left fine key
Right trim key
Fine-tuning key
Pre-fine key
Indicator light
Rolling keys
Directional putter
(front and rear left
and right side fly)
"Di" pattern for H
"Di Di" pattern for M
"Di Di Di" pattern for L
3 Different Speed Modes: High, Medium
And Low Speed Self-Tuning
02
04
06
01
03
05
2.0 parameters
Main wing length: 66mm
Size: 83.5*83.5*42.2mm
Weight: 20g(without battery)
Motor: 6015 1S brush motor
Lipo battery: 3.7V 200mAh 35C
Flight time: 5min
Omnidirectional reception antenna
Working temperature:-10℃ to +40℃
Craft parameter
83.5 mm
42.2 mm
83.5 mm
83.5mm
5.8G 25mw map
transmission transmitter
6015 1s brush motor
5.8G 3dBi miniature antenna
30mm propeller
Lipo battery
3.7V 200mAh 35C
(The bottom of the aircraft)
1000TVL M7 Lens
120°FOV H170°
Wide angle camera
Battery
3
2
2
8
8
7
7
4
5
6
6
9
9
9
11
10
1
Frequency Table
Unit:MHz
CH1 CH2 CH3 CH4 CH5 CH6 CH7 CH8
Band 1 5865 5845 5825 5805 5785 5765 5745 5725
Band 2 5733 5752 5771 5790 5809 5828 5847 5866
Band 3 5705 5685 5665 5645 5885 5905 5925 5945
Band 4 5740 5760 5780 5800 5820 5840 5860 5880
Band 5 5658 5695 5732 5769 5806 5843 5880 5917
Key functions:
1、Short press the button to adjust the frequency
function, and at the frequency FR1-FR8 cycle
between the switch.
2、Long press the button for 2 seconds (LD1
flashing when the release button) for the
adjustment frequency group function, and in the
frequency group CH1-CH5 cycle between the
switch.
3、Long press the button for 5 seconds (LD1 from
flashing to off when the release press key) to
adjust the standard function, P system LD2
flashing, N system when LD2 long bright.
1 2 3 4 5 6 78
A B CD EF G
CH1
indicator
FR1
indicator
Button
LD1
time indicator
LD2
N / P indicator
P system flashes
N system long bright
Antenna
3.0 Frequency method
Button
Antenna
CH2
indicator
CH3
indicator
CH4
indicator
CH5
indicator
FR2
indicator
FR3
indicator
FR4
indicator
FR5
indicator
FR6
indicator
FR7
indicator
FR8
indicator
360 ° rollOne key return
Headless
mode
F P V
Size of the
amount of control
1
2
3
2.4GHz
Safe flight
Six axis
gyroscope
6.0.Operational guidelines
6.1 Boot program
Battery
Battery
Red line
(positive electrode)
Black line
(negative )
6.1.1. The battery into the fuselage battery compartment, then the
battery port access to the fuselage power port, and placed on the
level, then the aircraft taillight flashing, open the remote control
power switch, remote control issued a "tick" sound, then remote
control The remote control gives a "beep" once again, and then
the remote control indicator is turned on again. At this time, the
remote controller will be issued again. Bright, the aircraft LED light
is always bright, said the completion of the code.
6.1.2. After the
completion of the
aircraft on the
code, to promote
the left joystick
throttle can start
the aircraft.
5.0.Aircraft Lipo battery
charging
Battery
Plug the USB plug into the USB port of the computer (or the
charger of the USB port with the DC5V output). At this time,
the USB charging port has a red indicator light and the
battery is connected to the USB charging cable. When the
red light is off, it indicates that it is charging. Charging time
30-40 minutes. To ensure safety, be sure to do so within
sight.
FPV system :5.8G 40CH
See Table 3 on the frequency table
Please use 3 "AAA 1.5V"
batteries and assemble
them in positive and
Unscrew the screw and
open the battery cover
Close the battery cover
and screw it on
6.2 Gyroscope proofreading
After the completion of the code, the aircraft
placed in the horizontal position,
Push the two joysticks at the same time to the
lower right corner 45 ° for gyro calibration. LED
lights flash quickly, proofreading is complete.
When the left joystick (throttle) is pushed
up or down, the aircraft rises or falls
accordingly.
When the right operating lever
(direction) is pushed up or down, the
aircraft forwards or retracts accordingly.
When the left joystick (throttle) is pushed
left or right, the aircraft turns left or right
accordingly.
When the right-hand lever (direction) is
pushed to the left or to the right, the
corresponding side fly or fly on the right
side of the aircraft.
The aircraft can do 360 ° rollover by the following
joystick operation.
Tips: low alarm
When the aircraft appears tapping flashing, indicating that the aircraft is
about to run out of power, then the aircraft
Will automatically turn off the trick, the aircraft in the conventional
control state, the maintenance time of 30 seconds.
① manual landing.
② first turn off the power of the aircraft, and
then turn off the remote control power.
③ Remove the aircraft from the aircraft.
11.0. End flight
The propeller of the aircraft is installed with the
location requirements, please press the corresponding
code to install,coded as shown below.
AGES 14+
Tips:
The use of high
toughness coated
explosion-proof .It
will be better to tear
the film before use.
 Loading...