


MODEL EAA BAIKAL IZH27
European American Armory
402 Richard Road
Rockledge, FL. 32955
OVER AND UNDER SHOTGUN
(12, 16, 20, 28 GA and .410 Bore)
WARNINGS AND
INSTRUCTION MANUAL
European American Armory Corp.
3855 North U.S. Highway 1
Cocoa, Florida 32926
www.eaacorp.com
E-mail: eaacorp@eaacorp.com
(321) 639-4842
© Copyright 2004

EAA CORP. MODEL: IZH27
OVER & UNDER SHOTGUNS
WARNINGS AND INSTRUCTION MANUAL
PLEASE READ THESE INSTRUCTIONS
MODEL NUMBER BARREL LENGTH GAUGES
IZH27 26", 28", 30",32" 12, 20, 16, 28, 410
TYPE FINISH
OVER/UNDER BLUE
SHOTGUN
GENERAL INFORMATION:
Weight (average) - 28" = 7.7 Lbs.
Overall Length - 43", 45", 47", 49"
FOR YOUR SAFETY AND THE SAFETY OF OTHERS, this owner’s
manual contains important warnings, instructions and safety
procedures which must be understood BEFORE using this firearm.
Read the ENTIRE MANUAL and if you do not understand any part
of it or the operation of your shotgun, stop and seek professional
firearms instruction. You can get a copy of this manual from European
American Armory Corp. upon request.
Record the serial number of your firearm (located on the top of the
receiver underneath the top lever):
# _____________________________________________________
and a description of it:
______________________________________________________
Make a copy of this manual and the proof of purchases/sales record for
safekeeping in a secure safe or fireproof container. Such proof is
necessary if the firearm is damaged, stolen or sent in for warranty repair.
2

W A R N I N G
**YOU RISK PERSONAL INJURY OR DEATH
BY HANDLING THIS FIREARM**
Before handling
and most importantly, keep the firearm pointed in a safe direction.
Before handling
in this manual. Always keep this manual with the firearm. If you lend,
give or sell this firearm, be sure the manual goes with it. If there is
anything you do not understand, seek advice from someone qualified in
safe handling of firearms. You must ALWAYS obey the following
warnings, instructions and safety procedures:
1. Always keep the muzzle pointed in a safe direction.
2. Firearms should be unloaded and secured when
3. Don’t rely on your firearm’s safety.
4. Be sure of your target and what’s beyond it.
5. Use only proper ammunition matching the precise
any firearm, make sure you know the safety procedures
this firearm, read, understand and follow the instructions
not actually in use.
gauge of your specific shotgun.
6. If your shotgun fails to fire when the trigger is
pulled, handle with care.
7. Always wear ear and eye protection when shooting.
8. Be sure the barrels are clear of obstructions before
shooting.
9. Don’t alter or modify your firearm and have it
serviced regularly.
10. Learn the mechanical and handling characteristics
of your shotgun.
11. Shoot sober!
3

Type Of Ammunition To Be Used:
It is suggested that high quality commercially manufactured ammunition be
used in this firearm. Avoid military surplus or old ammunition as it may not fire
with sufficient force to expel the projectile or wad from the barrel.
reloaded, high pressure or hand-loaded ammunition can be dangerous
and will void the warranty.
LEAD WARNING: The actual firearm does not contain any lead;
however, it does fire ammunition which contains lead or lead compounds
known to the State of California to cause cancer, birth defects, reproductive
toxicity, and other serious physical injury. Those who discharge a firearm,
stand near someone who discharges a firearm or clean firearms are hereby
warned of the dangers presented by lead and lead compounds and should
take protective health measures. Avoid exposure to lead while handling
and wash your hands after contact. Proper air ventilation is absolutely
necessary when shooting indoors.
N O T I C E
SHOTGUNS ARE CLASSIFIED AS FIREARMS OR DANGEROUS
WEAPONS and are sold by European American Armory Corp. with the specific
understanding that we are not responsible in any manner whatsoever for their
safe handling or resale under local laws and regulations.
The use of
European American Armory Corp. shall not be responsible in any manner
whatsoever for malfunctioning of the firearm, for physical injury or for property
damage resulting in whole or in part from (1) intentional or negligent discharge,
(2) improper or careless handling, (3) unauthorized modifications and/or
alteration of the internal/safety mechanisms, (4) defective, improper, high
pressure, hand-loaded, or reloaded ammunition, (5) corrosion and/or lack of
proper maintenance (6) neglect, or (7) other influences beyond our direct and
immediate control. This limitation applies regardless of whether liability is
asserted on the basis of contract, negligence or strict liability (including any
failure to warn). Under no circumstance shall European American Armory Corp.
be liable for incidental or consequential damages, such as loss of use of property,
commercial loss and loss of earnings or profits.
4

FOLLOWING THESE SAFETY RULES CAN SAVE
YOUR LIFE OR THE LIFE OF SOMEONE ELSE
Get competent firearms instruction in safe handling before using this firearm.
Please ask your dealer for names of qualified instructors. All guns are extremely
dangerous if carelessly handled or used. Remember that the
primary “safety” and that reliance on any mechanical device should never replace
safe handling procedures.
This firearm WILL FIRE if a cartridge is in the chamber and the trigger is pulled
while the safety is disengaged.
DO NOT LOAD THIS SHOTGUN UNTIL YOU UNDERSTAND HOW IT
OPERATES. KEEP this shotgun unloaded at all times except when you are
ready to fire and sure of your target.
firearm user is the
ALWAYS carry this shotgun in a case or original box
NEVER point this shotgun at anything that is not your intended target even if the
shotgun is unloaded. When loading, unloading, cleaning or handling, always be
sure the muzzle is pointed in a safe direction and always keep your finger off the
trigger.
NEVER assume any gun is unloaded. Before handling, check to make sure the
chamber is empty. See Unloading Instructions. Make sure you know that this or
any firearm is unloaded before displaying or handling it. When handling any
firearm, keep your fingers away from the trigger at all times until you intend to
fire.
Get instructions from a competent firearms instructor before using this or any
firearm. Learn from a professional how to handle, load, unload, operate, fire and
care for your gun.
NEVER PLAY with your firearm. It is not a toy and can be a very dangerous
weapon that can cause serious personal injury or death.
Always keep the gun pointed in a safe direction. Treat every gun as if it is
loaded...all the time. NEVER point any firearm (loaded or unloaded) at any person
or anything you do not intend to shoot. Always keep your gun unloaded until
ready to use and make sure that it is unloaded before cleaning.
unloaded.
Keep your finger OFF the trigger until you are actually aiming at the target and
ready to shoot. Learn to rest your finger outside of the trigger guard.
Never rely on a gun’s “safety” to protect you from unsafe gun handling. A safety
is only a mechanical device, not a substitute for using common sense and
following gun safety procedures.
5

FOLLOWING THESE SAFETY RULES CAN SAVE
YOUR LIFE OR THE LIFE OF SOMEONE ELSE
Never leave a gun unattended or where it could fall.
Store guns and ammunition separately beyond the reach of children. Make
sure that they are properly secured so untrained individuals and children will be
denied access to your guns and ammunition.
Test your gun’s operation and safeties only at a shooting range while the firearm
is pointed in a safe direction.
Know your target and what is beyond. Ask yourself what the projectile will hit if
it misses the target or passes through the intended target. Remember, a fired
projectile can travel over a mile (including a ricochet) and is capable of going
through walls. Never shoot at hard flat surfaces or water. . .shot ricochet.
Guns and alcohol or drugs do not mix. Don’t take any alcoholic beverages and/
or drugs before or during shooting activities.
Never pull a gun toward you by the muzzle. Don’t climb a tree, cross a ditch or
fence with a loaded gun.
Always empty guns before entering a house, car, truck, boat, RV, camp or any
building.
When receiving a gun, always open the action and check to make sure the
chamber is unloaded.
NEVER accept anyone’s word that a gun is “unloaded” or “empty.” You should
immediately open the action and check to make sure it is unloaded.
Be careful with
range due to the muzzle blast. Make sure your ammunition is new and in good
clean condition. Do NOT oil or grease ammunition as this may damage the
cartridge primer. Do NOT tamper with or alter the standard factory ammunition.
Keep firearms unloaded when not actually in use. Load the gun only when on
the range preparing to fire and unload it before leaving the range.
Never put your hand over the muzzle of a gun.
ALWAYS WEAR protective shooting glasses and hearing protection when
using firearms.
ALL ammunition. Even “blank” cartridges are deadly at close
6

FOLLOWING THESE SAFETY RULES CAN SAVE
YOUR LIFE OR THE LIFE OF SOMEONE ELSE
Spectators should be at least 10 feet behind and away from the shooter
while the shooter is loading, shooting and unloading. Spectators should
wear protection for hearing and sight loss and they should avoid distracting
those shooting their firearms.
Never drop your gun. If you do drop it, unload it and check it for proper function
before using it again.
Do NOT alter or modify your gun. Don’t try to change your gun’s trigger pull,
because it may affect sear engagement and thereby cause accidental firing.
Do NOT remove any internal safety or safety device on the firearm. Safety
mechanisms are designed to help protect you from injury or death.
Properly maintain and keep your gun clean. Keep it in a dry place away from
other metals and water. If your gun shows sign of corrosion or improper operation,
have it serviced by a competent gunsmith.
Keep the muzzle pointed in a safe direction when loading and unloading your
gun. Never point the muzzle at anyone.
If a gun fails to fire when the trigger is pulled, keep it pointed down range at the
target for 60 seconds. Sometimes slow primer ignition may cause a delay in full
ignition of the cartridge. If after 60 seconds, the cartridge does not fire, keep
muzzle pointed in safe direction and avoid exposure to the breech, as you attempt
to unload your firearm.
Never let water, snow, mud or other material enter the barrel. Always be sure
the barrel is free of any obstruction.
Since many ammunition identifications sound similar, be sure that you use only
the correct ammunition for your gun. Do NOT use the wrong size or wrong
strength ammunition in your firearm.
Teach children: 1. NOT to touch guns, bullets, cartridges, shells, flares or
any explosive device and 2. That if they discover such a dangerous item or
weapon, they must immediately report its location to their parents, school
teacher or
Remember a firearm has the capability of taking your life or the life of someone
else. Be careful with your firearm — an accident is almost always the result of
not following basic safety rules.
police.
7
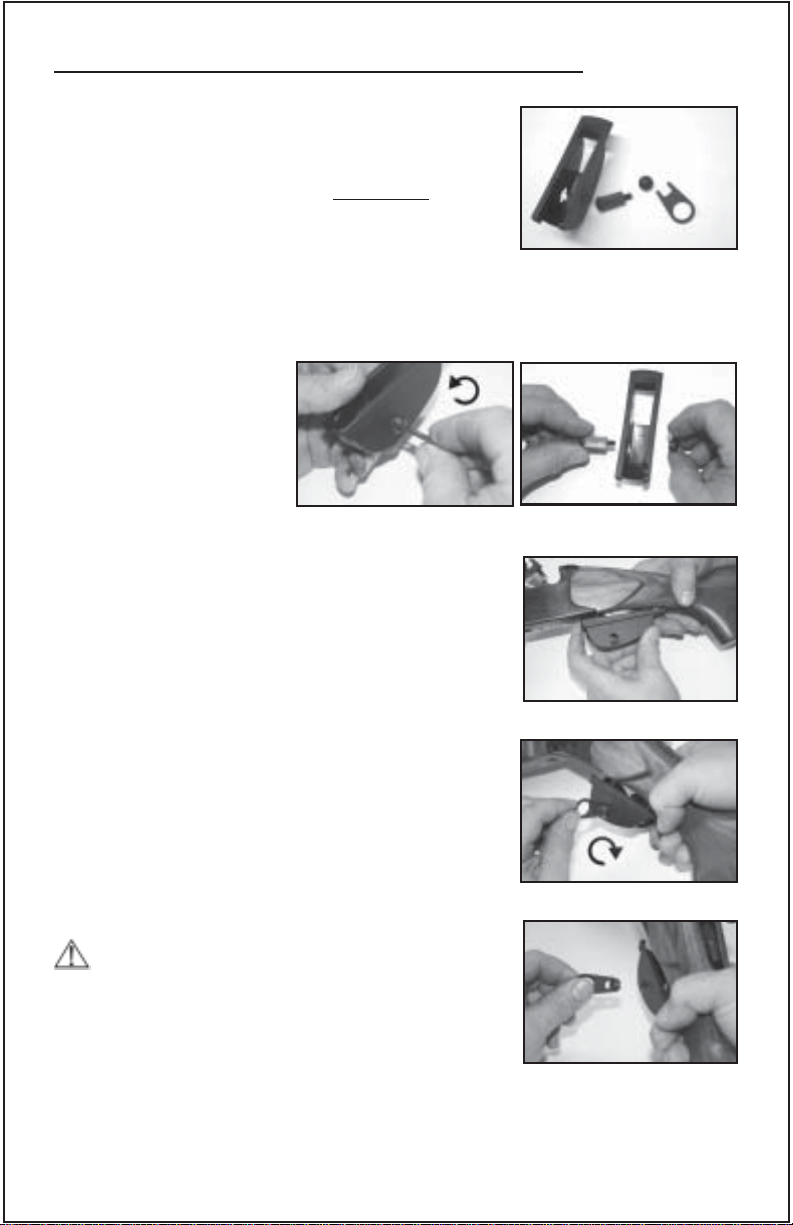
Use the Security Lock Provided with your Shotgun
This shotgun comes with a security lock to assist in
protecting against unauthorized use. See Picture
A. The shotgun must be unloaded when the security
lock is in place on the shotgun.
the security lock cannot substitute for securing your
firearm and ammunition in separate, locked
locations.
The security lock operates as follows:
1. To open the Trigger
Lock put the Key into the
notches of the Trigger
Lock Nut and unscrew it
counter-clockwise. See
Figures 1 and 2.
Remove the Trigger Lock
Screw.
2. To install the Trigger Lock on an over and under
break-open shotgun put the Trigger Lock around the
trigger guard. See Figure 3.
WARNING: Using
Figure 1
Picture A
Figure 2
3. Screw the Trigger Lock Nut on the Trigger Lock
Figure 3
Screw (clockwise) and tighten the nut with the key.
DO NOT TIGHTEN THE NUT TOO TIGHT OR
YOU COULD DAMAGE THE LOCK SCREW. See
Figure 4.
4. To remove the Trigger Lock, unscrew the Trigger
Lock Nut with the key and detach the Trigger Lock
Screw. See Figure 5.
Figure 4
W A R N I N G
Always store the key to the security lock: (1) in a
separate location away from the shotgun; (2) in a
secure location unknown and not accessible to
others, especially children. Whether you secure your
firearms by using the supplied security lock, a gun
Figure 5
lock or safe or some other mechanism, it is YOUR RESPONSIBILITY to store
your firearms in such a manner that children and other unauthorized persons
cannot gain access to them.
8

USED FIREARMS - Firearms are sometimes altered to work incorrectly, or
parts may be removed, lost or replaced with incorrect parts. If you got your
European American Armory Corp. firearm as a used gun, BEFORE USING IT
you should take
Corp. firearms, and have him examine it.
WRITE European American Armory Corp. concerning any items or
circumstances which you don’t understand and which might relate to your safety
and the operation of your firearm at: European American Armory Corp., 402
Richard Road, Rockledge, FL. 32955, phone: (321) 639-4842.
it to a good gunsmith who knows European American Armory
W A R N I N G (POTENTIAL OBSTRUCTIONS)
BEFORE LOADING or firing a shotgun, examine the bore and the firing chamber
to be certain they are clean and free of any obstruction. Even a heavy coat of
oil, grease, snow or water may result in damage to the firearm and injury to the
shooter and/or persons near the firearm. A misfire or unusual sound upon firing
is a signal to cease firing and to examine the chamber and bore. If there is any
obstruction, clear the obstruction and clean the bore and chamber before firing.
Any bore obstruction, even if it is only partly blocked, may cause the gun to blow
up if it is fired, or may cause damage to the gun such as a bulged barrel. To
avoid injury or death to the shooter or bystanders, check the barrel before
shooting or if a shot does not sound normal.
W A R N I N G
Always keep the muzzle pointed in a safe direction! Never attempt to load or
unload any firearm inside a vehicle, building or other confined space (except a
properly constructed shooting range). Enclosed areas frequently offer no
completely safe direction in which to point the firearm. If an accidental discharge
occurs, there is great risk of death, personal injury or property damage. Before
loading, always clean all, grease and oil from the bore and chamber, and check
to be certain that no obstruction is in the barrel. Any foreign matter in the barrel
could result in a bulged or burst barrel or other damage to the firearm and could
cause serious injury to the shooter or to others.
W A R N I N G
If there is any reason to suspect that a projectile is obstructing the barrel,
immediately unload the firearm (See Unloading Instructions) and check the
chamber and the bore. A wad, shot or some other matter may be lodged some
distance down the barrel where it cannot easily be seen. Check the bore by
using a cleaning rod to pass through the barrel. If a blockage is in the bore, DO
9

NOT ATTEMPT TO SHOOT IT OUT WITH ANOTHER CARTRIDGE, OR
BLOW IT OUT WITH A BLANK CARTRIDGE OR A CARTRIDGE FROM
WHICH THE SHOT HAS BEEN REMOVED. SUCH TECHNIQUE(S) CAN
GENERATE EXCESSIVE PRESSURE, DAMAGE THE FIREARM AND CAUSE
SERIOUS PERSONAL INJURY. If the blockage can be removed with a cleaning
rod, clean any unburned powder grains from the bore, chambers and mechanism
before resuming shooting. If the blockage cannot be dislodged by tapping it with
a cleaning rod, take the firearm to a gunsmith.
W A R N I N G (EYE AND EAR PROTECTION)
When shooting, full eye and ear protection is mandatory at all times. Shooters
and spectators must wear shooting glasses and hearing protection to prevent
eye injury and hearing loss. Vision and hearing impairment can occur with only
one moment of non-protection.
W A R N I N G (Mechanical Malfunctions)
STOP SHOOTING IMMEDIATELY AND UNLOAD YOUR FIREARM if your
firearm develops: a mechanical malfunction; binding or stoppage; spitting powder/
gas; a punctured cartridge primer; a bulged or ruptured cartridge case; or a
sound on firing does not sound quite right. Do NOT try one more shot but unload
your firearm and take it and the ammunition to a qualified gunsmith or send the
firearm back to European American Armory Corp. for examination. Do not
assume that the shotgun is empty merely because you checked the chamber.
You must also check the bore for any fired shot or wad jammed inside the
barrel.
BASIC PARTS OF YOUR SHOTGUN
EXTERNAL CONTROL PARTS:
Trigger Block Safety: The safety mechanism of the shotgun provides protection
against accidental and unintentional discharge under normal
usage when properly engaged and in good working order.
The safety mechanism is not a substitute for following the
rules of safe gun handling. Do not disengage the safety
unless you are ready to fire the shotgun. MAKE SURE YOU
UNDERSTAND HOW THE SAFETY WORKS BEFORE
YOU LOAD OR USE THE SHOTGUN.
The safety mechanism is a tang-style safety located behind
the top lever. See Figure 6. To place the safety in the “on”
Figure 6
10

or “safe” position, pull the button all the way to the rear. When
in the “on” or “safe” position, the safety blocks the rearward
motion of the trigger(s). To place the safety in the “off” or “fire”
position, push the slide all the way to forward. When in the
“off” or “fire” position, a red dot is exposed behind the slide
button. You have now disengaged the safety and the shotgun
is in the ready-to-fire position. See Figure 7.
W A R N I N G
Figure 7
Do not touch the trigger(s) while moving the safety . When operating the safety,
make sure you push or pull it to the full extent of its travel in the desired direction,
either fully “on” or fully “off.” Half-safe or partially-safe is UNSAFE.
Top Lever: The top lever is
located just forward of the safety
mechanism. See Figure 8. The
top lever is used to break open
the action to load and/or unload
the shotgun, and to assemble
and disassemble the shotgun. To
Figure 8
break open the action, fully push the top lever to the right.
See Figure 9.
Figure 9
Trigger(s): Over and under shotguns from European
American Armory Corp. are available in either a
double-trigger configuration or a single trigger
configuration. See Figure 10 and Figure 11.
Double-trigger shotguns are patterned after classic
over and under shotguns with two triggers. The front
Figure 10
trigger always fires the bottom barrel. The back
trigger always fires the top barrel. Pulling either
trigger with the safety in the “off” or “fire” position
fires the shotgun.
W A R N I N G
Figure 11
Never pull the trigger(s) until you are actually ready
to fire. Keep your fingers off the trigger(s) and outside of the trigger guard until
you are ready to pull the trigger and fire the shotgun. When opening and closing
the action and when engaging or disengaging the safety mechanism, make
sure your fingers are outside the trigger guard and away from the trigger(s).
11

W A R N I N G
Never fire a double-trigger shotgun by using two fingers because you may
inadvertently pull both triggers at the same time resulting in a near simultaneous
firing of both barrels. Use your index finger to pull one of the triggers to fire the
first shot. After that shot is fired, release the trigger and move your index finger
to the other trigger to fire the second shot.
Single-trigger IZH27 shotguns have a single trigger which is used to fire each
barrel. Once the trigger is pulled to fire the first barrel, release the trigger. The
second barrel is then ready to be fired by pulling the trigger again.
The Ejectors: The IZH27 shotguns are equipped with ejectors which are preset
at the factory for automatic ejection of fired rounds upon opening of the action.
However, the ejectors may be adjusted by the user to disable the automaticejection feature. When the ejectors are set in the disabled position, fired shells
will not be automatically ejected from the barrels when the action is opened.
The ejectors are controlled
by set screws located on
the curved portion at the
front of the receiver. The
right side set screw
controls the ejection of
shells from the bottom
barrel. See Figure 12.
The left side set screw controls the ejection of shells from the top barrel. See
Figure 13.
Figure 13Figure 12
The set screws for the
ejectors are preset at the
factory for automatic
ejection of fired shells
when the action is
opened. In the automatic
setting, the slots in the set
Figure 14
Figure 15
screws are oriented in a
vertical position running perpendicular to the length of the barrels. See vertical
positioning of slots as depicted in Figures 14 and 15.
To disable the automatic
ejectors, open the action
and turn the set screws
clockwise ˘ of a turn so
that the set screw slots are
in a horizontal position
parallel to the length of the
barrels. See Figures 16
Figure 16
Figure 17
and 17.
12

To return the shotgun to
the automatic-ejection
mode, simply turn the set
screws counterclockwise
˘ of a turn to their original
position with the set screw
slots oriented in a vertical
position perpendicular to the length of the barrels. See Figures 18 and 19.
Figure 18
Figure 19
W A R N I N G
Never adjust or disable the ejector set screws when the shotgun is loaded.
Adjust the set screws only when the shotgun is completely unloaded.
W A R N I N G
Never remove the ejector set screws from the shotgun. The ejectors are part of
the shell case head support system. Shooting the shotgun with the ejectors
removed or out of place may cause a shell head rupture causing serious personal
injury.
The Barrel Selector (for single-trigger shotguns only): As configured by
the factory, the Model IZH27 single-trigger shotgun is preset to fire the bottom
barrel on the first shot and then the top barrel on the second shot. Once the
shotgun is loaded, you may manually set the shotgun to fire the top barrel first.
To select the top barrel, with the safety engaged in the “on” position, point the
muzzle in a safe direction and push the trigger forward from the rear until you
feel and hear a click. You have now set the shotgun to fire the top barrel on the
first shot and the bottom barrel on the second shot. Note: Once you open the
action with the top lever, the shotgun automatically returns to its original
configuration of firing the bottom barrel first.
W A R N I N G
When you are pushing the trigger forward to select the top barrel, make sure
the safety is “on” and the muzzle is pointed in a safe direction. NEVER use the
barrel selector when the safety is in the “off” or “fire” position. Once you have
used the trigger to select the top barrel, remove your finger from inside the
trigger guard until you are ready to fire.
13

The Forend: The forend is the wooden grip piece
which attaches to the barrel assembly and locks the
barrel assembly into the receiver. See Figure 20.
The forend has a mechanical latch which is used to
lock and unlock the forend to the barrel assembly.
Never attempt to fire your shotgun without having
the forend locked in its proper position on the barrel
assembly.
The Serial Number: The shotgun’s serial number is located on the top of the
receiver underneath the top lever.
Figure 20
DIRECTIONS FOR ASSEMBLY OF SHOTGUN:
W A R N I N G
Before you begin to assemble the shotgun, you MUST (1) look down the barrels
from the breech end toward the muzzle end to make sure there is no ammunition
in the chambers or obstructions in the barrels, and (2) make sure the safety is in
the “safe” position.
Your shotgun was shipped with the barrel assembly (barrels and forend) detached
from the receiver assembly. To assemble the shotgun, follow these instructions:
1) Remove the plastic bags or wrapping covering
the parts. Then remove the forend from the barrel
by pulling outward on the mechanical lever in the
lower midsection of the forend and tipping the forend
out and away from the barrel. See Figure 21.
2) Now push the top lever of the receiver to the right
and hold with one hand. Do not force the top lever.
See Figure 22.
3) Holding the barrels with other hand, engage the
lower locking lug located on the lower portion of the
barrels with the receiver. The half-round cut out on
the lower locking lug fits around the round bar in the
forward lower portion of the slot in the receiver. With
the barrels engaged into the receiver, swing the barrels up into the locked position.
The top lever should move back to the center once the barrels are locked into
position. Note: The top lever may not move completely to the center on a new
shotgun until the gun is broken in. The top lever must move at least three
Figure 21
Figure 22
14

quarters of its full travel distance. See Figure 23 (a,b,c).
Figure 23a
4) Now that the barrels have been locked into the
receiver, you must reattach the forend to the barrels.
Place the forend on the front curve of the receiver
(the angle between the forend and barrels should be
about 20 degrees). Keep contact between forend and
receiver and with an upward swinging motion, lock
the forend into the barrels. While it may be necessary
to push the latch into its final flat position, never force the latch into position. See
Figure 24.
Figure 23b
Figure 23c
Figure 24
W A R N I N G Never fire the gun unless the barrels
are locked into position on the receiver and the forend is
locked into the receiver and barrels.
5) Make sure the trigger block safety is engaged after
completion of assembly (Red Dot covered). See Figure 25.
LOADING AND UNLOADING YOUR SHOTGUN
Figure 25
W A R N I N G Never load or fire the shotgun unless the barrels are
locked into position on the receiver, and the forend is locked in to the receiver
and barrels.
W A R N I N G Make sure the shotgun is pointed in a safe direction and
the trigger block safety is engaged at all times while loading and unloading.
NEVER allow your fingers or other objects to contact the trigger(s) while loading
or unloading.
W A R N I N G Do not disengage the trigger block safety until you are
ready to fire and have the gun pointed safely downrange.
15

W A R N I N G
Do not load shotgun until you are ready to fire.
TO LOAD:
1) Make sure the ammunition that you are using is the correct size and gauge.
The barrel is marked with the gauge and chamber size. Barrels marked 3"
76mm will use only 2 3/4" (70mm) or 3" (76mm) shot shells
and must not be used with 3 1/2" (89mm) shells. Barrels
marked with 2 3/4" (70mm) will use only 2 3/4" (70mm) and
must not be used with or 3" (76mm) or 3 1/2" (89mm) shells.
2) Visually inspect the chambers and barrels for
obstructions by breaking open the shotgun by depressing
the locking lever and tipping the barrels down. The
chambers and barrels should be free of oil or grease or
obstructions. See Figure 26.
3) After inspection load
the correct type of shot
shells into the chambers
making sure that the
shells are flush with the
extractor. See Figures
27 and 28). Then close
the action by swinging the barrels up until
they lock into the receiver. The locking
latch should move to its fully locked
position. See Figure 29. If the locking
lever does not move to the fully locked
position. (see Figure 30) break open the
action again and check to see if the shot
shell is fully seated in the chambers. If
the shells are fully seated then re-close
the action. If the shot shells are not fully
seated, check the chambers for blockage and check the shells for deformation
and retry closing the action once more. If the shells are the correct type and the
chambers are not blocked and the shells are not deformed and the top lever
does not move to its fully locked position, unload the gun (follow Unloading
Instructions) and have a competent gunsmith look at the gun or return the gun
to European American Armory Corp. for inspection. Do not force the shotgun
closed.
Figure 27
Figure 29
Figure 26
Figure 28
Figure 30
16

TO UNLOAD:
1) Break open the shotgun by pushing the top lever of the receiver all the way
to the right and tipping the barrels down. See Figure 31.
2) Remove the shell(s) from the chamber(s) by grabbing them by the rims and
pulling them from the chambers. See Figure 32.
3) Visually check the barrels to make sure that they are free from obstructions.
See Figure 33.
Figure 32Figure 31
FIRING YOUR SHOTGUN
Figure 33
W A R N I N G
Never load a cartridge into the chamber until
you are ready to fire the shotgun.
W A R N I N G Do not disengage the trigger block safety until the
shotgun is pointed in a safe direction and you are ready to fire.
W A R N I N G If a cartridge does not fire and the trigger has been pulled
and the trigger block safety is disengaged, Stop! Then do the following: a)
Make sure the gun is pointed in a safe direction b) Engage the trigger block
safety c) Wait 60 seconds d) Follow the instructions above for unloading the
shotgun.
W A R N I N G
If during firing the sound of any cartridge is noticeably softer or louder than the
previous cartridge fired, Stop! Then do the following: a) Make sure the gun is
pointed in a safe direction b) Engage the trigger block safety c) Follow the
instructions above for unloading the shotgun and d) With the shotgun unloaded
visually inspect the shotgun for barrel blockage or damage. Then inspect the
receiver of the shotgun for damage before continuing.
17

READ, UNDERSTAND AND FOLLOW ALL WARNINGS AND
INSTRUCTIONS IN THIS MANUAL BEFORE FIRING THE SHOTGUN.
TO FIRE THE SHOTGUN:
1) Make sure you are wearing eye and ear protection.
2) Make sure the shotgun is pointed in a safe
direction with the trigger block safety engaged.
See Figure 34.
3) Keeping your fingers away from the trigger(s),
push the trigger block safety to the “off” or “fire”
position with the red dot showing. See Figure 35.
4) With the butt stock held firmly against your
shoulder and the barrel pointed towards your
intended target, place your trigger finger on the
trigger. The shotgun will fire when you pull or
squeeze the trigger with the requisite force. See
Figure 36.
5) If you wish to fire a second shot from the other
barrel, you must:
a) In the case of a Model IZH27 singletrigger shotgun, release the trigger and then
pull or squeeze it again. The second barrel
will then fire.
b) In the case of a Model IZH27 double-trigger shotgun, move your
finger to the other trigger and pull or squeeze that trigger. The second
barrel will then fire.
Figure 34
Figure 35
Figure 36
W A R N I N G Once you have stopped firing the shotgun, immediately
pull the trigger block safety back to the “on” or “safe” position. Then follow the
unloading instructions above while keeping the muzzle pointed in a safe direction.
DIRECTIONS FOR DISASSEMBLY OF THE
SHOTGUN:
1) Make sure the shotgun is unloaded (FOLLOW UNLOADING
INSTRUCTIONS) and pointed in a safe direction.
2) Make sure the trigger block safety is engaged in the “on”
or “safe” position. See Figure 37.
18
Figure 37

3) Make sure the barrel assembly is locked into the
receiver and the action closed. The top lever should
now be in the center position. Remove the forend
from the barrels by pulling out the mechanical lever
in the lower center of the forend and removing the
forend in a downward outward swinging motion. See
Figure 38. Never force the forend off the barrels
and receiver.
4) With the barrels and receiver supported with one
hand, push the top lever fully to the right and tip the
barrel assembly down until it disengages from the
receiver. Check the barrels for damage and
obstructions after removal. See Figure 39.
Figure 38
Figure 39
MANUFACTURER’S WARNING:
This firearm was manufactured to properly perform with the original parts as
designed. It is your duty to make sure any parts you buy are correctly installed
and that neither replacements nor originals are altered or changed. Your gun is
a complex tool with many parts that must relate correctly to other parts for safe
and accurate operation. Putting a gun together wrong or with modified parts can
result in a damaged gun, or personal injury or death to you or others. Always let
a qualified gunsmith work on your gun or at least, check any work not performed
by a gunsmith. Firearms safety is your primary concern. THE GUN OWNER
MUST ACCEPT FULL RESPONSIBILITY FOR THE CORRECT
REASSEMBLY AND FUNCTIONING OF THE FIREARM AFTER ANY
DISASSEMBLY OR REPLACEMENT OF PARTS.
TO CLEAN AND MAINTAIN YOUR SHOTGUN:
A) Follow procedures for unloading shotgun as described previously.
B) Follow procedures for disassembly of shotgun as described previously.
C) Materials needed to clean this shotgun are: a cleaning rod, cotton bore
patches, brass bore brush, powder solvent, a small soft brush and good quality
gun oil.
WARNING: Lead or lead compounds are known to the State of California
to cause cancer, birth defects, reproductive toxicity, and other serious physical
injury. Those who clean firearms should take protective measures to avoid
contact or exposure to such chemicals.
D) Using the bore brush with powder solvent, scrub the interior of the barrels
and chambers to remove any powder and lead residue in the bore. Always and
lastly, swab the interior of the barrels with cotton patch with gun oil to coat and
protect the bore and chambers from rust and corrosion.
19

E) Any powder fouling on the firing wall, barrel, etc. can be easily cleaned with a
brush and powder solvent.
F) All external surfaces should be wiped down with a light coat of rust preventative.
Avoid using too much oil as powder, dust or other foreign material may get
trapped in the oil. This could lead to congealed deposits which may interfere
with the safe and reliable operation of the shotgun.
G) USE CAUTION while using solvents in gun bore cleaning. Prolonged or
excess contact with solvents can damage the gun’s bluing and finish. Be sure to
wipe away all excess solvent and then lubricate with oil.
H) A gun should be cleaned after firing. In addition, external parts should be
wiped with an oiled cloth after handling. A light oil is ordinarily all that is necessary
in cleaning if the gun has not been fired or fired very little. If a gun is used
frequently, it must be cleaned after each firing and regularly serviced by a
professional gunsmith. If the gun has been stored, remove all excess oil and/or
grease before firing. Always check to be sure that no cleaning patch or other
obstruction remains in the bore or chambers before firing.
DANGER – AMMUNITION WARNING
Firearms may be damaged and serious personal injury or death to the
shooter or bystanders may result from any condition which contributes to
the generation of excessive pressure or uncontrolled release of gas within
the firearm. Such adverse conditions can be caused by bore or chamber
obstruction, propellant powder overloads or by defective, incorrect or
improperly loaded and assembled cartridge components. Even the strongest
firearm can be blown up as a result of excessive pressure. It is extremely
dangerous to use a cartridge whose pressure is greater than that developed
by cartridges loaded to industry standards.
AMMUNITION (CARTRIDGES) NOTICE
We specifically disclaim responsibility for any damage, personal injury or death
occurring in connection with or as the result of the use of EAA Corp. shotguns
with faulty, nonstandard, remanufactured, hand-loaded or reloaded ammunition,
used cartridges or cartridges other than factory cartridges for which the firearm
was originally chambered.
LUBRICATION WARNING
Firing a shotgun with oil, grease or any other material even partially obstructing
the bore may result in damage to the shotgun and personal injury to the shooter
and those nearby. Do not spray or apply lubricants directly on ammunition. If
the powder charge of a cartridge is affected by the lubricant, it may not fully
ignite yet the energy from the primer and/or powder may be sufficient to push
the projectile or wad into the bore where it may become lodged. Firing a
subsequent cartridge into the obstructed bore will damage the shotgun and
may cause personal injury to the shooter and those nearby. Use lubricants
properly. You are responsible for the proper care and maintenance of your
firearm and ammunition.
20

ONE YEAR LIMITED WARRANTY
This EAA Corp. firearm is warranted to the original retail customer for One Year
from date of purchase against defects in material and workmanship. All parts
and labor or replacement at our option are covered. Wood Stock and Wood
Forend are not covered by the One Year Warranty. The warranty on the wood
stock and forend is 60 days from purchase and only covers manufactured and
material defects.
Transportation to and from our repair facilities, government fees, damage caused
by failure to perform normal maintenance, sales outside the United States,
damage due to use of high velocity, high pressure, reloaded or other nonstandard
ammunition, or any unauthorized repair, modification, misuse, abuse, or alteration
of the product is not covered by this Limited Warranty.
Any implied warranties, including the implied warranties of merchantability and
fitness for a particular purpose, are limited to one year from date of original retail
purchase. Consequential or incidental damages and/or expenses, or any other
expenses are not covered by this warranty.
To obtain warranty performance send your firearm with proof of retail purchase,
freight prepaid to:
European American Armory Corp.
3855 North U.S. Highway 1
Cocoa, Florida 32926
NOTICE: It is illegal to ship a firearm with ammunition in the firearm or in the
same packaging. Firearms and ammunition must be shipped separately. For
information about shipping ammunition, call EAA Corp. at (321) 639-4842
WARNING—ALTERATIONS OR MODIFICATIONS
Altering or modifying parts and/or internal safeties is dangerous and will void
the warranty. This shotgun was manufactured to perform properly with the original
parts as designed. It is your duty to make sure any parts you buy are made for
this firearm and are installed correctly and that neither the replacements nor
originals are altered or changed. Your gun is a complex precision tool with many
parts that must relate correctly to other parts in order for proper and safe
operation. Putting a gun together wrong or with incorrect or modified parts can
result in a damaged gun, danger, and personal injury or death to you and others
through malfunction. Always have a qualified gunsmith work on your gun or at
least check any work not performed by a gunsmith.
YOUR OWNER’S MANUAL
Always keep this manual with your firearm. Make sure you understand all the
warnings, operation instructions and safety procedures. When you lend, give or
sell the firearm, be sure this manual goes with it. You can get a copy of this
manual from European American Armory Corp. upon request.
21

ALL PARTS ORDERS ARE SUBJECT TO A $10.00 CHARGE FOR SHIPPING
AND HANDLING. Please state Model, Caliber, Serial Number, and Finish Color
when ordering. For parts, information and service contact: European American
Armory Corp., 402 Richard Road, Rockledge, FL. 32955 Phone: (321)
639-4842.
22

PARTS LIST Fig. 1 – IZH27 Exploded View
List of IZH27 Components
1. barrel assembly
2. ejector
3. screw
4. front sight
5. swivel ring
6. pin
7. hinge assembly
8. fore grip
9. screw
10. bush
11. catch casing
12. fore grip catch
13. pin
14. spring
15. housing
16. locking lever
17. screw
18. locking lever axle
19. locking strip
20. recoil spring
21. top striker
22. bottom striker
23. striker spring
24. right-hand hammer
assembly
25. left-hand hammer
assembly
26. pin
27. mainspring pivot
28. mainspring
29. right-hand sear
30. left hand sear
31. pin
32. spring
33. right-hand bolt
plunger
34. left-hand bolt
plunger
35. safety lock button
36. safety lock base
37. safety lock
38. pin
39. spring
40. spring
41. clip
42. pin
43. slide
44. intercepter
46. spring
47. screw
23
48. bridge
49. base plate
50. screw
51. locking strip retainer
52. spring
53. pin
54. right-hand trigger
55. left-hander trigger
56. pin
57. trigger bar
58. cock
59. pin
60. trigger guard
61. woodscrew
62. butt
63. screw
64. washer
66. butt plate
67. woodscrew
68. woodscrew
69. swivel base
70. screw
71. screw
72. washer

Fig. 2 - IZH27 Ejector Parts
Figure 2- LIST OF COMPONENTS
1. barrel assembly
2. right-hand ejector
3. left-hand ejector
4. ejector spring
5. plunger
6. hinge assembly
7. fore grip
8. ejector right-hand sear
9. ejector left-hand sear
10. ejector sear bolt
11. spring
12. base
13. right-hand bolt plunger
14. left-hand bolt plunger
15. tripping lever
16. tripping lever catch
17. spring
24

Fig. 3 - IZH27 Single Trigger Mechanism Parts
Figure 3- LIST OF COMPONENTS
1. carrier
2. locking strip
3. right-hand sear
4. left-hand sear
5. inertia-type tripping lever
6. intercepter
7. base plate
8. trigger
9. selector lever
10. selector lever spring
11. selector lever pin
12. trigger bar
13. tripping lever spring
14. trigger bar spring
15. tripping lever pin
16. trigger bar pin
17. trigger spring
18. change lever spring screw
19. intercepter spring
25

OPTIONAL CHOKE TUBES
WARNING. Never install or remove choke tubes while the firearm is loaded.
Only install or remove choke tubes with the firearm unloaded, the action open
and the trigger block safety engaged.
Screw in Chokes Symbols/Markings (This is an option—not all IZH27
shotguns have this feature)
The end of the choke tubes are marked with slashes to identify the choke
constriction:
/- Full
// - Improved Modified
/// - Modified
//// - Improved Cylinder
Cl - Cylinder
WARNING! MAKE SURE YOU FULLY TIGHTEN THE CHOKE TUBE
Shooting with a loose choke tube can cause damage to your
shotgun.
Additional information on screw choke tubes:
A) Only tighten or loosen choke tubes with flat key wrench supplied with shotgun.
Note: wrench (and extra choke tube or tubes if supplied) are under the cardboard
in front of the shotgun receiver in the box.
B) Never shoot the shotgun with a partially installed choke tube.
C) IZH27 shotguns are available with fixed choke or screw choke barrels.
There are two types of screw chokes available: lead shot choke tubes and
steel shot choke tubes. When installed, steel shot choke tubes protrude
approximately 3/4” from the muzzle end of the barrel and the mating lip will
be flush with the end of the barrel. When installed, lead shot choke tubes fit
flush with or slightly below the muzzle end of the barrel. If you have lead
shot choke tubes and intend to shoot steel shot cartridges or slugs, then
you must use only the IC or Cylinder tubes. DO NOT fire steel shot or slugs
in Modified, Improved Modified or Full lead shot choke tubes. If you have
steel shot choke tubes, you may fire steel shot cartridges through any of
those choke tubes. DO NOT fire slugs in Modified, Improved Modified or
Full lead shot choke tubes or steel shot choke tubes.
26

D) Correctly installed choke tubes: Lead shot choke tubes should fit flush or
slightly below the muzzle end of the barrel. Steel shot choke tubes will protrude
out from the barrel about 3/4” and the mating lip will be flush with barrel end.
E) Before using the shotgun make sure that the choke tubes are installed correctly.
F) Keep choke tubes lubricated and installed. Never fire the gun without a choke
tube installed. Handle choke tubes carefully since the leading edge is very thin.
Notes on Shot Material and Chokes:
1) Shells using Bismuth or Tungsten-Matrix shot are subject to the same
barrel and choke tube limitations as lead shot. Shells using TungstenIron shot or Hevi-Shot are subject to the same barrel and choke tube
limitations as steel shot.
2) On fixed choke guns, shells loaded with steel, Tungsten-Iron or HeviShot should be fired only in IC or Cylinder barrels. DO NOT fire steel,
Tungsten-Iron or Hevi-Shot shells in fixed barrels with Modified, Im
proved Modified or Full choke barrels. Lead, Bismuth and TungstenMatrix may be fired in all fixed choke barrels.
3) On fixed choke guns, slugs may be fired in only IC and Cylinder
barrels. DO NOT fire slugs in fixed choke barrels with Modified, Im
proved Modified or Full chokes.
If you would like to buy extra choke tubes (skeet, trap, extra full, etc.) call
1-321-639-4842
27

WARNING
European American Armory
402 Richard Road
Rockledge, FL. 32955
!
Children are attracted to and can operate firearms that
can cause severe injuries or death.
Prevent child access by always keeping guns locked
away and unloaded when not in use. If you keep a loaded
firearm where a child obtains and improperly
uses it, you may be fined or sent to prison.
ADVERTENCIA
!
A los ninos los atroen las armaside de fuego y los pueden
hacer funcionar. Ellos pueden causarses lesiones graves
y la muerte.
Evite que los ninos tengon acceso a los armas de fuego
guardandolas siempre con llave y descargadas cuando
no las este utilizando. Si usted tiene un arma de fuego
cargado en un lugar en que un nono tiene acceso a
ella y la usa indebidamente. Le pueden dar una
multa a enviarlo a la carcel.
Importer:
European American Armory Corp.
3855 North U.S. Highway 1
Cocoa, FL 32926
Izhevsky Mekhanichesky Zavod
8, Promyshlennaya str.,
426063 Izhevsk, Russia
Manufacturer:
 Loading...