

E28 R2811 User Manual

R2811
USER MANUAL
- 1 -

Declaration:
Read this Manual carefully before using your mobile phone. E28 Limited will not
undertake any responsibility or liability for any direct or indirect damage caused by
users who fail to comply with this operational manual strictly.
For the update of the software/hardware or the difference of the mobile networks, the
information and pictures in this manual may be different from the actua l condition of
the mobile phone, so E28 tries its best, but will not guarantee to eliminate this
difference completely. At the same time, E28 reserves the rights to revise or modify
the manual without prior notification or replacement with updated version. The mobile
phones, accessories and manual may vary depending on the release areas and time.
The copyright of this manual is reserved by E28. Without prior written permission of
E28, all or part of the content for this manual should not be reproduced, propagated or
distributed in any manner.
Copyright ©2005 E28. All rights reserved. Reproduction shall be punished.
E28 is the registered trademark of E28.
Java is the registered trademark of Sun Microsystems.
- 2 -
Safety Precautions:
Comply with the rules and regulations of airliners strictly, power off your
mobile phone when on air plane to avoid any interference with
equipments. Use of the mobile phone on airplane is
illegal.
The mobile phone may interfere with medical devices such as hearing
aids and pacemakers. Power off your mobile phone in hospitals or other
healthcare site with explicit stipulations. The patient who uses the
pacemakers should keep his mobile phone away from the pacemaker.
Do not disassemble the mobile phone or its accessories by yourself.
Do not use the mobile phone at gas station, oil deport and area with
chemical product or other flammable and explosive substance, to prevent
fire hazard or explosion.
Do not discard waste batteries randomly. Do not put the battery into fire,
water or contact it with metal conductor, to prevent explosion or short
circuit.
Use certificated power supply and charger.
Use the earphone or hands-free device when driving to prevent accident.
Comply with local rule and regulation about the usage of mobile phone
strictly.
Note that the mobile phone may interfere with computer, TV, radio and
other electronic devices.
Keep the mobile phone away from children to prevent that the SIM card is
swallowed or the mobile phone is fallen off.
The highest SAR value for this model phone when tested is 0.985 W/kg
for use at the ear and 1.22 K/kg for use close to the body.
For body worn operation, this phone has been tested and meets FCC RF
exposure guideline s when used with an accessory that contains no metal
SAR
and that positions the handset a minimum of 1.5cm from the body. Use of
other accessories may not ensure compliance with FCC RF exposure
guidelines.
3

NOTE: This equipment has been tested and found to comply with the limits for a Class B
digital device, pursuant to part 15 of the FCC Rules. These limits are designed to provide
reasonable protection against harmful interference in a residential installation. This
equipment generates uses and can radiate radio frequency energy and, if not installed
and used in accordance with the instructions, may cause harmful interference to radio
communications. However, there is no guarantee that interference will not occur in a
particular installation. If this equipment does cause harmful interference to radio or
television reception, which can be determined by turning the equipment off and on, the
user is encouraged to try to correct the interference by one or more of the following
measures:
— Reorient or relocate the receiving antenna.
— Increase the separation between the equipment and receiver.
— Connect the equipment into an outlet on a circuit different from that to which the
receiver is connected.
— Consult the dealer or an experienced radio/ TV technician for help.
1 Quick Reference ....................................................................8
1.1
MOBILE OUTLINE..........................................................................................................8
1.2
SIM CARD INSTALLATION .............................................................................................9
1.3
BATTERY INSTALLATION............................ ...................................................................9
1.4
INSTALLATION OF EXTENDED MEMORY.......................................................................11
1.5 C
HARGE.................................................. .................................................................12
1.6 I
DLE SCREEN................................................................................ ............................13
1.7 K
EYPAD USAGE....................................... .................................................................15
1.8 S
PECIFICATION...................................................................................................... ...16
2 Telephone..............................................................................18
2.1
TELEPHONE FUNCTIONS .............................................................................................19
2.1.1 Dialing..................................................................................................................................19
2.1.2 Photo dial ............................................................................................................................21
2.1.3 Quick dial numbers in SIM card.......................................................................................22
2.1.4 Answer Call.........................................................................................................................22
CONTACTS.................................................................................................................23
2.2
2.2.1 New contact........................................................................................................................24
2.2.2 View contact .......................................................................................................................25
2.2.3 Search contact ...................................................................................................................26
2.2.4 Delete contact.....................................................................................................................27
2.2.5 Groups and Categories.....................................................................................................27
2.2.6 Manage Categories ...........................................................................................................27
2.2.7 Manage groups ..................................................................................................................28
4

2.3 CALL LOG................................................. .................................................................29
3 Message.................................................................................31
3.1
INBOX .....................................................................................................................31
3.2
READ MESSAGE ............................. ............................................................................32
3.3
SEND MESSA G E..........................................................................................................33
3.4
DELETE MESSAGE ......................................................................................................35
4 Calendar ...............................................................................35
4.1 VIEW CALENDAR............................................... ..........................................................35
4.2
NEW EVENT............................................. ........................... ........................................36
5 Application ...........................................................................38
5.1
EMAIL .....................................................................................................................38
5.1.1 Setup email account..........................................................................................................39
5.1.2 Mailbox folder.....................................................................................................................40
5.1.3 Read email..........................................................................................................................40
5.1.4 Send email..........................................................................................................................41
5.1.5 Delete email........................................................................................................................41
5.2 M
EMO .....................................................................................................................42
ORLD CLOCK.........................................................................................................43
5.3 W
5.4 A
LARM CLOCK .......................................................................... ...............................43
ALCULATOR ...........................................................................................................44
5.5 C
5.6 J
AVA .....................................................................................................................44
6 Sight & Sound......................................................................45
6.1 P
HOTO CAMERA........................................................................................................46
6.1.1 Take photos........................................................................................................................46
6.1.2 Review Photo.........................................................................................................................47
6.1.3 Edit Photo...........................................................................................................................48
IDEO CAMERA ..................................................................................... ...................48
6.2 V
6.3
MP3 PLAYER......................... .....................................................................................49
6.3.1 Play Music...........................................................................................................................49
6.3.2 Play list ................................................................................................................................50
GALLERY ...................................................................................................................51
6.4
6.5
PLAY VIDEO...............................................................................................................51
7 Internet..................................................................................52
7.1
STK SERVICE ...................................................................................................... ......54
7.2 B
ROWSER ................................................................................................................54
7.3
BOOKMARKS...................................... ........................................................................55
5

7.4WEB HISTORY.............................................................................................................55
7.5
SAVED PAGES............................................................................................................55
DATA METERS ................................................................................... ........................55
7.6
7.7
INTERNET RADIO ........................................................................................................56
8 Tools & Setup........................................................................56
8.1 MEMORY USAGE........................................................................................................57
8.2C
ONNECT PC..............................................................................................................57
8.3
MODEM .....................................................................................................................58
8.4 A
LERTS....................................................................................................................59
8.5 D
EVICE.....................................................................................................................59
8.5.1 Date and Time...................................................................................................................59
8.5.2 Theme and Sounds ..........................................................................................................59
8.5.3 Auto Power On/Off............................................................................................................60
8.5.4 Security...............................................................................................................................60
8.5.5 Power Save Mode.............................................................................................................60
8.5.6 Screen Brightness.............................................................................................................60
8.5.7 Backlight & Auto Lock ......................................................................................................60
8.5.8 English (SC Input).............................................................................................................61
8.5.9 Reset Factory Settings.....................................................................................................61
8.5.10 User Information .........................................................................................................61
8.6 WLAN
8.6.1 WLAN setting.....................................................................................................................61
8.6.2 WLAN Connect Status .....................................................................................................61
8.6.3 VOIP setting.......................................................................................................................62
8.7 C
8.7.1 Network..............................................................................................................................62
8.7.2 Incoming Calls...................................................................................................................62
8.7.3 Outgoing Calls...................................................................................................................63
8.8 M
8.8.1 SMS....................................................................................................................................64
8.8.2 MMS....................................................................................................................................64
8.8.3 Cell Broadcast...................................................................................................................64
8.8.4 Quick Message..................................................................................................................64
8.8.5 Signature............................................................................................................................64
8.9 I
& VOIP SETTINGS ........................................................................................61
ALLS .....................................................................................................................62
ESSAGE.................................................................................................................63
NTERNET ..................... ............................................................................................64
9 Input operation......................................................................65
10 FAQ .....................................................................................69
10.1 H
OW TO MAKE A DIAL? .............................................................................................69
10.2 H
OW TO SET TIME AND DATE .....................................................................................69
6

10.3 HOW TO SET ALARM........................................ ..........................................................69
10.4 H
OW TO TURN ON OR OFF THE ANTENNA? .................................................................69
OW TO TAKE PHOTOS AND SET AS A WALLPAPER?................................. .................69
10.5 H
10.6 H
OW TO CHANGE THE WALLPAPER?......................................................... .................70
10.7 H
OW TO SEND A MMS?............................................................................................70
10.8 H
OW TO ACCESS THE INTERNET?..............................................................................70
10.9 H
OW TO DOWNLOAD AND PLAY MP3?.......................................................................70
10.10 H
10.11 H
OW TO CHANGE THE RING TONES?...............................................................70
OW TO DOWNLOAD VIDEOS AND PICTURES?.................................................70
11 Troubleshooting.................................................................71
7
1 Quick Reference
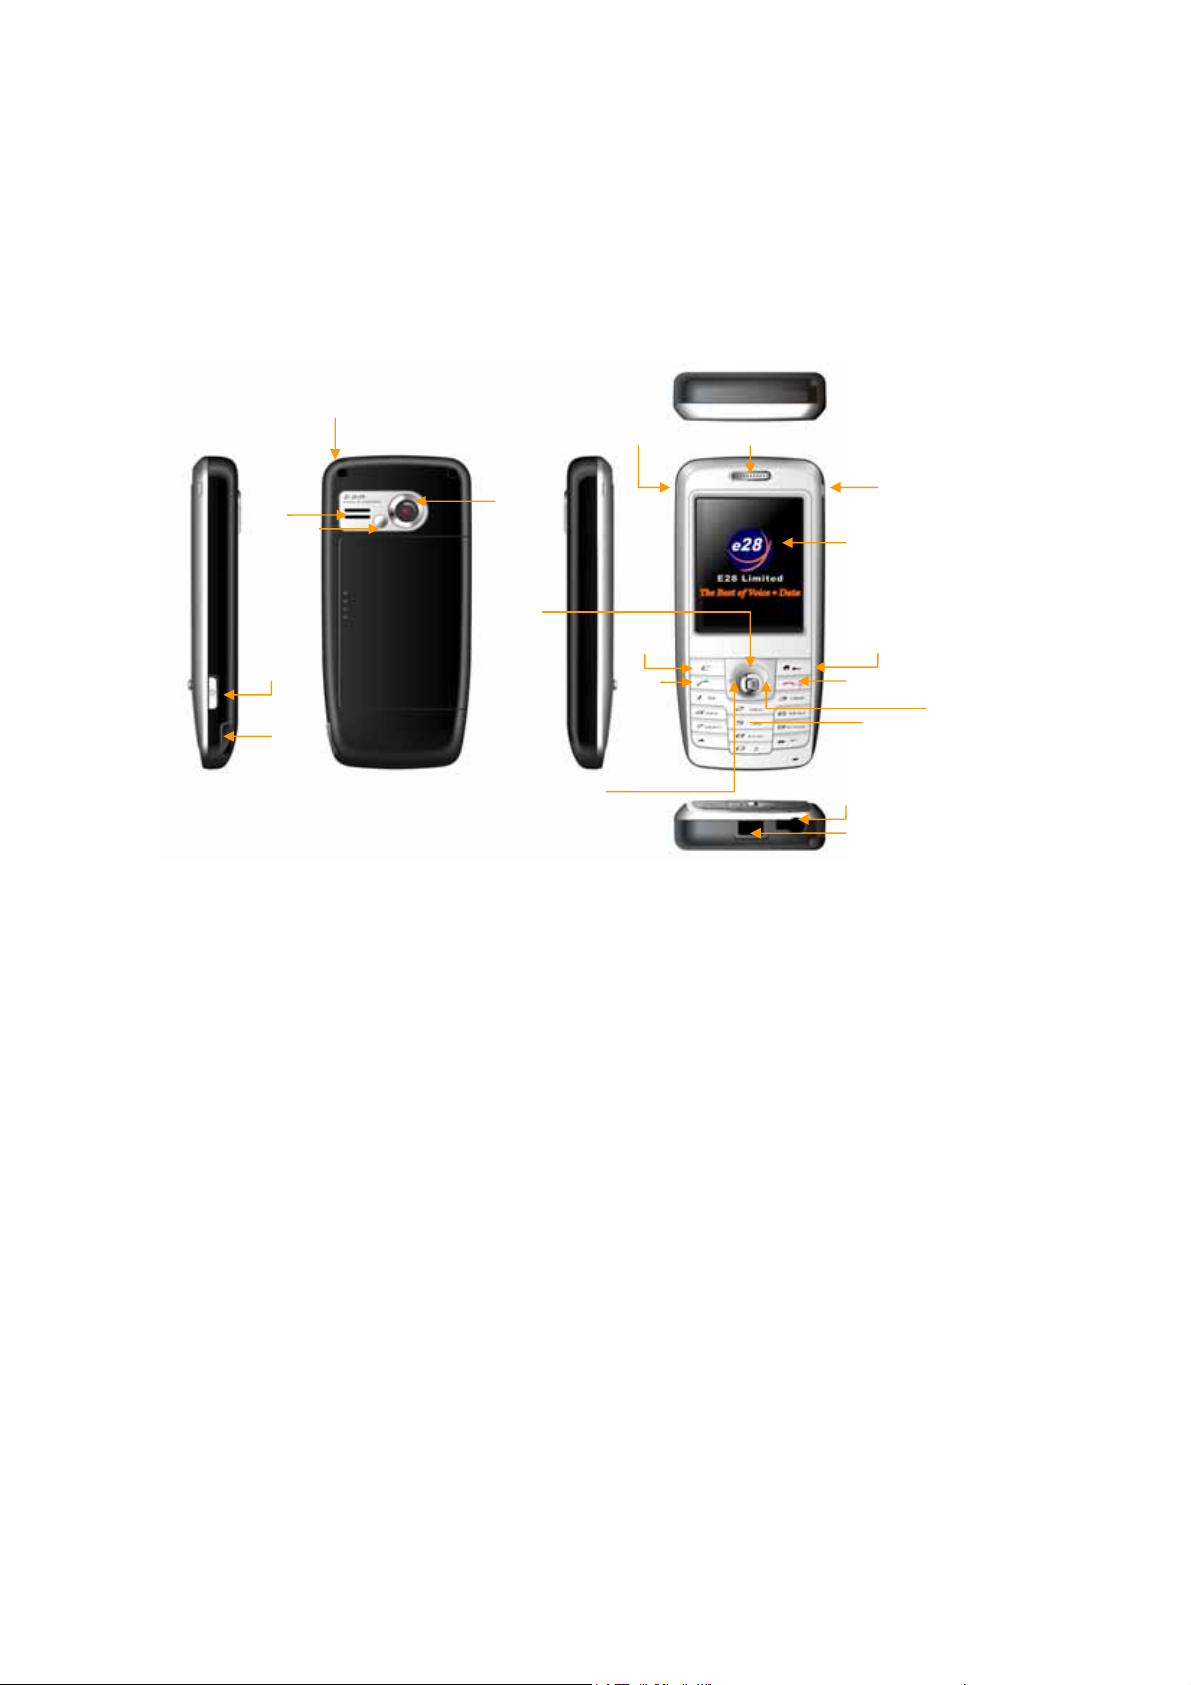
1.1 Mobile outline
Lanyard Anchor
Receiver GSM Side LED
Speaker
Mirror
Camera
Display/
Touch Screen
Power &
Screen Lock
Stylus
Contact
Message
Delete
Send
Menu
End&Home
5-way Joystick
Earphone Jack
Mini USB Port
Note: The color of the picutures in this manual may be different from that of actual
mobile phone.
WLAN Side LED
Call Log
8
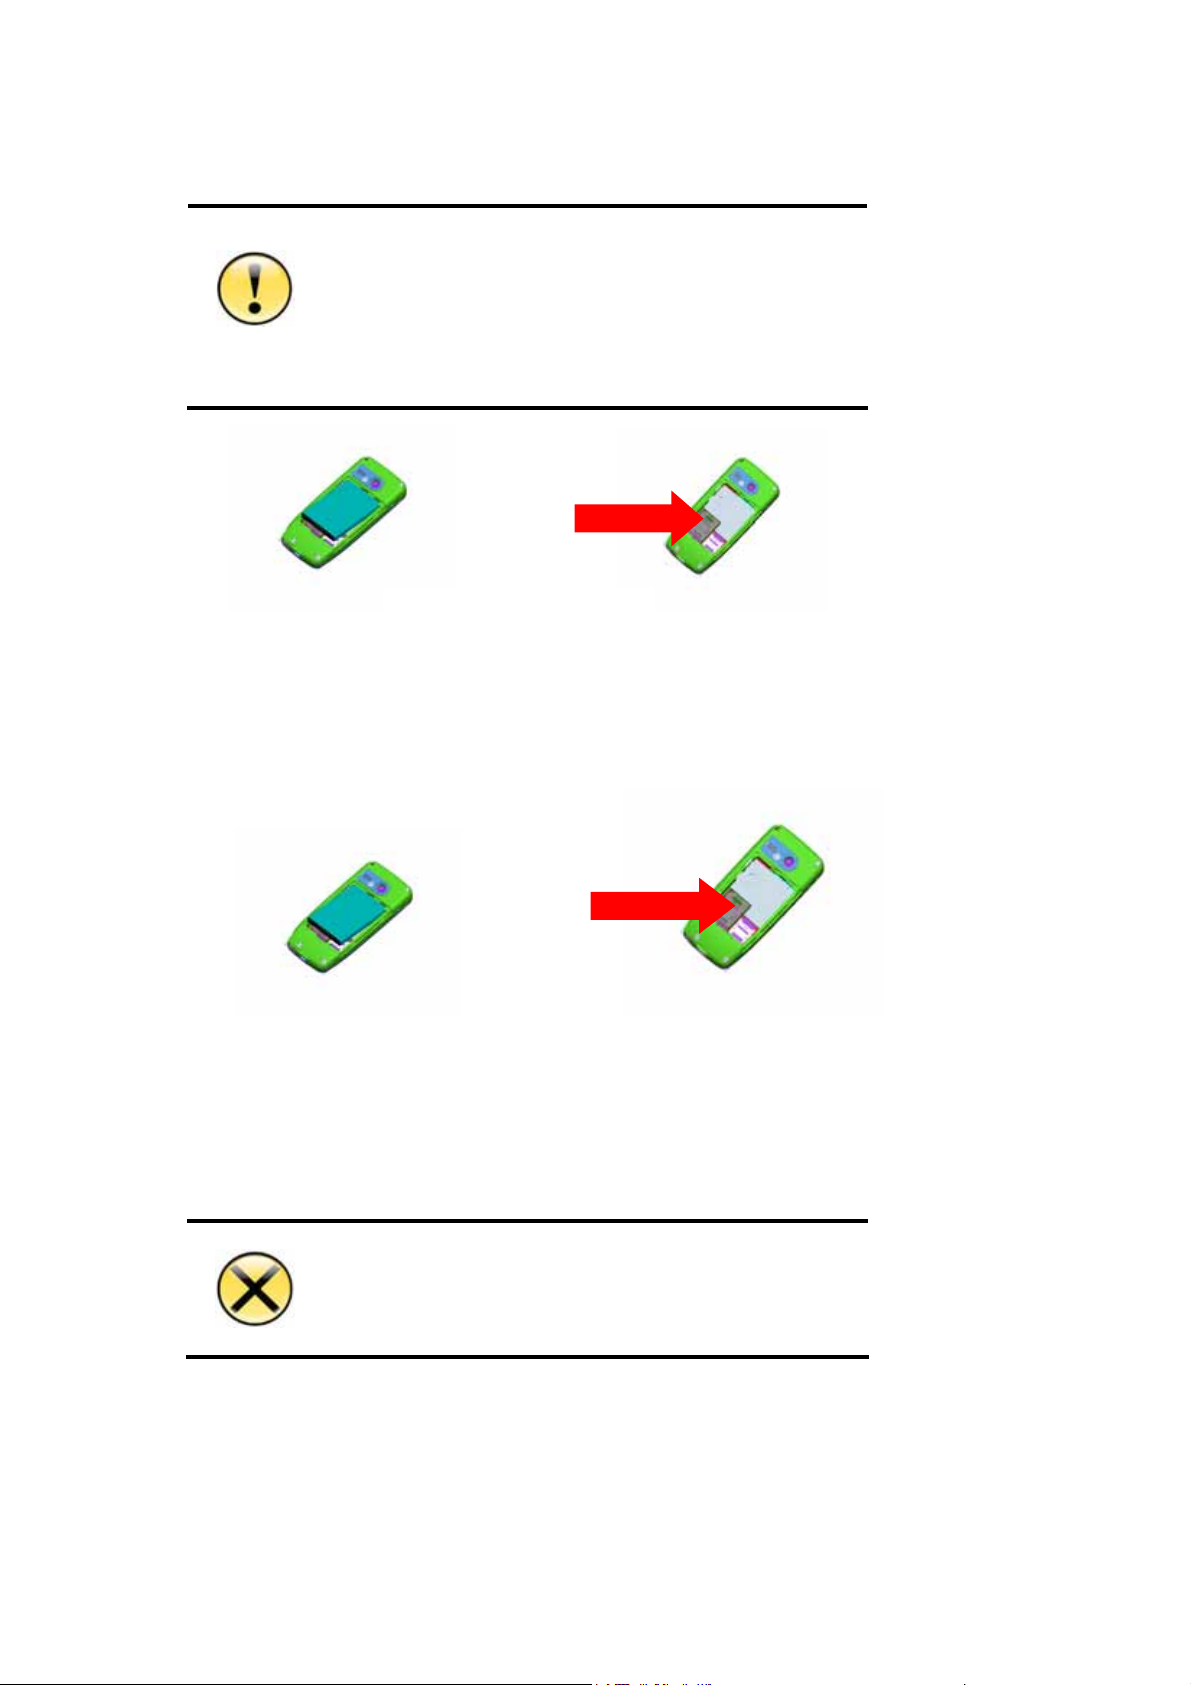
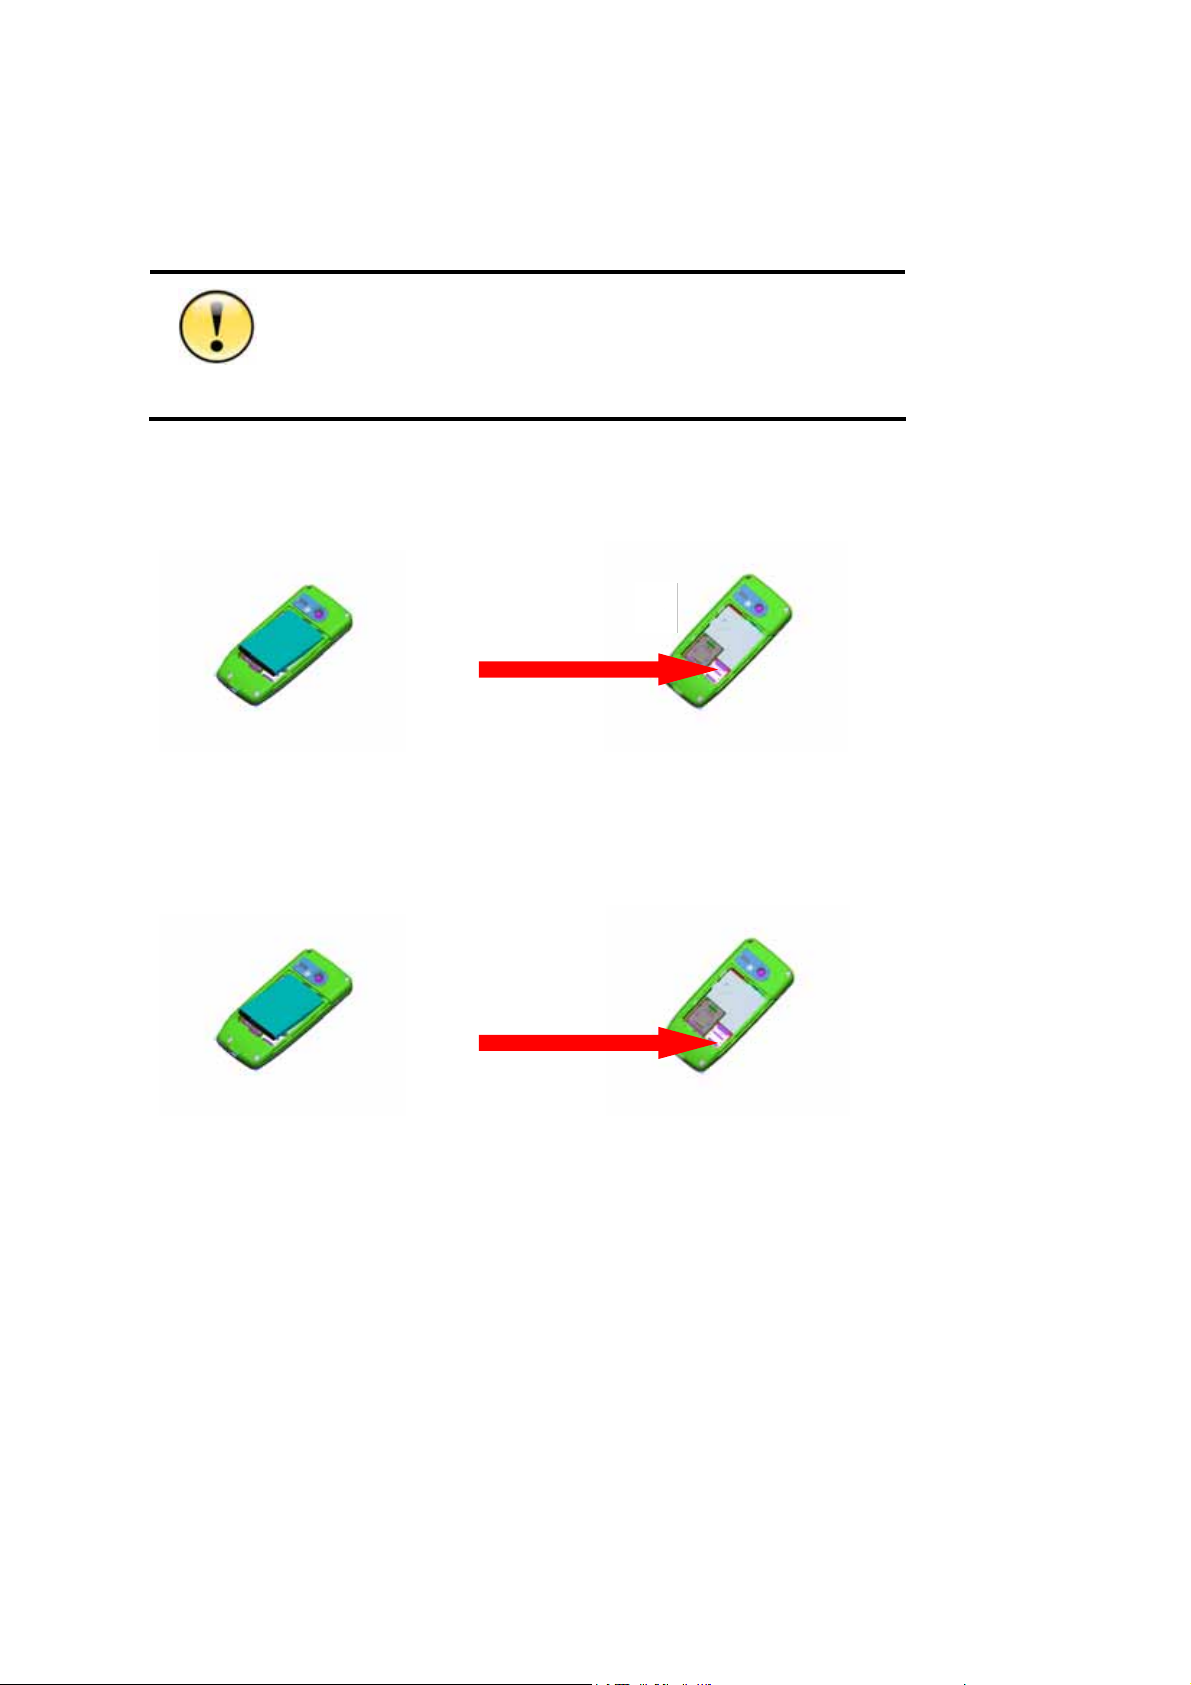
1.2 SIM card Installation
1. R2811 supports latest 3V SIM card. Apply for a new from the
mobile operator if the old 5V SIM card is used. Most of mobile
operators will replace it with a new without change of the phone
number.
Caution
2. Do not bend or scratch on SIM card or contact it with
electrostatic, dust or water.
①
Power off the mobile phone before removing the battery, and insert SIM card,
whose side with the cut off corner should be upward.
Insert the SIM card
① ②
②
Take out the SIM card
Power off the mobile phone before removing the battery, and then take out the SIM
card.
1.3 Battery Installation
1. DO NOT remove the battery or switch the power off
abnormally when the mobile phone is power-on or in the
charge status, to prevent the mobile phone from damaging or
the data from losing.
9
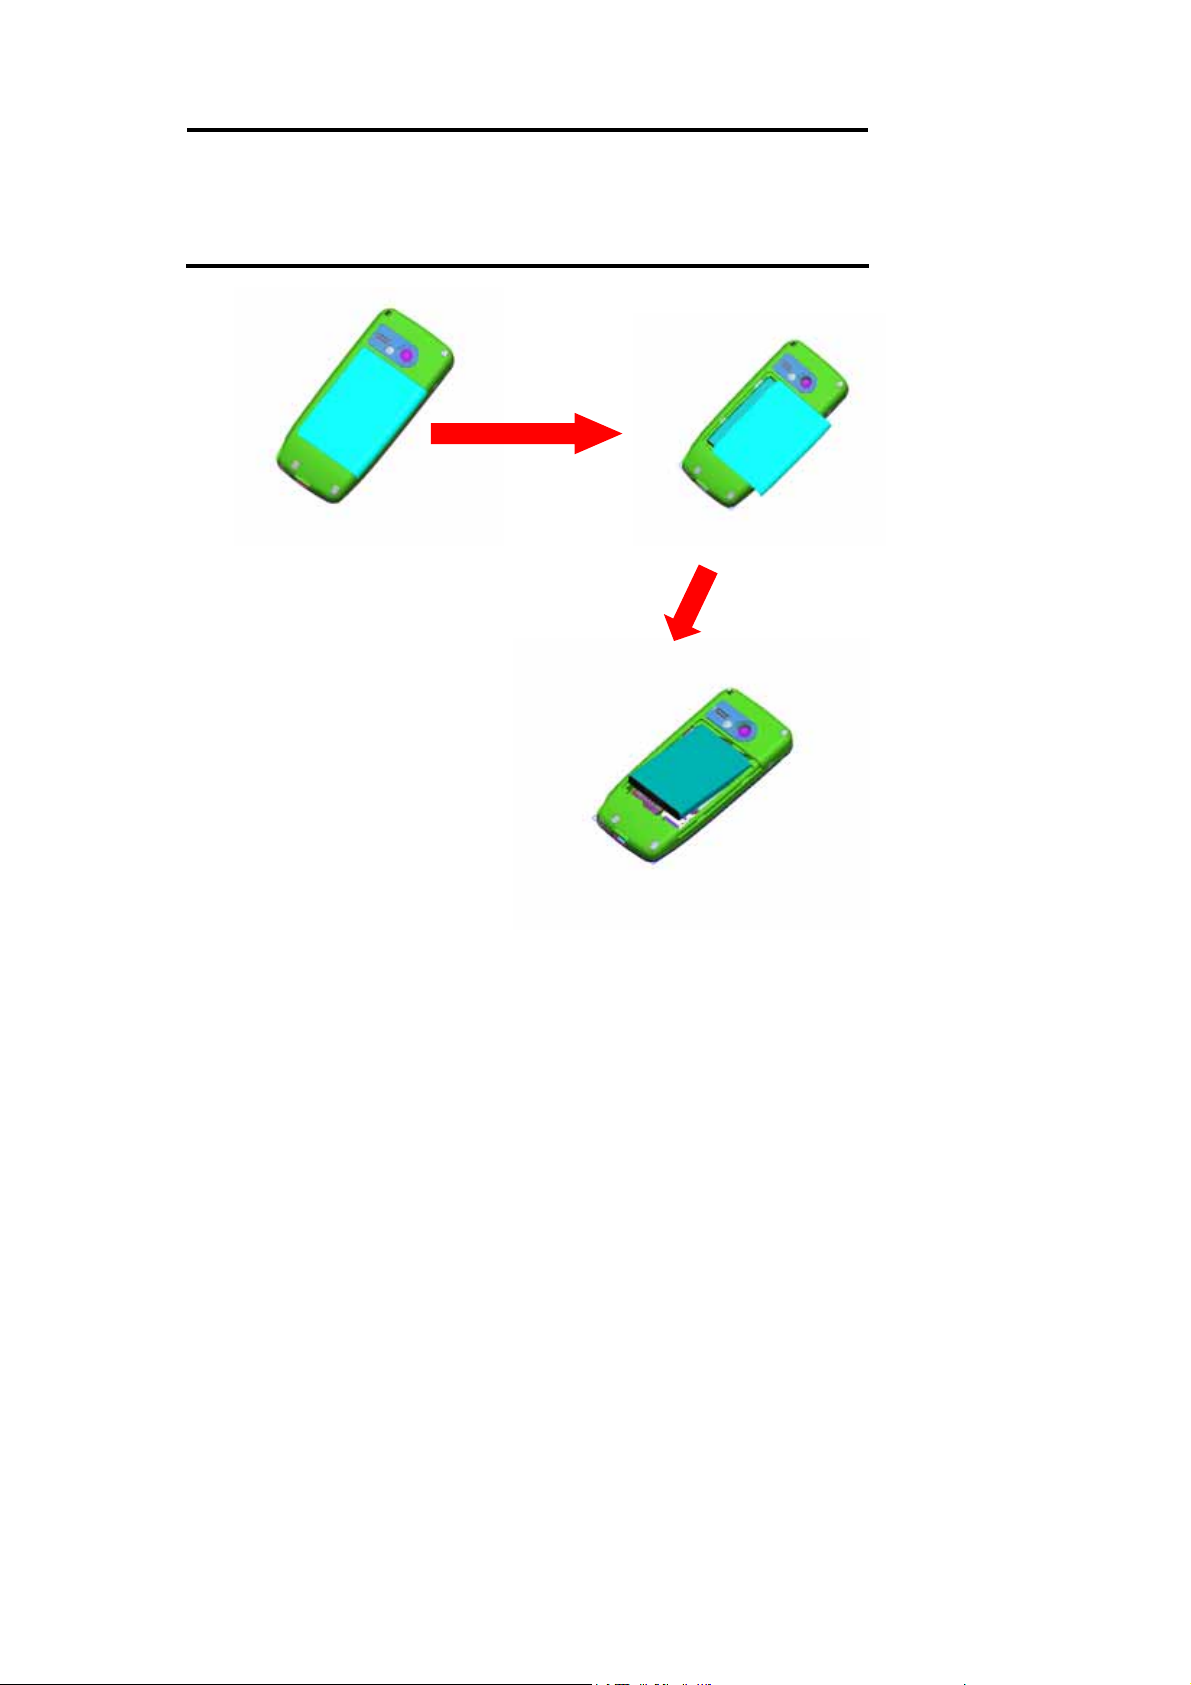
Warning
2. DO NOT contact the battery with conductor, to prevent
damage from short circuit.
3. DO NOT use battery which is not from original manufacturers
or is not specified model.
①
②
10
1.4 Installation of Extended Memory
1. For some T-Flash with poor compatibility, note to purchase and use
certificated memory.
2. Pull down and turn the cover of T-Flash over before taking out the
Caution
T-Flash. Don’t pull out it by force.
①
①
②
Install the T-Flash card
Power off the mobile phone before removing the ba ttery, and
then insert the T-Flash card.
Take out the T-Flash card
②
Power off the mobile phone before removing the battery, pull down and turn
over the cover, and then take out the T-Flash.
11
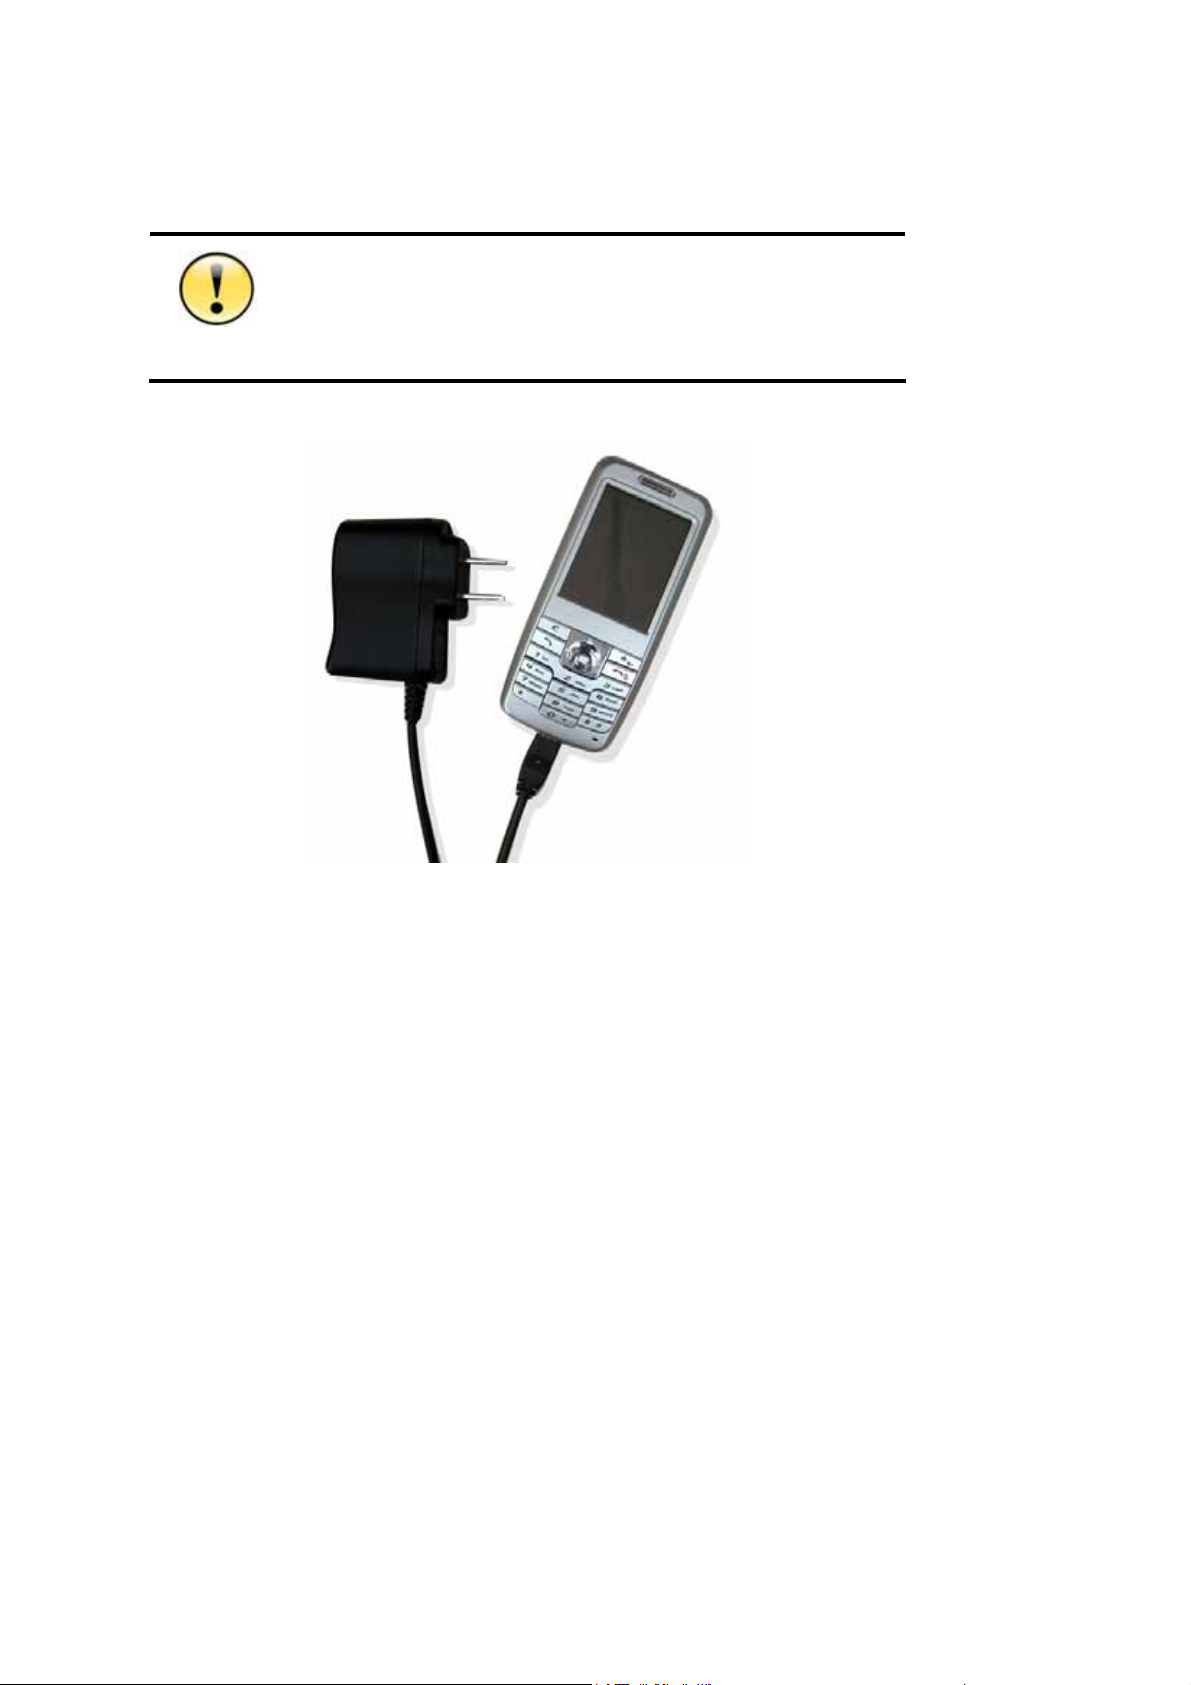
1.5 Charge
If the battery is discharged completely,the charge indicator will not
appear after the charger is plugged in and the mo bile phone can not be
power on immediately. It is necessary to wait for about 10 minutes until
Caution
the charge indicator appears.
USAGE OF TRAVEL CHARGER:
1. Connect the tap of the charger to the Mini USB connector at the bottom of the mobile
phone.
2. Plug the power supply of the charger into the socket of the main power supply.
3. The battery meter will flash when charging. It will be normal if the charger is hot for the
long charge time.
4. The indicator LED will turn in to yellow when the battery is full.
5. Switch the power supply off before the mobile phone is disconnected from the charger.
6.If the battery is discharged completely,the charge indicator will not appear after the
charger is plugged in, and the mobile phone can not power on immediately. It is necessary
to wait for about 10 minutes until the charge indicator appears.
12
USAGE OF USB CHARGER:
R281 1 provides users with the USB charge function, and it only needs to connect the USB
data cable with the computer for charging. Although the USB data cable c an be used to
charge, the battery may not be charged fully for low current supply or it will shorten the life
of the battery, so the USB charger should be used as few as possible unless it is
necessary.
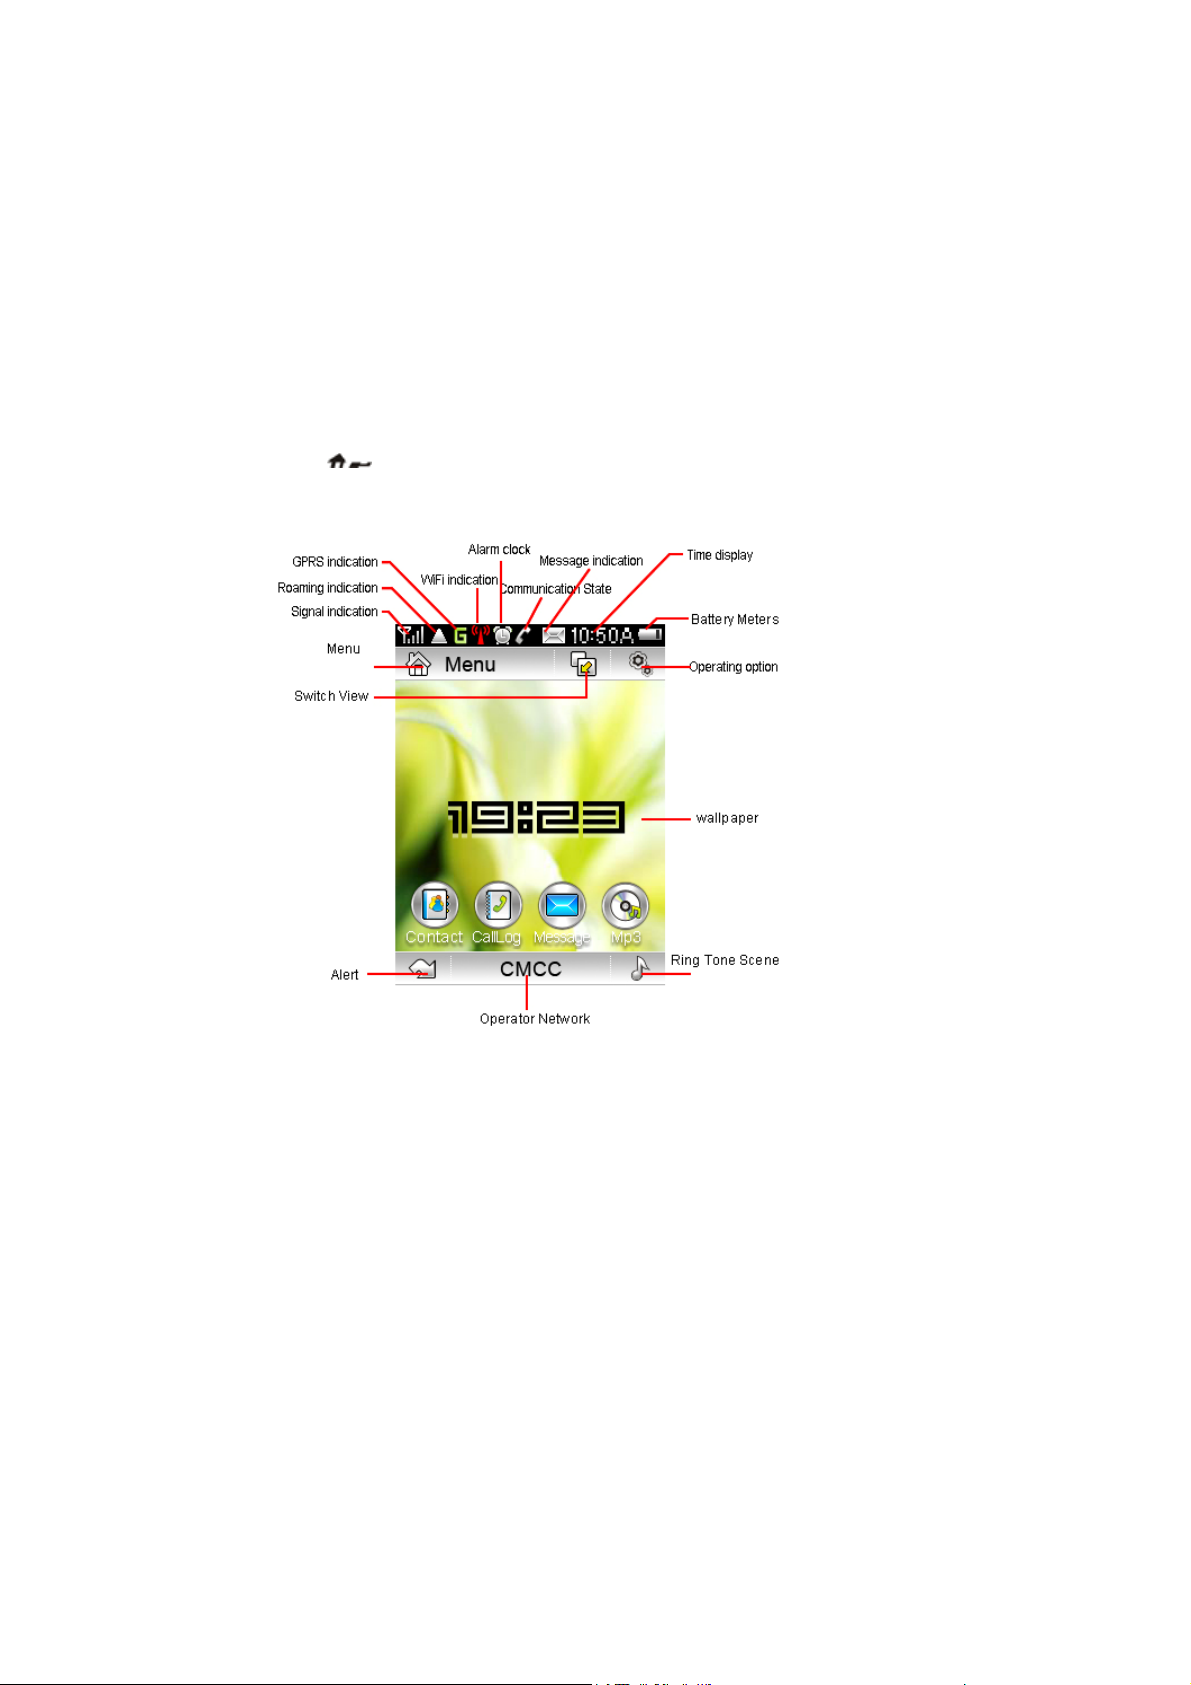
1.6 Idle Screen
The idle screen is the start screen of the mobile, from which to enter into various
applications. Press “
any application.
” key in face of the mobile phone to return to the main screen in
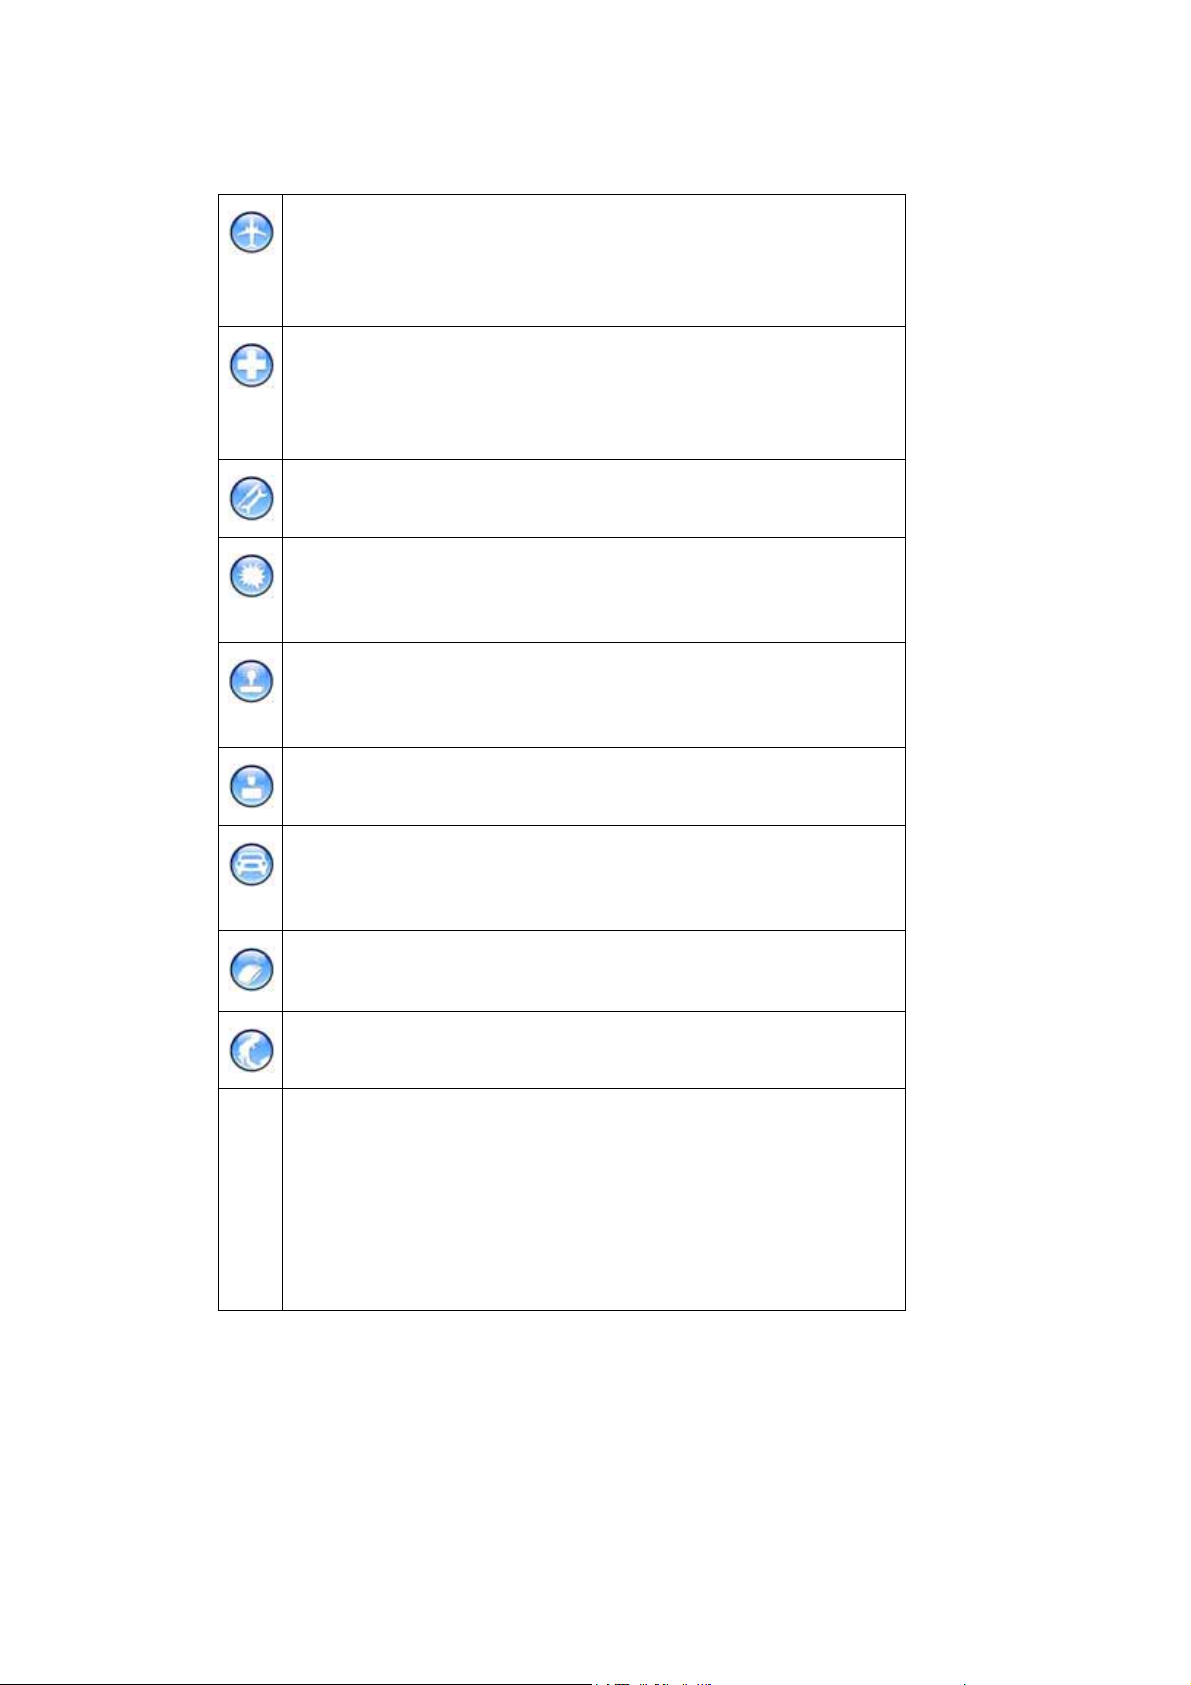
Status icons
The state bar is at the top and bottom of the main screen, of which several icons indicate
current status of the mobile phone.
13
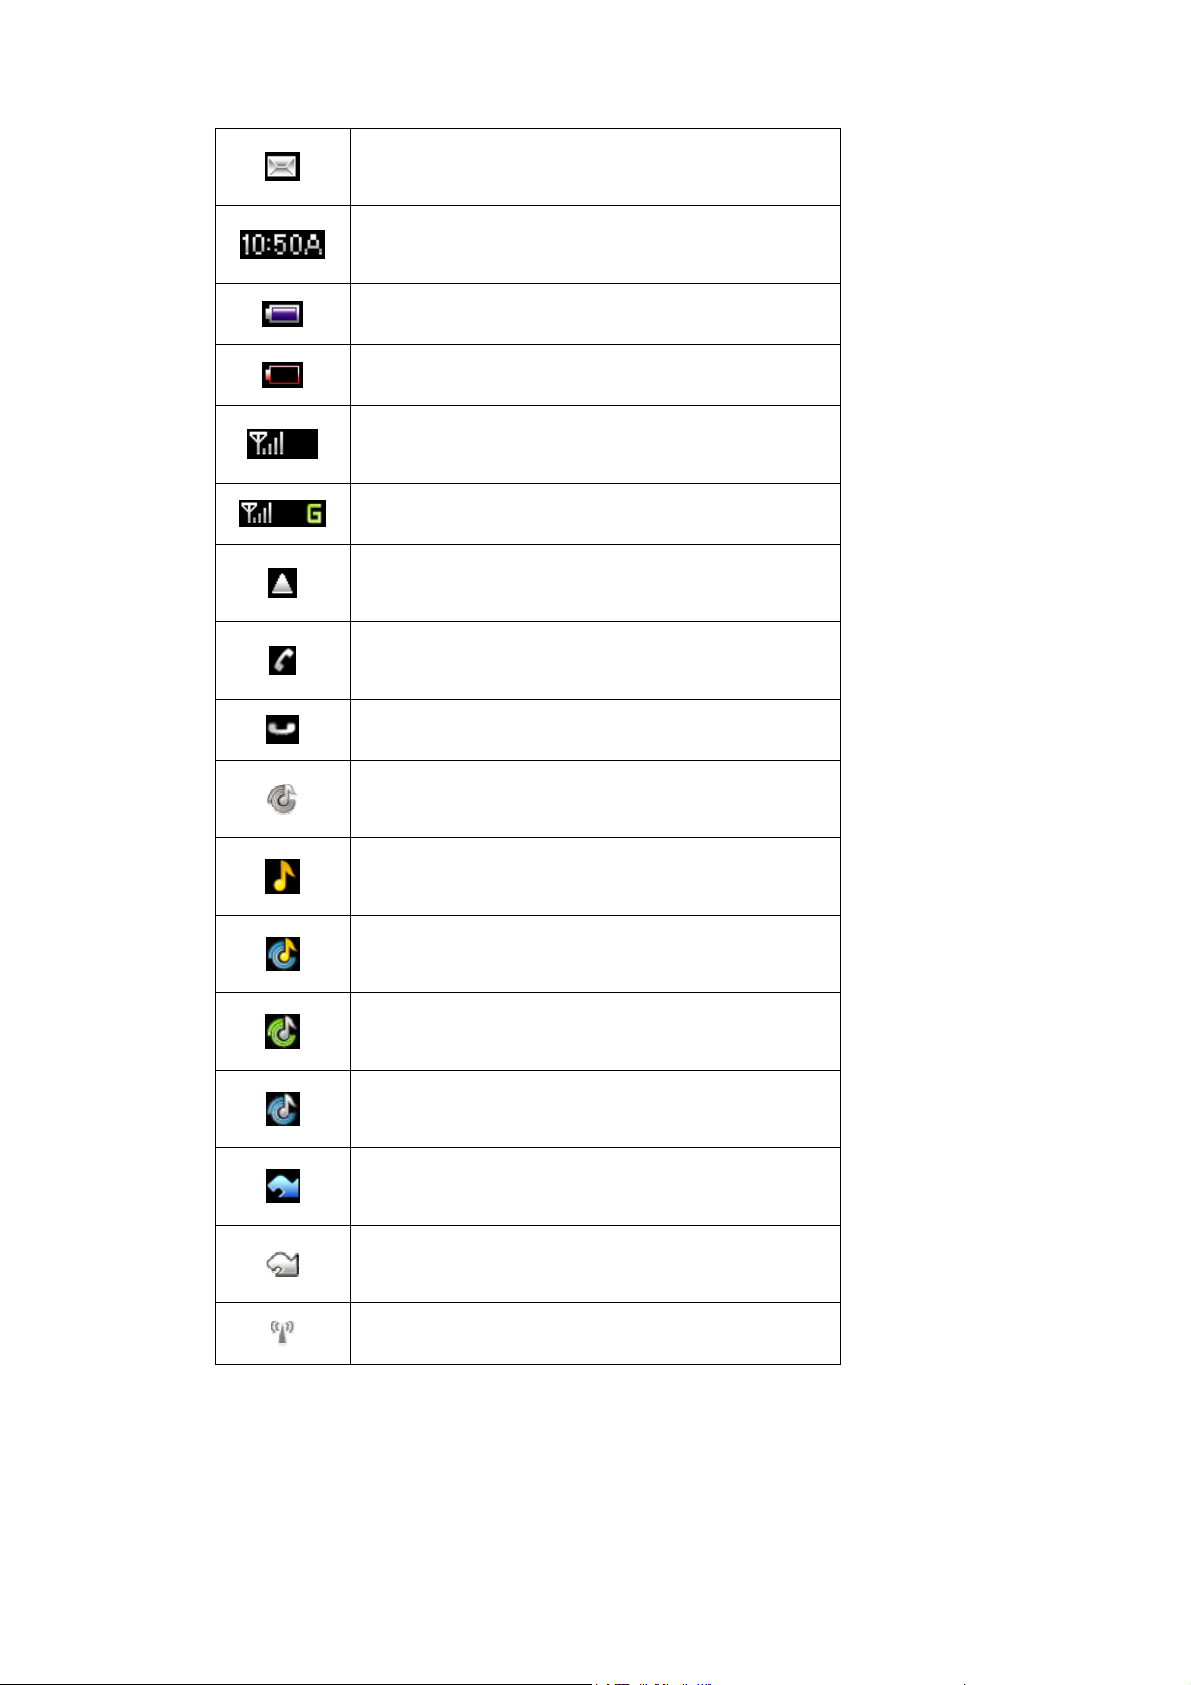
New message (SMS/MMS)
Clock
Battery is full
Battery is empty
With GSM service, no GPRS service
With GSM service, GPRS available
Roaming
Call active
Call on hold
Mute model, no ringing or vibrating
Ringing mode
Vibrating+ ringing mode
Vibrating only mode
Vibrating before Ringing
With alert
No alert
WLAN service disabled
14
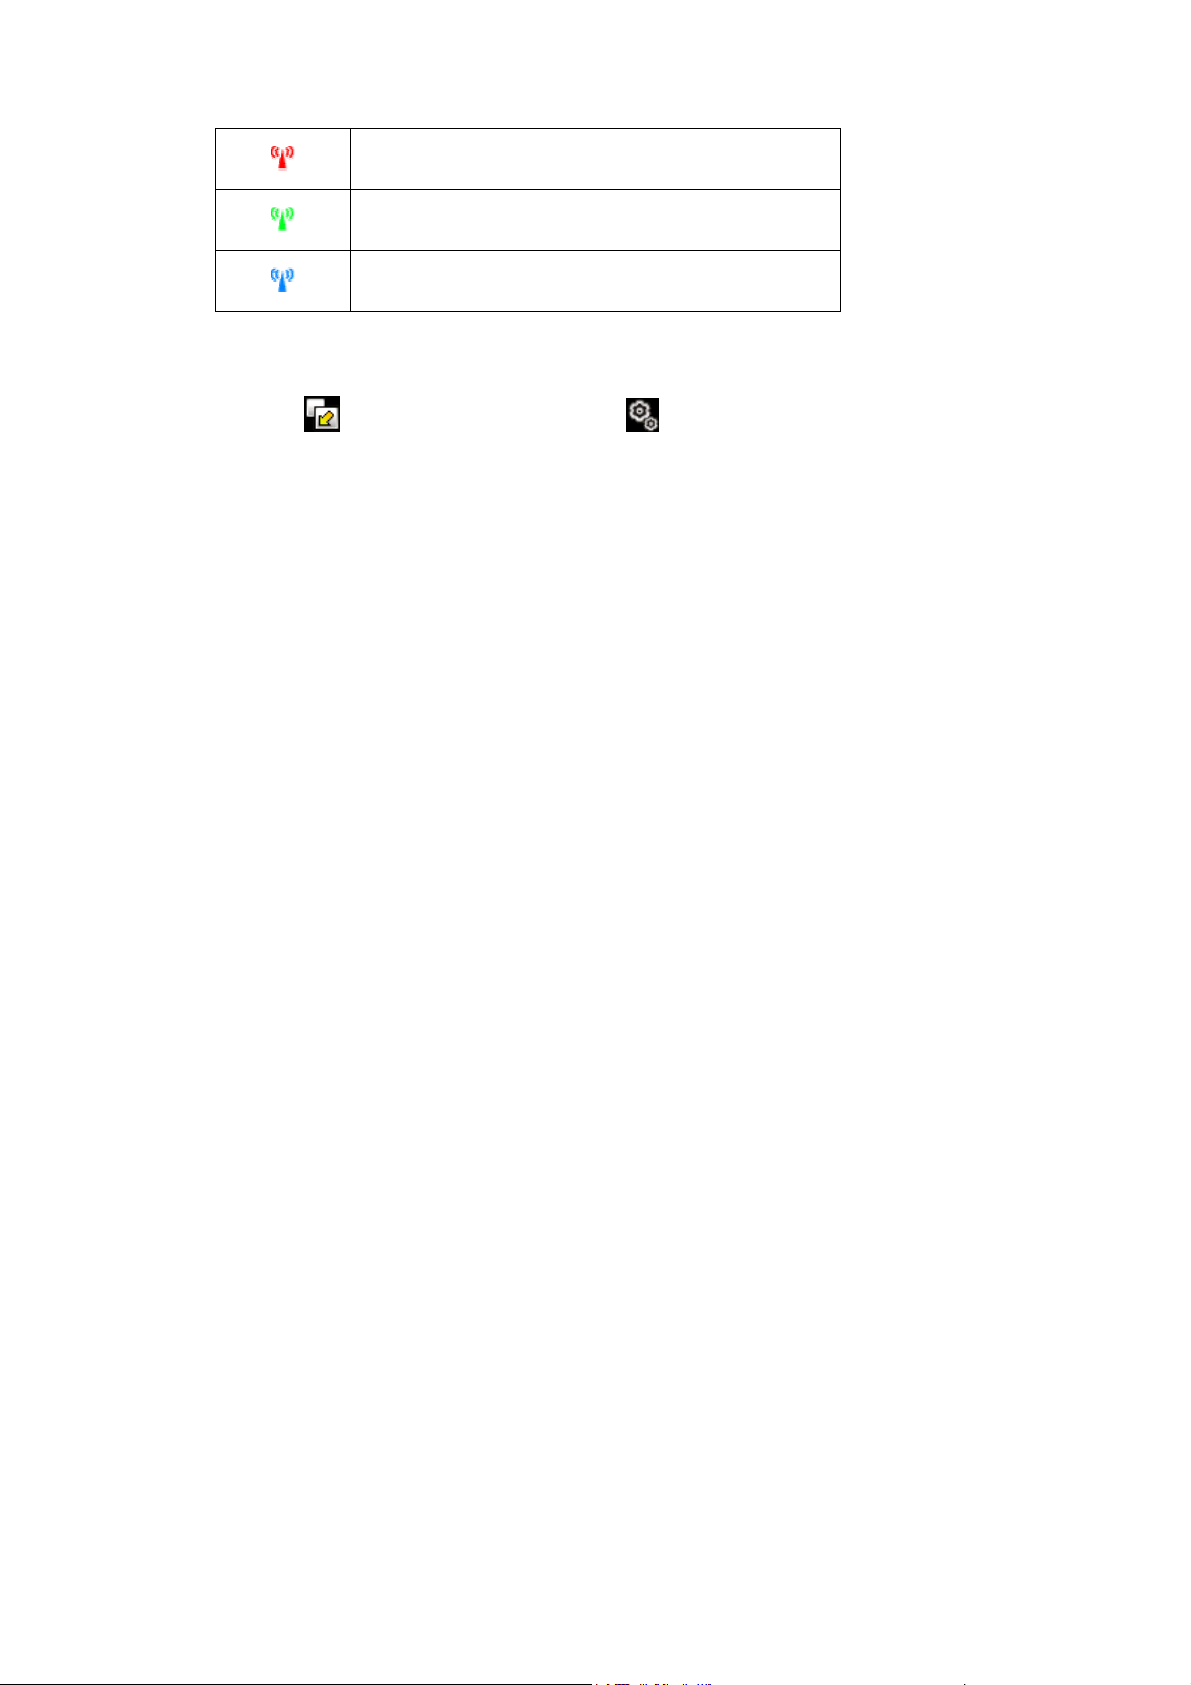
WLAN service enabled, but without WLAN connection
WLAN ready to serve
WLAN and VoIP service ready to serve
The idle screen of R2811 provides several views such as calendar ,clock,,shortcut
and none. Press
content of current view.
to select the view mode, and press to configure the display
1.7 Keypad usage
Keypad usage :
You can discard operations and return to idle screen by pressing “Home” key in most
cases except for some critical operations such as making phone call.
You can directly access application by 5-way joystick shortcut on idle screen:
1. Directly access pull-down menu by pressing 5-way joystick.
2. Directly access contacts by pushing 5-way joystick upward.
3. Directly access pull-down menu by pushing 5-way joystick downwards.
4. Directly access message by pushing 5-way joystick left.
5. Directly access call log by pushing 5-way joystick right.
6. Come up with dialing pad and input telephone numbers by pressing the number
key .
Operating on pull-down menu, you can:
1. Move up in menu item by pushing 5-way joystick upward.
2. Move down in menu item by pushing 5-way joystick downward.
3. Access options/submenus by pressing 5-way joystick
4. Return to idle screen at anywhere by pressing “HOME” key.
5. Return to upper level menus by pressing “Delete” key.
Screen lock/unlock key usage:
To prevent from pressing keyboard or screen uninentionally, press “Screen Lock”
key to lock keypad and touch screen. Press “Screen Lock” key again to unlock.
You cannot operate the mobile phone while the screen locked, Please press “Screen
lock” key to unlock mobile phone before further operations.
All application except MP3 player will quit to idle screen if the screen is locked,.
You need to unlock mobile before you can long press “Screen lock” key to power off
mobile
15

(Other special functions will be described in the later section)
1.8 Specification
Hardware:
GSM band: dual band( 900/1800mHz),support tri band
GPRS: Class 10
Built-in flash: 64MB
Built-in RAM: 64MB
Extended memory: T-Flash, maximum 2GB
Display screen: 2.2 inch, 240x320 pixels, TFT-LCD, 260 thousand colors
Touch screen
Camera: CMOS, 2 million pixels, maximum 4x digit zoom
Ring tone: Midi/MP3
Port: standard Mini USB port,support USB charging
Size: 106.5x48.5x16.5mm
Weight: about 100gramme(include standard battery)
Phone factor: Candy bar
Antenna: internal
Battery capacity: 1000mAH
Standby time: 75-130 hours (Vary with network state)
Talking time: 120-300 minutes (Vary with network state)
16

Software
Operating system: Linux
Language: English/French/German/Italian/Spanish
Input method: keypad, QWERTY soft keyboard
Symbol Input method:Soft keyboard
Digit camera: 4xdigit zoom, 2M pixels
Contacts book: Max. 1000 contacts
Support group and category management:maximum 50 groups,maximum 50 categories,
maximum 100 contacts in one group.
Support photo caller ID.
Support ring tone customization: ring tone customizable by individual contact or by
category
Max. Length of telephone number in contacts:32 digits
Max. Length of telephone number in dial pad:50 digit
Ring tone mute by single key press
Photo dialing (4groupsx9person/group)
Auto dialed phone number recall
Short Messages (SMS)
– Group sending:Max. 100 contacts
– Concatenated messages:10piecex140bytes/piece
Multi-Media Messages (MMS)
– Group sending:Max. 100 contacts
– Support picture/ring tone /text
– Max. Pages:20pages
STK
Calendar
Calculator
Memo
World clock
E-mail
Enable alarm clock in power-off mode
JAVA MIDP 2.0
17

Call log: 4x100 records
Browser: WAP 2.0&WWW
Encrypting privacy: Contacts/Messages/ gallery /calendar
Picture editing
Modem:CSD, GPRS
Automatic GSM operator profile selection by SIM card
Support flight mode
Scheduled power on/off
Emergency call without SIM card:Emergency call number112
Audio recording: AMR, maximum capacity 1 hour
Audio playback: MP3 / AMR / MIDI
Video recording: 3GP (H.263+AMR), QCIF
Video playback: 3GP (H.263+AMR), QCIF
MP4 (MPEG4+AAC), QCIF
MP4 (MPEG4+AAC), QVGA
Photo style: JPG, full color/sepia /black & white
- (240*240)
- (320*240)
- (480x480)
- (640x480)
- (1280*960)
- (1600*1200)
Picture format supported : JPG/GIF/GIFa/PNG
MP3 format supported
- 64K/128K/192K CBR
- VBR
- Dynamic display effect
2 Telephone
R2811 provides a lot of ways for dealing with telephone,which makes it at your greatest
convenience to dial or answer a phone call, do call diverting and do call waiting.
18
R2811 provides 400 records of call logs including 100 records of missed calls, 100
records of answered calls, 100 records of outgoing calls and records of rejected calls.
It is most worthy to mention about the super high capacity of contact book of R2811. It can
store 1000 items of contacts; each contact can present information such as mobile phone
number, home phone number, business phone number and so on. Furthermore, the photo
and ring tone can be set individually for each contact. Contacts can be sorted by groups or
categories for easy management.
Note: Above capacity is the recommended upper limit. The large capacity will affect the
use performance to some extent.
2.1 Telephone functions
You can only dial emergency
call number 112 without SIM
Caution
2.1.1 Dialing
card inserted.
R2811 provides vary of manners for dialing. You can dial directly by clicking dial pad on
touch screen, inputting phone number by keypad, dialing out fr om contacts book, photo
dial or call log.
Press
Tips
1. Press desktop wallpaper area on idle screen to dial pad.
key to return to idle screen
19
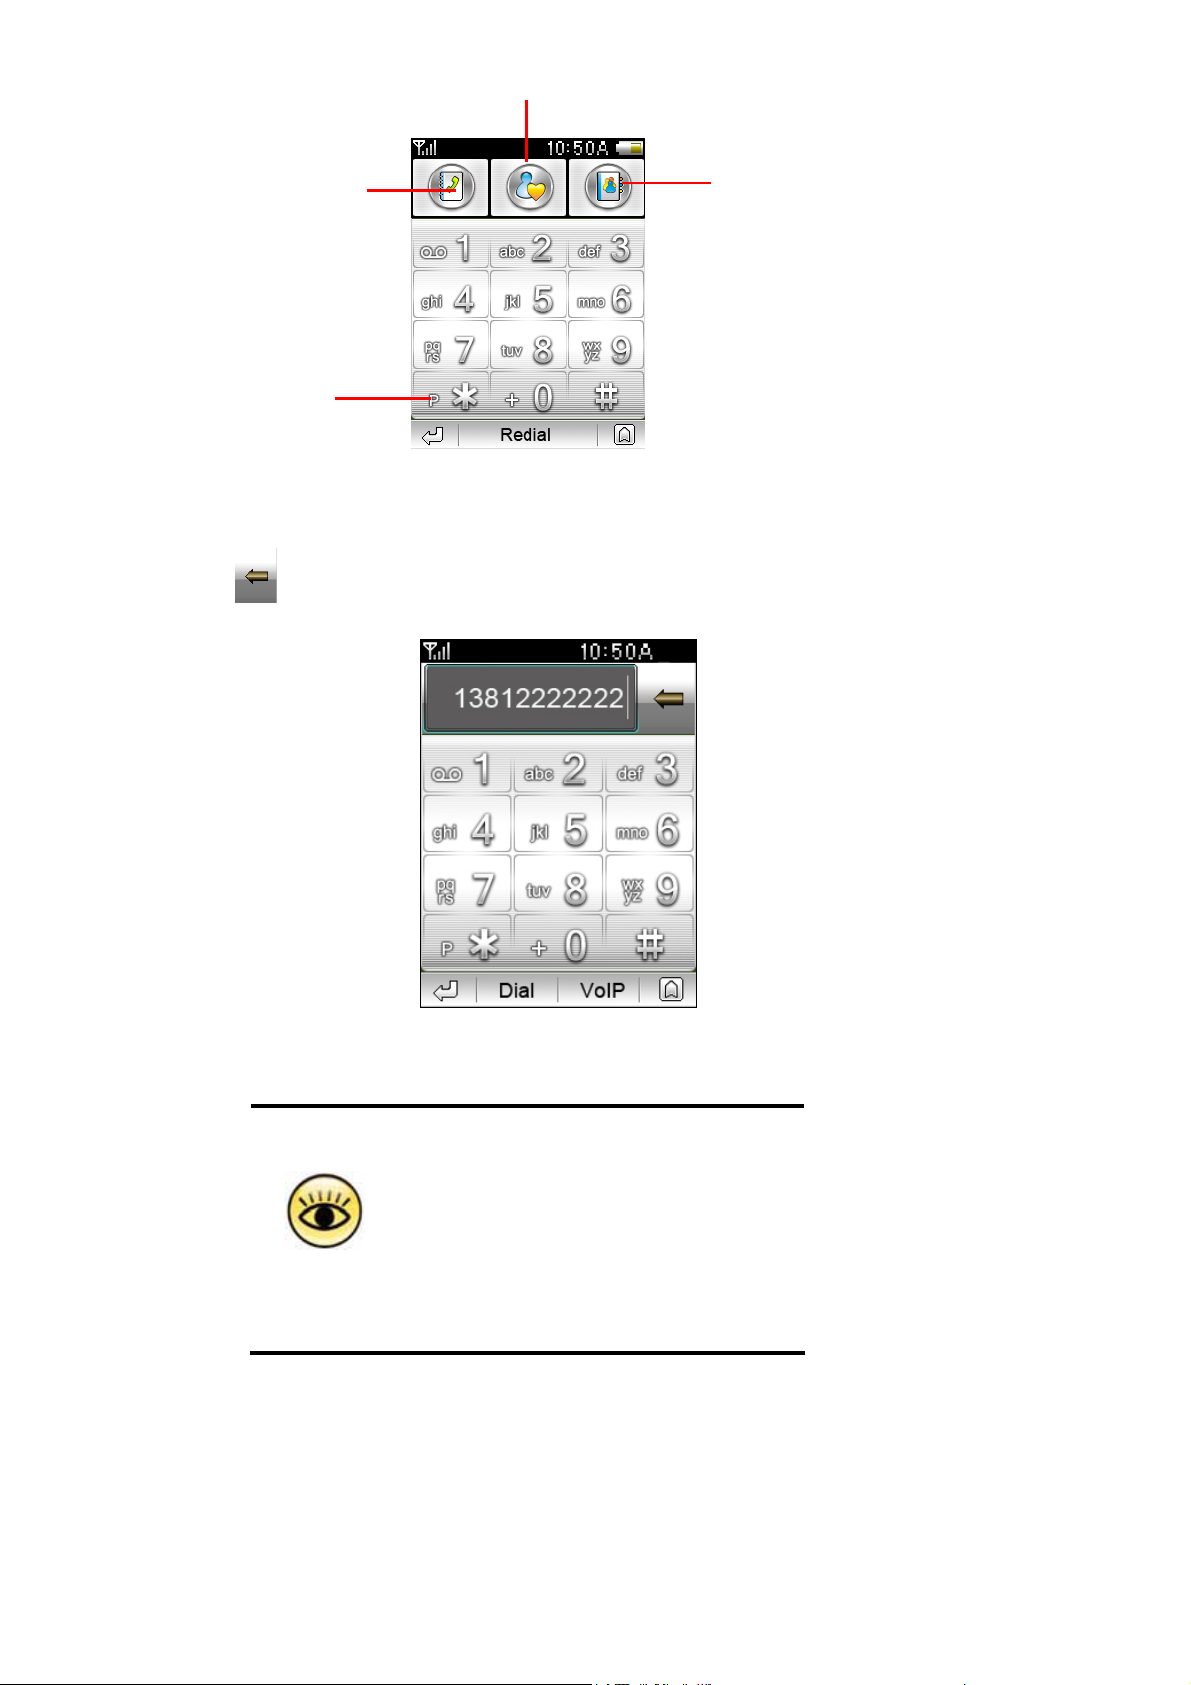
Photo Dial
ContactsCall log
Long click this key to
insert “p” which
followed by extension
number
(1)
2. Press number key to input the phone number which will be displayed in the number box.
Press
to delete a digit before cursor.
(2)
R2811 provides unique intelligent auto fill-up
function to help call the dialed number quickly.
When the first several digits are matched with
that dialed, the mobile phone will make up the
rest digits automatically. If the filled result is not
Tips
what you want, you can just continue to input
the rest digits and the auto filled digits will
disappear.
20
3. Click【Dial】button to dial the phone number shown in phone number box. If the number
matches with that in contact book, the corresponding name, photo and phone number
will be displaye d. Otherwise, the phone number with default picture will be displayed.
(3)
Press to dial extension or input digits (for example, input you account or password)
Press
Press
Press
Press【VOIP】 to make VOIP call. (Please refer to section 8.6 WLAN & VOIP settings to
configure your VOIP settings).
4. You can also input telephone number by keypad and dial out by “send” key.
5. Press【End】on screen or press “End” key to end the call
to switch mute.
to hold current call (need operator service)
to do third party call and conference call (need operator service)..
2.1.2 Photo dial
Click at dial pad to access photo dial.
21
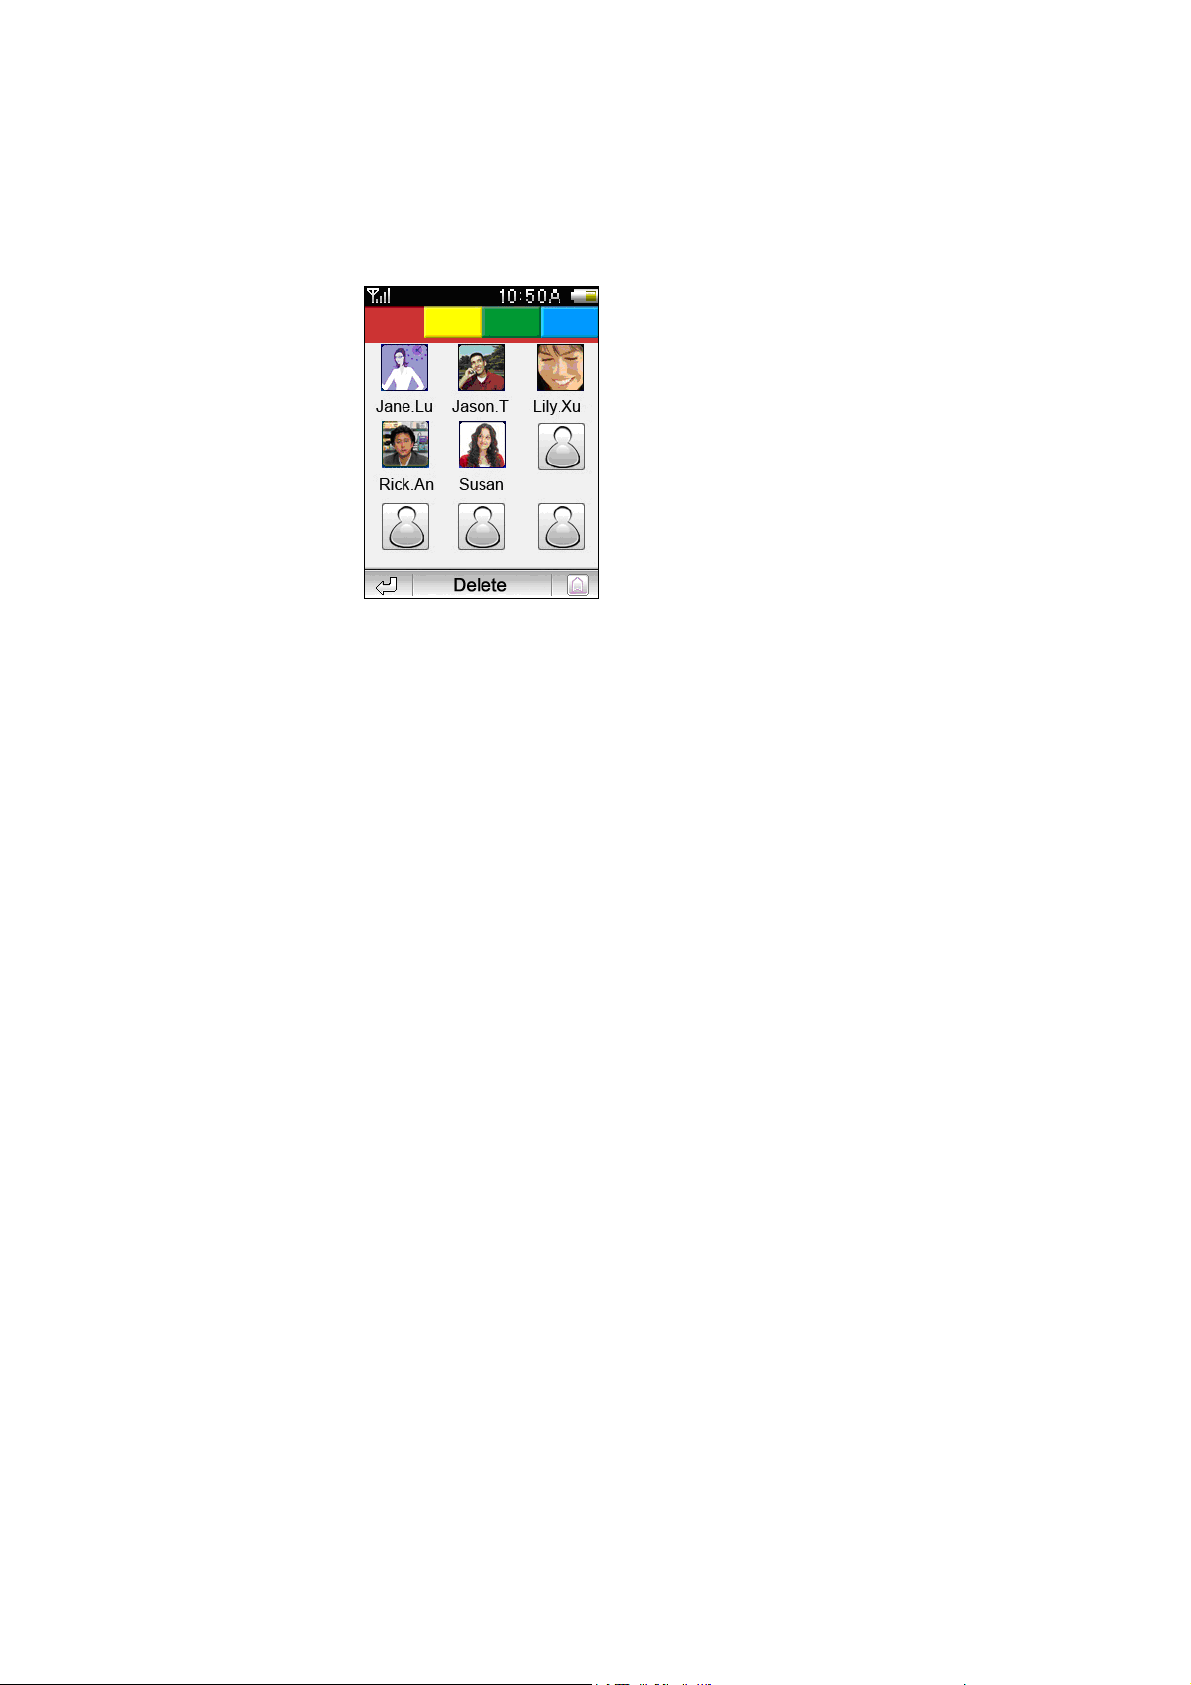
Photo dial makes the phone dialing easier and more directly. You can simply press the
photo of the contact to dial corresponding phone. It is easy to set up photo dial. Press
Blank to select a contact person from the Phonebook. A zoomed photo of the selected
contact will appear after the photo dial is set up. If th e contact not includes a photo, a
default picture is displayed.
(4)
If replacement required, press 【Delete】 to delete this person contact, and then press
Blank to set it again.
In order to facilitate the contact searching, there’re four groups of photo dial contacts,
which is different in background color. Each group contains 9 photo dial contacts.
2.1.3 Quick dial numbers in SIM card
Y ou can dial the number stored in SIM card by storage index on dial pad. Input the storage
index of the contact of your SIM card and then click “#” button, the corr esponding phone
number will be shown in the number box. Click【Dial】button to dial out.
2.1.4 Answer Call
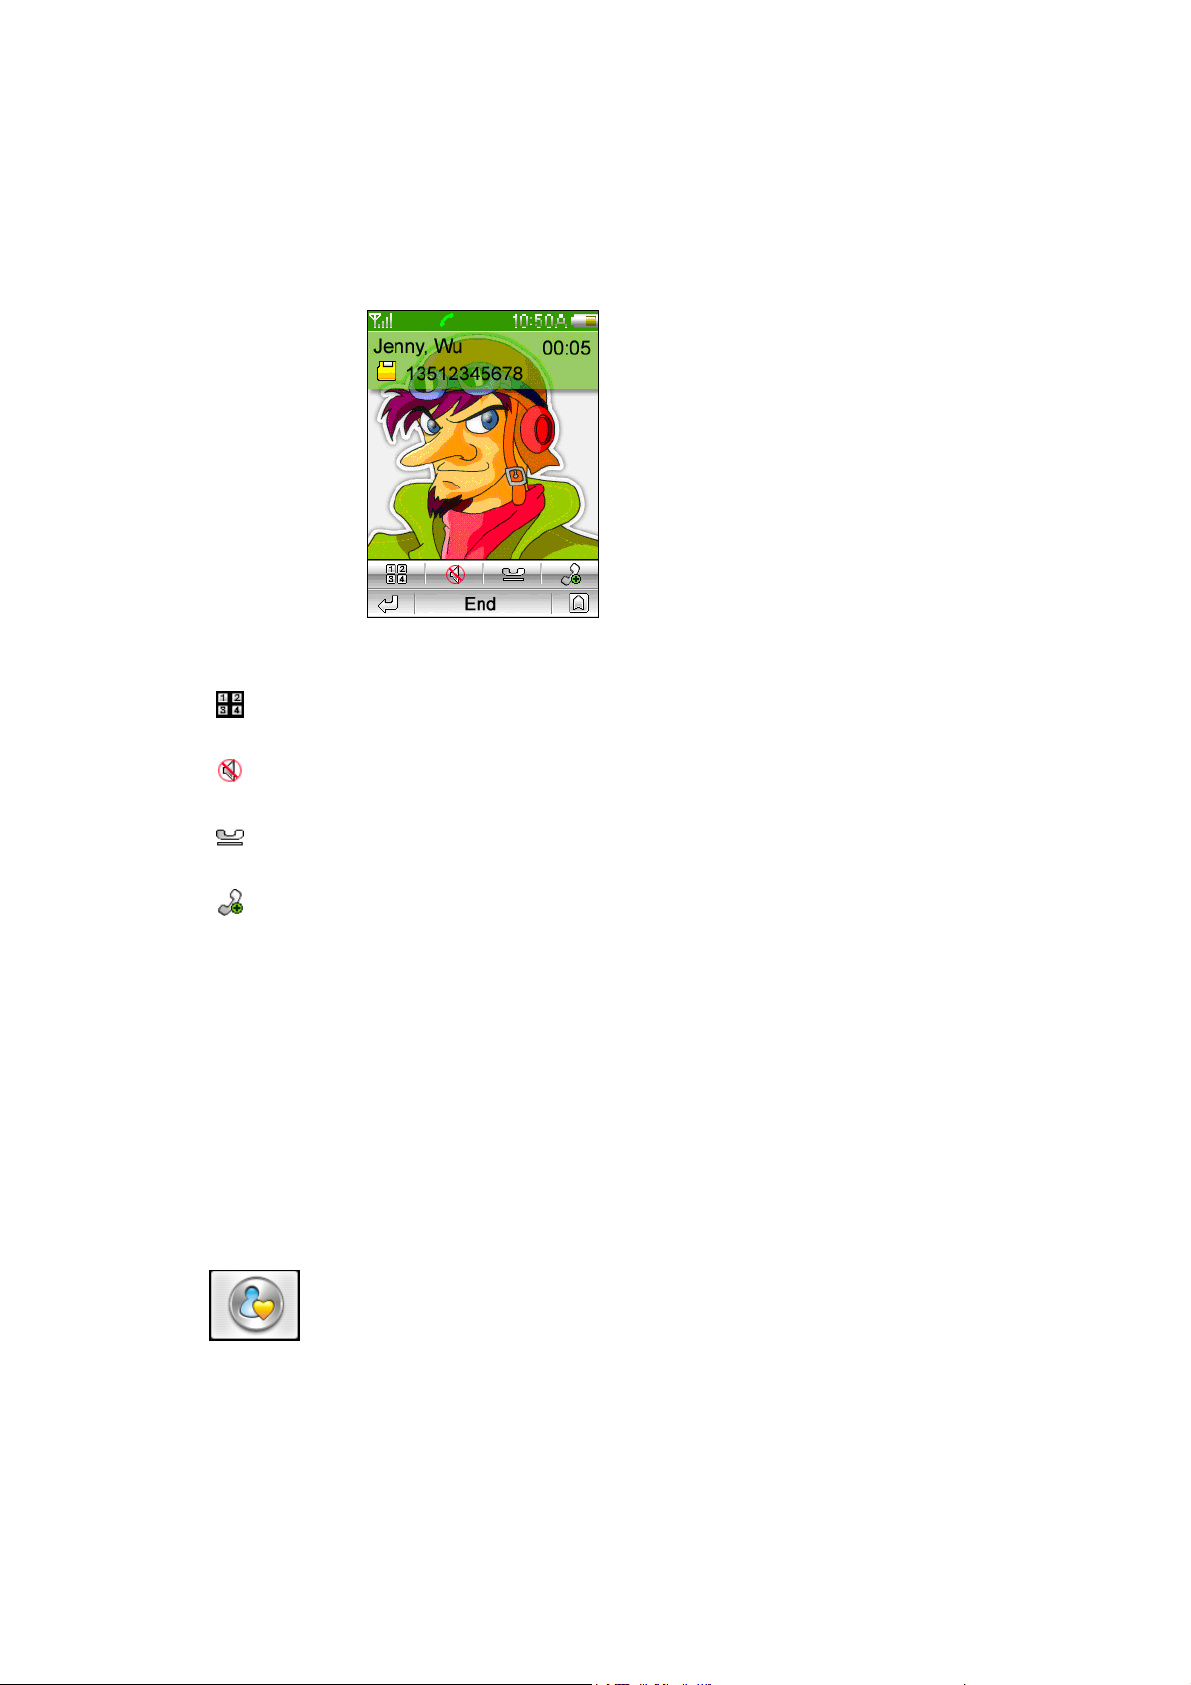
Caller ID will be matched during an incoming call. The name and photo will be displayed if
caller ID matches any contact. Otherwise, only caller ID and default photo will be
displayed. You can answer or reject call, or set phone busy.
22
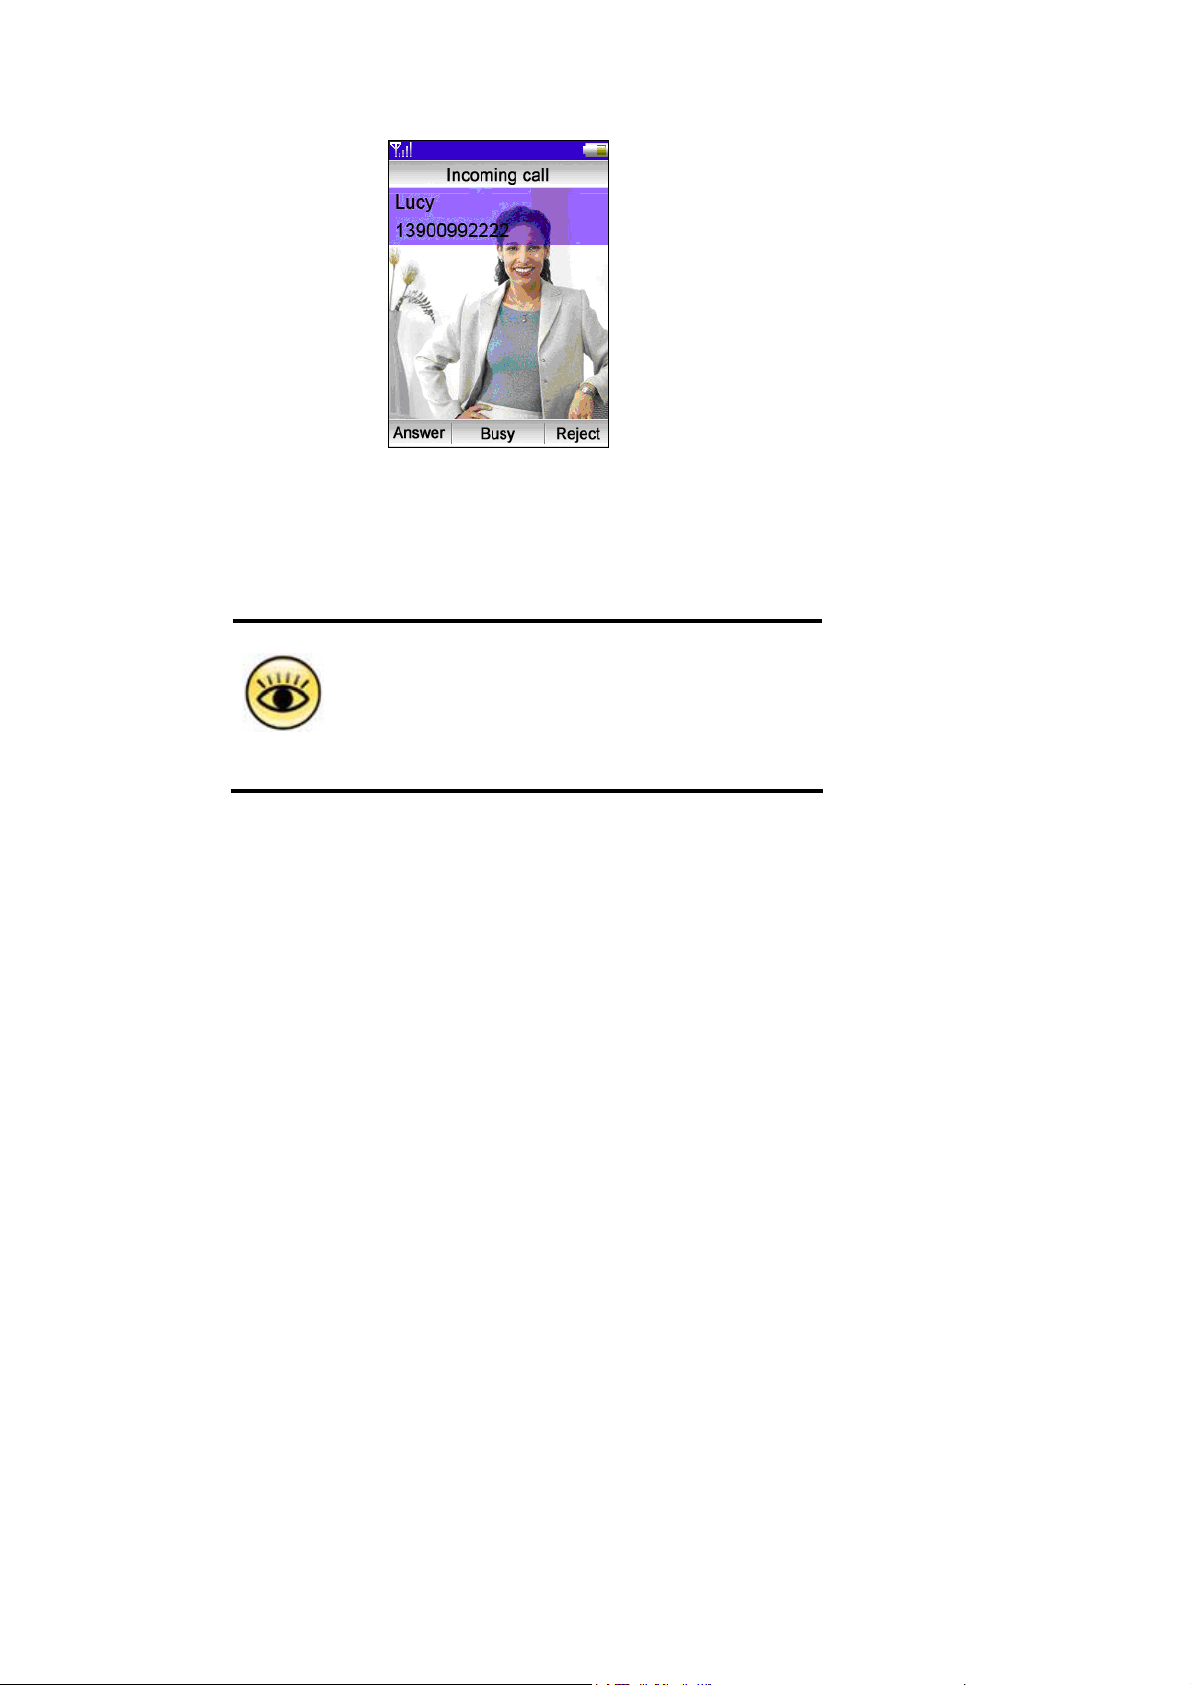
(5)
keypad usage:
1. Press “Send” key to answer call.
2. Press “End” key to reject call.
You can return to idle screen to access contact and
message while on a phone call.
While phone call screen is hiding backgr ound, it can be
brought to front again by pressing “Phone” icon in
Tips
shortcut view mode or by pressing wallpaper in other
view modes.
2.2 Contacts
R2811 provides contact book with super high capacity. Each contact is a big social
database which contains name, mobile phone number, home phone number, business
phone number, FAX number, address, birthday, etc.
R2811 contact book can be managed by groups and categories. Contacts can be sorted
into categories such as family, friends, colleague, etc. And you can define groups as
well.
R2811 contacts book also provides custom function to set the phone for the contact
person, which will be displayed as the caller ID on incoming call. What’s more, each
contact can be specified to use the unique ring tone.
23
 Loading...