

Page 1
INSTALLATION AND OPERATING INSTRUCTIONS
2006/03
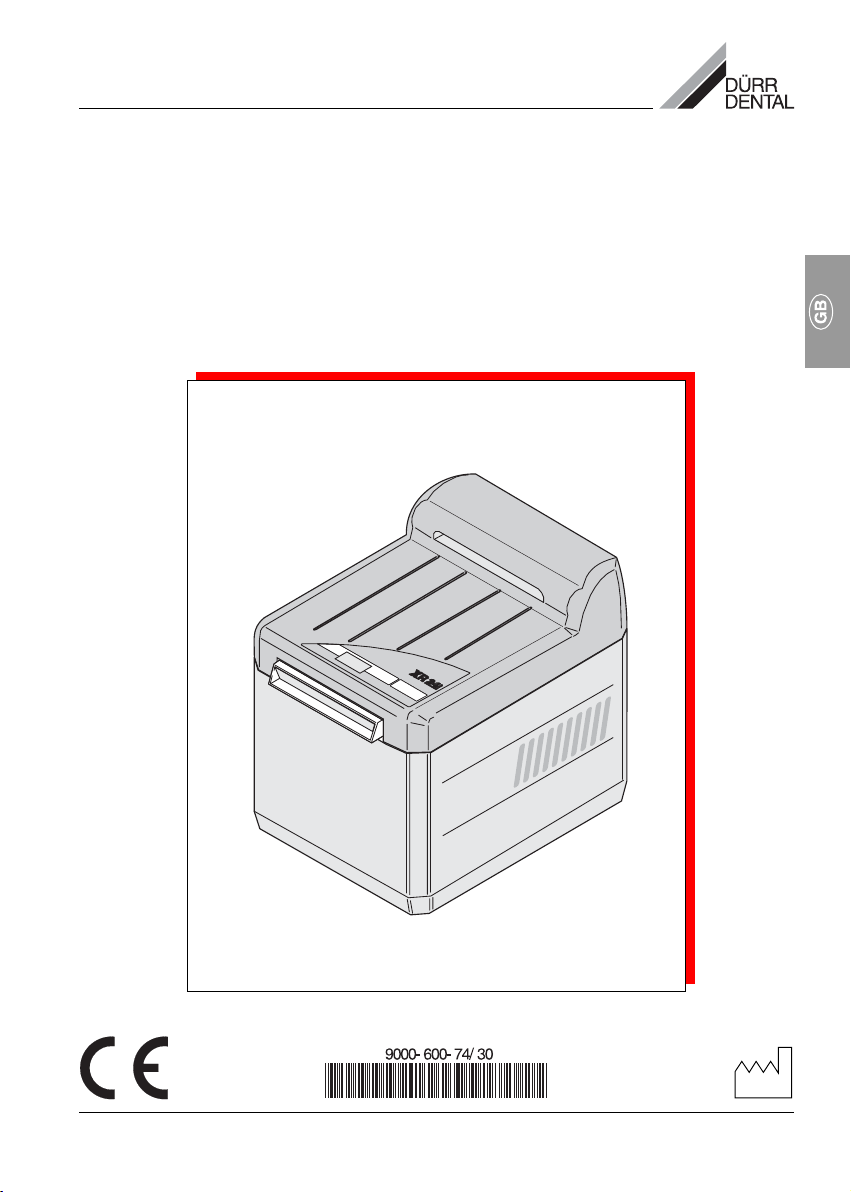
DÜRR XR 24 PRO
X-RAY FILM DEVELOPING APPLIANCE
Page 2

2
Page 3

CONTENT
Important information
1. Instructions ............................................. 4
1.1 EU - Labelling ................................... 4
1.2 Guidelines .........................................4
1.3 General Instructions ......................... 4
1.4 General Safety Instructions.............. 4
1.5 Use of additional apparatus ............5
1.6 Use of orthocromatic (green-
sensitive) films ..................................5
1.7 Safety instructions for electric power
protection .......................................... 5
1.8 Warning instructions and symbols .. 6
2. Product information .............................. 6
2.1 Use in accordance
with regulations ................................. 6
2.2 Use not in accordance
with regulations ................................. 6
2.3 Product information ..........................6
3. Extent of Supply ..................................... 7
3.1 Special accessories ......................... 7
3.2 Consumables.................................... 7
4. Technical data......................................... 7
5. Functional principle XR 24 PRO ..........8
6. Functional description of the
XR 24 PRO ...............................................9
6.1 Arrangement of plates ......................9
Mounting and assembly
7. Setting up ..............................................10
7.1 Area in which machine
is to be set up .................................10
7.2 How to set up machine ................... 11
7.3 Setting up the machine ................... 11
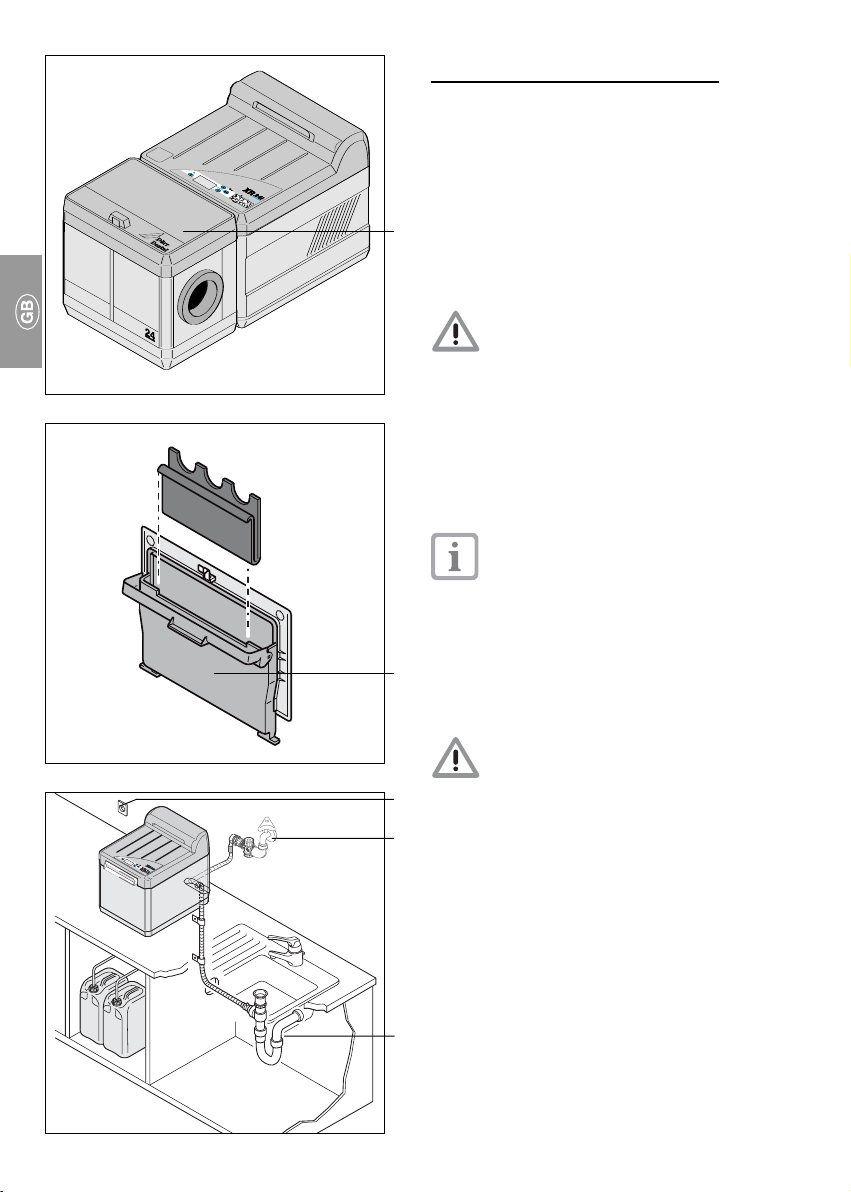
8. Installation ............................................ 12
8.1 Mains water supply ........................12
8.2 Wastewater connection .................. 12
8.3 Connection for developer and
Fixer outflow pipe ............................ 13
9. Before operating machine
for first time ..........................................14
9.1 Cleaning the machine ..................... 14
10. Power point (mains) ............................15
11. Circuit diagram ..................................... 16
12. First time operation .............................18
12.1Settings / Servicing work for
technician ........................................ 19
12.2Checking developer temperature and
carrying out acceptance test ......... 20
13. Transporting the machine ..................21
13.1 Removing the outflow pipes ...........21
13.2 Protection against damage ............21
Usage
14. Operation ............................................... 22
14.1 Procedure to be followed every
morning or before beginning work 23
14.2 Procedure to be followed every
evening or after finishing work .......24
14.3 Every week ..................................... 24
14.4 Every 4 weeks ................................24
14.5 1x a year ......................................... 24
14.6 When practice is closed ................. 24
14.7 List of reccomended films for Dürr
XR 24 PRO developing machine. ..25
15. Maintenance .......................................... 26
Troubleshooting
16. Tips for the user.................................... 32
17. Tips for Technicians .............................34
18. Troubleshooting tips........................... 35
18.1 Before beginning work ................... 35
18.2 Removing front covering ................35
18.3 Removing rear covering ................. 35
18.4 Removing lateral coverings ............ 35
18.5 After work has ended ..................... 35
18.6 Plan for carrying out service work . 36
18.7 Changing the display .....................38
18.8 Checking appliance fuses ............. 38
18.9 Replacing flow heating unit with
PTC sensor .....................................39
18.10 Checking the water valve ............39
18.11 Replacing the water valve ........... 39
18.12 Cleaning the water level sensor ..40
18.13 Changing the light barrier ............ 40
Disposal
19. Disposing of unit ................................. 40
3
Page 4

IMPORTANT INFORMATION
1. INSTRUCTIONS
1.1 EU - Labelling
The product carries EU labelling in
accordance with the Council’s guideline on
medicinal products (EU 93/42) and complies
with the basic requirements contained in
appendix 1 of this guideline.
1.2 Guidelines
• The requirement for electromagnetic
capability related to electric medical
appliances has been complied with.
1.3 General Instructions
• The instructions for mounting and using the
appliance are an integral part of the
machine. They must always be stored
close to the machine. These instructions
must be strictly complied with so that the
machine can be used and correctly
operated in accordance with the relevant
regulations. New employees must be
acquainted with the instructions for
mounting and using the machine
• So that the machine may be operated safely
and in a trouble-free manner, original parts
must be used. In addition, only
accessories mentioned in the technical
documentation or expressly released by
Dürr Dental for this purpose may be used.
• No warranty claims shall be made for
damage caused by the use of accessories
or consumables manufactured by external
companies. Dürr Dental can give no
warranty for the safe operating and
functioning of the machine.
• With regard to safety, reliability and
functionality, Dürr Dental shall only be
responsible if the machine has been
mounted, assembled, altered, enlarged or
repaired by Dürr Dental or by a specialist
authorised by Dürr Dental, and if the
machine was used and operated in
accordance with the instructions for
mounting and use.
• The XR 24 PRO developing appliance fulfils
the basic norms on safety and technology.
All rights of protection are reserved for the
circuits, procedures, names, software
programs and appliances mentioned in the
documentation.
• The technical documentation, or parts
thereof, may only be reprinted with the prior
written permission of Dürr Dental.
1.4 General Safety Instructions
The appliance was developed and designed
in such a way that dangers associated with
use in accordance with the relevant
regulations are largely ruled out. However,
we are obliged to list the following safety
measures so that residual dangers can also
be ruled out..
• When the machine is being operated, the
laws and regulations applying in the place
of use must be complied with. It is illegal to
reconstruct or alter the machine in any way;
contravention of this regulation shall lead to
expiry of the permit. If an altered machine
is operated, the operator shall be liable to
prosecution. When the machine is being
operated, the laws and regulations applying
in the place of use must be complied with.
It is illegal to reconstruct or alter the
machine in any way; contravention of this
regulation shall lead to expiry of the permit.
If an altered machine is operated, the
operator shall be liable to prosecution.
• The original packaging must be stored in
case the appliance has to be returned. The
packaging must be kept out of the reach of
children. Only the original packaging can
guarantee that the machine is protected in
the optimum manner while it is being
transported. If the machine has to be
returned during the warranty term, then Dürr
Dental shall not be liable for any damage
which occurred as a result of faulty
packaging while the machine was being
transported.
• The machine complies with the relevant EU
guidelines and may only be used by
qualified persons who are capable of
operating it in the appropriate manner.
4
Page 5

• Before using the machine, the user must
always check its functional safety and that
it is in proper condition..
• The user must be familiar with the
operating instructions for the machine.
• The machine must not be operated in
medical rooms where explosions are likely
to occur. Explosions may occur in areas
where combustible anaesthetics, skin
cleaning agents, oxygen and skin
disinfectants are used. The machine is not
suitable for operation in a combustible
atmosphere.
1.5 Use of additional apparatus
• Machines may only be used together or with
parts from other systems if a guarantee
exists that the safety of the patient, the user
and the surrounding area is not adversely
affected by his or her doing so. If the user
is unable to tell from the available technical
data whether or not safety is adversely
affected by coupling machines or using
parts from other systems, he or she must
enquire of the manufacturer or a suitably
qualified person in this regard..
1.6 Use of orthocromatic (green-
sensitive) films
To prevent incorrect exposure, the luminous
power of the darkroom light must be reduced
when green-sensitive films are being used.
A qualified technician must carry out the
necessary work in all such cases..
1.7 Safety instructions for electric power protection
• The developing machine may only be
connected to an earthed plug which has
been properly installed.
• Before the machine is connected an
inspection must be made to ensure that the
mains voltage and mains frequency
indicated on the appliance match the
values for the supply network.
• No extension leads may be used for
feeding the current.
• Before it is operated for the first time, the
machine and its leads must be checked to
ensure that they are not damaged in any
way. Damaged leads, plugs and sockets
must be replaced immediately..
• The machine may only be operated, i.e.,
connected to the mains, when sealed
(coverings must be attached and lid put
on).
• In accordance with IEC 601, the machine
should not be operated when patients are
present.
5
Page 6
1.8 Warning instructions and symbols
The following designations and symbols are
used for particularly important information in
the instructions for mounting and usage:
Information, requirements and
prohibitions on preventing personal
injury and extensive damage to
propert.
Warning about dangerous electrical
voltage
Special information concerning the
economic and profitable use of the
appliance, and other instructions.
EU labelling without Notified Body
Number
Comply with instructions for mounting
and usage
Mains button on / off
/ Select parameters
Confirm selection tigen
2. PRODUCT INFORMATION
2.1 Use in accordance with regulations
The Dürr XR 24 PRO X-ray developing
machine is to be used exclusively for the
automatic development of extra-oral and
intra-oral X-ray films in accordance with Dürr’s
recommended list of films.
Use in accordance with the regulations
includes compliance with the instructions for
mounting and usage as well as compliance
with the provisions on setting up, installing
and operating the machine, and on warranty.
Use in accordance with the regulations also
includes compliance with all legal provisions
in force in the place where the machine is
being used, with regard to work safety and
the disposal of chemicals.
2.2 Use not in accordance with regulations
If the machine is used for a purpose other
than the one stated in the regulations, the
manufacturer shall not be legally liable for any
damage arising as a result of same. In such
cases, the user shall incur the risk.
Switch on mains button
Switch off mains button
Open bibcock - every morning
Close bibcock - every evening
28 x 24 h
Change chemicals every 4 weeks
Allow chemicals to drain off
Clean machine
6
2.3 Product information
The exposed film passes through different
zones within the Dürr XR 24 PRO X-ray
developing machine: the developing, fixing,
rinsing and drying zones.
When the machine has been switched on, the
developing bath and the fixing bath are
heated to the set bath temperature (e.g.
28°C) at a rate of 0.5°C/min. The machine is
then ready to be operated. It starts operating
automatically when a film is slid inside. The
film is transported through the machine. As
soon as the message “MACHINE LOADED”
stops flashing on the display, another film can
be introduced, or up to 6 intra-oral films, can
be introduced together. When the film has
passed through the whole of the machine, it
switches automatically to stand-by.
Page 7

3. EXTENT OF SUPPLY
4. TECHNICAL DATA
XR 24 PRO X-ray developing machine
Model 1700-08
Model 1700-09 (100-110 V ~, 50-60 Hz)
Accessories, complete1700-001-00
(230 V ~, 50-60 Hz)
3.1 Special accessories
The following parts are not part of the extent
of supply.
They should be ordered if required!
XR-Cleaning Set for cleaning rack,
Content:
1 x cleaning tray,
2 x universal cleaner,
2 x sponges 1700-007-00
Cleaning films DÜRR clear100 1410-007-00
Water hose with Aqua-Stop 1330-001-51
Replenishing unit (230 V) 1700-820-00
Collecting tray, 20 litres
for developer 1416-021-00
Collecting tray, 20 litres
for fixer 1416-011-00
DL 24 daylight attachment
with filtering disc 1700-910-00
suitable for following film sizes:
2 x 3 cm up to max. 15 x 30 cm
DL 26 daylight attachment 1700-920-00
suitable for current film sizes
up to max. 24 x 30 cm
DA 24 darkroom attachment 1700-930-00
suitable for following film sizes:
2 x 3 cm up to max. 24 x 30 cm
suitable for following film sizes:
for model 1700-08, 230 V
T 6,3A 9000-115-25
for model 1700-09,110 V
T 10A 9000-115-50
(110 V) 1700-830-00
3.2 Consumables
DÜRR-AUTOMAT XR
Developer and fixer concentrate
for 2 applications CXB140C99..
Universal cleaner for cleaning
roller packets, two packets CCB600C55..
WR 2000, Spray Cleaner for
carrier rolls, six packets CCB800C55..
XR 24 PRO X-ray developing machine
Model 1700-08 (230 V)
Model 1700-09 (110 V)
Model 1700-08 1700-09
Voltage (V) 230 100-110
Frequency (Hz) 50-60 50-60
Power consumption (A) 4,0 9,2
Fuse (A) T 6,3 T 10
Heating capacity (W) 950
Heizleistung
Bath heating (W) 400
Drying (W) 450
Normal heating time (min) approx.20(0,5°C/min)
Time it takes film
to pass through (min)
normal 2:45 - 20
Bath circulation (l/min)
Developer approx. 1,8
Fixer approx. 2,0
Water through-flow (l/min) 2
Water pressure (bar)
min. water pressure 2
max. water pressure 6
Tank volume (l) both 5
Developer, Fixer
Temperature range
Environmental conditions
for machine in operation +10 to +28 °C
Optimal photo quality up to max. +28 °C
Storage and transport -10 to +60 °C
Air humidity
Machine in operation max. 80 %
Storage and transport max. 95 %
Dimensions T=51 cm, B=42 cm, H=44 cm
Weight 25 kg
Protection category IP20
Class of protection I
Overvoltage category II
Certificate-
of conformity EU-Labelling
7
Page 8
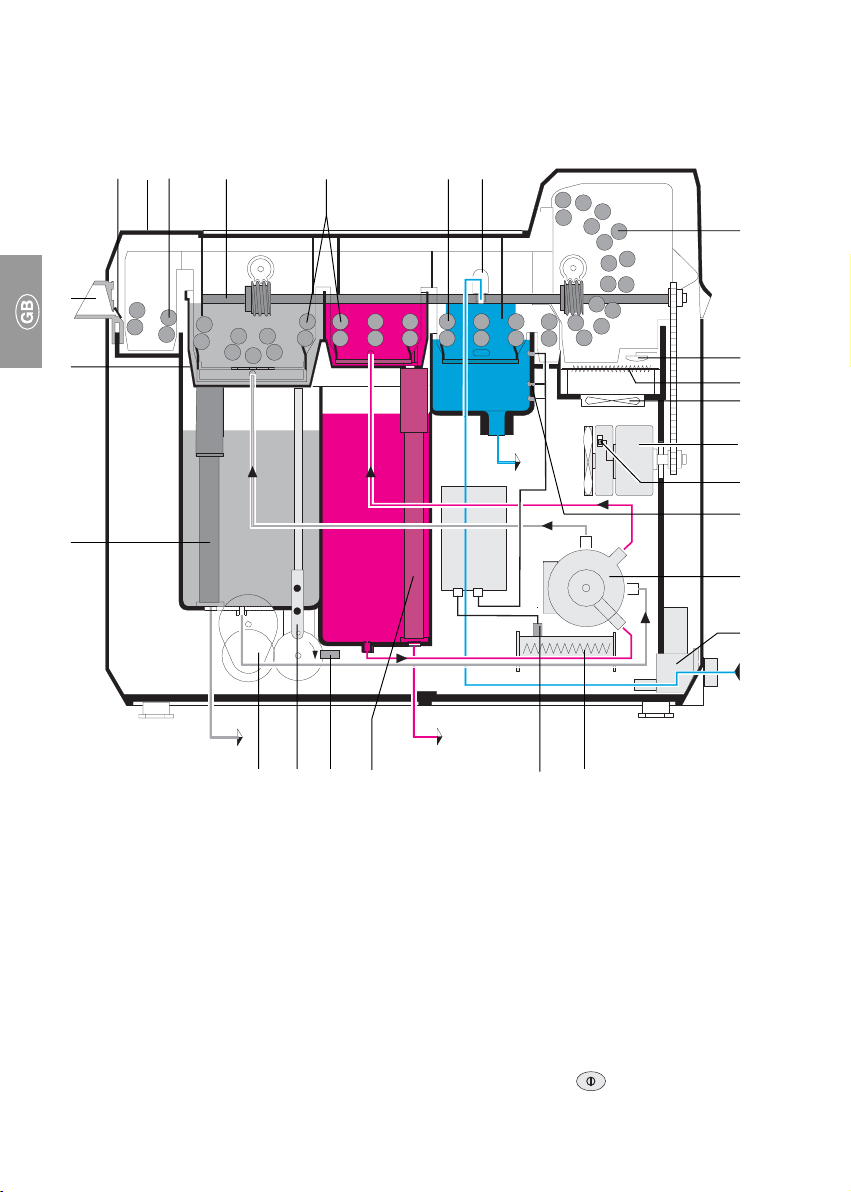
5. FUNCTIONAL PRINCIPLE XR 24 PRO
2A3 4 5 6 7
1
Stand By Position
8
22
DD
D
DD
21
20 19 19a 18 17 16
1 Film inlet
2 Start flap
3 Roller packet, film inlet
4 Drive shaft
5 Roller set, developer/fixer (D/F)
6 Roller set, water
7 Water inlet
8 Rollen set, drier
9 Safety switch for drier
10 Drier heater
11 Ventilator
12 Drive motor
12a Tachometer generator
13 Level sensors (for water)
14
Circulation pump (f. developer and fixer)
FF
F
FF
WW
W
WW
15 Water valve
16 Continuous heater
17 PTC-sensor
18 Overflow pipe with discharge plug (fixer)
19 Lifting rod
19a Light barrier, lifting tank
20 Lifting motor
21 Overflow plug (developer)
22 Lifting tray
D Developing bath
F Fixing bath
W Water bath
A Mains button on display
9
10
11
12
12a
13
14
15
8
Page 9
6. FUNCTIONAL DESCRIPTION
OF THE XR 24 PRO
When the mains button
(min. 2 sec.)
heating-up phase for the developing bath and
the fixing bath begins. The time remaining
until the correct temperature is reached is
displayed in the following manner: “WAITING
TIME… MIN” (display flashes). The machine
does not start at this point.
The bath begins to rotate when it is being
heated up.
place, the chemicals are pumped from the
developing tank and the fixing tank (volume of
5 litres for each tank) into the lifting tray (22)
via the circulation pump (14).
When the set temperature is reached, the
display lights up. The “MACHINE EMPTY”
message appears, indicating that the
machine is now ready to be operated.
As soon as the set temperature falls below
more than 0.5°C, the continuous heater and
the circulation pump (14) are switched on
again.
When a film is slid into the machine, the
start flap (2) opens and the “MACHINE
EMPTY” message flashes on the display
At the same time, a signal for lowering the
lifting tray (22) is triggered and the water
valve (15) opens. The drier heating unit (10),
drive motor (12) and circulating pump (14)
(for rotating the developing bath and the
fixing bath) start up.
The time it takes the film to pass through
the machine is controlled by a tachometer
generator (12a). The lifting tank’s rising and
falling movements are controlled by the disc’s
and the light barrier’s (19a) rotational speed.
,,
, the display is illuminated. The
,,
While this process is taking
is pressed
Should the outflow pipe be blocked, a signal
is sounded via a level sensor (13). The
water valve (15) closes and no more water is
fed into the machine.
When the film has been slid into the
machine, the start flap (2) closes. As soon as
the message “MACHINE LOADED” flashing
on the display goes out, another film can be
introduced, or up to 6 intra-oral films, can be
introduced together.
If no other film is slid into the machine when a
particular film has passed through it (this is
signalled by a sound) the lifting tray (22)
moves upwards (to stand-by position),
indicating that the machine is now empty.
The drive motor (12), water valve (15) and
drier heater (10) are switched off. When the
machine is in stand-by position, the
developer’s and fixer’s roller packets are
completely immersed in the chemicals. This
prevents deposits from forming on the rollers.
6.1 Arrangement of plates
23 A Operating part
23 B Control part
23 C Power part
23 A
When the lifting tray (22) is lowered, the film
is carried between the rolls through the
developing bath and the fixer bath, as well as
through the rinsing and drying zones (8)
within the time set for same.
While the film is being developed, water is fed
into the rinsing zone via water inlet (7).
The water is discharged via the outflow pipe.
Water flows through continuously at a rate of
2 l/min., with water pressure of 2 bar.
23 B 23 C
9
Page 10
MOUNTING AND ASSEMBLY
7. SETTING UP
7.1 Area in which machine is to be set up
• The XR 24 PRO developing machine should
only be set up in a dry, well-aired room.
24
• In winter, the room temperature should not
fall below +10°C; in summer it should not
rise above +28°C.
Danger. The appliance should not
be directly exposed to the sun’s
rays. There is a danger that the
1
25
2
26
27
chemicals may overheat or that the
films might be pre-exposed.
• The room in which the machine is being set
up must contain a R3/4” bibcock (27) with a
ventilation pipe, an outflow pipe (28) with a
ventilated plastic trap, and an earthed plug
(26). Ideally, a washbasin should also be
situated close to the machine.
The operating staff must have easy
access to the bibcock (27) and the
earthed plug (26)..
• We recommend that the XR 24 PRO be set
up in a darkroom. If the machine is
up in a darkroom, a daylight attachment
(24) (DL24 or DL26) must be fixed to it.
• The following should be taken into
consideration if the machine is being used
with a daylight attachmentwith a daylight attachment
with a daylight attachment:
with a daylight attachmentwith a daylight attachment
Danger. Films should never be
stored in the vicinity of an X-ray
room
Danger. When films are stored in
the daylight attachment’s film
storage part (25), there is a danger
that pre-exposure can occur due to
stray radiation in the appliance.
If necessary, a partition with a lead screen
may be inserted.
notnot
not set
notnot
10
28
3
Page 11
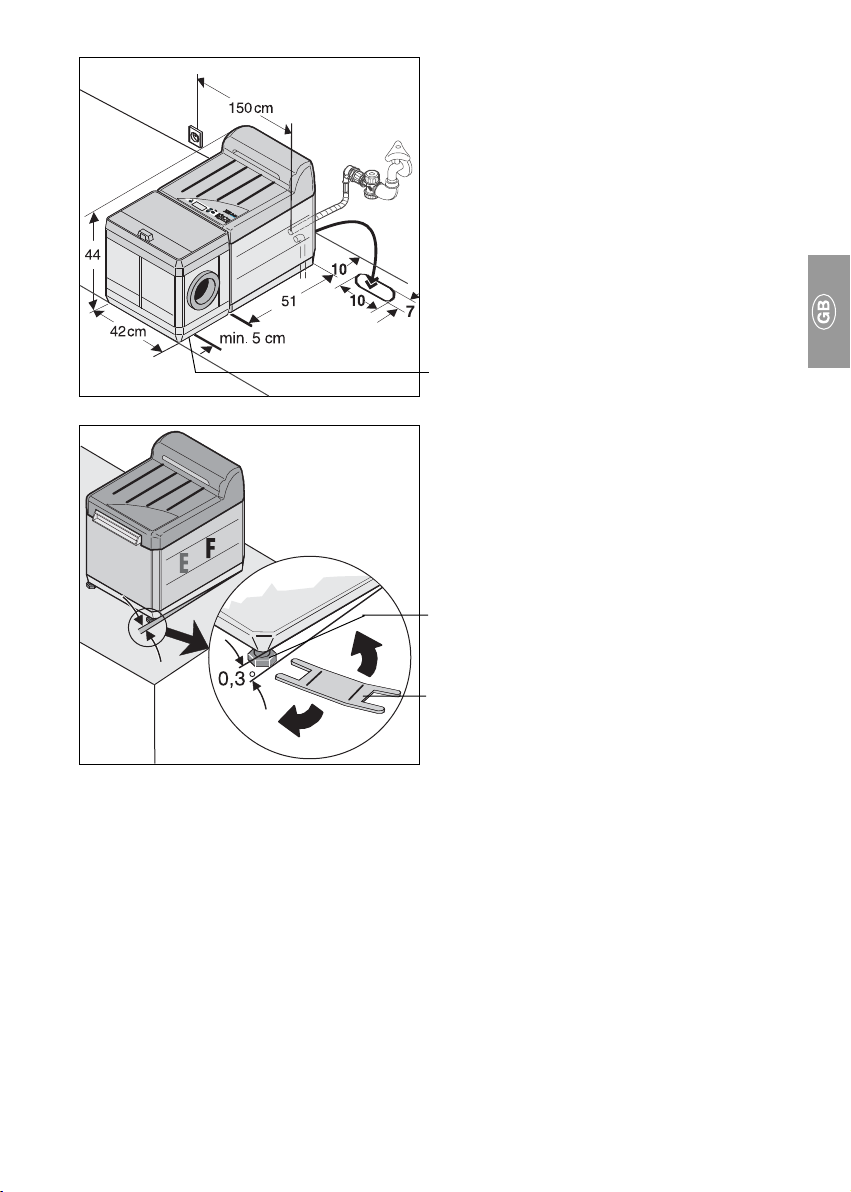
7.2 How to set up machine
• Set the machine up on a horizontal, stable,
even board at working height.
• When the tubes are being passed under,
the board must have an opening measuring
ca. 7 x 10 m
• Ensure that additional space is available so
that servicing work can be carried out and
so that the machine is adequately
ventilated:
There must be at least 10 cm of free
space behind the machine and ca. 50 cm
free space left and right.
At the front there must be enough space in
case a daylight attachment (24) has to be
24
4
fixed to the machine. If necessary, detach
the installation feet at the front and screw
them on to the back.
7.3 Setting up the machine
• Undo the plastic bands attached to the
cardboard packaging.
• Take out all small parts.
• Grip the sides of the machine and place it
in suitable position.
• Set it up close to a mains water supply, an
29
outflow pipe and an earthed pipe (max.
distance 1.5 m)
• Set up the appliance so that it has a slight
tilt, ca. 0.3 ° to the fixer bath (fig. 8).
30
Adjust the feet of the appliance (29) using
the spanner provided (30) as required.
7
11
Page 12
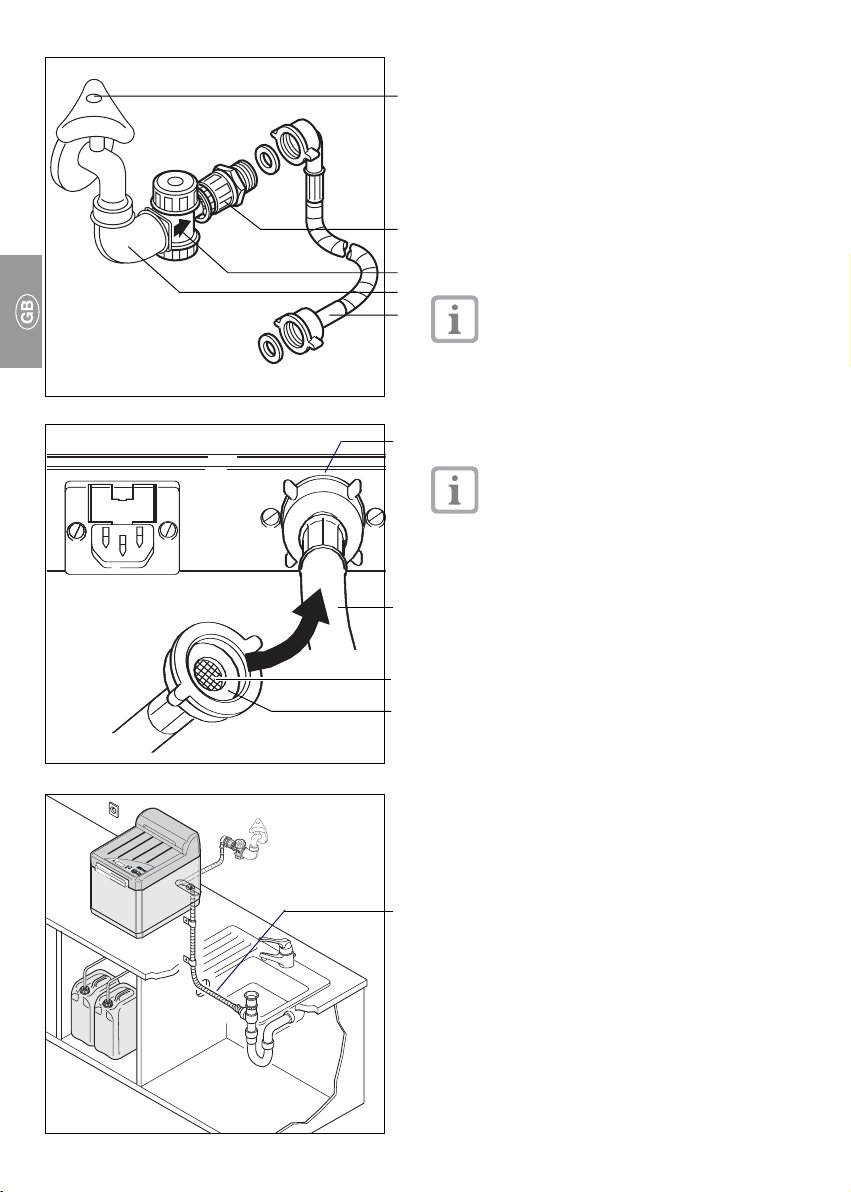
8. INSTALLATION
27
8.1 Mains water supply
• Check whether or not pure water is flowing
out of the bibcock (27). When the machine
is being installed initially, rinse the
pipelines thoroughly!
• Because the water quality can vary greatly
31
from region to region, a fine-mesh filter (32)
must be inserted between the bibcock (27)
32
and the water pipe (34).
33
34
7
35
34
The fine-mesh filter (32) protects the
flow-through limiter in the appliance’s
water valve from impurities
• Close the bibcock (27).
• Connect the 90º bow to the bibcock (27).
Attach the fine-mesh filter (32) (arrow in flow
direction) and double nipple (31) to the
bibcock
Check whether the strainer (34a) and
both seals (34b) are present in the
water pipe’s (34) threaded joints.
• Connect the water pipe to machine’s water
intake point (35) (threaded joint with
strainer) and to the double nipple (31).
12
34a
34b
8
8.2 Wastewater connection
• The wastewater connection may only be
connected via a ventilated siphon.
• Move the outflow pipe (36) to the siphon at
a continuous slant. Shorten the pipe to the
36
correct length.
9
Page 13

10
11
max. 3 cm
Fixierer
When moving the outflow pipe,
avoid sagging, constrictions and
reductions.
• Cover exterior of end of pipe with UHU
plaster
• Screw screwed fitting (37) to pipe and
attach to siphon’s (25) muff using pipe clip
(38).
• Secure outflow pipe using pipe clips,
screws and pins.
• The washing basin’s outflow point must be
open!
37
38
8.3 Connection for developer and
25
40
41
39
43
Fixer outflow pipe
• Set up the collecting tray (39) for the
developer (black level marking) and the
fixer (red level marking) beneath the
appliance so that it is clearly visible and
stable
• Move the pipes (40) at a continuous slant
• Shorten the pipes to the correct length.
• Feed the pipe for the developer (black
marking) into the black lid (41).
• Screw the lid (41) to the collecting tray (39)
for the developer
• Secure the pipe for the fixer (red marking)
to the collecting tray for the fixer in the
same way
When the full level marking has
been reached, empty the collecting
tray (danger of overflow). When
disposing of the developer and the
fixer, regional regulations must be
complied with. In Germany and in
several other countries X-ray
chemicals are classified as special
waste, and are disposed of
accordingly.
12
41
39
13
Page 14

11
13
9. BEFORE OPERATING
44
MACHINE FOR FIRST TIME
45
9.1 Cleaning the machine
• Take lid off.
• Remove floating lid from developing bath
and fixing bath
8
• Open green stop flaps (44) and seals (45).
• Swivel drier packet (8) backwards.
• Remove roller packets for water (6) and
developer/fixer (5).
8
• Swivel display (90) upwards.
6
5
14
3
90
14
The display may also be removed and
moved to the left.
• Remove roller packet film inlet (3).
90
15
Page 15

16
17
➘
➘
➘
• Actuate lateral lever and remove lifting tank
(22).
• Clean roller packets, lifting tray and tanks
22
with damp sponge
Adding chemicals Adding chemicals
„
Adding chemicals „
Adding chemicals Adding chemicals
and
and inserting roller packets and inserting roller packets
„
and inserting roller packets „
and inserting roller packets and inserting roller packets
see chapter on USE, Pt.15.1.3
10. POWER POINT (MAINS)
The machine is designed for use
with a mains voltage of 230 V or
100-110 V/50-60 Hz (see nameplate).
Before connecting the mains cable
check whether the required mains
voltage is available; otherwise the
appliance may be damaged. Use
the Dürr mains cable supplied with
the machine. The machine may only
be connected to the supply network
when it has been shut down and
when the lateral coverings have
61
been attached and the lid replaced.
• Plug the mains plug (61) into the machine
and the mains socket.
15
Page 16

11. CIRCUIT DIAGRAM
11.1 Printed circuit board, operating part / 11.2 Printed circuit board, control
(see also pos. 23 A and 23 B under Pt. 6)
23 B
U1 Photo-electric barrier cover
U2 Photo-electric barrier cover
U3 Photo-electric barrier, lifting tray
U4 Photo-electric barrier, film inlet flap
R1 Bath temperature temperature sensor
23 A
11.1 11.2
16
X5 Water level sensor
M1 Tachometer generator
Page 17

11.3 Printed circuit board,
power part 230 V
(see also pos. 23 C under Pt. 6)
23 C
11.3
M1 Roller drive
M2 Ventilator
M3 Circulating pump
M4 Lifting tray motor
R1 Bath heating unit
R2 Drier heating unit
Y1 Water valve
X1/X2 Appliance plug
X3 Replenishing unit
17
Page 18

12. FIRST TIME OPERATION
The XR 24 PRO developing machine has
three settings which determine the amount of
time it takes a film to pass through the
machine. The following values are set for the
machine “ex works”:
Intra-oral films 6 min. (INTRA program)
Extra-oral films 4 min. (EXTRA program)
Endodontal films 2.45 min. (ENDO prog.)
Note: It is not possible to archive X-ray films
which pass through the machine during this
short period of time).
- Developing bath and fixing bath
temperature: 28 ºC
- Drier capacity: 30%
When films with different drier capacities,
and which pass through the machine in
longer or shorter periods of time, are used,
the values can be changed in accordance
with the films which are to be processed.
In this context, see the list of films, point 14.7.
For a program overview, see the chapter on
USAGE
The machine may only be
connected to the supply network
when it has been shut down and
when the lateral coverings have
been attached and the lid replaced!
The operating instructions on the
display for the user
the chapter on USAGE, point 14
Detailed instructions on how to
service the machine are listed under
maintenance, point 18.6.
• The developing machine must
never be used without roller
packets!
If no roller packets are used, the
developing and fixing fluids can
spurt up and out of the developing
unit when placed under pressure.
Chemicals irritate the eyes and
skin. Serious injuries can be
incurred.
• If no developing and fixing roller
packets are used, the chemicals
cannot be directed into the tanks
There is a danger of the chemicals
being mixed together.
• The developing machine should
never be operated without fluids
(chemicals, water). This can lead
to malfunctioning of the heating
control system.
are contained in
Whenever the machine is switched on
using the mains button, the “INTRA”
program is started, i.e., whenever the
machine is switched off it is reset to
“INTRA”.
18
Page 19

12.1 Settings / Servicing work for technician
• Open the bibcock.
• Check leak tightness of machine and
connections
• Start servicing operation
+ +
+
press at same time (min. 4 s).
+ +
Machine now in service mode
• Select service function
Select with buttons and service
funktion
• Change settings
Change with or parameter value
With 1 s, confirm new value
*1 Selected language, frequency or value
appears at first by switch on
*2 Particular values by manufactoring
V18
• End servicing mode
Switch off machine using mains
button (press for min. 2 sec.)
• Parameters such as language, mains
frequency, etc. may be changed on the
display if the instructions are followed:
DEUTSCH?
[ENTER]=OK
50 Hz?
[ENTER]=OK
PROGR. INTRA?
[ENTER]=OK
PROGR. EXTRA?
[ENTER]=OK
PROGR. ENDO?
[ENTER]=OK
PARAMETER?
[ENTER=OK]
ENGLISH?
[ENTER]=OK
60 Hz?
[ENTER]=OK
PROCESS 6:00
[ENTER]=OK
PROCESS 4:00
[ENTER]=OK
PROCESS 2:45
[ENTER]=OK
FRANCAIS?
[ENTER]=OK
1
Change value with and in
5er and 5% steps, confirm with
DRYER 30%
[ENTER]=OK
DRYER 30%
[ENTER]=OK
DRYER 30%
[ENTER]=OK
Further
Language...
2
2
2
1
19
Page 20

21
12.2 Checking developer temperature
and carrying out acceptance test
The following procedure is only valid
for, e.g., Germany. Users in other
countries should comply with the
relevant local regulations!
• Switch on the machine and wait until
the heating phase for the bath has ended
(see also point 14.1, “in the morning or
before beginning work”).
• In order to check the developer
temperature, switch off the machine.
• Pull out the mains plug.
• Close the bibcock.
• Take off the lid.
• Measure the developer temperature (to the
front and left at a depth of ca. 20 cm).
In accordance with the list of films, the
developer temperature must amount to,
e.g., +28 ºC, +/- 0.5.
• Record the temperature in the acceptance
log and the constancy test log.
• Replace the lid, plug in the mains plug,
open the bibcock and switch on the
machine.
• Insert test film and carry out acceptance
test in accordance with ordinance on Xrays. Record the test results in the test log.
Store the test film in the archives.
Inform operating staff that constancy tests
must be carried out on a regular basis.
20
Page 21

22
13. TRANSPORTING THE MACHINE
Before carrying the developing machine,
27
please note the following:
The developing machine may only
31
39
63
be transported when the tanks are
empty.
• Switch off the machine by pressing the
mains button.
• Close the bibcock (27).
• Pull the mains cable out of the earthed
socket and the machine.
• Unscrew the water pipe (31) from the
machine and the bibcock (27).
• Empty the chemicals out of the collecting
trays (39) into the corresponding trays (63).
• Allow the chemicals to flow out of the tanks
into the collecting trays (39). See point
15.1.
• Clean the machine (see point 9.1)
23
24
13.1 Removing the outflow pipes
• Remove the outflow pipe (35).
• Disengage the pipe from the collecting tray
(39) for the developer and the fixer. Make
sure that no chemicals drip out.
35
13.2 Protection against damage
• Protect the machine against mechanical
stress and damage
• Ensure that the machine cannot move about
when it is being transported.
• Instruct staff charged with transporting the
machine.
39
21
Page 22

USAGE
Mains button
Confirmation button
, „Browsing through menu“
Program overview
The intra, extra and endo programs are set
to particular values when the machine is
being manufactured (see below).
However, each of them can be adapted by the
technician using the list of films.
INTRA -Processing time: t=6min
EXTRA - Processing time: t=4min
ENDO -Processing time: t=2min45sec
- Bath temperature: T=28 °C
- Drier capacity: 30%
- Bath temperature: T=28 °C
- Drier capacity: 30%
- Bath temperature: T=28 °C
- Drier capacity: 30%
Whenever the machine is switched
on using the mains button, the
“INTRA” program is started, i.e.,
whenever the machine is switched off
it is reset to “INTRA”.
Service- / and error messages
See point 16.1, error messages on display,
indicated by signal
SERV. INTERVAL
REACHED!
Only when acivated
by the technician!
22
BEFORE OPENING
MAIN PLUG PULL
ERROR
WATER TO LOW!
ERROR
WATER TO HIGH!
ERROR
ROLLER DRIVE
14. OPERATION
Before operating the machine, please note
the following:
• The developing machine must
never be used without roller
packets.
If no roller packets are used, the
developing and fixing fluids can spurt
up and out of the developing unit when
placed under pressure.
Chemicals irritate the eyes and
skin. Serious injuries can be
incurred.
• If no developing and fixing roller
packets are used, the chemicals
cannot be directed into the tanks.
There is a danger of the chemicals
being mixed together.
• The developing unit should never
be operated without fluids
(chemicals, water). This can lead
to a malfunction in the heating
control system.
In order to guarantee that the films be
of a consistently high quality, the
machine must be switched on every day.
Care must also be taken to ensure that the
temperature in the area surrounding the
machine is not higher than the temperature of
the developing bath!
Standby-Mode
When in the stand-by mode, the machine is
ready to be operated. A film may now be
inserted into it
Before inserting a film, check the program
selection!
Page 23

14.1 Procedure to be followed every morning or before beginning work
• Open the bibcock.
• Switch on the machine:
Press the mains button for ca.
2 sec. until the signal sounds
>> DURR DENTAL<<
✳ ✳
✳ XR 24 PRO V ..
✳ ✳
WARM UP PHASE
WAITING .. MIN
<INTRA> 6:00
M. FREE
▼▼
▼
▼▼
<INTRA> 6:00
M. TAKEN
<INTRA> 6:00
REMAIN TIME ..MIN
<INTRA> 6:00
M. TAKEN
<INTRA> 6:00
M. FREE
Changing the program:
▼▼
▼
▼▼
see next page
➞➞
➞
▼▼
▼
▼▼
➞➞
➞➞
➞
➞➞
➞➞
➞
➞➞
➞➞
➞
➞➞
➞➞
➞
➞➞
➞➞
➞
➞➞
➞➞
➞
➞➞
✳✳
✳
✳✳
1 The display lights up. The lifting tray
automatically moves to the corresponding
position, ca. 30 sec.
2 The machine is heated until the correct
temperature for the developing bath is
reached. Heating time: 0.5°C/min. The
“WAITING TIME… MIN” message flashes
on the display while this process takes
place.
3 As soon as the set temperature is reached,
the display lights up.
The machine is ready to be operated.
A film can be introduced.
The INTRA program has been pre-set; if
another program is to be used, select
EXTRA or ENDO using the button .
4 Once a film has been introduced into the
machine, the display message “MACHINE
LOADED” begins to flash. When the
message stops flashing, another film can
be introduced into the machine.
Up to six intra-oral films can be
introduced between the markings into
the machine together (see next
page).
5 The remaining time that the film spends in
the machine is displayed (automatic
counter).
A signal sounds when the film leaves the
machine.
6 If no other film is introduced, the lifting tray
moves to stand-by position
7 When the machine is in stand-by mode, the
“MACHINE EMPTY” message is displayed
Films which have not been
developed must not be laid on the
machine because they may be
incorrectly exposed due to the LCD
display.
23
Page 24

Changing the program
INTRA
M. FREE
6:00
PROCESS 6:00
[ENTER]=END
BATH TEMP. 28.0°C
[ENTER]=END
DRYER 30%
[ENTER]=END
EXTRA
M. FREE
ENDO
M. FREE
4:00
2:45
PROCESS 4:00
[ENTER]=END
PROCESS 2:45
[ENTER]=END
For error messages, see point
16.1 “error messages on the
display”.
25
• Up to six intra-oral films can be introduced
into the machine between the markings. If
2 x 3 films are being introduced, ensure that
they are not inserted crossways and that
the marking point in the developing
machine is respected.
• In order to acquire a check photo quickly
when the endo program is being used (e.g.,
when root canals are being treated) (short
processing time, 2.45 min.), change.
See list of recommended films (point 14.7).
14.2 Procedure to be followed every
evening or after finishing work
• Switch off the machine by pressing
the mains button.
• Close the bibcock.
BATH TEMP. 28.0°C
[ENTER]=END
BATH TEMP. 28.0°C
[ENTER]=END
DRYER 30%
[ENTER]=END
DRYER 30%
[ENTER]=END
14.3 Every week
• Using at least weekly cleaning films, e.g.
"DÜRR clear100" before starting work
order no. 1410-007-00
• Carry out a constancy test in accordance
with the ordinance on X-rays:
- Expose the film with the set parameters
for the constancy parameters.
- Measure the temperature.
- Develop the film.
- Compare the test results with the film for
the acceptance test and record the
results in the test log.
- Archive the test film.
14.4 Every 4 weeks
or according to requirements,
• Change chemicals, see para. 15.1
14.5 1x a year
• Clean the roller packets with chemicals in
the roller tray using the XR Cleaning Set;
order no. 1700-007-00; includes instructions
on use.
• Check light tightness of darkroom.
14.6 When practice is closed
for more than 2 weeks:
• Drain off chemicals.
Clean tanks and roller packets and allow to
dry (see point 15.1)
24
Page 25

14.7 List of reccomended films for
Dürr XR 24.. developing machine.
Intraorale Films
Bath temperature 28 °C
Processing time 6 min
Drier capacity 30 %
Filmtypes
Kodak Ultra Speed 2,2x 3,5 cm
Kodak Insight 2,2x 3,5 cm
Agfa Dentus M2
When taking certain examination films
(e.g. before root canal treatment) for
developing in the „ENDO“ program, bitte
please note the following:
During this short period of time, Xrays films may not be archived.
If the film is to be archived, it must be
fixed and rinsed for 30 sec. as soon
as possible after the diagnosis has
been made.
Comfort
3,1x 4,1 cm
2,7x 5,4 cm
5,7x 7,6 cm
3,1x 4,1 cm
2,4x 4,0 cm
2,7x 5,4 cm
5,7x 7,6 cm
2 x 3 cm
3 x 4 cm
5 x 7 cm
Extraorale Films
Bath temperature 28 °C
Film formats bis max. 24 x 30 cm
Filmtypes Processing Drier-
time capacity
Kodak
X-OMAT K 6min 30 %
T-MAT L/RA 4min 20 %
T-MAT G/RA 4min 20 %
Ekta Vision L 6min 30 %
Ekta Vision G 6min 30 %
Agfa
Dentus RP 6 6 min 30 %
Dentus Ortholux 6 min 30 %
The processing times for other types
of films must be checked against the
Dental Sensitivity Index, and adapted
accordingly.
25
Page 26

15. MAINTENANCE
Every 4 weeks
Change chemicals without using
replenishing unit (91) (see paragr.15.1 below)
Chemicals should be changed every
4 weeks if a maximum amount of 10
intra-oral and 3 extra-oral films are
used on a daily basis.
The instructions on how to clean the apparatus
should be kept close to the machine and
should be displayed in poster (A3) format.
Every 3 months
Change chemicals using replenishing unit
(91) (see paragraph 15.1 below).
1 x a year
Clean the roller packets using the
XR Cleaning Set
60
61
The tanks do not have to be cleaned
with chemicals. Only the roller
packets need to be cleaned using
chemicals using the XR Cleaning Set
(cleaning tray, accessories and
instructions for use).
Order no: 1700-007-00.
26
27
28
15.1 Changing the chemicals
15.1.1 Drain off the chemicals
• Switch off the machine using the mains
button.
• Pull the earthed socket out of the mains
91
plug (61).
• Remove the lid (60).
• Check if the collecting tray (39) is empty; if
necessary, empty into main tray (63).
39
63
It is important that the collecting tanks
be empty; if they are not, there is a
danger that they will overflow if the
chemicals are drained out of the tanks.
• Remove floating lid from developing bath
and fixing bath. Drain and put to one side
• Unscrew small plugs from lifting tanks, then
unscrew large plugs from tanks
• Empty collecting tray
• Unscrew lid from collecting tray. Hang pipe
ends in neutral tray
This prevents water from getting into
the collecting tray and the main tray
when cleaning is being carried out.
Page 27

11
29
15.1.2 Cleaning tanks and roller packets
44
• Open green stop flaps (44) and seals (45).
• Swivel drier packet (8) backwards
45
8
• Swivel display (90) upwards. If a daylight
attachment is being used, the display must
be removed and moved to the left
• Remove insertion packet for water (6) and
film (3)
6
30
31
3
• Remove roller packets for water (6) and
developer/fixer (5); tilt sideways to allow
chemicals to drain off
5
27
Page 28

➘
32
33
➘
➘
• Place roller packets in washbasin. Spray
with, e.g., WR 2000 Spray Cleaner and
allow to work in for ca. 10 min.
22
• Actuate lateral lever and remove lifting tank
(22).
Rinse using the sponges; black for
developing and red for fixing tank
• Rinse the lifting tank (22) with warm water
(min. 40 °C) and clean thoroughly using the
appropriated spongs as above.
• Rinse tanks (22) with suitable sponges
under warm water
• Rinse roller packets with suitable sponges
under warm water
• Screw large plugs (18, 21) into tanks
• Fill developing (E) and fixing tanks (F) to
marking (54) with 40 ºC warm water.
• Starting the developer and fixer packets
18
21
54
60
61
1
The developing machine must never
be used without roller packets. If
no roller packets are used, the
developing and fixing fluids can
spurt up and out of the developing
unit because the water is not being
redirected into the tanks! Chemicals
irritate the eyes.
• Close green stop flaps and seals
• Swivel display back into place
• Replace lid (60)
• Plug in mains plug (61). Switch on machine
by pressing mains plug.
• Start up machine. Insert 3 x 4 films into layin point (1) until start flap is actuated.
Leave films lying in this position for about 4
min.
• Allow machine to run for ca. 10 min. (pipes
and circulatory pump are thus automatically
cleaned).
• 10 min. later, switch off machine by
pressing mains button and pull out mains
plug (61).
• Remove lid (60)
• Swivel display upwards
• Open green stop flaps (44) and seals (45).
28
34
Page 29

35
• Remove roller packets for water (6) and
developer/fixer (5); tilt sideways to allow
water to drain off.
• Unscrew large plugs for developer (21) and
fixer (18); allow water to drain off from these.
15.1.3 Pouring in chemicals
The information on pouring in the
chemicals refers to the
54
52
“DÜRR AUTOMAT XR” chemistry.
• Screw the large plugs for the developer
(21) and the fixer (18) into the tanks (see
pg. 28)
• Reconnect developer and fixer pumps to
collecting trays
• Place partition (52) between developing
and fixing tank.
The partition prevents chemicals from
mixing together when they are being
poured in.
Chemicals can cause damage to
health. They irritate eyes and skin.
Danger of serious injury to eyes
exists. Irreversible injuries may be
caused.
Wear protective gloves and glasses
when pouring in chemicals.
If chemicals get into eyes, wash
thoroughly with water and consult
doctor.
Clean hands under running water
when work has been carried out.
36
For further information on safety
measures, see following internet site:
http://www.duerr.de.
Dürr Dental has converted from the
two-part to the one-part
“DÜRR AUTOMAT XR” chemistry
(pict. 35 and 36). The advantages are:
- These are easier to handle and
- result in a more constant
development quality
1. Filling the fixing tanks (F) (Picture 35)
Carefully pour into large red bottle (avoid
splashes so that chemical do not mix
together) and fill with water (max. 20 ºC) to
upper marking (54).
2. Filling the developing tanks (E) (Pict. 36)
Carefully pour into large black bottle (avoid
splashes) and fill with water (max. 20 ºC) to
upper marking.
29
Page 30

38
• Insert lifting tray (22)
• Screw small plugs into lifting tray
15.1.4 Inserting roller packets
60
59
6
5
58
3
22
44
8
45
Danger. The developing machine
must never be used without roller
packets.
If no roller packets are used, the
developing and fixing fluids can spurt
up and out of the developing unit
when placed under pressure.
Chemicals irritate the eyes and
skin. Serious injuries can be
incurred.
If no developing and fixing roller
packets are used, the chemicals
cannot be directed into the tanks.
There is a danger of the chemicals
getting into the eyes or being mixed
together.
• Insert drying packet (8) and swivel
backwards
• Insert, one after the other, roller packets for
water (6), developer/fixer (5) and film lay-in
(3).
Make sure that conduits interlock. If
necessary, rotate driving toothed wheel (58)
until it meshes with the worm on the drive
shaft
• Swivel drier packet (8) forwards
• Close green stop flaps (44) and seals (45)
• Insert floating lid (59) for developing bath
and fixing bath
• Swivel display backwards, or insert.
• Replace lid (60). Ensure that the bottom
edge of the lid meshes completely with the
conduits in the casing coverings.
• Plug in mains plug.
30
Page 31

31
Page 32

TROUBLESHOOTING
16. TIPS FOR THE USER
If faults cannot be remedied by using the following information, the Dental Depot
technician should be contacted for further technical assistance.
Error
1. Completely out
of order
2. Films too bright
3. Films too dark • Set correct exposure time on camera
4. Yellow-green
veil on film
5. Dark veil on
film
Possible causes
• Mains cable not correctly
plugged in
• Lid not replaced
• Mains button pressed for too
short a time
• Developer run down
• Film exposure time for
camera too short
• Developing bath temperature
too low
• Film exposure time for
camera too long
• Developing bath temperature
too high
• Film not completely fixed
• Film developed in ENDO
program (with processing
time of 2.45 min.)
• Lid of daylight attachment
open.
• Light entering into darkroom,
e.g., via keyhole
• Darkroom light incorrectly
attached or light travelling in
wrong direction
Remedying faults
• Plug mains cable into back of machine
and into earthed socket
• Replace lid correctly
• Press mains button for min. 2 sec.
• Change chemicals (see point 15.1).
• Set correct exposure time on camera
(if possible)
• Have technician check and, if
necessary, set same.
(if possible)
• Have technician check and, if
necessary, set same.
• Check whether fixer is still in working
order. Wave intra-oral films about for
ca. 40 sec. in the fixer. If the film is
transparent, the fixer is in working
order. If veils are still present, change
the chemicals (see point 15.1).
• Select program with longer processing
time. Monitor time it takes film to pass
through machine (see list of
recommended films, point 14.7).
• When orthochromatic (green-sensitive)
films are being processed, lid must be
closed; otherwise films will be preexposed
• Check light tightness of darkroom; if
necessary, seal room
• Lamp should only emit rays indirectly
6. Greenbrownish veil
on film
32
• Chemicals exhausted • Pour in new chemichals
Page 33

Error
Possible causes
Remedying faults
7. Increased
basic veil on
film
• Film concealed
• Film incorrectly stored
• Developing bath temperature
too high as room temperature
is too high
16.1 Error messages on display with signal tone
Display reading
BEFORE OPENING
MAIN PLUG PULL
SERV. INTERVAL
REACHED!
ERROR
WATER TO LOW!
ERROR
WATER TO HIGH!
further message
follows ...
At beginning and/or
during developing
process.
Once machine has
been switched on
After a film has been
laid in with a delay of
ca. 35 sec.
At beginning and/or
during developing
process.
possible causes
Securing relais on
PCB is defect
Servicing interval
has been reached.
Water feed for water
bath is interrupted
- Water outflow
pipe choked up,
incorrectly laid or
not ventilated
- Electrical bridging
caused by calcified level sensors.
• Check expiration date
• Check storage provisions, expiration
date or manufacturer’s data on film
packaging.
Do not store films near
camera. Pre-exposure of films
can result due to stray
radiation.
If necessary, a partition with a
lead screen may be inserted.
• Lower room temperature
Remedying faults
Arrange maintenance work by
contacting customer service
staff. Machine can still be
operated.
Before opening main plug pull
Arrange maintenance work by
contacting customer service
staff. Machine can still be
operated.
Check whether bibcock is
open and/or feed pipe is
connected
Unblock pipes; check
whether if water outflow pipe
is correctly laid (water
pockets).
Further work may be carried
out once fault has been
remedied
ERROR
ROLLER DRIVE
At beginning and/or
during developing
process
Rotational signal
from motor
interrupted; cable
or plug defective
Arrange maintenance work
by contacting customer
service staff.
Faults which occur when films are
being developed; film is only
carried in shortest processing time
(2.45). Inadequate fixing
33
Page 34

17. TIPS FOR TECHNICIANS
also see pt.18. Trouble Schooting Tips
Error
1. Completely out
of order
2. No fresh water
being fed into
machine
3. Incorrect
developing
temperature
4. Films too
bright
5. Films too dark • Replace flow heating unit and/or PTC
6. Yellow-green
veil on film
Possible causes
• Fuses in house defective
• Fuses in appliance defective
• Water valve blocked or
defective
• Water feed blocked
• Level sensors calcified
(electrical bridging).
• Flow heating unit defective
• Air in system, circulating
pump not ventilated. (If
machine is filled with water or
chemicals at 20ºC, the
machine starts without being
heated up.)
• Developing temperature too
low
• Flow heating unit defective
• No chemicals in roller packets
for developer and fixer (bath
level too low).
• Chemicals not being
circulated
Remedying faults
• Check fuses; replace if necessary
• Check fuses; replace if necessary
(see point 18.8)
• Check water valve; replace if
necessary (see point 18.10)
• Clean fine-mesh filter and strainer in
water pipe
• Clean level sensor (see point 18.2).
• Replace flow heating unit and PTC
sensor (see point 18.9).
• Ventilate the circulating pump, so that
the machine is repeatedly started in
succession. Mains switch ON /OFF.
• Measure the temperature and key it
into the service menü „CALIBRATION ?“
sensor (see point 18.9).
• Check sealing lip profile and roller
packet; replace if necessary.
• Check circulating pump for possible
air in pipe
7. Greenbrownish veil
on film
8. Film not
completely
dried
• Film not rinsed • Level sensor in water bath has switched
• Drier capacity incorrectly set
• Ventilator defective
• Heating unit defective
16.1 Error messages on display with signal tone
see 16.1
34
off water valve; check water outflow
pipe and, if necessary clean and lay in
accordance with regulations (see 8.2)
• Further possibilities: see remedying
faults, pt.17.2 (no feeding of fresh water)
• Set drier capacity in accordance with
list of recommended films (see pt. 14.7)
• Change ventilator
• Check temperature-locking device
Page 35

40
18. TROUBLESHOOTING TIPS
18.1 Before beginning work
60
••
Switch off machine using mainsSwitch off machine using mains
•
Switch off machine using mains
••
Switch off machine using mainsSwitch off machine using mains
buttonbutton
button
buttonbutton
• Pull out mains plug (61)
61
• Remove lid (60)
• Remove casing coverings required for
carrying out work
18.2 Removing front covering
• Swivel display upwards
• Open green stop flaps (44) on film insertion
packet (3)
• Remove film insertion packet (3)
• Unscrew two grey rapid seals (68) from the
44
front covering (56)
• Unscrew 3 Philips screws (57) and remove
front covering (56)
45
18.3 Removing rear covering
• Open stop flaps (44) and seals (45) on drier
8
packet (8)
• Swivel drier packet (8) backwards and
remove
• Unscrew 3 Philips screws (57) and remove
rear covering (67)
1141
42
3
18.4 Removing lateral coverings
• Remove front (56) and rear (67) covering;
pull lateral covering upwards and outwards
57
18.5 After work has ended
55
• Reattach casing coverings in accordance
with regulations (see also point 9.5)
57
67
55
68
56
Never operate appliance if casing
coverings have not been correctly
attached and screwed on. The
machine is live; danger of electric
shocks exists.
• Replace lid (60). Plug in mains plug
35
Page 36

36
A
V18
DEUTSCH?
[ENTER]=OK
50 Hz?
[ENTER]=OK
PROGR. INTRA?
[ENTER]=OK
PROGR. EXTRA?
[ENTER]=OK
PROGR. ENDO?
[ENTER]=OK
PARAMETER?
[ENTER= ]CONTINUE
ENGLISH?
[ENTER]=OK
60 Hz?
[ENTER]=OK
PROCESS 6:00
[ENTER]=OK
PROCESS 4:00
[ENTER]=OK
PROCESS 2:45
[ENTER]=OK
REGENERATION?
[ENTER]=OK
18.6 Plan for carrying out service work
FRANCAIS?
[ENTER]=OK
1
DRYER 30%
[ENTER]=OK
DRYER 30%
[ENTER]=OK
DRYER 30%
[ENTER]=OK
REGEN. OFF
[ENTER]=OK
Further
Language...
2
2
2
1
REGEN. ON
[ENTER]=OK
1
• Start service operation
Switch off machine using mains
button (press for min. 2 s)
+ +
+
+ +
Machine now in service mode
• Select service unction
Select buttons and service function with
and
• Change settings
Change with
With
*1 The language, frequency or value
settings selected appear first when
switched on again
*2 Factory default settings
• End servicing mode
Switch off machine using mains button
(press for min. 2 sec.)
REG.TIME
[ENTER]=OK
press at same time
or parameter value
1s, confirm new value
(min.4 sec)
BATH TEMP 28.0 °C
[ENTER]=OK
PROCESS TIME
FILM LENGTH
0000H
0000,0H
BATH TEMP 28 °C
[ENTER]=CONTINUE
Page 37

A
1
BACK
[ENTER]=OK
BACK
[ENTER]=OK
INPUTS
[ENTER]=OK
LIGHT BARRIER
LIFTING PAN ON/OFF
LIGHT BARRIER
FILM FLAP ON/OFF
SERV.INTERVAL?
WATER VALVE OFF
[ENTER]=CONTINUE
WATERVALVE ON
[ENTER]=CONTINUE
[ENTER]=OK
CALIBRATION?
[ENTER]=OK
COMP.TEST?
[ENTER]=OK
WATER VALVE?
[ENTER]=OK
SERVICE OFF SERVICEON
[ENTER]=OK
VALUE 28.0 °C
[ENTER]=CONTINUE
START MANUEL
[ENTER]=OK
START MANUELOFF
[ENTER]=OK
START MANUELON
[ENTER]=OK
REGEN.PUMP?
[ENTER]=OK
REG.PUMPOFF
[ENTER]=CONTINUE
REG.PUMPON
[ENTER]=CONTINUE
[ENTER]=OK
ROLLER DRIVE?
[ENTER]=OK
DRIVE OFF
[ENTER]=CONTINUE
DRIVE ON
[ENTER]=CONTINUE
LIFTING PAN?
[ENTER]=OK
LIFTING PAN DOWN
[ENTER]=CONTINUE
LIFTING PAN TOP
[ENTER]=CONTINUE
0490H
DUE
SERVICE RESET
BATH HEATER?
[ENTER]=OK
BATH HEATER OFF
[ENTER]=CONTINUE
BATH HEATER ON
[ENTER]=CONTINUE
VENTILATOR?
[ENTER]=OK
VENTILATOR OFF
[ENTER]=CONTINUE
VENTILATOR ON
[ENTER]=CONTINUE
SERVICE (TARGET)
0500H
CIRCULAT.PUMP?
[ENTER]=OK
CIRCULAT.PUMP OFF
[ENTER]=CONTINUE
CIRCULAT.PUMP ON
[ENTER]=CONTINUE
DRYER?
[ENTER]=OK
DRYER OFF
[ENTER]=CONTINUE
DRYER ON
[ENTER]=CONTINUE
37
WATERTO HIGH
ON/OFF
WATERTO LOW
ON/OFF
Page 38

43
18.7 Changing the display
91
• Pull the display cable’s (92) plug out of the
plate (86) and pull through openings (91)..
92
86
93
• Pull display (90) upwards.
• Attach new display in reverse sequence.
90
38
44
45
18.8 Checking appliance fuses
• Open flap (64) on rear of unit by applying
slight pressure with screwdriver.
64
• Press spring together and pull out fuse
65
holder (65).
• Check fuse; replace if necessary. For order
number, see point 3.1, special accessories
62
Page 39

46
18.9 Replacing flow heating unit with PTC sensor
• Remove all coverings.
• Allow chemicals to drain out (see point
15.1.1)
• Pull out plug (93, photo 43) on plate.
16
• Twist screw on circulating pump holder and
17
raise circulating pump.
79
• Pull both plugs out of the circulating pump
and pull plug on flow heating unit (16) out.
80
• Remove flow heating unit from holder and
15
pull out pipes.
81
• Insert new flow heating unit in accordance
with regulations.
34
• Put up all plugs on circulating pump and
flow heating unit.
Check for 230 V or 110 V plug connection.
• Put plug (93, photo 43) back up on plate
(86)..
• Reattach casing coverings in accordance
with regulations.
18.10 Checking the water valve
If the water valve has not been switched on:
• Start servicing mode (see point 18.6).
Select “Individual Test” menu and then
“Water Valve”..
• If the valve is not switched on despite the
presence of voltage, replace the whole
valve (15) (see point 18.11, “Replacing the
water valve”)
18.11 Replacing the water valve
Firstly, check water valve (see point 18.10);
replace if defective.
• Close bibcock
• Remove water pipe carefully from water
feed (34).
• Pull mains cable (80) out of valve
• Pull internal water pipe (79) carefully out of
valve at rear
• Unscrew Philips screws (81) beside water
feed and replace complete valve
39
Page 40

48
18.12 Cleaning the water level sensor
• Close bibcock.
• Remove lid.
• Open green stop flaps and seals
• Swivel drier packet backwards.
• Remove water roller packet.
• Clean level sensors (82 and 83) so that no
calcified bridges can form.
• In order to check functionality, operate
machine without water roller packets.
82
• Simulate laying-in of film; the message
“WATER LOW” will appear on the display
83
• If a bridge forms between both level
sensors (82 and 83), the message
“WATER HIGH” will appear on the display;
the sensors are now clear. The cleaning
process has ended. If deviations occur,
see
troubleshooting, point 16.1.
18.13 Changing the light barrier
For this purpose, use light barrier spare
parts kit (order no: 17000-993-00).
A description can be found in the spare part
kit.
40
DISPOSAL
19. DISPOSING OF UNIT
The built-in electronic plate and components
must be disposed of in the same way as
electronic scrap metal.
The remaining structural components can be
disposed in accordance with the relevant
local regulations.
 Loading...