

WildCam IR X30
INSTRUCTION MANUAL
GB GAME AND SURVEILLANCE CAMERA
WildCam IR X30
www.doerrfoto.de

GB INSTRUCTION MANUAL
DÖRR WildCam IR X30 Game and Surveillance Camera
IMPORTANT NOTES
Before starting to use the camera, please note the following safety hints:
• Your camera is tted with a weatherproof housing according to protection class IP54 (dust and splash waterproof). Therefore
the camera can be used outdoors. Nevertheless protect the camera from extreme weather conditions and direct sunlight.
• The recommended storage and operation temperature is -10 to 40 °C.
• Make sure to use fresh batteries of the same type and brand only.
• Use a soft cleaning tissue to clean the camera lens. Avoid touching the lens with your ngers.
• Remove dust and spots at the camera housing with a soft and slightly damp tissue.
• Store the camera at a dry and cool place when not in use.
• Remove the batteries in case you do not use the camera for a longer period.
• Do not drop the camera onto a hard surface.
• Do not open the camera housing (except protective cover and battery cover). The warranty will become void. In case of a defect,
send the camera to an authorized service agent.
• Up to date manuals can be found at www.download.doerrfoto.info/manuals/
NOTE The camera is high precision electrical device. Do not attempt to repair it by yourself.
When opening the housing, there is a risk of high voltage and other kind of risks.
NOTE Make sure to respect the regulations of privacy protection.
INDEX
Camera Description & Overview 3
Quick Start Guide 4
Choose one of the two available Energy Sources
Insertion of the SD/SDHC Memory Card
Positioning of the Camera
Camera Activation
Camera Programming 4
Time and Date Setting 5
Memory Card SD/SDHC 7
Installation
SD Card Capacity Overview 7
Exchange of Batteries 7
Viewing Images and Deleting Images 7
Specications 8
European Conformity Declaration Notes 8
2
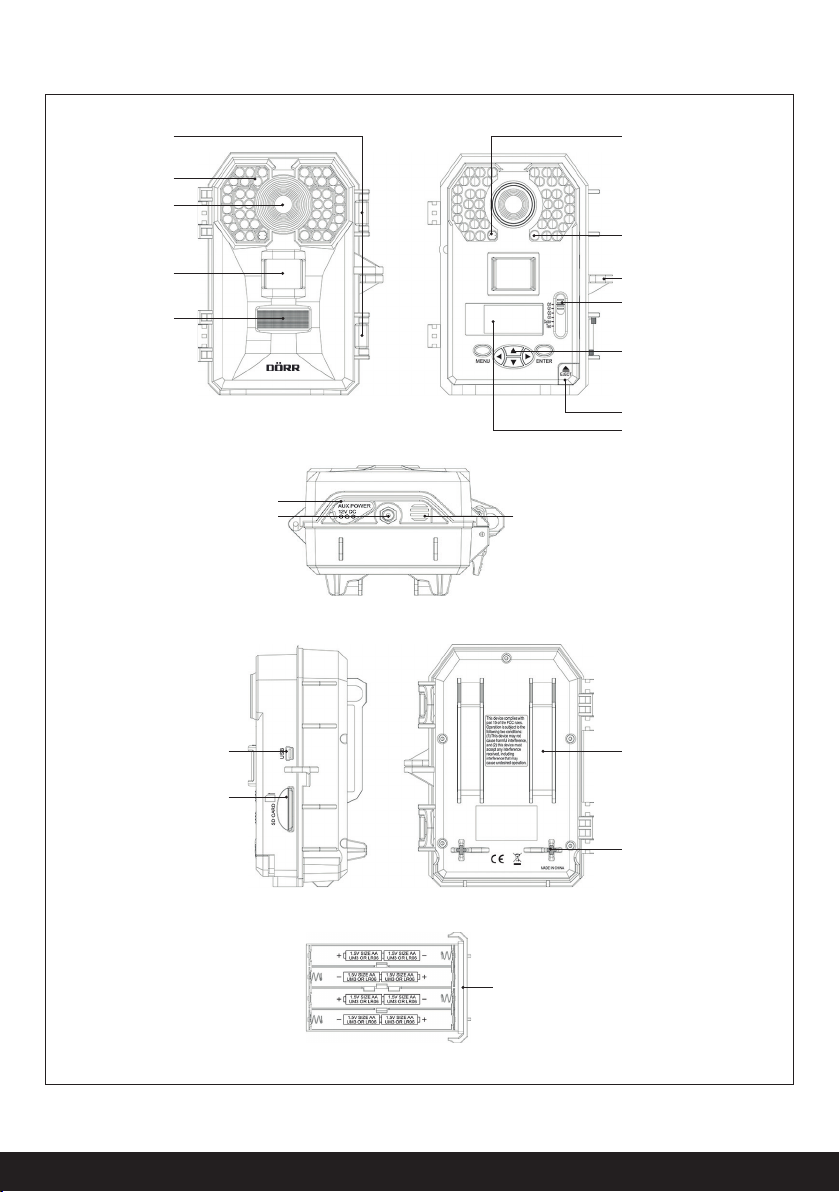
CAMERA DESCRIPTION AND OVERVIEW
Closures
IR LEDs
Camera Lens
Motion Sensor
Display
Input S ocket for Ex ternal Bat tery
Tripod Socket
Microphone
Twilight Sensor
Motio n Sensor in
Tes t Mode
Lead th rough for U- lock
Scroll B ar for Select ion
of Operation Mode
Control Panel
Battery Compar tment Opener
Display
Mini USB
SD Card S lot
Lead th rough for Fi xing Belt
Spacer
Battery Compartment
3

QUICK START GUIDE
Choose one of the two available Energy Sources
Insert 8 AA batteries into the battery compartment making sure to respect the correct polarity or connect the camera to a 12 V battery
using the socket DC 12 V located at the camera bottom.
AA batteries and 12 V battery are not included in the packaging.
Insertion of the SD/SDHC Memory Card
Insert the SD memory card into the card slot at the lateral side of the camera. Note the symbol indicating the direction for the inser-
tion. Make sure to use a SD/SDHC memory card with a capacity of minimum 2 GB, max 32 GB and speed of minimum Class 10.
Camera Installation
Mount the camera on a tree or pole or any other suitable object using the supplied belt. Do not x the belt nally at this stage. Make
sure that the camera won’t move with the wind. The optimum distance to the object is between 3 to 18 meters. Theoretically, larger
distances are also possible, however with less reliability and a larger picture frame. We recommend to take a few test shots and to
nally x the camera afterwards – read more in chapter camera programming.
Camera Activation
Use the scroll bar to select the desired setting.
Position Default Settings
QSET1 Resolution 8 MP– 3 pictures – 30 s delay
QSET2 Resolution 8 MP – 1 picture – 30 s delay
QSET3 10 s Video HD1280 x 720 – 30 s delay
CUSTOM Resolution 4 MP – 1 picture – 5 s delay (default)
De nition of delay: It is a predetermined pause during which the motion sensor is not active and no images will be taken.
Once the scroll bar is on the desired setting, the camera will be ready to shoot after 30s.
CAMERA PROGRAMMING
Your camera off ers 6 operation modes:
OFF / QSET1 / QSET2 / QSET 3 / CUSTOM / TEST.
The selected setting becomes active immediately after use of the scroll bar.
4

OFF:
This setting switches the camera off .
QSET1: Quick-Set 1 Quick-Set Program 1
With this setting, the screen shows the desired settings and starts a 30 s countdown. Thereafter the camera is activated. The display
also shows a chart indicating the battery status and the number of picture saved on the SD card.In case the camera does not notice
any movements, the display will switch off after 10s.
In this mode the camera takes pictures with a resolution of 8 MP. With every activation of the motion sensor, the camera takes
3 continuous shots. Then the motion sensor takes a 30 s pause during which no pictures are taken.
QSET2: Quick-Set 2 Quick-Set Program 2
With this setting, the screen shows the desired settings and starts a 30 s countdown. Thereafter the camera is activated.
Same display information as with QSET1.
In this mode the camera takes pictures with a resolution of 8 MP. With every activation of the motion sensor, the camera takes
1 picture. Then the motion sensor takes a 30 s pause during which no pictures are taken.
QSET3: Quick Set 3 Quick-Set Program 3
With this setting, the screen shows the desired settings and starts a 30 s countdown. Thereafter the camera is activated.
Same display information as with QSET1.
In this mode the camera takes a 10 s video sequence with HD resolution. Then the motion sensor takes a 30 s pause during which
no pictures are taken.
PROGRAMMING – TIME AND DATE SETTING
Custom:
In this mode, you can program the camera according to your requirements. There are also the default settings
Move the scroll bar to “Custom“, press Menu to enter the program mode. In the
program mode, navigate as follows:
Move within the main menu using the UP Ç and DOWN È. If you wish to change menu
items, con rm with ENTER. Select values using the LEFT Æ and RIGHT Å arrows. Then
con rm with ENTER
Example in menu item “Date“:
• Choose custom mode using the scroll bar. Press MENU and select DATE.
Press ENTER to con rm. Now set the weekday using Ç and È. Con rm the setting with Æ and repeat the procedure with
MONTH and YEAR. Then con rm with ENTER.
Note If do not enter a setting, the display will switch off . Press MENU to reactivate the camera. Now start programming by pressing
the MENU button again.
5

The following settings can be changed using the same navigation tools:
• Date
• Time
• Time Format 24 hours/12 hours AM - PM
• Camera Mode: photo, video, continuous shooting
When the 3 settings are made, the menu choice changes as follows:
• Photo Mode
Resolution 0,5 MP/2 MP/4 MP/ 8 MP selectable
Delay 3 s up to 59 min, 59 s selectable
Reduce Blur Reduces blur in case of movements
No. of Pictures 1 - 9 images (Multiburst) per motion detection selectable
• Video Mode
Delay 3 s up to 59 min, 59 s selectable
Resolution HD 1280 x 720 /720 x 480
Video Duration 10 s to 180 s, selectable in 5 steps
Audio On/Off
• Continuous Shooting Mode
Resolution 0,5 MP/2 MP/4 MP/ 8 MP selectable
Delay Bewegungssensor 3 Sekunden bis 59 Minuten und 59 Sekunden wählbar
Delay Serienbild 3 Sekunden bis 59 Minuten und 59 Sekunden wählbar
When the continuous shooting mode is activated, the motion sensor remains active, depending on the setting and may release
when a motion is recognized.
Continuous Mode Start enter time
Continuous Mode Stop enter time
Reduce Blur Blur caused by movement is reduced
• Camera Name Enter a name which will be displayed on the images
• Temperature Celsius/ Fahrenheit
• Time Stamp on/off
• Latitude enter local latitude
• Longitude enter local longitude
If you enter the camera position, the data will be saved with the picture information
• Reset Reset default settings No/Ye s
• Password O n / O – Select “On“and enter a 4 digit password, con rm with Enter. Please make sure to note the
password and store the note at a safe place.
• Format SD No/ Yes – SD card formatting. Attention: card content will be deleted!
• Languages German, English, Spanish, French
Test Mode:
Move the scroll bar to position “Test“. Position your camera at the desired place. Now you can check the range of the motion sensor.
Move forward, backward, to the left and to the right. As long as you move within the sensor’s range a green LED will blink at the right
top window at the camera front. Once you move out of the range, the green LED stops blinking. Whenever necessary, redirect the
camera.
6

MEMORY CARD SD/SDHC
Installation
Open the camera’s protective housing. The SD card slot is located at right-hand housing
side. Insert the SD memory card as shown on the sketch at the housing. Make sure
to format the memory card and that the card is not write-protected. The display will
indicate a missing or false SD memory card.
The camera supports SD/SDHC cards with a capacity of 2 GB to 32 GB. For best results
we recommend the use LEXAR brand cards with a speed of minimum “Class 10“.
SD CARD CAPACITY OVERVIEW
Chart shows number of pictures or video sequences depending on resolution and SD card capacity.
8 MP 4 MP 2 MP 0,5 MP HD Video 10 s
2 GB SD C 384 768 1536 6144 71
4 GB SDHC 768 1536 3072 12288 142
8 GB SDHC 1536 3072 6144 25576 284
16 GB SDHC 3072 6144 12288 49152 568
32 GB SDHC 6144 12288 24576 98304 1216
EXCHANGE OF BATTERIES
Press EJECT at the battery opener.
The cassette will come out of the
housing. Now insert 8 AA batteries
into the battery cassette, making sure
to respect the correct polarity.
We recommend to use fresh batteries
of the same type and brand only.
VIEWING IMAGES AND DELETING IMAGES
There are two ways to view the images and to delete them:
External Card Reader Remove the SD card from your camera and use an external card reader to view the images on your computer.
You can now copy and paste them or delete them.
Viewing from Camera Connect the camera to your computer using a USB cable. Your computer will recognize the SD card as a
removable medium. Now you can view, copy and paste or delete your images.
7

SPECIFICATIONS
Number and Type of LEDs 30 high performance infrared LEDs
Infrared Flash IR 840 nm
Trigger Time approx. 0,75 s
Resolution of Camera Sensor 2 MP Sensor of latest generation/Photos interpolated up to 8 MP/Video HD 1280 x 720/720 x 480
Video Sequence Length 10 to 180 s in 5 s steps selectable
No. of Photos per Motion Detection 1 to 9 pictures (Burst) selectable
Video Photo File Format Photo – JPEG, Video – AVI
Video Codex MJPEG
Refresh Rate 30 frames per second
Motion Sensor 45° angle, distance approx. 18 m
Flash Range approx. 24 m
Sensor Delay 1 s up to 60 min selectable
Time Stamp Displays date, time, temperature, moon phase
Continuous Shooting Mode yes
Housing Protection Class IP 54
Energy Source 8 x 1,5 V Mignon AA batteries or 12 V external battery (not included)
Memory Card SD/SDHC 2 GB up to 32 GB (not included)
Specications and design are subject to change without notice. 03.2015
EUROPEAN CONFORMITY DECLARATION NOTES
WEE E INFORM ATION The Wast e Electr ical and Ele ctronic E quipmen t Directi ve (WE EE Direct ive) is th e European c ommunit y
direc tive on wa ste elec trical and e lectron ic equipme nt, whic h became Euro pean law in Fe bruary 2 003 . The main pur pose of th is
direc tive is t o prevent e lectron ic waste. R ecycling a nd other fo rms of was te recover y should b e encourage d to reduce wa ste.
The be low symb ol (trash c an) on the pro duct and on t he packing me ans that us ed electr ical and elec tronic pr oducts sh ould not
be disp osed of wi th genera l househol d waste. I t is your res ponsibil ity to di spose of al l your elect ronic or ele ctrical w aste at
desig nated col lection p oints. D isposing o f this pro duct corre ctly wi ll help to sav e valuable r esources an d it is a signi cant
cont ributi on to prot ect our env ironmen t as well as huma n health . For more in format ion about t he correc t disposal o f electr ical
and ele ctronic e quipmen t, recycl ing and colle ction poi nts plea se contac t your local au thorit ies, was te manageme nt compani es,
your r etailer or t he manuf acturer of t his devic e.
ROHS CONFORMITY Thi s product is c ompliant w ith the E uropean di rectiv e 2011/6 5/E U of Januar y 03, 20 13 for the re stric tion
of use o f certai n hazardou s substan ces in elect rical and el ectroni c equipmen t (RoHS) an d its amend ments .
CE MA RKING T he CE marki ng complie s with th e European d irecti ves.
You can do wnload th e relati ve EU declara tion of co nformi ty wit h follow ing link:
http:// www.doerrfoto.de/info/EG-Konformität serklärungen
DÖRR GmbH · Messerschmittstr. 1 · D-89231 Neu-Ulm · Fon: +49 731 97037-0 · Fax: +49 731 97037-37 · info@doerrfoto.de
8
www.doerrfoto.de
 Loading...