

Page 1
2014 Dyson Bikes page 1
User Guide - The Hard Tail
Page 2

2014 Dyson Bikes page 2
Page 3

2014 Dyson Bikes page 3
Contents
Page Item
______________________________________________________________
4 Acknowledgements and Foreword
5 Symbols and Users‟ information and Responsibility
7 Components Description and Specification
9 Assembly Instruments
12 Mechanical Operation and Adjustment
17 Electric Operation and Adjustment
26 Safety
28 Maintenance and Care
32 Trouble shooting
33 Warranty
34 Maintenance Records
Page 4

2014 Dyson Bikes page 4
Acknowledgments
This manual has been developed by Dyson Bikes and their supplier. The information contained in
this manual complies with relevant Australian Standards at the time of printing.
Copyright 2014 Dyson Bikes. This manual may not be reproduced in part or whole without the
express and written permission of Dyson Bikes.
Foreword
Thank you for purchasing a Dyson e-bike, we are certain you will enjoy it for many years to come.
Please take the time to read this instruction manual thoroughly before assembly (if required), and
taking your first ride.
There are warnings throughout this manual and these will be highlighted with symbols or words as
detailed on the next page. Please ensure you follow these warning instructions, don‟t risk your
safety or that of others.
Failure to comply with these conditions may also affect your warranty and the long-term reliability of
your e-bike.
Your new e-bike is considered a vehicle and when ridden on public roads you must comply with all
local requirements. Laws vary in Australia from State to State - please refer to the relevant authority
in your State for more information.
YOU SHOULD READ THIS MANUAL
Your e-bike is an electrically power assisted cycle (EPAC),
which uses the same traffic
areas as cars, trucks and motorcycles. You need to know about certain legal and common
sense requirements for the safe and trouble free use of your e-bike.
Page 5
2014 Dyson Bikes page 5
Symbols used
Important information for your safety is specially marked. Always follow these instructions to avoid
personal injury or e-bike damage.
WARNING
Warns of dangers to your health and implies potential risk of injury.
ATTENTION
Indicates a potential hazard to the equipment or other objects.
Failure to observe could result in voiding of warranty.
NOTE
Suggestions and information.
Users’ information and responsibility
To reduce the risk of serious personal injury, you should read the instructions in this manual
carefully.
This is an electrically power assisted cycle (EPAC or commonly referred to as an e-bike), with a 1:1
pedal assistance system, designed for urban commuting and short distance travel.
The e-bike is intended only for riding on paved roads and trails. Do not use it for off-road purposes.
Do not use it in water, for jumping, stunting or in competitive sports events.
During riding, you should note that the e-bike covers 5 meters per second at a medium speed of
about 18 kilometers per hour in fine dry weather conditions. Keep sufficient distance from other
road users to ensure you can stop safely in case of an emergency and always consider the current
weather and road conditions.
Pay attention to the traffic during your ride and keep both hands on the handlebars at all times.
There are warnings on the e-bike containing
safety instructions. Non-observance of these
instructions may cause injury, failure or damage!
Page 6

2014 Dyson Bikes page 6
Do not use headphones in road traffic as it blocks other sounds and increases the risk of accidents.
Check the e-bike thoroughly against this manual to ensure correct function of components before
your first ride and rectify any issues before riding. The owner is then responsible for normal
maintenance of the e-bike.
Learn how to operate all standard and accessory equipment on the e-bike.
Ensure that anyone who uses the e-bike has been fully instructed in the operation of its mechanical
and electrical functions.
Your e-bike conforms to relevant Australian standards (AS NZS 1927-2010 Pedal bicycles - Safety
requirements and European Committee for Standardization EN 15194:2009+A1:2011 Cycles –
Electrically power assisted cycles –EPAC Bicycles). Please note other local regulations may apply.
Check our website www.dysonbikes.com.au for additional information or call 0497 357 117 if you
cannot find the answer to your question.
Page 7
2014 Dyson Bikes page 7
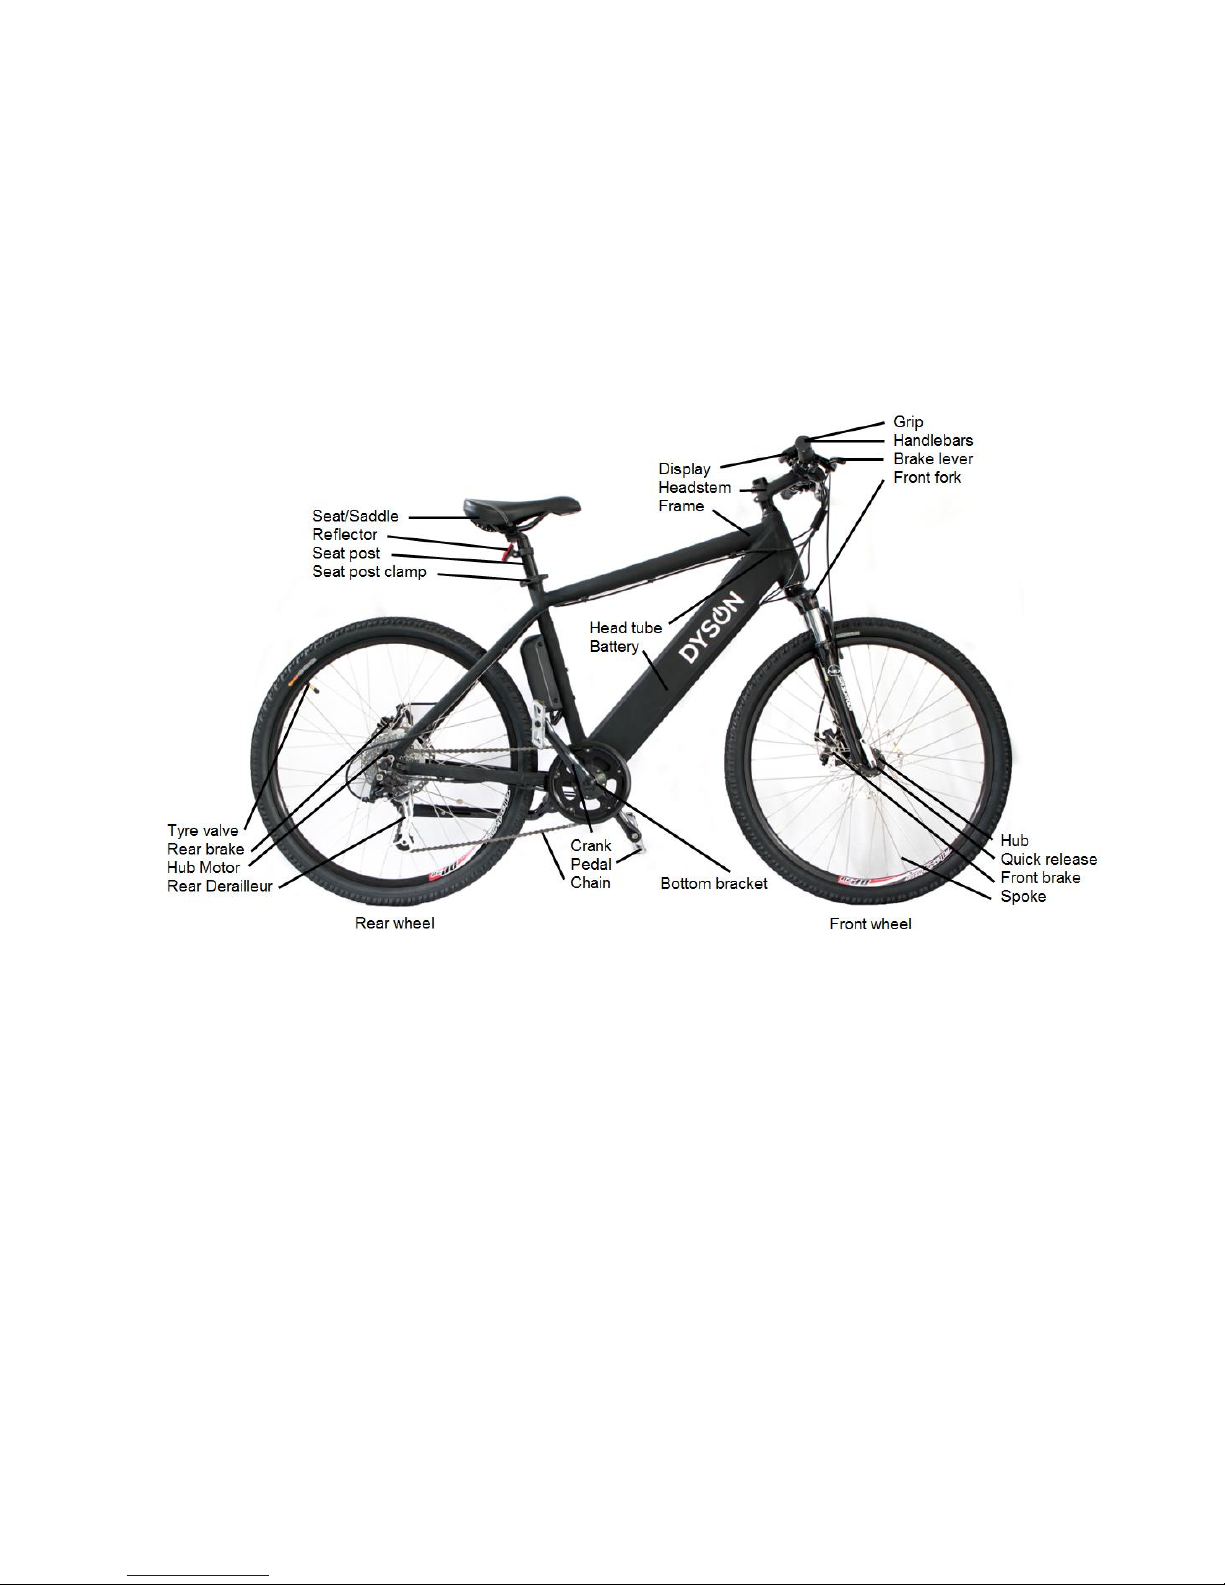
Section-1 Component Description and Specification
An e-bike consists of various mechanical parts such as the frame, wheels, brake, handlebar, saddle
etc.
Please take the time to familiarise yourself with this terminology; it will make basic operation and
maintenance instructions easier to follow.
The e-bike serial number is engraved in the front of the head tube.
NOTE This diagram is for reference only, from time to time changes may be made in the interests of
product improvement.
Page 8

2014 Dyson Bikes page 8
General
Wheel size
26 inches
Dimension LxWxH
1660x235x850 mm
Tyre Pressure range
280 – 460 kPa
Valve type
Schraeder
Dimension (packing) LxWxH
1840x255x980 mm
Net Weight (battery included)
22 kg
Range on one full charge
Approx. 60~70 km*
Max. load of carrier (if fitted)
25 kg
Permissible total weight
120 kg
Max. speed (with assistance)
25 km/h
Technical specification of the battery
Battery type
Sony - Li(NiCoMn)O2
Capacity
316.8WH – 8.8AH
Nominal voltage
36V
Charging voltage
42V
Max charging current
1830 mA
Discharge current
15000 mA
Operating temperature of discharging
-20 ~ 40℃
Operating temperature of charging mode
0 ~ 45 ℃
Technical specifications of the motor
Motor type
Brushless geared hub motor
Power
250 W
Voltage
36 V
Max. torque
4.5~15 Nm
Max. rotational speed
274 RPM
Control system
Cadence sensor in bottom bracket
Technical specifications of the controller and the charger
Undervoltage protection
29±0.5 V
Overload protection
12±0.5A
Charging mode
3-step “Intelligent”
Charging current
Approx. 1.8 A
Display
By LED red / green
Weight
550 g
Charging time
Approx. 5 hours (2.5 hours, up to 80%)^
*The range on a full charge is affected by many external factors, such as the weight of the rider, the terrain and
winds.
^ Depending on the depth of battery discharge this time may be longer or shorter.
Page 9

2014 Dyson Bikes page 9
Section 2 - Assembly Instructions
If you have purchased your new e-bike online and had it delivered, you will need to carry out some
minor assembly before your e-bike can be ridden. If you have purchased an assembled e-bike
please continue reading from Section 3 on page 12.
Please follow these instructions carefully to ensure your new e-bike is correctly assembled for safe
operation.
If you are unsure of anything and require further assistance please call Dyson Bikes on
0497 357 117 and we will be happy to talk you through the procedure.
Alternately you may wish to have your e-bike assembled by a trained e-bike mechanic.
Step 1.
Remove e-bike from outer carton and remove packaging material from frame taking care not to
mark or scratch your new e-bike.
Step 2.
Locate included tools, namely 3, 4, 5, 6-mm Allen Keys and 8, 10, 13, 15-mm spanners.
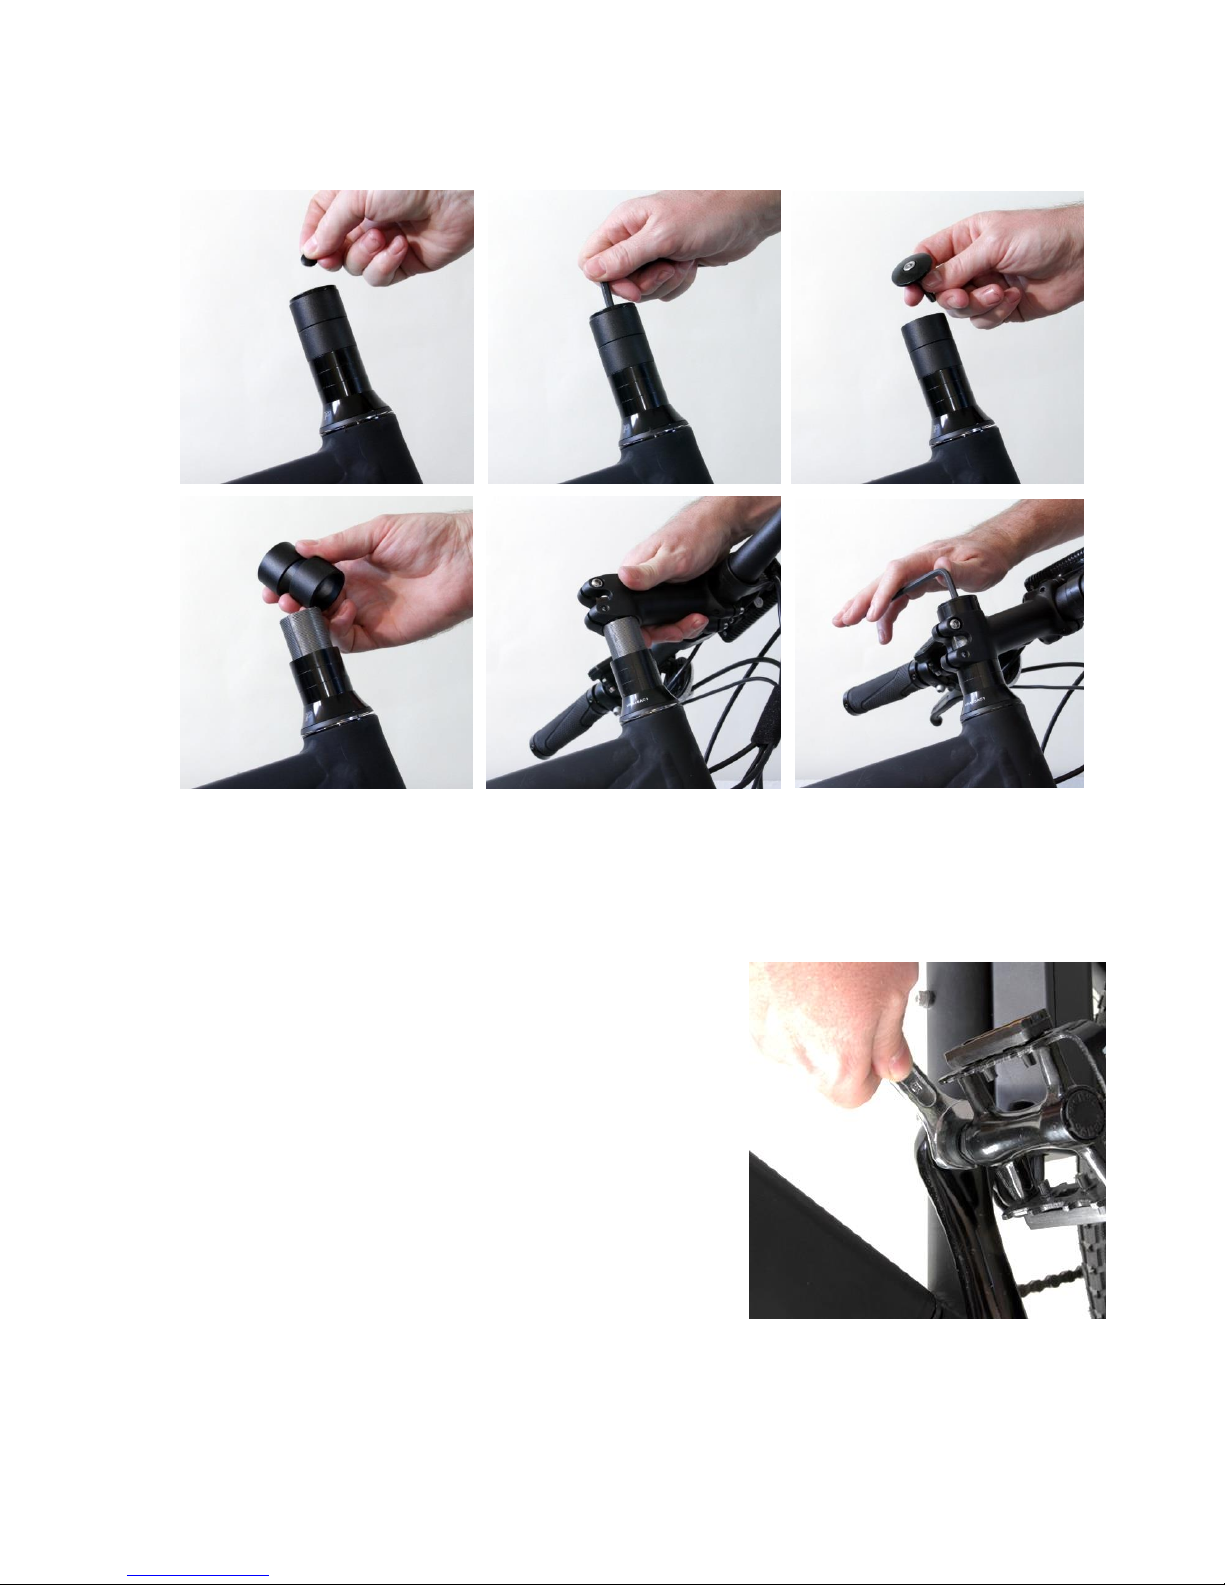
Step 3.
To fit the handlebar to your e-bike, remove the small black rubber cap and hex bolt with the 5mm
Allen Key, then remove the ring spacers and set aside, (refer images on the following page). Please
take care that the controls will not interfere with the correct operation of other components, or
cables.
Now fit two thin rings followed by the head stem, then the last thin ring to the top of the fork. Take
the black cap and hex bolt previously removed and refit. Check that the lower bearing is seated
correctly and tighten, (taking care not to over tighten) it is right when the handlebars turn freely and
there is no free play. Check by holding the front brake on and moving the bike back and forth.
Check for correct alignment of the front wheel in relation to the handlebars, they should be at right
angles. Now tighten the two locking hex bolts to 7~10NM, take care not to over tighten.
Page 10
2014 Dyson Bikes page 10
More information regarding handlebar adjustment can be found on page 14.
Step 4.
Locate pedals and use 15-mm spanner to attach to crank arms
as shown in the image shown here.
Note that the pedals are marked „L‟ for left and „R‟ for right. The
Left pedal has a left hand thread and needs to be tightened in
an anti-clockwise direction; the right hand pedal tightens in a
regular clockwise direction.
Screw into the crank carefully using your fingers, then tighten
firmly with the 15-mm spanner. We recommend a torque
wrench be used to tighten to ≥35Nm.
Page 11
2014 Dyson Bikes page 11
Step 5.
Charging the battery. The battery is held into the
frame with a keyed lock, two keys are supplied
with your e-bike.
We highly recommend that you keep one key in a
safe and secure location in the event the main key
is lost.
Locate the battery charger and plug into a regular
240-Volt wall socket, the other small plug can then
be inserted into the battery as shown below. The
LED light on the charger will glow red to indicate
charging is in progress.
Charging can take place with the battery in the frame, or you can remove and charge separately.
Once fully charged the LED indicator light on the Charger will be green.
Make sure the battery is fully charged before the first ride and charge again for at least 6-hours
after.
Further notes on battery care can be found under Section 4.2 Battery and Charger.
Step 6.
Your e-bike is now assembled, but it is not quite ready for the first ride. Please continue to read
through this manual paying particular attention to Section 3 ensuring that all bolts screws etc. are
firmly tightened to the recommended specification.
Page 12

2014 Dyson Bikes page 12
Section 3 - Mechanical Operation and Adjustment
3.1 Fitting your e-bike for a safe ride
To ride safely and comfortably your e-bike and its equipment must be matched properly to the size
and skills of the rider. An e-bike that is too big or too small for the rider is hard to control and can be
uncomfortable. If your e-bike does not fit properly, you may lose control and fall.
3.2 Controls, position and adjustment
The brake and shifting levers on your e-bike are positioned in a way that they work best for most
riders. The angle of the shifting lever can be adjusted by loosening the hex bolts securing them to
the handlebars. Once adjusted, retighten securing hex bolts, ensuring the controls will not interfere
with the correct operation of other components or cables.
3.3 Brakes
Pulling either brake level will immediately cut out the electric motor, this is a safety feature of your
e-bike. Make sure that your hands can reach and squeeze the brake levers comfortably.
Due to normal brake pad wear or cable stretch you
may need to adjust the brakes from time to time.
To adjust you can make minor adjustments with
the thumb wheels (marked A) on the brake caliper
as shown.
If required, the cable may need to be adjusted by
loosening the attachment (marked B) and pulling
the cable through. It is recommended that a
trained e-bike technician perform this operation.
The brake pads should be adjusted in such a way
that they are parallel to the disc rotor and have a
lateral clearance of approximately 1 mm with the rotor. Two hex bolts securing the brake caliper to
either the front fork or frame make this adjustment. It is recommended that a trained e-bike
technician perform this adjustment.
Front wheel brake lever must be mounted on the RIGHT
hand
side; rear brake lever on the LEFT hand side.
Page 13

2014 Dyson Bikes page 13
The brakes of the front and rear wheel can be applied independently, or simultaneously.
Keep the disc rotors and brake pads clean and free of lubricants, waxes or polishes.
WARNING
The e-bike is equipped with a front disc brake and it can achieve a very high braking force.
In sharp turns, on sandy or slippery roads, wet asphalt and icy paths; apply the front brake carefully,
so that the front wheel will not slip.
Please brake with care and caution. Locked wheels have a lower braking effect and can lead to
slipping and falling. In principle, do not brake while turning, instead do it beforehand. Braking in a
turn/curve increases the risk of slipping.
NOTE We do advise that you practice „worst case‟ heavy braking in a clear location, where you
won‟t injure yourself or others.
3.4 Saddle position
To ride comfortably and pedal efficiently, it's very important to have the saddle at the correct height.
Your leg length determines the correct saddle position. The saddle is at the correct height for you
when, while seated on the saddle, your knee is slightly bent when the crank is at the maximum
down stroke (pedal is closest to the ground).
To adjust the saddle height, loosen the seat post clamp
(marked A) by unlocking the quick release, and moving
the seat post up or down as required while ensuring it is
within the minimum and maximum range as marked on
the seat post. Make sure the saddle is parallel to the top
frame tube. Lock the quick release tight enough so that
you cannot twist the saddle out of alignment. Do not
overtighten. By adjusting the nut on the quick-release
lever, the clamping force can be regulated.
The saddle can be tilted and also adjusted in the
longitudinal direction for best fit. This may be adjusted
by loosening the hex screw located under the saddle. Adjust to the desired position then tighten.
Page 14

2014 Dyson Bikes page 14
Handlebar grips or tube-end plugs should be replaced if
damaged. Unprotected tube-ends can cause injury.
WARNING An incorrectly tightened quick release lever may come loose and rotate downward
during the ride. This may lead to serious falls.
The quick release lever will require sufficient pressure to close that the heel of the hand is needed
to move it. In this way, the friction is strong enough. The quick release shall be tight enough so that
it requires you to provide a degree of force to unlock it.
Under no circumstances should the seat post project from the frame beyond its 'Minimum Insertion'
or 'Maximum Extension' mark.
3.5 Handlebar position
The handlebar height is correct when the stem is on the same plane as the top surface of the
saddle or slightly higher. The height can be adjusted by moving the rings above or below the head
stem, refer pages 9-10.
To adjust remove the top hex bolt and black cap, then loosen the two locking hex bolts. Taking care
not to excessively bend control cables remove head stem and position rings to desired height and
refit top hex bolt and cap, tighten. Tighten locking hex bolts to 7~10NM while ensuring correct
alignment of handlebars is maintained.
3.6 Changing Gears
Located on the right hand handlebar is the control for the 9 speed gear system. The current gear is
indicated in the display with „1‟ being the lowest and „9‟ the highest. Use the lower gears for climbing
inclines or riding slowly. Note in the lower gears the crank will turn more in relation to the road
speed, this will cause the e-bike controller to provide greater assistance.
With experience you will learn the best gear to use in conjunction with the PAS level to maintain the
desired road speed.
To change down a gear, press the rear lever forward one „click‟ and to change to a higher gear,
press the front lever backward. Continue to pedal forward during this operation.
WARNING Do not pedal backwards whilst changing gears, the chain may fall off!
Page 15

2014 Dyson Bikes page 15
3.7 Tyres
Ensure tyres are correctly inflated. Under inflated tyres can lead to punctures or damage to rims.
In addition to standard manual air pumping, the tyres can be inflated with air compressor devices
like those found at service stations.
We recommend a tyre pressure for front and rear at 420 kPa, (equivalent to approximately 60 PSI
or 4.1 Bar). This is a higher pressure within the acceptable range, higher pressures decrease the
rolling resistance making it easier to pedal and putting less load on the electric motor therefore
increasing the available range of a battery charge.
WARNING When pumping up tyres with an air compressor device (for example at service
stations) please note that due to the small volume of the tubes, the tyres will inflate quickly.
Do not over or under inflate. Keep within a range of 280 - 460 kPa (40 – 65 PSI or 2.8 – 4.6 Bar).
3.8 Cranks
The cranks will loosen gradually over time. Check regularly if the cranks are tightened properly.
Force the cranks from one side, and there should be no slack between it and the bottom bracket.
There should also be no slack between the bottom bracket and the axle, and the crank can rotate
easily. Check the bottom bracket regularly by moving the crank back and forth from one side.
If you find that the cranks or the bottom bracket is loose, go to an experienced repairer for
rectification. The cranks are tightened to max. 35 Nm.
3.9 Pedals
Check regularly that the pedals are firmly secured to the cranks.
Note that the pedals are marked „L‟ for Left and „R‟ for Right. The Left pedal has a left hand thread
and needs to be tightened in an anti-clockwise direction; the Right pedal tightens in a regular
clockwise direction.
Tighten firmly with a 15-mm spanner. We recommend a torque wrench be used to tighten to
≥35Nm.
Page 16

2014 Dyson Bikes page 16
3.10 Spokes
A tight fit of the spokes is important for impact-free running of the wheels. Loose spokes should be
retightened as soon as possible.
A broken spoke/s and their opposite spokes must be replaced immediately and the wheel trued
thoroughly. If necessary, rebuild the wheel.
Broken spokes and an out of balance wheel can often result from improper tensioning of spokes.
It is recommended that a trained e-bike technician replaces, tightens or eases spokes.
3.11 Forks
The forks can be set to the locked position by a level located on the top right hand leg.
In the event that the front forks need to be replaced it is critical that they are replaced with a
component of the same specification. Forks of a different size may cause your e-bike to become
unsafe.
3.12 Kick Stand
If fitted, ensure the kick stand is folded down completely when parking. Make sure it is folded back
up before riding.
Page 17

2014 Dyson Bikes page 17
Section 4 - Electric operation and adjustment
This section covers using the display panel and other e-bike specific functions.
4.1 General information
The Pedal Assistance System, (PAS) is dependent on the pedaling frequency and will end when
you stop pedaling (motor stops in about 2 seconds), more assistance is provided when you pedal
faster (such as when in a lower gear).
The assistance will decrease when your riding speed goes up and will completely end at about
25km/h (this is a legal requirement for operating the e-bike on public roads).
Applying either the front of rear brake level will cut out PAS.
You can adjust and/or completely turn off the assistance at any time, and ride your e-bike as an
ordinary bicycle.
We recommend you disable the assistance in hard rain, in sandy terrain and in heavy traffic.
If you have to wheel the e-bike, switch off the control panel in case the motor might suddenly start
due to an unintended crank rotation.
Always keep the control panel off when the e-bike is not in use.
WARNING Never turn on the motor in heavy traffic or crowds!
4.2 Battery and Charger
The battery of your Dyson e-bike is Lithium–ion and some care is needed to maintain the battery‟s
peak performance.
The battery features a self-contained charge indicator, press the small blue button on the topside to
display the current state of charge, red only is low, red and three blue LED‟s is full.
Only use the supplied charger to charge the battery. If lost or damaged replace only with a genuine
Dyson charger.
Page 18

2014 Dyson Bikes page 18
The charger is a computer-controlled system with many monitoring and control functions. The
charger stops charging when the battery is fully charged. The battery cannot be overcharged
however; we recommend that the battery be connected to the charger only when the e-bike will be
used in the near future. The included charger must only be used for charging genuine Dyson
batteries.
The LED on the charger indicates the current operating status.
Charging cycle and LED indicators for lithium ion Battery
LED COLOR
MODE
Red
Charging
Green
Charging finished; Charger stops working
If the charging is abnormal
Check if the power outlet is OK.
Check if the contact to connectors is right.
If it is still not possible to charge, please contact Dyson Bikes for advice on how to rectify.
The battery may be charged while mounted to the e-bike, or may be removed and charged
separately.
To remove the battery use one of the supplied keys in the lock situated on the top of the frame near
the head. Turn to open with one hand and use the other to remove by placing two fingers in the slot
on the underside near the lock. Use care, as the battery is heavy!
To refit the battery align the bottom of the battery with the frame and carefully push the top of the
battery into the frame. A „click‟ will be heard from the locking mechanism once positioned correctly.
When the battery is removed from the e-bike it is advisable to keep the power switch in the „OFF‟
position to remove the risk of accidentally shorting the battery terminals.
NOTE Two keys are supplied with your e-bike; store one in a safe place in case the other is lost.
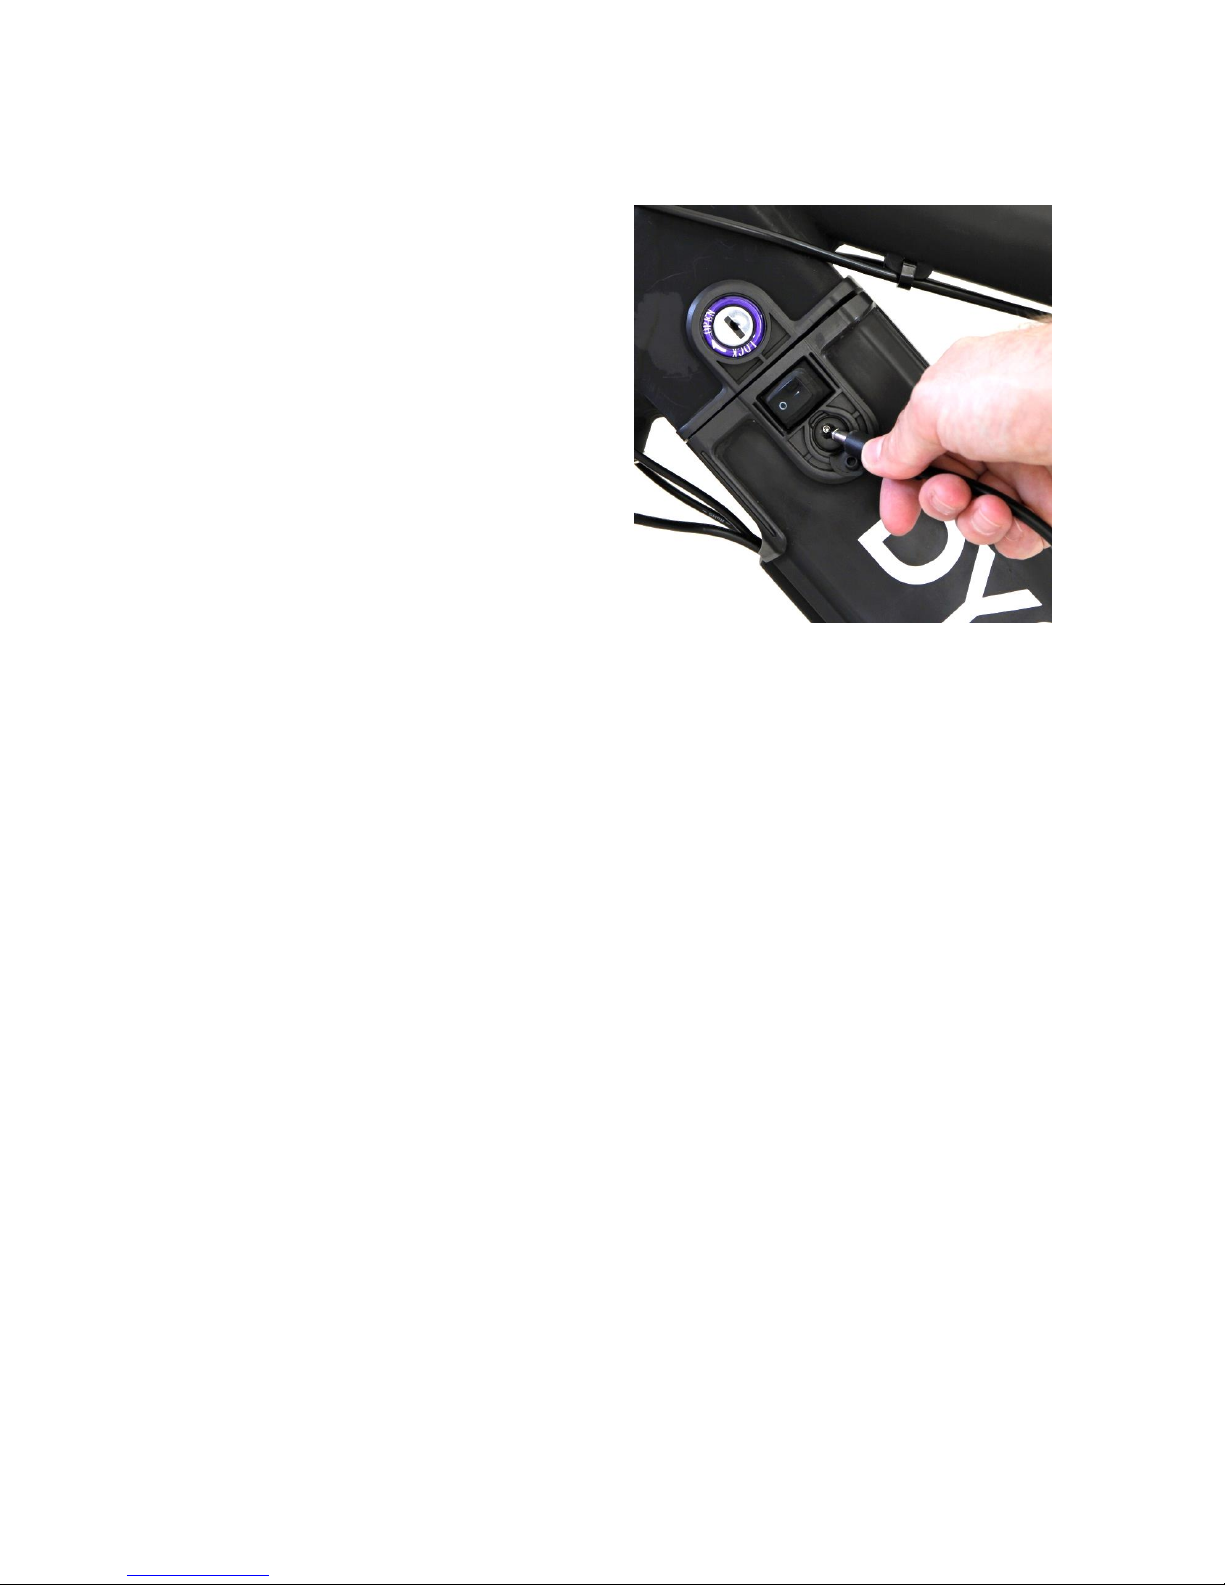
To charge the battery plug the charger into a regular 240-Volt wall socket, the other small plug can
then be inserted into the battery by lifting the small flap next to the battery power switch. The LED
light on the charger will glow red to indicate charging in progress.
Page 19

2014 Dyson Bikes page 19
Once fully charged the LED indicator light on the
Charger will be green.
Make sure the battery is fully charged before the first
ride and charge again for at least 6 hours after.
Switch on the main power switch located on the battery
when using the e-bike and off again when the bike is not
in use.
The position of the battery power switch does not affect
charging.
To maximize the battery life, the following instructions should be followed:
The charger will not work efficiently if the battery stays below 0° C or above +40° C. Ideally,
keep the battery at room temperature (approx. 20° C) during charging.
Remove charger once charged; do not leave on charge for extended periods.
Charge in a dry place.
Recharge every 2 months if unused.
Before re-using the battery after long periods, charge the battery fully.
Keep the battery as close to normal room temperature as possible by parking the bike out of
the sun on hot days and not leaving in hot cars or sheds. If necessary remove the battery
from the bike.
WARNING Failure to comply can lead to absolute discharge of the battery. A completely
discharged battery is not covered by warranty.
NOTE Self-discharge will occur over time, this is a normal characteristic of batteries. This is due to
chemical processes in the gas-tight cells, state of charge and environmental conditions
(temperature, humidity).
Page 20

2014 Dyson Bikes page 20
4.3 Control panel
4.3.1 Display indication
The display indicates the key functions of the e-bike such as battery charge status and PAS level.
The control panel is operated by
the three buttons located on the
small pad on the left hand side of
the handlebars.
For your e-bike to function, the
main power switch on the battery
must be in the ON position.
4.3.2 Settings and configuration
Your e-bike is set to the correct settings before delivery and no adjustment is required for normal
operation, but it is possible to make adjustments. See the following for advice on how to make
changes.
4.3.3 Entering setting mode
Ensure the battery mounted power switch is in the „I‟ position.
Press the centre „MODE‟ button for 1.5 seconds to turn on the display.
After switching the display on, immediately press both „UP‟ and „DOWN‟ buttons
simultaneously for 2.5 seconds.
The display then enters into setting mode and the first parameter flashes.
Page 21

2014 Dyson Bikes page 21
Parameter 1 - Wheel diameter.
Press „UP‟ or „DOWN‟ buttons, and select „26 inch‟.
Confirm the wheel size by pressing „MODE‟.
Parameter 2 - Display background lighting level
The second set parameter is the brightness of the display background lighting.
Please press „UP‟ or „DOWN‟ button to change the brightness level.
You can select from low to high - 1, 2 or 3 (maximum brightness).
Confirm setting by pressing „MODE‟.
Parameter 3 - Measurement system
The third set parameter is for shifting the display unit between metric and imperial.
Press „UP‟ or „DOWN‟ buttons to change the indicating measurement.
You can select Mile or Km.
Page 22

2014 Dyson Bikes page 22
Saving all settings:
After selection of the desired settings, press and hold the „MODE‟ button for 3 seconds to save the
settings. Once saved the display will revert to normal.
4.3.4 Display ON/OFF
ON - Ensure the battery switch is in the „I‟ position, then press and hold the „MODE‟ button for 1.5
seconds to turn on the display.
OFF - Press and hold the „MODE‟ button to turn off the display; the power of the controller will be
cut off.
NOTE In the power OFF status, no battery power will be consumed.
4.4.5 Backlight
When riding at night it is advisable to switch on the control panel backlight.
Once the display is on, press and hold the MODE and UP buttons simultaneously for 3 seconds
until the backlight comes on. Use the same procedure to switch off.
4.4.6 PAS mode
There are 5 PAS levels available to suit your riding style. Press the „UP‟ or „DOWN‟ buttons to select
the appropriate assistance level for the current situation. For most situations „3 – Standard‟ provides
the best mix of assistance and range. To ride without assistance select „0‟. The speed, trip and
odometer functions will still function in this mode.
In addition to the 5 PAS levels, there is also “WALK” assistance mode. You can activate this mode
by keeping pressing the “DOWN” button for a few seconds and deactivate this mode by releasing
the button. This will activate the motor without pedaling to maintain a walking speed.
NOTE Riding the bike with the display off will not record mileage.
Page 23

2014 Dyson Bikes page 23
4.4.7 Mileage measurement
Two display modes are available, „TRIP‟ distance travelled since powering on display and „ODO‟
(Odometer) total mileage.
Press the „MODE‟ button, and select between „TRIP‟ and „ODO‟.
TRIP measures the distance travelled since turning on the display, this is reset each time the
display is cycled off and on. The odometer measures total distance traveled, however please note
distance traveled will not be recorded if the bike is ridden without assistance and the display off.
To zero the „TRIP‟ meter during a ride:
Press the „MODE‟ button until „TRIP‟ appears
Then press and hold the MODE for 3 seconds till „TRIP‟ reading is “0.0”
4.4.8 Speed measurement recording
Maximum speed (MAX SPEED) and the average speed (AVG SPEED) are recorded for a trip. A trip
is the time between turning on the display or resetting the „TRIP‟ meter and assistance stopped.
Page 24

2014 Dyson Bikes page 24
To access this information:
Press and hold „UP‟ button for 3 seconds until „AVG-SPEED‟ is displayed.
Press and hold „UP‟ again until „MAX-SPEED‟ is displayed.
Press and hold „UP‟ button again to go back to the normal indication.
4.4.9 Power Indicator
The display shows the power consumption in Watts while riding.
To maximise range try and keep this figure as low as possible.
4.4.10 Error Message
In the unlikely event there is a problem with the electronic control system „Error‟ may be displayed
followed by an error code number 21, 22 etc.
Page 25

2014 Dyson Bikes page 25
Code no.
Description
21
Voltage error
22
Throttle problem
23
Motor phase problem/ sensor
24
Motor hall problem
25
Brake switch problem
ATTENTION If your e-bike displays an error code:
Please refer to the trouble-shooting guide on page 32.
The problem must be resolved before the e-bike can return to the normal state.
Do not ride the e-bike with assistance active before the issue has been rectified.
Riding as a regular bike with the main battery switch off is OK to complete your journey.
Page 26

2014 Dyson Bikes page 26
Section 5.0 - Safety
5.1 General
□ Check and tighten any loose nuts, bolts, and straps.
□ Tyres: are they correctly inflated? Push down with your thumb on the top of the tyre, it should
depress slightly. Compare to how it feels when you know the tyres are correctly inflated.
Check for cuts or cracks, replace damaged tyres before they puncture.
□ Wheels: are they straight and true? Spin each wheel and check for brake clearance and side to
side wobble. If a wheel wobbles it may be buckled. If buckled take to an experienced e-bike repairer
to rectify.
□ Brake: Check that the brakes operate effectively.
□ Quick Releases: Are the front wheel and seat post quick releases properly adjusted and in the
locked position? Check all quick release mechanisms are correctly and securely closed.
□ Lights (where fitted) and Reflectors: Are they working and correctly aligned?
□ Handlebars and Saddle: Are the:
Handlebars and saddle system horizontal and tight enough so they won't twist
Handlebars secure and in good condition
Handlebar ends in place? And,
Is the bell working?
NOTE Any broken or worn parts should be replaced before the e-bike is used. When replacing parts
we recommend using genuine Dyson parts.
5.2 Safety equipment and commonsense riding
As a road user you are responsible for your own and others' safety.
You need to know: The road rules and how to ride safely.
5.2.1 Your e-bike
Check your e-bike before using it as detailed in this manual. Know how to operate all mechanical
and electrical controls. For riding in low light and night conditions, switch on display backlighting, fit
and use front and rear lights.
Page 27

2014 Dyson Bikes page 27
5.2.2 Your Clothing
Wear a correctly fitted and fastened approved helmet. Bright colored clothes and reflective tape
help improve your visibility to other road users at night. Wear covered shoes, not thongs or bare
feet.
5.2.3 Be Alert
Watch out for other road and pathway users. Adapt your riding to suit the conditions. Do not listen to
loud music, as this will interfere with your ability to hear other road users or dangers.
5.2.4 Carrying Loads
Never load the e-bike beyond its capacity, refer specifications table on page 8 for details.
5.2.5 Riding in the wet
We highly recommend that you do NOT ride your e-bike in wet weather. Wet weather affects
visibility for all road users. It is harder for any vehicle to stop in the wet. Allow more distance to stop
while braking.
Page 28

2014 Dyson Bikes page 28
Section 6 - Maintenance and care
6.1 Mechanical parts
These are parts found on regular pedal bicycles, (as opposed to electrical parts found only on
e-bikes).
6.1.2 Cleaning
Mud and dust can be highly abrasive. Regular cleaning of the e-bike, especially the
electrical parts, will help maintain your e-bike in good condition.
Wipe the e-bike with a damp micro-fiber cloth. Never hose or flush the e-bike, as this has a
risk of damaging electrical parts and it can also wash the lubricants from the drivetrain.
Always thoroughly dry and lubricate your e-bike after washing or riding in rain to prevent
corrosion.
Do not apply polish as this will affect the satin finish.
WARNING Never use a high pressure water washer!
6.1.3 Lubrication
Keep your e-bike regularly lubricated for good performance and durability. Lubrication reduces
friction and helps protect against rust. All bearings and other moving parts require regular
appropriate lubrication:
Grease type lubrication: bearings in head stem, wheels, bottom bracket and pedals at least
once a year
Oil type lubrication: Brake and derailleur pivot points and jockey wheel, chain, freewheel
once a month
Never lubricate the brake pad, rim or tyre.
6.1.4 Monthly Service Items
Tyres and tubes
Clean the tyres and inspect treads for wear.
Remove any debris from tread or walls.
Check if tyre pressure is correct.
Check valves for leakage.
Replace faulty tubes.
Page 29

2014 Dyson Bikes page 29
Wheels
Check rims for accuracy and spokes for evenness of tension.
Replace any bent or broken spokes.
Make sure that the wheel is mounted centrally in the frame.
Brakes
Check brake pad and brake lever mounting bolts.
Check brake pads for wear and replace them if necessary.
Check if the pad toe-in alignment is correct.
Gear and brake cables
Inspect all cable housing for damage. Replace if necessary.
Clean and examine all cable wires for kinks and frayed ends. Replace if necessary.
Adjust barrel adjusters and/or cable anchor bolts to compensate for cable stretch.
Hubs
Check front and rear hub bearings for excess play or binding. These have adjustable
cup-and-cone bearings, tightened or loosened if necessary.
Check if hubs are correctly lubricated.
Tighten hub axle nuts and check quick release levers for correct tension.
Drivetrain
Clean chain wheel; check if it is true and has no broken teeth or is excessively worn.
Check if crank arms are tight on bottom bracket spindle.
Clean and lubricate freewheel and check for wear.
Check freewheel sprocket for worn or broken teeth.
Check chain for excessive wear or stretching.
Check for any stiff links.
Use a suitable chain lubricant, we recommend Shimano Wet Lube (WS8000121)
Adjust the rear derailleur to ensure correct chain tension and alignment.
Bottom Bracket/Axle
Test bottom bracket bearings for excess play or binding.
Check if the locknut is tight.
Check if bottom bracket is correctly lubricated.
Headstem
Check headstem for excess play or binding.
Check if the lock bolts are tight.
Pedals
Make sure pedal bodies are not cracked.
Tighten the mounting bolts of pedals if necessary.
Page 30

2014 Dyson Bikes page 30
General
Check frame alignment and all the tubes for dents or damage.
Check welds for cracks.
Check all fasteners, bolts, nuts and quick releases are secure.
Tighten bolts to the correct tension with the correct tools.
6. 2. Electrical Components
6.2.1 Rear Hub Motor
Pay attention to the abrasion or damage of all cable connections, so as to avoid short circuit
or motor failures.
Avoid riding or parking in heavy rain or deep water.
6.2.2 Control Panel
Inspect cables for damage; repair where necessary to avoid short circuits and damage to
the control unit.
Avoid direct contact with water.
6.2.3 Battery
Only use the supplied charger to charge the battery. If the battery will not be used for a long
period, please store it in a cool and dry place, and charge it every 2 months for a minimum
of 2 hours (half charged).
Before connecting the charger to the mains, check whether the voltage of your power
supply matches the nominal voltage of the charger.
For your own safety: Never place the battery near fire or other heat sources.
Do not dispose of in a fire.
Do not place the battery near combustibles or explosives while charging.
The battery will heat up under heavy load. Pay attention to the room temperature before
charging and place the battery where it‟s cool.
Protection against moisture: Avoid riding the e-bike in standing water or in pouring rain,
otherwise the electronic parts or connections could be damaged.
The battery contains no user serviceable parts – DO NOT OPEN. Contact Dyson Bikes for
advice on repair or replacement.
Never connect together the two pins of the battery; this will result in a short circuit and fire.
Prevent the battery from falling on the ground or heavy striking.
Alloy bicycle parts can be easily
damaged by over tightening.
Page 31

2014 Dyson Bikes page 31
The maximum battery life can be achieved if you charge it at ambient temperature between
+10℃ and +30℃. Avoid extended exposure to the sun or an environment of over 60℃ (for
example in vehicles or sheds).
Keep water or moisture out of the charging jack.
Keep the battery out of the reach of children.
NOTE A worn-out battery is subject to special disposal requirements. The battery contains toxic
heavy metals and therefore is subject to the hazardous waste treatment regulations. Only
authorized parties are allowed to take care of the disposal. Contact Dyson Bikes if you need further
information.
6.2.4 Charger
Store the charger out of the reach of children.
Never use the charger during a thunderstorm.
Do not use the charger for charging unauthorised accessories or batteries, which may lead
to fire, electric shock or personal injury.
Do not use the charger if there is apparent damage to the charging plug or cable.
The charger is not able to be serviced by the user – please do not disassemble.
Incorrect installation may lead to electric shock or fire.
In order to avoid short circuit, please disconnect the charger from the mains before cleaning
it.
Only use the charger in dry, clean and cool conditions.
Prevent liquids and metal objects from getting into the charger.
Always keep the charger somewhere safe and stable; protect it against impacts and other
damages.
Clean the device with a dry cloth. Do not use oil, water or solvents.
Only use genuine Dyson parts for replacement of safety critical
components, especially motor, controller, battery, charger and
control panel. Use of unauthorised components may result in
serious injury or accident!
Page 32

2014 Dyson Bikes page 32
Section 7 – Trouble-shooting
ISSUE
SOLUTION
The control display has no power and cannot be
started.
Check battery is in „I‟ position.
Check the battery charge indicator. If there
is no outgoing voltage, the battery must be
charged or replaced.
Check the control display. If the control unit
is broken down or damaged, it must be
replaced.
Check if there are contaminates or
damages on the contact points between
battery and control display.
The control display can be turned on, but it
does not provide assistance and the speed is
not displayed.
Incorrect positioning of the magnet in the rear
wheel may cause this malfunction. Adjust the
magnet in such a way that it passes the sensor
unit as closely as possible and that it is
fastened tightly onto the spoke.
The indication is normal, but the motor does not
start.
This failure may be caused by an improper
connection between the motor and the control
display. Check if the plug is correctly connected
or if there are cable breakages.
The control display can be turned on, but it
turns off during riding, and the indicator goes
off.
This failure may be attributable to a short
circuit in the motor connection. Please
check if all cables are properly connected
and are damage free.
Check that you are not bumping the battery
on/off switch.
The battery indicator blinks and the PAS does
not work.
The battery is running too low and must be
charged.
The indicator blinks during the charging
process.
It means that the charger is in protection mode
due to a short circuit. Eliminate the short circuit
or consult an authorised repairer.
Failure indicated by the control display.
If the display lights blink or are not working
properly, there is an electrical failure. Check all
cable connections. If all cables are correctly
connected and the error code is still shown,
contact an authorised repairer.
Note: You may ride the e-bike trouble-free as an ordinary bike without assistance in this case!
Page 33

2014 Dyson Bikes page 33
Section 8 - Warranty
An Electric Bike, Bike, Bike Part or Bike Accessories („E-Bike‟, „Bike‟, „Part‟ and „Accessory‟) purchased
new from Dyson Bikes is warranted for the periods and on the conditions set out below.
An E- Bike, Bike, Part or Accessory purchased from Dyson Bikes is covered for a period of 12 months.
Adequate proof of purchase must be provided to support a Warranty claim.
If a Bike, Part or Accessory is defective (other than for the Warranty exclusions specified below) during
that period, we will replace or repair it at our cost. To make a claim please return the complete Bike,
defective Part or Accessory to the place of purchase.
Our goods come with guarantees that cannot be excluded under the Australian Consumer Law. You are
entitled to have the goods repaired or replaced if the goods fail to be of acceptable quality and the failure
does not amount to a major failure. The benefits under this warranty are in addition to other rights and
remedies you may have at law.
This voluntary Warranty is given by Hasta industries Pty Ltd trading as Dyson Bikes of 40 Catherine
Road, Bentleigh East, Victoria, Australia. ABN 211 656 485 00. The Warranty covers the correction,
during the relevant Warranty Period, of defects in any such E-Bike, Bike, Part or Accessory, by repair or
at Dyson Bikes option by replacement. The benefits conferred by this Warranty are in addition to other
rights and remedies available to you under the Australian Consumer Law. This Warranty in no way limits
or restricts your rights or remedies under the Australian Consumer law.
E-Bike, Bike, Part and Accessory Warranty exclusions. Normal Bike maintenance items which require
periodic replacement during the course of normal operation, such as brake pads/shoes, tyres, tubes,
chains, batteries, gears, bearings etc. are warranted against manufacturing defect for the lesser of (a) 12
months from the date of purchase, or (b) 2,000km of use, whichever occurs first. Failures attributed to
normal wear and tear, misuse or abuse, incorrect fitting from a third party (not purchased from Dyson
Bikes) accessories and/or components or poor third party workmanship will not be covered.
The user assumes all risks for any personal injuries, damage to or failure of the e-bike or bike and other
losses if this bike is used in any competitive event, including, but not limited to, stunting, bicycle racing,
dirt biking or similar activities, or training for such activities.
This warranty does not cover any personal injuries, damage or failure of the e-bike or any other losses
due to accident, misuse, neglect, abuse, normal wear, improper assembly or maintenance.
For customer assistance, please call us on 0497 357 117 or email us at info@dysonbikes.com.au.
Page 34

2014 Dyson Bikes page 34
Section 9 - Maintenance Record
Your e-bike is a mechanical product, which needs to be maintained regularly.
We recommend the first service after approx. 100 km or 3-months. After that, we recommend
servicing by a trained e-bike technician every 1,000 km or 12-months whichever is greater.
Service 1: 100km / 3-months
Notes:
Date / /20 Repairer stamp
Service 2: 1,000km / 12-months
Notes:
Date / /20 Repairer stamp
Service 3: 2,000km / 24-months
Notes:
Date / /20 Repairer stamp
Service 4: 3,000km / 36-months
Notes:
Date / /20 Repairer stamp
Service 5: 4,000km / 48-months
Notes:
Date / /20 Repairer stamp
Service 6: 5,000km / 60-months
Notes:
Date / /20 Repairer stamp
Page 35

Page 36

Dyson Bikes - 40 Catherine Road - Bentleigh East Vic 3165
w. dysonbikes.com.au – e. info@dysonbikes.com.au – p. 0497 357 117
ABN 211 656 485 00 – Printed May 2014
 Loading...