

Page 1

OPERATING MANUAL
ASSEMBLY OPERATION
click
1
2
Automatic
click
click
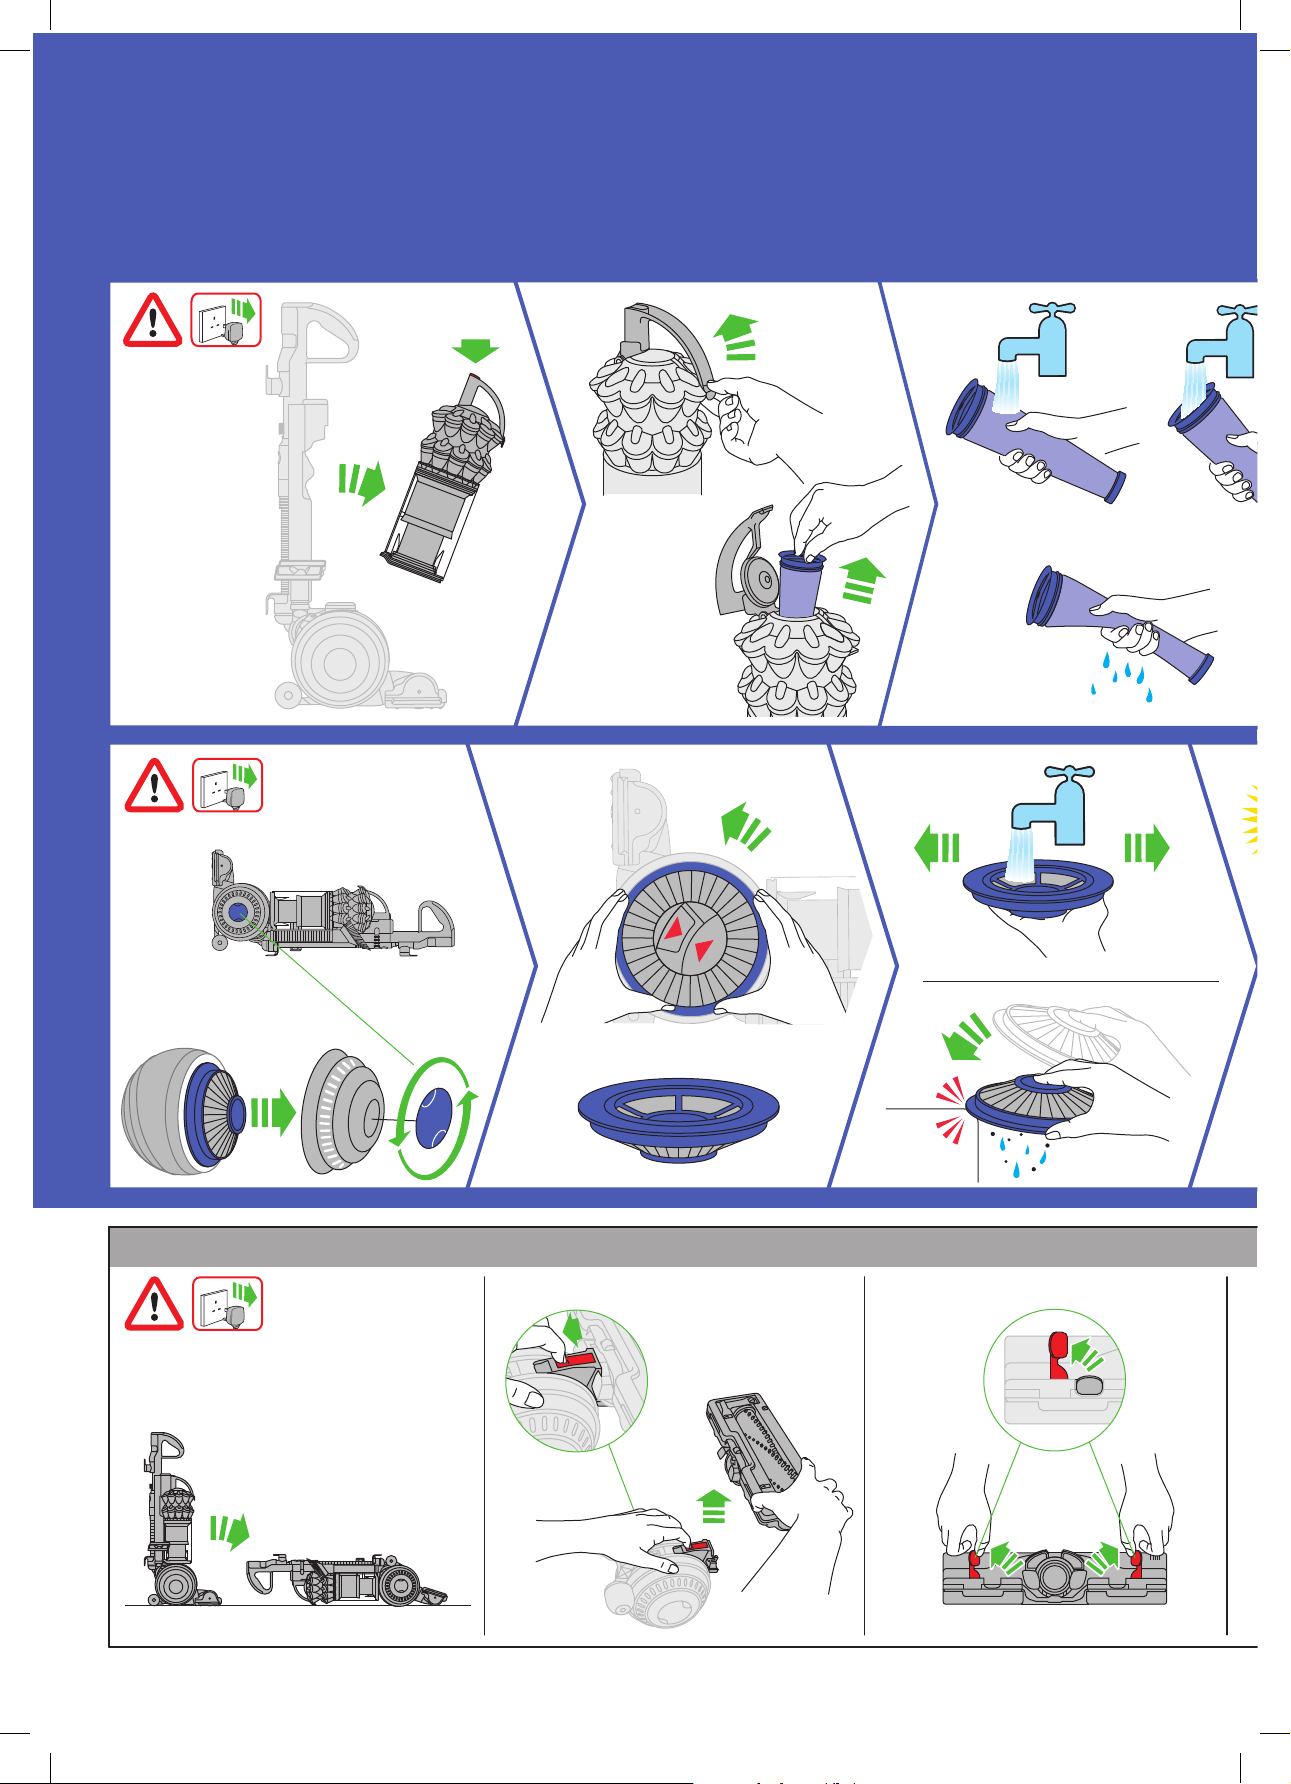
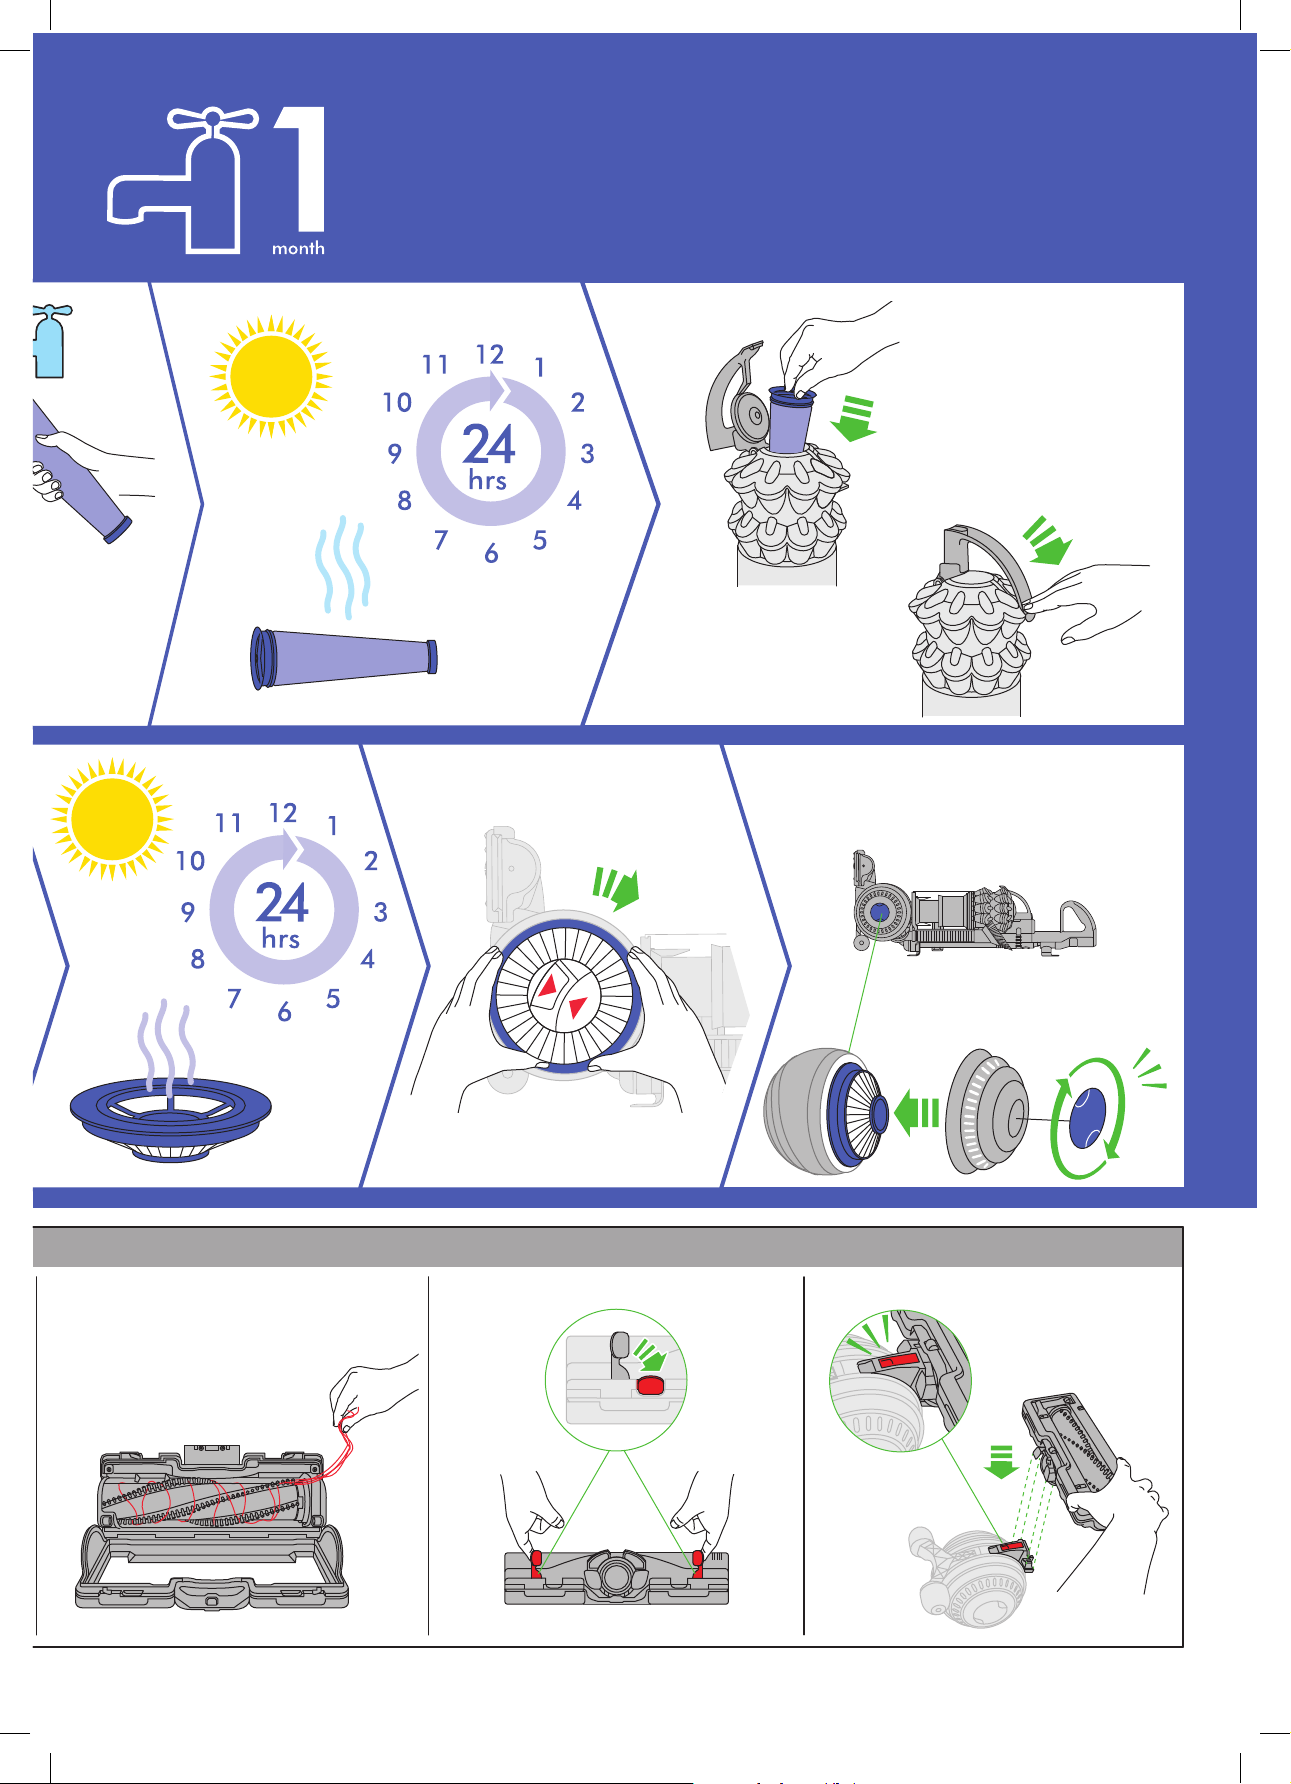
WASH FILTERS
Wash filters with cold water
at least every month.
REGISTER
YOUR FREE
5 YEAR
GUARANTEE
TODAY
Page 2
DYSON CUSTOMER CARE
THANK YOU FOR CHOOSING TO BUY A
DYSON APPLIANCE
After registering your 5year guarantee, your Dyson
appliance will be covered for parts and labour for 5years
from the date of purchase, subject to the terms of the
guarantee. If you have any questions about your Dyson
appliance, call the Dyson Helpline with your serial number
and details of where/when you bought the appliance.
Most questions can be solved over the phone by one of
our trained Dyson Helpline staf f.
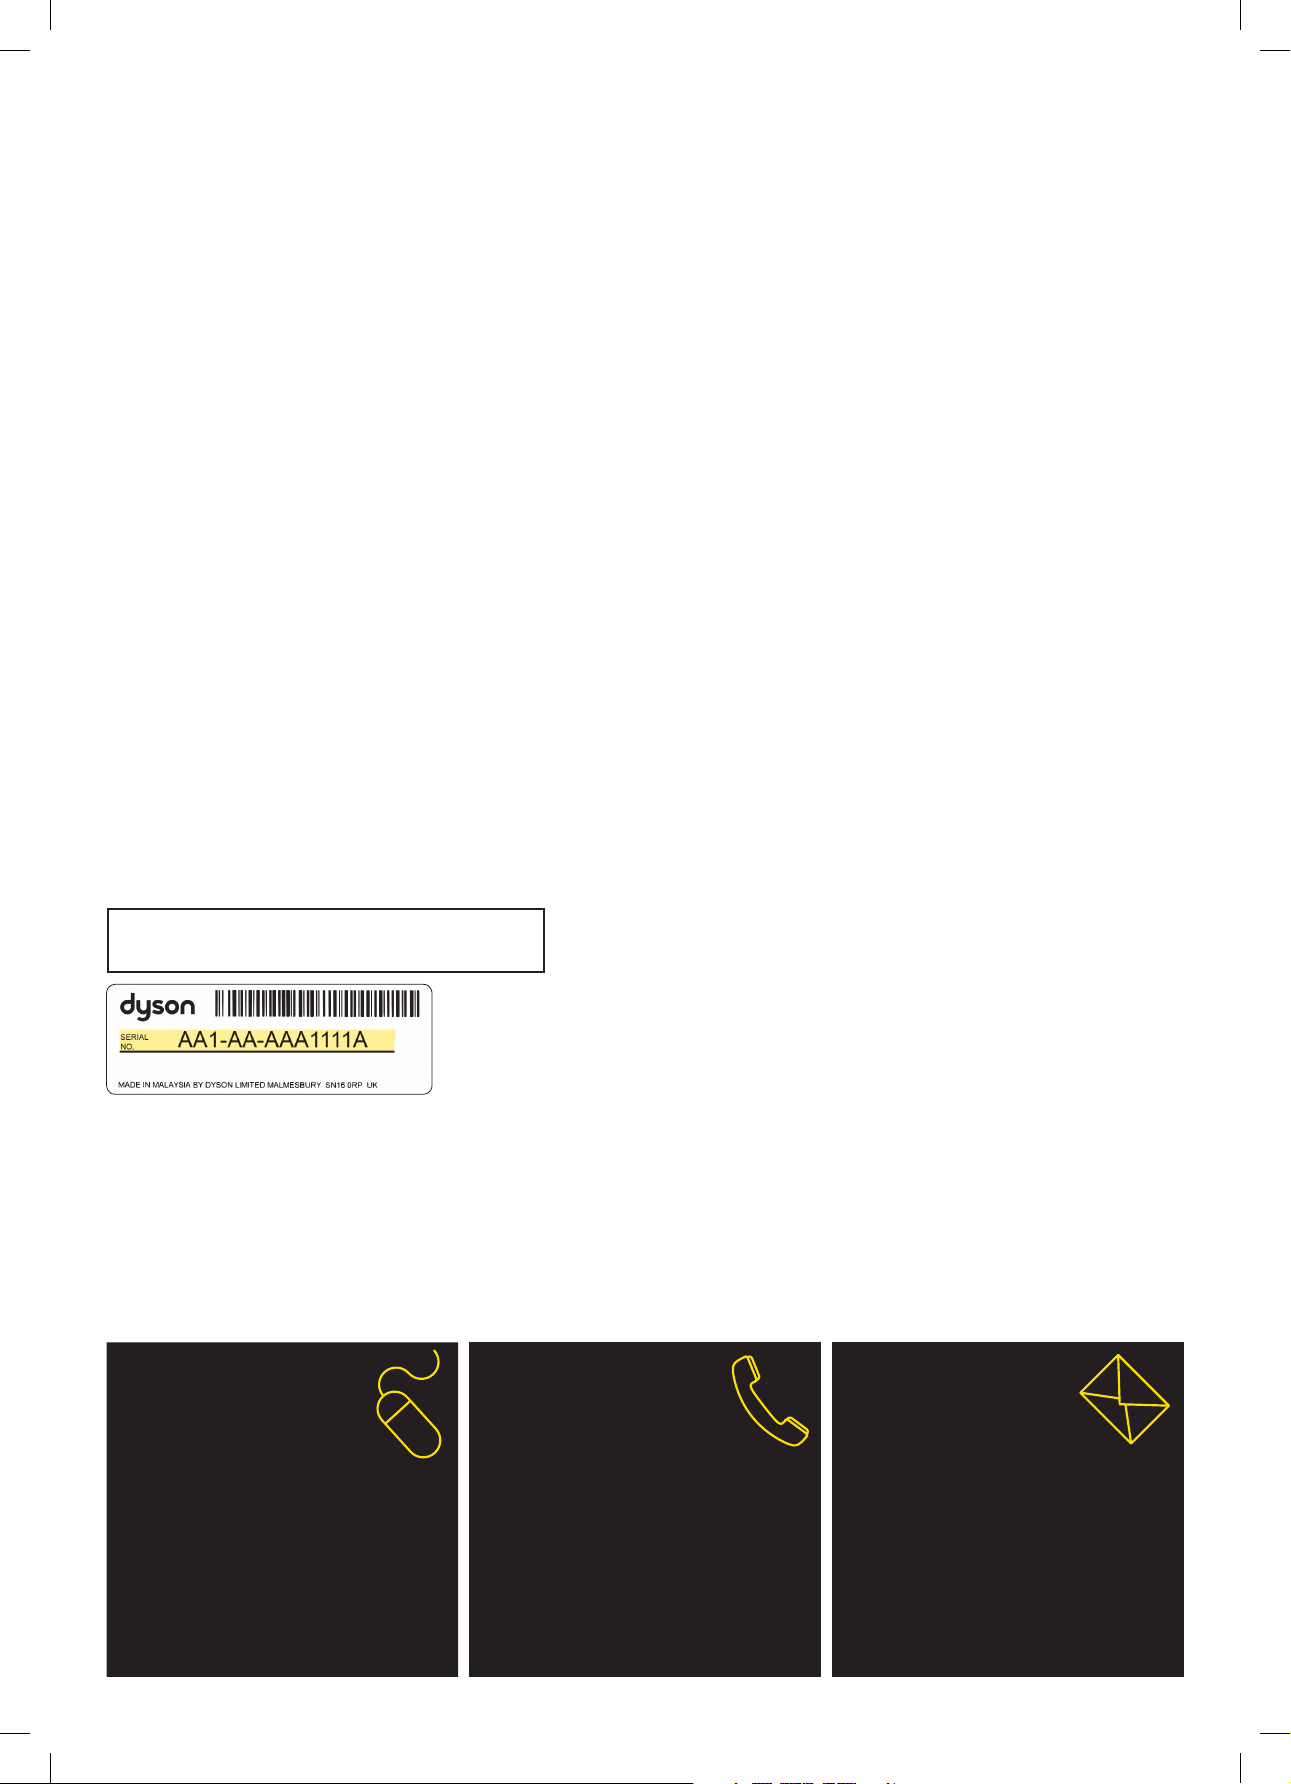
Your serial number can be found on your rating plate
which is behind the clear bin.
Alternatively, visit www.dyson.co.uk/support (UK) or
www.dyson.ie/support (ROI) for online help, general tips
and useful information about Dyson.
DYSON CONTACT DETAILS
UK:
Website: www.dyson.co.uk/support
Dyson Helpline: 08002980298
Email: askdyson@dyson.co.uk
Address: Dyson Ltd, Tetbury Hill, Malme sbury, Wiltshire, SN160RP
ROI:
Website: www.dyson.ie/support
Dyson Helpline: 014757109
Email: askdyson@dyson.co.uk
Address: Dyson Ireland Limited, Unit G10, Grants Lane, Greenogu e Business Park,
Rathcoole, Dublin 24
Note your serial number for future reference.
This illustration is for example purposes only.
3 EASY WAYS TO REGISTER YOUR FREE 5 YEAR GUARANTEE
REGISTER
ONLINE
Visit our website to register your
full parts and labour guarantee
online.
www.dyson.co.uk/register
www.dyson.ie/register
REGISTER
BY PHONE
Call our dedicated Helpline.
Open Monday to Friday 8am-8pm
& Saturday and Sunday 8am-6pm.
UK: 08002980298
ROI: 014757109
REGISTER
BY MAIL
Complete and return the form to
Dyson in the envelope supplied.
2
Page 3

IMPORTANT SAFETY INSTRUCTIONS
BEFORE USING THIS APPLIANCE READ ALL INSTRUCTIONS AND CAUTIONARY MARKINGS IN THIS
MANUAL AND ON THE APPLIANCE
When using an electrical appliance, basic precautions should always be followed, including the following:
WARNING
These warnings apply to the appliance, and also where applicable, to all tools, accessories, chargers or
mains adaptors.
TO REDUCE THE RISK OF FIRE, ELECTRIC SHOCK, OR I N J U R Y:
1. This Dyson appliance is not intended for use by young children or infirm persons with reduced physical, sensory or
reasoning capabilities, or lack of experience and knowledge, unless they have been given supervision or instruction
by a responsible person concerning use of the appliance to ensure that they can use it safely.
2. Do not allow to be used as a toy. Close attention is necessary when used by or near children. Children should be
supervised to ensure that they do not play with the appliance.
3. Use only as described in this Dyson Operating Manual. Do not carry out any maintenance other than that shown in
this manual, or advised by the Dyson Helpline.
4. Suitable for dry locations ONLY. Do not use outdoors or on wet surfaces.
5. Do not handle any part of the plug or appliance with wet hands.
6. Do not use with a damaged cable or plug. If the supply cable is damaged it must be replaced by Dyson, its service
agent or similarly qualified person in order to avoid a hazard.
7. If the appliance is not working as it should, has received a sharp blow, has been dropped, damaged, left outdoors,
or dropped into water, do not use and contact the Dyson Helpline.
8. Contact the Dyson Helpline when service or repair is required. Do not disassemble the appliance as incorrect
reassembly may result in an electric shock or fire.
9. Do not stretch the cable or place the cable under strain. Keep the cable away from heated surfaces. Do not close a
door on the cable, or pull the cable around sharp edges or corners. Arrange the cable away from traffic areas and
where it will not be stepped on or tripped over. Do not run over the cable.
10. Do not unplug by pulling on the cable. To unplug, grasp the plug, not the cable. The use of an extension cable is
not recommended.
11. Do not use to pick up water.
12. Do not use to pick up flammable or combustible liquids, such as petrol, or use in areas where they or their vapours
may be present.
13. Do not pick up anything that is burning or smoking, such as cigarettes, matches, or hot ashes.
14. Keep hair, loose clothing, fingers, and all parts of the body away from openings and moving parts, such as the
brush bar. Do not point the hose, wand or tools at your eyes or ears or put them in your mouth.
15. Do not put any object into openings. Do not use with any opening blocked; keep free of dust, lint, hair, and anything
that may reduce airflow.
16. Use only Dyson recommended accessories and replacement parts.
17. To avoid a tripping hazard wind the cable when not in use.
18. Do not use without the clear bin and filters in place.
19. Do not leave the appliance when plugged in. Unplug when not in use and before servicing.
20. Do not pull or carry by cable or use cable as a handle.
21. Use extra care when cleaning on stairs. Do not work with the appliance above you on the stairs.
22. Turn off all controls before unplugging. Unplug before connecting any tool or accessory.
READ AND SAVE THESE INSTRUCTIONS
THIS DYSON APPLIANCE IS INTENDED FOR HOUSEHOLD USE ONLY
Do not pull on the
cable.
Do not store near
heat sources.
Do not use near
naked flames.
Do not run over the
cable.
Do not pick up
water or liquids.
Do not pick up
burning objects.
Do not use above
you on the stairs.
Do not put hands
near the brush bar
when the appliance
is in use.
3
Page 4
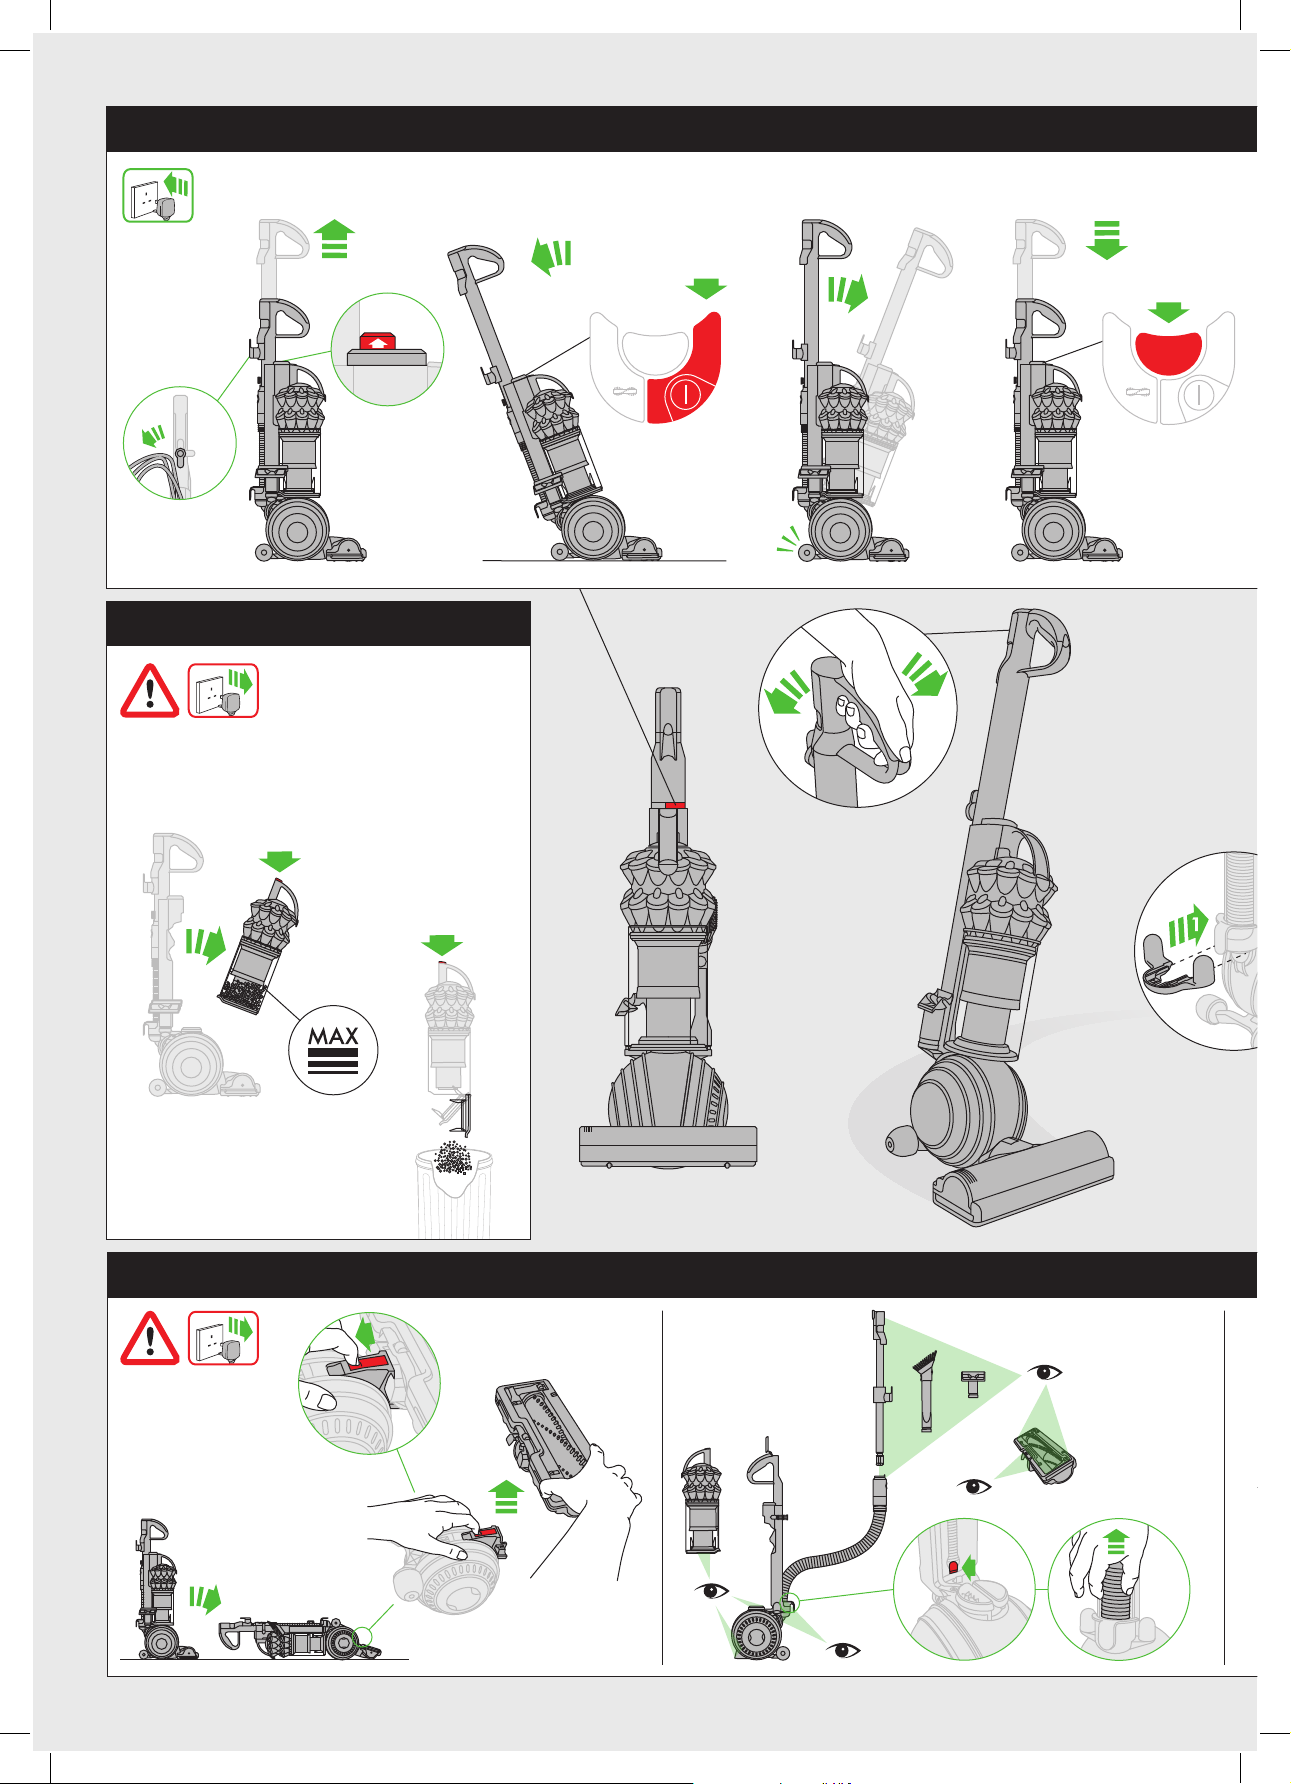
Carrying the appliance
Operation
Emptying the clear bin
Storage
1
2
click
Looking for blockages
4
4
Page 5

Carrying the appliance
Carpets or hard floors
Automatic
Self- adjusting cleaner head with suction control
Tool attachments
Brush bar – clearing obstructions
5
5
Page 6
Base plate reassembly
IMPORTANT!
WASH FILTERS
A
B
Base plate disassembly
x10
6
Page 7
Wash filters with cold water at least every month.
The filters may require more frequent washing if vacuuming fine dust.
Base plate reassembly
click
click
click
click
7
Page 8

USING YOUR DYSON APPLIANCE
PLEASE READ THE ‘IMPORTANT SAFETY INSTRUCTIONS’ IN THIS DYSON
OPERATING MANUAL BEFORE PROCEEDING.
ASSE M B LY
• Lie the appliance on its back.
• The cleaner head fits onto the connections underneath the front part of the ball.
Slide the cleaner head up into the channels either side of the airway. Push f irmly:
the cleaner head w ill click into place and the red latch will engage.
• Stand the appliance up straight.
• Place the handle and wand asse mbly into the grooves in the top of the duct on
the appliance.
• Push the red handle release button down. Slide the handle down in the grooves
for about 10cm. Let go of the button. Pull up the handle gently until it clicks into
place – the red handle release button w ill pop up.
• Connect the wand and the hose. Make sure they are seated in the recess of
the handle.
• Push the red handle release button down whilst pressing the red but ton on the
hose. Slide the handle down into place in the machine. The red handle release
button will remain down. This is the storage position.
• Close the wand cap.
• To fit the tool holder, firs t remove the cyclone and clear bin assembly: release it
by pressing the red button at the top of the cyclone.
• Slide the tool hold er onto the back of the appliance, just above the ball, as
shown. Press the tool holder on with your thumbs, while holding th e front of the
appliance with your fingers. The fit ting is tight, so use a constant, firm pressure.
(Please note: The tool holder is not designed to be removed.)
• Refit the cyclone and clear bin unit.
• Attach the tools.
• Wind the cable around the cable hooks. S ecure with the clip.
• To watch a shor t online video visit:
– UK – www.dyson.co.uk/dc50gettingstarted
– RO I – www.dyson.ie/dc50gettingstarted
OPERATION
• Unwind the cable.
• Plug the appliance into the mains electricity supply.
• To use, pull up the handle to ex tend it. T he red handle releas e button will pop
up. Recline the appliance by pulling backwards on the handle.
• To switch ‘ON’ or ‘OFF’ press the red power button, located as shown.
• After use, return the appliance to the upright position, pushing it firmly into
place. The stabiliser wheels will automatically lower.
• To retract t he handle, make sure the hose and wand are seated in the recess of
the handle.
• Push the red handle release button down. Slide the handle down into place in
the appliance.
• Then unplug the appliance, coil the cable safely and put the appliance a way.
• Switch ‘OFF’ the appliance, unplug and ensure it is upright before:
– changing or using tools
– removing the hose or air way inspection parts.
• Use the c yclone carry handle to carr y the machine.
• The wand can be used w hen the handle is retracted or extended.
• To release the wand, open the wand release cap.
• Pull the wand up and awa y from the handle.
• In use, the tools can be attached to either the hose or the wand.
• To attach the tools to the hose, press the red release bu tton in the connec ting
collar and remove the wand from the hose.
• To refit, remove tools and place the wand into the hose until the red button clicks
into place.
• Press the red but ton on the hose. Slide the wand into the hose.
• Make sure the wand and hose are seated in the recess of the handle. The hose
must be contracted.
• If the handle is extended, hold the collar with the cable hook on it and slide it
down in the recess of the handle – it will click into place. Make sure the top of
the wand clicks into place in the top of the handle at the same time. Close the
wand cap.
• Press the red handle release button down and slide the handle down into
the appliance.
• If the handle is contracted (i.e. in the low storage position), make sure the collar
with the cable hook is seated in the recess of the handle. Slide the wand down
into the hose so the top of the wand clicks into place in the top of the handle at
the same time.
SELF-ADJUSTING CLEANER HEAD WITH
SUCTION CONTROL
• This cleaner head is used for testing with the European Regulations:
No. 665/2 013 and No. 666/2013.
POWERFUL SUCTION
• For daily vacuuming of carpets, rugs and hard flooring.
– Your appliance is pre-set to this level of suction when you take it out of the
box. This is the set ting you will normally use to vacuum.
MAXIMUM SUCTION
• For vacuuming heavily soiled carpets, rugs and hard flooring.
– To switch to this se tting, move the suction control slider on top of the cleaner
head as shown.
– Before vacuuming, check the flooring manufacturer’s
cleaning recommendations.
– After vacuuming, move the suction control slider back to its original position
as shown.
CARPETS OR HARD FLOORS
• The brush bar will always default to ‘ON’ (spinning) each time you s witch the
appliance ‘ON’ and recline it for cleaning.
• The brush bar will not rotate when the appliance is upright.
• To switch the brush bar 'OFF' (e.g. for delicate rugs and delicate flooring):
– switch the appliance ‘O N’
– recline the appliance
– press the brush bar ‘ON/OFF’ but ton – the br ush bar will stop spinning.
• The brush bar will au tomatically stop if it becomes obstructed. See ‘Brush bar –
clearing obstructions’.
• Before vacuuming your flooring, rugs and carpet s, check the manufacturer ’s
recommended cleaning instructions.
• Some carpets may fuzz if a rotating br ush bar is us ed when vacuuming. If this
happens, we recommend vacuuming with the brush bar switched 'OFF ' and
consulting with the flooring manufacturer.
• The brush bar on the appliance may damage some carp et typ es. If you are
unsure, turn ‘OFF’ the brush bar.
• Check the brush bar regularly and clear away any debris (such as hair).
Debris left on the brush bar may cause damage to flooring when vacuuming.
LOOKING AFTER YOUR DYSON APPLIANCE
• Do not car ry out any maintenance or repair work other than that shown in this
Dyson Operating Manual, or advised by the Dyson Helpline.
• Only use p arts recommended by Dyson. If you do not this could invalidate
your guarantee.
• Store th e appliance indoors. Do not use or store it be low 3°C (37.4°F ).
Ensure the appliance is at room temperature before operating.
• Clean th e appliance only with a dry cloth. Do not use any lubricants, cleaning
agents, polishe s or air fresheners on any part of the appliance.
• If used in a garage, always wipe the base pla te and ball with a dry cloth
afte r vacuuming to clean of f any sand, dirt, or pebbles that could damag e
delicate floors.
VACUUMING
• Do not use without the clear bin and filters in place.
• Fine dir t such as flour should only be vacuumed in ver y small amounts.
• Do not use the appliance to pick up sharp hard objects, small toys, pins, paper
clips, etc. They may damage the appliance.
• When vacuuming, certain carpets may generate small static charges in the
clear bin or wand. The se are harmless and are not associated with the mains
electricity supply. To minimise any effect from this, do not put your hand or
inser t any object into the clear bin unless you have first emptied it and rinsed it
out with cold water (see ‘Cleaning the clear bin’).
• Do not work with the appliance above you on the stairs. W hen cleaning stairs it
is recommended that the handle is not ex tended and that you use a tool on the
end of the hose rather than the wand.
• Do not put the appliance on chair s, tables, etc.
• Before vacuuming highly polished floors, such as wood or lino, first check that
the underside of the floor tool and its brushes are f ree from foreign obje cts tha t
could cause marking.
• Do not leave the cleaner head in one place on delicate floors.
EMPTYING THE CLEAR BIN
• Empty as soon as the dirt rea ches the level of the M AX mark – do not overfill.
• Switch ‘OFF’ and unplug before emptying the clear bin.
• To remove the c yclone and clear bin unit, press dow n on the red button on the
top of the carrying handle on the cyclone.
• To release the dirt, pre ss all the way down on the same red button on the top of
the carrying handle on the cyclone.
• To minimise dust/allergen contact w hen empt ying, encase the clear bin tightly in
a plastic bag and empt y.
• Remove the clear bin carefully from the bag.
• Seal the bag tightly, dispose as normal.
• To refit:
– ensure the air way in the bin base is clear of dust and dirt
– close the clear bin base so it clicks into place
– push the cyclone and clear bin unit into the main body of the appliance;
it will click into place
– ensure the cyclone and clear bin unit is secure.
CLEANING THE CLEAR BIN
• Remove the cyclon e and clear bin (see ‘Emptying the clear bin’).
• To separate the cyclone unit from the clear bin press the red button to open
the clear bin base. This expos es a small silver button behind the red ope ning
mechanism. Press the silver button (on its ribbe d area) and separate the cyclon e
unit from the clear bin.
• Clean th e clear bin with cold water only.
• Do not use detergents, polishes or air fresheners to clean the clear bin.
• Do not put the clear bin in
• Do not immerse the whole cyclone in water or pour water into the cyclones.
• Clean th e cyclone shroud with a cloth or dr y brush to remove any lint and dust.
• Ensure the clear bin is completely dry before replacing.
• To refit:
– fit the cyclone shroud into the clear bin so that the silver button clicks
and engages
– close the clear bin base so it clicks into place
– push the cyclone and clear bin unit into the main body of the appliance;
it will click into place
– ensure the cyclone and clear bin unit is secure.
a dishwasher.
8
Page 9

WASHING YOUR FILTERS
• Your appliance has two washable f ilters, located as shown.
• Check an d wash the filters regularly according to instruc tions to
maintain performance.
• Switch ‘OFF’ and unplug before checking or removing the filters.
• The filters may re quire more frequent washing if vacuuming fine dust.
• Wash with cold water only. Do not use detergents.
• Do not put the filters in a dishwasher, washing machine, tumble dryer, oven,
microwave or near a naked flame.
Filter A
• Remove the cyclon e and clear bin (see ‘Emptying the clear bin’).
• Release the catch on the front of the cyclone handle and then remove the fil te r.
• Wash the filter with cold water only. Hold under a tap and run water through the
open end until the wa ter runs clear. Turn upside down and tap out.
• Squeeze and twist with both hands to make sure the excess water is removed.
• Run water over the outside of the filter until the water runs c le ar.
• Squeeze and twist with both hands to make sure the excess water is removed.
• Stand the filter on its wide, open end to dr y. Leave to dry completely for a
minimum of 24 hours.
• Replace the filter into the c yclone. Swing the handle back into place. Ensure the
latch clicks to engage and is secure. Fit the cyclone and clear bin unit onto the
appliance (instructions above).
Filter B
• Lie the appliance on its side.
• To remove filter B:
– turn the blue c entral locking dial on the outer cover of the ball anti-clockwise
until the cover is released
– lift off the cover
– turn the filter one-quarter anti-clockwise to releas e.
• Wash the filter with cold water only.
• Filter B should be rinsed and tapped out until the water runs clear, then tappe d
out again to ensure all excess water is removed. (Tap on the plastic rim, not the
filter material.) Leave to dr y completely for a minimum of 24 hours.
• It is normal for the filter in the ball to turn grey in colour.
• To refit filter B:
– refit the filter on to the ball
– se cure the filter by turning it clockwise so the white arrows align.
• When refitting the outer cover of the ball, keep turning the ce ntral locking dial
clock wise. When it star ts to click it is locked.
• To watch a shor t online video visit:
– UK - www.dyson.co.uk/dc50filterwash
– RO I - www.dyson.ie/dc50filterwash
BLOCKAGES – THERMAL CUT-OUT
• This appliance is fitted with an autom atically resetting thermal cut-out.
• Large items may block the tools or wand inlet. If any par t becomes blocked the
appliance may overheat and automatically cut-ou t.
• If this happens, follow the instructions below in ‘Lookin g for blockages’.
LOOKING FOR BLOCK AGES
• Switch ‘OFF’ and unplug before looking for blockages. Failure to do so could
result in personal injury.
• Leave to cool down for 1-2 hours before checking the f ilters or for blockages.
• Clear any blockage before res tarting.
• Look for blockage s in the wand, airways and cleaner head.
• To release the hose from the machine, you will need to remove the wand.
• Open the wand release cap.
• Pull the wand up and awa y from the handle.
• Press the red release button in the connecting collar and remove the wand from
the hose.
• Remove the clear bin and cyclone unit. Then release the hose from the appliance
by pressing the red tab on the bas e of the hose –you can see it from the front of
the appliance.
• Check for blockages in the hose.
• Beware of sharp objects wh en checking for blockages.
• To refit the hose, align the guides on the base of th e hose with the channels
in the neck of the air way. Ensure the red tab faces the front of the appliance.
Push the hose on. It will click into place. To refit the wand follow the instructions
above in the
‘Operation’ section.
• To remove the base plate to access an obstruction, se e ‘Base plate –
disassembly/reassembly’.
• To look for blockages in the front air way between the ball and the cleaner
head you will need to remove the cleaner he ad: see ‘Base plate – disassembly/
reassembly’ b elow on how to do this.
• To look for blockages in the rear air way bet ween the ball and the cleaner
head you will need to release the elasticated re ar connection. Pull the plastic
connector towards you to rele ase from the upper air way. To replace it, pull it a
little way out on the horizontal so that it aligns with the upper airway.
Gently release it so it pulls itself back into place.
• Beware of sharp objects wh en checking for blockages.
• Refit all parts securely before using.
• Clearing blockages is not covered by your guarantee.
BRUSH BAR – CLEARING OBSTRUCTIONS
• If your br ush bar is obstruc ted, it may shut ‘OFF’. If this happens, you will need
to remove the blockage.
• Switch ‘OFF’ and unplug before procee ding. Failure to do so could result in
personal injur y.
• Beware of sharp objects wh en clearing obstructions.
• If you still cannot clear the obstruction, please follow the instructions below to
remove th e base plate. This gives more access to the obstruc tion. Alternatively,
contac t a Dyson expert on the Dyson Helpline or visit the website. Clearing
brush bar obstructions is not covered by your guarantee.
BASE PLATE – DISASSEMBLY/REASSEMBLY
• Switch ‘OFF’ and unplug before procee ding. Failure to do so could result in
personal injur y.
• Lie the appliance on its front.
• There is a red latch on the connection between the ball and cleaner he ad.
Slide it towards the b all, suppor ting the appliance as you do so.
• Pull the cleaner he ad away from the appliance. Use a constant, firm pressure.
• At each e nd of the cle aner head there are t wo red levers:
– pivot the levers up and out towards the end of the cleaner head until they click
– swing the base plate op en.
• Beware of sharp objects wh en clearing obstructions.
• To refit the b ase plate, hinge it closed.
• To refit the b ase plat e:
– fit the lugs on the lower edge of the base plate behind the lip on the base of
the cleaner head
– swing the base plate down, ensuring it fits correctly; it will click into place.
• To secure the base plate pivot both levers back into position so they are flush
with the surface of the cleaner head.
• Lay the appliance on its back.
• Fit the cleaner head back onto the conne ctions underneath the front part of the
ball. Slide the cleaner head up into the channels either side of the airway.
Push firmly: the cleaner head will click into place and the red latch will engage.
BRUSH BAR – TROUBLESHOOTING
• If the brush bar has s topped spinning, follow the ins tructions above on clearing
obstr uctions. Alternatively, contact a Dyson expert on the Dyson Helpline or visit
the website.
• To watch a shor t online video visit:
– UK - www.dyson.co.uk/dc50brushbarmaintenance
– RO I - www.dyson.ie/dc50brushbarmaintenance
DISPOSAL INFORMATION
• Dyson product s are made from high grade recyclable materials.
Recycle where possible.
GUARANTEE TERMS AND CONDITIONS
DYSON CUSTOMER CARE
THANK YOU FOR CHOOSING TO BUY A DYSO N APPLIANCE
After registering your 5year guarantee, your D yson appliance will b e covered
for par ts and labour for 5years from the date of purchase, subject to the terms
of the guarantee. If you have any questions about your Dyson appliance, call the
Dyson Helpline with your serial number and details of where/when you bought
the appliance. Most questions can be solved over the phone by one of our
trained Dyson Helpline staff.
Alternatively, visit www.dyson.co.uk/support (U K) or www.dyson.ie/support (ROI)
for online help, general tips and useful information about Dy son.
If your Dyson appliance nee ds a service, call the Dyson Helpline so we can
discuss the available options. If your Dyson appliance is under guarantee,
and the repair is covered, it will be repaired at no cost.
Your serial number can be found on your rating plate which is behind the
clear bin.
PLEASE REGISTER AS A DYSON
APPLIANCE OWNER
To help us ensure you receive prompt an d efficient ser vice, please register as a
Dyson appliance owner. There are three way s to do this:
• Online at www.dyson.co.uk/register (UK) or www.dyson.ie/register (ROI).
• Telephone the Dyson Helpline.
• Complete the enclosed form and post it to us.
This will confirm ownership of your Dyson appliance in the event of an insurance
loss, and enable us to contact you if necessary.
LIMITED 5 YEAR GUARANTEE
TER MS AND CONDITIONS OF THE DYSON 5 YEAR LIMITED GUARANTEE.
WHAT IS COVERED
• The repair or replacement of your Dyson appliance (at Dyson’s discretion) if it
is found to be defec tive due to faulty m aterials, workmanship or function within
5 years of purchase or deliver y (if any par t is no longer available or out of
manufacture Dyson will replace it with a functional replacement part).
• Where this appliance is sold outside of the EU, this guarantee will only be valid if
the appliance is use d in the country in which it was sold.
• Where this appliance is sold within the EU, this guarantee will only b e valid (i) if
the appliance is use d in the country in which it was sold or (ii) if the appliance is
used in Austria, Belgium, France, Germany, Ireland, Italy, Netherlands, Spain or
the United Kingdom and the same model as this appliance is sold at the same
voltage rating in the relevan
t country.
9
Page 10

WHAT IS NOT COVERED
Dyson does not guarantee the repair or replacem ent of a product where a
defect is the result of:
• Accidental dama ge, faults caused by negligent use or care, misuse, neglect,
careless operation or handling of the appliance which is not in accordance w ith
the Dyson Opera ting Manual.
• Use of the appliance for anything other than normal domestic
household purposes.
• Use of parts not assemble d or installed in accordance with the instructions
of Dyson.
• Use of parts and accessories which are not genuine Dyson components.
• Fault y installation (exce pt where installed by Dyson).
• Repairs or alterations carried out by parties other than Dyson or its
authorised agents.
• Blockages – please refer to the Dyson Operating Manual for details of how to
look for and clear blockages.
• Normal wear and tear (e.g. fuse, brush bar etc.).
• Use of this appliance on rubble, ash, plaster.
• Reduc tion in battery discharge time due to batter y age or use (where
applicable).
If you are in any doubt as to w hat is covered by your guarantee, please
contact Dyson.
SUMMARY OF COVER
• The guarantee be comes ef fective at the date of purchase (or the date of delivery
if this is later).
• You must provide proof of (b oth the original and any subsequent) delivery/
purchase before any work can be carried out on your Dyson appliance.
Without this proof, any work carried out will be chargeable. Keep your receipt or
delivery note.
• All work w ill be carried out by Dyson or its authorised agents.
• Any par ts which are replaced by Dyson will become the prop erty of Dyson.
• The repair or replacement of your Dyson appliance under guarantee will not
extend the period of guarantee.
• The guarantee provides ben efits which are additional to and do not affect your
statutory rights as a consumer.
ABOUT YOUR PRIVACY
• Your information will be held by Dyson and its agents for promotional,
marketing and servicing purposes.
• If your personal details change, if you change your mind about any of your
marketing preferences or if you have any queries about how we use your
information, please contact Dyson.
• For more information on how we protect your privacy, please see our privac y
policy on the Dyson website.
10
Page 11

111213
Page 12

Page 13

Page 14

IMPORTANT!
WASH FILTERS
Wash filters with cold water at least every month.
The filters may require more frequent washing if vacuuming fine dust.
After registering your 5year guarantee, your Dyson appliance
will be covered for parts and labour for 5years from the date of
purchase, subject to the terms of the guarantee. If you have any
questions about your Dyson appliance, call the Dyson Helpline
with your serial number and details of where/when you bought
the appliance. Most questions can be solved over the phone by
one of our trained Dyson Helpline staff.
DYSON CONTACT DETAILS
UK:
Website: www.dyson.co.uk/support
Dyson Helpline: 08002980298
Email: askdyson@dyson.co.uk
Address: Dyson Ltd, Tetbury Hill, Malme sbury, Wiltshire, SN160RP
ROI:
Website: www.dyson.ie/support
Dyson Helpline: 014757109
Email: askdyson@dyson.co.uk
Address: Dyson Ireland Limited, Unit G10, Grants Lane,
Greenogue Business Park, Rathcoole, Dublin 24
JN.71391 PN.207187-02-03 16.12.14
www.dyson.com
Page 15

Page 16

Serial number
GUARANTEE FORM
Date of purchase
Title
First name
Address
Postcode
e-mail
Telephone Mobile
As a Dyson vacuum cleaner owner, you can hear
about Dyson inventions, services and products before
anyone else. If it’s okay to contact you, please let us
know how we may do this.
By mail Yes No
By phone Yes No
By email Yes No
By text message Yes No
/ /
Surname
We sometimes ask other companies (such as market researchers) to
contact owners on our behalf. We do this to get feedback on ideas or
ask you to try new products and services. Would this be okay?
Yes No
Country of purchase
UK ROI
3 EASY WAYS TO REGISTER YOUR FREE 5 YEAR GUARANTEE
REGISTER
ONLINE
Visit our website to register
your full parts and labour
guarantee online.
www.dyson.co.uk/register
www.dyson.ie/register
REGISTER
BY PHONE
Call our dedicated Helpline.
Open Monday to Friday 8am8pm & Saturday and Sunday
8am-6pm.
UK: 08002980298
ROI: 014757109
REGISTER
BY MAIL
Complete and
return the form
to Dyson in the envelope
supplied.
 Loading...