

Page 1
OPERATING MANUAL
ASSEMBLY
click
click
click
REGISTER
YOUR FREE
5YEAR
GUARANTEE
TODAY
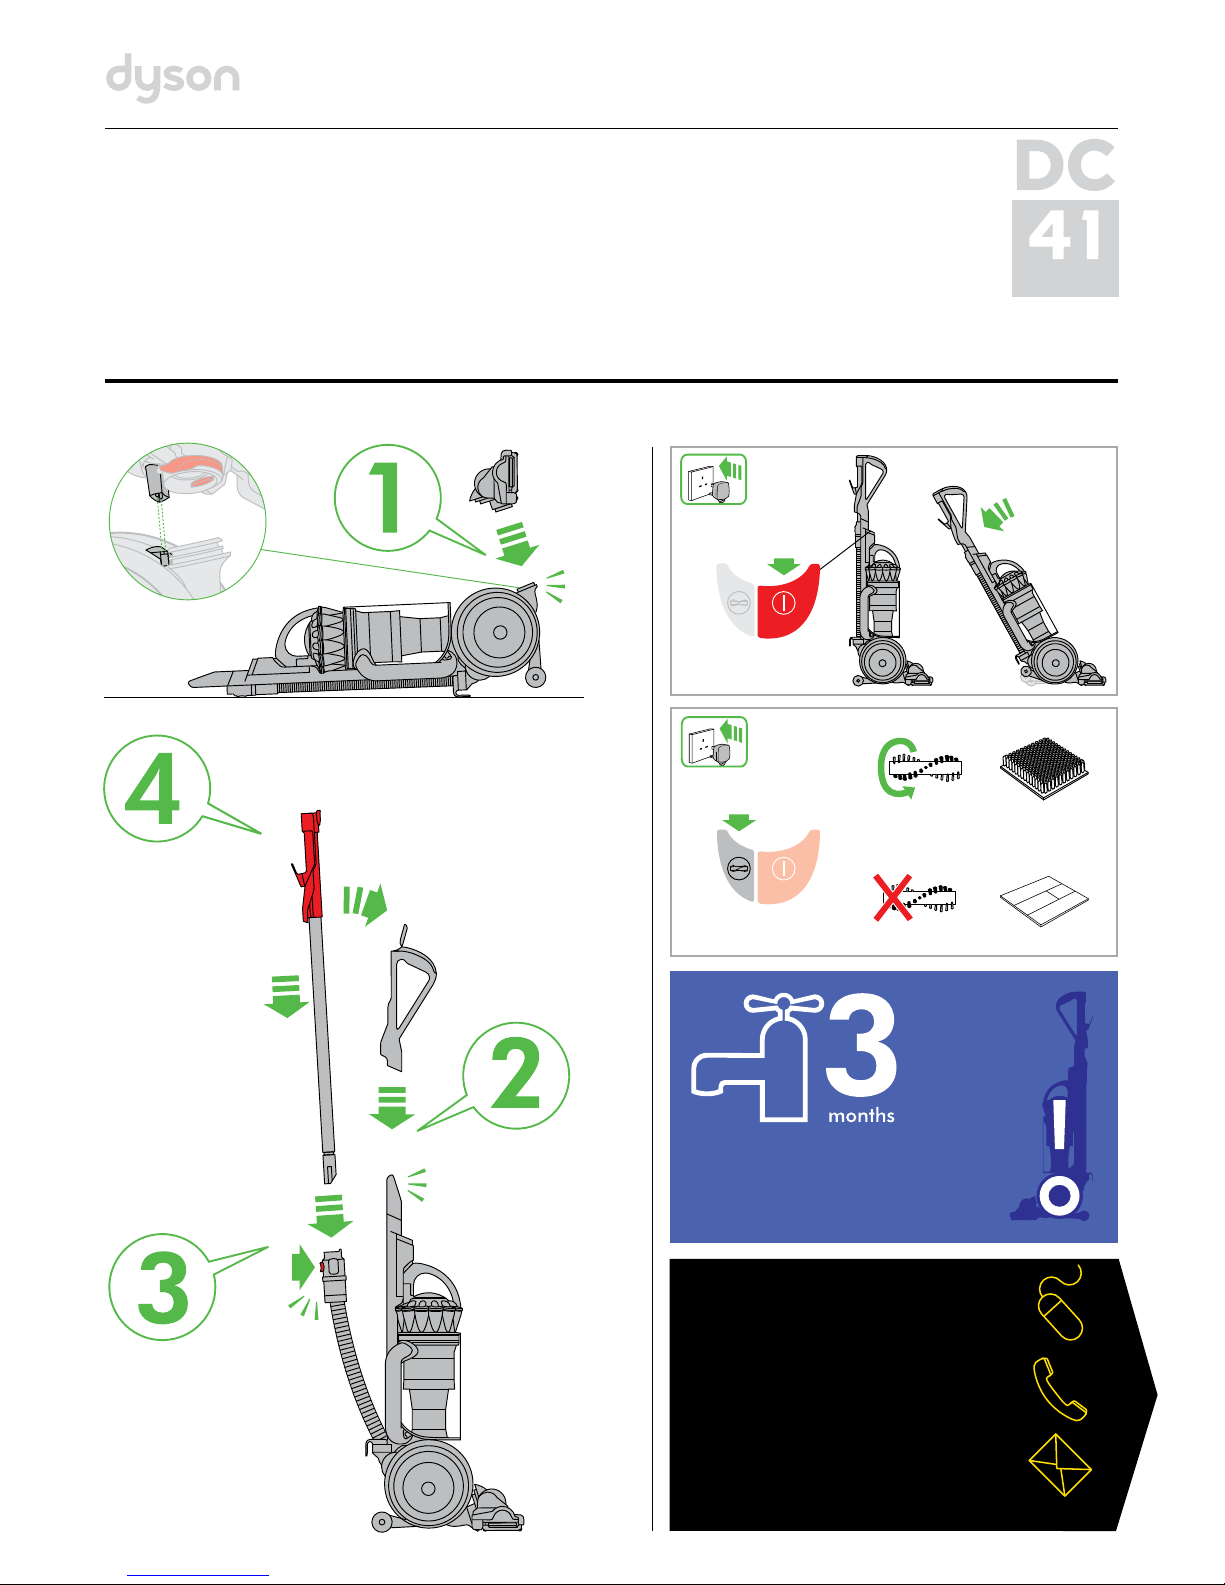
WASH FILTERS
Wash filters with cold water
at least every 3 months.
Page 2

DYSON CUSTOMER CARE
THANK YOU FOR CHOOS ING TO BUY A DYSON APPLIANC E
After registering your f ree 5year guarantee, your Dyson
appliance will be covered for parts and lab our for 5years
from the date of purchase, subject to the terms of t he
guarantee.
If you have any questions about your Dy son appliance,
call the Dyson Helpline with your serial numbe r and
details of where/when you bought the appliance.
Most questions can be sol ved over the phone by one of
our trained Dyson Helpline staf f.
Alternatively, visit www.dyson.co.uk/support for online
help, general tips and useful information about D yson.
The rating plate is on the top of the appliance above the
switches. Note the serial numbe r before fitting the wand
handle onto the appliance.
IMPORTANT SAFETY INSTRUCTIONS
BEFORE USI NG THIS APPLIA NCE READ ALL I NSTRUCTIONS A ND CAUTIONARY M ARKINGS IN THIS
MANUAL A ND ON THE APPLIA NCE
When using an electrical appliance, basic pre cautions should always be followed, including the following:
WARNING
TO REDUCE THE R ISK OF FIRE, ELECT RIC SHOCK, OR INJ URY:
1. This Dyson appliance is not intended for us e by young children or infirm persons with reduced physical, sensor y or
reasoning capabilities, or lack of experience and k nowledge, unless they have been given super vision or instruction
by a responsible person concerning use of the ap pliance to ensure that they can use it safely.
2. Do not allow to be used as a toy. Close attention is necess ary when used by or near children. Children should be
supervised to ensure tha t they do not play with the appliance.
3. Use only as described in this Dyson O perating Manual. Do not carry out any maintenanc e other than that shown in
this manual, or advised by the Dyson Helpline.
4. Suitable for dry locations only. Do not use outd oors or on wet surfaces.
5. Do not handle any part of the plug or appliance wit h wet hands.
6. Do not use with a damaged cable or plug. If the s upply cable is damaged it must be replaced by D yson, its service
agent or similarly qualified person in order to avoid a hazard.
7. If the appliance is not working as it should, has received a shar p blow, has been dropped, damaged, left outdoors,
or dropped into water, do not use and contact the Dyson Helpline.
8. Contact the Dyson He lpline when service or repair is required. Do not disassemb le the appliance as incorrect
reassembly may result in an elec tric shock or fire.
9. Do not stretch the cable or place the cable un der strain. Keep the cable away from heated sur faces. Do not close a
door on the cable, or pull the cable around sharp edges or cor ners. Arrange the cable away from traf fic areas and
where it will not be stepped on or tr ipped over. Do not run the appliance over the cable.
10. Do not unplug by pulling on the cable. To unplug, grasp the plug, not the cable. The use of an extension cable is
not recommended.
11. Do not use to pick up water.
12. Do not use to pick up flammable or combustible liquids, such as pe trol, or use in areas where they or their vapours
may be present.
13. Do not pick up anything that is burning or smoking, such as cigare ttes, matches, or hot ashes.
14. Keep hair, loose clothing, fingers, and all parts of body away from op enings and moving parts, such as the brush
bar. Do not point the hose, wand or tools at your eyes or ears or put them in your mouth.
15. Do not put any object into openings. Do not us e with any opening blocked; keep free of dust, lint, hair, and anything
that may reduce airflow.
16. Use only Dyson recommende d accessories and replacement par ts.
17. To avoid a tripping hazard rewind the cable when not in use.
18. Do not use without the clear bin and filter s in place.
19. Do not leave the appliance when plugge d in. Unplug when not in use and before servicing.
20. Do not pull or carry by cable or use cable as a han dle.
21. Use extra care when cleaning on s tairs. Do not work with the appliance above you on the stairs.
22. Turn off all controls before unplugging.
READ AND SAVE THESE INSTRUCTIONS
THIS DYSON APPLIA NCE IS INTENDE D FOR HOUSEHOLD US E ONLY
REGISTER
BY MAIL
Complete and return
the form to Dyson in the
envelope supplied.
REGISTER
BY PHONE
Call our dedicated Helpline
Open 7am–10pm.
7 days a week.
REGISTER
ONLINE
Visit our website to register
your full parts and labour
guarantee online.
www.dyson.co.uk/register
www.dyson.ie/register
UK 0800 298 0298
ROI 01 475 7109
3 EASY WAYS TO REGISTER YOUR FREE 5 YEAR GUARANTEE
2
3
Note your seria l number for future refe rence
This illustra tion is for example pu rposes only.
DYSON CONTACT DETAILS
Website: www.dyson.co.uk/support
UK:
Dyson Helpline: UK:08002980298
Open 7am–10pm. 7 days a week.
Email: askdyson@dyson.co.uk
Address: Dyson Limited, Tetbury Hill, Malmesbury, Wiltshire SN160RP England.
ROI:
Dyson Helpline: ROI:014757109
Open 7am–10pm. 7 days a week.
Email: askdyson@dyson.co.uk
Address: Unit 10, Grants Lane, Greenogue Business Park, Rathcoole, Dublin 24.
Do not pull on
the cable.
Do not store ne ar
heat source.
Do not use near
naked flame.
Do not run over
the cable.
Do not pick up
water or liquid s.
Do not pick up
burning obje cts.
Do not use above
you on the stair s.
Do not put hands
near the brus h bar
when the appli ance
is in use.
Page 3
click
x1
click
Operation
Emptying th e clear bin
Storage Carrying t he appliance Carpets or har d floors
Attachmen ts
Looking for blo ckages
4
5
Brush bar – cle aring obstructions
Page 4

click
A
B
click
click
click
click
clickclick
click
6
IMPORTANT!
WASH FILTERS
Wash filters with cold water at least every 3 months.
The filters may re quire more frequent washing if vac uuming fine dust.
Base plate rea ssembly Base plate disa ssembly
Page 5

8
9
USING YOUR DYSON APPLIA NCE
PLEASE R EAD THE ‘IMPO RTANT SAFET Y INSTRUCTI ONS’ IN THIS DYSON
OPERATI NG MANUAL B EFORE PROCEE DING.
RATING PL ATE
• The rat ing plate is on the top of the a ppliance above the sw itches. Note the
serial numbe r before fitting th e wand handle onto the ap pliance.
ASSEMBLY
• Lie the ap pliance on its back.
• Att ach the cleaner head b y sliding it on to the conne ctions on the lower fro nt
part of the bal l. Ensure the electr ical plug on the cleane r head fits into the
twin-bloc k connection on the b ody of the appliance, wh ich is directly above th e
airway. Push fi rmly: the cleaner he ad will click into place.
• Stand t he appliance up straig ht.
• Att ach the wand handle by slid ing it on to the top of the appl iance. The spring
clip in the handle w ill click into place.
• Ensure t he hose is straight. Pre ss the red button on t he hose. Slide the wand in to
the hose.
• Ensure t he hose and wand sit in the re cess of the handle. S lide the end of the
wand down into th e handle to secure it.
• Close th e wand cap.
• Ensure t he cyclone and clear b in unit is secured to the ma in body of the
appliance.
• Att ach the tools as shown. In u se, the tools can be at tached to either the h ose or
the wand.
• Wind th e cable anti-clock wise around the cable h ooks. Secure with t he clip.
• To watch a shor t online video visit :
UK – www.dys on.co.uk/DC41getting started
ROI – www.dy son.ie/DC41gettings tarted
OPERATION
• Unwind t he cable.
• Plug the a ppliance into the main s electricity sup ply.
• To switch ‘O N’ or ‘OFF’ press the p ower button, locat ed as shown.
• To use, reclin e the handle. The stabi liser stand will auto matically lift up.
• Aft er use, return the appli ance to the upright pos ition, pushing it firml y into
place. The st abiliser wheels will au tomatically lower.
• Then: unp lug, coil the cable safe ly, put the appliance away.
• Switc h ‘OFF’ the appliance, un plug and ensure it is upri ght before:
– changing or usin g tools
– removing the ho se or airway inspec tion parts.
• Use the c yclone carry han dle to carry the applia nce.
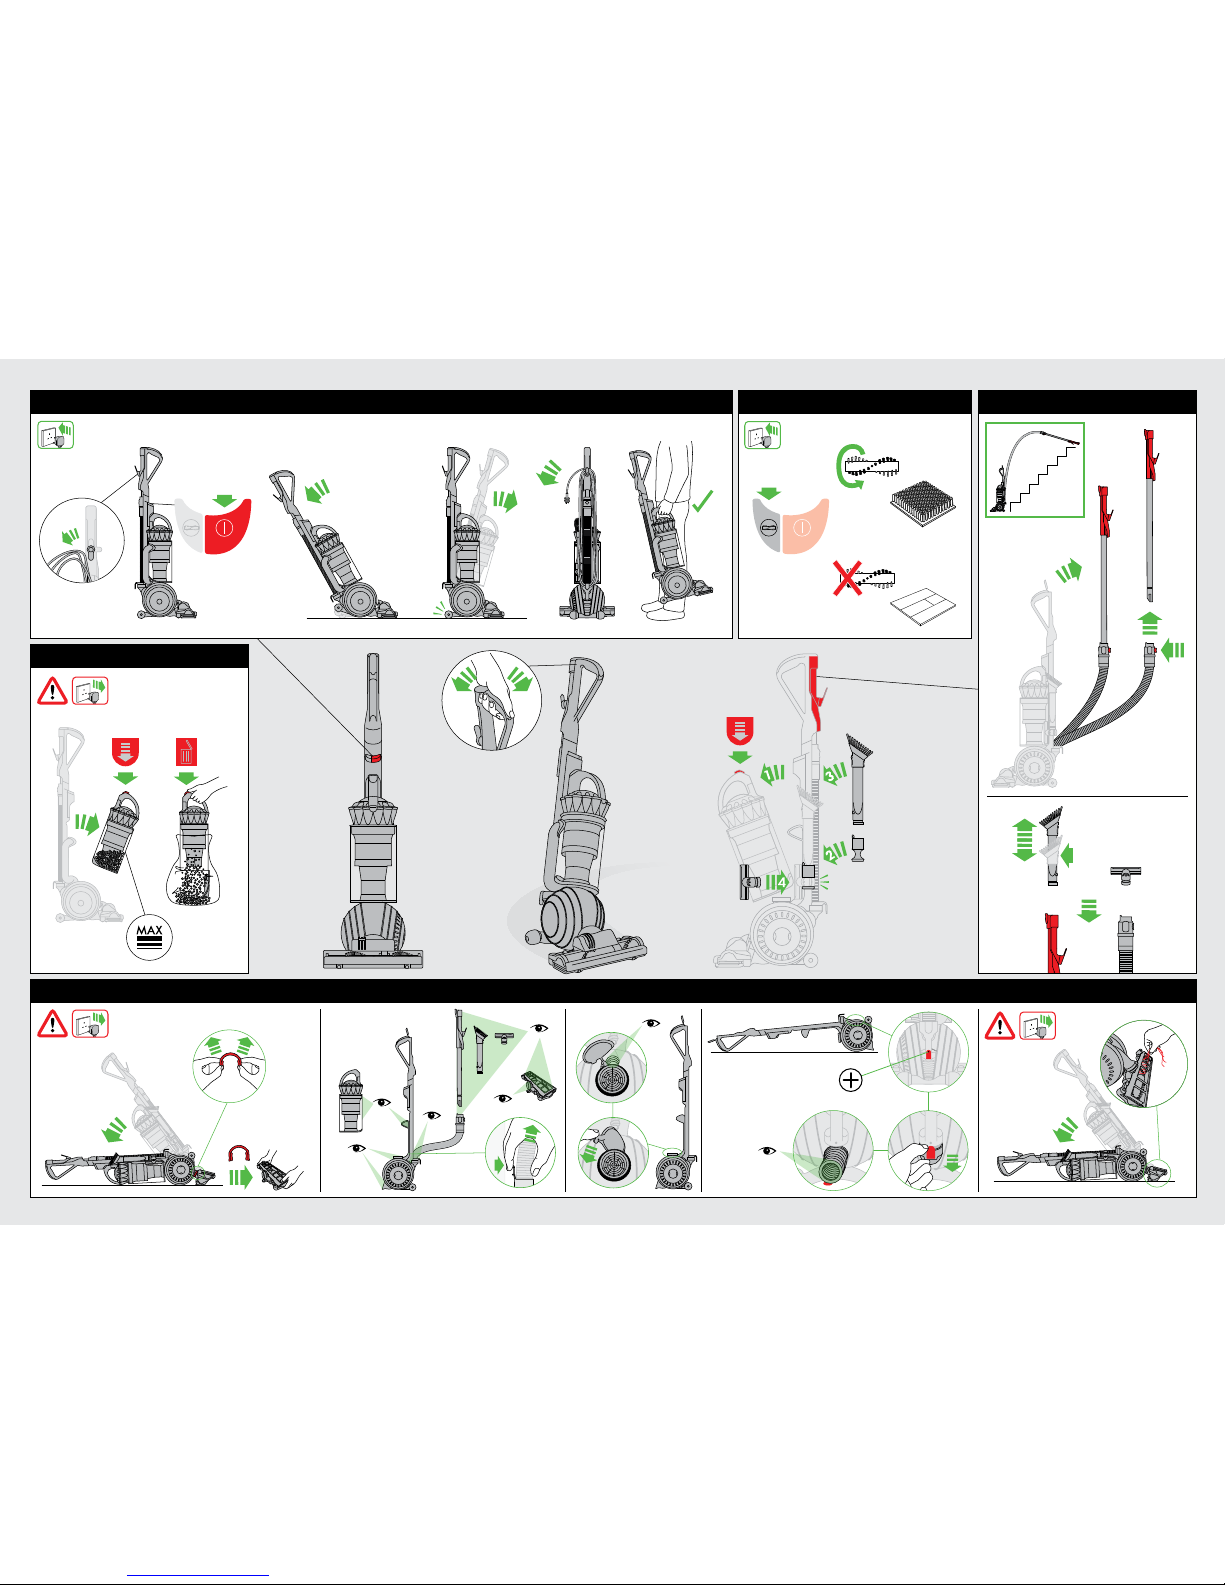
ATTACHMENTS
• To release t he wand, open the wand cap a nd pull the red tube up and a way
from the handle .
• Pull the w and out of the hose until it c licks into place.
• Press t he button to releas e the wand from the hose.
CARPET S OR HARD FLOORS
• The bru sh bar will always def ault to ‘ON’ (spinning) ea ch time you switch the
appliance ‘ON ’ and recline it for clea ning.
• The bru sh bar will not rotate wh en the appliance is upri ght.
• To switch th e brush bar off (e.g. for h ard floors):
– switch the app liance ‘ON’
– recline the app liance
– press the brus h bar ‘ON/OFF’ butt on – the brush bar will st op spinning.
• The bru sh bar will automatic ally stop if it become s obstructed. S ee ‘Brush bar –
clearing obs tructions’.
• Befor e vacuuming your floor ing, rugs and carpet s, check the manufac turer’s
recommende d cleaning instruc tions.
• Some c arpets may fuzz if a ro tating brush bar is us ed when vacuuming. If th is
happens, we rec ommend vacuuming in ‘ha rd floor’ mode and co nsulting with
the flooring m anufacturer.
• The bru sh bar on the appliance m ay damage some carp et types. If you are
unsure, turn of f the brush bar.
LOOKING AFT ER YOUR DYSON APPLIANCE
• Do not car ry out any maintena nce or repair work othe r than that shown in this
Dyson Oper ating Manual, or advis ed by the Dyson Helpl ine.
• Only use p arts recommen ded by Dyson. If you do no t this could invalidate
your guarante e.
• Store th e appliance indoors . Do not use or store it bel ow 0°C (32°F). Ens ure the
appliance is at ro om temperature bef ore operating.
• Clean th e appliance only with a dr y cloth. Do not use any lu bricants, cleaning
agents, polis hes or air freshener s on any part of the appli ance.
• If used i n a garage, always wipe th e soleplate, ball and s tabiliser wheels wi th
a dry cloth af ter vacuuming to clean o ff any sand, dirt, or peb bles that could
damage delica te floors.
VACUUMING
CAUTION:
• Do not us e without the clear bin a nd filters in place.
• Fine dus t such as plaster dus t or flour should only be v acuumed in very
small amounts .
• Do not us e the appliance to pick up sh arp hard objects, sm all toys, pins, paper
clips, etc. The y may damage the applia nce.
• When va cuuming, certain car pets may generat e small static charge s in the
clear bin or wand. T hese are harmless an d are not associated w ith the mains
electrici ty supply. To minimise any ef fect from this, do not pu t your hand or
insert any obj ect into the clear bin u nless you have firs t emptied it and rinsed i t
out with cold wa ter (see ‘Cleaning the cl ear bin’).
• Power ful suction can caus e the hose to ‘pull back’ – ple ase take care.
• Do not wor k with the appliance ab ove you on the stairs.
• Do not pu t the appliance on chair s, tables, etc.
• Befor e vacuuming highly polis hed floors, such as wo od or lino, first check t hat
the undersid e of the floor tool and it s brushes are free fro m foreign objects th at
could cause mar king.
• Do not le ave the cleaner head i n one place on delicate f loors.
EMPT YING THE CLEA R BIN
• Empt y as soon as the dirt rea ches the level of the M AX mark – do not over fill.
• Switc h ‘OFF’ and unplug befo re emptying the cle ar bin.
• To remove the c yclone and clear bin uni t, press down on the red bu tton at the
rear of the carr ying handle on the cy clone.
• To release t he dirt, press all the wa y down on the red butto n at the rear of the
carrying h andle on the cyclone.
• To minimise dus t/allergen contact w hen emptying, enca se the clear bin tightl y in
a plastic bag an d empty.
• Remove t he clear bin carefully.
• Seal t he bag tightly, dispose as n ormal.
• To refit:
– close the clea r bin base so it clicks into p lace
– pus h the cyclone and clea r bin unit into the main bod y of the appliance; it will
click into place
– ensure the cyc lone and clear bin unit is s ecure.
• For a free f act sheet visit: w ww.dyson.co.uk/ technology/allergy
CLEANIN G THE CLEAR BI N
• Remove c yclone and clear bin (in structions abov e).
• To separat e the cyclone unit from t he clear bin press the re d button to open
the clear bin ba se. This exposes a smal l silver button behi nd the red opening
mechanism. Pr ess the silver butt on and separate the c yclone unit from the
clearbin.
• Clean th e clear bin with cold wat er only.
• Ensure t he clear bin is complete ly dry before repla cing.
• Do not us e detergents, polis hes or air freshener s to clean the clear bin.
• Do not pu t clear bin in a dishwasher.
• Do not imm erse the whole cycl one unit in water or pour wa ter into it.
• Clean th e cyclone shroud wit h a cloth or dry brush to re move lint and dust.
• To refit:
– fit t he cyclone shroud int o the clear bin so that th e silver button click s and
engages
– close the clea r bin base so it clicks into p lace
– pus h the cyclone and clea r bin unit into the main bod y of the appliance; it will
click into place
– ensure the cyc lone and clear bin unit is s ecure.
WASHING YOUR FILTERS
• Your applian ce has two washable f ilters, located as s hown.
• Check an d wash the filters reg ularly according to in structions to main tain
performa nce.
• Switc h ‘OFF’ and unplug befo re checking or removin g the filters.
• The fil ters may require more f requent washing if vac uuming fine dust.
• Wash with c old water only. Do not use de tergents.
• Do not pu t the filters in a dishwas her, washing machine, tumbl e dryer, oven,
microwave or nea r a naked flame.
• Aft er washing lay the filt er on its side and leave a t least 24 hours to dry
completely b efore refitting .
• To remove fil ter A see the ‘Wash filt ers’ section in this D yson Operating Ma nual.
• To remove fil ter B:
– tur n the central locking di al on the outer cover of th e ball anti-clockw ise until
the cover is rele ased
– lift off th e cover
– turn the filte r one-quarter a nti-clockwise t o release.
• Filter B s hould be rinsed and tap ped out until the wate r runs clean, then tapp ed
out again to ensu re all excess water is rem oved. Leave to dry co mpletely for
24hours.
• It is nor mal for the filter in the b all to turn grey in colour.
• To refit fil ter B:
– refit the filt er on to the ball
– secure the fil ter by turning it one- quarter turn cloc kwise.
• When re fitting the oute r cover of the ball, keep tur ning the central locki ng dial
clockwise . When it starts to c lick it is locked.
• To watch a shor t online video visit :
UK – www.dys on.co.uk/DC41filter wash
ROI – www.dy son.ie/DC41filterwa sh
LOOKING FOR BLOCK AGES
• Switc h ‘OFF’ and unplug befo re looking for blockag es. Failure to do so could
result in pers onal injury.
• Beware o f sharp objects wh en checking for block ages.
• Refit a ll parts securely b efore using.
• Cleari ng blockages is not cove red by your guarantee.
CLEARI NG BLOCKAGES – TH ERMA L CUT-OUT
• This app liance is fitted wi th an automatically re setting therma l cut-out.
• Large it ems may block the tool s or wand inlet. If any par t becomes blocked th e
appliance may o verheat and automa tically cut-out.
• Switc h ‘OFF’ and unplug. Lea ve to cool down for 1-2 hours bef ore checking
filters or for b lockages.
• Clear an y blockage before res tarting.
• Cleari ng blockages is not cove red by your guarantee.
BRUSH BAR – CLE ARING OBS TRUCTIONS
• If your br ush bar is obstruc ted, it may shut off. If t his happens, you will ne ed to
remove the bloc kage.
• Switc h ‘OFF’ and unplug befo re proceeding. Failur e to do so could result in
personal inju ry.
• Beware o f sharp objects wh en clearing obstru ctions.
• If you st ill cannot clear the obs truction, pleas e follow the instruc tions below to
remove the base p late. This gives more ac cess to the obstru ction. Alternat ively,
contact a Dy son expert on the D yson Helpline or visi t the website. Clearin g
brush bar obs tructions is not cove red by your guarantee.
BASE PLATE - DI SASSEMBLY/RESASSEMB LY
• Switc h ‘OFF’ and unplug befo re proceeding. Failur e to do so could result in
personal inju ry.
• Lie the ap pliance on its front.
• Detac h the red ‘C’ clip which is on t he connection bet ween the cleaner h ead
and the applian ce. It is quite firm, but do n ot pull it off roughly. Use a c onstant,
firm pressur e.
• Pull the c leaner head away fro m the appliance. Use a co nstant, firm pressu re.
• On the cle aner head are two dia ls: turn each a quarte r-turn anti-clock wise until
it clicks.
• Put the c leaner head onto it s back:
– lift up the top e dge of the base plate, so i t rotates to the uprigh t position
– lift out.
• Beware o f sharp objects wh en clearing obstru ctions.
• To refit the b ase plate:
– fit t he 3 lugs on the lower edg e of the base plate into th e 3 slots in the base of
the cleaner he ad
– swing the upp er edge of the base plat e down; it will click into plac e.
• To secure th e base plate:
– press the bas e plate close to the clea ner head
– sec ure the first dial by tur ning it a quarter-turn c lockwise until it cli cks and
engages
– repeat with t he second dial.
• Refit t he red ‘C ‘clip onto the cleane r head. The flatt er edge of the clip fits
against the cl eaner head. It is easi er to slide one lug into its s lot before the other.
• Lie the ap pliance on its back.
• Att ach the cleaner head b y sliding it on to the conne ctions on the lower fro nt
part of the bal l. Ensure the electr ical plug on the cleane r head fits into the
twin-bloc k connection on the b ody of the appliance, wh ich is directly above th e
airway. Push fi rmly: the cleaner he ad will click into place.
BRUSH BAR – TRO UBLESHOOTING
If the brush ba r has stopped spinnin g, follow the instruc tions above on clearin g
obstruct ions. Alternativ ely, contact a Dyson ex pert on the Dyson H elpline or visit
the website.
• The rat ing plate is under the wan de handle. To access it:
– open the wand ca p and pull the red tube up an d away from the handle.
– press in the bla ck clip in the recess of the d uct
– pull the wand han dle up and off the applia nce; use a constant, firm p ressure.
• To watch a shor t online video visit :
UK – www.dys on.co.uk/DC41brushbar maintenance
ROI – www.dy son.ie/DC41brushbarma intenance
DISPOSAL IN FORMATION
Dyson produ cts are made from high gr ade recyclable mat erials. Please disp ose
of this product r esponsibly and rec ycle where possibl e.
GUARAN TEE TERM S & CONDITIONS
DYSON CUSTOMER CAR E
THANK YOU FO R CHOOSING TO BUY A DY SON APPLIANC E
After regi stering your free 5ye ar guarantee, your Dy son appliance will be
covered for par ts and labour for 5ye ars from the date of purch ase, subject to
the terms of the g uarantee.
If you have any que stions about your D yson appliance, call th e Dyson Helpline
with your seri al number and details of w here/when you bough t the appliance.
Most quest ions can be solved over t he phone by one of our train ed Dyson
Helpline sta ff.
Alternati vely, visit www.dyson .co.uk/support for on line help, general tips an d
useful infor mation about Dyso n.
If your Dyson a ppliance needs a ser vice, call the Dyso n Helpline so we can
discuss the ava ilable options. If you r Dyson appliance is un der guarantee, and
the repair is cove red, it will be repaired at n o cost.
The rating pla te is on the top of the applian ce above the switche s, under the
wand handle.
PLEASE RE GISTER AS A DYSON APPLI ANCE
OWNER
To help us ensure you re ceive prompt and eff icient service, p lease register as a
Dyson applia nce owner. There are three w ays to do this:
• Online a t www.dyson.co.uk /register
• Telephon e the Dyson Helplin e.
• Comple te the enclosed for m and post it to us.
This will confi rm ownership of your Dy son appliance in the eve nt of an insurance
loss, and enabl e us to contact you if nec essary.
LIMITED 5 YE AR GUARA NTEE
TERMS A ND CONDITIONS OF TH E DYSON 5 YEAR LIMITE D
GUARA NTEE.
WHAT IS COVERED
• The rep air or replacement of yo ur Dyson appliance (a t Dyson’s discretion) if it
is found to be def ective due to fault y materials, workm anship or function w ithin
5 years of purcha se or delivery (if any p art is no longer avail able or out of
manufactu re Dyson will replac e it with a functional r eplacement par t).
• Use of the D yson appliance in th e country of purchas e only.
WHAT IS NOT COVERED
Dyson does n ot guarantee the repa ir or replacement of a pro duct as a result of:
• Accide ntal damage, faults c aused by negligent us e or care, misuse, neglec t,
careless ope ration or handling of th e appliance which is not in a ccordance with
the Dyson Op erating Manual.
• Use of the a ppliance for anyth ing other than normal d omestic househol d
purposes.
• Use of par ts not assemble d or installed in accord ance with the instr uctions
of Dyson.
• Use of par ts and accessor ies which are not genuin e Dyson component s.
• Fault y installation (exce pt where installed by D yson).
• Repair s or alterations carr ied out by parties ot her than Dyson or it s
authorised a gents.
• Blocka ges – please refer to th e Dyson Operatin g Manual for details of h ow to
look for and cle ar blockages.
• Norma l wear and tear (e.g. fuse, br ush bar, etc).
If you are in any doub t as to what is covered by your g uarantee, please
contact Dy son.
SUMM ARY OF COVER
• The gua rantee becomes ef fective at the da te of purchase (or the dat e of delivery
if this is later).
• You must prov ide proof of (both the ori ginal and any subseque nt) delivery/
purchase bef ore any work can be carrie d out on your Dyson app liance. Without
this proof, any work ca rried out will be charg eable. Keep your rec eipt or
delivery no te.
• All work w ill be carried out by Dy son or its authoris ed agents.
• Any par ts which are replace d will become the prop erty of Dyson.
• The rep air or replacement of yo ur Dyson appliance u nder guarantee will no t
extend the p eriod of guarantee.
• The gua rantee provides ben efits which are addit ional to and do not aff ect your
statutor y rights as a consumer.
ABOUT YOUR PRIVACY
• Your inform ation will be held by Dy son Limited and its age nts for promotional,
marketing and s ervicing purpos es.
• If your p ersonal details chan ge, if you change your mind a bout any of your
marketing pre ferences or if you have a ny queries about how we u se your
information, p lease contact Dy son Limited.
• For more in formation on how we prot ect your privacy, ple ase see our privacy
policy on the D yson website.
DYSON CONTACT DETAILS
Website: ww w.dyson.com/support
UK:
Dyson Helpl ine: UK:08002980298
Open 7am–10pm. 7 days a we ek.
Email: askdyson @dyson.co.uk
Address: Dy son Limited, Tetbury Hi ll, Malmesbury, Wilt shire SN160RP England.
ROI:
Dyson Helpl ine: ROI:014757109
Open 7am–10pm. 7 days a we ek.
Email: askdyson @dyson.co.uk
Address: Unit 10, Gr ants Lane, Greenog ue Business Park, Ra thcoole, Dublin 24.
PRODUCT INFO RMATION
Please note: S mall details may vary f rom those shown.
Net weight: 7.75kg.
Page 6

www.dyson.com
Dyson Cus tomer Care
After regi stering your f ree 5year guar antee, your Dys on appliance
will be covere d for parts and labour for 5 years from the date of
purchase, sub ject to the te rms of the guara ntee.
If you have a ny questions ab out your Dyso n appliance, call the
Dyson Help line with your s erial number an d details of whe re/when
you bought th e appliance.
Most ques tions can be so lved over the ph one by one of our
trained Dys on Helpline st aff.
JN.39483 PN.22237-04 -01 01.08.11
DYSON CONTACT DETAILS
Website: ww w.dyson.co.uk/suppor t
UK:
Dyson Helpl ine: UK:08002980298
Open 7am–10pm. 7 days a we ek.
Email: askdyson @dyson.co.uk
Address: Dy son Limited, Tetbury Hi ll, Malmesbury,
Wiltshire SN160R P England.
ROI:
Dyson Helpl ine: ROI:014757109
Open 7am–10pm. 7 days a we ek.
Email: askdyson @dyson.co.uk
Address: Unit 10, Gr ants Lane, Greenog ue Business
Park, Rathcoo le, Dublin 24.
IMPORTANT!
WASH FILTERS
Wash filters with cold water at least every 3 months.
The filters may re quire more frequent washing if vac uuming fine dust.
Page 7

REGISTER
BY MAIL
Complete and return
the form to Dyson in the
envelope supplied.
REGISTER
BY PHONE
Call our dedicated Helpline
Open 7am–10pm.
7 days a week.
REGISTER
ONLINE
Visit our website to register
your full parts and labour
guarantee online.
www.dyson.co.uk/register
www.dyson.ie/register
UK 0800 298 0298
ROI 01 475 7109
3 EASY WAYS TO REGISTER FOR YOUR FREE 5 YEAR GUARANTEE
GUARANTEE FORM
Title
Surname
First name
Telephone Mobile
email
Postcode
Address
By mail Yes No
By phone Yes No
By email Yes No
By text message Yes No
As a Dyson appliance owner, you can hear about
Dyson inventions, services and products before anyone
else. If it’s okay to contact you, please let us know how
we may do this.
We sometimes ask other companies (such as market researchers) to
contact owners on our behalf. We do this to get feedback on ideas or
ask you to try new products and services. Would this be okay?
Yes
■
No
■
Date of purchase
/ /
Country of purchase
UK ROI
Serial number
 Loading...