

Page 1
Page 2

DYON HORNET
Important Safety Instructions
1) Read these instructions.
2) Keep these instructions.
3) Heed all warnings.
4) Follow all instructions.
5) Do not use this apparatus near water.
6) Clean only with dry cloth.
7) Do not block any ventilation openings, install in accordance with the
instructions.
8) Do not install near any heat sources such as radiations, heat registers,
stoves, or other apparatus (including amplifiers) that produce heat.
9) Do not defeat the safety purpose of the polarized plug. If the provided plug
does not fit into your outlet, consult an electrician for replacement of the
obsolete outlet.
10) Protected the power cord from being walked on or pinched particularly at
plugs, convenience receptac les, and the point where they exit from the
apparatu s.
11) Only use attachments/accessories specified by the manufacturer.
12) Unplug this apparatus during lighting storms or when unused for long
periods of time.
13) Refer all servicing to qualified service personnel. Servicing is required when
the appara tus has been damaged in any way, such as power- supply cord or
plug is damaged, liquid has been spilled or objects have fallen into the
apparatu s, the apparatus has been exposed to rain or moisture, does not
operate normally, or has been dropped.
14) Mains plug is used as the disconnect device, the disconnect device shall
remain readily operable.
15) The ventilation should not be impeded by covering the ventilation openings
with items, such as newspapers, table-cloth, curtains, etc.
16) No naked flame sources, such as lighted candles, should be placed on the
apparatu s.
17) Attention should be drawn to the environmental aspects of battery disposal.
18) The use of apparatus in moderate climate.
WARNING: To reduce the risk of fire or electric shock, do not expose this
apparatus to rain or moisture.
WARNING: The batteries shall not be exposed to excessive heat such as
sunshine, fire or the like.
Page 3
DYON HORNET
The symbol indicates that dangerous voltages constituting a risk of
electric shock are present within this unit.
The symbol indicates that there are important operating and
maintenance instructions in the literature accompanying this unit.
This symbol indicates that this product incorporates double
insulati on between hazardous mains voltage and user
accessible parts.
When servicing use only identical
replacement parts.
CAUTION:
When the apparatus was in electrostatic circumstance, it may
be malfunction and need to reset by user.
Tips regarding environmental protection
At the end of its operating life, this product may not be disposed of by way of your normal
household waste. Instead it must be delivered to a collection point for recycling electrical and
electronic equipment. The icon on the product, in the operating instructions or on the
packaging, indicates this.
The materials used in manufacturing this product are recyclable, de pending on their identifying
markings. By recycling this equipment, by recycling its components, or through other
procedures of re-using outdated equipment, you are making an important contribution to
protection our environment. Please ask you local municipal administration for the location of the
corresponding recycling point.
Battery Recycling
In order to ensure the environmently friendly disposal of batteries, please do NOT dispose of
used batteries through normal household waste. Please take the batteries to your local retai l or
community collection point for recycling.
The following may be an indication of a discharged battery: The devi ce cannot be switched
on. The device switches off automatically and "Battery Empty" is shown in the displ ay. The
device and or battery do not function properly.
Page 4

DYON HORNET
1 Appropriate use
The receiver is designed for receiving unencrypted digital SD-DVB-T TV and Radio channels (free-to-air)
for private use. It is exclusively meant for this purpose and must only be used for the same. This also
includes paying attention to all information contained in this operating manual, especially in the safety
instructions. Any other usage is considered to be improper and may lead to material damages and even
personal injuries. Moreover, it will result in the immediate loss of guarantee. The manufacturer does not
bear any liability for damages caused due to improper use.
2 Support
URL: http://www.dyon.eu
See our website for the latest information on this DVD player, on other products by our company and on
our company itself. If you have questions or problems, please read the FAQs on our website or contact our
customer support service support@dyon.eu.
Notes for DVB-T (DTT Service)
Whether and how many DVB-T channels can be received by Multi Pocket TV 350, is strongly
depending on the operational place, and the DVB-T signal strength in this Area.
DVB-T radio in particular is very limited and not available in most locations
Please note that for using of DVB-T after each larger local changes, a new channel search
should be accomplished. Since the frequency of the Channels may Vary from region to
region.
Page 5

DYON HORNET
Table of Contents
Appropriate use ........................................................................................3
1
2 Support .....................................................................................................3
3 Front and Rear Panel ...............................................................................5
4 Remote Control.........................................................................................6
5 Connections..............................................................................................9
6 First Time Installation..............................................................................10
7 Display Program Information’s................................................................12
7.1 EPG Information................................................................................12
7.2 Viewing Teletext................................................................................12
8 Main Menu..............................................................................................13
8.1 Program Search ................................................................................13
8.2 System Setting ..................................................................................14
8.3 Program List......................................................................................14
8.3.1 How to edit the program list....................................................15
8.4 Parental Control ................................................................................17
8.5 Media.................................................................................................17
9 Troubleshooting......................................................................................18
10 Technical Specifications.........................................................................18
11 Warranty condition..................................................................................19
Page 6
DYON HORNET
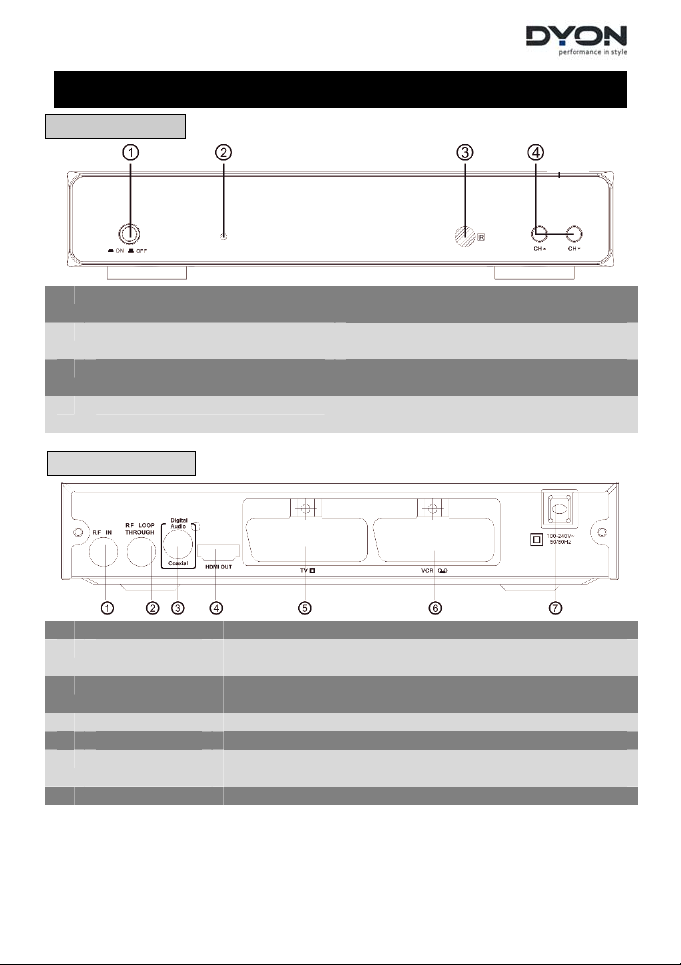
3 Front and Rear Panel
1. Front panel
1 POWER Used to turn on/ off the main power
2 STANDBY INDICATOR Used to visually show power state of
3 REMOTE CONTROL SENSOR Used to receive the signal from the
4 CHANNEL UP/DOWN Used to change channels without using
2. Rear panel
1 RF IN This socket connects to your external aerial.
2 RF LOOP
THROUGH
3 COAXIAL This socket connects to a coaxial socket on your
4 HDMI OUT This socket connects to HDMI in external device
5 TV SCART This socket connects to your TV
6 VCR SCART This socket connects to either a DVD or other video
7 MAINS CABLE This is used to connect to your main power supply
This socket will bypass the RF signal to either your TV or
another video system.
surround sound system.
system.
supply
the set top box
remote control.
the remote control
Page 7
DYON HORNET
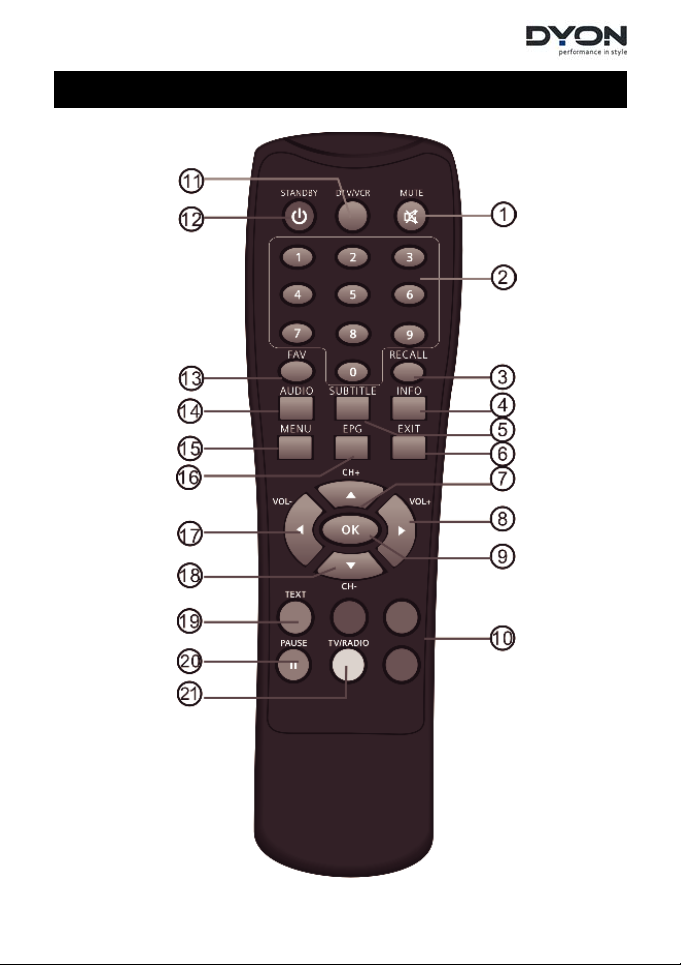
4 Remote Control
Page 8

DYON HORNET
No. Key Function
1 MUTE Mute or Restore Audio Output
2 0-9 Used to select channel numbers or input numbers in
menus.
3 RECALL Used to switch between the last two viewed channels.
4 INFO Displays additional channel information.
5 SUBTITLE Used to switch between different subtitles that are
broadcasted
6 EXIT Exits the current Menu or returns to the previous Menu
7
/CH+ Used to move around the menu screens or selecting the
channels in non-menu state.
8
/ VOL+ Used to move around the menu screens or changing the
volume in non-menu state.
9 OK Confirms an entry or selection. Displays the list of
channels
10 COLOUR
BUTTONS
Used to operate different functions in TEXT screen or
other menus(TV/RADIO: Used to switch between TV
channels and Radio stations.)
11 DTV/VCR Toggle DTV and VCR state
12 STANDBY Used to switch the set top box to on or standby.
13 FAVOURITE Used to switch access your favourite channels.
14 AUDIO Used to set the sound output, the available settings Are
STEREO, LEFT,RIGHT, MONO.
15 MENU Used to open the main menu window.
16 EPG Used to display information about the program being
viewed and what's on next. (Electronic Program Guide)
17 / VOL- Used to move around the menu screens or changing the
volume in non- menu state.
18 / CH- Used to move around the menu screens or selecting the
channels in non- menu state.
19 TEXT Used to open teletext OSD display if teletext available in
the broad caste stream.
20 PAUS E () Used to freeze the program being viewed.
View will switch back to current time when pressed
again.
21 TV / RADIO Switches from TV function to Radio function and from
Radio to TV.
22 RECLIST Used to show the recorded program list
23 SLOW Used to enter slow playback
24 REC ( ) Used to record the program
NOTE: SUBTITLE/TEXT/LANGUAGE may not be available for all channels.
Page 9

DYON HORNET
Installing the Batteries
Remove the battery cover from the Remote Control and put 2xAAA size
batteries inside the compartment.
The diagram inside the Battery Compartment shows the correct way to
install the batteries.
1.Open the cover 2.Install batteries 3.Close the cover
Using the Remote Control
To use the Remote Control, point it towards the front of the Digital Set Top
Box. The Remote Control has a range of up to 7 metres from the Set Top
Box at an angle of up to 60 degrees.
The Remote Control will not operate if its path is blocked.
Sunlight or very bright light will decrease the sensitivity of the Remote
Control.
Page 10
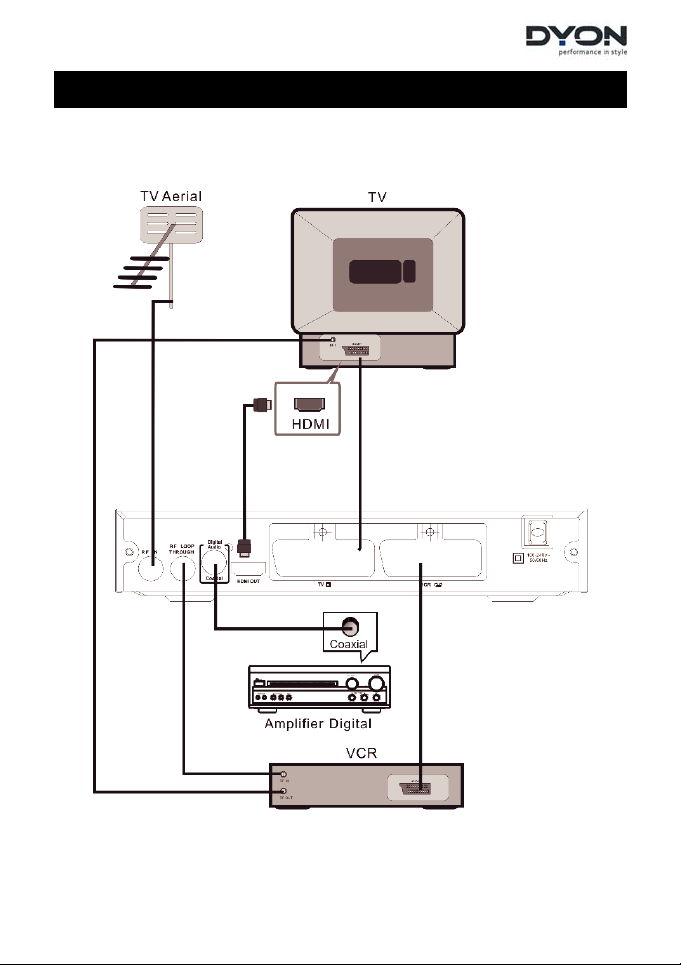
DYON HORNET
5 Connections
Caution: Make sure to check the voltage specification of the wall outlet is
the same rating with the receiver. To prevent the risk of electric shock,
do not open the cover or the back of the receiver.
Note: When connecting the receiver to other equipment, e.g., TV, VCR
and amplifier, make sure to refer to relevant user manual for instruction.
Also, make sure you disconnect all the equipments from the mains supply
before the connection.
Page 11
DYON HORNET
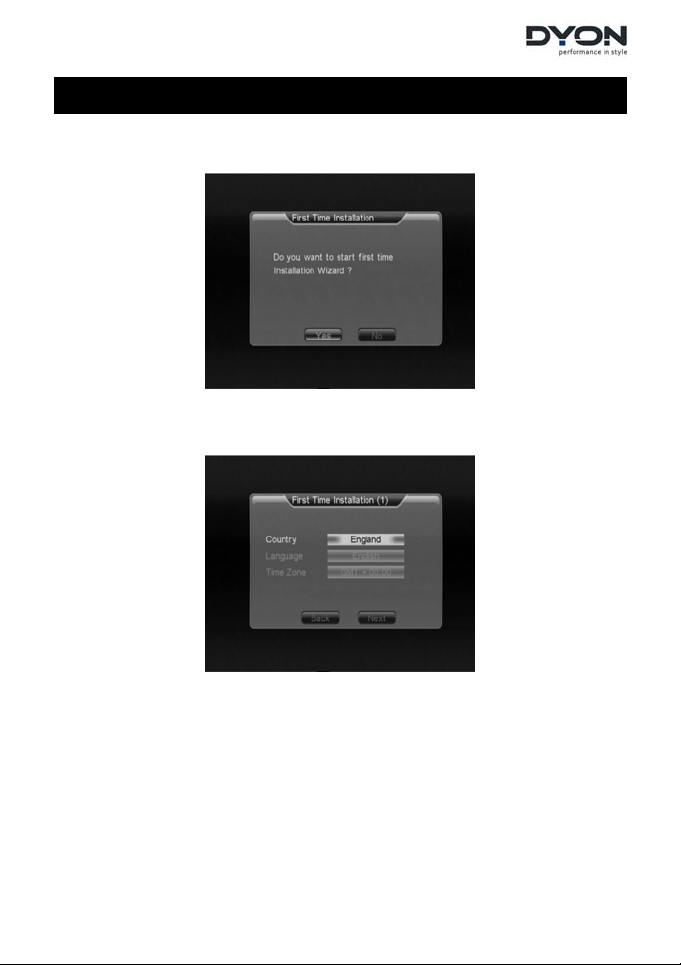
6 First Time Installation
If there is no channel stored in the memory, the receiver will enter first
time installation wizard automatically.
Step 1
If you want to start installation, select YES to enter step of Country and
Language setting.
Step 2 Settings
Select the region you located and select the desired OSD language.
The preset language is German.
- Press / to move focus.
- Press OK to open select list and select value from the list.
- Press OK again to confirm the setting.
- If necessary modify the Time Zone Setting.
- Move focus to "NEXT" and press OK to entry next step
"Channel Search".
Note: The Engine can not switch automatically between Summertime
(DST) and wintertime. During summertime please select GMT+01:00 in
England and Portugal and GMT +02:00 in other European Countries.
Page 12

DYON HORNET
Step 3 Auto Channel Search
Auto Search, all channels found will be stored, just waiting it finished
- Press / to move focus.
- Select “Yes” and press OK to confirm in order to start the
channel scan.
- Select “BACK” and press OK to step back to the settings screen.
- Please wait until the search is completed after selecting “YES”.
Cauton: This engine has a build-in power saving function. The engine
will turn off after 3 hours without any keystroke. Go to the main menu
and open the system settings to disable this “Auto Standby” function.
Page 13

DYON HORNET
7 Display Program Information’s
7.1 EPG Information
You can see detailed information about the current program.
Press EPG key to view detailed information.
- Press / to select the program.
- Press to open detailed information’s about this program.
- Press close the page.
- Press OK to open the task setup to store the opened EPG program.
7.2 Viewing Teletext
Teletext Service is text data service from Service Provider. It is available
only when the program provides teletext data service.
- Press TEXT key to display teletext.
- Use / to step one page up/down
- Use /to change between sub-pages if available.
- Press EXIT to exit the teletext function.
Page 14

DYON HORNET
8 Main Menu
Open the Main Menu to configure your settop box on your own whishes.
- Press MENU key to enter the Main Menu. Press //OK key to select a
submenu.
- Press / to toggle between the submenu at the right and the
submenu selection bar at the left side.
- Press OK to open select list and select value from the list.
- Press OK again to confirm the setting.
- Press EXIT to exit the settings step by step
8.1 Program Search
Automatic Search Automatic Search will scan all channels, the frequency and bandwidth
Manual Search
Country Setting
OSD Language Set the On Screen Display Language
LCN
Antenna Power Set the antenna power on or off to supply +5V power to antenna or not.
Auto Time Zone /
Time Zone
of channel depend on Country Setting, you can select to erase all
stored channels or not, before automatic search starting.
Manual Search will add the found channels into database, it doesn’t
erase the database, but you has to know the Frequency and
Bandwidth for scanning, if the user scans the same Frequency and
Bandwidth more than once, the previous programs of this Frequency will
be overwritten.
a) you can enter right side to select the channel one by one,
the Frequency, Bandwidth, Strength, Quality of channel you selected
will displayed in the bottom of the menu.
b) Or enter left side to select one channel directly by <UP/DOWN> button.
C) Press <OK> to start the manual scan the channel you selected.
Set the country for Auto Scan, Manual Scan and Time Zone.
Note: Change the Country Setting will automatically change the
default Frequency and Bandwidth for Auto Scan.
Set the Logical Channel Number to on or off.
Note: LCN is a number that uniquely identifies a logical channel, which is
popular in some ٛ uropean countries such as England, France.
Note: The default is OFF, set th i s o p t i o n to ON only if this STB is
connected to an active antenna which amplifies the received RF signal,
otherwise please set it to OFF
Allow you to enable or disable auto time zone offset update.
If you know the GMT(Greenwich Mean Time) time zone offset of your
location, set the Auto Time Zone to OFF and select an appropriate
Time Zone, otherwise set it to ON and let the system update the time
zone automatically according to the transport stream.
Note: Depending on the incoming signal the engine might not be able to
switch automatically between summer- and wintertime.
During the European summertime please select
GMT +02:00 instead of GMT+01:00.
Page 15

DYON HORNET
8.2 System Setting
TV Standard
Display Type
Video Output
HDMI
Resolution
Language
Auto Standby
Factory default
System Info
Set PAL, NTSC or AUTO for display. AUTO will switch PAL or NTSC by
program content. This setting should be matched with user’s TV.
Set display format for watching program, such as 4:3LB, 4:3PS,
16:9
4:3LB(LetterBox): Typically for wide screen content displays on
conventional 4:3 TV with black bars above and below the picture.
4:3PS(PanScan): Typically for wide screen content displays on
conventional 4:3 TV with left and right edges cropped.
16:9: Typically for wide screen 16:9 TV.
Shows the Video output signal format for this unit. (Not changeable)
Set the HDMI output as 480i, 480p, 576i, 576p, 720p, 1080i, 1080p.
Note: The HDMI output is confli ct with the SCA RT output except the 576i
and 480i resolution
The SCART output will be mixed in other HDMI output modes
(480p, 576p, 720p, 1080i, 1080p),
If the HDMI cable is pluged out, the output of HDMI will return to
576i(PAL) or 480i(NTSC) automatically in order to recover the SCART
output.
Set the audio language for watching program and the language for displaying
subtitle.
Switch the auto off function to on or off
Note: This function is designed to save power and will turn off the device
after 3 hours without any keystroke.
To restore the Factory settings.
Show system Information’s about this device.
8.3 Program List
Show and modify the program and schedule lists.
TV Program
Radio Program
Note: Depending on the region you are living in it is possible that not
DTT (DVB-T) radio stations are available.
Al low y ou m ana ge t he TV p ro gra ms , you c an a dd it t o Fa vor it e,
Move, Lock or Delete it
Al low y ou m ana ge t he Ra di o pro gr ams , yo u ca n add i t to Fa vo rit e,
Move, Lock or Delete it
Page 16

DYON HORNET
8.3.1 How to edit the program list
- Press / to select channel from the list.
- Press to show the submenu for this channel.
- Press / to select the desired function
- Press OK to confirm.
Move
- Select a channel.
- Press OK when “Move” is selected.
- Press to exit the submenu.
- Now Press / to move the selected channel to the desired position.
- Press to open the submenu again.
- Select “Move” and press OK to disable the move function for this channel.
- Now proceed with other channels in the same way.
- Press Exit to exit setup and save the changes.
Favorite
- Select a channel.
- Press OK when “Favorite” is selected.
- Press to exit the submenu.
- Now Press / to select another channel
- Press to open the submenu again
- Now proceed with other channels in the same way.
- Press Exit to exit setup and save the changes.
Page 17
DYON HORNET
Parental Lock
- Select a channel.
- Press OK when “Parental Lock” is selected.
- Enter the Password to lock the channel.
- Select OK and Press OK-key to confirm.
- Press to exit the submenu.
- Now Press / to select another channel
- Press to open the submenu again
- Now proceed with other channels in the same way.
- Press Exit to exit setup and save the changes.
Note: For more information about this function and for instructions how
to enable it please refer to chapter 8.4.
Using this function again on a locked channel will unlock this channel.
Default Password is “6666”.
Delete
- Select a channel.
- Press OK when “Delete” is selected.
- Press to exit the submenu.
- Now Press / to select another channel
- Press to open the submenu again
- Now proceed with other channels in the same way.
- Press Exit to exit setup and save the changes.
Note: The marked channels will be deleted when exiting the function.
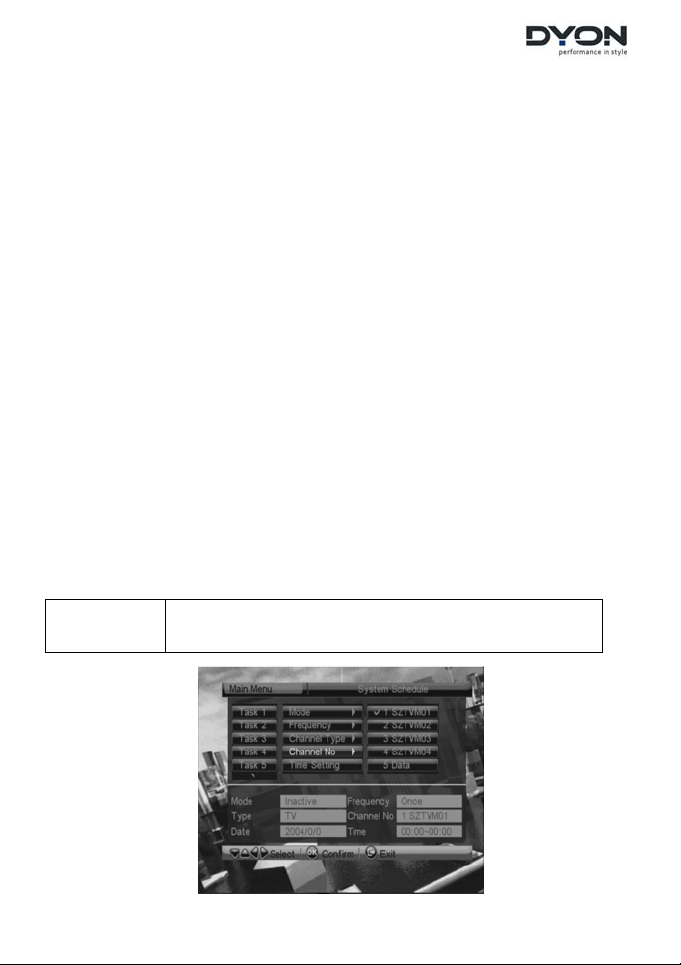
System
Schedule
Yo u ca n set 10 tim e r fo r wat c hi n g t h e sp e c i f i e d pr o gr a m by s e t th e
start date, start time and end time manually or from the EPG event,
when the start date and start time arrived, the receiver will
automatically switch to the specified program.
Note: It is not possible to use this function for recording.
Page 18

DYON HORNET
- Use / to select a not used task.
- Press to switch to the task settings
- Use / again to select a setting.
Mode
Frequency
Channel Type
Channel No
Time Setting
Activate / Deactivate the current task.
Set how often this task should be used (Once / Daily / Weekly).
Select if the desired channel is a TV or Radio channel.
Select the channel.
Select the start-up time if this task.
/// -key – Select a value
0-9 - key – change the selected value
- Press to switch to the submenu of the selected setting.
- Use / to select the desired setting.
- Press OK to confirm.
- Proceed with the other settings of the current task in the same way.
- Press Exit to exit setup and save the changes.
Note: To use a task you must switch the “Mode” setting to “Play”.
Attention: The engine must be switched on when you would like to use
this function. It can not be used when the device is in standby or off stat.
Sort
Allow you sort all program By Name, By Service ID, or By Channel No.
Attention: This setting will overwrite the order that was made using the
Program list editor!
8.4 Parental Control
Channel Lock
Change PIN
Note: Default Password is “6666”.
Lock the channel which has been set to lock status when turning on the
Channel Lock. Please see sectio n 8.3.1 for details.
To change the PIN code, select this option, press <Left/Right> button
to trigger changing password and <0~9> buttons to enter old
password, new password and confirm new password. If succeed, the
PIN Code a changed message will be displayed, otherwise a PIN
Code Error message will be displayed.
8.5 Media
Digital Out
Set the SPDIF output as PCM or RAW, or select OFF disable SDPIF
output.
Note: This setting has only effect for the coaxial digital audio output
socket.
Page 19

DYON HORNET
9 Troubleshooting
Problem Potential Reasons What to do
No picture
Screen shows
No Signal
No sound from
speaker
Power isn't connected
The power switch is not on
Aerial is disconnected or damaged
out of digital signal area check your local availability of DTT
No or incorrect connection with audio
cable
Mute the sound
Incorrect sound track
Connect the power
Switch on the power
connect or check aerial
services.
Connect the audio cable correctly
Switch on the correct volume
control
Try another sound track
no image on the
screen
Remote control
unit is not workable
The image stop
suddenly or mosaic
No or incorrect connection with audio
cable
The program is a radio program
The battery is exhausted Change new battery
Remote control unit is not in the right
opposite of the front panel or too far from
The signal is too weak Strengthen the signal
Connect the audio cable correctly Only sound,
Press <TV/RADIO> key to shift into TV
mode
Adjust the way of holding remote
control unit and near from the panel
it
10 Technical Specifications
Item Specification
Frequency Range 50,5 – 858 MHz
Tuner
Signal Input Level
IF Bandwith
QPSK,16QAM,64QAM
Modulation
Voltage 100~240V~ 50/60Hz
Power
Power
Decoder Format
Video
SCART output
HDMI output
Decoder format
Audio
Audio output
-80 ~ -20 dBm
7MHz and 8 MHz
Max 6W
MPEG4 AVC/H.264 HP@L4; MPEG2 MP@ML.HL
4:3PS, 4:3LB, 16:9
480i, 480p, 576i, 576p, 720p, 1080i, 1080p
MPEG-1 (layer1&2)
Digital audio: S/PDIF
Page 20

DYON HORNET
This symbol on the product or in the instructions means that your electrical and electronic
equipment should be disposed at the end of life separately from your household waste.There are
separate collection systems for recycling.For more information,
your retailer where you purchased the product
.
please contact the local authority or
11 Warranty condition
The following conditions comprise the requirements and scope of our warranty conditions and do not affect
our legal and contractual warranty obligations.
We offer a warranty on our products in accordance with the following conditions:
1. DYON products are covered by a 24 month warranty. We will resolve damages or defects on
DYON products free of charge within 12 months of the purchase date under the following warranty
conditions. For any damage or defect determined later than 12 months after the purchase date,
proof of a manufacturing fault must be submitted for repair under warranty.
The warranty does not cover batteries and other parts, which are considered consumables, parts
that break easily such as glass or plastic or defects based on normal wear and tear. There is no
warranty obligation in the event of marginal differences compared to the target appearance and
workmanship provided these have a negligible effect on the product's fitness for use, in the event
of damage caused by chemical or electrochemical effects, by water or generally from abnormal
conditions.
2. The warranty will be performed in such a way that we shall decide whether to repair the defective
parts or to replace them with working parts free of charge. AXDIA reserves the right to exchange
the product for a replacement product of equal value if the product that is sent in cannot be
repaired within a reasonable time or at reasonable cost. The product can also be exchanged for a
different model of the same value. Requests cannot be made for repairs to be carried out on site.
Parts that have been replaced or exchanged become our property.
3. The warranty claim does not apply if repairs or other work is carried out by unauthorized persons
or if our products are equipped with additional parts or accessories that are not approved for our
products.
4. Warranties that have been activated do not cause the warranty period to be extended, nor do they
trigger a new warranty period. The warranty period for any replacement parts installed ends with
the warranty period for the entire product.
5. Any other or further claims are excluded, especially those for replacement due to damage caused
outside of the product, provided there is no obligatory legal liability. We therefore accept no
liability for accidental, indirect or other consequential damage of any kind, which leads to usage
restrictions, data loss, loss of earnings or interruption to business.
Asserting a warranty claim
1. To make use of the warranty service, you must contact the AXDIA Service Center by e-mail, fax or
phone (see below for contact details). You can also use the service form on our website or on the
back of the warranty conditions.
2. AXDIA Service Center will try to diagnose and solve your problem. If it is determined that a
warranty claim exists, you will be given an RMA number (Return Mate rial Authorization) and you
will be asked to send the product to AXDIA.
IMPORTANT: AXDIA will only accept parcels that have an RMA number.
Page 21

DYON HORNET
Please observe the following when sending the product:
1. Send the product suitably packaged with carriage and insurance paid. Do not enclose any
accessories with the products (no cables, CD's, memory cards, manuals, etc.), unless the AXDIA
Service Centre specifies otherwise.
2. Mark the RMA number on the outside of the package in such a way that it is visible and clearly
legible.
3. You must enclose a copy of the sales slip as proof of purchase.
4. Once AXDIA has received the product, it will meet its warranty obligations in accordance with the
warranty conditions and will return the product to the sender with carriage and insurance paid.
Service outside of warranty
AXDIA can refuse any service claim made that is not covered by the warranty. If AXDIA
agrees to provide a service outside the warranty, the customer will be invoiced for all repair
and transport costs.
AXDIA will not accept any packages that have not first been approved by AXDIA by means
of an RMA (Return Material Authorization).
 Loading...