

Page 1
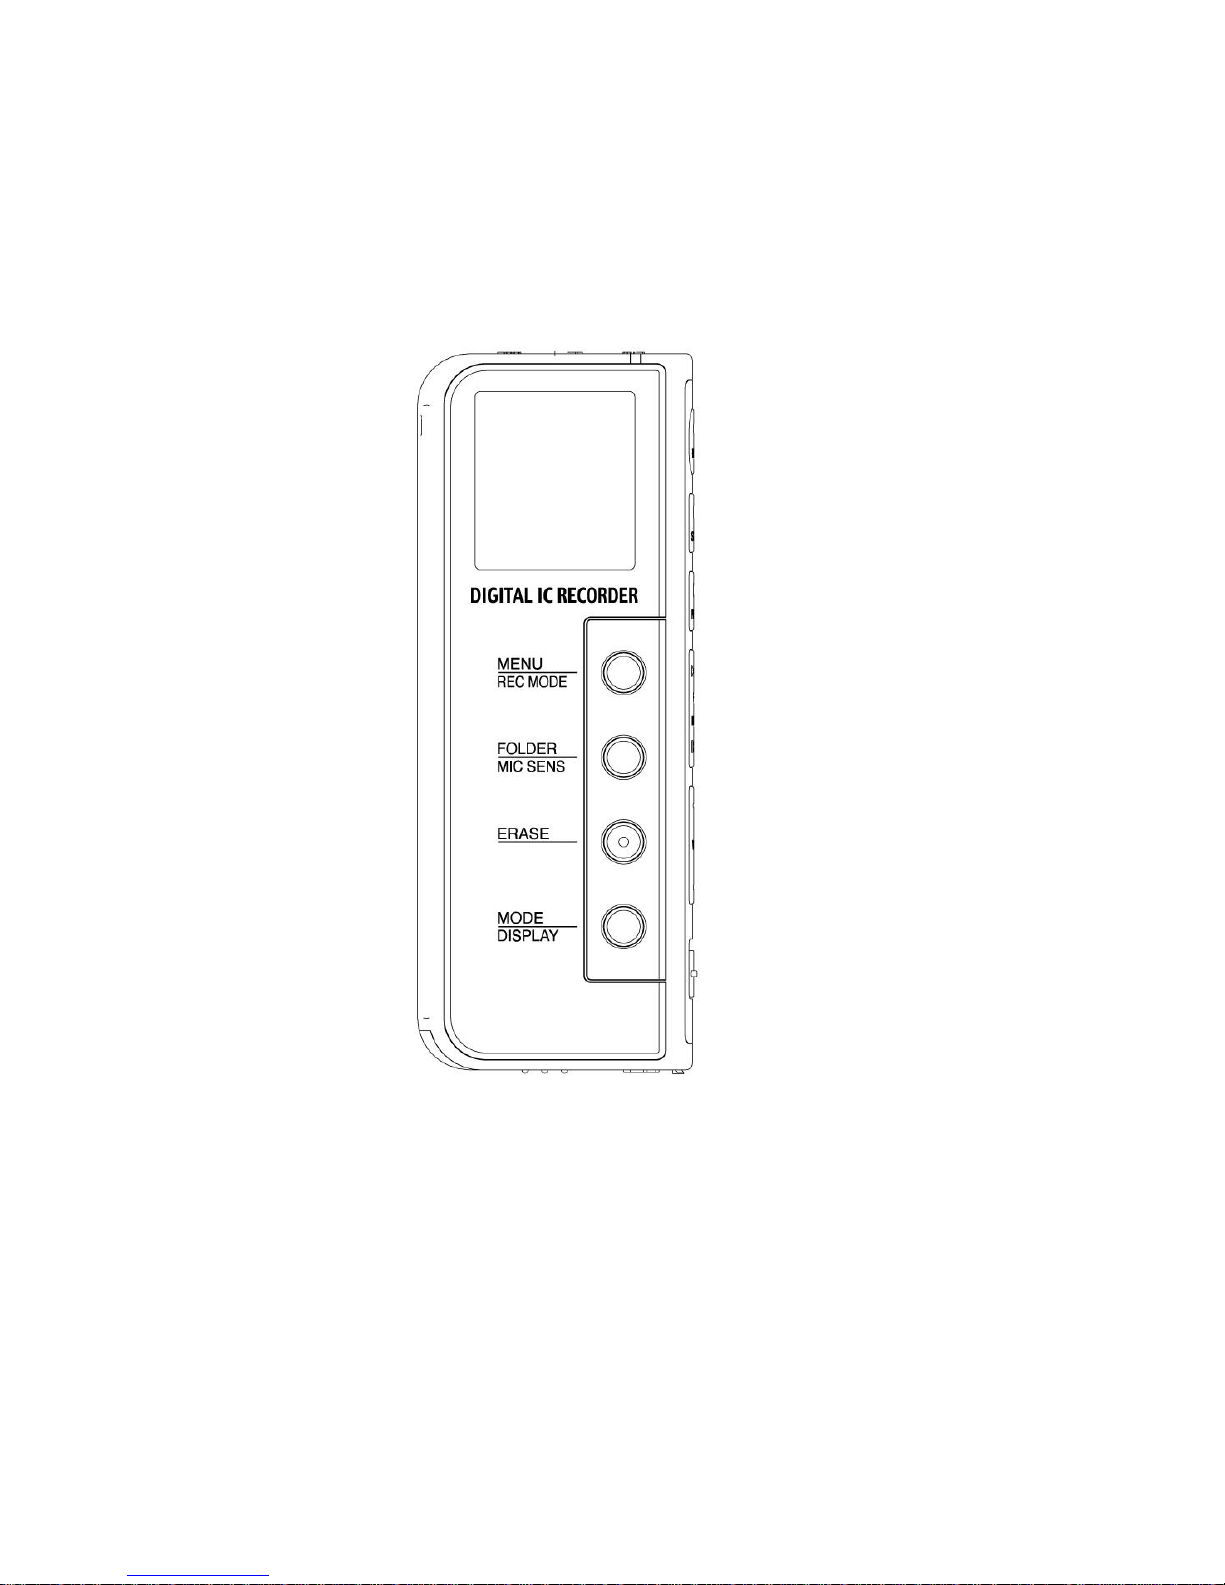
1
User’s Manual
DR1064/DR1128/DR1256/DR1512/DR11024
Dyne Telecom Co., Ltd.
Page 2

2
Contents
PPrreeppaarraattiioonn........................................................................................................................................................................................................................3
3
PPrreeccaauuttiioonnss...............................................................................
.......................................33
PPrroouucctt FFeeaattuurreess.......................................................................
.......................................44
AAcccceessssoorriieess...............................................................................
.......................................55
BBeeffoorree UUssiinngg tthhee uunniitt...........................................................
.......................................55
WWhhaatt iiss MMPP33//WWMMAA??.....................................................................
.......................................66
LLaayyoouutt aanndd FFuunnccttiioonn KKeeyyss.....................................................
.......................................77
FFuunnccttiioonn DDeessccrriippttiioonn.............................................................
.....................................................................................................
......................7
7
HHooww ttoo PPoowweerr OONN//OOFFFF...............................................................
.......................................77
MMooddee SSeettttiinngg.............................................................................
.......................................88
HHooww ttoo sseett mmooddee.....................................................................
.
.....................................................................................................
.........................................................................88
VVooiiccee MMooddee........................................................................................................................................................................................................................8
8
BBuuttttoonn DDeessccrriippttiioonn...............................................................
.
.....................................................................................................
.......................................................................88
DDeessccrriippttiioonn ooff LLCCDD wwhhiillsstt rreeccoorrddiinngg...............................
.....................................1111
RReeccoorrddiinngg && PPaauussee.................................................................
.
.....................................................................................................
...............................................................1111
PPaauussee WWhhiillee rreeccoor
rddiinngg............................................................................................
.....................................................................................................
.........................1122
CChhaaiinnggiinngg rreeccoorrdd ttyyppee wwhhiillee rreeccoorrddiin
ngg..................................................................................................
..................................................................112
2
HHooww ttoo cchheecckk tth
h
ee rreemmaaiinniinngg ttiimmee wwhhiillee rreeccoorrddiinngg.....................................
...........................................................................................1133
CChha
annggiinngg rreeccoorrddiinngg sseennssiivviittyy wwhhiillee rreeccoorrddiinngg..................
.....................................................................................................
.......................1133
CCoonnnneeccttiinngg ttoo tthhee EExxtteerrnnaall DDeevviiccee...................................
.....................................1144
CCoonnnneeccttiinngg ttoo tthhee EExxtteerrnnaall MMiiccrroopphhoonnee.........................
.
.....................................................................................................
...................................1144
RReeccoorrddiinngg ffrroomm TTeelleepphhoonnee.............
.....................................................................................................
............................................................................................114
4
PPl
l
aayybbaacckk && PPaauussee.........................................................................
.....................................................................................................
............................................................115
5
PPaauussee.........................
.
.....................................................................................................
.....................................................................................................
................................................115
5
PPllaayyiinngg pprreevviioouuss // NNeexxtt
ffiillee wwhhiillee ppllaayyiinngg.................................................................
.............................................................................................1166
FFa
asstt FFoorrwwaarrdd // FFaasstt RReewwiinndd....................................................
.....................................................................................................
...............................................1166
CChhaannggiinngg TTiimmee DDiissppllaayy wwhhi
illee ppllaayyiinngg bbaacckk......................................................................
................................................................................116
6
SSeeccttiioonn
RReeppeeaatt.........................................................................................
.....................................................................................................
........................................................116
6
DDiissppllaayyiinngg FFiillee IInnffo
o
rrmmaattiioonn.......................................................................................
.....................................................................................................
..............117
7
FFiillee DDeelleettiioonn.......................................................
.
.....................................................................................................
...............................................................................................1177
C
Chhaannggiinngg FFoollddeerr........................................................................
.....................................................................................................
.................................................................1177
UUssiinngg HHeeaarriinngg AAi
idd FFuunnccttiioonn................................................................................
.....................................................................................................
...................1188
MMeennuu SSeettttiinngg.....................................................
.....................................................................................................
................................................................................................118
8
FFuunnccttiioonn SSeettttiinngg MMeennuu...........................................................
.....................................................................................................
..........................................................118
8
SSyysstteemm SSeettttiinngg MMeennu
u
.....................................................................................................
.....................................................................................................
......................119
9
RRaaddiioo MMooddee..................................................................................................................................................................................................................227
7
BBuuttttoonn DDeessccrriippttiioonn...............................................................
.
.....................................................................................................
...................................................................2277
PPrreesseett SSeettttiinngg.
.....................................................................................................
.....................................................................................................
.............................................2299
UUssiinngg PPrreesseett...........................
.....................................................................................................
.....................................................................................................
.........................3300
PPrreesseett DDeelleettiioonn.........................................
.....................................................................................................
.....................................................................................................
.3311
RRaaddiioo RReeccoorrddiinngg aanndd CChhaannggiinngg tthhee RReeccoorrdd FFoollddeerr...
.....................................................................................................
....................331
1
MMeennuu SSeettttiinngg...................................................
.
.....................................................................................................
.................................................................................................3311
MMuussiicc MMooddee.................................................................................
.....................................3333
BBuuttttoonn DDeessccrriippttiioonn...............................................................
.
.....................................................................................................
...................................................................3333
Page 3

3
LLCCDD DDiissppllaayy ddeessccrriippttiioonn wwhhiillee ppllaayybbaacckk.....................
.
.....................................................................................................
...................................3344
PPllaayybbaacckk // SSttoopp...............................
.....................................................................................................
.....................................................................................................
...........3344
PPaauussee...........................................................................
.....................................................................................................
....................................................................................................3
355
PPllaayyiinngg bbaacckk pprreevviioouuss//NNeexxtt ssoonngg wwhhiillee PPllaayybbaacckk.....
.....................................................................................................
..........................335
5
FFaasstt SSeeaarrcchhiinngg.........................................
.
.....................................................................................................
.....................................................................................................
..336
6
SSeelleecctteedd aarreeaa rreeppeeaatt ffuunnccttiioonn((AA-- BB)).......................
.
.....................................................................................................
...................................................3366
FFiillee DDeelleettiioonn...................
.....................................................................................................
.....................................................................................................
...............................3366
UUssiinngg HHeeaarriinngg AAiidd FFuunnccttiioonn.............
.....................................................................................................
......................................................................................337
7
MMeennuu
SSeettttiinngg.......................................................................................
.....................................................................................................
..............................................................337
7
UUssiinngg bbyy ccoonnnneeccttiinngg ttoo PPCC..................................................................................................................................................................339
9
FFiillee UUppllooaadd//DDoowwnnllooaadd.............................................................
.....................................3399
MMaassss SSttoorraaggee DDrriivveerr IInnssttaallllaattiioonn ffoorr WWiinnddoowwss 9988.....
.
.....................................................................................................
.......................4400
FFoonntt DDoowwnnllooaadd ((LLaanngguuaaggee ssuuppppoorrtt)).....................................
.....................................4400
DDrriivveerr IInnssttaallllaattiioonn.............................................................
.
.....................................................................................................
.....................................................................4400
FFoonntt DDoowwnnllooaadd.
.....................................................................................................
.....................................................................................................
.........................................4400
LLiisstteenniinngg ttoo rreeccoorrddeedd ffiillee.................................................
.....................................4411
EExxpprreessss MMeeddiiaa PPllaayyeerr iinnssttaallllaattiioonn.................................
.
.....................................................................................................
...............................................4411
PPllaayybbaacckk tthhee rreeccoorrddeedd ffiil
lee..................................................................................................
.....................................................................................................
.........4444
SSppeecciiaall UUttiilliittyy.......................................................................
.....................................4455
SSppeecciiaall UUttiilliittyy IInnssttaallllaattiioonn...........................................
.
.....................................................................................................
...............................................................4455
SSppeecciiaall UUttiilliittyy E
Exxeeccuuttiioonn....................................................................................
.....................................................................................................
...........................4477
CCoonnnneeccttiinngg ttoo PPCC.....................................
.....................................................................................................
..................................................................................................447
7
SSppeecciiffiiccaattiioonn...........................................................................
.....................................5511
TTrroouubbllee sshhoooottiinngg.....................................................................
.....................................5522
PPrreeppaarraattiioonn
PPrreeccaauuttiioonnss
Please Read the following precautions before using the unit.
Any problem happened without reading this precaution is not Dyne telecom’s
responsibilty.
● Do not use the unit for other purposes which are not recommended in this
manual.
● Do not impact the unit by strong stock or shaking. Or it may cause a serious
problems on unit.
● Do not use or place the unit in hot, humid, strongly vibrated and strong magnetic
places.
● Be careful that the unit does not get wet. As this may cause critical damage that
could be impossible to repair. If the player gets wet then please wipe the unit with a
dry towel and contact the service center.
● When other materials are on the unit, wipe it out with soft cloth or towel.
Do not clean the unit with inflammable solvents like alcohol, benzene and thinner,
Page 4

4
etc.
● Do not disassemble & assemble the unit by yourself. It will not covered by
Dyne’s A/S
● Check the polarity before you use the battery.
● When you are not going to use the unit for a long time, remove the batteries to
prevent damage from battery leakage and corrosion.
● Please plug in / unplug the earphone or cable by grasping the plug connector. This
may cause a break in the wire.
● Do not make a shock or a shake while the USB is connected to the PC.
● Case of any data loss saved in the unit by user mistake or unit breakdown, dyne
telecom does not have any responsibility to compensate for your data loss.
● If the hold Button
is locked, the player is not working. Unlock the hold
button.
● Do not carry the battery with other metallic items, as it can cause a fire because of
the short of battery that is used in the player.
● Watch out the scratching from the Papers or Wrap paper.
● Please take care not to be hurt while opening the battery cover or by product
edge.
●Using the earphone for long time will cause some problem on your ear. So, do
control the use time.
●Do not use the earphone while you are driving because it is so dangerous.
●Do not hear the earphone with full volume when you walk by the crosswalk.
Copyright Protection
1. You cannot use the TCV, TVF files produced by Digital Audio Player for the
purpose of commercial purpose. They can be used for personal purpose only.
2. This company reserves all the copyrights of the contents of this publication
and Digital Audio Player software. So, we notice that you cannot reproduce,
copy or translate any part of this publication into any language in any form
without the prior written consent of the copyright holders.
3. It could be illegal to use or duplicate the recordings beyond a private purpose
PPrroouucctt FFeeaattuurreess
● Full Graphic & Icon LCD
● FLEXISPEED Control : 6 levels
● Multi Format Support : MP3 and WMA Format
● EQ Function : 8 different EQ support : NORMAL(FLAT), POP, CLASSIC, JAZZ, ROCK,
AUTO,USER, 3D
● Multi Language Support : Korean, English, Japanese, Chinese etc.
● Support Multi Language Menu OSD(Korean / Japanese / English)
Page 5
5
● External Stereo Recording : Real time recording to MP3 file by connecting to
external audio device.
● Mass Storage : Used as a portable storage device.
● Firmware Upgrade available via the USB
● Navigation : Anytime file selection is available while listening to music by
Navigation file search function
● FM Radio Listening and Recording Function : Automatic saving, Automatic search
24 Preset of FM Radio.
● Voice Recording : Voice Recording Function via the built-in microphone
( Recording time: about 45hrs and 30min, 128MB memory )
● Folder : Can be stored 199 message in one folder
● Repeat Function : Multi Repeat function for Language Study : Intro, Selection
repeat, one file or all of files repeat function, Random playback function
● Clock(Alam, Reseved Recording)Function
● Screen Saver
● Built in Speaker
AAcccceessssoorriieess
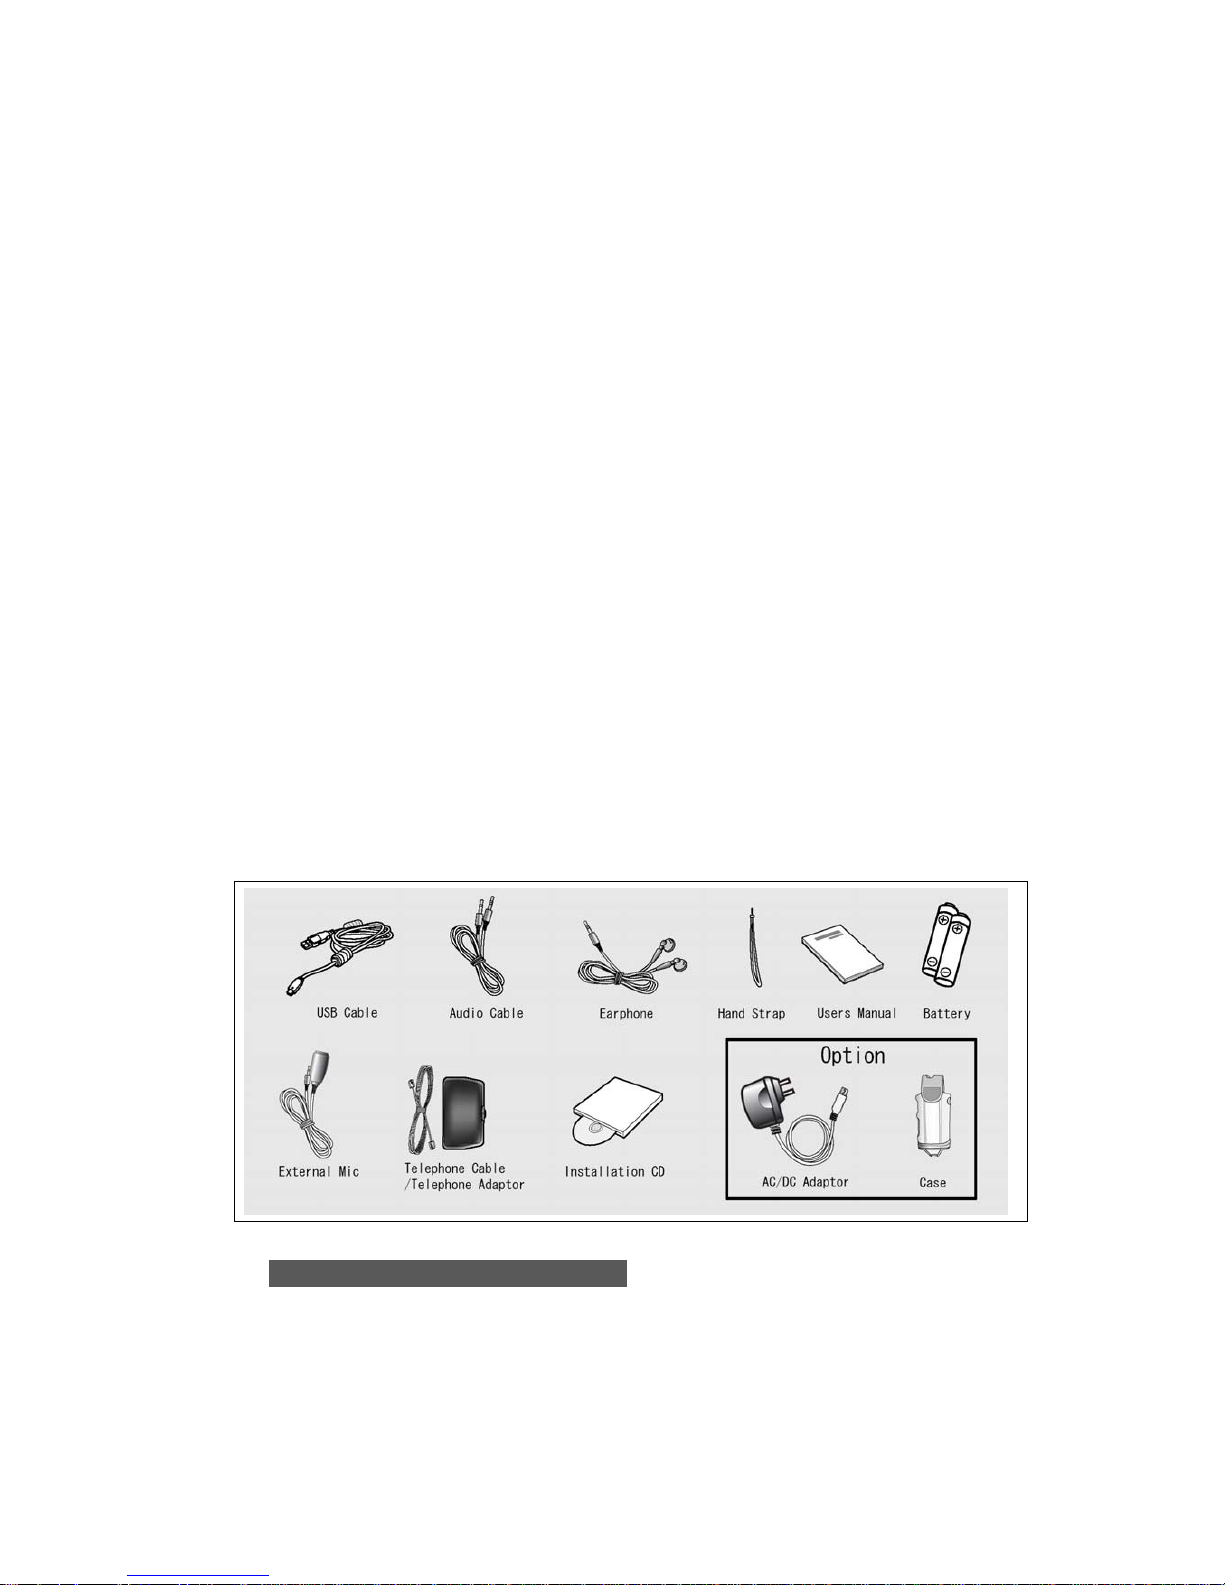
Earphone, USB Cable, Audio Cable, Installation CD, Battery(AAA) X 2, Hand Strap, User’s
Manual, Telephone Cable, Telephon Adaptor, Carriage Bag, External Mic.
*Optional Item : AC/DC Adaptor
BBeeffoorree UUssiinngg tthhee uunniitt
Step 1 : Inserting the batteries
1. Slide to ▷(on the cover) direction and lift the battery cover.
2. Insert two batteries(AAA) with correct polarity, and close the cover.
Page 6
6
Caution
z Do not take out batteries while operating. It can cause severe malfunction.
z Be sure to replace batteries while power down.
z Do not use different types of batteries together.
z Be sure to replace both batteries with new ones when replacing the batteries.
z Do not recharge batteries and follow the instructions of battery manufacturer.
z Take out batteries to protect the unit if you do not use the unit for a long time.
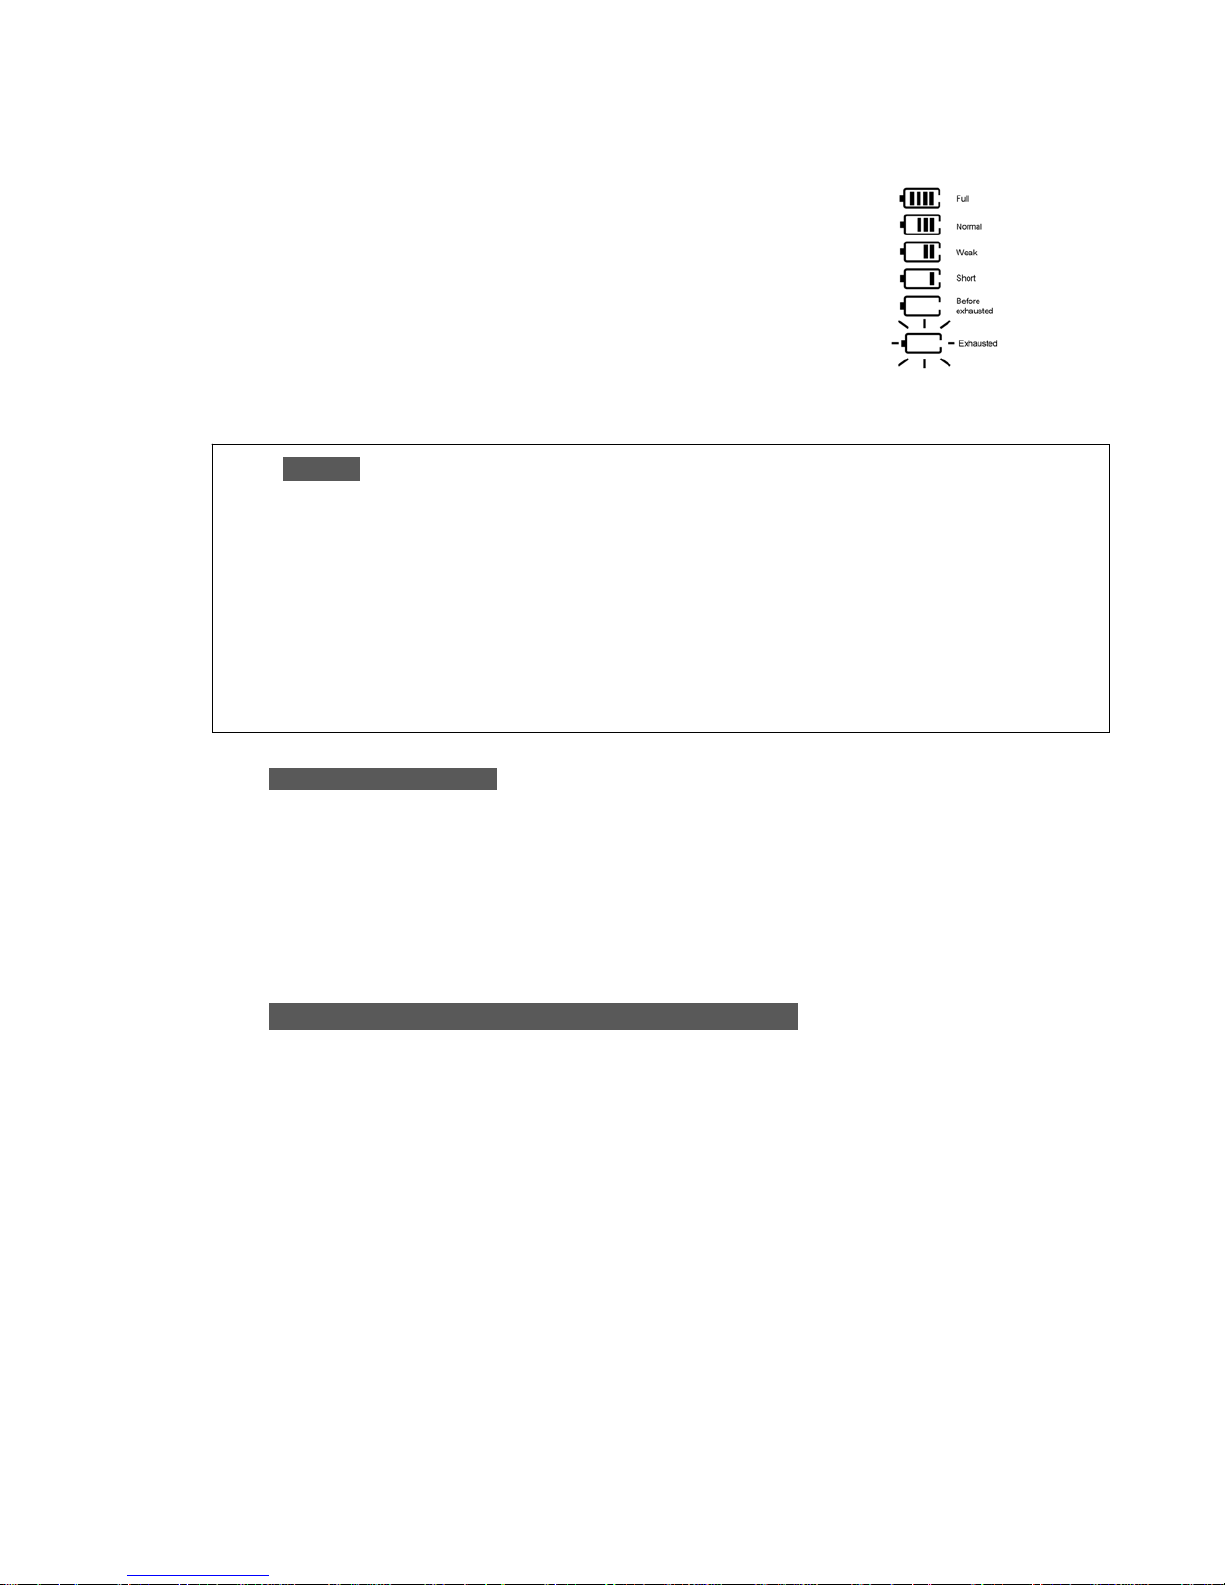
3. The battery indicator shows the battery consumption .
4. The unit have a small rechargeable battery in side to preserve time &
settings. However, if 1 hours or 10 hours (In case a small
Rechargeable battery is charged for an hour) is passed without batteries,
the time & settings can be erased. In this case, input
time and settings like alarm etc. again after inserting new
batteries.
Battery Life & Good Usage
The battery running time of consequent using is about 15 hrs 30 min. for voice recording and
28 hrs(Earphome volume 10) for playback in voice mode.
The battery consumption for recording is more than playback.
To turn the volume up in playback need more consumption of battery. Therefore, if you
use the unit with earphone at lower volume level, you can save batteries.
Step 2 : Setting Date and time ( Refer to 24page)
WWhhaatt iiss MMPP33//WWMMAA??
● What is MP3?
MP3 is the shorten word of MPEG-1 Audio Layer 3 and audio data compression
technology. Usually, it means MP3 file type music data. The MP3 file is
compressed to the size of 1/12 of normal CD fille and sounded like CD.
● What is WMA ?
A popular alternative to MP3, Microsoft’s WMA(Windows Media Audio) format
can compress files into even smaller sizes while retaining audio quality. A
general compression rate of 1/24 in relation to CD-DA(Compact Disc D
Page 7
7
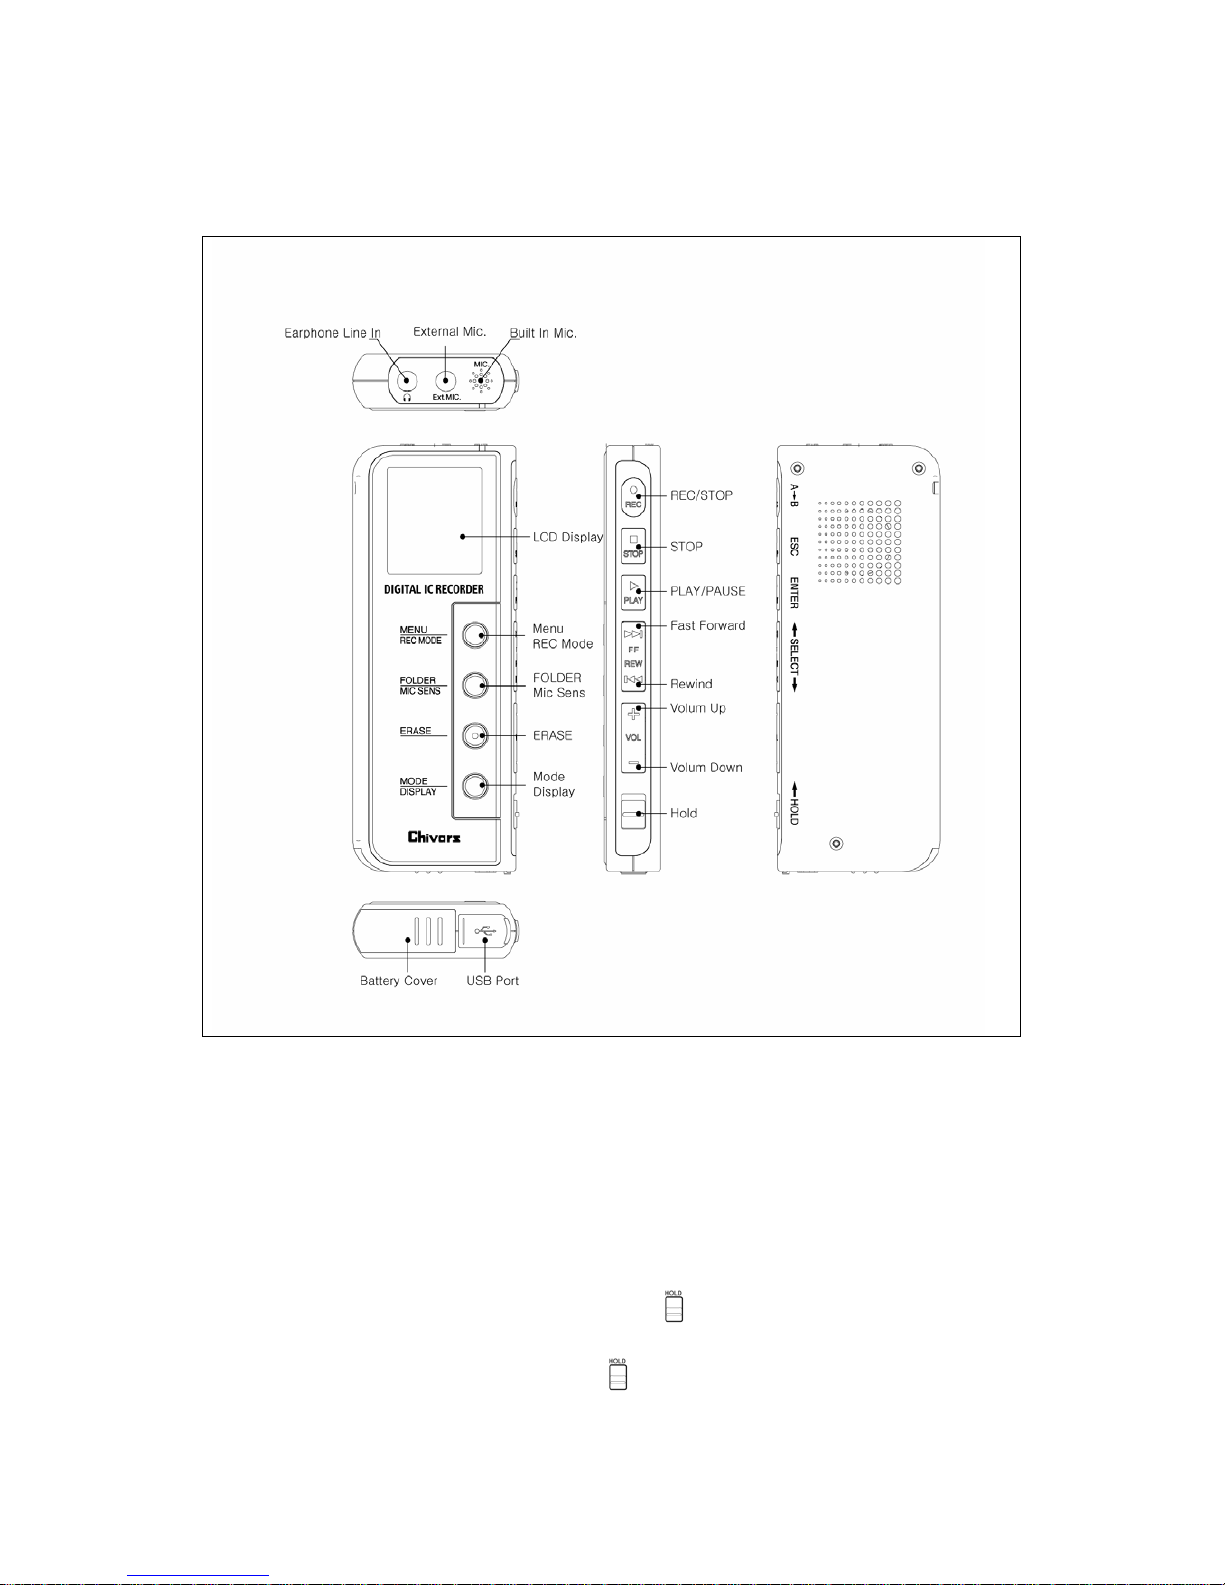
LLaayyoouutt aanndd FFuunnccttiioonn KKeeyyss
FFuunnccttiioonn DDeessccrriippttiioonn
HHooww ttoo PPoowweerr OONN//OOFFFF
This product has automatic power off funtion. If the time passes 3 minutes
without any use, the power is cut off automatically.
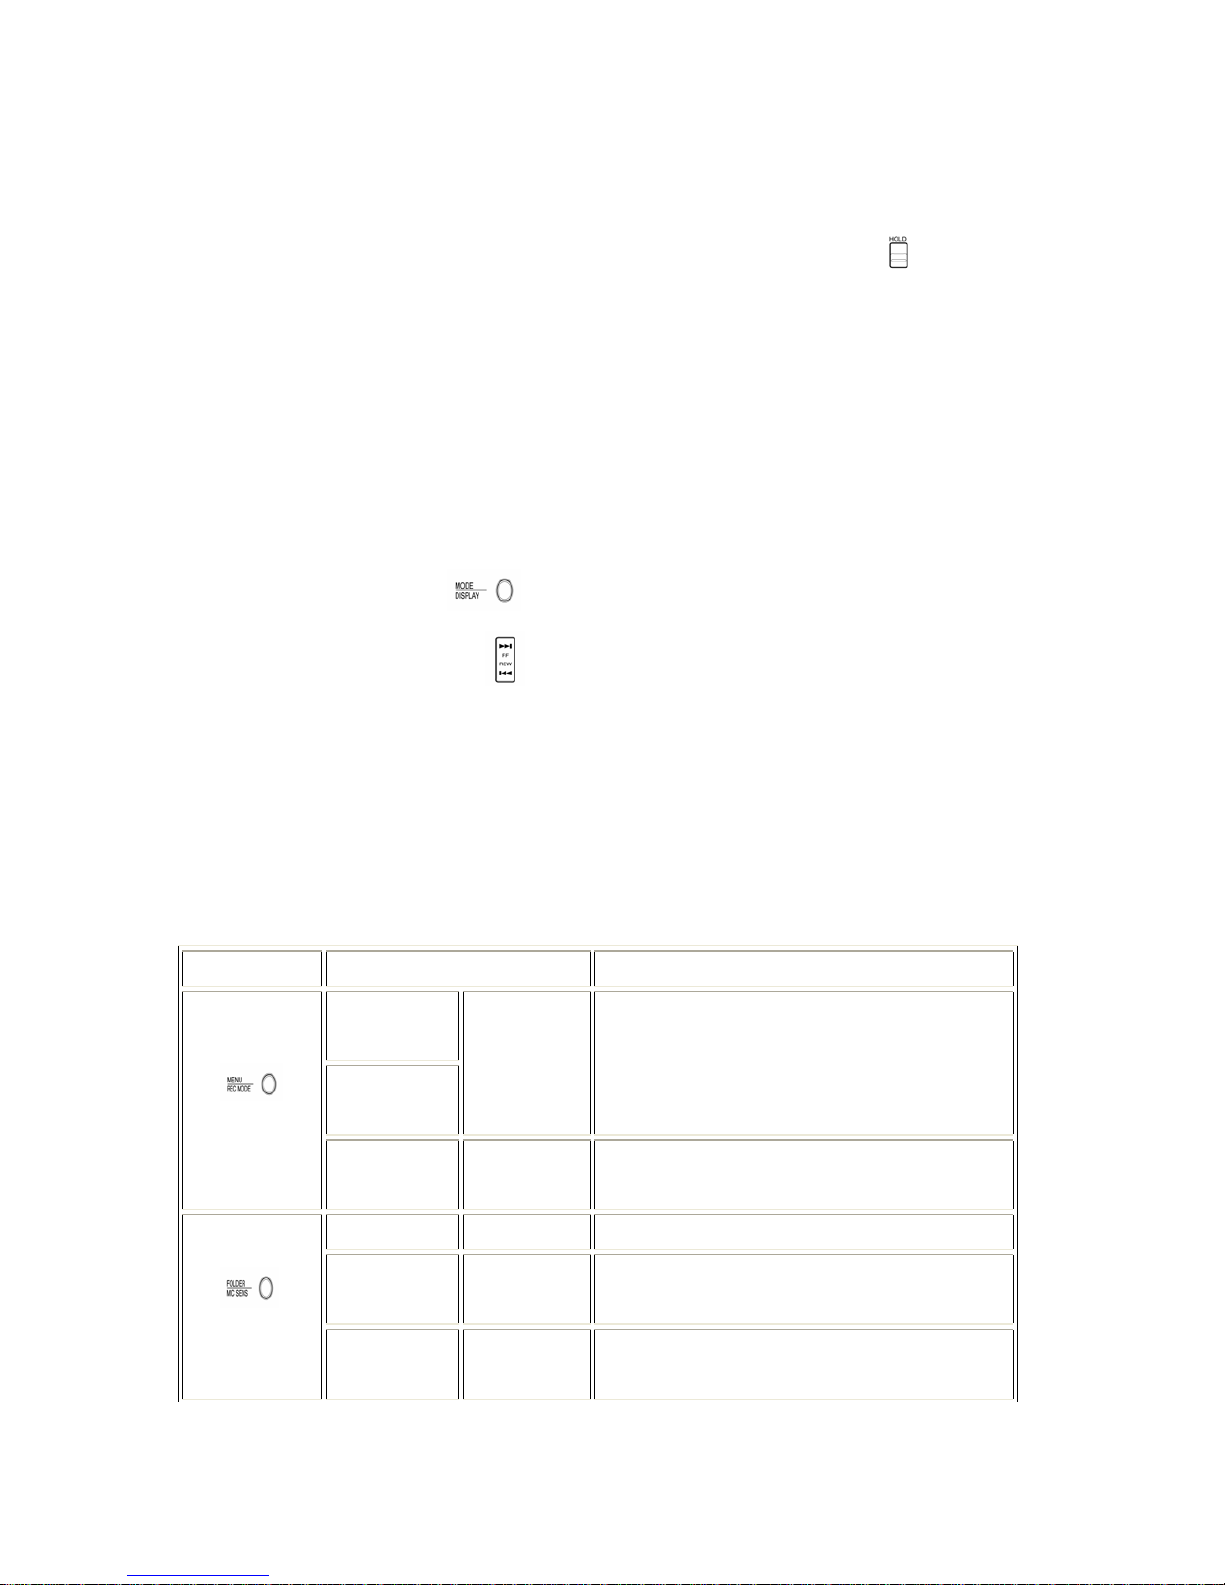
To turn power off directly, Set the HOLD
button on.
To turn power on, release the HOLD
button and press any key.
Page 8
8
In case press any key in Hold mode, the current time will appear for about 5
seconds and disappear. To use the player again, release the HOLD
button to
off.
MMooddee SSeettttiinngg
This unit is devided into three modes like VOICE MODE, RADIO MODE and MUSIC
MODE. Select Voice Mode to record. Select Radio Mode to listen to Raido and
select Music Mode to playback files.
HHooww ttoo sseett mmooddee
Press Mode/Display button for a long to select a mode
Using FF button or REW
button, select Music→Voice→Radio mode.
After Selecting Mode, press play key then, the selected mode will be adapted..
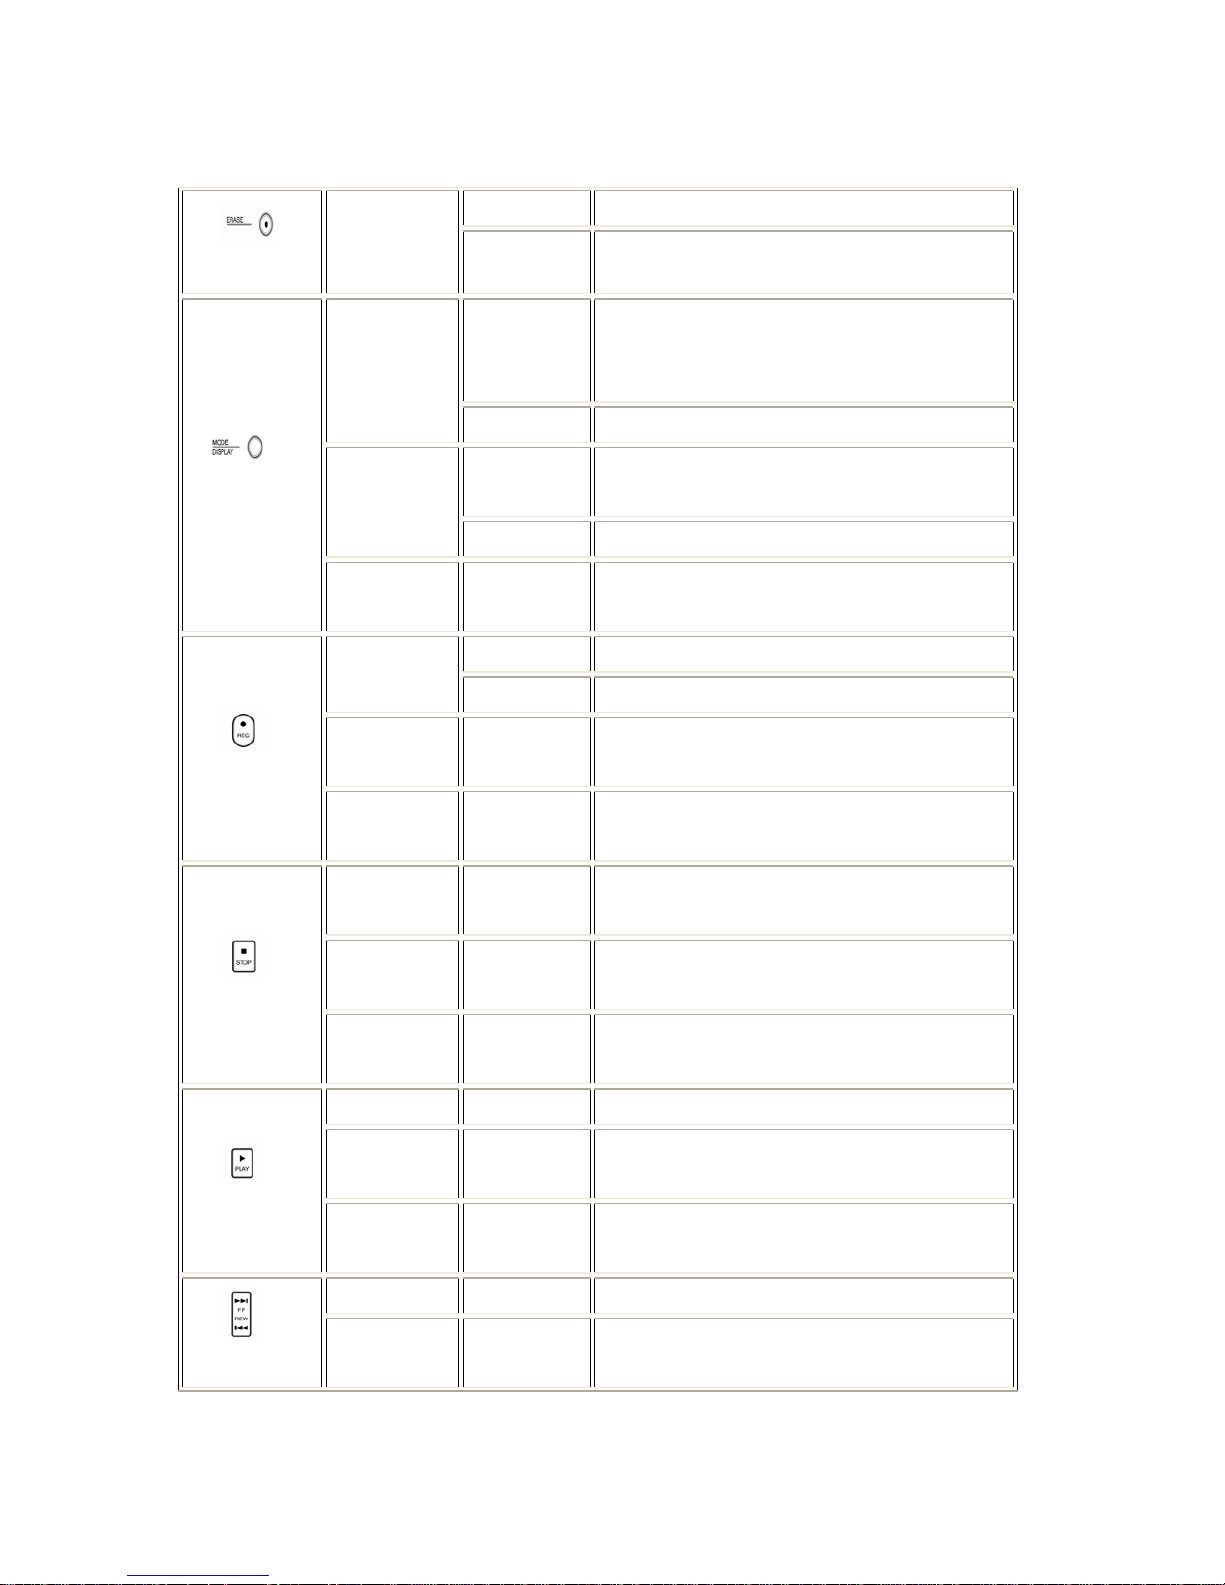
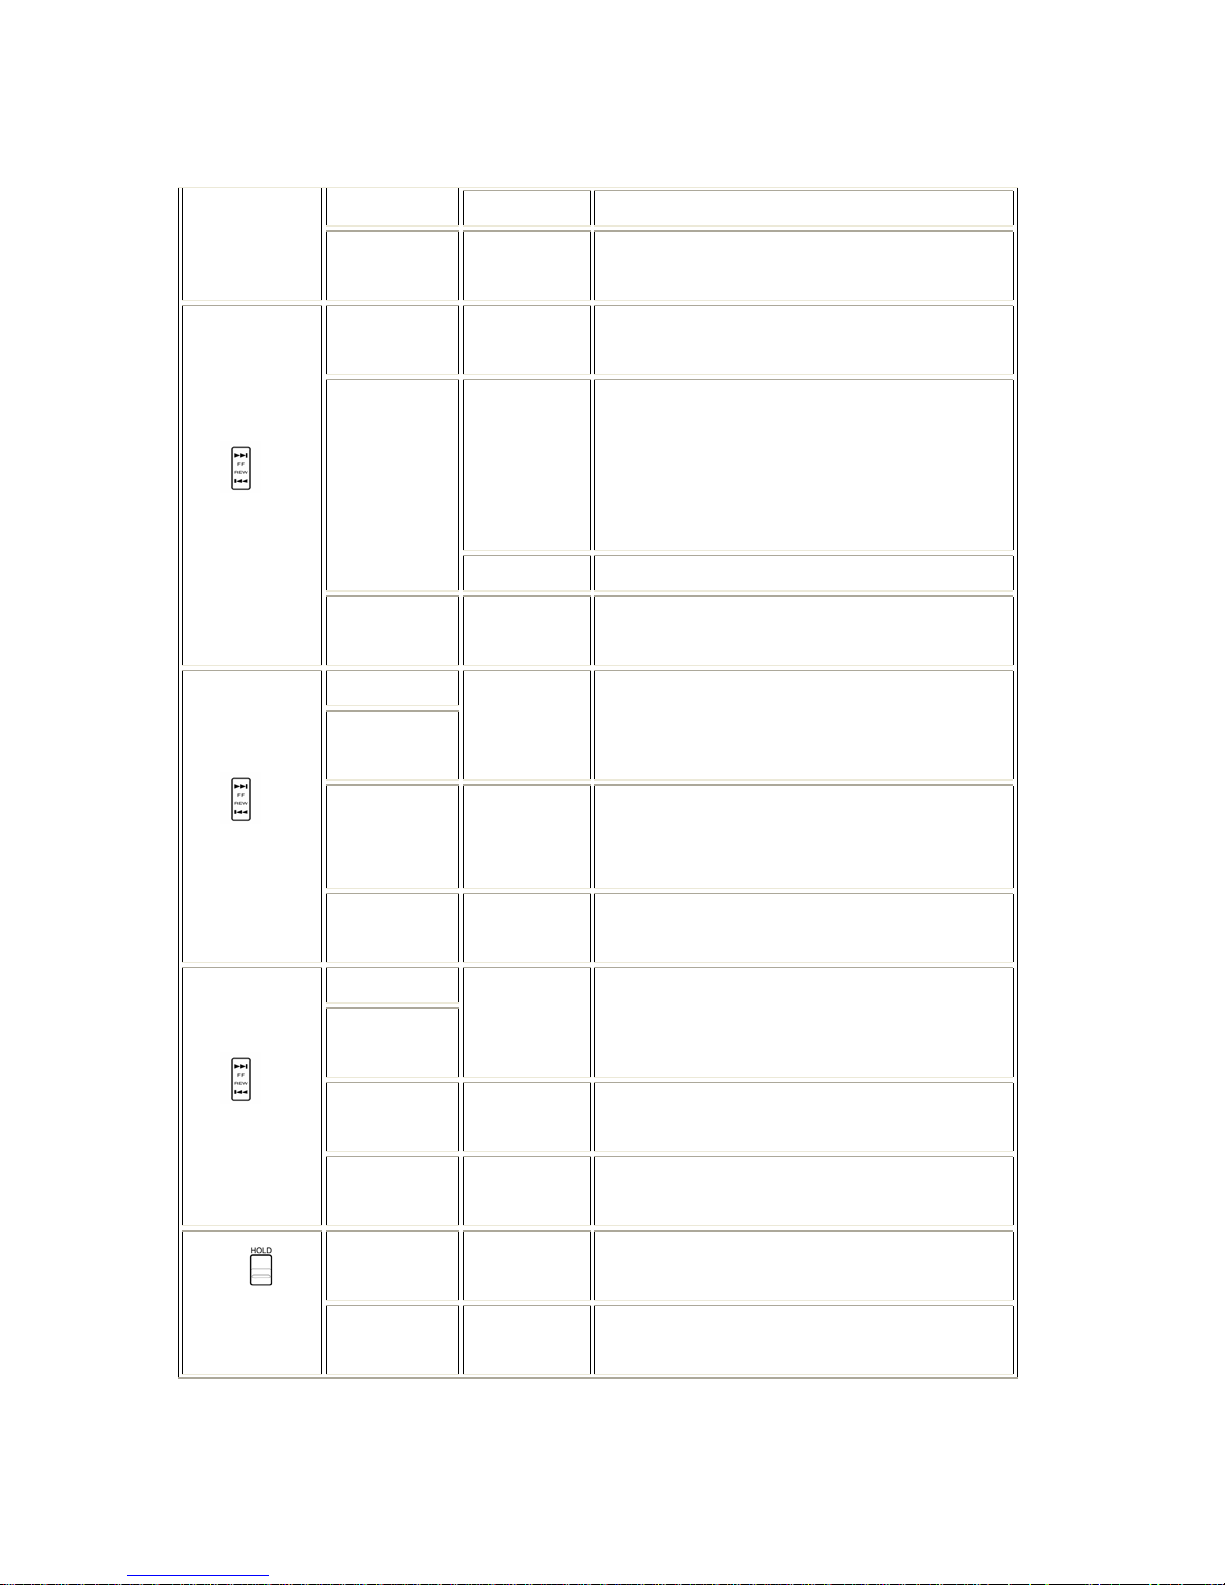
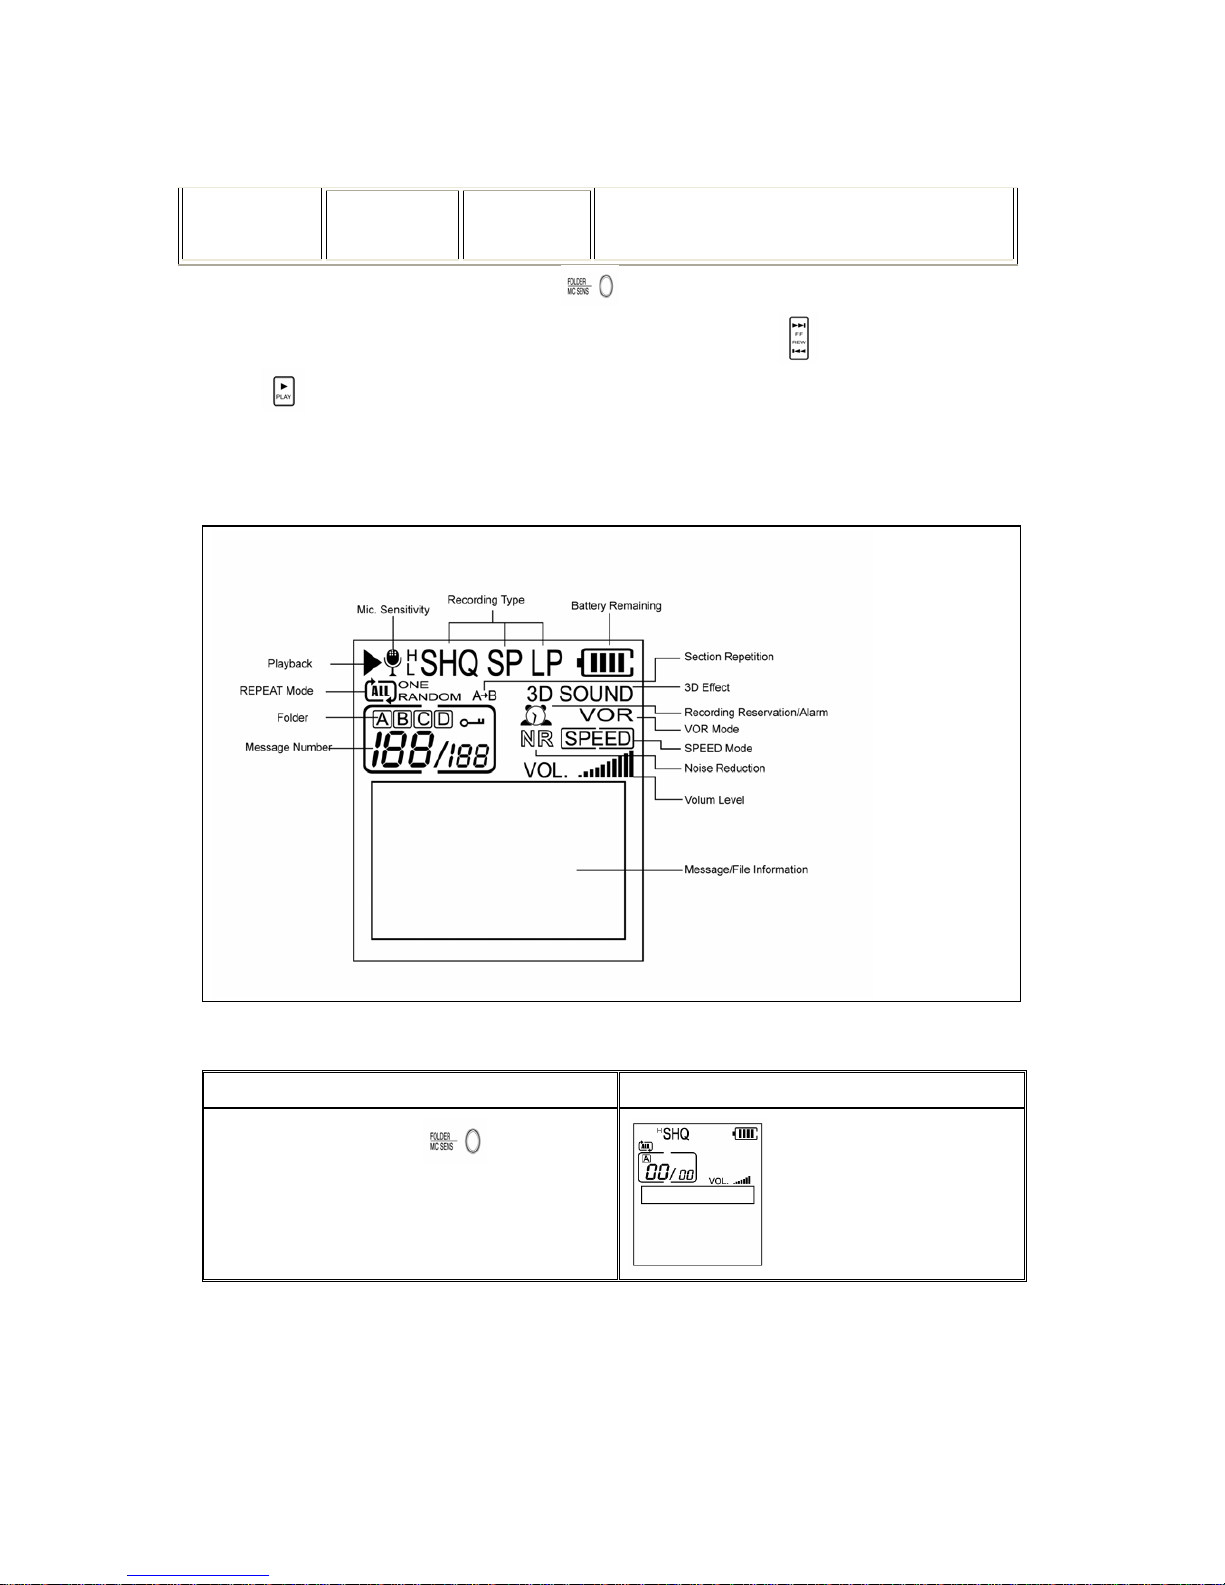
BBuuttttoonn DDeessccrriippttiioonn
Key Status & Method Key Description
Stop
State
Playback
State
Long Press Go to Main Main
Menu
Recording
State
Short Press Recording Method(SHQ,HQ,SP,LP)Change
Stop State Short Press Recording folder(A,B,C,D)Change
Playback
State
Short Press Go to Navigation mode
Folder
Recording
State
Short Press Adjusting Mic Sensitivity level
VVooiiccee MMooddee
Page 9
9
Short Press Deleting file
Erase
Stop State
Long Press Deleting all the files in the folder
Short Press
Displaying current time
and the information of
the recordedfile
Stop State
Long Press Mode Change
Short Press
Displaying the information of
the recored file
Playback
State
Long Press Mode Change
Mode/Display
Recording
State
Short Press
Displaying the remaining
time according to memory size
Short Press Recording start
Stop State
Long Press Hearing Aid Function
Playback
State
Short Press Section Repeat
REC
Recording
State
Short Press Pause Recording
Playback
State
Short Press Playing Stop
Recording
State
Short Press Recording Stop
Stop
Menu State Short Press
Canceling current selected file and
Move to upper stage
Stop State Short Press Playback Start
Playback
State
Short Press Playback Pause
Play
Menu State Short Press
Saving current file and escaped
Stop State Short Press Move the cursor to the upper file
FF
Playback
State
Short Press
Playing next file
Page 10
10
Long Press Fast Forwarding Search
Menu State
Short Press
Move the curser to the next or
change the value up
Stop State Short Press
Move the cursor
To the lower file
Short Press
Playing former file
(In case of Playing within 10sec)
Playing current file
(In case of playing after 10 sec)
Playback
State
Long Press Fast rewinding search
REW
Menu State Short Press
Move the curser to the previous or
change the value down
Stop State
Playback
State
Short Press Volume up (Max 20)
Recording
State
Short Press
Volume up
Mic Sensivility Up
(In case of pressing folder button)
Vol +
Menu State Short Press
Set the value up for the selected
part
Stop State
Playback
State
Short Press Volume down
Recording
State
Short Press Volume down / Mic volume down
Vol -
Menu State Short Press
Set the value down for the selected
part
Stop
State
OFF Turn Off
Hold
Playback
State
ON
Hold
Page 11
11
Recording
State
ON
*Navigation Function : Press folder button and go to Navigation Mode while
playingback, you can select desired file using FF or REW
button. By pressing
play
button shortly in the state of file selection, the selected file will be
played back.
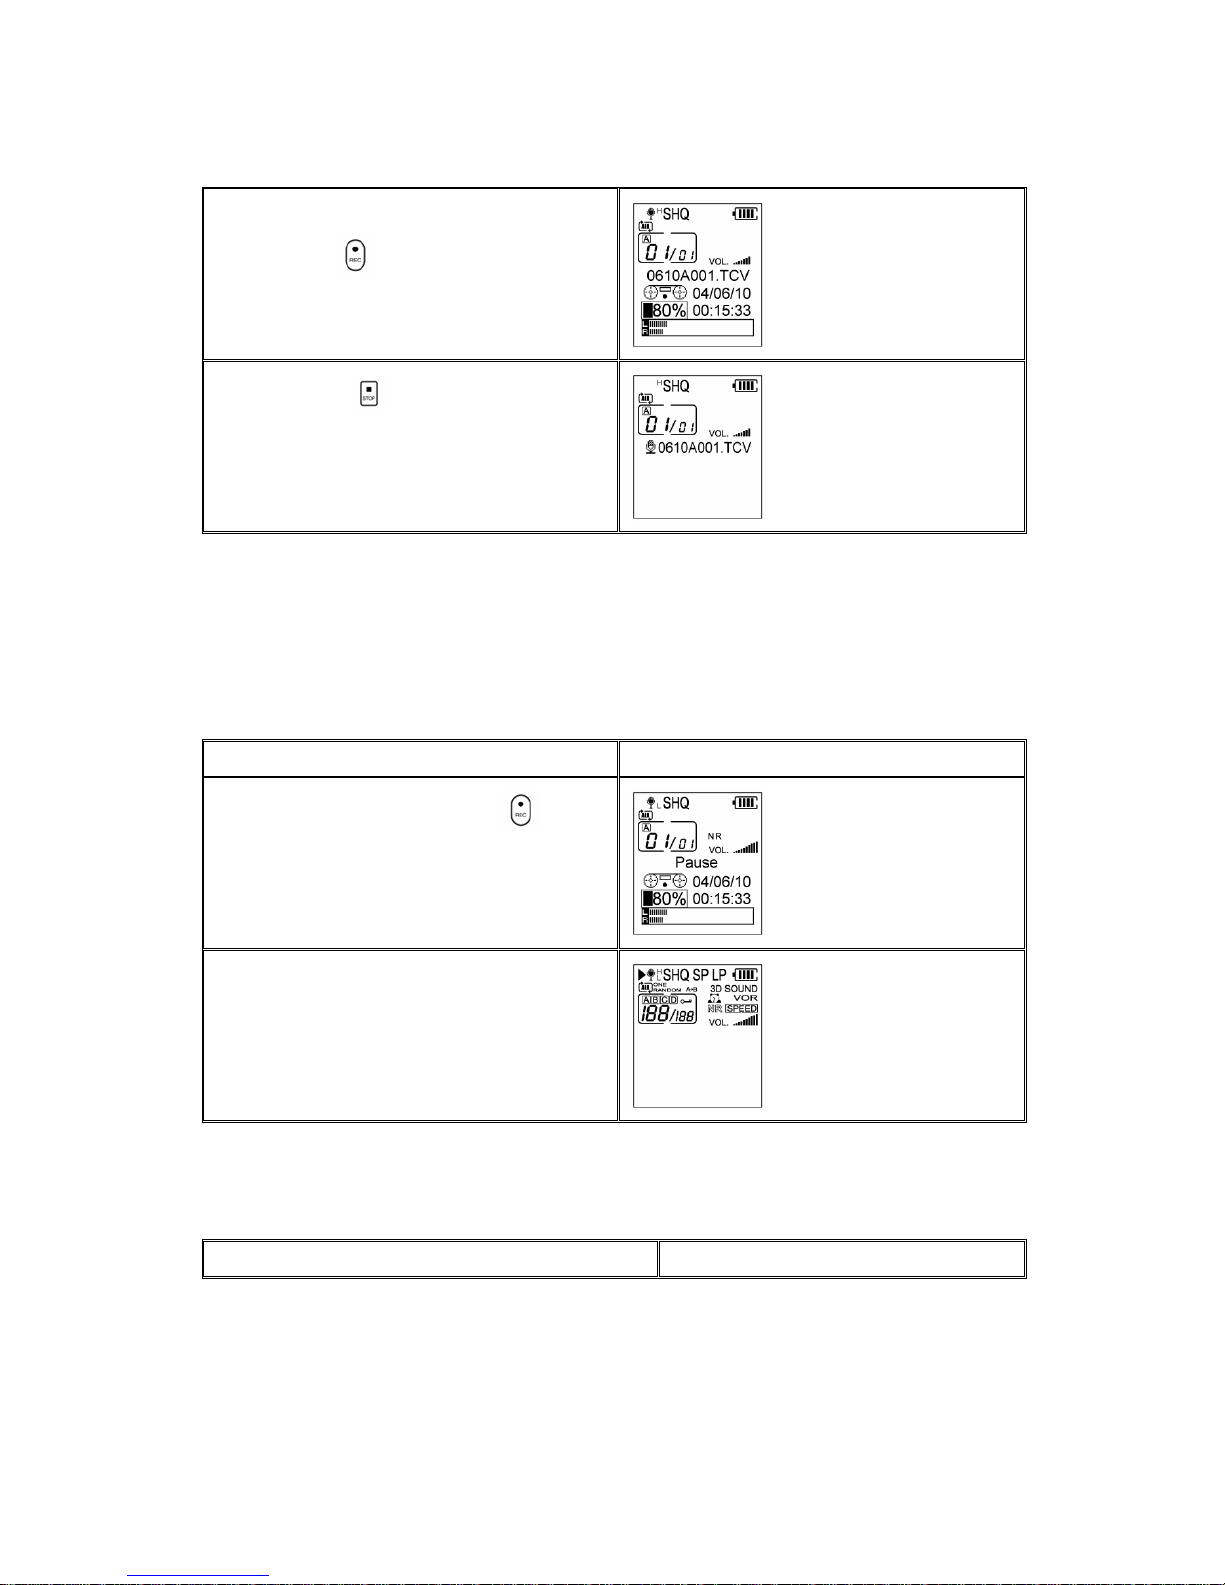
DDeessccrriippttiioonn ooff LLCCDD wwhhiillsstt rreeccoorrddiinngg
RReeccoorrddiinngg && PPaauussee
Description LCD
1. Choose the folder you want to
record by folder button in the voice
mode
Page 12
12
2. After placing Mic. to the sound source
press REC
button shortly to record
3. Press Stop button shortly to stop
while playing
– Try test recording not to fail recording
- The number of recoding will be automatically saved next to the last recorded file
- Be careful not to scrub the surface of the player while recording to prevent the
noise to be recorded.
Be careful not to pull out the battery while recording to prevent the malfunction
of the player.
PPaauussee WWhhiillee rreeccoorrddiinngg
Description LCD
1. Pause by pressing REC button
shortly while playingback.
2. Pause maintains 10minutes. After
10minutes, converted waiting mode.
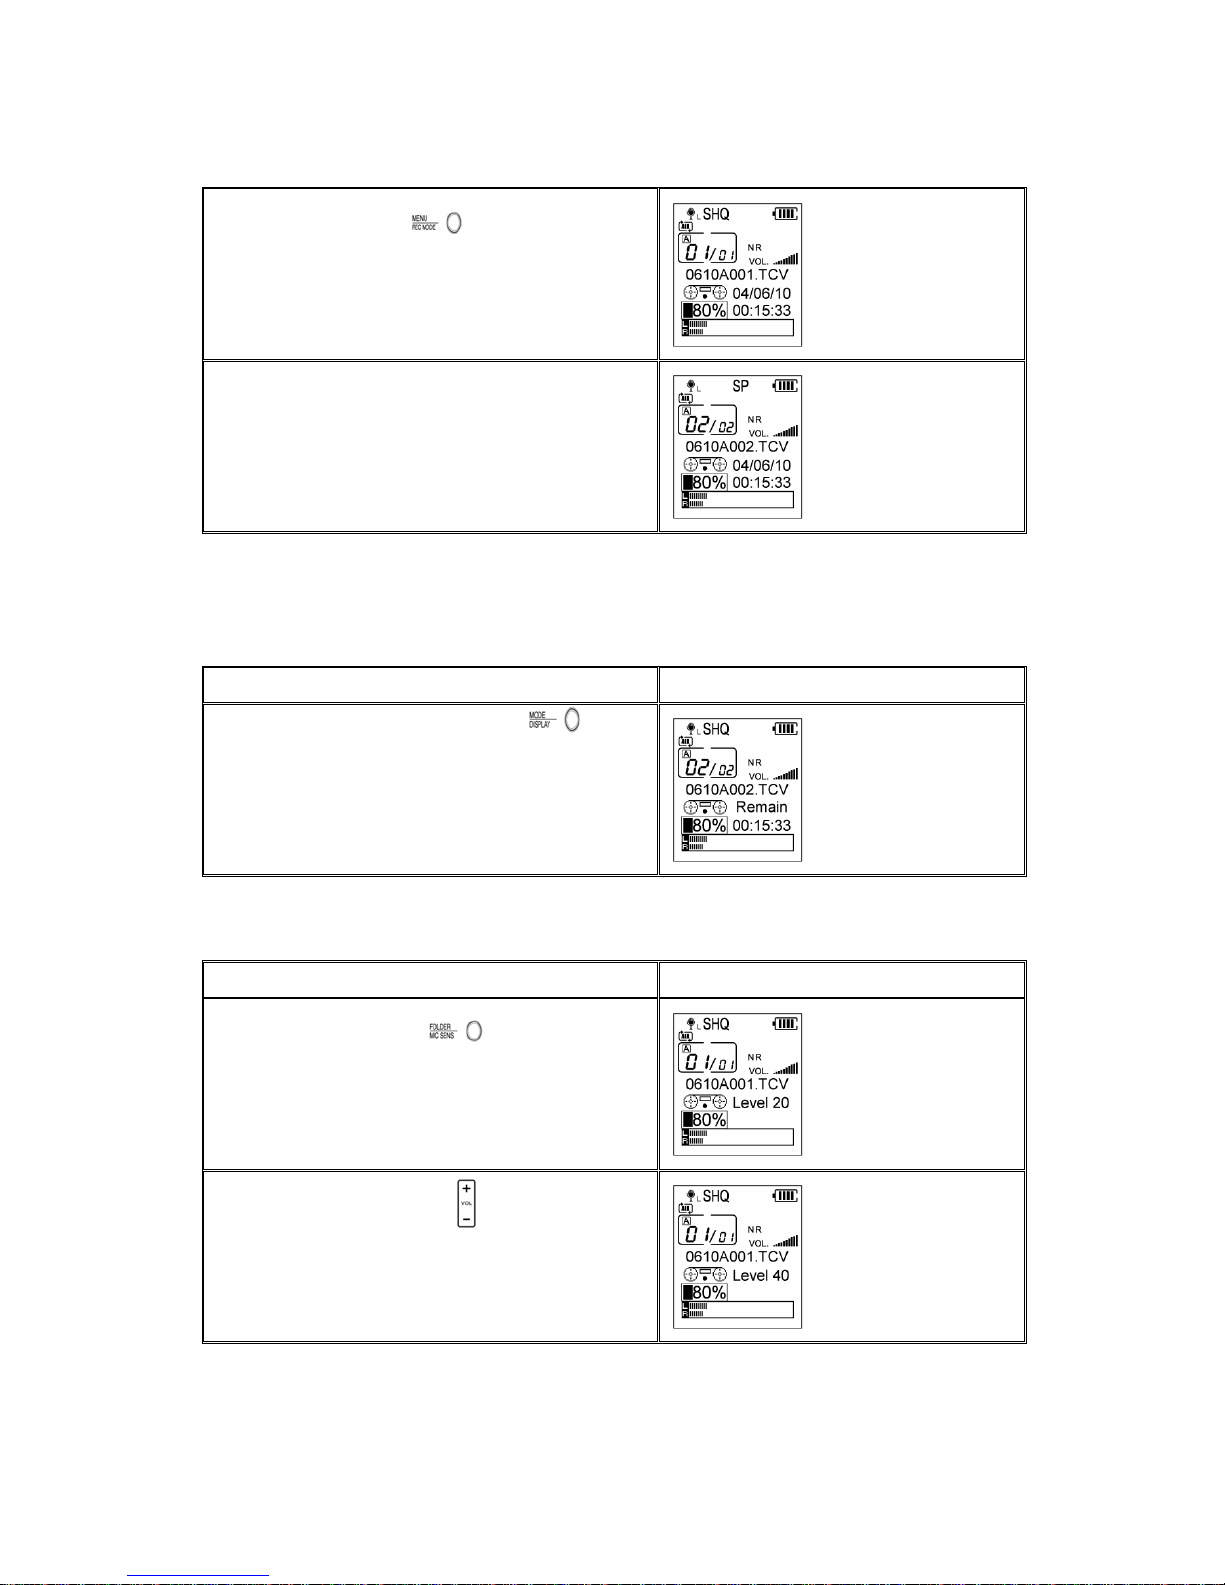
CChhaaiinnggiinngg rreeccoorrdd ttyyppee wwhhiillee rreeccoorrddiinngg
Description LCD
Page 13
13
1. By pressing Menu
button, Change the
mode to SHQ→HQ→SP→LP mode.
2. After checking selected mode, press menu
button about 2 seconds, then recording
will be started while the message number
is changed.
*By changing mode, recording time is extended when the remaining time is insufficient
while recording
HHooww ttoo cchheecckk tthhee rreemmaaiinniinngg ttiimmee wwhhiillee rreeccoorrddiinngg
Description LCD
1. By pressing Mode/Display button
shortly, the remaing time show on the LCD.
CChhaannggiinngg rreeccoorrddiinngg sseennssiivviittyy wwhhiillee rreeccoorrddiinngg
Description LCD
1. By pressing Folder button, recording
sensivity shows on the LCD while recording
2. By pressing Volume button recording
sensivity can be modified.
*When the sound source is weak, the recordig sensivity can be modified to record
clearly.
Page 14
14
CCoonnnneeccttiinngg ttoo tthhee EExxtteerrnnaall DDeevviiccee
CCoonnnneeccttiinngg ttoo tthhee EExxtteerrnnaall MMiiccrroopphhoonnee
You can easily record the message by using the external microphone.
1. Connect the external microphone to the MIC terminal of the voice recorder.
2. Press REC
button. It starts recording.
3. To stop the recording, press STOP
button again.
4. In case recording by External Mic., the stereo recording is available only
in SHQ and HQ mode.
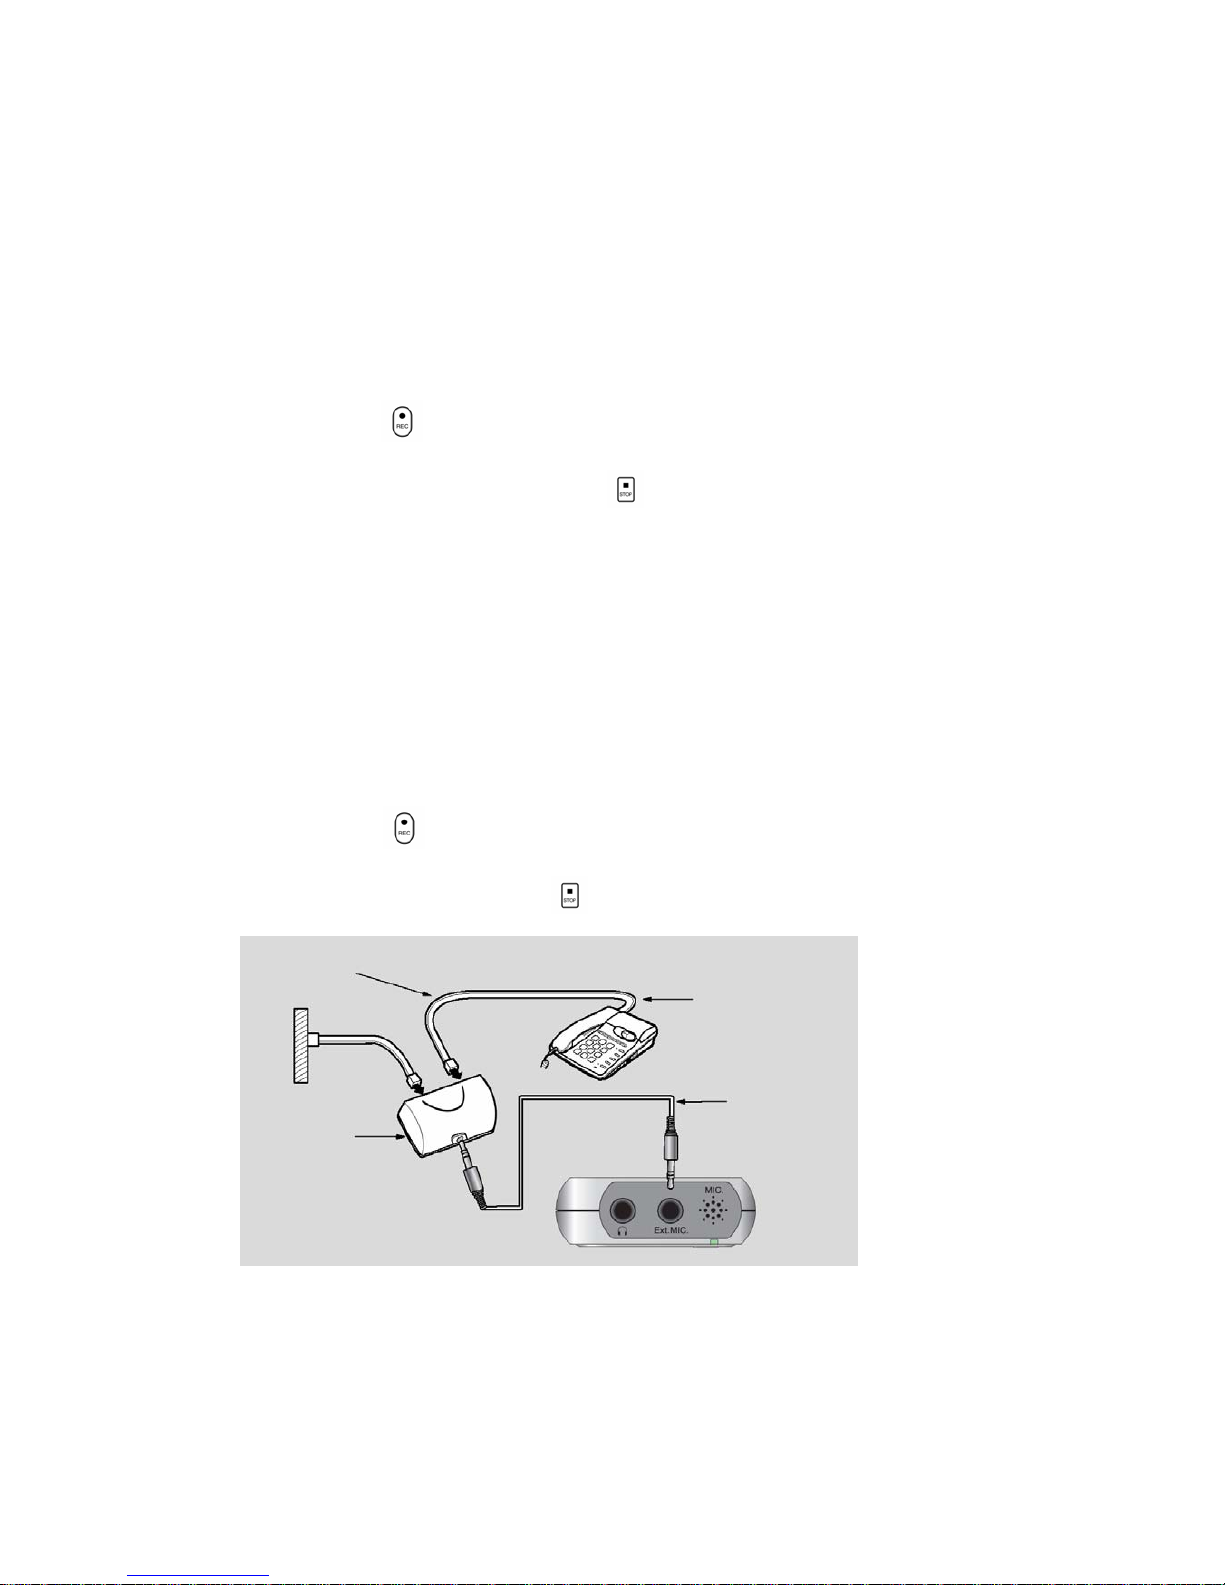
RReeccoorrddiinngg ffrroomm TTeelleepphhoonnee
You can record telephone conversation.
However, you can not record the conversation through the digital telephone.
1. Connect the Voice Recorder to the telephone using telephone adaptor.
2. Press REC
button during conversation. The conversation will be recorded.
To stop recording, press STOP
button again.
Telephon
Line
Telephon
Adaptor
External
Cord
Telephon
Cord
Page 15
15
*Note!
If you do not use the Microphone, Telephone line and Telephone adaptor supplied by
us, the set may not work properly.
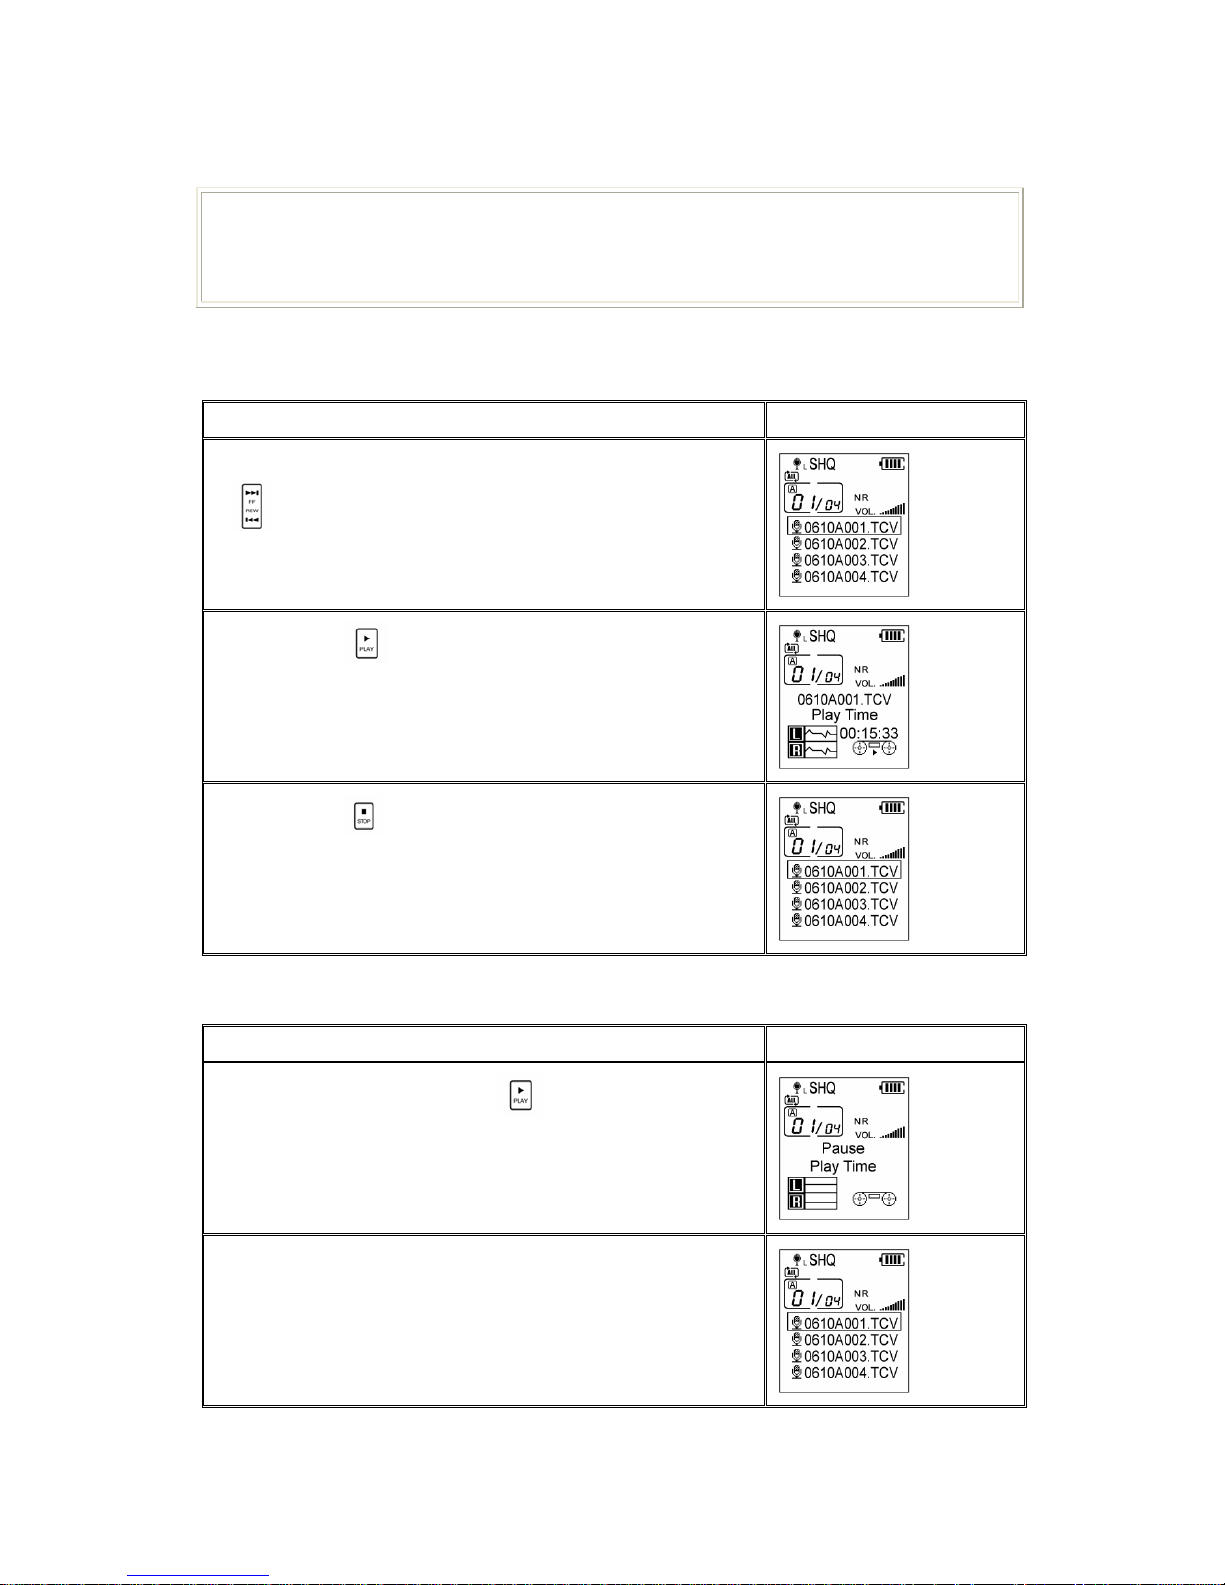
PPllaayybbaacckk && PPaauussee
Description LCD
1.Choose the file you want to listen by FF or Rew
buttton.
2. Press Play button shortly to play
3. Press Stop button to stop.
PPaauussee
Description LCD
1. Pause by pressing Play button shortly while
playingback
2. Pause will be maintained for 10 minutes. After 10
minutes, pause will be converted into waiting mode
.
Page 16

16
PPllaayyiinngg pprreevviioouuss // NNeexxtt ffiillee wwhhiillee ppllaayyiinngg..
1. Press REW button shortly while playback
Previous song will be upfront in case of playback in 10 seconds.
2. Press
button shortly while playblack, it moves to next song
Ongoing song will begin from the first in case of playback 10 seconds
afterward.
FFaasstt FFoorrwwaarrdd // FFaasstt RReewwiinndd
Press FF or REW button long while playback, it moves fast to previous
part or next part of the file in playback.
CChhaannggiinngg TTiimmee DDiissppllaayy wwhhiillee ppllaayyiinngg bbaacckk
By pressing Mode/Display button, the display on the LCD changes Playing
time→Remaining time→Recording date→Recording time.
SSeeccttiioonn RReeppeeaatt
Section repeat function is the listening of certain section file repeatedly
Page 17
17
DDiissppllaayyiinngg FFiillee IInnffoorrmmaattiioonn
In stop stage, when pressing Mode/Display button, current time and the
information of the selected file will be shown as playback Time -> recording
Time in order.
FFiillee DDeelleettiioonn
In stop stage of Voice mode, press Erase button shortly. the selected
file will be deleted. When pressing Erase
button long, the selected
folder will be deleted.
*Caution
The erased MP3 files cannot be restored. Check before erasing.
CChhaannggiinngg FFoollddeerr
In stop stage, the folder will be changed to A→B→C→D repectively by pressing
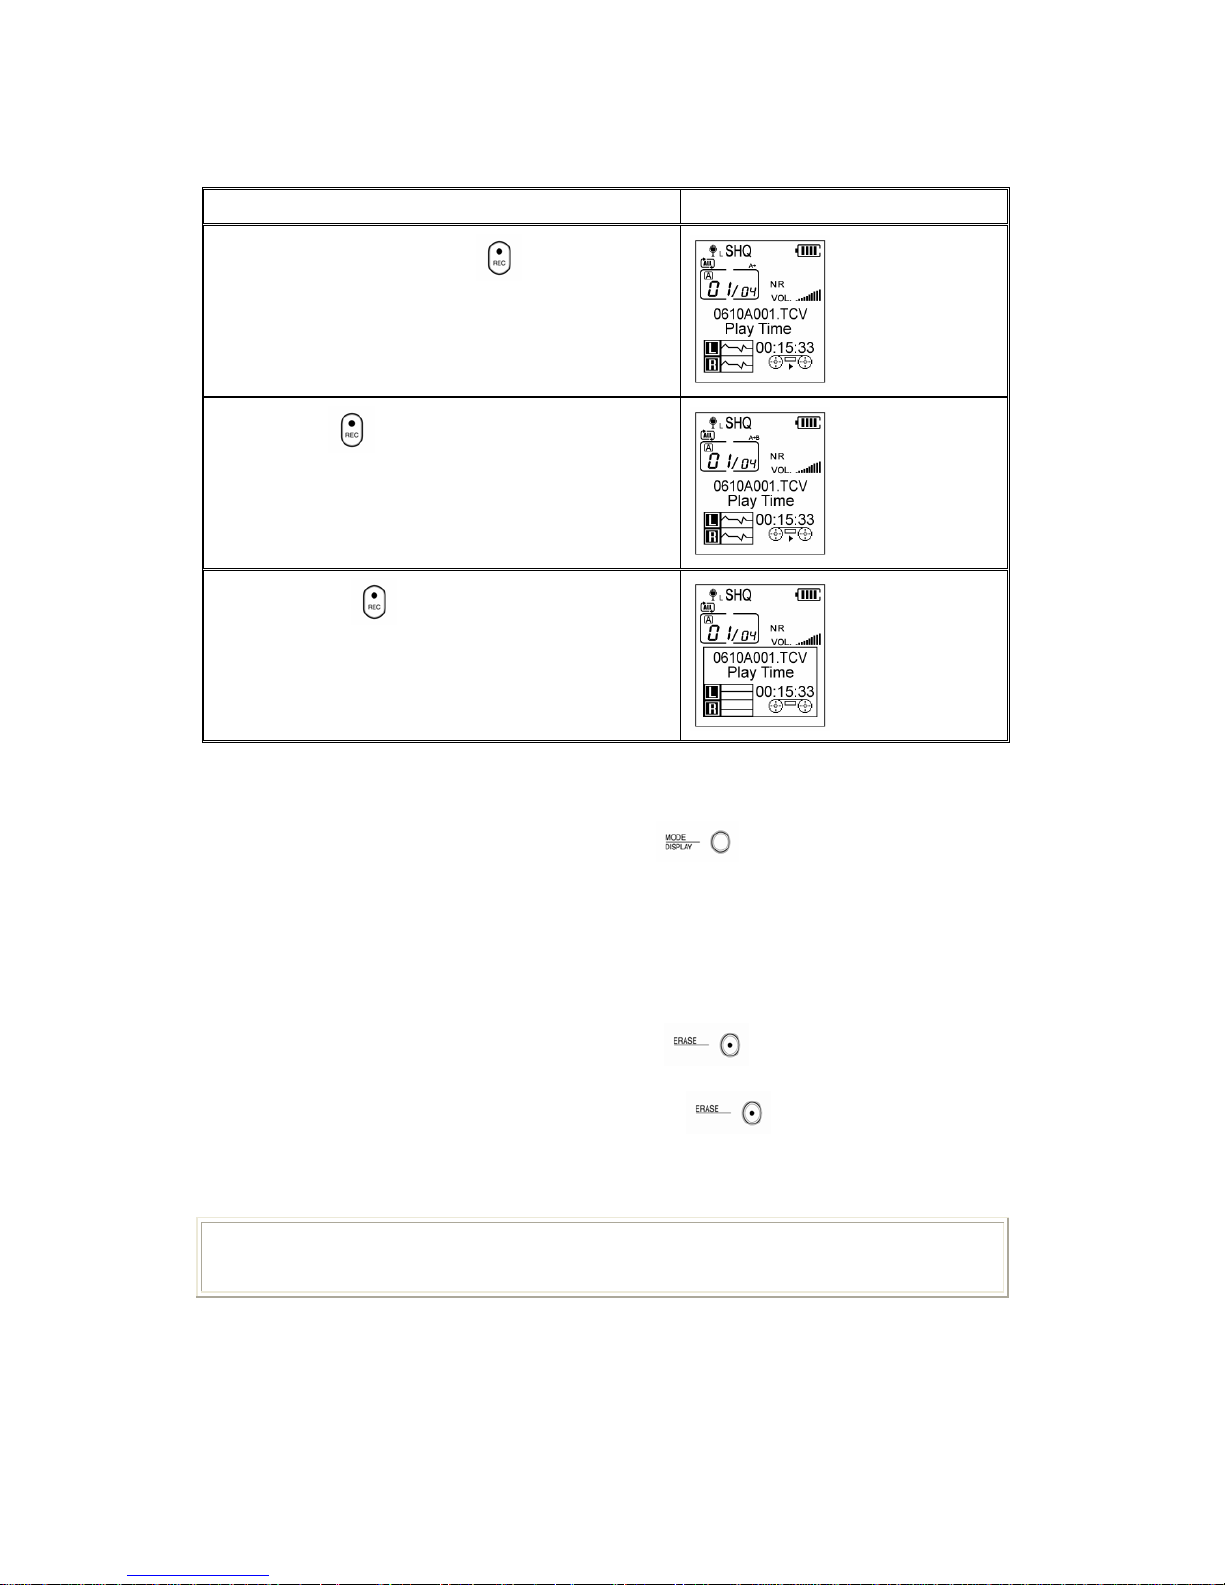
Description LCD Display
1. While playing, Press REC button shortly,
“ A→ “ will be displayed on LCD and then
Starting point of section repeat will be set.
2. Press REC button shortly again, then “A
→ B“ on LCD will show and work the section
repeat.
3. Press REC button shortly again. Then,
section repeat is released.
Page 18
18
folder
button.
UUssiinngg HHeeaarriinngg AAiidd FFuunnccttiioonn
For using hearing aid fuction, earphone must be connected to the set.
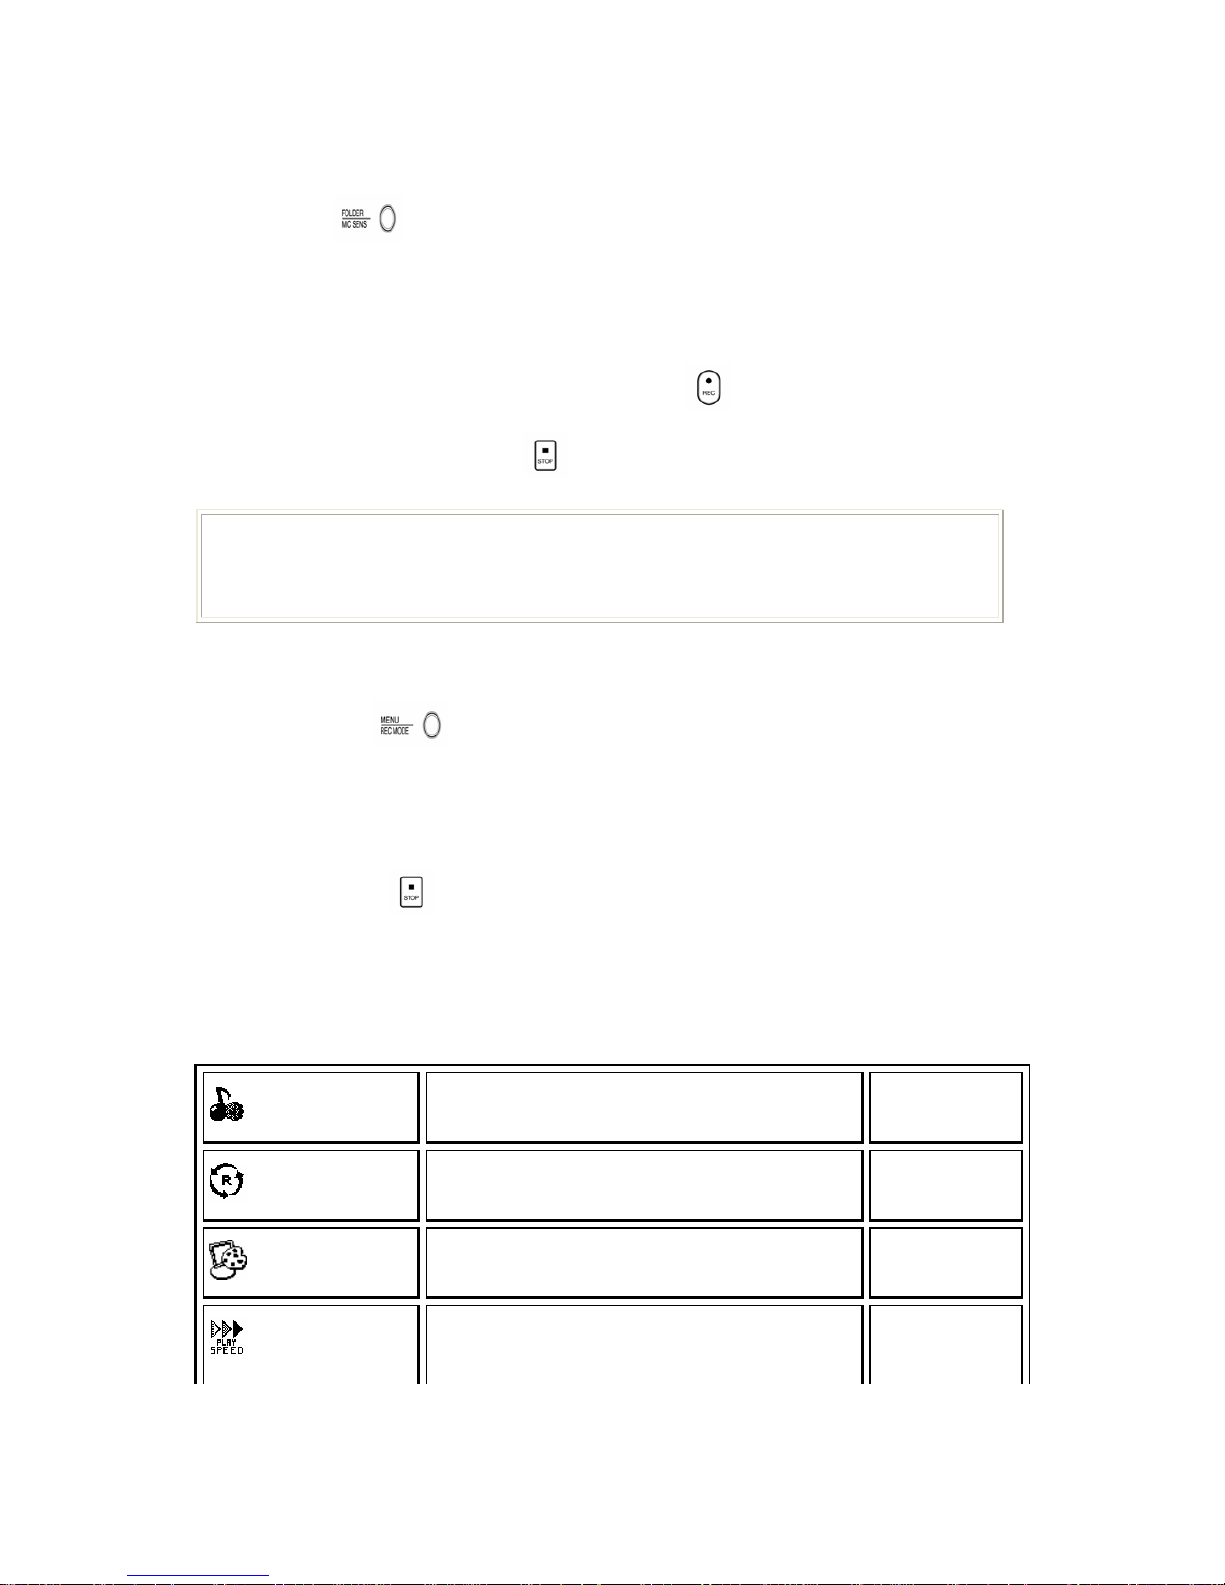
Connecting earphone, when pressing long REC
button, hearing aid function
starts. When pressing stop
button, this function stops.
MMeennuu SSeettttiinngg
Press Menu button long, then, it will move to Main Menu Setting mode.
Main Menu is divided into function setting and system setting. Function setting
is to control each mode, and system setting is to control the system related
parts regardless of its mode.
*Press Stop
button shortly in Menu Setting mode. Then, it will escape
from Menu Setting mode.
The detail information on each menu is described below.
FFuunnccttiioonn SSeettttiinngg MMeennuu
Function Setting
Description Default
Repeat
INTRO, NORMAL ONE, NORMAL ALL, NORMAL RANDOM,
REPEAT ONE, REPEAT ALL, REPEAT RANDOM
REPEAT ALL
Screen Saver
OFF, Clock, User’s image OFF
Play Speed
80%, 90%, 100%, 110%, 120%, 130% 100%
Caution
Before wearing earphone, do not forget to check the sound level which is sometime
s strong enough to hurt the sense of hearing of a person who has sensitive ear.
Page 19
19
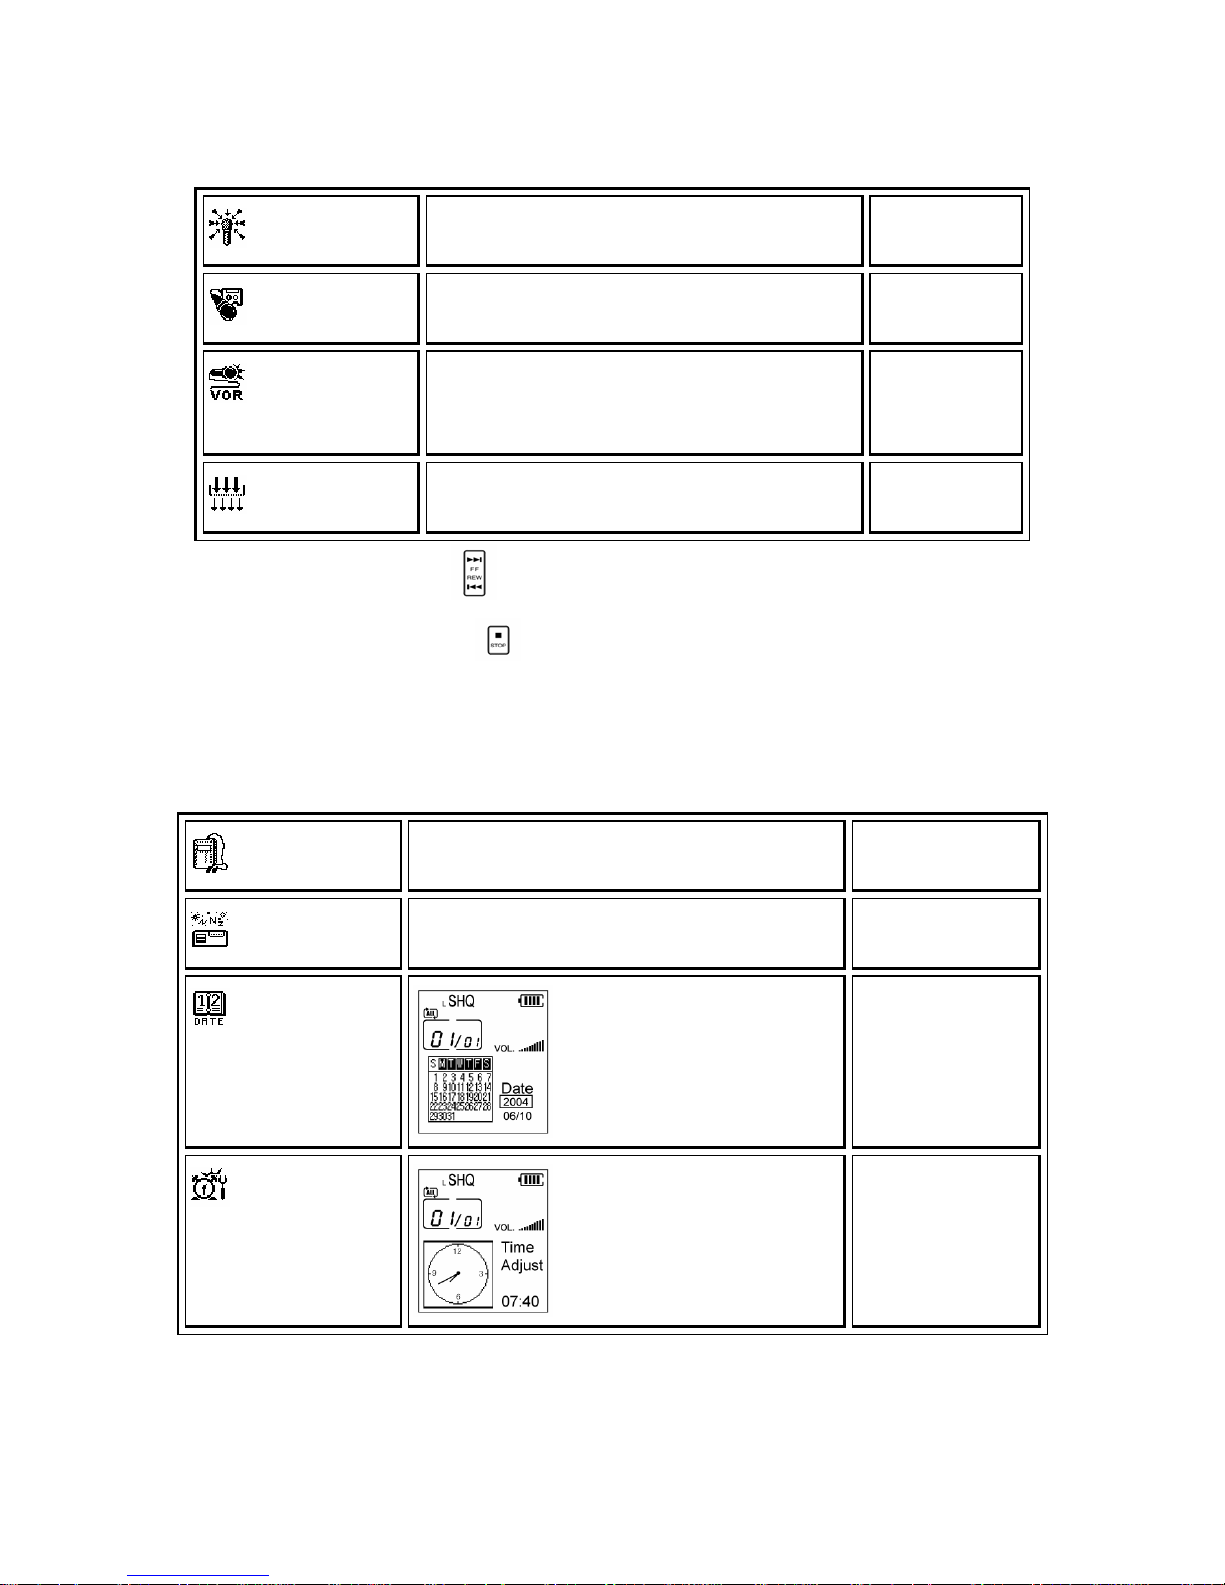
Mic Sensivity
LOW, HIGH HIGH
Record type
LP(6K), SP(32K), HQ(64K), SHQ(128K) SHQ(128K)
VOICE
OPERATING RECORD
VOR OFF, VOR ON VOR OFF
Noise Reduction
Noise Reduction OFF, Noise Reduction ON Noise Reduction
OFF
* Pressing FF or REW button in the main menu, it moves to system setting
menu. By pressing stop
button, it will escape from main menu.
The detail information on each menu is described below.
SSyysstteemm SSeettttiinngg MMeennuu
System Setting
Description Default
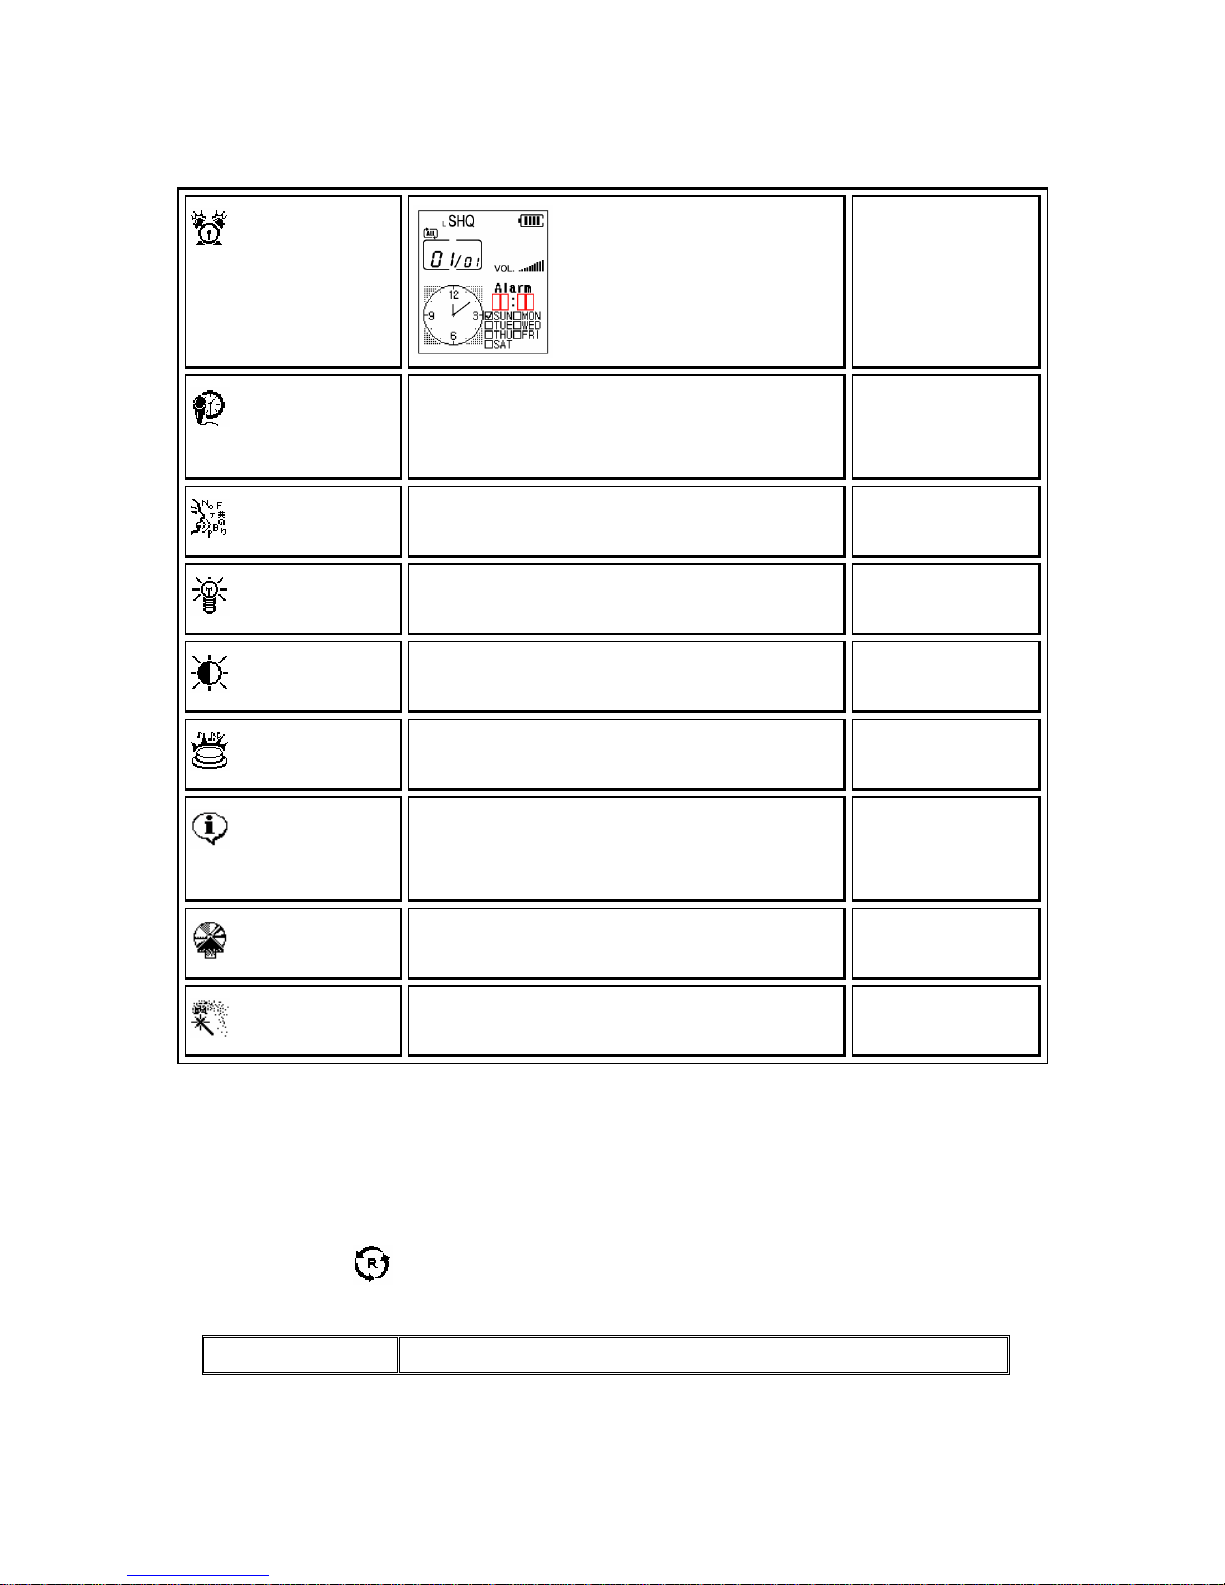
Sleep Mode
OFF(0Min~240Min) OFF
Date
Clock Adjust
Page 20
20
Alarm
Recording
Time Preset
Voice Recording, Radio Recording Voice Recording
Language
Japanese, Korean, English Japanese
LCD Backlight
OFF, 1 ~ 20sec LCD Backlight ON
LCD Contrast
0~20 10
Beep Sound
0~20 10
System
Information
Memory Size & Version Description
System Upgrade
Upgrade & Font Download
Initialize
Low Level Format & Initialize all settings
Function Setting Menu
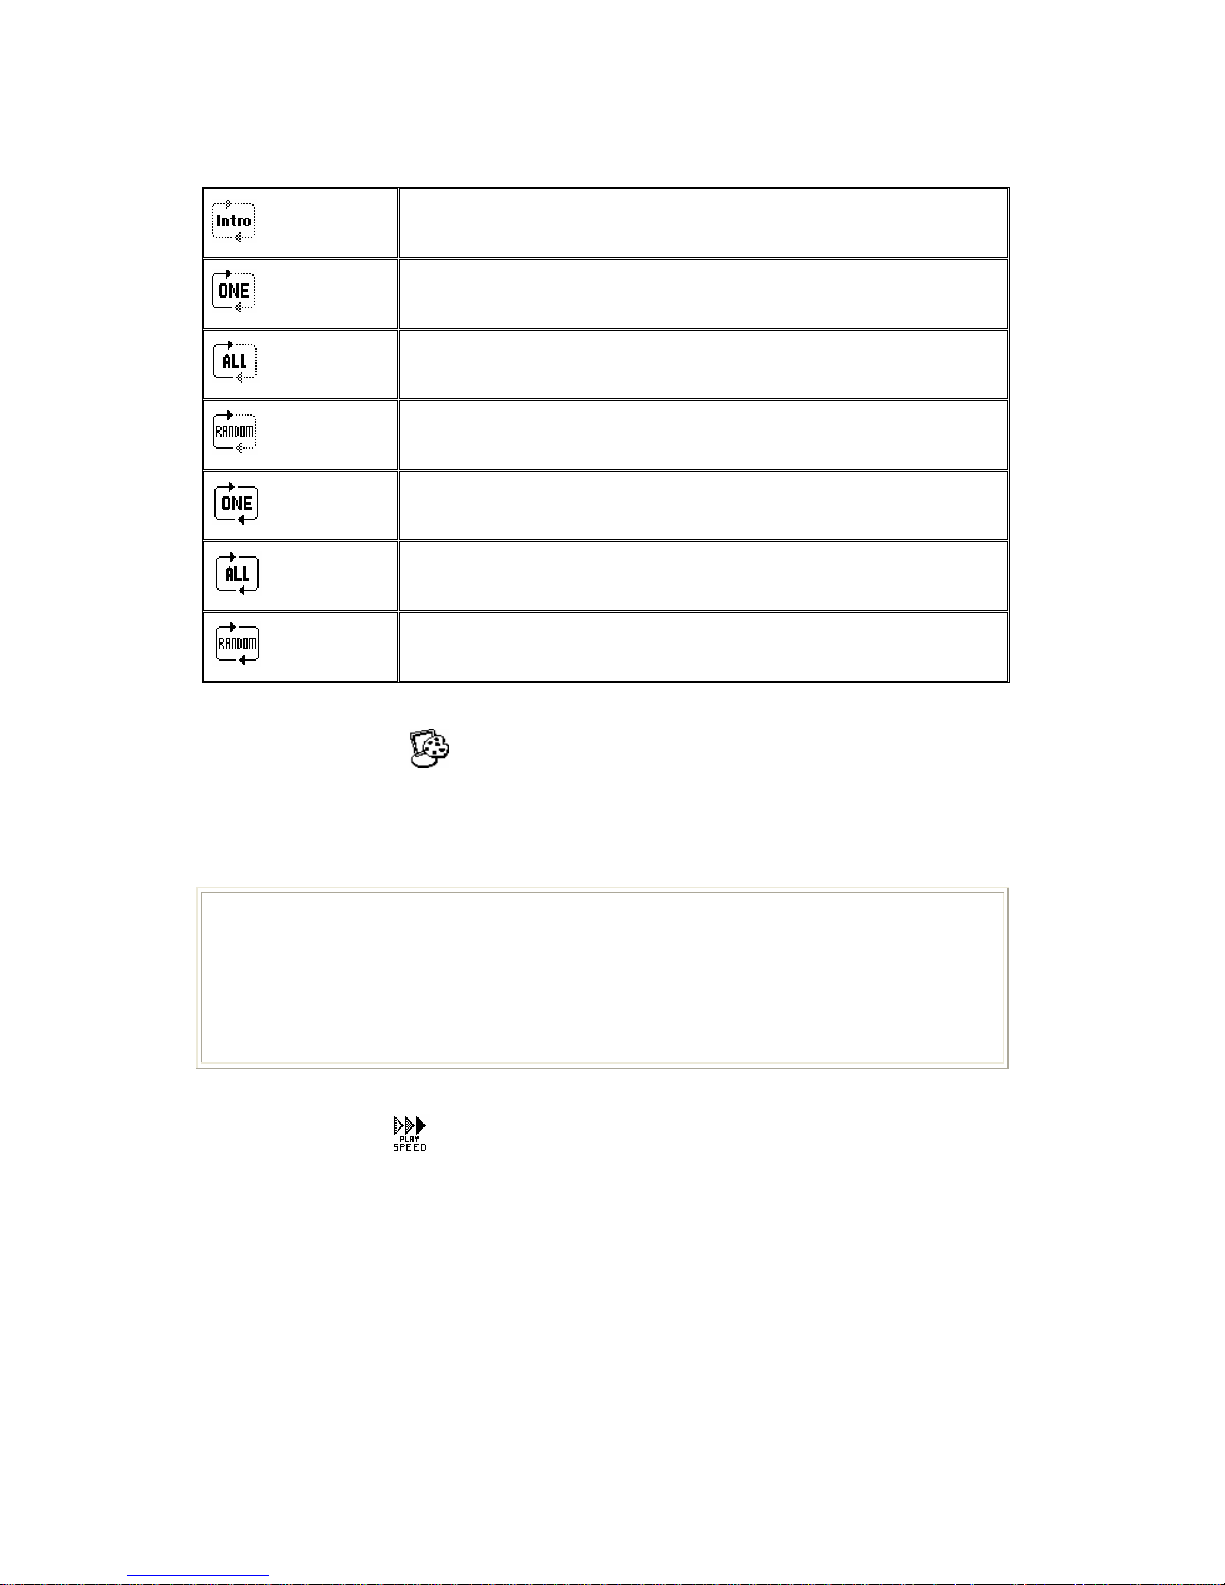
1. Repeat
The Player provides 7 different repeat modes.
Mode Description
Page 21
21
Intro
Playback all the file’s front for 10 seconds.
Normal One
Stop after playback one file only.
Normal All
Stop after playback all the files in Memory.
Normal Random
Random Playback from first to last files in Memory
Reapeat One
Repeat playback all the files in Memory
Repeat All
Repeat playback all the files in Memory
Repeat Random
Repeat playback from first to last files in Memory
2. Screen Saver
If it pass some time in Playback, the LCD view will change to Watch or User Image.
The LCD view is selectable between Watch and User Image in Screen Save function.
Note!
In case User Image, the interval time between images can be set. The interval time
is adjustable from 0.1 sec. to 10 sec. and the set time is applied to the User
Image view. For the detail information to use Screen Saver, please refer to „Using
Screen Saver Editor“
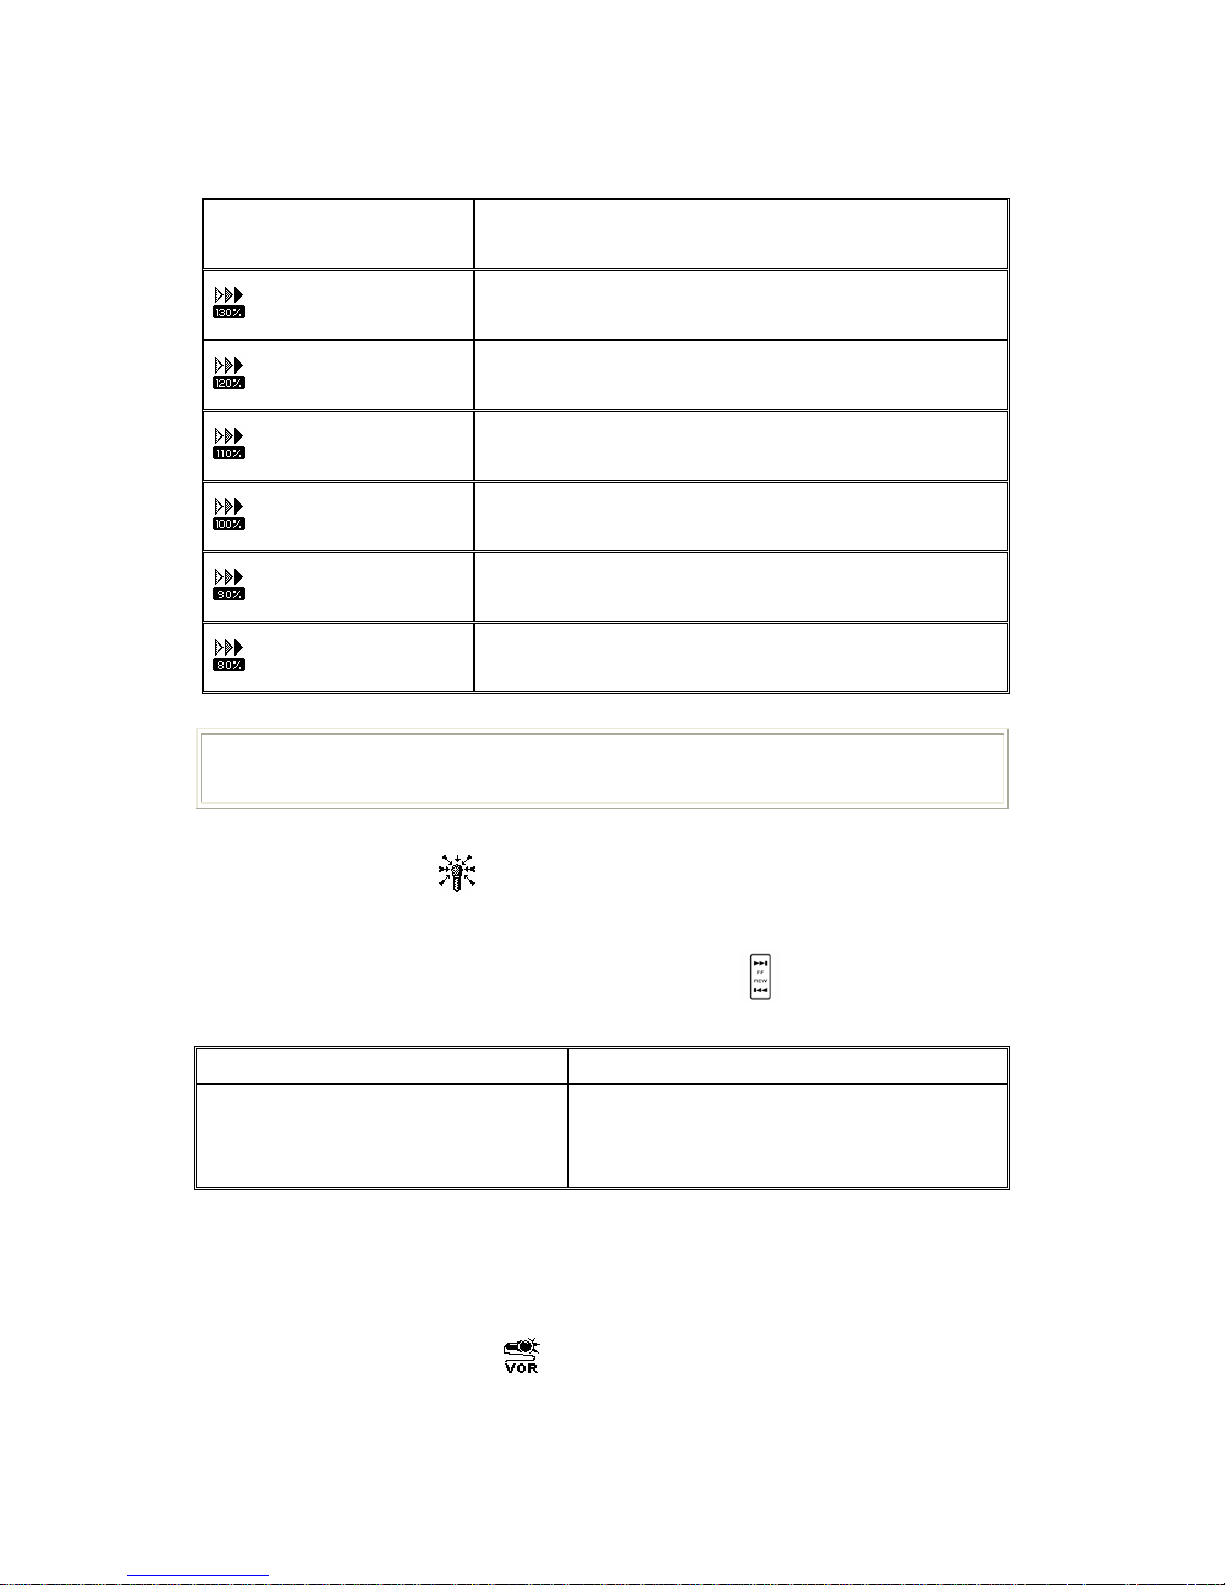
3. Play Speed
To control playback speed
Page 22
22
*Note
LP(Long Play)recording is only being played with Normal Play speed,100%.
4. Mic Sensitivity
Adjusting the Recording Sensitivity according to the level of noise in surround.
Select recording sensitivity by pressing FF or REW
button.
MIC HI(High Sensitivity) MIC LO(Low Sensitivity)
Sound source is far or there is little
noise.
Sound source is near or there in much noise
* On the LCD selected recording sensitivity will be shown as H or L.
* When executing microphone recording, selected recording sensitivity will be
adapted.
5. Voice Operated Recording
VOR(Voice Operated Recording) function is that the unit records only when sound
Mode
Description
Speed 130%
Playback of 130% speed rate
Speed 120%
Playback of 130% speed rate
Speed 110%
Playback of 130% speed rate
Speed 100%
Playback of 130% speed rate
Speed 90%
Playback of 130% speed rate
Speed 80%
Playback of 130% speed rate
Page 23
23
exists.
SETTING VOR RANGE
1. Automatic Setting
1-1. Start Recording.
1-2. Make the circumstance quiet after pressing Erase button shortly.
* The dot line of Level bar on the bottom of the LCD changes to maximum value of
the input sound and becomes the standard range of the VOR.
1-3. It searches the applicable VOR range by flickering the VOR icon on the
upper side of the LCD for some time.
1-4. It will stop the flickering of the icon in some time and save the VOR Range
value. The saved value will be last before re-setting it.
2. Manual Setting
2-1. Start Recording
2-2. Change the VOR Range using FF/REW button.
6. Noise Reduction
To reduce noise when playing recorded file.
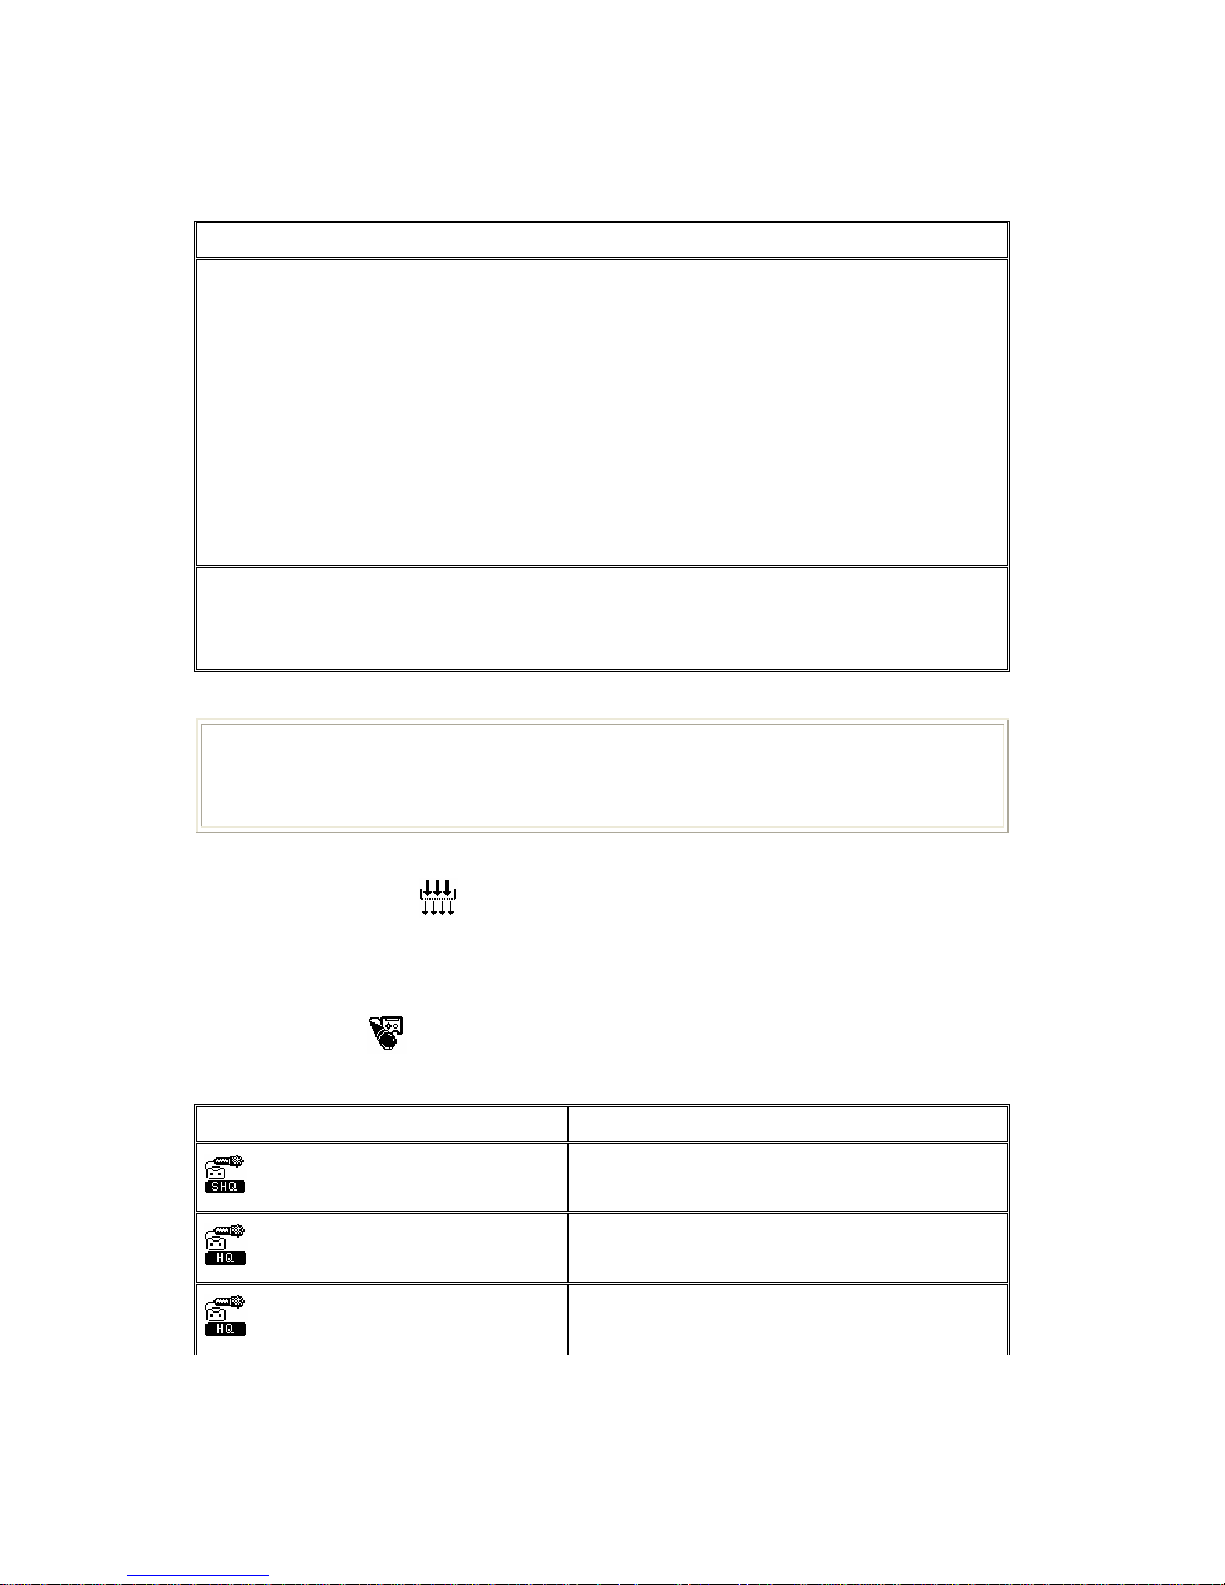
7. Record Type
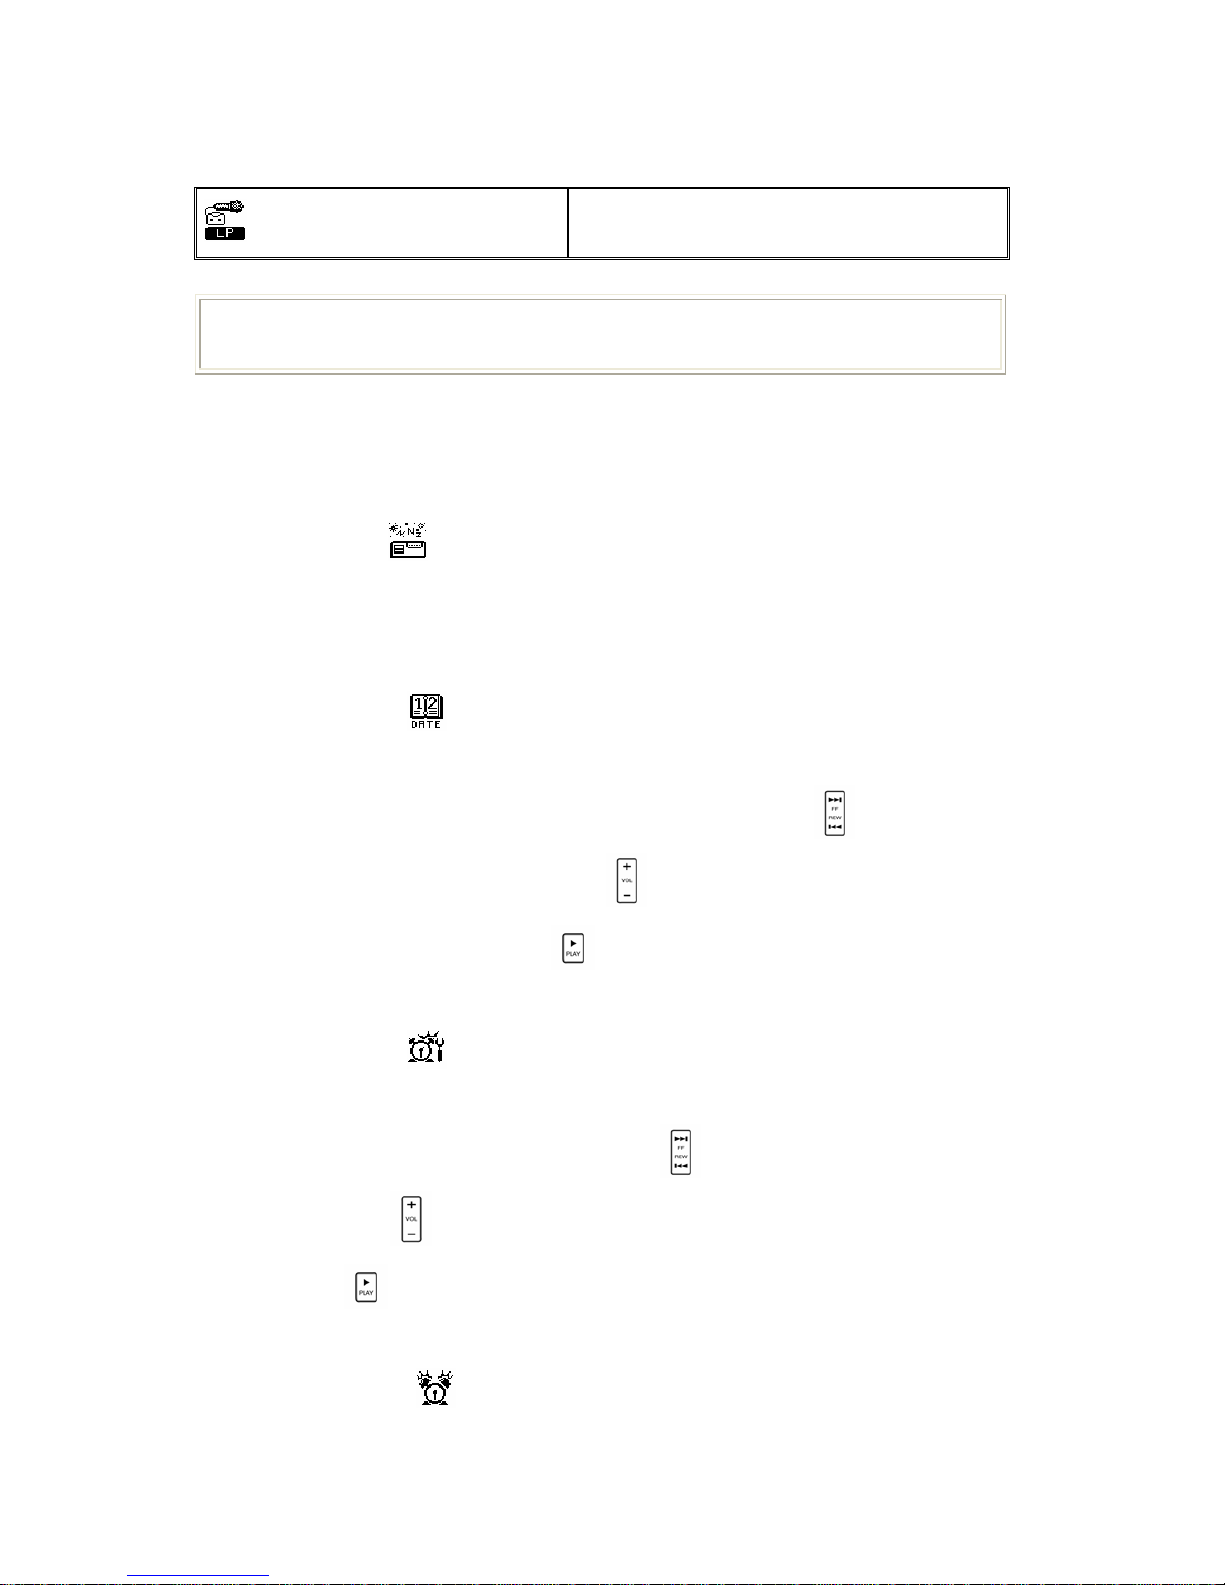
This player provides 4 different record quality types.
Mode Description
Super High Quality
Record with 128Kbps
High Quality
Record with 64Kbps
Standard Play
Record with 32Kbps
*Note
Test the Mic. Sensitivity by changing it when it needs to have more sensitivity or
the VOR is working continuously in a loud place.
Page 24
24
Long Play
Record with 6Kbps
*Note
*Lower bit rate is able to povide longer recording time but low sound quality.
System Setting Menu
1. Sleep Mode
If Sleep Time is set on, the unit is powered off automatically after the
set time
2. Date Setting
See the current date, recorded date, recorded time and playback time by
Date Setting. Select Year, month and date by FF or REW
buttons and
Adjust them by Vol+ and Vol-
buttons. The adjusted date will be
applied in when press Play
button after the Date setting.
3. Time Setting
See the current time, recorded time and playback time by time setting.
Select time and minute by FF and REW
buttons and adjust them by Vol+
and Vol-
buttons. The adjusted time will be applied in when press
Play
button after the Time setting.
4. Alarm Setting
Page 25

25
Alarm will be activated if it is set on. Select Time, Minute, Day by FF or
REW
buttons and set the Alarm time and day by Vol+ or Vol- buttons.
The alarm will be set on after set the alarm time and press the Play
button.
5. Recording Time Reservation
If the date and time are reserved by this funtion, it will be recorded on
the reserved time. Select Voice Recording and Radio Recording by FF or REW
buttons.
- Select Voice Recording
Set the date and recording time length(hr:min) by FF or REW
buttons
after press Play
button. The recording reservation is set on when
press Play
buttom after completion of the setting.
- Select Radio Recording
Select the Radio station to be recorded by Vol+ or Vol-
buttons and
select the Day, Time and recording time length(hr:min) by FF or REW
buttons after press Play
Key. The recording reservation is set on when
press Play button
after setting.
Page 26
26
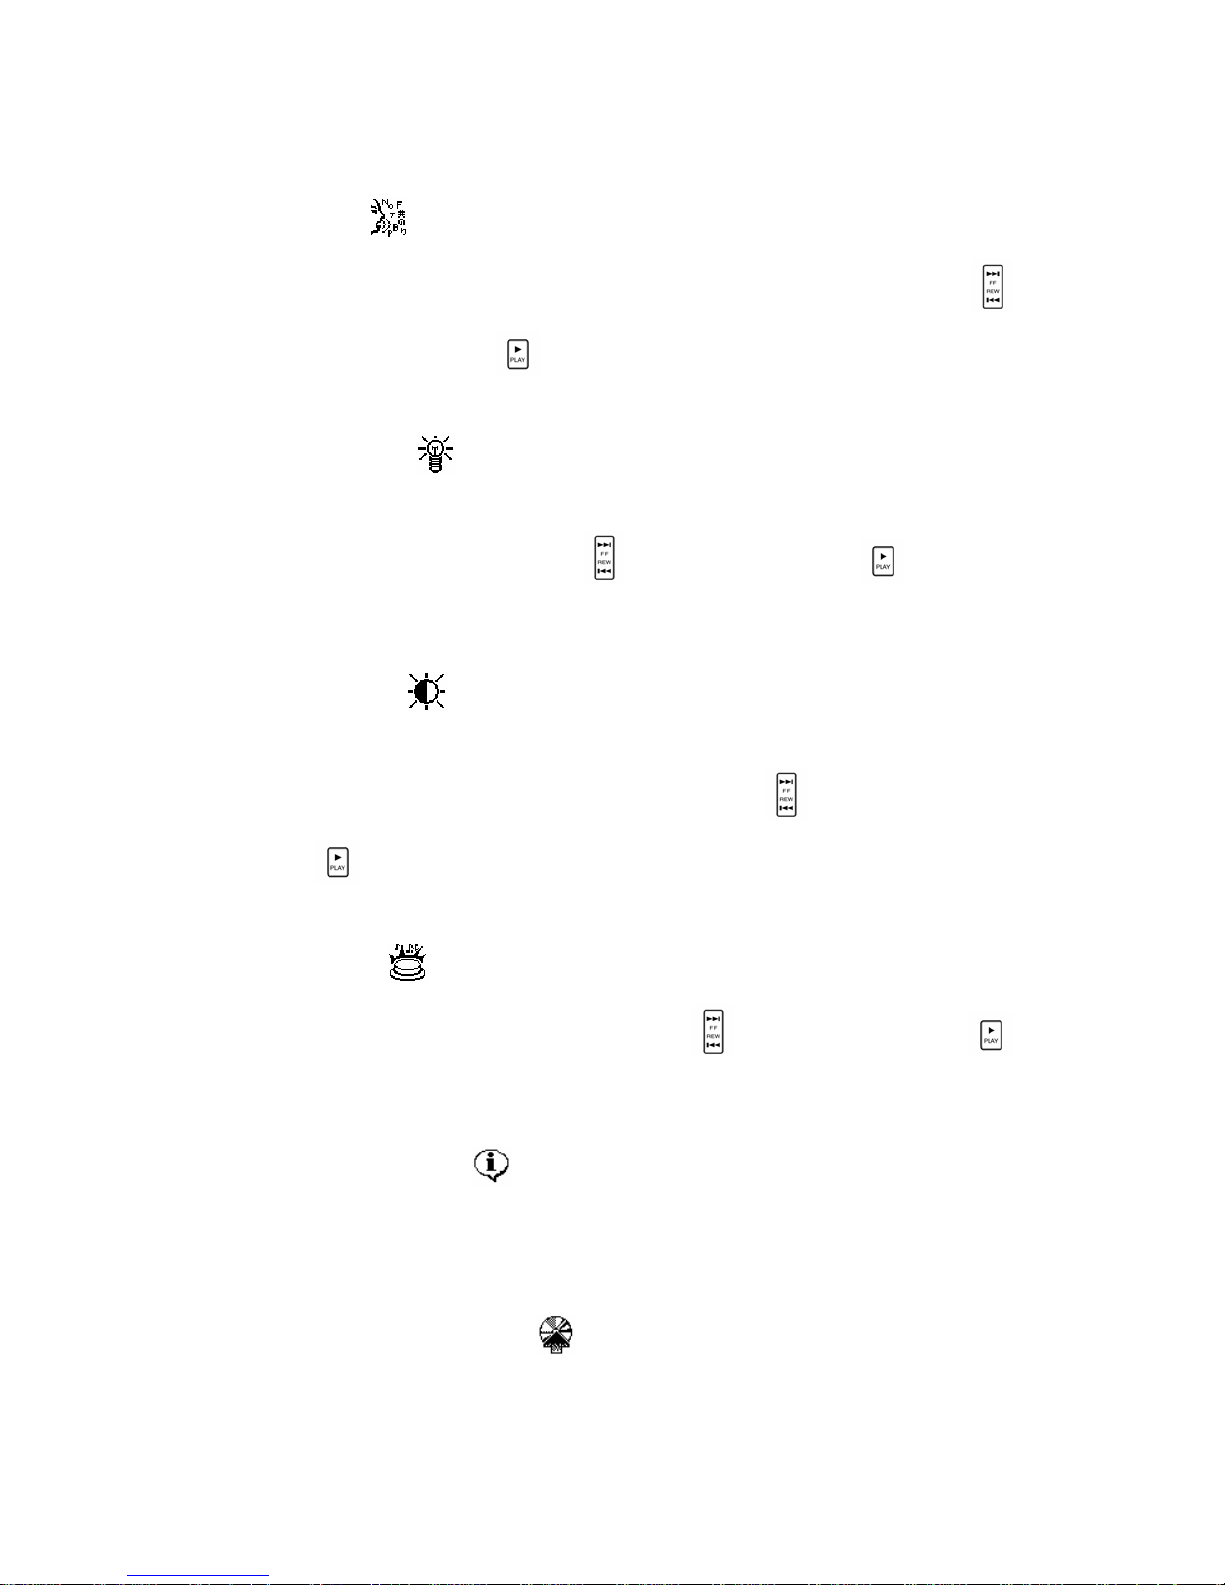
6. Language
Select one language among Korean, Japanese and Engligh by FF or REW
button. If press Play
button after language selection, the menu and all
description will be displayed by the selected language.
7. LCD Backlight
LCD Backlight supports to see the LCD display in the dark place. Set the
Backlighting time by FF or REW
button after press Play button. The
time can be adjusted as 0
~20 sec. by 21 steps.
8. LCD Contrast
Adjust the LCD contrast.
Select the preferred LCD contrast by FF or REW buttons after prsee
Play
button. LCD Contrast can be adjusted as 0~20 by 21 steps.
9. Beep Sound
Adjust the beep sound volume by FF and REW
button after press Play
button. Beep sound can be adjusted as 0
~20.
10. System Information
It displays the information of total memory capacity, available memory capacity and
Software version.
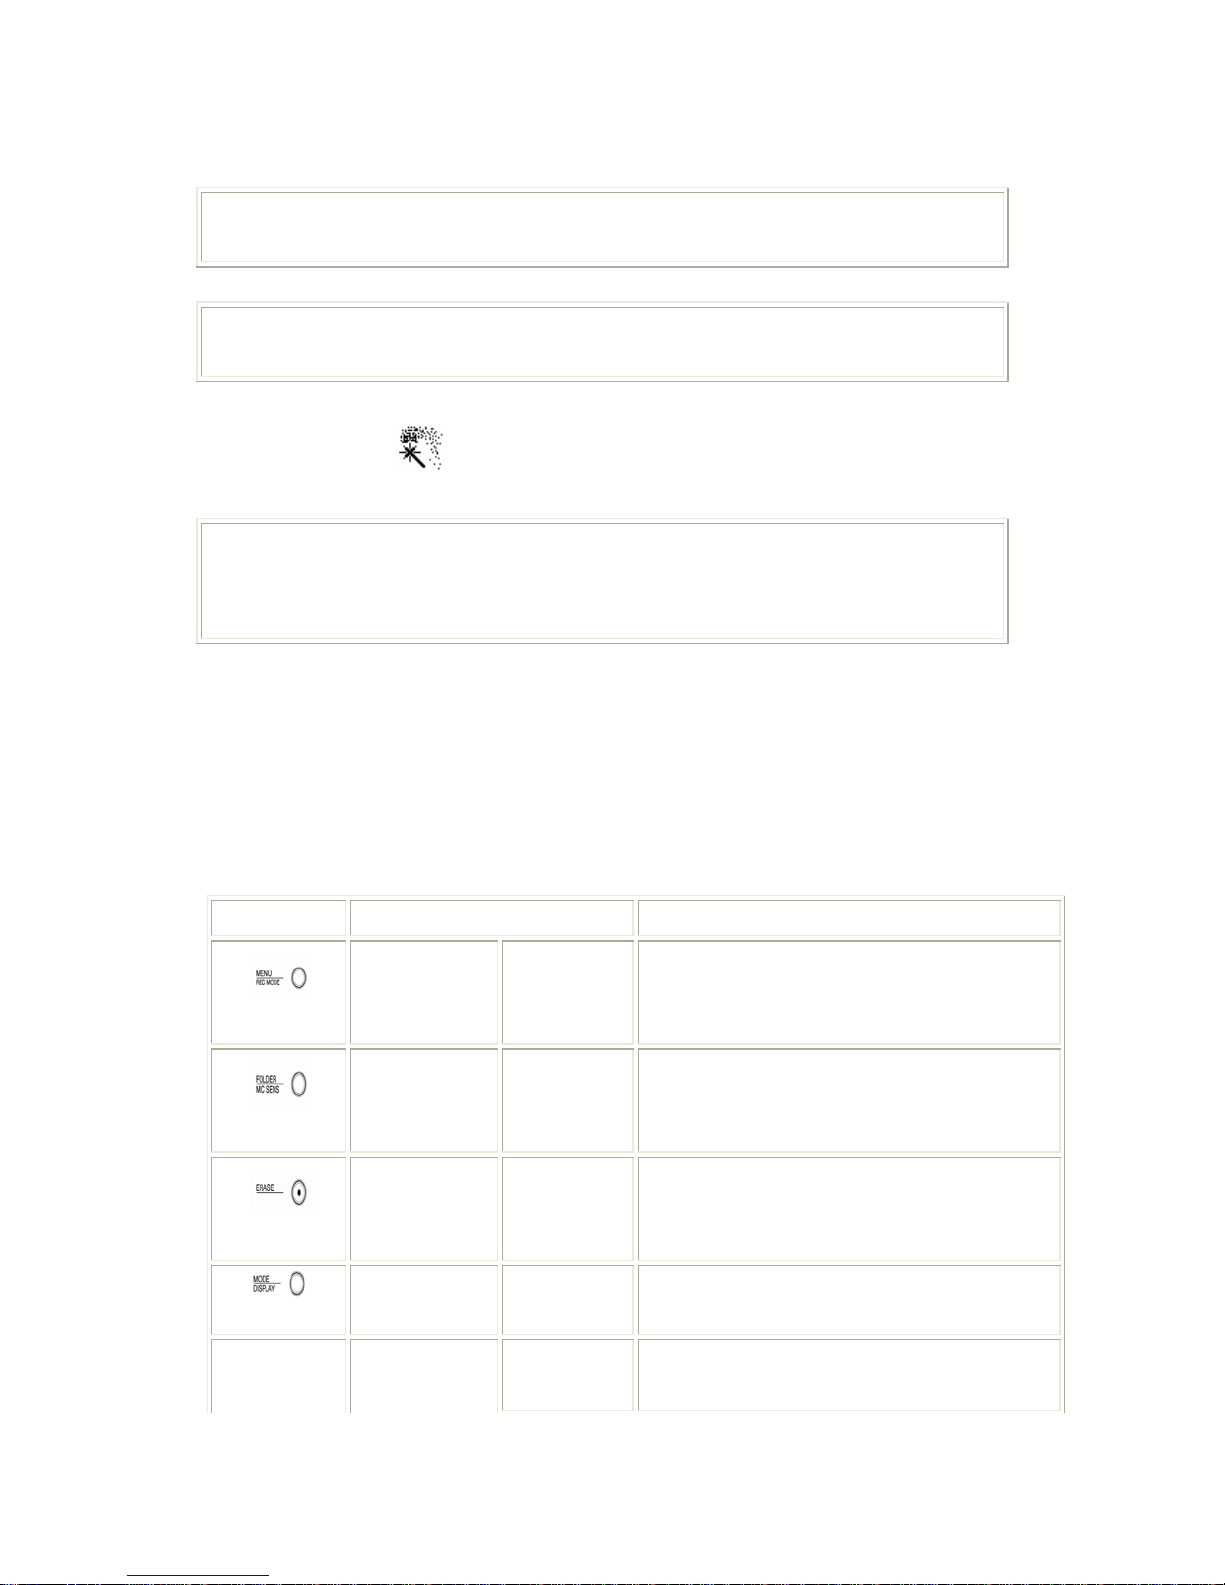
11. Upgrade and Font download
User can upgrade and download the fonts for the player.
Page 27
27
Caution!
Be careful the USB cable is not disconnected while upgrading and font downloading.
Note
Refer to the “Font Download“ for the detail.
12. Initialize
Initialize the Menu setting value after memory format.
Caution!
Low Format may take several minutes depending on the memory size. Be careful the
power is not off while format.
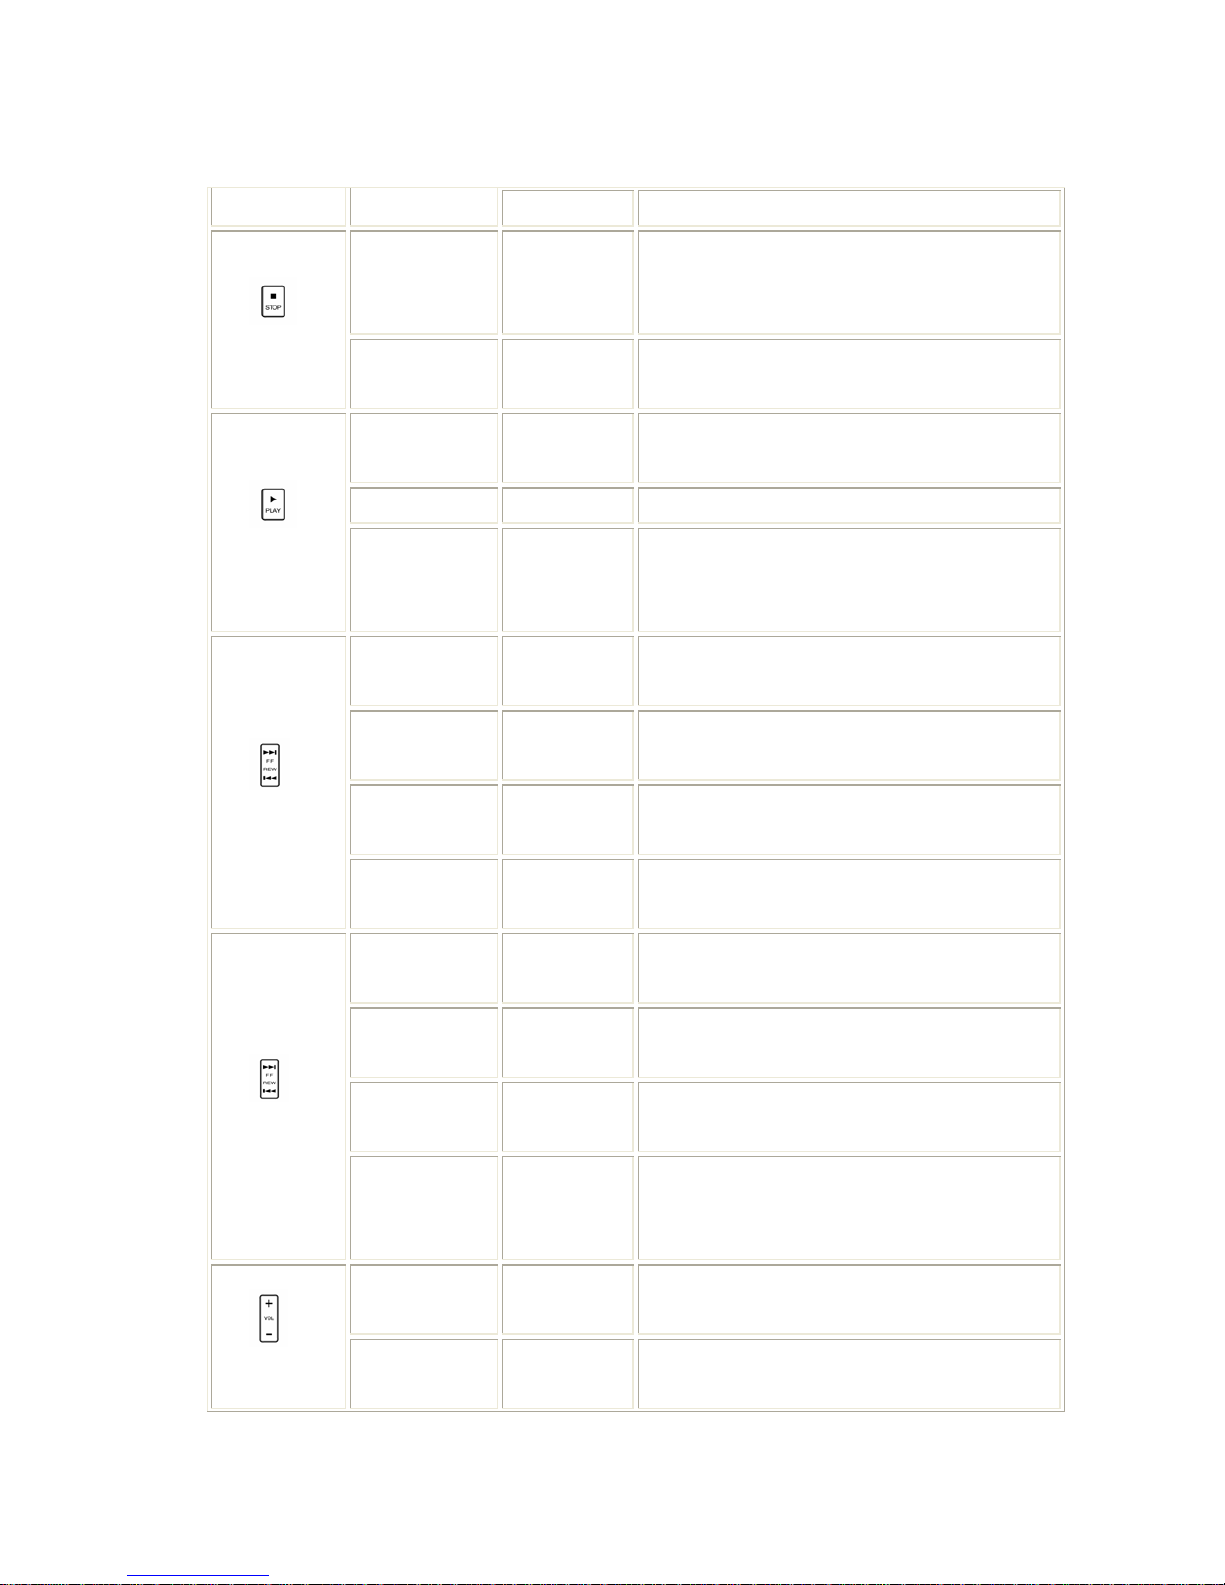
BBuuttttoonn DDeessccrriippttiioonn..
Key Status & Method Key Description
Menu
Long Press Move to Menu mode
Folder
Short Press
Change
Recording Folder(A,B,C,D)
Erase
Preset Long Press Erase current Preset
Mode/Display
Long Press Change Mode
Short Press
Start Recording
RRaaddiioo MMooddee
Page 28
28
REC Long Press Save Manual Station
Searching
station
automatically
Short Press
Stop Searching
Stop
Menu Short Press
Cancel current selected category
and move to upper class.
Short Press
Select preset mode and frequency man
ual mode.Preset
Long Press Search station automatically
Play
Menu
Short Press
Save current selected station and
escape from
The menu
Preset Mode
Short Press
Move to the next preset
Frequency
Manual Mode
Short Press
Set Frequency up, Searching Frequenc
y manually
Frequency
Manual Mode
Long Press Searching Frequency automatically
FF
Menu
Short Press
Move cursor to the next part or set
the value up
Preset Mode
Short Press
Move to previous Preset
Frequency
Manual Mode
Short Press
Set Frequency down
Frequency
Manual Mode
Long Press
Searching the Frequency
automatically
REW
Menu
Short Press
Move cursor to the previous part or
set the value
down
Short Press
Volume up
Vol +
Menu
Short Press
Set the value up for the selected
menu
Page 29
29
Short Press
Volume down
Vol -
Menu
Short Press
Set the value down for the selected
menu
Hold
ON Power Off
PPrreesseett SSeettttiinngg
Save your preferred radio station and listen easily later time.
To set the Preset, there are manual setting and automatic ways. The detail
usage information is following.
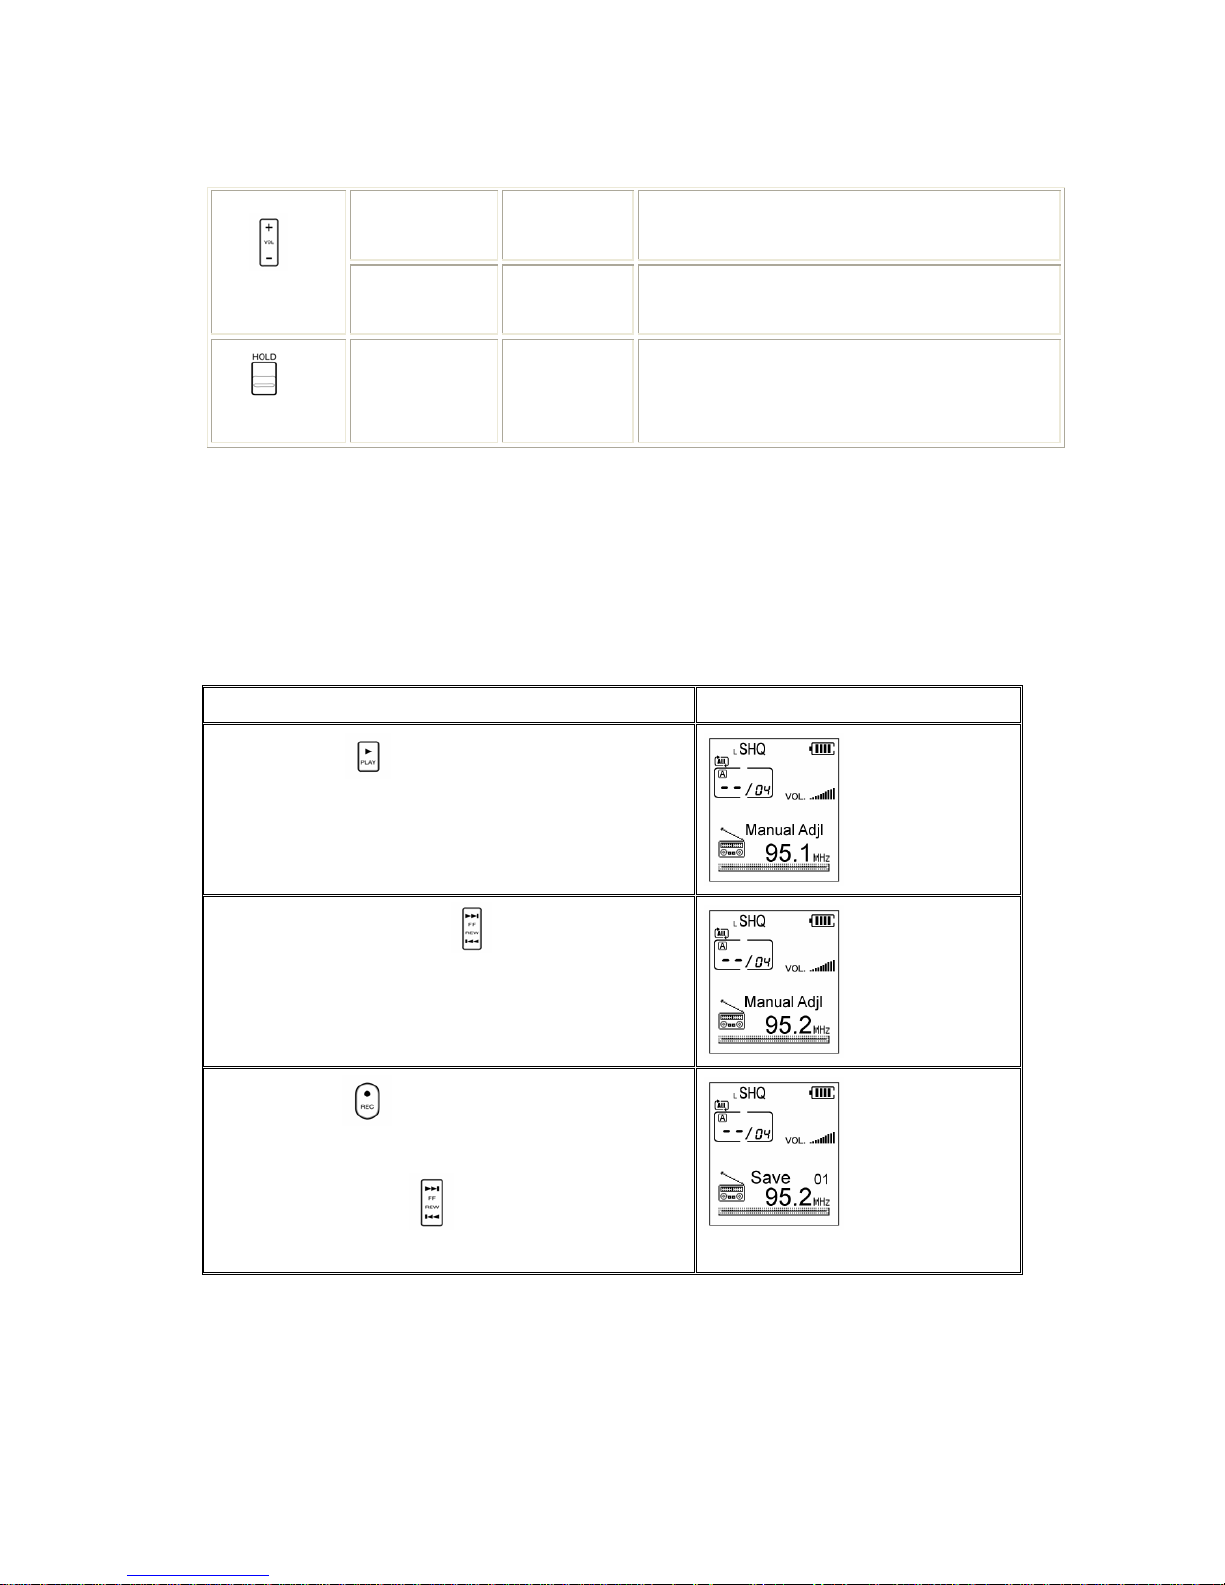
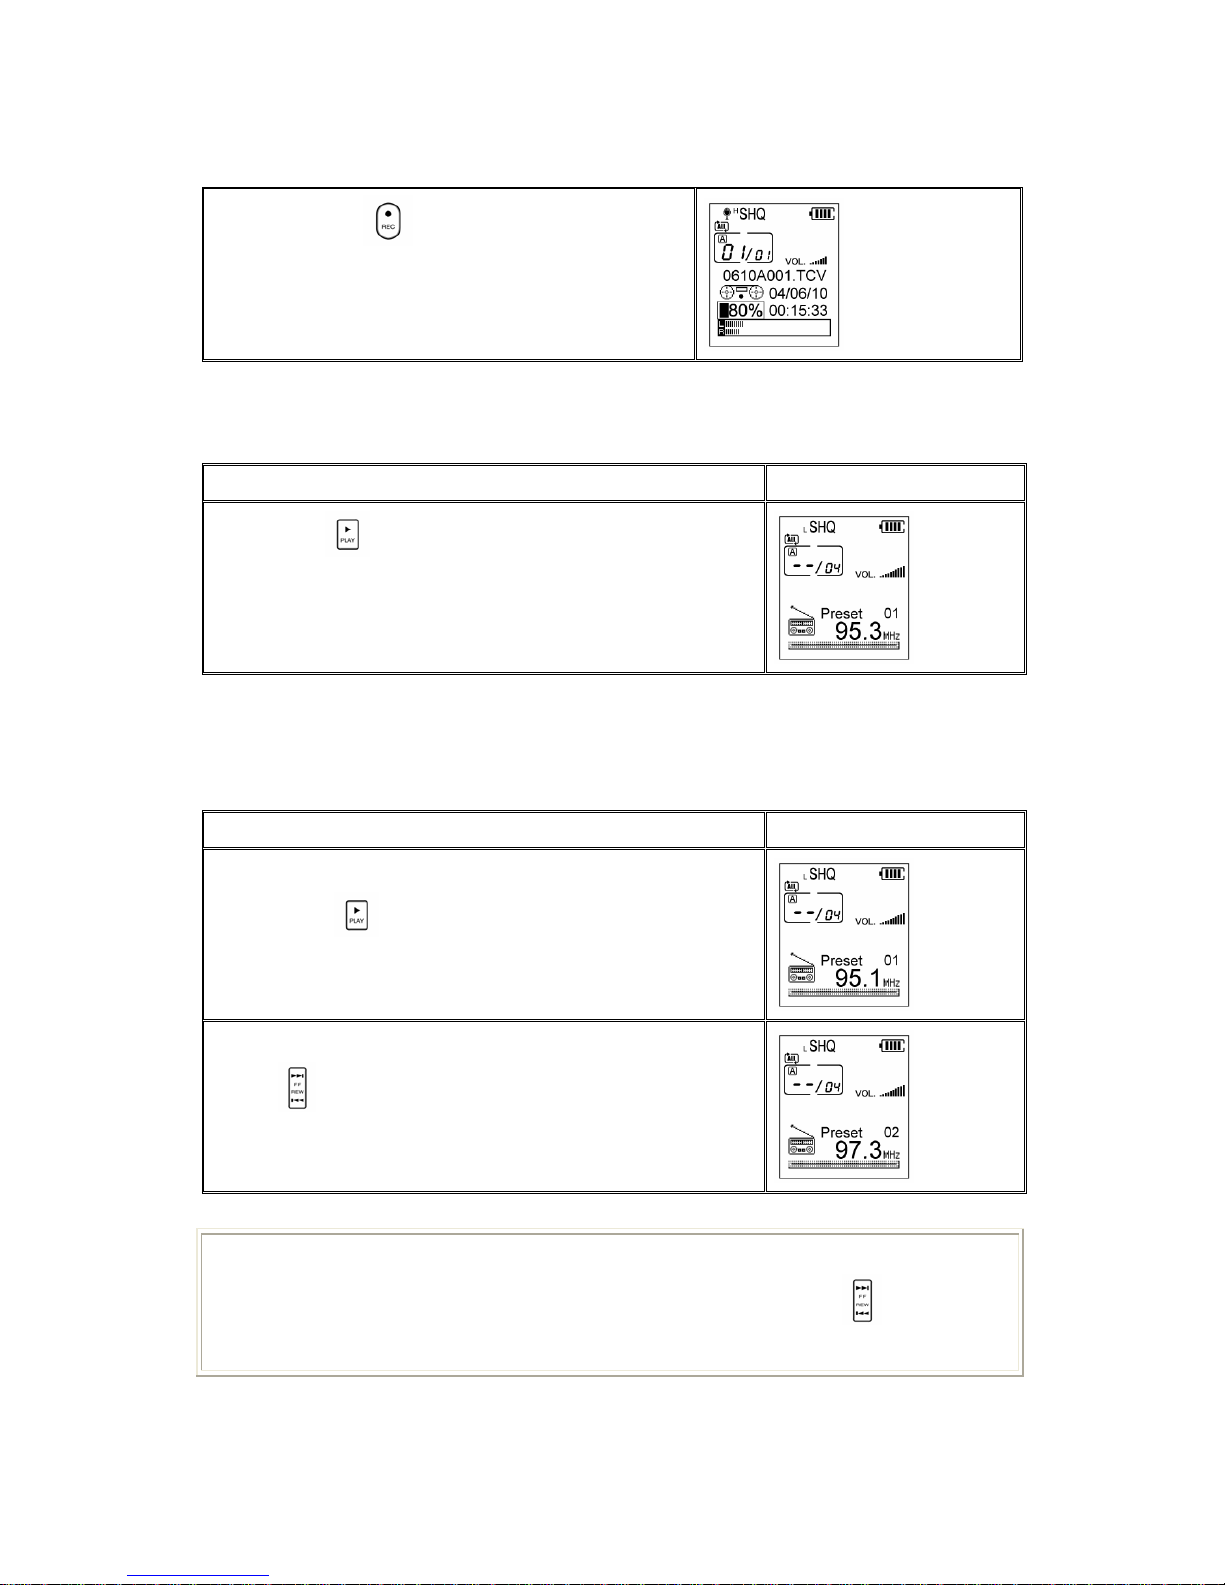
1. Manual Setting
Description LCD Display
1. Press Play button in case of preset mode,
then select the manual frequency setting mode.
2. By using FF or REW button, select the
broadcasting you want to listen.
3. Press REC button long ,then, the preset
number is selected. Change to ohter number
using REW or FEW
button.
Page 30
30
4. press REC
button shortly, currently
selected broadcasting station will be
recorded.
2. Automatic Setting
Description LCD Display
Press Play button long and automatically set the
Preset value..
* Note : Earphone has an antenna function. So, do not remove the earphone
from the unit.
UUssiinngg PPrreesseett
Description LCD Display
1. Preset No. And ‚Preset’ will be displayed when press
Play Key
shortly.
2. Move to the previous or next preset by pressing FF or
REW
key.
NOTE
Search the nearest station to the current one by pressing FF or REW
button in the
Manual frequency search mode.
Page 31
31
PPrreesseett DDeelleettiioonn
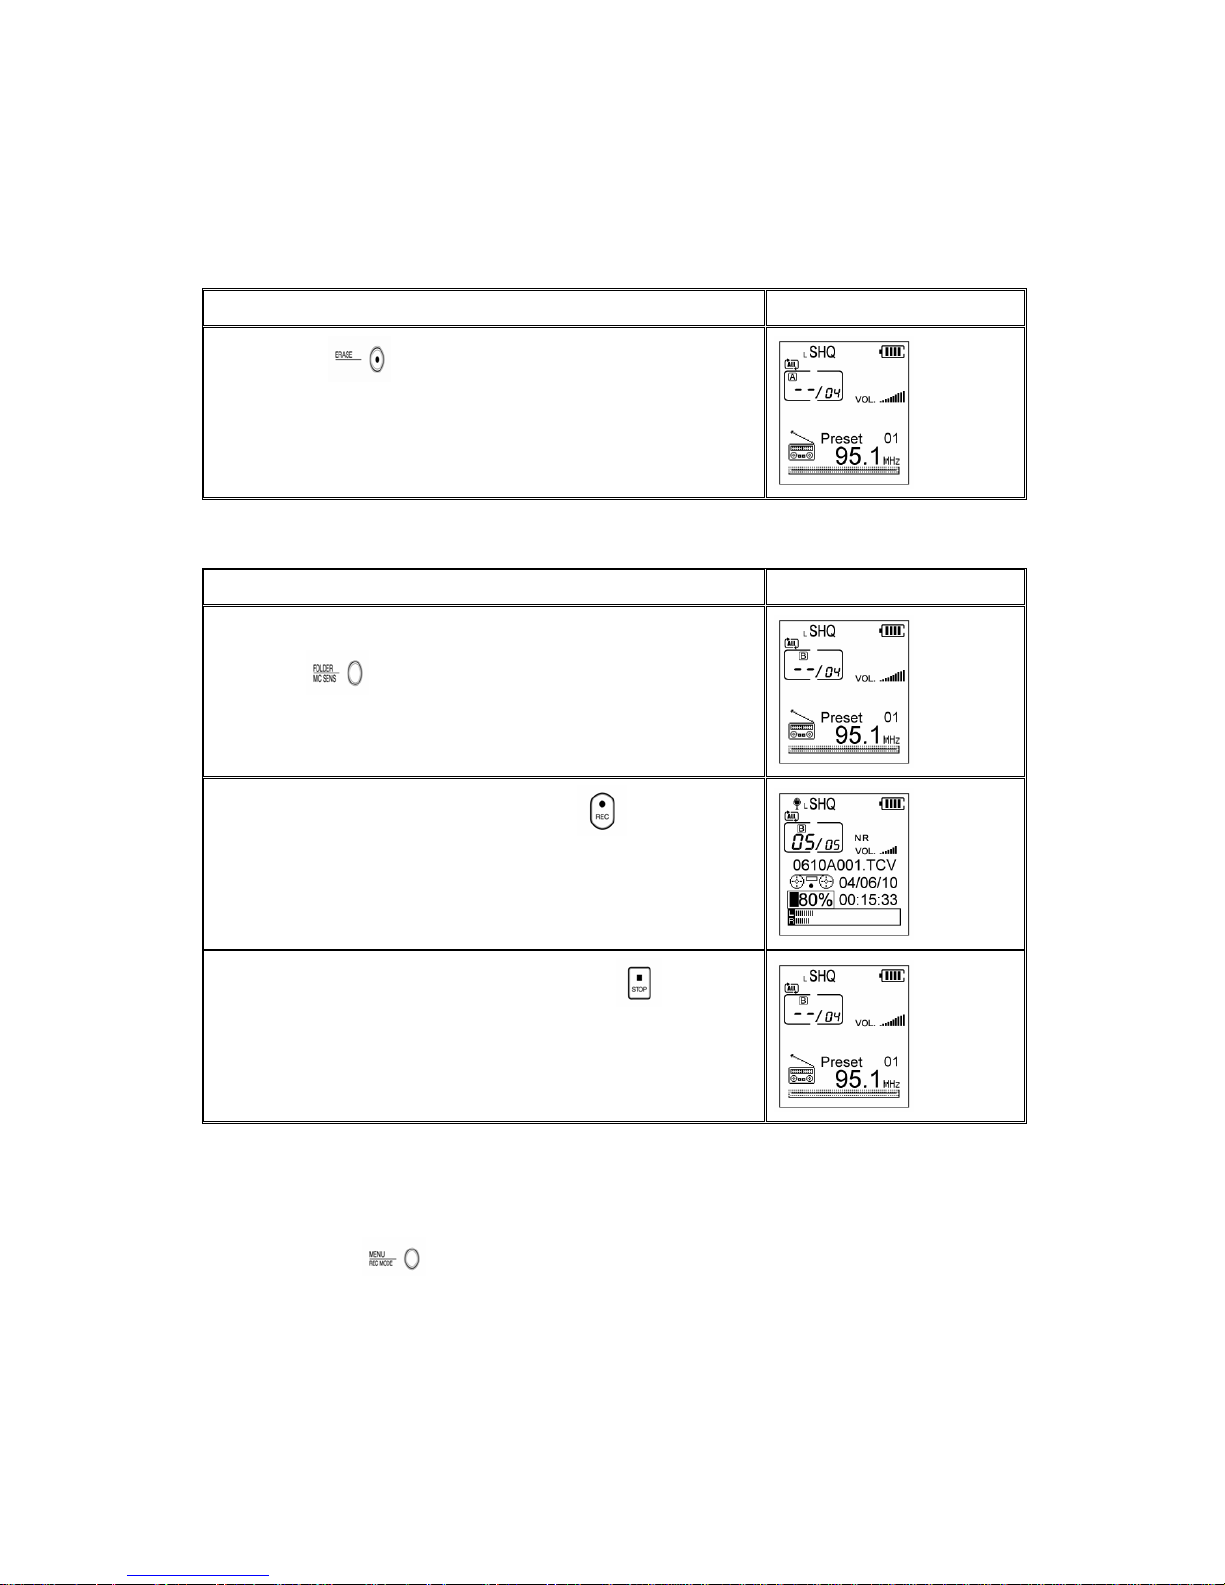
Description LCD Display
1. IF press button long, the preset will be erased
one by one, and the Preset numbers after the erased
one will be erased one by one too.
RRaaddiioo RReeccoorrddiinngg aanndd CChhaannggiinngg tthhee RReeccoorrdd FFoollddeerr
Description LCD Display
1. Select the folder to be recorded by pressing
Folder
button
2. Record the Radio by pressing REC button after
selet the station.
3. Stop the recording by pressing the STOP button.
MMeennuu SSeettttiinngg
Press Menu button long, then it will enter into Main Menu.
Main Menu is divided into function setting and system setting. Function setting
is to control each mode, and system setting is to control the system related
parts regardless of its mode.
Page 32
32
*Press Stop
button shortly in Menu Setting mode. Then, it will escape from
Menu Setting mode.
The detail information on each menu is described below.
Function Setting
Description Default
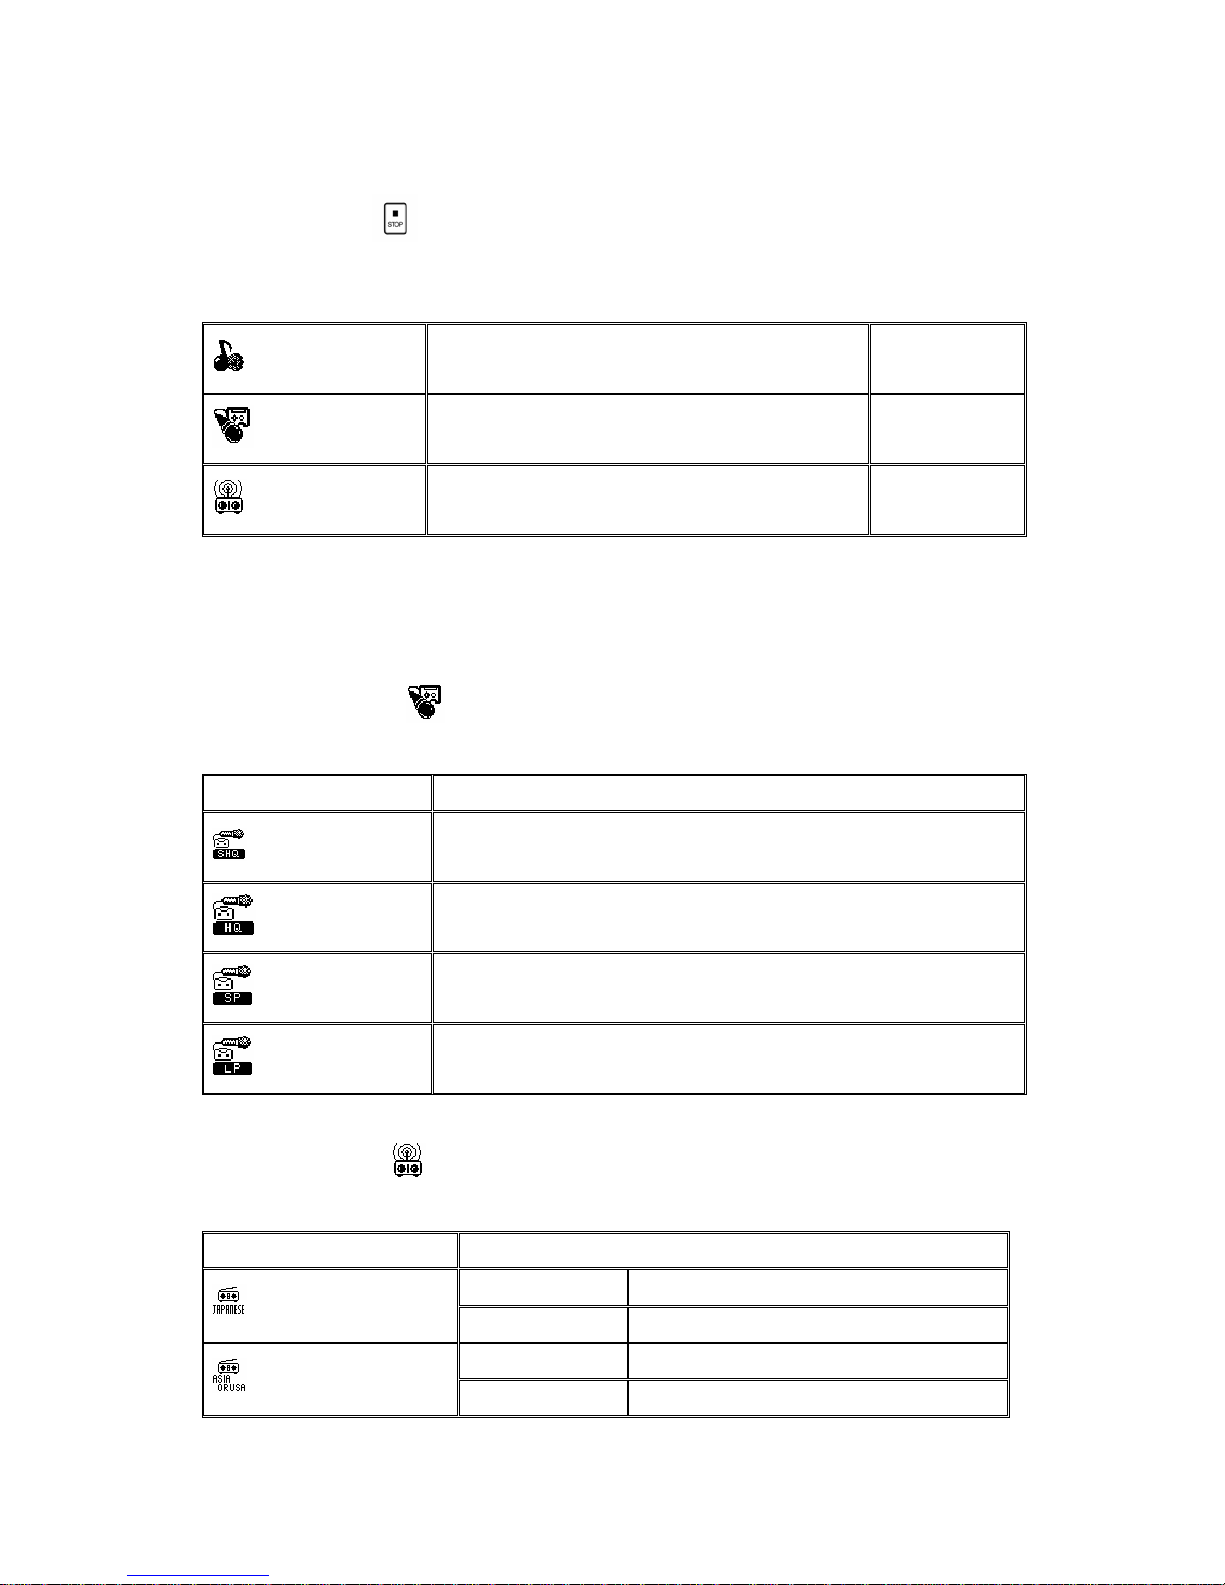
Record Type
LP(6K), SP(32K), HQ(64K), SHQ(128K) SHQ
Radio Band
Japan, Asia/USA, Europe Japan
Function Setting Menu
1. Record Type
This player provides 4 different record quality types
Mode Description
Super High Quality
Record with 128kbps
High Quality
Record with 128kbps
Standard Play
Record with 128kbps
Long Play
Record with 128kbps
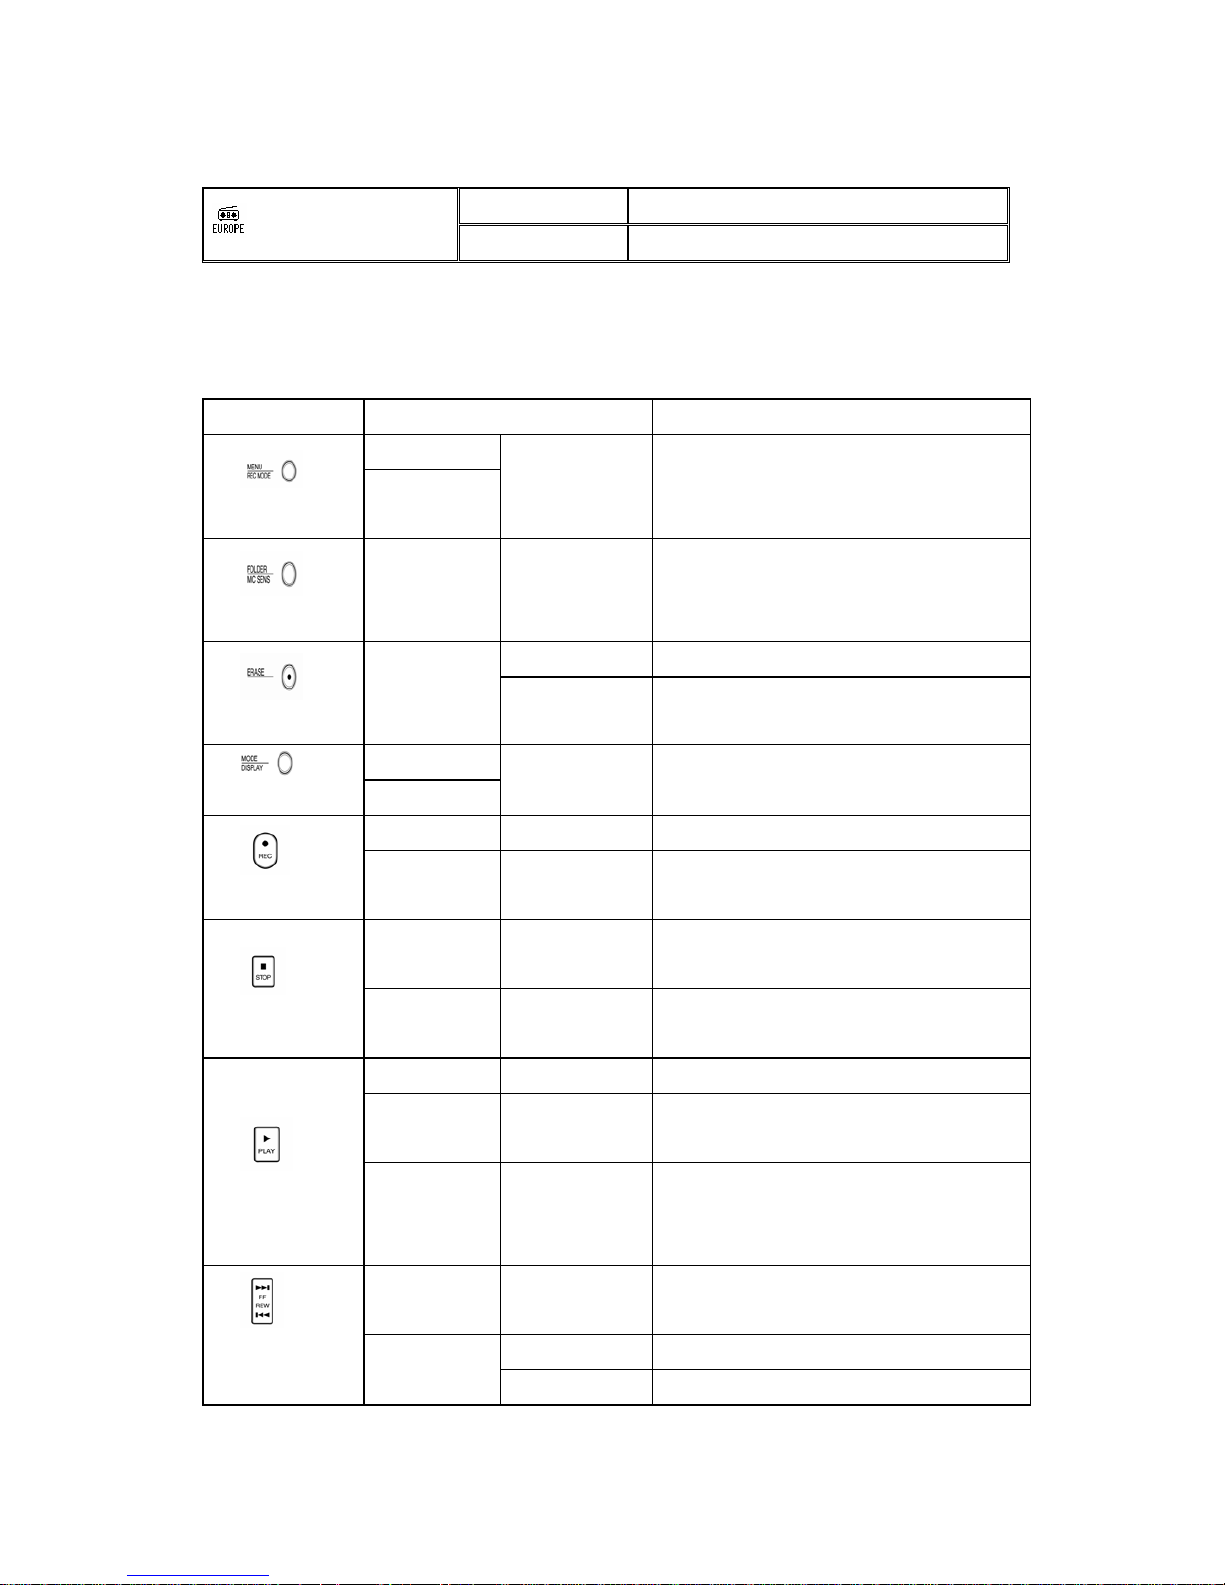
2. Radio Band
Set the area frequency range and frequency step.
Mode Description
Frequency Range 76 ~ 90 MHz
Japna
Frequency Step 0.1 MHz
Frequency Range 87.5 ~ 108 MHz
Asia/USA
Frequency Step 0.1 MHz
Page 33
33
Frequency Range 87.5 ~ 108 MHz
Europe
Frequency Step 0.05 MHz
MMuussiicc MMooddee
BBuuttttoonn DDeessccrriippttiioonn
Key Status & Method Key Description
Stop State
Menu
Playback
State
Long Press Enter into Main Menu
Folder
Playback
State
Short Press Change to the Navigation
Short Press Delete the selected file
Erase
Stop State
Long Press Delete all the files in a folder
Stop State
Mode/Display
Stop State
Long Press Change the Mode
Stop State Long Press Ear aid function
REC
Playback
State
Short Press Selected area repeat function
Playback
State
Short Press Pause
Stop
Menu
State
Short Press
Cancel the current menu and move
to upper part
Stop State Short Press Playback
Playback
State
Short Press Pause the Playback
Play
Menu State Short Press
Save the current selected menu
and
escape out
Stop State Short Press
Move the cursor to the upper
file
Short Press Playback the next file
FF
Play back
State
Long Press Fast searching to next part
Page 34
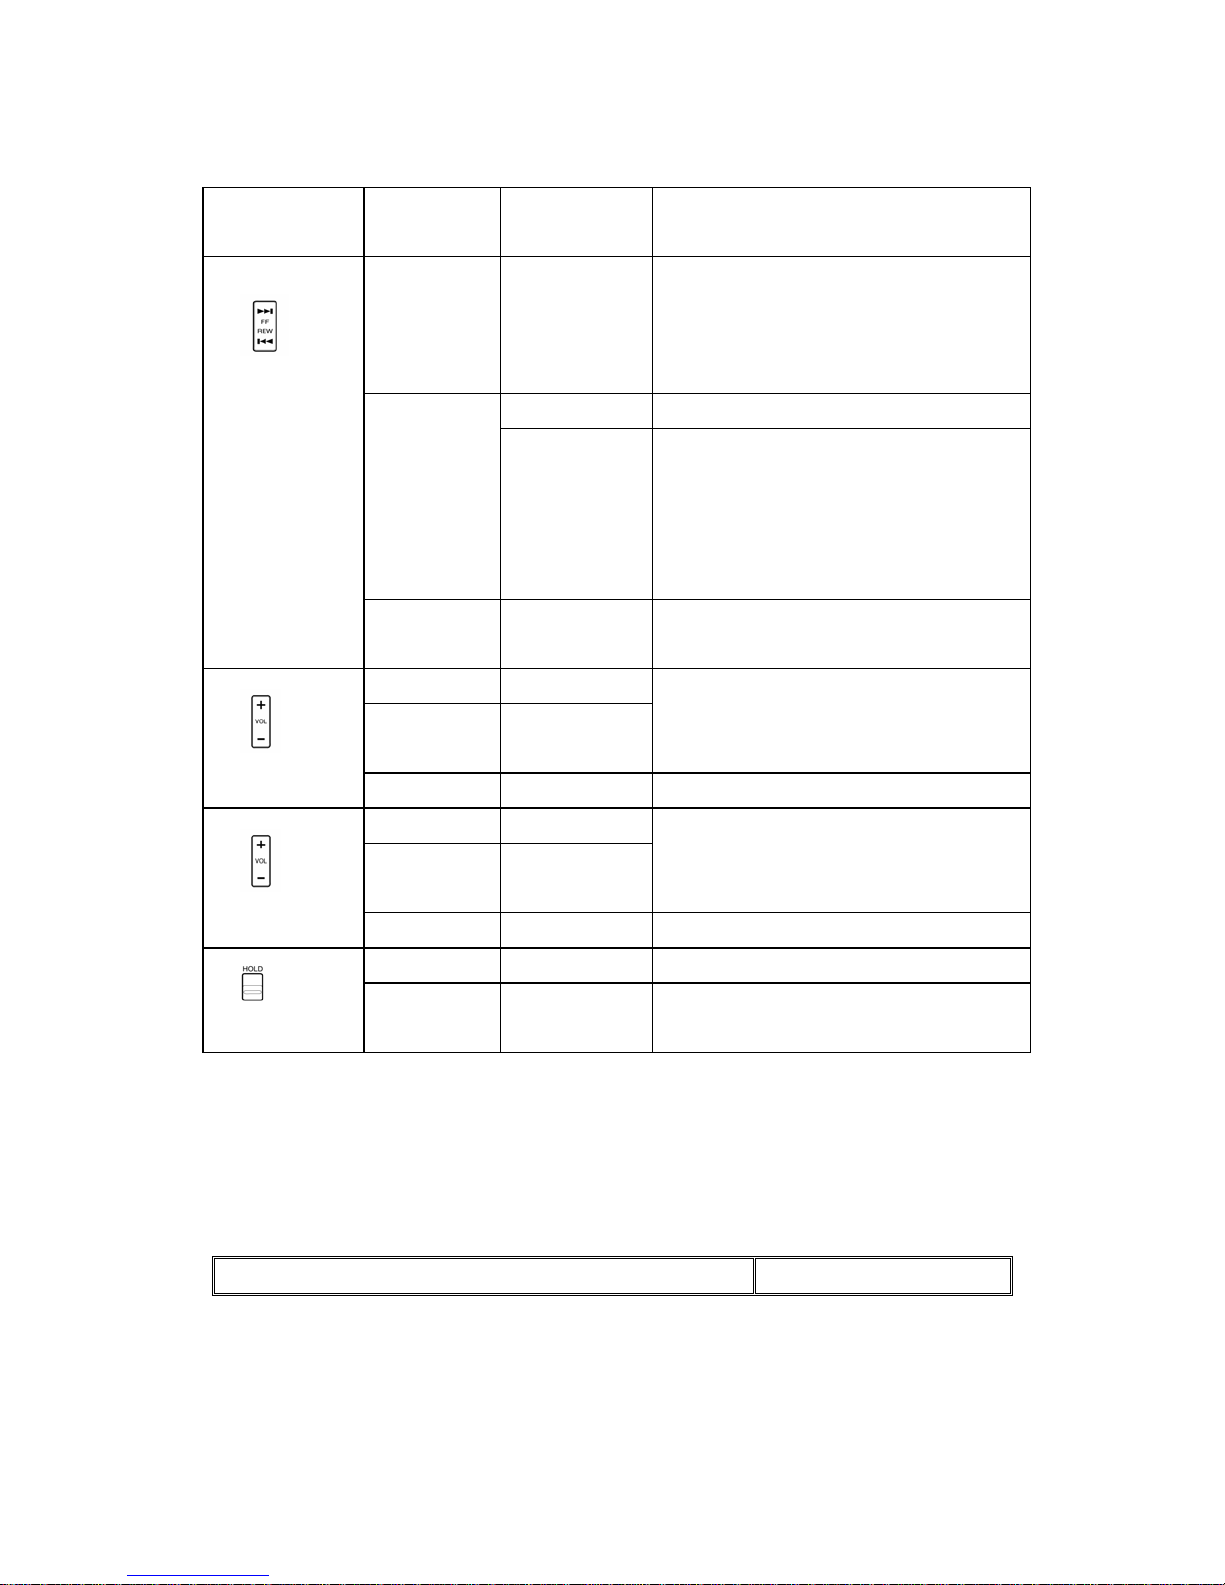
34
Menu State Short Press
Move the cursor to next part or
set the value up
REW
Stop State Short Press
Move the cursor to the lower
file
Short Press Playback the previous file
Playback
State
Long Press
Playback the previous file(In
case within 10 sec. of playback)
Playback the current fileI(In
case after 10 sec. of playback)
Menu State Short Press
Move the cursor to the previous
part or set the value down
Stop State Short Press
Playback
State
Short Press
Volume Up (Max. 20)
Vol +
Menu State Short Press Set the selected value up
Stop State Short Press
Playback
State
Short Press
Volume Down
Vol -
Menu State Short Press Set the selected value down
Stop State OFF Power Off
Hold
Playback
State
ON Hold
LLCCDD DDiissppllaayy ddeessccrriippttiioonn wwhhiillee ppllaayybbaacckk
PPllaayybbaacckk // SSttoopp
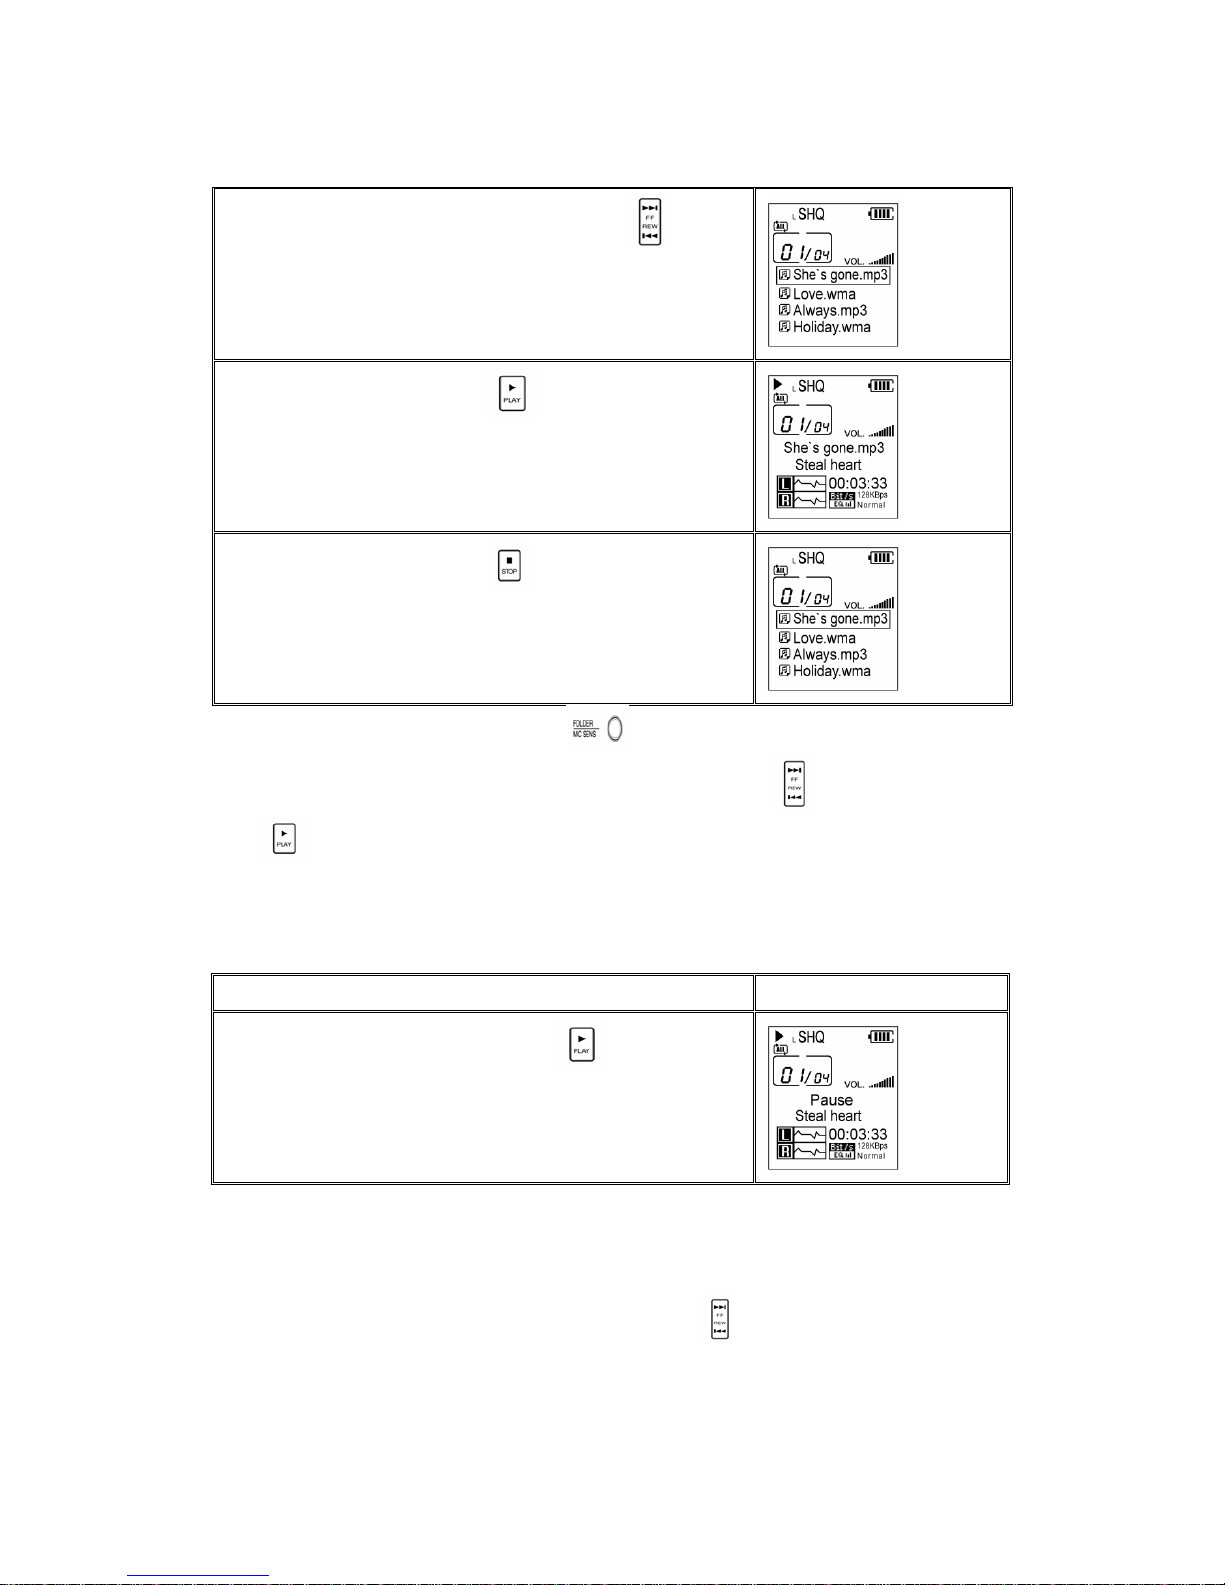
Description LCD Display
Page 35
35
1. Select the file to playback by FF or REW
button
2. Playback by pressing Play button shortly
3. Stop it by pressing Stop button while playback
* Navigation Function : Press folder button and go to Navigation Mode while
playingback, you can select desired file using FF or REW
button. By pressing
play
button shortly in the state of file selection, the selected file will be
played back.
PPaauussee
Description LCD Display
1. Pause it by pressing Play Key shortly while
playback
PPllaayyiinngg bbaacckk pprreevviioouuss//NNeexxtt ssoonngg wwhhiillee PPllaayybbaacckk
1. Playback the previous song by pressing REW button shortly while
playback(within 10sec.)
Page 36
36
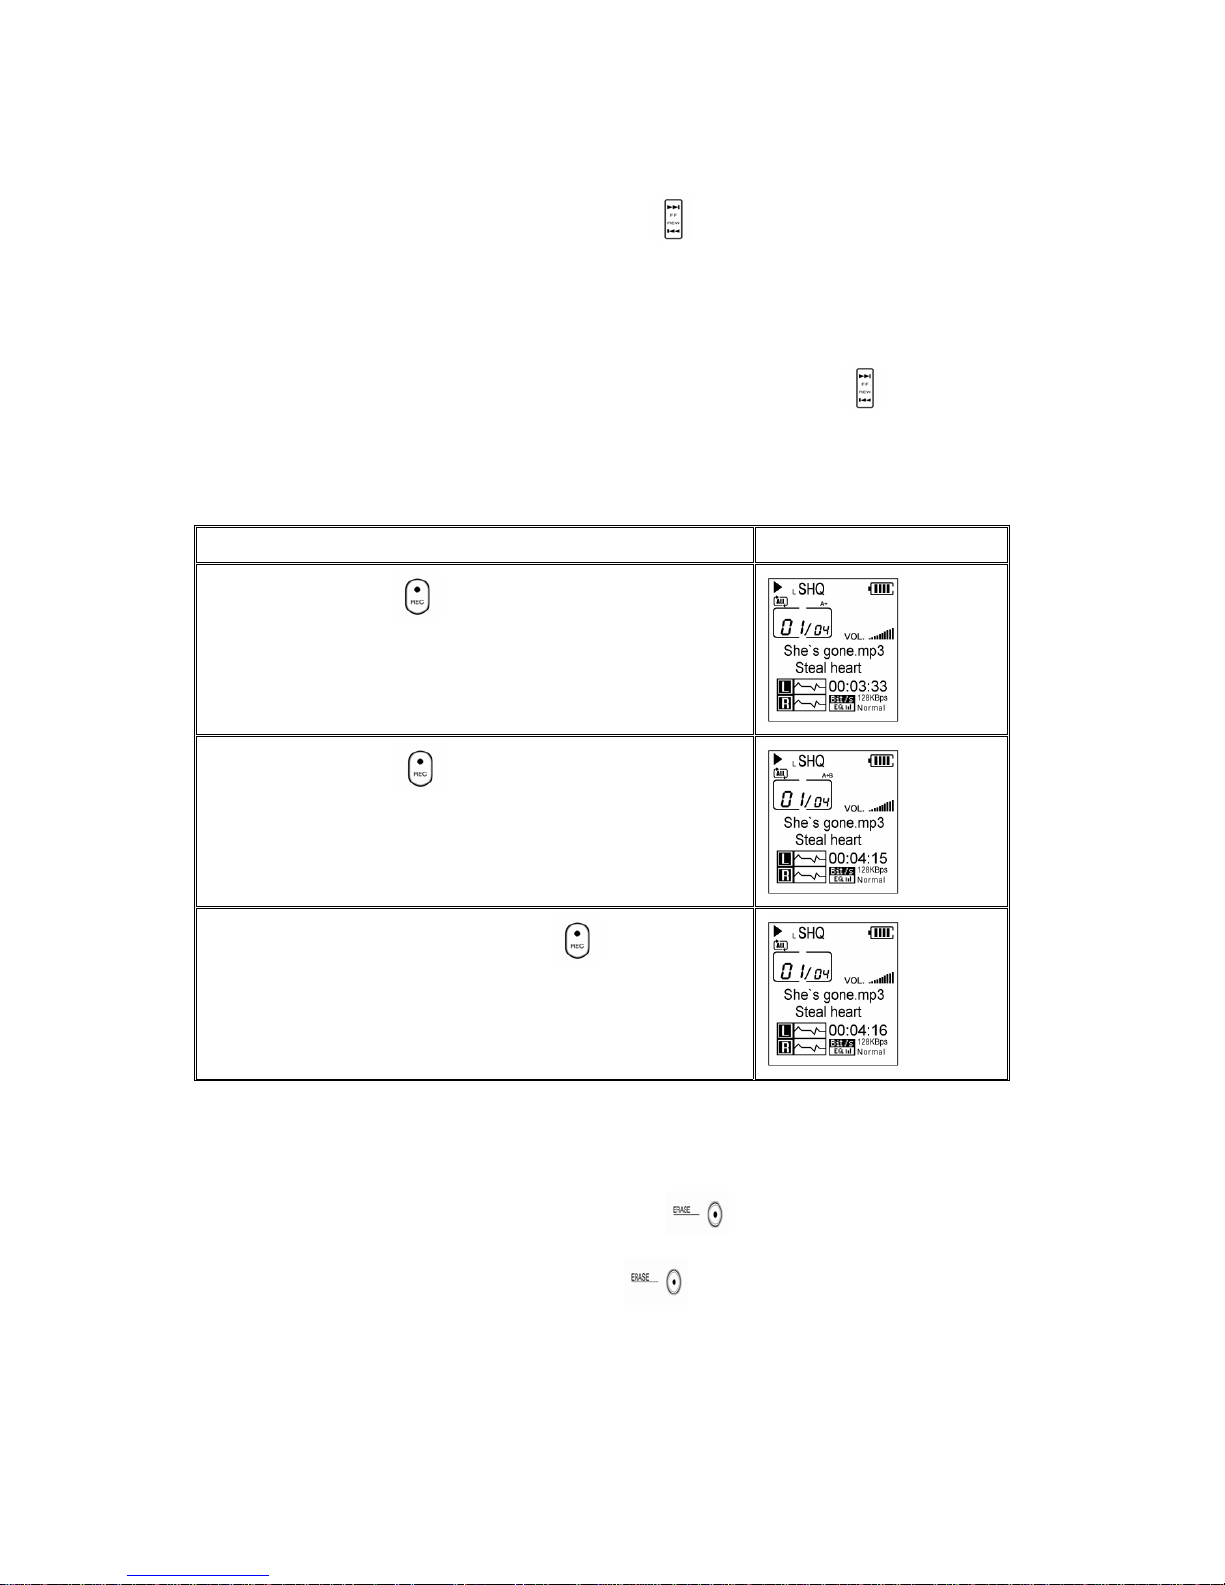
2. Playback the next song by pressing FF
button shortly while
playback(after 10sec.)
FFaasstt SSeeaarrcchhiinngg
Fast forward or backward in a song by pressing REW or FF button while
playback.
SSeelleecctteedd aarreeaa rreeppeeaatt ffuunnccttiioonn((AA-- BB))
Listen to the selected area repeatedly in a playback file.
Description LCD Display
1. When press REC button while playback, A → will
be displayed on the LCD as a start point.
2. When press REC shortly again, A → B will be
displayed on the LCD and repeat the area.
3. To release the funtion, press REC shortly again.
FFiillee DDeelleettiioonn
In stop stage of Music mode, press Erase button shortly. the selected
file will be deleted and press Erase
button long, selected folder will
be deleted.
Page 37
37
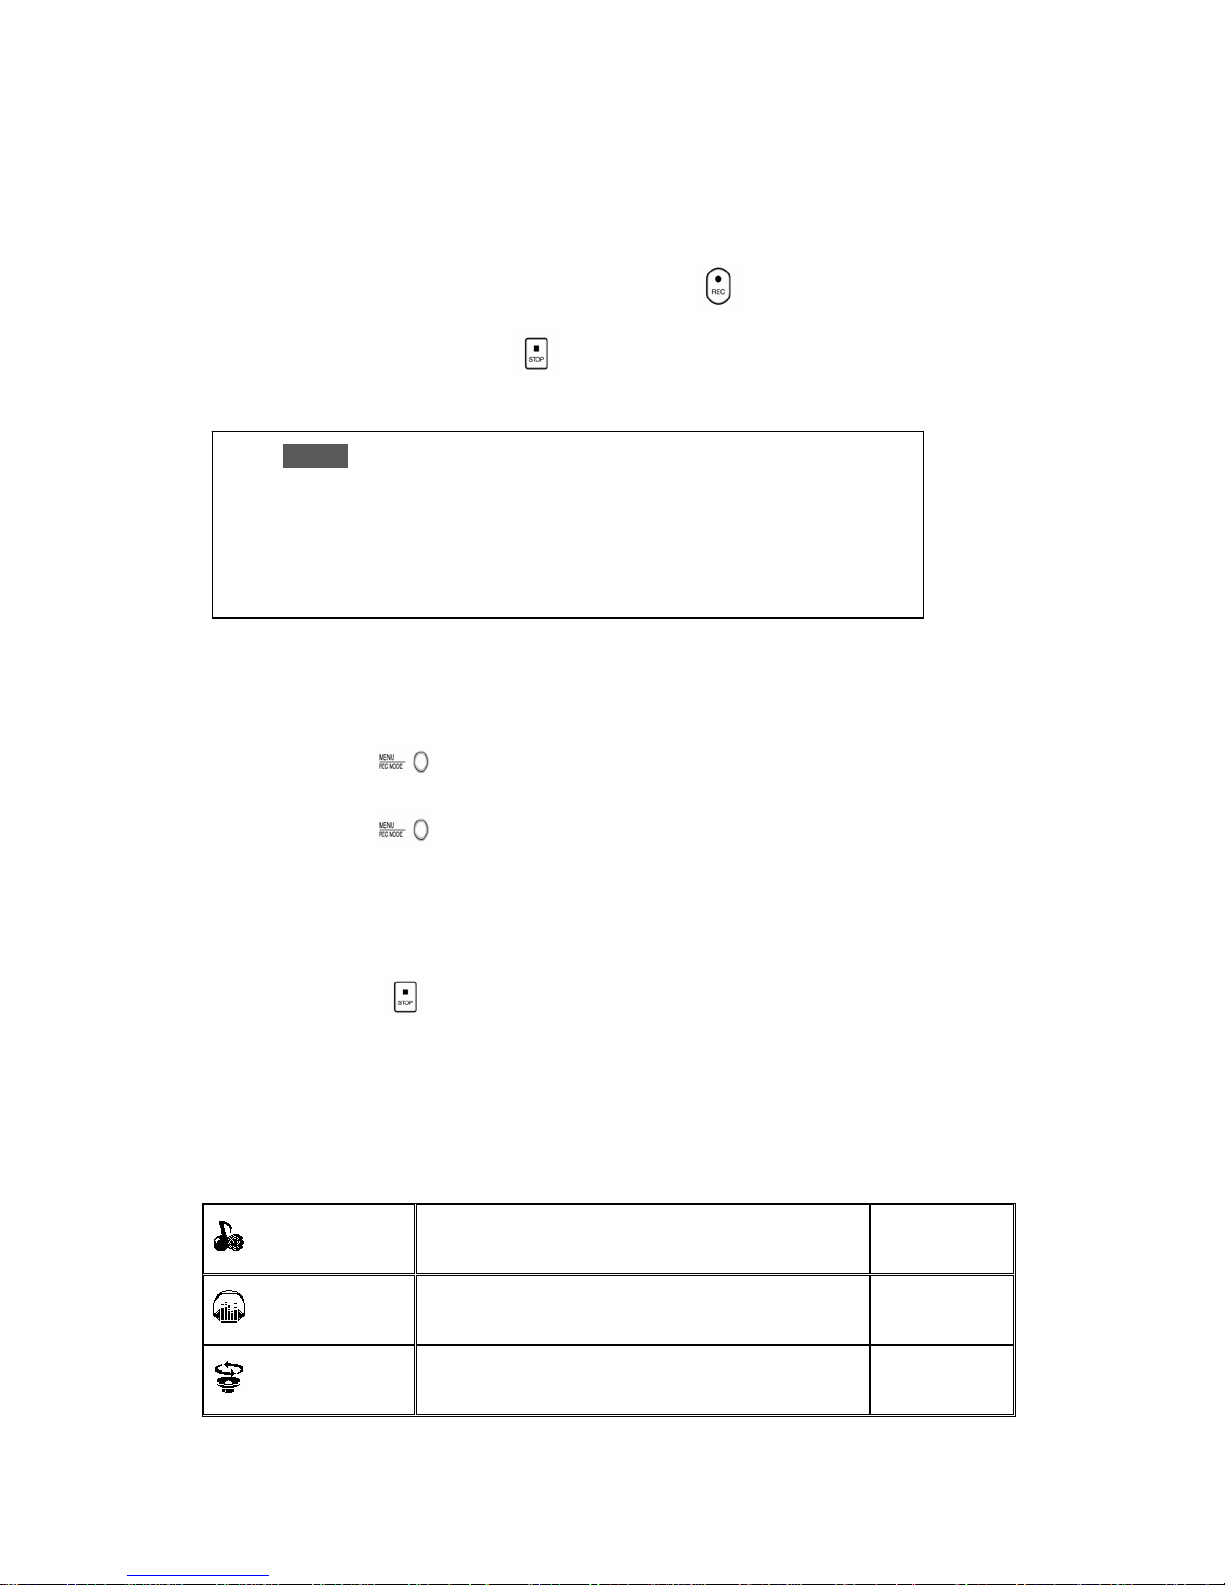
UUssiinngg HHeeaarriinngg AAiidd FFuunnccttiioonn
For using hearing aid fuction, earphone must be connected to the set.
Connecting earphone, when pressing long REC
button, hearing aid function
starts. When pressing stop
button, this function stops
MMeennuu SSeettttiinngg
Press Menu button long, then it will enter into Main Menu.
Press Menu
button long, then, it will move to Main Menu Setting mode.
Main Menu is divided into function setting and system setting. Function setting
is to control each mode, and system setting is to control the system related
parts regardless of its mode.
* Press stop
button shortly in Menu Setting mode. Then, it will escape from
Menu Setting mode.
The detail information on each menu is described below.
Function Setting Menu
Function Setting
Description Default
Equalizer
Normal, Classic, Jazz, Rock, Pop, Auto EQ,
User EQ
Normal
3D Effect
3D OFF, 3D ON OFF
Caution
Hearing Aid Function is for who has weak sense of ear
Before wearing earphone, do not forget to check the sound level w
hich is sometimes strong enough to hurt the sense of hearing of a
person who has sensitive ear.
Page 38
38
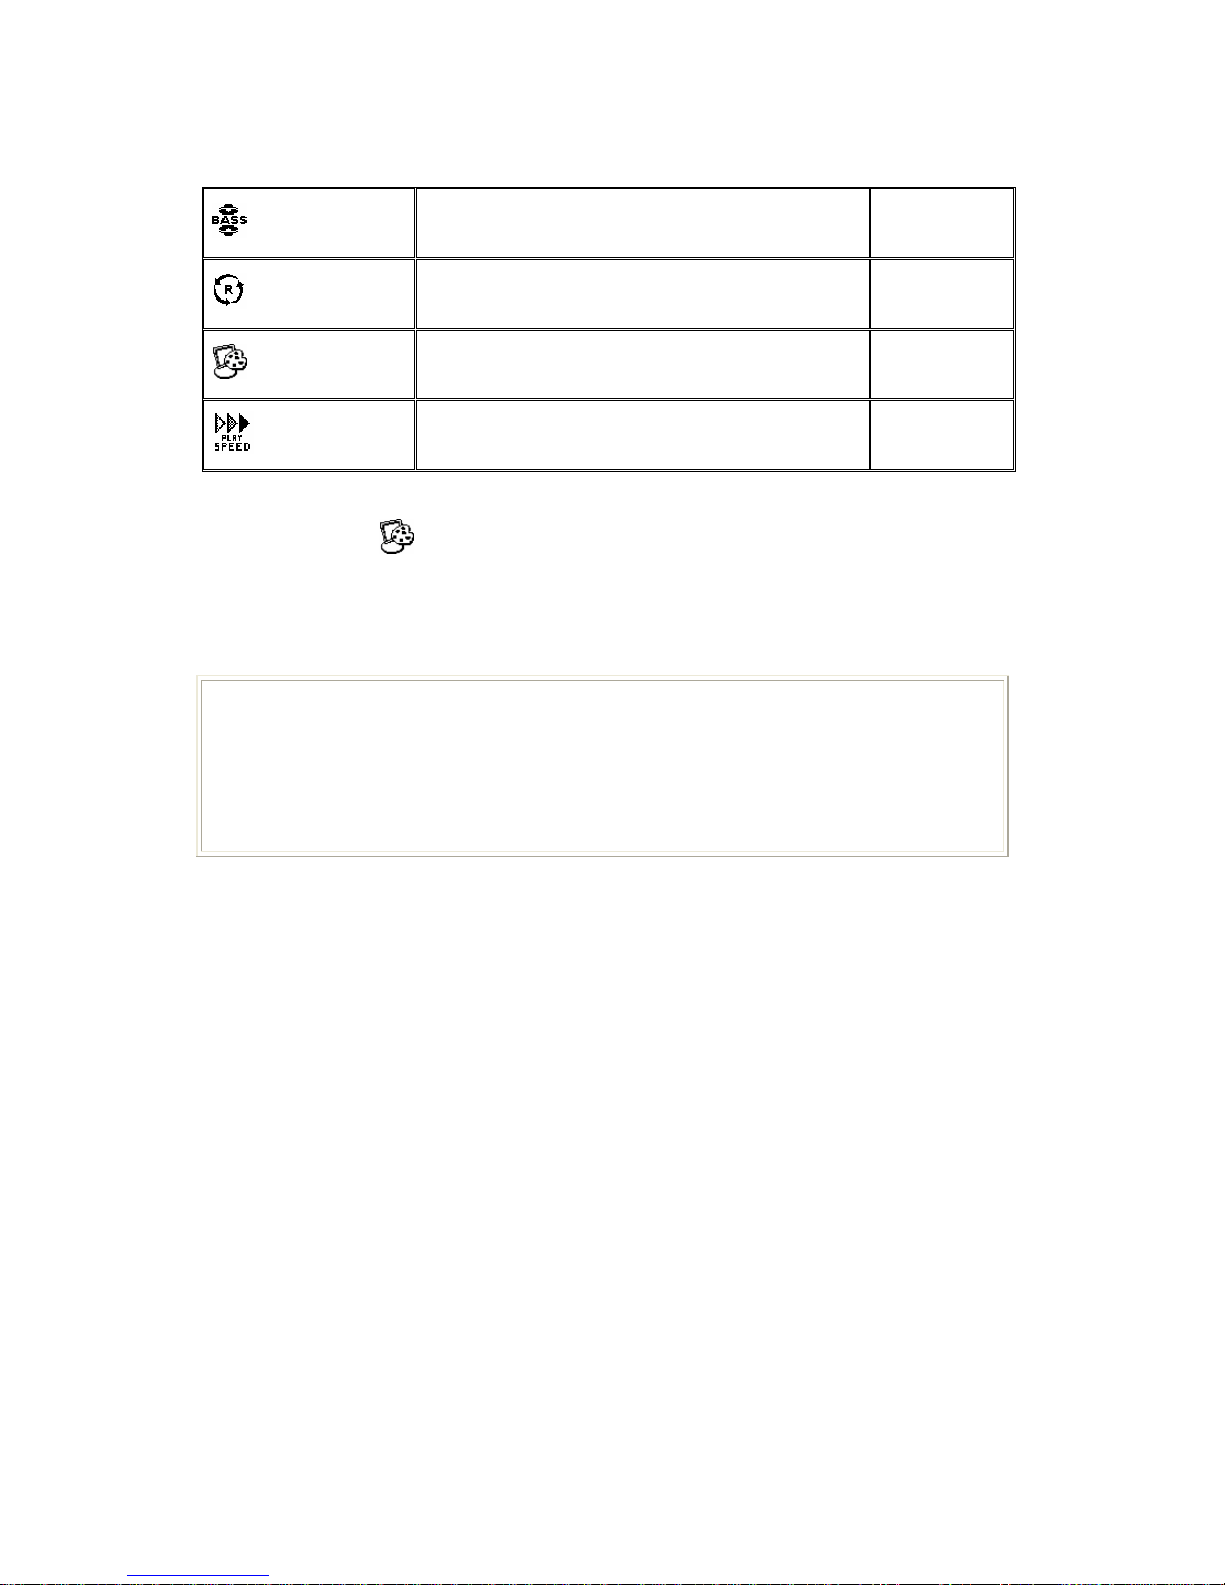
Bass Boost
Bass Boost OFF, BASS Boost ON OFF
Repeat
INTRO, NORMAL ONE, NORMAL ALL, NORMAL RANDOM,
REPEAT ONE, REPEAT ALL, REPEAT RANDOM
REPEAT ALL
Screen Saver
OFF, Clock, User’s Image OFF
Play Speed
80%, 90%, 100%, 110%, 120%, 130% 100%
1.Screen Saver
If it pass some time in Playback, the LCD view will change to Watch or User Image.
The LCD view is selectable between Watch and User Image in Screen Save function.
Note!
In case User Image, the interval time between images can be set. The interval time
is adjustable from 0.1 sec. to 10 sec. and the set time is applied to the User
Image view. For the detail information to use Screen Saver, please refer to „Using
Screen Saver Editor“
Page 39
39
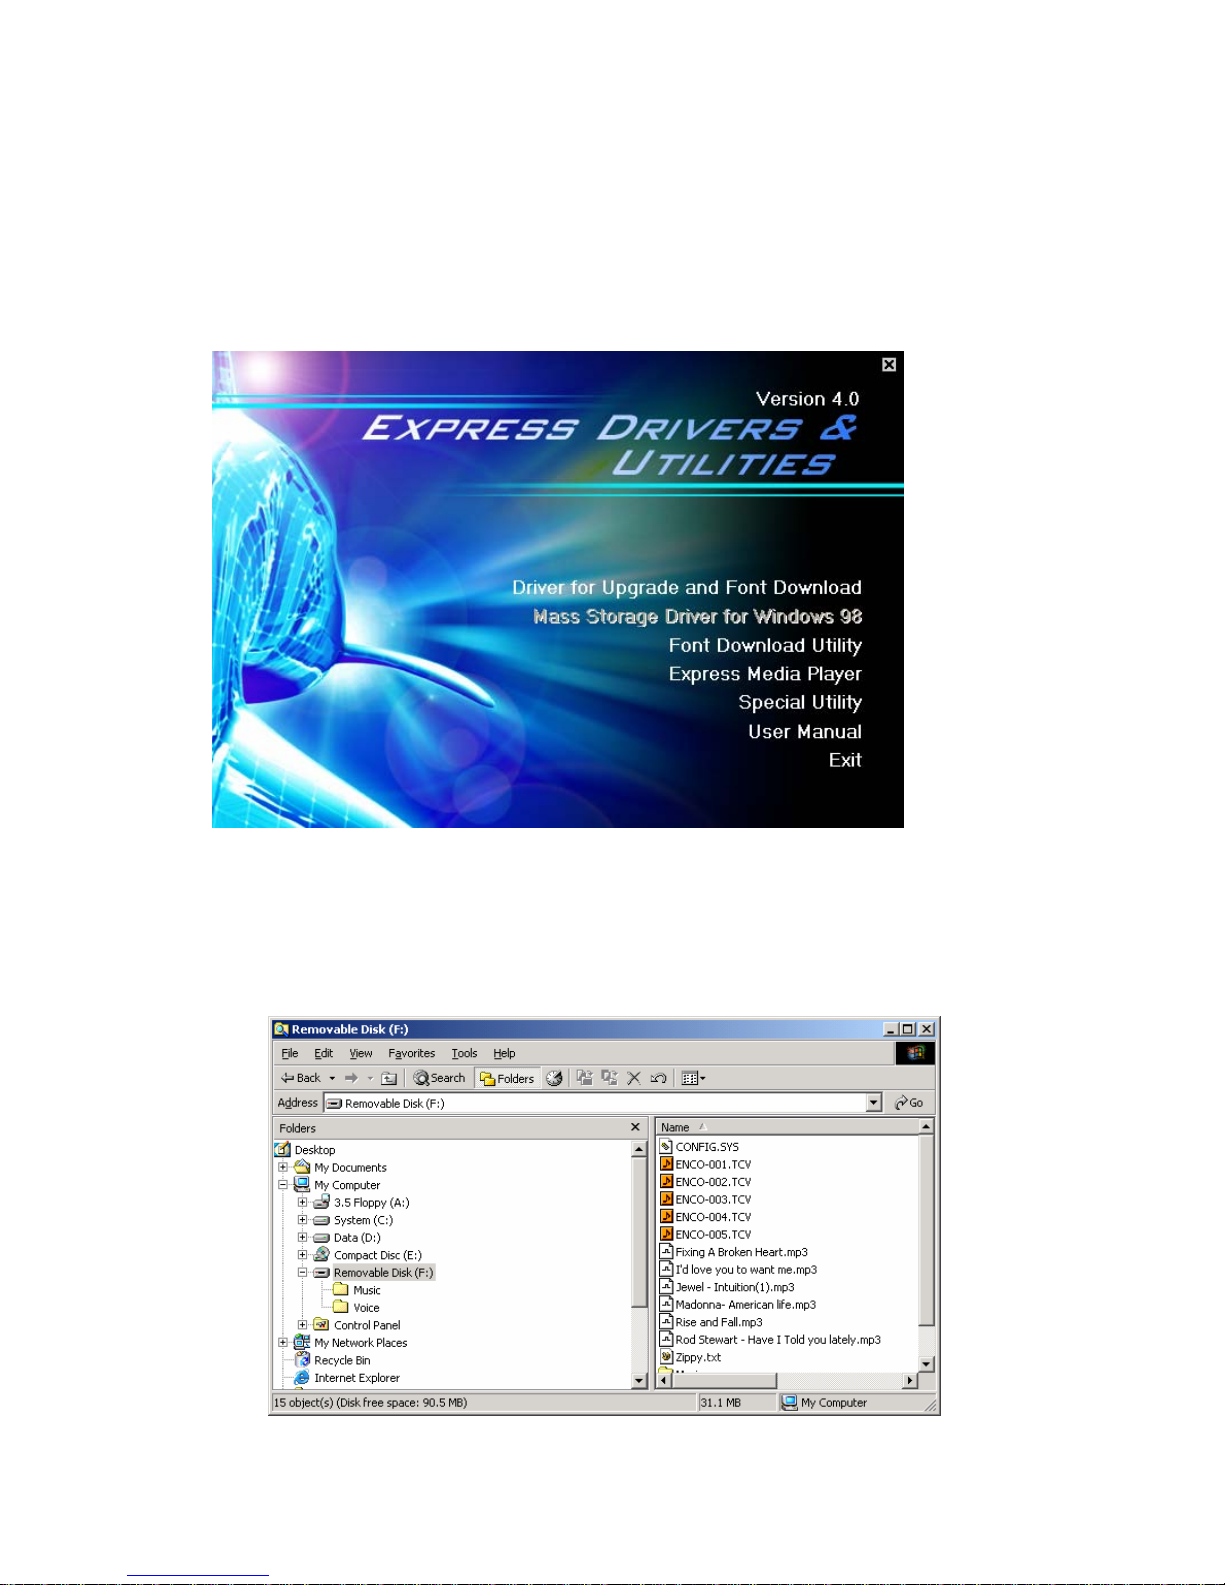
No need to get installation of any software but directly use this device in Window ME,
2000, XP. However, being requested to install „ MASS Storage Driver“ in Windows 98.
Insert provided CD into CD-ROM to make it autorun with „ Installation program“.
If not, kindly select and click „ INSTALL. EXE“ by manual.
FFiillee UUppllooaadd//DDoowwnnllooaadd
UUssiinngg bbyy ccoonnnneeccttiinngg ttoo PPC
C
Page 40
40
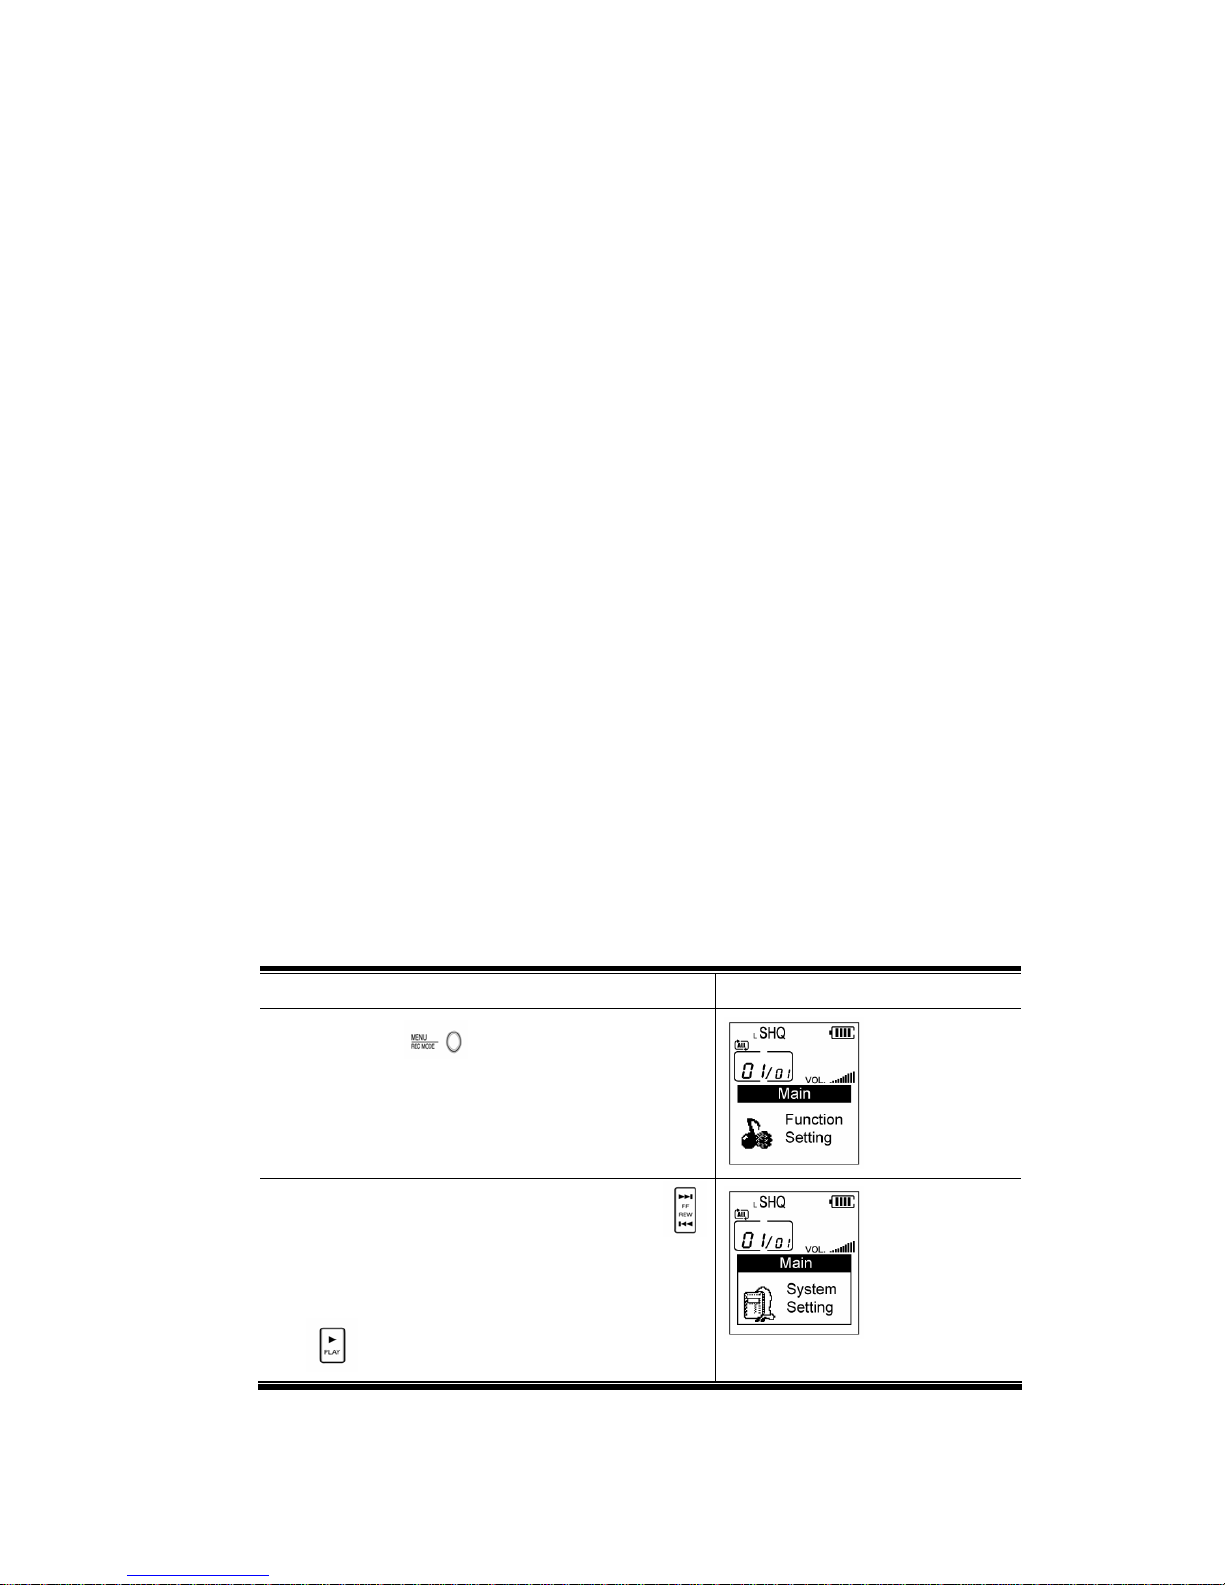
Connected to PC , It is automatically recognized with removable disc.
No need to get installation of any software but directly use this device in
Window ME, 2000, XP. However, being requested to install „ MASS Storage
Driver“ in Windows 98.
MMaassss SSttoorraaggee DDrriivveerr IInnssttaallllaattiioonn ffoorr WWiinnddoowwss 9988
Select the Mass Storage Drive for Windows 98 on the menu of INSTALLATION
PROGRAM in CD. It will be automatically installed.
FFoonntt DDoowwnnllooaadd ((LLaanngguuaaggee ssuuppppoorrtt))
To perform the player with same language as Window’s in PC, need to download
the FONT. It is basically built-in when you purchase, to use directlly, however,
case of using another language, you should get font download in the related
language Windows.
*Before downloading the FONT, needing to set the DRIVER using the Download
program.
DDrriivveerr IInnssttaallllaattiioonn
Driver, which is used to get download the Font, is used to get program upgrade.
Select the part of “Driver for Upgrade and Font Download“ in installation
program Menu, it will be installed automatically.
FFoonntt DDoowwnnllooaadd
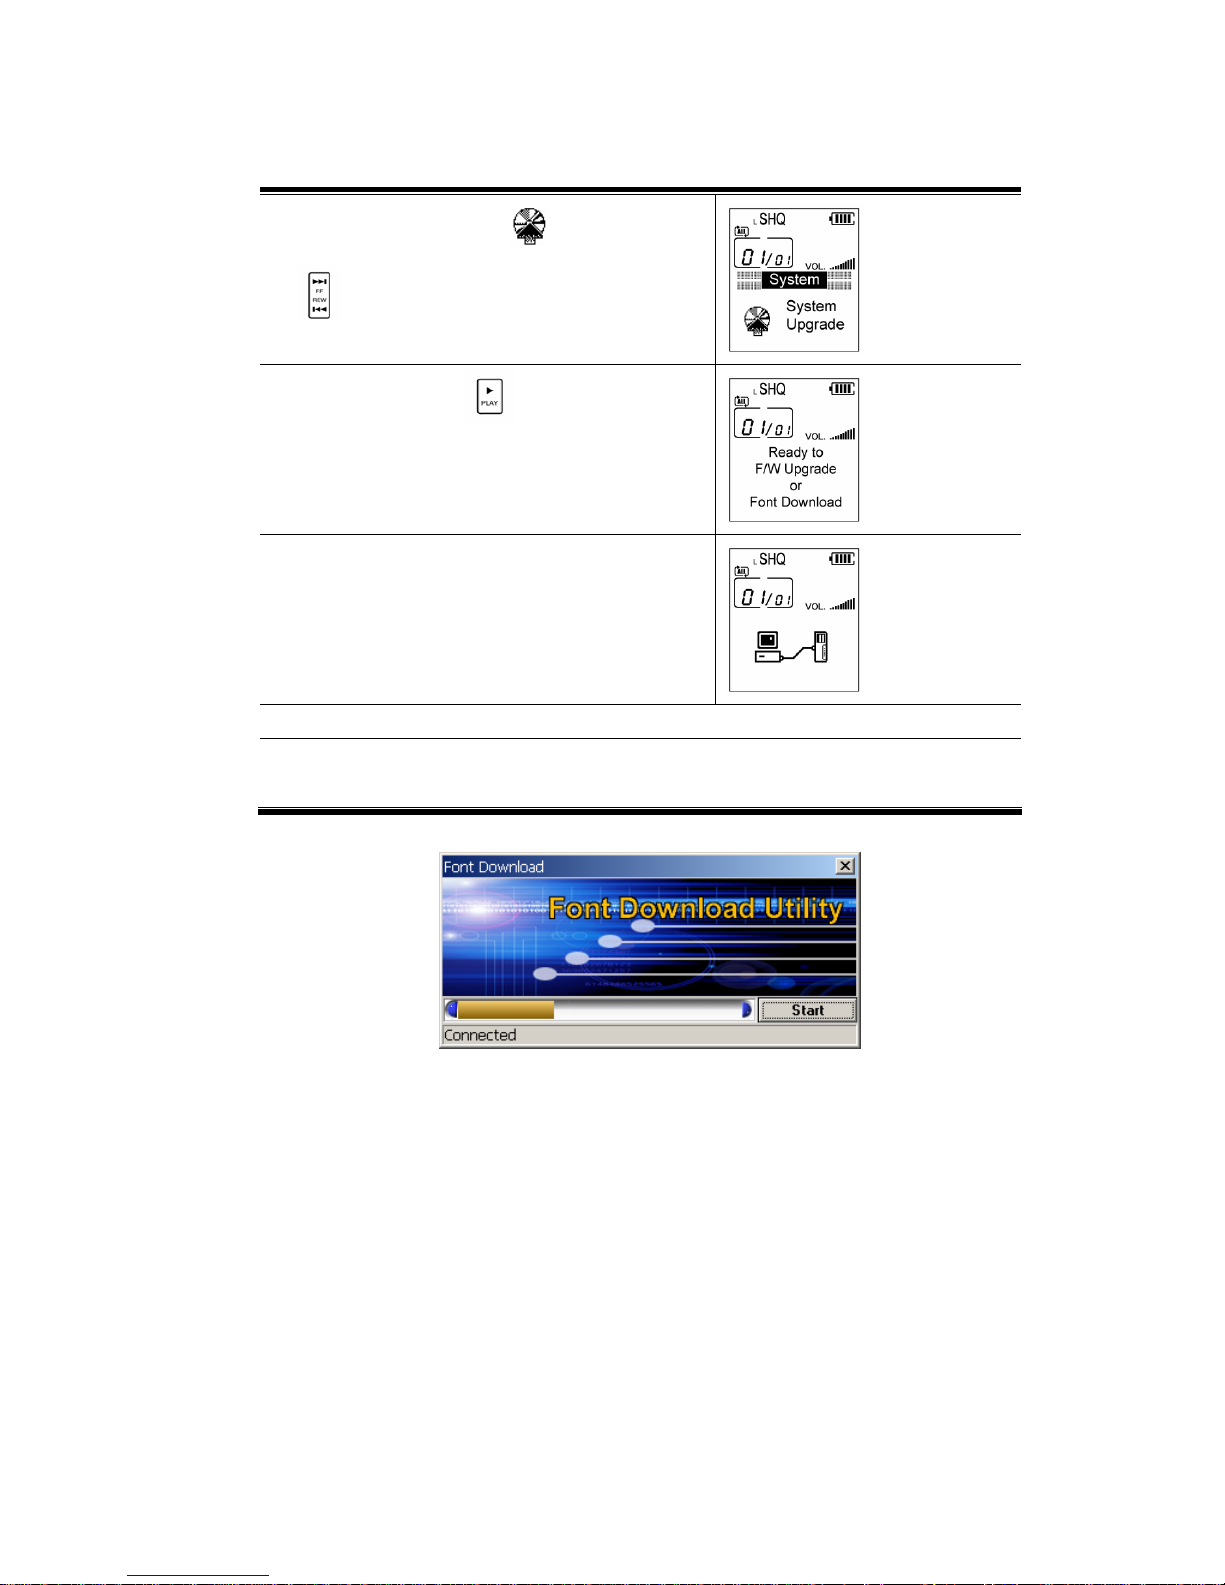
Description LCD Display
1. Press Menu button long to move to
Menu mode.
2.Select system setting menu using
buttons. System setting menu wil be shown on
you like right picture when you press
play
button on the menu,
Page 41
41
3. Select System upgrad
by using FF or
REW
button.
4. By pressing play button, upgrade and
font download will be stand by.
5. By connecting the set into a PC using USB
cable, the picture like right side will be
shown on the LCD.
6. Execute Font Download Utility of installation program.
7.Check ‚Connected’ message on the bottom side of display and press ‚Start’
button to download
LLiisstteenniinngg ttoo rreeccoorrddeedd ffiillee
After uploading the files(TCV,TVF) recorded on Player, being requested to get
“Express Media Player“ to playback at PC.
EExxpprreessss MMeeddiiaa PPllaayyeerr iinnssttaallllaattiioonn
1)Before installation, all of the programs should be shut down.
2)Select “Express Media Player“ from Installation Program Menu, installation
will be started.
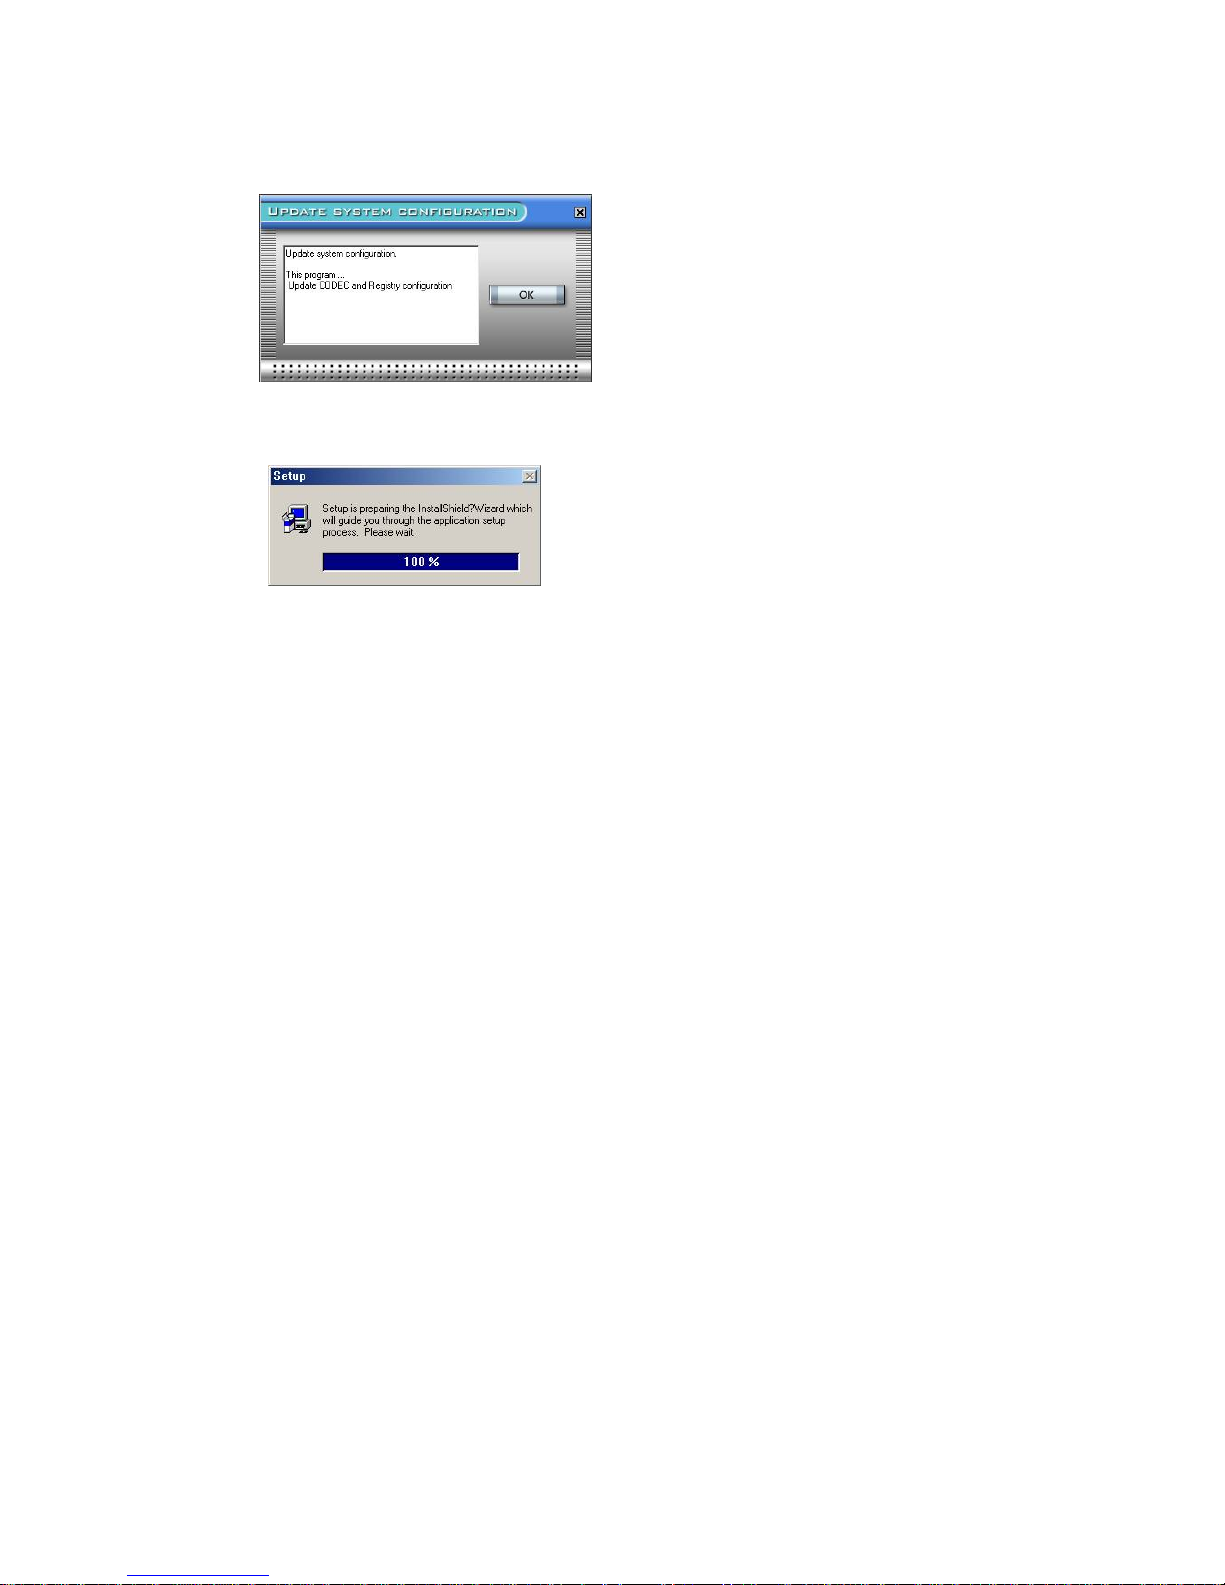
3)Press <OK> button when the pop window shows.
Page 42
42
4) Be ready to get installation.
Page 43
43
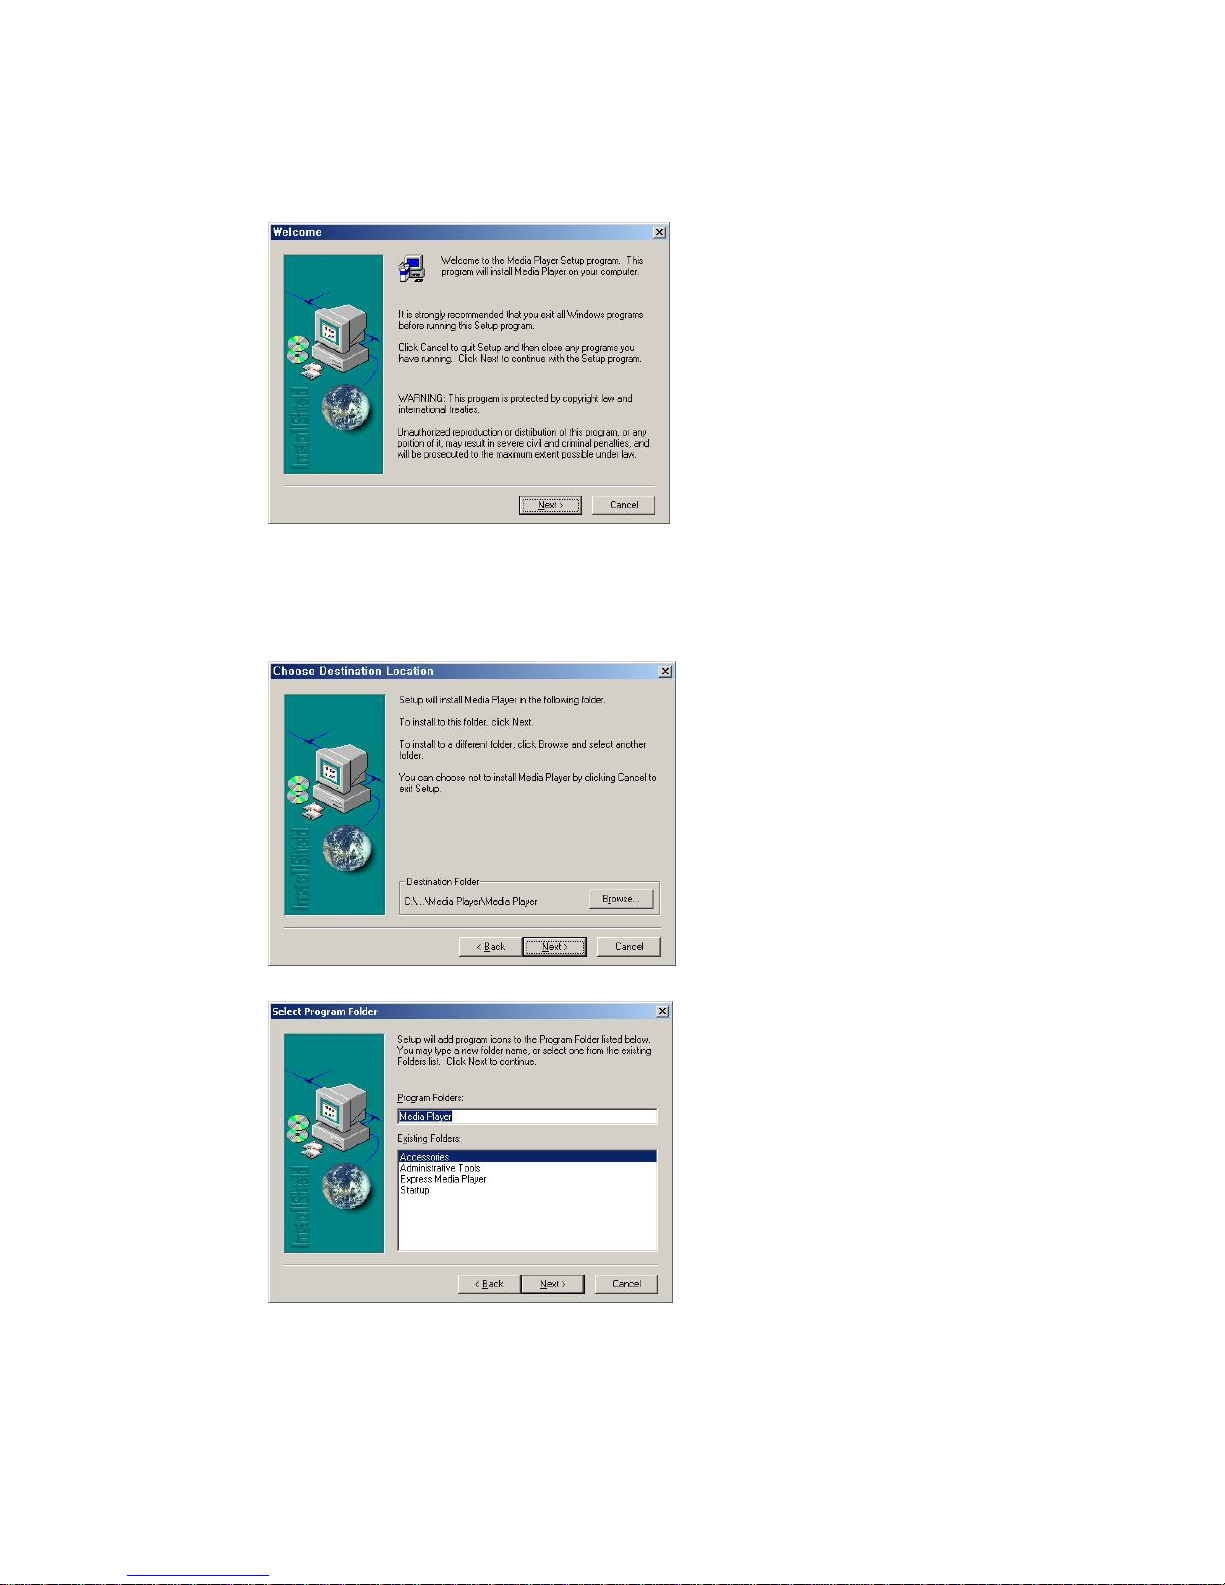
5) Press a <Next> button.
6) Press <Next> button.
(To change the directory of installation, press <Browse...> button as below
and set the directory)
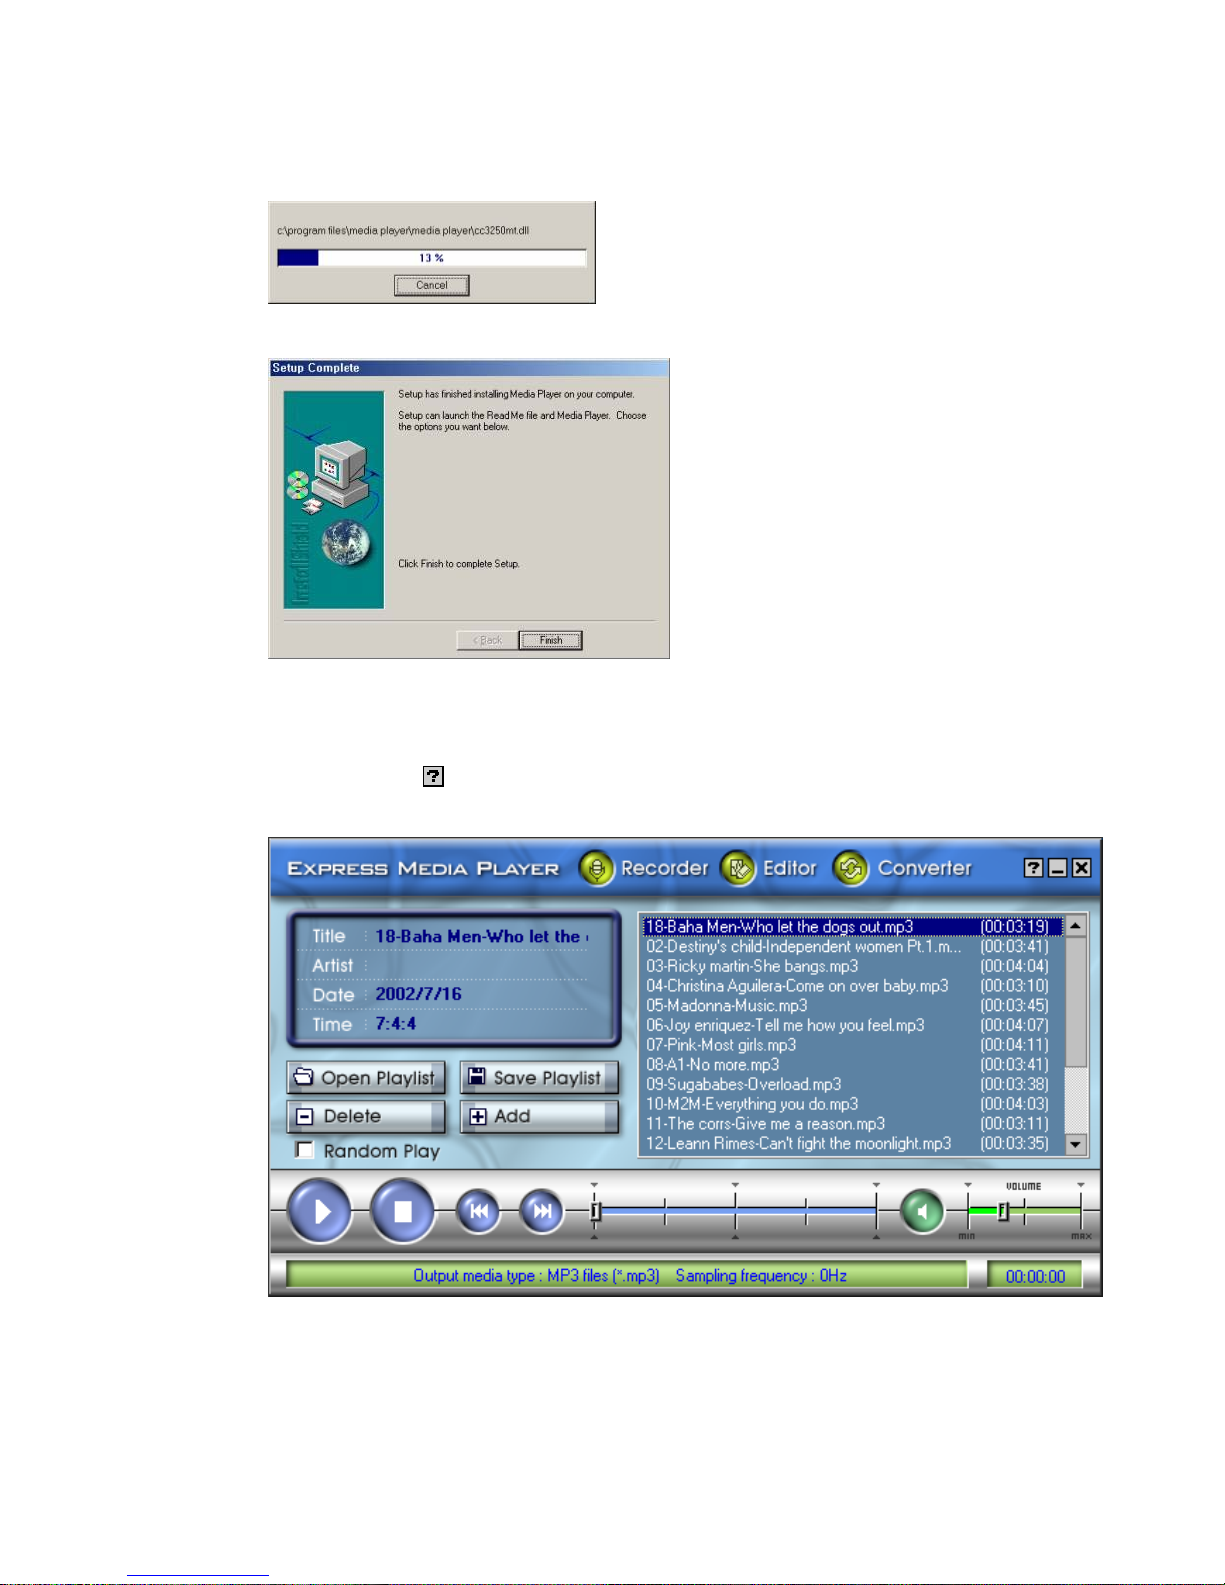
7)Press <Next> button, file will be copied.
Page 44
44
8)Press <Finish> button to finish the installation.
PPllaayybbaacckk tthhee rreeccoorrddeedd ffiillee
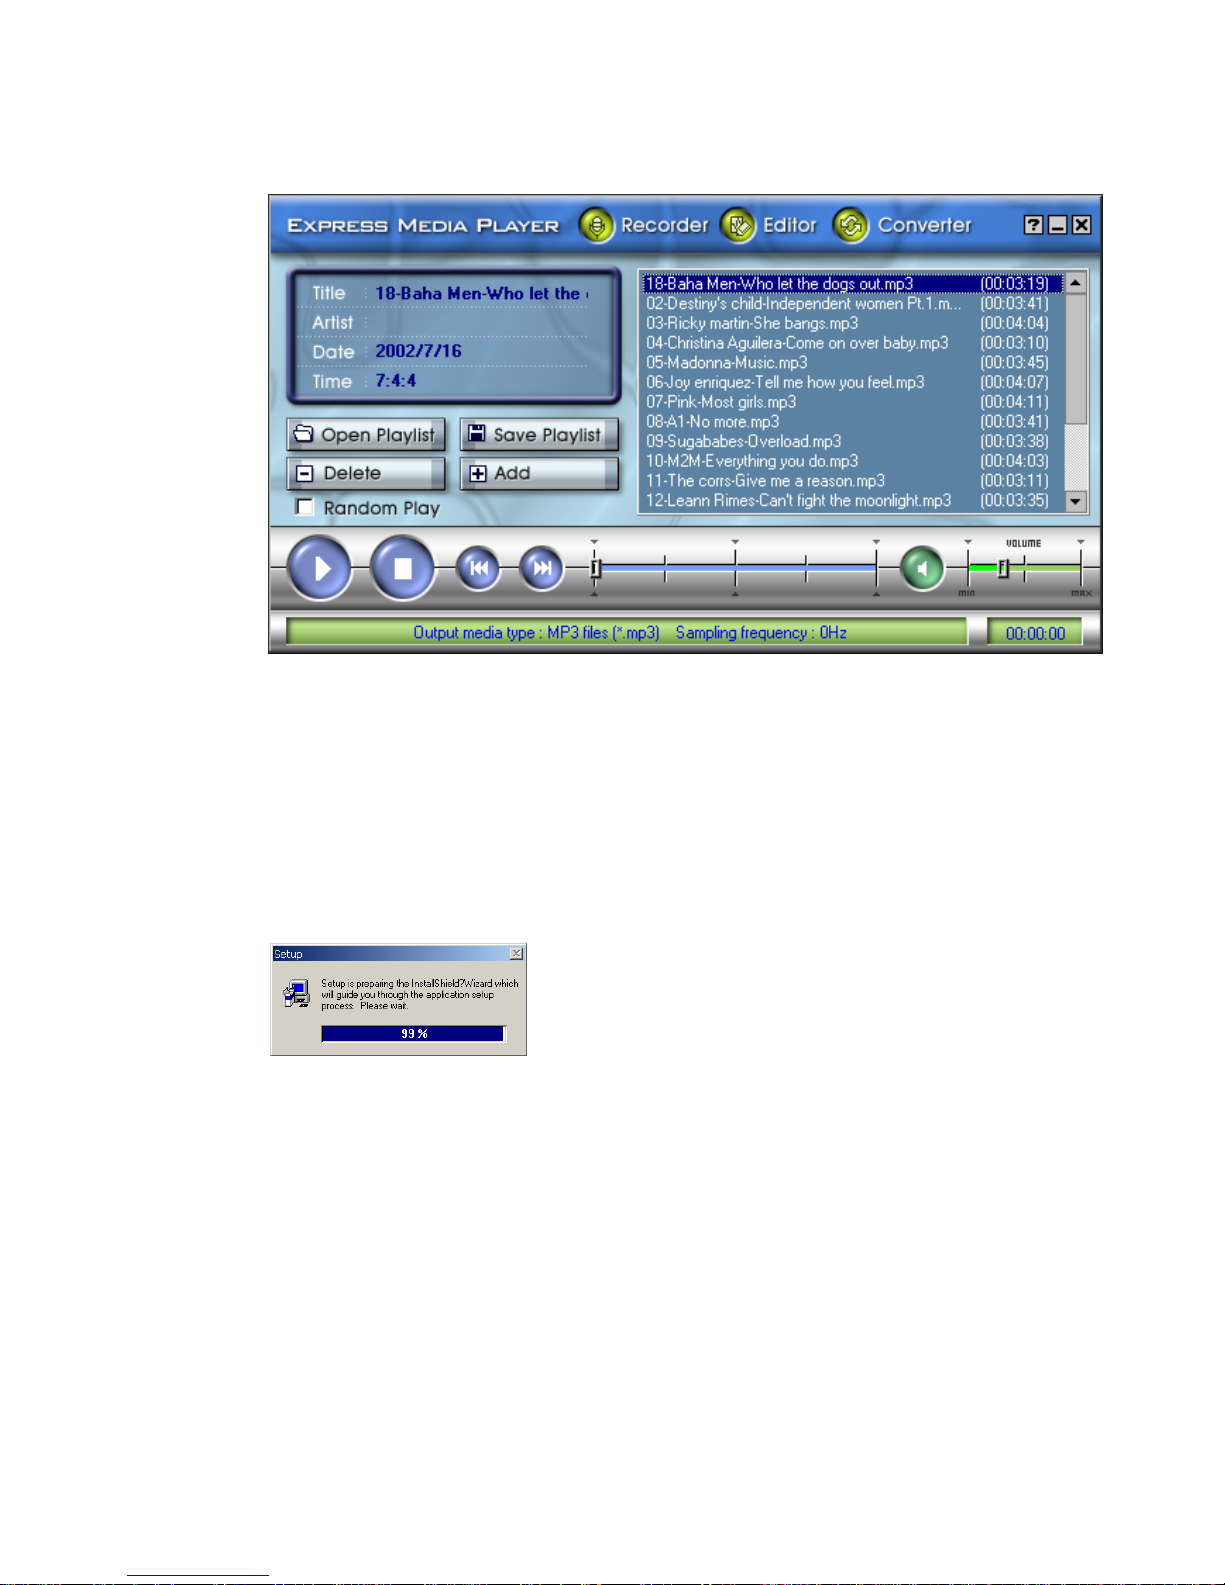
After installation, Basic screen is as belows. Detailed usage descriptions are
followed in “
“ button placed the right top side of Express Media
Player.
Page 45
45
SSppeecciiaall UUttiilliittyy
SSppeecciiaall UUttiilliittyy IInnssttaallllaattiioonn
1) All running programs should be closed before installation
2) Select ‚Special Utility’ of installation program menu in the CD,
installation will start.
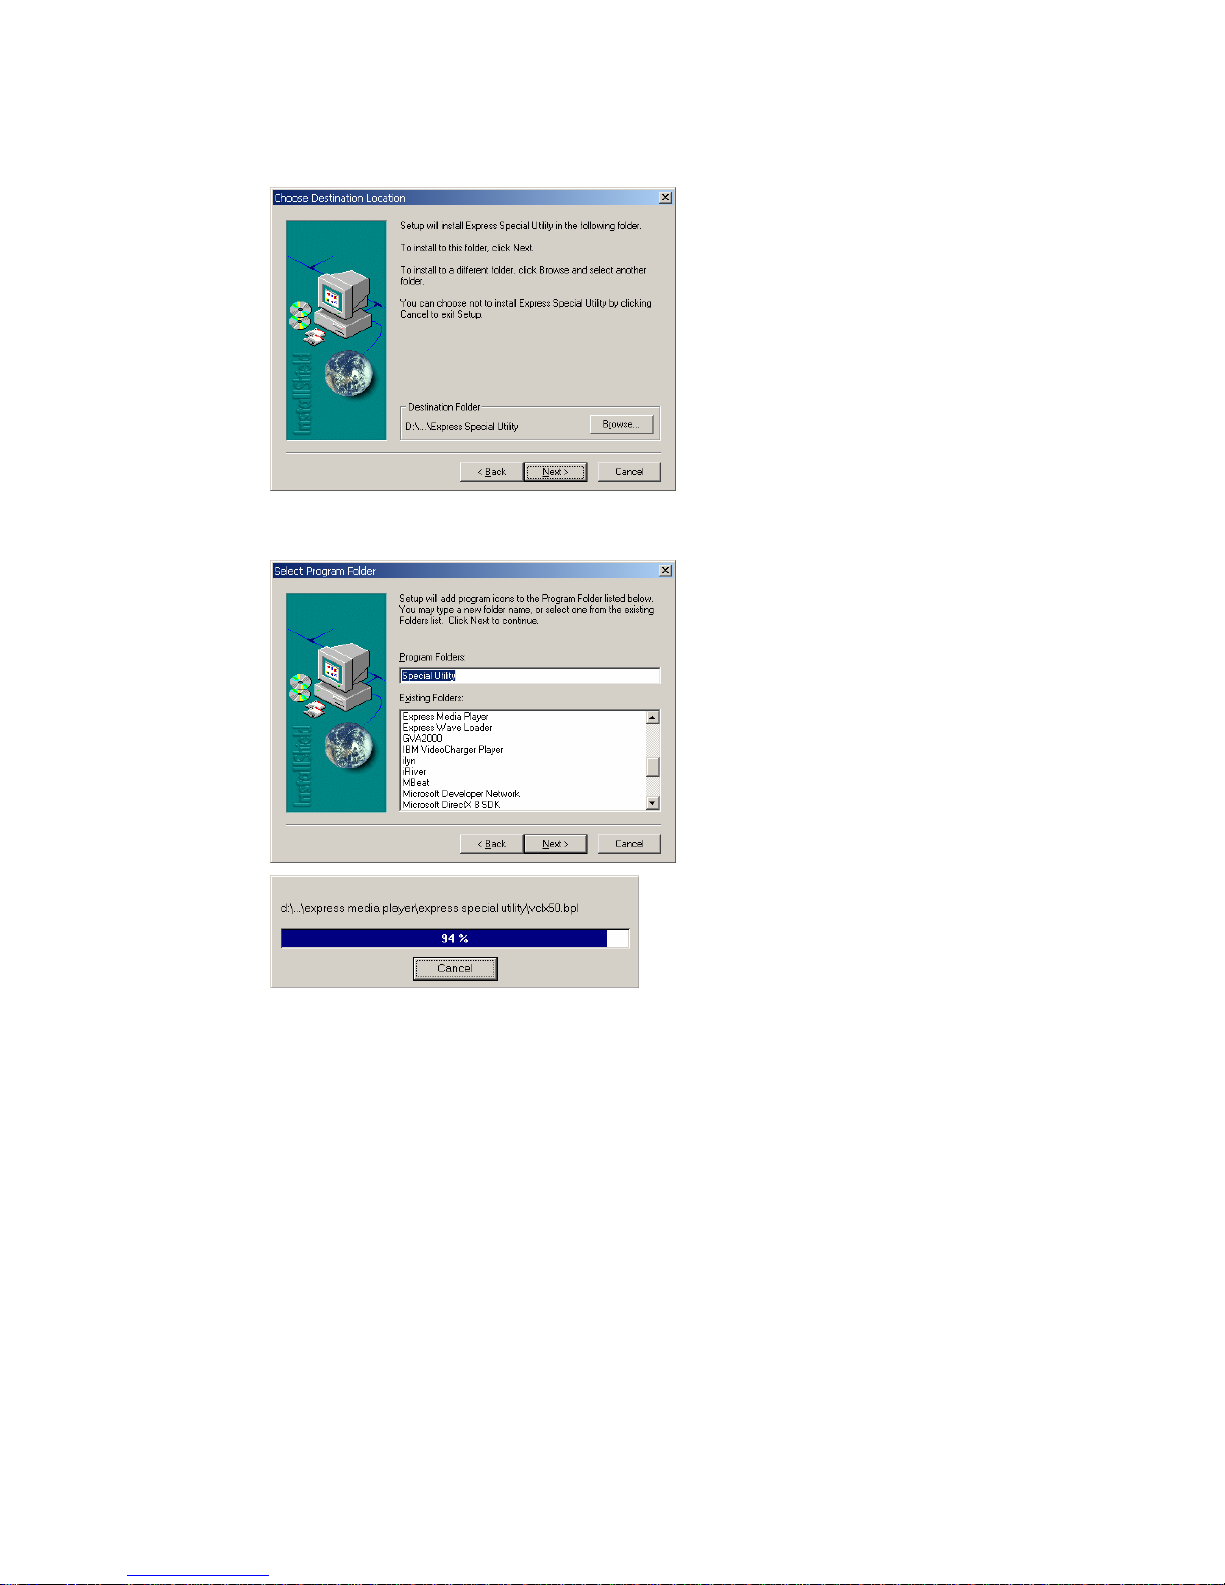
3) Preparing to install
4) Press <Next> button
(To change the directory of installation, press <Browse...> button as below and
set the directory)
Page 46
46
5) Press <Next> button, then, the installation will be completed after file
copy.
Page 47
47
SSppeecciiaall UUttiilliittyy EExxeeccuuttiioonn
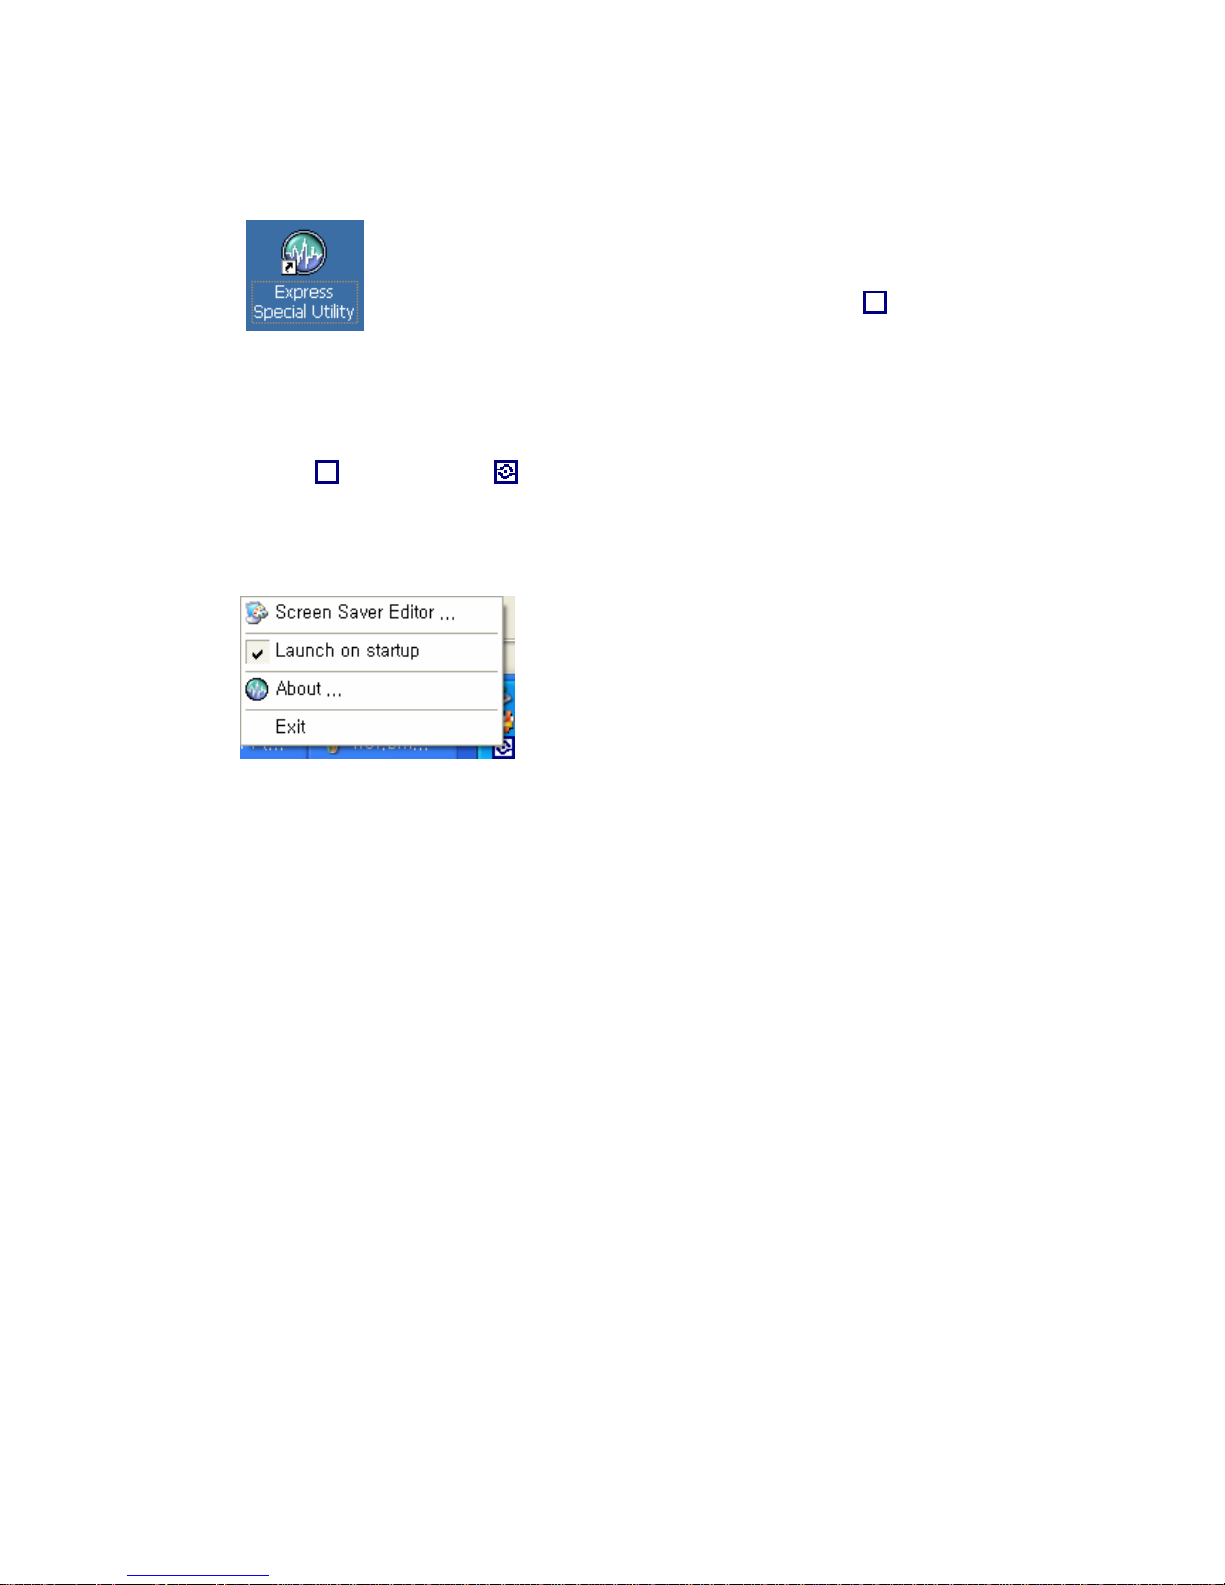
1.The icon „Express Special Utility“ will be created on the PC
background when the instalation is completed.
2. Double click the icon and execute it, the icon
will show up
in System Tray.
CCoonnnneeccttiinngg ttoo PPCC
1. If player is connected to PC, the state icon will be changed like below
: Before : After
Note : In case of using Windows 98, please install the driver refering to the
part „Mass Storage Driver Installation for Windows 98“.
2. Utility menu will show up if place mouse point on state icon and click right
button.
1) Screen Saver Editor : Edit the picture to make user selected picture be
displayed on the LCD.
2) Launch on startup : In case of selection of this menu, program will be
automatically executed when the system starts
Page 48
48
Using Screen Saver Editor
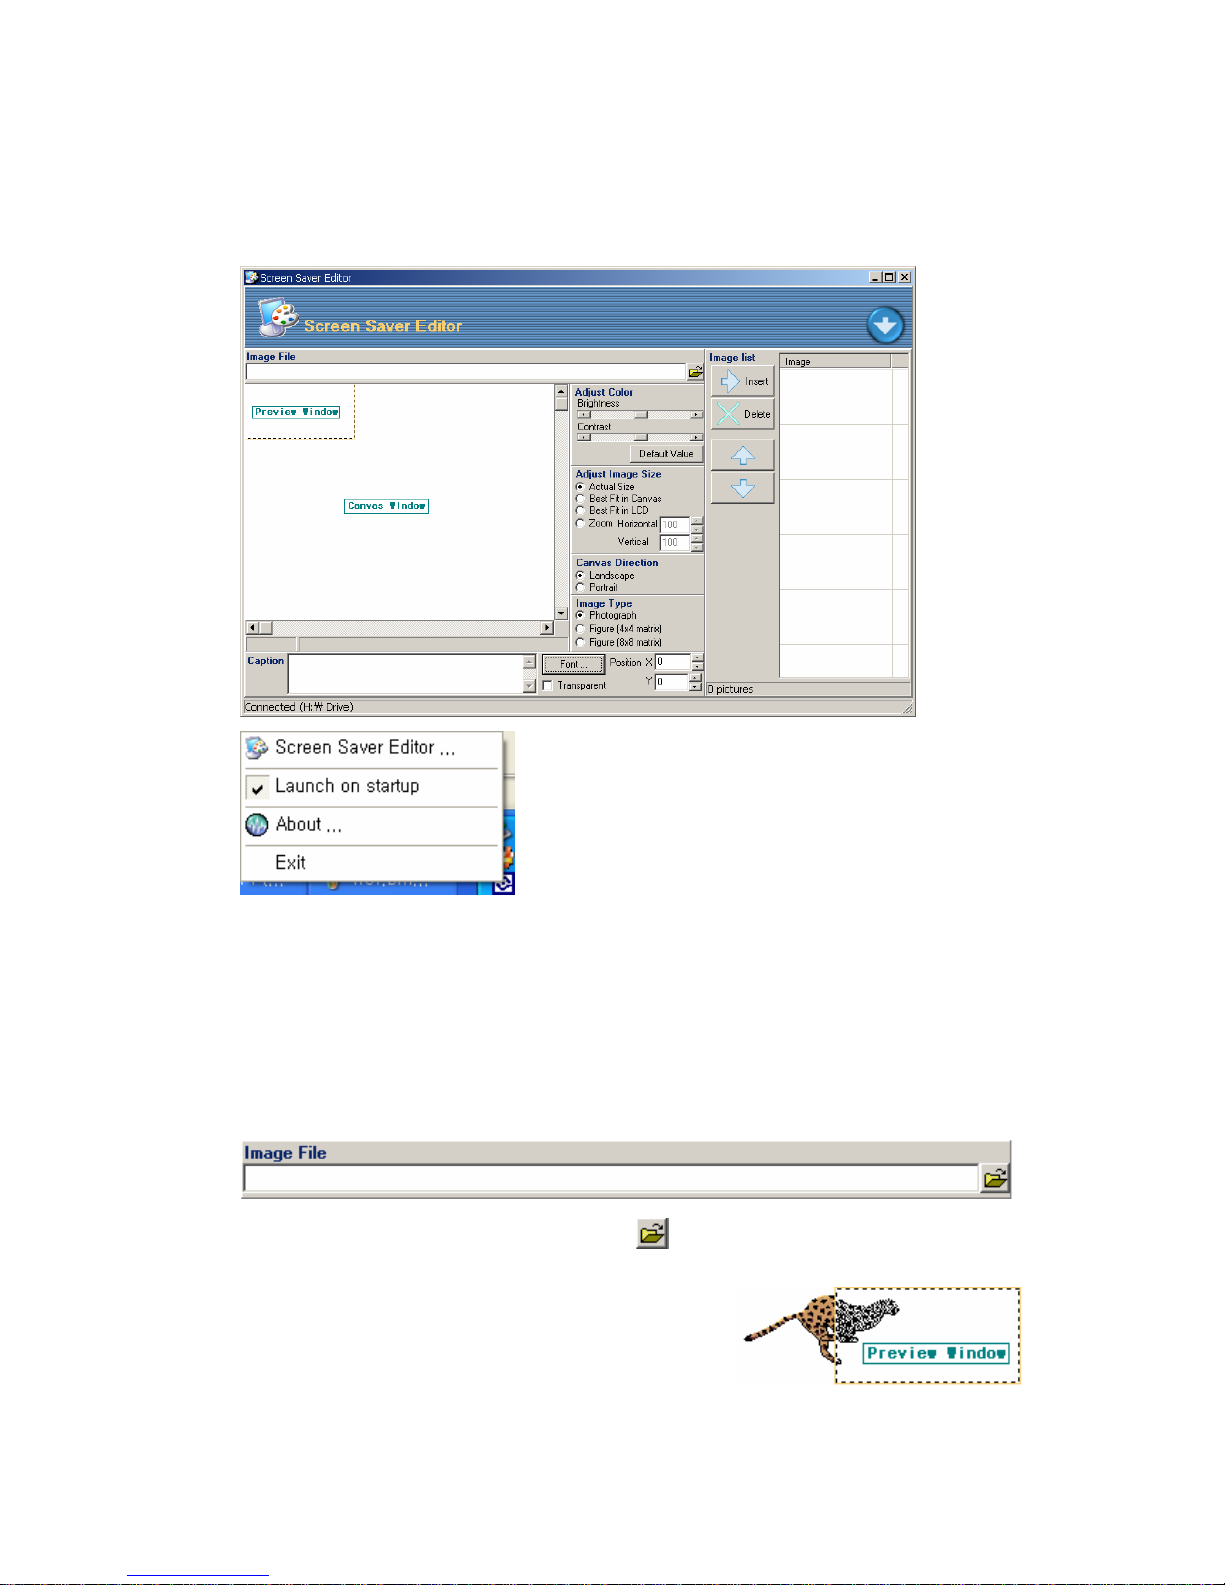
Edit the picture to make user selected picture be displayed on the LCD.
Screen Saver Editor will be executed when select „Screen Saver Editor“ in state
icon menu.
1) Opening Image File
Import the file to be edited by pressing button
2) Preview Window
Preview the file to be displayed on the LCD.
3) Color Adjusting
Adjust the Brightness and Contrast of Image.
Page 49
49
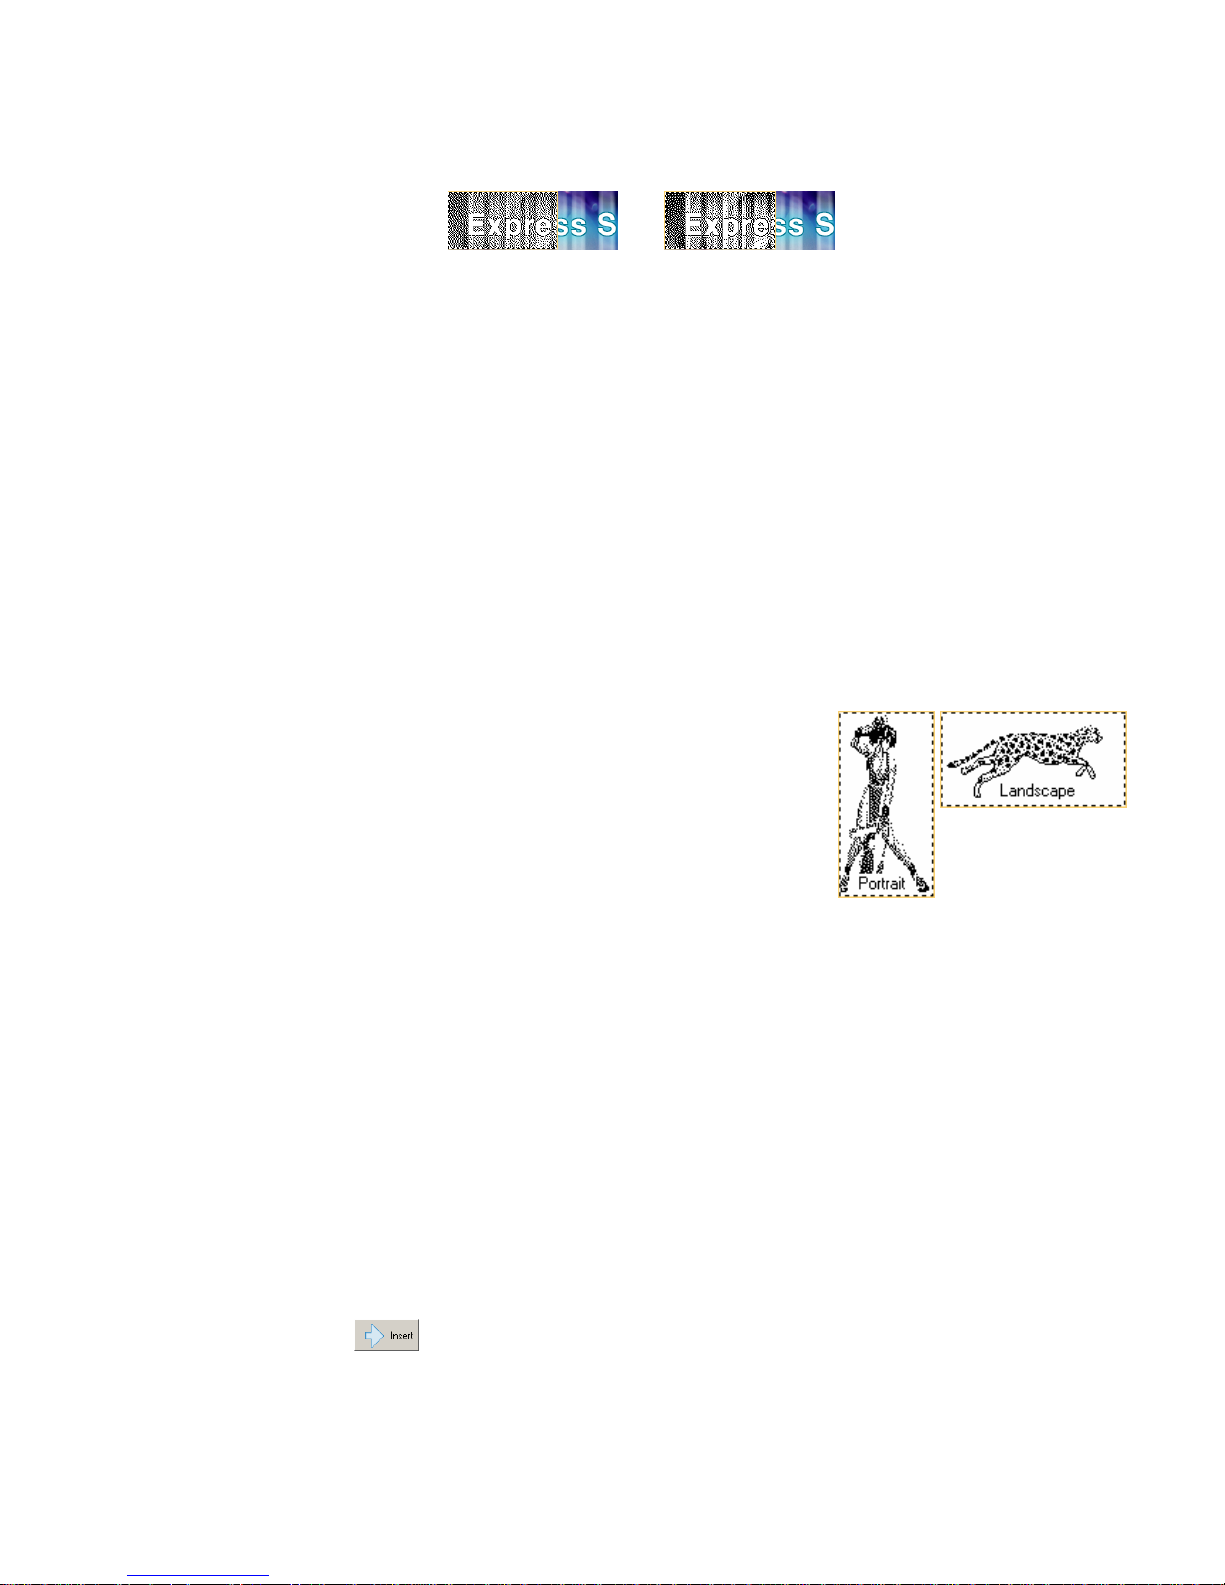
<Before Adjusting> <After Adjusting>
4) Image Size Adjusting
Adjust the image size what user want.
- Actual Size : Adjust the size as same with original one.
- Best Fit in Canvas : Adjust the size same with Canvas window.
- Best Fit in LCD : Adjust the size same with Preview window.
- Zoom : Adjust the image size into what user want.
5) Caption
Insert the caption into the image
- Caption Input Window : Input the caption in it.
- Position X,Y : Select the location where the caption is displayed.
- Transparent : Display overlapped image between caption and background.
- Font : Select the font of caption.
6) Image Direction
Adjust the direction of image.
- Landscape : Adjust the image direction into horizontally.
- Portrait : Adjust the image direction into vertically.
7) GIF Animation
There are several images saved in one image file if the GIF supports animation.
- Show Animation : Use it when edit the images altogether.
- Show each frame : Use it when edit only one image.
8) Image Type
Select the transformed type depending on original image type.
- Photograph : Select it if the original image is photograph.
- Figure : Select it if the original image is figure(diagram).
9) Image List
If save the edited image into player, the saved image will display on the LCD
when Screen Saver is on.
- Insert
: Add the edited image into the Image List.
Page 50

50
- Delete
: Delete the selected image from the Image List.
- Changing Order
: Change the order of selected images in Image
List.
10) Saving
Save the edited image list in palyer.
Page 51

51
SSppeecciiffiiccaattiioonn
Item Description
Channel Stereo
Frequency Range 20Hz ~ 20KHz
Earphone output 10mW + 10mW(16 ohm)
Speaker output 180mW(16ohm)
Audio
S/N Rate 90dB (MP3)
Model
Description
64MB 128MB 256MB 512MB
SHQ 1Hrs. 05Min 2Hrs.10Min 4Hrs.25Min 8Hrs. 50Min
HQ 2Hrs. 10Min 4Hrs. 25Min 8Hrs. 50Min 17Hrs. 40Min
MQ 4Hrs. 25Min 8Hrs.50Min 17Hrs.40Min 35Hrs.20Min
Time
LQ 22Hrs.45Min 45Hrs. 30Min 91Hrs. 182Hrs.
SHQ : 128 Kbps(Mono or Stereo)
HQ : 64 Kbps(Mono or Stereo)
MQ : 32 Kbps(Mono)
Recording
Sound Quality
LQ : 6 Kbps(Mono)
Formats MPEG 1/2.5 Layer3, WMA
Bit Rate 8Kbps ~ 320Kbps(MP3), 32Kbps ~ 192Kbps(WMA)
File Support
Tag ID3 V1 Tag, ID3 V2 2.0, ID3 V2 3.0, ID3 V2 4.0
Frequency Range 87.5~108MHz(Korea, U.S.A, Europe), 76~90MHz(Japan)
Earphone output 5mW x 2ch
S/N Rate 50dB
FM Radio
Antenna Earphone Antenna
System Pentium 133MHz, RAM64MB, 20MB Hard Disc
OS Win98/ME/2000/XP
PC I Interface
Sound Card Sound Blaster
Power Battery LR03 Type( AAA Size ) X 2 개
Size(W*H*D) 100mm X 42mm X 13mm
Weight 49 g (Battery Excluding)
Operating Temp. -0 °C ~ 40 °C
Memory 64M, 128MB, 256MB, 512MB Internal Memory
USB USB 1.1
Speaker : Approx. 20Hrs.(128kbps, Normal EQ, Vol.: 10)
MP3 Playing
Eearphone : Approx. 21Hrs(128kbps, Normal EQ, Vol.: 10)
Speaker : Approx. 27Hrs(Vol.:10) Voice Record Playing
(LP Mode)
Eearphone : Approx. 28Hrs(Vol.:10)
Voice Recording
(LP Mode)
Approx.16Hrs
General
Battery life
Radio Listening Approx. 31Hrs
Page 52

52
Note : It depends on the battery type and the using condition(Above data is
according to the manufacturer’s standard)
TTrroouubbllee sshhoooottiinngg
Problem Cause Action
No stable sound
* Check the battery
voltage
* Some problem exists
on file itself.
* Memory format is not
properly worked.
* Replace with a new battery.
* Do upload and playback in Manager program
case of the same problem which is
happened, please delete and download
again.
* After formatting the memory, download
again the song.
Difficult to
download the
file
* Check the battery
shift
* Poor battery
* Check hold key
* Check battery polarity
* Replace with a new battery
* Release Hold key
No response from
button
* Check the battery
shift
* Poor battery
* Check hold key
* Check battery polarity
* Replace with a new battery
* Release Hold key
No Playback
* Volume set is very low
* USB connected
* Do control a proper volume set
* Remove the USB cable from Unit
The contents of this User’s Manual has a chance to alter without any
notification for quality improvement.
 Loading...