

Dynavin N7 Pro platform Owner's Manual
Pro platform

Contents
General Information................................................................................................................................................3
General Safety Instructions
Product Features
Installation Instructions
2 Din Most-connections
1 Din Connections
2 Din Connections
Button Functions (Front Panel)...........................................................................................................................10
First Steps..............................................................................................................................................................11
System Settings.................................................................................................................................................... 12
Main Menu............................................................................................................................................................. 20
Moving Icons........................................................................................ .....................................................................21
Radio Function...................................................................................................................................................... 22
Radio Options...................................................................................................................................................23
CD/DVD Function................................................................................................................................................. 24
CD/DVD Video Playback................................................................................................................................ 26
Phone Function.....................................................................................................................................................27
....................................................................................................................................................
...................................................................................................................................
...........................................................................................................................................
.....................................................................................................................................
..............................................................................................................................................
..............................................................................................................................................
5
6
7
7
8
9
Button Functions (Phone Menu).................................................................................................................... 28
Contact Options from Phonebook................................................................................................................. 29
Call History....................................................................................................................................................... 30
Phonebook
Bluetooth® Setting Menu
iPod® Function
Functions of the iPod® Menu.........................................................................................................................34
Display Symbol for Repeat............................................................................................................................. 35
Display Symbol for Shuffle............................................................................................................................. 35
iPod® Options Menu....................................................................................................................................... 36
Album Menu .................................................................................... ....................................................................37
Artist Menu ...................................................................................... ....................................................................38
Song Menu ......................................................................................................................................40
Playlist Menu.................................................................................................................................................... 40
USB Function........................................................................................................................................................ 41
Functions in USB mode.................................................................................................................................. 42
USB Options.....................................................................................................................................................43
........................................................................................................................................................
...............................................................................................................................
.....................................................................................................................................................
31
32
33
Album Menu ...................................................................................................................................44
Artist Menu .....................................................................................................................................45
Song Menu .....................................................................................................................................46
Video Playback Menu .....................................................................................................................47

2
Image View Menu............................................................................................................................................47
Folder Structure Menu.................................................................................................................................... 50
SD-Card................................................................................................................................................................. 51
Album Menu..................................................................................................................................................... 52
Artist Menu........................................................................................................................................................53
Song Menu....................................................................................................................................................... 54
BT Audio Function.......................................................................................................................................... 55
AUX Function...................................................................................................................................................... ..56
Internal Memory
Album Menu ...................................................................................................................................58
Artist Menu .....................................................................................................................................59
...................................................................................................................................................
57
Song Menu
Folder Options
Menu Function
Copying Files to Internal Memory..................................................................................................................62
Navigation
Navigation Software Path.................................................................................................................................... 63
Navigation Start-Up......................................................................................................................................... 64
Sound Settings......................................................................................................................................................65
Fader – Balance – Delay................................................................................................................................ 66
Bass – Middle – Treble................................................................................................................................... 67
Equalizer........................................................................................................................................................... 68
Source
Other Settings
........................................................................................................................................................................
DAB
.....................................................................................................................................................................
DVB-T
...........................................................................................................................................................................................
OBC
.......................................................................................................................................................
......................................................................................................................................................
.................................................................................................................................................
................................................................................................................................................................................
...............................................................................................................................................................
..................................................................................................................................................
60
61
62
63
69
70
71
71
72
Time Synchronization (except MC2000)........................................................................................................... 73
Updating Unit Firmware....................................................................................................................................... 74
Product Specification ...........................................................................................................................76
FAQ / Troubleshooting.........................................................................................................................................78

3
General Information
Thank you for choosing Dynavin.
The Dynavin brand has existed for over 11 years and has developed into one of the best retrofit
equipment manufacturers. In 2008, Dynavin began based on an idea to offer drivers an OEM-look
multimedia radio system not only with significantly better features than the original system, but also
with the same optical performance. Dynavin continuously works to improve its products allowing
Dynavin head units to be offered to over 30 models and currently have the largest technical standard
on the market.
We have paid special attention to your personal safety during the development of Dynavin products
combined with maximum ease of use, modern design, and the latest technology possible. However,
please be aware if installed, used, or handled improperly, injury and/or damage may occur. Please
read this instruction manual completely and carefully and keep it with you!
This product meets the requirements of the applicable European and national guidelines. Conformity
has been established and the relevant documents and explanations are available from the
manufacturer.
Dynavin features, software, and performance is subject to change at any time without notice in the
interest of technical progress and adapting to the vehicle market. Before installing the unit, please
review the legal regulations in your country. Non-compliance with the law may lead to significant
penalties.
Dynavin and its recognized partners, resellers, and distributors are not liable for any direct or indirect
damages or losses nor responsible for costs or fees resulting in reinstallation, uninstallation, and/or
diagnosis. All necessary installation steps are performed upon customer request with the knowledge of
the possible product incompatibility or that the product’s operations can vary depending upon vehicle.
Dynavin or its recognized distributors and dealers are not responsible for installation and removal costs
or losses. Despite all efforts and various testing carried out by Dynavin and its recognized
partners, suppliers, and distributors cannot guarantee 100% compatibility with all original features on
all vehicles or equipment variations of the specific models.
If the electrical system in your vehicle suddenly has an irregular or improper function, unplug the
product from the vehicle electronics and call for an inspection at an authorized workshop.
For warranty or repairs, please contact your dealer or distributor. Please save your original packaging.
Note: You must first contact your dealer/distributor before returning and follow their specific return
requirements (RMA procedure).
Any of the following will void your warranty:
a) Tampering with the device or accessories without the approval of the manufacturer or its partners
b) Opening the housing of the device
c) Repairs to the device not performed by the manufacturer or its partners
d) Improper usage or operation
e) Physical or water damage to the device due to dropping, willful damage, accident, flooding, fire, etc.
Install in accordance with all safety regulations and legal provisions.
For your safety:
Ensure the installation is carried out only by a trained specialist. Installation should only be performed
when vehicle is de-energized. In certain installations, the battery must be disconnected from the
electrical system. Be sure to check the provisions of the vehicle manufacturer as changing the vehicle
electronics may result in loss of warranty.

4
Never use safety-related connections or mounting points such as steering, braking systems, or other
Class 1
Laser Product
vehicle-related safety components for your safety and the safety of others. Connect the device only to
those car-specific power and ground points specified by Dynavin.
Avoid settings on the device which may cause distractions to the user while driving thereby
endangering yourself and others. Please review and follow the driving laws of your state/country.
References of Legal Regulations for Operation
Install the device only in the intended domain. The warranty will be voided if the unit is not installed
properly or unapproved alterations are made.
Use only original CD/DVD no Mini-Disks or other shaped disks. This can damage the disk drive of the
unit.
The CD/DVD drive may have shipping screws inserted on the top side of the unit. Remove these
before installation otherwise no media can be introduced into the drive.
Marking of products using laser scanners
This marking indicates the contained components in the appliance
using a weaker class 1 laser for scanning media.
Declaration of Conformity with respect to the EMC regulation ETSI EN301 489
Declaration of Conformity with regard to radio regulation ETSI EN300328
Declaration of Conformity with regard to safety regulation EN60065
5
General Safety Instructions
Warning: opening the device housing will void your warranty unless permission is given
by the manufacturer or distributor.
Do not try to repair the unit yourself. Doing so will void your warranty. If repair is needed,
please contact your dealer or distributor.
Attention! Do not overload the power wiring or extension cables. This is a fire hazard.
Attention! Do not insert foreign objects into the opening of the unit. This is a fire hazard
due to the risk of short circuiting and/or damaging the circuit board.
Attention! If any cable, wire, or connector is damaged, please shut down the unit
immediately, remove power, and contact your dealer.
Attention! If any cable is smashed, please shut down the unit immediately, remove
power, and contact your dealer.
Attention! If the unit makes unordinary noises, smolders, or smells bad, please shut down
the unit immediately, remove power, and contact your dealer.
Attention! Do not put the unit in direct sunlight or near a heater. The unit can be damaged
by high temperatures.
Attention! Be sure that the unit has good airflow. Do not close any openings or obstruct
the vents on the unit.
If you must change a fuse, be sure that the power connection is separated and that you
use the same fuse as before.
Attention! On certain units, a laser is installed. Do not open the case and do not look into
the light. Risk of eye injury.
Attention! Do not use any magnetic parts. Keep all magnetic parts away from the unit.
This may cause lost files or damaged units.
The references in this section apply to most of our products, but not to all. If you have further
questions, please contact your local dealer.

6
Product Features
This unit offers a variety of new functions.
The new Dynavin N7 Pro was developed as a multimedia device with a new
operating system based on Microsoft © Windows known as DynOS with a number
of new optical and technical properties.
Operating system : DynOS – self-programmed system from Dynavin
CPU : 833 MHz
Internal memory : 4 GB
Multitudinous TFT 6.2“ 7“ 9“ or 10.1" Display (varies by model)
7” Resolution: 1024 x 600 16:9
9” Resolution: 1024 x 600 16:9
10.1” Resolution: 1024 x 600 16:9
6.2” Resolution: 800 x 480 16:9
Navigation
Hands-free Bluetooth®
BT Audio Music Playback (wireless audio connection)
iPod© Controlling Connect an iPod ® or iPhone ® via USB with an
Aux-In
SD / Micro-SD slot for navigation and media
USB 2.0
Support depends on the vehicle, the original PDC and camera system
External connections
for music and video playback as well as connection for iPod® and iPhone®
Navi-SW : iGO-Primo (included)
additional connection cable
playback
Video-Out
Audio-Out
A/V-In
Capable of connecting a DAB or DVB-T device with touchscreen control
7
Installation Instructions:
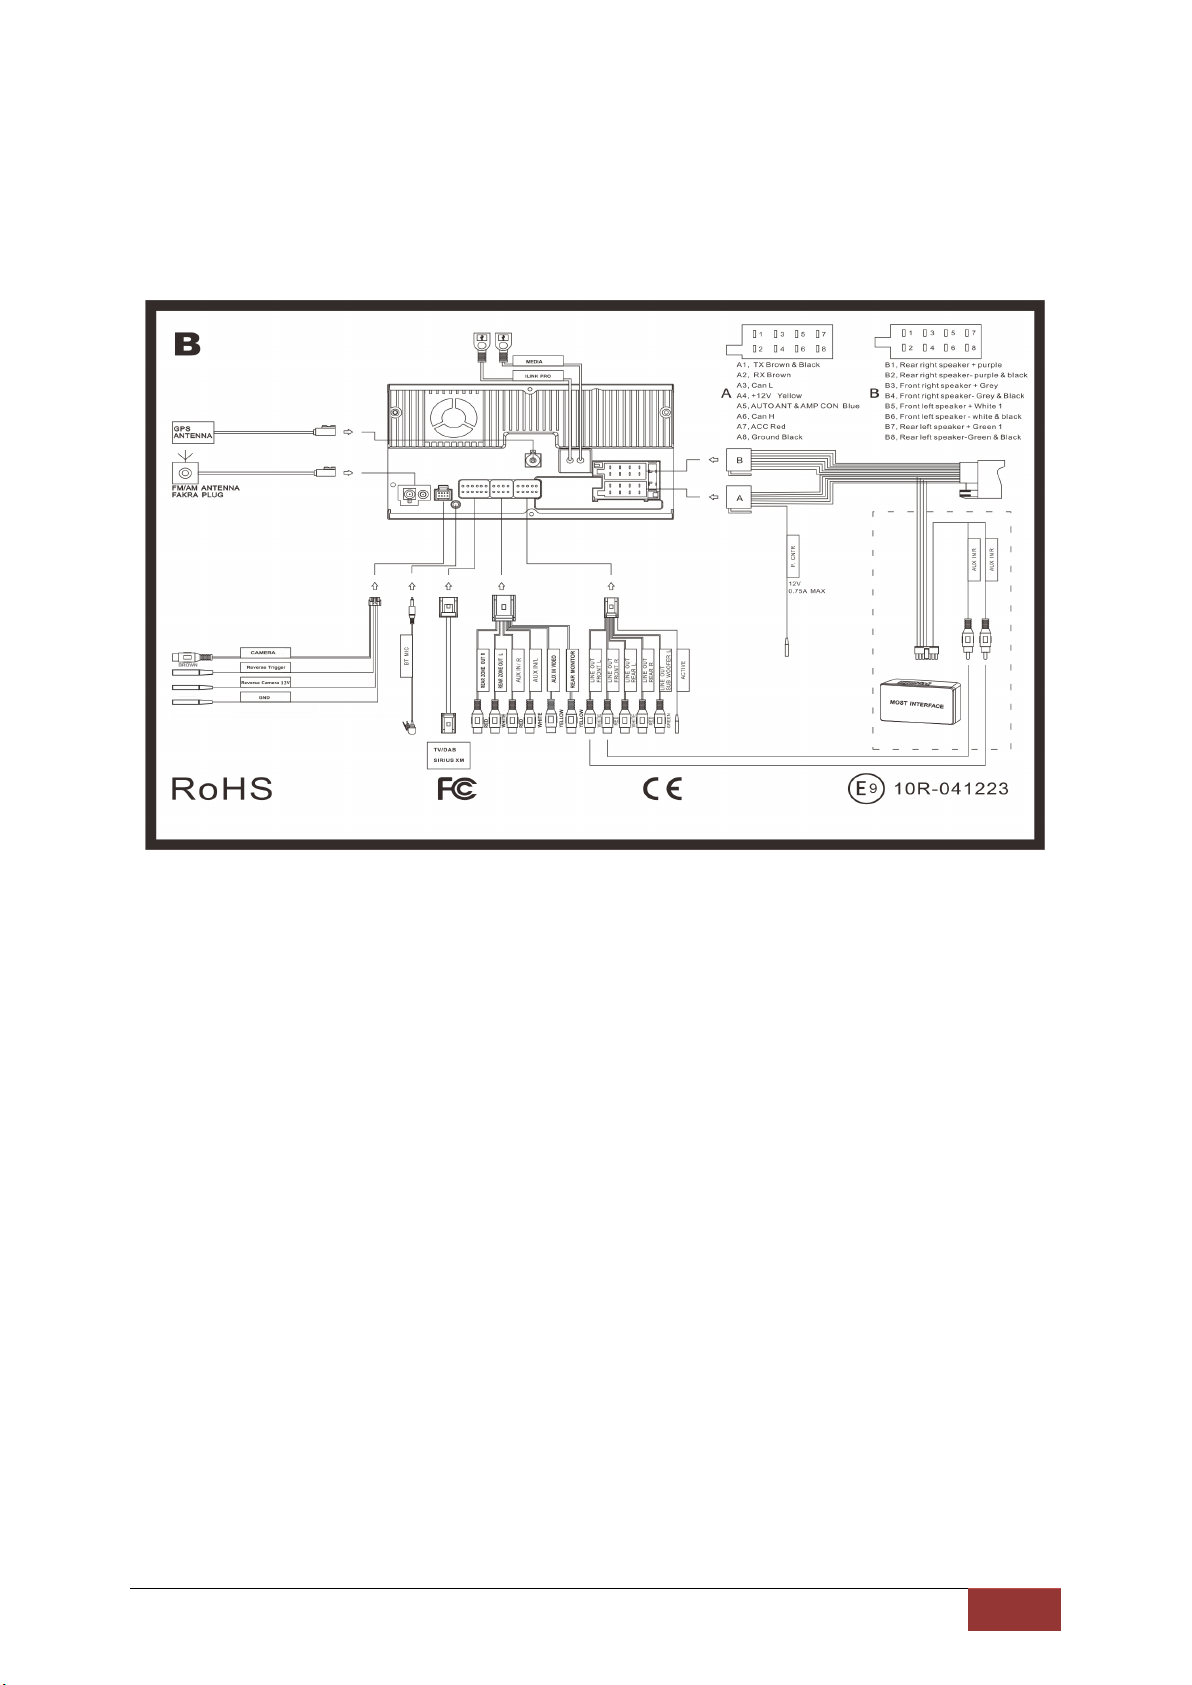
2 Din Most-connections
8
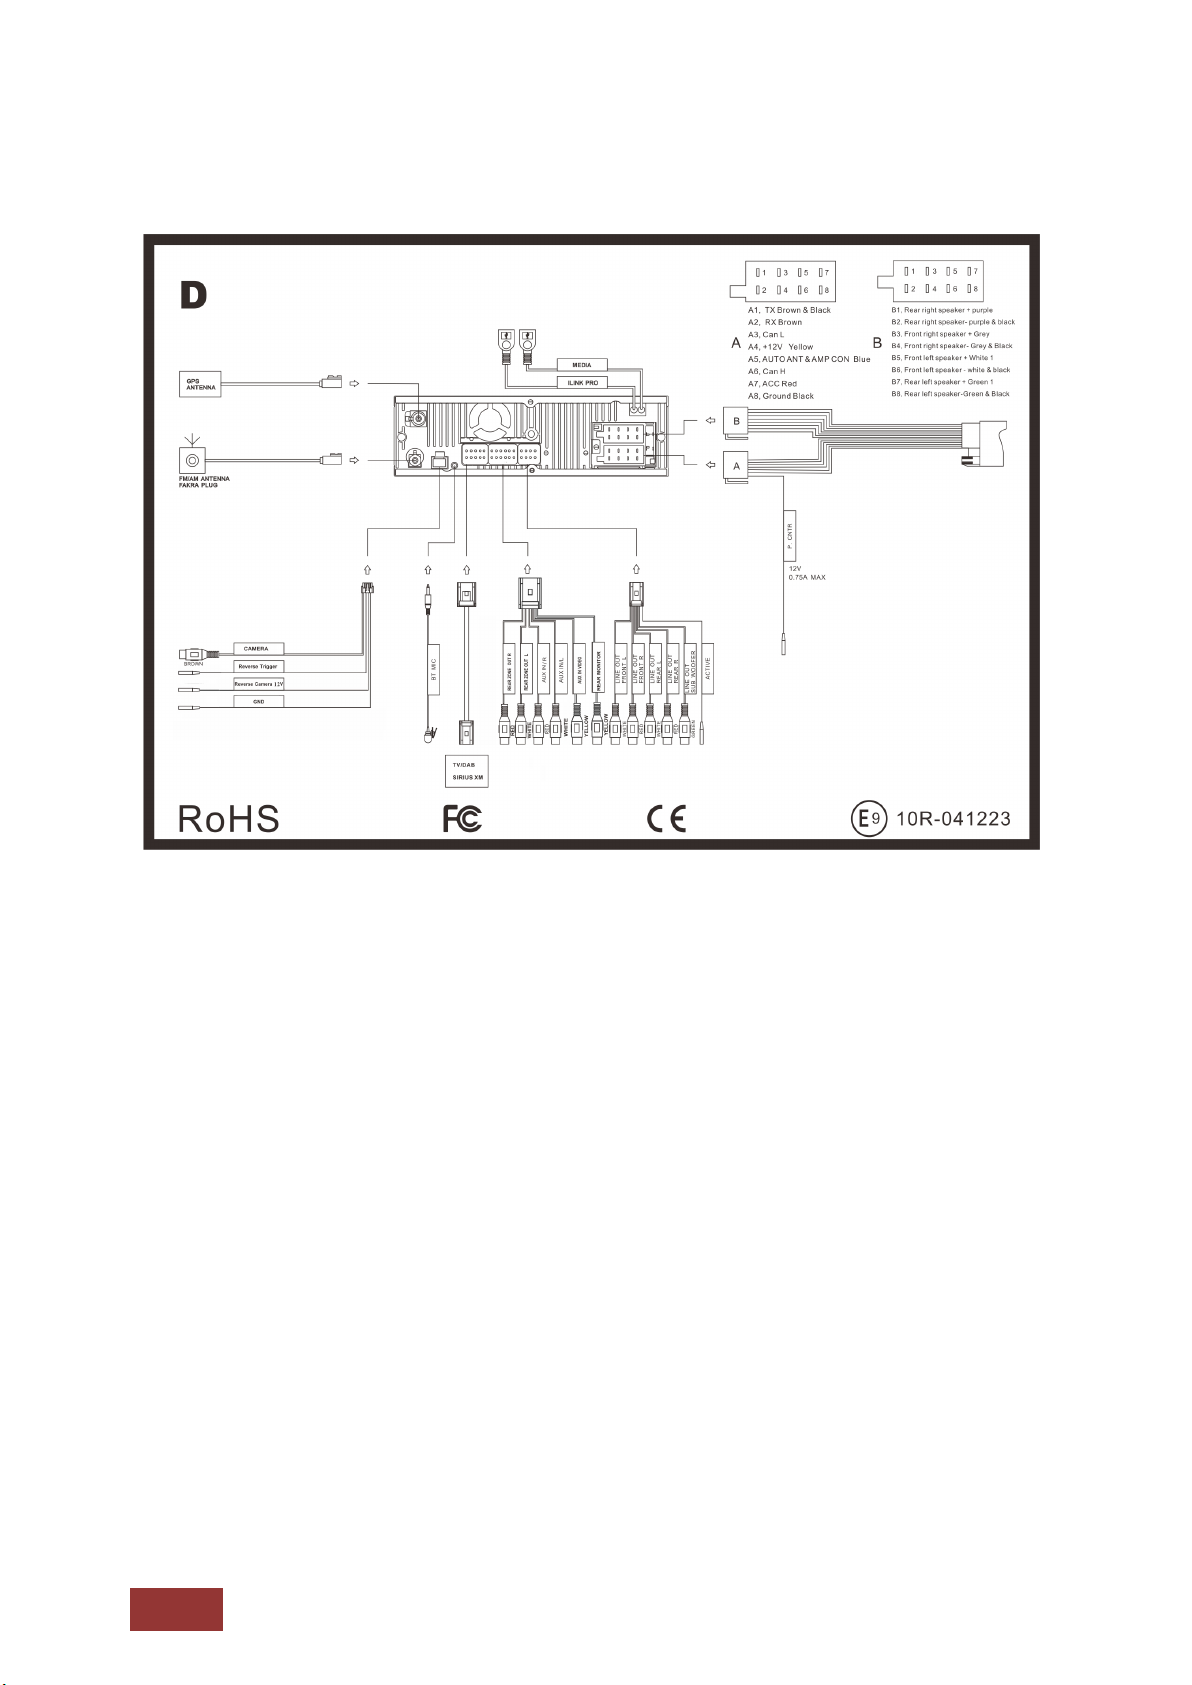
1 Din Connections
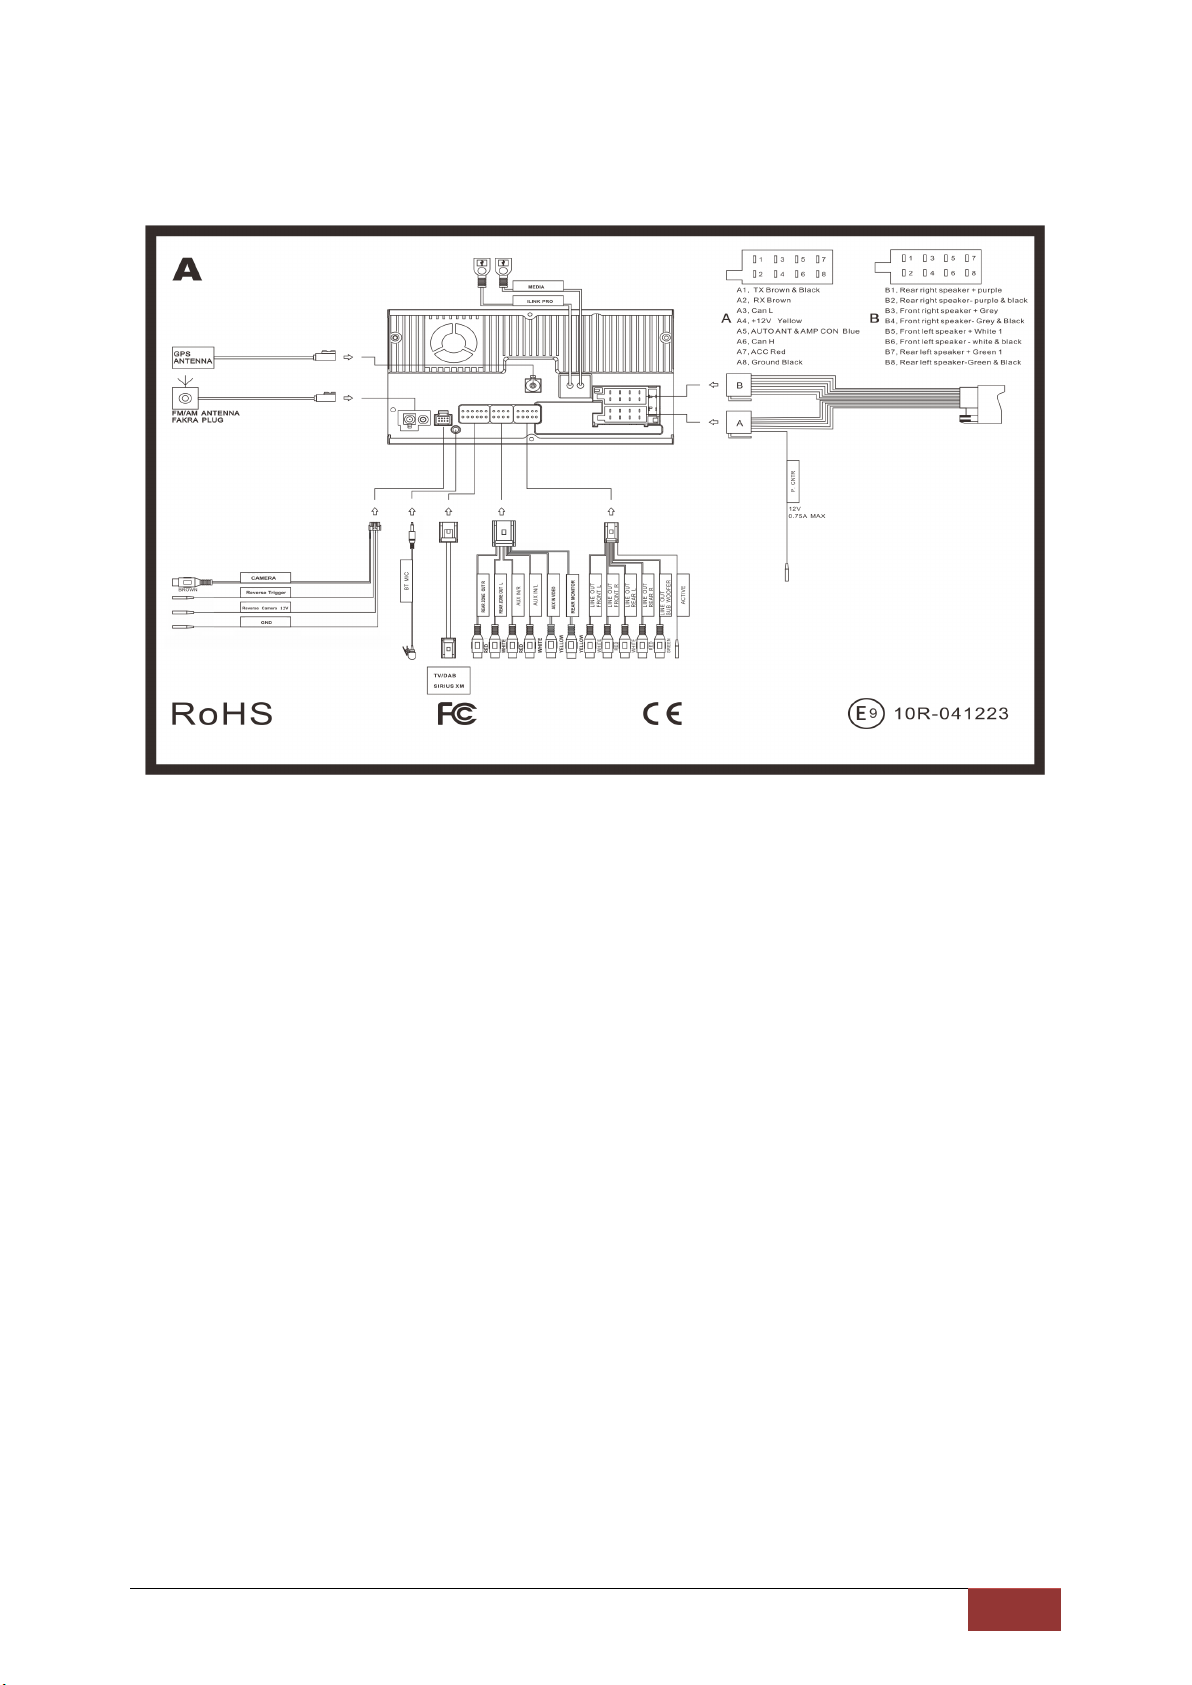
9
2 Din Connections

10
Button Functions (Front Panel)
==Previous track
Next track
=
CD/DVD eject
Disc
==Play/Pause
CD/DVD Option
=
iLink Pro
USB=USB Option
TV=TV/DVB-T Option
SRC
NAV==
Select Source / Main Menu
Navigation start-up
Mute==
Multi-function button
Mute
Radio=Radio source
BND
TEL==
Switching from FM and AM
Phone mode
SD=Opens the SD Card Menu
AUX=Opens the AUX menu
1-6=Radio station memory buttons
The key below varies by Dynavin model. This is a general overview of the keys and their functions.
Right-hand rotary knob
- Press = Phone function
- Turn = (Depending on the function/source selected) For example: Next / Previous for songs
Left knob
- Press = On / Off switch (standby)
- Turn = Adjusts volume
11
First Steps
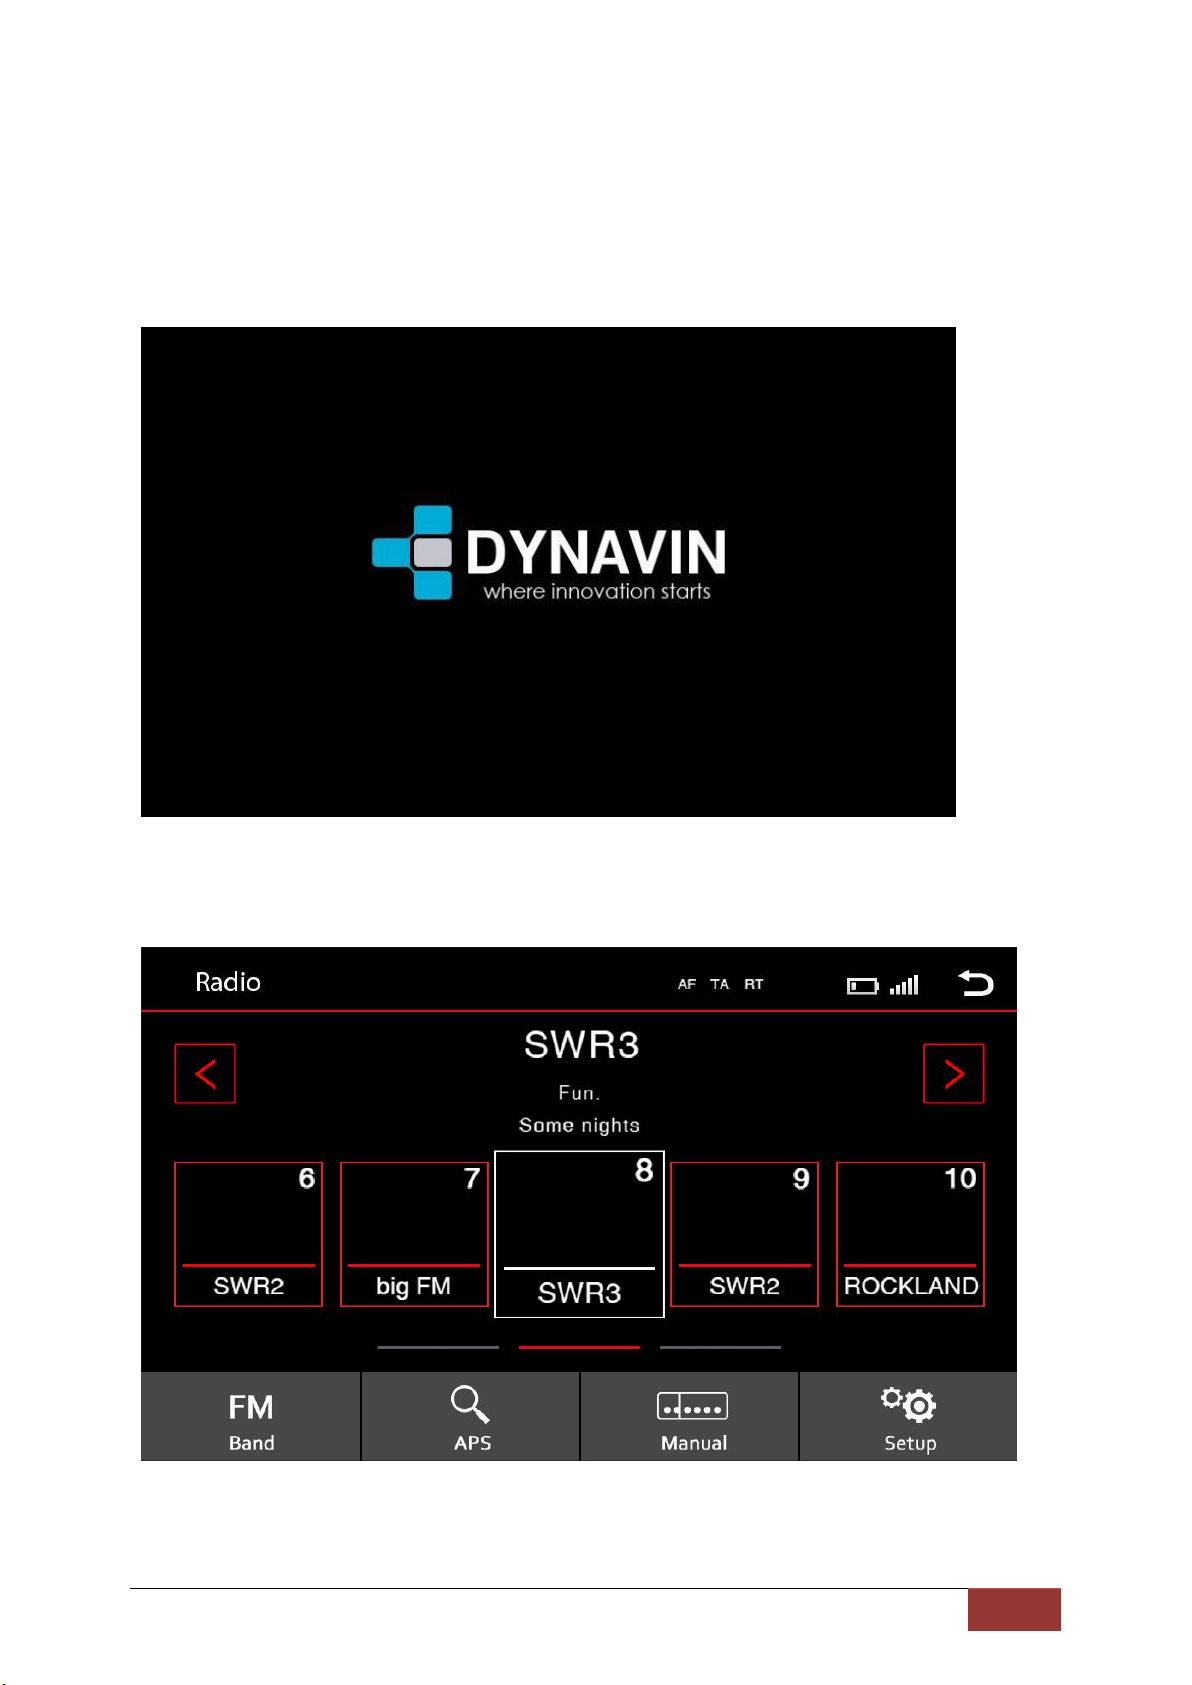
If you have connected the device as indicated, turn on the ignition of the vehicle. The Dynavin will then
boot-up. This may take about 30 seconds the first time. It will begin on the radio screen.
Radio Screen
12
Operating the Touchscreen
As on a smartphone, you can swipe to move left or right. To do this, touch the screen and slide the
surface to the left or right.
Most functions of the Dynavin device are controlled through the touchscreen. Therefore, to ensure the
most accurate possible control, it is recommended that you calibrate the screen.
To calibrate the screen, you will see the icons below. Be sure to perform each function as indicated.
Touch the screen (short)
Touch the screen (long)
Press and hold and move
System Settings
13
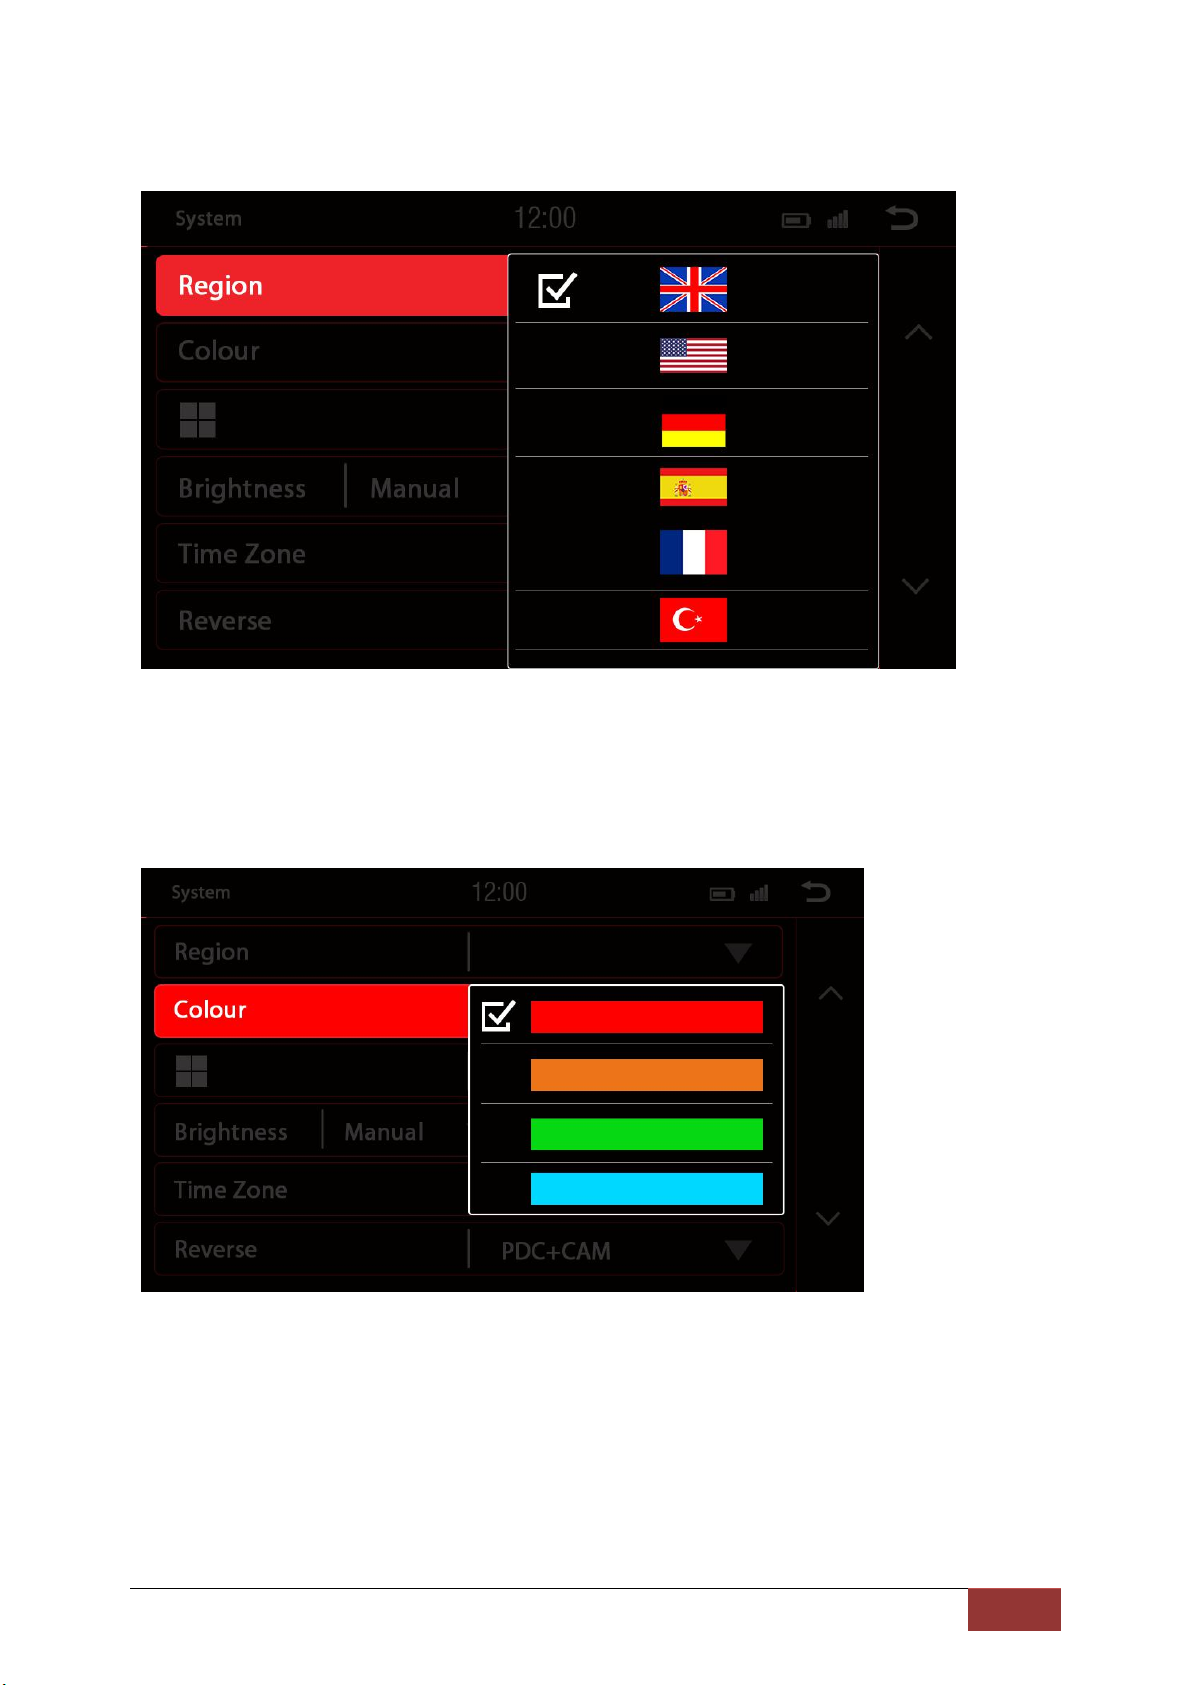
Region
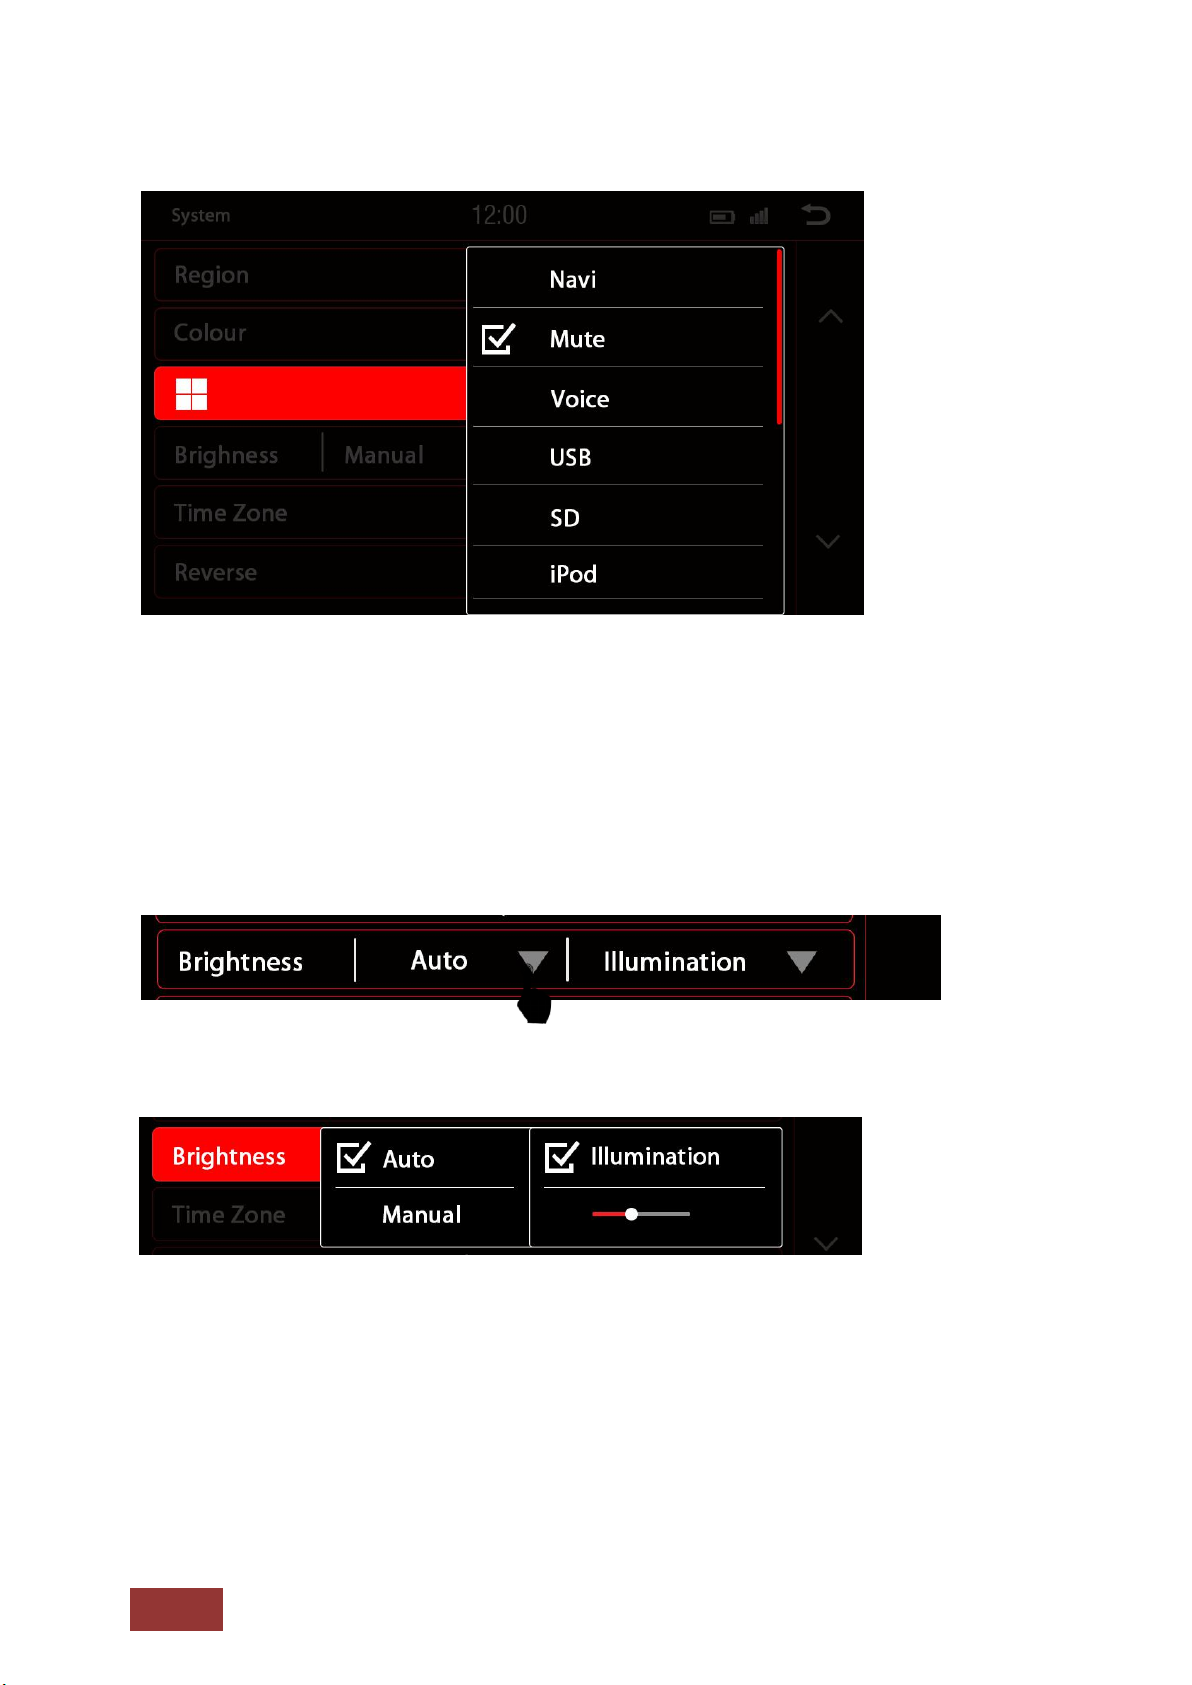
Set your desired device language in the region setting. You have a choice of up to 10 languages.
It is possible that in one of the selected languages the meaning is unclear or the text is too long.
Color
Select a color to change the color of the lines and icon borders on the screen.
14
Multi-Function Button
You can program this button to create a shortcut to a preferred function or mode. (Options are
pictured.) Once programmed, simply press the button to instantly access it.
Brightness
You have several ways to adjust the brightness and control. This includes the dimming function.
First, touch the down arrow key right of the menu item labeled Auto / Manual.
After touching the arrow, there will be a sub-menu.
Depending on the selected function, another option in the settings may be unlocked.
Auto
Manual = Manually adjust the back light
= Automatic dimming function
Illumination = on when lights are turned on
Sensor = light detection in the interior of the vehicle
15
The sub-menu will close automatically once you have completed a selection. If changed, a new button
will be displayed.
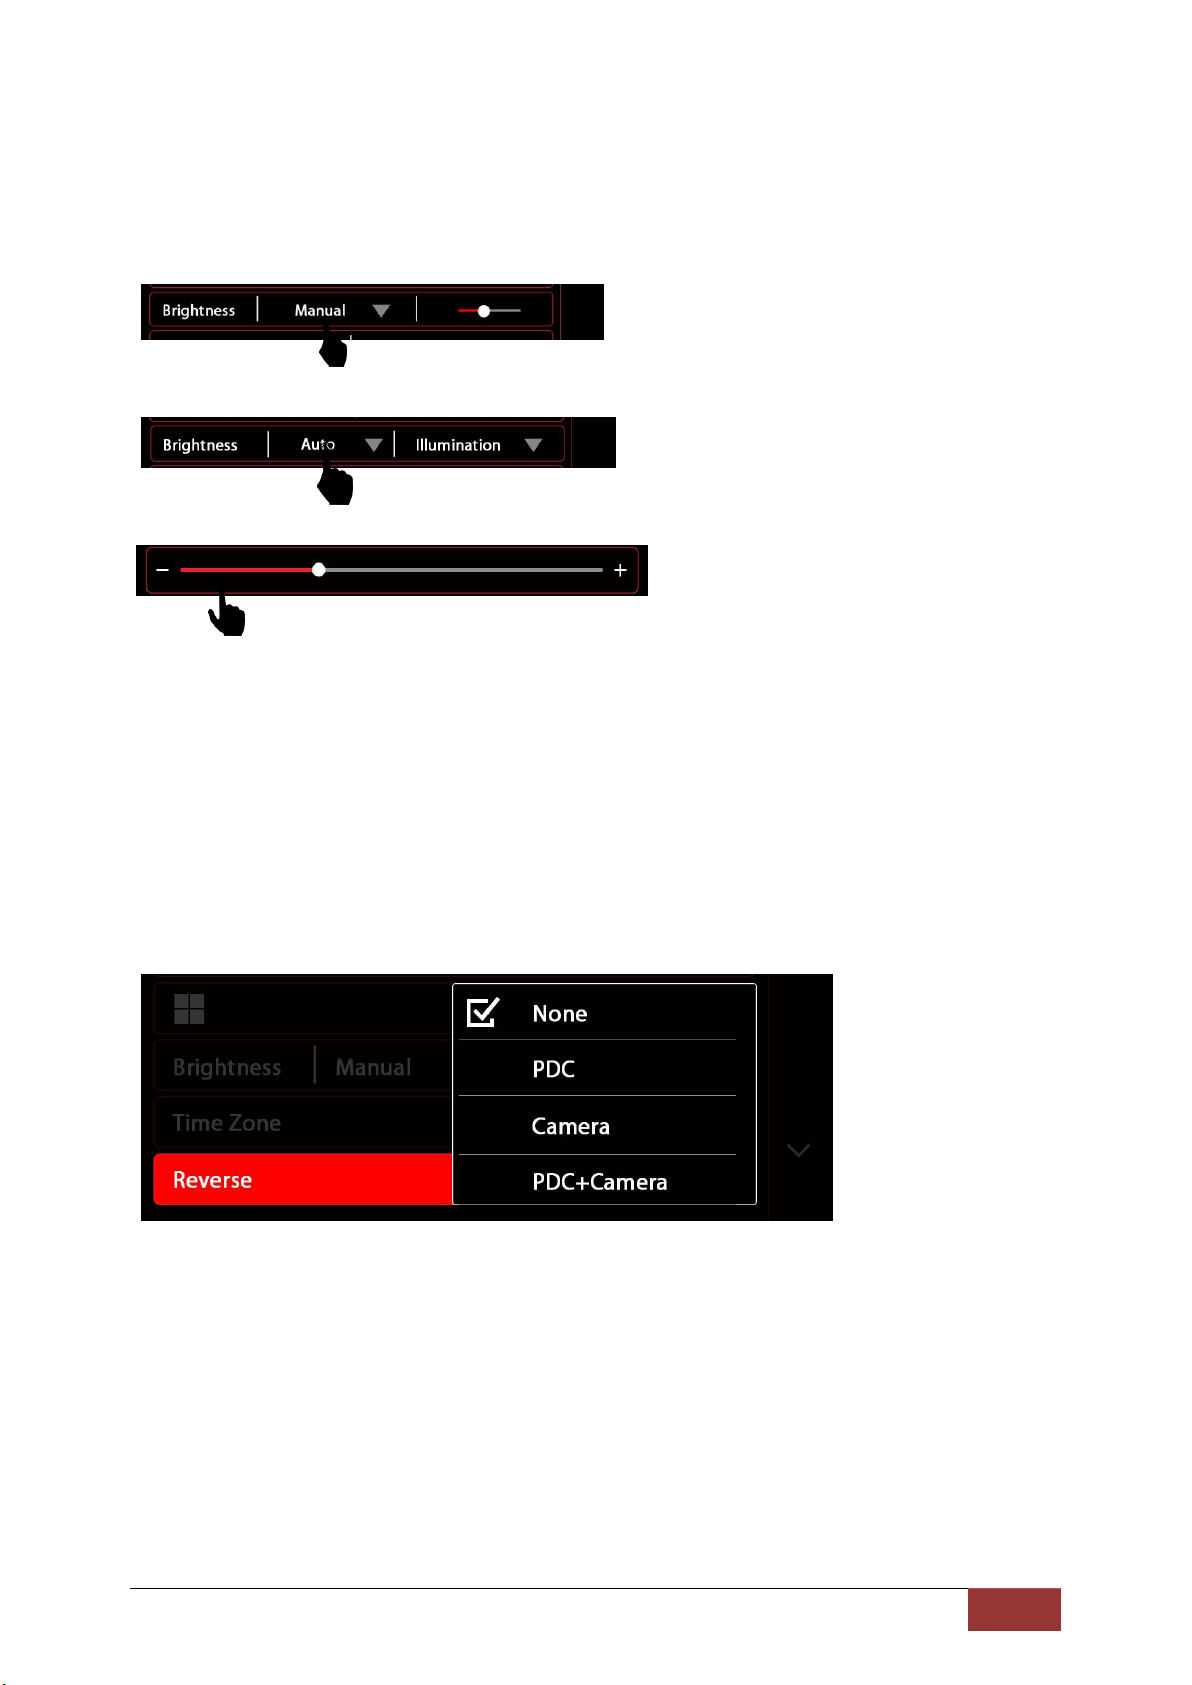
For Manual mode, on the right of Manual, there will be a slider.
Then press on the slider to set the setting lever for the dimming function
Through a Side-motion you can adjust the slider to the desired value.
.
Time Zone
In this menu, you can set the time zone in which you are located. This is set by Coordinated Universal
Time (UTC).
Reverse
If your vehicle has an ORIGINAL PDC system installed or has an original rear-view camera, you can
re-enable these depending on vehicle type.
This is NOT compatible on all vehicle models. Please refer to the compatibility information from
Dynavin.
None : When no system is installed
PDC : If only one PDC system is installed
CAM : If only a rear-view camera is installed
PDC+CAM : When both systems (PDC and rear-view camera) are installed in the vehicle
With None selected, the screen will remain in the current menu when the vehicle is put in reverse.
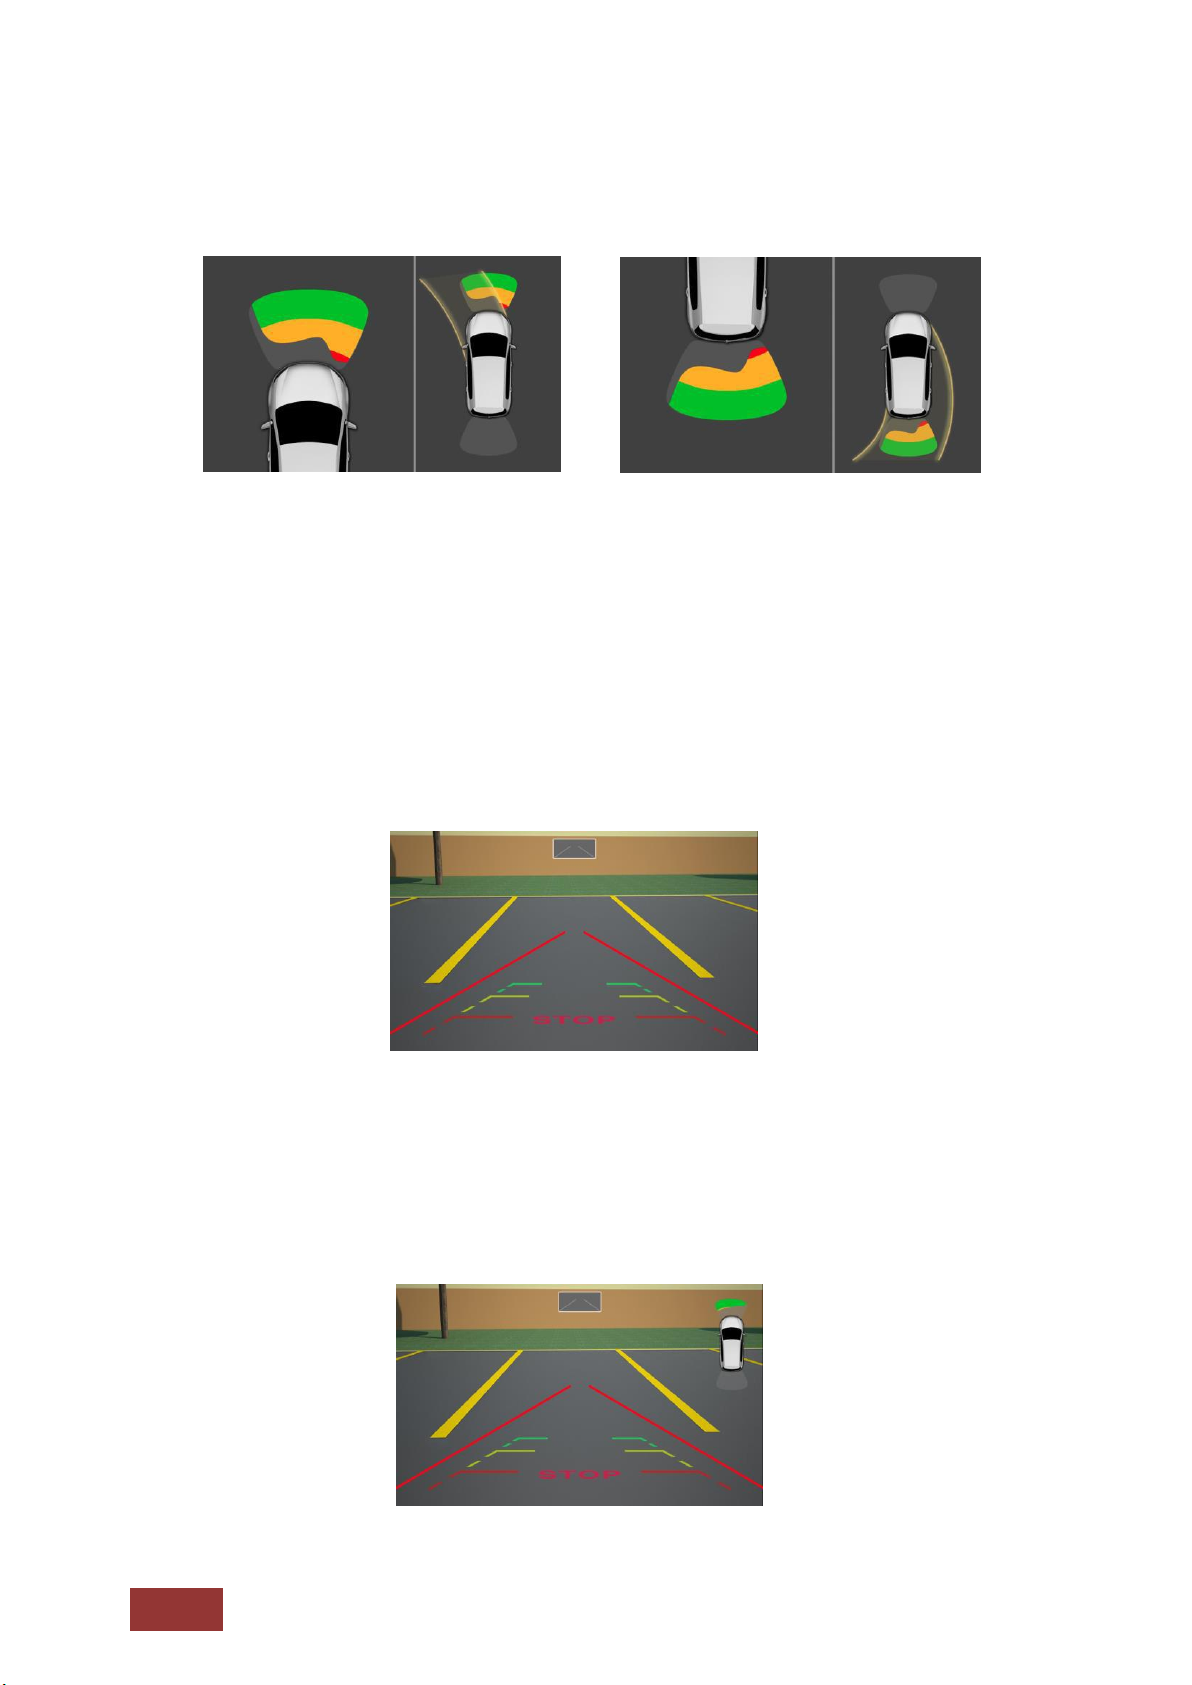
16
With PDC selected, a new image will appear when in reverse.
Depending on the vehicle and vehicle system it is also possible that the front PDC information is
displayed.
Please note that this system has only a supporting role. Faulty measurements caused by improperly
built-in systems or by environmental effects causing interference can not be compensated by the
system. These systems do not replace driver control or responsibility. Be aware of minimum
clearances.
With CAM selected, the rear view camera image will be shown.
Please note that proper image transmission is affected by camera settings, the installation of the
camera angle, and/or external interference. These systems do not replace driver control or
responsibility. Be aware of minimum clearances.
With PDC + CAM selected, both images will be displayed in one screen.

17
If you get a call while you are using the PDC system of your car, the call will be displayed as a 2nd
window in the screen corner.
For more functions move the menu bar to the bottom by sliding the scroll bar or tapping the up
and down arrows on the right side of the screen.
18
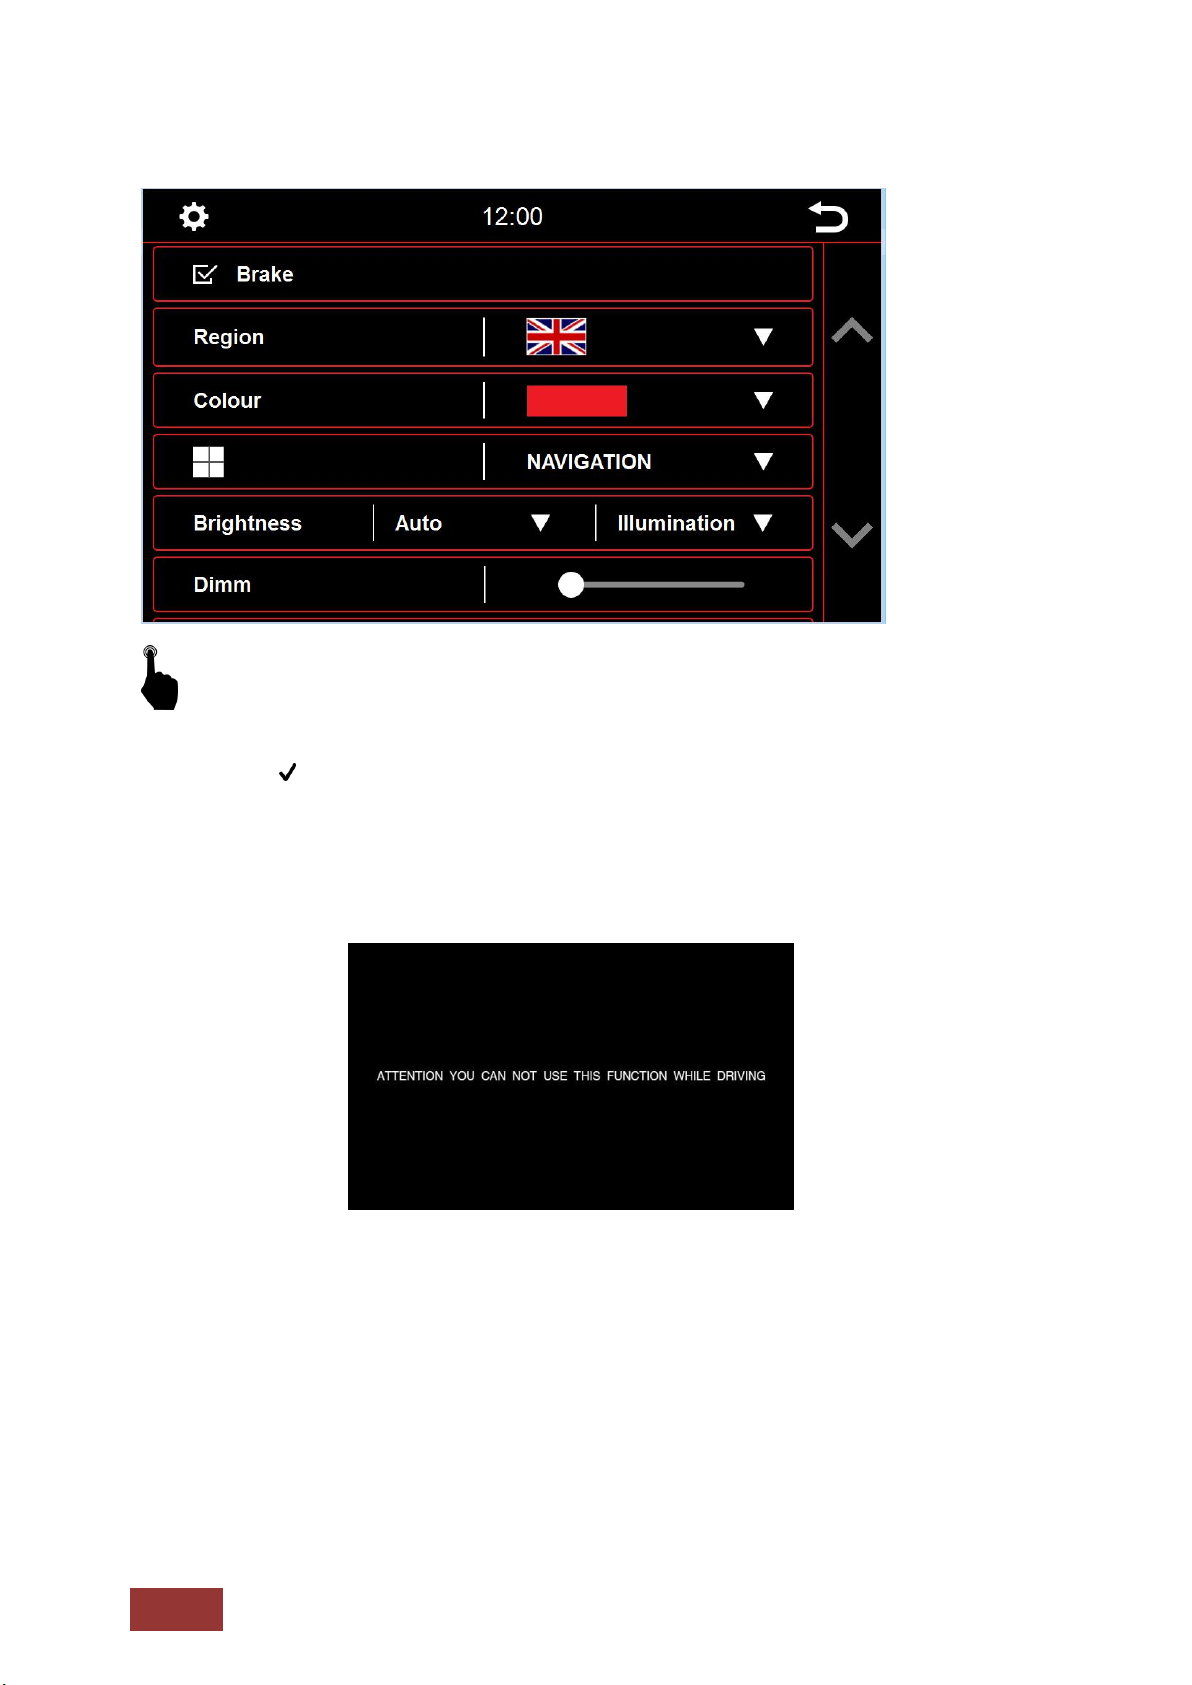
Brake
In the system settings you can change some of the basic options and settings of the device.
Through a brief touch of the box next to the words, the option will be enabled.
A checkmark indicates that the option is selected.
With Brake deselected, video playback or DAB-T will be inhibited so that you are not distracted while
driving.
When you engage the handbrake, the image below will be displayed informing you that video playback
is not allowed while traveling.
If you want to activate the video while traveling, select the Brake option.
Warning:
It is the responsibility of the user to review state and country laws, guidelines and legal regulations. If
you enable this option illegally, this can lead to substantial fines. This is a setting that is not enabled or
recommended for general use of the Dynavin. Dynavin is not responsible for fines aquired. This setting
is only activated by the user and owner and, therefore, the user assumes all responsibility by
activating.

19
Video Input
You can adjust the brightness and contrast of all external video devices.
Dual Zone
If enabled, video can be shown on external monitors in the passenger area while navigation is shown
on the Dynavin screen.
Factory Setting
You can reset unit to the default settings.
20
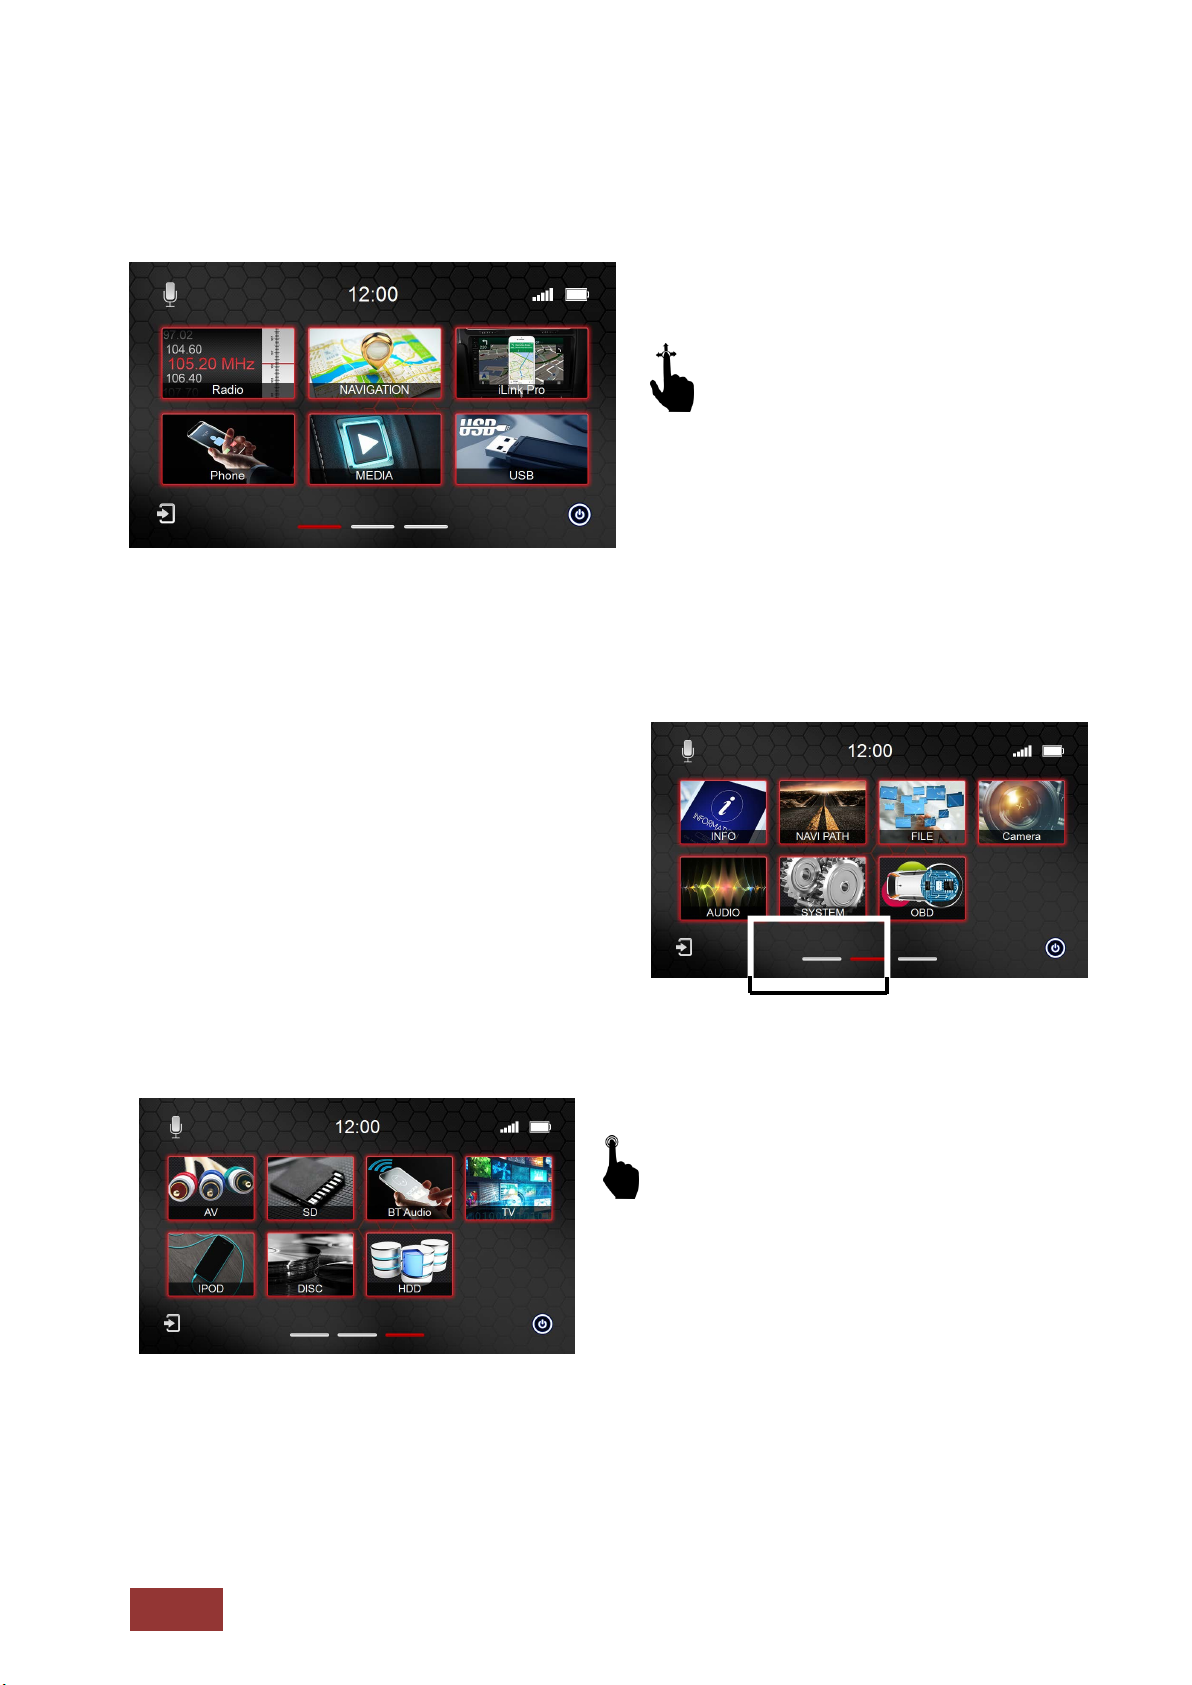
Main Menu
The main menu displays icons for various features/modes across three pages or sections. You can
move the windows using a swiping motion left or right
.
Touch the screen with a finger and
then move it to the right or to the left. This
moves you to the individual pages of the main
menu.You can do this in almost every menu.
The three lines on the lower side of the display show
you which page is open and to which direction you
can move. You can also touch one of the lines to go
to that page.
Touch one of the icons on the screen
with a finger to open the selected menu.
This is only possible if the selected
device is connected or the
function has been enabled.
The marked symbols on the first image have a special function. These can be replaced according to
your preference.
21
Moving Icons
To move a function icon on the Main Menu, read the instructions below.
You have the option to change two of the
icons on the first page to icons from the last
(third) menu page.
In the left picture, note the highlighted
interchangeable icons.
Go through a scrolling movement to
the third menu page.
Touch and hold to the function you want to
move with a finger.
After about two seconds, the icon for the selected function is moved and you will automatically be on
the first menu page. Continue holding your finger on the screen.
Place the icon you have selected over the icon you
wish to replace.
Now take your finger off the screen. The icons
will be exchanged automatically.
22
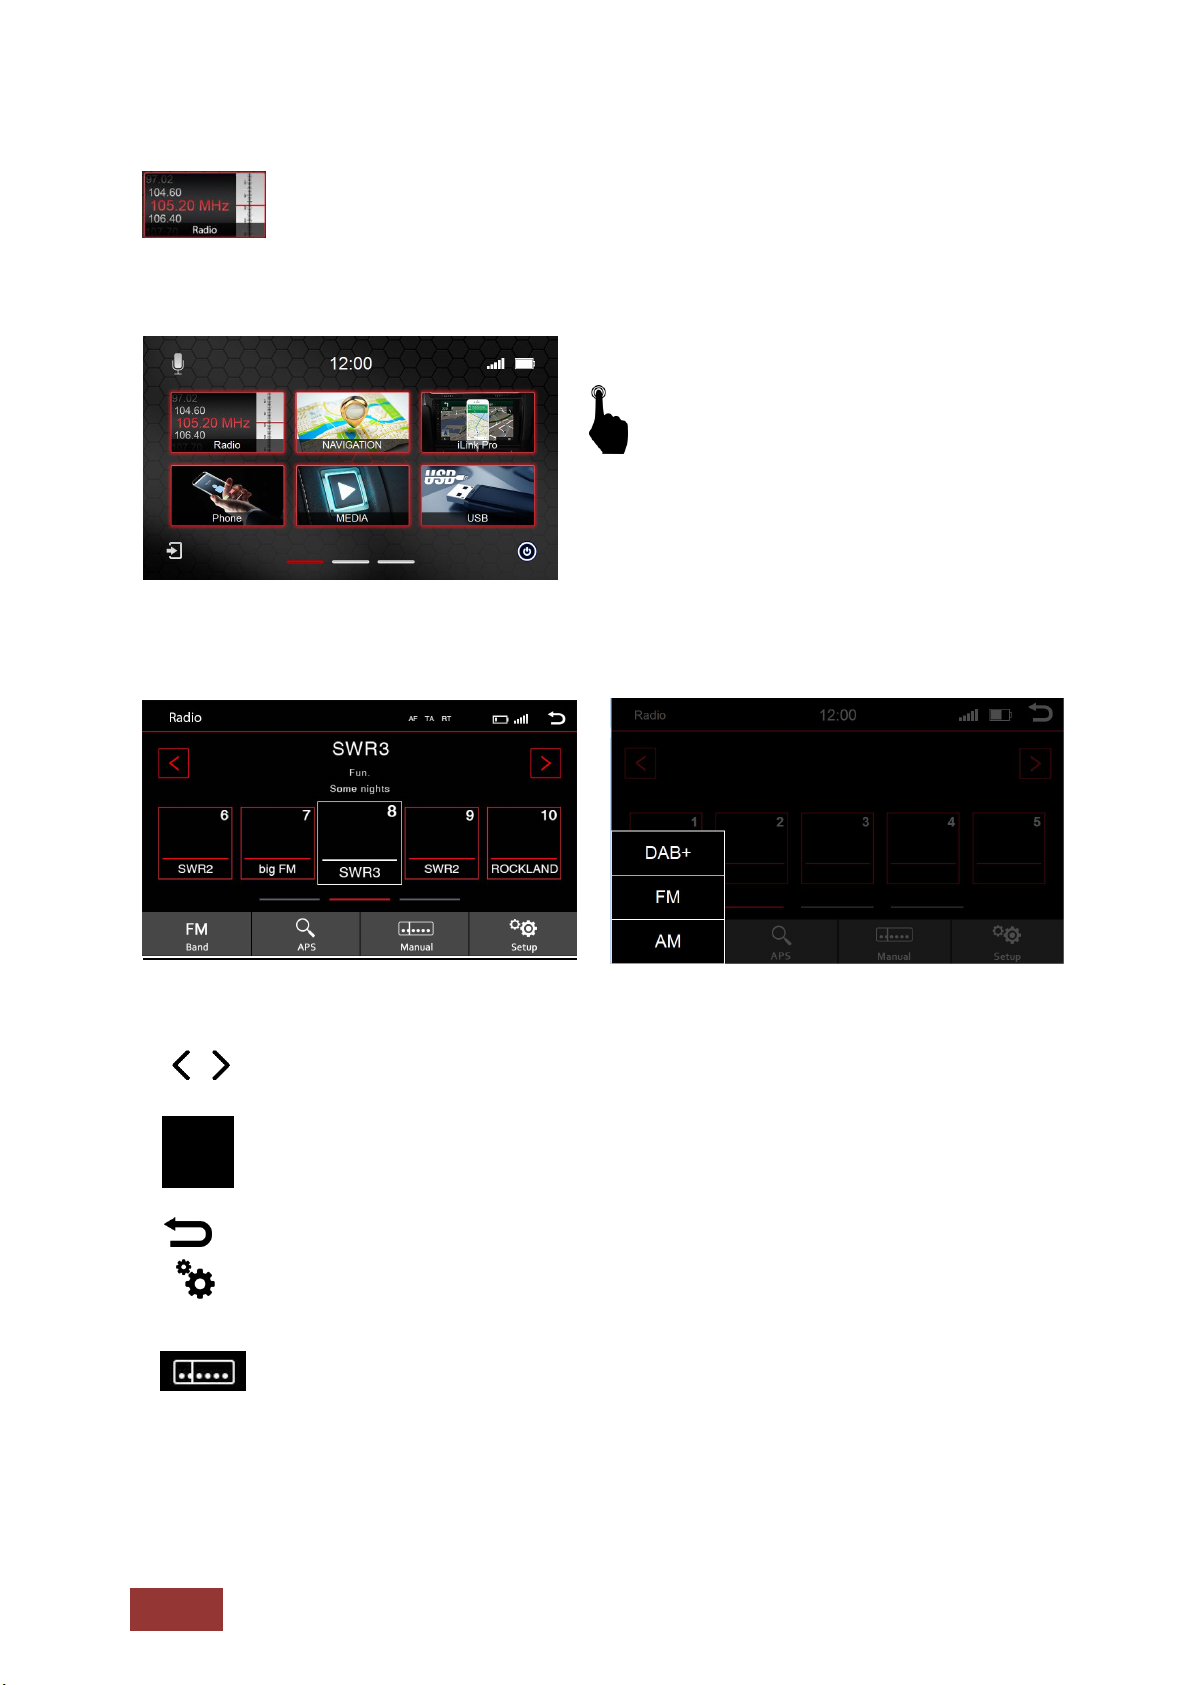
Radio Function
Button Overview
= Manual tuning
To access the radio function, select the
radio icon in the Main Menu or press the
physical radio button on the front panel of
the unit.
APS
FM
Brand
= Automatic search (The five strongest stations will be stored automatically.)
= Change frequency between AM/FM and DAB+
= Station keys 1-15
Scrolling to the left or right accesses all presets
= back to main menu
= Radio options
= Frequency adjust manually
23
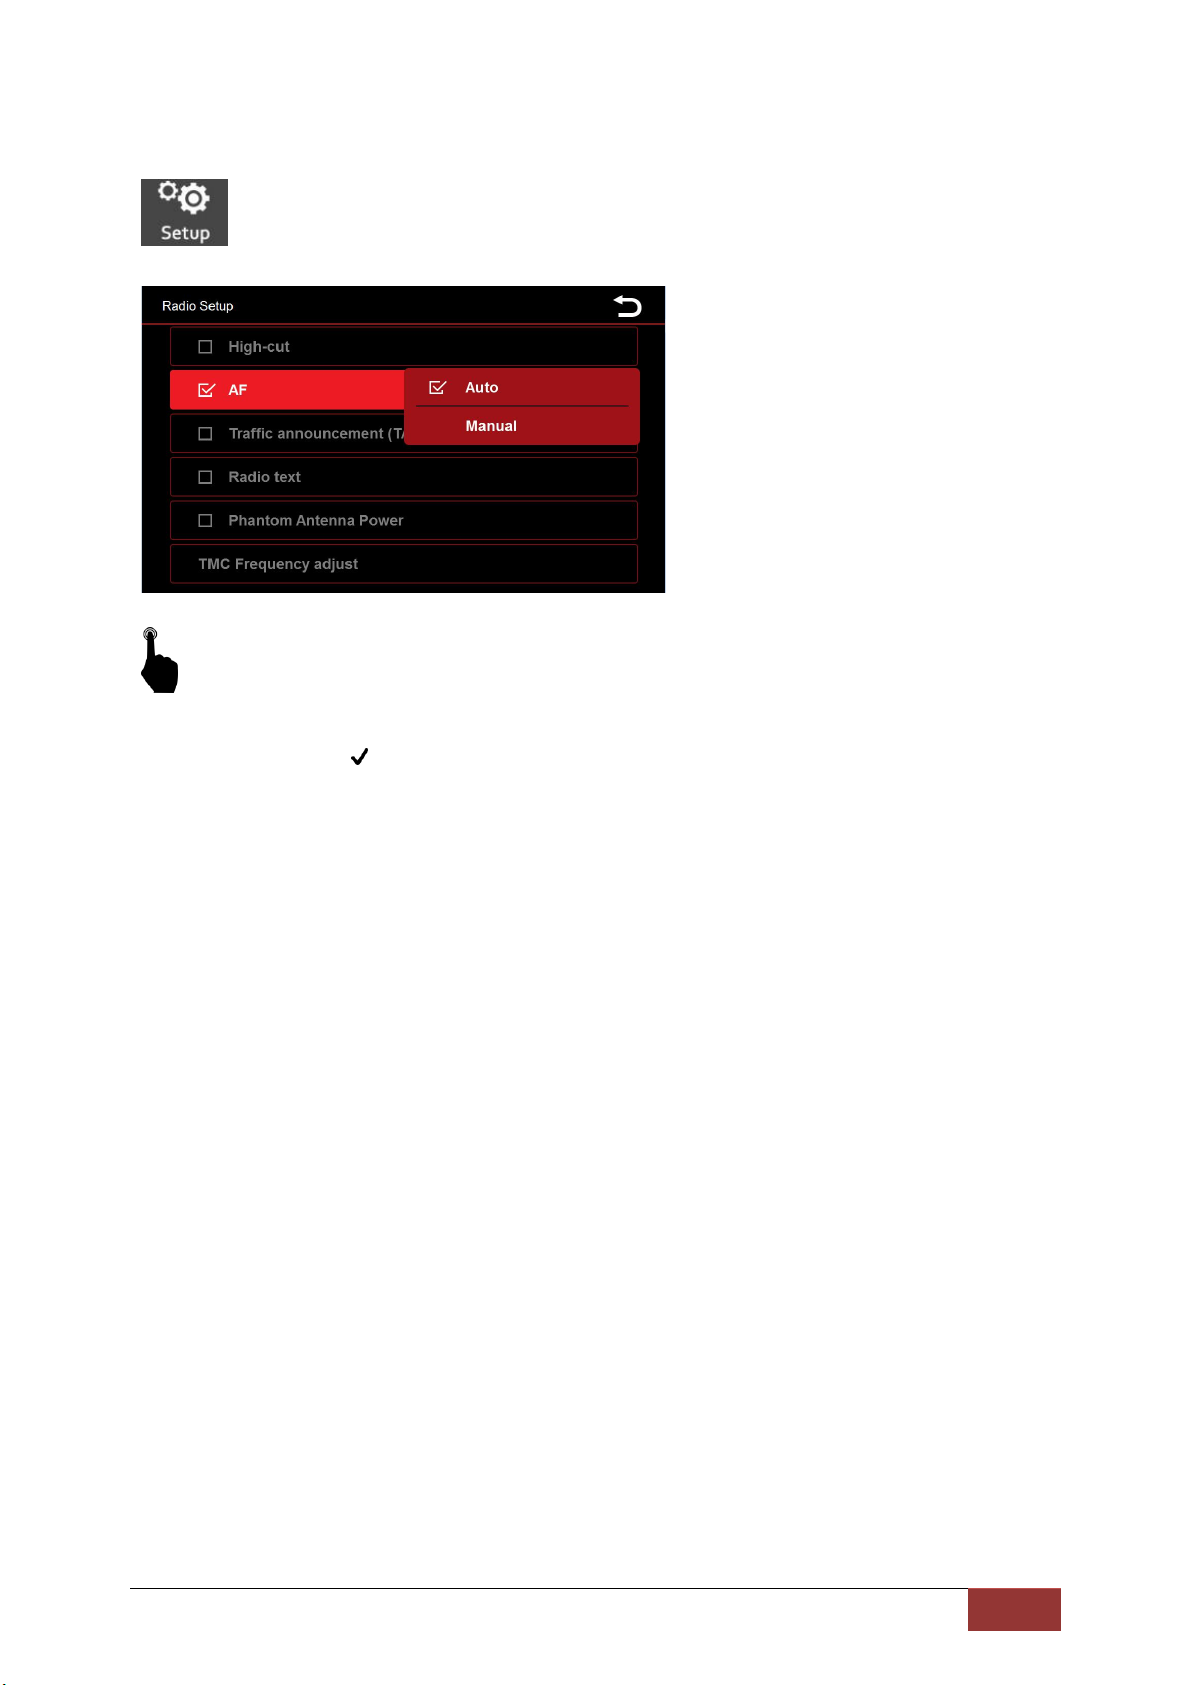
Radio Options
Tap the box next to AF to enable the option.
A checkmark indicates that the option is selected.
High-cut = Reduce radio noise
AF = Alternative frequency
When selected, AF will display on the top of the radio menu. This allows a receiver to
transform a different frequency providing the same station when the first signal
becomes too weak.
Automatic
With this additional function of AF, you can select whether the AF function of the station you
are listening is to be exchanged for another (Automatic) or that the station is to be maintained
and only a new stable frequency is to be searched.
TA = Traffic Announcement
If this option is enabled, traffic messages can be recorded in the current program
automatically.
Radio Text
If you have activated this function, information can be transmitted by the radio station to your
radio. For example, information about played song or information about the current program
as well as the station name.
Phantom Antenna Power
When radio signal is weak, you can select Phantom Antenna Power to power the radio
antenna.
TMC Frequency adjust
Here you can set whether always the strongest stations in the region to be selected for the TA
function, or the station you hear in the moment.
 Loading...