

Page 1
Dynavector DV507MKII Tonearm
Instruction Manual
Page 2

1. Introduction
Thank you for your purchase of the DV-507MKII tonearm.
DV507MKII is a high-performance tonearm with many advanced features, which en-
able it to transmit signals on the record precisely through a cartridge. The original
mass-separation or 'bi-axis inertia' arm was the 505. The 507 MKII is the latest de-
velopment of that revolutionary design with greatly enhanced performance and ease
of use thanks to a major redesign.
Correct installation, set-up and operation are important to provide the best sonic per-
formance.
Please read this instruction manual carefully before attempting installation and use.
2. What is the bi-Axis inertia controlled tonearm.
The tonearm is required to fulll two functions so that the cartridge can reproduce
the exact signal from the record groove. One of these is to hold the cartridge station-
ary at audible frequencies so that the stylus and cantilever motion is translated into
a music system without losses. The other is to allow the cartridge to track warped re-
cords. These require totally contradictory properties from the tonearm and so all con-
ventional tonearms are a compromise between the two. However, a very reasonable
solution exists in the bi-axis tonearm.
The bi-Axis inertia control tonearm is in effect two arms in one - the main arm beam
has an effective-mass that is 3 or 4 times higher compared with conventional tone-
arm but moves only horizontally. On the other hand, the sub-arm has a lower effec-
tive-mass than any conventional tonearm but moves only in the vertical direction.
This combination means that the high effective-mass in the horizontal direction holds
the cartridge steady at audio frequencies, especially at low frequencies and high
groove excursions, whilst the low vertical effective-mass allows unmatched warp rid-
ing performance.
The DV507MKII has unique, non-contact, electro-magnetic damping system that re-
quires no maintenance or adjustment unlike the usual oil damping system. With the
new MK11 this damping is further enhanced by the use of neodymium magnets.
DV507MKII Instruction Manual
Page 3
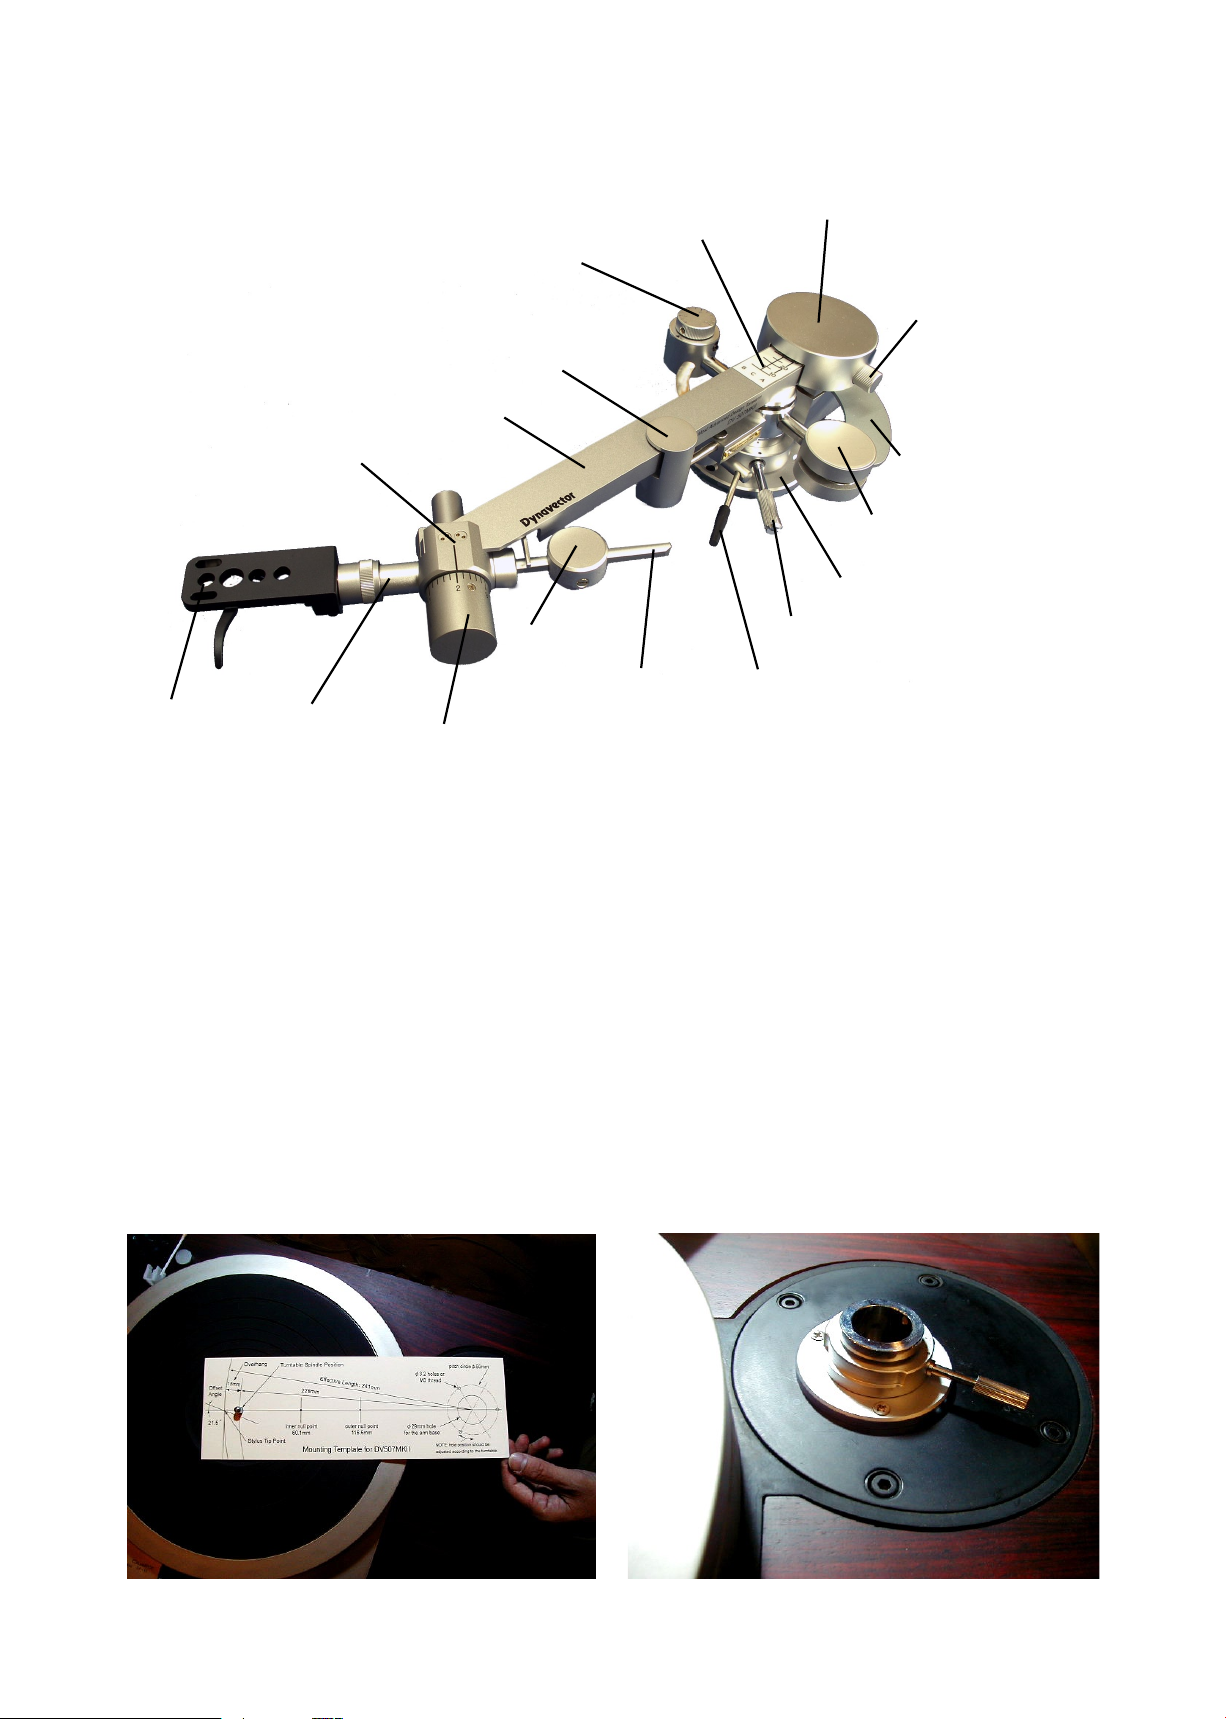
3. Parts identication
headshell
sub arm
tracking force adjuster
sub arm bar
sub weight
arm head
main arm
arm rest
height adjusting lever
arm lift
damper magnet
damper plate
main weight
main weight
stopper
anti-skating divice
main base
balancing scale
4. Mounting to the turntable
Use the supplied mounting template for the DV507MKII. Drill a 30mm diameter
hole on the arm board of the turntable 226 mm away from the turntable spindle
center.
Temporarily place the tonearm into to this hole. Adjust the angle of the tonearm
by rotating the arm base of the tonearm in the hole so that the desired position of
the tonearm at rest is achieved. Once found mark this position with a sharp point
through the three arm-base mounting holes. Drill these holes as appropriate for
the supplied woodscrews or bolts and x the base to the turntable.
Page 4
5. Connection of the arm cable
The tonearm cable supplied is designed to the highest specication, with a
double-balanced, shielded cable and 4N OFC/6N. This cancels potential difference
between right channel and left channel giving the best possible transmission of the
signal.
Insert the 5-pin plug of the tonearm cable into the output connector of the tonearm
and connect the RCA plugs of the tonearm cable to the input of the phono stage
or the pre-amplier.
6. Alignment and operation
Please check and adjust the each part according to the following procedures
before xing the cartridge to the headshell.
6-1. Damper plate check
Very strong lines of ux run in the gap between the damper magnets. An eddy
current produced when the damper plate passes through this gap acts as a
dynamic damper to reduce arm resonance.
Rotate the main arm right and left gently
and check that the main arm rotates
smoothly while the damper plate passes
through the gap without touching with
damper magnets.
We carefully assembled the damper
plate to rotate smoothly, if there is
any physical contact between plate
and magnets at all, please return the tonearm for repair to your local dealer or
Dynavector distributor as this could seriously damage your cartridge.
6-2. Mounting the cartridge
a) Mount the cartridge onto the headshell supplied. Use good quality M2.5 or M2.6
screws supplied by the cartridge manufacturer and do not tighten them fully before
overhang alignment has been completed. The connection of the leads should be
done according to the instruction manual of the cartridge.
Page 5

b) Overhang alignment
Overhang is the distance from the spindle center of the turntable and the stylus
tip of the cartridge when the tonearm is rotated over the spindle. The overhang
of 15mm has been designed on the 507MKII so that minimum tracking error is at
the inner track of the record.
NOTE: You can easily check the overhang by using the mounting gauge supplied
- see above, which ts between headshell and arm. When the stylus rests on the
zero point then overhang is perfect. The inner null point and the outer null point
on the mounting template is correct when the overhang alignment is set using
this gauge.
c) Azimuth adjustment
Check the cartridge seen from the front. It should be perpendicular to the record.
The azimuth can be easily adjusted on the headshell we supplied - simply loosen
the socket head screw located on the side of the headshell.
NOTE: If the overhang or the azimuth adjustment is not correct, it will cause
tracing distortions.
Page 6

6-3. Mounting the headshell to the tonearm.
Use the stylus guard to avoid accidental damage.
6-4. Main weight adjustment
DV507MKII is essentially two arms on one. The heavy and rigid main arm moves
only in a horizontal direction and does not effect the VTF (Vertical Tracking Force)
of the cartridge - however there is an adjustable balance weight so that the
bearings are evenly loaded to reduce friction and bearing ‘chatter’. There is then a
choice of three small weights used to balance the cartridge on the sub arm - A, B
or C.
The position of main arm weight is dependent on the total mass of the cartridge
and headshell, and on which small counterweight is used on the sub arm.
First calculate the total weight (headshell weight + cartridge weight). After that you
should choose suitable sub-weight according to the following table.
At the pivot end of the main arm you will see marked a series of scales, three in all
and each corresponding to one of the three sub-weights.
Total weight Type of the sub weight
15 - 23 g A
20 - 33 g C
25 - 35 g B
The weight of the Dynavector headshell : 15.4 g
Page 7

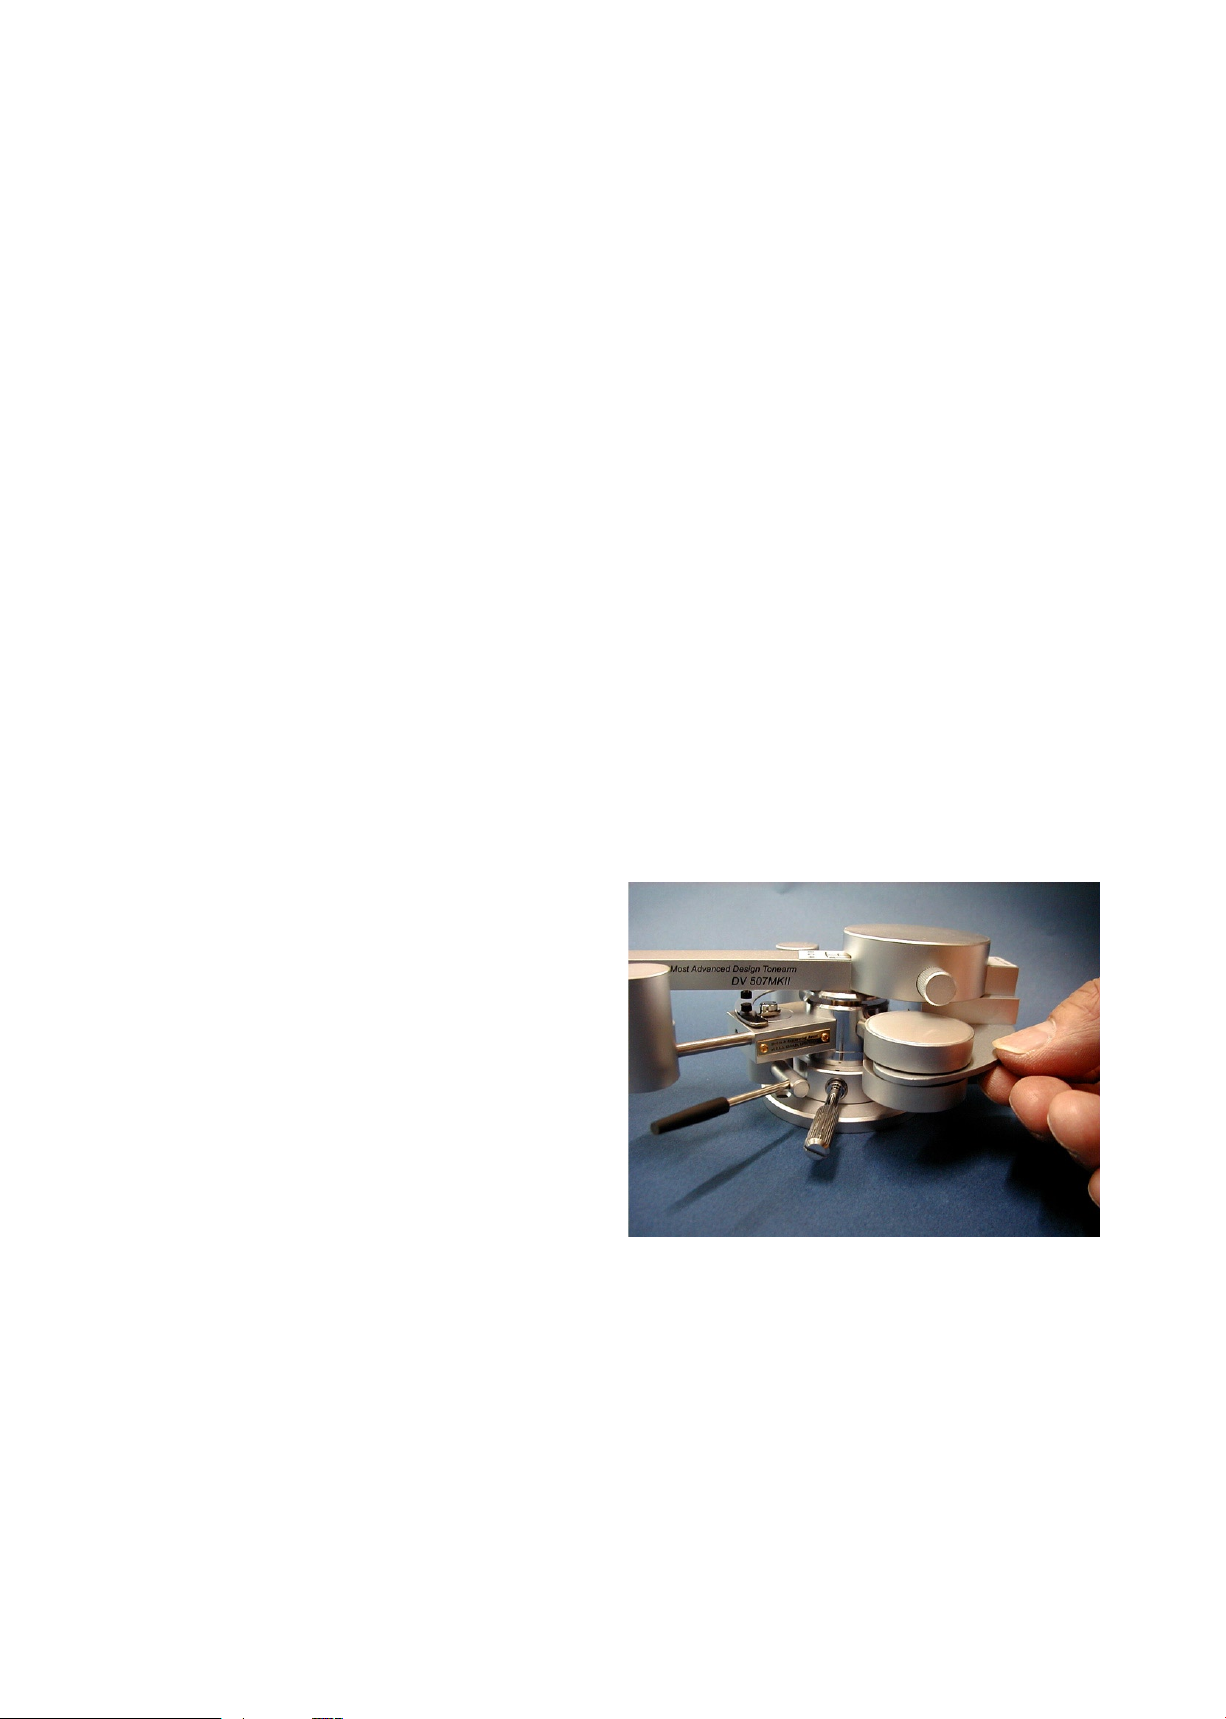
E.g. When the total weight is 20g and you use
sub weight A, you should adjust the front end
of the main weight to line up with the 20 above
the ‘A’ printed on the arm - see picture.
NOTE: This adjustment is not super critical if
the turntable and arm are level (as they should
be).
6-5. Vertical Tracking Force (VTF) adjustment
Place the correct sub-weight onto the sub
arm. Please note the screws of the sub-weight
should face toward you.
(1) The VTF dial should be adjusted to “0g” point.
(2) Balance the sub arm level b y sliding t h e
sub-weight forward and backward.
(3) You can then adjust the VTF according to the
cartridge manufacturer’s specication using the VTF
dial.
(4) Adjustment range of the VTF is between 0.5 g
and 3.0 g in 0.2g steps.
You will nd whilst doing this that the mounting
of the counterweight stub is exible, this is
deliberate and a feature that is designed to
reduce resonances in the arm
Page 8

6-6. Arm height (VTA) adjustment
(1) Adjust the arm height approximately by loosing the height adjustment screw on
the side of the arm mount and sliding the whole arm up or down.
(2) Tighten the height adjustment screw.
(3) Loosen the height adjustment lever
by turning anticlockwise.
(4) You can then adjust the arm height
more precisely by moving the height
adjustment lever left and right.
(5) Set the cartridge on the record and
set arm height so that the headshell top
is parallel with the surface of the record
by moving the height adjustment lever.
(6) Lock the lever to the optimum position by turning the lever clockwise - do not
overtighten, simple nger pressure is enough.
(7) 7 mm of height adjustment is available using this lever - larger changes should
be done using the height adjusting screw.
6-7 Anti-skate adjustment
Normally the anti-skating dial should be set to the same value as the tracking
force.
Howe ver act u al req u irem e nts are
dependent on a number of variable
factors such as the shape of the stylus
tip or record material itself.
Whe n you u se a c a rtr idge w ith a
line-contact stylus, you will get better
results by increasing the anti-skating
force a little.
If you notice left channel mistracks, reduce the setting, and if you notice the right
channel mistracks, increase the setting.
NOTE: The dial can be operated while playing the record.
Page 9

6-8. Arm lift (cueing device)
The silicone oil dampened tonearm lift is provided.
(1) To lower the stylus onto the record
Position the tonearm so that the sty-
lus is over the record groove and
lower the arm lift lever carefully.
(2) To lift the stylus from the record
raise the arm lift lever carefully.
NOTE: When lowering the stylus onto the record, the cueing point may drift a little
toward the outer groove of the record. This is because of anti-skating force, it is
not defect with the arm lift.
u
All adjustments and setting are now completed. DV507MKII is designed to be
maintenance free and there are no parts which will wear out under usual operating
conditions.
Please contact your local dealer or Dynavector distributor in your country in the
event of any of the problems listed below.
(1) The arm had been dropped or subjected to excessive shock.
(2) Kept for a long time in a dusty condition.
7. Appendix
We hope that with the aid of the instruction manual you been able to achieve cor-
rect adjustment and setting. Please note the following to keep the arm at the best
condition.
(1) Do not attempt to disassemble the arm.
(2) Do not apply oil or other lubricant to any parts of the arm.
(3) Keep the packaging for sending the arm for repair.
Page 10

Type Bi-Axis inertia controlled Dynamic and Eddy-Current Damping
Dynamic Balance type tone arm
Overall length 306mm. With head shell: max 326 mm
Effective length 241mm (i.e. tonearm pivot point to cartridge stylus point)
Overhang 15mm
Offset angle 21.5 degree
Height 59mm lifts up to 92mm
Height adjustment range 39mm-72mm at sub arm center
Depth 36mm without connecting cable
Optimum cartridge weight 15-35 grams, including headshell
Horizontal tracking angle error -1.1 degree - +2.2 degree ,
0 degree at inner band of record, 2.2 degree at outside
Tracking force adjustment range 0-38 grams by 0.2 grams step
Sensitivity Horizontal less than 50 mg, Vertical less than 40 mg
Net weight 1,380 grams
Output connection DIN 5P connector
Headshell connection EIA standards 4 Pin connector
Accessories
low resistance (0.046 ohms/m, 54pF/m) high quality arm cable,
milled aluminum headshell weight 15.4 grams.
mounting template for the arm
overhang gauge for the headshell
8. Specications
Page 11

This product can be recycled. Products bearing this symbol must NOT
be thrown away with normal household waste. At the end of the product's
life, take it to a collection point designated for recycling of electrical and
electronic devices. Find out more about return and collection points through
your local authority.
The Euro pean Wast e Elec trical and Ele ctronic Equip ment (WE EE)
Directive was implemented to dramatically reduce the amount of waste
going to landlls, there by reducing the environmental impact on the planet
and on human health. Please act responsibly by recycling used products. If
this product is still useable, consider giving it away or selling it.
Page 12

2-16-15 Chiyoda-ku Iwamoto-cho Tokyo 001-0032 Japan
TEL +81 (0) 3-3861-4341 FAX +81 (0) 3-3862-1650
 Loading...