

Page 1
SAFETY
, OPERATION & MAINTENANCE MANUAL
®
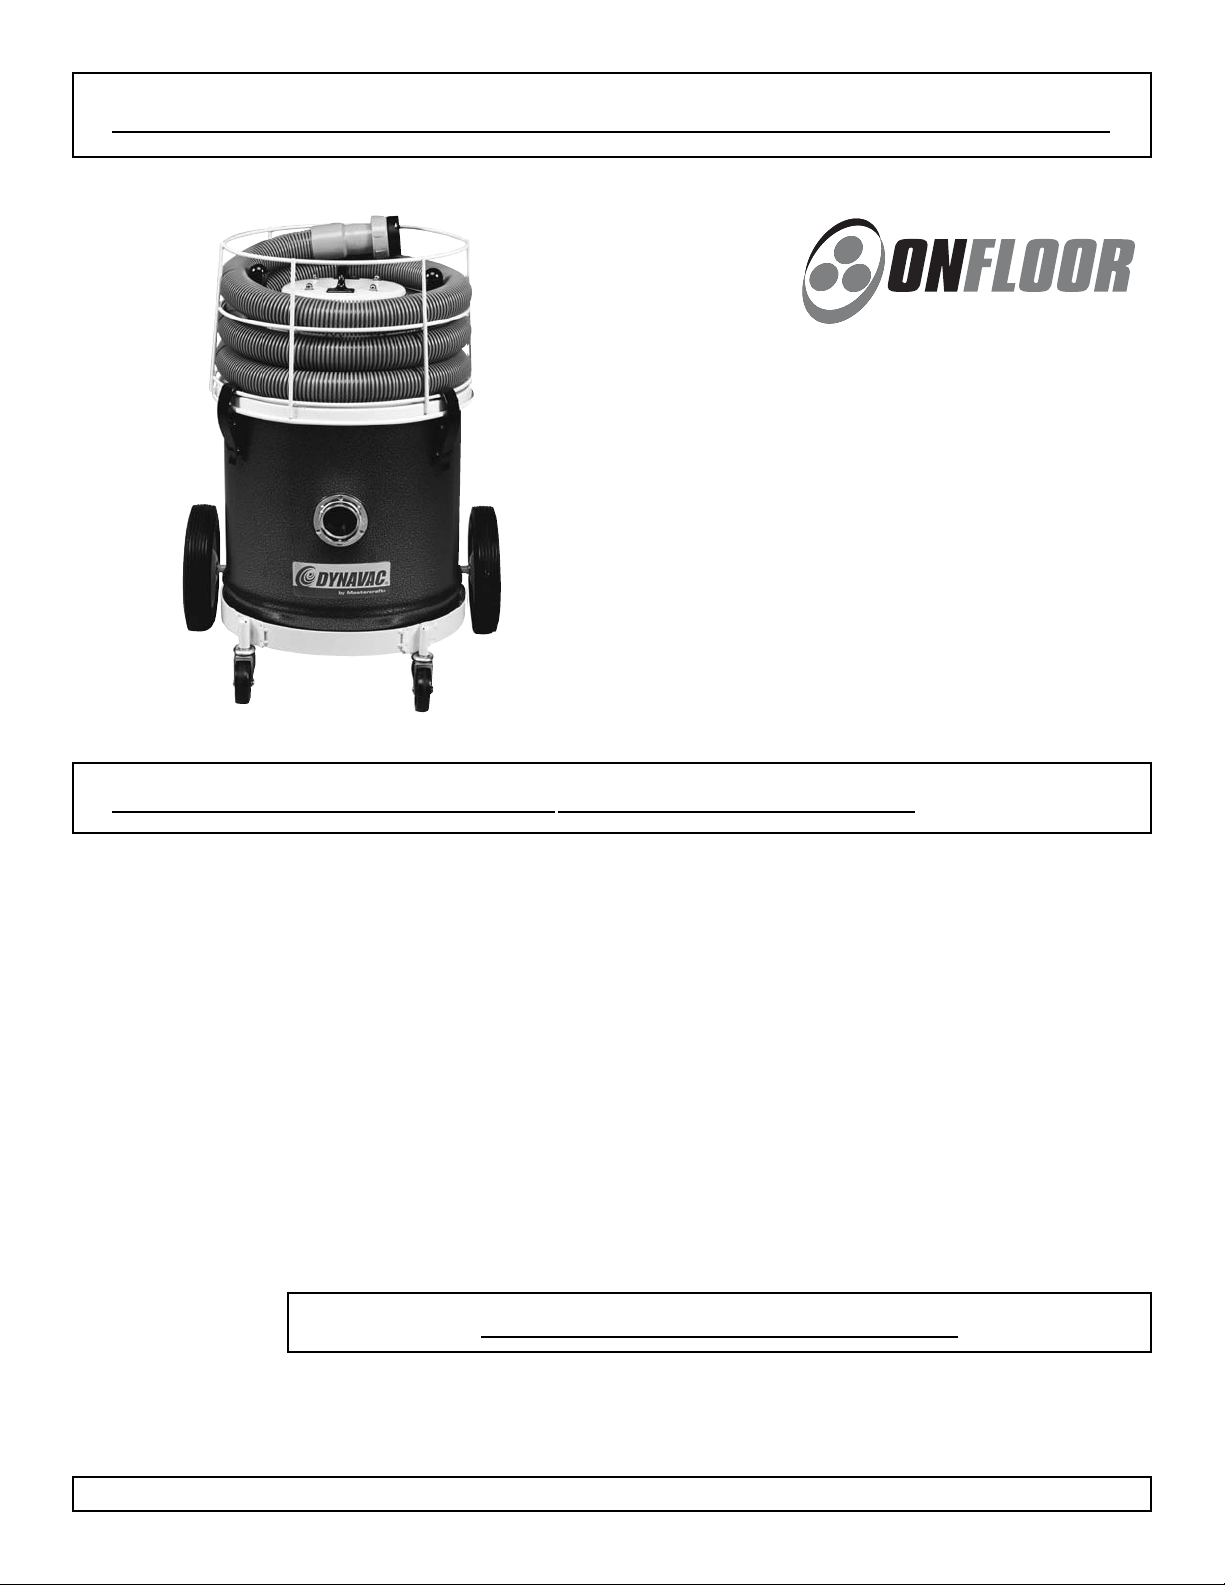
DYN-812D & DYN-1012D
DYNAVAC CONCRETE VACUUMS
This unit is intended for commercial use.
READ & FOLLOW ALL
INSTRUCTIONS, WARNINGS &
CAUTIONS
PLEASE READ CAREFULLY BEFORE OPERATING
This vacuum will afford you many years of troublefree operating satisfaction, provided it is given
proper care. All parts have passed rigid quality control standards prior to their being assembled to
produce the finished product. Prior to packaging,
your vacuum was again inspected for assurance of
flawless assembly.
This vacuum is protectively packed to prevent damage in shipment. We recommend that upon delivery, unpack the vacuum and inspect it for any possible damage. Only a visual examination will reveal
damage that may have occurred.
If damage is discovered, immediately notify the
transportation company that delivered your vacuum. As a shipper, we are unable to report any claim
for damage. You must originate any claim within 5
days.
This manual is for your protection and information.
PLEASE READ CAREFULLY since failure to follow
precautions could result in discomfort or injury.
Read this manual completely before operating this
vacuum. It is important to follow the instructions in
the manual to prevent the possibility of injury or
damage to the user and/or vacuum.
Treat your vacuum cleaner as you would any other
high grade precision made product. Dropping,
unreasonable bumping across thresholds and other
misuses may result in a damaged unit that will not
be covered by warranty.
SAVE THESE INSTRUCTIONS
Address: 777 South Street,P.O. Box 2310, Newburgh, New York 12550-0606
TEL: 877.356.6703 / 845.565.6623 / FAX: 845.565.8894
Internet Address: www.onfloor.com / info@onfloor.com
PP
11
AAGGEE
PN 225878 - DYN812D & DYN1012D Vacuum Manual - Printed in USA 05/01/07
Page 2

IMPORTANT SAFETY INSTRUCTIONS
WARNING:
To Reduce the Risk of Fire, Electric Shock or Injury:
Electric shock could occur if used on wet surfaces.
DO NOT expose to rain. Store indoors.
When using this vacuum basic precautions should always
be followed, including the following:
1) DO NOT leave the vacuum when plugged in.
Unplug from the outlet when not in use and before
servicing.
2) To avoid electric shock, DO NOT expose to rain.
Store indoors. DO NOT use on wet surfaces.
3) This is NOT a toy. Close attention is necessary
when used around or near children.
4) Use only as described in this safety manual. Use
only manufacturer's recommended attachments
and accessories.
5) DO NOT use this vacuum with a damaged cord
or plug. If the vacuum is not working as it should,
because it has been dropped, damaged, left outdoors or dropped into water, contact an authorized
service center or factory.
6) DO NOT unplug the vacuum by pulling on the
cord. To unplug, grasp the plug, not the cord.
7) DO NOT pull or carry by the cord, use cord as a
handle, close a door on cord, or pull cord around
sharp edges and corners. DO NOT run vacuum over
cord. Keep cord away from heated surfaces.
8) DO NOT handle the vacuum’s plug with wet
hands.
9) Keep hair, loose clothing, fingers, and all parts
of the body away from openings and moving parts.
11) DO NOT put any objects into the openings. DO
NOT use with any opening blocked; keep free of
dust, lint, hair and anything that may reduce air
flow.
12) DO NOT pick up anything that is burning or
smoking, such as cigarettes, matches, or hot ashes.
13) DO NOT use without the cloth filter assembly
in place.
14) DO NOT use the vacuum to pick up flammable
or combustible liquids such as gasoline or use in
areas where they may be present.
15) DO NOT use where anesthetics and oxygen are
used.
16) Turn OFF all the controls before unplugging
17) DO NOT use an extension cord unless absolute-
ly necessary. If an extension cord is used, then wire
size must be #14 or larger and should not exceed
50 feet in length. The extension cord must be a
three-wire type to insure grounding protection.
18) Replace damaged or worn parts immediately
with genuine original equipment parts to maintain
safety and to protect your limited warranty.
This vacuum must be connected to a properly
grounded outlet only. (See grounded instructions)
When not in use the power cord should be wrapped
around the motor head for storage.
10) Use extra care when cleaning on stairs.
AVE THESE INSTRUCTIONS
S
PP
AAGGEE
22
Page 3
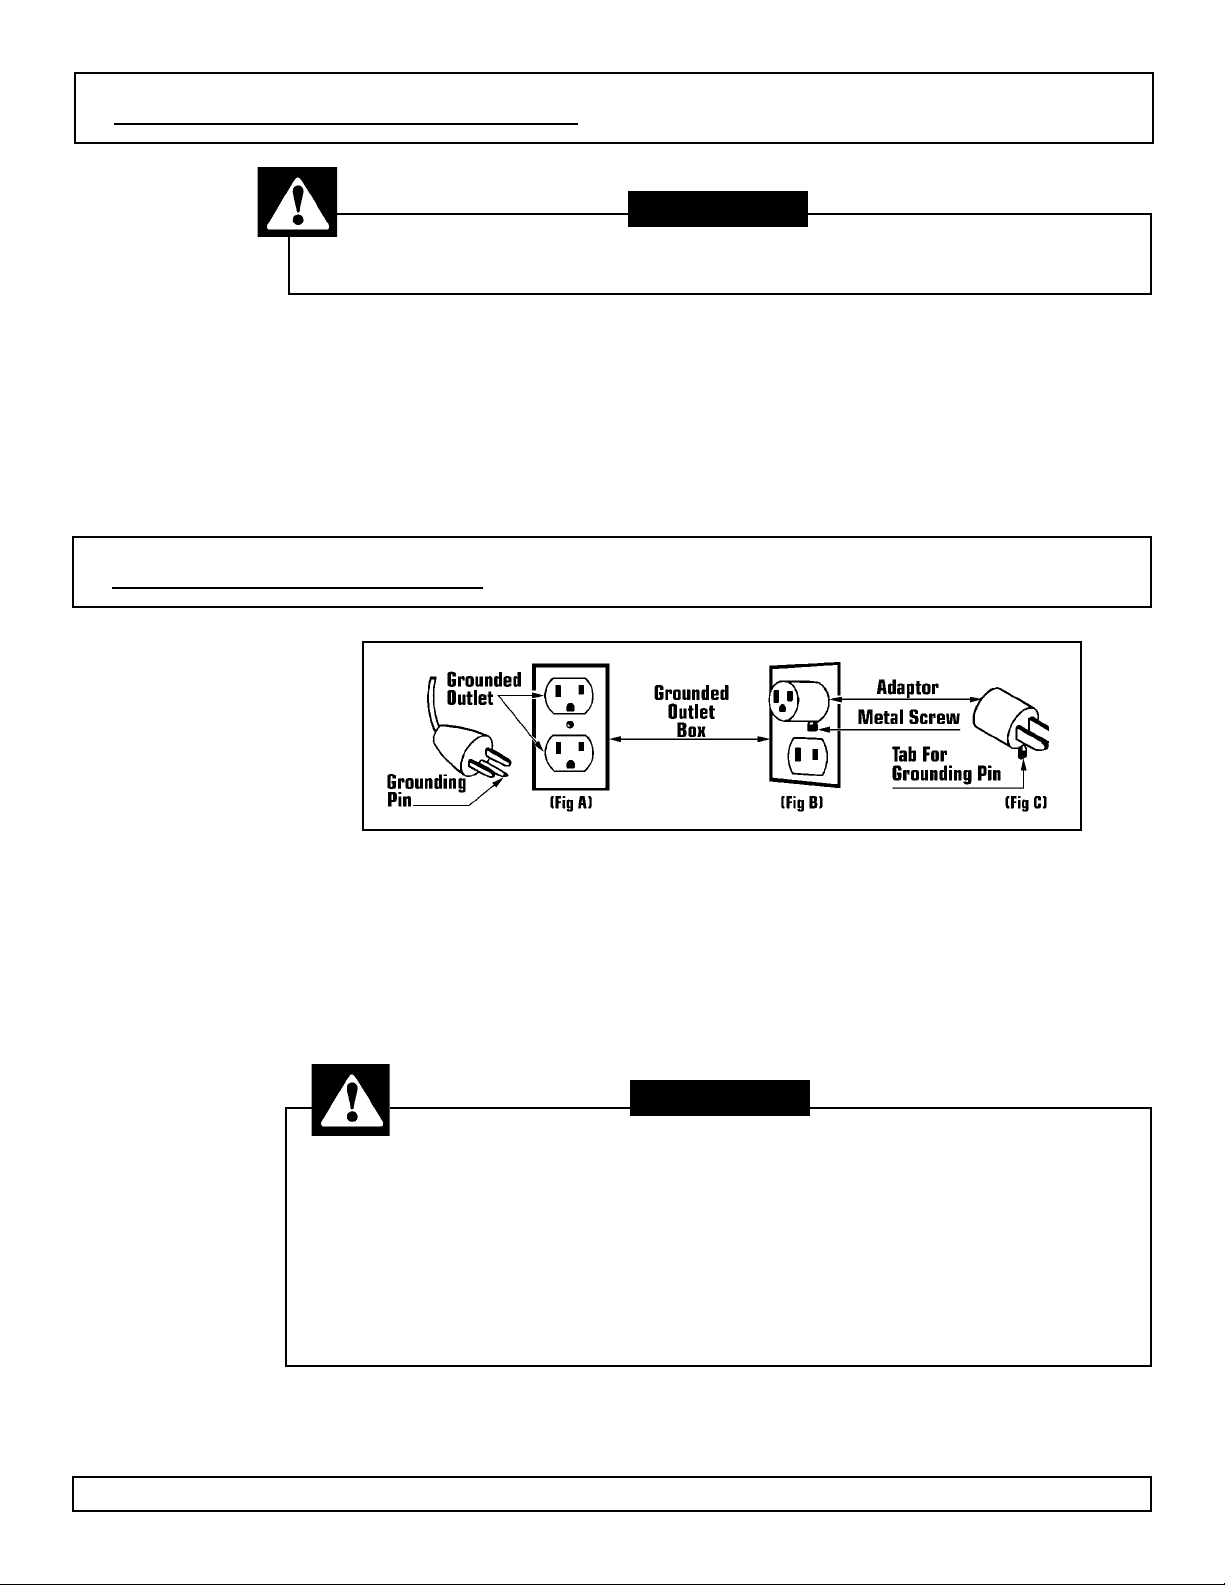
GROUNDING INSTRUCTIONS
Improper use of the grounding plug can result in a risk of electric shock.
DANGER:
Electrical equipment must be grounded. If it
should malfunction or breakdown, grounding provides a path of least resistance for electrical current to reduce the risk of electric shock. This vacuum is equipped with a cord having an equipmentgrounding conductor and grounding plug. The plug
must be inserted into an appropriate outlet that is
properly installed and grounded in accordance with
all local codes and ordinances.
GROUNDING METHOD
This electric equipment is for use on a nominal 120
volt circuit, and has a grounded plug that looks like
the plug illustrated in (Fig A). A temporary adaptor
that looks like the adaptor illustrated in (Fig B & C)
may be used to connect this plug to a 2-pole receptacle as shown in (Fig B) if a properly grounded outlet is not available.
If repair or replacement of the cord or plug is necessary, DO NOT connect the grounded wire to
either flat blade terminal. The wire with insulation having an outer surface that is green with or
without yellow stripes is the grounding wire.
The temporary adaptor should be used only until a
properly grounded outlet (Fig A) can be installed by
a qualified electrician. The green color rigid ear,
lug or the like extending from the adaptor must be
connected to a permanent ground such as a properly grounded outlet box cover. Whenever the
adaptor is used, it must be held in place by a metal
screw. (Fig C)
WARNING:
Improper connection of the equipment-grounding conductor can result in a risk of
electric shock. Check with a qualified electrician or service
person if you are in doubt as to whether the outlet is properly grounded.
DO NOT modify the plug provided with the equipment. If it will not fit the outlet,
have a proper outlet installed by a qualified electrician.
Note: In Canada, the use of a temporary adaptor is not permitted
by the Canadian Electrical Code.
PP
33
AAGGEE
Page 4

INTENDED USE OF THIS VACUUM
This vacuum has been specifically designed to
clean up concrete dust. Special filters reduce the
incidence of airborne dust that would be created
by other methods of cleaning.
DO NOT at any time attempt to substitute,
remove, bypass filters in the vacuum.
When installing a new filter use only the manufacturer’s approved vacuum filter.
ASSEMBLY INSTRUCTIONS
1) Remove vacuum, casters and attachments from
the shipping carton and set aside.
2) Carefully remove the hose cage, motor head,
and filter assembly. Set aside.
To insure a snug fit, make sure that the area around the lid and top edge
of the filter assembly’s vinyl sealing gasket is free of dirt and other foreign matter.
Before attempting to use or before cleaning with
this vacuum, be sure that you fully understand the
instructions for installing or cleaning the filter.
DO NOT use this unit until the owner’s manual has
been read. Improper use could cause damage to
the vacuum or special filters employed.
3) Turn the tank upside down. Insert casters into
caster mounts and press down to lock in place.
Return tank to the upright position.
4) Replace filter assembly, motor head and hose
cage.
CAUTION:
FILTER INSTALLATION
Cloth Filter
Installation:
The filter assembly in
this vacuum MUST be
correctly installed to
avoid damaging the cloth
filter and to make sure
the vacuum will maintain
its efficiency.
1) When installing the cloth filter assembly, the
flat side of the cloth must sit in the tank as shown
above so it does not interfere with the tank inlet.
NEVER operate the vacuum cleaner without the filter assembly properly installed.
Motor damage, lose of operating efficiency and re-circulation of material into
Cloth Filter Maintenance:
In order to maintain maximum efficiency of the
vacuum cleaner it is important to clean the cloth
filter each time the tank is emptied.
1) Remove the wire filter frame from the cloth filter and set aside.
2) Shake off loose particles and brush exposed surface with a soft bristle brush or carefully vacuum
off the particles.
3) Reassemble the wire filter frame to the cloth filter and place filter assembly in tank as shown.
NOTE: DO NOT WASH the cloth filter, shrinkage to
the cloth and damage to the gasket can occur.
CAUTION:
the work area will take place.
PP
AAGGEE
44
Page 5

OPERATION OF FILTER SHAKER
HOSE CAGE INSTALLATION
Filter
Shaker
Knob
The filter shaker is designed to keep the cloth filter from clogging. When loss of suction occurs or
every 30 minutes you need to use the filter shaker.
1) Turn OFF the vacuum.
2) Agitate the shaker by pushing down on top of
the knobs 3 or 4 times. Extreme pressure is not
required.
Note: After using the filter shaker if loss of suction still occurs, empty the vacuum tank.
1) Position the hose cage on the motor head making sure the power cord is through the raised loop
at the bottom of the cage.
2) Lift the holdown clamps up over the bottom wire
of the hose cage and snap down the clamps.
HOSE & TOOL ASSEMBLY
Hose &
Swivel
Connector
The hose and swivel connector are preassembled at the factory. To attach the
swivel connector to intake fitting on the
vacuum tank:
1) Line up the swivel connector slots with
retaining rivets on the intake.
2) Insert swivel connector and twist clockwise until rivets reset against slot end.
Wand
Assembly
1) Align the button lock of upper wand
section with the opening for the button
lock in the lower wand section and push
sections together.
2) Slide free end of hose into the grooved
end of upper wand.
PP
AAGGEE
Tool
Installation
1) Turn wand nut counterclockwise
approximately (4) complete turns. Insert
the tool into wand nut and coupling.
2) While holding tool in place, turn nut
clockwise until wand nut is fully locked.
55
Page 6

MOTOR HEAD REPLACEMENT PARTS LIST
_________________________________
Ref Description Qty Part
No No
_________________________________
1 #10-24 Acorn Nut 4 359807
2 Steel Washer 8 322164
3 Dome Cover w/Handle 1 363057
4 Nylon Spacer 4 332186
5 #10-24 Hex Nut w/Lockwasher 7 331201
6 Foam Silencing Disc 1 359300
7 #12-14 X 1/2" Screw 6 314595
8 #12 Lockwasher 3 364037
9 #10-24 X 1" Screw 4 335169
10 #10-32 Screw 1 393258
11 Electrical Lead w/Terminals 1 307440
12 Screw Protector 6 341649
13 Tapered Handle 2 497231
14 3” Coiled Spring 2 459828
15 .25 Flat Washer 2 431214
16 Nylon Bushing 2 497258
17 Cap Plug 1 443344
18 Switch Assembly 1 324140
19 Yellow Wire Connector 2 350648
20 #10-24 X 3/4" Screw 1 337315
21 Dome Assembly 1 438014A
22 Strain Relief 1 434299
23 Motor Holdown 1 315737
24 30 Ft, 16/3 Power Cord 1 306819
25 Gasket 1 303011
26 115 Volt, 2 HP Motor 1 389684
27 Purse Lock 1 365483
28 Circle Gasket 1 378607
29 Cover Assembly 1 312207
30 Filter Shaker Frame 1 496472
_________________________________
PP
AAGGEE
66
Page 7

VACUUM TANK REPLACEMENT PARTS LIST
__________________________________
Ref Part Description Qty Part
No No
__________________________________
1A 8 Gal CRS Tank Assy (w/o Casters) 1 460028A
1B 10 Gal CRS Tank Assy (w/o Casters) 1 456055
2 Inlet Fitting 1 356298
3 .281” Steel Tubular Rivet 3 348511
1
/2” Hose Connector 1 349445
41
513/4” X 8” Wheel 2 330396
1
/2” Flat Washer 4 315435
6
1
7
/2” Palnut 2 319619
821/2” Swivel Caster 2 307408
9A 14” Ring Dolly (8 Gallon Tank) 1 342971A
9B 14” Ring Dolly (10 Gallon Tank) 1 342971
10 Lift Handles (10 Gallon Tank Only) 2 484091
11 .187” Steel Tubular Rivet 6 348503
12 Holdown Clamps 3 358312
__________________________________
REPLACEMENT FILTERS AND TOOLS
______________________________________________________________
(4)
(5)
(6)
(7)
PP
AAGGEE
77
______________________________________________________________
______________________________________________________________
Ref Part Description Part
No No
1 Deep Wire Filter Frame 496235
2 14” Filter Ring 316415
3 14” Concrete Cloth Filter w/Gasket 459798
4 10 Ft Hose 344680
4A Swivel Hose Connector 349445
5 14” Metal Floor Tool 456357
6 Hose Cage 313408
7 5 Ft, 2 Pc Metal Wand 429562
Page 8

TROUBLE SHOOTING GUIDE
Always disconnect power cord before servicing the vacuum.
PROBLEM: Loss of Vacuum.
POSSIBLE CAUSE: POSSIBLE SOLUTION:
1. Dry filter assembly clogged. 1. Use the filter shaker or clean cloth filter
2. Clogged hose or wand. 2. Remove obstruction.
3. Tank rim damaged. 3. Replace tank.
4. Loose or broken fan. 4. Contact manufacturer or service center.
5. Motor not working. 5. Contact manufacturer or service center.
6. Gasket worn. 6. Replace gasket.
PROBLEM: Motor is not running.
POSSIBLE CAUSE: POSSIBLE SOLUTION:
1. Broken switch. 1. Contact manufacturer or service center
2. Power cord defective. 2. Contact manufacturer or service center.
3. Motor defective. 3. Contact manufacturer or service center.
4. Blown fuse or tripped circuit breaker. 4. Replace fuse or reset circuit breaker.
at the wall panel.
CAUTION:
(See page 4 - Cloth Filter Maintenance).
WARNING:
Repairs should only be performed by an authorized service center.
DYN-812D & 1012 WARRANTY & REGISTRATION
We warrantee to the original purchaser this vacuum
cleaner against defects in material and workmanship
for a period of 1 year, motor and steel tank 2 years
from the date of delivery. Please note the following
conditions pertaining to this warranty.
1) Applies only to the original owner and is not transferable.
2) Machine will not have been dismantled or tampered
with in any way.
3) Normal wear items will be warranted from manufacturing defects for up to 90 days from date of purchase
including the following items, but not limited to:
Accessories; Belts; Bearings; Capacitors; Carbon
Brushes; Casters; Electric Cords; Finishes;
Filters; Floats; Switches; and the like.
4) This warranty does not apply to any repair arising by
reason of misuse, neglect, abuse, or to proprietary
parts.
5) This warranty is in lieu of and excludes every condition or warranty not herein expressly set out and all
liability for any form of consequential loss or damage
is hereby expressly excluded.
6) This Warranty is limited to repair or replacement of
covered components and reasonable labor expenses.
Warranty Registration:
It is purchaser’s responsibility to fill out the warranty
card included in the manual package and mail it to
Onfloor. This will register your purchase and start your
warranty. Failure to send us this card in one week upon
receipt of the machine may void the warranty.
PN 225878 - DYN812D & DYN1012D Vacuum Manual - Printed in USA 05/01/07
PP
AAGGEE
®
88
 Loading...