

Page 1

Instruction Manual
er Model
Wandhalterung Für Dynaudio Kompakt-Lautsprecher
Bedienungsanleitung
Wall Mount Bracket For Dynaudio Compact Loudspeak
Page 2

Introduction
We thank you for choosing this quality wall-mount bracket
which has been designed to work particularly well with the
Dynaudio compact loudspeaker models Audience 42 an 52.
The bracket has been designed to provide a very rigid and
stable support, thus allowing the speaker(s) to perform at
optimum levels in a wide variety of positions. The unique curved shape adds strength to the mounting assembly while also
offering the flexibility of both vertical and horizontal adjustment capabilities. Therefore the loudspeaker(s) may be precisely angled to obtain the optimum listening axis in any
room. The speakers will be mounted in place at a distance
within 6 cm of the wall boundary, and the mounting bracket
will essentially be hidden behind the speaker cabinet.
Mounting surfaces
WARNING
Carefully evaluate the composition, construction and
strength of the surface you are mounting to.
Take care to avoid concealed water (plumbing) and
power (electric) supplies which may be located behind
the desired mounting location(s).
2 11
Instruction Manual
Page 3
Tools required
Spirit level
Power Drill
3 mm masonry drill bit
No2 Pozidriv screwdriver
Assembly/Installation
Before assembly you should check that the hardware kit is
complete. A complete kit consists of the following:
4 curved steel plates
8 wood screws
2 washers
1 wrench
2 bolts
2 nuts
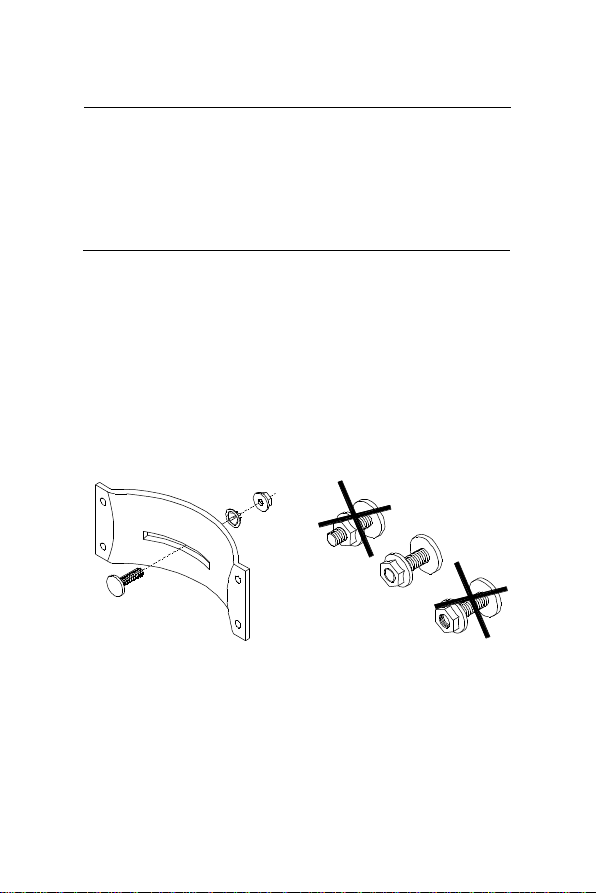
First put the bold and the plain washer through the slot of the
smaller curved plate. Then, screw the nut flush onto the bolt,
as shown in the picture at the right.
310
Page 4

Next, drill the holes and attach the smaller plate concentric
onto the speaker cabinet. The holes should measure 3mm in
diameter but shouldn’t be deeper than 15mm to prevent the
screws of breaking through into the cabinet enclosure.
NOTE
Sometimes it is helpful to connect the loudspeaker
cable before completing the assembly. The mounting
bracket plate could be positioned right above the
terminals of the speaker(s).
Audience 42
Audience 42W
Audience 52
Audience 42C
4
Page 5

Decide upon the location where the loudspeakers will be
mounted and mark the wall at the edges of the longer plate.
Also mark the location of the holes in the wall, having first
checked the vertical positioning with the level.
Fix the plate with screws/wall plugs that are suitable for the
consistency and materials of your wall.
Please note that the hole at the end of the slot should be positioned at the top of the plate.
5
Page 6

You may then connect the plates by putting the nut of the
shorter plate through the slot on the longer plate. Then tighten the nut with the wrench to complete the installation.
Congratulations – and happy listening!
6
Page 7

Dynaudio A/S
Version 25.01.2001
Sverigesvej 15
DK - 8660 Skanderborg
Phone: +45 8652 34 11
Fax: +45 86 52 31 16
e-mail: d@dynaudio.com
www.dynaudio.com
 Loading...