

Page 1
Owner’s Manual
Xeo Hub / Extender / Link /
Dynaudio Connect
English
Page 2

All Apple products are trademarks of Apple Inc.
All Sony products are trademarks of Sony Electronics Inc.
All Sonos products are trademarks of Sonos Inc.
The Bluetooth word mark and logos are registered trademarks owned by Bluetooth SIG, Inc.
All Google products are trademarks of Google Inc.
Other trademarks and trade names are those of their respective owners.
An update to this manual may be necessary due to product improvements and new functions.
The latest version of this manual is available on the Internet at www.dynaudio.com/support/manuals
2 Dynaudio
Page 3

Thank you
for choosing Dynaudio Xeo.
Xeo combines the latest wireless technology with impressive sound quality and makes listening to
music truly comfortable and easy.
The next few pages contain important information on connecting the system and its operation to
ensure perfect function and the best-possible sound quality.
We hope you have a great time listening to your favorite music,
Dynaudio
About this products
Xeo consists of several high-quality components that are optimally matched. When combined, they
can fulll the most demanding requirements for a wireless multi-room and multi-source system.
Xeo can be used with any device that plays music: computer, mobile phone, personal player, video
system, docking station, network player, CD player, streaming client, TV, Hi-Fi audio system, anything.
The music from your computer sounds great. Videos from the internet sound great. Even your
smartphone sounds great. Finally. See “The Xeo system” on page 10 for information about the Xeo
components and the combination possibilities.
About this manual
This manual describes all of the available Xeo components. It is possible that only a few of the
descriptions are relevant to you, depending on your system conguration.
3Hub / Connect / Extender / Link
Page 4

Table of Contents
Important Safety Instructions 5
Unpacking 7
Packaging material 7
Disposal 7
Scope of delivery 8
Xeo Hub / Dynaudio Connect 8
Xeo Extender 9
Xeo Link 9
The Xeo system 10
Components 10
Combination examples 11
Remote control 12
Control elements 12
Xeo Hub 13
Connections and control elements 13
Connection 14
Dynaudio Connect 15
Connections and control elements 15
Basic setup 16
Connection 17
Bluetooth setup 17
WiFi setup 18
Xeo Extender 19
Connections and control elements 19
Connection 20
Xeo Link 21
Connections and control elements 21
Connection 22
Division into audio zones 23
Malfunctions 24
Technical data 25
Annex 26
Connection options for Hub/Connect 26
Declaration of Conformity (EU only) 28
Reminding (USA and Canada only) 29
IC NOTICE 30
MPE Reminding 30
4 Dynaudio
Page 5
Important Safety Instructions
1. Read these instructions.
2. Keep these instructions.
3. Heed all warnings.
4. Follow all instructions.
5. Do not use this apparatus near water.
6. Clean only with dry cloth.
7. Do not block any ventilation openings. Install in accordance with the manufacturer‘s instructions.
8. Do not install near any heat sources such as radiators, heat registers, stoves, or other apparatus
(including ampliers) that produce heat.
9. Do not defeat the safety purpose of the polarized or grounding-type plug.
USA and Canada only: A polarized plug has two blades with one wider than the other. A
grounding type plug has two blades and a third grounding prong. The wide blade or the third
prong are provided for your safety.
If the provided plug does not t into your outlet, consult an electrician for replacement of the
obsolete outlet.
10. Protect the power cord from being walked on or pinched particularly at plugs, convenience
receptacles, and the point where they exit from the apparatus.
11. Only use attachments/accessories specied by the manufacturer.
12. Unplug this apparatus during lightning storms or when unused for long periods of time.
13. Refer all servicing to qualied service personnel. Servicing is required when the apparatus has
been damaged in any way, such as power supply cord or plug is damaged, liquid has been spilled
or objects have fallen into the apparatus, the apparatus has been exposed to rain or moisture,
does not operate normally, or has been dropped.
14. WARNING: To reduce the risk of re or electric shock, this apparatus should not be exposed
to rain or moisture and objects lled with liquids, such as vases, should not be placed on this
apparatus.
15. To completely disconnect this equipment from the mains, disconnect the power supply cord plug
from the receptacle.
16. The mains plug of the power supply cord shall remain readily operable.
5Hub / Connect / Extender / Link
Page 6
Power supply unit
WARNING
RISK OF ELECTRIC SHOCK! DO NOT OPEN!
When plugged in, a dangerous electrical voltage is present inside the housing of the supplied
Xeo power supply unit.
►
To reduce the risk of electric shock, do not open the power supply unit and do not expose it to
rain or moisture. No user serviceable parts inside.
►
Refer servicing to qualied personnel.
►
Make sure that the housing is not damaged. Exchange the power supply unit for a new one if it
has been damaged.
Remote control battery
WARNING
Danger of explosion
Danger of explosion if battery is incorrectly replaced.
►
Replace only with the same or equivalent type.
WARNING
Chemical burn hazard
If the coin/button cell battery is swallowed, it can cause severe internal burns in just 2 hours
and can lead to death.
►
If you think batteries might have been swallowed or placed inside any part of the body, seek
immediate medical attention.
6 Dynaudio
Page 7
Unpacking
After unpacking, make sure the system is complete and check the device and all accessories for
transport damage. Transport damage may be expected if the packaging is already severely harmed.
Do not attempt to commission a damaged device. If the contents are incomplete or damaged, please
contact your Dynaudio Xeo distributor. Distributor addresses can be found in the Internet at www.
dynaudio.com.
Packaging material
The packaging has been designed so that it may be reused if it was not damaged during transport.
Keep the packaging and use the original packaging for all further transport.
Disposal
Disposal of used electrical and electronic equipment (applicable in European countries with
separate collection systems for this equipment)
This symbol on the product or its packaging indicates that the product may not be treated as
household waste. Instead it must be handed over to the applicable collection point for the recycling of
electrical and electronic equipment. By ensuring this product is disposed of correctly, you will help
prevent potential negative consequences for the environment and human health. The recycling of
materials helps to conserve natural resources. For more detailed information on recycling this product,
please contact your local authority, community waste disposal oce, or the shop where you purchased
the product.
7Hub / Connect / Extender / Link
Page 8
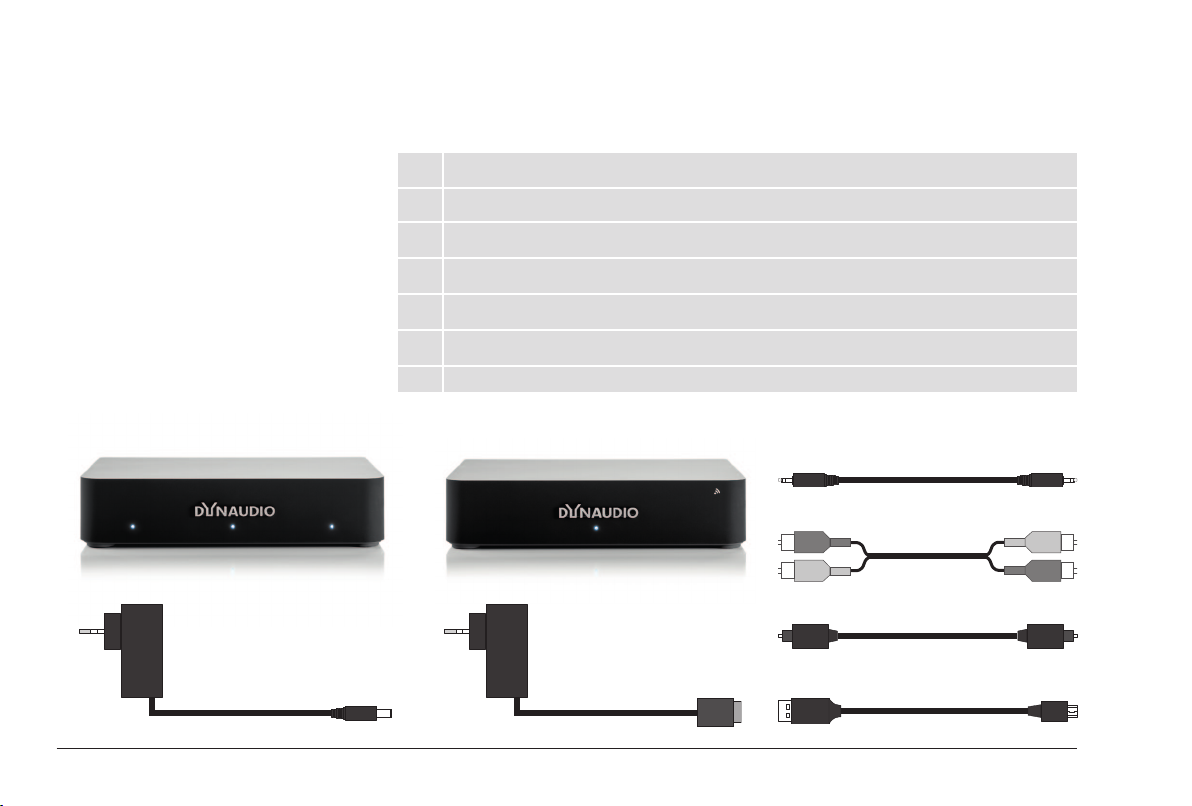
Scope of delivery
Xeo Hub / Dynaudio Connect
1 Xeo Hub or Dynaudio Connect
1 Xeo power supply unit (country-specic version), Hub: micro USB, Connect: DC jack
1 stereo analog cable (jack 3.5 mm – 3.5 mm, length: 1.5 m)
1 stereo analog cable (RCA – RCA, length: 1.5 m)
1 optical digital cable (Toslink – Toslink, length: 1.5 m)
1 USB cable (Hub: USB – mini USB, Connect: USB – micro USB, length: 1.5 m)
1 Xeo rst time setup manual (quick guide for installation, not shown)
Connect Hub
8 Dynaudio
Page 9
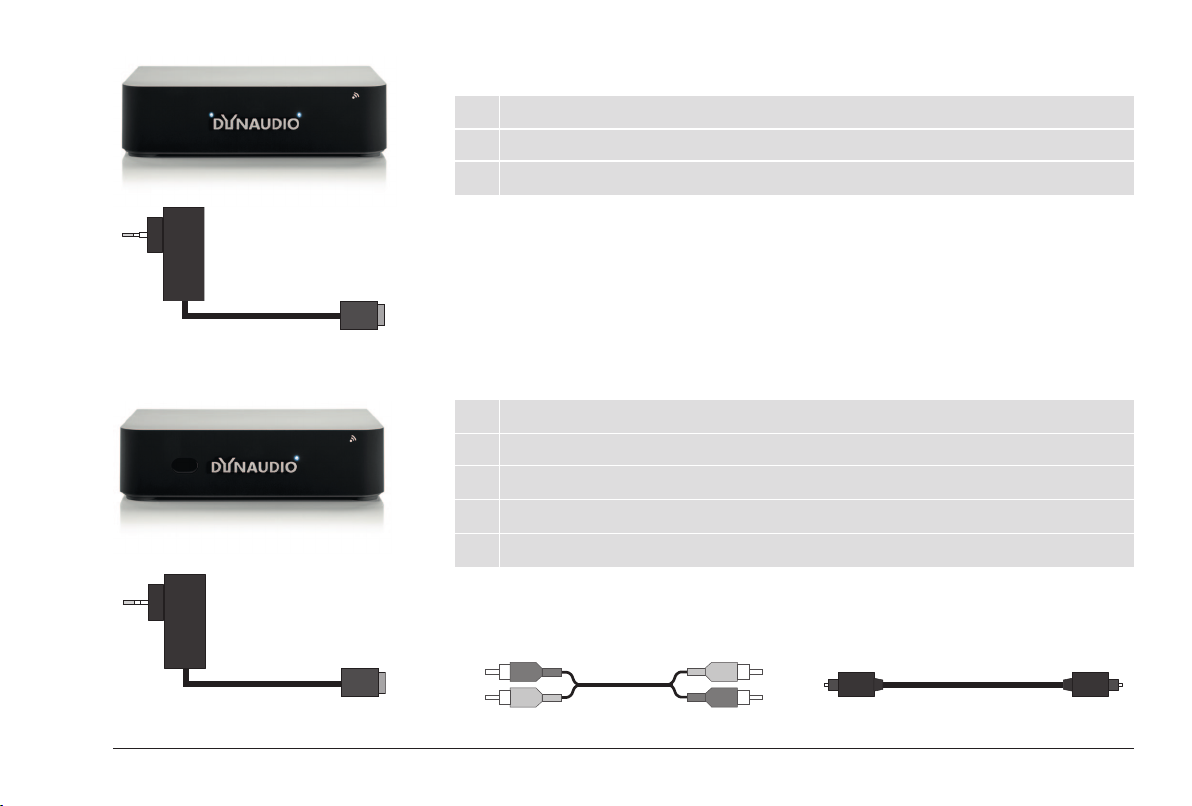
Xeo Extender
1 Xeo Extender
1 Xeo power supply unit with micro USB cable (country-specic version)
1 Xeo rst time setup manual (quick guide for installation, not shown)
Xeo Link
1 Xeo Link
1 Xeo power supply unit with micro USB cable (country-specic version)
1 stereo analog cable (RCA – RCA, length: 1.5 m)
1 optical digital cable (Toslink – Toslink, length: 1.5 m)
1 Xeo rst time setup manual (quick guide for installation, not shown)
9Hub / Connect / Extender / Link
Page 10
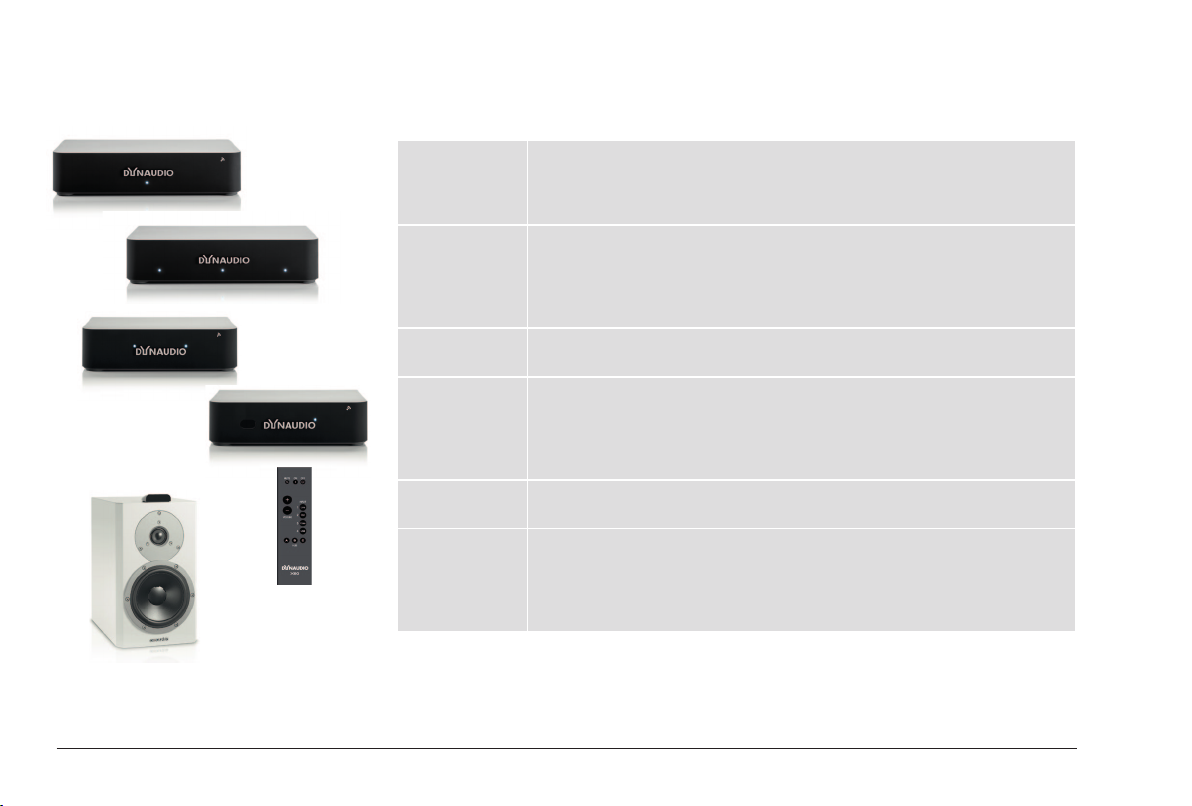
The Xeo system
Components
Xeo Hub The Xeo Hub is the control center for the Xeo system. Signal sources such as
Dynaudio
Connect
Xeo Extender
Xeo Link The Xeo Link receives wireless signals from a Xeo Hub/Connect or Extender
Xeo remote
control
Xeo speakers The active Xeo 2, Xeo 4, and Xeo 6 speakers receive the wireless signals from
tuners, receivers, CD players, TVs, streaming clients, network players, MP3
players, or computers are connected to it. Signals are sent via radio from the
Hub to the speakers (or Xeo Link) where they are then played back.
The Connect is based on the Hub, sharing its form factor and oering the
same analog and digital audio inputs including a USB input for computers,
while adding Wi-Fi integration for the home network, Bluetooth connectivity for
streaming from mobile devices such as smartphones, and 24/192 compatibility
on the optical and coaxial digital audio inputs.
The Xeo Extender extends the reception range of the Hub/Connect. As a result,
Xeo speakers or Link can be operated further away from the Hub/Connect.
and outputs analog and digital signals from its connections. As a result, you can
also connect active subwoofers, active speakers, or other components to the
Xeo system. Xeo Link can also be connected with a 1st generation Xeo Hub
(transmitter).
The Xeo remote control can be used to turn the speakers on and o, change the
volume, and select a Hub/Connect and its connected signal sources.
the Hub/Connect and play them back in optimal sound quality. They have an
integrated amplier and can be controlled with the Xeo remote control. A display
indicates the operational state of the system and lets you switch it on/o or
change the volume without using the remote control.
10 Dynaudio
Page 11
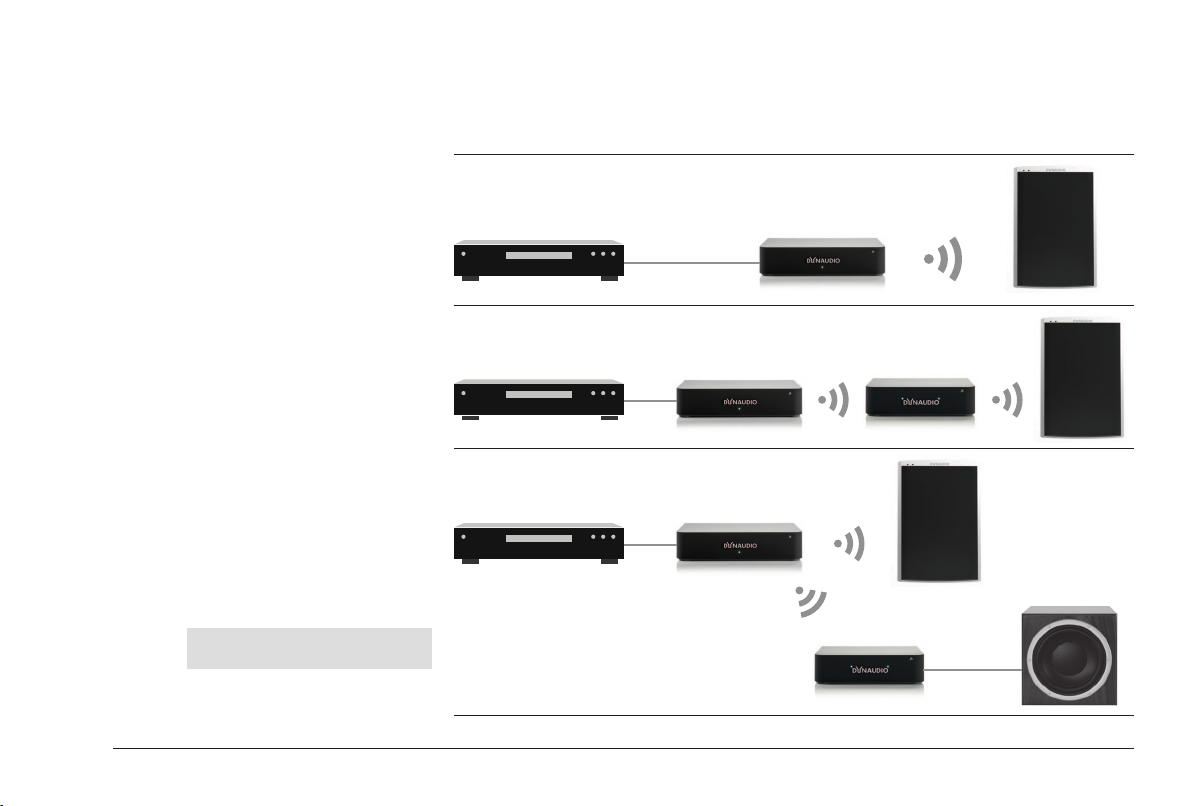
With Hub or Connect:
Analog/digital audio sources +
Hub or Connect + Xeo speaker
For extended range:
Analog/digital audio sources
+ Hub or Connect + Extender +
Xeo speaker
For additional speakers:
Analog/digital audio sources
+ Hub or Connect + Xeo speaker
plus
+ Link + active component
(e.g. active subwoofer, active speakers,
or power amplier and passive speakers)
Combination examples
Below you will nd several examples of Xeo component combinations. The high level of exibility in
the Xeo system enables even more variants. Ask your Dynaudio distributor to nd the perfect solution
for your needs.
Hub or Connect
Hub or Connect
Hub or Connect
Extender
NOTE: Extender and Link may also be
combined.
Link
11Hub / Connect / Extender / Link
Page 12
Connection and operation
This section describes the connections and control elements for the Xeo components. Please contact
your Dynaudio Xeo distributor if you have any problems with connection and start-up. Distributor
addresses can be found in the Internet at www.dynaudio.com.
Remote control
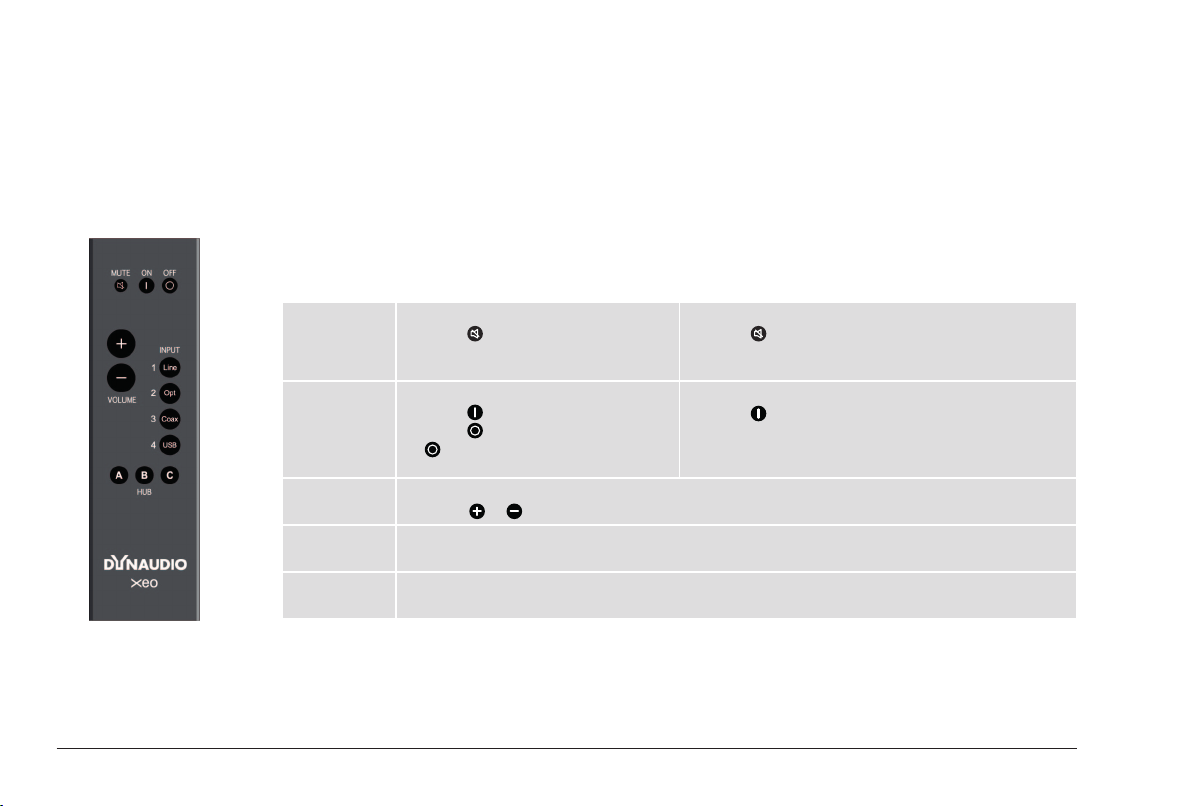
The Xeo remote control can be used to turn the speakers on and o, change the volume, and select a
Hub/Connect and its connected signal sources. Commands will always apply to both of the speakers.
Control elements
MUTE
ON/OFF
VOLUME Volume control
INPUT
1/2/3/4
HUB
A/B/C
Muting the speaker
► Press to mute or unmute the
speakers.
Speaker on/o
► Press
► Press for standby mode. Press
► Press
Signal source
► Press to select a signal source.
Selecting the Hub/Connect
► Press to select one of the three possible Hubs/Connects A, B, or C.
to switch on the speakers.
for at least 5 seconds to put the
speakers to sleep mode.
or to raise or lower the volume level.
Fixing the volume
► Press for at least 2 seconds to set a high volume
for the speakers (see owner´s manuals of the Xeo
speakers).
Reset
► Press for at least 5 seconds to reset the speakers
to the factory settings.
12 Dynaudio
Page 13
Xeo Hub
Connections and control elements
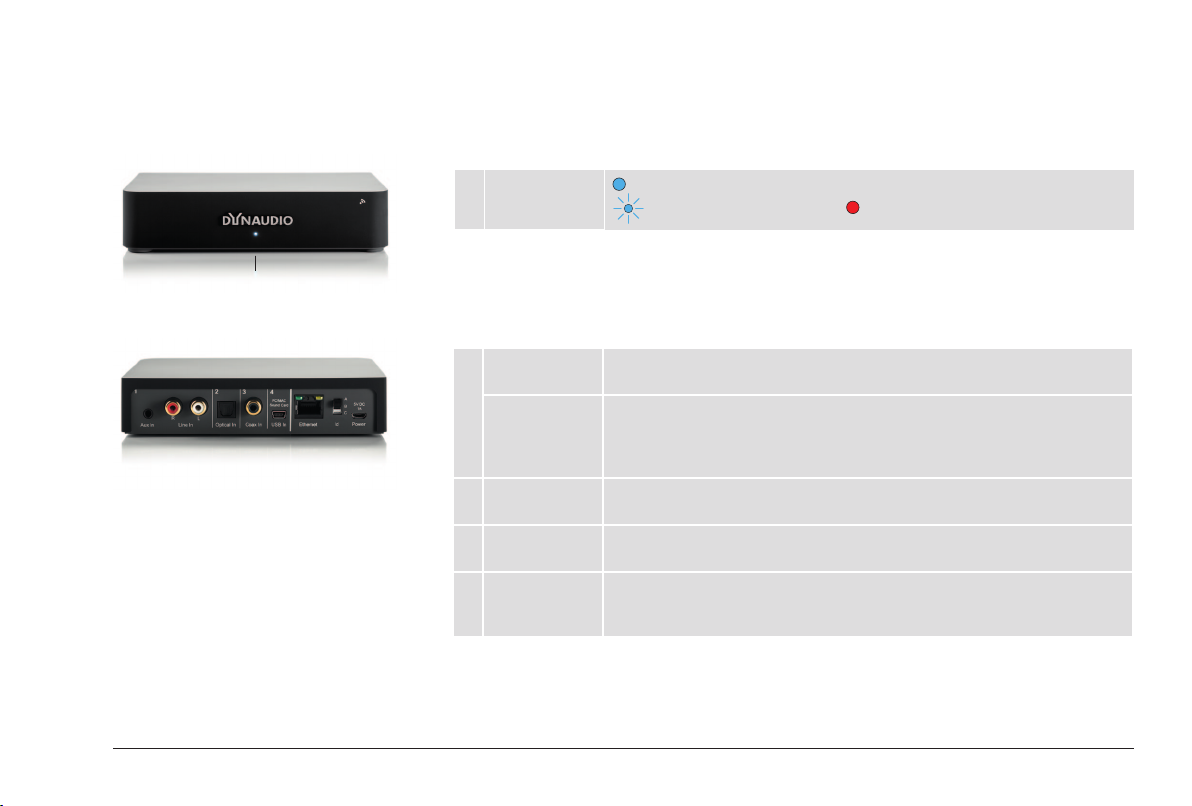
Front plate
1 Operational
state
1
Rear plate – inputs
1 Aux In Input for cable with stereo jack (3.5 mm stereo)
Line In Input for cable with RCA plug
2 Optical In Input for optical digital cable (Toslink)
3 Coax In Input for electrical digital cable (coax)
4 USB In Input for USB cable
= connection to a speaker, Extender, or Link
= searching for a connection, = no connection
Connect devices here that have an output for the stereo jack.
Connect devices here that have an output for the RCA plug.
NOTE: If a device is connected in parallel at Aux in, only that device will be
played back.
Connect devices here that have an optical digital output.
Connect devices here that have an electrical digital output.
Connect your computer’s USB output here. The Hub will then work as a
sound card.
13Hub / Connect / Extender / Link
Page 14
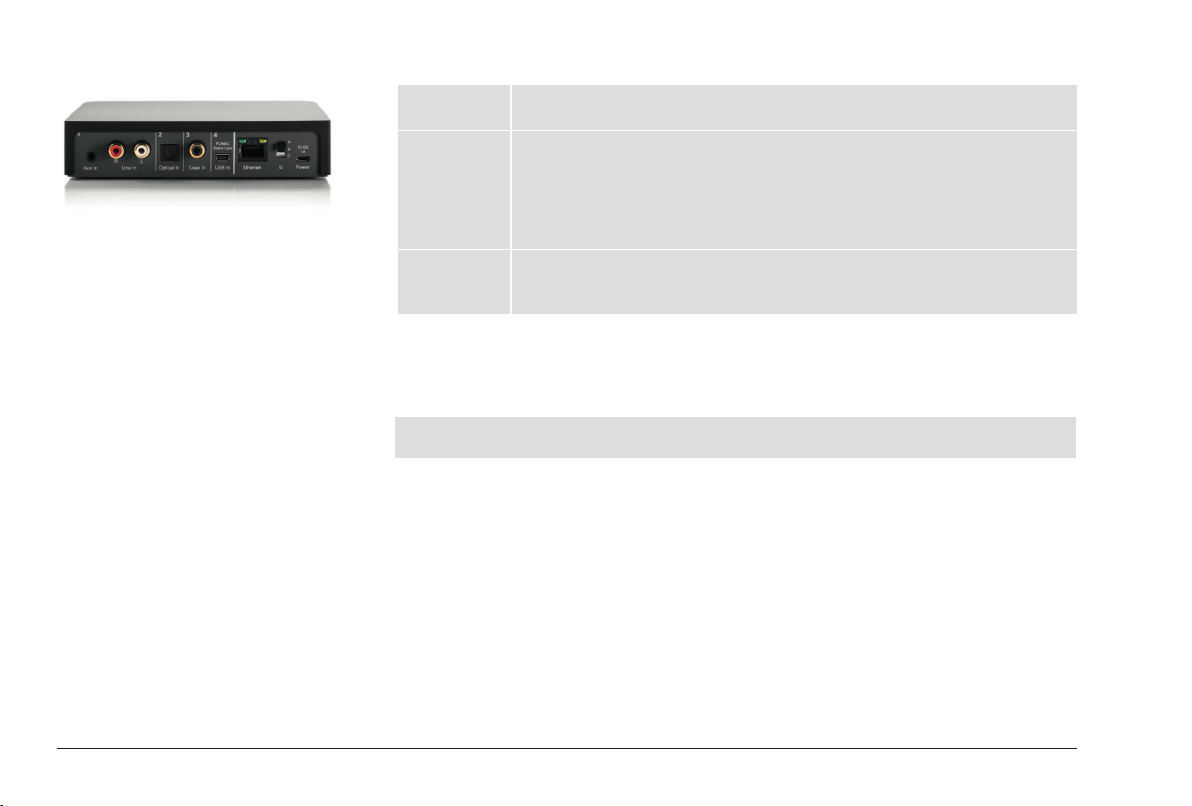
Rear plate – other connections and control elements
Ethernet Network connection
Id Transmission channel
Power Connection for power supply unit
Intended for future use.
If you assign an ID, you can select the desired Hub from several Hubs using the
remote control.
In addition, each ID has its own transmission channel: A = 2.4 GHz, B = 5.2 GHz,
C = 5.8 GHz. If the transmission quality is poor or there is a disruption caused by
other radio systems, changing to a dierent channel may produce an improvement.
Connect the delivered Xeo power supply unit here.
Do not use a dierent power supply unit!
Connection
► Connect the Hub to the mains voltage using the POWER connection and the Xeo power supply
unit. Do not use a dierent power supply unit!
NOTE: If you connect Xeo Hub via a USB cable to a computer (that is switched on), you do not need an
additional mains connection.
► Connect your signal source to the appropriate input on the Hub.
For a selection of signal sources and options for connecting to the Hub or Connect see
“Connection options for Hub/Connect” on page 26.
14 Dynaudio
Page 15
Dynaudio Connect
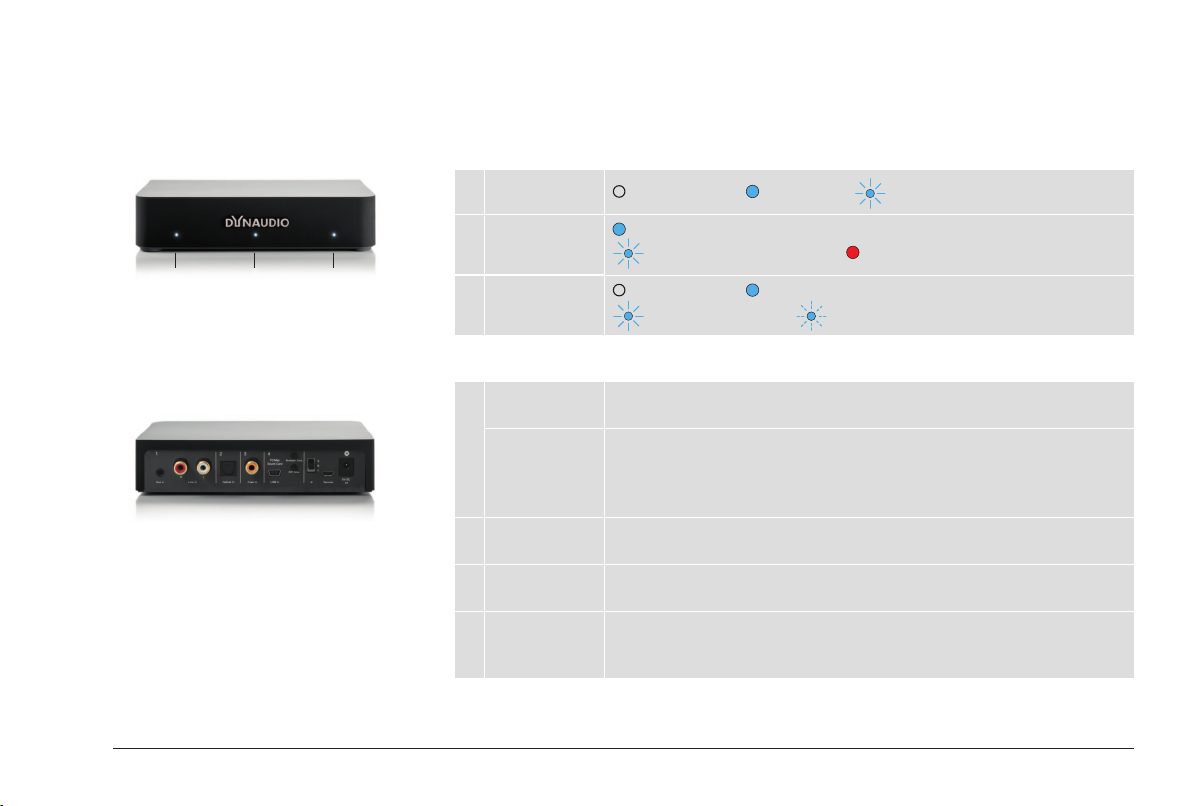
Connections and control elements
Front plate
1 Bluetooth
= not connected, = connected, = pairing mode
2 Operational
state
1
2 3
3 WiFi
= connection to a speaker, Extender, or Link
= searching for a connection, = no connection
= not connected, = connected,
= access point mode, = WiFi booting / WPS mode (for 1 minute)
Rear plate – inputs
1 Aux in Input for cable with stereo jack (3.5 mm stereo)
Line in Input for cable with RCA plug
2 Optical In Input for optical digital cable (Toslink)
3 Coax In Input for electrical digital cable (coax)
4 USB In Input for USB cable
► Connect devices here that have an output for the stereo jack.
► Connect devices here that have an output for the RCA plug.
NOTE: If a device is connected in parallel at Aux in, only that device will be
played back.
► Connect devices here that have an optical digital output.
► Connect devices here that have an electrical digital output.
► Connect your computer’s USB output here.
▼ The Connect will then work as a sound card.
15Hub / Connect / Extender / Link
Page 16
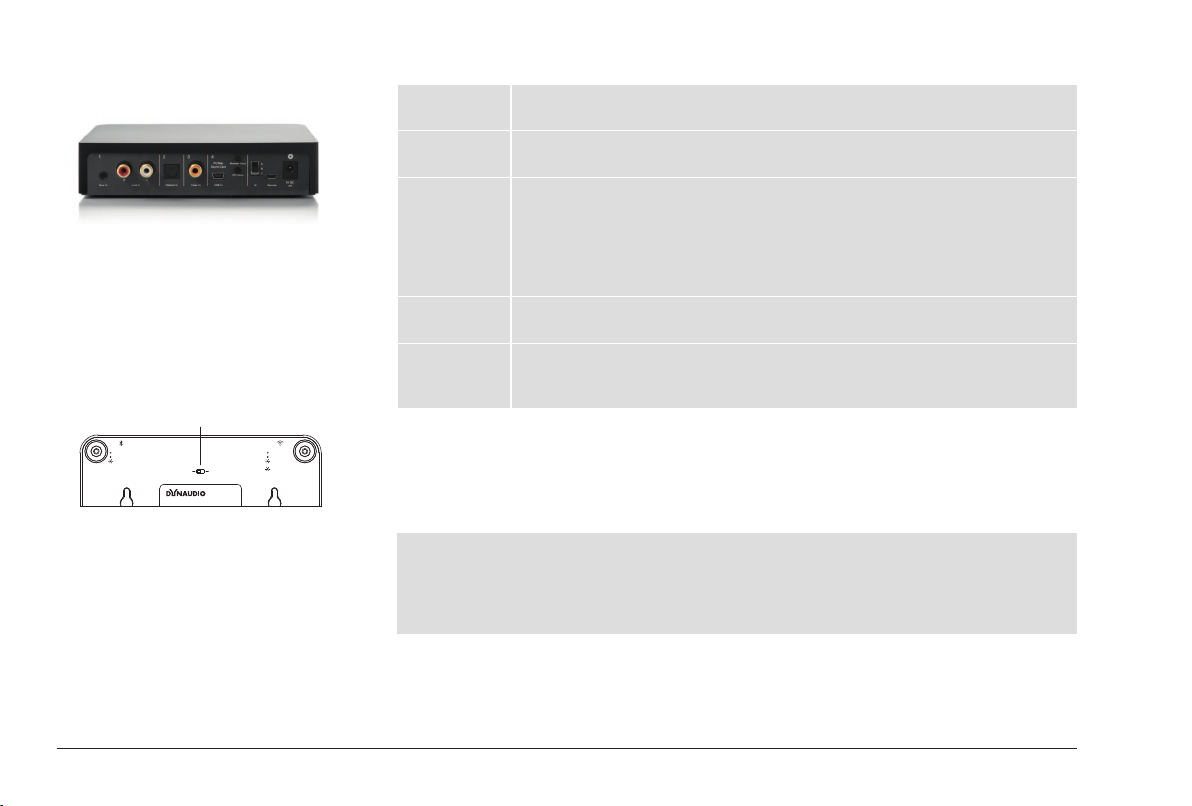
Bluetooth
Not Connected
Connected
Pairing Mode
1
Multiroom
High Resolution
3 Zones
1 Zone
16 Bit / 48 kHz
24 Bit / 96 kHz
Model: Dynaudio Connect, ID 4573141
Dynaudio A/S, Sverigesvej 15, DK-8660 Skanderborg
Rear plate – other connections and control elements
Bluetooth
Setup
WiFi Setup Key for WiFi setup
Id Transmission channel
Service USB service connector
Power Connection for power supply unit
WiFi
Not Connected
Connected
Slow Blinking:
Acess Point Mode
Fast Blinking:
WPS Mode
Basic setup
1. On the bottom side of the housing (1) set the broadcast mode of the Connect:
– High Resolution: Resolution is set to 24 bit/96 kHz. In this mode just one zone can be used.
– Multiroom: Resolution is set to 16 bit/48 kHz. In this mode up to three zones can be used
NOTE: Xeo 4 and Xeo 6 speakers do not support hi-res broadcast. Focus XD speakers will need the latest
firmware upgrade to support 24 Bit/96 kHz broadcast.
When changing broadcast mode of Dynaudio Connect, speakers will need to reboot by
disconnecting mains power to enable new broadcast mode. Reboot can also be done by press and
hold A, B or C button on the remote control.
2. Set the Id switch on the rear plate to A, B or C
Key for Bluetooth setup
► Press to start Bluetooth setup (see “Bluetooth setup” on page 17).
► Press to start WiFi setup (see “WiFi setup” on page 18).
If you assign an ID, you can select the desired Hub from several Hubs using the
remote control.
In addition, each ID has its own transmission channel: A = 2.4 GHz, B = 5.2 GHz,
C = 5.8 GHz. If the transmission quality is poor or there is a disruption caused by
other radio systems, changing to a dierent channel may produce an improvement.
For service purposes only.
► Connect the delivered Xeo power supply unit here.
Do not use a dierent power supply unit!
16 Dynaudio
Page 17
Connection
PC/Mac
Sound Card
Bluetooth Setup
WiFi Setup
Id
A
B
C
Service
4
F
1. Connect your signal source to the appropriate input on the Connect.
For a selection of signal sources and options for connecting to the Connect see “Connection
options for Hub/Connect” on page 26.
2. Connect the Connect to the mains voltage using the POWER connection and the Xeo power
supply unit. Do not use a different power supply unit!
3. Connect power to your speakers and power on speakers.
4. Select A, B or C on your remote control.
Make sure it matches to your settings on the Connect, either A, B or C.
5. Choose input 1 – 4 on the remote control.
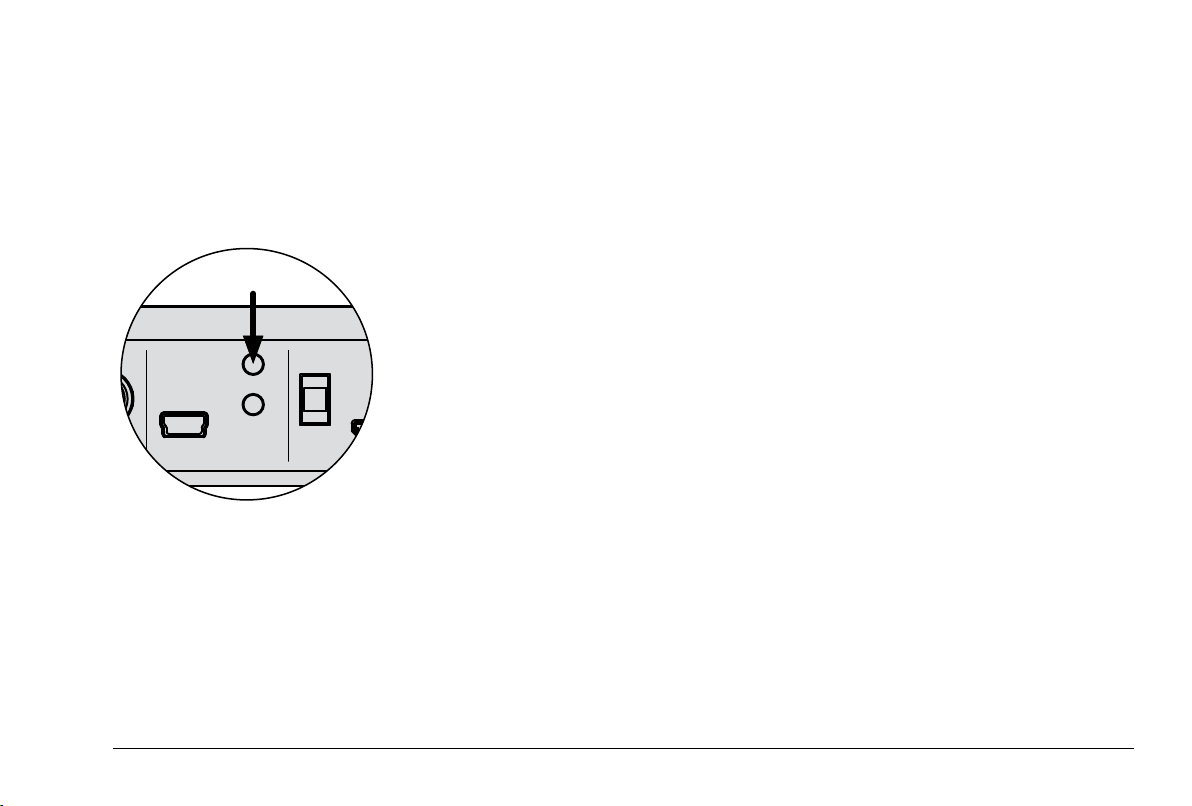
Bluetooth setup
Pairing is necessary when using a Bluetooth device for the rst time. After a successful pairing the
Bluetooth device can be easily used as an audio source.
Pairing a device:
1. Press Bluetooth Setup on the rear plate.
2. Within 1 minute accept the pairing on your device.
3. From now on just select the wanted Connect A, B or C from the list of Bluetooth devices.
17Hub / Connect / Extender / Link
Page 18
PC/Mac
Sound Card
Bluetooth Setup
WiFi Setup
Id
A
B
C
Service
4
F
1.
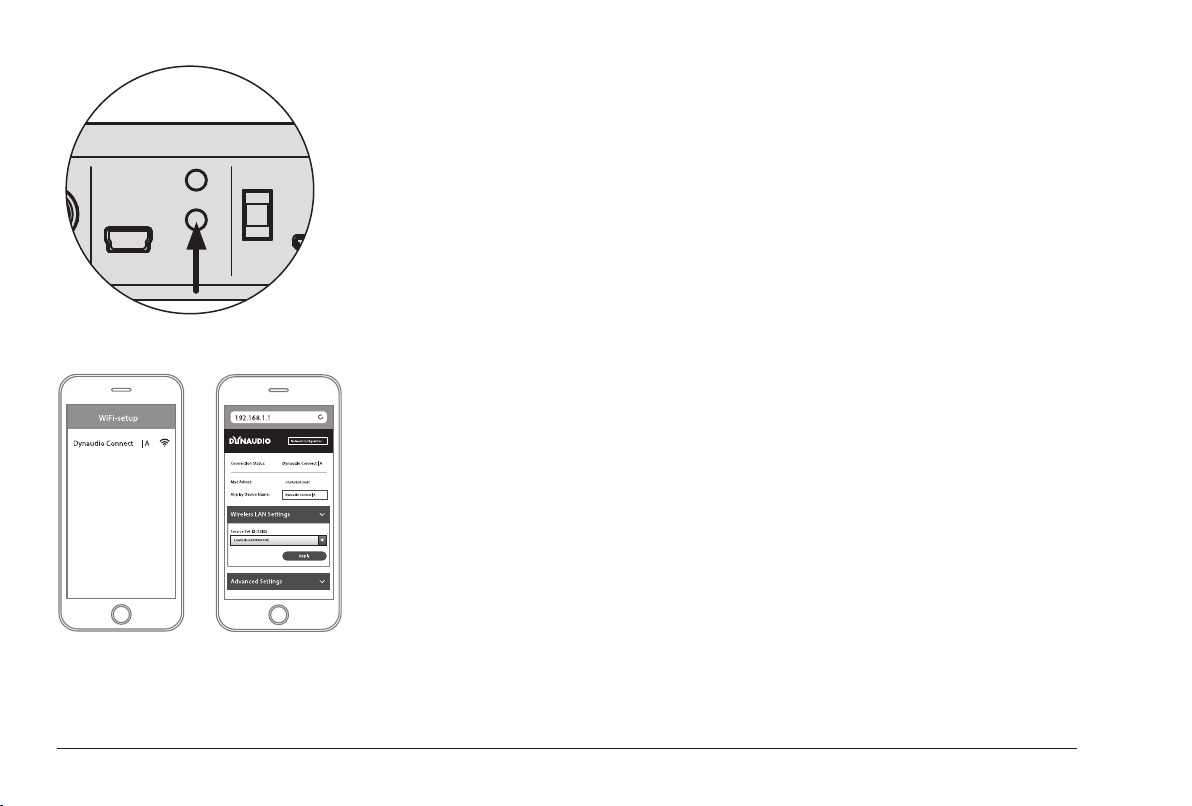
WiFi setup
Setting up WiFi is necessary when using a WiFi connection for the rst time.
Setting up WiFi:
1. Press and hold the WiFi setup button for 3 seconds.
▼ Connect is now searchable from an external device.
▼ The WiFi light (3) on the front (see “Front plate” on page 15) starts blinking slowly.
2. Find Dynaudio Connect in your list of WiFi devices and connect to it.
3. Enter http://192.168.1.1 into the address window of your internet browser and follow the setup
wizard to connect to your home network.
4. From now on just select Dynaudio Connect A, B or C from the list of Bluetooth devices (if not
connected automatically) and select button 4 on your remote control for playing back via WiFi and
streaming from DLNA.
2.
3.
18 Dynaudio
Page 19
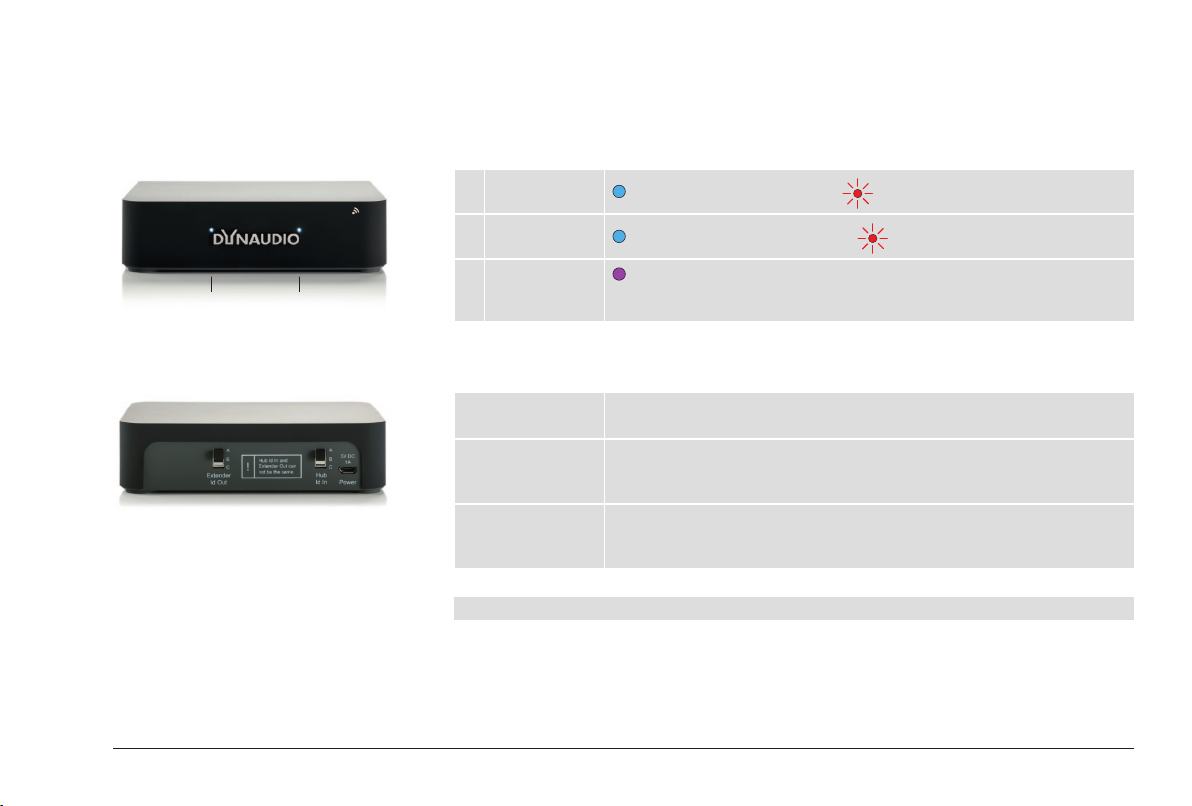
1 2
Xeo Extender
Connections and control elements
Front plate
1 Reception
status
2 Transmission
status
1
Id error
+
2
Rear plate
Extender
Id Out
Hub
Id In
Power Connection for power supply unit
NOTE: Extender Id Out and Hub Id In must not be identical!
= connected to a Hub/Connect, = no connection possible
= connected to a speaker or Link, = no connection possible
= The same ID was selected for Hub Id In and Extender Id Out.
This is not permitted.
Transmission ID to speaker
► Select a ID. Select the same Id at the speaker.
Reception ID from Hub/Connect
► Select the same ID as the one on the Hub/Connect that provides the
signal.
► Connect the delivered Xeo power supply unit here.
Do not use a dierent power supply unit!
19Hub / Connect / Extender / Link
Page 20
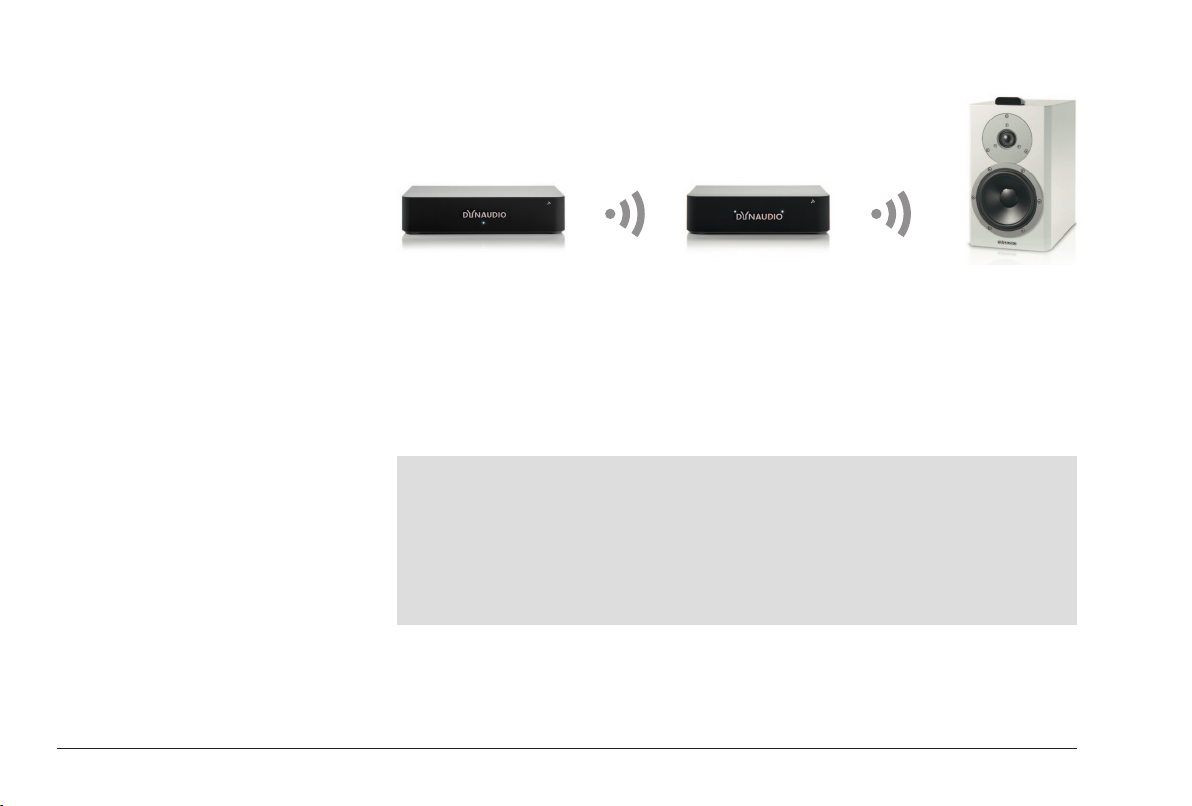
Connection
Hub/Connect Extender
1. Connect the Power socket to the voltage supply via the Xeo power supply unit.
Do not use a dierent power supply unit!
2. Select the same ID on the Hub/Connect and Extender for the Hub Id In.
E.g. Hub/Connect: Id = B → Extender: Hub Id In = B.
3. Select any (other) ID on the Extender for the Extender Id Out.
It may not be identical to the Hub Id In.
E.g. Extender Id Out = C
NOTES: Two Extenders may also be used in a sequence.
Select e.g. the following ID settings:
• Hub: Id = A → Extender 1: Hub Id In = A, Extender Id Out = B → Extender 2: Hub Id In = B,
Extender Id Out = C
Only one Extender may be deployed if using two Hubs/Connects.
Select e.g. the following ID settings:
• Hub/Connect 1: Id = A
• Hub/Connect 2: Id = B → Extender: Hub Id In = B, Extender Id Out = C
20 Dynaudio
Page 21
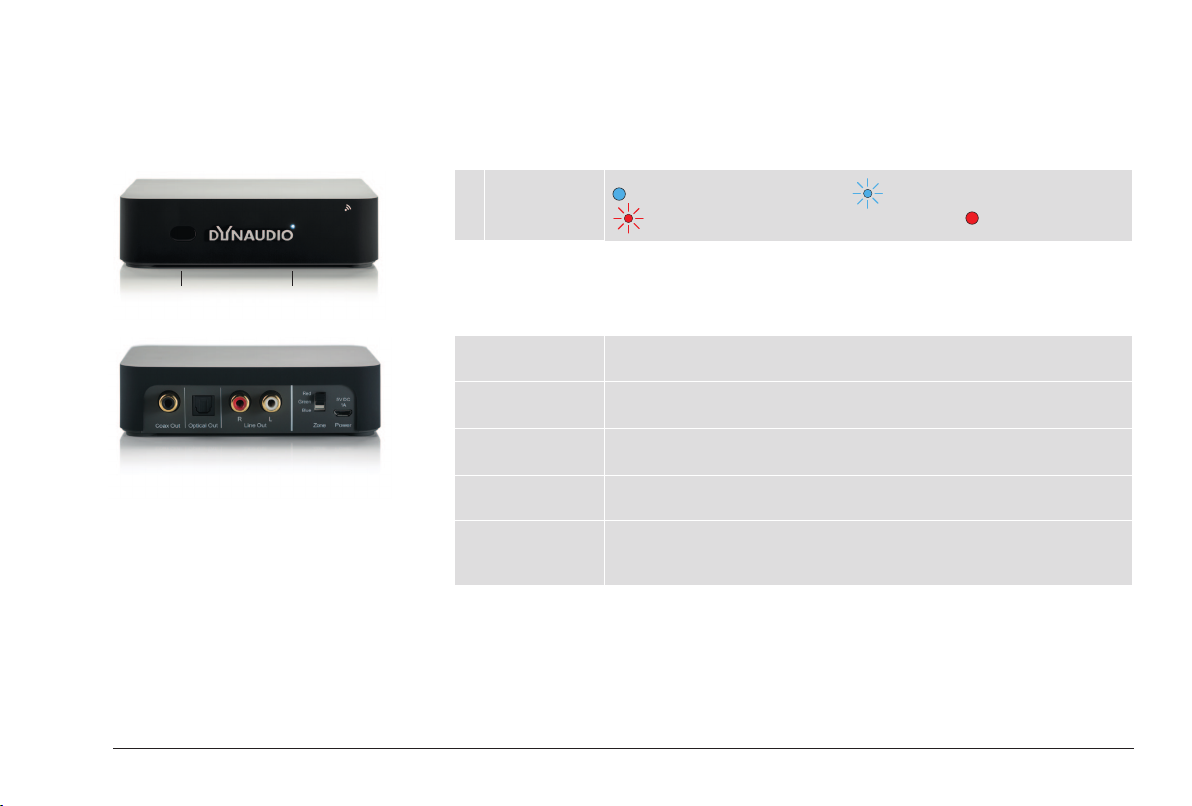
Xeo Link
Connections and control elements
Front plate
1 Operational
state
= an audio signal is played back, = connection but no audio signal,
= no connection to a Hub/Connect or Extender, = standby mode
1 2
Rear plate
Coax Out Output for electrical digital cable
► Connect devices here that have an electrical digital input (coax).
Optical Out Output for optical digital cable
► Connect devices here that have an optical digital input (Toslink).
Line out Output for cable with RCA plug
► Connect devices here that have an input for the RCA plug.
Zone Audio zones
► Select the desired audio zone here.
Power Connection for power supply unit
► Connect the delivered Xeo power supply unit here.
Do not use a dierent power supply unit!
21Hub / Connect / Extender / Link
Page 22
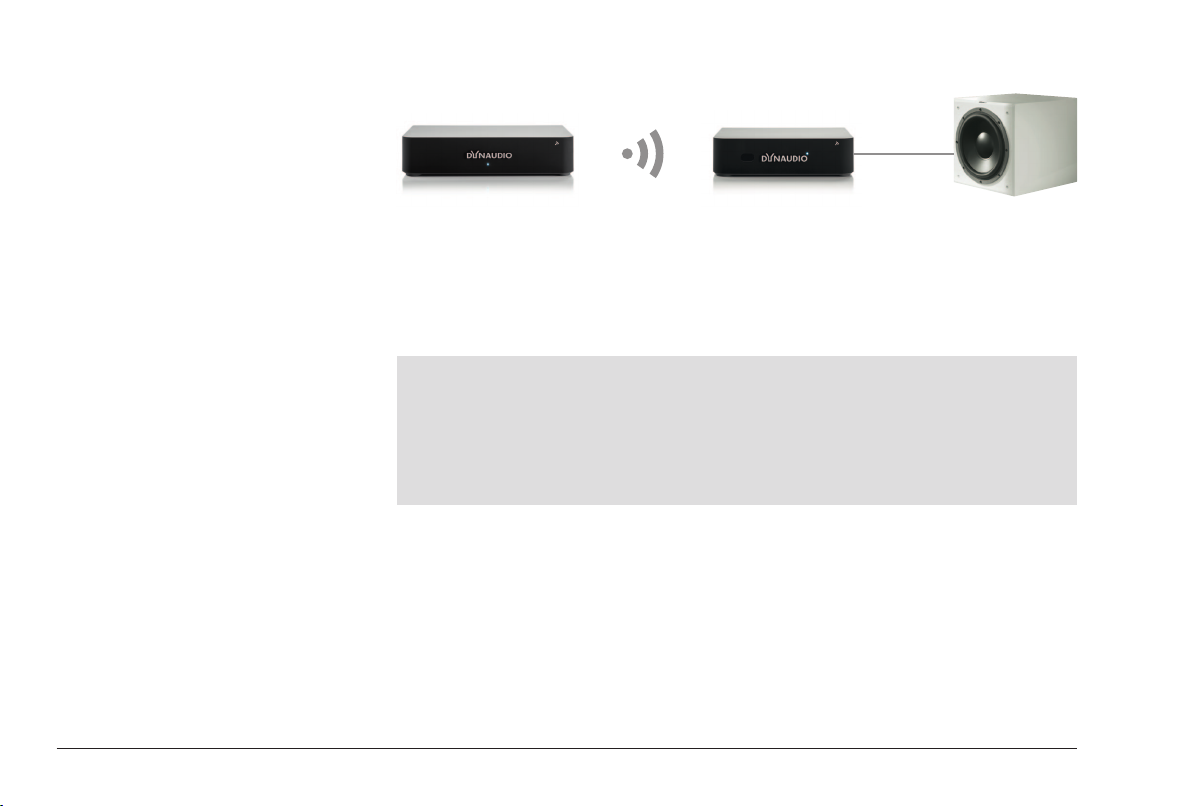
Connection
Hub/Connect
1. Connect the Power socket to the voltage supply via the Xeo power supply unit.
Do not use a dierent power supply unit!
2. Select an audio zone: Red, Green, or Blue.
Use one of the outputs to connect Xeo Link with one of the active components, e.g. the active
subwoofer Dynaudio Sub 600.
3. Select the desired signal source with the remote control and control the volume.
NOTES: You can assign Xeo Link to an audio zone the same way as with the Xeo 2, Xeo 4, and Xeo 6
speakers and then control it specically via the remote control.
A Xeo speaker can also be used parallel to Xeo Link.
Several active components can be connected to Xeo Link. The signal is then output in parallel on all
analog and digital outputs.
Xeo Link can also be used in conjunction with Xeo Extender. The settings are identical for using Xeo
Extender and a Xeo speaker.
Link
22 Dynaudio
Page 23
Red
Green
Blue
Zone
Speaker Id
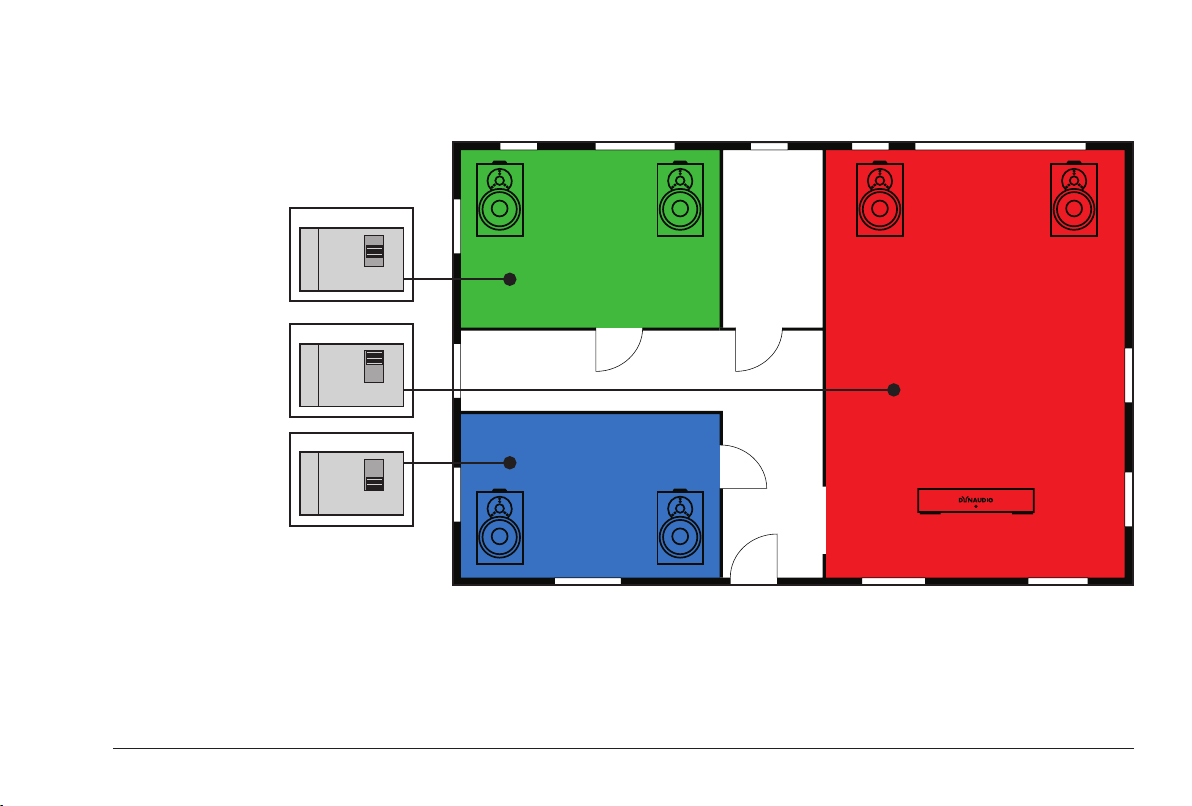
Division into audio zones
Xeo Link (as well as the Xeo speakers) can be assigned to audio zones using the Zone selector
switch. All components assigned to the same zone can be operated together via the remote control.
Green
Red
Green
Blue
Zone
Speaker Id
Red
Green
Blue
Zone
Speaker Id
Red
Blue
The picture shows a possible zone conguration.
23Hub / Connect / Extender / Link
Page 24

Malfunctions
Interruptions, clicking noises, or other audible interference when playing music is usually not caused
by the radio transmission in the Xeo system. Often other external causes inuence the transmission
quality.
Below are a few tips for improving transmission quality:
1. Position all radio transmitters and receivers away from each other. WLAN devices, radio receivers,
and radio systems may inuence each other if they are too close together. Test out various
locations for each device.
2. Switch o the automatic search function in WLAN devices. WLAN devices and other radio
systems permanently scan for available frequencies, thus sending signals that could disrupt other
radio systems. This automatic search function can usually be switched o.
3. Xeo technology radio signals can, of course, transmit through walls. However, walls may consist of
very dierent materials, such as wood berboard, stone, or even steel. The walls may also contain
complex cable installations for electrics, phones, TVs, and radios, as well as water pipes and air
shafts. These can divert radio signals. This is why you should test dierent locations for the Xeo
Hub, Extender, and Link and favor the most direct radio path between the Xeo components.
4. Some electrical devices, such as microwaves, generate strong electromagnetic elds that could
disrupt radio systems. Do not operate such electrical devices near Xeo components.
You can ask your Dynaudio Xeo distributor for assistance at any time.
Or go to www.dynaudio.com/support to read the FAQ or to contact the Customer Support Team.
Further information can also be found on the Xeo website at www.dynaudio.com/xeo
24 Dynaudio
Page 25
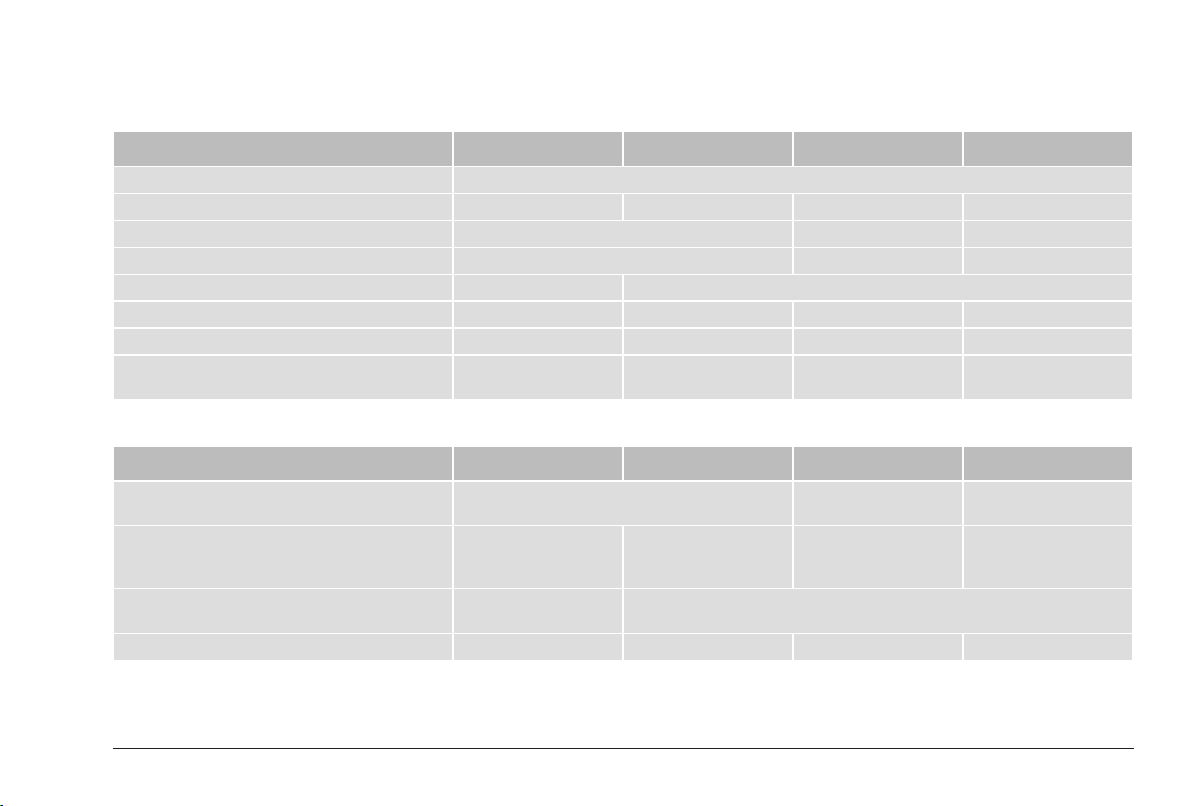
Technical data
Technical specications
Dynaudio Connect Xeo Hub Xeo Extender Xeo Link
Signal frequencies
Sampling rate for digital inputs up to 24 bit/96 kHz 16 bit/48 kHz – –
Input voltage (typ.) RCA: 2 V
Input impedance RCA: 11.4 kΩ, Minijack: 8.2 kΩ – –
Voltage supply (Adapter) 100 – 240 V, 5 V, 2 A 100 – 240 V, 5 V, 1 A
Power consumption (max. / min.) 7 W / 4.5 W 3 W / 2.5 W 5 W / 4 W 2.5 W / 2 W
Weight 0.2 kg / 0.44 lbs 0.2 kg / 0.44 lbs 0.16 kg / 0.35 lbs 0.16 kg / 0.35 lbs
Dimensions (W x H x L) 140 x 32 x 105 mm /
5.5 x 1.3 x 4.1"
Connections
Dynaudio Connect Xeo Hub Xeo Extender Xeo Link
Inputs Analog: Minijack + RCA, Digital optical: Toslink,
Digital coax: RCA (75 Ohms), USB: Mini
Outputs – – – Analog: RCA,
Power Coaxial power
connector
Other Service: Micro USB Ethernet: RJ-45 – –
A: 5.2 Ghz (Low), B: 5.2 Ghz (High), C: 5.8 Ghz (if available)
Minijack: 1 V
rms,
140 x 32 x 105 mm /
5.5 x 1.3 x 4.1"
rms
– –
120 x 32 x 90 mm /
4.7 x 1.3 x 3.5"
– –
Micro USB
120 x 32 x 90 mm /
4.7 x 1.3 x 3.5"
Digital coax: RCA,
Digital optical: Toslink
25Hub / Connect / Extender / Link
Page 26
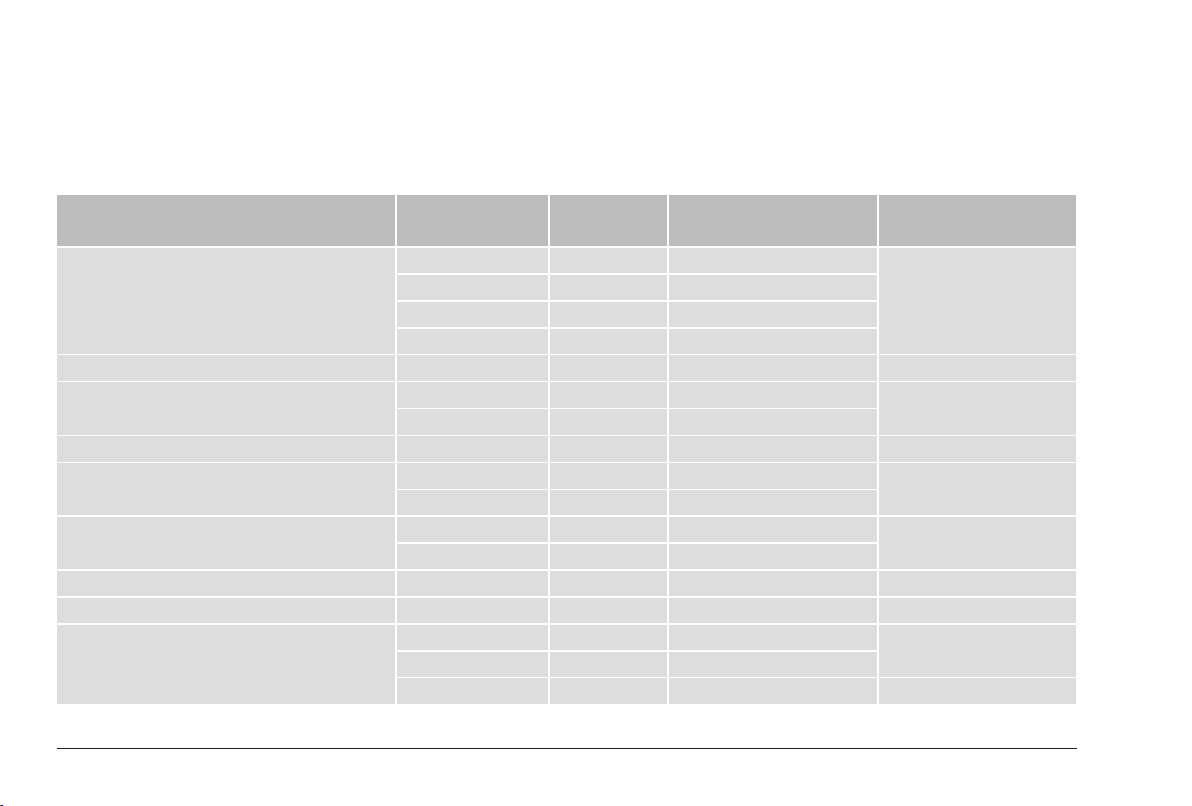
Annex
Connection options for Hub/Connect
Below you will nd a selection of signal sources and options for connecting to the Xeo Hub or
Connect.
Your signal source Signal source
Notebook, Mac™, PC USB* 4: USB in USB – mini USB * The Hub works as a
Smartphone, other portable devices Headphones 1: Aux in Minijack 3.5 mm – 3.5 mm –
Astell&Kern Headphones 1: Aux in Minijack 3.5 mm – 3.5 mm –
PonoPlayer Jack 1: Aux in Minijack 3.5 mm – 3.5 mm –
Docking station, network client, Sonos,
Bluesound, etc.
Google Chromecast Audio Line out Aux in Jack 3.5 mm – 3.5 mm Select a variant.
Apple AirPort Express Optical 2: Optical In Mini Toslink – Toslink –
Apple TV* Optical 2: Optical In Toslink – Toslink * up to 3
Hard disk, network player,
CD player
output
Optical 2: Optical In Toslink – Toslink
Line out 1: Line in RCA – RCA
Headphones 1: Aux in Minijack 3.5 mm – 3.5 mm
Optical 2: Optical In Toslink – Toslink
Line out 1: Line in RCA – RCA * If available
Optical* 2: Optical In Toslink – Toslink
Optical Optical In Mini Toslink – Toslink
Line out 1: Line in RCA – RCA * If available
Optical* 2: Optical In Toslink – Toslink
Electrical* 3: Coax In Coax – coax –
Xeo Hub
input
Cable
(source – Hub)
Notes
sound card.
rd
generation
26 Dynaudio
Page 27
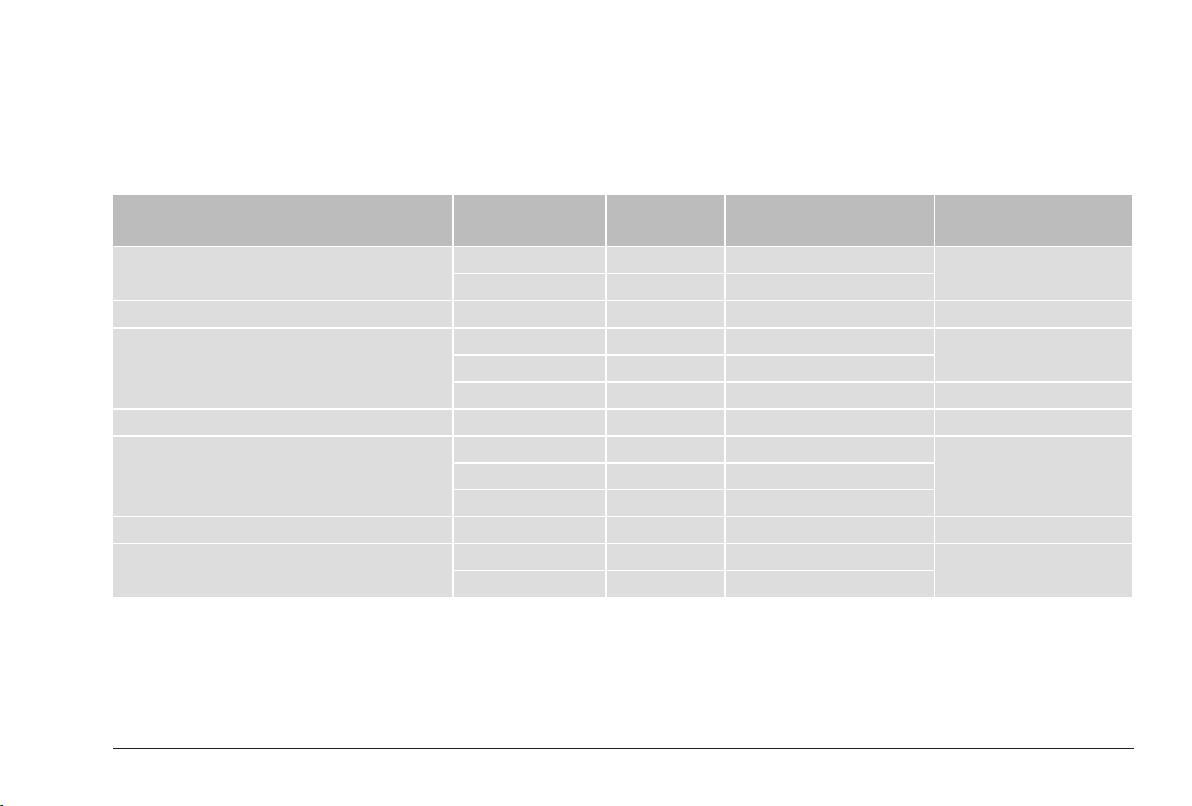
Your signal source Signal source
output
Analog radio, digital radio Line out 1: Line in RCA – RCA * If available
Optical* 2: Optical In Toslink – Toslink
Analog record player Line out* 1: Line in RCA – RCA * On phono preamplier
TV Headphones 1: Aux in Minijack 3.5 mm – 3.5 mm Select a variant.
Line out 1: Line in RCA – RCA
Optical* 2: Optical In Toslink – Toslink * If available
Stereo preamplier Pre-out, main out 1: Line in RCA – RCA –
Stereo power amplier Tape out 1: Line in RCA – RCA * Disconnect bridge
Pre-out, main out* 1: Line in RCA – RCA
Second pre-out 1: Line in RCA – RCA
Subwoofer Analog output 1: Line in RCA – RCA –
AV receiver, AV processor Optical 2: Optical In Toslink – Toslink –
Pre-out, main out 1: Line in RCA – RCA
Xeo Hub
input
Cable
(source – Hub)
Notes
27Hub / Connect / Extender / Link
Page 28

Declaration of Conformity (EU only)
Dynaudio A/S hereby declares, that the products Xeo Hub, Xeo Extender, Xeo Link, and Dynaudio
Connect are in conformity with the following directives:
• 2001/95/EF (Product Safety)
• 2004/108/EF (EMC)
• 1999/5/EC (R&TTE)
• 2011/65/EU (ROHS)
The Declaration of Conformity is available on the Internet at www.dynaudio.com/support/manuals
28 Dynaudio
Page 29

Reminding (USA and Canada only)
A polarized plug has two blades with one wider than the other. A grounding type plug has two blades
and a third grounding prong. The wide blade or the third prong are provided for your safety. If the
provided plug does not t into your outlet, consult an electrician for replacement of the obsolete outlet.
This device complies with Part 15 of the FCC Rules. Operation is subject to the following two
conditions: (1) This device may not cause harmful interference, and (2) this device must accept any
interference received, including interference that may cause undesired operation.
Cet appareil est conforme à Ia section 15 des réglementations de Ia FCC. Le fonctionnement de
l‘appareil est sujetaux deux conditions suivantes: (1) cet appareil ne doit pas provoquer d‘interférences
néfastes, et (2) cet appareil doit tolérer les interférences reçues, y compris celles qui risquent de
provoquer un fonctionnement indésirable.
This equipment has been tested and found to comply with the limits for a Class B digital device,
pursuant to part 15 of the FCC Rules. These limits are designed to provide reasonable protection
against harmful interference in a residential installation. This equipment generates uses and can
radiate radio frequency energy and, if not installed and used in accordance with the instructions, may
cause harmful interference to radio communications. However, there is no guarantee that interference
will not occur in a particular installation. If this equipment does cause harmful interference to radio
or television reception, which can be determined by turning the equipment o and on, the user is
encouraged to try to correct the interference by one or more of the following measures:
• Reorient or relocate the receiving antenna.
• Increase the separation between the equipment and receiver.
• Connect the equipment into an outlet on a circuit dierent from that to which the receiver is
connected.
• Consult the dealer or an experienced radio/TV technician for help.
Please take attention that changes or modication not expressly approved by the party responsible for
compliance could void the user‘s authority to operate the equipment.
29Hub / Connect / Extender / Link
Page 30

IC NOTICE
This device complies with Industry Canada licence-exempt RSS standard(s). Operation is subject
to the following two conditions: (1) this device may not cause interference, and (2) this device must
accept any interference, including interference that may cause undesired operation of the device.
Le présent appareil est conforme aux CNR d‘Industrie Canada applicables aux appareils radio
exempts de licence. L‘exploitation est autorisée aux deux conditions suivantes : (1) l‘appareil ne doit
pas produire de brouillage, et (2) l‘utilisateur de l‘appareil doit accepter tout brouillage radioélectrique
subi, même si le brouillage est susceptible d‘en compromettre le fonctionnement.
MPE Reminding
This equipment should be installed and operated with a minimum distance 20 cm between the radiator
and your body.
(i) The device for operation in the band 5150 – 5250 MHz is only for indoor use to reduce the potential
for harmful interference to co-channel mobile satellite systems;
(ii) The maximum antenna gain permitted for devices in the bands 5250 – 5350 MHz and
5470 – 5725 MHz shall comply with the e.i.r.p. limit; and
(ii1) The maximum antenna gain permitted for devices in the band 5725 – 5825 MHz shall comply with
the e.i.r.p. limits specied for point-to-point and non point-to-point operation as appropriate.
Cet équipement doit être installe et utilisé à une distance minimale de 20 cm entre le radiateur et votre
corps.
(i) Tout appareil destiné à la bande 5150 – 5250 MHz devra être exclusivemenl utilisé en intérieur a
n de réduire les risques de pertuarbatians électromagnétiques gênantes sur les systémes de satellite
mobile dans un même canal.
(ii) Les radars à forte puissance sont désignés comme les utilisateurs principaux (c‘est-à-dire qu‘ils
sont prioritaires) des bandes 5250 – 5350 MHz et
(iii) 5650 – 5850 MHz. IIs peuvent provoquer des perturbations electromagnetiques sur les appareils
de type LELAN (réseau de communication local sans licence) ou les endommager.
30 Dynaudio
Page 31

Page 32
All there is.
Dynaudio A/S, 8660 Skanderborg, Denmark
Sales & Marketing: Dynaudio International GmbH, Ohepark 2, 21224 Rosengarten, Germany, Phone: +49 4108 - 41 80 - 0
www.dynaudio.com
© Dynaudio International GmbH, Xeo Owner’s Manual 1215 EN. All text and image copyrights reserved. Subject to change without notice.
 Loading...