


SMW1 SPORTS MONITORI
NG WATCH
User Manual
User Manual
User ManualUser Manual
Preliminary document not for redistribution. Company confidential. Product features and specifications may vary.
Copyright ©2006 Dynastream Innovations Inc. REV: 2006-08-18 Page 1
REV: 2006-08-18

Introduction ................................................................... 3
Navigating Your SMW1 Sports Monitoring Watch........................ 9
Customizing Your SMW1 Sports Monitoring Watch..................... 11
Training with Your SMW1 Sports Monitoring Watch ................... 15
Device Pairing ................................................................ 21
Footpod Calibration......................................................... 22
Preliminary document not for redistribution. Company confidential. Product features and specifications may vary.
Copyright ©2006 Dynastream Innovations Inc. REV: 2006-08-18 Page 2

Introduction
SMW1 Sports Monitoring System
SMW1 Sports Monitoring System
SMW1 Sports Monitoring SystemSMW1 Sports Monitoring System
Features
Features
FeaturesFeatures
• Full-featured digital sports watch for the fitness enthusiast or serious athlete
• Integrates Dynastream’s ANT™ wireless technology to reliably connect simultaneously with a speed distance
monitor, heart rate monitor, and bike speed/cadence monitor
• Store and recall up to 50 laps of sport and fitness data
• All wireless data is digitally encoded and transmitted in short bursts at 2.4 GHz to prevent cross-talk
• Battery life of one year with typical use
This Guide
This Guide
This GuideThis Guide
The SMW1 Sports Monitoring Watch User Manual illustrates the functionality of the product when configured with a
speed distance monitor, heart rate monitor, and bike speed/cadence monitor. Different configurations will have
different functionality and will result in different available data.
Preliminary document not for redistribution. Company confidential. Product features and specifications may vary.
Copyright ©2006 Dynastream Innovations Inc. REV: 2006-08-18 Page 3

SMW1 Modes and Features
SMW1 Modes and Features
SMW1 Modes and FeaturesSMW1 Modes and Features
Your SMW1 Sports Monitoring Watch has four primary modes.
TIME
View and adjust time (two time zones) and date
View, enable, and adjust daily alarm
Enable chime mode
SPORT
Connect with ANT-enabled sports devices
Display and record chronograph and sports data
Set units, zone alarms, and other settings
Save sessions for later recall
TIMER
Set two individual countdown timers
Set single-expiry or repeating mode
Utilize interleaved timers for flexibility during
workout interval sessions
DATA
View history of workout sessions – up to 50 laps
View available data: lap time, distance, speed,
Preliminary document not for redistribution. Company confidential. Product features and specifications may vary.
Copyright ©2006 Dynastream Innovations Inc. REV: 2006-08-18 Page 4
Delete individual or full session history
step count, calories, heart rate, and cadence

Quick Start Steps
Quick Start Steps
Quick Start StepsQuick Start Steps
Follow these basic instructions to begin using your speed distance monitor (footpod), heart rate monitor, and bike
speed/cadence monitor and discover the functionality of your SMW1 Sports Monitoring Watch.
SDM2 Speed Distance Monitor
POWER ON
• Press and hold the button for 2 seconds to power on the footpod. The red light flashes to indicate the pod is
powered on.
POWER OFF
• Press and hold the button for 2 seconds to power off the pod. If left on, the pod will automatically turn off 30
minutes after foot motion has stopped.
SECURE FIT
• The SDM2 Speed Distance Monitor (footpod) must be attached securely to the shoe.
• The footpod must stay in place on the shoe during running for optimum accuracy. Tight lacing will reduce
jiggling or bouncing of the pod, which can be detrimental to speed and distance results.
Preliminary document not for redistribution. Company confidential. Product features and specifications may vary.
Copyright ©2006 Dynastream Innovations Inc. REV: 2006-08-18 Page 5

HRM1 Heart Rate Monitor
POWER ON
• The HRM1 will turn on automatically and remain on while it is worn around the chest.
POWER OFF
• The HRM1 will turn off automatically 5 minutes after being removed from the chest.
SECURE FIT
• Proper placement of the HRM1 Heart Rate Monitor is important for optimum capture of heart rate pulses.
• Wear the HRM1 directly on your skin and wet both sensors on the back with water or biogel.
• The HRM1 should fit snugly enough to remain in place during your exercise session.
• Wipe down the HRM1 with a wet cloth before and after use. Do not immerse in water.
Preliminary document not for redistribution. Company confidential. Product features and specifications may vary.
Copyright ©2006 Dynastream Innovations Inc. REV: 2006-08-18 Page 6

BKM Bike Speed and/or Cadence Monitors
The BKM Bike Monitors mount easily onto the rear triangle of a bike frame.
• The BKM monitors turn on automatically and remain on as long as they detect magnet events (5-minute
timeout).
• Securely attach both speed and cadence monitors and ensure the magnet pickups pass within 5 mm of the
trigger areas. Sliding motion and misalignment will affect accuracy.
Preliminary document not for redistribution. Company confidential. Product features and specifications may vary.
Copyright ©2006 Dynastream Innovations Inc. REV: 2006-08-18 Page 7

SWM1 Wristwatch Quick Start
Turn on the footpod, heart rate monitor, and/or bike monitor and bring the device[s] within range of the watch
(<2 meters).
The watch will search and connect to all ‘paired’ devices when placed into SPORT mode.
• If your products came packaged together (watch, footpod, heart rate monitor, bike monitor), pairing will
have already been performed and you do not need to perform additional steps.
• To pair devices to the watch (i.e., to add a new device or to re-pair a heart rate monitor after battery
replacement), refer to page 21, Device Pairing.
From TIME mode, press once
to move to SPORT mode.
Momentarily press to toggle between primary views.
Available
views are
dependent
on
connected
devices.
Preliminary document not for redistribution. Company confidential. Product features and specifications may vary.
Copyright ©2006 Dynastream Innovations Inc. REV: 2006-08-18 Page 8
Lap Time Speed / Pace* Distance Heart Rate Bike Cadence
Press and hold to toggle between secondary views.
The display will indicate
when devices are found.
Momentarily press to START a training session. Momentarily press again for each Lap event.
Press and hold for 2 seconds to STOP your session.
Once stopped, press and hold for 2 seconds to SAVE your training session data.
Speed / Pace
SEARCHING FOUND
Distance Heart Rate Steps CaloriesSplit Time
* Speed or
Pace is
specificed
by the user
in the
SPORT mode
Adjust
menu.

Navigating Your SMW1 Sports Monitoring Watch
Each of the four watch buttons maintains a consistent function across the various modes and menus. The buttons
are described as Mode, Action, Adjust, and View.
ADJUST
Enter Adjust Mode
Backlight
Erase / Clear
MODE
Cycle Mode
Cycle Settings
VIEW
Cycle View
Use the Mode button to cycle through the four primary modes: TIME, SPORT, TIMER, and DATA.
In any mode, press and hold the Mode button to ‘Time Jump’ immediately to TIME mode.
In the Adjust menu (see #3), use Mode to cycle through the adjustment settings.
Use the Action button to start, lap, stop, and save your SPORT session and to start and stop the timers (TIMER).
In TIME mode, use Action to cycle between Time/Alarm (momentary press) and to set the chime on or off (press and hold).
In DATA mode, useAction to cycle through session data menus (Totals/Averages/Lap Data).
In the Adjust menu, use Action to adjust the selected setting upwards.
In TIME, SPORT, and TIMER modes, press and hold the Adjust button to enter the Adjust menu.
Press Adjust to turn on the Backlight for 5 seconds; any button press during this time extends the backlight for an additional 5 seconds.
In DATA mode,Adjust is used to Erase saved sessions. In SPORT and TIMER modes, Adjust is used to reset/Clear data.
In all modes, use the View button to cycle through displays. In TIMER mode, use View to toggle between Timer 1 and Timer 2.
In TIME mode, use View to select a time zone (press and hold) and to enable/disable the alarm (momentary press).
In the Adjust menu, use View to adjust the selected setting downwards.
Preliminary document not for redistribution. Company confidential. Product features and specifications may vary.
Copyright ©2006 Dynastream Innovations Inc. REV: 2006-08-18 Page 9
Adjust Setting DOWN
ACTION
Start / Lap / Stop / Save
Adjust Setting UP

Icons
Icons
IconsIcons
The LCD displays various icons to inform you of the current mode and actions of your SMW1 Sports Monitoring
Watch.
Preliminary document not for redistribution. Company confidential. Product features and specifications may vary.
Copyright ©2006 Dynastream Innovations Inc. REV: 2006-08-18 Page 10

Customizing Your SMW1 Sports Monitoring Watch
Customize your SMW1 Sports Monitoring Watch before use. Most adjustable settings are found in the Adjust menu
of the respective mode.
TIME Mode
TIME Mode
TIME ModeTIME Mode
Time of day and current date for each of two individual time zones
Daily alarm
SPORT
SPORT Mode
Mode
SPORTSPORT
Mode Mode
Units (imperial or metric)
Display (pace or speed)
Auto-lap feature
Target zones and zone alarm
Bicycle and footpod calibration
User data (weight and gender)
TIMER Mode
TIMER Mode
TIMER ModeTIMER Mode
Timer expiry intervals (Timer1 and Timer2)
Timer expiry mode (single expiry or repeating)
Timer2 enable (for interleaved operation)
Adjust
Adjust Menu Operation
Menu Operation
AdjustAdjust
Menu Operation Menu Operation
(1) To enter into the Adjust menu of a particular mode, press and hold the Adjust button for 2 seconds.
(2) Use the Mode button to cycle through the adjustment settings.
(3) Use the Action button to adjust a setting upwards, and use the View button to adjust a setting downwards.
(4) Press the Adjust button to exit out of the Adjust menu and return to the parent mode.
Preliminary document not for redistribution. Company confidential. Product features and specifications may vary.
Copyright ©2006 Dynastream Innovations Inc. REV: 2006-08-18 Page 11

TIME
TIME Mode and
Mode and Adjustment Settings
TIME TIME
Mode and Mode and
Adjustment Settings
Adjustment SettingsAdjustment Settings
Time of Day View
To enable/disable chime mode, press and hold the Action button for 2 seconds (chime icon will toggle on/off).
To switch between monthly and weekday date views, momentarily press the View button.
To switch between T1/T2 time zones, press and hold the View button for 2 seconds (T2 icon will toggle on/off).
Alarm View
To switch between the time of day and alarm views, momentarily press the Action button.
In the alarm view, momentarily press the View button to enable/disable the alarm.
If no buttons are pressed for 30 seconds, the watch display switches to the time of day view.
Adjust Menu Settings
In the time of day view, press and hold the Adjust button to adjust the time and date of the current time zone.
In the alarm view, press and hold the Adjust button to adjust the alarm expiry.
Press to toggle between time and alarm views.
UP
Enter TIME mode.
Cycle through
adjustment settings.
Press and hold to enter Adjust mode. Press to exit Adjust mode.
DOWN
Press to enable/disable alarm and
to toggle between month and day.
In time display, press and hold to
alternate between time zones.
Press and hold to toggle chime on or off.
Adjust up or down.
Time Adjustment Settings Alarm Adjustment Settings
Preliminary document not for redistribution. Company confidential. Product features and specifications may vary.
Copyright ©2006 Dynastream Innovations Inc. REV: 2006-08-18 Page 12

SPORT
SPORT Mode Adjustment Settings
SPORTSPORT
Mode Adjustment Settings
Mode Adjustment Settings Mode Adjustment Settings
The SPORT Adjust menu is used to select display defaults, set user data, and access sports settings.
Use to start/lap/stop/save session.
UP
Adjust up or down.
Execute (Pair/Calibration).
Enter SPORT mode.
Cycle through
adjustment settings.
Press and hold to enter the Adjust menu. Momentarily press to exit the Adjust menu.
DOWN
Toggle between views during session.
Select km (metric)
or miles (imperial)
Select speed (kph/mph)
or pace (min/km / min/mi)
as default footpod view
Enable / disable
footpod autolap
feature
Set autolap
distance
Use target
training zones
[3]
Initiate footpod
auto-calibration
mode [1]
Set bicycle
wheel diameter
[4]
Adjust footpod
calibration
offset [1]
Adjust user
body weight
of user
Set gender
Pair with new
device [2]
[1] For further detail on calibration of a running footpod, see page 22, Footpod Calibration.
[2] For further detail, see page 21, Device Pairing.
[3] For further detail, see page 17, Using Training Zones.
[4] Sample Tire Sizes and Corresponding Wheel Diameters
Mountain Bike 26 x 1.75 2030 mm
Road & Touring 700 x 23C 2096 mm
Preliminary document not for redistribution. Company confidential. Product features and specifications may vary.
Copyright ©2006 Dynastream Innovations Inc. REV: 2006-08-18 Page 13

TIMER Mode an
TIMER Mode and Adjustment Settings
TIMER Mode anTIMER Mode an
d Adjustment Settings
d Adjustment Settingsd Adjustment Settings
Use TIMER mode to set and to use two countdown timers.
If both timers are enabled, they will operate in interleaved fashion, first Timer1 followed by Timer2.
Use the Adjust menu to set the timers as well as to select either single-expiry or repeating mode.
Press to start/stop/resume timer. The stopwatch
icon flashes while the timer counts down.
UP
Enter TIMER mode.
Cycle through
adjustment settings.
Press and hold for the Adjust menu to set/reset timer(s).
DOWN
Press to toggle between Timer 1 and Timer 2.
If Timer does not start, go to step 3 and set it.
Adjust up or down.
Repeat process for Timer 2 if needed.
Preliminary document not for redistribution. Company confidential. Product features and specifications may vary.
Copyright ©2006 Dynastream Innovations Inc. REV: 2006-08-18 Page 14

Training with Your SMW1 Sports Monitoring Watch
Your SMW1 Sports Monitoring Watch provides a complete fitness and training platform for casual and serious
athletes alike. The SPORT mode integrates a full-featured chronograph with instantaneous fitness data when
connected with wireless speed distance monitors, heart rate monitors, and bike speed/cadence monitors.
FEATURES
Receive instantaneous training feedback on speed*, distance, steps, calories, heart rate, and bike cadence.
Select from 7 views in the primary display: lap time, split time, speed/pace, distance, heart rate, and cadence.
Select from 7 views in the secondary display: split time, speed/pace, distance, heart rate, steps, and calories.
Receive full support for training zones:
o The watch alerts you when you are above or below a user-specified zone.
o The watch tracks time spent above, below, and within target zones.
Mark up to 50 laps to record progress during session intervals.
Save data for later analysis; for each lap, the watch tracks average speed, average and maximum heart rate,
calories, and lap times.
Use the auto-lap feature to automatically mark laps at preset distances without user intervention.
*Speed or pace is user-selectable in the SPORT mode Adjust menu. Pace is the default view.
Preliminary document not for redistribution. Company confidential. Product features and specifications may vary.
Copyright ©2006 Dynastream Innovations Inc. REV: 2006-08-18 Page 15

SPORT
SPORT Mode Summary
SPORTSPORT
Mode Summary
Mode Summary Mode Summary
The SPORT mode provides instantaneous feedback of sports data during an activity session. Both the primary (top
line) and secondary (bottom line) views are user-selectable. An integrated chronograph with lap support (up to 50
laps) can be used to track run segments for later recall, with laps marked either manually or automatically based on
a preset distance.
Momentarily press to START a training session.
Momentarily press again for each lap event.
Press and hold for 2 seconds to STOP your session.
Once stopped, press and hold for 2 seconds to SAVE your training session.
Enter
SPORT
mode.
Press and hold the
Adjust button to clear
the current session,
either during operation
or once the session is
stopped. All data will
be lost.
Preliminary document not for redistribution. Company confidential. Product features and specifications may vary.
Copyright ©2006 Dynastream Innovations Inc. REV: 2006-08-18 Page 16
Available
views are
dependent
on
connected
devices.
An active session is indicated by the flashing stopwatch icon.
Momentarily press to toggle between primary views during training session.
Lap Time Speed / Pace* Distance Heart Rate
Press and hold to toggle between secondary views during training session.
Speed / Pace*
Distance Heart Rate Steps CaloriesSplit Time
Bike Cadence
* Speed or
Pace is
specificed
by the user
in the
SPORT mode
Adjust
menu.

SPORT
Adjust
menu
Using
Using Training
Training Zones
Using Using
TrainingTraining
Zones
Zones Zones
Training zones can be used to help an athlete maintain speed, heart rate, or cadence within a target range. Visual
and audible alerts are activated when outside of this range. In addition, time spent within, above, and below zones is
tracked for later recall in DATA mode. Perform the following steps to enable and adjust training zones:
In the SPORT Adjust menu, cycle to the zones selection using the Mode button. Press Action to enable.
Enable or disable the zone alarm. If enabled, you will receive an audible beep when above or below zones.
Enable the RUN, HRM, bike speed, and/or bike cadence zones for run speed/pace, heart rate, bike
speed/pace, and/or bike cadence readings, respectively. Adjust the HI and LO values to set a desired target
training zone.
Zone audible alerts and arrows [][] will be activated under the following conditions:
o Chronograph is active.
o Speed/pace, heart rate, or cadence is present in the primary display.
During a session, the arrows
will flash to indicate
out-of-zone training.
Enable/disable
audible zone
alarm.
Preliminary document not for redistribution. Company confidential. Product features and specifications may vary.
Copyright ©2006 Dynastream Innovations Inc. REV: 2006-08-18 Page 17
Available target zones
will depend on
connected devices.

Reviewing Saved Workout Sessions
When browsing through data,
momentarily press
to return to top level.
Press and hold to erase
an individual session
or all sessions.
Reviewing Saved Workout Sessions
Reviewing Saved Workout SessionsReviewing Saved Workout Sessions
The DATA mode can be used to view saved sessions and all stored activity data.
Sessions are saved chronologically and displayed by date – any number of sessions up to 50 laps aggregate.
Sports data is saved for the session’s active devices only.
When the lap memory is full, sessions can be erased either individually or all at once.
Use to browse through the top-level
Clear current run.
data menu. Select from TOTAL data,
AVERAGE data, and data for each
individual LAP.
Enter
DATA
mode.
Continue holding
button to clear all.
Preliminary document not for redistribution. Company confidential. Product features and specifications may vary.
Copyright ©2006 Dynastream Innovations Inc. REV: 2006-08-18 Page 18
At the top level, use to select session (RUN ## / BIKE ##).
When reviewing data, use to browse through different
views (e.g. heart rate, speed, etc.).
Totals
(displays Start Time)
Available data is illustrated on the following pages.
Averages
(displays Average Lap)
Lap Data
(displays Number/Time)

PressView button to scroll through available data types
.
Stored data for each session includes TOTAL, AVERAGE, and individual LAP data.
After entering the DATA mode, use the View button to select the desired session (Run ## / Bike ##).
Press the Action button to select either TOTAL data (includes start time of session), AVERAGE data, or
individual LAP data.
Use the View button to browse further through the session data.
The following figure shows the available views for the TOTAL data.
Totals
(displays Start Time)
Total Time
TotalTime In
Zone (Heart Rate)
Averages
(displays Average Lap)
Total Distance Total CaloriesTotal Steps
Total Time Above
Zone (Heart Rate)
Lap Data
(displays Number/Time)
Total Time Below
Zone (Bike)
TotalTime In
Zone (Bike)
TotalTime Below
Zone (Run)
Total Time Above
Zone (Bike)
TotalTime In
Zone (Run)
TotalTime Below
Zone (Cadence)
Total Time Above
Zone (Run)
Total Time In
Zone (Cadence)
TotalTime Below
Zone (Heart Rate)
TotalTime Above
Zone (Cadence)
Preliminary document not for redistribution. Company confidential. Product features and specifications may vary.
Copyright ©2006 Dynastream Innovations Inc. REV: 2006-08-18 Page 19

The following figure shows the available views for the AVERAGE data.
PressView button to scroll through available data types
.
PressView button to scroll through available data types
.
Averages
Totals
(displays Start Time)
(displays Number/Time)
Lap Data
Average Lap
Average Speed Average Heart Rate
The following figure shows the available views for the LAP data (duplicated for each lap).
Lap Data
Totals
(displays Start Time)
Lap Number
and Time
Preliminary document not for redistribution. Company confidential. Product features and specifications may vary.
Copyright ©2006 Dynastream Innovations Inc. REV: 2006-08-18 Page 20
Lap/Split Time Lap/Split Distance
Averages
(displays Average Lap)
Average Lap
Speed
Number of Steps Average and
Maximum Lap
Heart Rate
Calories per Lap Average Lap
Cadence

Device Pairing
Each sports device (footpod, heart rate monitor) has a unique digital ID that must be stored in the wristwatch to
enable the watch to connect to the appropriate device during activity. Each device must be ‘paired’ with the watch.
• Prior to pairing, the footpod and heart rate monitor must first be turned on, see page 5, Quick Start Steps.
• To place the wristwatch into the pairing mode, enter the SPORT mode Adjust menu and execute “PUSH PAIR”,
as detailed on page 13, SPORT Mode Adjustment Settings.
• Pairing will complete within 15 seconds. A message “Paired Pod” or “Paired Heart” indicates success.
• *** Ensure that only the device to be paired is within 10 meters of the watch. This will prevent unintentional
pairing with wrong devices.
• *** Only one device ID per device type (footpod, heart rate monitor) can be stored in the watch at a time. If a
device is found during a pair procedure, the previously stored device is overwritten. If no device of a particular
type is found during a pair procedure, then the stored ID remains intact.
INITIAL SYSTEM SETUP
• If your sports system was shipped as a complete set (wristwatch, footpod, and heart rate monitor) then pairing
before use is not necessary; pairing is done at the factory. Devices will therefore be found automatically
within 10 seconds when they are turned on and the watch is placed into SPORT mode.
BATTERY REPLACEMENT
• The pair operation must be repeated following heart rate monitor battery replacement, since the heart rate
monitor regenerates its unique ID upon battery replacement.
• The pair operation does NOT need to be repeated following wristwatch or footpod battery replacement.
NEW DEVICES
• To pair a newly purchased footpod or heart rate monitor into an existing watch system, perform a pairing
operation in isolation with the new device. The previously paired device will be overwritten.
Preliminary document not for redistribution. Company confidential. Product features and specifications may vary.
Copyright ©2006 Dynastream Innovations Inc. REV: 2006-08-18 Page 21

Footpod Calibration
The accuracy of the speed distance monitor (footpod) is 97% out of the box for a majority of users. Some users with
certain stride characteristics, such as pronation and supination, will not obtain 97% accuracy until a simple
calibration procedure is performed. Calibration can be done either manually or using the auto-calibration feature.
Manual Calibration
Manual Calibration
Manual CalibrationManual Calibration
• Manual calibration involves the adjustment of a multiplication factor that is then applied to all future speed
and distance measurements.
• The nominal value of the manual calibration factor is 1.000.
• The nominal value can be adjusted upwards or downwards if the athlete has a known reference distance to
calculate the calibration factor appropriately.
• The manual calibration factor will be automatically adjusted following an auto-calibration process, and can be
recorded for future reference (for example to track calibration values for multiple users).
Auto
Auto----Calibration
Calibration
AutoAuto
CalibrationCalibration
• Perform auto-calibration by running a known ‘truth’ distance, such as a 400-meter track. For best results,
choose a truth distance between 400 and 1000 meters
• After running, adjust the measured distance to the ‘actual’ distance that you ran.
• Auto-calibration will automatically calculate and apply the required calibration factor for you.
• *** When calibrating, place the footpod on the same foot that you will typically use for all runs.
• *** Perform the run at your typical running pace. Note that the footpod will still give accurate data at other
speeds.
Preliminary document not for redistribution. Company confidential. Product features and specifications may vary.
Copyright ©2006 Dynastream Innovations Inc. REV: 2006-08-18 Page 22
SPORT
Adjust
menu
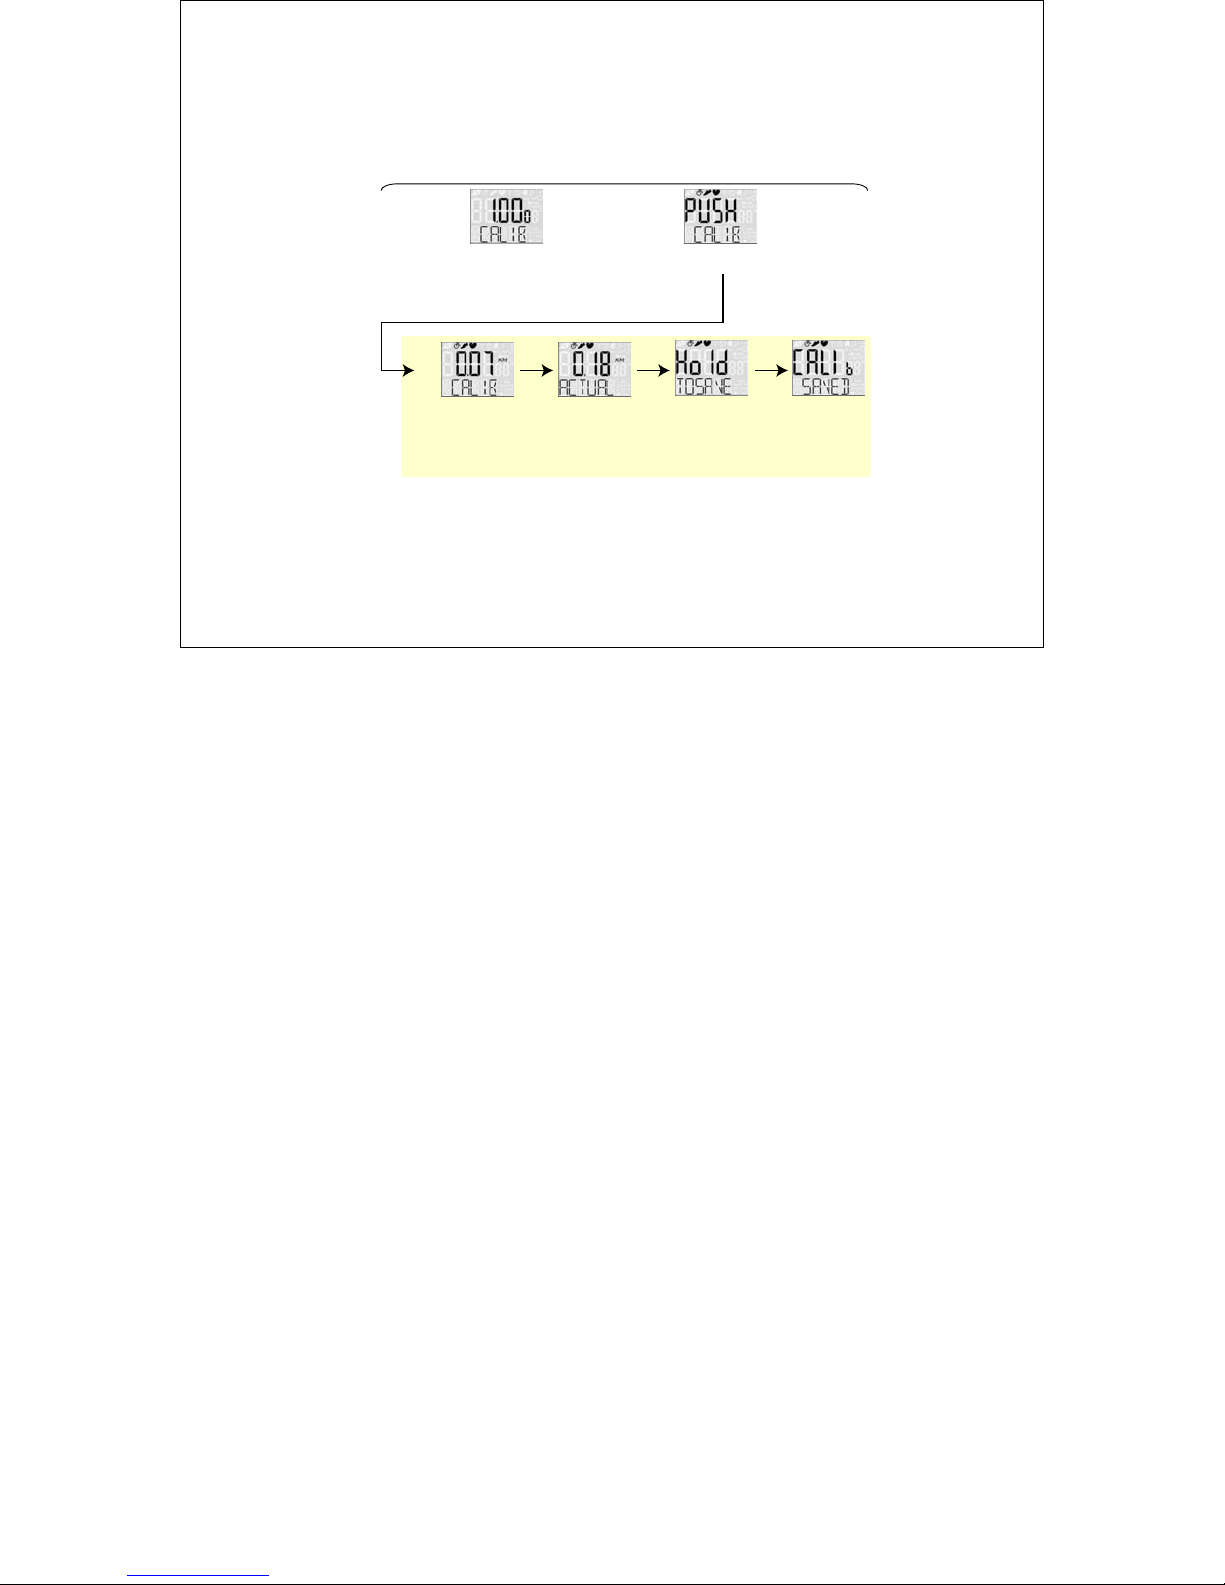
Calibration M
Calibration Menu
Calibration MCalibration M
Both manual and auto-calibration settings are found in the SPORT Adjust menu.
enu
enuenu
. . .
Manual calibration is performed
by adjusting the nominal value
of 1.000 up or down using the
Action (+) or View (-) buttons.
Alternatively, begin the auto-calibration
process by pressing the Action button. [1]
Begin your run of a
known distance
(e.g. 400-meter track).
Press Action when
complete.
Adjust the measured
distance with the actual
distance you ran using
the Action (+) and
View (-) buttons.
Auto-Calibration Process
Hold the Adjust
button to save.
Watch confirms
calibration.
[1] The auto-calibration setting is not available until the watch is paired with a footpod.
Preliminary document not for redistribution. Company confidential. Product features and specifications may vary.
Copyright ©2006 Dynastream Innovations Inc. REV: 2006-08-18 Page 23

Menu Structure and Detail
Menu Structure and Detail
Menu Structure and DetailMenu Structure and Detail
TIME Mode User Interface Menu Items
Preliminary document not for redistribution. Company confidential. Product features and specifications may vary.
Copyright ©2006 Dynastream Innovations Inc. REV: 2006-08-18 Page 24

SPORT Mode User Interface Menu Items
Preliminary document not for redistribution. Company confidential. Product features and specifications may vary.
Copyright ©2006 Dynastream Innovations Inc. REV: 2006-08-18 Page 25

TIMER Mode User Interface Menu Items
Preliminary document not for redistribution. Company confidential. Product features and specifications may vary.
Copyright ©2006 Dynastream Innovations Inc. REV: 2006-08-18 Page 26

DATA Mode User Interface Menu Items
Preliminary document not for redistribution. Company confidential. Product features and specifications may vary.
Copyright ©2006 Dynastream Innovations Inc. REV: 2006-08-18 Page 27

Battery
Battery
BatteryBattery
Your SMW1 Sports Monitoring Watch uses a single CR2032 3V lithium battery. Battery life is approximately one year
depending on use. Please have a certified watch service center or professional jeweller replace the battery.
Preliminary document not for redistribution. Company confidential. Product features and specifications may vary.
Copyright ©2006 Dynastream Innovations Inc. REV: 2006-08-18 Page 28

FCC Compliance
FCC Compliance
FCC ComplianceFCC Compliance
Operational Conditions
Operational Conditions
Operational ConditionsOperational Conditions
This device complies with Part 15 of the FCC Rules. Operation is subject to the following two conditions: (1) This
device may not cause harmful interference, and (2) This device must accept any interference received, including
interference that may cause undesired operation. Changes or modifications not expressly approved by the party
responsible for compliance could void the user’s authority to operate the equipment.
Preliminary document not for redistribution. Company confidential. Product features and specifications may vary.
Copyright ©2006 Dynastream Innovations Inc. REV: 2006-08-18 Page 29
 Loading...