

Page 1
MODEL UFX
ULTRASONIC FLOW METER
Operating Instructions
1
Page 2

2
Page 3

TABLE OF CONTENTS
• Quick Start Instructions 4-5
• Introduction 6
• Specifications 6
• Controls and Terminology 7
• Transducer Mounting Locations 8
• Mounting the Transducer 9
• Operating the UFX 10
• Velocity to Volume Conversions 11
• Battery Replacement 11
• Troubleshooting Guide 12
• Velocity Conversion Chart 13
• Warranty 14
• Spare Parts and Accessories 15
• Service Instructions 15
3
Page 4

QUICK-START INSTRUCTIONS
This manual contains detailed operating instructions for the UFX instrument.
The following condensed instructions are provided to assist an experienced
operator in basic operation of the instrument. If the operator is unfamiliar with
this type of instrument, refer to the detailed explanations located at the
corresponding letter on pages 8-11.
A. Select a transducer mounting location at least 10 pipe
diameters downstream and 5 diameters upstream of
flow disturbances (i.e. elbows, tees, valves, etc.)
STEP A
NO
B. On horizontal pipe, choose a
transducer mounting location
approximately 90 degrees from
the top of the pipe.
YES YES
C. Remove rust, scale and paint
from the transducer mounting
location. Clean to bare metal.
Plastic pipes do not require
preparation.
D. Plug the transducer plug into
the transducer jack.
4
NO
STEP B
STEP D
Page 5
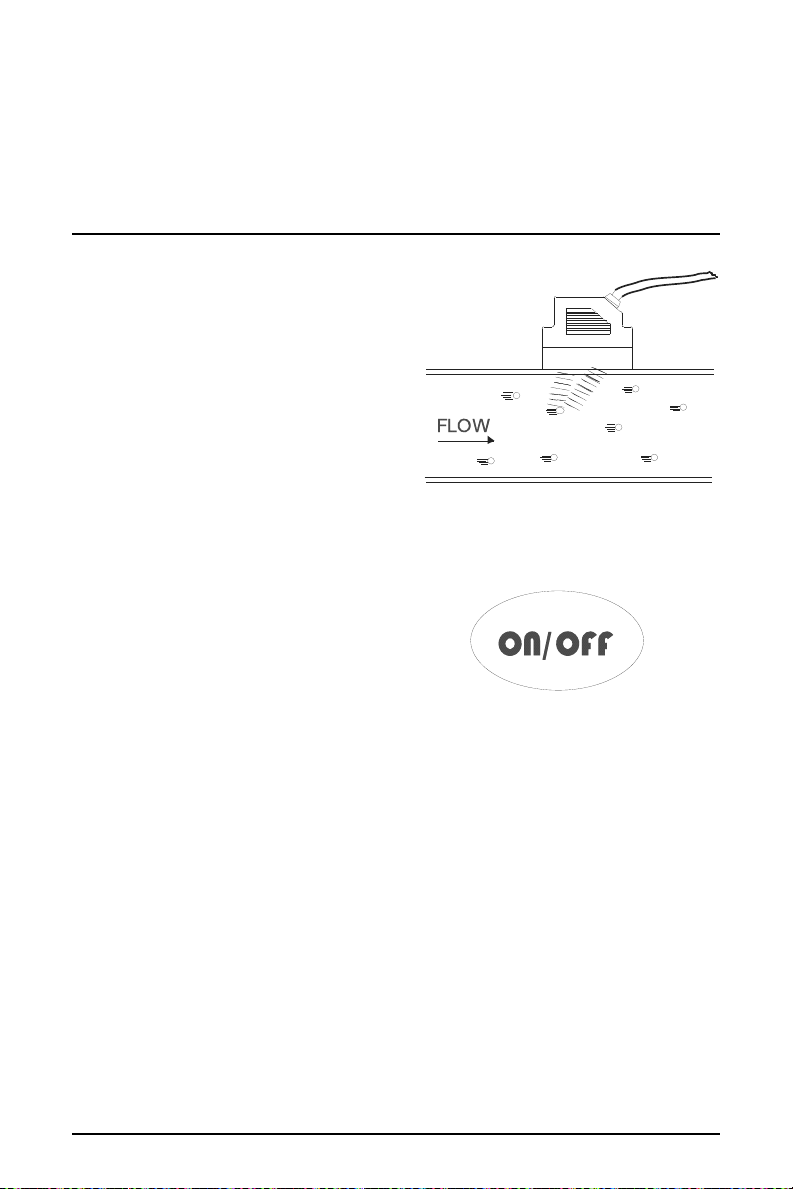
E. Apply approximately ⅛ inch
[3 mm] silicone grease to
the transducer face. Place
the transducer face on the
prepared area of pipe. Hold
the transducer parallel to
the pipe with the cable
pointing downstream of the
flow direction.
F. Press the ON/OFF key.
Wait at least 30 seconds
before recording a reading.
The UFX will automatically
turn itself off after 3
minutes.
G. Change units of measure
by pressing the FT/SEC M/SEC key.
STEP E
STEP F
5
Page 6

INTRODUCTION AND OPERATING THEORY
Series UFX Phase Shift Flow Meters feature advanced Trans-Phase
measuring technology, providing accurate and reliable flow velocity
assessments in closed piping systems. The UFX utilizes a non-invasive
transducer which is hand-held or strapped to the outside of a pipe.
Within seconds, the large 0.7 inch [18mm] LCD provides stable
readings in either FPS (Feet per Second) or MPS (Meters per Second).
This product is designed to operate on metal, plastic or rubber pipes
containing liquids with greater than 100 ppm of suspended solids or
entrained gases that act as reflectors.
Phase Shift flow meters utilize two piezoelectric crystals contained
within one transducer to transmit ultrasonic sound energy into the fluid
stream and receive reflected
Figure 1
FLOW
of oscillation will be altered with respect to the transmitted frequency.
The magnitude of frequency change is directly proportional to the
velocity of the reflector.
sound from reflectors (suspended
solids or entrained gases) within
the liquid. See Figure 1. In
accordance with the theories of
Christian Johann Doppler (circa
1842), if the liquid is moving
therefore carrying the reflectors
with it) and oscillating energy is
imposed on the moving reflector,
the reflected energy’s frequency
(and
SPECIFICATIONS
Description Specification
Power
Flow Range
Temperature
Enclosure Rating
Accuracy
Transducer Mount
6
four AA alkaline cells provide over 30 hours of
operation
0.30 to 30.00 FPS [0.10 to 9.00 MPS]
electronics: -28°F to +140°F [-20°C to +60°C]
transducer: -40°F to +180°F [-40°C to +82°C]
NEMA 12X, splash resistant
±2% full scale
Hand-held (clamp on), utilize acoustic
couplant such as DOW 111
Page 7

CONTROLS AND TERMINOLOGY
Transducer Cable
Transducer Plug
Transducer Jack
Display
Keypad
Transducer
NOTE: The UFX battery compartment
is located on the back of the enclosure.
Remove the two upper screws to gain
access to the battery compartment.
7
Page 8

A. TRANSDUCER LOCATION
Selecting the proper location for taking a flow measurement is the single
most critical step in the operational procedure. The transducer utilized
by the UFX flow meter contains two piezoelectric crystals for transmitting
and receiving ultrasonic signals through the wall of a pipe. Select a
transducer location with adequate straight runs (without flow disturbances)
of pipe, both upstream and downstream, to achieve stable and accurate
readings. Examples of common piping configurations and the
recommended minimum upstream and downstream pipe lengths are
included in Table 1.
Table 1
FLOW
FLOW
FLOW
FLOW
FLO W
FLOW
Note: If adequate straight plumbing cannot be provided the UFX will
operate repeatably
, but will most likely not achieve ideal accuracy.
8
Page 9

B. MOUNTING LOCATIONS ON THE PIPE
If the transducer is applied to
horizontal pipe, choose a
NO
mounting position at
approximately 3 o’clock or 9
o’clock, assuming 12 o’clock to
be to top of the pipe. These
YES
YES
positions typically provide
optimum acoustic penetration
into the moving liquid. As
illustrated in Figure 2,
placement at the top or bottom
of the pipe can result in poor
sound penetration due to air
NO
pockets (on the top of the pipe)
or sediment (at the bottom of
Figure 2
the pipe).
If the transducer is applied to vertical pipe, orientation does not matter.
C. PIPE PREPARATION
Before the transducer face can be coupled to a pipe surface, an area
slightly larger than the flat surface of the transducer must be cleaned to
bare metal on the pipe. Remove all scale rust and paint. Thoroughly dry
and clean the mounting surface.
NOTE: For plastic pipes, such as PVC or PVDF, pipe preparation
is typically not required.
D. CONNECTING THE TRANSDUCER
Connect the transducer plug into the transducer jack. The connection is
polarized, so alignment of the keyway is necessary.
NOTE: The splash-resistant environmental seal is provided only when
the transducer plug is secured into the transducer jack. It is advisable
to make this connection before entering an area where the UFX may be
dropped into or splashed with liquid.
E. APPLYING THE TRANSDUCER
To ensure an acoustically conductive path between the transducer face
and the prepared pipe surface, a coupling compound is employed.
Enclosed with the UFX flow meter is a tube of Dow Corning 111 silicone
based grease. This grease is adequate for the majority of installations.
If an alternate grease is utilized, the grease must be specified not to
flow at the temperature of the pipe surface or the ambient conditions.
9
Page 10
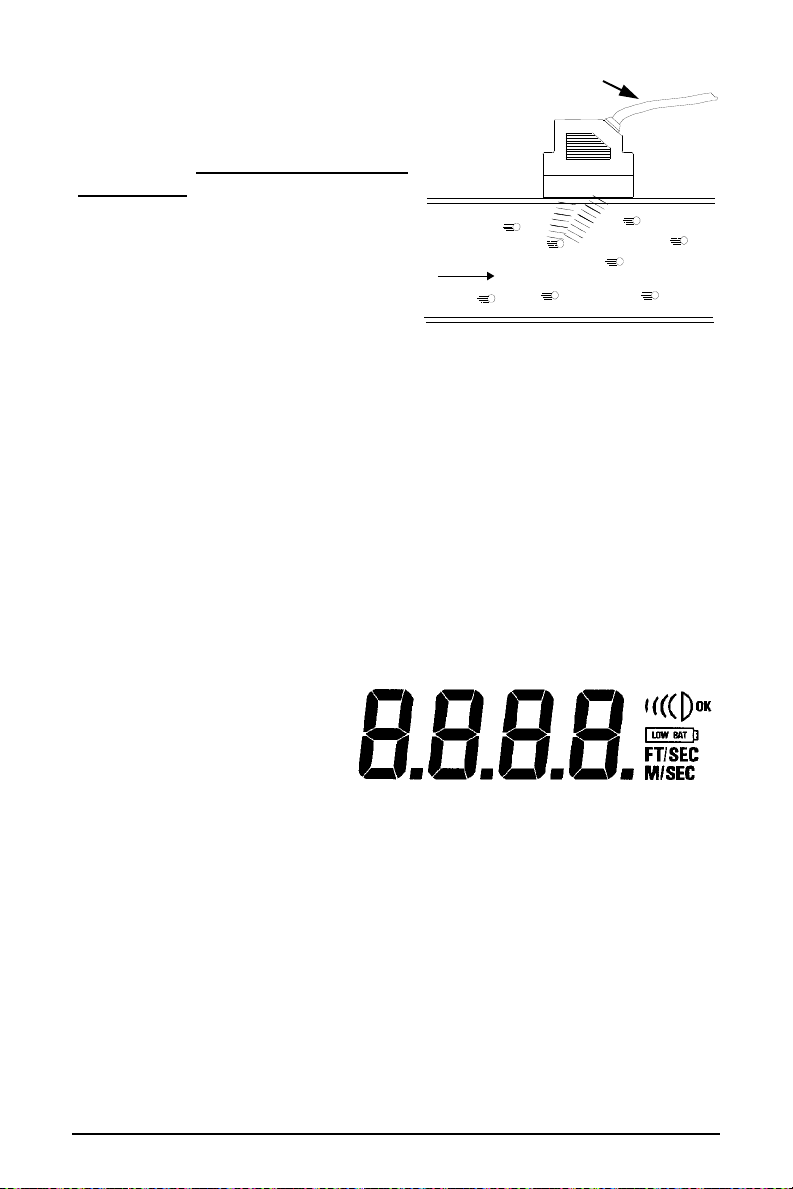
Apply an even layer of grease,
Transducer Cable
approximately ⅛" (3 mm) thick to the
flat surface of the transducer. Place
the transducer on the prepared area
of the pipe, with the cable pointing
downstream. See Figure 3. Align the
transducer with the pipe, ensuring
that it is parallel with the pipe wall.
Apply only enough pressure to hold
FLOW
the transducer in place. If no reading
is shown, perform a “rub test” by
rubbing thumb across the dry
transducer head. The zeros should
Figure 3
display a low flow reading. See
Troubleshooting Guide for further
Figure 3
recommendations.
F. OBTAINING A READING
Press the ON/OFF key on the keypad. On power up, the UFX performs
internal diagnostics and starts the ultrasonic transmitter. The display will
read Hold for approximately 5 seconds during this time. If the
transducer is properly mounted to a pipe containing flowing liquid with
at least 100 ppm of 100 micron or larger particles or entrained gases,
the display will begin to indicate velocity. The default units of measure
are FPS (feet per second). The response time of the UFX is
approximately 10 seconds
to obtain a reading.
Adequate signal strength
is obtained when the OK
icon appears in the upper
right corner of the display.
See Figure 4. Readings
taken without this icon
present may be
erroneous. It is recommended that survey readings of at least 30
seconds be taken to ensure reading stability.
Figure 4
The UFX can be turned off by pressing the ON/OFF key on the keypad,
or the unit will automatically turn off after approximately 3 minutes of
operation.
G. CHANGING UNITS OF MEASURE
Toggle between FPS (feet per second) and MPS (meters per second)
by depressing the FT/SEC M/SEC key on the keypad.
10
Page 11

H. CONVERSION FROM VELOCITY TO VOLUME
The velocity readings taken from the UFX can be readily converted to
volumetric flow rate measurements such as GPM (gallons per minute)
or LPM (liters per minute). A chart is located on page 13 of this manual
that contains conversions for many popular schedule 40 pipe sizes. If
the pipe size is not located in this chart, use the following equations:
♦ For conversion to GPM (pipe I.D. in inches):
GPM = FT/SEC x 2.448 x I.D.
♦ For conversion to LPM (pipe I.D. in millimeters):
LPM = M/SEC x 0.047 x I.D.
2
2
I. LOW BATTERY INDICATION
When the power supply batteries become drained to a level of 4 volts,
the LOW BAT icon will illuminate on the right-hand side of the display.
Typical alkaline batteries will provide about 2 hours of operation after
the LOW BAT icon turns on. The flow meter will no longer operate when
battery voltage is less than 3.5 volts. At 3.5 volts and lower, an Err1 will
be displayed and then unit will shut off.
Replace the batteries by removing the two screws located on the upper
portion of the enclosure back. Install four fresh AA alkaline batteries
following the polarity indicated within the battery compartment and
replace the battery cover. A fresh set of alkaline batteries will provide
approximately 30 hours of service. Use of carbon-based batteries is not
recommended.
Do not allow discharged batteries to remain in the UFX during storage.
Discharged batteries can leak and may cause severe damage to the
internal circuits of the UFX. Damage caused b y leaking batteries will
not be covered under the manufacturer’s warranty.
!
J. DISPLAY TEST
The UFX contains software to verify operation of the individual LCD
segments. To run the display test, turn the UFX off. Press and hold the
FT/SEC - M/SEC key, then press the ON/OFF key. Release both keys
and verify that all segments illustrated in Figure 4 illuminate. The UFX
firmware version number (FX.XX) is displayed at the end of the test.
11
Page 12

TROUBLESHOOTING GUIDE
Unit does not turn “ON”
when ON/OFF key is
pressed
“Err1” is indicated
No display readings are
obtained and no “OK”
icon is observed
Dashes appear on display
• Verify that batteries are installed and
contain a charge.
• The batteries must be replaced.
• Poor acoustic coupling to pipe. Apply
silicone grease to transducer.
• Ensure pipe is full of a flowing liquid.
• If the pipe has a plastic liner, move the
transducer to another location. The liner
may contain an air void.
• Non-working transducer. Rub
transducer head with thumb for reading.
• Liquid contains less than 3% total
suspended solids.
• Move transducer closer to a source of
flow disturbance (i.e. an elbow, pump
outlet or control valve).
• Liquid velocity is greater than 30 FPS (9
MPS).
Readings are obtained,
but the “OK” icon does
not turn on.
Erroneous Readings
12
• Signal strength is low. Flow readings
may be erroneous. Move the transducer
closer to a source of hydraulic
disturbance.
• Transducer mounted incorrectly.
• Another local ultrasonic instrument is
operating at approximately the same
frequency as the UFX.
• Excessive pipe vibration.
• Very viscous (thick) liquids will cause
the unit to read lower than actual flow.
• The pipe is not completely full of liquid.
Page 13
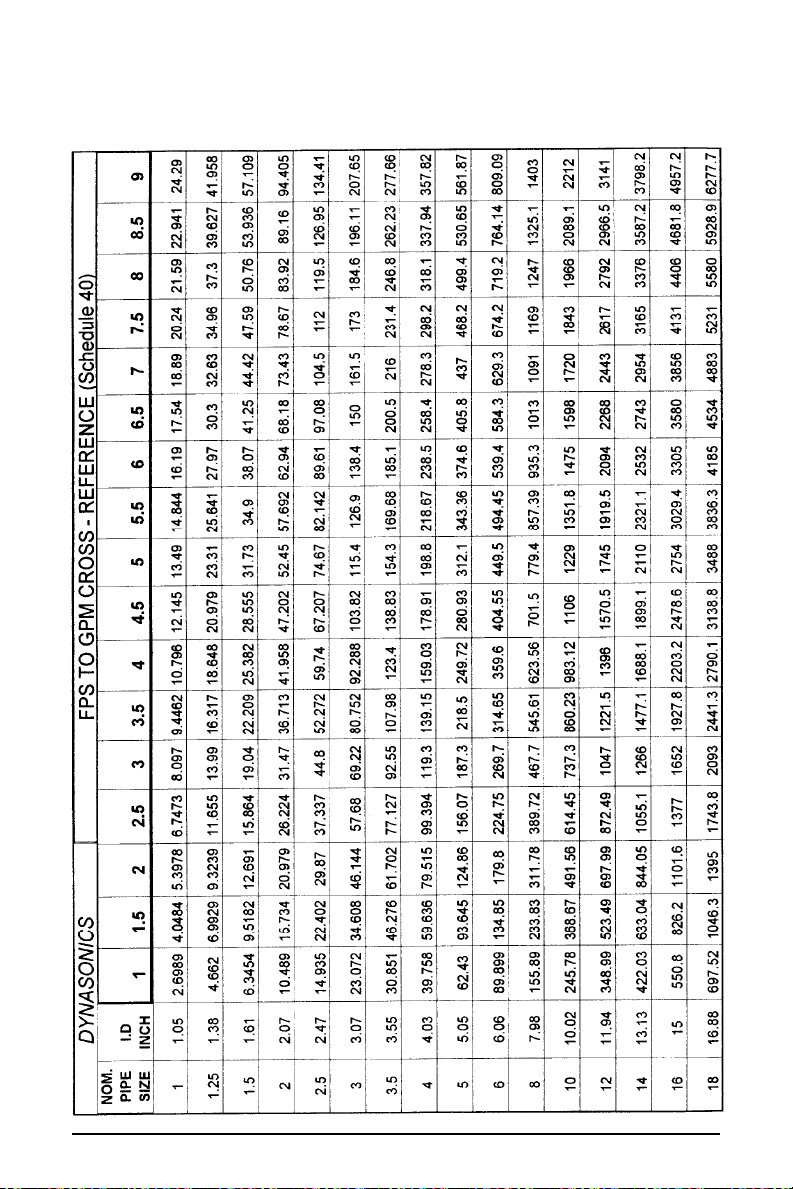
LIQUID VELOCITY TO VOLUME CONVERSION CHART
13
Page 14

STATEMENT OF WARRANTY
Dynasonics, Division of Racine Federated Inc. warrants to the end
purchaser, for a period of one year from the date of shipment from the
factory, that all flow meters manufactured by it are free from defects in
materials and workmanship. This warranty does not cover products that
have been damaged due to defects caused by misapplication, abuse,
lack of maintenance, modified or improper installation. Dynasonics’
obligation under this warranty is limited to the repair or replacement of a
defective product, at no charge to the end purchase, if the product is
inspected by Dynasonics and found to be defective. Repair or
replacement is at Dynasonics’ discretion. A return goods authorization
(RGA) number must be obtained from Dynasonics before any product
may be returned for warranty repair or replacement. The product must
be thoroughly cleaned and any process chemicals removed before it
will be accepted for return.
The purchaser must determine the applicability of the product for its
desired use and assumes all risks in connection therewith. Dynasonics
assumes no responsibility or liability for any omissions or errors in
connection with the use of its products. Dynasonics will under no
circumstances be liable for any incidental, consequential, contingent or
special damages or loss to any person or property arising out of the
failure of any product, component or accessory.
All expressed or implied warranties, including the implied warranty of
merchantability and the implied warranty of fitness for a particular
purpose or application are expressly disclaimed and shall not apply
to any products sold or services rendered by Dynasonics .
The above warranty supersedes and is in lieu of all other warranties,
either expressed or implied and all other obligations or liabilities. No
agent or representative has any authority to alter the terms of this
warranty in any way.
14
Page 15

SPARE PARTS AND ACCESSORIES
PART NUMBER DESCRIPTION
D002-2007-001 SS Mounting Strap, 36 inch [900 mm]
D002-2007-002 Nylon Mounting Strap, 30 inch [750 mm]
D002-2011-002 Couplant, RTV (for permanent mounting)
D002-2011-001 Couplant, Silicone (for temporary mounting)
D003-0825-001 SS Identification tag
DTUFX-D1 Series DUFX Std. Pipe Transducer
DTUFX-B1 Series DUFX Small Pipe Transducer
DTUFX-D1-CE Series DUFX Std. Pipe Transducer - CE unit
DTUFX-B1-CE Series DUFX Small Pipe Transducer - CE unit
DUFX O&M Series DUFX Operations Manual
D003-1009-005 UFX Carrying Case
SERVICE AND REPAIR
When returning equipment, it is necessary to contact our service
department at (800) 535-3569 or (262) 639-6770 to obtain a
Return Goods Authorization (RGA) number for the authority and
tracking of your material and its proper inspection and return. All
returns of equipment must go to the following address:
Dynasonics
Attn: RGA#xxxx
8635 Washington Avenue
Racine, WI 53406
15
Page 16

8635 Washington Avenue
Racine, WI 53406
Toll-Free in U.S. and Canada:
Tel: (800) 535-3569 Fax: (800) 732-8354
Tel: (262) 639-6770 Fax: (262) 639-2267
www.dynasonics.com
DYNASONICS is a registered trademark of Racine Federated Inc.
UL is a registered trademark of Underwriters Laboratories.
16
© 2011 Racine Federated Inc.
All rights reserved.
Printed in the USA
UFX O&M REV 01/11
 Loading...