

Page 1
Hybrid Ultrasonic Flow Meters
DXN Portable Ultrasonic Measurement System
HYB-UM-00090-EN-05 (August 2018)
User Manual
Page 2

Hybrid Ultrasonic Flow Meters, DXN Portable Ultrasonic Measurement System
Page ii August 2018HYB-UM-00090-EN-05
Page 3

User Manual
CONTENTS
Introduction. . . . . . . . . . . . . . . . . . . . . . . . . . . . . . . . . . . . . . . . . . . . . . . . . . . . . . . . . . . . . . . . . . . . . . . . . 7
Scope of This Manual . . . . . . . . . . . . . . . . . . . . . . . . . . . . . . . . . . . . . . . . . . . . . . . . . . . . . . . . . . . . . . . . 7
Typographic Conventions . . . . . . . . . . . . . . . . . . . . . . . . . . . . . . . . . . . . . . . . . . . . . . . . . . . . . . . . . . . . . 7
Unpacking and Inspection. . . . . . . . . . . . . . . . . . . . . . . . . . . . . . . . . . . . . . . . . . . . . . . . . . . . . . . . . . . . . 7
Safety . . . . . . . . . . . . . . . . . . . . . . . . . . . . . . . . . . . . . . . . . . . . . . . . . . . . . . . . . . . . . . . . . . . . . . . . . . . . . 7
Terminology and Symbols . . . . . . . . . . . . . . . . . . . . . . . . . . . . . . . . . . . . . . . . . . . . . . . . . . . . . . . . . . . . . 7
Installation Considerations . . . . . . . . . . . . . . . . . . . . . . . . . . . . . . . . . . . . . . . . . . . . . . . . . . . . . . . . . . . . 7
Electrical Considerations . . . . . . . . . . . . . . . . . . . . . . . . . . . . . . . . . . . . . . . . . . . . . . . . . . . . . . . . . . . . . . 8
Important Safety & Usage Instructions . . . . . . . . . . . . . . . . . . . . . . . . . . . . . . . . . . . . . . . . . . . . . . . . . . . . . 9
Waste Electrical And Electronic Equipment (WEEE) Directive . . . . . . . . . . . . . . . . . . . . . . . . . . . . . . . . . . . . . . 10
Declaration of Conformity . . . . . . . . . . . . . . . . . . . . . . . . . . . . . . . . . . . . . . . . . . . . . . . . . . . . . . . . . . . . 10
Battery Care . . . . . . . . . . . . . . . . . . . . . . . . . . . . . . . . . . . . . . . . . . . . . . . . . . . . . . . . . . . . . . . . . . . . . 10
Meter Overview . . . . . . . . . . . . . . . . . . . . . . . . . . . . . . . . . . . . . . . . . . . . . . . . . . . . . . . . . . . . . . . . . . . . . 11
General . . . . . . . . . . . . . . . . . . . . . . . . . . . . . . . . . . . . . . . . . . . . . . . . . . . . . . . . . . . . . . . . . . . . . . . . 11
Application Versatility. . . . . . . . . . . . . . . . . . . . . . . . . . . . . . . . . . . . . . . . . . . . . . . . . . . . . . . . . . . . . . . 11
Temperature Ratings for Transducers . . . . . . . . . . . . . . . . . . . . . . . . . . . . . . . . . . . . . . . . . . . . . . . . . . . . . 11
Data Integrity . . . . . . . . . . . . . . . . . . . . . . . . . . . . . . . . . . . . . . . . . . . . . . . . . . . . . . . . . . . . . . . . . . . . 11
Product Identication. . . . . . . . . . . . . . . . . . . . . . . . . . . . . . . . . . . . . . . . . . . . . . . . . . . . . . . . . . . . . . . 11
Multilingual Support . . . . . . . . . . . . . . . . . . . . . . . . . . . . . . . . . . . . . . . . . . . . . . . . . . . . . . . . . . . . . . . 11
User Interface . . . . . . . . . . . . . . . . . . . . . . . . . . . . . . . . . . . . . . . . . . . . . . . . . . . . . . . . . . . . . . . . . . . . 12
DXN Flow Meter Data and Controls Layout . . . . . . . . . . . . . . . . . . . . . . . . . . . . . . . . . . . . . . . . . . . . . . . . . . . . 13
Controls . . . . . . . . . . . . . . . . . . . . . . . . . . . . . . . . . . . . . . . . . . . . . . . . . . . . . . . . . . . . . . . . . . . . . . . 13
Pre-Installation Checklist. . . . . . . . . . . . . . . . . . . . . . . . . . . . . . . . . . . . . . . . . . . . . . . . . . . . . . . . . . . . . . . . 16
Charged Battery . . . . . . . . . . . . . . . . . . . . . . . . . . . . . . . . . . . . . . . . . . . . . . . . . . . . . . . . . . . . . . . . . . 16
Tools Not Included with the Flow Meter . . . . . . . . . . . . . . . . . . . . . . . . . . . . . . . . . . . . . . . . . . . . . . . . . . . 16
Prepared Mounting Area for Transducers . . . . . . . . . . . . . . . . . . . . . . . . . . . . . . . . . . . . . . . . . . . . . . . . . . 16
Transducer Installation . . . . . . . . . . . . . . . . . . . . . . . . . . . . . . . . . . . . . . . . . . . . . . . . . . . . . . . . . . . . . . . . . 17
Select a Transmission Mode . . . . . . . . . . . . . . . . . . . . . . . . . . . . . . . . . . . . . . . . . . . . . . . . . . . . . . . . . . . 17
Select a Mounting Location . . . . . . . . . . . . . . . . . . . . . . . . . . . . . . . . . . . . . . . . . . . . . . . . . . . . . . . . . . . 18
Select a Mounting Conguration. . . . . . . . . . . . . . . . . . . . . . . . . . . . . . . . . . . . . . . . . . . . . . . . . . . . . . . . 20
Enter the Site, Fluid and Pipe Properties . . . . . . . . . . . . . . . . . . . . . . . . . . . . . . . . . . . . . . . . . . . . . . . . . . . 22
Mount the Transducer . . . . . . . . . . . . . . . . . . . . . . . . . . . . . . . . . . . . . . . . . . . . . . . . . . . . . . . . . . . . . . 23
DTTSU Small Pipe Transducer Installation . . . . . . . . . . . . . . . . . . . . . . . . . . . . . . . . . . . . . . . . . . . . . . . . . . 27
Doppler Transducer Installation . . . . . . . . . . . . . . . . . . . . . . . . . . . . . . . . . . . . . . . . . . . . . . . . . . . . . . . . 28
Page iii August 2018 HYB-UM-00090-EN-05
Page 4

Hybrid Ultrasonic Flow Meters, DXN Portable Ultrasonic Measurement System
Display Operation and Conguration. . . . . . . . . . . . . . . . . . . . . . . . . . . . . . . . . . . . . . . . . . . . . . . . . . . . . . . . 30
Main Group . . . . . . . . . . . . . . . . . . . . . . . . . . . . . . . . . . . . . . . . . . . . . . . . . . . . . . . . . . . . . . . . . . . . . . . . 32
Meters Page . . . . . . . . . . . . . . . . . . . . . . . . . . . . . . . . . . . . . . . . . . . . . . . . . . . . . . . . . . . . . . . . . . . . . 32
Graph Page . . . . . . . . . . . . . . . . . . . . . . . . . . . . . . . . . . . . . . . . . . . . . . . . . . . . . . . . . . . . . . . . . . . . . 33
Graph Setup Page . . . . . . . . . . . . . . . . . . . . . . . . . . . . . . . . . . . . . . . . . . . . . . . . . . . . . . . . . . . . . . . . . 34
Table Page . . . . . . . . . . . . . . . . . . . . . . . . . . . . . . . . . . . . . . . . . . . . . . . . . . . . . . . . . . . . . . . . . . . . . . 35
Alerts Page. . . . . . . . . . . . . . . . . . . . . . . . . . . . . . . . . . . . . . . . . . . . . . . . . . . . . . . . . . . . . . . . . . . . . . 36
Setup Group . . . . . . . . . . . . . . . . . . . . . . . . . . . . . . . . . . . . . . . . . . . . . . . . . . . . . . . . . . . . . . . . . . . . . . . 37
Site Page . . . . . . . . . . . . . . . . . . . . . . . . . . . . . . . . . . . . . . . . . . . . . . . . . . . . . . . . . . . . . . . . . . . . . . . 37
Fluid Page . . . . . . . . . . . . . . . . . . . . . . . . . . . . . . . . . . . . . . . . . . . . . . . . . . . . . . . . . . . . . . . . . . . . . . 39
ANSI Pipe Page . . . . . . . . . . . . . . . . . . . . . . . . . . . . . . . . . . . . . . . . . . . . . . . . . . . . . . . . . . . . . . . . . . . 41
Pipe Page. . . . . . . . . . . . . . . . . . . . . . . . . . . . . . . . . . . . . . . . . . . . . . . . . . . . . . . . . . . . . . . . . . . . . . . 42
Liner Page . . . . . . . . . . . . . . . . . . . . . . . . . . . . . . . . . . . . . . . . . . . . . . . . . . . . . . . . . . . . . . . . . . . . . . 48
Transit Page . . . . . . . . . . . . . . . . . . . . . . . . . . . . . . . . . . . . . . . . . . . . . . . . . . . . . . . . . . . . . . . . . . . . . 49
Doppler Page . . . . . . . . . . . . . . . . . . . . . . . . . . . . . . . . . . . . . . . . . . . . . . . . . . . . . . . . . . . . . . . . . . . . 50
Meter Group . . . . . . . . . . . . . . . . . . . . . . . . . . . . . . . . . . . . . . . . . . . . . . . . . . . . . . . . . . . . . . . . . . . . . . . 51
Flow Page . . . . . . . . . . . . . . . . . . . . . . . . . . . . . . . . . . . . . . . . . . . . . . . . . . . . . . . . . . . . . . . . . . . . . . 51
Totalizer Page . . . . . . . . . . . . . . . . . . . . . . . . . . . . . . . . . . . . . . . . . . . . . . . . . . . . . . . . . . . . . . . . . . . . 52
Limit Page . . . . . . . . . . . . . . . . . . . . . . . . . . . . . . . . . . . . . . . . . . . . . . . . . . . . . . . . . . . . . . . . . . . . . . 53
Filter Page . . . . . . . . . . . . . . . . . . . . . . . . . . . . . . . . . . . . . . . . . . . . . . . . . . . . . . . . . . . . . . . . . . . . . . 54
Energy Page . . . . . . . . . . . . . . . . . . . . . . . . . . . . . . . . . . . . . . . . . . . . . . . . . . . . . . . . . . . . . . . . . . . . . 56
Log (Data Logging) Group. . . . . . . . . . . . . . . . . . . . . . . . . . . . . . . . . . . . . . . . . . . . . . . . . . . . . . . . . . . . . . . 57
Setup Page. . . . . . . . . . . . . . . . . . . . . . . . . . . . . . . . . . . . . . . . . . . . . . . . . . . . . . . . . . . . . . . . . . . . . . 57
Select Data Page . . . . . . . . . . . . . . . . . . . . . . . . . . . . . . . . . . . . . . . . . . . . . . . . . . . . . . . . . . . . . . . . . . 58
I/O (Input / Output) Group. . . . . . . . . . . . . . . . . . . . . . . . . . . . . . . . . . . . . . . . . . . . . . . . . . . . . . . . . . . . . . . 60
Set Out (Setup Outputs) Page. . . . . . . . . . . . . . . . . . . . . . . . . . . . . . . . . . . . . . . . . . . . . . . . . . . . . . . . . . 60
Scale Out (Scale Outputs) Page . . . . . . . . . . . . . . . . . . . . . . . . . . . . . . . . . . . . . . . . . . . . . . . . . . . . . . . . . 61
Set In (Setup Input) . . . . . . . . . . . . . . . . . . . . . . . . . . . . . . . . . . . . . . . . . . . . . . . . . . . . . . . . . . . . . . . . 62
Test Out (Test Outputs) Page . . . . . . . . . . . . . . . . . . . . . . . . . . . . . . . . . . . . . . . . . . . . . . . . . . . . . . . . . . 63
Adv (Advanced) Group . . . . . . . . . . . . . . . . . . . . . . . . . . . . . . . . . . . . . . . . . . . . . . . . . . . . . . . . . . . . . . . . . 64
Signals Page. . . . . . . . . . . . . . . . . . . . . . . . . . . . . . . . . . . . . . . . . . . . . . . . . . . . . . . . . . . . . . . . . . . . . 64
Transit Page . . . . . . . . . . . . . . . . . . . . . . . . . . . . . . . . . . . . . . . . . . . . . . . . . . . . . . . . . . . . . . . . . . . . . 66
Waveform Page . . . . . . . . . . . . . . . . . . . . . . . . . . . . . . . . . . . . . . . . . . . . . . . . . . . . . . . . . . . . . . . . . . . 67
Doppler Page . . . . . . . . . . . . . . . . . . . . . . . . . . . . . . . . . . . . . . . . . . . . . . . . . . . . . . . . . . . . . . . . . . . . 68
Monitor Page . . . . . . . . . . . . . . . . . . . . . . . . . . . . . . . . . . . . . . . . . . . . . . . . . . . . . . . . . . . . . . . . . . . . 69
Page iv August 2018HYB-UM-00090-EN-05
Page 5

User Manual
Cal (Calibration) Group . . . . . . . . . . . . . . . . . . . . . . . . . . . . . . . . . . . . . . . . . . . . . . . . . . . . . . . . . . . . . . . . . 70
Transit Page . . . . . . . . . . . . . . . . . . . . . . . . . . . . . . . . . . . . . . . . . . . . . . . . . . . . . . . . . . . . . . . . . . . . . 70
Doppler Page . . . . . . . . . . . . . . . . . . . . . . . . . . . . . . . . . . . . . . . . . . . . . . . . . . . . . . . . . . . . . . . . . . . . 72
Factory Page. . . . . . . . . . . . . . . . . . . . . . . . . . . . . . . . . . . . . . . . . . . . . . . . . . . . . . . . . . . . . . . . . . . . . 73
System Group. . . . . . . . . . . . . . . . . . . . . . . . . . . . . . . . . . . . . . . . . . . . . . . . . . . . . . . . . . . . . . . . . . . . . . . 74
Misc (Miscellaneous) Page . . . . . . . . . . . . . . . . . . . . . . . . . . . . . . . . . . . . . . . . . . . . . . . . . . . . . . . . . . . . 74
Power Page . . . . . . . . . . . . . . . . . . . . . . . . . . . . . . . . . . . . . . . . . . . . . . . . . . . . . . . . . . . . . . . . . . . . . 75
Disk Page. . . . . . . . . . . . . . . . . . . . . . . . . . . . . . . . . . . . . . . . . . . . . . . . . . . . . . . . . . . . . . . . . . . . . . . 76
PC Page. . . . . . . . . . . . . . . . . . . . . . . . . . . . . . . . . . . . . . . . . . . . . . . . . . . . . . . . . . . . . . . . . . . . . . . . 76
Storage Page . . . . . . . . . . . . . . . . . . . . . . . . . . . . . . . . . . . . . . . . . . . . . . . . . . . . . . . . . . . . . . . . . . . . 77
ENet Page . . . . . . . . . . . . . . . . . . . . . . . . . . . . . . . . . . . . . . . . . . . . . . . . . . . . . . . . . . . . . . . . . . . . . . 78
Time Page . . . . . . . . . . . . . . . . . . . . . . . . . . . . . . . . . . . . . . . . . . . . . . . . . . . . . . . . . . . . . . . . . . . . . . 82
Update Page. . . . . . . . . . . . . . . . . . . . . . . . . . . . . . . . . . . . . . . . . . . . . . . . . . . . . . . . . . . . . . . . . . . . . 82
Comm (Communications) Page. . . . . . . . . . . . . . . . . . . . . . . . . . . . . . . . . . . . . . . . . . . . . . . . . . . . . . . . . 83
Inputs/Outputs. . . . . . . . . . . . . . . . . . . . . . . . . . . . . . . . . . . . . . . . . . . . . . . . . . . . . . . . . . . . . . . . . . . . . . 84
General . . . . . . . . . . . . . . . . . . . . . . . . . . . . . . . . . . . . . . . . . . . . . . . . . . . . . . . . . . . . . . . . . . . . . . . . 84
Total Reset . . . . . . . . . . . . . . . . . . . . . . . . . . . . . . . . . . . . . . . . . . . . . . . . . . . . . . . . . . . . . . . . . . . . . . 84
Digital Outputs . . . . . . . . . . . . . . . . . . . . . . . . . . . . . . . . . . . . . . . . . . . . . . . . . . . . . . . . . . . . . . . . . . . 85
Analog Outputs . . . . . . . . . . . . . . . . . . . . . . . . . . . . . . . . . . . . . . . . . . . . . . . . . . . . . . . . . . . . . . . . . . 87
Upgrading Software. . . . . . . . . . . . . . . . . . . . . . . . . . . . . . . . . . . . . . . . . . . . . . . . . . . . . . . . . . . . . . . . . . . 89
Quick Boot . . . . . . . . . . . . . . . . . . . . . . . . . . . . . . . . . . . . . . . . . . . . . . . . . . . . . . . . . . . . . . . . . . . . . . 94
Microsoft Software License Terms for Windows XP Embedded and Windows Embedded Standard Runtime. . . . . . . . . . . 95
Use Rights . . . . . . . . . . . . . . . . . . . . . . . . . . . . . . . . . . . . . . . . . . . . . . . . . . . . . . . . . . . . . . . . . . . . . . 95
Additional Licensing Requirements and/or Use Rights . . . . . . . . . . . . . . . . . . . . . . . . . . . . . . . . . . . . . . . . . . 95
Scope of License . . . . . . . . . . . . . . . . . . . . . . . . . . . . . . . . . . . . . . . . . . . . . . . . . . . . . . . . . . . . . . . . . . 96
Internet-Based Services. . . . . . . . . . . . . . . . . . . . . . . . . . . . . . . . . . . . . . . . . . . . . . . . . . . . . . . . . . . . . . 96
Windows Update Agent (also known as Software Update Services). . . . . . . . . . . . . . . . . . . . . . . . . . . . . . . . . . 97
Product Support . . . . . . . . . . . . . . . . . . . . . . . . . . . . . . . . . . . . . . . . . . . . . . . . . . . . . . . . . . . . . . . . . . 97
Backup Copy . . . . . . . . . . . . . . . . . . . . . . . . . . . . . . . . . . . . . . . . . . . . . . . . . . . . . . . . . . . . . . . . . . . . 97
Proof of License. . . . . . . . . . . . . . . . . . . . . . . . . . . . . . . . . . . . . . . . . . . . . . . . . . . . . . . . . . . . . . . . . . . 97
Transfer to a Third Party . . . . . . . . . . . . . . . . . . . . . . . . . . . . . . . . . . . . . . . . . . . . . . . . . . . . . . . . . . . . . 97
Not Fault Tolerant . . . . . . . . . . . . . . . . . . . . . . . . . . . . . . . . . . . . . . . . . . . . . . . . . . . . . . . . . . . . . . . . . 98
Restricted Use. . . . . . . . . . . . . . . . . . . . . . . . . . . . . . . . . . . . . . . . . . . . . . . . . . . . . . . . . . . . . . . . . . . . 98
No Warranties for the Software . . . . . . . . . . . . . . . . . . . . . . . . . . . . . . . . . . . . . . . . . . . . . . . . . . . . . . . . . 98
Liability Limitations . . . . . . . . . . . . . . . . . . . . . . . . . . . . . . . . . . . . . . . . . . . . . . . . . . . . . . . . . . . . . . . . 98
Export Restrictions. . . . . . . . . . . . . . . . . . . . . . . . . . . . . . . . . . . . . . . . . . . . . . . . . . . . . . . . . . . . . . . . . 98
Page v August 2018 HYB-UM-00090-EN-05
Page 6

Hybrid Ultrasonic Flow Meters, DXN Portable Ultrasonic Measurement System
KFactors . . . . . . . . . . . . . . . . . . . . . . . . . . . . . . . . . . . . . . . . . . . . . . . . . . . . . . . . . . . . . . . . . . . . . . . . . . 99
Description . . . . . . . . . . . . . . . . . . . . . . . . . . . . . . . . . . . . . . . . . . . . . . . . . . . . . . . . . . . . . . . . . . . . . 99
Calculating KFactors . . . . . . . . . . . . . . . . . . . . . . . . . . . . . . . . . . . . . . . . . . . . . . . . . . . . . . . . . . . . . . . 99
Specic Heat Capacity Values for Fluids . . . . . . . . . . . . . . . . . . . . . . . . . . . . . . . . . . . . . . . . . . . . . . . . . . . . . . 101
Specications . . . . . . . . . . . . . . . . . . . . . . . . . . . . . . . . . . . . . . . . . . . . . . . . . . . . . . . . . . . . . . . . . . . . . . .102
Process Monitoring Inputs/Outputs . . . . . . . . . . . . . . . . . . . . . . . . . . . . . . . . . . . . . . . . . . . . . . . . . . . . . .102
System . . . . . . . . . . . . . . . . . . . . . . . . . . . . . . . . . . . . . . . . . . . . . . . . . . . . . . . . . . . . . . . . . . . . . . . . 102
Transducers . . . . . . . . . . . . . . . . . . . . . . . . . . . . . . . . . . . . . . . . . . . . . . . . . . . . . . . . . . . . . . . . . . . . .102
North American Pipe Schedules . . . . . . . . . . . . . . . . . . . . . . . . . . . . . . . . . . . . . . . . . . . . . . . . . . . . . . . . . . . 103
Fluid Properties . . . . . . . . . . . . . . . . . . . . . . . . . . . . . . . . . . . . . . . . . . . . . . . . . . . . . . . . . . . . . . . . . . . . .107
Glossary . . . . . . . . . . . . . . . . . . . . . . . . . . . . . . . . . . . . . . . . . . . . . . . . . . . . . . . . . . . . . . . . . . . . . . . . . .109
Page vi August 2018HYB-UM-00090-EN-05
Page 7

Introduction
INTRODUCTION
Scope of This Manual
This manual is divided into two main sections:
• “Meter Overview” on page11 is intended to help you get the DXN flow metering system up and running quickly. Refer to
the detailed instructions if you require additional information.
• The remaining chapters provide a detailed description of all software settings and hardware installation guidance.
MPORTANTI
Read this manual carefully before attempting any installation or operation. Keep the manual accessible for future reference.
Typographic Conventions
• Items on the software screens that you will be asked to select or choose by clicking a button, highlighting, checking a box
or another similar means are in bold text and capitalized in the manual.
Example: Press Delete Site Logs.
• Names of tabs, pages, options, boxes, columns and fields are italicized. In most cases, first letters will be capitalized.
Example: The Low Flow Limit is the minimum flow rate at which the meter gives reliable readings.
• Messages and special markings are shown in quotation marks.
Example: “Lock EWF Fail” displays in the text area.
Unpacking and Inspection
Upon opening the shipping container, visually inspect the product and applicable accessories for any physical damage such
as scratches, loose or broken parts, or any other sign of damage that may have occurred during shipment.
OTE:N If damage is found, request an inspection by the carrier’s agent within 48 hours of delivery and file a claim with the
carrier. A claim for equipment damage in transit is the sole responsibility of the purchaser.
SAFETY
Terminology and Symbols
Indicates a hazardous situation, which, if not avoided, is estimated to be capable of causing death or serious
personal injury.
Indicates a hazardous situation, which, if not avoided, could result in severe personal injury or death.
Indicates a hazardous situation, which, if not avoided, is estimated to be capable of causing minor or moderate
personal injury or damage to property.
Installation Considerations
The installation of the DXN flow meter system must comply with all applicable federal, state, and local rules, regulations,
and codes.
MPORTANTI
Not following instructions properly may impair safety of equipment and/or personnel.
Page 7 August 2018 HYB-UM-00090-EN-05
Page 8
Safety
Electrical Considerations
Function Direct Current Alternating Current Earth (Ground) Protective Ground Chassis Ground
Symbol
Figure 1: Electrical symbols
The 24V DC power converter and 12V auto-style power cord connect to the 3-pin socket connection located on the back of
the enclosure. A fully charged battery provides up to 9 hours of continuous operation before recharging is necessary.
At that point, the meter operates for only a short time more until it automatically turns itself off.
If the flow meter is to be used for extended periods of operation, the 24V DC line power converter or the 12V auto-style
converter can remain connected indefinitely.
To charge the internal Lithium-Ion Smart battery, apply power, using the enclosed 24V DC line power converter or auto style
power cord, to the flow meter for a period of 4 hours with the unit off. The flow meter has an integral charging circuit that
prevents overcharging. The flow meter can be permanently connected to an AC line power without damaging the meter or
the battery.
The Lithium-Ion Smart battery is maintenance free, but it still requires a certain amount of attention to prolong its useful life.
To obtain the greatest capacity and longevity from the battery, the following practices are recommended:
• When charging or using external power, allow for airflow to the instrument.
• The flow meter’s battery management circuitry does not allow the battery to become overcharged.
• The lithium-ion battery is rated for 300 cycles, but may last much longer than that. Cycle counts are shown in the
system menu.
• If the meter is stored for prolonged periods of time:
• Recharge the battery every 6 months and recharge before use.
• Store at room temperature. Extended exposure above 104° F (40° C) can degrade battery life.
• Do not expose unit to temperatures beyond those specified.
• Battery should only be replaced by authorized personnel.
• In the unlikely event that smoke, abnormal noise or strange odor is present, immediately power off the DXN and
disconnect all power sources. Report the problem to your device provider immediately.
Use wiring practices that conform to local codes (National Electric Code® Handbook in the USA). Use only the power
converters that have been supplied with the flow meter. The ground terminal, if present on the converter, is mandatory for
safe operation.
CAUTION
ANY OTHER WIRING METHOD MAY BE UNSAFE OR CAUSE IMPROPER OPERATION OF THE INSTRUMENT. IT IS
RECOMMENDED NOT TO RUN LINE POWER WITH OTHER SIGNAL WIRES WITHIN THE SAME WIRING TRAY OR CONDUIT.
OTE:N The flow meter requires clean electrical line power. Do not operate the meter on circuits with noisy components (for
example, fluorescent lights, relays, compressors, variable frequency drives and like equipment).
The flow meter can be operated from a 10…15V DC source, using the included auto-style power cord, as long as it is capable
of supplying at least 40 watts. Observe proper polarity. Note that extended operation on an automotive supply could
substantially reduce the automotive battery.
WARNING
THE INTERNAL BATTERY PACK SHOULD ONLY BE REPLACED BY AN AUTHORIZED BADGER METER SERVICE
REPRESENTATIVE. PLEASE CONTACT YOUR PRODUCT AND/OR SERVICE PROVIDER FOR INTERNAL BATTERY
REPLACEMENT SERVICE.
Page 8 August 2018HYB-UM-00090-EN-05
Page 9

Safety
Important Safety & Usage Instructions
Read these safety instructions carefully.
• Read all cautions and warnings on the equipment.
• Place this equipment on a reliable surface when installing. Dropping it or letting it fall may cause damage.
• Make sure the correct voltage is connected to the equipment.
• For puggable equipment, the socket outlet should be near the equipment and should be easily accessible.
• If equipment has reached its end of life, please recycle properly.
• Disconnect this equipment from the AC outlet before cleaning it. Use a moist cloth. Do not use liquid or spray detergent
for cleaning.
• To fully disengage the power to the unit, disconnect the power from the AC outlet.
• Do not scratch or rub the screen with a hard or sharp object.
• Never use any of the solvents, such as thinner spray-type cleaner, wax, benzene, abrasive cleaner, acid or alkaline solvent,
on the display. Harsh chemicals may cause damage to the enclosure and the touch screen sensors.
• Remove dirt with a lightly moistened cloth. Then wipe the enclosure with a soft dry cloth.
• The fins on the enclosure are for air convection and protect the equipment from overheating.
• DO NOT COVER THE OPENINGS.
• Position the power cord so that cannot be stepped on. Do not place anything over the power cord.
• If the meter will not be used for a long time, disconnect it from the power source to avoid damage by transient
over-voltage.
• Never pour any liquid into openings. This may cause fire or an electrical shock.
• Never open the equipment. There are no user serviceable parts inside. For safety reasons, the equipment should be
opened only by qualified service personnel.
• If one of the following situations arises, get the equipment checked by service personnel:
• The power cord or plug is damaged.
• Liquid has penetrated into the equipment.
• The equipment does not work properly, or you cannot get it to work according to the user’s manual.
• The equipment has been dropped or damaged.
• The equipment has obvious signs of breakage.
Page 9 August 2018 HYB-UM-00090-EN-05
Page 10

Safety
Waste Electrical And Electronic Equipment (WEEE) Directive
In the European Union, this label indicates that this product should not be disposed of with household waste. It should be
deposited at an appropriate facility to enable recovery and recycling.
Declaration of Conformity
CE
The CE symbol on your product indicates that it is in compliance with the directives of the Union European (EU).
FCC Class B
This device complies with Part 15 of the FCC Rules.
Certificates of Compliance, Test Reports, and further information is available by contacting Technical Support.
Battery Care
• A portable device should be turned off while charging. This allows the battery to reach the threshold voltage unhindered
and reflects the correct saturation current responsible to terminate the charge. A parasitic load confuses the charger.
• Charge at a moderate temperature. Do not charge below freezing.
• Lithium-ion does not need to be fully charged. A partial charge is better.
• Chargers use different methods for ready indication. The light signal may not always indicate a full charge.
• Discontinue using charger and/or battery if the battery gets excessively warm.
• Before prolonged storage, apply some charge to bring the pack to about half charge.
Page 10 August 2018HYB-UM-00090-EN-05
Page 11

Meter Overview
METER OVERVIEW
General
The DXN portable ultrasonic flow meter is designed to measure volumetric flow rate within a closed conduit. The transducers
are a non-contacting, clamp-on or clamp-around type, which provide the benefits of non-fouling operation and ease
of installation.
In Transit Time mode, the flow meter uses two transducers that function as both ultrasonic transmitters and receivers. The
transducers are clamped on the outside of a closed pipe at a specific distance from each other. The transducers can be
mounted in V-Mount, where the sound transverses the pipe two times, W-Mount, where the sound transverses the pipe four
times, or in Z-Mount, where the transducers are mounted on opposite sides of the pipe and the sound crosses the pipe once.
The selection of mounting method is based on pipe and liquid characteristics, which both have an effect on how much signal
is generated. The flow meter operates by alternately transmitting and receiving a frequency modulated burst of sound energy
between the two transducers and measuring the time interval that it takes for sound to travel between the two transducers.
The difference in the time interval measured is directly related to the velocity of the liquid in the pipe.
Internally, volumetric flow rate is derived from fluid velocity and the cross-sectional area of the pipe inner diameter.
Application Versatility
The flow meter can be successfully applied on a wide range of metering applications because the meter has both transit time
and Doppler capabilities. A full range of fluids—from ultrapure to thick slurries—can be measured.
The flow meter can be used on pipe sizes ranging from 0.5…120" (12…3048 mm) while accommodating a wide variety of
liquid applications:
ultrapure liquids cooling water potable water river water
chemicals plant effluent sewage sludge
Temperature Ratings for Transducers
Because the transducers are non-contacting and have no moving parts, the flow meter is not affected by system pressure,
fouling or wear. Temperature ratings for each transducer are listed below.
Transducer Temperature Rating
DTTR –40…250° F (–40…121° C)
DTTN –40…185° F (–40…85° C)
DTTL –40…194° F (–40…90° C)
DTTSU –40…194° F (–40…90° C)
DT94 –40…194° F (–40…90° C)
DTTH –40…350° F (–40…176° C)
OTE:N When the type of transducer is selected, the flow meter automatically chooses the correct transmission frequency for
that transducer set.
Data Integrity
Non-volatile flash memory retains all user-entered configuration values in memory for several years at 77° F (25° C), even if
power is lost or turned off.
Product Identication
The serial number and complete model number of the flow meter are located on the
bottom surface of the flow meter’s body. If you require technical assistance, please
provide the customer service department with this information.
Figure 2: Serial number location
Multilingual Support
To select a language for the user interface display, go to System > Misc or use the Status Bar Control:
Dutch German Korean Portuguese Spanish
English Italian Norwegian Russian Swedish
French Japanese Polish Simplified Chinese
Page 11 August 2018 HYB-UM-00090-EN-05
Page 12

Meter Overview
User Interface
The DXN flow meter has a sophisticated touchscreen user interface to control all functions. The tabbed menu tree provides
access to all controls and settings within two layers of menus. Large, easy-to-read touchscreen buttons allow for gloved
operation in inclement weather.
CAUTION
DO NOT USE SHARP OBJECTS ON THE TOUCHSCREEN AS DAMAGE WILL OCCUR.
Conventions and Controls
To describe menu navigation, this manual specifies first the Group Tab name, and then the Page. For example, Main > Meters.
Group Tab
Main
Menu Structure
GraphMeters
Figure 3: Group > Page convention
Graph Setup
Pages
Table
Alerts
• Group tabs contain page tabs and interface pages.
• Left or right navigation buttons sequentially access the group tabs and page tabs.
• Pressing a group tab or page tab activates that item.
• On some pages, repeatedly pressing an item accesses additional functionality.
• The interface page can contain meters, user entry controls and graphs.
Smart Status Bars
• Status bars contain items that show and control helpful flow meter functions, such as showing flow or controlling
data logging.
• The user can navigate status bars sequentially only with the status bar navigation button.
• Certain status items can be double pressed for addition functionality. Oftentimes, they can automatically navigate to a
page tab.
• Status bars include Quickview, Power status, Shutdown and Sensor positioning.
Page 12 August 2018HYB-UM-00090-EN-05
Page 13
DXN FLOW METER DATA AND CONTROLS LAYOUT
Group & Page
ol
Tabs
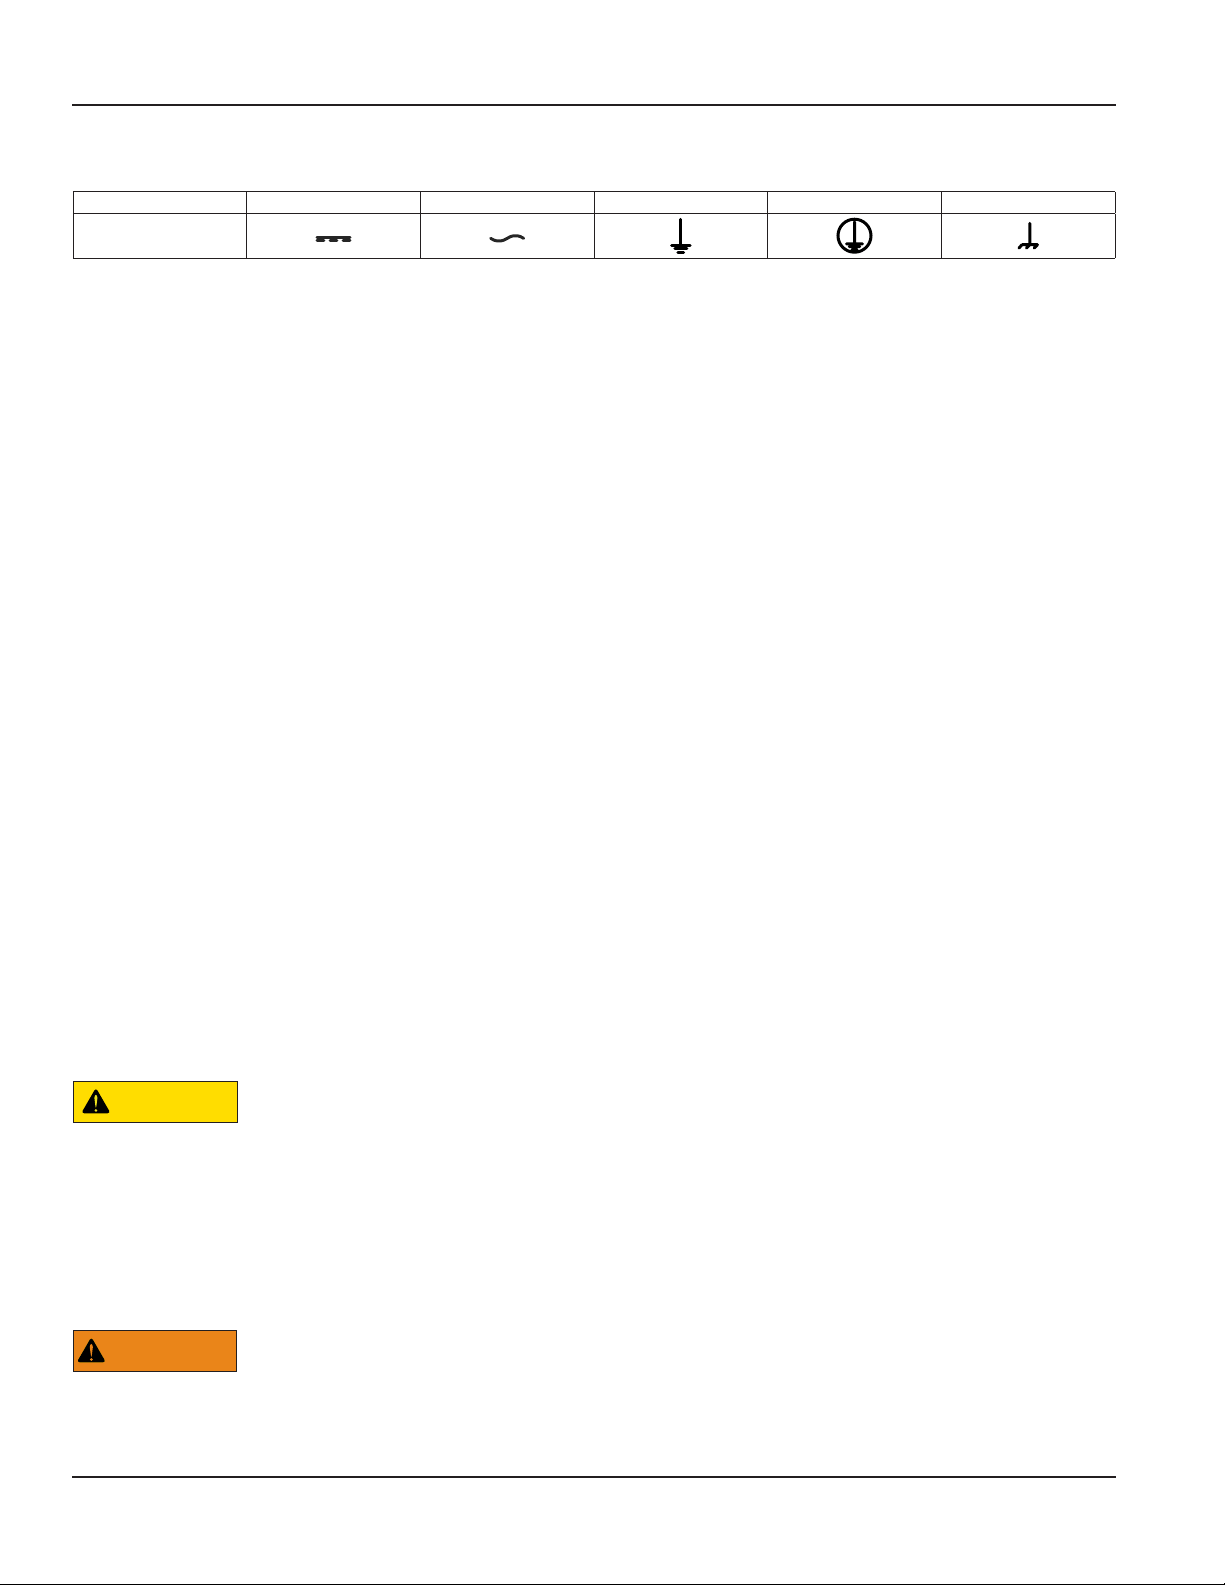
DXN Flow Meter Data and Controls Layout
Navigate
Menu Left
Left Context
Sensitive
Area
Navigation
Button
Status BarStatus Bar
Navigate
Menu Right
Right Context
Sensitive
Area
Data & Contr
Pages
Figure 4: Main user screen layout
Controls
The DXN uses many of the same software controls as common, Windows-based graphical user interfaces. The following
describes the controls and how they are used.
Text Boxes
Text boxes (Figure 5) provide space to enter data. For example, when you press the Create New Site button, a keyboard pops
up, allowing you to enter text and numbers.
Create New Site From
DEFAULT Settings
Figure 5: Typical text boxes
Create New Site From
CURRENT Settings
Create SiteEnter New Site Name:
Cancel
~ 1 2 3 4 5 6 7 8 9 0 - = Del
~ 1 2 3 4 5 6 7 8 9 0 _ + Del
q w e r t y u i o p [ ] \ Ins
Q W E R T Y U I O P { } | Ins
a s d f g h j k l ; ‘ Enter
A S D F G H J K L : “ Enter
z x c v b n m , . / Shift
Z X C V B N M < > ? Shift Abc
<- Space -> Backspace
<- Space -> Backspace
Figure 6: Alphanumeric keypad
On/Off Check Box
Use the check box to control the state of a function. A checkmark indicates the function is ON. If there is not checkmark, the
function is OFF.
Doppler AGC Gain Doppler AGC Gain
Figure 7: Check box states
When an item is changed, the control temporarily changes to orange while the settings are updated.
Doppler AGC Gain
Figure 8: Check box transition
Page 13 August 2018 HYB-UM-00090-EN-05
Page 14
Push-Button
Drag Slider
DXN Flow Meter Data and Controls Layout
Buttons
Button controls work in a similar manner to a push-button switch. Generally, they start or stop a function.
Figure 9: Push-button control
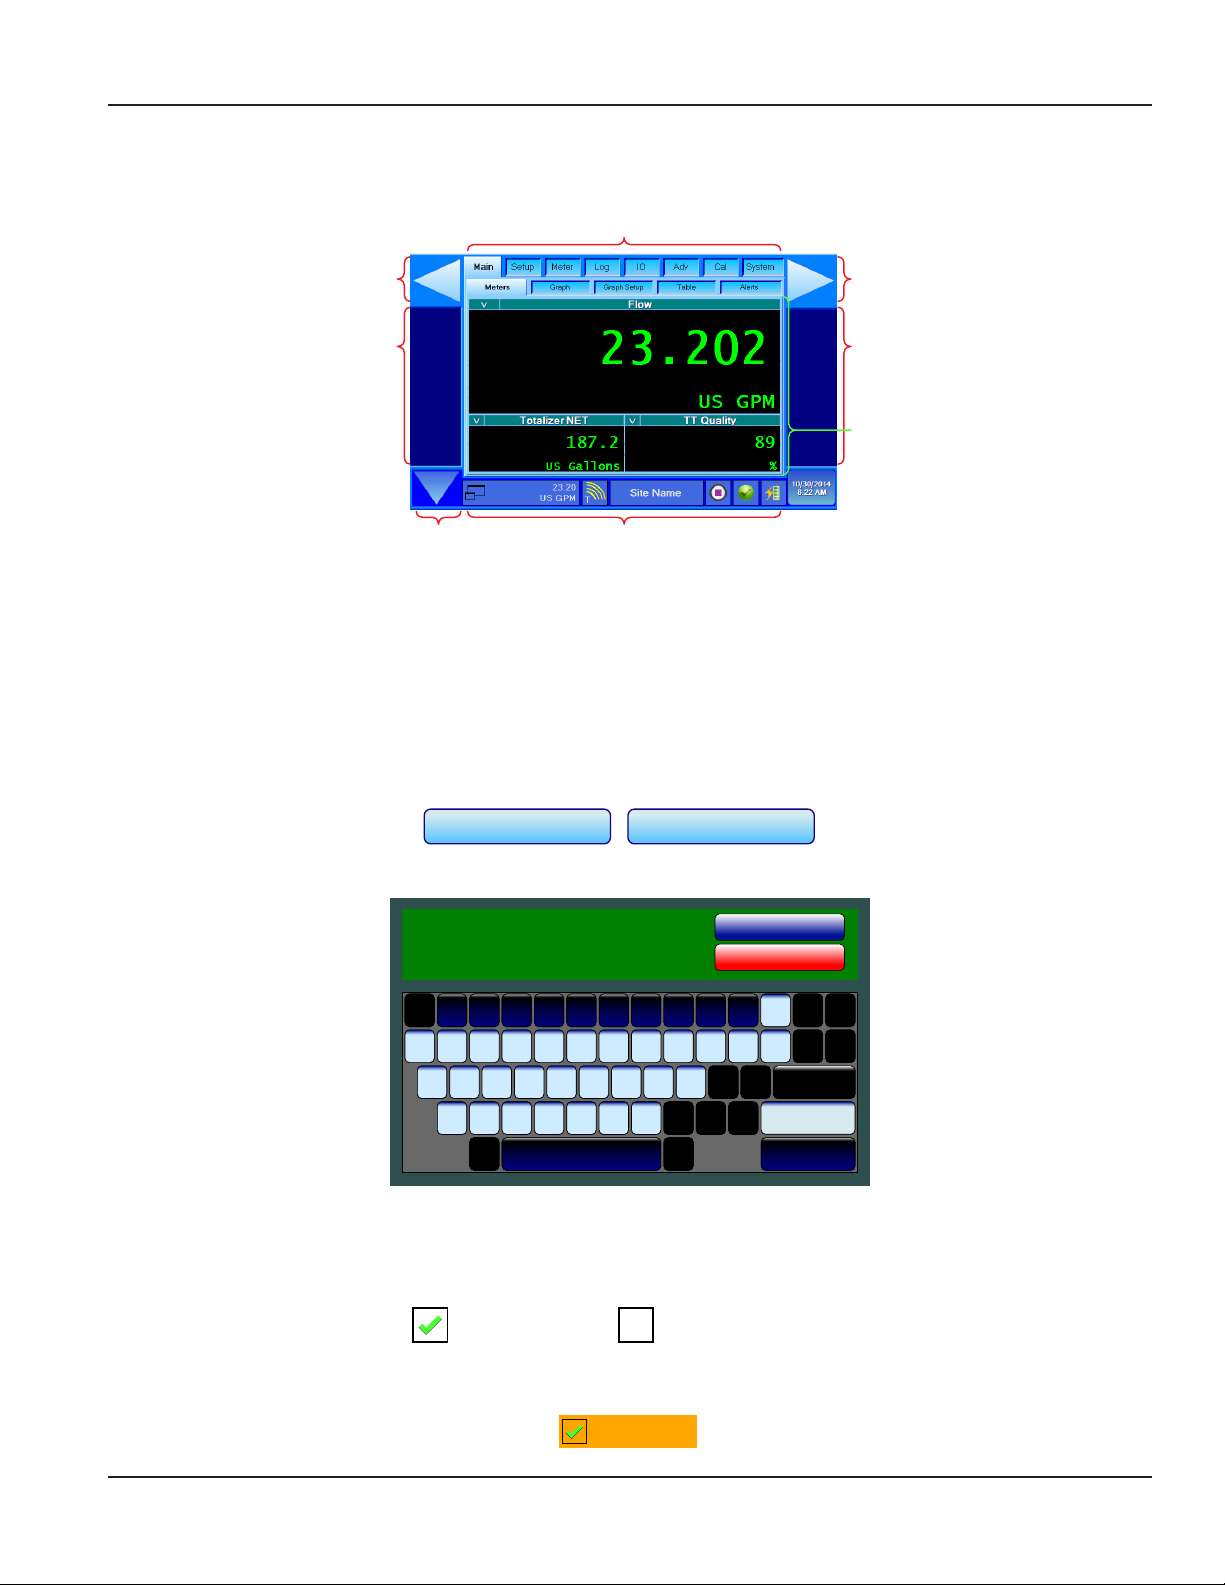
Shutdown Slider
Use the Shutdown Slider to turn off the DXN flow meter without having to press and hold the physical On/Off button. To use
the shutdown slider, press the Down Arrow until the red Shutdown Slider appears. Press and hold the red button on the left
side of the screen. Drag it to the right until it snaps to the right screen stop.
With Finger
> > > Slide To Shut Down > > >
Figure 10: Shutdown slider
Increment/Decrement Control
To enter numeric data:
• Use the (Increment) and (Decrement) buttons to select numeric data, or
• Double-tap the numerical value area and use the pop-up keypad to enter the numbers.
Value Display
and
Double Tap Area
Increment
(increase)
625
Decrement
(decrease)
Figure 11: Increment/decrement control
Min
0.25
1
4
7
+/-
Clear
Parameter Pipe OD Currently 2.375
2
5
8
0
OK
Max
200.00
3
6
9
.
Cancel
Figure 12: Numeric input control
Min, Max and the selected parameter all display on the top line of the numeric keypad.
• Press Clear to start over.
• Press Cancel to close without changes.
• Press OK to store the new value and close the keypad.
Page 14 August 2018HYB-UM-00090-EN-05
Page 15

Combo Box
An arrow to the left of a box indicates the box contains a list of options.
Combo Box
Active Area
DXN Flow Meter Data and Controls Layout
Combo Box
Indicator
Water-Tap
Figure 13: Retracted combo box
Press the box’s active area to show the choices for that parameter.
Cancel
Water-Tap
Water-Tap
×
Water-Black
Acetone
Ammonia
Benzene
Brine
Parameter
Choices
Set
Make
Selection
Ethanol
Ethylene Glycol 100%
Ethylene Glycol 50%
Ethylene Glycol 25%
Gasoline
Glycerin
Isopropanol
Kerosen
Jet Fuel A1/JP8
Jet Fuel B/JP4
Scroll
Bar
Move
Selection
Buttons
Figure 14: Combo box with large scroll bars
The (Up) and (Down) arrow buttons moves the blue highlighted area up or down, depending on the original position of
the highlight. Use the
Set
(Set) button to lock in the highlighted selection or use the × (Cancel) button to exit the combo box
without making any changes.
If the drop-down list of parameters is too large to be contained in one combo box length, you can move the large scroll bar
up or down to display the remaining parameters.
A small scroll bar is also used when parameter entries are too numerous for a single screen page. The scroll bars may appear
either horizontally or vertically.
Figure 15: Small scroll bar
Page 15 August 2018 HYB-UM-00090-EN-05
Page 16

Pre-Installation Checklist
PREINSTALLATION CHECKLIST
Charged Battery
Charge the battery for four hours with the flow meter turned OFF.
Tools Not Included with the Flow Meter
• A 5/16 in. nut driver or a flat-head screwdriver
• Permanent marker or other utensil that will make a visible mark on the pipe
• Tape for larger pipe configuration, Z-mode
• Scissors for larger pipe configuration, Z-mode
• Rag or paper towels
Prepared Mounting Area for Transducers
• The pipe surface where the transducers are to be mounted must be clean and dry.
• Remove scale, rust or loose paint to provide satisfactory acoustic conduction.
• Wire brush the rough surfaces of pipes to smooth bare metal.
• Plastic pipes do not require preparation, other than cleaning.
Page 16 August 2018HYB-UM-00090-EN-05
Page 17

Transducer Installation
TRANSDUCER INSTALLATION
The transducers for the DXN flow meter contain piezoelectric crystals that transmit and receive ultrasonic signals through the
walls of liquid piping systems.
DTTR, DTTN, DTTL, DTTH and DT94 transducers are relatively simple and straightforward to install, but spacing and alignment
of the transducers is critical to the system’s accuracy and performance. CAREFULLY PERFORM THESE INSTRUCTIONS.
DTTSU small pipe transducers have integrated transmitter and receiver elements. A spacing slider is provided to adjust the
required spacing, based on pipe size and mounting method.
Mounting the DTTR, DTTN, DTTL, DTTH and DT94 clamp-on ultrasonic transit time transducers takes four steps:
1. Select the optimum transmission mode and mounting location on a piping system.
2. Select a mounting conguration.
3. Enter the site information, then the uid pipe properties for the specic site.
4. Prepare the pipe and mount the transducers.
Select a Transmission Mode
The first decision to be made is what mode of ultrasonic transmission to use.
• Use Transit Time mode with fluids that have little to no particulates or entrained air.
• Use Doppler mode with fluids that contain significant levels of particulates and aerated fluids.
• Use Hybrid mode to automatically switch between Transit Time and Doppler modes.
If the fluid type is unknown, start with Transit Time mode, which is more forgiving of having some particulate or air than
Doppler mode is of not having enough particulate or entrained air.
If the fluid type is an unknown, you can mount both Transit Time and Doppler transducers on the same pipe and let the flow
meter decide which set of transducers to use. The flow meter can operate as a dedicated Transit Time meter, a dedicated
Doppler meter or it can automatically switch between Transit Time and Doppler modes using the Hybrid mode.
Signal Quality
When the flow meter is in Hybrid mode, switching between Transit Time and Doppler modes is controlled by the signal quality.
For any mode setting elected from the Meter > Flow page, the signal quality myst be at least 10% to obtain any readings.
Above a signal quality of 10%, but below 40%, the flow meter uses the mode that develops the hightest signal quality. If, for
example, the Doppler signal quality is 38% and Transit Time signal quality is 33%, Doppler is automatically selected. Above
40%, the flow meter uses Transit Time.
Page 17 August 2018 HYB-UM-00090-EN-05
Page 18

Transducer Installation
Select a Mounting Location
At this point, consider the transducer mounting location. A guiding principle is to mount the transducers on a section of pipe
that has at least 10 pipe diameters upstream of the transducers and 5 pipe diameters downstream. See Table 1 on page19
for additional pipe length considerations.
For example, if a 3 inch pipe is being measured, the minimum upstream pipe in front of the transducers should be 30 inches
and the minimum downstream pipe behind the transducers should be at least 15 inches.
Pipe runs shorter than the minimums may sometimes be used with reduced accuracy. There is no way to determine how
much accuracy is sacrificed without doing in-field testing. For installations where the 10/5 pipe diameters rule cannot
be followed, divide the total length of available straight pipe into thirds and mount the transducers with 2/3 of the pipe
upstream and 1/3 of the pipe downstream.
A full pipe is absolutely essential for making accurate flow measurements in either Transit Time and Doppler mode. The flow
meter cannot determine if the pipe is full or not. If the pipe is partially full, the meter will over report the amount of flow by
the percentage of the pipe that is not filled with liquid.
An optimum transducer mounting location is defined as:
• A piping system that is completely full of liquid when measurements are being taken. The pipe may become empty during
a process cycle, which results in a “Low Signal Strength” error while the pipe is empty. This error code clears automatically
when the pipe refills with liquid. Do not mount the transducers in an area where the pipe may become partially filled.
Partially filled pipes cause erroneous and unpredictable operation of the meter.
• A piping system that contains lengths of straight pipe such as those described in Table 1 on page19. The optimum
straight pipe diameter recommendations apply to pipes in both horizontal and vertical orientation. The straight runs in
Table 1 apply to liquid velocities that are nominally 7 fps (2.2 mps). As liquid velocity increases above this nominal rate, the
requirement for straight pipe increases proportionally.
• Mount the transducers in an area where they will not be inadvertently bumped or disturbed.
• Avoid installations on downward flowing pipes unless adequate downstream head pressure is present to overcome partial
filling of or cavitation in the pipe.
Page 18 August 2018HYB-UM-00090-EN-05
Page 19
Transducer Installation
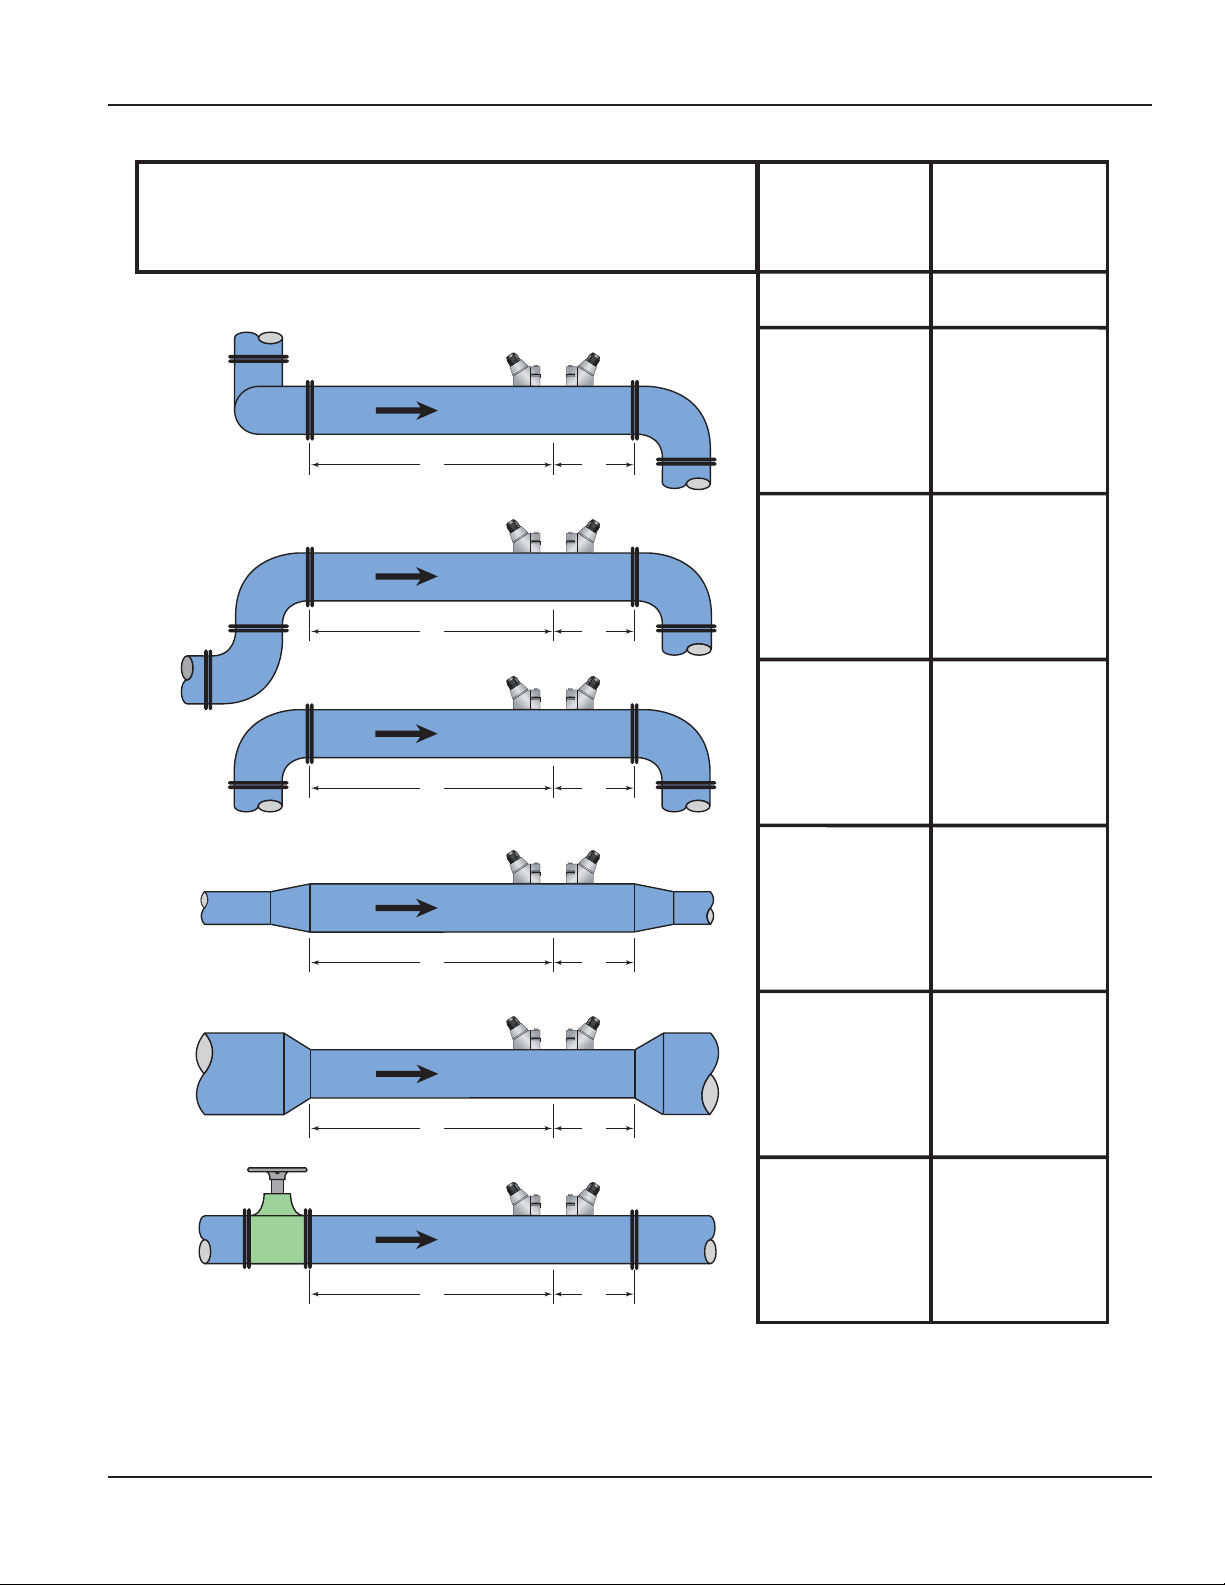
Piping Conguration
and Transducer Positioning
Flow
*
Flow
*
Flow
**
**
Upstream
Pipe
Diameters
Downstream
* **
24
14
10
Pipe
Diameters
5
5
5
*
Flow
*
Flow
*
Flow
*
Table 1: Piping configuration and transducer positioning
The DXN flow metering system provides repeatable measurements on piping systems that do not meet these pipe diameter
requirements, but the accuracy of the readings may be influenced.
**
**
**
**
10
10
24
5
5
5
Page 19 August 2018 HYB-UM-00090-EN-05
Page 20

Transducer Installation
Select a Mounting Conguration
The flow meter can be used with these transducer types: DTTR, DTTN, DTTL, DTTH, DTTSU and DT94. Meters that use
transducer sets consist of two separate sensors that function as both ultrasonic transmitters and receivers. The transducers are
clamped on the outside of a closed pipe at a specific distance from each other.
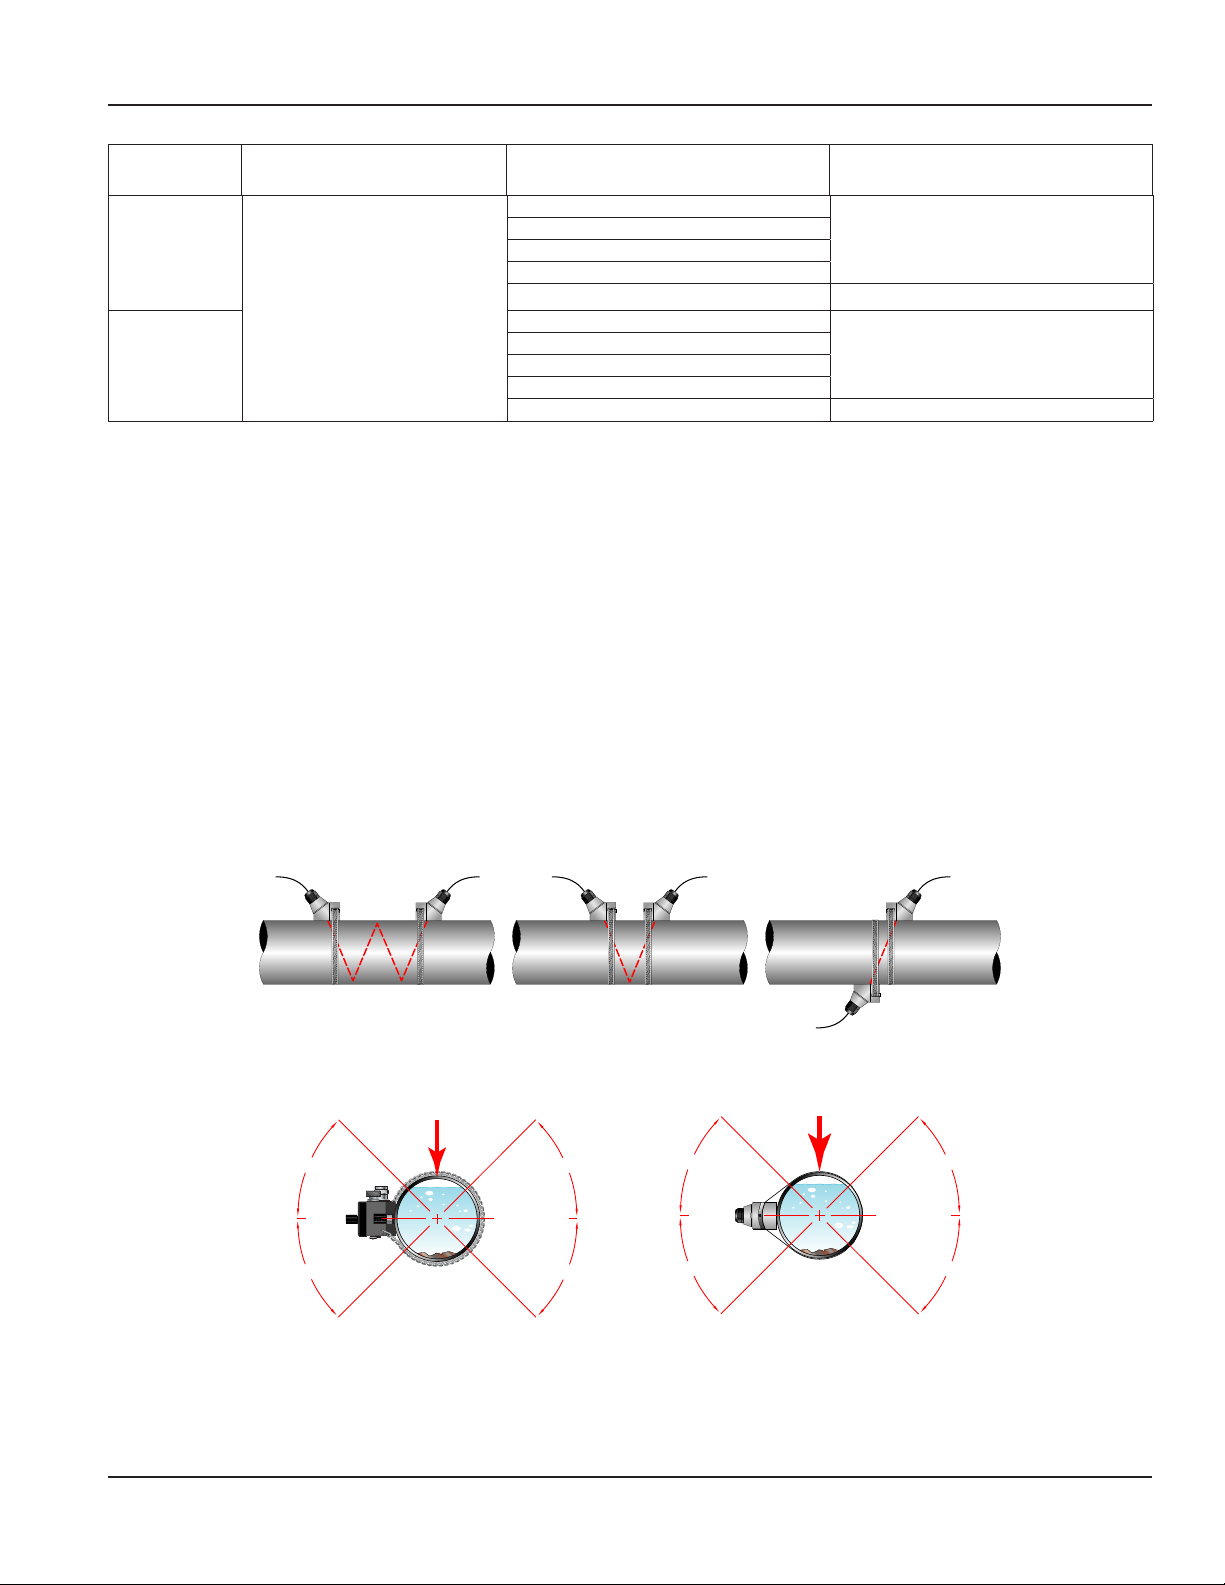
The transducers can be mounted in:
• W-Mount where the sound traverses the pipe four times. This mounting method produces the best relative travel time
values but the weakest signal strength.
• V-Mount where the sound traverses the pipe twice. V-Mount is a compromise between travel time and signal strength.
• Z-Mount where the transducers are mounted on opposite sides of the pipe and the sound crosses the pipe once. Z-Mount
yields the best signal strength but the smallest relative travel time.
Transducer
Mount Mode
W-Mount
V-Mount
Z-Mount
Transducer Pipe Material Pipe Size
Plastic (all types)
DTTR/DTTN/DTTH
DTTL
DTTR/DTTN/DTTH
DTTL
DTTR/DTTN/DTTH
DTTL
Table 2: Transducer mounting modes for DTTR, DTTN, DTTL and DTTH
Carbon Steel
Stainless Steel
Copper
Ductile Iron
Cast Iron
Plastic (all types)
Carbon Steel
Stainless Steel
Copper
Ductile Iron
Cast Iron
Plastic (all types)
Stainless Steel
Copper 4…30 in. (100…750 mm)
Ductile Iron
Cast Iron
Plastic (all types) 16…48 in. (406…1220 mm)
Carbon Steel
Stainless Steel
Copper 16…48 in. (406…1220 mm)
Ductile Iron
Cast Iron
Plastic (all types) > 30 in. ( > 750 mm)
Carbon Steel
Stainless Steel
Copper > 30 in. ( > 750 mm)
Ductile Iron
Cast Iron
Plastic (all types) > 48 in. ( > 1220 mm)
Carbon Steel
Stainless Steel
Copper > 48 in. ( > 1220 mm)
Ductile Iron
Cast Iron
2…4 in. (50…100 mm)
Not recommended
8…16 in. (203…406 mm)
Not recommended
4…12 in. (203…406 mm)Carbon Steel
2…12 in. (50…300 mm)
16…36 in. (406…915 mm)
16…30 in. (406…750 mm)
> 12 in. ( > 300 mm)
> 12 in. ( > 300 mm)
> 36 in. ( > 915 mm)
> 30 in. ( > 750 mm)
Page 20 August 2018HYB-UM-00090-EN-05
Page 21
Transducer Installation
Transducer
Mount Mode
Transducer Pipe Material Pipe Size
Plastic (all types)
W-Mount
Carbon Steel
Stainless Steel
0.5…0.75" (12.7…19 mm)
Copper
DTTSU
V-Mount
Galvanized Not recommended
Plastic (all types)
Carbon Steel
Stainless Steel
0.75…2.4" (19…61 mm)
Copper
Galvanized 0.5…2.4" (12.7…61 mm)
Table 3: Transducer mounting modes for DTTSU
DTTL transducers may also be advantageous on pipes between 4…24 inches if there are less quantifiable complicating
aspects, such as sludge, tuberculation, scale, rubber liners, plastic liners, thick mortar, gas bubbles, suspended solids,
emulsions, or pipes that are partially buried where a V-mount is required or desired.
The DTTR, DTTN, DTTH and DTTL transducers must be properly oriented and spaced on the pipe to provide optimum
reliability and performance. On horizontal pipes, when Z-Mount is required, the transducers should be mounted 180 radial
degrees from one another and at least 45 degrees from the top-dead-center and bottom-dead-center of the pipe.
See Figure 24 on page25. Also see “Z-Mount Installation” on page24. On vertical pipes the orientation is not critical.
The best accuracy is achieved when transducer spacing is exactly what the flow meter calculates, so the calculated spacing
should be used if signal quality is satisfactory. If the pipe is not round, the wall thickness not correct or the actual liquid
being measured has a different sound speed than the liquid programmed into the transmitter, the spacing can vary from
the calculated value. If that is the case, the transducers should be placed at the highest signal level observed by moving the
transducers slowly around the mount area.
OTE:N Transducer spacing is calculated on ideal pipe. Ideal pipe is almost never found so the transducer spacing distances
may need to be altered. An effective way to maximize signal quality is to configure the display to show signal quality,
fix one transducer on the pipe and then starting at the calculated spacing, move the remaining transducer small
distances forward and back to find the maximum signal quality point.
TOP VIEW
OF PIPE
TOP VIEW
OF PIPE
TOP VIEW
W-Mount V-Mount Z-Mount
Figure 16: Transducer mounting modes for DTTR, DTTN, DTTL and DTTH
Top of
Flow Meter
Mounting Orientation
45°
YES
45°
TOP OF
PIPE
Flow Meter
Mounting Orientation
DTTSU Transducers
Figure 17: Transducer orientation for horizontal pipes
YES
45°
45°
45°
YES
45°
DTTR, DTTN, DTTL and DTTH Transducers
OF PIPE
Pipe
45°
YES
45°
Page 21 August 2018 HYB-UM-00090-EN-05
Page 22

Transducer Installation
Enter the Site, Fluid and Pipe Properties
The DXN has the ability to store over 300 sites. Each site contains uid and piping characteristics as well as other settings that
are congured during meter commissioning. Sites are recallable from a pull-down menu each time the specic site is visited.
This makes period measurements of the particular site less time consuming. For further detail on sites, see “Site Page” on
page37.
The DXN flow metering system calculates proper transducer spacing based on the piping and mounting method information
you enter into the ow meter via the touchscreen display.
The most accuracy is achieved when the transducer spacing is exactly what the flow meter calculates, so use the calculated
spacing if the signal strength is satisfactory. If the pipe is not round, the wall thickness not correct or the actual liquid being
measured has a different sound speed than the liquid programmed into the flow meter, the spacing can vary from the
calculated value. In that case, place the transducers at the highest signal level observed when moving the transducers slowly
around the mount area.
OTE:N Transducer spacing is calculated on “ideal” pipe. Ideal pipe almost never exists, so you may need to alter the
transducer spacing. An effective way to maximize signal strength is to configure the display to show signal strength,
fix one transducer on the pipe and then—starting at the calculated spacing—move the remaining transducer small
distances forward and back to find the maximum signal strength point.
MPORTANTI
Enter all of the data on this list before mounting the transducers.
1. Enter the pipe information.
a. For pipes conforming to ANSI specifications, fill in the information with the pull-down menus under Setup > ANSI Pipe.
– Pipe Material
– ANSI Schedule
– Nominal Size
– Liner (For Ductile Iron)
b. For pipes that do not conform to ANSI specifications, or where piping information is unknown, select Use Manual
Entry in the Pipe Material pull-down under the Setup > ANSI Pipe page, then fill in the information under the Setup >
Pipe page.
– Pipe Material (If the pull-down list does not contain the correct material, select the closest alternative.)
– Pipe OD
– Pipe Wall thickness (Use the numeric entry if the value is known, or use the pipe wall thickness gauge feature to
determine wall thickness. See page 48 for details.)
OTE:N Based on Material selection, a nominal value for roughness is already provided.
2. Enter the liner information (if applicable) under the Setup > Liner page.
3. Enter the transducer information
4. For transit time flow measurement, enter in the appropriate information under the Setup > Transit page. See Table 2 on
page20 for information on which items to select.
– Transducer
– Transducer Mount
5. Record the Required Spacing value that was calculated and displayed after all previous steps have been completed. This
number will be needed when mounting the transducers. The distances are in inches if the ow meter is congured in
English units, or millimeters if congured in metric units.
Page 22 August 2018HYB-UM-00090-EN-05
Page 23
Transducer Installation
Mount the Transducer
After selecting an optimal mounting location and determining the proper transducer spacing, mount the transducers onto
the pipe.
1. Clean the surface of the pipe. If the pipe has external corrosion or dirt, wire brush, sand or grind the mounting location
until it is smooth and clean. Paint and other coatings, if not flaked or bubbled, need not be removed. Plastic pipes typically
do not require surface preparation other than soap and water cleaning.
2. Orient and space the transducers on the pipe to provide optimum reliability and performance. On horizontal pipes, when
Z-Mount is required, mount the transducers 180 radial degrees from one another and at least 45 degrees from the
top-dead-center and bottom-dead-center of the pipe. See Figure 17 on page21. Also see “Z-Mount Installation” on
page24. On vertical pipes, the orientation is not critical.
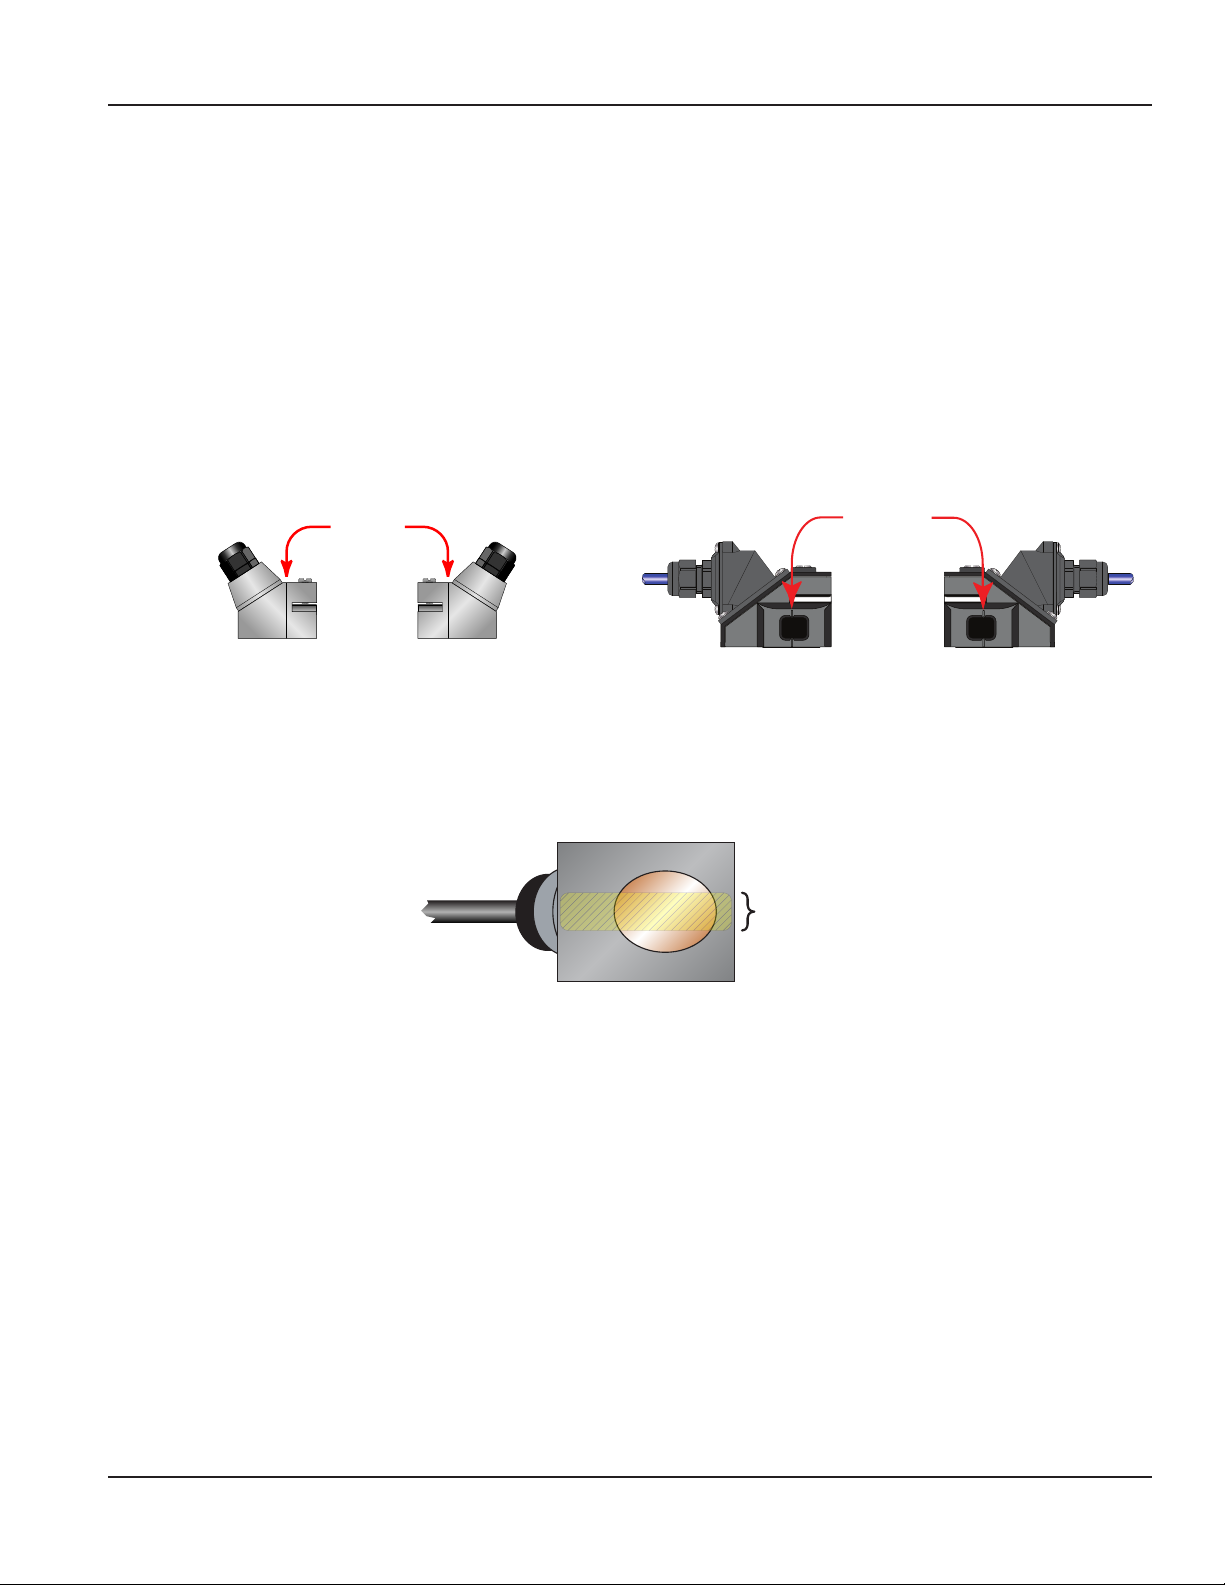
The spacing between the transducers is measured between the two spacing marks on the sides of the transducers. These
marks are approximately 0.75 inches (19 mm) back from the nose of the DTTR, DTTN and DTTH transducers, and 1.2 inches
(30 mm) back from the nose of the DTTL transducers.
Alignment
Marks
Figure 18: Transducer alignment marks for DTTN, DTTH, DTTL Figure 19: Transducer alignment marks for DTTR
Alignment
Marks
V-Mount and W-Mount Installation
Apply the Couplant
For DTTR, DTTN, DTTL and DTTH transducers, place a single bead of couplant, approximately 1/2 inch (12 mm) thick, on the
flat face of the transducer. See Figure 20. Generally, a silicone-based grease is used as an acoustic couplant, but any good
quality grease-like substance that is rated to not ow at the operating temperature of the pipe is acceptable. For pipe surface
temperature over 130° F (55° C), use Sonotemp® (P.N. D002-2011-010).
½ in.
(12 mm)
Figure 20: Application of couplant
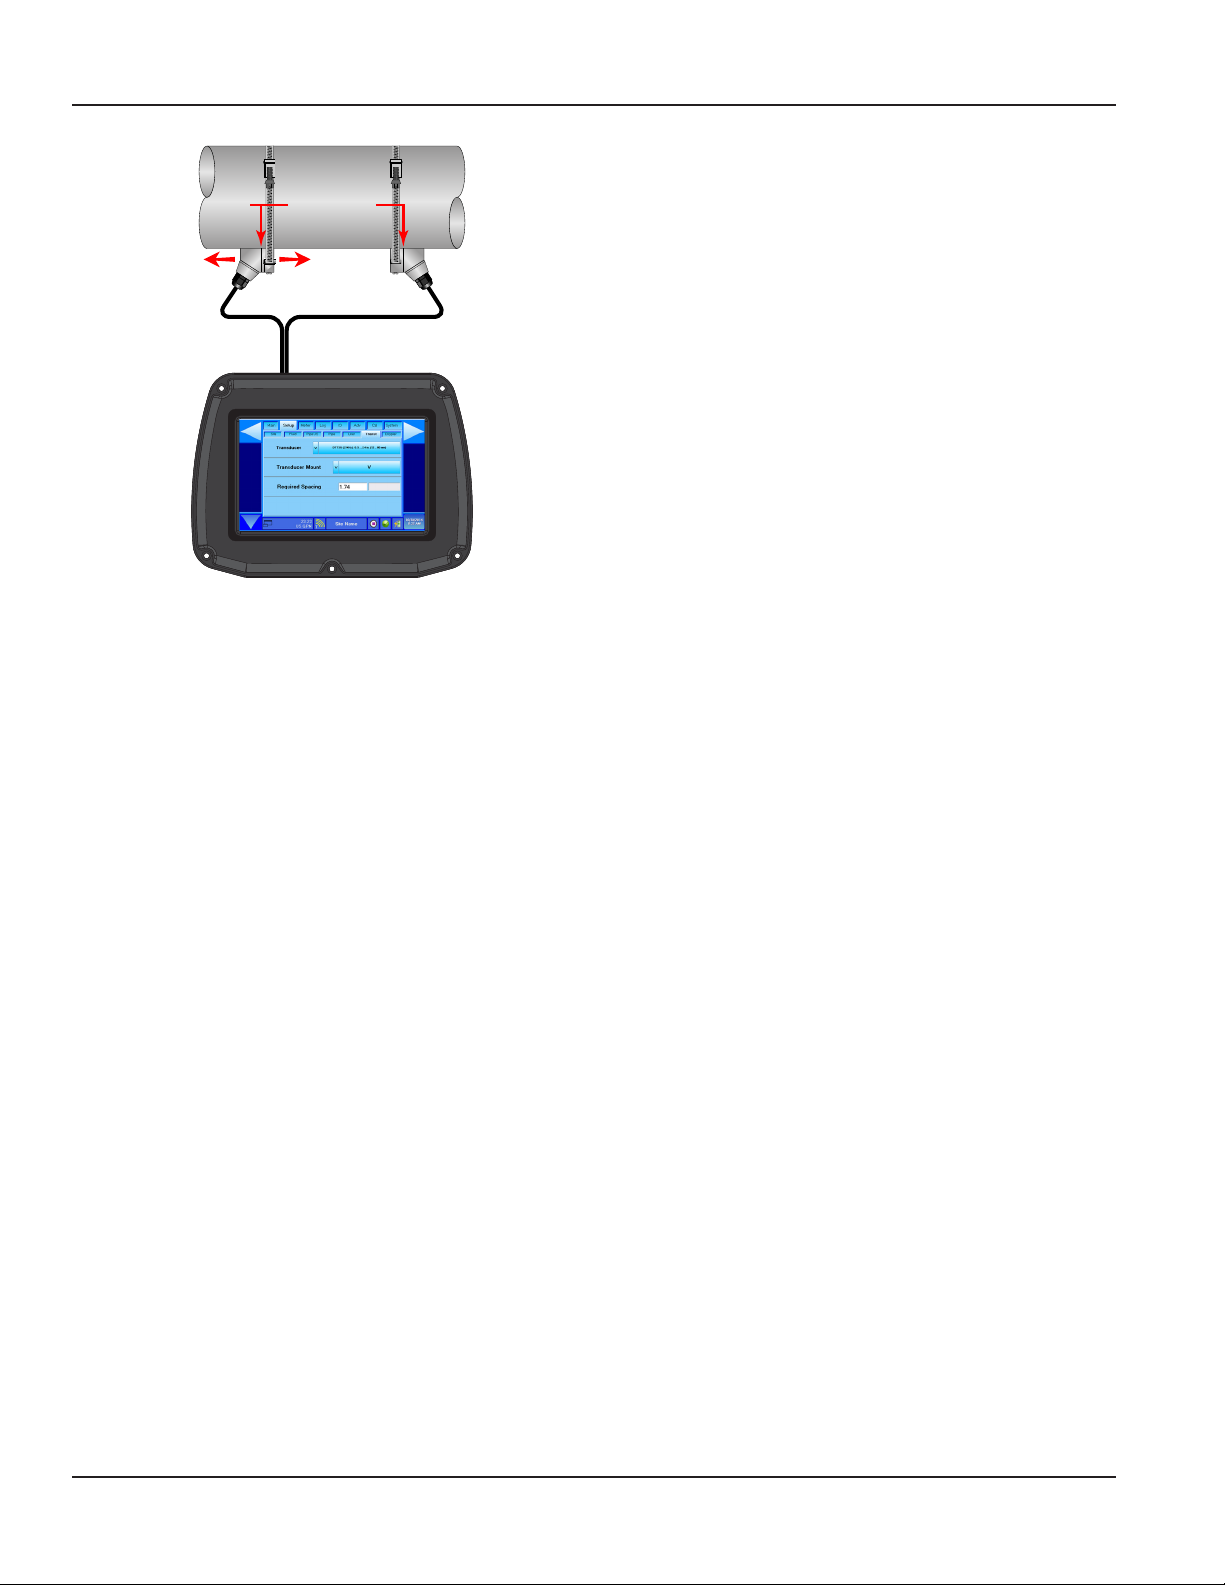
Position and Secure the Transducer
1. Place the upstream transducer in position and secure with a mounting strap. Place the straps in the arched groove on the
end of the transducer. Use the screw provided to help hold the transducer onto the strap. Verify that the transducer is true
to the pipe and adjust as necessary. Tighten the transducer strap securely.
2. Using the alignment marks, place the downstream transducer on the pipe at the calculated transducer spacing. See
Figure 21 on page24. Apply rm hand pressure. If signal strength is greater than 10%, secure the transducer at this
location. If the signal strength is not greater than 10%, using rm hand pressure, slowly move the transducer both towards
and away from the upstream transducer while observing signal strength.
Signal strength can be displayed on the ow meter’s display. Clamp the transducer at the position where the highest
signal strength is observed. The factory default signal strength setting is 10%. However, there are many applicationspecic conditions that may prevent the signal strength from attaining this level. Signal levels less than 10% are not
acceptable for reliable readings.
OTE:N Signal strength readings update only every few seconds. Move the transducer 1/8 inch, then wait to see if the signal
is increasing or decreasing. Repeat until the highest level is achieved.
3. If, after adjusting the transducers, the signal strength does not rise to 10%, use an alternate transducer mounting
conguration. If the mounting conguration was W-Mount, re-congure the ow meter for V-Mount, move the
downstream transducer to the new spacing distance and repeat the procedure “Enter the Site, Fluid and Pipe Properties” on
page22.
Page 23 August 2018 HYB-UM-00090-EN-05
Page 24
Transducer Installation
Figure 21: Transducer positioning
Z-Mount Installation
Transducer
Spacing
OTE:N Use the DTTL transducer on pipes 24 inches and
larger and not on pipes smaller than 4 inches. You
can consider using the DTTL transducers on pipes
smaller than 24 inches if there are less quantifiable
aspects—such as sludge, tuberculation, scale, rubber
liners, plastic liners, thick mortar liners, gas bubbles,
suspended solids, emulsions—and smaller pipes
that are perhaps partially buried where a V-Mount is
required or desired.
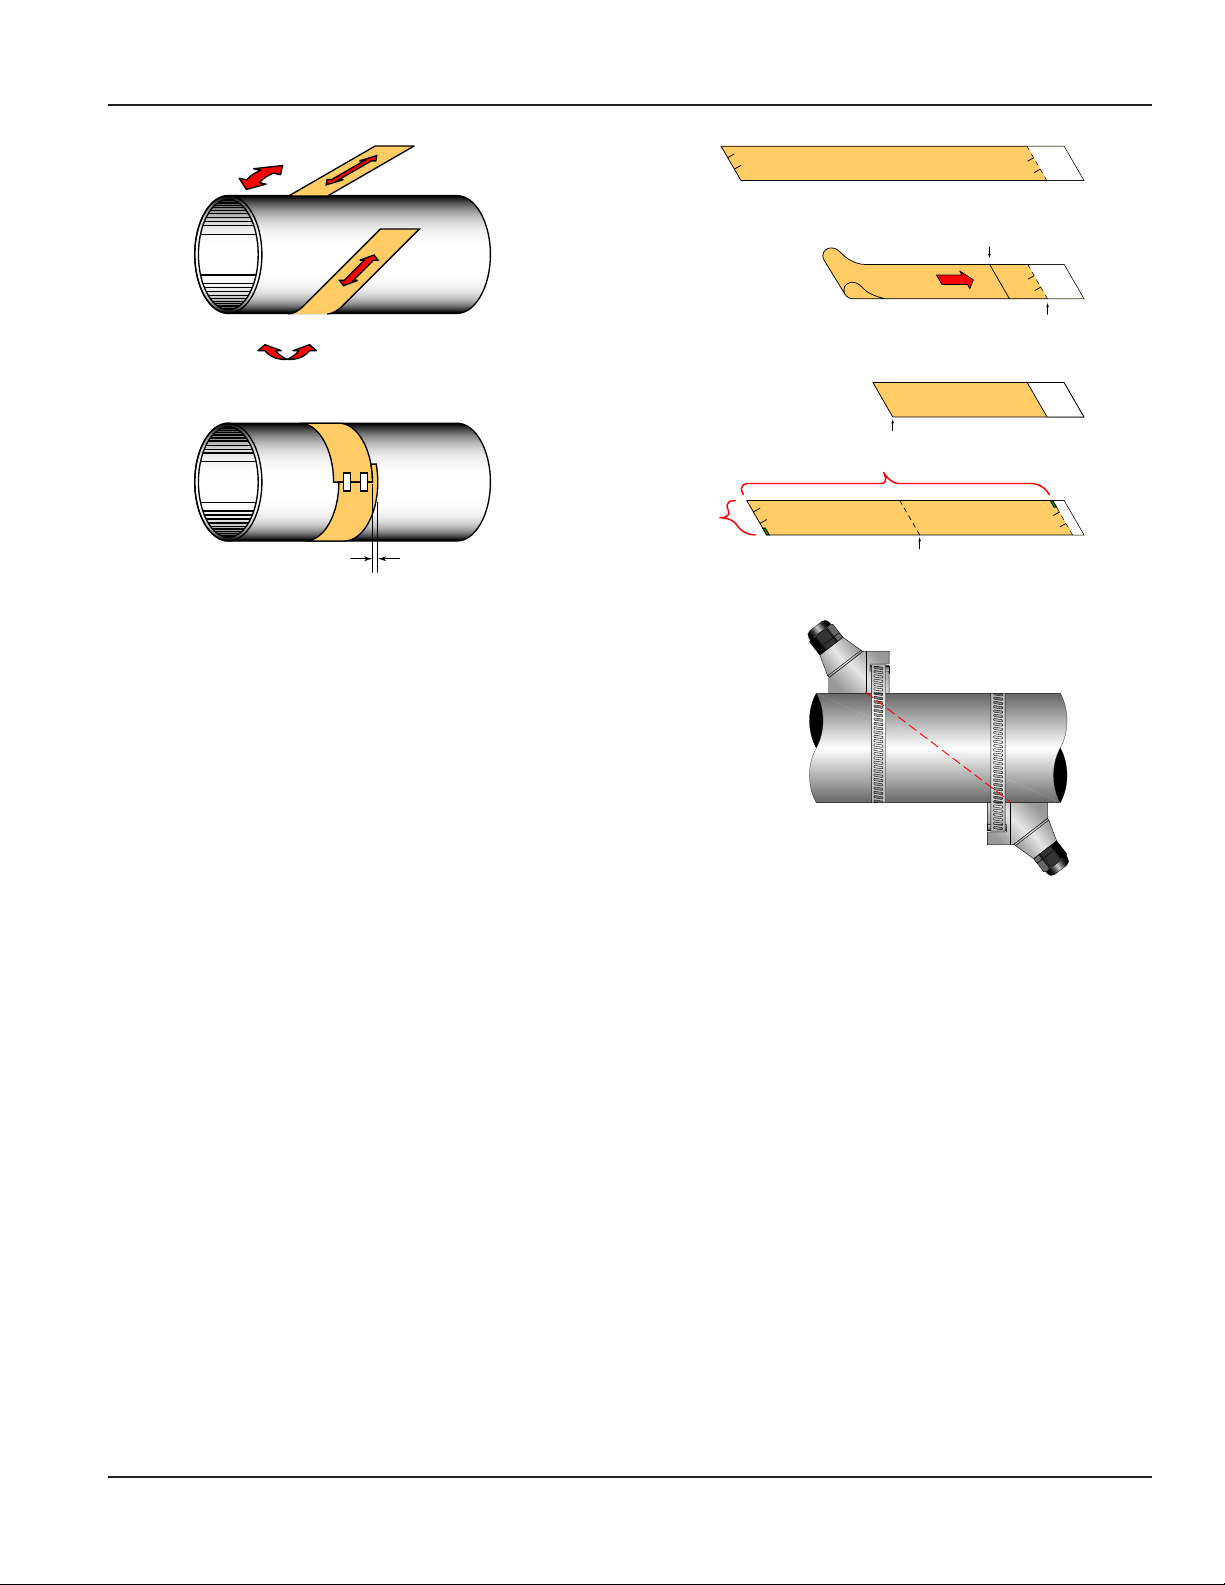
Installation on larger pipes requires careful measurements of the linear and radial placement of the DTTR, DTTN, DTTL and
DTTH transducers. Failure to properly orient and place the transducers on the pipe may lead to weak signal strength and/or
inaccurate readings. This section details a method for properly locating the transducers on larger pipes. This method requires
a roll of paper such as freezer paper or wrapping paper, masking tape and a marking device.
1. Wrap the paper around the pipe in the manner shown in Figure 22. Align the paper ends to within 1/4 inch (6 mm).
2. Mark the intersection of the two ends of the paper to indicate the circumference. Remove the template and spread it out
on a at surface. Fold the template in half, bisecting the circumference. See Figure 23.
3. Crease the paper at the fold line. Mark the crease. Place a mark on the pipe where one of the transducers will be located.
See Figure 17 for acceptable radial orientations. Wrap the template back around the pipe, placing the beginning of the
paper and one corner in the location of the mark. Move to the other side of the pipe and mark the pipe at the ends of
the crease. Measure from the end of the crease (directly across the pipe from the rst transducer location) the dimension
derived in “Select a Mounting Configuration” on page20. Mark this location on the pipe.
4. The two marks on the pipe are now properly aligned and measured. If access to the bottom of the pipe prohibits the
wrapping of the paper around the circumference, cut a piece of paper 1/2 the circumference of the pipe and lay it over the
top of the pipe. The equation for the length of 1/2 the circumference is: 1/2 Circumference = Pipe O.D. × 1.57
The transducer spacing is the required spacing value that was recorded during setup. Mark opposite corners of the paper on
the pipe. Apply transducers to these two marks.
Page 24 August 2018HYB-UM-00090-EN-05
Page 25
LESS THAN ¼” (6 mm)
(Center of Pipe)
Transducer
Spacing
Fold
Pipe Circumference
Crease
Transducer Installation
Edge of
Paper
Line Marking
Circumference
Figure 22: Paper template alignment
Figure 23: Bisecting the pipe circumference
5. For DTTR, DTTN, DTTL and DTTH transducers, place a single bead of
couplant, approximately 1/2 inch (12 mm) thick, on the at face of the
transducer. See Figure 20. Generally, a silicone-based grease is used
as an acoustic couplant, but any good quality grease-like substance
that is rated to not ow at the operating temperature of the pipe is
acceptable.
6. Place the upstream transducer in position and secure with a stainless
TOP VIEW
OF PIPE
steel strap or other fastening device. Straps should be placed in the
arched groove on the end of the transducer. A screw is provided to help
hold the transducer onto the strap. Verify that the transducer is true to
the pipe, adjust as necessary. Tighten transducer strap securely. Larger
pipes may require more than one strap to reach the circumference of
the pipe.
Figure 24: Z-Mount transducer placement
7. Place the downstream transducer on the pipe at the calculated transducer spacing. See Figure 24. Using rm hand
pressure, slowly move the transducer both towards and away from the upstream transducer while observing signal
strength. Clamp the transducer at the position where the highest signal strength is observed. A signal strength percentage
between 10…98 is acceptable.
The factory default signal strength setting is 10%. However, there are many application-specific conditions that may
prevent the signal strength from attaining this level. A minimum signal strength of 5% is acceptable as long as this signal
level is maintained under all flow conditions.
On certain pipes, a slight twist to the transducer may cause signal strength to rise to acceptable levels. Certain pipe and
liquid characteristics may cause signal strength to rise to greater than 98. The problem with operating this flow meter with
very high signal strength is that the signals may saturate the input amplifiers and cause erratic readings. Strategies for
lowering signal strength would be changing the transducer mounting method to the next longest transmission path. For
example, if there is excessive signal strength and the transducers are mounted in a Z-Mount, try changing to V-Mount or
W-Mount. Finally, you can also move one transducer slightly off-line with the other transducer to lower signal strength.
8. Secure the transducer with a stainless steel strap or other fastener.
Page 25 August 2018 HYB-UM-00090-EN-05
Page 26
Transducer Installation
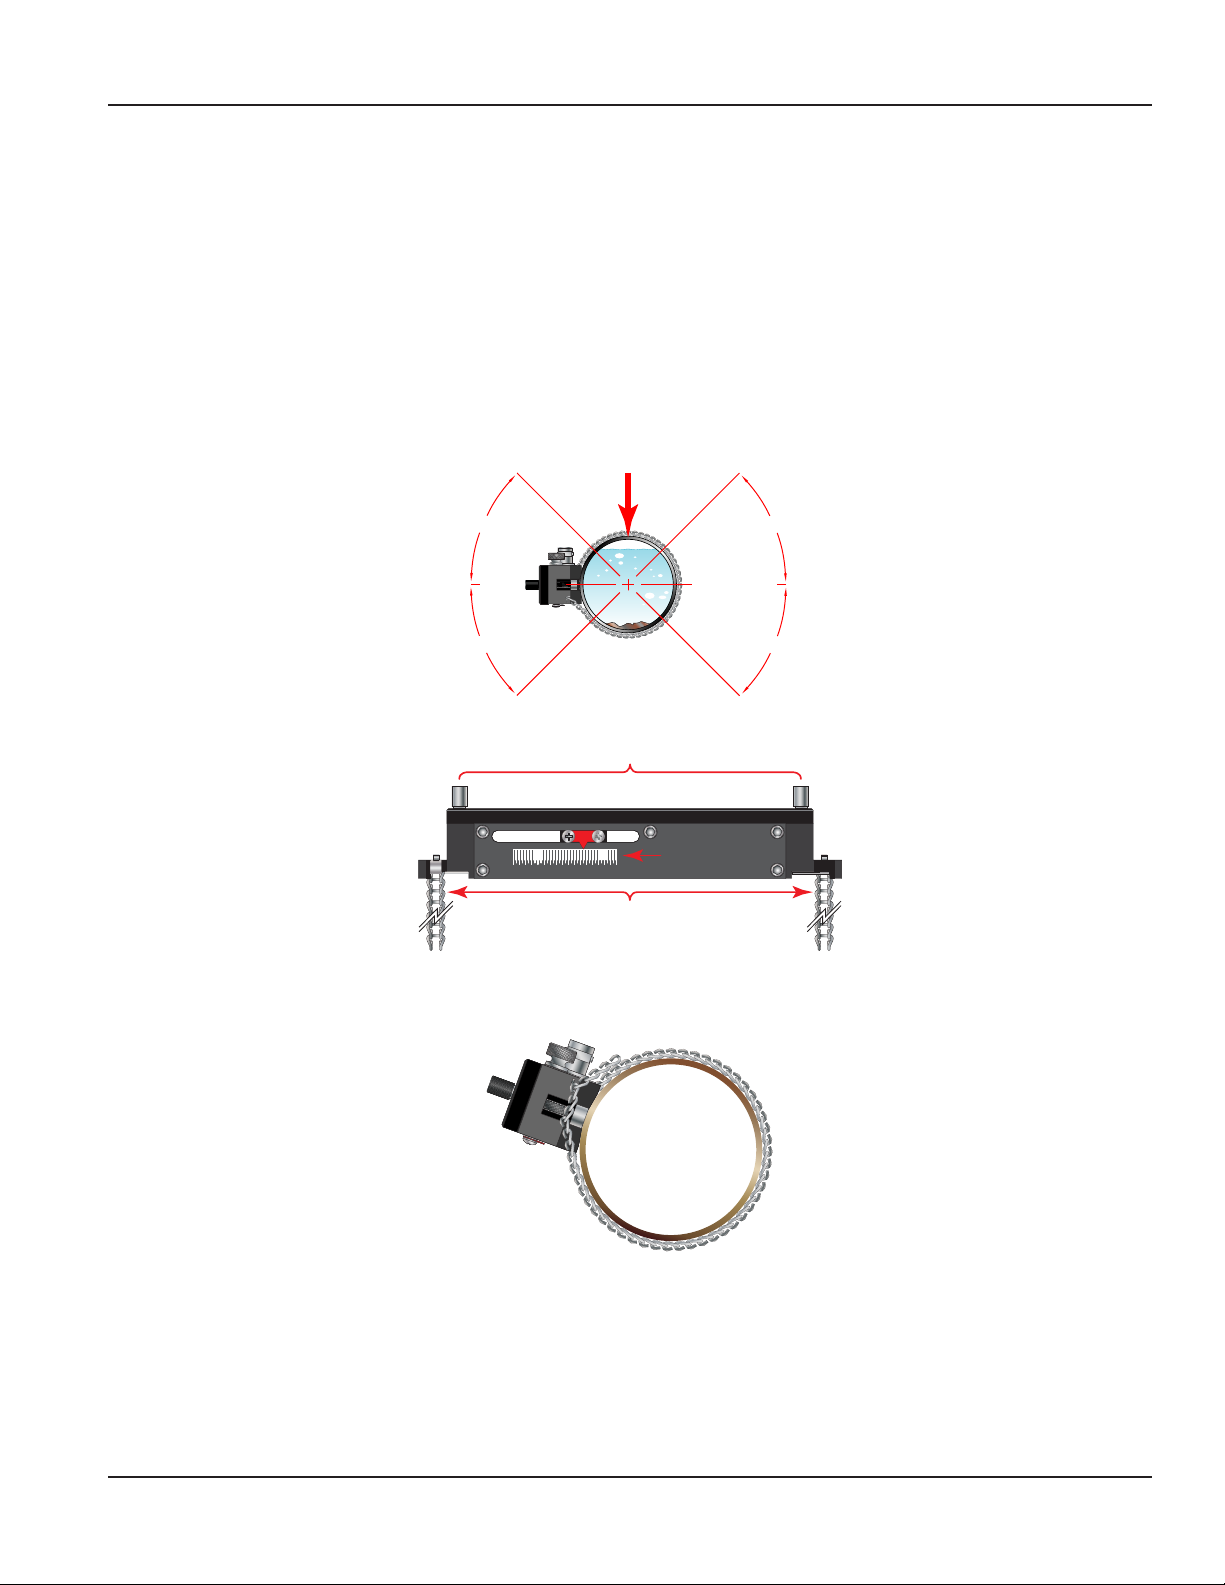
Mounting Rail System Installation for DTTR
For remote flow DTTR transducers with outside diameters between 2…10 inches (50…250 mm), the rail mounting kit aids
in installation and positioning of the transducers. Transducers slide on the rails, which have measurement markings that are
viewable through the sight opening.
1. Install the single mounting rail on the side of the pipe with the stainless steel bands provided. Do not mount it on the top
or bottom of the pipe. On vertical pipe, orientation is not critical. Check that the track is parallel to the pipe and that all
four mounting feet are touching the pipe.
2. Slide the two transducer clamp brackets toward the center mark on the mounting rail.
3. Place a single bead of couplant, approximately 1/2 inch (12 mm) thick, on the at face of the transducer.
See Figure 20 on page23.
4. Place the rst transducer in between the mounting rails near the zero point on the scale. Slide the clamp over the
transducer. Adjust the clamp and transducer so the notch in the clamp aligns with the zero on the scale. See Figure 26.
5. Secure with the thumb screw. Check that the screw rests in the counter bore on the top of the transducer. (Excessive
pressure is not required. Apply just enough pressure so that the couplant lls the gap between the pipe and transducer.)
6. Place the second transducer in between the mounting rails near the dimension derived in the transducer spacing section,
while using the alignment marks. Read the dimension on the mounting rail scale. Slide the transducer clamp over the
transducer and secure with the thumb screw.
Figure 25: Mounting rail system for DTTR
Mounting Track Installation for DTTN/DTTH
A convenient transducer mounting track can be used for pipes that have outside diameters between 2…10 inches
(50…250 mm) or 2…16 inches (50…406 mm) and for DTTN/DTTH transducers. If the pipe is outside of that range, mount the
transducers separately.
1. Install the single mounting rail on the side of the pipe with the stainless steel bands provided. Do not mount it on the top
or bottom of the pipe. On vertical pipe, orientation is not critical. Check that the track is parallel to the pipe and that all
four mounting feet are touching the pipe.
2. Slide the two transducer clamp brackets toward the center mark on the mounting rail.
3. Place a single bead of couplant, approximately 1/2 inch (12 mm) thick, on the at face of the transducer.
See Figure 20 on page23.
4. Place the rst transducer in between the mounting rails near the zero point on the scale. Slide the clamp over the
transducer. Adjust the clamp and transducer so the notch in the clamp aligns with the zero on the scale. See Figure 26.
5. Secure with the thumb screw. Check that the screw rests in the counter bore on the top of the transducer. (Excessive
pressure is not required. Apply just enough pressure so that the couplant lls the gap between the pipe and transducer.)
6. Place the second transducer in between the mounting rails near the dimension derived in the transducer spacing section.
7. Read the dimension on the mounting rail scale. Slide the transducer clamp over the transducer and secure with the thumb
screw.
Top View
of Pipe
Figure 26: Mounting track installation
Page 26 August 2018HYB-UM-00090-EN-05
Page 27
Transducer Installation
DTTSU Small Pipe Transducer Installation
Mount DTTSU transducers with the cable exiting within ±45 degrees of the side of a horizontal pipe. On vertical pipes the
orientation does not apply.
The DTTSU small pipe transducers are adjustable for pipe sizes between 1/2…2 in. (12…50 mm). Do not attempt to mount a
DTTSU transducer onto a pipe that is either too large or too small for the transducer.
1. Determine the transducer spacing required using the ow meter and the scale on the side of the DTTSU transducers, set
the spacing. See Figure 28.
2. On horizontal pipes, mount the transducer in an orientation such that the cable exits at ±45 degrees from the side of the
pipe. Do not mount with the cable exiting on either the top or bottom of the pipe. On vertical pipes the orientation does
not matter.
TOP OF
PIPE
45°
YES
45°
Figure 27: DTTSU positioning
Thumb Screws
1.02.0 1.5 0.5
Mounting Chains
Figure 28: Transducer spacing scale for DTTSU transducers
Transducer Spacing
Scale
45°
YES
45°
3. Wrap the mounting chains around the pipe and secure the chains to their respective mounting cleats. See Figure 29.
Figure 29: DTTSU transducers mounted
OTE:N The chains do not need to be taut at this point. Any slack in the chains is removed when the thumb screws
are adjusted.
Page 27 August 2018 HYB-UM-00090-EN-05
Page 28

Transducer Installation
Chain Mounting Cleat
½”
(12 mm)
Figure 30: Application of acoustic couplant for DTTSU transducers
4. Finger tighten the thumb screws so that the acoustic coupling grease begins to ow out from the under the transducer.
Do not over tighten.
5. If signal quality is less than 10%, remount the transducer at another location on the piping system.
Doppler Transducer Installation
For Doppler installation, the only pipe information needed is the Pipe Inside Diameter.
Sonic Reflectors for Doppler Mode
Flow meters based on Doppler shift principals operate by transmitting an ultrasonic sound from its transmitting transducer
through the pipe wall into the flowing liquid. The sound reflects off sonic reflectors suspended within the liquid and recorded
by the receiving transducer. If the sonic reflectors are moving within the sound transmission path, sound waves are reflected
at a frequency shifted (Doppler frequency) from the transmitted frequency. The shift in frequency is directly related to the
speed of the moving particle or bubble. This shift in frequency is interpreted by the instrument and converted to various user
defined measuring units.
The four criteria for a good Doppler reflectors are :
1. The scattering material must have a sonic impedance (sound speed dierence) dierent from the uid. The minimum
dierence must be at least 10%.
2. There must be some particles large enough to cause longitudinal reection—particles larger than 35 micron (435 mesh).
3. For a given pipe size, the longitudinal reection must have sucient energy to overcome the Rayleigh (energy wasting)
scattering caused by smaller particles.
4. The reecting material must travel at the same velocity as the uid for good accuracy.
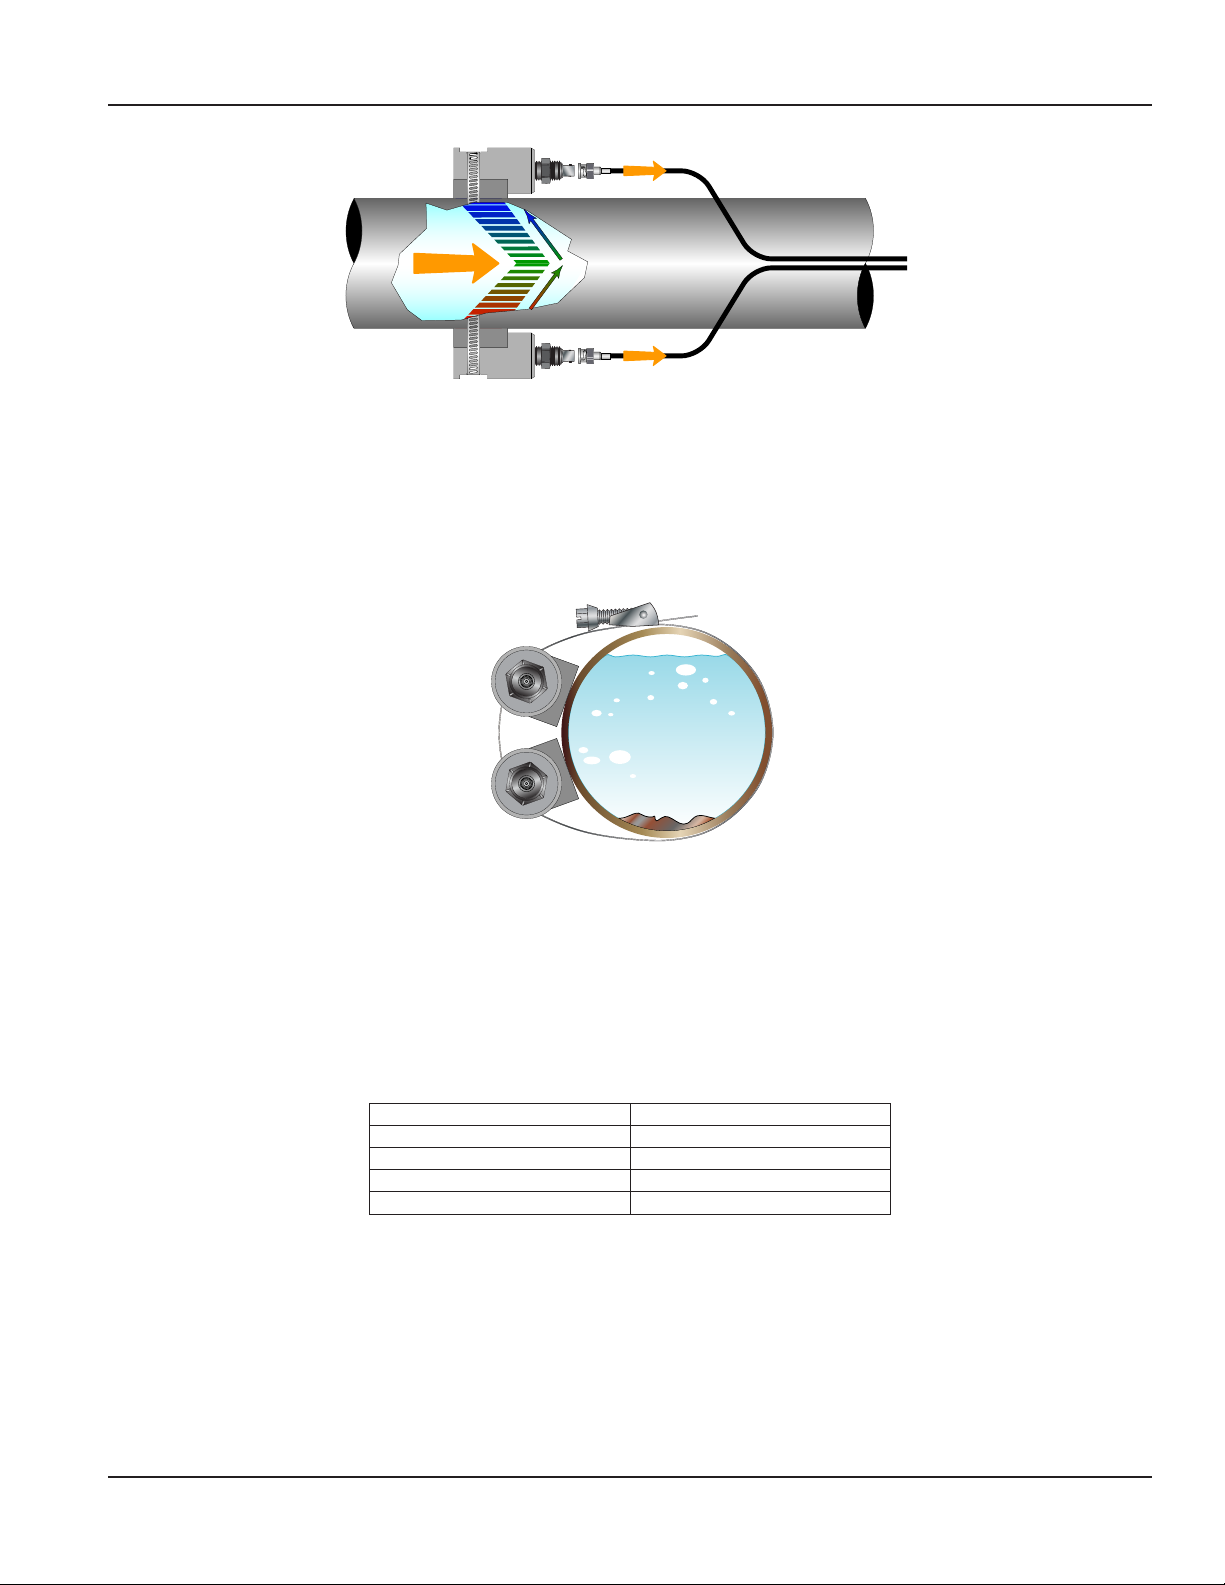
Installation Method
Mount Doppler transducers on the pipe 180 degrees apart and facing each other, with the cables on the downstream side of
the transducers. If the pipe is horizontal, the preferred mounting orientation is 3 and 9 o’clock, with 12 o’clock being the top of
the pipe. See Figure 31. Orientation on vertical pipes does not matter.
OTE:N Doppler transducers may be mounted on the same pipe as transit time transducers without encountering acoustic
cross-talk.
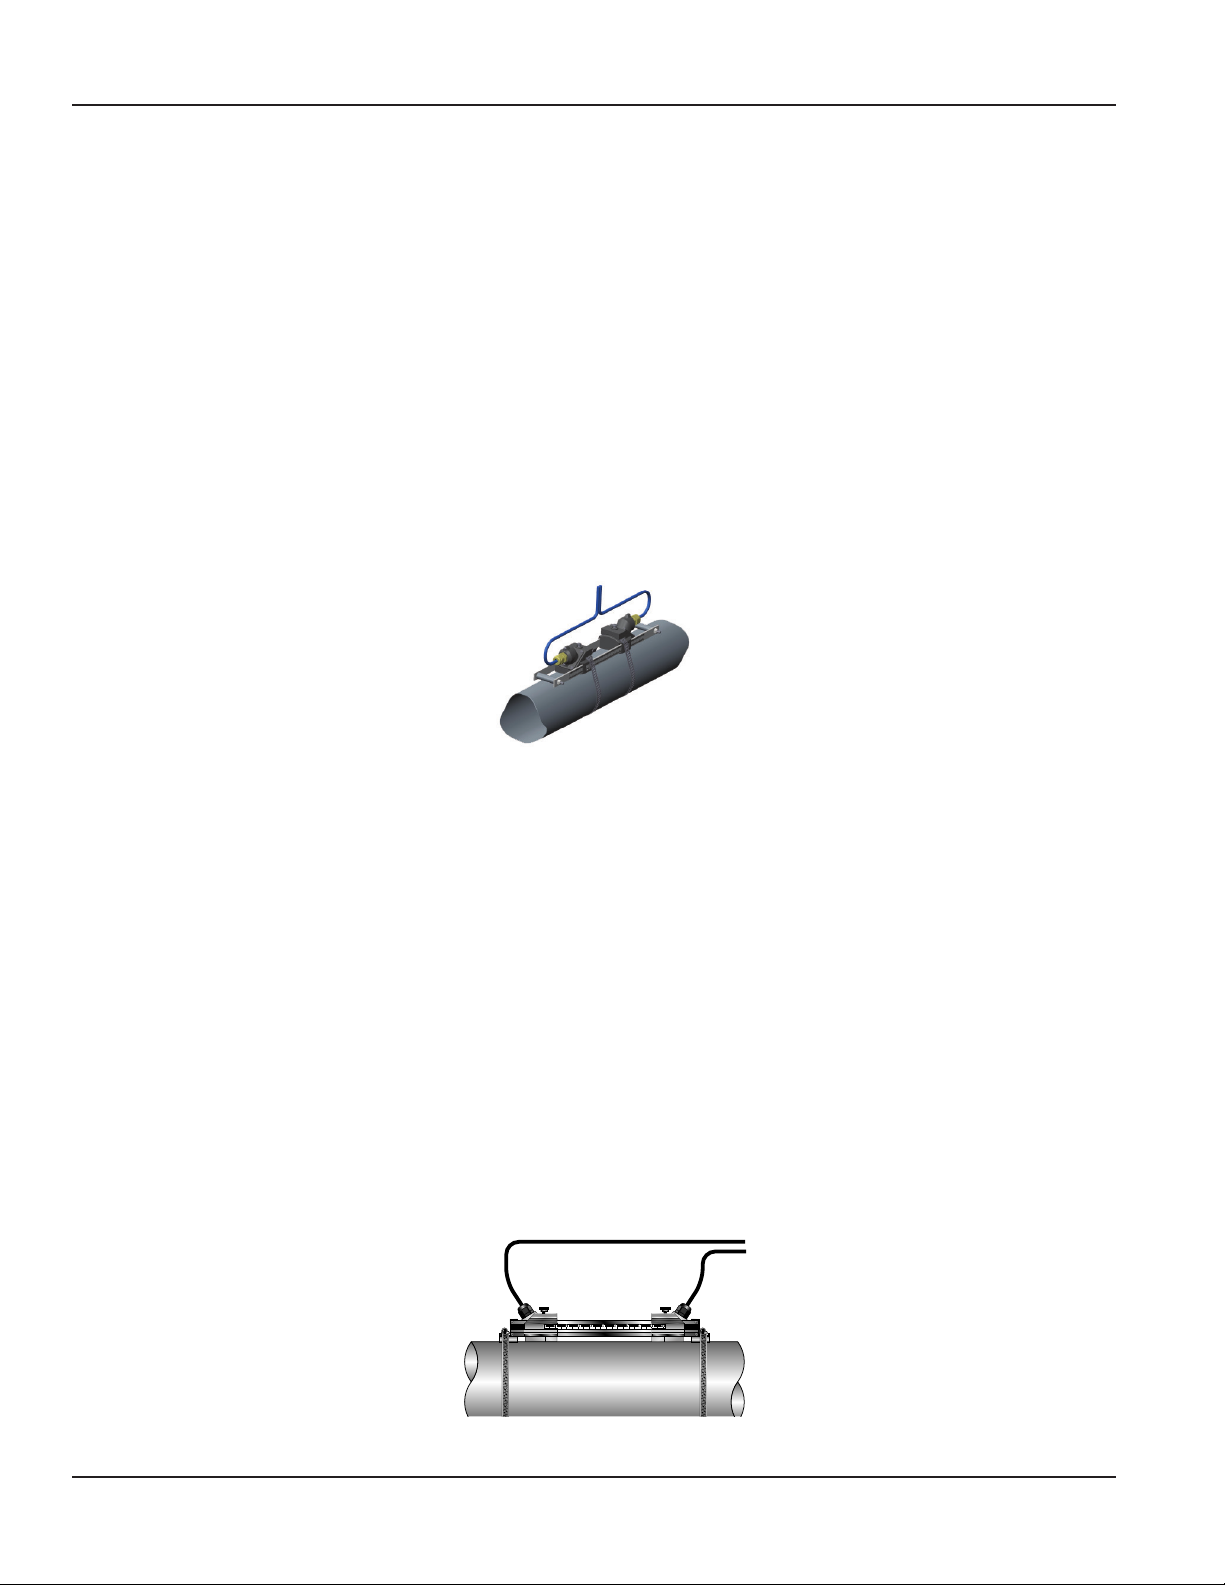
1. Large pipe installations use stainless steel straps to secure the transducers to the outside of the pipe. The DXN system
is shipped with four 36 in. (900 mm) straps, which are suitable for pipes up to 39 in. (1000 mm) diameter. Select the
proper number of transducer straps to allow a complete strap to go around the circumference of the pipe. See Table 4 on
page29.
2. Wrap the strap around the pipe in the area where the transducers are to be mounted. Leave the strap loose enough to
allow the transducers to be placed underneath. If multiple straps are being used, it can be benecial to wrap electrical
tape around all but one strap connection to secure the strap worm screws in place.
3. Spread an even layer of coupling compound, approximately 1/8 in. (3 mm) thick by 1/2 in. (12 mm) wide, to the bottom
at face of the two transducers.
4. Place each transducer under the strap with the at face—amber plastic window—positioned towards the pipe. The notch
on the back of the transducer provides a mounting surface for the strap. The transducer cables must be facing in the same
direction and in the downstream direction for proper operation.
Page 28 August 2018HYB-UM-00090-EN-05
Page 29
Wires Pointing in Direction of Flow
FLOW
Transducer Installation
FLOW
Top View
of Pipe
FLOW
Wires Pointing in Direction of Flow
Figure 31: Doppler transducer placement
OTE:N Large pipes may require two people for this procedure.
5. Tighten the strap enough to hold the transducers in place, but not so tight that all of the couplant squeezes out of the gap
between the transducer face and pipe. Align the transducers squarely on the pipe and 180 degrees apart.
6. Route the transducer cables back to the ow meter location, avoiding high voltage cable trays and conduits.
OTE:N Where a high amount of particulates are expected mounting the transducers side-by-side may allow enough sound
reflection for the Doppler function to work.
Figure 32: Side-by-side placement
OTE:N Low particulate content may sometimes be overcome by mounting the Doppler transducers downstream of a pipe
elbow. A better solution to a low particulate fluid would be switching over to transit time measurements.
Mounting Straps
The most economical way to affix DTTR, DTTN, DTTH, DTTL and DT94 transducers to a pipe is by using adjustable mounting
straps. Individual straps in both 36 in. (900 mm) and 72 in. (1830 mm) are available from Badger Meter. See Table 4 for required
number of straps. The straps can be connected together to make a continuous length. Small pipe transducer installations do
not use straps, but use an integral clamping mechanism built into the transducer.
Pipe Size No. of 36 in. Straps Required*
1…9 in. (25…225 mm) 1
10…19 in. (250…480 mm) 2
20…29 in. (500…740 mm) 3
30…39 in. (760…1000 mm) 4
Table 4: Straps required per pipe size
OTE:N *Table 4 indicates the number of straps required to mount one transducer. For transit time installations, two
transducers must be mounted.
Doppler transducers are mounted either opposite each other or side-by-side and considered a single transducer for
calculating the number of straps required.
Page 29 August 2018 HYB-UM-00090-EN-05
Page 30
Display Operation and Conguration
DISPLAY OPERATION AND CONFIGURATION
CAUTION
THE DXN IS DESIGNED TO OPERATE FOR EXTENDED PERIODS WITH FREE AIR MOVEMENT TO COOL THE METER. THE
UNIT SHOULD NOT BE OPERATED FOR MORE THAN 30 MINUTES IN A CLOSED CASE INCLUDING THE CANVAS CARRYING
CASE.
MPORTANTI
The screen should be cleaned only with the cleaning kit supplied. Do not use common cleaning chemicals such as glass cleaner.
Clean the exterior surfaces of the meter using a clean, soft cloth and water.
Menu Conventions
The DXN uses a Group > Page layout for navigation. The tabbed menu tree provides access to all controls and settings using a
Group Tab name > Page name.
When navigating the DXN menus, select a Group tab and a Page name. For example, to navigate to Main > Alerts, press the
Display tab, then press on the Alerts page.
Group Tab
Main
GraphMeters
Graph Setup
Table
Alerts
Pages
Figure 33: Group > page format
Main Screen
The DXN main screen contains all the controls needed to manipulate the user interface. The meter uses buttons, drop-down
lists and scroll bars to configure meter functions.
Figure 34: Main display screen
Page 30 August 2018HYB-UM-00090-EN-05
Page 31

Display Operation and Conguration
Status Bars
The status bar arrow key, in the bottom left corner, controls which status bars are displayed. Each press of the arrow key scrolls
to the next control or display.
Status Bar
Arrow Key
0.00
US GPM
0.00
US GPM
Raw Delta Time 0.000 ns
Raw SS Oset 0.000 us
Begin Wizard
> > > Slide To Shut Down > > >
Site Name
Site Name
TT ‘Ducer Spacing: 0.86 = 0-27/32”: Z Mode
<< Press button to begin Guided Setup Wizard
Version L©2014 Badger Meter, Inc.
Battery: 35%, -1.0A, 42.0CPC CPU: 12% 138MB 54C
10/30/2014
8:22 AM
Flow Meter Quick Status Bar
Transit Time Setup Status Bar
Power and Activity Status Bar
Setup Wizard
About Status Bar
Shutdown Bar
Figure 35: Status bars
The Quick Status Bar also has a segment that does double duty as a button that functions as a toggle as well.
0.00
US GPM
Full Screen On/O
Figure 36: Status bar button
Use the left icons on the Quick Status Bar turn ON/OFF the Full Screen mode. The Quick Status Bar also has a number of
shortcuts leading to some of the most referenced menu screens.
The Battery icon brings up the System > Power screen, showing real time battery condition.
The Communications icon brings up the System > Comm screen, showing continuous data being output to the
active serial port.
The Status icon indicates new communication or change in the flow meter settings.
The Datalogger shortcut brings up the Log > Setup control screen, allowing quick access to the datalogger
controls.
Page 31 August 2018 HYB-UM-00090-EN-05
Page 32

Main Group
MAIN GROUP
Main
Setup
Meter Adv Cal System
GraphMeters
Log I/O
Graph Setup Table
Figure 37: Main group
Alerts
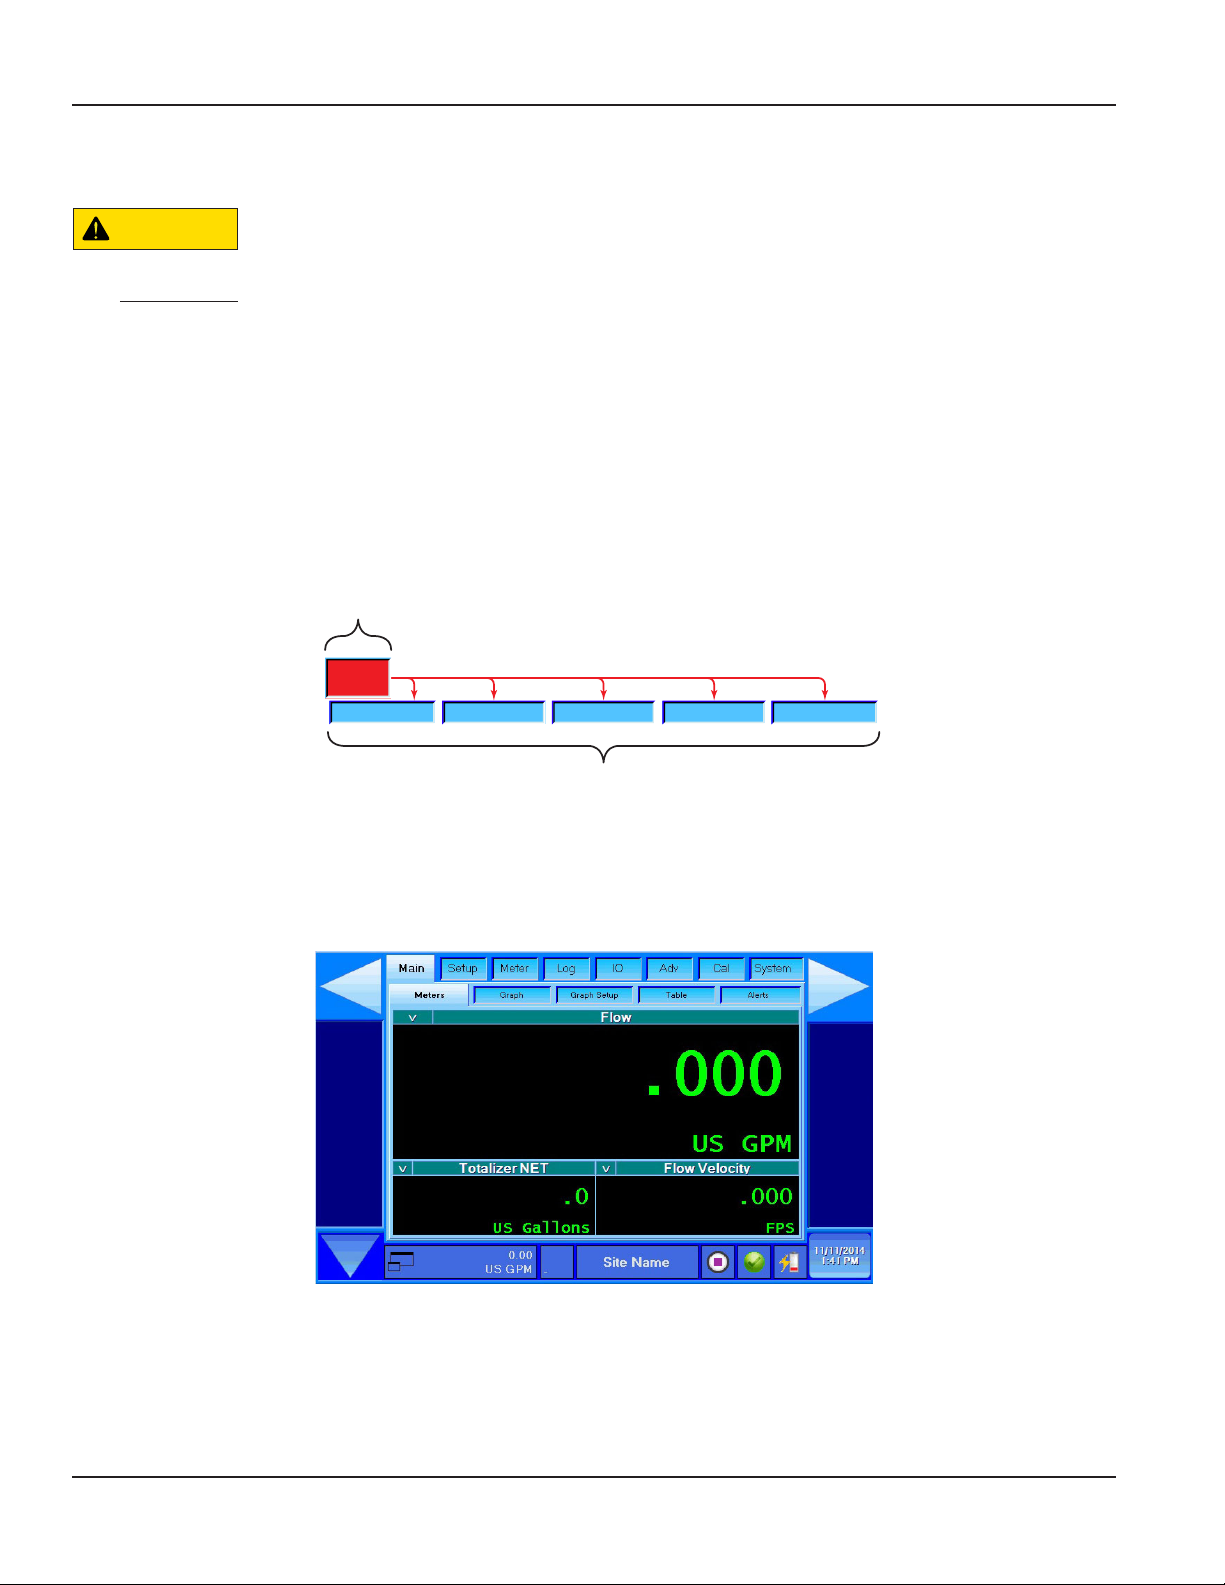
Meters Page
The Meters page displays system data, such as the current reading and units of measurement.
Meters On
Screen Button
Metering
Parameter
Combo Box
Control
Full Screen
Button
Figure 38: Main > Meters
The DXN can show up to four parameters sub-screens on the main screen. The number of individual sub-screens shown is
controlled by the Main > Meters button.
To change the number of sub screens shown:
1. Press the Meters page tab until the desired number of screens display.
2. Press Full Screen on the Quick Status Bar to turn the full screen function ON or OFF (See Figure 36).
OTE:N Currently 1, 3, or 4 parameters can be seen on the screen at a time.
To change which parameters display, press the combo box in the upper left corner of each screen or sub-screen. Press the
down arrow to expand the drop-down list and select a parameter. Figure 39 shows an example of the drop-down list.
Current
Value
Metering
Units
Home
Button
Flow
×
Totalizer NET
Totalizer POS
Totalizer DOP
Flow Velocity
Hybrid Mode
Reynolds Number
Power
Energy NET
Energy POS
Energy DOP
Energy NEG
TT Flow
TT Gain
Set
TT Quality
Figure 39: Sample drop-down list
Page 32 August 2018HYB-UM-00090-EN-05
Page 33

Table 5 shows the metering parameter choices.
Flow Energy NET DOP Quality TT Aperture Start
Totalizer NET Energy POS TT Flow Velocity RTD1 Temperature
Totalizer POS Energy DOP TT Delta T RTD2 Temperature
Totalizer NEG Energy NEG TT Delta T Raw RTD Delta Temp
Totalizer DOP TT Flow TT TOF Bias Raw IO Voltage In
Flow Velocity TT Gain TT TOF Fluid IO Digital In
Hybrid Mode TT Quality TT Fluid SOS IO Voltage Out
Reynolds Number DOP Flow DOP Flow Velocity IO Current Out
Power DOP Gain DOP Frequency IO Digital Out
TT = Transit Time DOP = Doppler
Graph Page
Main Group
Table 5: Meters drop-down menu choices
Axis Select
Sequentially
Main, X,
Y-Left, Y-Right
Shift Center
of Axes
More Negative
Zoom Axes
(Zoom In)
Restore All
Zoom & Shift
to Default
Shift Center
of Axes
More Positive
Zoom Axes
(Zoom Out)
Figure 40: Main > Graph
Axes Scaling Buttons
Control of the axis scaling is performed with the axes scaling buttons. Pressing the Axes button successively moves through
the three axis configuration choices as shown in Figure 41.
The X axis is always time-based. The (Zoom In) or (Zoom Out) buttons expand or contract the timeline shown on the
horizontal (X axis). The minimum graph time period is 10 seconds and the maximum is 1 year.
The
Axes
Y Lt
and
Axes
Y Rt
functions control the scale of the left and right sides of the graph, respectively.
The (Zoom In) and (Zoom Out) buttons work in the same fashion as on the X axis except that on the Y Lt and Y Rt axis
they expand or contract the range of the vertical scaling.
The (Scroll Up) and (Scroll Down) buttons shift the zero point of the graph up or down.
Home
The
(Home) button resets the graph to the parameters set using the Main > Graph Setup screen.
Page 33 August 2018 HYB-UM-00090-EN-05
Page 34

Main Group
Graph Setup Page
Axes
-
Axes
Y Lt
Axes
X
Axes
Y Rt
Axes
-
Figure 41: Graph axis configuration
Axes
X
Axes
Y Lt
Home
Axes
Y Rt
Home
Figure 42: Main > Graph setup
Left and Right Axis Data
The Left and Right Axis Data controls which parameters are shown on the respective axis. See Table 6 for parameter choices.
When you press the control, a drop-down menu appears. Highlight a parameter with the blue box and press Set to load the
parameter. Press X to exit the drop-down menu.
Flow Energy NET DOP Quality TT Aperture Start
Totalizer NET Energy POS TT Flow Velocity RTD1 Temperature
Totalizer POS Energy DOP TT Delta T RTD2 Temperature
Totalizer NEG Energy NEG TT Delta T Raw RTD Delta Temp
Totalizer DOP TT Flow TT TOF Bias Raw IO Voltage In
Flow Velocity TT Gain TT TOF Fluid IO Digital In
Hybrid Mode TT Quality TT Fluid SOS IO Voltage Out
Reynolds Number DOP Flow DOP Flow Velocity IO Current Out
Power DOP Gain DOP Frequency IO Digital Out
TT = Transit Time DOP = Doppler
Table 6: Y Lt and Y Rt axis parameter choices
Page 34 August 2018HYB-UM-00090-EN-05
Page 35

Main Group
Time Range
The Time Range control selects a period to be shown on the X axis. See Table 7 for the time choices. When you press the
control, a drop-down menu appears. Highlight a parameter with the blue box and press Set to load the parameter. Press X to
exit the drop-down menu.
10 Seconds 30 Minutes 1 Day 14 Days
30 Seconds 1 Hour 5 Days 1 Month
1 Minute 5 Hours 7 Days 6 Months
10 Minutes 10 Hours 10 Days 1 Year
Table 7: Time Axis Choices
Delete Graph Data
To clear any current graphing data and return the graph scaling to factory defaults, first press Unlock Graph Data Clear. A
green checkmark appears and the Delete Graph Data button turns red.
Figure 43: Delete graph data
Press Delete Graph Data. The graph resets to factory defaults and the Delete Graph Data button turns gray.
Table Page
Figure 44: Main > Table
The Table page shows all the current values the meter is tracking along with their respective units. The scroll bar on the right
side of the page is used to scroll up or down the list until the required parameter is found.
Page 35 August 2018 HYB-UM-00090-EN-05
Page 36

Main Group
Alerts Page
Figure 45: Main > Alerts
The Alerts page keeps track of any abnormal conditions encountered by the meter. Such things as battery condition, unit
temperature issues, low signal quality episodes and fluid sound speed problems are shown in the alerts page until they are
resolved.
The severity of the condition is indicated by the color of the description. Red colored descriptions are the most serious with
orange being moderate severity and yellow depicting low severity.
Red Serious Immediate Action Required
Orange Moderate Cautionary
Yellow Minor Minor
Page 36 August 2018HYB-UM-00090-EN-05
Page 37

SETUP GROUP
Setup Group
Main
Site
Meter Adv Cal System
Log I/OSetup
ANSI Pipe TransitFluid
Figure 46: Setup group
Pipe
DopplerLiner
The Setup group is used to create and store individually configured metering locations. Each new location can be stored with
all the setup parameters for that particular site, making periodic measurements less time consuming.
New sites can be created in two different ways. A site can be created using the factory default settings or the settings the
meter is currently using. In either case, settings can be changed for that particular site whenever necessary.
Site Page
Figure 47: Site page configuration
Create New Site from DEFAULT Settings (Alphanumeric Entry)
To create a new site using the meters default settings:
1. Press Create New Site From DEFAULT Settings. The alphanumeric keypad displays.
2. Type in a unique name (restricted to 45 characters ) for the site and press Create Site.
The meter’s default settings are copied from memory and stored under the new site name. The Site Name button also shows
the new site name.
Create New Site from CURRENT Settings (Alphanumeric Entry)
To create a new site using the meter’s current settings:
1. Press Create New Site From CURRENT Settings. The alphanumeric keypad displays.
2. Type in a unique name (restricted to 45 characters ) for the site and press Create Site.
The meter’s current settings are stored under the new site name. The Site Name button also shows the new site name.
This function is used when the meter is completely set up and operating as required. Once all parameters have been
optimized, all the settings are saved under the new site name, making the setup of the same site much faster in the future.
Site Name
The Site Name function has a drop-down list of all existing site names that have been programmed into the meter.
Highlight a site name and press Set to activate it. If a large number of sites have been stored use the scroll bars to locate the
site. To exit the drop-down menu without making any changes, × (Cancel).
Page 37 August 2018 HYB-UM-00090-EN-05
Page 38

Setup Group
Load Defaults Settings
Loading the factory defaults returns the meter to a known state for most of the customer-selectable parameters. The default
settings do not include basic setup parameters such as pipe size, pipe type, and fluid type. To prevent unintended loading of
the default settings, you must check the Unlock Load Default Settings box to activate the Load Default Settings function.
1. Press Unlock Load Default Settings. A green checkmark appears and the Load Default Setting button turns orange.
2. Press Load Default Settings. When the settings have been loaded, the Load Default Settings button turns gray and the
green checkmark disappears from the Unlock Load Default Settings box.
Figure 48: Load default settings enabled
Page 38 August 2018HYB-UM-00090-EN-05
Page 39

Setup Group
Fluid Page
Select Setup from the Group bar at the top of the screen. When the site page appears, select the Fluid page to enter
information about the type of uid to be used.
OTE:N Use the Fluid page also to start the entry of information about a custom fluid.
Figure 49: Fluid setup
OTE:N Use the scroll bars to the right of the menu choices to display more information than can be seen on one page.
To navigate the Fluid page, use the Up/Down arrow keys or the scroll bar.
Fluid
Choose the uid material from the drop-down list.
Water – Tap Ethanol Isopropanol Oil Diesel #1 Propylene Glycol 50%
Water – Black Ethylene Glycol 100% Jet Fuel A1/JP8 Oil Diesel #2 Propylene Glycol 25%
Acetone Ethylene Glycol 50% Jet Fuel B/JP4 Oil Hydraulic (Petro) Stoddard Solvent
Ammonia Ethylene Glycol 25% Kerosene Oil Lubricating Water – Distilled
Benzene Gasoline Methanol Oil Motor (SAE 20/30) Water – Sea
Brine Glycerin Milk 4% Propylene Glycol 100% Custom
Table 8: Fluid material choices
This list is provided as an example. Additional fluids are added periodically. Select a fluid from the list or select Custom, if the
fluid is not listed.
When you select a fluid from the list, the system automatically loads a nominal value for speed of sound, specific gravity,
viscosity, and specific heat capacity for that material. If actual values are known for the specific fluid system and those values
vary from the pre-defined numbers, you can revise the value by selecting the Custom fluid choice and entering the values.
Custom Fluids
When you select Custom from the Fluid list, you must enter the appropriate values for sound speed, specific gravity, viscosity
and specific heat capacity.
Page 39 August 2018 HYB-UM-00090-EN-05
Page 40

Setup Group
Figure 50: Custom fluid setup
Custom Fluid Sound Speed (Numeric Value)
Enter the sound speed of the custom fluid. If English is used for the Entry Units enter the sound speed in fps. If Metric is used
the sound speed is entered in mps. The fluid sound speed is also obtained directly from the meter if the transducers are
already correctly positioned and the signal quality is above 10%. This value is available by selecting TT SOS in one of the data
panels. See Figure 49.
Custom Fluid Specific Gravity (Numeric Value)
DXN flow meters use pipe size, specific gravity and viscosity to calculate Reynolds numbers. Since the Reynolds
number influences flow profile, the DXN has to compensate for the relatively high velocities at the pipe center during
transitional or laminar flow conditions. The Specific Gravity entry is used in the calculation of Reynolds and the resultant
compensation values.
The Specific Gravity entry allows adjustments to be made to the specific gravity (density relative to water) of the liquid.
As stated previously specific gravity is used in the Reynolds correction algorithm. It is also used if mass flow measurement
units are selected for rate or total.
If a fluid is chosen from the Fluid Material list, a nominal value for specific gravity in that media is automatically loaded. If the
actual specific gravity is known for the application fluid and that value varies from the automatically loaded value, the value
can be revised.
If a custom fluid is entered, a specific gravity needs to be entered if mass flows are calculated. See “Fluid Properties” on
page107.
Dynamic Viscosity (Numeric Value Entered in cP)
If a fluid was chosen from the Fluid Material list, a default viscosity is automatically loaded. If the actual viscosity of the liquid
is known or it differs from the default value, the value can be revised. A list of alternate fluids and their associated viscosities is
located in the Appendix of this manual.
Viscosity is a measure of the resistance of a fluid to deform under either shear stress or extensional stress. It is commonly
perceived as thickness, or resistance to flow. Viscosity describes a fluid’s internal resistance to flow and may be thought of as a
measure of fluid friction.
The cgs (centimeters - grams - seconds) system uses a unit of dynamic viscosity called the poise (P). It is more commonly
expressed, particularly in ASTM standards, as centipoise (cP). The centipoise is commonly used because water has a viscosity
of 1.0020 cP (at 68° F (20° C); the closeness to one is a convenient coincidence).
The DXN uses dynamic viscosity, expressed in cP, in the calculation of Reynolds numbers and its Reynolds
correction algorithm.
Specific Heat Capacity – (Numeric Value entered in kJ/kg x °K)
Allows adjustments to be made to the specific heat capacity of the liquid.
Page 40 August 2018HYB-UM-00090-EN-05
Page 41

kJ
xK
Setup Group
If a fluid from the Fluid Material list is chosen, a default specific heat is automatically loaded. If the actual specific heat of
the liquid is known or it differs from the default value, the value can be revised. A list of alternate fluids and their associated
specific heat capacities is located in the Appendix of this manual. Enter a value that is the mean of both pipes.
Heat capacity or thermal capacity, is the physical quantity that characterizes the amount of heat required to change a
substance’s temperature by a given amount. The SI unit of heat capacity is expressed in joules per degree kelvin (J/°K).
The specific heat capacity, often simply called specific heat, is the heat capacity per unit mass of a material. Occasionally, in
engineering contexts, a volumetric heat capacity is used. The quantity used in the DXN is calculated as:
Specific Heat Capacity
=
°
kg
ANSI Pipe Page
Figure 51: Setup > ANSI Pipe
The ANSI Pipe page provides access to built-in pipe tables. The pipe lookup tables use cascading options to make selections.
When you select Pipe Material, the ANSI Schedule/Class option becomes available. When you select ANSI Schedule/Class,
the Nominal Size option becomes active.
The Setup > ANSI Pipe and Setup > Pipe drop-down lists interact with each other. When you select a parameter in one
drop-down list, that parameter becomes unavailable in the other drop-down list.
Select Use Manual Entry for Pipe Material to enter non-standard parameters. Choosing Use Manual Entry unlocks the
Pipe Material, Pipe OD, and Pipe Wall [Thickness] options (see Figure 54) on the Setup > Pipe page.
Pipe Material
Choose the pipe material from the combo box drop-down list.
Manual Dimension Entry Iron - Cast St Steel 304L
Aluminum Iron - Ductile St Steel 316
Brass (Naval) PVC CPVC St Steel 347
Carbon Steel St Steel 302/303 St Steel 410
Copper St Steel 304 St Steel 430
Table 9: Pipe material choices
OTE:N This list is provided as an example. Additional pipe materials are added periodically.
Page 41 August 2018 HYB-UM-00090-EN-05
Page 42

Setup Group
Pipe Schedule/Class
The choice of pipe material determines the options available in the Schedule/Class drop-down list. For example, if you select a
pipe material that is governed by ANSI standards, the option label is ANSI Schedule and the schedule choices are appropriate
for ANSI pipe. If you select Cast Iron, the options label is Class instead of Schedule, indicating the pipe material is categorized
in classes.
Nominal Size
The Nominal Size option has a drop-down list of standard or nominal pipe sizes from which to choose.
Liner Schedule – Restricted Choice
Some combinations of Pipe Material, Class and Nominal Size have liner information built into the pipe specification. This
condition is usually found in ductile iron classes, 6 inches and up. If a ductile pipe with built-in liner is used, a selection of
either Standard or Double can be made.
OTE:N Choosing Standard or Double disables the Setup > Liner option.
Figure 52: ANSI pipe page manual entry
If you select the Manual Dimension Entry option in Setup > ANSI Pipe (see Figure 57), the parameters in the Setup > Pipe page
become available. See Figure 54.
OTE:N If you use the Setup > ANSI Pipe feature, the values you enter are automatically loaded into the parameter choices in
the Setup > Pipe screen.
Pipe Page
Figure 53: Pipe page from nominal entry
Page 42 August 2018HYB-UM-00090-EN-05
Page 43

Setup Group
Use the Setup > Pipe page to manually enter pipe parameters. If you used the lookup function in Setup > ANSI Pipe, nominal
values for Pipe OD, Pipe Wall [Thickness] and Roughness are automatically entered. If the actual values of the pipe differ from
the ones automatically entered, go back to Setup > ANSI Pipe and select Manual Dimension Entry to enter non-standard
parameters. Selecting Manual Dimension Entry unlocks the Pipe Material, Pipe OD and Pipe Wall [Thickness] inputs as shown in
Figure 54.
Figure 54: Pipe page allowing manual entry
Pipe Material
When a pipe material is chosen from the Pipe Material list, a nominal value for speed of sound in that material and the pipe
roughness are automatically loaded.
Pipe OD (Numeric Value)
Enter the Pipe OD (outside diameter) in inches for English units or in millimeters for Metric units.
OTE:N Charts listing popular pipe sizes have been included in this manual. Correct entries for pipe O.D. and pipe wall
thickness are critical to obtaining accurate flow measurement readings.
Pipe Wall [Thickness] (Numeric Value)
The Pipe Wall thickness is the value of the actual pipe wall thickness excluding any liner that may be present.
OTE:N Accurate values for Pipe OD and Pipe Wall thickness are necessary for accurate computation of the volumetric flow
rate. Without accurate pipe data, flow rates will be in error by the difference between the actual pipe cross sectional
area and the area calculated using the incorrect pipe OD or pipe wall thickness values.
Pipe Wall Thickness Gauge Automatic Use
OTE:N There are two different “reference” measurement methods required depending on the type of pipe being used. With
Tubing the reference is checked with the transducer ON pipe, for all other pipe types the reference is set with the
transducer OFF the pipe.
OTE:N Pipe thickness transducer must be applied perpendicular to the long axis of the pipe/tube (See Figure 64).
1. Make sure Setup > ANSI Pipe > ANSI Schedule is set to “Use Manual Entry” as in Figure 55.
Page 43 August 2018 HYB-UM-00090-EN-05
Page 44

Setup Group
Figure 55: Setup > Pipe US — schedule manual entry selected
2. In the Setup > Pipe screen, make sure that the Pipe Material and Pipe OD have been entered as in Figure 56.
3. The pipe wall thickness gauge uses the same input connectors as the transit time ultrasonic transducers. The thickness
gauge has two BNC connectors with red and blue markings. Connect the pipe wall thickness transducer to the DXN
matching the red and blue BNC plugs to the red and blue transit time inputs.
Figure 56: Setup > Pipe
Figure 57: Pipe thickness gauge connections
2. From the Setup > Pipe screen, press Gauge to enter the pipe gauge wizard (see Figure 56). The Ultrasonic Thickness Gauge
wizard appears in Automatic Analysis Mode.
Page 44 August 2018HYB-UM-00090-EN-05
Page 45

Setup Group
Ultrasonic Thickness Gauge
Close
Aluminum OD=1.4 in
Automatic Analysis Mode
35000
Y
21000
Y
7000
-7000
Y
-21000
Y
-35000
Remove from Pipe and Clean Transducer
THEN Check to Lock Reference
30 45 60 75 90 105 120 135 150150
Rpk
Best Peak
0.387 in
Peak 1
0.319 in
01P Thin Metal Pipe
PkM
Pk1Pk2
Thickness Waveform Thickness Envelope
Store to Pipe Wall Setting
0.422 in
Peak 2
0.500 in
X
X
X -
X -
Figure 58: Pipe thickness gauge wizard screen
3. Before applying couplant and putting the transducer on the pipe, wait for the waveform to stabilize (about 2...4 seconds).
If measuring pipe with wall thickness greater than about 0.1 in. or 2.5 mm:
4. Press the Remove from Pipe and Clean Transducer check box. A checkmark appears in the check box and the Red-Rpk
line in the waveform display stops moving. This locks the reference.
5. Apply couplant to pipe/transducer and apply the transducer to the pipe so that the cable is perpendicular to the pipe (as
well as the alignment line on the bottom of the transducer). The waveform and measurements settle in a few seconds.
Bottom View
of
Pipe Thickness Transducer
Pipe
Centerline
Place Across
Pipe Centerline
08
5MHz
Pipe Thickness
Transducer
Figure 59: Thickness gauge transducer positioning
6. The inside of the green button in the lower right of the screen shows the pipe wall thickness measurement.
7. Lastly Press the green measurement button to store pipe thickness to Setup > Pipe > Wall Thickness.
If measuring copper tubing or other types of metal tubing with wall thickness less than 0.1 in. or 2.5 mm:
7. Apply couplant to pipe/transducer and apply transducer to pipe so the cable is perpendicular to the pipe (as is the notch
in the transducer). The waveform settle in a few seconds.
Page 45 August 2018 HYB-UM-00090-EN-05
Page 46

Setup Group
Ultrasonic Thickness Gauge
Close
Aluminum OD=1.4 in
Automatic Analysis Mode
35000
Y
21000
Y
7000
-7000
Y
-21000
Y
-35000
Apply Transducer and Couplant to Pipe
THEN Check to Lock Reference
30 45 60 75 90 105 120 135 150150
Rpk
Best Peak
0.387 in
Thickness Waveform Thickness Envelope
Peak 1
0.319 in
01P Thin Metal Pipe
PkM
Store to Pipe Wall Setting
0.422 in
Peak 2
0.500 in
X
X
X -
X -
Figure 60: Tubing thickness gauge wizard screen
8 Press Apply Transducer and Couplant to Pipe check box. A check appears in the box and the Red-Rpk line in the
waveform display stops moving. This locks the reference.
9. The inside of the green button in the lower right of the screen shows the pipe wall thickness measurement.
10. Press the green measurement button to the store pipe thickness to Setup > Pipe > Wall Thickness.
Page 46 August 2018HYB-UM-00090-EN-05
Page 47

RMSMeasurement of thePipes Internal Wall Surface
Setup Group
Advanced Mode
The advanced mode is intended users with knowledge of ultrasonic testing or when automatic settings are not appropriate.
To enter Advanced Mode, uncheck Automatic Analysis Mode. The manual settings reflect the automatic settings when the
wizard first opens.
You can select the type of waveform and analysis from the pull-down menu. The first two digits represent how many signal
periods are transmitted, and the text indicates the analysis used in making the measurement:
01P Metal Tubing 1 Pulse Tubing Mode
01P Thin Metal Pipe 1 Pulse Thin Pipe Mode/ Pipe Mode
02P Generic Metals 2 Pulse Pipe Mode
03P Plastics, Iron Pipe 3 Pulses Pipe Mode
05P Thick Plastics, Ceramics, Mortar 5 Pulses Pipe Mode
15P Very Thick 15 Pulses Pipe Mode
Table 10: Pipe mode explanations
In Pipe Mode, you must lock the reference signal BEFORE applying the transducer to the pipe. Ultrasonic transit time is
measured as the difference in time from the ultrasound leaving the transducer face to the first reflection from the fluid-pipe
interface. The reference is detected as the large peak below a timed threshold. The largest amplitude peak is used as the
first reflection.
In Thin Pipe Mode, you must also lock the reference signal BEFORE applying the transducer to the pipe.
In Tubing Mode, you must lock the reference AFTER applying the transducer is to the pipe. Ultrasonic transit time is measured
as the difference in time between two adjacent-in-time signal reflections. The largest amplitude peak is used as the reference,
Peak 1 and Peak 2 are any detected adjacent peaks to the reference.
Supplementary Information
• Expected error is about 1.5% + 15 mils or 1.5% + 0.4 mm
• Measurement under 0.1 in. or 2.5 mm is difficult and requires special techniques (Tubing Mode and Thin Pipe Mode).
• Does not measure liner thickness.
• May not always work on all materials, conditions and fluids.
• ◊ In thin metal and metal pipe modes, the reference can disappear from the display once the transducer is applied to
the pipe. This is why the reference is locked prior to placement on pipe.
[Pipe] Roughness (Numeric Value in Micro Feet)
Surface roughness is the measure if the small surface irregularities in the pipe surface and is composed of three components:
roughness, waviness and form. These are the result of the manufacturing process employed to create the surface.
Surface roughness average (Pipe R), also known as arithmetic average (AA) is rated as the arithmetic average deviation of the
surface valleys and peaks expressed in micro inches (µ inches).
The DXN provides flow profile compensation in its flow measurement calculation. One of the components of that calculation
is roughness. The ratio of average surface imperfection as it relates to the pipe internal diameter is used in this compensation
algorithm and is found by using the following formula:
Pipe R
Inside Dia=mmeterofthe Pipe
OTE:N A microinch (µ inch) is one millionth (1/1,000,000) of an inch.
If a pipe material was chosen from the Pipe Material list, a nominal value for relative roughness in that material is
automatically loaded.
If the pipe has a roughness value that differs from standard for the pipe type, a custom value can be entered using the
Roughness controls.
Page 47 August 2018 HYB-UM-00090-EN-05
Page 48

Setup Group
Liner Page
Figure 61: Setup > Liner page
Liner Material
Choose the pipe liner material from the drop-down list.
The following list is an example. Additional materials are added periodically. Select the liner material from the list. If the exact
liner material is not listed, choose one that most closely represents it.
None Mortar Polystyrene
Acrylic HD Polyethylene Rubber
Asbestos Cement LD Polyethylene Tar Epoxy
Ebonite Polypropylene Teflon® (PFE)
Table 11: Liner material choices
Liner Wall
Enter the liner wall thickness in inches for English units or millimeters for Metric units.
OTE:N If a liner is present, an accurate value for Liner Wall thickness is necessary for accurate computation of the volumetric
flow rate. Without accurate liner data, flow rates will be in error by the difference between the actual pipe cross
sectional area and the area calculated using the incorrect pipe liner thickness.
Liner Roughness
When you select a liner material from the Liner Material list, the system automatically loads a nominal value for relative
roughness in that material.
Page 48 August 2018HYB-UM-00090-EN-05
Page 49

Setup Group
Transit Page
Figure 62: Setup > Transit
Transducer
Select a transducer from the drop-down list. Transducer transmission frequencies are specific to the type of transducer.
Transducer Frequency Type Use for Pipe Sizes
DTTR/DTTN
1 MHz
DTTH High Temperature Transducers
DTTL 0.5 MHz Large Pipe Transducers > 16 in. (400 mm)
DTTSU 2 MHz Small Pipe Transducers 0.5…2 in. (13…50 mm)
Standard Transducers
2…98 in. (50…2500 mm)
Table 12: Transducer types and frequencies
Transducer Mount
Select the mounting pattern for the transducers from the drop-down list. An appropriate mounting pattern is based on pipe
and liquid characteristics.
The DXN transit time flow meters can be used with these transducer types: DTTR, DTTN, DTTH, DTTL and DTTSU. The DTTR,
DTTN, DTTH or DTTL transducer sets consist of two separate sensors that function as both ultrasonic transmitters and
receivers. DTTSU transducers integrate both sensors into one assembly. All transducers require the separation of the
transmit/receive modules be adjusted to the spacing value calculated during the DXN flow meter setup. DTTR, DTTN and
DTTL transducers are clamped on the outside of a closed pipe at a specific distance from each other.
The DTTN and DTTL transducers can be mounted in:
• W-Mount, where the sound traverses the pipe four times. This mounting method produces the best relative travel time
values but the weakest signal quality.
• V-Mount, where the sound traverses the pipe twice. V-Mount is a compromise between travel time and signal quality.
• Z-Mount, where the transducers are mounted on opposite sides of the pipe and the sound crosses the pipe once.
• Z-Mount, which yields the best signal quality but the smallest relative travel time.
See Table 2 on page20 for transducer mounting mode selection starting points.
Required Spacing
The spacing required between transducers is calculated by the firmware after all pipe parameters have been entered.
The value represents the one-dimensional linear measurement between the transducers (the upstream/downstream
measurement that runs parallel to the pipe). This measurement is taken between the lines that are scribed into the side of the
transducer blocks. The value is in inches for English or millimeters for Metric.
For DTTR or DTTN transducers that are mounted using the transducer track assembly, place one transducer at the 0 mark
etched into the track and the other at the calculated measurement.
Page 49 August 2018 HYB-UM-00090-EN-05
Page 50

Setup Group
Doppler Page
Figure 63: Doppler transducer selection
To use the Doppler measuring, select the DT94 series transducers. At this time, the DT94 series are the only Doppler
transducers supported.
Page 50 August 2018HYB-UM-00090-EN-05
Page 51

METER GROUP
Meter Group
Display Adv Cal System
Site
Meter
TotalizerFlow
Log I/O
Limit
Figure 64: Meter group
Filter Energy
Select the Meter Group from the Group bar at the top of the screen. When the Meter pages appear select the flow page to
enter information about the flow units to be used.
Flow Page
Figure 65: Flow units setup
Flow Units Volume
Select an engineering unit for flow rate measurements:
US Gallons Cubic Feet Oil Barrels (42 Gallons) Meters
Liters Cubic Meters Liquid Barrels (31.5 Gallons) Pounds
Mega US Gallons Acre Foot Feet Kilograms
Table 13: Flow units
Flow Units Rate
Select a time interval for flow rate measurements: Seconds, Minutes, Hours, Days
Transmission Mode
Select the type of ultrasonic signal for the flow meter to generate:
• Hybrid – The DXN flow meter monitors the fluid conditions and determines automatically when to switch between
Doppler and transit time modes. Both transit time and Doppler transducers must be installed and connected.
If in Hybrid mode:
• If Transit Time signal quality is greater than 40%, Transit Time is used
• If Transit Time signal quality is greater than 10%, but less than 40%, and is still greater than Doppler Signal quality, Transit Time
is used
• If Transit Time signal quality is less than 10% and Doppler is greater than 10%, Doppler is used
• If either signal quality is less than 10%, there is no flow measurement
• Transit Time – The DXN flow meter always operates in transit time mode. If in Transit Time mode:
• If signal quality is less than 10%, there is no flow measurement
• Doppler – The DXN flow meter always operates in Doppler mode. If in Doppler mode:
• If signal quality is less than 10%, there is no flow measurement
Page 51 August 2018 HYB-UM-00090-EN-05
Page 52

Meter Group
Totalizer Page
Figure 66: Totalizer setups
Total Units
From the pull-down list, select an engineering unit for flow accumulator (totalizer) measurements.
US Gallons Acre Foot
Liters Oil Barrels (42 Gallons)
Mega US Gallons Liquid Barrels (31.5 Gallons)
Cubic Feet Feet
Cubic Meters Meters
Table 14: Totalizer units
Totalizer Reset
Totalizer Reset function resets all totalizers back to zero. To prevent inadvertent resets, a totalizer lock is provided.
To reset the totalizers:
1. Press Check To Unlock Total Reset box (See Figure 66). A checkmark appears in the box. The Reset Totalizer option
becomes active.
2. Press Reset Totalizer to return all totalizers to zero.
OTE:N The DXN flow meter also has a hardware totalizer reset function.
Page 52 August 2018HYB-UM-00090-EN-05
Page 53

Meter Group
Limit Page
Figure 67: Limit value settings
Min Flow Limit
A minimum rate setting establishes the filter software parameters and the lowest rate value to display. Volumetric entries
display in the Flow Units selected in Meter > Flow.
• For unidirectional measurements, set the Min Flow Limit to zero.
• For bidirectional measurements, set the Min Flow Limit to the highest negative (reverse) flow rate expected in the
piping system.
The flow meter does not display a flow rate at flows less than the Min Flow Limit value. As a result, if the Min Flow Limit is set to
a value greater than zero, the flow meter displays the Min Flow Limit value, even if the actual flow/energy rate is less than the
set Min Flow Limit.
For example, if the Min Flow Limit is set to 25 and the actual rate is 0, the flow meter displays 25.
If the Min Flow Limit is set to –100 and the actual flow is –200, the flow meter displays –100. This can be a problem if the
meter’s Min Flow Limit is set to a value greater than zero because at flows below the Min Flow Limit, the flow meter displays
zero flow, but the totalizer, which is not affected by the Min Flow Limit setting, continues totalizing.
Max Flow Limit
A maximum flow rate setting establishes the filter software settings and the highest rate value to display. Volumetric entries
display in the Rate Units selected in Meter > Flow.
For both unidirectional and bidirectional measurements, set the Max Flow Limit to the highest (positive) flow rate expected
in the piping system.
Low Flow Limit
A Low Flow Limit entry allows the flow meter to display very low flow rates (that can be present when pumps are off and valves
are closed) as zero flow. Typical values are 1.0…5.0% of the Min Flow Limit.
The Low Flow Limit is the minimum flow rate at which the meter gives reliable readings.
Page 53 August 2018 HYB-UM-00090-EN-05
Page 54

Meter Group
Filter Page
Figure 68: Filter settings
Filter Method
The DXN flow meter offers several levels of signal filtering:
• None imposes no filtering on the signal from the transducers.
• Simple with Rejection uses Damping and Bad Data Rejection to filter the flow data.
• Adaptive filtering allows the meter’s software routines to alter the filtering, depending on the variability of the transducer’s
signal. The Adaptive filter uses a combination of Damping, Bad Data Rejection, Sensitivity and Hysteresis to modify the flow
input data.
Damping (Range 0…100 Seconds)
Damping is the approximate amount of time the filtering routines use to attain a 99% stable rate value. Generally, the higher
the damping value, the more stable the rate readings are—but at the expense of response time.
Sensitivity (Range 0…100%)
Sensitivity determines how fast the adaptive ltering responds to a change in rate. Increasing the sensitivity decreases the
ltering, which allows the display to respond to rate changes more rapidly.
Hysteresis (Range 0…25%)
Hysteresis creates a window around the average flow measurement reading, defining the limits at which the automatic
damping increases occur. If the rate varies within the hysteresis window, greater damping occurs up to the maximum values
set by the flow filter Damping entry. The filter also establishes a flow rate window where measurements outside of the
window are captured by the Bad Data Rejection window. Enter the value as a percentage of actual flow rate.
For instance, a Hysteresis setting of 5% allows the flow to vary ± 5% from the currently established flow rate without
automatically decreasing the value of the Damping.
For example, if the average flow rate is 100 gpm and the Hysteresis is set to 10%, a filter window of 90…110 gpm is
established. Successive flow measurements that reside within that window are recorded and averaged in accordance with the
Damping setting. Flow readings outside of the window are rejected or accepted in accordance with the
Bad Data Rejection setting.
Filter settings for this example:
Filter Method Adaptive
Damping 40 seconds
Sensitivity 60%
Hysteresis 10%
Bad Data Rejection 3
Page 54 August 2018HYB-UM-00090-EN-05
Page 55

Meter Group
150
Flow Within
Hysteresis Limit
110
±10% Hysteresis
Limit
100
90
50
Flow
0
Figure 69: Hysteresis window
Bad Data Rejection (Range 0…10 Samples)
The Bad Data Rejection setting is related to the number of successive readings that must be measured outside of a the
Hysteresis value before the flow meter considers the new flow value valid. In this example, a Hysteresis setting of 10% produces
a ± 10% band centered on the current valid flow rate of 100 gpm.
The Bad Data Rejection setting is the number of successive samples that must be outside of the Hysteresis window before
the flow meter considers the change in flow as real. Larger values are entered into the Bad Data Rejection window when
measuring liquids that contain gas bubbles, as the gas bubbles tend to disturb the ultrasonic signals and cause more
extraneous flow readings to occur. Larger Bad Data Rejection values tend to make the flow meter less responsive to rapid
changes in actual flow rate.
In Figure 71 on page56, flow data falls outside the flow Hysteresis window but does not reach the minimum time specified in
the Bad Data Rejection window. When data appears that is outside the Hysteresis band and shorter than the Bad Data Rejection
window time, the data is rejected.
150
3 Samples Outside
Hysteresis Limit
110
100
90
50
0
1 2 3
Sample
Limits
Bad Data Rejection
Window
Flow
Flow Outside
Hysteresis Limit
±10% Hysteresis
Limit
Figure 70: Bad data (rejection)
Page 55 August 2018 HYB-UM-00090-EN-05
Page 56

Meter Group
The flow rate is again outside the original ±10% Hysteresis window, but the data exists for a time period greater than the
Bad Data Rejection window. In this instance, the meter interprets the data as a new valid flow rate and moves the Hysteresis
window to correspond with the new established flow rate.
150
Energy Page
100
50
110
90
0
Old
±10% Hysteresis
Limit
4 Samples Outside
Hysteresis Limit
New
±10% Hysteresis
Limit
Flow
Figure 71: New valid flow data
Flow Outside Original
Hysteresis Limit
1 2 3 4
Bad Data
Rejection Window
Figure 72: Energy units selection
Power Units
Watts Btu per hour (Btu/hr) Thousand Joules per hour (kJ/hr)
Kilowatts (kW) Thousand Btu per hour (MBtu/hr) Million Joules per hour (MJ/hr)
Megawatts (MW) Million Btu per hour (MMBtu/hr)
Table 15: Power unit choices
Energy Units
British Thermal Units (Btu) Ton Thousand Watt Hours (kWh)
Thousands of Btus (MBtu) Thousand Joules (kJ) Million Watt Hours (MWh)
Millions of Btus (MMBtu) Million Joules (MJ)
Table 16: Energy unit choices
Page 56 August 2018HYB-UM-00090-EN-05
Page 57

LOG DATA LOGGING GROUP
Log (Data Logging) Group
Main Adv Cal System
Setup
Meter I/O
Log
Select DataSetup
Figure 73: Log Group
Setup Page
The setup screen controls the selection of the Logging Rate and has a software button for starting and stopping logging
sessions.
Figure 74: Datalogging setup
Data Logger Control
MPORTANTI
To enable datalogging, a site from the Setup > Site page must be created or selected from previous site names. If a site is not chosen,
the datalogger start/stop control button does not function and the control is grayed out.
Logging Rate
The Logging Rate entry tells the flow meter how often to collect data points. The logger memory area has the capacity to store
more than 300 individual files consisting of a maximum of 65,500 points per log file.
The amount of time the logger collects data depends on the Logging Rate programmed into the flow meter. In general, the
logging time is calculated by dividing 65,563 by the number of data points recorded per minute.
Logging Time(Minutes) =
Number of Samplesper Minute
65,563
Page 57 August 2018 HYB-UM-00090-EN-05
Page 58

Log (Data Logging) Group
Logging Rate
(Once every #)
0.1 second (10 Hz) 10 109 1.8 0.08
1 second 1 1092 18.2 0.76
2 seconds 0.5 2183 36.4 1.52
5 seconds 0.2 5458 91.0 3.79
10 seconds 0.1 10,917 182 7.58
20 seconds 0.05 21,833 364 15.2
30 seconds 0.03333 32,750 546 22.7
1 minute 0.01667 65,500 1092 45.5
2 minutes 0.008333 131,000 2183 91.0
5 minutes 0.003333 327,500 5458 227
10 minutes 0.001667 655,000 10,917 455
30 minutes 0.00055556 1,965,000 32,750 1365
1 hour 0.00027778 3,930,000 65,500 2729
2 hours 0.00013889 7,860,000 131,000 5458
4 hours 6.941
12 hours 2.315
1 day 1.157
Samples/Second Minutes Hours Days
-5
-5
-5
15,720,000 262,000 10,917
47,160,000 786,000 32,750
94,320,000 1,572,000 65,500
Table 17: Logging durations
Logging Duration
Any log les gathered are stored with the site information.
Select Data Page
The Log > Select Data lets you choose the way the time is displayed for each logged entry and what kind of data is recorded in
the user fields.
Figure 75: Data selection (page 1)
Column 0: Time
Column 0 can be set up for one of three time stamp formats.
• The conventional Year, Month, Day, Hour, Minute, and seconds.
• The Microsoft Excel® decimal time format.
• A simple counter that increments once for each logged entry recorded.
Column 1: Flow
Column 1 always stores the current flow rate in the user-selected units.
Page 58 August 2018HYB-UM-00090-EN-05
Page 59

Column 2: User, Column 3: User, Column 4: User
The three user-defined fields can be configured to capture any of the following values.
Nothing Flow Totalizer Net
Flow Velocity Reynolds Number Power
Energy Net TT Flow TT Gain
TT Quality DOP Flow DOP Gain
DOP Quality TT Delta T TT Raw Delta T
TT Fluid SOS DOP Flow Velocity DOP Frequency
TT Aperture Start RTD 1 Temperature RTD 2 Temperature
RTD Delta Temperature I/O Voltage In
Table 18: Logging parameter choices
Log (Data Logging) Group
Figure 76: Data selection (page 2)
Page 59 August 2018 HYB-UM-00090-EN-05
Page 60

I/O (Input / Output) Group
I/O INPUT / OUTPUT GROUP
Main Adv Cal System
Setup
Meter Log
Figure 77: I/O group
I/O
Set Out (Setup Outputs) Page
Figure 78: Data outputs setup
The I/O > Set Out option determines which of the flow meter’s outputs are active.
• Current Output Mode
Test OutSet Out Scale Out Set In
• Voltage Output Mode
• Digital Output Mode
The DXN flow meter’s output signals are analog or digital/pulse. Analog signals change continuously over time. Digital/
pulse signals are present at discrete points and represent information using a sequence of on/off pulses. For connection
information, see Figure 80 on page61.
Select the type of I/O from the pull-down lists. The two analog outputs are 4…20 mA and 0…10V DC output. The pulse
output has a maximum frequency of 1000 Hz and can be configured as either a rate pulse or a totalizing pulse.
All outputs are scaled the same way using the I/O > Scale Out. For example, 20 mA, 1000 Hz and 0…10V all represent the same
maximum flow rate set in the I/O > Scale Out.
Page 60 August 2018HYB-UM-00090-EN-05
Page 61

Scale Out (Scale Outputs) Page
Figure 79: Scale outputs setup
The I/O > Scale Out sets the parameter to which the output circuitry responds.
Data to Output
Choices for Data To Output are Flow and Power.
I/O (Input / Output) Group
Flow at Min Out
Flow at Min Out sets the minimum value to which the outputs are scaled.
Flow at Max Out
Flow at Max Out sets the maximum value to which the outputs are scaled.
OTE:N Transit time measurements are capable of bidirectional flow but Doppler is not. The only time that setting the
Flow at Min Out to a negative value may be necessary is if the meter stays in Transit time mode. If the meter is used in
Doppler mode exclusively, or when in hybrid mode the meter switches to Doppler mode, set the value for
Flow at Min Out no lower than zero.
An example of a valid use of setting Flow at Min Out below zero would be a transit time application where flow can be in
either the forward or reverse direction. If, for instance, a tap water system is capable of 100 gpm forward and 100 gpm in
reverse, then setting the Flow at Min Out to –100 and Flow at Max Out to +100 would be valid entries.
If the meter were programmed to output a 4…20 mA signal, then 4 mA would represent –100 gpm and 20 mA would
represent +100 gpm. The zero flow point would be indicated as 12 mA (halfway between 4 mA and 20 mA).
4 mA 20 mA8 mA 16 ma12 mA
-100 100-50 500
Figure 80: Bidirectional current output
mA
GPM
Dead
Band
Because no flow meter can read down to zero, there is going to be a small dead band around true zero where the velocity of
the fluid is not great enough for the meter to register. The absolute minimum, under perfect conditions, is 0.1 fps (0.03 mps).
Whatever flow rates these velocities correspond to create the minimum dead band around true zero.
Page 61 August 2018 HYB-UM-00090-EN-05
Page 62

I/O (Input / Output) Group
Set In (Setup Input)
Digital Input Mode
• Off: Disables the Digital input
Figure 81: Input setup
• Reset at 0 Volts: Resets totalizers when the digital input voltage is equal to zero.
Voltage Input Mode
The Voltage Input mode contains 3 choices. The Voltage Input can be viewed on the Main > Meters page or through Modbus
communications.
• Off: No voltage input will be read.
• Enable 0-10V Input: Enables the voltage input for a span of 0…10V. Voltage can be scaled in the data log
• Enable 0-5V Input: Enables the voltage input for a span of 0…5V. Voltage can be scaled in the data log
Page 62 August 2018HYB-UM-00090-EN-05
Page 63

I/O (Input / Output) Group
Test Out (Test Outputs) Page
Figure 82: Test outputs setup
The Test Out options are used to calibrate devices connected to the flow meter through the I/O breakout box.
To use this function:
1. Connect the output to a device designed to read that type of output signal.
• For Test 4…20 mA Out, use a milliammeter.
• For Test Frequency Out, use either a frequency counter or an oscilloscope.
• For Test 0…10V Out, use a voltmeter.
2. Use the + and – buttons to select the output level to calibrate to. For example, common test levels for the 4…20 mA
output are 4, 8, 12, 16 and 20 mA.
3. Put a checkmark in the Enter Output Test Mode box to activate the outputs.
Page 63 August 2018 HYB-UM-00090-EN-05
Page 64

Adv (Advanced) Group
ADV ADVANCED GROUP
The Advanced group tab provides users a way to troubleshoot problematic applications, as well as setting up the flow meter
to best suit application needs. Pages within this tab should only be modified under the guidance of Badger Meter Technical
Support or with caution. Modifying values can alter flow measurement accuracy.
Signals Page
Monitor Signal
Site
MeterDisplay Cal System
TransitSignals
Log I/O
Waveform Doppler
Figure 83: Advanced group
Figure 84: Advanced signals page
Adv
Monitor
Select the signal type to be monitored from the Monitor Signal pull-down list and adjust the graph scale using the Axes
adjustments. This is used for reference only.
Monitor Signal X axis Description
Transit RX Signals 0…1000 Received Up/Down Signals
Transit RX Signals Analyzed 0…1000 Received Up/Down Signals, Analysis Portion
Transit RX Noise 0…1000 Received Up/Down Noise test signals
Transit XCorr –40…40 Cross Correlations
Transit XCorr Alt –40…40 Alternate Cross Correlations
Transit RX Envelope 0…1000 Received Up/Down signal Envelopes
Transit Rx Alt 0…1000 Alternate Received Up/Down Signals
Transit RX Waveout 0…1000 Transmitted Up/Down Waveforms
Pipe Thickness Signals 0…1000 Pipe Thickness Test Signals
Doppler Best Acorr 0…50 Doppler Autocorrelations
Doppler Best Rate 0…200 Doppler Auto Sample Rate Raw Data
Doppler Full Rate 0…200 Doppler 25 kHz Sample Rate Raw Data
Doppler HI Rate 0…200 Doppler 25/4 kHz Sample Rate Decimated
Doppler MED Rate 0…200 Doppler 25/16 kHz Sample Rate Decimated
Doppler LO Rate 0…200 Doppler 25/32 kHz Sample Rate Decimated
Table 19: Monitor signal parameters
Page 64 August 2018HYB-UM-00090-EN-05
Page 65

Adv (Advanced) Group
Axes Scaling Buttons
Press the Axes button successively to move through the three axis configuration choices, as shown in Figure 85.
The X axis is always time based. Press + magnifying glass or – magnifying glass to expand or contract the timeline shown
on the horizontal (X axis). The minimum graph time period is 10 seconds and the maximum is 1 year.
The Axis Y Lt and Axis Y Rt functions control the scale of the left and right sides of the graphs Y axis, respectively.
The + magnifying glass and – magnifying glass work in the same fashion as on the X axis except that on the Axis Y Lt and
Axis Y Rt they expand or contract the range of the vertical scaling.
The Up Arrow and Down Arrow buttons shift the zero point of the graph up or down.
The Home button resets the graph to the parameters set on the Main > Graph Setup screen.
Axes
-
Axes
Figure 85: Graph axis configuration
Axes
X
-
Home
Axes
Y Lt
Page 65 August 2018 HYB-UM-00090-EN-05
Page 66

Adv (Advanced) Group
Transit Page
Figure 86: Advanced transit time setup
Auto Tx or 1/Amp
• Transmit attenuation.
• When box is checked, attenuation is automatic).
• When box is unchecked, attenuation is manual. 1…16 time attenuation. If 16, then transmitted signal is 1/16th full power.
Transit AGC or Gain
• Automatic Gain Control override.
• Box is checked means gain is automatic.
• Box is unchecked means manual gain control. Setting is 1…100%, 100% is largest gain, 1% is smallest gain.
Automatic Pull-Down List
This controls the analysis of the transit time data used to determine flow.
• Automatic
• Harmonic EnvPH – An analysis that is best suited for sine wave type output waveforms (Sin, Sine Carrot Top). Uses
correlation to detect peak hop (use Sine Carrot Top).
• Harmonic NoPH – An analysis that is best suited for sine wave type output waveforms (Sin, Sine Carrot Top). No peak hop
detection is implemented, for slow flows only.
• Correlation MaxPH – Uses correlation analysis, which correlates signal envelopes for peak hop detection.
• Correlation EnvPH – Uses correlation analysis, which uses maximum of raw signal correlation for peak hop detection. Very
useful for high speed flows, especially if waveform is set to Best Barker, Chirp or Sin Carrot Top.
• Correlation NoPH – Uses correlation analysis, which uses peak within first wavelength for flow rate. Cannot fail to give
a result.
Analysis Duration (%)
Override of automatic analysis duration control.
Only a portion of the signals seen in the RX window is used.
• 10% means 10% of the automatic value.
• 100% means 10 times the automatic value. This is limited to the full number of samples collected.
Page 66 August 2018HYB-UM-00090-EN-05
Page 67

Adv (Advanced) Group
Waveform Page
Figure 87: Advanced waveform selection
For most applications, select the Automatic waveform. In some circumstances, you may select an alternate waveform at the
direction of Badger Meter Technical Support.
Automatic Pull-Down List Options
This controls the transmitted waveform. This is very useful for various flow conditions.
• Automatic
• Sin - Straight sine wave. Frequency can be adjusted.
• Sin Carrot Top - Sine wave with Triangular envelope (50%). Frequency can be adjusted.
• Chirp - Frequency swept sin wave. Frequency & bandwidth can be adjusted.
• Best Barker - 3, 5, 7, 11 or 13 chips. Chips & Wavelengths per chip are determined with transducer and setup. Frequency
can be adjusted. Chip count is adjusted automatically to Duration.
Best Barker is best for high speed flows.
Sin Carrot Top is best for low speed flows.
Waveform Duration (%)
Overrides of automatic transmit duration control. This can be useful for high speed flows.
Transmitted waveform duration is automatically calculated based on pipe setup transducers, etc.
• 1% means 1% of the automatic value.
• 100% means 1x times of the automatic value.
For a high speed flow, users can try 75%, 50%, and even 25% durations depending on transducer types and setups.
Nominal Frequency (%) and Secondary or Width (%)
These two adjustments are really only useful if Waveform is not automatic.
• Frequency is adjustable from 50% to 200% nominal.
• Secondary or Width is from 50% to 200% nominal. This is seldom used (only for Chirp).
Page 67 August 2018 HYB-UM-00090-EN-05
Page 68

Adv (Advanced) Group
Doppler Page
Figure 88: Advanced Doppler setup
Doppler Tx Freq (kHz)
Read only. Doppler baseband frequency (usually 625 kHz).
Custom Transducer Angle (deg)
Read only. Doppler Transducer Launch Angle (30.00°).
Doppler Sample Rate Control
Read only. Doppler sample rate control is automatic.
Doppler AGC Gain
Overrides Doppler Automatic Gain control:
• When the box is checked, gain control is automatic.
• When the box is unchecked, gain control is manual. 1…100% of full scale. 1 means 1% full scale.
Page 68 August 2018HYB-UM-00090-EN-05
Page 69

Monitor Page
Figure 89: Advanced monitor
Waveform Update Rate (s)
Read only. Waveform update rate. Default is 1 update per 5 seconds only when waveform tab is visible.
Adv (Advanced) Group
Snapshot Rate (s)
Read only. Data snapshot rate. Default is 1 update per 1 second.
System Info Rate (s)
Read only. Power System & OS information rate. Default is 1 update per 10 seconds.
Page 69 August 2018 HYB-UM-00090-EN-05
Page 70

Cal (Calibration) Group
CAL CALIBRATION GROUP
Transit Page
Set Zero (ns)
Setup
Transit
Meter AdvMain System
Log I/O
Doppler
Figure 90: Calibration group
Figure 91: Calibrate transit time
Cal
Factory
Press Set Zero (ns) zeros to remove the No Flow transit time offset. This is also referred to as Zeroing the meter.
Because every flow meter installation is slightly different and sound waves can travel in slightly different ways through these
various installations, it is important to remove the zero offset at zero flow to maintain the meter’s accuracy. To establish
Zero flow and eliminate the offset:
1. The pipe must be full of liquid.
2. Flow must be absolutely zero. Securely close any valves and allow time for any settling to occur.
3. Press Set Zero (ns) once.
User Adjustment
This allows the user to enter a calibration factor. The range can be 0.2…5.0. This adjustment modifies the indicated flow rate
by multiplying the flow rate value by the number entered into the User Adjustment field. For example, if indicated flow rate is
20 gpm, a user adjustment of “2.000” will modify the flow rate to 40 gpm.
OTE:N Only use this under the guidance of Badger Meter Technical Support. Default should always be “1.000”.
Positive Flow
As of Rev K, the Positive flow checkbox is always marked. This checkbox will be used to allow reversal of measurement.
Reynolds Correcting
As of Rev K, the Reynolds Correcting checkbox is always greyed and unmarked.
This checkbox will be used to allow Reynolds compensation of flow measurements. Currently, the DXN does not support
Reynolds compensation.
Page 70 August 2018HYB-UM-00090-EN-05
Page 71

Cal (Calibration) Group
SOS Comp
When SOS Comp is not checked, the flowmeter equation simply uses the soundspeed from the lookup table as:
C
= C
fluid
fluid from lookup table
When SOS Comp is checked, the flowmeter equation uses the soundspeed as measured from the signals:
L
fluid
C
=
fluid
t
fluid
Where L is the fluid length where the ultrasound travels, and:
t
= t
t
signal
fluid
= t
peak
signal
+ t
–2 * (t
aperture start
piezo
+ t
– t
signaloffset
resdelay
+ t
– t
transducer
– t
daq
+ t
pipe
waveform
+ t
– t
)
liner
electronics
The following are constants for the hardware:
Electronics circuits: t
Transducers: t
Setup: t
Cal->Transit-> SOS Offset: t
Soundspeed Offset Button and Numeric Control
This button gures out t
signaloset
such that C
=
uid
Cuid from lookup table
.
OTE:N The Soundspeed Offset is only useful when SOS Comp is checked.
daq
t
electronics
piezo
t
resdelay
t
transducer
pipe
t
pipe
t
waveform
signaloffset
Page 71 August 2018 HYB-UM-00090-EN-05
Page 72

Cal (Calibration) Group
Doppler Page
Figure 92: Calibrate doppler
User Adjustment
This allows the user to enter a calibration factor. The range can be 0.2…5.0. This adjustment modifies the indicated flow rate
by multiplying the flow rate value by the number entered into the User Adjustment field. For example, if indicated flow rate is
20 gpm, a user adjustment of “2.000” will modify the flow rate to 40 gpm.
OTE:N Only use this under the guidance of Badger Meter Technical Support. Default should always be “1.000”.
Positive Flow
This is always grayed and checked. Doppler flow is always positive for our instruments as of 2014.
Page 72 August 2018HYB-UM-00090-EN-05
Page 73

Cal (Calibration) Group
Factory Page
The factory calibration page shows all the parameters stored in the flow meter’s memory, originally derived during calibration.
These are the values that re-load when you use press Load Default Settings from Setup > Site.
Figure 93: Factory calibration (page 1)
Store Cal Table
For factory use only.
Reset Cal Values
For factory use only.
Re-Load Table
For factory use only.
Store Cal Table to USB
For factory use only.
Figure 94: Factory calibration (page 2)
Page 73 August 2018 HYB-UM-00090-EN-05
Page 74

System Group
SYSTEM GROUP
Main
Setup
Meter Adv Cal
Disk TimePowerMisc
Log I/O System
Storage
PC
Figure 95: System group
ENet
Misc (Miscellaneous) Page
Figure 96: System miscellaneous
Language
Use the Language pull-down list to select the language for screen displays.
Update
Comm
English Deutsch Français
Español Japanese Pyccкий
Português Italiano Netherlands
Svenska Norsk
Table 20: Language selections
Entry Units
Entry Units are the units of measurement for configuring meters.
Select English for inches or Metric for millimeters.
OTE:N The Entry Units are independent of the choices made to display flow rate, total, energy readings and similar units. For
example, the meter can be configured for a 2” ANSI pipe and still have the rate displayed in liters per minute (lpm).
The English/Metric selection also configures the DXN flow meter to display sound speeds in pipe materials and liquids as either
feet per second (fps) or meters per second (mps), respectively.
MPORTANTI
If the Entry Units choice has been changed from English to Metric or from Metric to English, the entry must be saved by doing a
power down and then a power up in order for the DXN flow meter to initiate the change in operating units. Failure to save and reset
the flow meter results in improper transducer-spacing calculations and an instrument that may not measure properly.
Page 74 August 2018HYB-UM-00090-EN-05
Page 75

System Group
Power Page
The System > Power page has a group of lights that indicate the state of the internal Lithium-Ion battery.
The flow meter has a sophisticated battery management circuit that provides a long trouble-free battery life. The meter can
remain connected to the charger without over-charging the battery.
The page consists of four status indicator lights and a graph that shows the charge percentage and the battery temperature.
The first two lights are battery status lights and the last two indicate if the charger is connected and how many charging
cycles the battery has been through.
Figure 97: System Power
The first light stays lit as long as there is enough power remaining in the batter to run the meter. When the meter is connected
to the battery charger, the text to the right of the light says “Battery Not Being Discharged”. When the charger is removed,
the text changes to show the estimated running time before the battery becomes fully discharged. A typical status message
would be “6.5 Hours Battery Runtime”.
• The battery life indicator is continuously being updated. If the current draw from the battery increases—as when the
outputs are switched on—the runtime indicator recalculates the battery life.
• The second light reports on the battery’s charging status, either “Charging” or “Not Charging.” The battery only charges
when there is a need and the charger is connected. The fact that the charger is connected does not necessarily mean that
the battery is charging.
• The third light indicates whether the charger is connected. When the External DC light is on, the charger is connected and
powering the meter. The charger may or may not also be charging the battery, depending on the battery status.
• The fourth light is the Cycle counter and indicates the number of charging cycles the battery has undergone.
• Check the Disable Charging box when the meter is going to run on AC power for a long time. The Disable Charging
feature prevents the battery from generating excessive heat. In some cases, a lower level of noise is realized.
The graphs to the right of the battery status indicator show the present temperature of the battery and the percentage of
charge the battery currently holds.
Auto Shutdown
The meter has a feature to help prevent the flow meter from operating in a low battery range. Any time the flow meter battery
goes below 5% charge, the user is prompted to plug in the charger. The meter will automatically shut down if the charger is
not plugged in within 120 seconds.
Page 75 August 2018 HYB-UM-00090-EN-05
Page 76

System Group
Disk Page
Figure 98: System disk
The System > Disk page provides information about the meter’s hard disk storage capacity. The flow meter uses an 8 gigabyte
hard drive, of which, 1 gigabyte is available to the user.
PC Page
Figure 99: System PC
PC CPU STATUS
The status graph shows the temperature of the system processor board and the CPU (Central Processing Unit), the
percentages of RAM (Random Access Memory) used and how busy the CPU is.
Backlight Control
The System > PC page contains the backlight brightness control and the switch for the automatic screen saver. Judicious use
of these controls help extend the battery life between charges. The flow meter’s WVGA screen consumes about 1/3 of the
battery capacity when the meter is running on battery. By using the screen saver and lowering the amount of backlight when
conditions permit, battery life is significantly extended for that session.
• The backlight Brightness control ranges from a low of 1 (least bright) to 5 (brightest).
• The Timed Power Off box, when checked, enables the screen saver to start after the time indicated in Off Minutes. Tap the
display to turn it back on..
• The Off Minutes has a range of 0…50 minutes.
If the meter is running with the battery charger connected, there is no need to either decrease the backlight or use the screen
saver function.
Page 76 August 2018HYB-UM-00090-EN-05
Page 77

System Group
Storage Page
Figure 100: System storage
The System > Storage page helps you manage the sites stored in the flow meter’s memory.
To manage a site:
Use the Select Site to Manage pull-down list to choose the site to be modified or deleted. Once the site is selected several
actions become available.
Copy Site To USB
Copies all of the files associated with the selected site to a USB device connected to the USB port on the meter.
Rename Site
Lets you change the site name.
Delete Site Logs
To delete the site logs:
1. Place a checkmark in the Unlock Logs Delete box. The Delete Site Logs button turns red.
2. Press Delete Site Logs to delete all the logs for the site chosen in the Select Site To Manage control.
Delete Site
The Delete Site control deletes both the site logs and the site itself:
1. Place a checkmark in the Unlock Site Delete box. The Delete Site button turns red to warn that the entire site is about to
be deleted.
2. Press Delete Site to delete the site and the site logs from the meter’s memory space.
Page 77 August 2018 HYB-UM-00090-EN-05
Page 78

System Group
Restore Sites from USB
Site configurations can be uploaded from a USB to the DXN memory.
1. Insert a USB with copied site information to the USB port on top of the unit.
2. Wait one minute to ensure connectivity between the UDB drive and the DXN.
3. Press Restore Sites from USB to upload already congured site.
OTE:N Be sure to not alter site file names on the USB drive prior to loading them into the DXN.
This could cause a read/write error.
Figure 101: Restore sites from USB
ENet Page
Figure 102: System ethernet (ENet)
The ENet page shows the status of the network interface settings and the Modbus TCP connection, as well as controls for each.
Network Interface Status and Settings
• The No Network Connection light indicates the network connection is lost.
• Use the IP Address Edit option to change the address.
• Use the Subnet Mask Edit option to change the mask.
Modbus TCP Status and Control
• The Server Active light indicates the Modbus TCP Server is connected.
• The Activity light indicates legitimate Modbus TCP requests.
• The Error light indicates a Modbus request error.
• Check the Enable Modbus TCP Server box to activate the ability to connect via Modbus.
Page 78 August 2018HYB-UM-00090-EN-05
Page 79

System Group
Modbus TCP Connection Instructions
Bits Bytes Modbus Registers
Long Integer 32 4 2
Single Precision IEEE754 32 4 2
Double Precision IEEE754 64 8 4
Table 21: Modbus data formats
Modbus Register / Word Ordering
Each Modbus Holding Register represents a 16-bit integer value (2 bytes). The official Modbus standard defines Modbus as a
‘big-endian’ protocol where the most significant byte of a 16-bit value is sent before the least significant byte. For example,
the 16-bit hex value of ‘1234’ is transferred as ‘12’ ‘34’.
Beyond 16-bit values, the protocol itself does not specify how 32-bit (or larger) numbers that span over multiple registers
should be handled It is very common to transfer 32-bit values as pairs of two consecutive 16-bit registers in little-endian word
order. For example, the 32-bit hex value of ‘12345678’ is transferred as ‘56’ ‘78’ ‘12’ ‘34’. Notice the Register Bytes are still sent in
big-endian order per the Modbus protocol, but the Registers are sent in little-endian order.
Other manufacturers store and transfer the Modbus Registers in big-endian word order. For example, the 32-bit hex value of
‘12345678’ is transferred as ‘12’ ‘34’ ‘56’ ‘78’. It does not matter in which order the words are sent, as long as the receiving device
knows which way to expect it.
Since it is a common problem between devices regarding word order, many Modbus master devices have a configuration
setting for interpreting data (over multiple registers) as ‘little-endian’ or ‘big-endian’ word order. This is also referred to as
swapped or word-swapped values and allows the master device to work with slave devices from different manufacturers.
If, however, the endianness is not a configurable option within the Modbus master device, it is important to make sure it
matches the slave endianess for proper data interpretation. The transmitter actually provides two Modbus Register maps to
accommodate both formats. This is useful in applications where the Modbus Master cannot be configured for endianness.
Operation
ModbusTCP allows users the ability to monitor basic parameters such as flow and totals via the Ethernet port. The DXN
ModbusTCP operation is automatic, and starts up automatically. Errors may be cleared with some settings changes and
disabling/enabling Modbus TCP server. During setup, system error boxes may pop up indicating network conflicts.
• Server Active indicator is bright green when operating properly.
• Network Connected is bright green when network is connected properly.
• No Network Connection will appear with a dull green box if there is no Ethernet connection.
• Activity will flash upon successful read of Modbus Registers.
• Error will flash upon improper reads/writes, or incorrect Modbus addressing.
First, set up the Ethernet settings that will be used to monitor the flow meter:
1. Make sure to unplug the Ethernet cable.
2. Navigate to System > ENet.
3. Verify the Enable Modbus TCP Server box is unchecked. If checked, press the box to disable the Modbus TCP server.
Page 79 August 2018 HYB-UM-00090-EN-05
Page 80

System Group
Figure 103: Modbus TCP server enabled Figure 104: Modbus TCP server disabled
4. Press Edit to change IP Address or Subnet Mask to the desired setting for the network.
Figure 105: Edit buttons
Figure 106: IP address edited Figure 107: Subnet mask edited
5. When changes are nished, check the Enable ModbusTCP Server box to enable Modbus TCP server.
6. Reconnect the Ethernet cable and verify communications.
Page 80 August 2018HYB-UM-00090-EN-05
Page 81

Modbus Register Addresses
MODBUS Registers
Floating Point
Data Component Name
Format
Signal Strength 40100 - 40101 40200 - 40201 40300 - 40303
Flow Rate 40102 - 40103 40202 - 40203 40304 - 40307
Net Totalizer 40104 - 40105 40204 - 40205 40308 - 40311
Positive Totalizer 40106 - 40107 40206 - 40207 40312 - 40315
Negative Totalizer 40108 - 40109 40208 - 40209 40316 - 40319
Temperature 1 40110 - 40111 40210 - 40211 40320 - 40323 °C
Temperature 2 40112 - 40113 40212 - 40213 40324 - 40327 °C
Table 22: Flow meter modbus register map for ‘little-endian’ word order master devices
Long Integer
For reference: If the ow meters Net Totalizer = 12345678 hex
Register 40102 would contain 5678 hex (Word Low)
Register 40103 would contain 1234 hex (Word High)
Long Integer
Data Component Name
Format
Signal Strength 40600 - 40601 40700 - 40701 40800 - 40803
Flow Rate 40602 - 40603 40702 - 40703 40804 - 40807
Net Totalizer 40604 - 40605 40704 - 40705 40808 - 40811
Positive Totalizer 40606 - 40607 40706 - 40707 40812 - 40815
Negative Totalizer 40608 - 40609 40708 - 40709 40816 - 40819
Temperature 1 40610 - 40611 40710 - 40711 40820 - 40823 °C
Temperature 2 40612 - 40613 40712 - 40713 40824 - 40827 °C
Table 23: Flow meter modbus register map for ‘big-endian’ word order master devices
For reference: If the ow meters Net Totalizer = 12345678 hex
Register 40602 would contain 1234 hex (Word High)
Register 40603 would contain 5678 hex (Word Low)
Modbus Coil Description Modbus Coil Notes
Reset Totalizers 1 Forcing this coil on will reset all totalizers. After reset, the coil automatically returns to the off state.
Single Precision
Format
MODBUS Registers
Floating Point
Single Precision
Format
Table 24: Modbus coil map
Double Precision
Format
Gallons, Liters, MGallons, Cubic Feet, Cubic
Meters, Acre Feet, Oil Barrel, Liquid Barrel, Feet,
Meters, Lb, Kg, BTU, MBTU, MMBTU, TON, kJ,
Per Second, Minute, Hour, Day
Double Precision
Format
Gallons, Liters, MGallons, Cubic Feet, Cubic
Meters, Acre Feet, Oil Barrel, Liquid Barrel, Feet,
Meters, Lb, Kg, BTU, MBTU, MMBTU, TON, kJ,
Per Second, Minute, Hour, Day
System Group
Available Units
kW, MW
Available Units
kW, MW
Page 81 August 2018 HYB-UM-00090-EN-05
Page 82

System Group
Time Page
The System > Time page provides date and time setting controls. The current date is shown on a calendar page with the
currently programmed date highlighted in blue.
Figure 108: System time
1. To access the date/time controls, press Press to Edit Time. All the date/time controls on the right side of the screen
become active and the button changes to “Press to Set Time”.
2. Use the Increment and Decrement buttons to set the correct date and time.
3. Press Press to Set Time to load the settings into the system memory.
Update Page
The System > Update page is used in conjunction with software updates supplied by Badger Meter to install new software
revisions into the DXN system. For complete updating instructions, see “Upgrading Software” on page89.
Figure 109: System update
Quit Meter to Manage / Update
Press this option to open the main splash screen where you can enter or configure the flow meter, software updates and
system settings.
Set Up Quick Boot
Press this option to set up the flow meter to boot faster. Afterfirst time use, some bootup menus become unnecessary.
Enabling this skips those menus.
Page 82 August 2018HYB-UM-00090-EN-05
Page 83

Comm (Communications) Page
Figure 110: System communications (comm)
The Comm page is mostly for engineering and debugging purposes.
The scrolling blue and black text indicates proper communication.
System Group
Disconnect Pull-Down Menu
Use this selection to connect or disconnect communication to the flow meter.
No TT Flow Sim
Indicates the status of flow simulation.
Resubmit Settings
Resubmits the current flow meter settings.
Reset Flow Meter
Electronically resets the flow meter, then resubmits the settings.
Page 83 August 2018 HYB-UM-00090-EN-05
Page 84

Inputs/Outputs
INPUTS/OUTPUTS
General
The DXN system offers a variety of input and output options. The individual I/O connections are accessed by using the
included Breakout Box connected to the flow meter via a DB15 cable connection labeled Process I/O.
I/O connection
Figure 111: Display I/O connection
DB15
Interconnect
Cable
Total Reset
To DXN
Figure 112: Breakout box
+ V
External
Pull-Up
Resistor
Same as using Meter ► Totalizer Reset Totalizer
Figure 113: External totalizer reset
Page 84 August 2018HYB-UM-00090-EN-05
Page 85

Inputs/Outputs
Digital Outputs
Digital/Pulse Outputs
The digital output is an open collector transistor which must have a pull-up resistor to function. The output can be configured
as either a frequency output scale, based upon the minimum and maximum flow rate chosen, or a totalizing pulse controlled
by the incrementing totalizer.
+ V
External
Pull-Up
Resistor
Totalizing Pulse - 33 mS Duration
+V
0
Rate pulse - 1 KHz Maximum
+V
0
Figure 114: Digital output external power
Totalizing Pulse - 33 mS Duration
+V
0
Rate pulse - 1 KHz Maximum
+V
33 mS
On Time = O Time
On O
External
Pull-Up
Resistor
33 mS
On Time = O Time
0
Figure 115: Digital output internal power
On O
Page 85 August 2018 HYB-UM-00090-EN-05
Page 86

Inputs/Outputs
Rate Pulse Scaling
The rate pulse has a maximum frequency of 1000 Hz that is proportional to the minimum and maximum user flow rates
entered. Setting the minimum and maximum flow rates is accomplished using the Meter > Limit software controls.
For example, if the minimum flow rate were set to –100 gpm and the maximum flow rate was +100 gpm the 1000 Hz output
would span the distance from –100…100 gpm.
In this example the output frequency would then be interpreted as follows:
0 Hz = –100 gpm
250 Hz = –50 gpm
500 Hz = 0 gpm
750 Hz = +50 gpm
1000 Hz = +100 gpm
The maximum current capacity for the transistor is 100 mA with a maximum supply voltage of 10V DC. These parameters
require the pull-up resistor rated for a minimum of 1000 ohms.
In rate pulse output mode, the transistor has a duty cycle of 50%.
Totalizing Pulse
When used to transmit a totalizing pulse, the digital output sends a fixed width (33 mS) pulse that follows the display totalizer.
For each increment of the totalizer, the digital output sends 1 pulse. The duration of the pulse is 33 mS with an amplitude
approximately equal to the level of +V. See “Totalizer Page” on page52 to set totalizer parameters.
OTE:N The totalizing pulse output can be set for total net, total positive, total negative, total Doppler, energy net, energy
positive and energy negative.
Page 86 August 2018HYB-UM-00090-EN-05
Page 87

Inputs/Outputs
Analog Outputs
Analog outputs are signals that change continuously over time. In most control applications, analog signals range
continuously over a specified current or voltage. The DXN offers a DC voltage output and two styles of 4…20 mA current
output. See I/O > Set Out.
Voltage Output (10V DC Max)
The voltage output is configured for 0…10V DC. Analog signals represent continuously variable measurements.
0V DC
(Ground)
Voltage Output
Signal
Figure 116: Voltage output connection
4…20 mA Current Loop Output (Current Sinking)
10 . . . 30V DC
Power Supply
(+) 4 . . . 20 mA (-) 4 . . . 20 mA
Figure 117: 4…20 mA current sinking output
The 4…20 mA output interfaces with most recording and logging systems by transmitting an analog current signal that is
proportional to system flow rate. The 4…20 mA output is internally powered (current sourcing) and can span negative to
positive flow/energy rates.
The 4…20 mA output is driven from a +15V DC source located within the meter. The source is isolated from earth
ground connections within the DXN. The 4…20 mA output signal is available between the 4…20 mA Out and Signal
Ground terminals.
Page 87 August 2018 HYB-UM-00090-EN-05
Page 88

Inputs/Outputs
4…20 mA Current Output (Current Sourcing)
0V DC
(Ground)
Jumper
4 . . . 20 mA
Signal
Figure 118: 4…20 mA current sourcing output
The current output from the DXN can also be configured to source current. With terminals 6 and 7 jumpered together.
15V DC Supply (30 mA Max)
The DXN has a built in power supply that can be used to power current or voltage sensors external to the meter.
4…20 mA Supply (30V DC Max)
RTD Connections
Figure 119: RTD connections
1000 Ω
RTD 2
1000 Ω
RTD 1
Page 88 August 2018HYB-UM-00090-EN-05
Page 89

Upgrading Software
UPGRADING SOFTWARE
MPORTANTI
The Dynasonics USB Flash Drive is formatted in FAT/FAT32. NTFS (New Technology File System) formats do not work.
The upgrade is supplied as a self extracting zip file and must be expanded on a PC before it can be loaded into the DXN.
1. Save the supplied zip le to a convenient place on the computer’s hard drive.
2. Double-click on the PortableFlow meter_YYYYMMDD_RevX.zip le to start the extraction process. The completed
extraction should open the zip le and place the contents in a folder named “PortableFlow meter” on the hard drive.
OTE:N The “YYYYMMDD” indicates the year, month, and day of the current revision. The “X” in the file name stands for the
current revision letter.
Name Date modied Type Size
PortableFlowmeter 4/12/2013 12:20 PM File Folder
3. When the extraction process is complete, copy the entire “PortableFlow meter” folder to a USB ash drive.
4. Start the ow meter and select the Main > Meters screen.
OTE:N Revision E and later of the DXN firmware has multi-language capabilities. To change the language displayed on the
menu tabs, press the language button until the proper language is displayed on the screen.
Page 89 August 2018 HYB-UM-00090-EN-05
Page 90

Upgrading Software
5. Insert the thumb drive into the USB port on the rear of the ow meter.
6. From the Main > Meters screen, press the System tab on the far right of the top menu display.
7. From the System screen, select the Update page.
8. Press Quit Meter to Manage / Update.
9. Press Software Update.
10. Press Unlock Step 1: Unlock System (Reboot).
11. A small panel in the center of the screen says “Reboot Required.” Remove the ash drive and press OK.
Page 90 August 2018HYB-UM-00090-EN-05
Page 91

Upgrading Software
12. After the reboot, the screen shows a grayed-out Software Update button. When the update drive is inserted, the grayed out
button illuminatios. Press Start Updater after it illuminates.
13. The meter returns to the Update screen. Press Update System Step 2: Update System (Reboot).
OTE:N If this step was completed in a previous system update, the update utility may skip directly to
Copy Step 3: Copy Updated Files.
When the update process is complete, a green checkmark displays in the Update System (Reboot) box. The screen says
“Reboot Required”.
14. Remove the USB Update Drive and press OK.
Page 91 August 2018 HYB-UM-00090-EN-05
Page 92

Upgrading Software
When the opening screen appears, insert the USB Update Drive. The “Software Update“ message again becomes selectable.
15. Press Start Updater.
16. Press Copy Step 3: Copy Updated Files. The text area to the right displays a series of status messages that ends with
“Copying Files Complete 100 Files”.
OTE:N If the process hangs-up, press Copy a second time to clear the hang. The process may take a few minutes to
complete. When the process is complete, use the scroll bars in the message area find to the message “!Successful
Update!…Exiting Reprogramming Mode”. This verifies that the updating process has terminated.
17. Press Update Flow Meter Step 4: Update Flow Meter. A short process runs again with text lling the text area
Page 92 August 2018HYB-UM-00090-EN-05
Page 93

When the update process completes, green checkmarks appear in the boxes next to steps 1, 2, 3 and 4.
18. Press Lock Step 5: Lock System (Reboot), remove the USB drive and press OK to reboot.
Upgrading Software
OTE:N If the thumb drive is not removed before you press OK, the unit may lock-up. The error message “Lock EWF Fail” may
also appear in the text area. Remove the thumb drive. When the meter returns to the screen with the grayed-out
Software Update button, press Start Flow Meter to resume normal operations.
See the last page for additional instruction on clearing a lock-up. When the thumb drive is removed the device may continue
on to a system reboot but hang at the Dynasonics splash screen.
This condition requires a hard reboot. Press and hold the main power button until the unit turns off. Press the power button
again to start the meter.
Page 93 August 2018 HYB-UM-00090-EN-05
Page 94

Upgrading Software
Quick Boot
1. To enable Quick Boot, from the main screen, select System > Update and then press Set Up Quick Boot.
The application closes, reverting to the system menu.
2. Press Start Flow Meter again. The unit enters a hibernation process and shuts down.
On the next power up, the unit starts in Quick Boot mode.
Page 94 August 2018HYB-UM-00090-EN-05
Page 95

Microsoft Software License Terms for Windows XP Embedded and Windows Embedded Standard Runtime
MICROSOFT SOFTWARE LICENSE TERMS FOR WINDOWS XP EMBEDDED
AND WINDOWS EMBEDDED STANDARD RUNTIME
These license terms are an agreement between you and Badger Meter. Please read them. They apply to the software included
on this device. The software also includes any separate media on which you received the software.
The software on this device includes software licensed from Microsoft Corporation or its affiliate.
The terms also apply to any Microsoft
• Updates,
• Supplements,
• Internet-based services, and
• Support services
for this software, unless other terms accompany those items. If so, those terms apply. If you obtain updates or supplements
directly from Microsoft, then Microsoft, and not Badger Meter, licenses those to you.
As described below, using some features also operates as your consent to the transmission of certain standard
computer information for Internet-based services.
By using the software, you accept these terms. If you do not accept them, do not use or copy the software. Instead,
contact Badger Meter to determine its return policy for a refund or credit.
If you comply with these license terms, you have the rights below.
Use Rights
You may use the software on the device with which you acquired the software.
Additional Licensing Requirements and/or Use Rights
Specific Use
Badger Meter designed this device for a specific use. You may only use the software for that use.
Other Software
You may use other programs with the software as long as the other programs
• Directly support the manufacturer’s specific use for the device, or
• Provide system utilities, resource management, or anti-virus or similar protection.
Software that provides consumer or business tasks or processes may not be run on the device. This includes email, word
processing, spreadsheet, database, scheduling and personal finance software. The device may use terminal services protocols
to access such software running on a server.
Device Connections
You may use terminal services protocols to connect the device to another device running business task or processes software
such as email, word processing, scheduling or spreadsheets.
You may allow up to ten other devices to access the software to use
• File Services,
• Print Services,
• Internet Information Services, and
• Internet Connection Sharing and Telephony Services.
The ten connection limit applies to devices that access the software indirectly through multiplexing or other software or
hardware that pools connections. You may use unlimited inbound connections at any time via TCP/IP.
Page 95 August 2018 HYB-UM-00090-EN-05
Page 96

Microsoft Software License Terms for Windows XP Embedded and Windows Embedded Standard Runtime
Scope of License
The software is licensed, not sold. This agreement only gives you some rights to use the software. Badger Meter and Microsoft
reserve all other rights. Unless applicable law gives you more rights despite this limitation, you may use the software only as
expressly permitted in this agreement. In doing so, you must comply with any technical limitations in the software that allow
you to use it only in certain ways. For more information, see the software documentation or contact Badger Meter. Except and
only to the extent permitted by applicable law despite these limitations, you may not:
• Work around any technical limitations in the software;
• Reverse engineer, decompile or disassemble the software;
• Make more copies of the software than specified in this agreement;
• Rent, lease or lend the software; or
• Use the software for commercial software hosting services.
Except as expressly provided in this agreement, rights to access the software on this device do not give you any right to
implement Microsoft patents or other Microsoft intellectual property in software or devices that access this device.
You may use remote access technologies in the software such as Remote Desktop to access the software remotely from
another device. You are responsible for obtaining any licenses required for use of these protocols to access other software.
Remote Boot Feature
If Badger Meter enabled the device Remote Boot feature of the software, you may
• (i) use the Remote Boot Installation Service (RBIS) tool only to install one copy of the software on your server and to deploy
the software on licensed devices as part of the Remote Boot process; and
• (ii) use the Remote Boot Installation Service only for deployment of the software to devices as part of the Remote Boot
process; and
• (iii) download the software to licensed devices and use it on them.
For more information, please see the device documentation or contact Badger Meter.
Internet-Based Services
Microsoft provides Internet-based services with the software. Microsoft may change or cancel them at any time.
Consent for Internet-Based Services
The software features described below connect to Microsoft or service provider computer systems over the Internet. In some
cases, you will not receive a separate notice when they connect. You may switch off these features or not use them. For more
information about these features, visit
http://www.microsoft.com/windowsxp/downloads/updates/sp2/docs/priV ACy.mspx.
By using these features, you consent to the transmission of this information. Microsoft does not use the information to
identify or contact you.
Computer Information
The following features use Internet protocols, which send to the appropriate systems computer information, such as your
Internet protocol address, the type of operating system, browser and name and version of the software you are using, and
the language code of the device where you installed the software. Microsoft uses this information to make the Internet-based
services available to you.
Web Content Features
Features in the software can retrieve related content from Microsoft and provide it to you. To provide the content, these
features send to Microsoft the type of operating system, name and version of the software you are using, type of browser
and language code of the device where the software was installed. Examples of these features are clip art, templates, online
training, online assistance and Appshelp. These features only operate when you activate them. You may choose to switch
them off or not use them.
Page 96 August 2018HYB-UM-00090-EN-05
Page 97

Microsoft Software License Terms for Windows XP Embedded and Windows Embedded Standard Runtime
Digital Certificates
The software uses digital certificates. These digital certificates confirm the identity of Internet users sending X.509 standard
encrypted information. The software retrieves certificates and updates certificate revocation lists. These security features
operate only when you use the Internet.
Auto Root Update
The Auto Root Update feature updates the list of trusted certificate authorities. You can switch off the Auto Root
Update feature.
Windows Media Player
When you use Windows Media Player, it checks with Microsoft for
• Compatible online music services in your region;
• New versions of the player; and
• Codecs if your device does not have the correct ones for playing content. You can switch off this feature. For more
information, go to: http://microsoft.com/windows/windowsmedia/mp10/priV ACy.aspx.
Windows Media Digital Rights Management
Content owners use Windows Media digital rights management technology (WMDRM) to protect their intellectual property,
including copyrights. This software and third party software use WMDRM to play and copy WMDRM-protected content. If the
software fails to protect the content, content owners may ask Microsoft to revoke the software’s ability to use WMDRM to play
or copy protected content. Revocation does not affect other content. When you download licenses for protected content, you
agree that Microsoft may include a revocation list with the licenses. Content owners may require you to upgrade WMDRM to
access their content. Microsoft software that includes WMDRM will ask for your consent prior to the upgrade. If you decline
an upgrade, you will not be able to access content that requires the upgrade. You may switch off WMDRM features that access
the Internet. When these features are off, you can still play content for which you have a valid license.
Misuse of Internet-based Services
You may not use these services in any way that could harm them or impair anyone else’s use of them. You may not use the
services to try to gain unauthorized access to any service, data, account or network by any means.
Windows Update Agent (also known as Software Update Services)
The software on the device includes Windows Update Agent (WUA) functionality that may enable your device to connect
to and access updates (Windows Updates) from a server installed with the required server component. Without limiting any
other disclaimer in this Microsoft Software License Terms or any EULA accompanying a Windows Update, you acknowledge
and agree that no warranty is provided by MS, Microsoft Corporation or their affiliates with respect to any Windows Update
that you install or attempt to install on your device.
Product Support
Contact Badger Meter for support options. See the support number provided with the device.
Backup Copy
You may make one backup copy of the software. You may use it only to reinstall the software on the device.
Proof of License
If you acquired the software on the device, or on a disc or other media, a genuine Certificate of Authenticity label with a
genuine copy of the software identifies licensed software. To be valid, this label must be affixed to the device, or included on
or in the Badger Meter software packaging. If you receive the label separately, it is not valid. You should keep the label on the
device or packaging to prove that you are licensed to use the software. To identify genuine Microsoft software, see
http://www.howtotell.com.
Transfer to a Third Party
You may transfer the software only with the device, the Certificate of Authenticity label, and these license terms directly to a
third party. Before the transfer, that party must agree that these license terms apply to the transfer and use of the software.
You may not retain any copies of the software including the backup copy.
Page 97 August 2018 HYB-UM-00090-EN-05
Page 98

Microsoft Software License Terms for Windows XP Embedded and Windows Embedded Standard Runtime
Not Fault Tolerant
The software is not fault tolerant. Badger Meter installed the software on the device and is responsible for how it operates on
the device.
Restricted Use
The Microsoft software was designed for systems that do not require fail-safe performance. You may not use the Microsoft
software in any device or system in which a malfunction of the software would result in foreseeable risk of injury or death to
any person. This includes operation of nuclear facilities, aircraft navigation or communication systems and air traffic control.
No Warranties for the Software
The software is provided as is. You bear all risks of using it. Microsoft gives no express warranties, guarantees or conditions.
Any warranties you receive regarding the device or the software do not originate from, and are not binding on, Microsoft
or its affiliates. When allowed by your local laws, Badger Meter and Microsoft exclude implied warranties of merchantability,
fitness for a particular purpose and non-infringement.
Liability Limitations
You can recover from Microsoft and its affiliates only direct damages up to two hundred fifty U.S. Dollars (U.S. $250.00). You
cannot recover any other damages, including consequential, lost profits, special, indirect or incidental damages.
This limitation applies to:
• Anything related to the software, services, content (including code) on third party internet sites, or third party
programs; and
• Claims for breach of contract, breach of warranty, guarantee or condition, strict liability, negligence, or other tort to the
extent permitted by applicable law.
• It also applies even if Microsoft should have been aware of the possibility of the damages. The above limitation
may not apply to you because your country may not allow the exclusion or limitation of incidental, consequential
or other damages.
Export Restrictions
The software is subject to United States export laws and regulations. You must comply with all domestic and international
export laws and regulations that apply to the software. These laws include restrictions on destinations, end users and end use.
For additional information, see www.microsoft.com/exporting.
Page 98 August 2018HYB-UM-00090-EN-05
Page 99

KFactors
KFACTORS
Description
The Kfactor (with regards to flow) is the number of pulses that must be accumulated to equal a particular volume of fluid. You
can think of each pulse as representing a small fraction of the totalizing unit.
An example might be a Kfactor of 1000 (pulses per gallon). This means that if you were counting pulses, when the count total
reached 1000, you would have accumulated one gallon of liquid. Using the same reasoning, each individual pulse represents
an accumulation of 1/1000 of a gallon. This relationship is independent of the time it takes to accumulate the counts.
The frequency aspect of Kfactors is a little more confusing because it also involves the flow rate. The same Kfactor number,
with a time frame added, can be converted into a flow rate. If you accumulated 1000 counts (one gallon) in one minute, then
your flow rate would be one gpm. The output frequency, in Hz, is found simply by dividing the number of counts (1000) by
the number of seconds in a minute (60) to get the output frequency.
1000 ÷ 60 = 16.6666 Hz. If you were looking at the pulse output on a frequency counter, an output frequency of 16.666
Hz would be equal to one gpm. If the frequency counter registered 33.333 Hz (2 × 16.666 Hz), then the flow rate would be
two gpm.
Finally, if the flow rate is two gpm, then the accumulation of 1000 counts would take place in 30 seconds because the flow
rate, and hence the speed that the 1000 counts is accumulated, is twice as great.
Calculating KFactors
Many styles of flow meters are capable of measuring flow in a wide range of pipe sizes. Because the pipe size and volumetric
units the flow meter will be used on vary, it may not possible to provide a discrete Kfactor. In the event that a discrete Kfactor
is not supplied then the velocity range of the flow meter is usually provided along with a maximum frequency output.
The most basic Kfactor calculation requires that an accurate flow rate and the output frequency associated with that flow
rate be known.
Example 1
Known values are:
Frequency = 700 Hz
Flow Rate = 48 gpm
700 Hz × 60 sec = 42,000 pulses per min
K factor
Example 2
Known values are:
Full Scale Flow Rate = 85 gpm
Full Scale Output Frequency = 650 Hz
650 Hz × 60 sec = 39,000 pulses per min
K factor
The calculation is a little more complex if velocity is used because you first must convert the velocity into a volumetric flow
rate to be able to compute a Kfactor.
To convert a velocity into a volumetric flow, the velocity measurement and an accurate measurement of the inside diameter
of the pipe must be known. Also needed is the fact that one US gallon of liquid is equal to 231 cubic inches.
Example 3
Known values are:
Velocity = 4.3 ft/sec
Inside Diameter of Pipe = 3.068 in.
42,000 pulses per min
48 gpm
39,000 pulses per min
85 gpm
875 pulses per gallon= =
458.82 pulses per gallon= =
Page 99 August 2018 HYB-UM-00090-EN-05
Page 100

99.1 gpm
KFactors
Find the area of the pipe cross section.
2
πr
Area =
2
3.068
Area
= π = π x
2
2.35 = 7.39 in
Find the volume in one foot of travel.
2
2
7.39 in2 x 12 in. (1 ft)ft=
88.71in
What portion of a gallon does one foot of travel represent?
231 in
3
= 0.384 gallons
3
88.71 in
So for every foot of fluid travel 0.384 gallons will pass.
What is the flow rate in gpm at 4.3 ft/sec?
0.384 gallons × 4.3 FPS × 60 sec (1 min) = 99.1 gpm
Now that the volumetric flow rate is known, all that is needed is an output frequency to determine the Kfactor.
Known values are:
Frequency = 700 Hz (By measurement)
Flow Rate = 99.1 gpm (By calculation)
700 Hz × 60 sec = 42,000 pulses per gallon
K factor
42,000 pulses per min
423.9 pulses per gallon= =
Page 100 August 2018HYB-UM-00090-EN-05
 Loading...