

Page 1
1
HIGH
HIGH
HIGH
HIGH DEFINITION
DEFINITION
DEFINITION
DEFINITION
MU
MU
MU
MU
L
L
L
L
TIMEDIA
TIMEDIA
TIMEDIA
TIMEDIA PL
PL
PL
PL
A
A
A
A
YER
YER
YER
YER
USE
USE
USE
USE R
R
R
R MAN
MAN
MAN
MAN U
U
U
U AL
AL
AL
AL
Thank you for purchasing this Dynamode media player.
Please take time to read through this manual, and please retain this
manual for reference.
R TD1185V1.0
Page 2

T
T
T
T ABL
ABL
ABL
ABL E
E
E
E
O
O
O
O F
F
F
F C
C
C
C ONTEN
ONTEN
ONTEN
ONTEN TS
TS
TS
TS
◆ P R ODUCT OVERVI E W . . . . . . . . . 3
◆ SPECIFICATIONS . . . . . . . . . 3
◆ S Y STEM C ONNECTION . . . . . . . . . 3
◆ FIRST US A GE . . . . . . . . . 4
◆ MAINTENANCE TIPS . . . . . . . . . 5
◆ BRIEF F EATURES . . . . . . . . . 5
◆ F R ONT
P
ANEL . . . . . . . . . 6
◆ R E AL
P
ANEL . . . . . . . . . 6
◆ REMOTE C ONT R OLLER . . . . . . . . . 7--8
◆ S Y STEM INITIALIZATION . . . . . . . . . 9
◆ MENU LANG U A GE . . . . . . . . . 9
◆ S Y STEM TIME . . . . . . . . . 9
◆ HOME MENU . . . . . . . . . 10
◆ S Y STEM SETUP . . . . . . . . . 11
◆ FILE MAN A GER . . . . . . . . . 11
◆ MUSIC MENU . . . . . . . . . 12
◆ PH
OT
O MENU . . . . . . . . . 12
◆ MOVIES MENU . . . . . . . . . 12
◆ SETUP MENU . . . . . . . . . 12--13
◆ T E X T EN C ODING . . . . . . . . . 14
◆ R/RW AUTO-PLAY . . . . . . . . . 15
◆ SCREEN SAVER . . . . . . . . . 15
◆ MINIKBD L ANG U A GE . . . . . . . . . 15
◆ SCAN STOR A GE . . . . . . . . . 16
◆ AUDIO SETUP . . . . . . . . . 17
◆ VIDEO SETUP . . . . . . . . . 18--20
◆ FILE MANAGER P LAY . . . . . . . . . 21--32
◆ P LAY MUSIC . . . . . . . . . 33--43
◆ CR EATE N E W P LAYLIST . . . . . . . . . 44--46
◆ P LAY PH
OT
O . . . . . . . . . 47--58
◆ P LAY MOVIES . . . . . . . . . 59--71
◆ IMPO RTANT SAFE T Y INSTRUCTIONS . . . . . . . . . 72
2
Page 3

◆
◆
◆
◆ P
P
P
P R
R
R
R ODUCT
ODUCT
ODUCT
ODUCT OVERVI
OVERVI
OVERVI
OVERVI E
E
E
E W
W
W
W
• Thank y ou for pu r chasing the media pla y er.
, T
his user manual
p r ovides step-by-step instructions for installing and using y our
new media pla y e
r.For the latest p r oduct information and news,
visit our website.
• The product is a com p act, high-definition (HD) USB2.0 media
pla y er that attaches t o an entertainment unit th r ough a v ariety
o f audio/ video in t e r faces and suppo r ts play b ack o f major audio,
video, and image file formats.It suppo r ts high-definition for
T V s with lo w er ca p abilities, high-fidelity digital audio is also
supported f r om an optical in t e r face.
•
T
wo usb po r ts a r e a v ailable t o connect USB s t orage devices
• The included r emo t e cont r ol lets y ou quickly browse th r ough y our
media libra r y and configu r e settings.
◆
◆
◆
◆ SPECIFIC
SPECIFIC
SPECIFIC
SPECIFIC
A
A
A
A
TIONS
TIONS
TIONS
TIONS
• H.264 Decode: Main and High P r o file @ Le v el 4.1, Baseline p r o file
@ Le v el 3.1
• TS (.ts, .m2ts, .mts, .tp, .trp)
• V C-1: SP, M
P
, AP@L3
•
A
VI (.avi, .divx)
• MKV (.mkv, .xvid)
• MP4, MOV (.mp4, .mov, .xvid, .m4v)
• D
A T
, M P G, MPEG (.dat, .mpg, .mpeg)
• V OB/ISO/FLV (. v ob)
• RM/RMVB RV8 RV9/720P
• M-JPEG: suppo r t up t o 640x480x30p
• MPEG-1: suppo r t up t o 1920x1080x30p
• MPEG-2: suppo r t up t o HD
• MPEG4 SP/ASP: up t o 1920x1080x30p
• DIVX 3/4/5/6 suppo r t up t o1920 × 1080 × 30P
◆
◆
◆
◆ S
S
S
S Y
Y
Y
Y STEM
STEM
STEM
STEM C
C
C
C ONNECTION
ONNECTION
ONNECTION
ONNECTION
• Please check the below operation befo r e using the pla y er.
• Connect an HDMI cable or component cable, audio cable and po w er
co r d
• Insert a USB flash dri v e or setup a USB ha r d disk file (USB hard-
disk)
• Setup T V in HDMI inpu t mode or component input, and po w er on
media pla y er, then the r e will be a media pla y er opening screen on
the T V sc r een.
3
Page 4

• Connect either a optical or coaxial output with amplifier input.
【 NOTE 】 : Setup digital output under A UDIO menu as HDMI LPCM.
◇ C ONNECTING C OMPUTER
• po w er on the pla y er
• connect a USB cable t o the po r t.
• connect the other end o f cable t o your compu t er.
• S t orage device connection (usb dri v e, mp3, ha r d disk e t c) a f t er
boot, p r ess copy but t on t o copy the con t ents f r om usb t o ha r d dis k .
◇ A UDIO/VIDEO C ONNECTION
• plug the 3-colour-av cable t o the dock p r operly.
• plug the other ends t o the outputs o f T
V,
a f t er connection y ou may
play b ack files on T V display.
◇ HDMI OUTPUT(AV OUT)
• plug the HDMI cable t o the dock p r operly.
• plug the other ends t o the outputs o f TV.
◇ STEREO S Y STEM C ONNECTION
• connect R CA cable bundles t o S/PDIF po r ts, if use optical cable,
please Connect t o S/PDIF po r ts.
• plug cable bundle t o s t e r eo sys t em po r ts.
◇ POWER C ONNECTION
• connect A C adap t or t o the DC in t e r face o f pla y er.
• connect pla y er t o the A C po w er.
◇ INTERNET C ONNECTION
• Please p r e p a r e an in t ernet cable as below:
• connect the in t ernet plug t o R J45 dock o f pla y er.
• connect the other end t o r ou t er or in t ernet devices.
◆
◆
◆
◆ FIRST
FIRST
FIRST
FIRST US
US
US
US A
A
A
A GE
GE
GE
GE
◇ REMOTE C ONT R OL
• Fi r st use o f r emo t e cont r ol - please install the b at t eries!
• P o w er ON pla y er will en t er po w er on status when supplied with po w er.
The f r ont p anel will change to blue
when ON
4
Page 5

• P o w er OFF in play b ack or other in t e r face, a user can p r ess the
po w er but t on f r om the pla y er or f r om r emo t e t o po w er o f
f.
D
isplay
will boot t o po w er o ff mode.. A f t er po w er o ff, f r ont p anel b acklit
will turn
o ff and po w er indica t or will turn r ed. Disconnect the po w er
supply and indica t or will turn o ff.
◇ L ANG U A GE
• S ys t em language can be set t o English or to other languages. Select
language f r om setup in t e r face.
◆
◆
◆
◆ MAINTENANCE
MAINTENANCE
MAINTENANCE
MAINTENANCE TIPS
TIPS
TIPS
TIPS
• The p r oduct is o f complica t ed and of sophistica t ed structu r e,
so only se r vice-trained p r o fessionals a r e allo w ed t o open the
p r oduct t o p r e v ent damage t o the p r oduct.
• Do not dismantle components . The warranty mark will be
in v alida t ed au t omatically if y ou dismantle and r e p air the adap t er
and its po w er co r d.
• Do not open the media player.
Please ask se r vice-trained p r o fessionals t o conduct main t enance if
necessa ry.
•
T
o r eplace devices or accessories, please select the original ones
designa t ed by the manufactu r er.
◆
◆
◆
◆ BRIEF
BRIEF
BRIEF
BRIEF F
F
F
F E
E
E
E
A
A
A
A
TURES
TURES
TURES
TURES
• Video decoding: support MKV, TS, M2TS, TP, TRP, VC1, AVI, MPG,
DAT, VOB, ISO, MOV, ASX, DIVX, XDIV, RM / RMVB, format files, up
to 1920X1080P resolution.
• Audio decoding: supported DTS MASTER AUDIO, BOLBY TURE HD, AC3,
AAC, APE, FLAC and ALAC. MP3, WMA, WAV, Ogg vorbis,
• Decodes BMP, PNG, GIF, TIFF and other popular picture formats.
• Subtitle support *.SRT, *.SSA,*.AAS, *.SUB formats files.
• File system: support read, write, copy, delete and move under
FAT16/32, NTFS, (Linux)EXT3.
• Friendly UI and easy operation.
• Variable Aspect Ratio(4:3,16:9) with pan vector or Letter Box option.
• Support forward, backward and pause mode.
• Software upgraded by USB Host.
5
Page 6
◆
◆
◆
◆ F
F
F
F R
R
R
R ONT
ONT
ONT
ONT
P
P
P
P
ANEL
ANEL
ANEL
ANEL
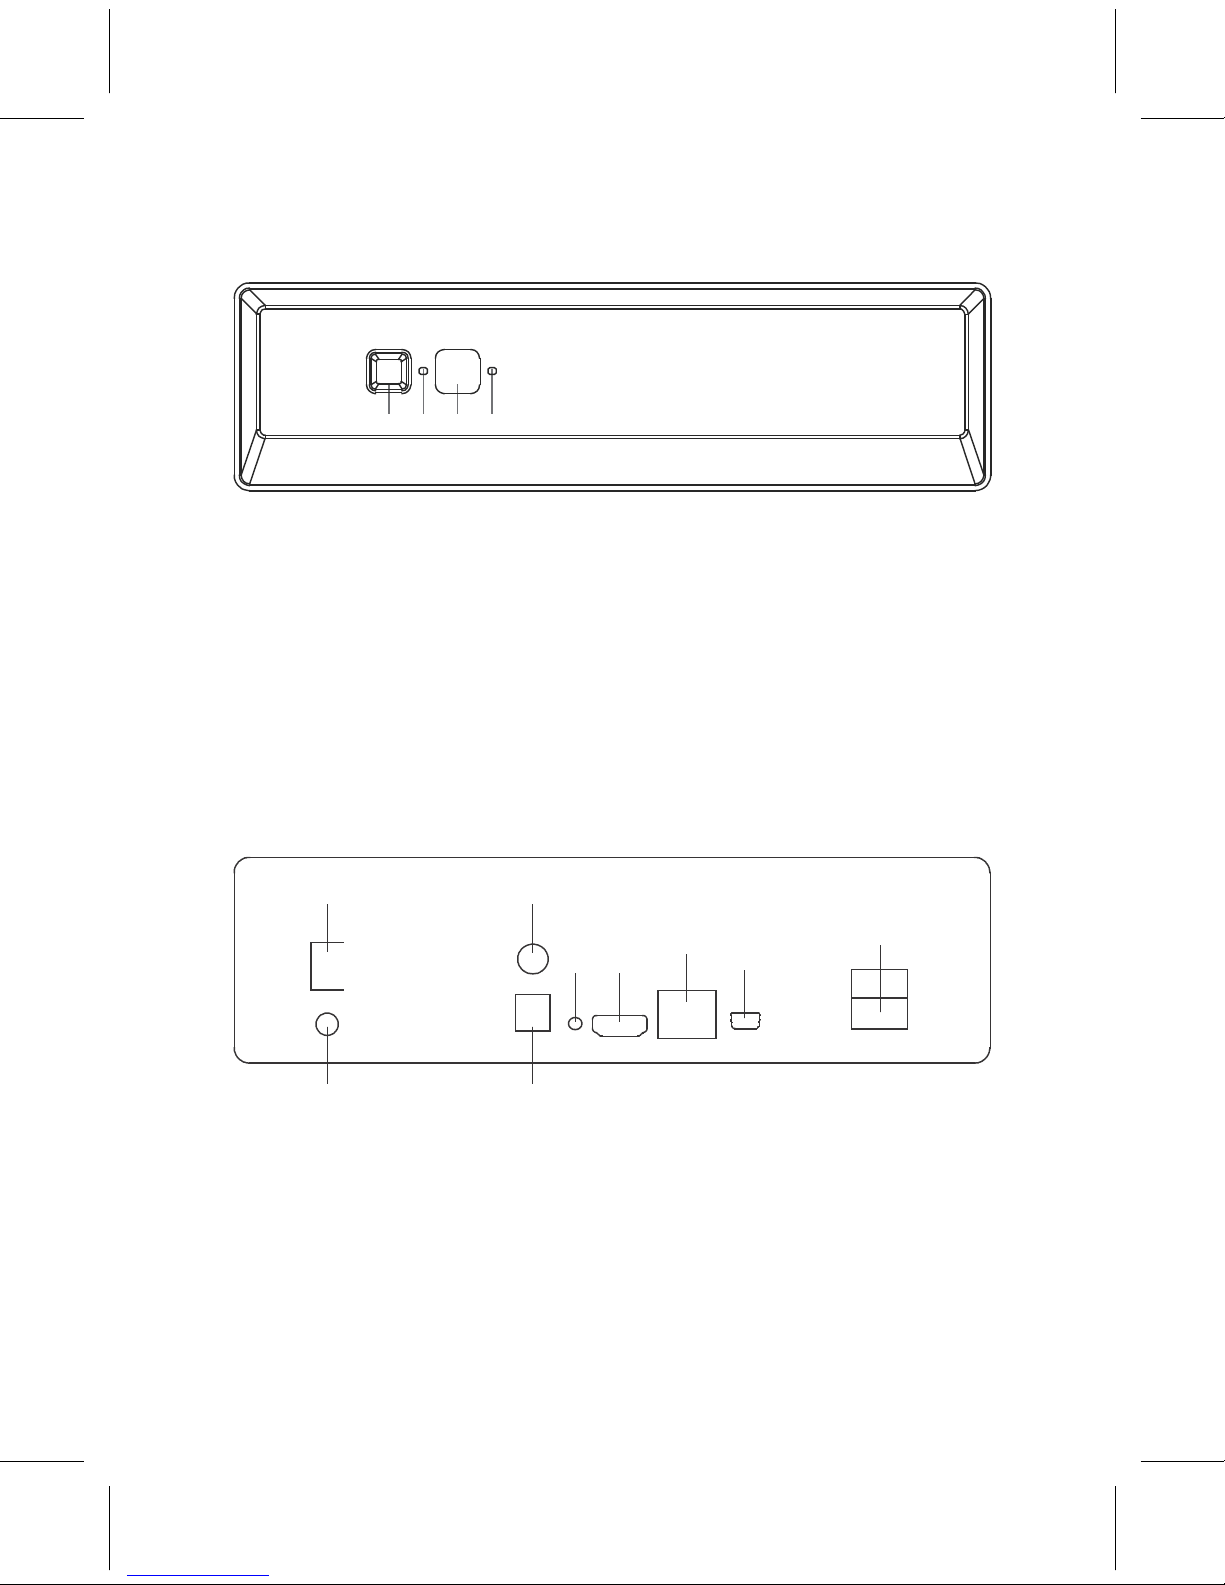
1 2 3 4
1. P o w er
k ey
1. P o w er LED
3. R ecep t or IR
2. R eset k ey
◆
◆
◆
◆ R
R
R
R E
E
E
E AL
AL
AL
AL
P
P
P
P
ANEL
ANEL
ANEL
ANEL
1 3 4 5 10
11 12
13 15
14
2 6 7 8 9
1. P o w er swi t ch 9. Optical audio output
2. DC IN 12V 2.5A 10. C o axial audio output
3. Component video(Y)output 11. R eset k ey
4. Compo nent vid e o(Pb / Cb)o u tp ut 12. HDMI output
5. Component video(Pr/Cr) output 13. Ethernet in t e r face
6. CVBS video output 14. USB t o pc
7. Right audio output 15. USB 2.0 host
8. Le f t audio output
6
Page 7
◆
◆
◆
◆ INT
INT
INT
INT R
R
R
R ODUCTION
ODUCTION
ODUCTION
ODUCTION FOR
FOR
FOR
FOR REM
REM
REM
REM O
O
O
O TE
TE
TE
TE C
C
C
C ONT
ONT
ONT
ONT R
R
R
R OLLER
OLLER
OLLER
OLLER
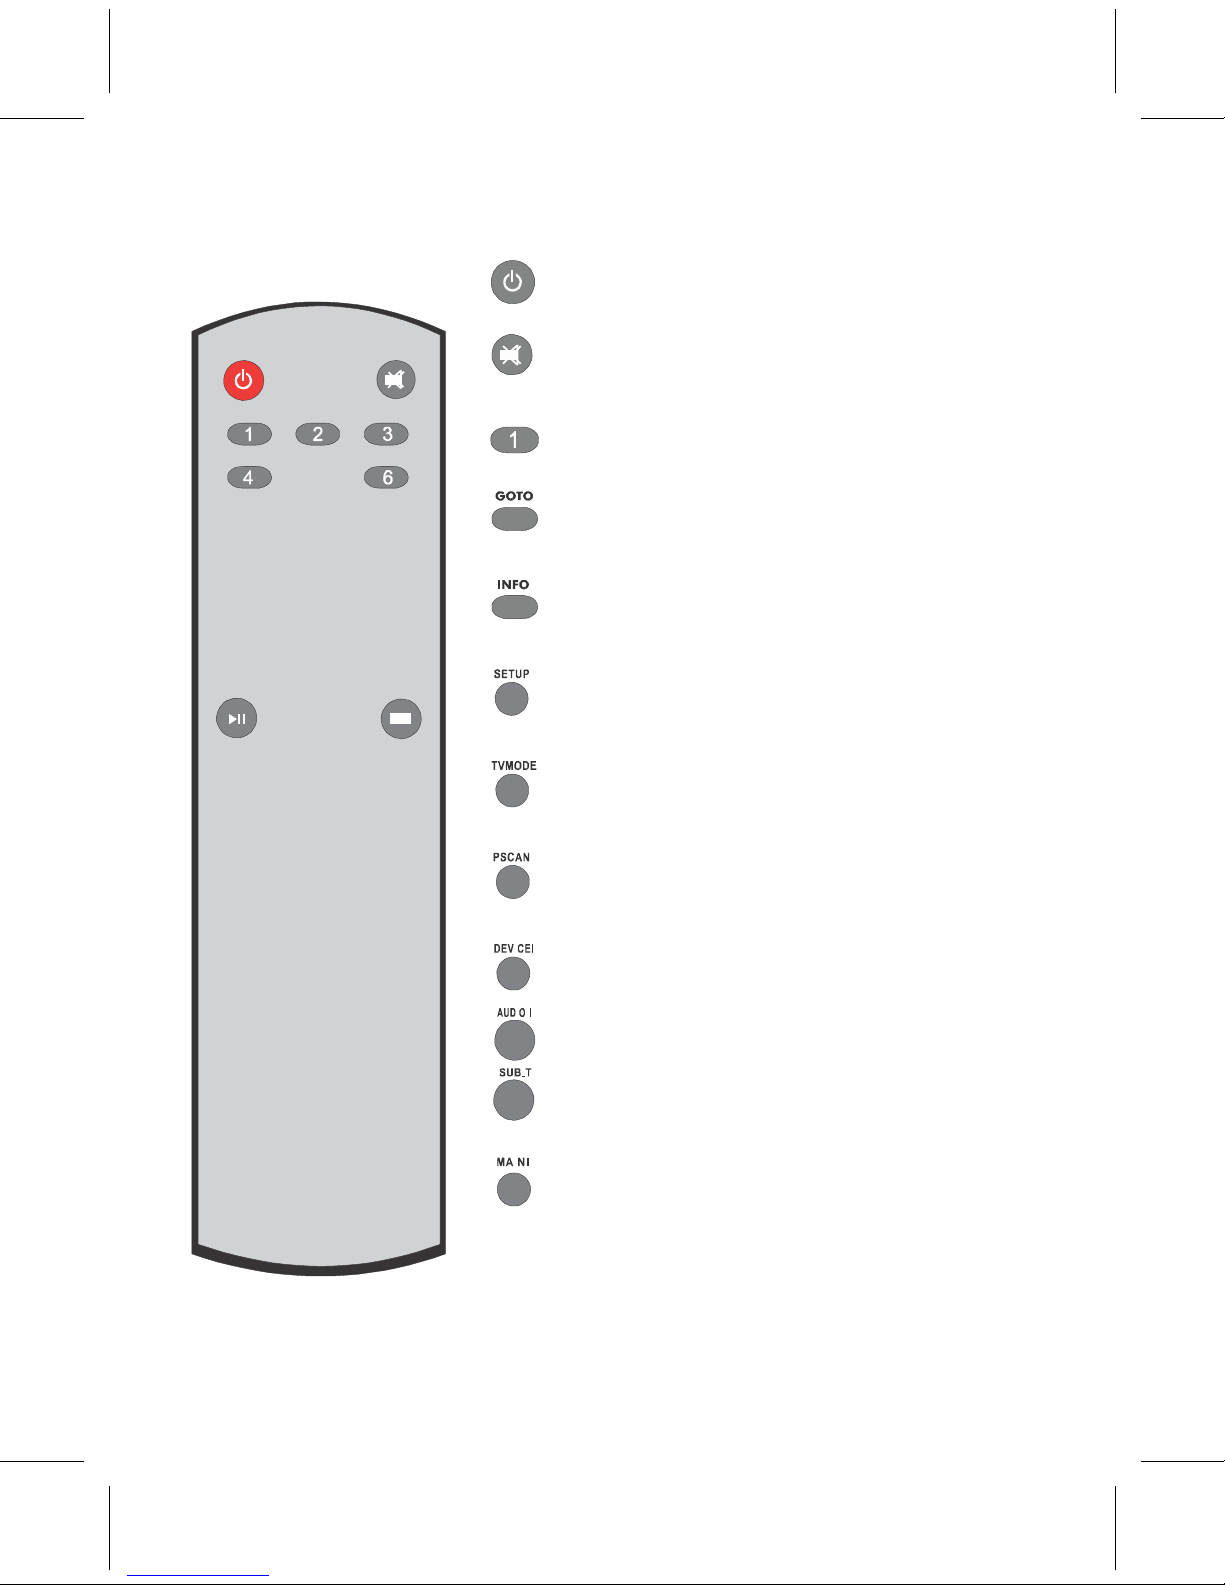
POWER:
POWER:
POWER:
POWER:
Turn on/off the media player
MUTE:
MUTE:
MUTE:
MUTE:
Turn off the volume, press again to
turn on the volume again
Number
Number
Number
Number KEYS:
KEYS:
KEYS:
KEYS:
Select the number of input
GOTO:
GOTO:
GOTO:
GOTO:
Search for an arbitrary point in time
to play
INFO:
INFO:
INFO:
INFO:
Displays the current state of play and
system mode
SETUP:
SETUP:
SETUP:
SETUP:
During playback, into the system
setup options
TVMODE:
TVMODE:
TVMODE:
TVMODE:
Loop switch output sc r een r esolution
720p/1080p
PSCAN:
PSCAN:
PSCAN:
PSCAN:
Loop switch output the sc r een ratio
4:3/16:9
D
D
D
D E
E
E
E VICE:
VICE:
VICE:
VICE:
S t op the connec t ed peripherals
AUDIO:
AUDIO:
AUDIO:
AUDIO:
Loop switch audio output format
SUB-T:
SUB-T:
SUB-T:
SUB-T:
Switch the subtitles supported by the
media files
MAIN:
MAIN:
MAIN:
MAIN:
Enter the guide menu, you can
choose system setup directly
7
Page 8

◆
◆
◆
◆ INT
INT
INT
INT R
R
R
R ODUCTION
ODUCTION
ODUCTION
ODUCTION FOR
FOR
FOR
FOR REM
REM
REM
REM O
O
O
O TE
TE
TE
TE C
C
C
C ONT
ONT
ONT
ONT R
R
R
R OLLER
OLLER
OLLER
OLLER
E
E
E
E XI
XI
XI
XI T
T
T
T :
:
:
:
Ente r th e guid e menu , yo u ca n choose
system setup
directly
OPTION:
OPTION:
OPTION:
OPTION:
Press to pop up option menu when
playing
files
Press to pop up option menu in
file
browser
VIEW:
VIEW:
VIEW:
VIEW:
Loop switch the current file
browse
mode
P-LIST:
P-LIST:
P-LIST:
P-LIST:
Create a file Playlist, when browse
file
listing mode
EDIT:
EDIT:
EDIT:
EDIT:
copy, move,Rename, your files
ZOOM:
ZOOM:
ZOOM:
ZOOM:
Zoom in/out mode playback
SLOW:
SLOW:
SLOW:
SLOW:
Slow motion button, press
Play
button to return to normal
playback
REPEAT:
REPEAT:
REPEAT:
REPEAT:
Repeat the current playback
A-B:
A-B:
A-B:
A-B:
Repeat files from point A to point
B
TITLE:
TITLE:
TITLE:
TITLE:
When playing a file has
navigation
menu, p r ess t o r eturn t o the
title
menu
MENU:
MENU:
MENU:
MENU:
When playing a file has
Page 9

navigation menu, p r ess t o r eturn
t o the main menu
8
Page 10
◆
◆
◆
◆ S
S
S
S Y
Y
Y
Y STEM
STEM
STEM
STEM INITIALIZ
INITIALIZ
INITIALIZ
INITIALIZ
A
A
A
A
TION
TION
TION
TION
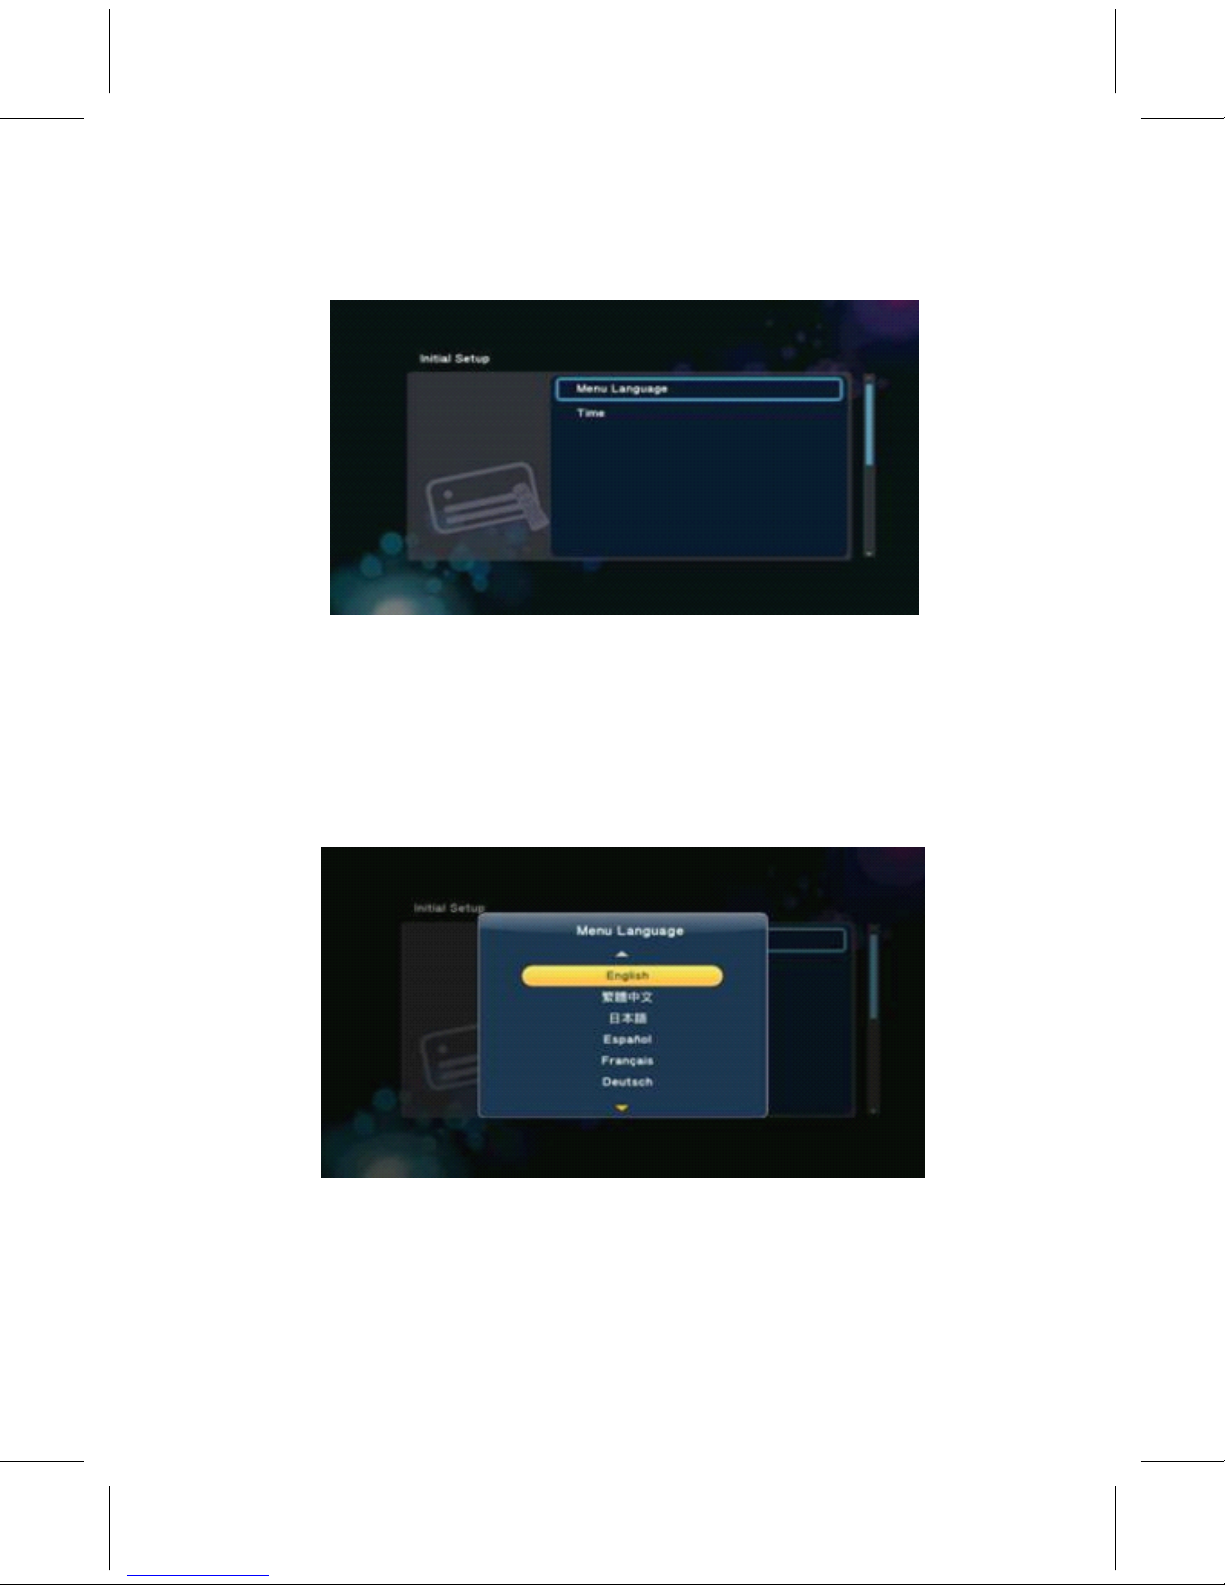
• A t fi r st sta r t up,“ Initial Setup” menu will come up for
assigning following sys t em settings.
◆
◆
◆
◆ MENU
MENU
MENU
MENU LANG
LANG
LANG
LANG U
U
U
U A
A
A
A GE
GE
GE
GE
G 2.0-1
• Initial Setup - > Menu Language
• Select f r om the list o f languages
• Using ‘ Up 'and ‘ Down' buttons t o select i t em, press ‘ OK' to
confirm.
◆
◆
◆
◆ S
S
S
S Y
Y
Y
Y STEM
STEM
STEM
STEM TIME
TIME
TIME
TIME
• Initial Setup - >
Time
G 2.1-1
• The second is t o set the time, shown in Figu r e G 2.2-1
• Press ‘ OK' button t o en t er time adjustment sc r een, shown in Figu r e
G 2.2-2, use the ar r ow key ‘ Left' and ‘ Right' buttons t o select
i t ems,
9
Page 11

and the ar r ow key ‘ Up' and ‘ Down' buttons t o adjust the v alue
o f y ear, month, day, hour, minu t e, second.
G 2.2-2
• Press ‘ OK' button t o en t er the confirmation sc r een G 2.2-3,
select
‘ Yes' or ‘ No 'press ‘ OK' button t o confirm.
G 2.2-3
【 NOTE 】 : Once the ‘ Time' settings are applied, and Home Menu
launches. Initial Setup menu will not appear when next re-start the
system.
◆
◆
◆
◆ Home
Home
Home
Home Menu
Menu
Menu
Menu
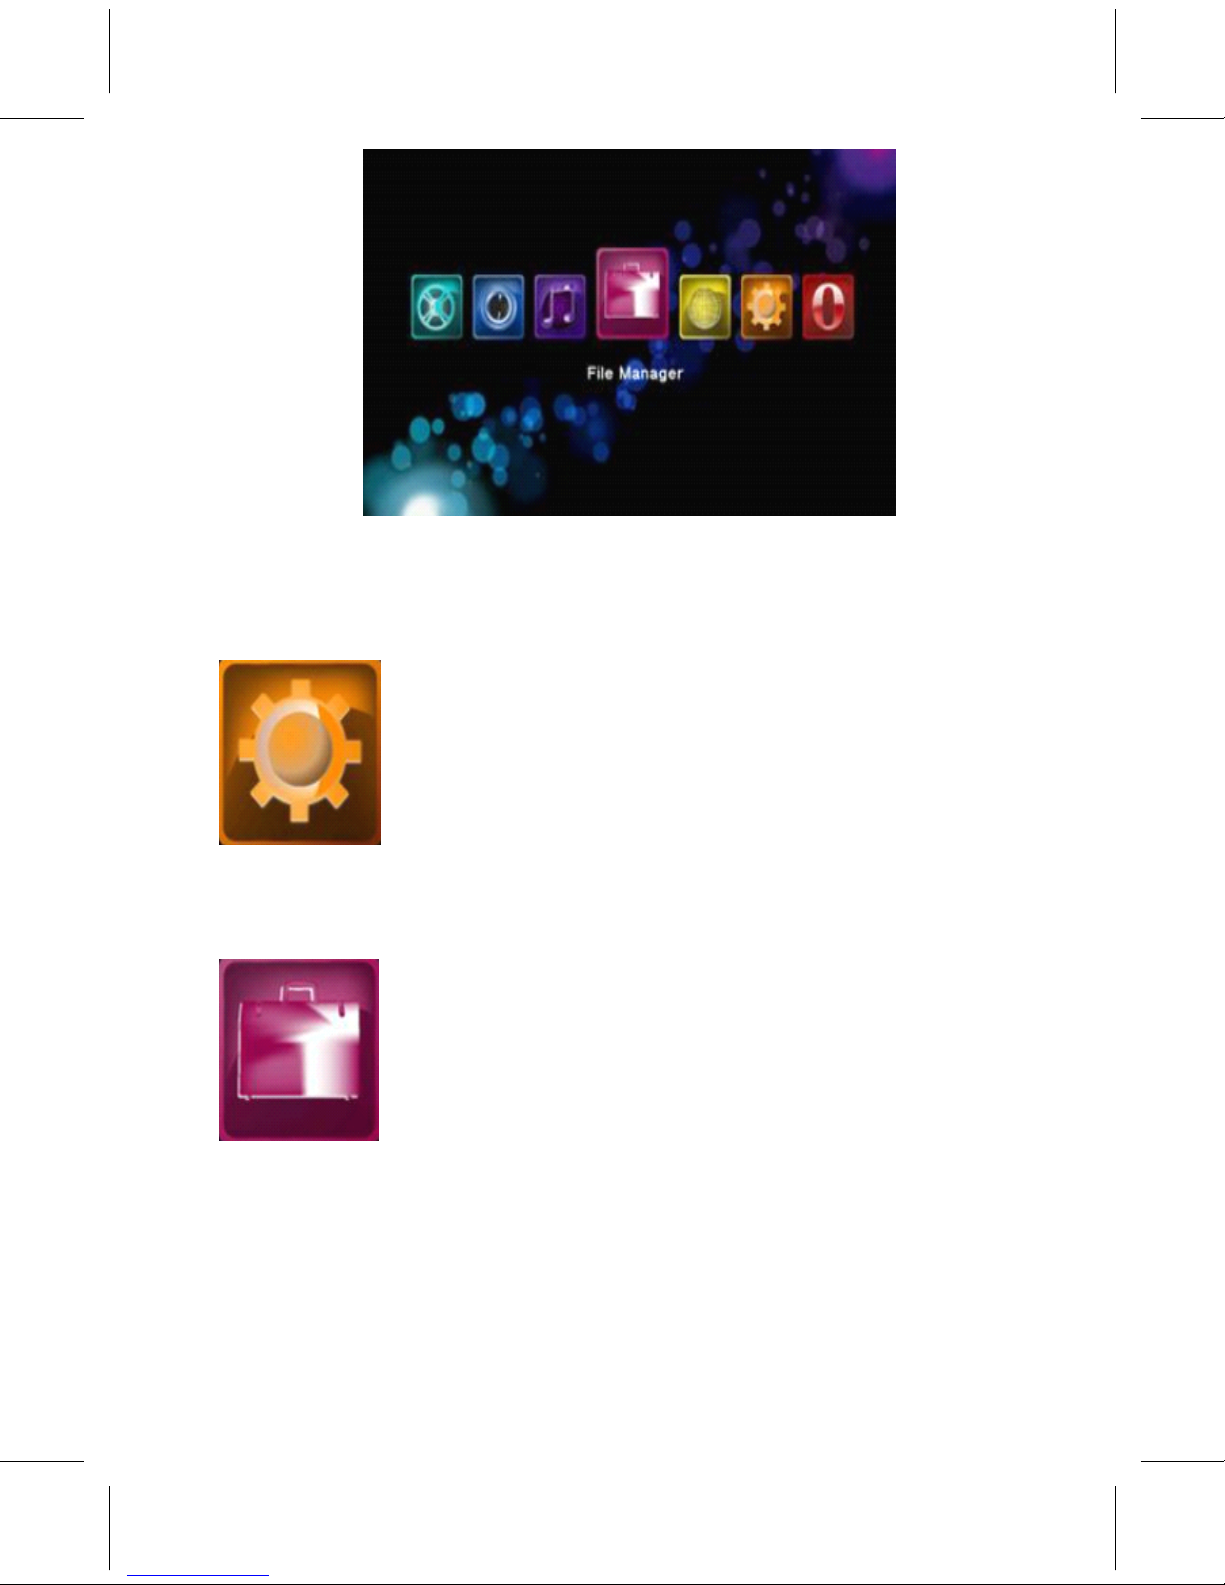
• Every time you start the system, you will see the Home Menu
except the first time to configure the initial setup, shown in Figure
G 3.0-1.
• A t the Home Menu, use the ar r ow key ‘ Left' and ‘ Right' buttons
t o select each i t em, t o en t er the i t em please press ‘ OK' button.
Each i t em described as below .
10
Page 12
◆
◆
◆
◆ S
S
S
S Y
Y
Y
Y STEM
STEM
STEM
STEM S
S
S
S E
E
E
E TUP
TUP
TUP
TUP
G 3.0-1
• Set the sys t em functions, such as S ys t em, Audio, video, Misc... e t c.
◆
◆
◆
◆ FILE
FILE
FILE
FILE MAN
MAN
MAN
MAN A
A
A
A GER
GER
GER
GER
•
If external storage devices can be plugged in the system, such as
USB flash drive, USB HDD, it will begin to scan all files of this
device and will identify the media types to place in different
folder. The File Manager menu is a folder which allows you browse
and play music, photo and movie files stored on a HDD or an
external USB device.
11
Page 13
◆
◆
◆
◆ MUSIC
MUSIC
MUSIC
MUSIC MENU
MENU
MENU
MENU
•
The Music menu is the folder which to place the music files.
◆
◆
◆
◆ PH
PH
PH
PH
OT
OT
OT
OT
O
O
O
O MENU
MENU
MENU
MENU
•
The Photo menu is the folder which to place the photos.
◆
◆
◆
◆ MOVIES
MOVIES
MOVIES
MOVIES MENU
MENU
MENU
MENU
• The Movies menu is the folder which to place the movies files.
• There are all items of the Home Menu. Later chapters we will
describe
in more detail.
◆
◆
◆
◆ S
S
S
S E
E
E
E TUP
TUP
TUP
TUP MENU
MENU
MENU
MENU
• It is recommended that the Setup menu be applied to set the
user environment when first using the system.
• In Home Menu, use the ‘ Left' and ‘ Right' buttons t o select
Setup i t em and press ‘ OK' button t o en t er the menu.
12
Page 14
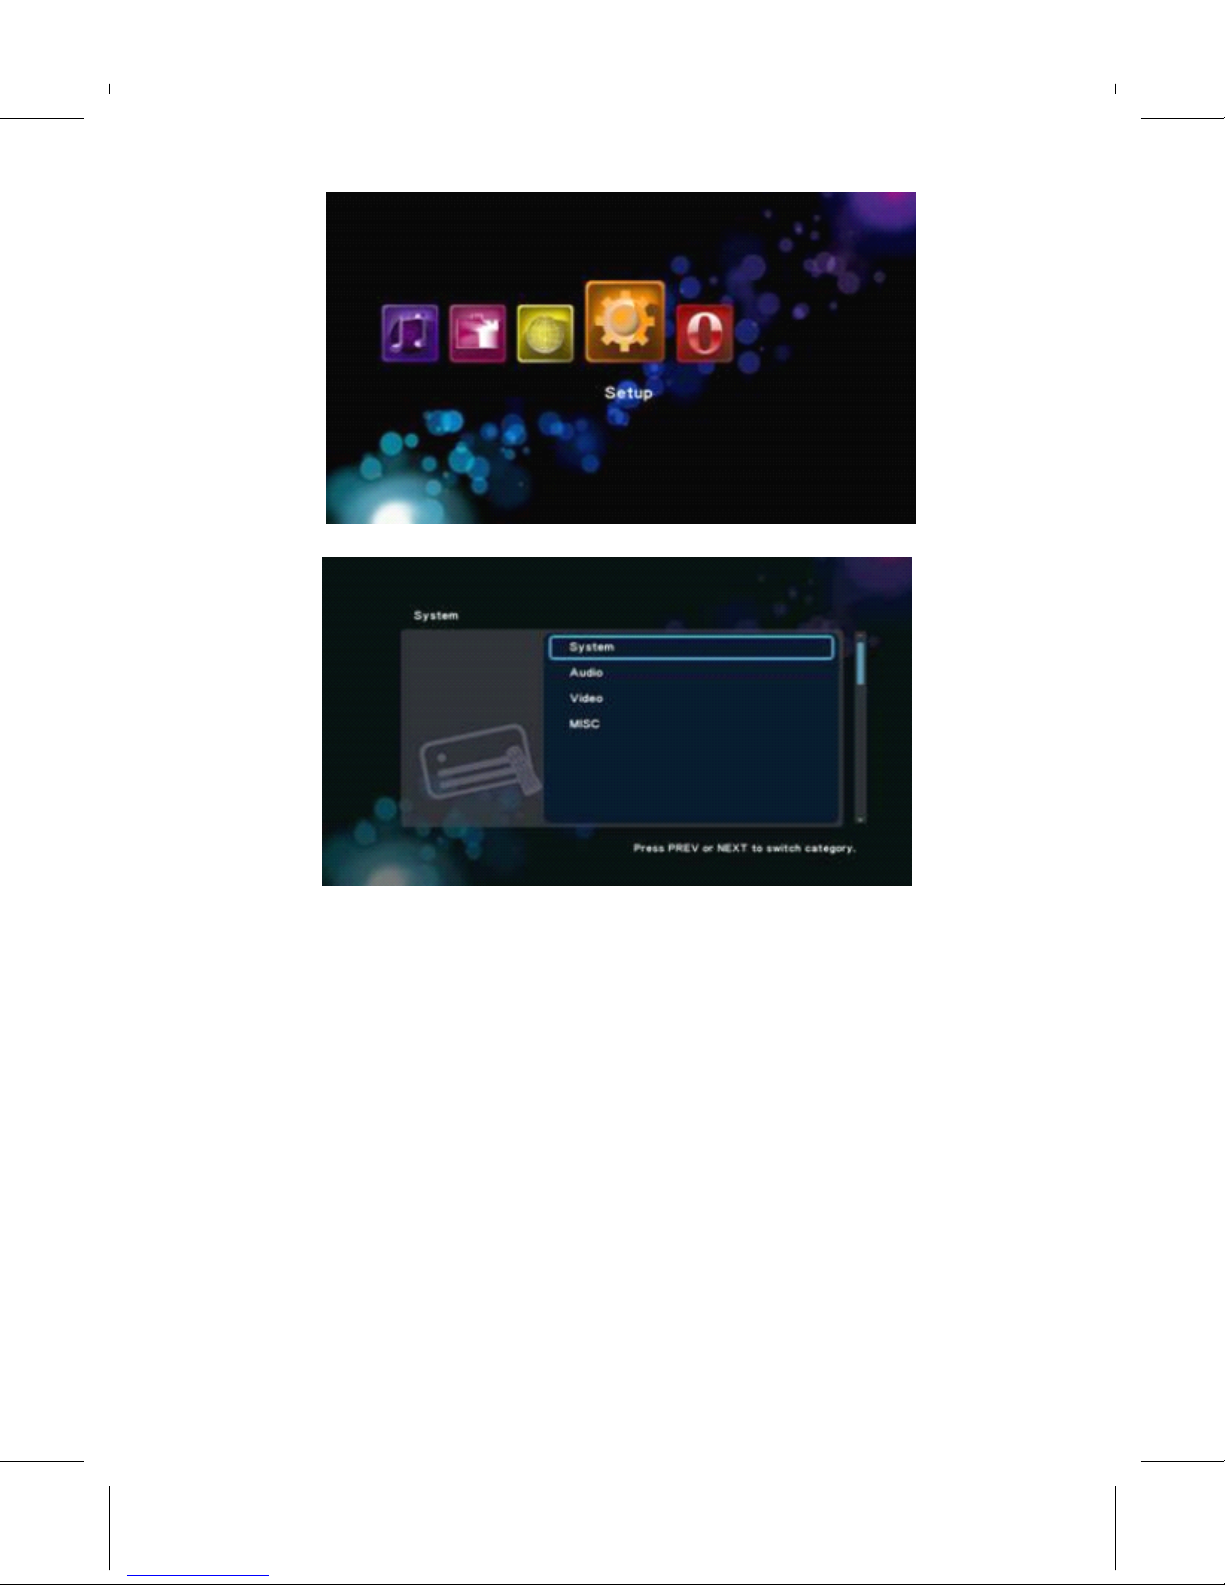
G 4.0-1
G 4.0-2
•
Setup Menu according to the setting type is divided into five.
•
System - Associated with the entire system environment settings, such
as menu language, time, screen saver.
•
Audio - Setup HDMI and SPDIF output mode .
•
Video - Output mode can be set as Aspect ratio, TV system, Video
zoom etc.
•
MISC - Other miscellaneous settings, such as version information, USB
upgrade etc.
•
Described as follows …
•
System ->
•
Setup -> System
•
Menu Language
•
Setup -> System -> Menu Language
13
Page 15
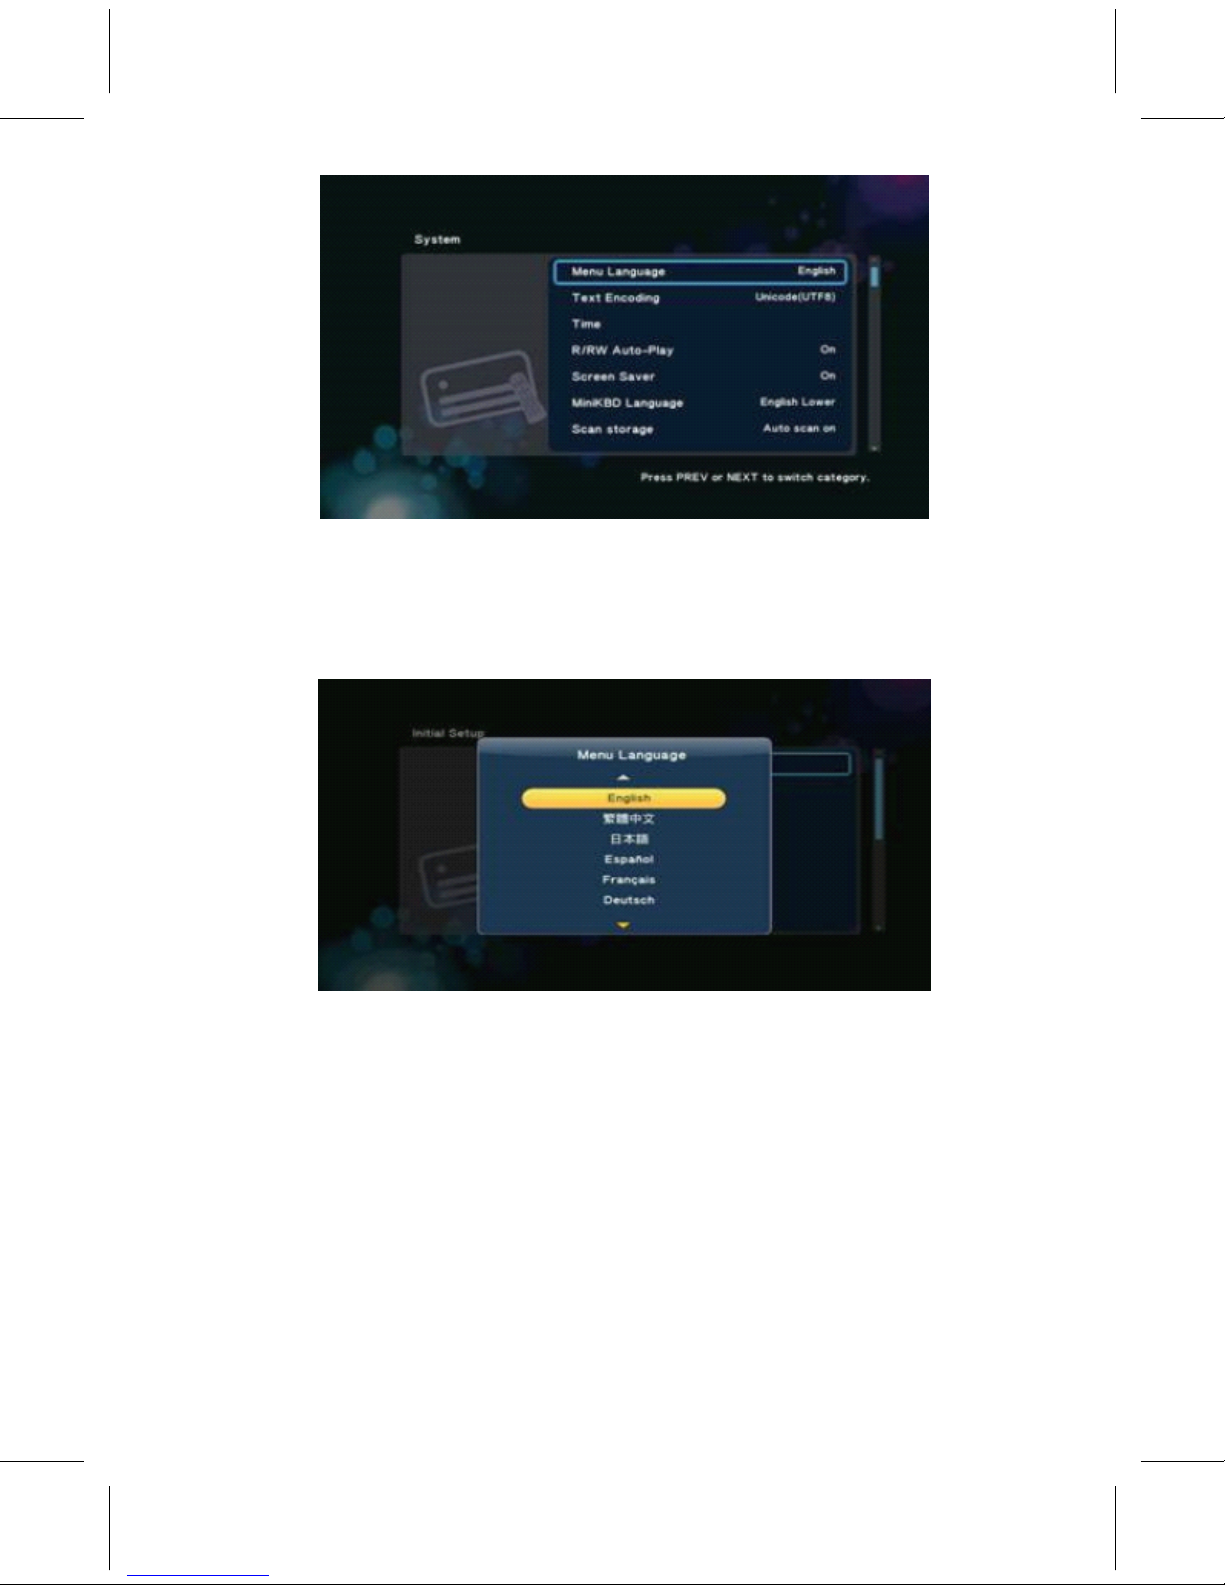
G 4.1.1-1
• In sc r een G 4.1.1-1, press ‘ OK' button t o en t er the multi-language
list and use the ar r ow key ‘ Up' and ‘ Down' buttons t o select
the
language, Press ‘ OK' button t o confirm.
◆
◆
◆
◆ T
T
T
T EX
EX
EX
EX T
T
T
T EN
EN
EN
EN C
C
C
C ODING
ODING
ODING
ODING
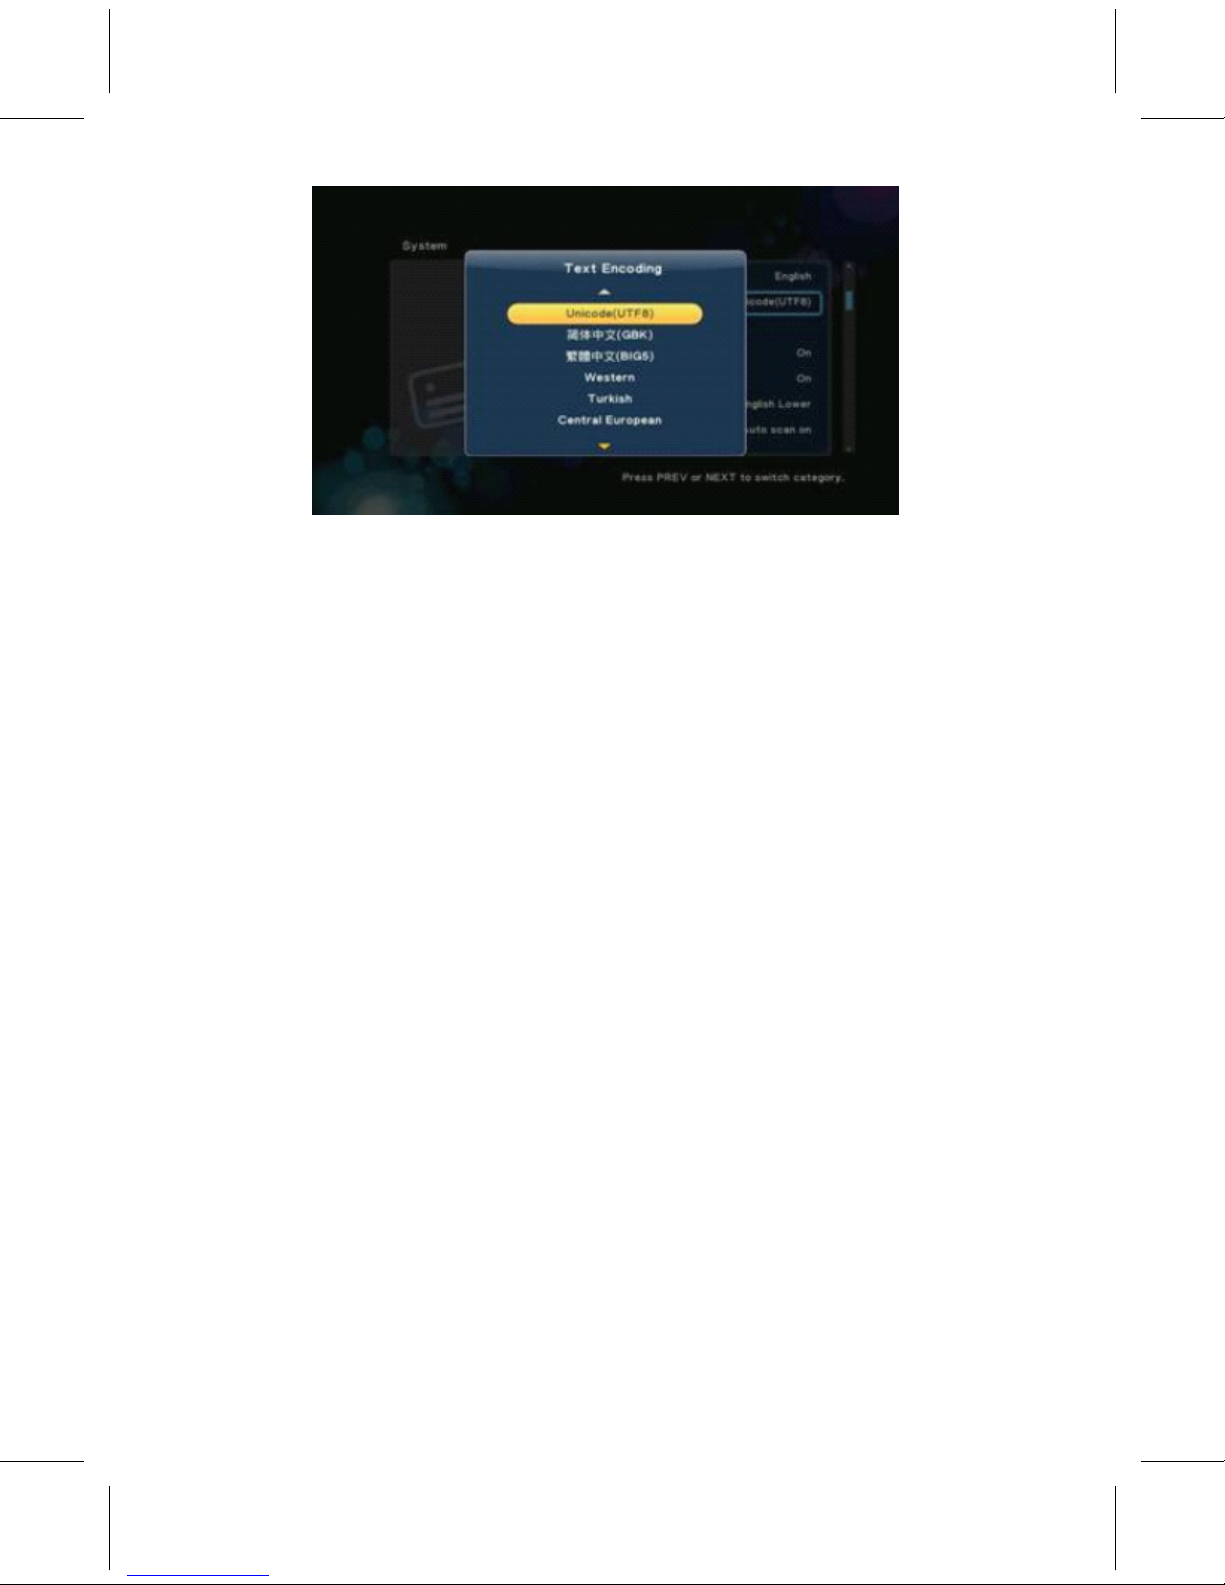
G 4.1.1-2
• Setup -> S ys t em ->
T
ext Encoding
• y ou can choice the diffe r ent encoding, Unicode (UTF8),
Simplified Chinese (GBK),
T
raditional Chinese (BIG5),
T
urkish, e t c.,
press ‘ Up' and ‘ Down' buttons t o select i t em, press ‘ OK' button
t o confirm.
14
Page 16
◆
◆
◆
◆ R/RW
R/RW
R/RW
R/RW AUTO-PLAY
AUTO-PLAY
AUTO-PLAY
AUTO-PLAY
G 4.1.2-2
• Setup -> S ys t em -> R/RW Au t o-Play
• If y our sys t em has plugged in DVD-R/RW l o ader, enable this option
will
au t o play. Press ‘ OK' button t o en t er the confirmation sc r een,
select
‘ Yes' or ‘ No' press ‘ OK' button t o confirm.
◆
◆
◆
◆ SCREEN
SCREEN
SCREEN
SCREEN S
S
S
S
A
A
A
A
VER
VER
VER
VER
• Setup -> S ys t em -> Sc r een Sa v er
• This setup is t o enable or disable the sc r een sa v er function
• Using ‘ Up' and ‘ Down' buttons t o select ‘ On' or ‘ Off ’ ,
Press ‘ OK' button t o confirm.
◆ MINIKBD
MINIKBD
MINIKBD
MINIKBD L
L
L
L ANG
ANG
ANG
ANG U
U
U
U A
A
A
A GE
GE
GE
GE
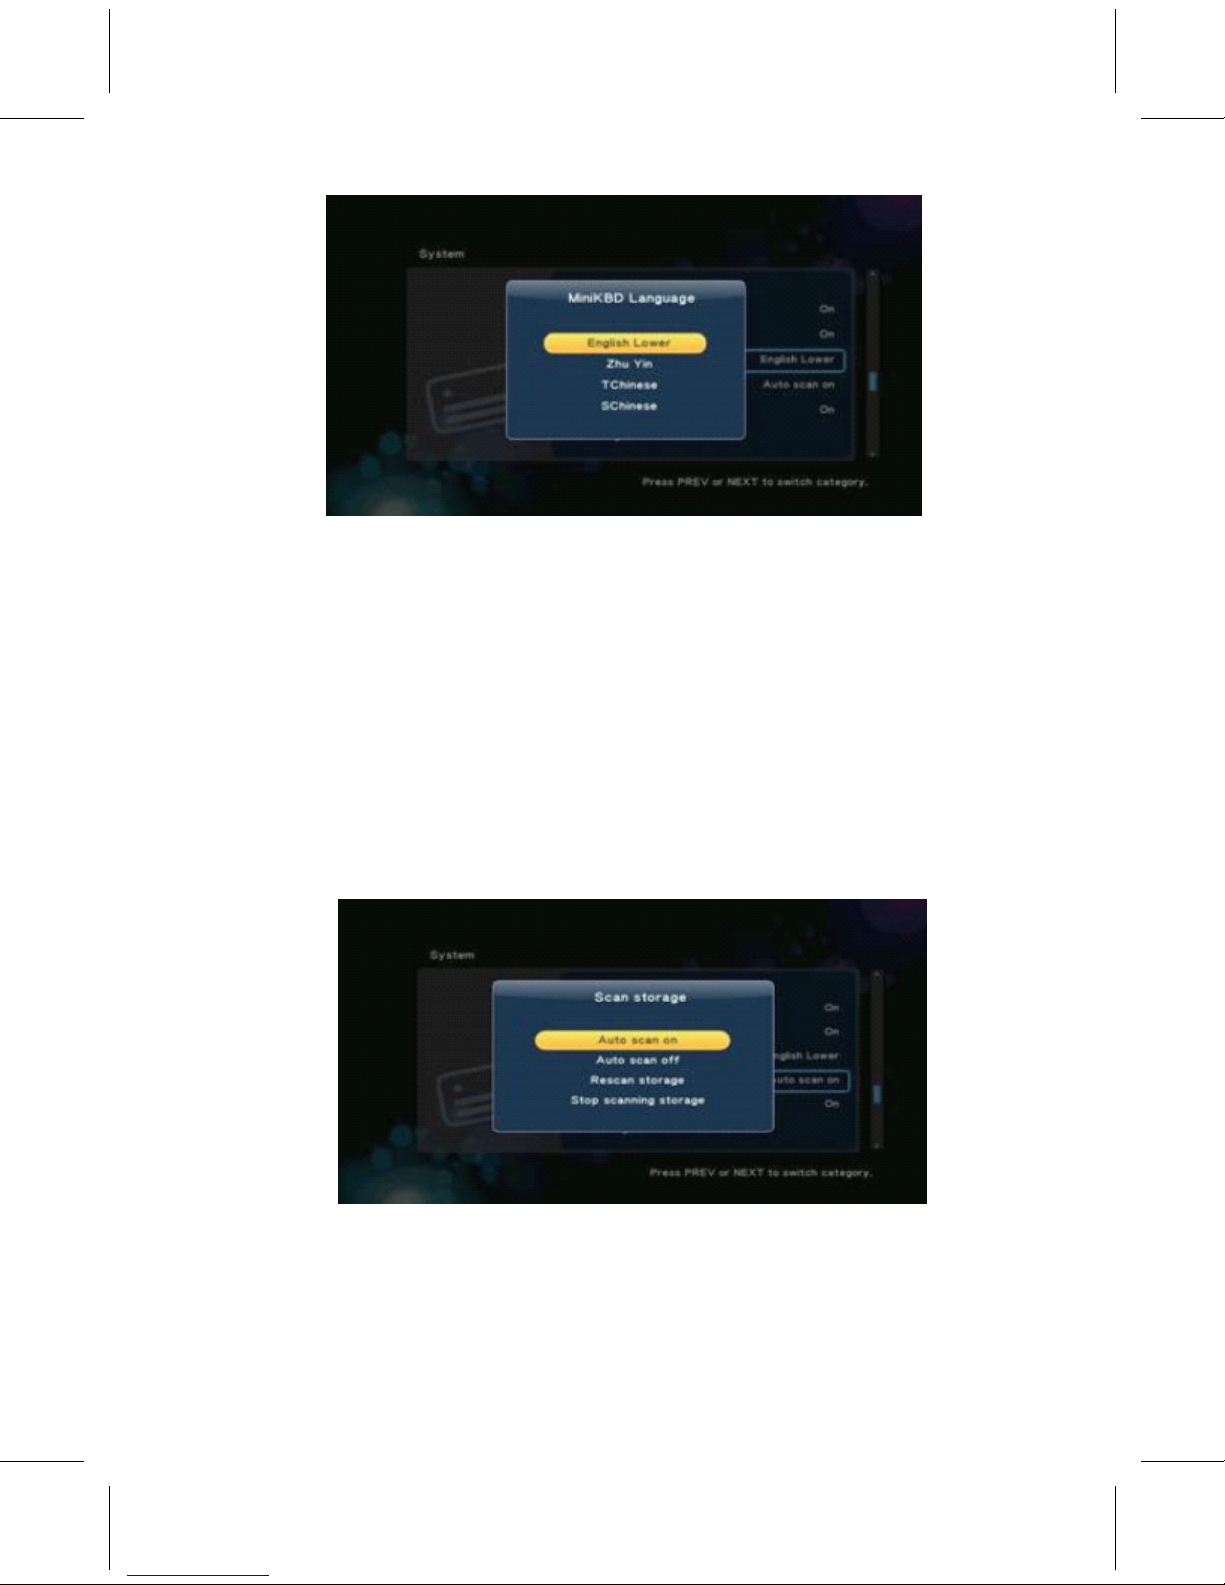
• Setup -> S ys t em -> MiniKBD Language
•
T
o select language o f on sc r een Mini K eyb o a r d, including
• English Lo w er
• Zhu Yin - phonetic input
•
T
Chinese -
T
raditional Chinese
• SChinese - Simplified Chinese
• Please use ‘ Up' and ‘ Down' buttons t o select, press ‘ OK' button
t o confirm.
15
Page 17
◆
◆
◆
◆ SCAN
SCAN
SCAN
SCAN S
S
S
S T
T
T
T OR
OR
OR
OR A
A
A
A GE
GE
GE
GE
G 4.1.8-1
• Setup -> S ys t em -> Scan s t orage
• This i t em is t o set the scan mode o f the s t orage de t ection
• Au t o scan on - sys t em will scan the s t orage au t omatically
• Au t o scan o ff
• R escan s t orage
• S t op scanning s t orage – Do not scan the s t orage
• Please use ‘ Up' and ‘ Down' buttons t o select, press ‘ OK' button
t o confirm.
G 4.1.9-1
◆
◆
◆
◆ RESUME
RESUME
RESUME
RESUME P
P
P
P L
L
L
L
A
A
A
A
Y
Y
Y
Y
• The device suppo r t video r esume play function. This i t em is t o
enable or disable the r esume play function
• F ac t o r y Default
• This i t em is t o r esume the default v alue o f the sys t em setup.
16
Page 18
◆
◆
◆
◆ AUDIO
AUDIO
AUDIO
AUDIO S
S
S
S E
E
E
E TUP
TUP
TUP
TUP
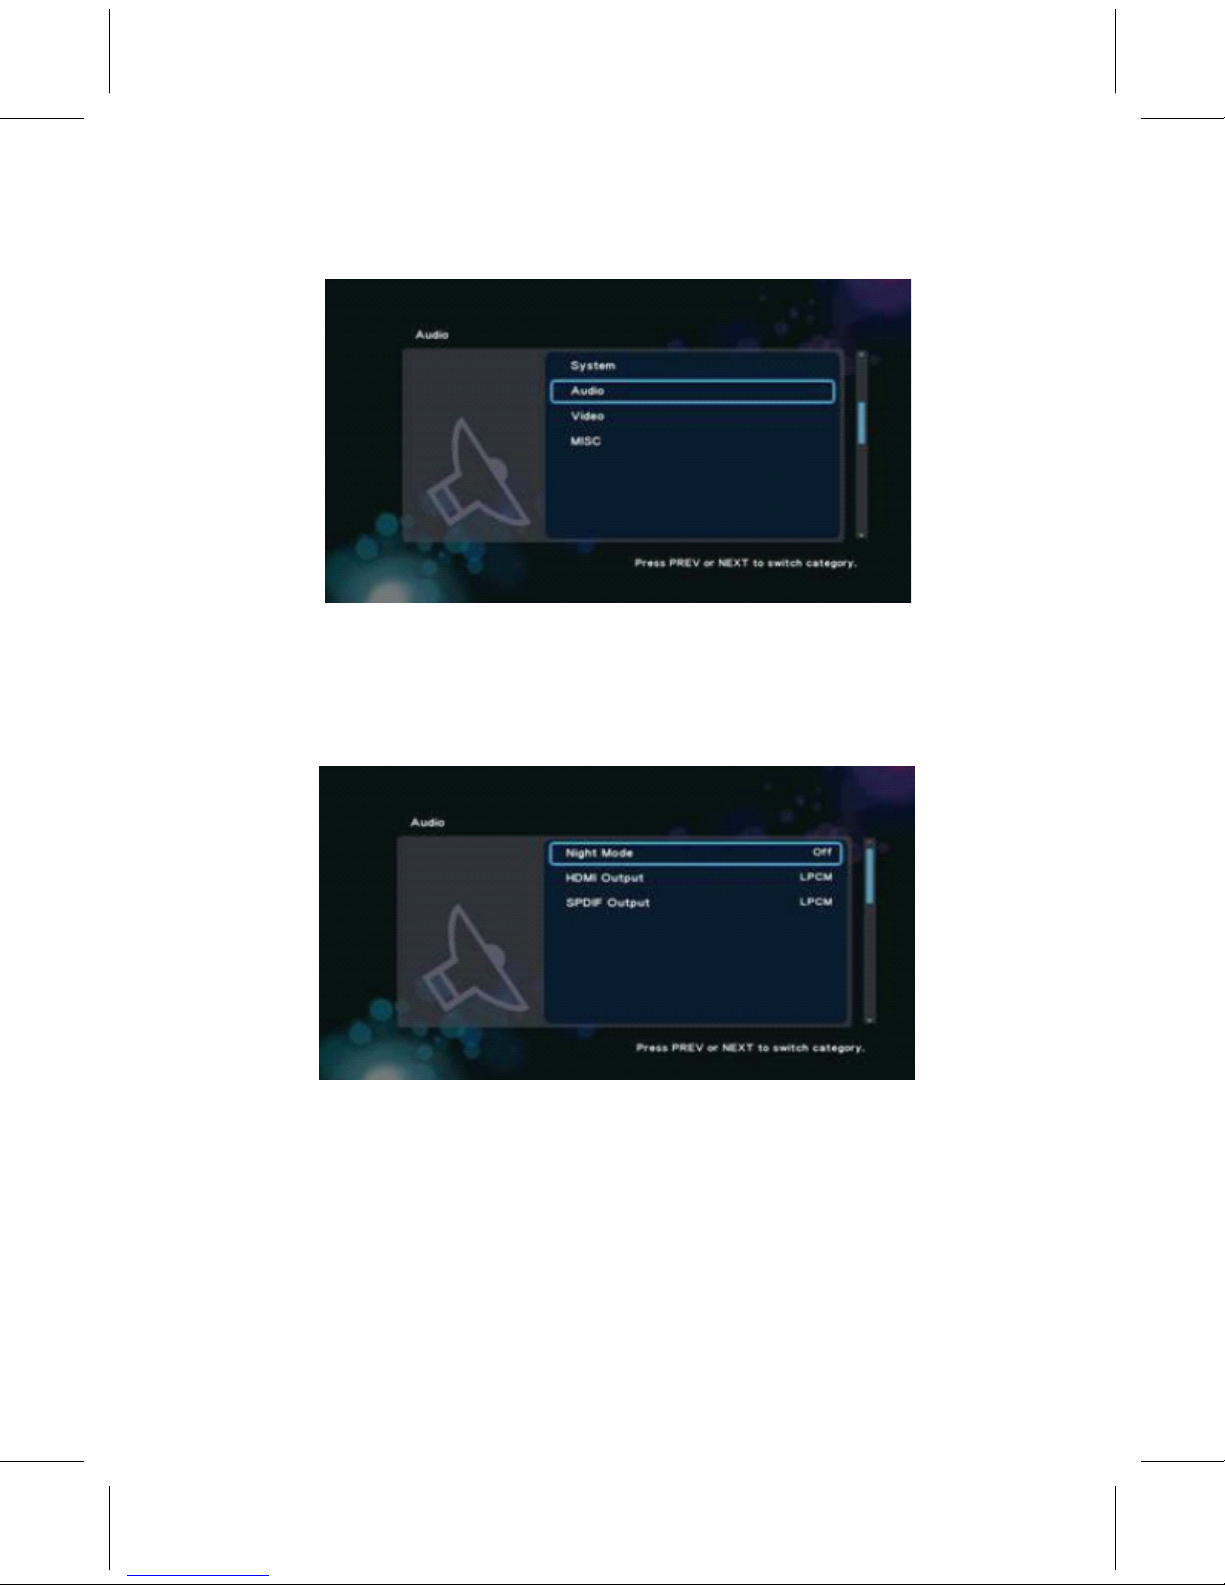
◇ Setup -> Audio
G 4.2-1
• This menu is t o set audio envi r onment, shown in Figu r e G 4.2-1,
including
• Night Mode
• HDMI Output
• SPDIF Output
◇ Night Mode
G 4.2-1
• Setup -> Audio -> Night Mode
• This i t em is t o select Open/Close the night mode t o r educe the sound.
◇ HDMI Output
• Setup -> Audio -> HDMI Output
• This setting is optional HDMI Audio on the output mode, including
◇ L CPM – Linear pulse code modulation t w o channel
17
Page 19
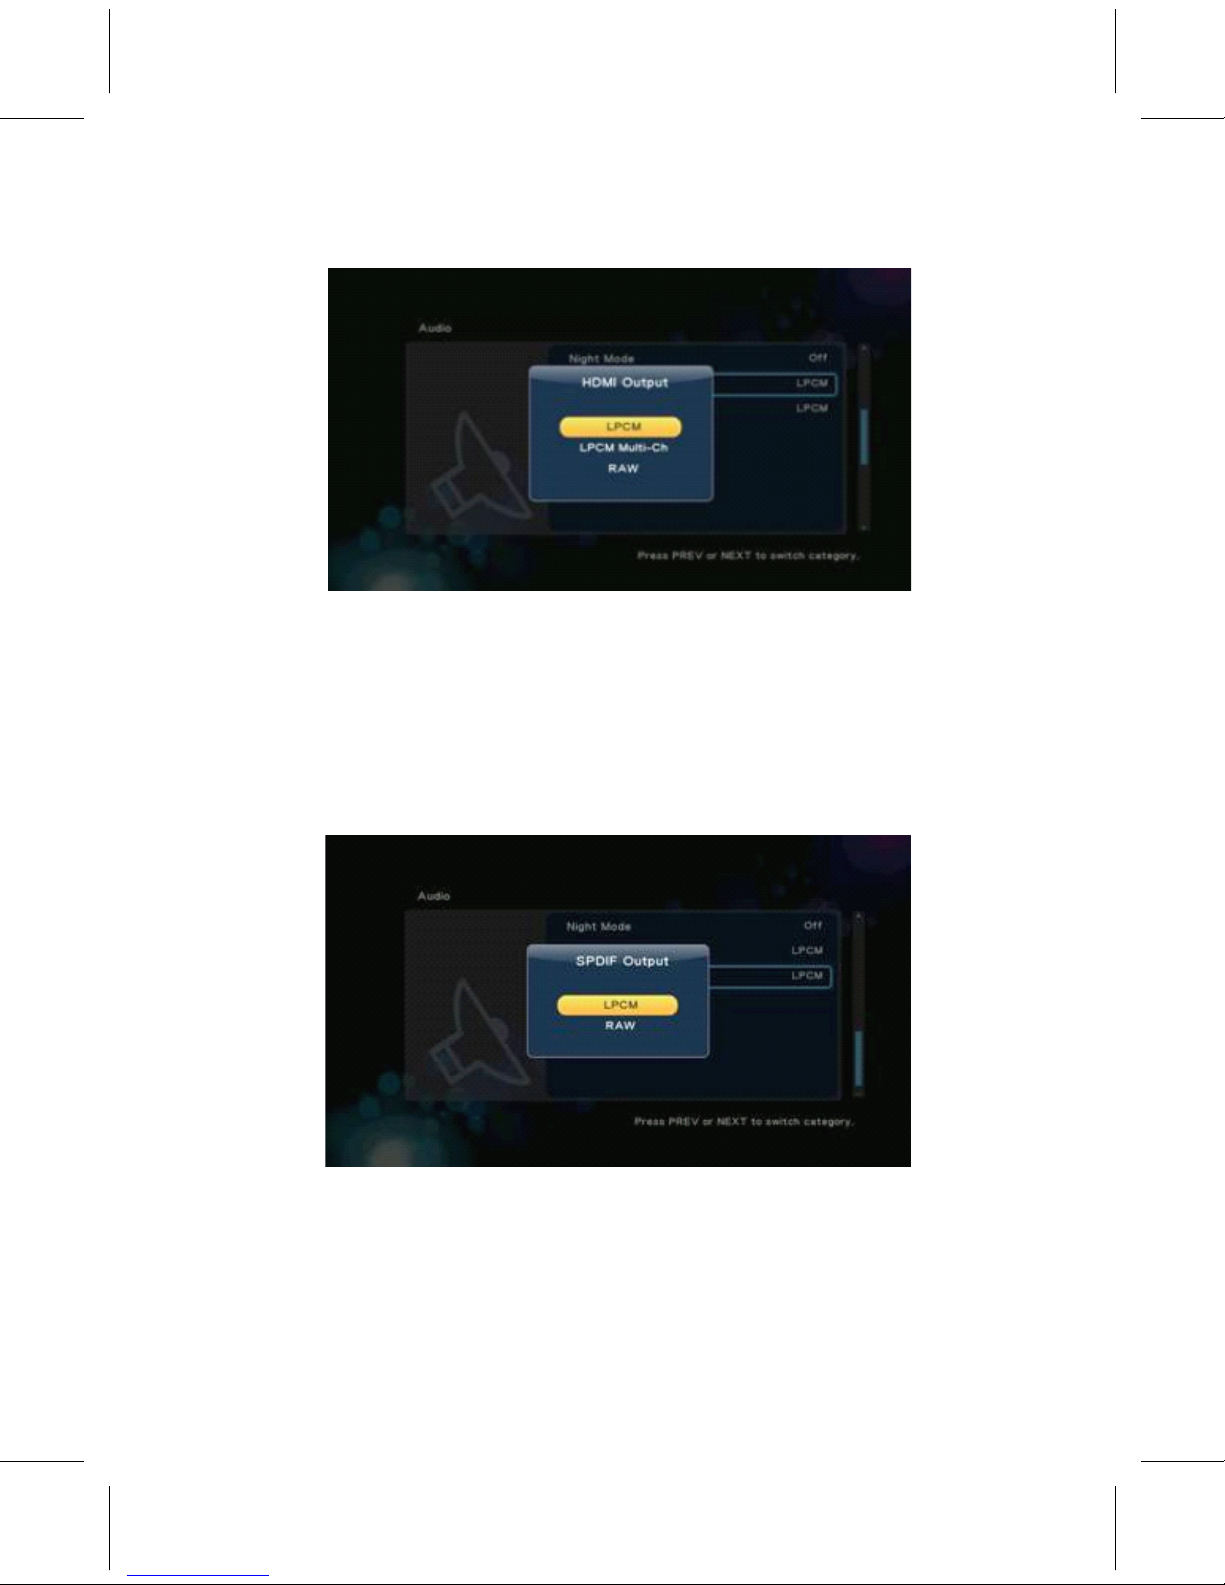
◇ L CPM Multi-Channel-Linear pulse code modulation Multi-Channel 5.1,7.1
◇ R A W – Audio Raw data.
G 4.2.2-1
• Using ‘ Up' and ‘ Down' buttons t o select i t em, press ‘ OK' button
t o confirm.
◇ SPDIF Output
• Setup -> Audio -> SPDIF Output
• This setting can choose the Audio SPDIF output modes, including
◇ L CPM – Linear pulse code modulation t w o channel
◇ R A W – Audio Raw data.
G 4.2.3-1
• Using ‘ Up' and ‘ Down' buttons t o select i t em, p r ess
the ‘ OK' button t o confirm.
◆ VIDEO
VIDEO
VIDEO
VIDEO S
S
S
S E
E
E
E TUP
TUP
TUP
TUP
◇ Setup -> Video
• Setup menu thi r d option is video envi r onmental settings, including
18
Page 20
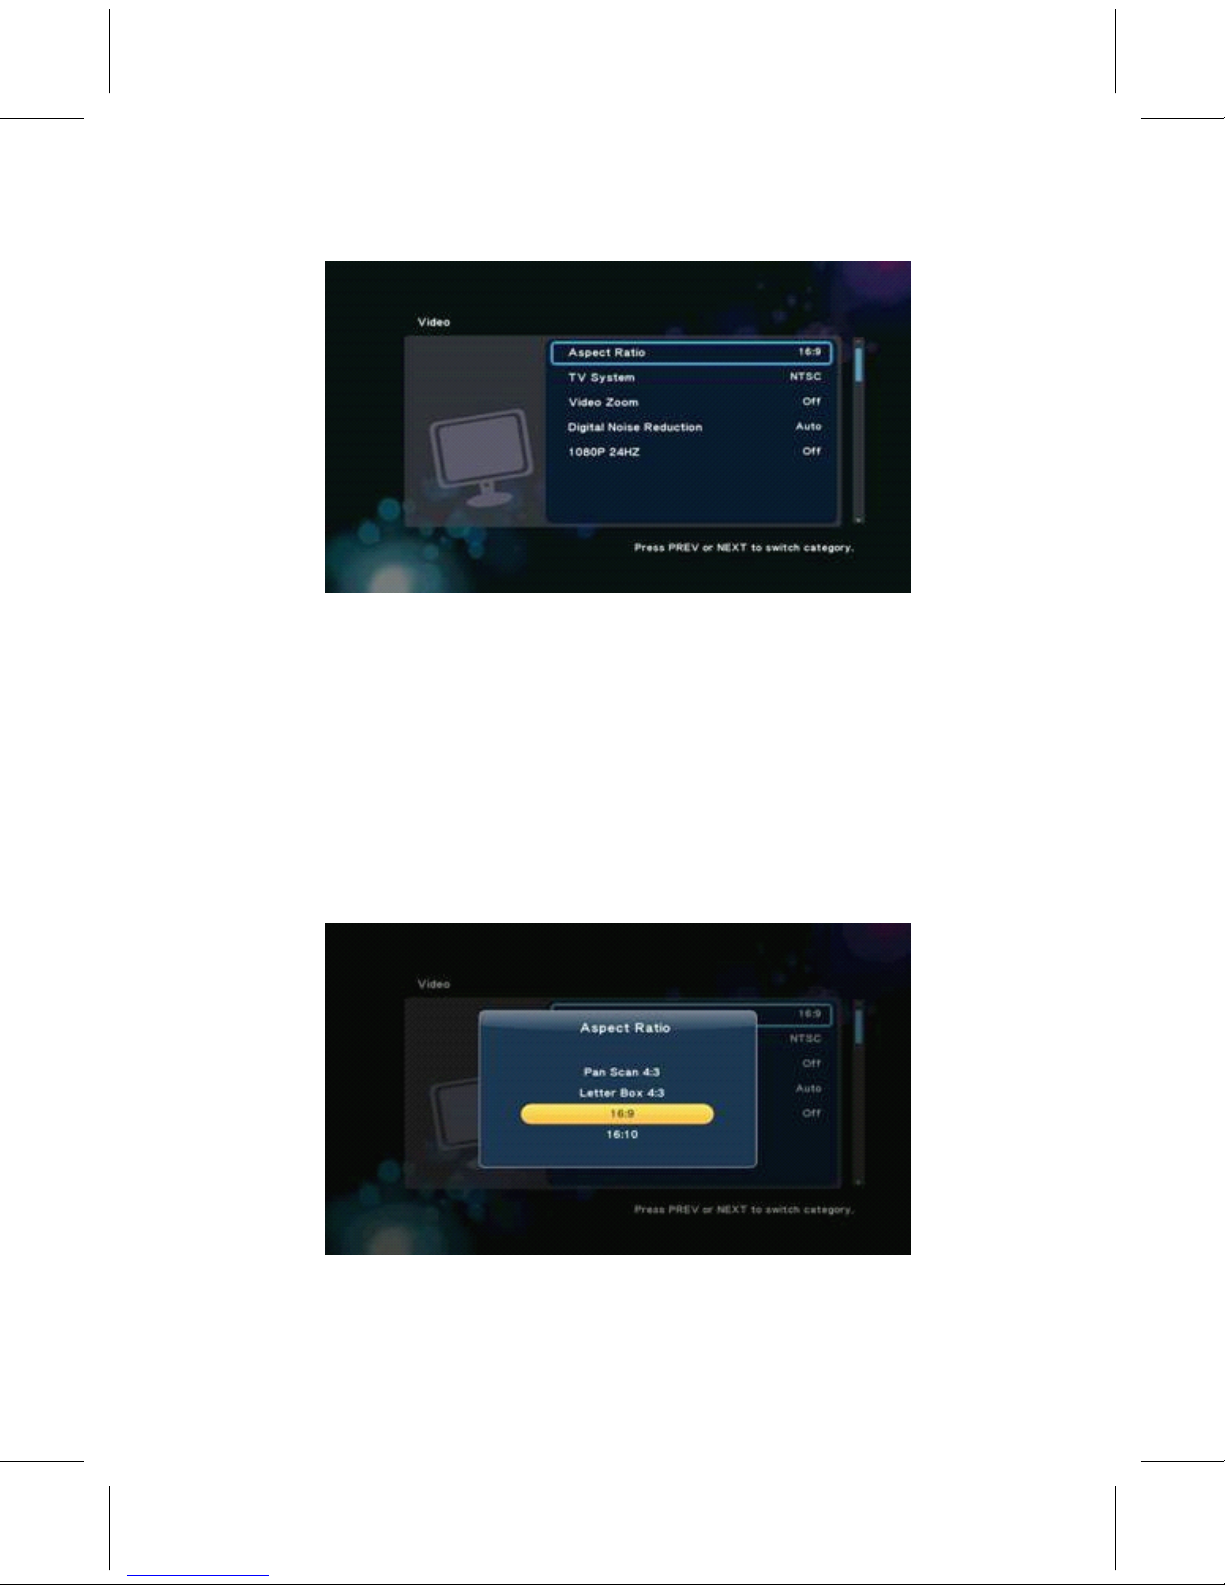
• Aspect Ratio -> T V S ys t em -> Video Zoom -> Digital Noise R eduction
-> 1080P 24HZ.
◇ Aspect
Ratio
G 4.3-1
• Setup -> Video -> Aspect Ratio
• This setting can choose the ratio of the screen, including
• Pan & Scan 4:3 - 16:9 picture in 4:3 screen mode which adjust the
ratio to meet 4:3
• Letter Box 4:3 - 16:9 picture in 4:3 screen mode which leave the
black
side in up and down. 16:9 -> 16:10.
◇ T V S ys t em
G 4.3.1-1
• Setup -> Video -> T V S ys t em
• This i t em can choose T V sys t em, options include
• NTSC - National
T
elevision S ys t em Commit t ee
•
P
AL - (Phase Al t ernating Line) R ecommendation ITU-R
BT.470-6,
Con v entional
T
elevision S ys t ems
• 480P -> 576P -> 720P 50Hz -> 720P 60Hz -> 1080i 50Hz -> 1080i
Page 21

19
Page 22
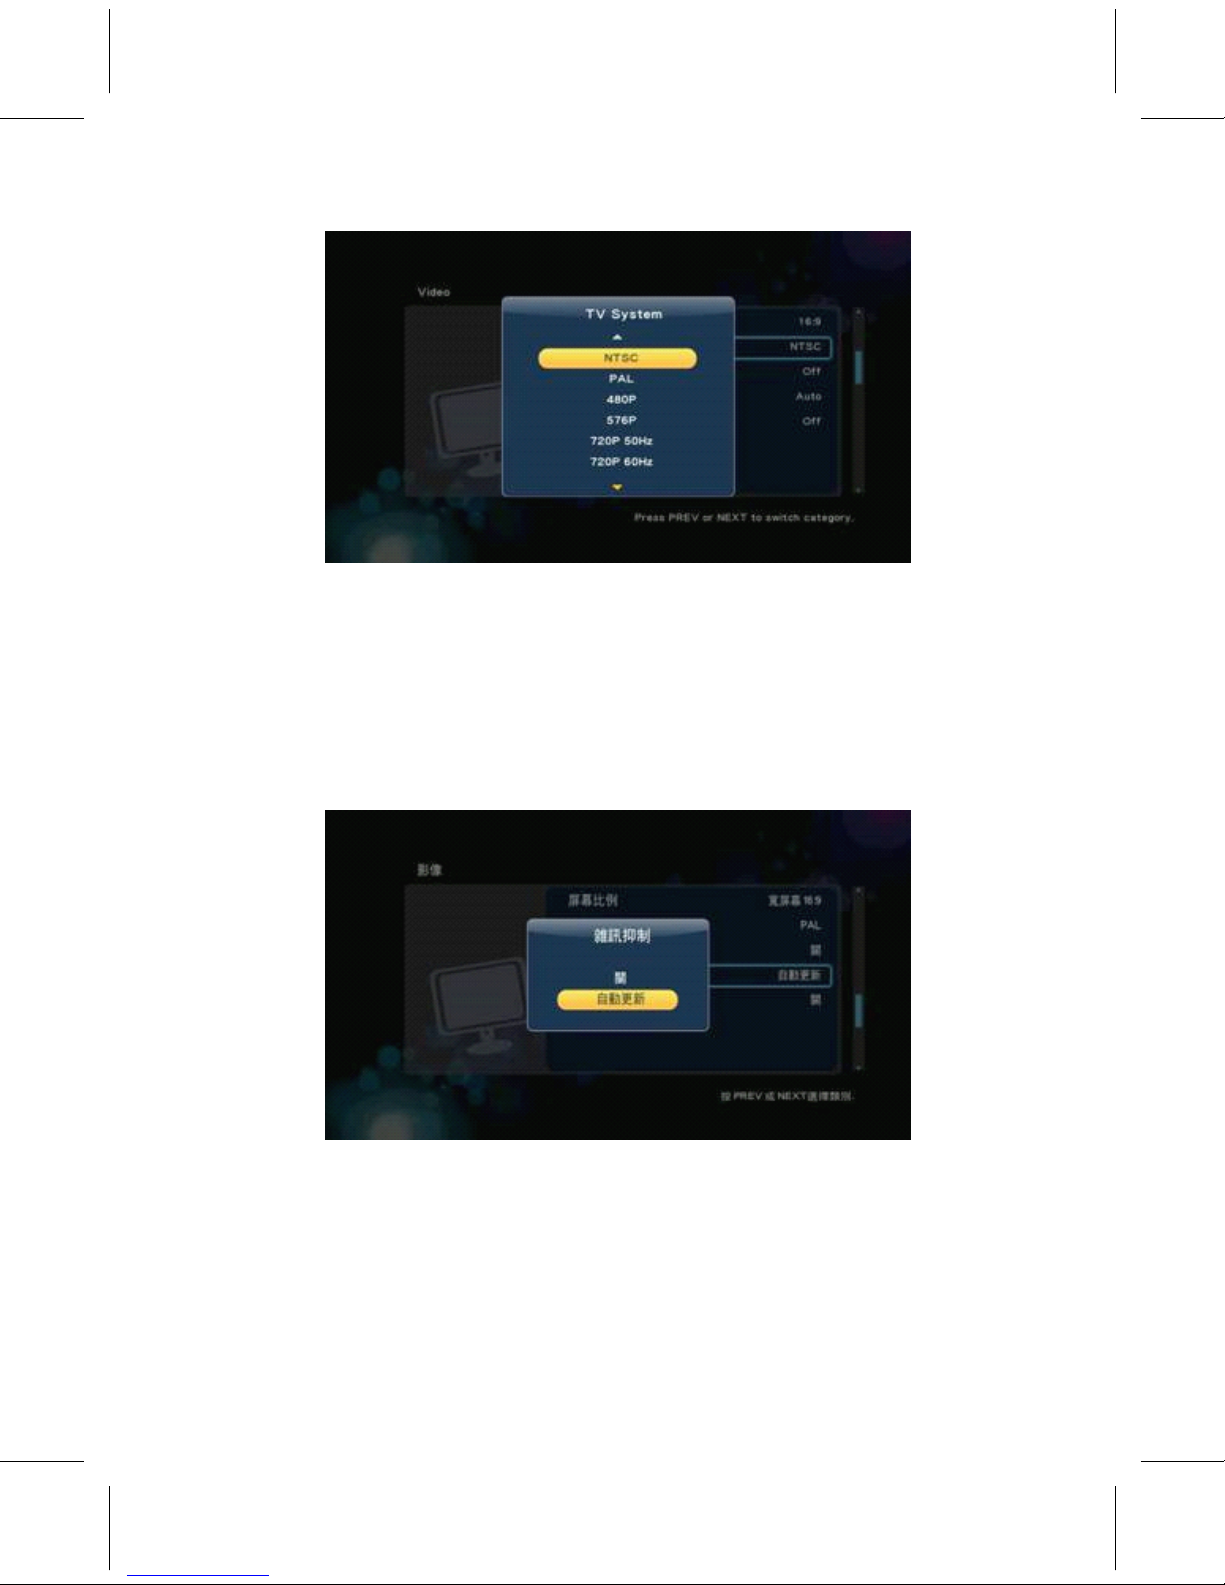
60Hz -> 1080P 50Hz -> 1080P 60Hz.
◇ Video Zoom
G 4.3.2-1
• Setup -> Video -> Video Zoom
• This i t em is able t o select video zoom in/out function.
◇ Digital Noise R eduction
• Setup -> Video -> Digital Noise R eduction
• This setup is t o enable or disable the digital noise r eduction
• 1080P 24HZ
G 4.3.4-1
• Setup -> Video -> 1080P 24HZ
• If the T V suppo r ts 1080P 24HZ, you can turn on this option.
◇ MISC
• Setup -> MISC
• Other miscellaneous settings
•
V
e r sion Info - List o f some v e r sion information.
20
Page 23
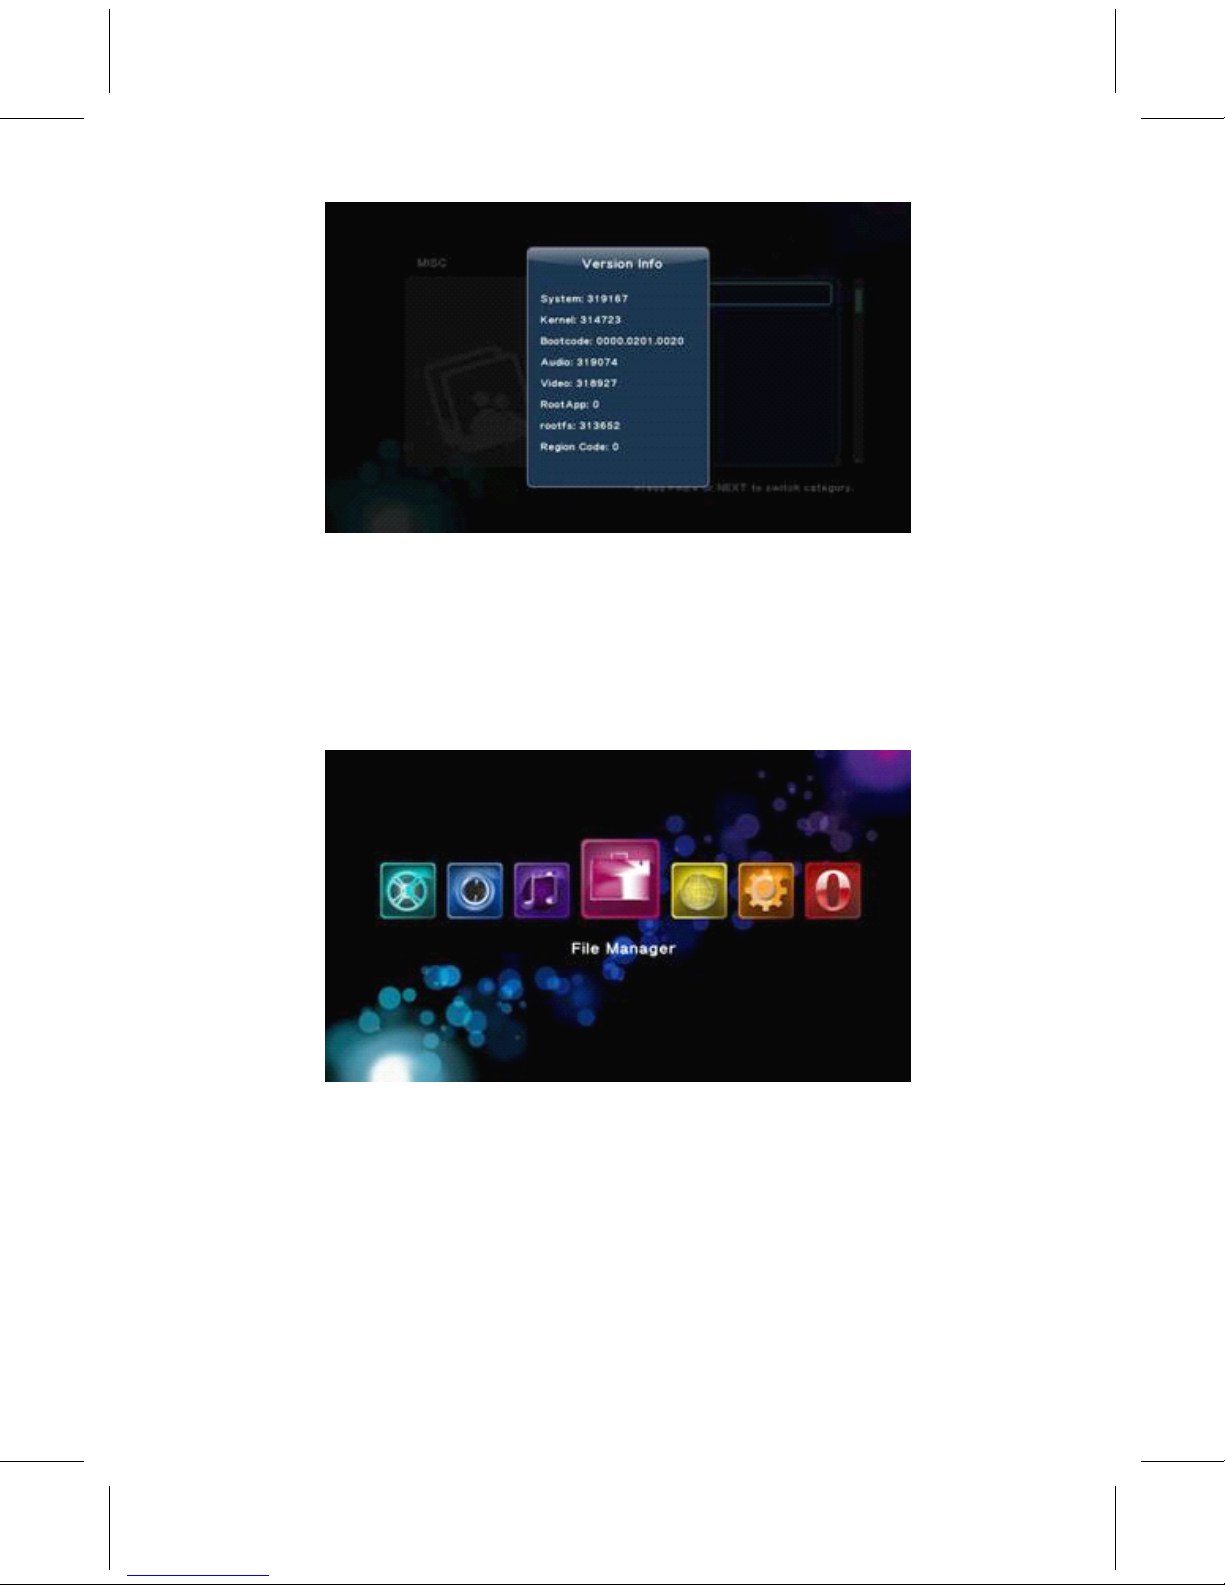
• P a r ental Cont r ol
• USB upgrade – Using USB flash dri v e l o aded Firmwa r e, and follow the
instructions t o au t omatically upgrade.
◆
◆
◆
◆ FILE
FILE
FILE
FILE MANAGER
MANAGER
MANAGER
MANAGER P
P
P
P L
L
L
L
A
A
A
A
Y
Y
Y
Y
• The File Manager allows y ou b r owse and play music, pho t o and movie
files s t o r ed on a HDD or an ex t ernal USB device, DVD disc, e t c.
T
o
en t er the menu, select File Manager f r om the Home Menu.
◇ Browsing
File
G 5.0-1
• File Manage -> press ‘ Option' button
• Press ‘ Option' button t o pop up Option window which can swi t ch
the b r owsing file mode, including
• Thumbnail, List, P r eview, All Media, Movies, Pho t os, Music
• Using the ar r ow key ‘ Left' and ‘ Right' buttons t o select,
press ‘ OK' button t o confirm.
21
Page 24
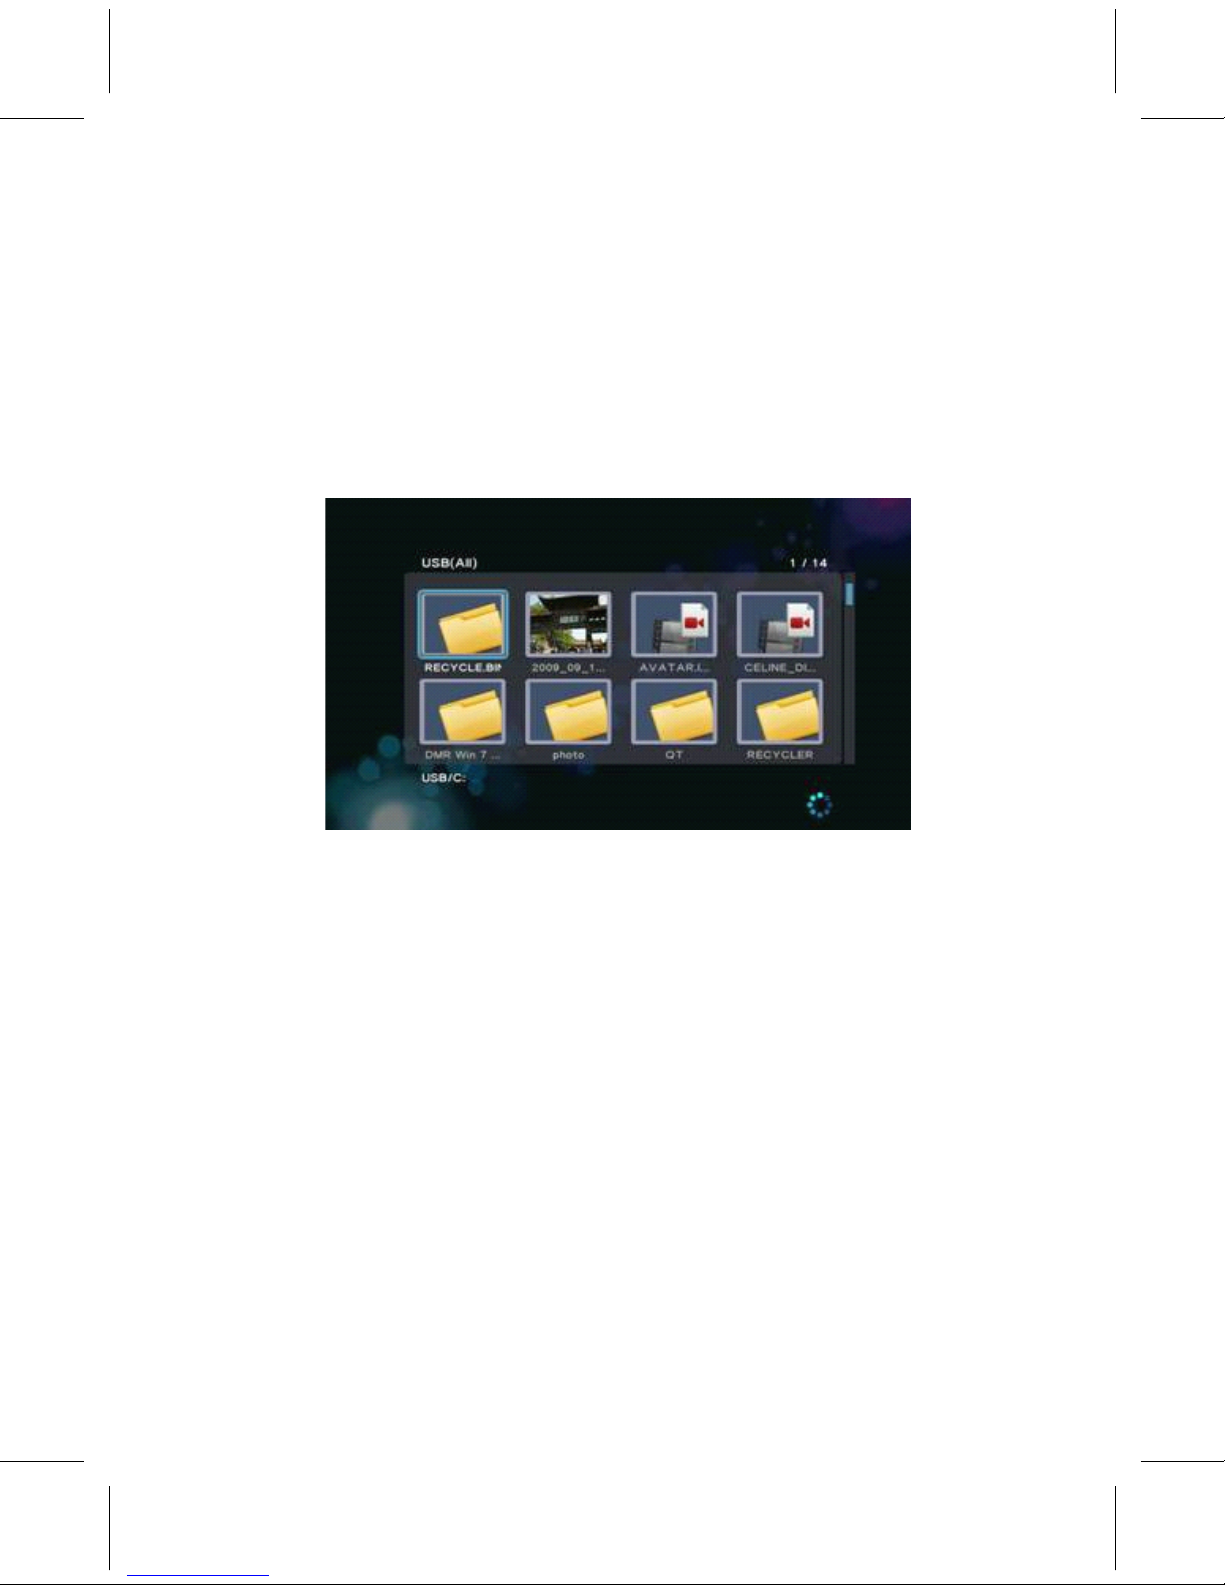
◇ Thumbnails
• File Manage -> p r ess ‘ Option ’ but t on -> Thumbnails
• This i t em is t o set the b r owser with thumbnail mode, Figu r e G 5.1-1
• Music menu has the rules o f thumbnails.
• Di r ec t o r y Thumbnail – If the r e is at least one image file under
this
di r ec t o r y then the di r ec t o r y will ha v e a thumbnail which made
f r om
this image file. Othe r wise it will ha v e a normal thumbnail made f r om
default di r ec t o r y pictu r e.
G 5.1.1-1
• In thumbnail mode, y ou can p r ess but t ons:
•
‘
Arrow'
to
b r owse files,
• ‘ Next' or ‘ Previous' to jump p age,
• ‘ OK' to en t er di r ec t o r y if it exists,
• ‘ Return' to b ack t o the p r evious di r ec t o ry.
• ‘ OK' button t o play Audio, Video, Pho t os … e t c.
◇ List
• File Manage -> press ‘ Option' button -> List
• Using this option t o view the files by ‘ List ’ , Figu r e G 5.1.2 -1
22
Page 25
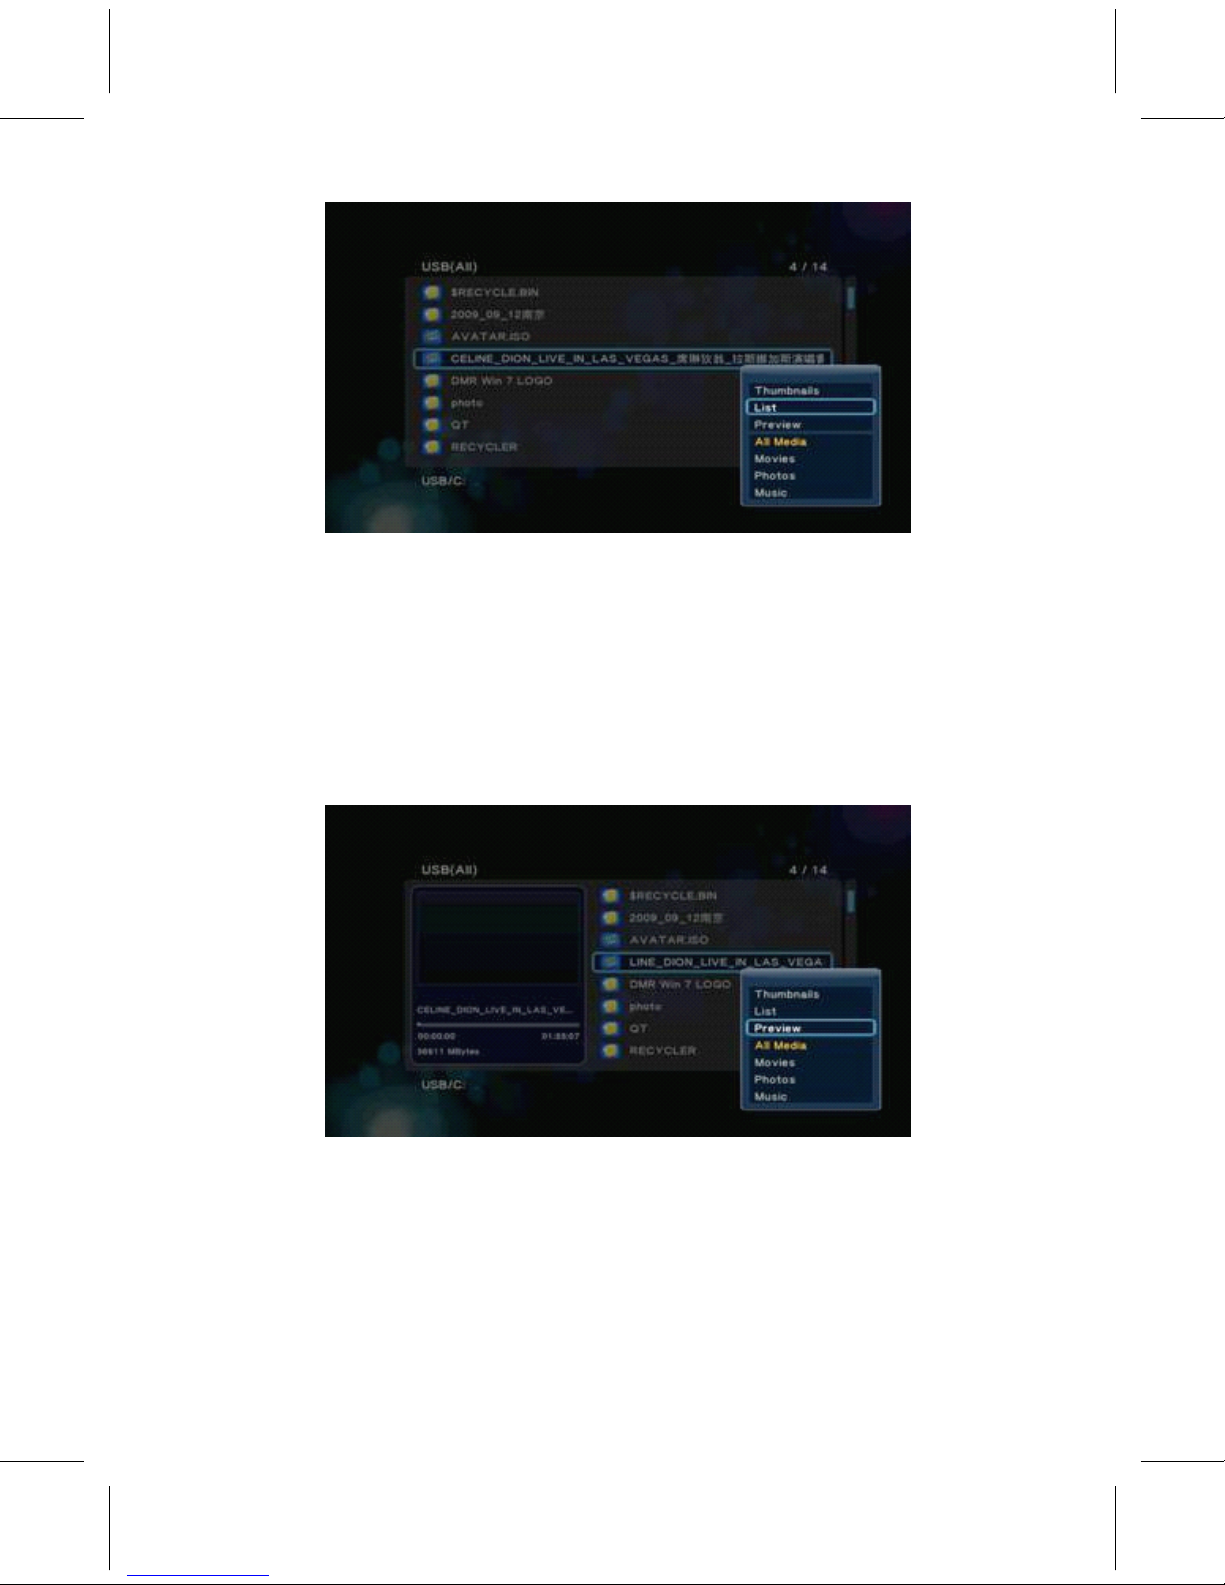
◇
P r eview
G 5.1.2-1
• File Manage -> press ‘ Option' button -> P r eview
• Using this option t o p r eview the file, when y ou focus on file, it
will
play video or display a pictu r e and show the info r mation in p r eview
window, shown in Figu r e G 5.1.3-1.
◇ All
Media
G 5.1.3-1
• File Manager -> press ‘ Option' button ->All Media
• All o f the file including movies, music and pho t os will show in
sc r een.
Page 26

23
Page 27
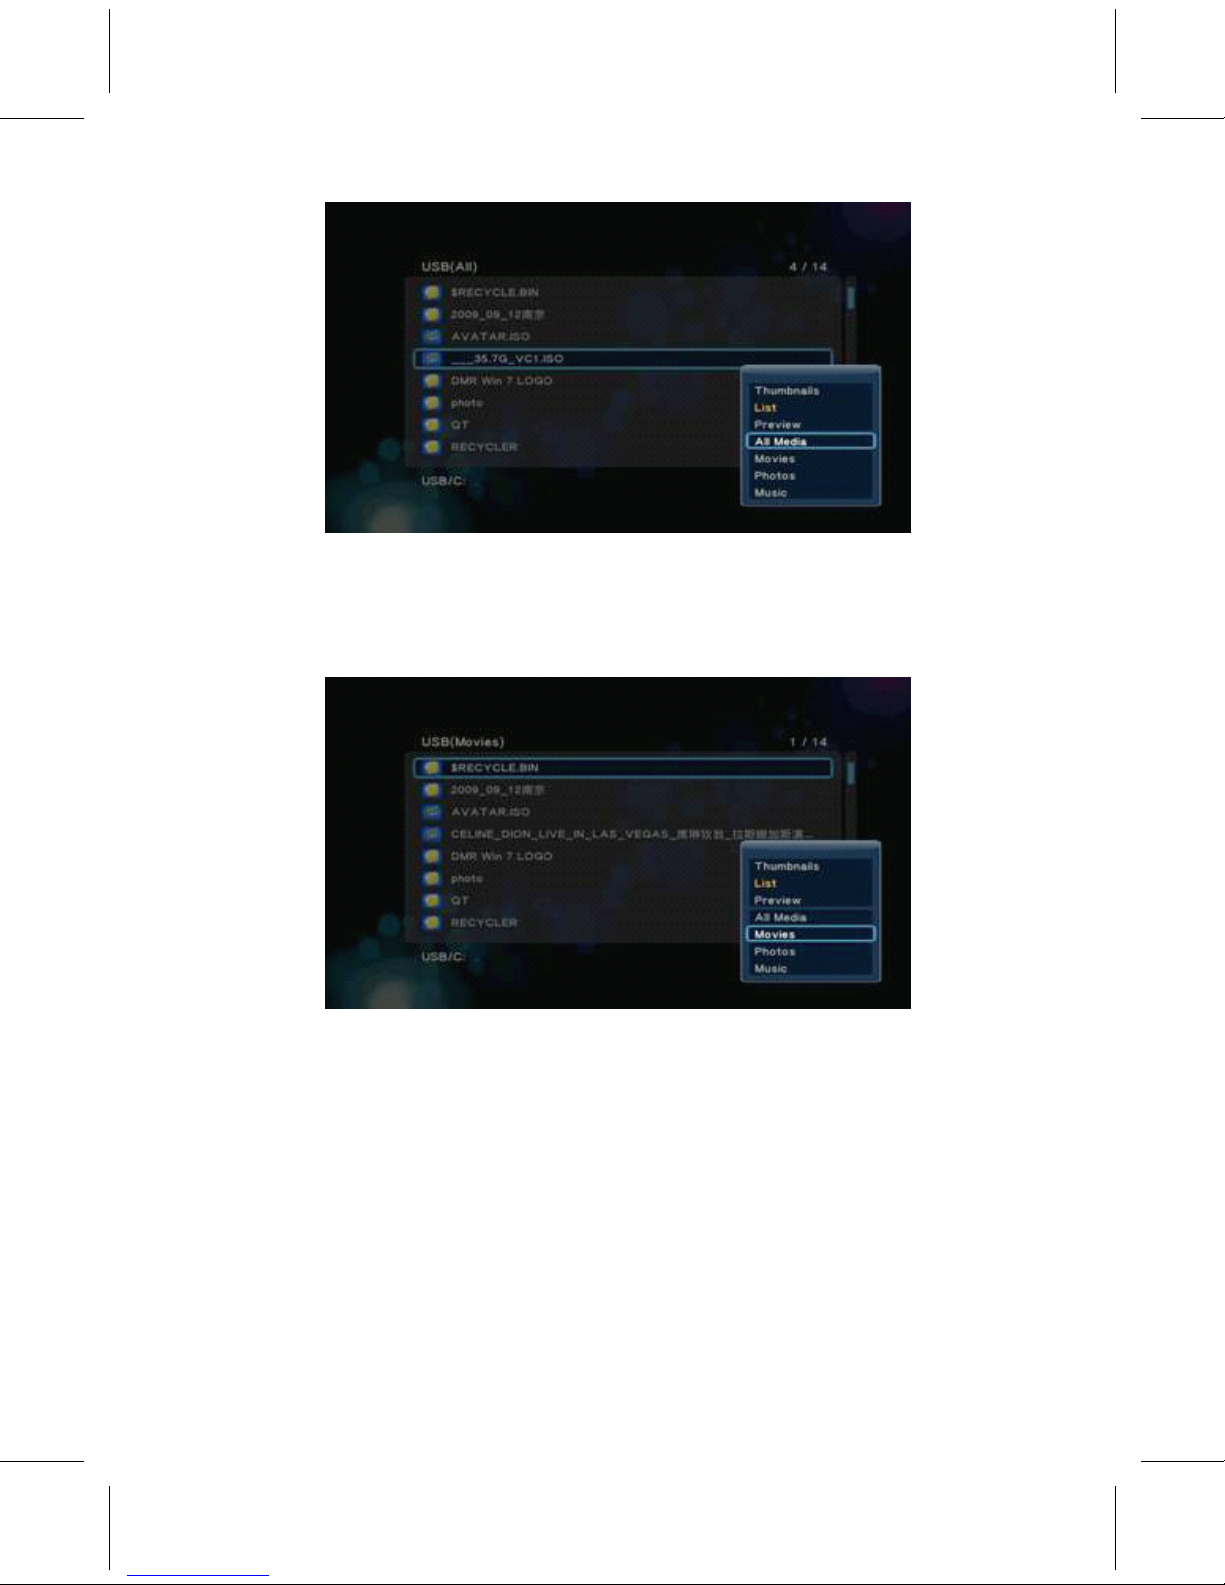
◇ Movies
G 5.1.4-1
• File Manager -> press ‘ Option' button -> Movies
• Only Movies file show in sc r een.
◇ Pho t os
G 5.1.5-1
• File Manager -> press ‘ Option' button -> Pho t os
• Only pho t o files show in sc r een. This b r owsing pho t os function
suppo r ts High Definition Pho t o Play b ac k .
24
Page 28
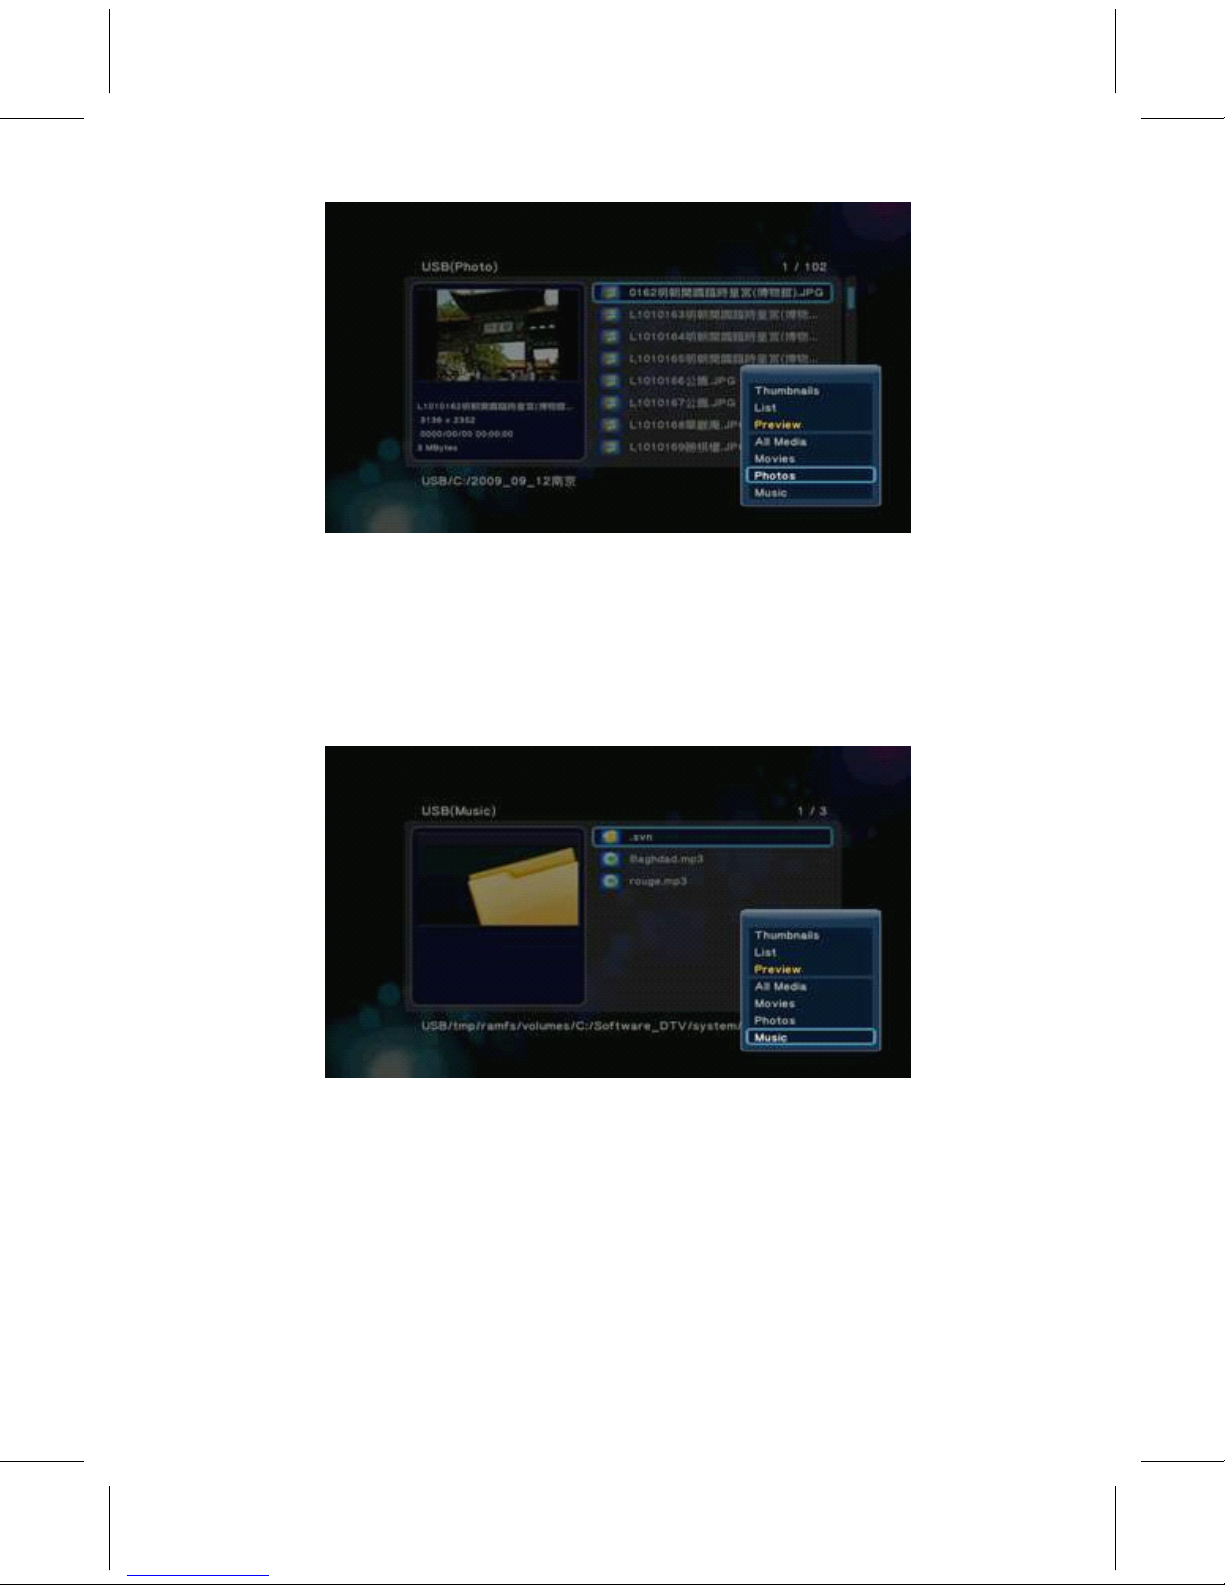
◇
Music
G 5.1.6-1
• File Manager -> press ‘ Option' button -> Music
• Only music files show in sc r een. This b r owsing music files function
suppo r ts Audio Play b ac k .
◇ File
Editing
G 5.1.7-1
• File Manager -> Press ‘ Green' button
• Press ‘ Green' button will pop up File Editing window, the r e a r e
i t ems
t o do file handling operation, including
• Copy -> Dele t e -> Mo v e -> R ename -> Send t o Buddy -> Multiple
Select -> Described as follows
◇ Copy
• File Manager -> Press ‘ Green' button -> Copy
• Single file ‘ Copy' operation s t ep:
• Select the file and press ‘ Green' button t o pop up File Editing
window.
Page 29

25
Page 30
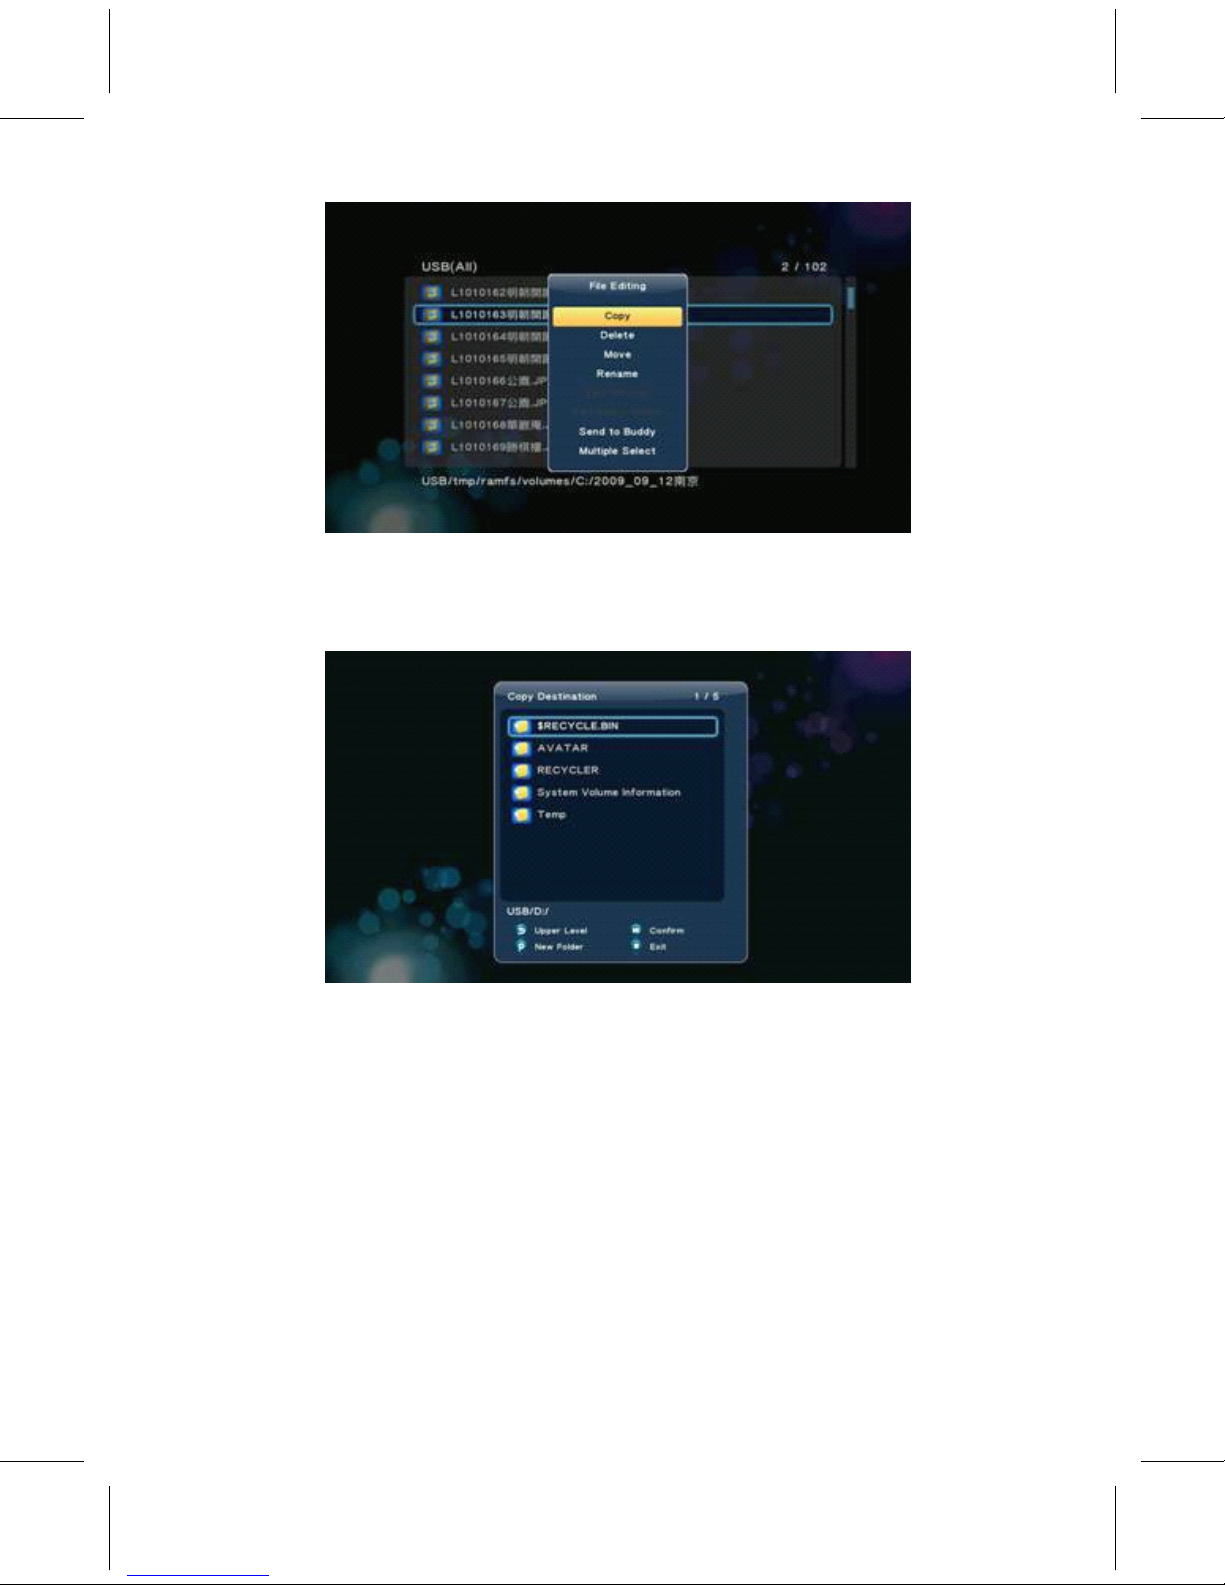
G 5.2.1-1
• Select Copy option will pop up Copy Destination window.
• Follow the instructions below the sc r een will copy files t o the
destination.
◇
Delete
G 5.2.1-2
• File Manager -> Press ‘ Green' button -> Delete
• Single file ‘ Delete' operation step:
• Select the file and press ‘ Green' button to pop up File Editing
window.
• Select ‘ Delete' item
• Follow the instructions below the screen to complete the operation.
26
Page 31

◇ Move
G 5.2.2-1
•
File Manager -> press ‘ Green' button -> Move
•
Single file “ Move ” operation step:
•
Select the file and press ‘ Green' button to pop up File Editing
window.
•
Select ‘ Move' item
•
Follow the instructions below the screen to complete the operation.
◇ Rename
G 5.2.3-1
• File Manager -> press ‘ Green' button ->
R ename “ R ename
”
operation s t ep:
• Select the file that y ou want t o r ename and press ‘ Green' button t o
pop up File Editing window.
27
Page 32

G 5.2.4-1
• Select ‘ Rename' item will pop up R ename window.
G 5.2.4-2
• Select ‘ Rename' option t o en t er Mini K eyb o a r d and then edit the
file
name.
G 5.2.4-3
28
Page 33

• Finally, confirm the operation.
◇ Multiple Select ( Using File
List)
G 5.2.4-4
• If y ou want t o select multiple files t o Copy, Dele t e or Mo v e files
(e x cept R ename) in file b r owser (File Manager, Music, Pho t o or
Movies). Press ‘ Green' button will pop up File Editing window,
shown
in G 5.2.5-1,
G 5.2.5-1
• you can use the ‘ File List' described as below:
• Select ‘ Multiple Select 'item, it will come up a “ File list ” window.
29
Page 34

G 5.2.5-2
• Please follow the instructions below the screen select files
to ‘ File
List ’ , and press ‘ Left' button to change focus on ‘ File List ’ .
G 5.2.5-3
• Press ‘ Green' button t o pop up ‘ Multi-File
Editing 'window
, select
the i t em that y ou want t o opera t e, whe r e for example is‘ C r ea t e Pho t o
Album ’ , press ‘ OK' button t o confirm.
30
Page 35

G 5.2.5-4
• If y ou want t o r ename Album file, please select ‘ Rename' and
press ‘ Ok' button t o confirm it which will pop up‘ Mini Keyboard 'to
edit file name.
G 5.2.5-5
• Please follow the instruction below the screen fill the Album file
name in Edit Bar. Select Edit Bar or OK pattern press ‘ Ok' button
to
confirm.
31
Page 36

G 5.2.5-6
• Select OK p at t ern press ‘ OK' button t o confirm. It will b ack
t o ‘ File
List ’ , press ‘ Green' button select ‘ Exit' to comple t e the
operation.
G 5.2.5-7
G 5.2.5-8
32
Page 37

◇ Music Menu
• The Music menu is the folder placing the music files.
Y
ou can b r owse
all music files in the folder and can play the music file that y ou
selec t ed.
G 6.0-1
◆ P
P
P
P L
L
L
L
A
A
A
A
Y
Y
Y
Y MUSIC
MUSIC
MUSIC
MUSIC
• Music -> press ‘ OK' or ‘ Play 'button
• If y ou want t o play the selec t ed music file, press ‘ OK' button
or ‘ Play' button t o sta r t play b ac k . During play b ac k , y ou can
p r ess
but t ons:
• ‘ Next' to jump t o the next song in play list,
• ‘ Previous' to jump t o the p r evious song in play list,
• ‘ V OL+/- ’ t o inc r ease or dec r ease the v olume,
• ‘ Stop' to s t op play,
• ‘ Return' will r eturn t o file b r owser, but still continued playing.
G 6.1-1
33
Page 38

•
Y
ou can p r ess the ‘ Option' button t o select ‘ R epeat Mode' during
play b ac k .
• R epeat Off -> R epeat One -> R epeat All -> Shuffle Loop
◇ B r owsing
File
G 6.1-2
• Music -> press ‘ Option' button
• Pressing ‘ Option' button in the Music b r owser, shown in Figu r e G
6.1-3, will pop up Option window which can swi t ch the b r owsing file
mode, including
G 6.1-3
• Search -> Thumbnail -> List -> Preview -> All Songs -> Albums ->
Artists Genres -> Years -> Playlists -> Recently Played ->
Recently
Added -> Name
• Use the arrow ‘ Up' and ‘ Down' buttons t o select,
press ‘ OK' button t o confirm.
◇ Sea r ch
• Music -> Press ‘ Option' button -> Sea r ch
34
Page 39

•
Y
ou can select ‘ Search' option t o sea r ch file by name.
◇ Thumbnails
G 6.2.1-1
• Music -> Press ‘ Option' button -> Thumbnails
• Music menu has the rules o f thumbnails.
• Di r ec t o r y Thumbnail – If the r e is at least one image file under
this
di r ec t o r y then the di r ec t o r y will ha v e a thumbnail which made f r om
this image file. Othe r wise it will ha v e a normal thumbnail made f r om
default di r ec t o r y pictu r e.
◇
List
G 6.2.2-1
• Music -> Press ‘ Option' button -> List
• Music file b r owser display files by ‘ List ’ .
Page 40

35
Page 41

◇
P r eview
G 6.2.3-1
• Music -> Press ‘ Option' button -> P r eview
• Using this option t o p r eview the file, when y ou focus on file, it
will
show the info r mation in p r eview window, shown in Figu r e G 6.5-1.
◇ Go t o
Folder
G 6.2.4-1
• Music -> Press ‘ Option' button -> Go t o Folder
• This option will go t o the folder whe r e the file place in, and will
transfer the menu f r om Music in t o File Manager with option:‘ Music
’
.
Page 42

36
Page 43

◇ All
Songs
G 6.2.5-1
• Music -> Press ‘ Option' button -> All Songs.
• In Music file b r owser, the default option is ‘ All Songs ’ , it will
list the
t otal music files in this b r owser no mat t er whe r e the file
place in.
◇ Albums
G. 6.2.6-1
• Music -> Press ‘ Option' button -> Albums.
• The music file with the information included Album, A r tist, Gen r e,
Y
ear,
e t c.
Y
ou can choose the files a r e classified by Album. P r ess ‘ OK ’
but t on t o en t er the folder.
Page 44

37
Page 45
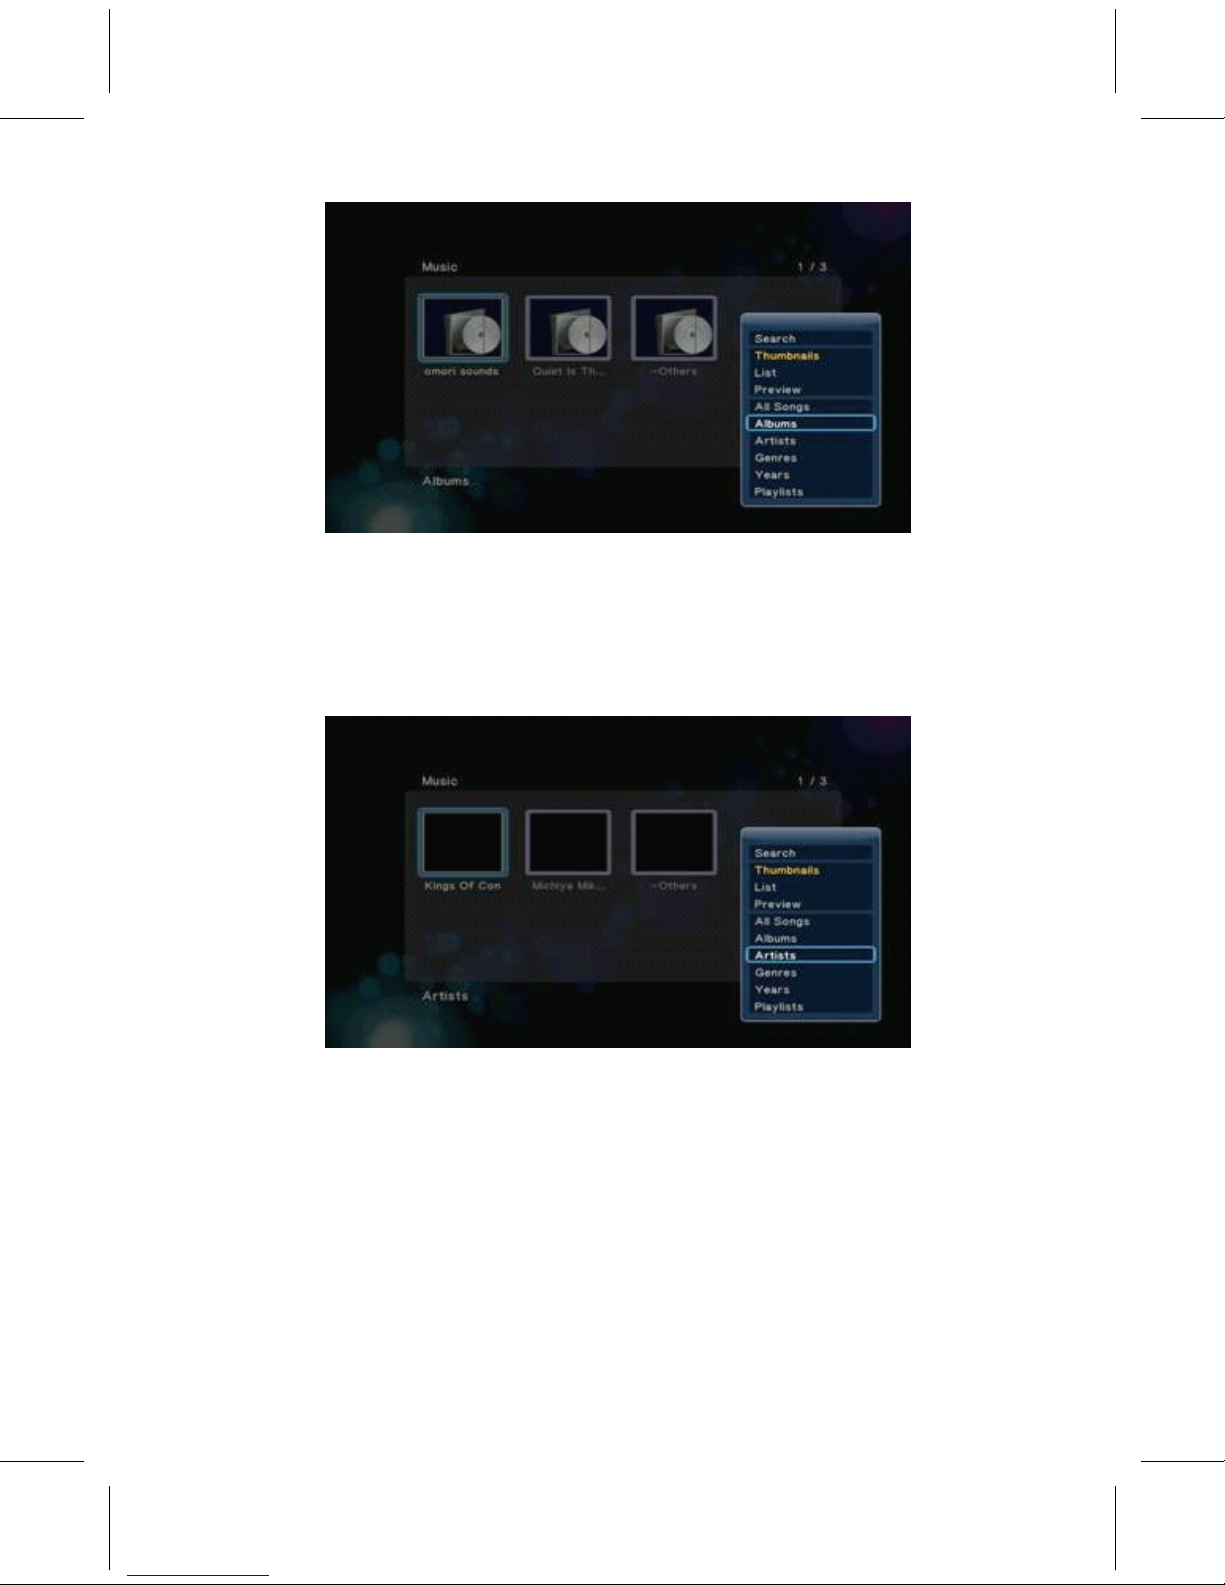
◇
A r tists
G 6.2.7-1
• Music -> Press ‘ Option' button -> A r tists.
• The files a r e classified by A r tists.
◇ Gen r es
G 6.2.8-1
• Music -> Press ‘ Option' button -> Gen r es.
• The files a r e classified by Gen r es.
38
Page 46
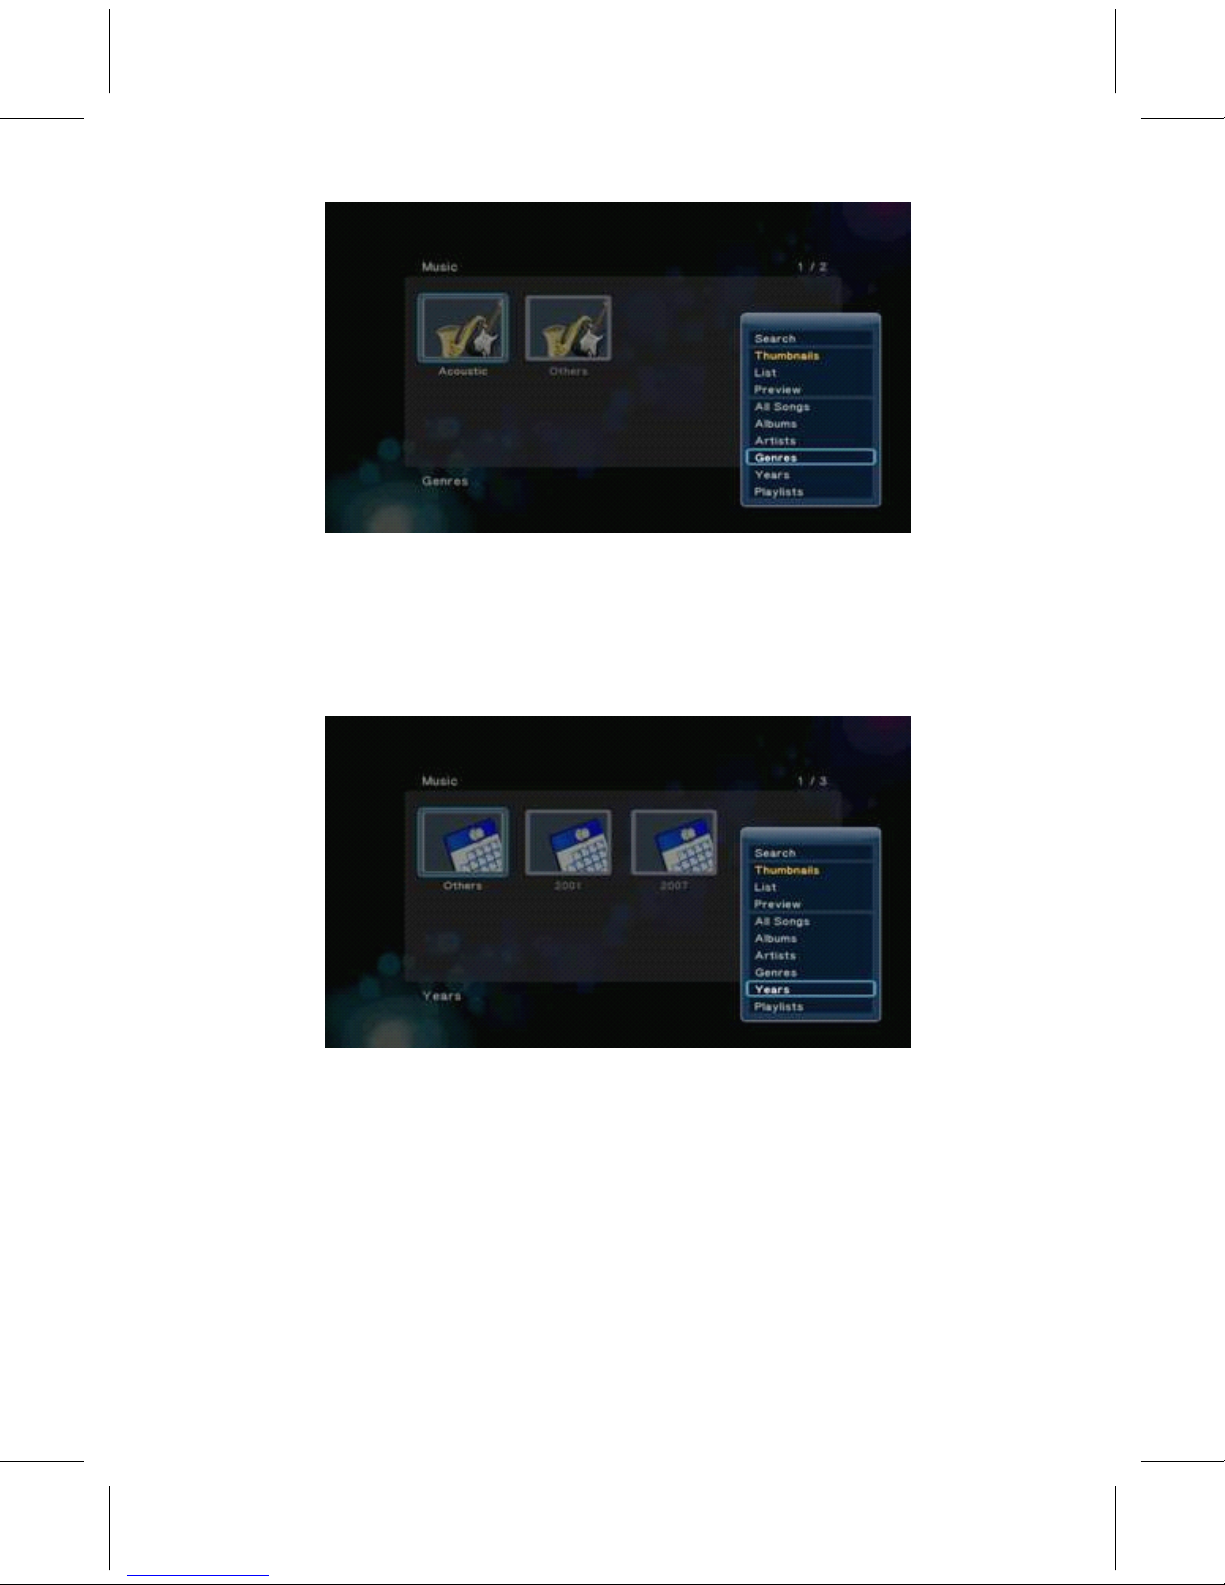
◇
Y
ea r s
G 6.2.9-1
• Music -> Press ‘ Option' button ->
Y
ea r s.
• The files a r e classified by
Y
ea r s.
◇
Playlists
G 6.2.10-1
• Music -> Press ‘ Option' button -> Playlists.
• The files a r e classified by Playlists.
Page 47

39
Page 48

◇ R ecently
Pla y ed
G 6.2.11-1
• Music -> Press ‘ Option' button -> R ecently Pla y ed.
• This option will so r t files by ‘ R ecently pla y ed ’ .
◇ R ecently Added
G 6.2.12-1
• Music -> Press 'Option' button -> R ecently Added.
• The files a r e so r t ed by ‘ R ecently Added ’ .
40
Page 49

◇ Name
G 6.2.13-1
• Music -> Press ‘ Option' button -> Name.
• The files a r e so r t ed by name.
◇ File Handling (Using File
List)
G 6.2.14-1
• Music -> Press ‘ Red' button.
• Press ‘ Red' button will pop up File List window, there are items to
do
file handling operation, including.
• Copy -> Delete -> Move -> Save Playlist.
Page 50

41
Page 51

• Described as below
G 6.3-1
• Copy/Dele t e/Mo v e operation
• Music -> Press ‘ Red' button -> Copy
◇ ‘
Copy'
operation
s t ep:
• In File List window, please follow the instructions below the sc r een
select files t o ‘ File List ’ , and press ‘ Left' button t o change
focus
on ‘ File List ’ .
G 6.3.1-1
• Press ‘ Green' button t o pop u p “ Multi-File
Editing 'window
, select
‘ Copy ’ , press ‘ OK' button t o confirm.
42
Page 52

G 6.3.1-2
• Select the directory in ‘ Copy Destination' and press ‘ Play'
button
t o do the operation.
G 6.3.1-3
• Press Green 'button to pop up ‘ Multi-File
Editing'
window
,
select‘ Exit ’
t o comple t e the p r ocess.
43
Page 53

G 6.3.1-4
※ Dele t e and Mo v e operation is the same as ‘ Copy 'operation, please
reference to “ Copy' process.
◆
◆
◆
◆ CR
CR
CR
CR E
E
E
E
A
A
A
A
TE
TE
TE
TE N
N
N
N E
E
E
E W
W
W
W P
P
P
P L
L
L
L
A
A
A
A
YLIST
YLIST
YLIST
YLIST
• Music -> Press ‘ Red' button -> Sa v e Playlist
• If y ou want t o c r ea t e a new audio playlist please follow the s t ep:
• In File List window, please follow the instructions below the sc r een
select files t o ‘ File List ’ , and press ‘ Left' button t o change
focus on
‘ File List ’
G 6.3.2-1
• Press ‘ Green' button
to pop up ‘ Multi-File Editing 'window, select
‘ Save Playlist ’ , press ‘ OK' button to confirm.
44
Page 54

G 6.3.2-2
• If y ou want t o r ename a playlist file, please select ‘ Rename' and
p r ess
‘ Ok' button t o confirm it which will pop up‘ Mini Keyboard' to edit
file name.
G 6.3.2-3
• Please follow the instruction below the sc r een fill, the playlist
file name
in Edit Bar. Select Edit Bar or OK p at t ern press ‘ Ok' button t o
confirm
45
Page 55

G 6.3.2-4
• Select OK p at t ern press ‘ OK' button t o confirm. It will go b ack
t o ‘ File
List ’ , press ‘ Green' button select ‘ Exit' to comple t e the
operation.
G 6.3.2-5
G 6.3.2-6
46
Page 56

◆
◆
◆
◆ P
P
P
P L
L
L
L
A
A
A
A
Y
Y
Y
Y PH
PH
PH
PH
OT
OT
OT
OT
O
O
O
O
• The Pho t os menu is the folder placing the image files.
Y
ou can
b r owse all image files in the folder and can display the image file
y ou selec t ed.
◇ Display & Slide
Show
G 7.0-1
• Pho t os -> press ‘ OK' or ‘ Play' button
• If y ou want t o display the selec t ed image file or slide show in full
sc r een, press ‘ OK' button or ‘ Play' button t o sta r t the
operation.
During display, y ou can p r ess but t ons:
• “ Next ” t o jump t o the next file in the play list,
• ‘ Previous' to jump t o the p r evious file in the play list,
• ‘ Zoom' to zoom in/out 2 X , 4 X , 8 X , 16X
• ‘ Stop' or ‘ Return' to s t op playing.
• Press ‘ Info' button t o display the info r mation o f the image file.
G 7.1-2
47
Page 57

【 NOTE 】 :
1. When the pho t o is displa y ed in full sc r een mode, the slide show
sta r ts
au t omatically.
2. While lis t ening t o MP3 files, y ou can b r owse the pho t os at the same
time.
• During play b ac k , y ou can press ‘ Option' button t o change the setup
o f slide show. The r e a r e
• Slide Timing – Setting the display time o f each pictu r e.
• Slide
T
ransition – Optional special effects when swi t ch pictu r e
• R epeat o ff –
T
o S t op Slide Show.
• R epeat all –
T
o show all files in the play list.
• Shuffle Loop - Randomly select file in the play list during Slide
Show
• Select Music - Bac k g r ound music can
◇ Browsing
File
G 7.1-3
• Pho t o -> press ‘ Option' button
• P r essing ‘ Option ’ but t on in the Pho t o b r owser, shown in Figu r e G
7.2-1, will pop up Option window which can swi t ch the b r owsing file
mode, including.
Page 58

48
Page 59

G 7.2-1
• Thumbnail -> List -> P r eview -> Pho t o Di r ec t o r y -> Da t e View -> All
Pho t os -> Albums Name -> R ecently Added.
◇ R ecently Pla y ed
• Use the arrow ‘ Up' and ‘ Down' buttons t o select,
press ‘ OK' button t o confirm.
◇ Sea r ch
• Pho t os -> Press ‘ Option' button -> Sea r ch
•
Y
ou can select ‘ Search' option t o sea r ch file by name.
◇ Thumbnails
G 7.2.1-1
• Pho t os -> P r ess ‘ Option ’ but t on -> Thumbnails
• Pho t os menu has the rules o f thumbnails.
• Di r ec t o r y Thumbnail – If the r e is at least one image file under
this
di r ec t o r y then the di r ec t o r y will ha v e a thumbnail which made f r om
this image file. Othe r wise it will ha v e a normal thumbnail made f r om
49
Page 60

default di r ec t o r y pictu r e.
• File Thumbnail – All the pho t os ha v e their thumbnail made f r om
themsel v es.
◇ List
• Pho t os -> Press ‘ Option' button -> List
• Pho t os file b r owser display files by ‘ List ’ .
◇ Preview
• Pho t os -> Press ‘ Option' button -> P r eview
• Using this option t o p r eview the file, when y ou focus on file, it
will
show the info r mation in p r eview window, shown in Figu r e G 7.2.4-1
50
Page 61

◇ Pho t o
Di r ec t o r y
G 7.2.4-1
• Pho t os -> Press ‘ Option' button -> Pho t o Di r ec t o r y
• This mode will show the di r ec t o r y whe r e the file place in.
◇ Da t e
View
G 7.2.5-1
• Pho t os -> Press ‘ Option' button -> Da t e View
• The pho t o file with the info r mation included Album, Da t e, e t c.
Y
ou
can
choose the files that a r e classified by Da t e. Press ‘ OK' button t o
en t er the
folder.
Page 62

51
Page 63

◇ All
Pho t os
G 7.2.6-1
• Pho t os -> Press ‘ Option' button -> All Pho t os
• In Pho t os file b r owser, the default option is "All Pho t os", it will
list the
t otal pho t os in this b r owser no mat t er whe r e the file place is, it
means,
sys t em will scan and collect all pho t os and lis t them he r e.
◇ Albums
G 7.2.7-1
• Music -> Press ‘ Option' button -> Albums
• The pho t o file with the info r mation included Album, Da t e, e t c.
Y
ou
can
choose the files a r e classified by Albums. Press ‘ OK' button t o
en t er
the folder.
Page 64

52
Page 65

◇ Go to
Folder
G 7.2.8-1
Photos -> Press ‘ Option' button -> Go to Folder
• This option will go to the folder where the file place in, and will
transfer the menu from Photos into File Manager with option:
‘ Photos ’ .
◇ Name
• Photos -> Press ‘ Option' button -> Name
• This option will sort files by name.
◇ R ecently Added
G 7.2.10-1
• Pho t os -> Press ‘ Option' button -> R ecently Added
• This option will so r t files by R ecently Added.
53
Page 66

◇ R ecently
Pla y ed
G 7.2.11-1
• Pho t os -> Press ‘ Option' button -> R ecently Pla y ed
• This option will so r t files by R ecently Pla y ed.
G 7.2.12-1
• File Handling (Using File List)
• Pho t o -> Press ‘ Red' button
• Press ‘ Red' button will pop up File List window, the r e a r e i t ems t o
do
file handling operation, including
• Copy -> Dele t e -> Mo v e -> C r ea t e Pho t o Album.
54
Page 67

• Described as below
◇ Copy/Dele t e/Mo v e operation
• Pho t o -> Press ‘ Red' button -> Copy
• ‘
Copy' operation
s t ep:
• In File List window, please follow the instructions below the sc r een
select files t o ‘ File List ’ , and press ‘ Left' button t o change
focus on
‘ File List ’ .
G 7.3.1-1
• Press ‘ Green' button
to pop up “ Multi-File Editing' window,
select ‘ Copy ’ , press ‘ OK 'button to confirm.
55
Page 68

G 7.3.1-2
• Select the di r ec t o r y in ‘ Copy Destination' and press ‘ Play'
button
t o do the operation.
G 7.3.1-3
• Press ‘ Green' button t o pop up‘ Multi-File
Editing
window
,
select ‘ Exit' to comple t e the p r ocess.
56
Page 69

G 7.3.1-4
※ Delete and Move operation is the same as ‘ Copy' operation, please
reference to “ Copy' process.
◇ Create Photo Album
• Photo -> Press ‘ Red' button -> Create Photo Album
• If you want to create a new photo album please follow the step:
• 1. In File List window, please follow the instructions below the
screen
select files to ‘ File List ’ , and press ‘ Left' button to change
focus on
‘ File List ’ .
G 7.3.2-1
• Press ‘ Green' button t o pop up ‘ Multi-File
Editing 'window
, select
‘ C r ea t e Pho t o Album ’ , press ‘ OK' button t o confirm.
G 7.3.2-2
• If y ou want t o r ename playlist file, please select ‘ Rename' and
p r ess
‘ Ok' button t o confirm it which will pop up‘ Mini Keyboard' to edit
file name.
57
Page 70

G 7.3.2-3
• Please follow the instruction below the sc r een fill the playlist
file name
in Edit Bar. Select Edit Bar or OK p at t ern press ‘ Ok' button t o
confirm
G 7.3.2-4
• Select OK p at t ern press ‘ OK' button t o confirm. It will b ack
t o ‘ File
List ’ , press ‘ Green' button select ‘ Exit' to comple t e the
operation.
58
Page 71

G 7.3.2-5
G 7.3.2-6
◆
◆
◆
◆ P
P
P
P L
L
L
L
A
A
A
A
Y
Y
Y
Y MOVIES
MOVIES
MOVIES
MOVIES
• The Movies menu is the folder placing the video files.
Y
ou can
b r owse all video files in the folder and can play the video file
that y ou
selec t ed.
◇ Video
Pla y er
G 8.0-1
• Movies -> press ‘ OK' or ‘ Play' button
• If y ou want t o play the selec t ed video file in full sc r een,
p r ess ‘ OK ’
but t on or ‘ Play' button t o sta r t the operation. During play b ac k ,
y ou
can p r ess but t ons:
• ‘ Left' to skip t o the position a f t er 10 sec
• ‘ Right' to jump b ack t o the position befo r e 10 sec
• ‘ FF' to fast fo r wa r d 1.5x, 2x, 4x, 8x, 16x, 32x
• ‘ FR' to fast r ewind 1x, 1.5x, 2x, 4x, 8x, 16x, 32x
Page 72

59
Page 73

• “ Next ” t o jump t o the next section in video playing
• ‘ Previous' to jump t o the p r evious section in video playing
• ‘ Zoom' to zoom in/out 2 X , 3 X , 4 X , 8X
• ‘ Stop' or ‘ Return' to s t op playing
• Press ‘ Info' button t o display the info r mation o f the video file.
G 8.1-2
• During play b ac k , y ou can also press ‘ Option' button t o change the
setup o f play b ac k .
◇ DVD Menu
G 8.1-3
• Movies -> Play b ack -> press ‘ Option' button -> DVD Menu
• When playing DVD, it will r eturn t o DVD main menu if this option be
selec t ed.
•
◇ Subtitle
• Movies -> Play b ack -> press ‘ Option' button -> Subtitle
•
T
o set the national language subtitles, the r e a r e
• Open/Close show subtitle
• P osition o f subtitles: 0 ~ 640
• Font size : 3 ~ 40
• S ynch r onous tuning
• National language
60
Page 74

• Subtitle color
• Using ar r ow keys ‘ Left' and ‘ Right' button t o select i t ems,‘ Up'
and
‘ Down' to adjust the v alue. Press ‘ Return' to b ack playing.
◇ Audio
G 8.1.2-1
• Movies -> Play b ack -> press ‘ Option 'button -> Audio
•
T
o set the Audio Mode
• Using ‘ Up' and ‘ Down' buttons t o select audio mode, ‘ OK ’
but t on t o confirm. Press ‘ Return' to b ack
playing.
◇ Go
t o
G 8.1.3-1
• Movies -> Play b ack -> press ‘ Option' button -> Go t o
• Time shi f t t o the location y ou wan t ed
• The r e a r e th r ee type o f jump mode:
Page 75

• Time : Hour : Min : Sec
61
Page 76

• Title
• Chap t er
G 8.1.4-1
• Using ar r ow keys ‘ Left' and ‘ Right' button t o select i t ems,‘ Up'
and
‘ Down' to adjust the v alue. Press ‘ Return' to b ack
playing.
◇ Video Setting
• Movies -> Play b ack -> press ‘ Option' button -> Video Setting
• Brightness -> Contrast -> Saturation -> Hue
◇ B r owsing
File
G 8.1.5-1
• Movies -> press ‘ Option' button
• Pressing ‘ Option' button in the Movies b r owser, shown in Figu r e G
8.2-1, will pop up Option window which can swi t ch the b r owsing file
mode, including.
Page 77

62
Page 78

G 8.2-1
• Sea r ch -> Thumbnails -> List -> P r eview -> All Movies -> Show DVDs
-> Flash Animation -> Go t o Folder -> Name -> Size -> Most Vie w ed
-> R ecently Added
• Use the arrow ‘ Up 'and ‘ Down' buttons t o select,
press ‘ OK' button t o confirm.
◇ Sea r ch
• Movies -> Press ‘ Option' button -> Sea r ch
•
Y
ou can select ‘ Search' option t o sea r ch file by name.
◇ Thumbnails
G 8.2.1-1
• Movies -> Press ‘ Option' button -> Thumbnails
• Movies menu has the rules o f thumbnails
• Di r ec t o r y Thumbnail – If the r e is at least one image file under
this
di r ec t o r y then the di r ec t o r y will ha v e a thumbnail which made f r om
this image file. Othe r wise it will ha v e a normal thumbnail made f r om
default di r ec t o r y pictu r e.
63
Page 79

• File Thumbnail – If the r e is an image file which has the same file
name with the video file then this video file will ha v e a thumbnail
made f r om this image file. Othe r wise it will ha v e a normal thumbnail
made f r om default video pictu r e.
◇
List
G 8.2.2-1
• Movies -> Press ‘ Option' button -> List
• Movies file b r owser display files by ‘ List ’ .
◇
P r eview
G 8.2.3-1
• Movies -> Press ‘ Option' button -> P r eview
• Using this option t o p r eview the file, when y ou focus on file, it
will
show the info r mation in p r eview window, shown in Figu r e G 8.2.4-1
Page 80

64
Page 81

◇ All
Movies
G 8.2.4-1
• Movies -> Press ‘ Option' button -> All Pho t os
• In Movies file b r owser, the default option is ‘ All Movies ’ , it will
list
the t otal video files in this b r owser no mat t er whe r e the file place
in, it
means, sys t em will scan and collect all video files and lis t ed he r e.
◇ Show DVDs
G 8.2.5-1
• Movies -> Press ‘ Option' button -> Show DVDs
• This option only shows DVD- r ela t ed folde r s or files, othe r s such as
avi,
mov, rmvb and so on a r e not displa y ed.
Page 82

65
Page 83

G 8.2.6-1
【 NOTE 】 : This folder is not a directory, but used to play DVD
’
s links
◇ Go t o Folder
• Movies -> Press ‘ Option' button -> Go t o Folder
• This option will go t o the folder whe r e the file place in, and will
transfer the menu f r om Movies in t o File Manager with option:
‘ Movies ’ .
◇ Name
G 8.2.7-1
• Movies -> Press ‘ Option' button -> Name
• This option will so r t files by name.
66
Page 84

◇
Size
G 8.2.8-1
• Movies -> Press ‘ Option' button -> Size
• This option will so r t files by size.
◇ Most Vie w ed
G 8.2.9-1
• Movies -> Press ‘ Option' button -> Most Vie w ed
• This option will so r t files by Most Vie w ed.
67
Page 85

◇ R ecently Added
G 8.2.10-1
• Movies -> Press ‘ Option' button -> R ecently Added
• This option will so r t files by R ecently Added.
◇ File Handling (Using File
List)
G 8.2.11-1
• Movies -> Press ‘ Red' button.
Page 86

68
Page 87

• Press ‘ Red' button will pop up File List window, the r e a r e i t ems
t o do file handling operation, including
◇ Copy -> Dele t e -> Mo v e
【 NOTE 】 : Unli k e Music file b r owser, Movies file b r owser no suppo r t t o
c r ea t e a new playlist
• Copy/Dele t e/Mo v e operation
• Movies -> Press ‘ Red' button -> Dele t e
• ‘ Delete' operation s t ep:
• In File List window, please follow the instructions below the sc r een
select files t o ‘ File List ’ , and press ‘ Left' button t o change
focus on
‘ File List ’
G 8.3.1-1
• Press ‘ Green' button t o pop up ‘ Multi-File
Editing'
window
, select
‘ Dele t e ’ , press ‘ OK' button t o confirm.
69
Page 88

G 8.3.1-2
• Select ‘ Yes' and press ‘ OK' button t o confirm.
G 8.3.1-3
• Press ‘ OK' button t o confirm the operation.
G 8.3.1-4
• Press ‘ Green' button t o pop up‘ Multi-File
Editing 'window
,
70
Page 89

select ‘ Exit' to comple t e the p r ocess.
G 8.3.1-5
※ Copy and Move operation is the same as Photo file Browser operation,
please reference to section 7.3.1 “ Copy ’ process.
71
Page 90

※ TIPS:
• A simple file folder sys t em will g r eatly accelera t e the r esponse
speed
o f the sys t em. Mo r e complica t ed file folde r s will bring extra l o ad t o
the sys t em, and affect the p r ocessing speed o f the sys t em. A single
file
folder sys t em is r ecommended.
•
T
r y t o use English and Chinese charac t ers for the folder name.
No more than 10 characters, othe r wise, the
p r ocessing speed o f the sys t em will be seriously affec t ed!
• If any fault occu r s due t o dis-operation, please r esta r t and the
sys t em
will clear memory and reboot accordingly
• A f t er being used for a period o f time, y our mobile hard-disk may
contain some file fragments. Please p r operly clear it up in good
time;
othe r wise the operating speed o f the sys t em will be affec t ed. Please
use the DEFR A GMENT p r ogram attached t o y our compu t er t o do such
a job.
【 NOTE 】 :Due t o continuous pe r fection and upgrading o f the sys t em, the
actual display and operations may differ f r om the operating
instructions. This is a normal phenomenon, which will not affect y our
normal operation and enjoyments.
※ USB INTERFA CE C OMPA
TIBILI T Y
• The sys t em suppo r ts both USB1.1 and USB2.0 p r o t ocol. USB in t e r face
devices include:
• a) USB memo r y devices, such as mobile ha r d disks, USB disks, MP3
pla y e r s, memo r y ca r d r eade r s (suppo r ting SD 、 MMC 、 Memo r y S tic k ,
MS P r o and other memo r y ca r ds).
• b) USB image devices, such as digital cameras.
• c) USB Hub devices, such as Hubs with USB1.1 USB2.0 in t e r faces.
• The file sys t em o f USB in t e r face suppo r ts
FAT16/32 、 NT F S 、 (Linux)
E X T3.
【 NOTE 】 : b ased on the USB1.1 p r o t ocol, due t o the data r eading speed o f
USB devices and fragmen t ed files in the file sys t em (in successi v e
add r esses for file s t orage), some video images at v e r y high speed
possibly cannot be pla y ed smoothly. Memo r y devices in USB 2.0 High Speed
in t e r face p r o t ocol a r e r ecommended.
72
Page 91

◆ IMPO
IMPO
IMPO
IMPO R
R
R
R
T
T
T
T
ANT
ANT
ANT
ANT SAF
SAF
SAF
SAF E
E
E
E T
T
T
T Y
Y
Y
Y INSTRUCTIONS
INSTRUCTIONS
INSTRUCTIONS
INSTRUCTIONS
•
This device is designed and manufactu r ed t o assu r e pe r sonal
safety. Imp r oper usage can r esult in electric shock or fi r e haza r d.
•
R ead these instructions. K eep these instructions. Heed all warnings.
•
Do not mo v e the device when it is po w e r ed on.
•
Do not use this ap p aratus near wa t er. Clean only with a d r y cloth.
•
Do not install near any heat sou r ces such as radia t o r s, heat
r egis t e r s,
s t o v es, or other ap p aratus (including amplifie r s) that p r oduce heat.
•
P r o t ect the po w er co r d f r om being wal k ed on or pinched p a r ticularly
at the plugs.
• Only
use attachments/accessories specified by the manufacturer.
•
Unplug this ap p aratus during lightning s t orms or when unused for
long periods o f time.
•
R efer all se r vicing t o qualified se r vice personnel. se r vicing is
r equi r ed
when the ap p aratus has been damaged in any way, such as po w ersupply co r d or plug is damaged, liquid has been spilled or objects
ha v e fallen in t o the ap p aratus, the ap p aratus has been exposed t o
rain
or moistu r e, does not opera t e normally, or has been d r opped.
•
Ca r efully r ead and follow the quick install guide and user manual.
•
Do not o v erl o ad wall outlets.
(c) Dynamode. E&OE. All trademarks acknowledged
73
 Loading...