

Page 1

802.11n Wireless Access Point and Bridge
BR411AP
Page 2

The BR411AP provides connectivity between Ethernet wired networks and
radio-equipped wireless devices. It is an easy, web-based setup for installation and
management. Even though you may not be familiar with the AP, this guide will make
configuring the AP easy. Before installing the AP, please look through this guide to get
to know all the AP’s functions.
Features:
◆
Supports 64/128-bit WEP, complies with 128 bit WPA standard(TKIP/AES)
◆ Supports 135/121.5/108/81/54/40.5/27/13.5/65/58.5/52/39/26/19.5/13/6.5/54/48/
36/24/18/12/9/6/11/5.5/2/1Mbps wireless LAN data transfer rates
Provides Bridge(AP/Client) mode
Wireless speed up to 150Mbps when connected to 11n device
Wireless security encryption easily at a push of “WPS” button
Seamlessly compatible with 802.11b and 802.11g devices
2dBi Fixed Antenna
Specifications:
Software Specification
Standards IEEE 802.11n, IEEE 802.11g, IEEE 802.11b
Wireless Signal Rates
With Automatic
Fallback
11n: Up to 150Mbps (Dynamic)
11g: Up to 54Mbps (Dynamic)
11b: Up to 11Mbps (Dynamic)
Frequency Range 2.4-2.4835GHz
Wireless Transmit
Power
20dBm(MAX)
Modulation Type DBPSK,DQPSK,CCK, OFDM
135M: -68dBm@10% PER
Receiver Sensitivity
54M: -68dBm@10% PER
11M: -85dBm@8% PER
Wireless Range
Wireless Security
Indoors up to 100m, Outdoors up to 300m
64/128 bit WEP
WPA/WPA2, WPA-PSK/WPA2-PSK (TKIP/AES)
Hardware Specification
Interface 1 10/100M Ethernet Ports
Antenna Type Detachable Omni-directional Antenna
Power supply Input AC100~240V,output DC9 V/1A
Operating Temperature0°C~40°C (32~104)
Storage Temperature -40°C~70°C (-40~158)
Relative Humidity 10% ~ 90%, non condensation
Storage Humidity 5%~95% non-condensing
Weight 110.6g
Dimensions 88mm × 88mm × 30 mm
Page 3
1. Hardware installation:
1-1 Connect one end of power adapter to power port on Wireless Access Point and
connect the other end into an available electrical outlet.
1-2 Connect Ethernet cable between computer and Access Point’s Ethernet port
when you want to set the Access Point. After finishing settings, connect the
Ethernet cable between the wired network(router or Switch) and the Access
Point’s Ethernet port.
2. Software installation:
2-1 IP address assignment
You must assign your computer a static IP address within the same range as the IP
address of the Access Point. The Access Point’s default IP address is
Subnet mask of
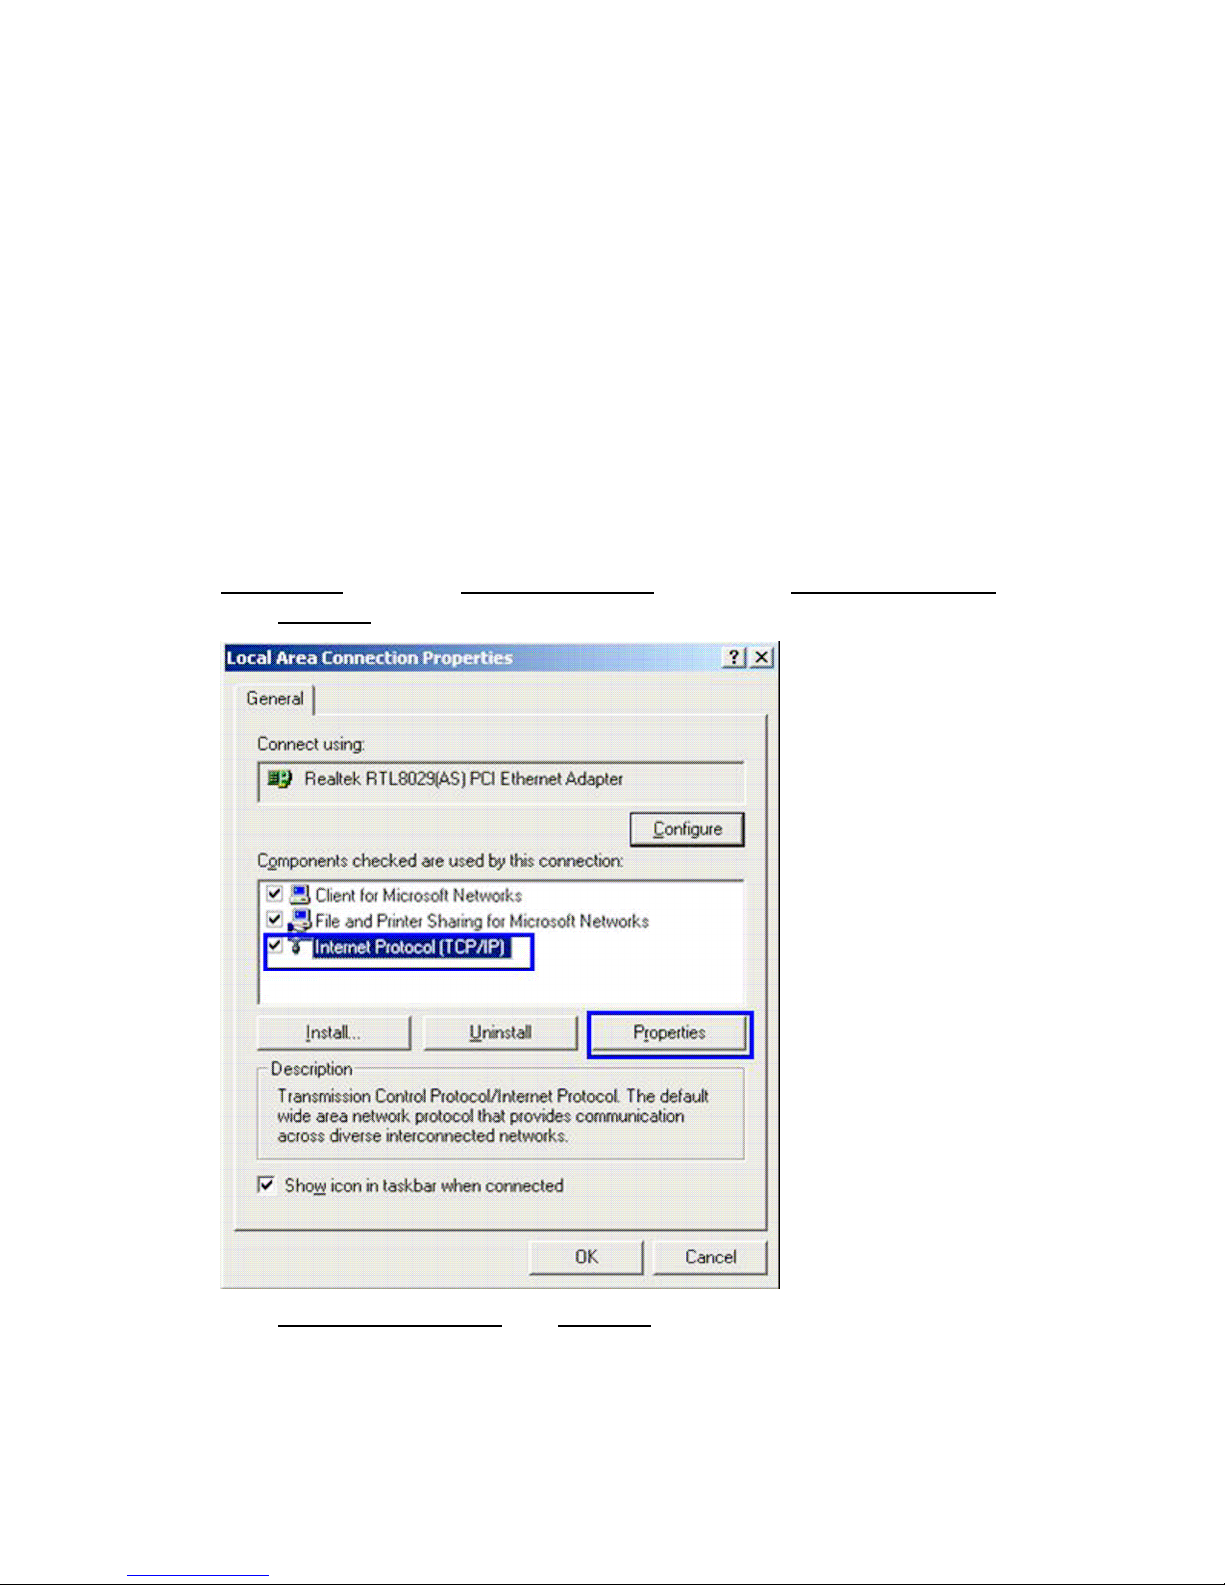
2-1-1 Windows 2000/XP IP address assignment
Click the Start button (it should be located at the lower-left corner of your monitor), then click
Control Panel
Properties
Select
255.255.255.0
. Double-click
, Local Area Connection status window will appear.
. Please see the detailed information below:
Network Connections
, then right-click
10.10.10.254
Local Area Connection
with a
,
Internet Protocol(TCP/IP)
Select
, Click
Properties
,
Page 4
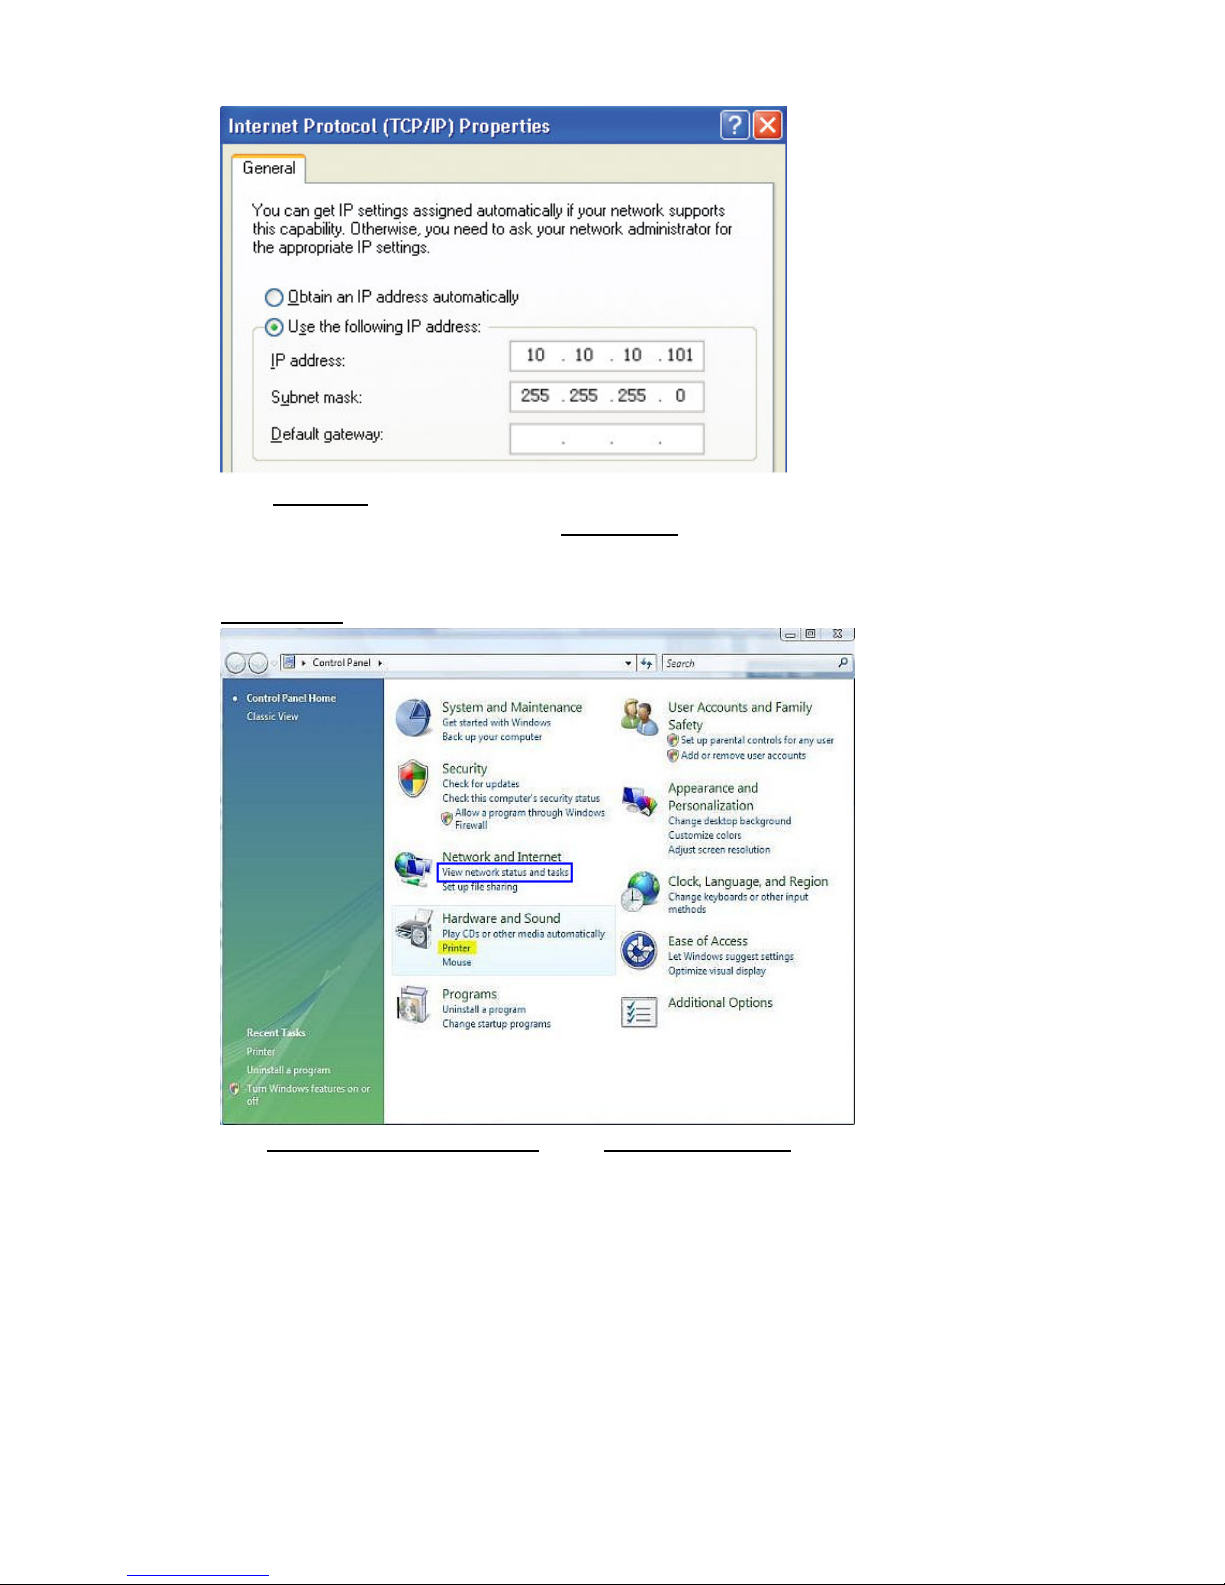
IP address
In the
field, enter the address
between 2 and 253, such as 101). In the
10.10.10.x
(x should be replaced by a number
Subnet mask
field, enter
255.255.255.0
.
2-1-2 Windows Vista IP address assignment
Click the Start button (it should be located at the lower-left corner of your monitor), then click
Control Panel
.
View network status and tasks (
Click
Network and Internet)
under
.
Page 5
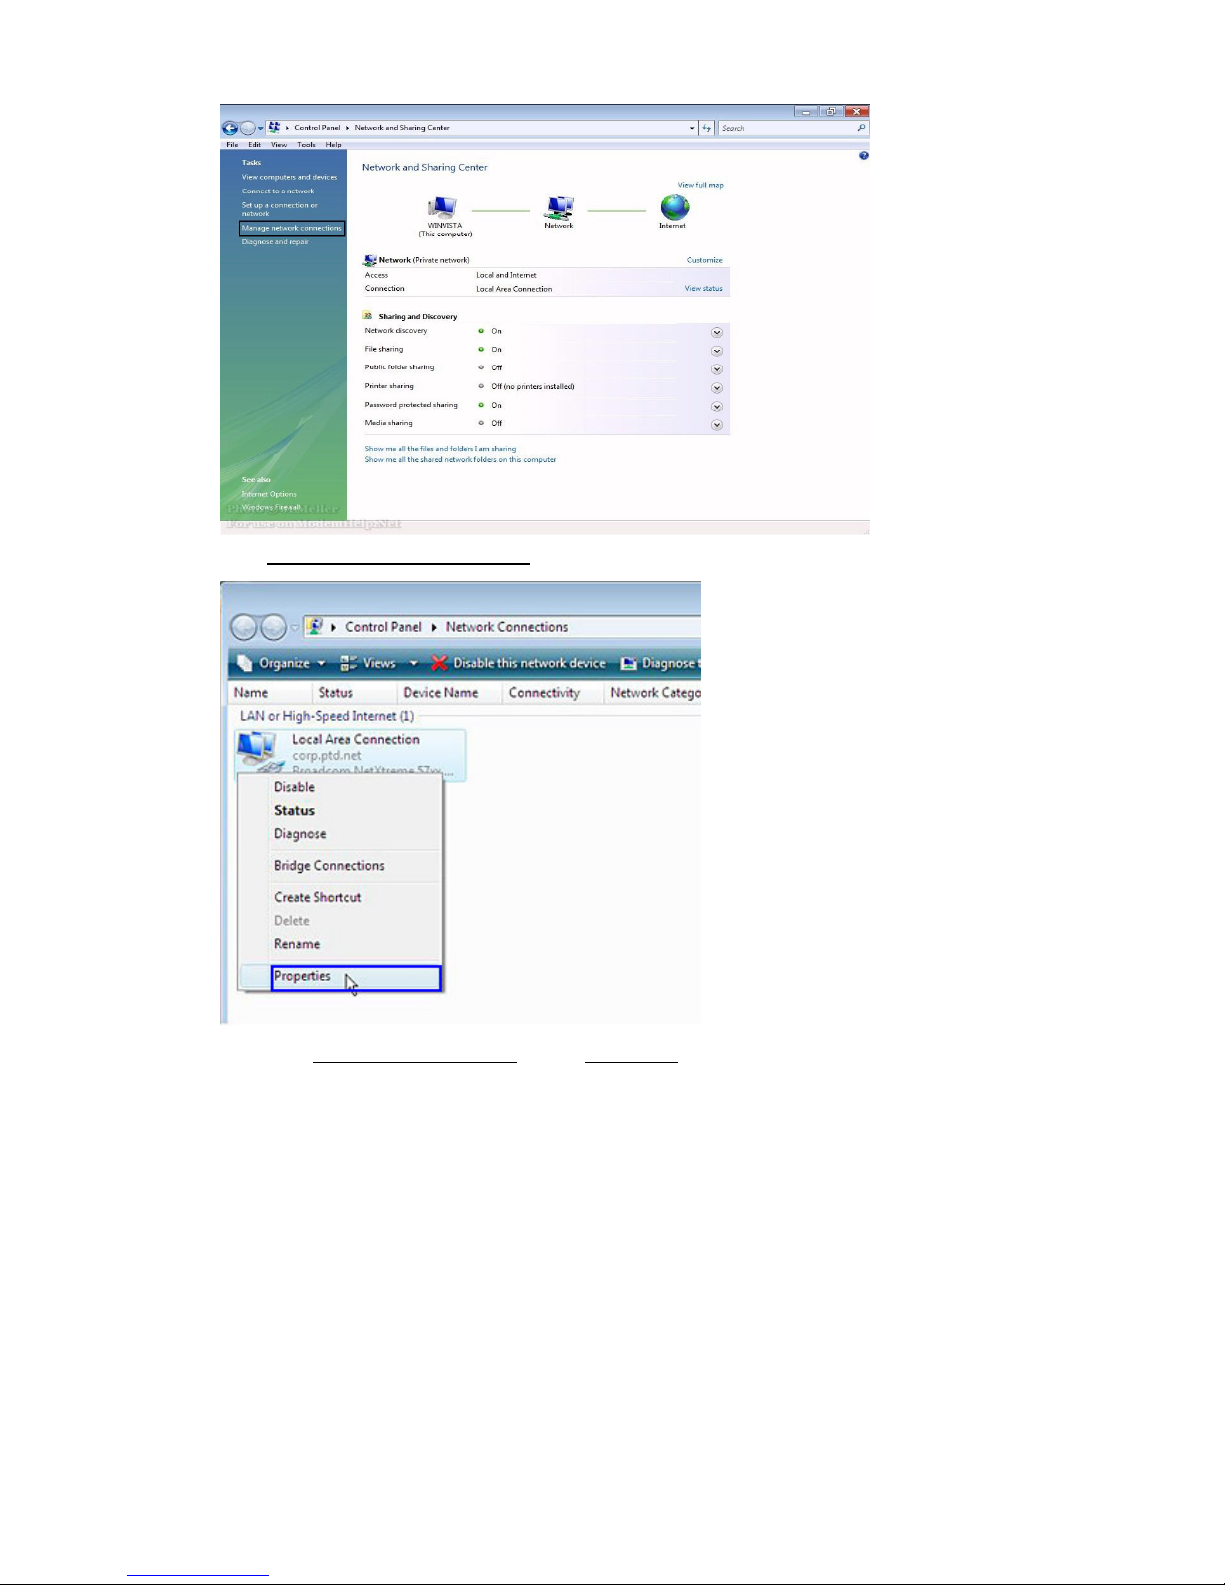
Manage network connections
Click
Right-click
will appear.
Local Area Connection
, Select
Properties
, Local Area Connection status window
Page 6
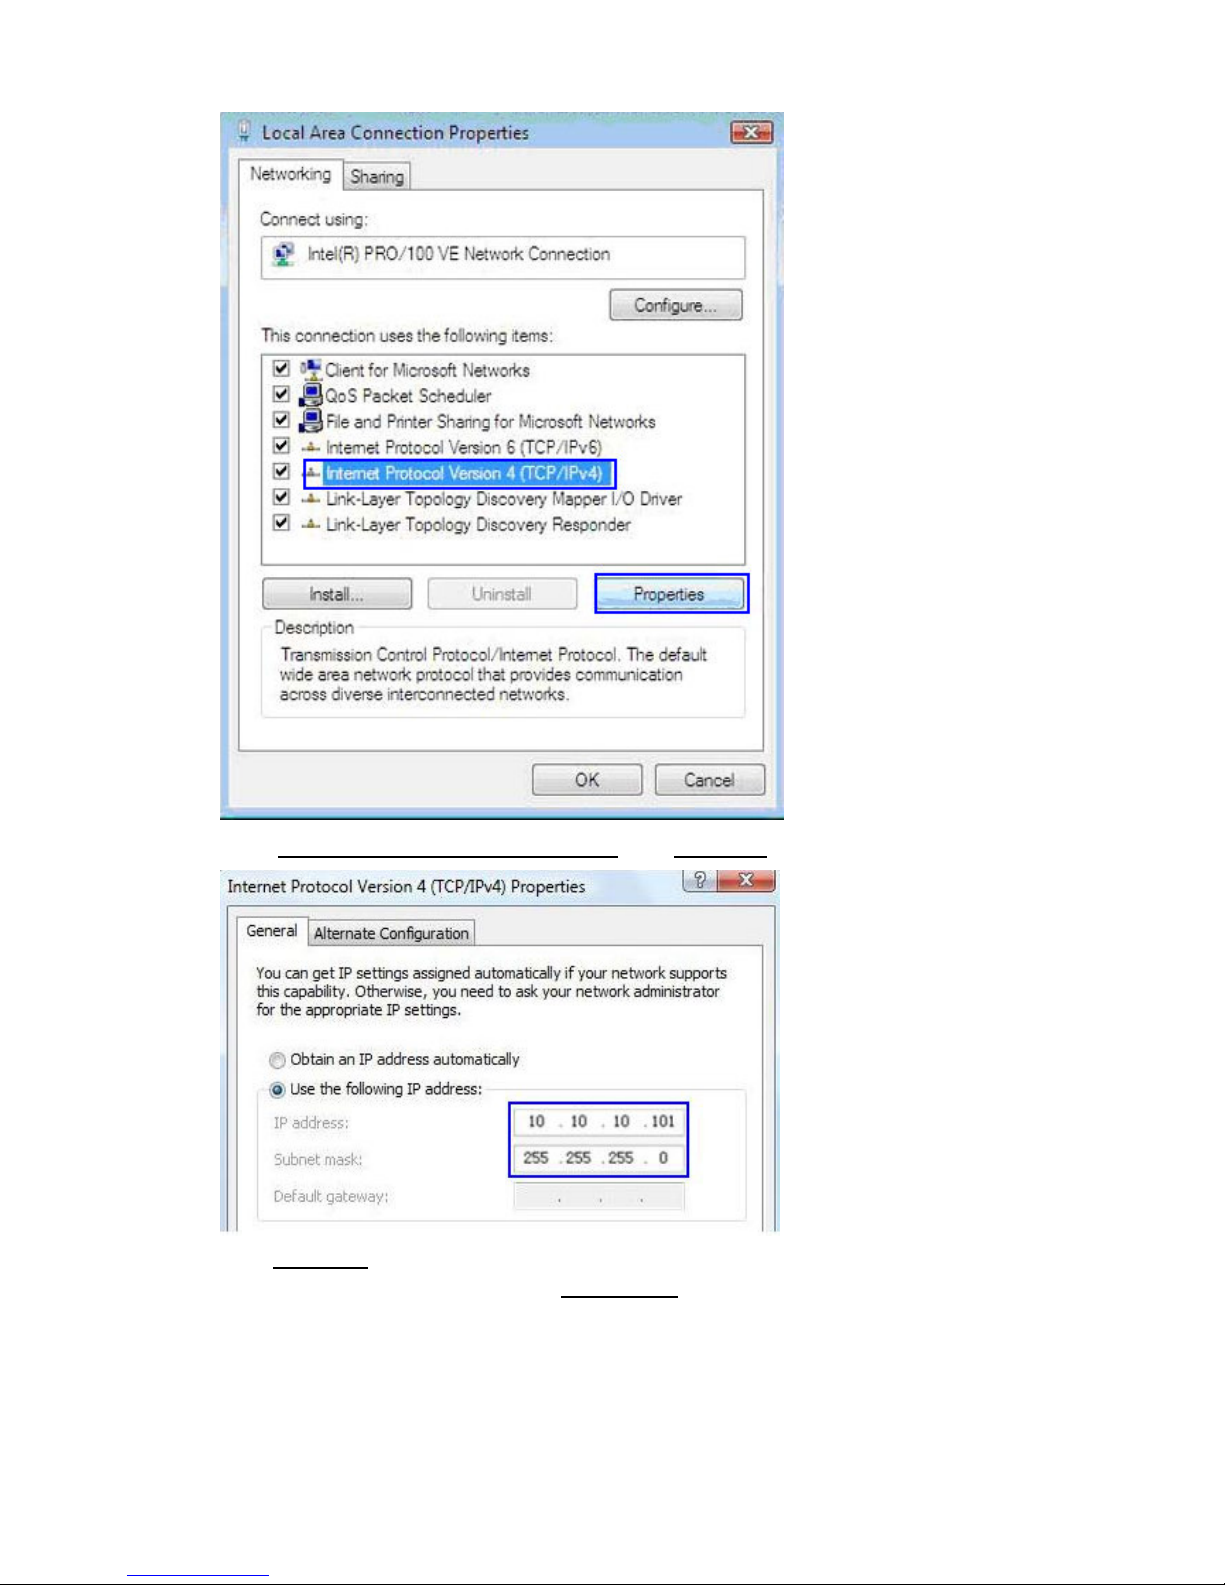
Internet Protocol Version 4 (TCP/IPv4)
Select
, Click
Properties
,
IP address
In the
between 2 and 253, such as 101). In the
field, enter the address
10.10.10.x
Subnet mask
(x should be replaced by a number
field, enter
255.255.255.0
.
NOTE: If numbers are already present in the IP address, Subnet Mask and/or
Default gateway fields, be sure to write them down as you will need to re-enter them
so your PC can access the Internet once Access Point configuration is complete.
Page 7
2-2 Access Point Configuration
2-2-1 Login
Typing http://10.10.10.254 in the address field of web browser. After a moment, a
login window will appear, Enter
admin
for the User Name and Password, both in lower
case letters. Then click the OK button or press the Enter key.
After your successful login, you can configure and manage the AP.
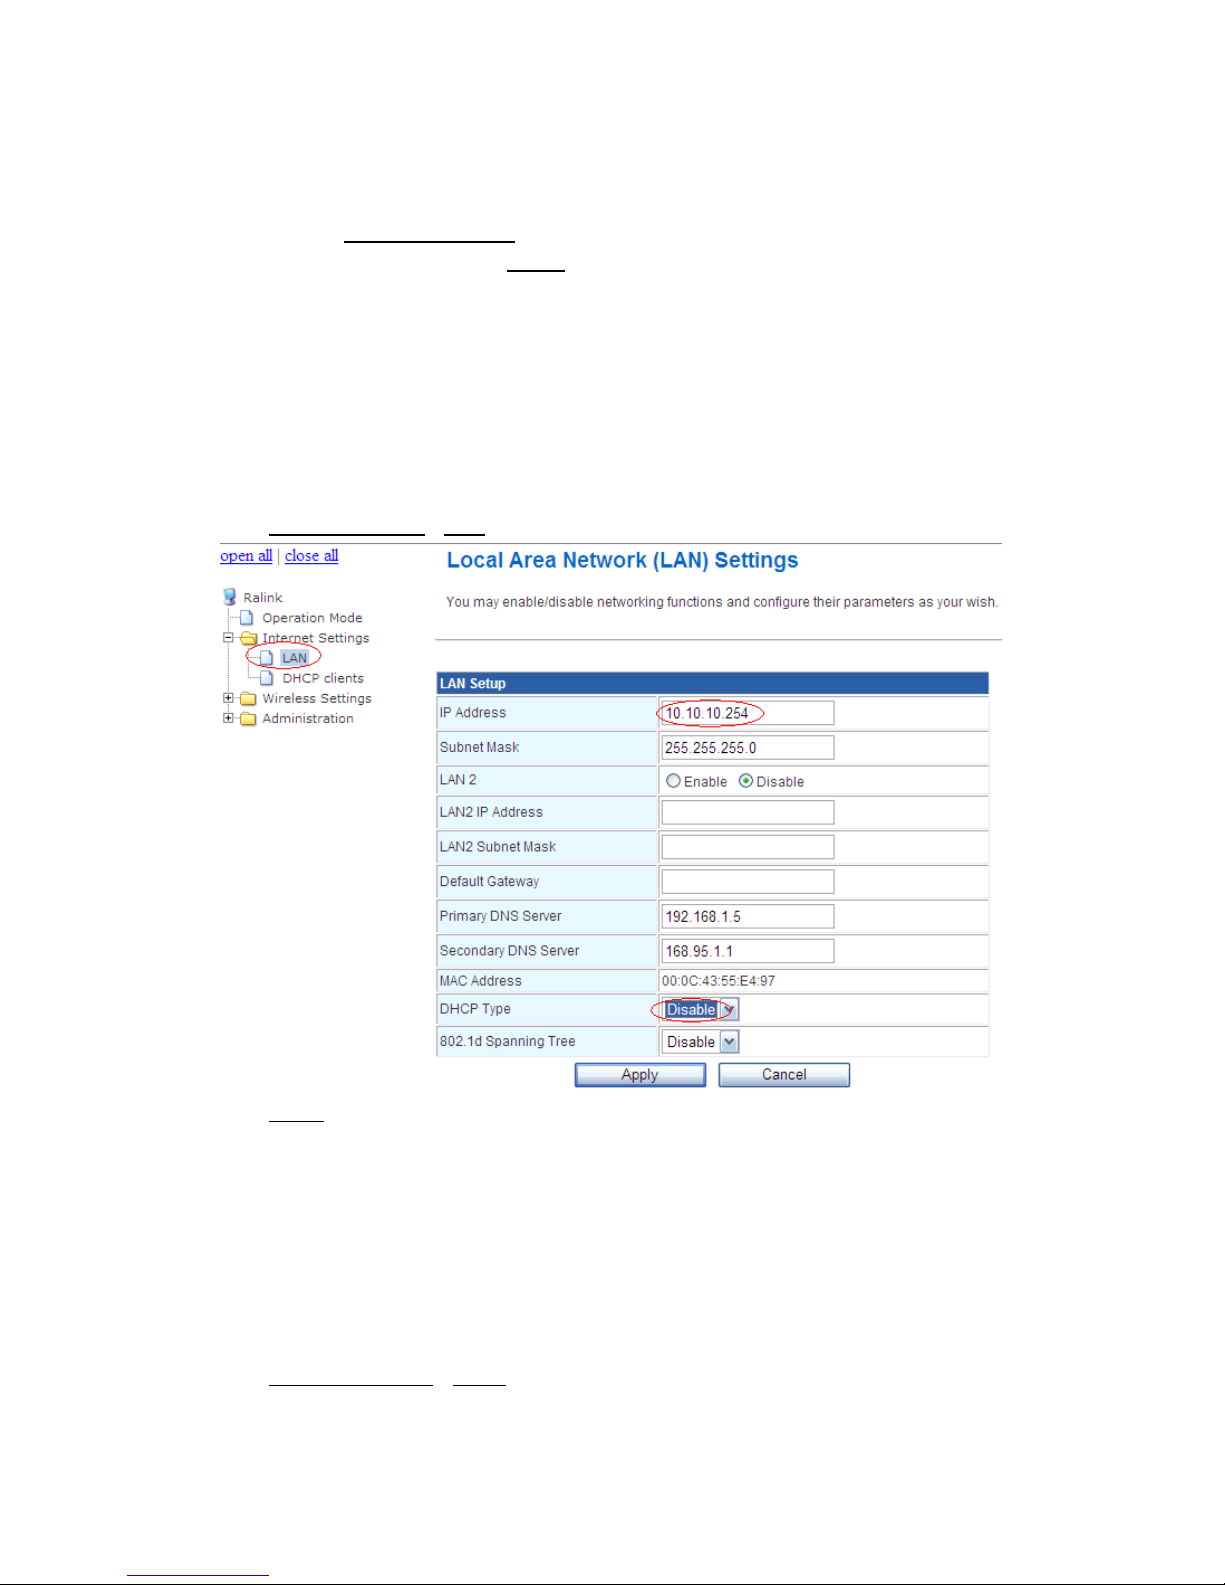
2-2-2 LAN Settings
You may enable/disable networking functions and configure their parameters as
your wish. for example, you can change the IP address and enable/disable the DHCP
server, if there exist another DHCP server within your network, you must disable this AP’s
DHCP server. As below:
Click Internet SettingsLAN
Click Apply save the settings
2-2-3 Wireless Settings
2-2-3-1 Basic Wireless Settings
You could configure the minimum number of Wireless settings for communication,
such as Network Name (SSID) and Channel. The Access Point can be set simply with
only the minimum setting items. As below:
Click Wireless SettingsBasic
Page 8

2-2-3-2 Wireless Security/Encryption Settings
Setup the wireless security and encryption to prevent from unauthorized access and
monitoring. As below:
Click Wireless SettingsSecurity
Click
save settings.
Apply
2-2-3-3 Wi-Fi Protected Setup
You could setup security easily by choosing PIN or PBC method to do Wi-Fi
Protected Setup. As below:
Click
Wireless SettingWPS
Page 9
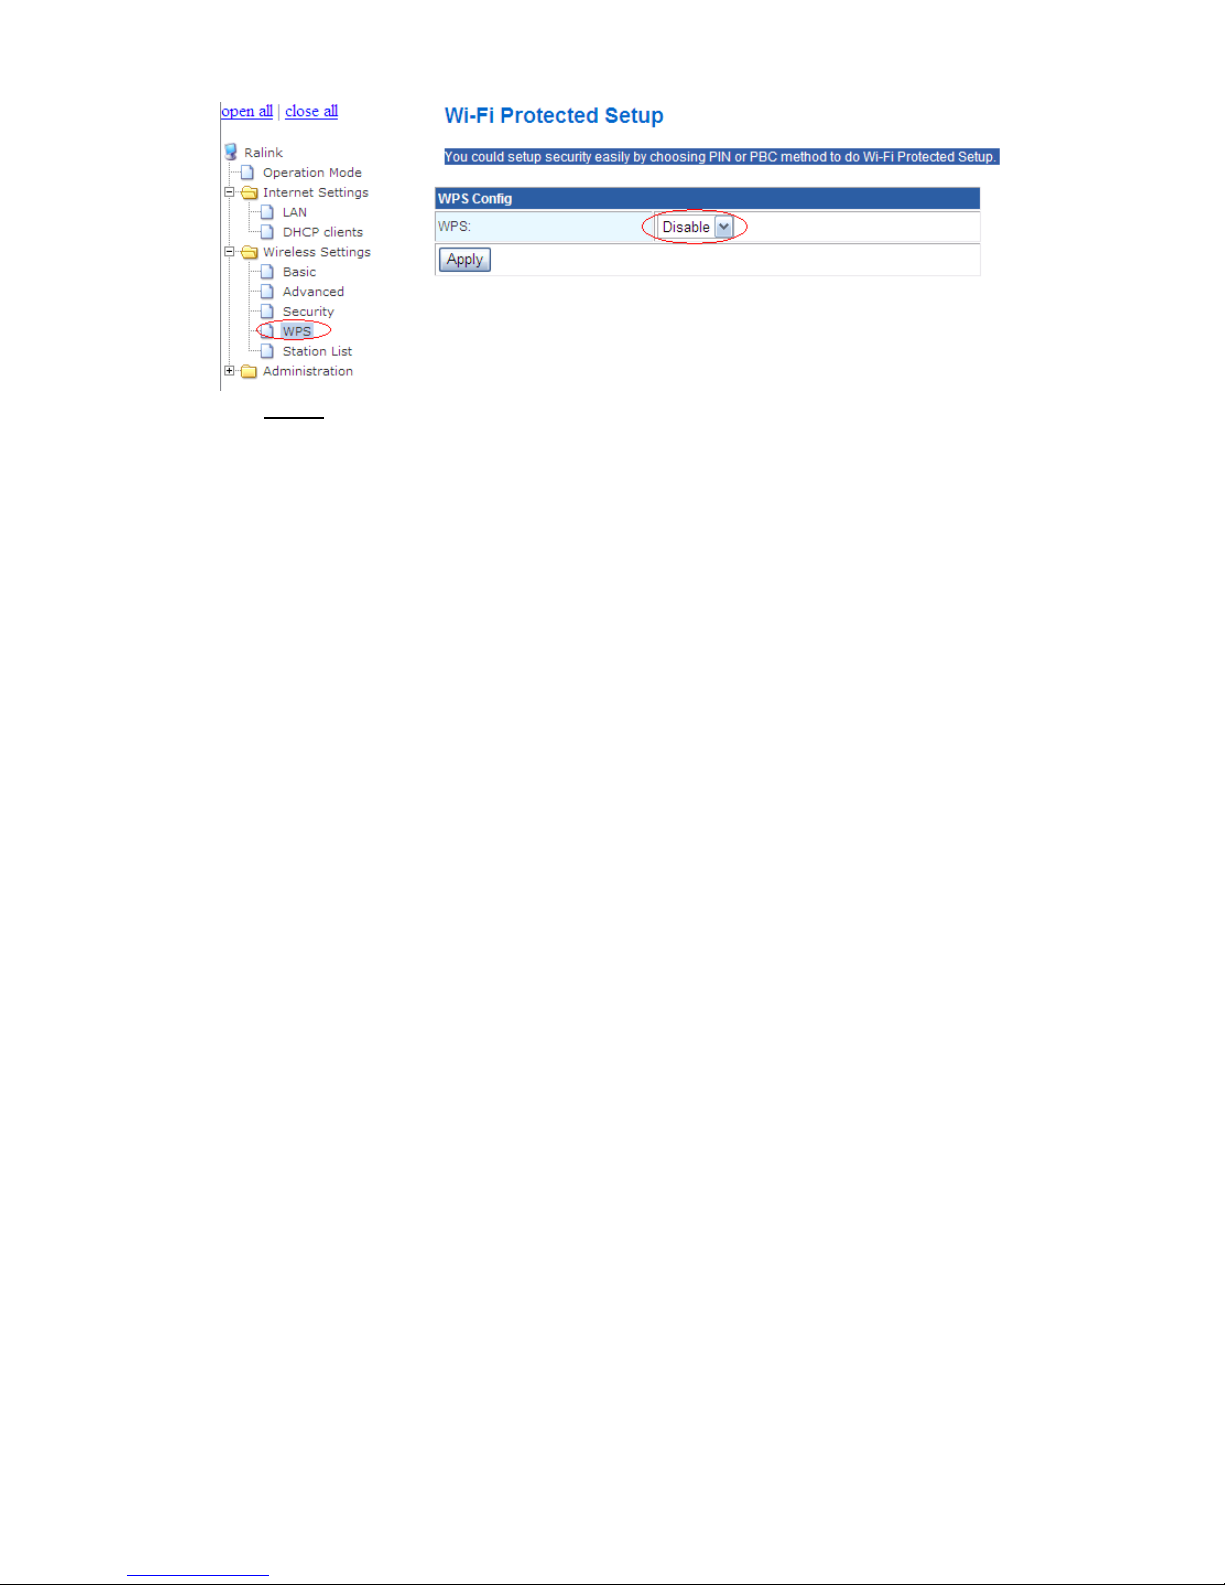
Click
Apply
save settings
Finish above settings, you can connect this AP to your wired network(Router
or switch) and setup your pc’s wireless LAN adapter and select the AP’s SSID to
join it. Then you can communicate wirelessly with other client within wired network.
 Loading...