

Page 1
Passport™ Duo 400W Dual AC/DC Touch Charger
Instruction Manual | Bedienungsanleitung | Manuel d’utilisation | Manuale di Istruzioni
NOTICE
All instructions, warranties and other collateral documents are subject to change at the sole discretion of Horizon Hobby, LLC. For up-to-date product literature, visit
horizonhobby.com and click on the support tab for this product.
MEANING OF SPECIAL LANGUAGE
The following terms are used throughout the product literature to indicate various levels of potential harm when operating this product:
NOTICE: Procedures, which if not properly followed, create a possibility of physical property damage AND a little or no possibility of injury.
CAUTION: Procedures, which if not properly followed, create the probability of physical property damage AND a possibility of serious injury.
WARNING: Procedures, which if not properly followed, create the probability of property damage, collateral damage, and serious injury OR create a high probability of
superficial injury.
WARNING: Read the ENTIRE instruction manual to become familiar with the features of the product before operating. Failure to operate the product correctly
can result in damage to the product, personal property and cause serious injury.
This is a sophisticated hobby product. It must be operated with caution and common sense and requires some basic mechanical ability. Failure to operate this Product
in a safe and responsible manner could result in injury or damage to the product or other property. This product is not intended for use by children without direct adult
supervision. Do not attempt disassembly, use with incompatible components or augment product in any way without the approval of Horizon Hobby, LLC. This manual
contains instructions for safety, operation and maintenance. It is essential to read and follow all the instructions and warnings in the manual, prior to assembly, setup or
use, in order to operate correctly and avoid damage or serious injury.
Age Recommendation: Not for children under 14 years. This is not a toy.
INCLUDED ITEMS
(2) Banana plug to EC3™ battery connector (DYNC0066)
AC power cord (one region—US, EU, AU or UK)
(2) JST_XH balance adapter (DYN5032)
OPTIONAL ITEMS
DC power cord (DYNC1103)
Banana to Traxxas® insulated charge adapter: male (DYNC0054)
Charger lead with receiver connector (DYNC0033)
Banana to Deans insulated charge adapter: male (DYNC0053)
LiPo Charge Protection Bag, Small (DYN1400)
LiPo Charge Protection Bag, Large (DYN1405)
Temperature Sensor (DYN5033)
SPECIFICATIONS
Input Voltage 100-240V AC; 11-18V DC
Charging Capability 1–6S Li-Po/Li-Ion/Li-Fe;
1–10C Ni-Cd/Ni-MH; 2–24V Pb
Battery Capacities 50–10000 mAh
Charge Current 0.01–10.0A (in 0.1A increments/200W max per channel)
Discharge Current 0.01–5A (in 0.1A increments/200W max per channel)
Operating Temperature 0ºC to + 40ºC
Charging Mode Ni-Cd/Ni-MH: Peak; Li-Po/Li-Ion/Li-Fe/Pb: CC/CV
Protection Short-circuit, over-current, reverse polarity, low input
voltage, over-temperature
NOTICE: This appliance is not intended for use by persons with reduced physical, sensory or mental capabilities, or lack of experience and knowledge, unless they have been
given supervision or instruction concerning use of the appliance by a person responsible for their safety.
CHARGING WARNINGS
WARNING: Failure to exercise caution while using this product and
comply with the following warnings could result in product malfunction,
electrical issues, excessive heat, FIRE, and ultimately injury and property
damage.
• NEVER LEAVE CHARGING BATTERIES UNATTENDED.
• NEVER CHARGE BATTERIES OVERNIGHT.
• Never attempt to charge dead, damaged or wet battery packs.
• Never attempt to charge a battery pack containing different types of batteries.
• Never allow children under 14 years of age to charge battery packs.
• Never charge batteries in extremely hot or cold places or place in direct
sunlight.
• Never charge a battery if the cable has been pinched or shorted.
• Never connect the charger if the power cable has been pinched or shorted.
• Never connect the charger to an automobile 12V battery while the vehicle is
running.
• Never attempt to dismantle the charger or use a damaged charger.
• Never attach your charger to both an AC and a DC power source at the same
time.
• Never connect the input jack (DC input) to AC power.
• Always use only rechargeable batteries designed for use with this type of
charger.
• Always inspect the battery before charging.
• Always keep the battery away from any material that could be affected by
heat.
• Always monitor the charging area and have a fire extinguisher available at all
times.
• Always end the charging process if the battery becomes hot to the touch or
starts to change form (swell) during the charge process.
• Always connect the charge cable to the charger first, then connect the battery
to avoid short circuit between the charge leads. Reverse the sequence when
disconnecting.
• Always connect the positive red leads (+) and negative black leads (–) correctly.
• Always disconnect the battery after charging, and let the charger cool between
charges.
• Always charge in a well-ventilated area.
• Always terminate all processes and contact Horizon Hobby if the product
malfunctions.
WARNING: Never leave charger unattended, exceed maximum charge
rate, charge with non-approved batteries or charge batteries in the wrong
mode. Failure to comply may result in excessive heat, fire and serious
injury.
CAUTION: Always ensure the battery you are charging meets the
specifications of this charger and that the charger settings are correct.
Not doing so can result in excessive heat and other related product
malfunctions, which can lead to user injury or property damage. Please
contact Horizon Hobby or an authorized retailer with compatibility
questions.
GETTING STARTED
Using an AC Power Source:
1. Ensure the charger is powered OFF.
2. Connect the AC power cord (D) to the AC power source.
3. Power ON the charger with the Power Switch (A).
4. When the charger is powered ON, a message will appear on the LCD Touch
Screens (E,F).
Using a DC Power Source:
1. Connect the DC power cord to the charger DC Power Input Port (C)
2. Connect the DC alligator clips to the DC power source.
3. Power ON the charger with the Power Switch (A).
4. When the charger is powered ON, a message will appear on the LCD Touch
Screens (E,F).
Connecting the Battery to the Charger:
CAUTION: Always power ON the charger before connecting a battery, or
damage to the charger and the battery can result.
1. With charger powered on, select charging settings.
2. Connect the battery to the charger.
3. Start battery charging.
CAUTION: Before charging, always ensure you have chosen the correct
battery chemistry type for the battery you are charging.
PROGRAMMING QUICK GUIDE
1. Press the Left and Right Arrows on the LCD Touch Screen to scroll through
the main menu screens.
2. Press the action at the bottom of the LCD Touch Screen to enter that menu.
3. Press a parameter to highlight that parameter.
4. Press the Up and Down Arrows to edit the parameter.
5. Press Select to save the parameter.
6. If there is more than one screen of parameters, press the top right corner of the
LCD Touch Screen to scroll through the parameter screens.
7. Press Back to return to the main menu screens.
When the charger is powered ON, there is a series of self tests and the screen will
show the charger brand name and model number.
DYNC3005
USER_NAME
OPERATING YOUR CHARGER
CAUTION: If at any time during the charge process the battery pack becomes hot or begins to puff disconnect the battery immediately and discontinue the
charge process as batteries can cause fire, collateral damage and injuries.
CAUTION: Using a charge rate that is not compatible with the battery capacity may result in damage or malfunction of the charger or battery.
CAUTION: The Lithium charge program menus are to be used ONLY for the charging and discharging of Lithium battery packs. Charging other battery types
using the Lithium charge programs will damage the battery or the charger.
1 - SELF TEST AND PROGRAM SELECT SCREENS
1. Connect the JST_XH balance adapter to the Balance Circuit Adapter Board
Connector (6).
2. Connect the battery connector to the device connector.
3. Connect the balance connector of the battery to the JST_XH balance adapter.
4. Press the Left and Right Arrows on the LCD Touch Screen to scroll through
the main menu screens until you reach Program Select=Li-Po/Li-Ion/Li-Fe/Li-HV.
Program select=LiPo
LiPo
CHG DCHG STOR
5. Press CHG.
LiPo CHARGE
Pack.Volt. : 11.1V/3S
Capacity : 2100mAh
Current : 2.1A
End Cell Volt : 4.20V
Press&Hold : CHARGE
BACK SELECT
6. Press a parameter to highlight that parameter.
7. Press the Up and Down Arrows to edit the parameter.
8. Press Select to save the parameter.
9. Once the parameters are at the desired settings, press and hold CHARGE.
10. The charger will check the battery and charger settings and charging will begin.
The charger will beep and display the following screen:
LiPo CHG 000:11S
Capacity : 11mAh
Current : 4.0A
Voltage : 8.00V
Resistance : 392mΩ
Peak Temp. : No sens
STOP Unit Graph
11. Press the arrow in the top right of the LCD Touch Screen to see the rest of
the Charging information.
12. Press Unit to see the voltages for each cell. Press Back to return to the
charging screen.
13. Press RES. to see the cell resistance screen. Press Back to return to the
voltage screen.
14. Press Graph to see the battery voltage graph. Press Back to return to the
charging screen.
Data LiPo = Graph
8.03V 000:34S
BACK
15. Press STOP at any time to stop charging.
16. When charging is complete, the charger will sound a series of beeps and
display the following screen:
17. Press the arrow in the top right of the LCD Touch Screen to see the rest of
the Charging information.
18. Disconnect the battery from the charger.
2 - LITHIUM (LI-PO/LI-FE/LI-ION/LI-HV) CHARGING
3 - LITHIUM DISCHARGING
2A- LITHIUM HIGH VOLTAGE
1. Connect the JST_XH balance adapter to the Balance Circuit Adapter
Board Connector (6).
2. Connect the battery connector to the device connector.
3. Connect the balance connector of the battery to the JST_XH balance adapter.
4. Press the Left and Right Arrows on the LCD Touch Screen to scroll
through the main menu screens until you reach Program Select=Li-Po/Li-Ion/
Li-Fe/Li-HV.
5. Press DCHG.
6. Press a parameter to highlight that parameter.
7. Press the Up and Down Arrows to edit the parameter.
8. Press Select to save the parameter.
9. Once the parameters are at the desired settings, press and hold DISCHRG.
10. The charger will check the battery and charger settings and discharging will
begin. The charger will beep and display the following screen:
11. Press the arrow in the top right of the LCD Touch Screen to see the rest of
the Discharging information.
12. Press Unit to see the voltages for each cell. Press Back to return to the
discharging screen.
13. Press RES. to see the cell resistance screen. Press Back to return to the
voltage screen.
14. Press Graph to see the battery voltage graph. Press Back to return to the
discharging screen.
15. Press STOP at any time to stop discharging.
16. When discharging is complete, the charger will sound a series of beeps and
display the following screen:
17. Press the arrow in the top right of the LCD Touch Screen to see the rest of
the Charging information.
18. Disconnect the battery from the charger.
4 - LITHIUM STORAGE CHARGING
1. Connect the JST_XH balance adapter to the Balance Circuit Adapter
Board Connector (6).
2. Connect the battery connector to the device connector.
3. Connect the balance connector of the battery to the JST_XH balance adapter.
4. Press the Left and Right Arrows on the LCD Touch Screen to scroll
through the main menu screens until you reach Program Select=Li-Po/Li-Ion/
Li-Fe/Li-HV.
5. Press STOR.
6. Press a parameter to highlight that parameter.
7. Press the Up and Down Arrows to edit the parameter.
8. Press Select to save the parameter.
9. Once the parameters are at the desired settings, press and hold STORE.
10. The charger will check the battery and charger settings and storage charging
will begin. The charger will beep and display the following screen:
11. Press the arrow in the top right of the LCD Touch Screen to see the rest of
the storage Charging information.
12. Press Unit to see the voltages for each cell. Press Back to return to the
storage charging screen.
13. Press Graph to see the battery voltage graph. Press Back to return to the
storage charging screen.
14. Press STOP at any time to stop charging.
15. When charging is complete, the charger will sound a series of beeps and
display the following screen:
16. Press the arrow in the top right of the LCD Touch Screen to see the rest of
the Charging information.
17. Disconnect the battery from the charger.
CAUTION: The nickel charge program menus are to be used ONLY for the charging and discharging of nickel battery packs. Charging other battery types using
the nickel charge programs will damage the battery or the charger.
1. Connect the battery connector to the device connector.
2. Press the Left and Right Arrows on the LCD Touch Screen to scroll through
the main menu screens until you reach Program Select=Ni-MH/Ni-Cd.
Program select=NiMH
CHG DCHG
N i M H
CYCLE
3. Press CHG.
NiMH CHARGE
Capacity : 50mAh
Current : 0.1A
CHG Mode : Man
Delta Peak : 5m V/C
Press&Hold : CHARGE
BACK SELECT
4. Press a parameter to highlight that parameter.
5. Press the Up and Down Arrows to edit the parameter.
6. Press Select to save the parameter.
7. Once the parameters are at the desired settings, press and hold CHARGE.
8. The charger will check the battery and charger settings and charging will begin.
The charger will beep and display the following screen:
NiMH CHG 000:09S
Capacity : 2mAh
Current : 1.8A
Voltage : 7.98V
Resistance : ****mΩ
Peak Temp. : No sens
STOP Graph
9. Press the arrow in the top right of the LCD Touch Screen to see the rest of
the Charging information.
10. Press Graph to see the battery voltage graph. Press Back to return to the
charging screen.
Data NiMH = Graph
8.03V 000:28S
BACK
11. Press STOP at any time to stop charging.
12. When charging is complete, the charger will sound a series of beeps and
display the following screen:
13. Press the arrow in the top right of the LCD Touch Screen to see the rest of
the Charging information.
14. Disconnect the battery from the charger.
Only Li-Po is shown in the following three sections. Li-Ion/Li-Fe/Li-HV menus differ ONLY in Cell and Pack Voltage values.
Only Ni-MH is shown in the following three sections.
TABLE OF CONTENTS
1 - Self Test and Program Select Screens
2 - Lithium (Li-Po/Li-Fe/Li-Ion/Li-HV) Charging
2A - Lithium High Voltage
3 - Lithium (Li-Po/Li-Fe/Li-Ion/Li-HV) Discharging
4 - Lithium (Li-Po/Li-Fe/Li-Ion/Li-HV) Storage Charging
5 - Nickel (Ni-MH/Ni-Cd) Charging
6 - Nickel Discharging
7 - Nickel Cycle Charging
8 - Pb Charging
9 - Pb Discharging
10 - Setup
11 - View
12 - Balance
13 - Memory
14 - USB Device Charging
15 - Troubleshooting
5 - NICKEL (NI-MH/NI-CD) CHARGING
VOLTAGE MUST BE SET TO THE CORRECT VALUE BEFORE THE CHARGER IS POWERED ON.
DATA LiPo–CELLS
BACK RES.
4.08 4.07 4.06 0.00 0.00 0.00
1> 114MΩ
2> 104
MΩ
3> 100
MΩ
4> -- MΩ
Main:320MΩ
– Resistance –
5>
--
MΩ
6> --
MΩ
7> --
MΩ
8> --
MΩ
BACK
LiPo CHG 010:30S
Input Volt : 12.22V
End Volt. : 12.60V
Int Temp : 21ºC
Safety Timer : 240min
Capacity Lim : 2100mAh
STOP Unit Graph
LiPo DONE 010:30S
Input Volt : 12.22V
End Volt. : 12.60V
Int Temp : 21ºC
Safety Timer : 240min
Capacity Lim : 2100mAh
STOP Unit Graph
NiMH DONE 001:15S
Input Volt : 14.8?V
Delta Peak : 8mV/C
Int Temp. : 60F
Safety Timer : 240min
Capacity Lim. : 3300mAh
BACK Cycle Graph
LiPo DCHG 000:30S
Capacity : 13mAh
Current : 1.4A
Voltage : 11.39V
Resistance : 369mΩ
Peak Temp. : No sens
STOP Unit Graph
LiPo DONE 000:30S
Input Volt : 12.25V
End Volt. : 11.40V
Int Temp : 20ºC
Safety Timer : 240min
Capacity Lim : 2100mAh
STOP Unit Graph
LiPo DONE 000:30S
Capacity : 13mAh
Current : 1.4A
Voltage : 11.39V
Resistance : 369mΩ
Peak Temp. : No sens
STOP Unit Graph
LiPo DONE 010:30S
Input Volt : 12.22V
End Volt. : 12.60V
Int Temp : 21ºC
Safety Timer : 240min
Capacity Lim : 2100mAh
STOP Unit Graph
LiPo STORE 010:30S
Input Volt : 12.22V
End Volt. : 12.60V
Int Temp : 21ºC
Safety Timer : 240min
Capacity Lim : 2100mAh
STOP Unit Graph
LiPo DONE 010:30S
Input Volt : 12.22V
End Volt. : 12.60V
Int Temp : 21ºC
Safety Timer : 240min
Capacity Lim : 2100mAh
STOP Unit Graph
Program select=LiPo
LiPo
CHG DCHG STOR
LiPo DISCHARGE
Pack.Volt. : 11.1V/3S
Capacity : 2100mAh
Current : 2.1A
End Cell Volt : 3.80V
Press&Hold : DISCHRG
BACK SELECT
DATA LiPo–CELLS
BACK RES.
3.80 3.80 3.80 0.00 0.00 0.00
Data LiPo = Graph
7.91V 001:25S
BACK
1> 114MΩ
2> 104
MΩ
3> 100
MΩ
4> -- MΩ
Main:320MΩ
– Resistance –
5>
--
MΩ
6> --
MΩ
7> --
MΩ
8> --
MΩ
BACK
DATA LiPo–CELLS
BACK RES.
3.80 3.80 3.80 0.00 0.00 0.00
NiMH DONE 001:15S
Capacity : 53mAh
Current : 0.0A
Voltage : 8.16V
Resistance : 53mΩ
Peak Temp. : No sens
BACK GraphCycle
Program select=LiPo
LiPo
CHG DCHG STOR
A
CB
D
E
F
G H I J K L M N O
LiPo STORAGE
Pack.Volt. : 11.1V/3S
Capacity : 2100mAh
Current : 2.1A
End Cell Volt : 3.80V
Press&Hold : STORE
BACK SELECT
LiPo STORE 000:11S
Capacity : 4mAh
Current : 2.0A
Voltage : 11.8V
Resistance : 375mΩ
Peak Temp. : No sens
STOP Unit Graph
LiPo DONE 000:11S
Capacity : 4mAh
Current : 2.0A
Voltage : 11.8V
Resistance : 375mΩ
Peak Temp. : No sens
STOP Unit Graph
Data LiPo = Graph
8.03V 000:34S
BACK
NiMH CHG 000:09S
Input Volt : 12.24V
Delta Peak : 1.8A
Int Temp : 21ºC
Safety Timer : 240min
Capacity Limit : 2100mAh
STOP Graph
NiMH DONE 000:09S
Input Volt : 12.24V
Delta Peak : 1.8A
Int Temp : 21ºC
Safety Timer : 240min
Capacity Limit : 2100mAh
STOP Graph
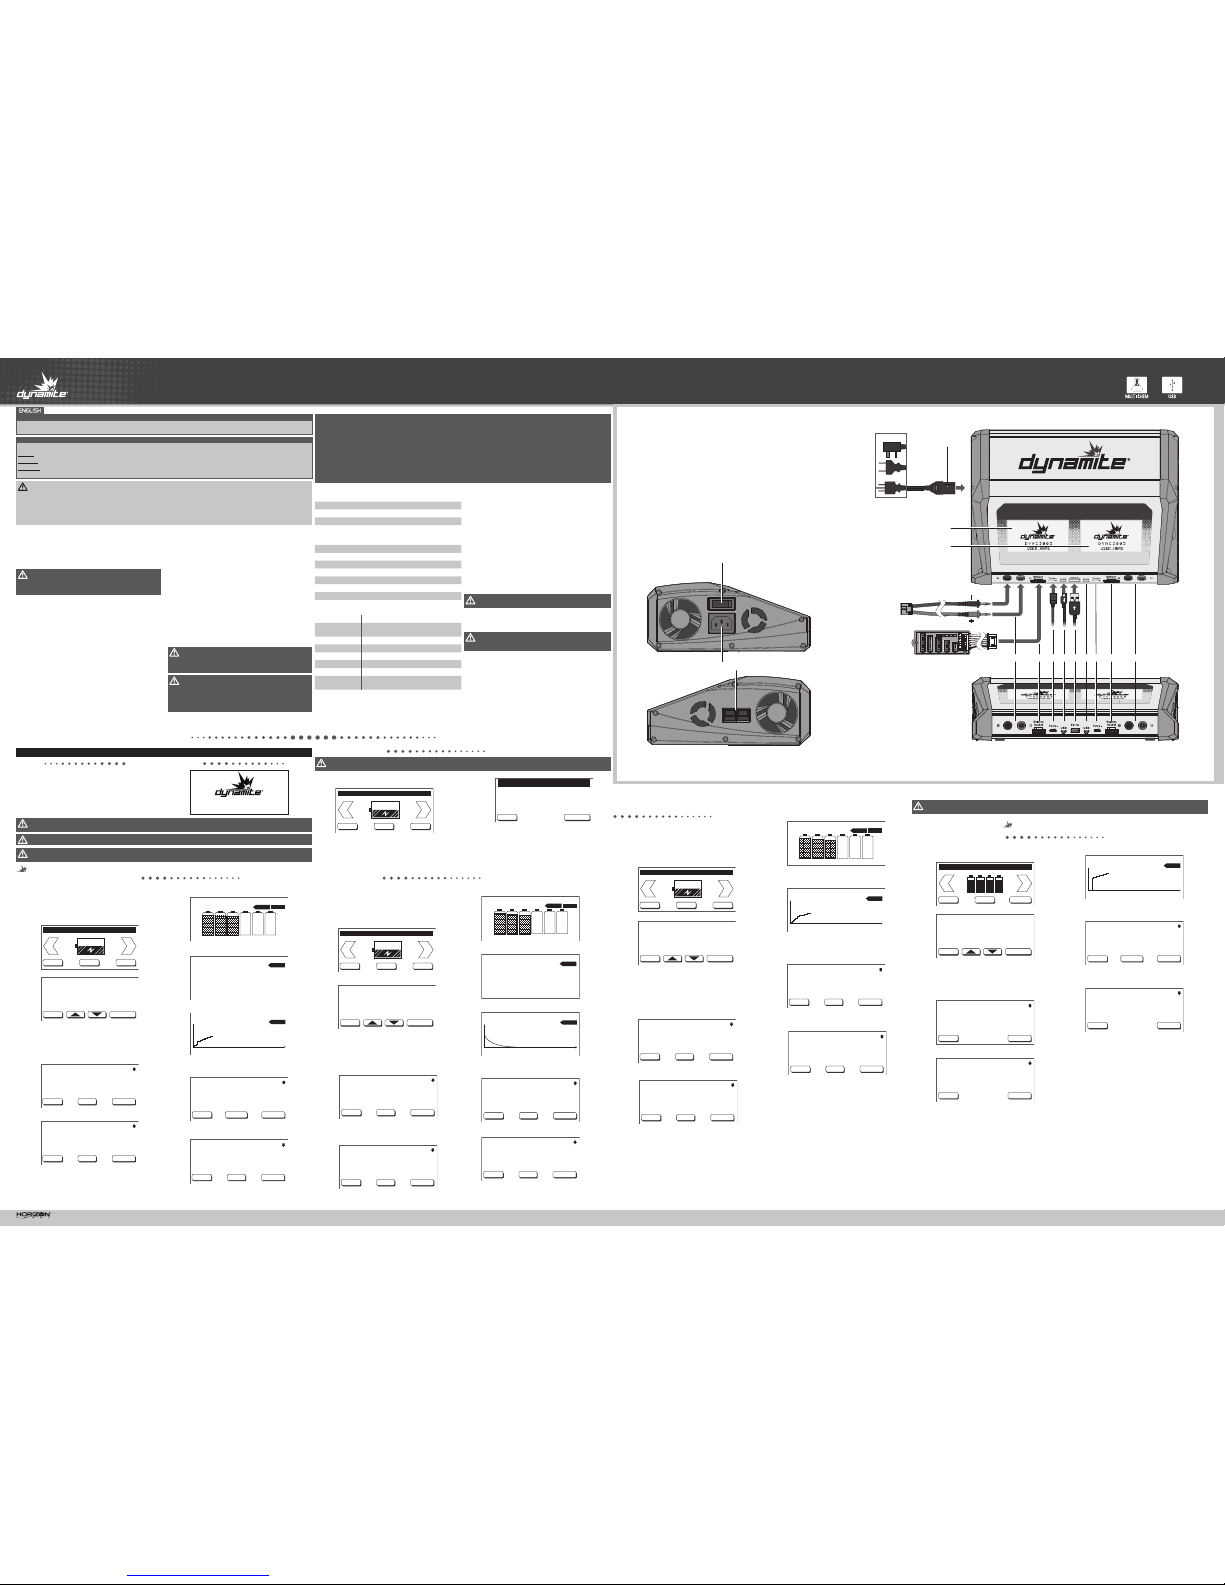
A. Power Switch
B. AC Power Input Port
C. DC Power Input Port
D. AC Power Cord
E. Charger 1- LCD Screen
F. Charger 2- LCD Screen
G. Charger 1- Power Output Ports
H. Charger 1- Balance Board Port
I. Charger 1- Temperature Sensor Port
J. Charger 1- Micro USB Port
(Software updates ONLY; do not use for charging)
K. 2.1A USB Power Output Port
L. Charger 2- Micro USB Port
(Software updates ONLY; do not use for charging)
M. Charger 2- Temperature Sensor Port
N. Charger 2- Balance Board Port
O. Charger 2- Power Output Ports
Not to scale.
Not all wiring shown.
Not all connectors shown.
CAUTION: Only use 4.35V capable Li-Po batteries when using the Li-HV charge mode. Charging other Li-Po batteries in this mode can lead to property damage,
fire, or serious injury.
1. Press the Left and Right Arrows on the LCD Touch Screen to scroll through
the main menu screens until you reach Program Select=Li-HV.
2. Press CHG.
3. The following WARNING screen appears. You must be sure you are using
High Voltage cells capable of being charged to 4.35 Volts.
4. Press Select to continue to charging.
5. Follow Lithium (Li-Po/Li-Fe/Li-Ion/LI-HV) Charging, Dishcharging and Storage
insturctions
6. Press Back to exit warning and choose another charging method.
Program select=LiHV
LiHV
CHG DCHG STOR
BACK SELECT
WARNING!
Battery must be 4.35
V/Cell compatible. If
not property damage
fire or serious injury
could result.
Page 2

12 - BALANCE
1. Press the Left and Right Arrows on the LCD Touch Screen to scroll through
the main menu screens until you reach Program Select=View.
VIEW BALANCE
Program select=View
2. Press BALANCE.
3. Press the type of battery you want to balance: Li-Po/Li-Ion/Li-Fe.
4. Press START. The charger will begin balancing the cells.
BATTERY
BACK START
LiPo LiIon LiFE
5. Press STOP at any time to stop balancing.
6. When balancing is complete, the charger will beep and display the following
screen:
–Balancing Complete–
BACK RES.
BACK RES.
3.94 3.94
0.00 0.00 0.00 0.00
13 - MEMORY
1. Press the Left and Right Arrows on the LCD Touch Screen to scroll through
the main menu screens until you reach the battery program you would like to
save: Program Select=Li-Po/Li-Fe/Li-Ion/Ni-MH/Ni-Cd/Pb.
2. Press the action at the bottom of the LCD Touch Screen to enter that menu.
3. Press a parameter to highlight that parameter.
4. Press the Up and Down Arrows to edit the parameter.
5. Press Select to save the parameter.
6. If there is more than one screen of parameters, press the top right corner of
the LCD Touch Screen to scroll through the parameter screens.
7. Once the parameters are at the desired settings, press Back to return to the
main menu screens.
8. Press the Left and Right Arrows on the LCD Touch Screen to scroll through
the main menu screens until you reach Program Select=Memory.
MEMORY
Program select=Memory
9. Press MEMORY.
10. Choose an empty memory profile and press it.
USER SETUP [1/4]
M01 NULL
M02 NULL
M03 NULL
M04 NULL
M05 NULL
BACK SAVELOADDEL
11. Press SAVE. The charging parameters you just entered will be saved in that
memory profile.
12. To use a memory profile, press it, then press LOAD.
13. To delete a memory profile, press it, then hold DEL.
14. Press the top right of the LCD Touch Screen to scroll through all 20 memory
profiles.
14 - USB DEVICE CHARGING
The charger has the capability to charge any USB-compatible device with the 2.1A USB Power Output Port (F). To use the charging function, simply connect a
compatible charging device or cord into the charge port while the charger is powered ON. The charger provides up to 2.1A current at 5V DC.
15 - TROUBLESHOOTING
During charger operation, circuits monitor battery and charger functions. If the following messages show on the charger’s LCD screen, make the recommended
responses. If the message continues after you respond as recommended, contact your nearest Horizon Hobby customer service center for assistance.
REVERSE POLARITY Make sure each connection polarity is correct between the power source and the charger, then between the charger and the battery.
PROCESS INTERRUPTED Make sure the power connections are correct for charging.
OUTPUT SHORT CIRCUIT Make sure there are no short circuits between the poles of the battery or the battery and the charger. Replace damaged wires.
INPUT VOLTAGE ERROR Input voltage to the charger fell below the default or adjusted input voltage setting. Make sure the power source for the charger
provides correct input voltage.
CHARGER FAILURE Charger electronics require repair.
BATTERY LOW VOLTAGE Battery voltage is lower than the value setting in the charger. Adjust settings, then make sure the battery is not damaged or replace the
battery.
BATTERY HIGH VOLTAGE Battery voltage is higher than the value setting in the charger. Adjust settings, then make sure the battery is not damaged or replace the
battery.
CELL LOW VOLTAGE Cell voltage is lower than the value setting in the charger. Adjust settings, then make sure the battery is not damaged or replace the
battery.
CELL HIGH VOLTAGE Cell voltage is higher than the value setting in the charger. Adjust settings, then make sure the battery is not damaged or replace the
battery.
CELL CONNECT ERROR Make sure the balance connection is correct for charging.
CHARGER OVERHEATING Charger temperature is too high. Power OFF the charger and let it cool.
OVER POWER Input voltage to the charger exceeded the default or adjusted input voltage setting. Make sure the power source for the charger provides
the correct input voltage.
MAX CURRENT Current is higher than the value setting in the charger. Adjust settings, then make sure the battery is not damaged or replace the battery.
SAFETY TIMER Maximum safe time limit has been reached.
MAX CAPACITY Maximum capacity limit has been reached.
MAX EXT. TEMP External temperature is too high. Let charger and battery cool.
11 - VIEW
1. Press the Left and Right Arrows on the LCD Touch Screen to scroll through
the main menu screens until you reach Program Select=View.
VIEW BALANCE
Program select=View
2. Press VIEW. The screen will display the current charger status.
DATA VIEW
Input Volt : 15.30V
Output Volt : 0.02V
Int Temp. : 29ºC
Ext Temp. : No sens
Resistance : ****mΩ
BACK CELLS
3. Press CELLS to view the connected lithium battery’s individual cell voltage.
DATA View–CELLS
BACK RES.
0.00 0.00 0.00 0.00 0.00 0.00
8 - PB CHARGING
1. Connect the battery connector to the battery adapter cable.
2. Press the Left and Right Arrows on the LCD Touch Screen to scroll through
the main menu screens until you reach Program Select=Pb.
Program select=Pb
CHG DCHG
3. Press CHG.
Pb CHARGE
Pack. Volt. : 2V/1P
Capacity : 50mAh
Current : 0.1A
Press&Hold : CHARGE
BACK SELECT
4. Press a parameter to highlight that parameter.
5. Press the Up and Down Arrows to edit the parameter.
6. Press Select to save the parameter.
7. Once the parameters are at the desired settings, press and hold CHARGE.
8. The charger will check the battery and charger settings and display the
following screen:
START
Pb Charge Confirm
Back
-Connect- -Check-
Input • • • • OK Set: 6P
BATT. • • • • OK Read: 5P
9. Press START. The charger will beep and display the following screen:
Pb CHG 000:16S
Capacity : 8mAh
Current : 1.7A
Voltage : 14.69V
Resistance : ****mΩ
Peak Temp. : No sens
STOP Graph
10. Press the arrow in the top right of the LCD Touch Screen to see the rest of
the charging info.
11. Press Graph to see the battery voltage graph. Press Back to return to the
charging screen.
Data Pb = Graph
14.68V 000:12S
BACK
12. Press STOP at any time to stop charging.
13. When charging is complete, the charger will sound a series of beeps and
display the following screen:
Pb DONE 000:19S
Capacity : 8mAh
Current : 1.7A
Voltage : 11.60V
Resistance : ****mΩ
Peak Temp. : No sens
BACK Graph
14. Disconnect the battery from the charger.
9 - PB DISCHARGING
1. Connect the battery connector to the battery adapter cable.
2. Press the Left and Right Arrows on the LCD Touch Screen to scroll
through the main menu screens until you reach Program Select=Pb.
Program select=Pb
CHG DCHG
3. Press DCHG.
Pb DISCHARGE
Pack. Volt. : 2V/1P
Capacity : 50mAh
Current : 0.1A
Press&Hold : DISCHRG
BACK SELECT
4. Press a parameter to highlight that parameter.
5. Press the Up and Down Arrows to edit the parameter.
6. Press Select to save the parameter.
7. Once the parameters are at the desired settings, press and hold DISCHRG.
8. The charger will check the battery and charger settings and display the
following screen:
START
Pb DCHG Confirm
-Connect- -Check-
Input • • • • OK Set: 6P
BATT. • • • • OK Read: 5P
BACK
9. Press START. The charger will beep and display the following screen:
Pb DCHG 000:19S
Capacity : 8mAh
Current : 1.7A
Voltage : 11.60V
Resistance : ****mΩ
Peak Temp. : No sens
STOP Graph
10. Press the arrow in the top right of the LCD Touch Screen to see the rest of
the discharging information.
11. Press Graph to see the battery voltage graph. Press Back to return to the
Discharging screen.
Data Pb = Graph
11.54V 000:32S
BACK
12. Press STOP at any time to stop discharging.
13. When discharging is complete, the charger will sound a series of beeps and
display the following screen:
14. Press the arrow in the top right of the LCD Touch Screen to see the rest of
the Charging information.
15. Disconnect the battery from the charger.
10 - SETUP
1. Press the Left and Right Arrows on the LCD Touch Screen to scroll through
the main menu screens until you reach Program Select=Setup.
Program select=Setup
SETUP
2. Press SETUP.
USER SETUP [1/4]
Temp (ºC/ºF) : ºC
Temp Cutt-Off : 60ºC
Input Low Volt : 10.0V
Input Limited : Auto
DCHG Mode : CC
BACK SELECT
3. Press a parameter to highlight that parameter.
4. Press the Up and Down Arrows to edit the parameter.
5. Press Select to save the parameter.
6. Press the top right of the LCD Touch Screen to get to the next set of
parameters.
Parameters
Temperature °C/°F
Temperature Cutoff 68–176°F (20–80°C)
Input Power Low Voltage Cutoff 10.0V–17.5V
Input LImited 1.0–16,5A
DCHG Mode CC–CV
Balance Voltage 0.01V–0.03V
Balance Force -0.01–7.00V
MH/Cd Trickle 50mA–200mA
Safety Timer 1–255 minutes
Back Light OFF–100%
Melody 1–5
Button Sound ON/OFF
Buzzer Sound ON/OFF
Buzzer Volume 0–100%
Username Enter your name here
Version 1.0
Factory Reset
Press and hold FCTY RST to return the
charger to default factory settings.
DYNAMITE 5-YEAR US LIMITED CHARGER WARRANTY INFORMATION
Horizon Hobby is so confident about the quality of our Dynamite chargers we offer a 5-year replacement plan on all of our Dynamite
®
Prophet™ and Passport™ chargers. Our
5-year replacement plan requires proof of purchase (copy of the receipt), and we do reserve the right to deny replacement to any abusers of our plan. See below for full
details. Contact the appropriate Horizon Service Department for instructions on warranty claims.
NON-US LIMITED WARRANTY
What this Warranty Covers - Horizon Hobby, LLC (“Horizon”) warrants to the
original purchaser that the product purchased (the “Product”) will be free from
defects in materials and workmanship at the date of purchase.
What is Not Covered - This warranty is not transferable and does not cover (i) cosmetic
damage, (ii) damage due to acts of God, accident, misuse, abuse, negligence,
commercial use, or due to improper use, installation, operation or maintenance, (iii)
modification of or to any part of the Product, (iv) attempted service by anyone other
than a Horizon Hobby authorized service center, (v) Product not purchased from an
authorized Horizon dealer, or (vi) Product not compliant with applicable technical
regulations.
OTHER THAN THE EXPRESS WARRANTY ABOVE, HORIZON MAKES NO OTHER
WARRANTY OR REPRESENTATION, AND HEREBY DISCLAIMS ANY AND ALL
IMPLIED WARRANTIES, INCLUDING, WITHOUT LIMITATION, THE IMPLIED
WARRANTIES OF NON-INFRINGEMENT, MERCHANTABILITY AND FITNESS FOR
A PARTICULAR PURPOSE. THE PURCHASER ACKNOWLEDGES THAT THEY ALONE
HAVE DETERMINED THAT THE PRODUCT WILL SUITABLY MEET THE REQUIREMENTS
OF THE PURCHASER’S INTENDED USE.
Purchaser’s Remedy - Horizon’s sole obligation and purchaser’s sole and exclusive
remedy shall be that Horizon will, at its option, either (i) service, or (ii) replace, any
Product determined by Horizon to be defective. Horizon reserves the right to inspect
any and all Product(s) involved in a warranty claim. Service or replacement decisions
are at the sole discretion of Horizon. Proof of purchase is required for all warranty
claims. SERVICE OR REPLACEMENT AS PROVIDED UNDER THIS WARRANTY IS THE
PURCHASER’S SOLE AND EXCLUSIVE REMEDY.
Limitation of Liability - HORIZON SHALL NOT BE LIABLE FOR SPECIAL, INDIRECT,
INCIDENTAL OR CONSEQUENTIAL DAMAGES, LOSS OF PROFITS OR PRODUCTION
OR COMMERCIAL LOSS IN ANY WAY, REGARDLESS OF WHETHER SUCH CLAIM
IS BASED IN CONTRACT, WARRANTY, TORT, NEGLIGENCE, STRICT LIABILITY OR
ANY OTHER THEORY OF LIABILITY, EVEN IF HORIZON HAS BEEN ADVISED OF THE
POSSIBILITY OF SUCH DAMAGES. Further, in no event shall the liability of Horizon
exceed the individual price of the Product on which liability is asserted. As Horizon
has no control over use, setup, final assembly, modification or misuse, no liability
shall be assumed nor accepted for any resulting damage or injury. By the act of use,
setup or assembly, the user accepts all resulting liability. If you as the purchaser or
user are not prepared to accept the liability associated with the use of the Product,
purchaser is advised to return the Product immediately in new and unused condition
to the place of purchase.
Law - These terms are governed by Illinois law (without regard to conflict of law
principals). This warranty gives you specific legal rights, and you may also have
other rights which vary from state to state. Horizon reserves the right to change or
modify this warranty at any time without notice.
WARRANTY SERVICES
Questions, Assistance, and Services - our local hobby store and/or place of purchase
cannot provide warranty support or service. Once assembly, setup or use of the
Product has been started, you must contact your local distributor or Horizon directly.
This will enable Horizon to better answer your questions and service you in the
event that you may need any assistance. For questions or assistance, please visit
our website at www.horizonhobby.com, submit a Product Support Inquiry at https://
horizonhobby.quickbase.com/db/bghj7ey8c?a=GenNewRecord, or call the toll free
telephone number referenced in the Warranty and Service Contact Information
section to speak with a Product Support representative.
Inspection or Services - If this Product needs to be inspected or serviced and
is compliant in the country you live and use the Product in, please use the Horizon
Online Service Request submission process found on our website or call Horizon to
obtain a Return Merchandise Authorization (RMA) number. Pack the Product securely
using a shipping carton. Please note that original boxes may be included, but are
not designed to withstand the rigors of shipping without additional protection. Ship
via a carrier that provides tracking and insurance for lost or damaged parcels, as
Horizon is not responsible for merchandise until it arrives and is accepted at our
facility. An Online Service Request is available at http://www.horizonhobby.com/
content/_service-center_render-service-center. If you do not have internet access,
please contact Horizon Product Support to obtain a RMA number along with
instructions for submitting your product for service. When calling Horizon, you will
be asked to provide your complete name, street address, email address and phone
number where you can be reached during business hours. When sending product into
Horizon, please include your RMA number, a list of the included items, and a brief
summary of the problem. A copy of your original sales receipt must be included for
warranty consideration. Be sure your name, address, and RMA number are clearly
written on the outside of the shipping carton.
NOTICE: Do not ship LiPo batteries to Horizon. If you have any issue with a
LiPo battery, please contact the appropriate Horizon Product Support office.
Warranty Requirements- For Warranty consideration, you must include
your original sales receipt verifying the proof-of-purchase date. Provided
warranty conditions have been met, your Product will be serviced or
replaced free of charge. Service or replacement decisions are at the sole
discretion of Horizon.
Non-Warranty Service - Should your service not be covered by warranty, service
will be completed and payment will be required without notification or estimate
of the expense unless the expense exceeds 50% of the retail purchase cost. By
submitting the item for service you are agreeing to payment of the service without
notification. Service estimates are available upon request. You must include this
request with your item submitted for service. Non-warranty service estimates will be
billed a minimum of ½ hour of labor. In addition you will be billed for return freight.
Horizon accepts money orders and cashier’s checks, as well as Visa, MasterCard,
American Express, and Discover cards. By submitting any item to Horizon for service,
you are agreeing to Horizon’s Terms and Conditions found on our website http://
www.horizonhobby.com/content/_service-center_render-service-center.
ATTENTION: Horizon service is limited to Product compliant in the country
of use and ownership. If received, a non-compliant Product will not be
serviced. Further, the sender will be responsible for arranging return
shipment of the un-serviced Product, through a carrier of the sender’s choice
and at the sender’s expense. Horizon will hold non-compliant Product for a
period of 60 days from notification, after which it will be discarded.
5-YEAR US LIMITED WARRANTY
Warranty Period - Exclusive Warranty - Horizon Hobby, LLC., (“Horizon”) warrants
that the included Dynamite Prophet, or Passport charger (“Product”) will be free from
defects in materials and workmanship for a period of five (5) years after the date of
purchase (“Warranty Period”).
What is Not Covered - This warranty is not transferable and does not cover
(i) cosmetic damage, (ii) damage due to acts of God, accident, misuse, abuse,
negligence, commercial use, or due to improper use, installation, operation
or maintenance, (iii) modification of or to any part of the Product, (iv) attempted
service by anyone other than a Horizon Hobby authorized service center, (v) Product
not purchased from an authorized Horizon dealer, (vi) Product not compliant with
applicable technical regulations, or (vii) use that violates any applicable laws, rules,
or regulations.
OTHER THAN THE EXPRESS WARRANTY ABOVE, HORIZON MAKES NO OTHER
WARRANTY OR REPRESENTATION, AND HEREBY DISCLAIMS ANY AND ALL
IMPLIED WARRANTIES, INCLUDING, WITHOUT LIMITATION, THE IMPLIED
WARRANTIES OF NON-INFRINGEMENT, MERCHANTABILITY AND FITNESS FOR
A PARTICULAR PURPOSE. THE PURCHASER ACKNOWLEDGES THAT THEY ALONE
HAVE DETERMINED THAT THE PRODUCT WILL SUITABLY MEET THE REQUIREMENTS
OF THE PURCHASER’S INTENDED USE.
Horizon’s sole obligation and purchaser’s sole and exclusive remedy shall be that
Horizon will, at its option, either (i) service, or (ii) replace, any Product determined by
Horizon to be defective. Horizon reserves the right to inspect any and all Product(s)
involved in a warranty claim. Service or replacement decisions are at the sole
discretion of Horizon. Proof of purchase is required for all warranty claims. SERVICE
OR REPLACEMENT AS PROVIDED UNDER THIS WARRANTY IS THE PURCHASER’S
SOLE AND EXCLUSIVE REMEDY.
Limitation of Liability - HORIZON SHALL NOT BE LIABLE FOR SPECIAL, INDIRECT,
INCIDENTAL OR CONSEQUENTIAL DAMAGES, LOSS OF PROFITS OR PRODUCTION
OR COMMERCIAL LOSS IN ANY WAY, REGARDLESS OF WHETHER SUCH CLAIM
IS BASED IN CONTRACT, WARRANTY, TORT, NEGLIGENCE, STRICT LIABILITY OR
ANY OTHER THEORY OF LIABILITY, EVEN IF HORIZON HAS BEEN ADVISED OF THE
POSSIBILITY OF SUCH DAMAGES. Further, in no event shall the liability of Horizon
exceed the individual price of the Product on which liability is asserted. As Horizon
has no control over use, setup, final assembly, modification or misuse, no liability
shall be assumed nor accepted for any resulting damage or injury. By the act of use,
setup or assembly, the user accepts all resulting liability. If you as the purchaser or
user are not prepared to accept the liability associated with the use of the Product,
purchaser is advised to return the Product immediately in new and unused condition
to the place of purchase.
Law - These terms are governed by Illinois law (without regard to conflict of law
principals). This warranty gives you specific legal rights, and you may also have
other rights which vary from state to state. Horizon reserves the right to change or
modify this warranty at any time without notice.
WARRANTY SERVICES
Questions, Assistance, and Services - Your local hobby store and/or place of
purchase cannot provide warranty support or service. Once assembly, setup or use
of the Product has been started, you must contact your local distributor or Horizon
directly. This will enable Horizon to better answer your questions and service you in
the event that you may need any assistance. For questions or assistance, please visit
our website at www.horizonhobby.com, submit a Product Support Inquiry at https://
horizonhobby.quickbase.com/db/bghj7ey8c?a=GenNewRecord, or call the toll free
telephone number referenced in the Warranty and Service Contact Information
section to speak with a Product Support representative.
Inspection or Services - If this Product needs to be inspected or serviced and
is compliant in the country you live and use the Product in, please use the Horizon
Online Service Request submission process found on our website or call Horizon to
obtain a Return Merchandise Authorization (RMA) number. Pack the Product securely
using a shipping carton. Please note that original boxes may be included, but are
not designed to withstand the rigors of shipping without additional protection. Ship
via a carrier that provides tracking and insurance for lost or damaged parcels, as
Horizon is not responsible for merchandise until it arrives and is accepted at our
facility. An Online Service Request is available at http://www.horizonhobby.com/
content/_service-center_render-service-center. If you do not have internet access,
please contact Horizon Product Support to obtain a RMA number along with
instructions for submitting your product for service. When calling Horizon, you will
be asked to provide your complete name, street address, email address and phone
number where you can be reached during business hours. When sending product into
Horizon, please include your RMA number, a list of the included items, and a brief
summary of the problem. A copy of your original sales receipt must be included for
warranty consideration. Be sure your name, address, and RMA number are clearly
written on the outside of the shipping carton.
Provided warranty conditions have been met, your Product will be serviced or
replaced free of charge. Service or replacement decisions are at the sole discretion
of Horizon.
NOTICE: Do not ship LiPo batteries to Horizon. If you have any issue with a
LiPo battery, please contact the appropriate Horizon Product Support office.
Warranty Requirements- For Warranty consideration, you must include
your original sales receipt verifying the proof-of-purchase date.
Non-Warranty Service - Should your service not be covered by warranty, service
will be completed and payment will be required without notification or estimate
of the expense unless the expense exceeds 50% of the retail purchase cost. By
submitting the item for service you are agreeing to payment of the service without
notification. Service estimates are available upon request. You must include this
request with your item submitted for service. Non-warranty service estimates will be
billed a minimum of ½ hour of labor. In addition you will be billed for return freight.
Horizon accepts money orders and cashier’s checks, as well as Visa, MasterCard,
American Express, and Discover cards. By submitting any item to Horizon for service,
you are agreeing to Horizon’s Terms and Conditions found on our website http://
www.horizonhobby.com/content/_service-center_render-service-center.
ATTENTION: Horizon service is limited to Product compliant in the country
of use and ownership. If received, a non-compliant Product will not be
serviced. Further, the sender will be responsible for arranging return
shipment of the un-serviced Product, through a carrier of the sender’s choice
and at the sender’s expense. Horizon will hold non-compliant Product for a
period of 60 days from notification, after which it will be discarded.
6 - NICKEL DISCHARGING
1. Connect the battery connector to the device connector.
2. Press the Left and Right Arrows on the LCD Touch Screen to scroll through
the main menu screens until you reach Program Select=Ni-MH/Ni-Cd.
Program select=NiMH
CHG DCHG
N i M H
CYCLE
3. Press DCHG.
NiMH DISCHARGE
End Volt : 0.10V
Capacity : 50mAh
Current : 0.1A
Press&Hold : DISCHRG
BACK SELECT
4. Press a parameter to highlight that parameter.
5. Press the Up and Down Arrows to edit the parameter.
6. Press Select to save the parameter.
7. Once the parameters are at the desired settings, press and hold DISCHRG.
8. The charger will check the battery and charger settings and discharging will begin. The
charger will beep and display the following screen:
9. Press the arrow in the top right of the LCD Touch Screen to see the rest of
the Discharging information.
10. Press Graph to see the battery voltage graph. Press Back to return to the
discharging screen.
Data NiMH = Graph
8.39V 000:47S
BACK
11. Press STOP at any time to stop discharging.
12. When discharging is complete, the charger will sound a series of beeps and
display the following screen:
13. Press the arrow in the top right of the LCD Touch Screen to see the rest of
the Charging information.
14. Disconnect the battery from the charger.
7 - NICKEL CYCLE CHARGING
1. Connect the battery connector to the device connector.
2. Press the Left and Right Arrows on the LCD Touch Screen to scroll
through the main menu screens until you reach Program Select=Ni-MH/
Ni-Cd.
Program select=NiMH
CHG DCHG
N i M H
CYCLE
3. Press CYCLE.
NiMH CYCLE [1/2]
Capacity : 3300mAh
CHG Curr. : 3.3A
DCHG Curr. : 0.1A
DCHG End Volt : 0.10V
Press&Hold : CYCLE
BACK SELECT
4. Press a parameter to highlight that parameter.
5. Press the Up and Down Arrows to edit the parameter.
6. Press Select to save the parameter.
7. Press the top right of the LCD Touch Screen to get to the next set of
parameters.
8. Once the parameters are at the desired settings, press and hold CYCLE.
9. The charger will check the battery and charger settings and cycle charging will
begin. The charger will beep and display the following screen:
NiMH CYCLE 000:06S
Capacity : 4mAh
Current : 3.3A
Voltage : 7.97V
Resistance : 53mΩ
Peak Temp. : No sens
STOP CYCLE Graph
10. Press the arrow in the top right of the LCD Touch Screen to see the rest of
the Cycle information.
11. Press CYCLE to see the voltage and amperage applied to each cycle.
Data NiMH = Cycle 1/1
--CHG-- --DISCHG--
00.00Vp 00.00Va
00000mAh 00000mAh
Back DownUP
12. Press Graph to see the battery voltage graph. Press Back to return to the
charging screen.
Data NiMH = Graph
8.03V 000:28S
BACK
13. Press STOP at any time to stop charging.
14. When cycle charging is complete, the charger will sound a series of beeps and
display the following screen:
15. Press the arrow in the top right of the LCD Touch Screen to see the rest of
the Charging information.
16. Disconnect the battery from the charger.
FCC INFORMATION
Note: This equipment has been tested and found to comply with the limits for a Class B digital device, pursuant to Part 15 of the FCC rules. These limits are designed to
provide reasonable protection against harmful interference in a residential installation. This equipment generates, uses and can radiate radio frequency energy and, if not
installed and used in accordance with the instructions, may cause harmful interference to radio communications.
NiMH DCHG 000:09S
End Volt : 12.24V
Int Temp : 21ºC
Safety Timer : 240min
Capacity Limit : 2100mAh
STOP Graph
NiMH DONE 001:15S
Capacity : 53mAh
Current : 0.0A
Voltage : 8.16V
Resistance : 53mΩ
Peak Temp. : No sens
BACK GraphCycle
NiMH DCHG 000:34S
Capacity : 16mAh
Current : 1.8A
Voltage : 8.43V
Resistance : ****mΩ
Peak Temp. : No sens
STOP Graph
CAUTION: The Pb charge program menus are to be used ONLY for the charging and discharging of Pb battery packs. Charging other battery types using the Pb
charge programs will damage the battery or the charger.
NiMH DONE 001:15S
Input Volt : 14.8?V
Delta Peak : 8mV/C
Int Temp. : 60F
Safety Timer : 240min
Capacity Lim. : 3300mAh
BACK Cycle Graph
NiMH DONE 001:15S
Input Volt : 14.8?V
Delta Peak : 8mV/C
Int Temp. : 60F
Safety Timer : 240min
Capacity Lim. : 3300mAh
BACK Cycle Graph
NiMH DONE 001:15S
Capacity : 53mAh
Current : 0.0A
Voltage : 8.16V
Resistance : 53mΩ
Peak Temp. : No sens
BACK GraphCycle
Pb DONE 000:19S
Capacity : 8mAh
Current : 1.7A
Voltage : 11.60V
Resistance : ****mΩ
Peak Temp. : No sens
BACK Graph
USER SETUP [2/4]
Balance Volt : Auto
Balance Force : Auto
Full Force : Auto
MH/Cd Trickle : OFF
Safety Timer : 240min
BACK SELECT
USER SETUP [3/4]
Back Light : 100%
Melody : 1
Button Sound : ON
Buzzer Sound : ON
Buzzer Vol : 100%
BACK SELECT
USER SETUP [4/4]
< ENTER_USER_NAME >
Version# : 1.00
Press&Hold -≥ FCTY_RST
BACK SELECT
NiMH DONE 000:09S
End Volt : 12.24V
Int Temp : 21ºC
Safety Timer : 240min
Capacity Limit : 2100mAh
STOP Graph
© 2016 Horizon Hobby, LLC. Dynamite, Passport, Prophet, EC3 and the Horizon Hobby Logo are trademarks or registered trademarks of Horizon Hobby, LLC. Traxxas is a registered trademark of Traxxas L.P. Created 06/2016 | 48546
5-14-2015
(DYNC3005)
WARRANTY AND SERVICE CONTACT INFORMATION
Country of Purchase Horizon Hobby Contact Information Address
United States of America
Horizon Service Center
(Repairs and Repair Requests)
servicecenter.horizonhobby.com/RequestForm/
4105 Fieldstone Rd
Champaign, Illinois, 61822 USA
Horizon Product Support
(Product Technical Assistance)
productsupport@horizonhobby.com.
877-504-0233
Sales
websales@horizonhobby.com
800-338-4639
United Kingdom
Service/Parts/Sales:
Horizon Hobby Limited
sales@horizonhobby.co.uk Units 1–4, Ployters Rd, Staple Tye
Harlow, Essex, CM18 7NS, United
Kingdom
+44 (0) 1279 641 097
Germany
Horizon Technischer Service service@horizonhobby.de
Christian-Junge-Straße 1
25337 Elmshorn, Germany
Sales: Horizon Hobby GmbH +49 (0) 4121 2655 100
France
Service/Parts/Sales:
Horizon Hobby SAS
infofrance@horizonhobby.com
11 Rue Georges Charpak
77127 Lieusaint, France
+33 (0) 1 60 18 34 90
EU Compliance Statement: Horizon Hobby, LLC hereby declares that this
product is in compliance with the essential requirements and other relevant
provisions of the EMC and LVD Directives
A copy of the EU Declaration of Conformity is available online at:
http://www.horizonhobby.com/content/support-render-compliance.
Instructions for disposal of WEEE by users in the European Union
This product must not be disposed of with other waste. Instead, it is the user’s
responsibility to dispose of their waste equipment by handing it over to a designated collections point for the recycling of waste electrical and electronic equipment. The
separate collection and recycling of your waste equipment at the time of disposal will help
to conserve natural resources and ensure that it is recycled in a manner that protects human health and the environment. For more information about where you can drop off your
waste equipment for recycling, please contact your local city office, your household waste
disposal service or where you purchased the product.
 Loading...