

Page 1
Thank you for purchasing the Dynamite® Li-Po Charger. It’s a
DC-powered charger meant only for 2–4 cell lithium-polymer
(Li-Po) battery packs and features a microchip CPU controller
with a large LED to display the charge status. It also precisely
follows standard Li-Po charger algorithms. This programmed
set of charging rules tells the charger to increase the voltage of
the Li-Po cell to 4.2V (per cell). While the voltage is rising, the
current is precisely kept at one of the preset rates (either 500mA,
1A or 2A). Once the maximum cell voltage is reached (at which
point the battery is 80–90% charged), the charger steadily
maintains a constant voltage, while the current decreases until
terminating the charge.
Features
• Microprocessor controlled technology provides efficient
and precise charging
• Uses a voltage booster to allow charging up to 4-cell
(14.8V) Li-Po batteries
• Selectable charge rate of 500mA, 1000mA and 2000mA
• Automatically detects cell count and indicates error
• LED and audible beeper indicates charging status
• Short circuit protection for both input and output
Specifications
• 12V DC-powered
• Charges 2–4 cell Li-Po packs
• Reverse polarity protection circuit
Page 2

Safety Precautions
Lithium Polymer batteries are volatile. Failure to read and follow
these instructions and safety precautions may result in fire,
personal injury and damage to property if batteries are charged
or used improperly. Horizon Hobby, Inc. and its retailers assume
no liability for failures to comply with these instructions and
precautions.
• Do not leave the battery and charger unattended while in
use. Improper charging of Li-Po batteries could
result in fire.
• When charging, constantly monitor the temperature of
the battery pack. If the battery becomes hot to the touch,
discontinue the charging operation immediately by
disconnecting the battery pack.
• Never charge around or in the area of any flammable or
combustible materials. The safest place to charge is on
a concrete surface.
• Do not allow children to charge battery packs unless
supervised by a responsible adult.
• The charger can become hot during charging. Use care
when selecting where you will charge the battery packs.
• This charger is DC only. Please note (+) (-) cannot be
connected inversely.
• The charger will not operate if the supply voltage is
below 10V.
• This charger is designed for lithium-polymer batteries
only. It MUST NOT be used to charge Ni-Cd and Ni-MH
battery packs.
• Maximum charging rate of the Li-Po battery should
not be set to over 1x capacity. Ideal charge rate is
approximately .7x the capacity of the pack.
• Please check power source or output to make sure they
are connected properly. The charger will not operate if
either is connected incorrectly.
• If at any time you see a battery starting to balloon or swell
up, discontinue charging process immediately. Batteries
in this condition may leak, and the reaction with air may
cause the chemicals to ignite, resulting in fire. Disconnect
the battery from the charger and observe it in a safe place
for approximately 15 minutes.
• Let the battery cool down to ambient temperature
before charging.
• Do not charge battery packs in series. Charge each
battery pack individually. Failure to do so may result in
incorrect battery recognition and charging functions.
Overcharging may occur and fire may be the result.
Supplying DC Power to the Charger
The charger is powered by connecting it to a 12V power source,
such as a 12V sealed battery (HAN102), a 12V automobile
battery (car must be not be running), a field box power panel
or appropriate power supply. The battery capacity must be
over 5Ah.
The charger includes two different methods of connecting the
charger to your power supply. Use the option best suited for
your application.
• Banana connectors for use with most power supplies
• Alligator sleeves for use with 12V sealed batteries,
automobile batteries
Step 1: Attach the red (positive) banana plug to the red (positive)
terminal on your 12V battery or power panel. Attach the black
(negative) banana plug to the black (negative) terminal on your
12V battery or power panel.
Step 2: Slide the alligator sleeves onto the banana connectors.
Attach the black (negative) banana plug to the black (negative)
alligator clip, and red (positive) banana plug to the black
(negative) alligator clip. Attach the red (positive) alligator clip to
the red (positive) terminal on your 12V battery or power panel,
and the black (negative) clip to the black (negative) terminal.
Once your charger is given power, the 6 control LED’s will blink
in order from 2000mA to 2-cell. After a signal tone, the 2-cell
and 500mA LED’s will light solid.
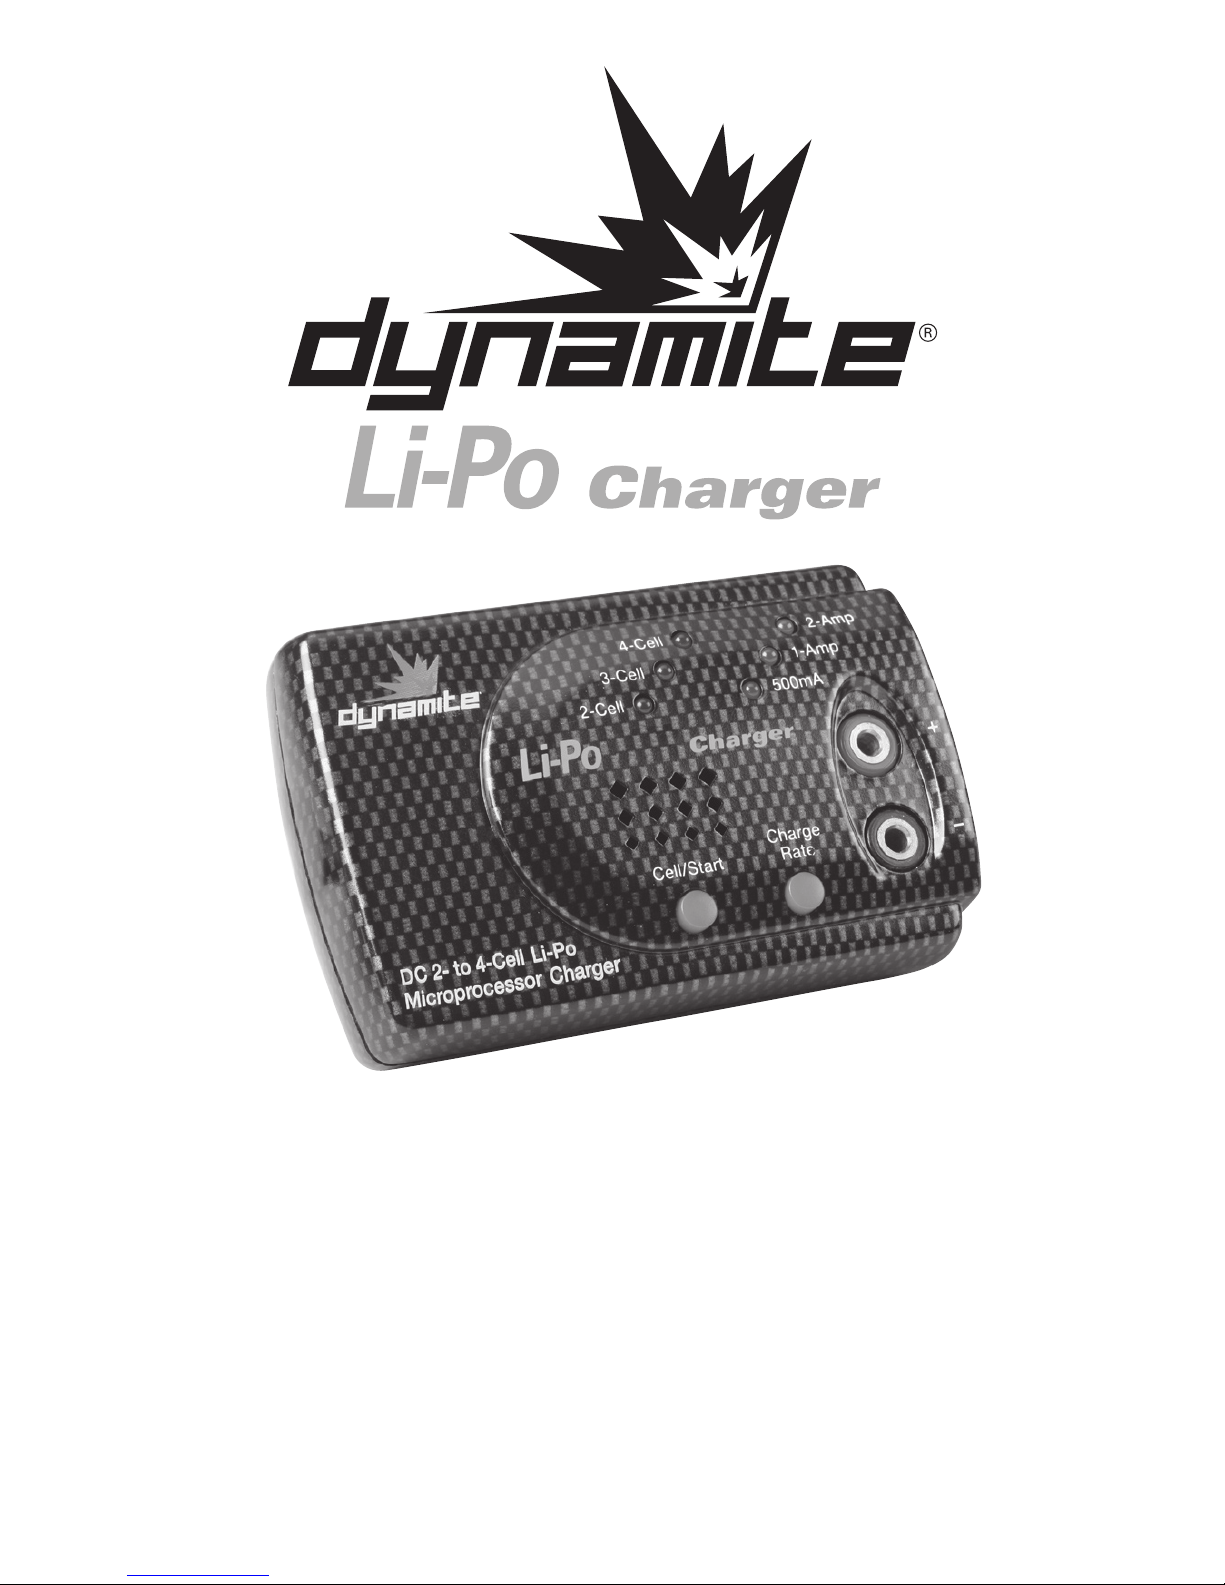
Cell Selection LED’s
Charge Rate
Button
Cell Selection/Start Button
Charge Rate LED’s
Output Jacks
Page 3

Warranty
Limited Warranty Period
Horizon Hobby, Inc. guarantees this product to be free from
defects in both material and workmanship for a period of 5 years
from the date of purchase.
Limited Warranty & Limits of Liability
Pursuant to this Limited Warranty, Horizon Hobby, Inc. will, at
its option, (i) repair or (ii) replace, any product determined by
Horizon Hobby, Inc. to be defective.
In the event of a defect, these are your exclusive
remedies.
This warranty does not cover cosmetic damage or damage
due to acts of God, accident, misuse, abuse, negligence,
commercial use, or modification of or to any part of the
product. This warranty does not cover damage due to improper
installation, operation, maintenance, or attempted repair by
anyone other than an authorized Horizon Hobby, Inc. service
center. This warranty is limited to the original purchaser and
is not transferable. In no case shall Horizon Hobby’s liability
exceed the original cost of the purchased product and will not
cover consequential, incidental or collateral damage. Horizon
Hobby, Inc. reserves the right to inspect any and all equipment
involved in a warranty claim. Repair or replacement decisions
are at the sole discretion of Horizon Hobby, Inc. Further, Horizon
Hobby reserves the right to change or modify this warranty
without notice.
REPAIR OR REPLACEMENT AS PROVIDED UNDER
THIS WARRANTY IS THE EXCLUSIVE REMEDY OF THE
CONSUMER. HORIZON HOBBY, INC. SHALL NOT BE LIABLE
FOR ANY INCIDENTAL OR CONSEQUENTIAL DAMAGES.
As Horizon Hobby, Inc. has no control over use,
setup, final assembly, modification or misuse, no
liability shall be assumed nor accepted for any
resulting damage or injury. By the act of use, setup or
assembly, the user accepts all resulting liability.
If you as the purchaser or user are not prepared to accept the
liability associated with the use of this product, you are advised
to return this product immediately in new and unused condition
to the place of purchase.
Charging Process
Step 1: Connect the battery to the charger. The charger will
signal the connection of the battery by producing one long
beep. The LED will also flash indicating the connection of
the battery.
Step 2: Press the Cell Selection/Start Button to choose the
proper cell count to match your battery pack.
Step 3: Refer to the chart below for recommended charge rates.
Select the appropriate charge rate for your particular battery by
actuating the Charge Rate button.
Battery Capacity Charge Rate
500mA–1000mA 500mA
1000mA–2000mA 1000mA
2000mA and above 2000mA
Warning: Selecting a charge rate higher than 1x battery
capacity may result in fire.
Step 4: Push and hold the Start button for two seconds. You will
hear a short beep, and the LED will remain on continuously to
indicate the battery is charging.
Note: Do not adjust the charge rate switch in this state.
Note: The charge cycle can be canceled by pressing the
Start button again. The charger will produce a short beep
to indicate the end of the charge cycle, and the LED will
again flash.
• The charger will detect the cell count to make sure the correct
cell count has been selected. If not, the charger will emit an
error tone and all the charge LED’s will flash.
• If the battery voltage is too low, the charger will also emit
the error tone even though the right number of cells has been
selected. Hold the CHARGE button for 2 seconds to enter the
charger into the low voltage charge mode. After 30 seconds the
charger will return to the correct charge mode.
Step 5: When charging is complete, the charger will emit one
long beep, ten double-beeps and then the LED will flash.
The beeper will sound every 45 seconds until the battery is
disconnected. Do not leave the battery connected to the charger
when charging is complete. Failure to comply may result in fire.
Page 4

Safety Precautions
This is a sophisticated hobby product and not a toy. It must be
operated with caution and common sense and requires some
basic mechanical ability. Failure to operate this product in a safe
and responsible manner could result in injury or damage to the
product or other property. This product is not intended for
use by children without direct adult supervision.
The product manual contains instructions for safety,
operation and maintenance. It is essential to read
and follow all the instructions and warnings in the
manual, prior to assembly, setup or use, in order to
operate correctly and avoid damage or injury.
Questions, Assistance, and Repairs
Your local hobby store and/or place of purchase cannot provide
warranty support or repair. Once assembly, setup or use of the
product has been started, you must contact Horizon Hobby, Inc.
directly. This will enable Horizon to better answer your questions
and service you in the event that you may need any assistance.
Questions or Assistance
For questions or assistance, please direct your email to
productsupport@horizonhobby.com, or call 877.504.0233 toll
free to speak to a service technician.
Inspection or Repairs
If your product needs to be inspected or repaired, please call for
a Return Merchandise Authorization (RMA). Pack the product
securely using a shipping carton. Please note that original boxes
may be included, but are not designed to withstand the rigors
of shipping without additional protection. Ship via a carrier that
provides tracking and insurance for lost or damaged parcels,
as Horizon Hobby, Inc. is not responsible for merchandise until
it arrives and is accepted at our facility. Include your complete
name, address, phone number where you can be reached
during business days, RMA number, and a brief summary of
the problem. Be sure your name, address, and RMA number are
clearly written on the shipping carton.
Warranty Inspection and Repairs
To receive warranty service, you must include your original
sales receipt verifying the proof-of-purchase date. Providing
warranty conditions have been met, your product will be
repaired or replaced free of charge. Repair or replacement
decisions are at the sole discretion of Horizon Hobby.
Non-Warranty Repairs
Should your repair not be covered by warranty and the expense
exceeds 50% of the retail purchase cost, you will be provided
with an estimate advising you of your options. You will be billed
for any return freight for non-warranty repairs. Please advise us
of your preferred method of payment. Horizon Hobby accepts
money orders and cashiers checks, as well as Visa, MasterCard,
American Express, and Discover cards. If you choose to pay
by credit card, please include your credit card number and
expiration date. Any repair left unpaid or unclaimed after 90
days will be considered abandoned and will be disposed of
accordingly.
Electronics and engines requiring inspection or repair
should be shipped to the following address (freight
prepaid):
Horizon Service Center
4105 Fieldstone Road
Champaign, Illinois 61822
All other products requiring inspection or repair
should be shipped to the following address (freight
prepaid):
Horizon Product Support
4105 Fieldstone Road
Champaign, Illinois 61822
9306.1
 Loading...