

Page 1
For 1–8 Cell Ni-Cd, Ni-MH and 1–3 Cell Lithium Polymer (Li-Po) Battery Packs
• Vision LCD icon shows charge status
• Multi-function LCD shows charge time, charge current and voltage
• Charges virtually all 1- to 8-cell Ni-MH & Ni-Cd packs and
1- to 3-cell Li-Po packs
• Adjustable charge rates from 0.1A–5A (Ni-MH & Ni-Cd)
• Adjustable charge rates from 0.1A–3A (Li-Po)
• Input and output circuit protection
• Automatic trickle charge
• Limited 5-year warranty
Safety Precautions
• Do not leave your battery and charger unattended during use.
• Always allow charger to cool between charges.
• Never connect the charger to an automobile 12V battery while the vehicle is running.
• Faceplate can become hot during charging. Keep the charger away from any material that may be affected by heat.
• Carefully observe connector polarities at all times.
• Do not let children charge battery packs without adult supervision.
• If either charger or battery becomes hot to the touch during the charge process, end the charge process immediately.
Warranty and Repair Policy
This charger is guaranteed against workmanship and manufacturing defects for a period of 5 years from the original date
of purchase. This warranty is limited to the original purchaser and is not transferable. Warranty repair will not cover units
that have been modified, misused or serviced by an unauthorized service center.
To speak to a service technician, call 1-877-504-0233.
If your charger needs to be repaired, ship the charger in its original box (freight prepaid) to:
Horizon Service Center
Attn: Dynamite Service
4105 Fieldstone Rd.
Champaign, IL 61822
Include your complete name and address information inside the carton and clearly write it on the outer label/return
address area. Include a brief summary of the difficulty. Date your correspondence and be sure that your name and address
appear on this enclosure. Also, please include a phone number where you can be reached during the business day.
Warranty Repairs
To receive warranty service, you must include your original sales receipt verifying the proof-of-purchase date. Providing
warranty conditions have been met, your charger will be repaired free of charge.
Non-Warranty Repairs
Should your repair cost exceed 50% of the retail purchase cost, you will be provided with an estimate advising you of
your options. Any return freight for non-warranty repairs will be billed to the consumer. For non-warranty repairs, please
advise us of the credit card you prefer to use. Horizon Service Center accepts Visa and MasterCard. Please include your
card number and expiration date. Horizon Service Center also accepts money orders.
5
Made in Taiwan
© 2006 Horizon Hobby, Inc.
Dynamite® products are distributed exclusively by Horizon Hobby, Inc., Champaign, IL U.S.A.
www.horizonhobby.com
7095.1
Fuses
This charger is protected by a 10A input and 7.5A output spade fuse. If you need to replace a fuse, your local hobby
retailer should be able to supply one. You can also find replacement fuses at automotive stores. Always replace your
fuse with a new fuse of the same rating.
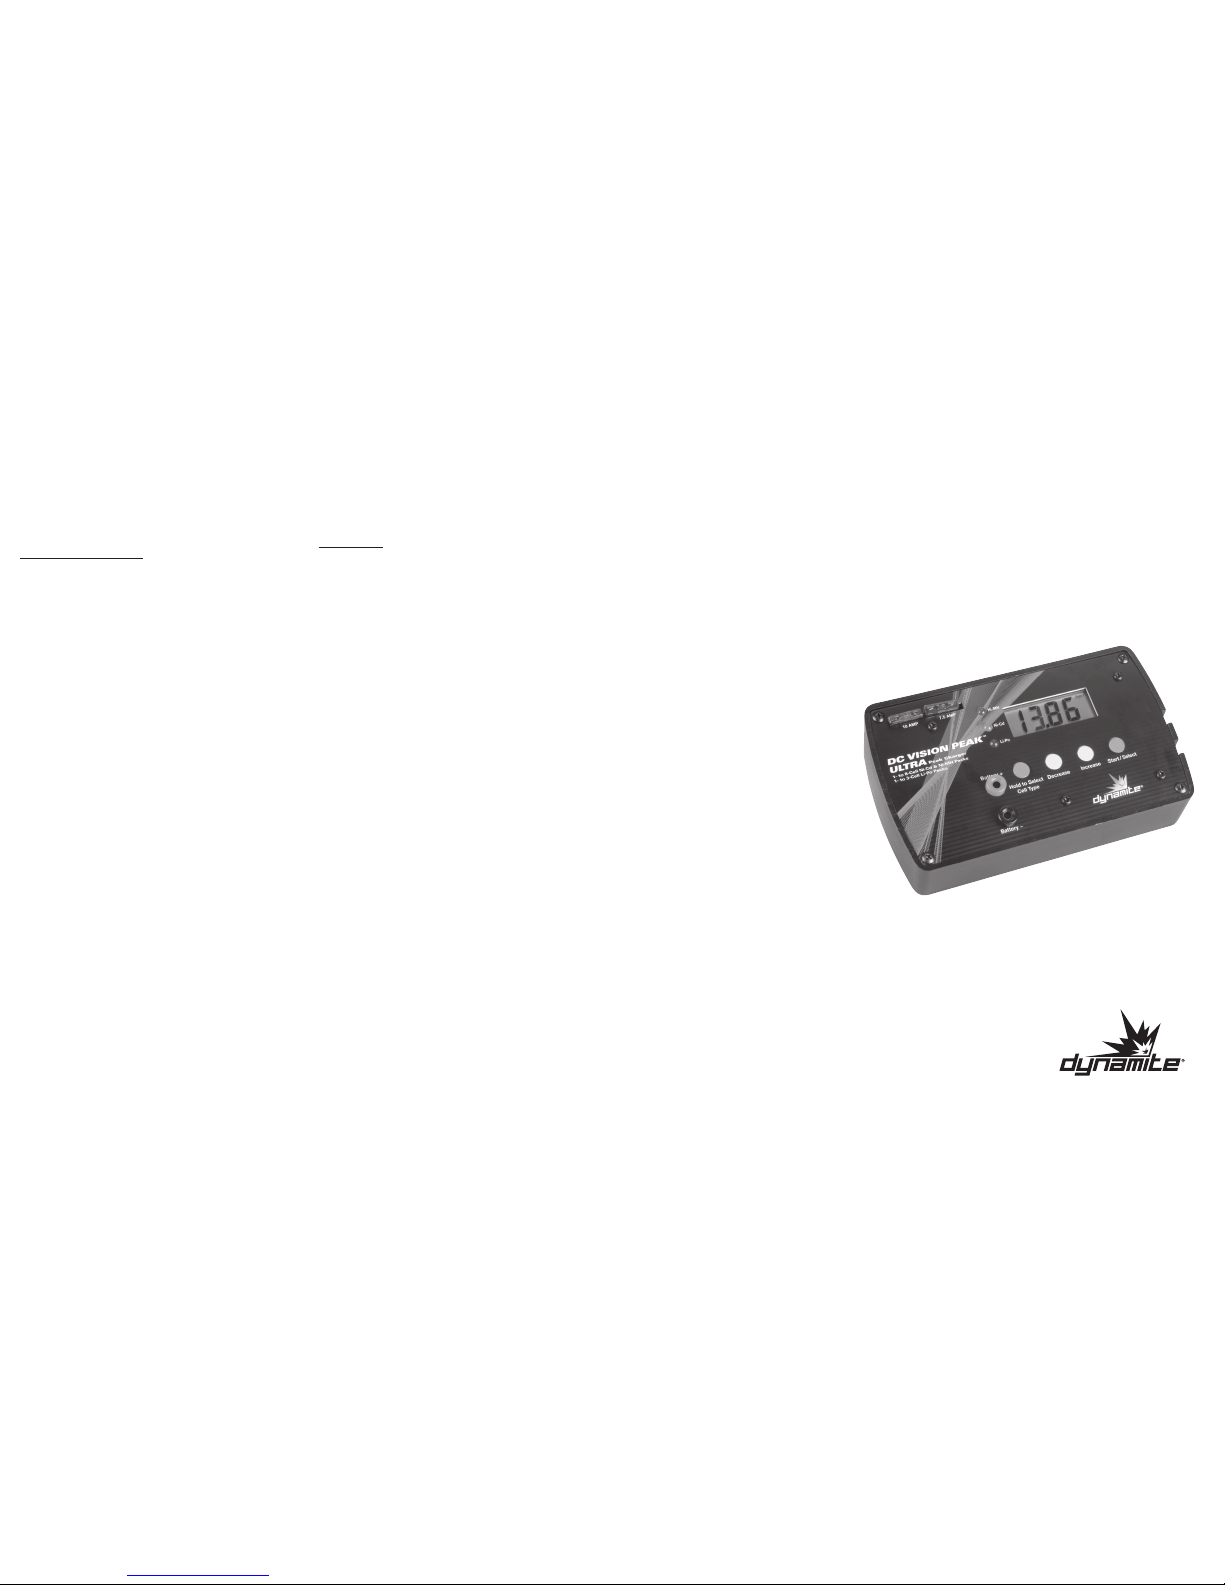
Peak Charger
DC VISION PEAK
™
ULTRA
Page 2
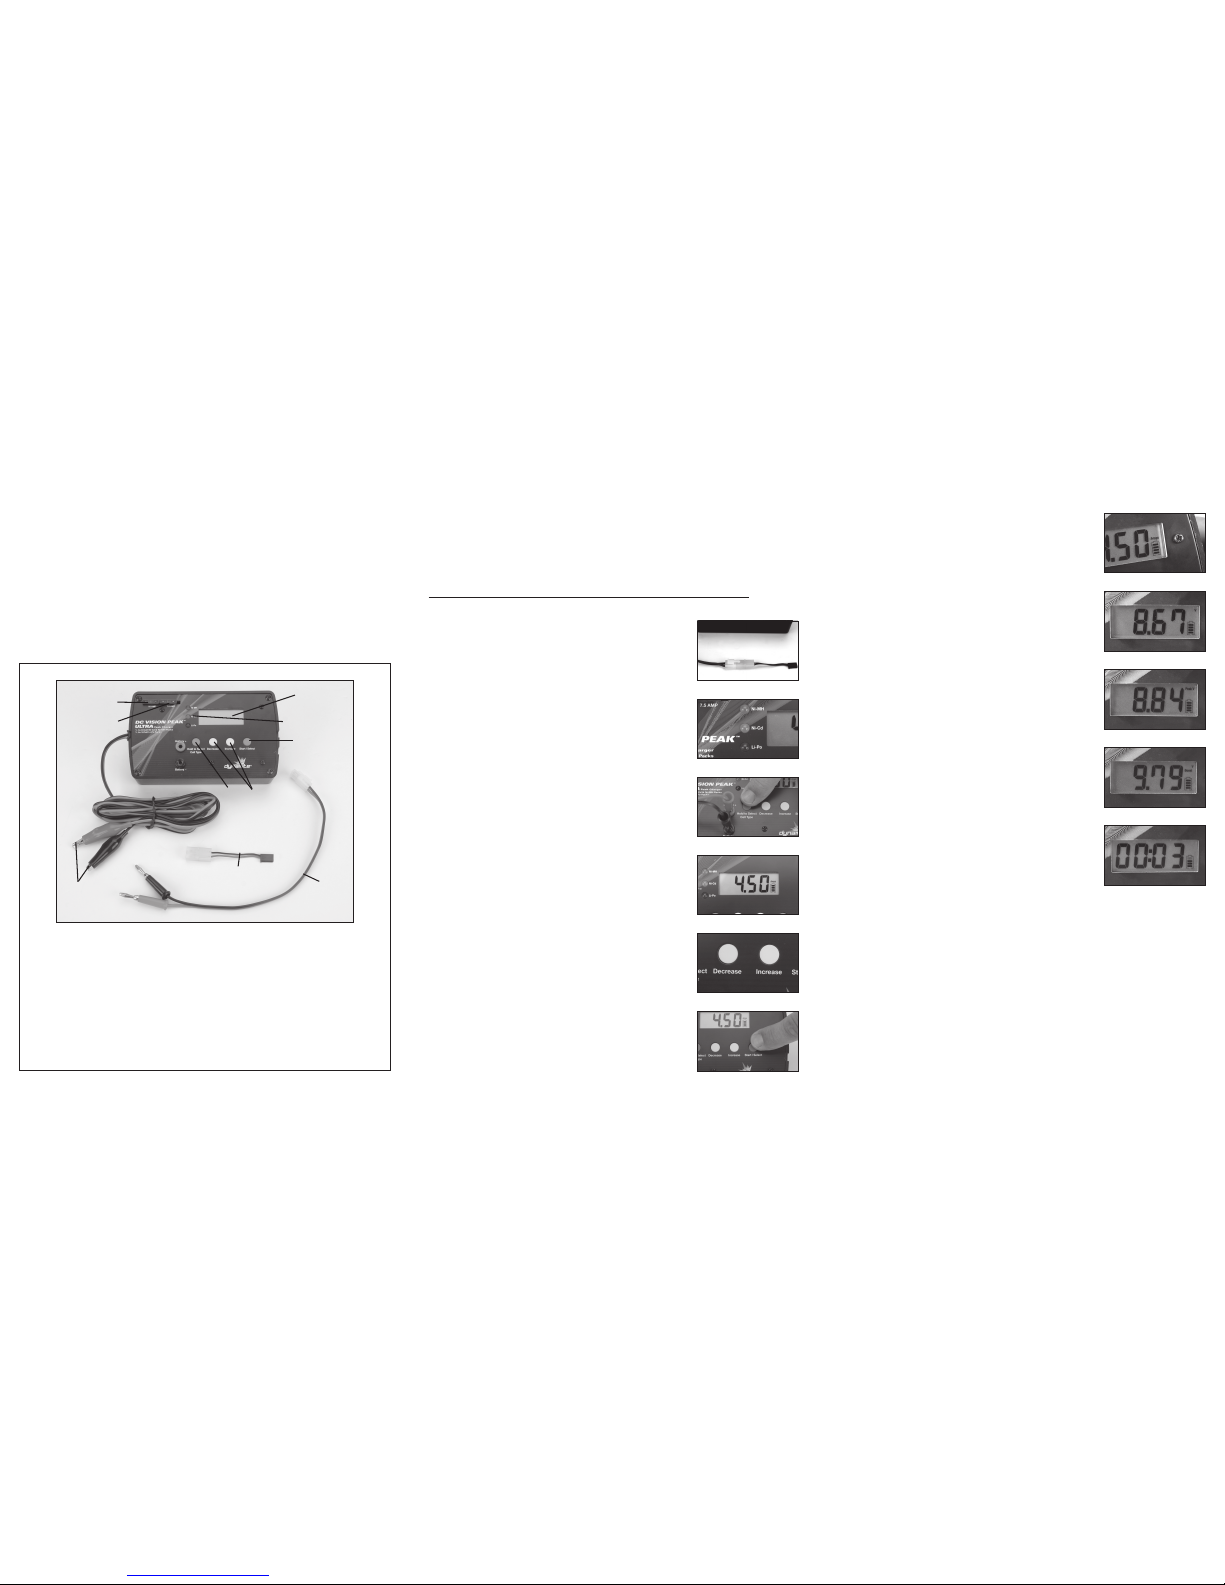
Operating Guidelines
Connecting the Input Power Source
This charger is powered by using the provided alligator clips to connect the charger to a 12V DC power source, such as
a 12V hobby battery (HAN102) or an automobile battery. Connect the red (positive) end of the alligator clips to the red
terminal of the DC power source and the black (negative) end of the alligator clips to the black terminal of the DC power
source.
If you choose to power your charger with an automobile battery, never do so with the automobile running!
Setting the Charge Perimeters
When power is supplied to the charger, the charger will beep and the cooling fan
will begin to run. The display will default to the “Voltage” indicator.
Connect the battery to the charge lead. Use the included charge adapter (figure 1)
if you are charging a radio batter y. The charger will beep and the battery voltage
will be shown on the LCD.
Notice which LED is flashing (figure 2). If it is not the LED indicating the
chemistry of the battery cells you intend to charge, press and hold the Display
mode button (figure 3) until the correct LED is flashing.
WARNING: Under no circumstances should a Li-Po battery be
charged in the Ni-Mh or Ni-Cd modes. The charger will not
terminate fast charge and personal injury and extreme damage
may occur.
The LED will automatically start flashing faster at this point and the LCD display
will automatically switch to the “Amps” mode (figure 4). Press the Current
Adjustment buttons (figure 5) to increase or decrease the charge rate.
NOTE: Lower capacity radio batteries should be charged at no more than 1
amp. Higher capacity radio batteries (over 1000mAh) may be charged at 2
amps. Larger sub-C cell sport packs may be charged at up to 3.5 amps, and
higher quality (matched cell) performance packs may be charged at higher
rates. Consider that the higher charge rates may lower charge time but may
not be as efficient as lower charge rates.
Press the Start/Select button (figure 6) to begin fast charging the pack. The
Vision LCD (figure 7) will begin to flash while the charger analyzes the battery
condition and automatically determines the cell count.
NOTE: If the charger notices a problem with the battery pack, such as
shorted or weak cells, fast charge will not begin and the beeper will sound
multiple times. Discard the battery pack.
As the battery becomes charged, the segments on the Vision LCD will increase.
Once the pack is fully charged, the LCD will be fully illuminated. The charger
will beep indicating the charger has entered a safe trickle mode.
(See Trickle Charge section).Press and release the Display Mode switch to
view the real time charge voltage, peak voltage, charge current and charge
time displays.
1. 12V DC input
2. Adjustable .1 to 5 amps fast charge rate (.1 to 3
amps for Li-Po)
3. LCD charge level/charging information
displayeatures
4. LED charge status indicator
5. Tamiya-style output
(battery) connector
6. Receiver Pack charge lead adapter
7. 10 amp fuse
8. 7.5 amp fuse
9. Start/Select switch
10. Display Mode Button
Charge transition beeper
Auto-trickle charge
Introduction
Thank you for purchasing the Dynamite® Vision Peak™ Ultra AC/DC Peak Detection Charger. As the most
technologically advanced charger in the Vision line, this charger has all the same great features the Vision
chargers are famous for but also now charges 1- to 3-cell Lithium Polymer (Li-Po) batteries. Now you can
monitor the fast charging process through the charge indicator on the LCD display as well as charge time, current
voltage and peak voltage. Also charge 1- to 8-cell Ni-Cd and Ni-MH packs with an automatic cell selector.
2
Features
3 4
Adjusting Charge Current During the Fast Charge Period
Once the fast charge period has begun, the charge
current is locked in.
To change the charge current:
• Press the Start/Select button (figure 6) and the LED will begin to flash.
• Press the Display Mode Switch until the amps are displayed on the LCD.
• Press the Current Adjustment buttons (figure 5) to adjust the charge current.
• Press the Start/Select Button to resume fast charge.
Volts
The voltmeter function (figure 8) allows you to monitor the real time charge
voltage of the battery to determine the battery’s charge state. The voltage
increases as the battery becomes charged.
Peak Volts
The Peak Volts (figure 9) records the highest voltage that the pack has reached
during the charge period. The higher the battery’s average voltage, the more
power it can deliver. Fully charging and discharging a battery pack (cycling) can
increase the Peak Voltage, translating into longer and faster runtimes.
Trickle Charge
When the LED is flashing, a low current pulsed trickle charge is being applied
to the battery. Trickle charging safely maintains the charge capacity until you are
ready to use the battery and helps equalize the cell voltage.
Boost (Repeak) Mode
After the battery has peaked and enters the Trickle Charge mode, you may enter
the Boost mode by pressing the Start/Select button. The word “Boost” will
be displayed on the LCD (figure 10). This mode allows you to fast charge the
battery at 1 minute intervals after the battery has peaked to “top-off” the pack.
Charge Timer
The Charge Timer records the fast charge time in minutes (figure 11). To
determine the charge capacity applied to the battery, multiply the charge time in
hours by the charge current in amps.
Example:
4.00 amps X (18 minutes / 60) 0.3 hours = 1.2 amp/hours (X1000 = 1200mA/h)
Figure 1
Figure 2
Figure 3
Figure 4
Figure 5
Figure 7
Figure 8
Figure 9
Figure 10
Figure 11
Figure 6
1
5
2
3
4
6
8
9
10
7
 Loading...