

Page 1
USING THE GRILL
LIGHTING INSTRUCTIONS
Note:
Remove the top grill cover before lighting. Turn all knobs to “OFF”. Turn the main gas supply on.
If you smell gas, shut-off gas supply and call for service.
Grill Lighting Instructions:
The grill knob is connected to the electronic ignition module. Pushing in on the grill knob will activate the ignition module to get a spark. Push and hold the ignition button, turn the selected burner knob to “SEAR”. If burner
does not light in 4 to 5 seconds, turn knob “OFF” and wait 5 minutes before trying again for any accumulated gas
to dissipate.
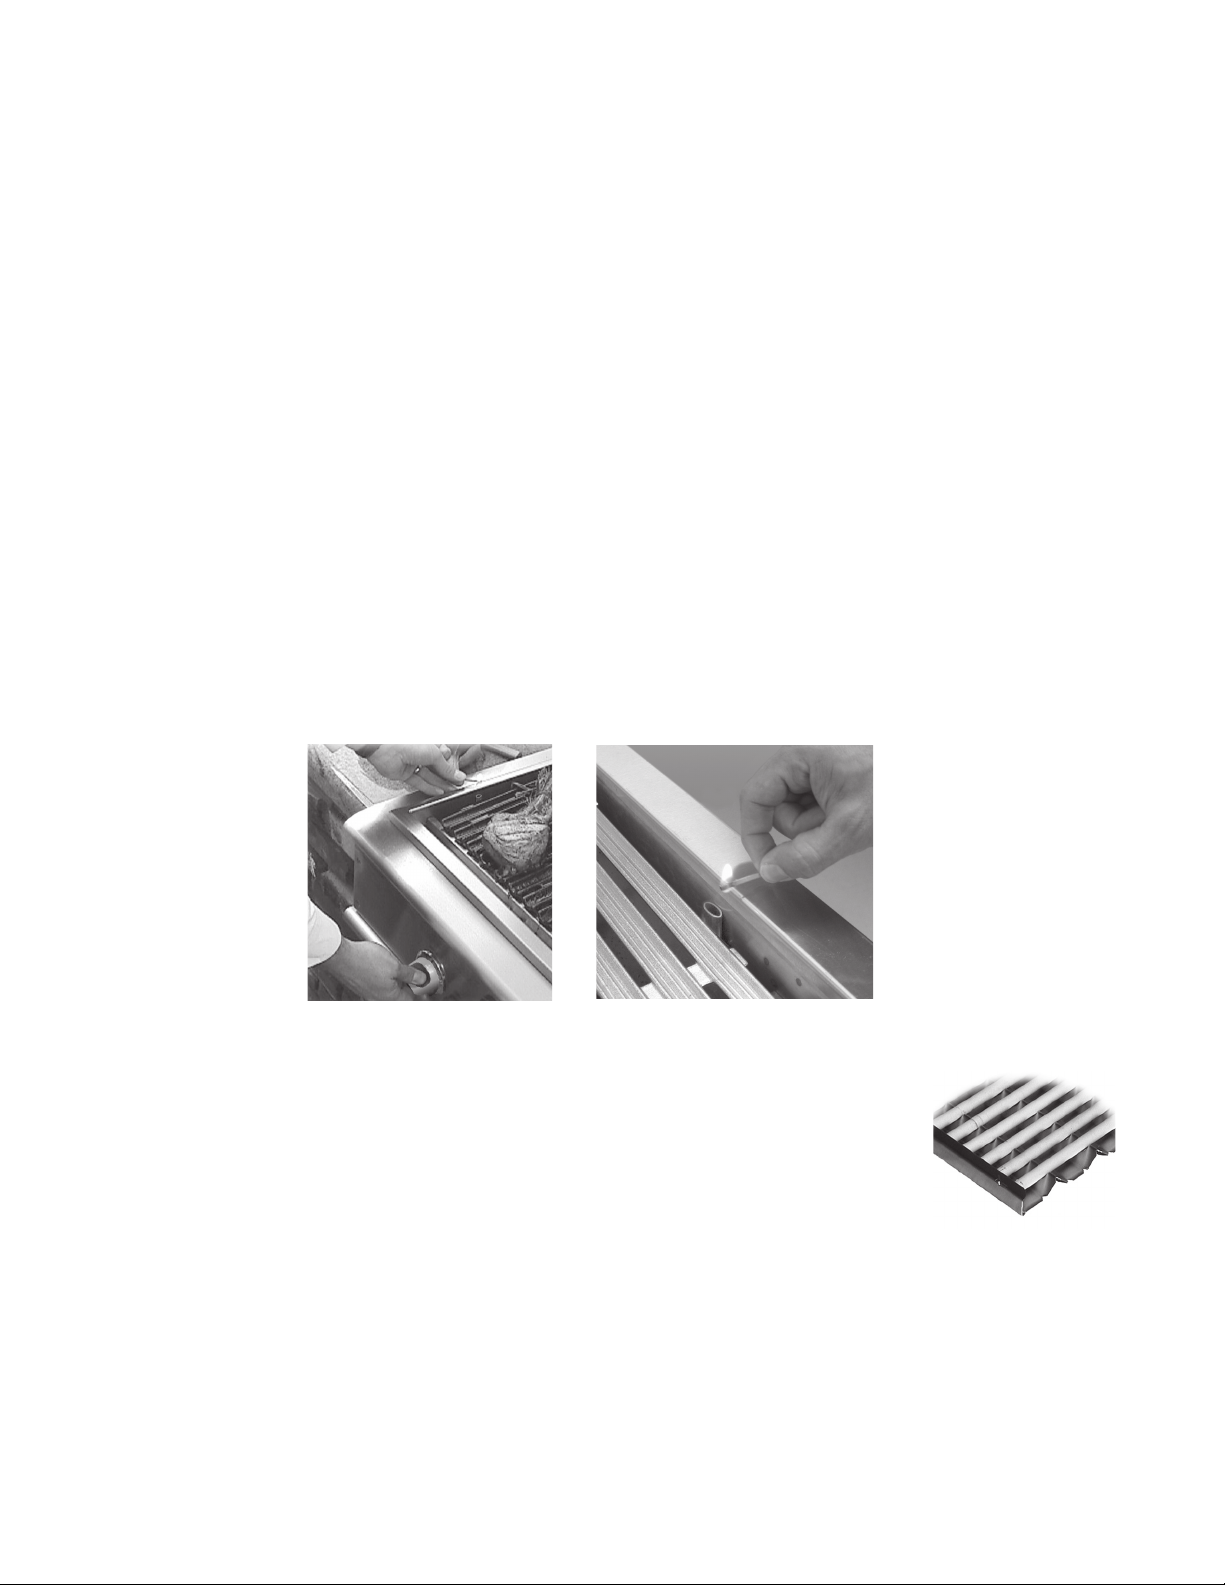
Grill Match Lighting:
If the burner will not light after several attempts, then the burner can be match lit. If you’ve just attempted to
light the burner with the ignition, allow 5 minutes for any accumulated gas to dissipate. Keep your face as far
away from the outdoor appliance as possible and hold a paper book match over the hole located on the top left
for burner on the left, or the right hole for the right burner (Fig. 52 and Fig. 53). Push and turn the control knob
which is centered on the burner where the lit match is located, to “SEAR”. If the burner does not light in 4 seconds, turn the knob off, wait 5 minutes and try again.
EN
Once the left or right burner is lit, the adjacent burner can be lit by the cross-lighting method. Light the left or
right burner using the standard or match light procedure. Push and turn the control knob for the adjacent burner
to “SEAR”. The gas will be ignited by the adjacent burners flame. If the burner does not light in 4 seconds, turn
knob off, wait 5 minutes and try again.
Fig. 52
Fig. 53
USE OF THE GRILL
Each grill section consists of a large stainless steel burner, stainless steel heat baffles, a
series of ceramic rods encased in a stainless steel radiant tray, and a stainless steel heat
retaining grates. Each burner is rated at 25,000 Btu/hr. Below the burners there is a stainless steel heat baffle which reflects usable heat upward into the cooking area and reduces
temperatures of the drip pan below. Above the burners are stainless steel
radiant trays which encase the ceramic rods and protect the grill burner ports from blockage (Fig. 54).
Fig. 54
The grill is supplied with radiant ceramic rods. Because of the porosity of ceramic rods,
performance is superior in the rods’ ability to capture heat as it rises from the grill burners. They also possess the
thermal mass needed for results. Flare ups are controlled because our radiant ceramic rods keep grease from getting to the flames and igniting. The intense heat produced by this system produces true outdoor-cooked flavor
as fats and juices are brought to the surface of the food and caramelized. Discoloration is normal after use.
27
Page 2

USING THE GRILL
HEAT HEAT
HEAT
IMPORTANT - Using the Grill:
Grilling requires high heat for searing and proper browning. Most foods are cooked between “MEDIUM” and
“LOW” heat setting for the entire cooking time. However, when cooking large pieces of meat or poultry, it may
be necessary to turn the heat to a lower setting after the initial browning. This cooks the food through without
burning the outside. Foods cooked for a long time or basted with a sugary marinade may need a lower heat
setting near the end of the cooking time. It is best to use sugary sauces at the end of the cooking process to
help prevent burning.
The grates are reversable. The “W” grate is used for meat products and lets the fat drain down the grooves.
Theopposite side is “ ” shape for fish, vegetables, and fruit which don’t have any fat.
1.
Check to be certain the drip pan and grease tray are in place.
2.
Light the grill burners using the instructions on page 27.
3.
Preheat the grill for 5 to 10 minutes on “SEAR” setting.
U
Direct heat outdoor appliance cooking
(Hot Dogs, Hamburgers,
Typical Thickness Steaks/Chicken)
Food
Grill
Rack
Burner
4.
Place the food on the grill grates and cook to the desired doneness. Adjust heat setting, if necessary.
Thecontrol knob may be set to any position between “SEAR” and “LOW” - most cooking is done between
“MED” and “LOW” settings.
5.
Allow grill to cool and clean the grates and drip pan after each use.
Note:
If using LP gas, your preheat time may be shorter than recommended. To prevent overcooking or burning, you may
want to lower heat settings.
GRILLING HINTS:
The doneness of meat, whether rare, medium, or well done, is affected to a large degree by the thickness of the
cut. Expert chefs say it is impossible to have a rare doneness with a thin cut of meat. The cooking time is affected
by the kind of meat, the size and shape of the cut, the temperature of the meat when cooking begins, and the
degree of doneness desired. When defrosting meats, it is recommended that it be done overnight in the refrigerator as opposed to a microwave. This in general yields a juicier cut of meat. Use a spatula instead of tongs or a
fork to turn the meat, as a spatula will not puncture the meat and let the juices run out. To get the juiciest meats,
add seasoning or salt after the cooking is finished and turn the meat only once (juices are lost when the meat is
turned several times). Turn the meat just after the juices begin to bubble to the surface. Trim any excess fat from
the meat before cooking. To prevent steaks or chops from curling during cooking, slit the fat around the edges at
2-inch intervals.
28
Page 3
USING THE SIDE BURNER
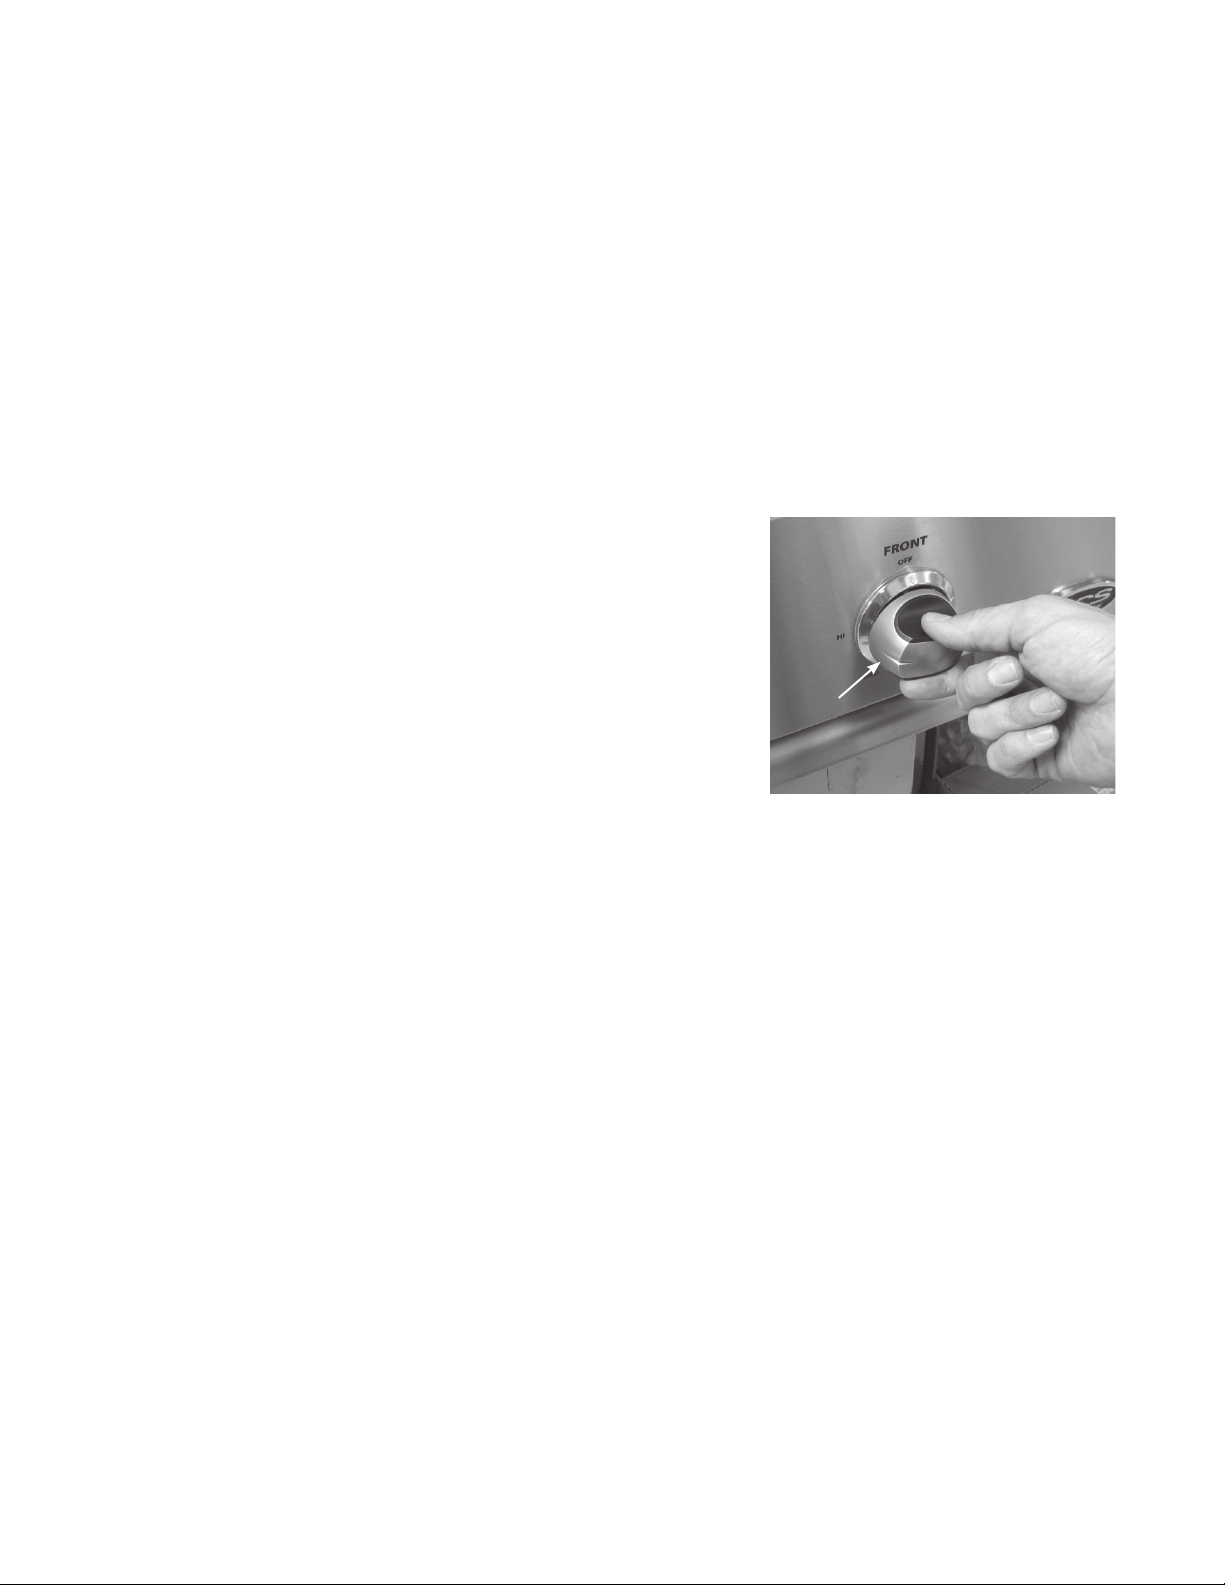
LIGHTING INSTRUCTIONS
First remove the cover and any cooking utensils from the burner grate. Check to see if the burner cap is on correct. Push, turn and hold the control knob in at the “HI” position until the burner is lit or 4 seconds pass
(Fig. 55). If the burner doesn’t ignite, wait 5 minutes for any accumulated gas to dissipate then try again. If the
burner will not light after several attempts, check the troubleshooting instructions on page 36.
MATCH LIGHTING
Hold a paper book match near the burner ports, turn the control knob counterclockwise to “HI”. Rotate the knob
immediately once the burner is lit to the desired setting.
Note:
If you are using propane gas, a slight pop or flash may occur at the burner ports a few seconds after the burner has been
turned “off”. This “extinction pop” is normal for propane gas.
EN
Control
Knob
Fig. 55
29
Page 4
USING THE GRIDDLE
The griddle is made from stainless steel, highly polished to provide
a smooth cooking surface. It is normal for it to darken with use as
oils cook onto the surface to provide a nonstick base or “seasoning”. Since the griddle is made from stainless steel, the surface will
not rust. However, after use it may have a rust stain or rust color.
The griddle burner is controlled by the gas burner underneath the
griddle plate and cycles on and off to maintain the set temperature.
The griddle assembly is not to be removed for cleaning and is held in
place by one front screw and two rear screws. These are mainly there
to keep the griddle from shifting in transit, thus avoiding breakage of
any ignition components.
THERMOCOUPLE
The griddle burner is equipped with a thermocouple and safety
valve system which monitors the burner. This will turn the gas off if
the burner isn’t lit or the knob is not held in. The burner will ignite
within 4 seconds after the gas reaches the burner.
BEFORE USING THE GRIDDLE FOR THE FIRST TIME
OR TO RESEASON
1. Clean the griddle thoroughly with hot, soapy water to remove any
protective coating.
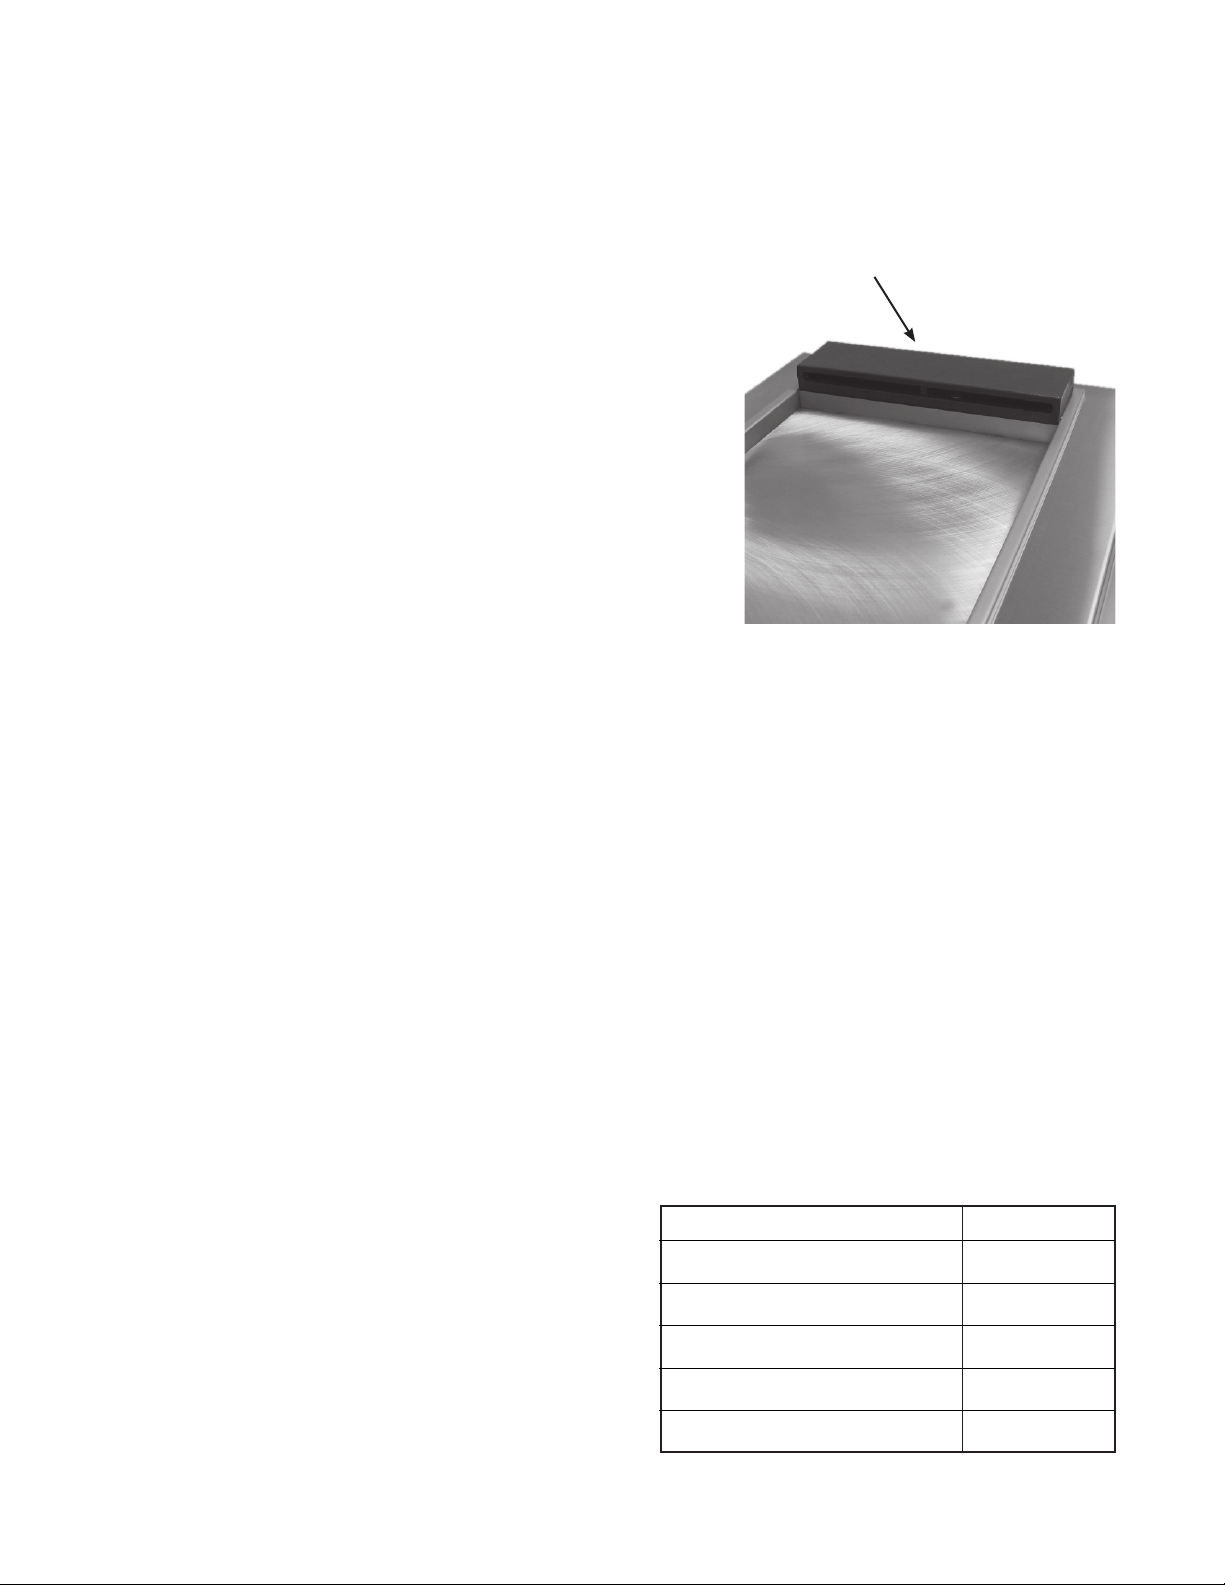
GRIDDLE FLUE
COVER
Fig. 56
2. Rinse with a mixture of 1/2 cup water and 1/4 cup white vinegar. Dry thoroughly.
3. Pour 1 teaspoon vegetable oil into the center of the griddle (do not use corn oil as it gets sticky). Rub the oil over
the entire surface of the griddle using a heavy soft cloth.
4. Turn the control knob to a Medium setting (350º F). Turn the heat “off” when the oil begins to smoke. Allow the
griddle to cool.
5. Repeat Step 3. Be sure to cover the entire surface with the oil.
6. Repeat Step 4. Allow the griddle to cool. Wipe the entire surface of the griddle using a heavy soft cloth. Apply a
very thin layer of vegetable oil. The griddle is now ready to use. If the griddle is not used for a period of time,
re-season it occasionally.
NOTE:
It is normal for the griddle to darken with use.
USE OF THE GRIDDLE
Before starting to cook on the griddle, be sure the flue cover (Fig. 56), grease cup and drip tray are in place.
Preheat griddle for 15 minutes with the control knob set to “HI”. When the griddle is preheated, turn the knob to
“MEDIUM” or “LOW” depending on the temperature desired. Place the food on the griddle and cook to desired
doneness.
NOTE:
When the griddle is properly seasoned it can be used
without any additional oil. However, oil can be used for
flavor. A light mist of non-stick vegetable spray, applied
before cooking to a cool griddle, makes delicate foods
easier to turn.
Eggs
Bacon, Ham, Pork Chops
Sausage, Grill Cheese Sandwiches
FOOD TEMPERATURE*
225ºF to 250ºF
300ºF to 325ºF
325ºF to 350ºF
30
Pancakes, French Toast
Hash Brown Potatoes
*Griddle temperatures will vary do to air flow and ambient temperatures.
350ºF to 375ºF
400ºF to 425ºF
Page 5

USING THE GRIDDLE
LIGHTING INSTRUCTIONS
Push in and turn griddle control knob to “HI” position. Pushing control knob in activates the ignition module and
produces repeated sparking at burner igniter. Holding control knob in also opens the integral safety valve used
for this section and starts the flow of gas to burner. Once burner is lit, continue to hold in the control knob for 10
seconds, or until burner remains lit after control knob is released. The knob can then be turned to desired position.
MATCH LIGHTING
Insert a paper book match (DO NOT LIGHT) securely into the clip end of the match extension rod. Light the match
held on the end of the rod and hold up against the bottom of the flash tube on the left side of the flue cover (Fig.
57). Push, turn and hold the griddle control knob to “HI”. Once burner is lit, continue to hold in the control knob
for 10 seconds, or until burner remains lit after control knob is released. The knob can then be turned to desired
position. If the burner does not light after 4 seconds, turn the knob “OFF”. Wait 5 minutes for any accumulated gas
to dissipate before trying to light the burner again.
EN
Fig. 57
31
Page 6

USING THE SINK
The sink is available to provide water to your Liberty collection. The faucet is in the “on” position when the lever is
turned up (Fig. 58). The faucet is “off” when in the down position as shown in Figure 59.
Fig. 58
On position
Fig. 59
Off position
WARNING!
The sink is intended for hand washing and cleaning activities. The sink should not be used for potable water or food
preparation activities unless installed by a certified plumber and per local codes.
32
Page 7

CARE AND MAINTENANCE
BATTERY REPLACEMENT:
1. Remove drip pan.
2. Pull battery downward (This may require use of pliers.)
3. Re-install upward and push to snap in - Fig. 60.
(Polarity is shown in Fig. 61).
Note:
Battery condition should be checked at least once a year.
REGULATOR AND HOSE REPLACEMENT
Fig. 60
The pressure regulator and hose assembly supplied with the unit must be used. If replacements are needed, contact Customer Care for orders at (888) 936-7872. Do not use the outdoor appliance if the odor of gas is present.
If the unit is LP, screw the regulator into the tank and leak check the hose and regulator connections with a soap
and water solution before operating the outdoor appliance. Turn all knobs to “OFF” then turn on the gas supply.
If LP, confirm there is gas in the tank.
n
Always keep your face and body as far away from the outdoor appliance as possible when lighting.
n
DO NOT leave the outdoor appliance unattended while cooking.
n
Keep a spray bottle of soapy water near the gas supply valve and check the connections before each use.
n
Do not attempt to “LIGHT” the outdoor appliance if the odor of gas is present.
n
Wait 5 minutes before relighting a hot outdoor appliance.
Fig. 61
EN
CLEANING GRILL GRATES:
The easiest way to clean the grill grates is immediately after cooking is completed and after turning off the flame.
Wear a barbeque mitt to protect your hand from the heat and steam. Dip a fine stainless steel bristle barbeque
brush in tap water and scrub the hot grates. Dip the brush frequently in the bowl of water. Steam, created as
water contacts the hot grates, assists the cleaning process by softening any food particles. The food particles will
fall onto the ceramic rods and burn or fall into the drip pan. If the grill is allowed to cool before cleaning, cleaning will be more difficult. After cleaning, apply a thin coat of vegetable oil to protect the grate from moisture and
rust stains.
WARNING!
Do not put grease down any drain or sink. Place the cool grease in a container and throw into the trash.
DRIP PAN AND GREASE TRAY/GREASE CUP:
The full width drip pan with grease tray will collect grease from the outdoor appliance. Allow the pan and its
contents to cool before attempting to clean. The griddle grease cup is dishwasher safe.
To remove drip tray: (if needed)
n Pull tray out until it stops.
n Continue pulling the tray out to clean.
To install drip tray:
n Align the side of the drip tray with the guides (Fig. 62).
n Push the tray in until it stops.
Guide
n Pull the tray forward and push in and out several times to engage
rollers.
33
Fig. 62
Page 8

CARE AND MAINTENANCE
If something has spilled into the trays it should be cleaned up as soon as possible to prevent “baked on” food soil.
Grease from the griddle or the outdoor appliance drains through the drain tube (Fig. 64) into the tray and liner
below. Do not allow the grease to accumulate in the tray as it can be a fire hazard. Clean the tube and tray as
soon as they are cool. Clean with hot soapy water. For the tube use a soapy bottle brush. Ensure the drip tray
is in place when cleaning the drain tube. A mild abrasive cleaner such as Fantastik®, Simple Green® or Formula
409® can be used. (Do not use steel wool pad, or a harsh abrasive such as: Comet® or Ajax®.) Rinse and dry all
parts thoroughly.
Drain Tube
Fig. 63
Fig. 64
CERAMIC RODS:
It is not necessary to remove the ceramic rods for cleaning. They burn themselves clean during the next cooking
operation. Periodically the trays holding the ceramic rods need to be turned over, and shaken free of debris for a
thorough cleaning. How often you use the grill and the amount and type of food cooked will determine when it
is necessary to clean the trays. If grease can be seen on the top of the tubes or if you get a lot of flare-up during
cooking, the tubes need to be turned over and heated on “SEAR” for 30 minutes; longer for heavy soil.
STAINLESS STEEL:
The outdoor appliance is made from non-rusting stainless steel. After initial usage, areas of the outdoor appliance may discolor from the intense heat given off by the burners, this is normal. There are many different stainless steel cleaners available. Always use the mildest cleaning procedure first, scrubbing in the direction of the
grain. To touch up noticeable scratches in the stainless steel, sand very lightly with wet 100 grit emery paper in
the direction of the grain. Specks of grease can gather on the surfaces of the stainless steel and bake on to the
surface and give the appearance of rust. For removal use an abrasive pad (such as Scotch Brite) in conjunction
with a stainless steel cleaner. Always rub in the direction of the grain.
Note:
Stainless steel tends to corrode in presence of chlorides and sulfides especially in coastal areas. To ensure corrosion prevention, wash all stainless steel surfaces every 3-4 weeks with fresh water and stainless cleaner. Keep outdoor appliance
covered when not in use.
GRILL BURNER:
Ensure gas supply has been turned off. Remove the grill
grates, then lift out the radiant tray. Grasp the burner, pull
it up and slightly to the rear of the unit so the burner head
comes off the brass orifice at the front, angle the burner
sideways, and remove.
GRILL BURNER CLEANING:
Clean the exterior of the burner with a stainless steel wire
brush. Clear stubborn scale with a metal scraper. Clear any
clogged ports with a straightened paper clip. Never use
a wooden toothpick as it may break off and clog the port.
Shake out any debris through the air shutter. Use a flashlight to inspect the burner inlet to ensure it is not blocked.
If obstructions can be seen, use a metal wire coat hanger
that has been straightened (Fig. 65).
Fig. 65
34
Page 9

CARE AND MAINTENANCE
ORIFICE CLEANING:
With the burner removed, remove the orifice and shine a flashlight through the opening to ensure there is no
blockage. Use a needle to clear any debris. Be extremely careful not to enlarge the hole or break off the needle.
See Fig. 65.
Note:
When replacing grill burners or orifices following cleaning, confirm orifice penetration into burner as shown in Fig. 66.
WARNING:
IT IS EXTREMELY IMPORTANT TO CENTER THE BURNER ON
THE ORIFICE PROPERLY TO PREVENT A FIRE HAZARD OR
EXPLOSION (FIG. 66).
Be careful not to upset the air shutters’ original position
(unless readjusting). Lower the rear of the burner into the
cutouts on the support channel at the rear of the burner
box. Make sure it is level and does not rock. Light all of the
burners and check for proper flame characteristics. If adjustments are necessary, refer to page 22. Do this prior
to using the appliance.
Fig. 66
EN
The side burner will give you years of trouble free service if properly maintained. Burner hangers are made from
non-rusting high grade stainless steel. The burner is heavy duty cast iron and brass. The venturi tube is brass.
SIDE BURNER GRATE
The side burner grate is porcelain enamel over cast
iron for durability. To avoid burns, do not clean a hot
grate. They may be wiped while in place with hot,
soapy water, rinsed and wiped dry thoroughly. Never
immerse a hot grate in water. Due to rapid temperature changes the porcelain may pop off the edges
of the grates. If the grates develop chips, do not be
concerned as the base metal, cast iron, soon darkens
to blend with the porcelain enamel. Use care when
wiping areas where the enamel has popped off, the
edges may be sharp. If cleaning necessitates grate
removal, care should be taken in lifting them. They
are very heavy. Be sure to place them on a protected
surface.
SIDE BURNERS
For proper lighting and performance, keep the burners clean. It is necessary to clean the burners if they
do not light even though the igniter clicks, if there
has been a severe boil over, or when the flame does
not burn blue. Be certain all burner knobs are in
the “OFF” position before attempting to clean the
burners. The burners have been designed for ease
of cleaning. When the grate and burners are cool,
remove the grate. The burner cap and the brass port
ring can easily be lifted off. Wash these parts in hot
soapy water, rinse and dry thoroughly. The burner
Brass Ring Locating
Pins
Locating Notch
Electrode
Locating Holes
Fig. 67
Cap
Main
Burner
Port Ring
Burner
Base
Venturi
35
Page 10

CARE AND MAINTENANCE
caps are porcelain enamel, follow the directions above that were given for the burner grates. A bristle brush
can be used to clean out the toothed burner ports, if necessary. After cleaning, it is important to make sure the
location pins on the bottom side of the port ring are properly aligned with the corresponding holes in the base.
Incorrect alignment will produce a potentially dangerous flame and poor burner performance (see Fig. 67).
SIDE BURNER ELECTRODES
Wipe with a water dampened cotton swab. Be careful not to damage
the electrode (see Fig. 68).
GRIDDLE
Griddle will darken when used. This is normal and needed for proper
non-stick cooking and does not require cleaning. However, the griddle
needs to be thoroughly cleaned of grease and food particles while it is
still hot, taking care not to scratch the griddle, using a nonmetal spatula or brass brush. Once the griddle has cooled to a lukewarm temperature, rub the surface lightly with vegetable oil (do not use corn oil,
it gets sticky). Thoroughly wipe the griddle with a heavy coarse cloth
or burlap to remove any remaining residue and food particles. If you
have a grease build-up, use one tablespoon of vinegar in a 1/2 cup of
water, clean with a scouring cloth such as a Chore Boy® Scouring Cloth.
For heat discoloration use a stainless steel cleaner for heat stains such as Revere Ware® Stainless Steel Cleaner.
Wash with hot soapy water, rinse and dry. If food soil or residue is cooked onto the griddle, use a griddle stone
(fine grained pumice), or a griddle pan and screen cleaner (these are both available at restaurant supply store),
following the manufacturers’ directions. Wash with hot soapy water, rinse and dry. If hot soapy water, vinegar,
or scouring powder are used to clean the griddle, it must be re-seasoned. Follow the directions on page 30 to
reseason the griddle.
Electrode (keep clean)
Fig. 68
NEVER FLOOD THE HOT GRIDDLE WITH COLD WATER. This could cause the griddle to crack or warp and/or create
hot steam that can burn you.
CONTROL KNOBS
These are die-cast metal with plastic grips and can be cleaned in hot, soapy water. To remove the knobs from
the control panel, grasp the knob and pull straight back towards you and away from the appliance. Wash, do not
soak. Rinse and dry thoroughly.
SINK
In cleaning any stainless steel, always use the soft side of the sponge. If you need to use a cleaner, use a stainless steel cleaner/spray for stainless steel. Hard water spots can be removed by using a product like Lime-A-Way.
Always read the directions in applying any cleaner. The sink can be cleaned easily using a degreaser like Dawn
Liquid Soap that will eliminate any grease residue. There are many stainless steel spray cleaners/polishers in the
market. Remember to use the soft side of the sponge. The drain plug should be removed and cleaned after using
the sink. Place the cover on top of the sink after cleaning is done.
36
Page 11

TROUBLESHOOTING - OUTDOOR APPLIANCE
BEFORE CALLING FOR SERVICE:
If the outdoor appliance does not function properly, use the following checklist before contacting your dealer
for service. You may save the cost of a service call. Troubleshooting is for general purposes only. If the problem
persists and you feel you require service, contact your dealer or the nearest authorized agency to perform service.
Only authorized agencies can perform warranty service. Call DCS Customer Care at
(888) 936-7872.
PROBLEM WHAT TO DO
EN
Outdoor appliance won’t light
when the control knob is
pushed.
Burner flame is yellow or orange, in conjunction with the
odor of gas.
Low heat with knob in “HI” or
“SEAR” position.
Is the gas supply turned on?
Ensure the outdoor appliance is cool. Remove the
outdoor appliance top grates and the ceramic radiant
trays. Watch the electrode tip. You should see a spark
jump from the tip of the electrode when the ignition
button is pushed.
If there is no spark when ignition button is pushed,
check the battery condition. Battery condition should
be checked at least once a year.
Attempt to match light the burner (see page 27 & 31).
Check to see that other burners on the unit operate.
Clean ignition tip of any debris.
Is it too windy? Wind break is needed.
Check the burner inlet for obstructions such as spider
webs. Check the air shutter for proper adjustment.
Outdoor appliance may be in a dusty area. Move to
less dusty area if possible.
If only one of th burners appears low, clean the orifice
and burner, clearing ports of any obstruction (see
page 34).
Outdoor appliance may be in a dusty area. Move to
less dusty area if possible.
Check for proper gas supply and pressure.
Pre-heat outdoor appliance for a full 15 minutes.
If using LP gas, check for empty tank.
Regular checkup. Turn all knobs to “OFF”, turn gas
supply “off”. Wait 5 minutes. Ensure all knobs are “off”.
Then turn gas supply “on” and wait 30 seconds. Then
attempt to light the burners.
Wind is blowing heat away from the food.
37
Page 12

TROUBLESHOOTING - SIDE BURNER
PROBLEM WHAT TO DO
Burner won’t light when the
ignition is pushed.
Burner flame is yellow or orange, in conjunction with the
odor of gas.
Remove the burner grate. Push in the control knob
and listen to the electrode while engaging the ignition.
There should be a spark from the electrode. When the
spark jumps, it makes a ticking sound.
If there is no spark........
Could be a dead battery. Try replacing the battery.
Or the air gap between an electrode tip and a contact
metal is too far (gap should be 1/8”) or dirty.
If there is a spark... is there gas supplied to the unit and
is the line purged of air? See page 20.
Does the other burner of a dual burner model
operate?
Check the orifice or venturi for blockage.
Check the burner for obstructions or dirt. See page 34.
Check for proper gas supply or wrong gas type.
Is the side burner in a dusty area? Move to less dusty
area if possible.
Is the fuel hose bent or kinked?
Low heat with knob in “HI”
position.
Is there adequate gas supply available? If it is only one
burner of the dual burner unit that appears low, does
the burner need cleaning?
If using LP gas, check for empty tank or low fill level.
Air movement. Wind break is needed.
38
 Loading...