

Page 1
THE PROFESSIONAL ISLAND VENT HOOD
Use and Care Guide
MODELS:
IVS40
IVS52
Page 2

Page 3
A MESSAGE TO OUR CUSTOMERS
Thank you for selecting this DCS Professional Island Vent Hood. Because of this appliance’s unique features
we have developed this Use and Care Guide. It contains valuable information on how to properly operate
and maintain your new appliance for years of safe and enjoyable cooking.
T
o serve you better,please fill out and submit your Product Registration by visiting our website at
www.dcsappliances.com and selecting “Customer Care” on the home page and then select “Product
Registration”. In addition, keep this guide handy, as it will help answer questions that may arise as you use
your new appliance.
For your convenience, product questions can be answered by a DCS Customer Care Representative by
phone: 1-888-936-7872, or email:customer.care@fisherpaykel.com.
NOTE: Please write the Model, Code, and Serial Number on this page for references (located on the
inside of the top panel on the left, behind the rear back filter, above the motor assembly)
MODEL NUMBER CODE SERIAL NUMBER
NOTE: Inspect the product to verify that there is no shipping damage. If any damage is detected,
call the shipper and initiate a damage claim. DCS by Fisher & Paykel is not responsible for shipping
damage.
DO NOT discard any packing material (box, pallet, straps) until the unit has been inspected.
APPROVED FOR RESIDENTIAL APPLIANCES AND RESIDENTIAL USE ONLY.
PLEASE READ ENTIRE INSTRUCTIONS BEFORE PROCEEDING.
Installation must comply with all local codes.
WARNING
If the information in this manual is not followed exactly, a fire or
xplosion may result causing property damage, personal injury or
e
death.
Do not store or use gasoline or other flammable vapors and liquids in
the vicinity of this or any other appliance.
DANGER
If You Smell Gas:
■ Do not tr
■ Do not touch any electrical switch; do not use any phone in your
building.
■ Immediately call your gas supplier from a neighbor’s phone. Follow
the gas supplier’s instructions.
■ If you cannot reach your gas supplier, call the fire department.
nstalla
■ I
service agency or the gas supplier.
y to light any appliance.
e must be per
tion and ser
vic
ormed by a qualified installer,
f
PLEASE RETAIN THIS MANUAL FOR FUTURE REFERENCE.
1
Page 4

A MESSAGE TO OUR CUSTOMERS
SAFETY WARNING:
urn off power circuit at service panel and lock out panel, before wiring this
T
appliance.
Requirement: 120 V AC, 60 Hz. 15 A Branch Circuit
WARNING
To reduce the risk of injury to persons in the event of a rangetop grease fire,
observe the following: Turn burner off first. Smother flames with a closefitting lid, cookie sheet, or metal tray. Be careful to prevent burns. If the
flames do not go out immediately evacuate and call the fire department.
Never pick up a flaming pan - You may be burned. DO NOT USE WATER,
including wet dishcloths or towels - a violent steam explosion will result.
Use an extinguisher ONLY if:
1) You know you have a Class ABC extinguisher, and you already
know how to operate it.
2) The fire is small and contained in the area where it started.
3) The fire department is being called.
4) You can fight the fire with your back to an exit
.
TABLE OF CONTENTS
SAFETY PRACTICES .........................................................................................................................................................3
USE AND CARE................................................................................................................................................................4-5
CARE AND MAINTENANCE........................................................................................................................................6
HOW TO OBTAIN SERVICE..........................................................................................................................................
WARRANTY............................................................................................................................................................................8
7
2
Page 5
SAFETY PRACTICES AND PRECAUTIONS
WARNING:
o reduce the risk of a range top grease fire:
T
A) Never leave surface units unattended at high settings. Boilovers cause smoking and greasy
spillovers that may ignite. Heat oil slowly on low or medium settings.
B) Always turn hood “ON”when cooking at high heat or when flaming foods.
C) Clean ventilating fans frequently. Grease should not be allowed to accumulate on fan or filter.
D) Use proper pan size. Always use cookware appropriate for the size of the surface unit.
Make-Up air may be necessary to prevent air flowing down chimney, or through unsealed door,
window, or fireplace opening.
WARNING:
o reduce the risk of fire, electrical shock, or injury to persons, observe the
T
following guidelines.
A) Installation and electrical wiring must be performed by qualified personnel in accordance with
all applicable codes & standards, including fire-rated construction.
B) To prevent backdrafting, sufficient air is needed to maintain proper combustion and safe
exhausting of gases through the flue (chimney) of fuel burning equipment. Follow the cooking
equipment manufacturers guideline and safety standards such as those published by the
National Fire Protection Association (NFPA) and the American Society for Heating, Refrigeration
and Air Conditioning Engineers (ASHRAE), and the local code authorities.
C) Use caution when cutting or drilling into walls or ceilings as not to damage electrical wiring
and other hidden utilities.
WARNING:
To Reduce the risk of fire and to properly exhaust air, be sure to duct air to
xhaust air into spaces within walls or ceiling, nor into
t e
en
TE: Unit MUST be vent
NO
ANT: Refer to ducting information supplied in the Installation Manual (p/n 17804)
T
IMPOR
outside
attics, crawl spaces, or garages.
. Do not v
ed to the outside of the building.
WARNING:
To Reduce the risk of electrical shock or injury to persons, all vent hoods
must be installed with ventilators that have been approved for use with the
.
hood
3
Page 6
USE AND CARE
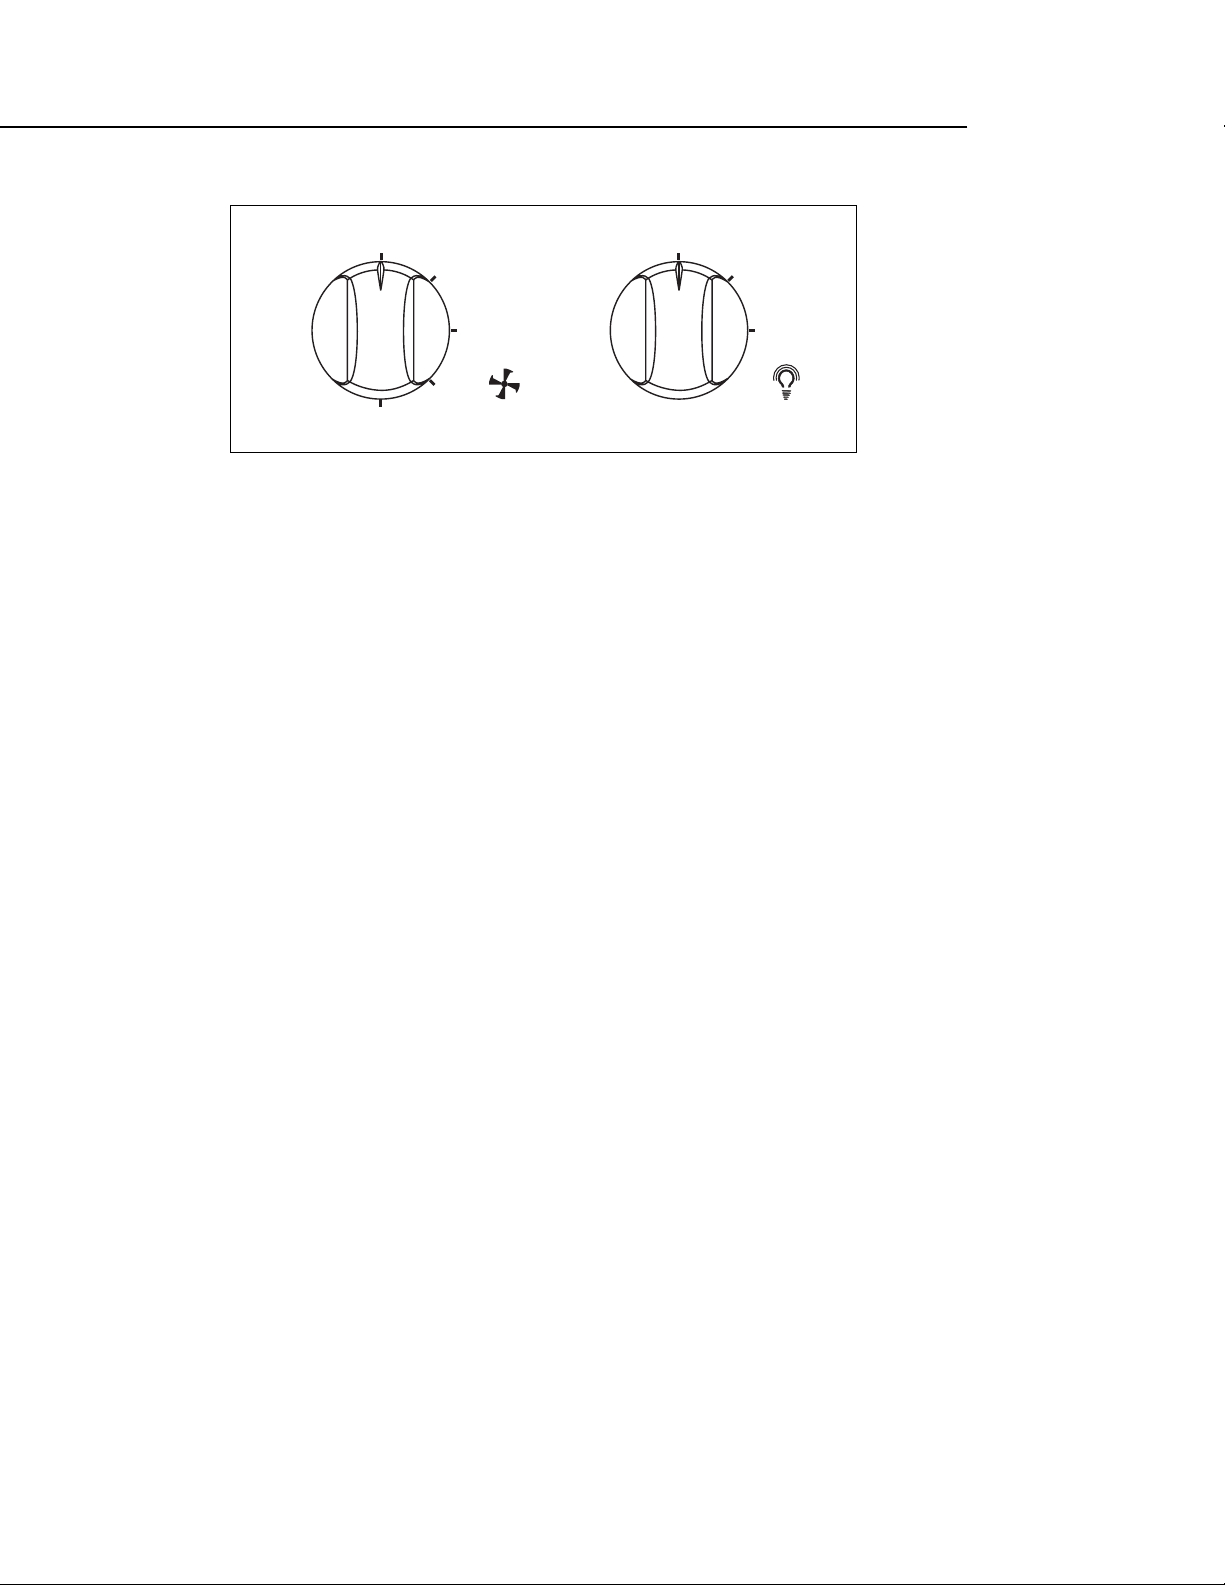
F
AN
L
IGHT
OFF
LO
MAX
M
ED
H
I
OFF
HI
L
O
Fig. 01
FAN CONTROL
Turn to LO, MED, HI or MAX as needed. Continuous use of the fan system while cooking helps keep
the kitchen comfortable and less humid. It also reduces cooking odors and soiling moisture that create
a frequent need for cleaning.
ALWAYS USE THE MAX SETTING WHEN GRILLING.
LIGHT CONTROL
Turn to HI while cooking or to LO for use as a night light.
HOOD OPERATING INSTRUCTIONS
The blower should be turned on for a few minutes before cooking in order to establish air currents upward through the hood. Thus when heat, smoke, moisture, grease and cooking odors are produced,
they will be carried outside instead of drifting into other rooms.
Use the low speeds for normal use and the higher speeds for strong odors or fumes.
Drafts across the range or cooktop will cause the escape of heat, smoke, moisture, grease and cooking
odors from the hood. Such drafts should be prevented in so far as possible.
The best job of ventilation in the kitchen is done where the only air currents are those created by the
blower itself.
4
4
Page 7
USE AND CARE
Drip
Tray
BLOWER
The motor is operated by a four-speed control switch. You may change the speed of the motor
depending on the amount of grease and smoke you are creating while cooking.
ALWAYS USE THE MAX SETTING WHEN GRILLING.
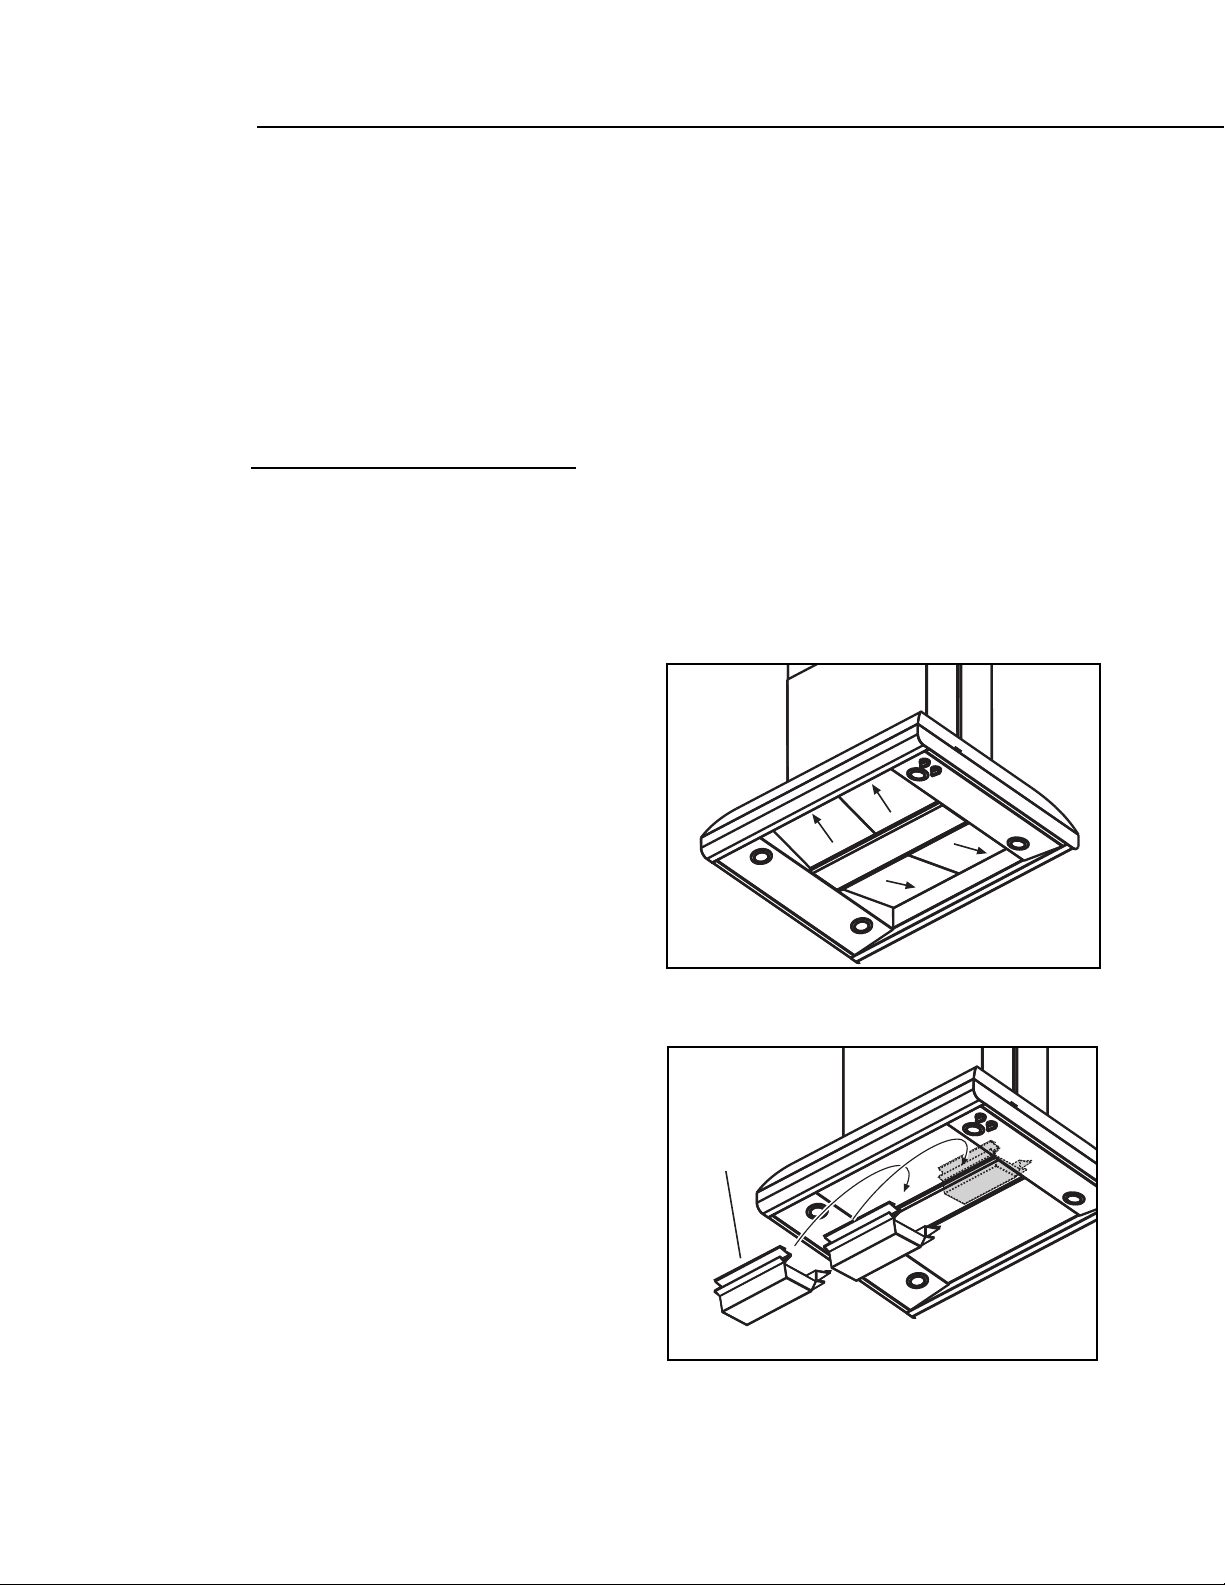
FILTERS AND DRIP TRAYS
These hoods have reusable stainless steel grease baffles and drip trays. The baffles guide the grease
released by foods on the cooktop into the drip trays.
IMPORTANT:
The baffles must ALWAYS be in place when the hood is used.
The baffles and drip trays should be cleaned once a month, or as needed. To clean the baffles and drip
trays, drain and wipe all excess grease with a dry paper towel. Soak them and then swish them around
in hot water and detergent. Don’t use ammonia or ammonia products because they will darken the
metal.
Do not use abrasives or oven cleaners. Rinse,
shake and let them dry before replacing. They
may also be cleaned in an automatic
dishwasher.
To remove baffles and drip trays:
Hold the baffle knobs and pull them up,
forward and out. Hold the drip tray and
carefully lift it up and out of the hood track.
To replace the drip trays:
e and seat the drip tray into the hood
lac
1. P
.
ack
tr
2. Slide them left or right until all trays are side-
by-side in place in the track.
To replace the baffles:
1. Hold the baffle at the bottom by one of the
knobs .
lace the other end of the baffle against the
2. P
inside front of the hood.
3. Slide it up and push the bottom end back
.
e
o plac
t
until it firmly sea
ts in
Fig. 02
. 03
ig
F
5
Page 8

CARE AND MAINTENANCE
TO CLEAN HOOD SURFACE
■ For general care, wipe the outside of the stainless steel with sudsy water or household cleaners
such as Fantastic® or Formula 409®, rinse well and dry with clean soft cloth to avoid water
marks.
■ Wipe and dry brushed stainless steel in the same direction as the grain.
■ Do not use abrasive products.
■ To remove finger prints and give added shine use spray cleaners such as Stainless Steel Magic®
and Shimmer®
LIGHTS
CAUTION:
Before replacing the light bulbs, switch power off at service panel and lock
service panel disconnecting means to prevent power from being switched
on accidentally.
NOTE: Turn off the lights and fan. Allow the lights to cool before handling. If new lights do
not operate be sure lights are inserted correctly before calling service.
REPLACE LIGHTS
■ Remove the damaged light (twist counter clockwise) and replace with a new 120 Volt, 50 Watt
(maximum) 50° halogen light made for a GU10 base.
WARNING:
Halogen lamps are constructed of a glass bulb with a pressurized internal
filament tube that operates at high temperatures and could unexpectedly
shatter. Should the outer bulb break, particles of extremely hot glass could
be discharged int
thereby creating a risk of personal injury or fire. When replacing the bulb,
let the bulb cool, and assure that power to the light has been turned off.
Never allow the hot bulb to come into contact with water. DO NOT TOUCH
the Light Bulb when in use. They may be hot enough to cause injury.
o the fixture enclosure and/or surrounding environment,
6
6
Page 9

HOW TO OBTAIN SERVICE
BEFORE YOU CALL FOR SERVICE
■ Is the circuit breaker tripped or the fuse blown?
s there a power outage in the area?
■ I
For warranty service, contact DCS Customer
please have the following information ready:
■ Model Number
filter, above the motor assembly)
■ Serial Number
filter, above the motor assembly)
ode
■ C
■ Date of installation
■ A br
Your satisfaction is of the utmost importance to us. If a problem cannot be resolved to your satisfaction,
please call, write or email us at:
Write:
Fisher & Paykel Appliances, Inc.
Attention: DCS Customer Care
5900 Skylab Road
Huntington Beach, CA 92647
email: customer.care@fisherpaykel.com
(loca
filter, above the motor assembly)
ief description of the problem
(located on the inside of the top panel on the left, behind the rear back
(located on the inside of the top panel on the left, behind the rear back
ted on the inside of the top panel on the left, behind the rear back
Care Representative at (888) 936-7872. Before you call,
7
Page 10

WARRANTY
LIMITED WARRANTY
When you purchase a new DCS Ventilation Product for personal or consumer use you automatically
receive a One year Limited Warranty covering parts and labor for the entire product, and a Five year
Limited Warranty on the switches and motor (parts only) for servicing within the 48 mainland United
States, Hawaii, Washington D.C and Canada. In Alaska the Limited Warranty is the same except that you
must pay to ship the Product to the service shop or for the service technician’s travel to your home.
Products for use in Canada must be purchased through the Canadian distribution channel to ensure
regulatory compliance.
If the Product is installed in a motor vehicle, boat or similar mobile facility, you receive the same One
year Limited Warranty, but you must bring the vehicle, boat or mobile facility containing the Product
to the service shop at your expense or pay the service technician’s travel to the location of the Product.
FISHER & PAYKEL UNDERTAKES TO:
Repair without cost to the owner either for material or labor any part of the Product, the serial number
of which appears on the Product, which is found to be defective. In Alaska, you must pay to ship the
Product to the service shop or for the service technician’s travel to your home. If the Product is installed
in a motor vehicle, boat or similar mobile facility, you must bring it to the service shop at your expense
or pay for the service technician’s travel to the location of the Product. If we are unable to repair a
defective part of the Product after a reasonable number of attempts, at our option we may replace the
part or the Product, or we may provide you a full refund of the purchase price of the Product (not
including installation or other charges).
This warranty extends to the original purchaser and any succeeding owner of the Product for products
purchased for ordinary single-family home use. All service under this Limited Warranty shall be
provided by Fisher & Paykel Appliances, Inc. or its Authorized DCS Service Agent during normal
business hours.
HOW LONG DOES THIS LIMITED WARRANTY LAST?
Our liability under this Limited Warranty for the entire product expires One Year from the date of
purchase of the Product by the first consumer. Our liability under this Limited Warranty for the
switches and motor (parts only) expires Five Years from the date of purchase of the Product by the first
consumer.
ranties, including the implied warranty of merchantability (an
Our liabilit
unwritten warranty that the Product is fit for ordinary use) also expires One Year (or such longer period
equir
as r
states do not allow limitations on how long an implied warranty lasts, so this limit on implied
warranties may not apply to you.
y under an
y applicable law) from the dat
ed b
y implied w
ar
e of purchase of the Product by the first consumer. Some
THIS WARRANTY DOES NOT COVER:
A. Service calls that are not related to any defect in the Product. The cost of a service call will be
charged if the problem is not found to be a defect of the Product. For example:
1. Correct faulty installation of the Product.
2. Instruct you how to use the Product.
3. Replace house fuses, reset circuit breakers, correct house wiring or plumbing, or replace light
bulbs.
4. Correct fault(s) caused by the user.
t.
oduc
5. Change the set
-up of the P
r
8
Page 11

WARRANTY
6. Unauthorized modifications of the Product.
7. Noise or vibration that is considered normal, for example, drain/fan sounds, regeneration
noises or user warning beeps.
8. Correcting damage caused by pests, for example, rats, cockroaches etc.
B. Defects caused by factors other than:
1. Normal domestic use or
2. Use in accordance with the Product’s Use and Care Guide.
C. Defects to the Product caused by accident, neglect, misuse, fire, flood or Act of God.
D. The cost of repairs carried out by non-authorized repairers or the cost of correcting such
unauthorized repairs.
E. Travel Fees and associated charges incurred when the product is installed in a location with limited
estricted access. (i.e. airplane flights, ferry charges, isolated geographic areas).
or r
F. Normal recommended maintenance as set forth in the Product’s Use and Care Guide.
If you have an installation problem contact your dealer or installer. You are responsible for providing
adequate electrical, exhausting and other connection facilities. We are not responsible for
consequential or incidental damages (the cost of repairing or replacing other property damaged if the
Product is defective or any of your expenses caused if the Product is defective). Some states do not
allow the exclusion or limitation of incidental or consequential damages, so the above limitation or
exclusion may not apply to you.
HOW TO GET SERVICE
Please read your Use and Care Guide. If you then have any questions about operating the Product,
need the name of your local DCS Authorized Service Agent, or believe the Product is defective and
wish service under this Limited Warranty, please contact your dealer or call us at:
TOLL FREE 1-888-936-7872 or contact us through our web site: www.dcsappliances.com.
You may be required to provide reasonable proof of the date of purchase of the Product before the
Product will be serviced under this Limited Warranty.
COMMERCIAL USE
This warranty applies to appliances used in residential applications; it does not cover their use in
commercial situations.
NO OTHER WARRANTIES
This Limited Warranty is the complete and exclusive agreement between you and Fisher & Paykel
Appliances, I
Service Agents) are authorised to make any addition or modification to this Limited Warranty.
Warrantor: Fisher & Paykel Appliances, Inc.
f you need further help concerning this Limited Warranty, please call us at the above number, or write
I
o:
t
nc. regarding any defect in the Product. None of our employees (or our Authorized
Fisher & Paykel Appliances, Inc.
5900 Skylab Road, Huntington Beach, CA 92647
This Limited Warranty gives you specific legal rights, and you may also have other rights which vary
.
e
t
o sta
e t
t
om sta
fr
9
Page 12

NOTES
10
Page 13

LA HOTTE À ÉVACUATION
PROFESSIONNELLE ISLAND
Manuel d'utilisation et d'entretien
MODÈLES :
IVS40
IVS52
Page 14

À L'INTENTION DE NOS CLIENTS
Nous vous remercions d'avoir choisi cette îlot hotte à évacuation professionnelle Island de DCS. Nous avons
conçu ce Manuel d'utilisation et d'installation pour expliquer ses fonctions uniques. Il contient des
informations extrêmement utiles sur la façon de faire fonctionner et d'entretenir correctement votre nouvel
appareil. Vous pourrez ainsi en profiter pendant des années en toute sécurité.
Aidez-nous à mieux vous servir en remplissant l'enregistrement de produit et en nous la soumettant
depuis notre site Web à www.dcsappliances.com. Sélectionnez « Customer Care » sur la page d'accueil puis
« Product Registration ». De plus, gardez ce manuel à portée de main afin de rapidement trouver réponse à
vos questions durant l'utilisation de votre nouvel appareil.
Si vous avez des questions au sujet de notre produit, communiquez avec un représentant du centre de
service à la clientèle DCS par téléphone : 1-888-936-7872, ou par courriel : customer.care@fisherpaykel.com.
REMARQUE : Veuillez noter les numéros de modèle et de série sur cette page pour information
(situé à l'intérieur du panneau supérieur sur la gauche, derrière les filtres de retour arrière, audessus de l'ensemble moteur)
NUMÉRO DE MODÈLE CODE NUMÉRO DE SÉRIE
REMARQUE : Inspecter le produit pour vérifier qu’il n’a pas été endommagé pendant l’expédition.
En cas de dommages, contacter le transporteur et entamer une déclaration pour dommage. DCS by
Fisher & Paykel n
’est en aucun cas responsable des dommages pendant l’expédition.
Ne pas jeter le matériau d’emballage (boîte, palette, sangles) avant d’avoir inspecté l’unité.
AUTORISÉ POUR APPAREILS ÉLECTROMÉNAGERS RÉSIDENTIELS ET POUR USAGE
RÉSIDENTIEL SEULEMENT.
VEUILLEZ LIRE TOUTES LES INSTRUCTIONS AVANT DE COMMENCER.
L'installation doit être conforme aux codes en vigueur.
AVERTISSEMENT
Si les informations de ce manuel ne sont pas suivies à la lettre, un incendie
ou une explosion peuvent se produire et causer des dommages matériels,
.
ximit
o
t
et appareil électroménager ou de tout autre.
é de c
ez de st
es ou la mor
er ou d'utiliser de l'essence ou tout autre liquide et vapeur
ock
des blessur
vit
É
inflammable à pr
DANGER
Si vous sentez une odeur de gaz :
■ N'essayez pas d'allumer aucun appareil électroménager.
■ Ne t
ouchez aucun in
dans l'édifice.
■ Appelez immédiatement votre fournisseur de gaz de chez un voisin.
Suivez les instructions du fournisseur de gaz.
■ Si vous n'arrivez pas à joindre votre fournisseur de gaz, appelez les
pompiers.
■ Toute installation ou service doit être confié à un installateur qualifié,
un organisme de service ou le fournisseur de gaz.
terrupteur électrique; n'utilisez aucun téléphone
1
Page 15

À L'INTENTION DE NOS CLIENTS
AVERTISSEMENT RELATIF À LA SÉCURITÉ :
Coupez le circuit électrique au niveau du panneau de service et verrouillez le
panneau avant de brancher cet appareil électroménager.
Alimentation : Circuit de branchement de 120 V c.a., 60 Hz, 15 A.
AVERTISSEMENT
Pour réduire les risques de blessures en cas de feu de graisse sur la cuisinière,
respectez les consignes suivantes : Éteignez d'abord le brûleur. Étouffez les
flammes à l'aide d'un couvercle hermétique, d'une plaque à biscuits ou d'un
plateau métallique. Attention à ne pas vous brûler. Si les flammes ne
s'éteignent pas immédiatement, évacuez les lieux et appelez les pompiers. Ne
prenez jamais en main une poêle ou une casserole qui a pris feu - Vous pourriez
ous brûler. N'UTILISEZ PAS D'EAU, y compris des serviettes mouillées; une
v
explosion de vapeur violente pourrait en résulter. Utilisez un extincteur
SEULEMENT si :
1) Vous êtes sûr qu'il s'agit d'un extincteur de classe ABC et savez
comment le faire fonctionner.
2) Ce n'est pas un très gros incendie et qu'il se limite à l'endroit où il s'est
déclenché.
3) Vous êtes en train d'avertir les pompiers.
4) Vous pouvez combattre l'incendie le dos tourné vers une sortie.
VEUILLEZ CONSERVER CE MANUEL À TITRE DE RÉFÉRENCE.
TABLE DES MATIÈRES
CONSIGNES DE SÉCURITÉ..........................................................................................................................................3
ENTRETIEN ET UTILISATION .................................................................................................................................
ENTRETIEN ET MAINTENANCE...............................................................................................................................6
POUR L'OBTENTION DE SERVICE..........................................................................................................................7
GARANTIE................................................................................................................................................................................8
4-5
2
Page 16

MESURES DE SÉCURITÉ ET DE PRÉCAUTION
AVERTISSEMENT :
Pour réduire les risques de feu de graisse sur la cuisinière :
) Ne laissez jamais les plaques de cuisson sur réglage élevé sans surveillance. L'ébullition peut
A
provoquer des débordements graisseux pleins de fumée pouvant prendre feu. Chauffez l'huile
lentement, à feu doux ou moyen.
B) Allumez toujours la hotte lorsque vous cuisinez à feu vif ou que vous flambez des aliments.
C) Nettoyez les ventilateurs fréquemment. Ne laissez pas s'accumuler la graisse sur le ventilateur
ou le filtre.
D) Utilisez des récipients de taille appropriée. Utilisez toujours des ustensiles de cuisson dont la
taille est appropriée à la surface de votre élément de cuisson.
Il peut s'avérer nécessaire d'assurer de l'air d'appoint pour empêcher l'air de s'écouler dans une
cheminée, une porte ou fenêtre non hermétique, ou l'ouverture d'un foyer.
AVERTISSEMENT :
Pour réduire les risques d'incendie, de choc électrique et de blessures,
respectez les consignes suivantes :
A) L'installation et le câblage électrique doivent être effectués conformément aux codes et
normes en vigueur, y compris les constructions classées résistant au feu.
B) Pour éviter le refoulement d'air, une quantité d'air suffisante est nécessaire pour assurer une
bonne combustion et l'évacuation des gaz à travers le carneau (cheminée) de l'appareil à gaz.
Suivez les consignes du fabricant de l'appareil de cuisson ainsi que les normes de sécurité
comme celles publiées par la National Fire Protection Association (NFPA) et la American Society
for Heating, Refrigeration and Air Conditioning Engineers (ASHRAE), ainsi que les normes
locales.
C) Faites preuve de prudence lorsque vous découpez ou percez des murs ou des plafonds afin de
ne pas endommager le câblage électrique et autres installations des services publics pouvant
être dissimulées.
AVERTISSEMENT :
Pour réduire les risques d'incendie et pour assurer une bonne évacuation
de l'air, veillez à ce que l'air soit acheminé vers l'extérieur. Ne rejetez pas
l'air évacué dans les espaces entre les murs ou les plafonds, ni dans les
greniers, les galeries ou les garages.
REMARQUE : L'appareil DOIT évacuer l'air vers l'extérieur du bâtiment.
IMPORTANT : Reportez-vous aux informations sur les conduits indiquées dans le Manuel
d'installation (réf. 17804)
AVERTISSEMENT :
Pour réduire les risques de choc électrique ou de blessures, les hottes à
e installées avec des ventilateurs dont l'utilisation
t êtr
tion doiv
acua
év
avec ces hottes a été approuvée.
en
3
Page 17

ENTRETIEN ET UTILISATION
F
AN
L
IGHT
O
FF
LO
MAX
M
ED
H
I
O
FF
HI
LO
Fig. 01
CONTRÔLE DU VENTILATEUR
Réglez le ventilateur sur LO, MED, HI ou MAX (BAS, MOYEN, HAUT ou MAX) selon le besoin. L'utilisation
continue du ventilateur durant la cuisson permet de rendre la cuisine confortable et moins humide.
Celui réduit également les odeurs de cuisson et l'accumulation de graisses, ce qui oblige à nettoyer
fréquemment sinon.
UTILISEZ TOUJOURS LE RÉGLAGE MAX LORSQUE VOUS GRILLEZ DES ALIMENTS.
CONTRÔLE DE LUMIÈRE
Réglez le bouton à HI (HAUT) durant la cuisson ou LO (BAS) pour vous servir de la lumière comme
veilleuse.
MODE D'EMPLOI DE LA HOTTE
Allumez le ventilateur pendant quelques minutes avant la cuisson afin d'établir un courant d'air
ascendant vers la hotte. Ainsi, la chaleur, la fumée, l'humidité, les graisses et les odeurs de cuisson
pr
oduites seront évacuées à l'extérieur au lieu de pénétrer dans les autres pièces.
Utilisez les basses vitesses pour un usage normal et les hautes vitesses pour les fortes odeurs ou les
fumées
Tout courant d'air au-dessus de la cuisinière ou de la table de cuisson gênera l'évacuation de la chaleur,
de la fumée, de l'humidité, des graisses et des odeurs de cuisson par la hotte. Évitez ces courants d'air
dans la mesure du possible.
V
provenant du ventilateur.
.
ous obtiendr
ez une ventilation idéale dans la cuisine si les seuls courants d'air présents sont ceux
4
Page 18

ENTRETIEN ET UTILISATION
Drip
Tray
VENTILATEUR
Le moteur est contrôlé à l'aide d'un bouton de contrôle à quatre vitesses. Vous pouvez changer la
vitesse du moteur en fonction de la quantité de graisse et de fumée produite durant la cuisson.
UTILISEZ TOUJOURS LE RÉGLAGE MAX LORSQUE VOUS GRILLEZ DES ALIMENTS.
FILTRES ET RÉCIPIENTS À GRAISSE
Cette hotte est dotée de baffles et de récipients à graisse en acier inoxydable réutilisables. Les baffles
acheminent la graisse de cuisson dans les récipients à graisse.
IMPORTANT :
Vous devez TOUJOURS mettre les baffles en place lorsque la hotte est
utilisée.
Nettoyez les baffles et les récipients à graisse une fois par mois ou selon le besoin. Pour nettoyer les
baffles et les récipients à graisse, égouttez et essuyez toute trace de graisse à l'aide d'une serviette en
papier. Faites-les tremper, puis remuez-les dans un mélange d'eau chaude et de détergent. N'utilisez
pas d'ammoniaque ou de produits à base
ammoniaque car ceux-ci peuvent foncer le
métal.
N'utilisez pas de nettoyants abrasifs ni de
produits à nettoyer les fours. Rincez, égouttez
et laissez-les séchez avant de les replacer. Vous
pouvez également les laver dans le lavevaisselle.
Pour retirer les baffles et les récipients à
graisse :
Saisissez les boutons des baffles et tirez vers le
haut et vers l'avant. Saisissez le récipient à
aisse et tirez-le soigneusement pour l'extraire
r
g
du rail de la hotte.
raisse :
écipien
er les r
eplac
our r
P
1. Positionnez et enfoncez le récipient à graisse
sur le rail de la hotte.
2. Glissez-les vers la gauche ou la droite jusqu'à
ce qu'ils soient juxtaposés dans la rainure.
er les baffles :
eplac
our r
P
Tenez la baffle par le bas par un des boutons.
1.
ts à g
Récipient
aisse
r
à g
Fig. 02
émité de la baffle contre la
tr
2. Placez l'autr
partie intérieure avant de la hotte.
3. Glissez-la et enfoncez la partie inférieure vers
l'arrière jusqu'à ce qu'elle soit bien en place.
e ex
. 03
ig
F
5
Page 19

ENTRETIEN ET MAINTENANCE
NETTOYAGE DE LA SURFACE DE LA HOTTE
■ Pour un entretien général, essuyez l'extérieur en acier inoxydable avec de l'eau savonneuse ou
des nettoyants ménagers tel que FantasticMDou Formula 409MD, rincez soigneusement puis
séchez à l'aide d'un linge doux et propre pour éviter de laisser des marques d'eau.
■ Essuyez et séchez l'acier inoxydable brossé dans le sens du grain.
■ N'utilisez pas de produits abrasifs.
■ Pour enlever les traces de doigts et donner un plus grand éclat, utilisez des nettoyants en
aérosol tel que Stainless Steel Magic
D
M
et Shimmer
D
M
.
AMPOULES
MISE EN GARDE :
Avant de remplacer les ampoules, coupez le courant au niveau du panneau
de service et verrouillez le dispositif de sectionnement pour éviter une
mise sous tension accidentelle.
REMARQUE : Éteignez les lumières et le ventilateur. Laissez refroidir les lumières avant de les
manipuler. Si les ampoules neuves ne fonctionnent pas, assurez-vous qu'elles
sont insérées correctement avant d'appeler le service technique :
REMPLACEMENT DES AMPOULES
■ Retirez l'ampoule endommagée (tourner dans le sens contraire des aiguilles d'une montre) et
remplacez-la par une ampoule halogène neuve de 120 volts, 50 watts (maximum) 50° prévue
pour une douille GU10.
AVERTISSEMENT :
Les lampes halogènes sont faites d'une ampoule de verre comportant un
tube à filamen
pouvant éclater subitement. Si l'ampoule externe casse, des particules de
e extrêmement chaudes peuvent être relâchées dans l'enceinte du
err
v
dispositif d'éclairage ou dans son environnement, créant ainsi un risque de
blessur
refroidir et assurez-vous que le courant est coupé. Ne laissez jamais une
ampoule chaude entrer en contact avec l'eau. NE TOUCHEZ PAS l'ampoule
d'éclairage lorsqu'elle est allumée. Elle pourrait être suffisamment chaude
pour vous blesser.
es ou d'inc
t interne pressurisé fonctionnant à températures élevées et
vant de remplacer une ampoule, laissez-la
. A
endie
6
Page 20

POUR L'OBTENTION DE SERVICE
AVANT D'APPELER LE SERVICE TECHNIQUE
■ Est-ce que le disjoncteur s'est déclenché ou que le fusible est grillé?
■ Y a-t-il une coupure de courant dans le secteur?
Pour le service sous garantie, contactez le représentant du centre de service à la clientèle DCS au
(888) 936-7872. Avant d'appeler, veuillez avoir les informations suivantes à portée de main :
■ Numéro de modèle (situé à l'intérieur du panneau supérieur sur la gauche, derrière les filtres
de retour arrière, au-dessus de l'ensemble moteur)
■ Numéro de série (situé à l'intérieur du panneau supérieur sur la gauche, derrière les filtres de
retour arrière, au-dessus de l'ensemble moteur)
■ Code (situé à l'intérieur du panneau supérieur sur la gauche, derrière les filtres de retour
arrière, au-dessus de l'ensemble moteur)
■ Date d'installation
■ Brève description du problème
■ Preuve d'achat
Votre satisfaction revêt la plus grande importance pour nous. Si un problème n'est pas résolu à votre
entière satisfaction, veuillez communiquer avec nous par téléphone, courrier ou courriel :
Écrivez-nous à l'adresse suivante :
Fisher & Paykel Appliances, Inc.
Attention: DCS Customer Care
5900 Skylab Road
Huntington Beach, CA 92647
Courriel : customer.care@fisherpaykel.com
7
Page 21

GARANTIE
GARANTIE LIMITÉE
Lors de l'achat d'un appareil de ventilation neuf DCS pour usage personnel ou non commercial, vous
bénéficiez automatiquement d'une garantie limitée d'un an couvrant les pièces et la main d'œuvre
pour l'intégralité du produit, et d'une garantie limitée de cinq ans sur les interrupteurs et le moteur
(pièces seulement) valide dans les 48 états continentaux des États-Unis, ainsi que Hawaï, Washington
D.C. et le Canada. La garantie limitée est la même en Alaska sauf que vous devez payer les frais
d'expédition du produit à un centre de service ou les frais de déplacement d'un technicien dans le cas
d'une visite à domicile. Les produits destinés à une utilisation au Canada doivent être achetés auprès
d'un distributeur canadien afin de respecter la réglementation en vigueur.
Si le produit est installé dans un véhicule ou bateau à moteur, ou une installation mobile similaire, vous
bénéficiez de la même garantie limitée d'un an, mais vous devrez acheminer à vos frais ledit véhicule,
bateau ou installation mobile contenant le produit jusqu'au centre de service ou payer les frais de
déplacement du technicien jusqu'à l'emplacement où se trouve le produit.
FISHER & PAYKEL S'ENGAGE À :
entreprendre à ses frais (pièces et main-d'oeuvre) toutes réparations du produit (sur lequel figure le
numéro de série) jugé défectueux. En Alaska, vous devez payer les frais d'expédition du produit à un
centre de service ou les frais de déplacement d'un technicien dans le cas d'une visite à domicile. Si le
produit est installé dans un véhicule ou bateau à moteur, ou une installation mobile similaire, vous
devez l'acheminer à vos frais jusqu'au centre de service ou payer les frais de déplacement du
technicien jusqu'à l'emplacement où se trouve le produit. Si nous sommes dans l'incapacité de réparer
une pièce défectueuse du produit après un nombre raisonnable de tentatives, nous pourrons, à notre
choix, remplacer la pièce ou le produit, ou vous rembourser entièrement le prix d'achat du produit (à
l'exclusion des frais d'installation ou autres frais.)
Cette garantie s'applique à l'acheteur initial et à tous les propriétaires successifs du produit dans la
mesure où il s'agit d'un produit acheté pour une utilisation à domicile normale. Tout service couvert
par cette garantie limitée sera assuré par Fisher & Paykel ou son agent de service DCS agréé durant les
heures d'ouverture normales.
QUELLE EST DURÉE DE CETTE GARANTIE LIMITÉE?
Notre responsabilité en vertu de cette garantie limitée concernant l'intégralité du produit expire UN
AN à partir de la table d'achat du produit par le premier acheteur. Notre responsabilité en vertu de
cette garantie limitée concernant les interrupteurs et le moteur (pièces seulement) expire CINQ ANS à
partir de la date d'achat du produit par le premier acheteur.
Notre responsabilité en vertu de toute garantie implicite, y compris la garantie implicite de qualité
tie tacit
chande (la gar
mar
également UN AN (ou une période plus longue si requis par la loi) à partir de la date d'achat du produit
par le premier acheteur. Certaines juridictions ne permettent pas la limitation de la garantie implicite,
il est donc possible que la limitation ci-dessus sur les garan
an
e selon laque le produit est approprié pour un usage normal) expire
.
ties implicit
es ne s'applique pas à v
ous
NE SONT PAS COUVERTS PAR LA GARANTIE :
A. Les appels de service n'ayant aucun rapport avec un défaut éventuel du produit. Le coût de l'appel
de service sera facturé s'il se trouve que le problème n'est pas dû à un défaut du produit. Par
exemple :
riger une mauvaise installation du produit.
or
C
1.
2. Montrer comment utiliser le produit.
8
Page 22

GARANTIE
. Remplacer des fusibles du domicile, réarmer les disjoncteurs, réparer les fils électriques ou la
3
plomberie du domicile, ou remplacer des ampoules.
4. Corriger des anomalies causées par l'utilisateur.
5. Changer la configuration du produit.
6. Modifications non autorisées du produit.
7. Bruits ou vibrations considérés comme normaux, par exemple les bruits de drain ou de
ventilateur, les bruits de régénération (vibrations, sifflements) ou les signaux d'avertissement à
l'intention de l'utilisateur.
8. Corriger des dommages causés par des animaux nuisibles, par exemple des rats, des
coquerelles, etc.
B. Défauts causés par des facteurs autres que :
Utilisation domestique normale ou
1.
2. Utilisation conformément aux indications du guide de l'utilisateur.
C. Défauts du produit pour cause d'accident, négligence, mauvaise utilisation, incendie, inondation ou
calamité naturelle.
D. Les coûts des réparations effectuées par des techniciens non autorisés ou le coût de correction de
ces réparations non autorisées.
E. Les frais de voyage et les frais connexes encourus lorsque le produit est installé dans un lieu à accès
illimité ou restreint (déplacement par avion ou par bateau, régions géographiques isolées, etc.).
F. Entretien normal recommandé par le guide l'utilisateur.
Contactez votre distributeur ou votre installateur en cas de problème d'installation. Il vous incombe
d'assurer une installation électrique, une ventilation et toute autre connexion appropriées. Nous ne
sommes pas responsables des dommages indirects ou accessoires (coût de réparation ou de
remplacement d'autres biens endommagés parce que le produit était défectueux ou tout autre coût
que vous auriez encouru parce que le produit était défectueux). Certaines juridictions interdisent
l’exclusion ou la restriction de la responsabilité des dommages indirects ou accessoires; l’exclusion ou
la restriction indiquée ci-dessus peut donc ne pas s'appliquer à votre cas particulier.
POUR OBTENIR DES RÉPARATIONS
Veuillez consulter le guide de l'utilisateur. Si vous avez des questions concernant l'utilisation du
produit, que vous cherchez le nom de l'agent de service DCS agréé local ou que pensez que le produit
est défectueux et désirez le faire réparer dans le cadre de cette garantie limitée, veuillez contacter
votre distributeur ou nous appeler au numéro suivant :
(NUMÉRO SANS FRAIS) 1-888-281-5698 ou contactez-nous par l'intermédiaire de notre site
Web : www.dcsappliances.com.
Vous devrez peut-être présenter une preuve raisonnable de la date d'achat du produit avant de
tion dans le cadre de cette garantie limitée.
oir bénéficier d'une r
pouv
épara
UTILISATION COMMERCIALE
Cette garantie s'applique à des appareils électroménagers utilisés à domicile; elle ne couvre pas les cas
d'utilisation commer
ciale.
9
Page 23

GARANTIE
AUCUNE AUTRE GARANTIE
Cette garantie limitée constitue l'accord entier et exclusif entre vous et Fisher & Paykel Appliances, Inc.
en ce qui concerne tout défaut du produit. Aucun de nos employés (ou agents de service agréés) n'est
autorisé à apporter des ajouts ou des modifications à cette garantie limitée.
Garant : Fisher & Paykel Appliances, Inc.
Si vous avez besoin d'aide au sujet de cette garantie illimitée, veuillez nous appeler au numéro cidessus ou nous écrire à l'adresse suivante :
Fisher & Paykel Appliances, Inc.
5900 Skylab Road, Huntington Beach, CA 92647
États-Unis
Cette garantie limitée vous donne des droits juridiques spécifiques et vous pouvez bénéficier d'autres
droits qui varient d'une juridiction à l'autre.
10
Page 24

REMARQUE
11
Page 25

REMARQUE
12
Page 26

REMARQUE
13
Page 27

Page 28

Fisher & Paykel Appliances, Inc.
5900 Sk
ust
C
are: 888.936.7872
omer C
each, CA 92647
on B
tingt
, Hun
oad
ylab R
Fax: 714.372.7003
www.dcsappliances.com
As product improvement is an ongoing process, we reserve the
right to change specifications or design without notice.
Nous améliorons constamment ses produits et se réserve le
droit de modifier les spécifications ou la conception de ses
produits sans aucun préavis.
P/N 221711 Rev. D
Litho in USA 08/2008
 Loading...