

Page 1

ADSL Router/Modem
Quick Setup Guide
RTA770
Page 2

ADSL Router Quick Set-up Guide
Important
This Guide is intended to get you started quickly. We have made
the factory default setting of this router suitable for Australia
All you need is to follow through the steps we describe here.
This Guide should be read in conjunction with the RTA77x Series
ADSL Router User’s Manual2. It is provided as a PDF file on this
CD. To view or print the User’s Manual, go to the previous menu
ADSL Router (RTA770) and click the View User Manual button.
Important safety notes can be found on page III of the User’s
Manual. Advanced users or users who have other setup
preferences should also read the User’s Manual.
If you choose to connect via the Ethernet port, no driver is
required. If you choose to connect via the USB port, you will
need to load a driver. A driver is only available for Windows 98,
ME, 2000 and XP systems. The drivers are found on this CD. To
install a driver into Windows, go to the previous menu ADSL
Router (RTA770) and click the Modem drivers button.
1
.
Notes for this page:
1. In Australia the majority of ADSL subscribers get PPPoA service
by default. Your router is preset to meet this requirement. If your
ISP specifies the service as PPPoE, an extra step is then required
to configure the router in PPPoE mode. Instructions will follow
to take you to Section 6 – Configuration for PPPoE service.
2. The User’s Manual available on this CD was written for
international users. In Chapter 5 – Connection Mode, only
references to PPPoA & PPPoE is relevant to Australian users.
Ignore all references to the value of VPI or VCI. In Australia VPI
is 8 and VCI is 35. These numbers are preset as factory default.
Do not change, or the router will not connect.
Page 3

1
Default Configuration for Australia
This router is shipped with the following factory default settings.
Router IP address 192.168.1.1
Subnet mask 255.255.255.0
VPI 8
VCI 35
Connect mode PPPoA VC-MUX
NAT enabled
DSL line mode auto select G.DMT / T1.413
WAN IP dynamic
DHCP enabled
DNS relay on
UPnP IGD enabled
Firewall incoming on
Firewall outgoing off
Router configuration & management:
User name admin
Password admin
Telnet password admin
If your ISP specifies that your ADSL service is PPPoE, connect mode must be
changed to PPPoE LLC/SNAP. Instructions will follow. Check with your ISP if
you are unsure of the type of service you have subscribed to. Advanced users
who have other setup preferences should first read the User’s Manual.
2
Before you start
Make sure your computer has these installed:
Ethernet or USB port
TCP/IP protocol enabled
A web browser, Internet Explorer 5.0/Netscape 6 or better.
Obtain your Internet account information from your ISP:
Login user name and password
Public IP address (only if you subscribe for static IP)
DNS server IP (only if specified by ISP).
Page 4

3
ADSL Router Quick Set-up Guide
Choose from your connection options:
1. Ethernet (for standalone computer or multiple computers, Operating
System independent)
The router comes with a built-in 4-port network switch. Up to 4 computers
can be connected to the router directly. If you require more connections to
more computers, purchase another network hub and connect it to the router
to provide for more connections. Only one Ethernet cable is provided. Extra
cables and network hub can be purchased from your supplier.
2. USB (for standalone Windows 98/ME/2000/XP computers only)
If one of your computers does not have an Ethernet port you may choose this
option. You must then install a driver to operate the router. The drivers are
found on this CD. To install a driver into Windows, go to the previous menu
and click the Modem drivers button.
Connect the Router
1. Connect the DSL port of the router directly into your ADSL jackpoint (telephone
wall socket) with the provided line cord. Do not connect through a filter, unless
the filter has a designated MODEM port for this purpose.
2. Connect the Ethernet port of each computer to any one of the LAN ports of
the router. Only one Ethernet cable is provided. If you choose to connect via
the USB port, make no USB connection now. During driver installation, you
will be advised to connect the USB port of the router to your computer.
3. Connect the provided AC/AC power adaptor to the PWR jack of the router.
Plug the adaptor into a mains power outlet. Switch on the router. The DIAG
light will remain on for a short time indicating self-check in progress. Wait
until the DIAG light has turned off before proceeding to the next section. In
normal operation these three lights shall be on: PWR, LAN (or USB) and DSL.
Section 9 of this Guide explains how these indicator lights work.
Page 5
4
Get your computer ready for networking
The description below assumes you are connecting the router via Ethernet. If
you are connecting the router via USB, refer to Chapter 2 - USB Driver Installation
on page 4 of the User’s Manual on CD.
You have two options. Following option (1) is simplest. This is the Windows
default network setting.
OPTION 1. CONFIGURE COMPUTER TO GET IP ADDRESS FROM DHCP
If your computer is already configured to obtain an IP address automatically
(from a DHCP server), do nothing. By default the router is a DHCP server. Now
go to Section 5 – Getting On-Line.
If you are unsure of your computer’s network setting refer to Chapter 3 – Configure
PC to get IP address from DHCP on page 18 of the User’s Manual.
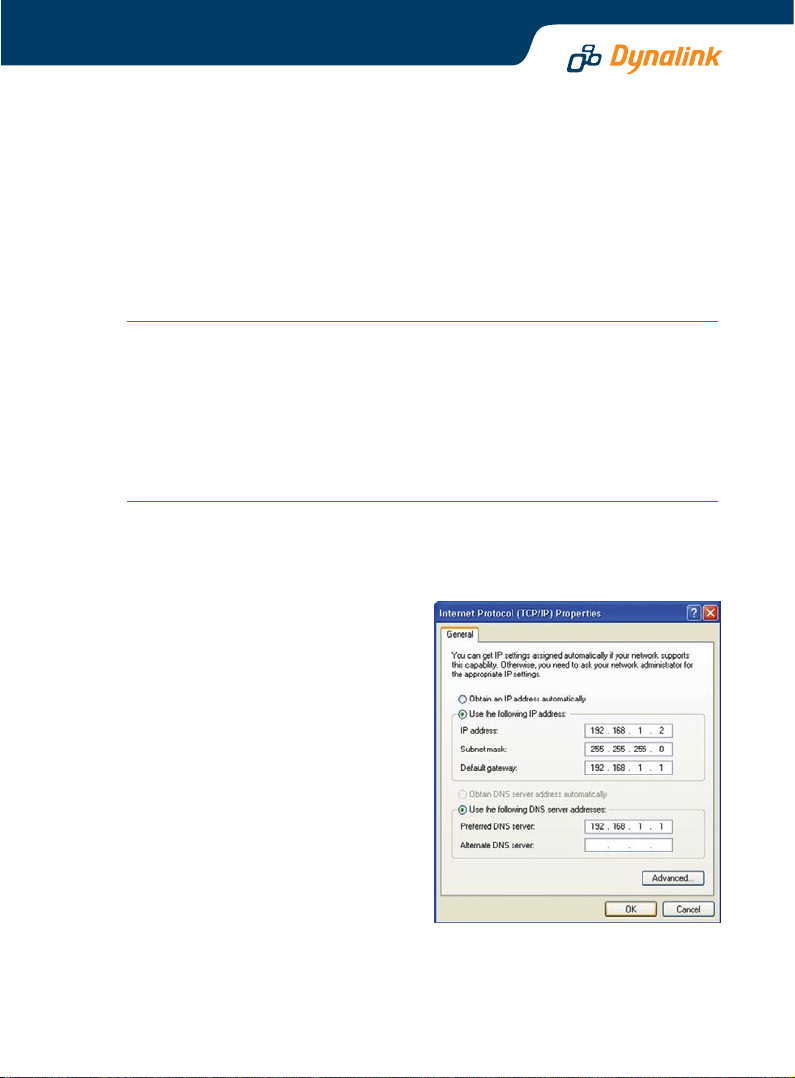
OPTION 2. MANUALLY ASSIGN IP ADDRESS TO COMPUTER
The router’s default address is 192.168.1.1. If you prefer to assign an IP address
manually, use 192.168.1.x (x is a number between 2 and 254).
Windows XP/2000:
1. Go to Control Panel – Network
Connections. Open Local Area
Connections and click Properties.
Double click Internet Protocol
(TCP/IP). Select Use the following
IP address.
2. Enter 192.168.1.x (x is a number you
pick between 2 and 254). This is the
IP address you assign to the
computer. Subnet Mask is
255.255.255.0.
3. Enter the router’s IP 192.168.1.1 as
Default gateway, and as Preferred
DNS server If your ISP specifies DNS
server addresses, enter the specified
addresses according to the ISP’s instructions.
4. Click OK to finish.
You have now finished with configuring your computer.
Page 6

ADSL Router Quick Set-up Guide
Windows 98/ME:
1. From Control Panel, double click
Network. Scroll down to highlight
TCP/IP -> (your network card). Click
Properties.
2. Select the IP Address tab. Specify
192.168.1.x (x is a number you pick
between 2 and 254). This is the IP
address you assign to the computer.
Subnet Mask is 255.255.255.0.
3. Select Gateway tab. Enter the
router’s IP address 192.168.1.1.
Click Add. If your ISP specifies DNS
server addresses, go to the tab DNS
Configuration. Enter the specified
addresses according to the ISP’s
instructions.
4. Click OK & then OK to finish. The
system may ask to read the
Windows CD, and then ask to restart the computer.
You have now finished with configuring your computer.
Go to Section 5 – Getting On-line.
5
Getting On-line It takes only 2 easy steps.
STEP1 GO TO THE ‘CONNECT TO INTERNET’ PAGE
Start your web browser. Enter the default
address http://192.168.1.1. Type admin
for both User name and Password.
See Q1 in Section 10 - Troubleshooting
if you cannot get this screen.
Next you will be in the Quick Start >
Connect to Internet page.
If your ISP specifies that your ADSL
service is PPPoE, you must now follow
Section 6 to change the router’s
connect mode to PPPoE. Check with
your ISP if you are unsure of the type of service you have subscribed to.
Page 7

STEP 2 ENTER INTERNET ACCOUNT DETAILS
Enter your Internet account User Name & Password in the exact format as specified
by the ISP. Make sure the page displays "Your DSL router is ready to connect"
before clicking Connect.
See Q2 in Section 10 – Troubleshooting, if after several minutes the message
"Your DSL router is not ready to connect" still shows.
Once connected the screen changes to display the on-line time. Click Disconnect
only if you wish to disconnect manually.
Your Internet account user name & password will be saved automatically.
Page 8

6
ADSL Router Quick Set-up Guide
Configuration for PPPoE service
Follow this procedure ONLY if your ISP specifies the service as PPPoE. Caution
- do not set your router to PPPoE mode if your ADSL service is PPPoA. It will not
connect. Reset to factory default will restore router to PPPoA mode.
From the Quick Start menu click on Quick Setup to configure for PPPoE.
1. Untick the Auto Scan Internet Connection box. VPI and VCI shall be set to 8
and 35 respectively. Click Next for the next page.
2. Select PPP over Ethernet (PPPoE). Encapsulation shall be LLC/SNAP as
illustrated below. Go to the next page, change nothing and then Next.
3. You can enter your Internet account User Name & Password now. If you leave
the space as blank, you will be asked to do it later. Go Next.
4. Do not change the network configuration unless you are an advanced user
having your own preferences. Go Next.
5. A summary of the configuration is displayed. Check carefully that the setting
is VPI/VCI = 8/35, Connection Type is PPPoE LLC/SNAP. Then click Finish to
confirm the changes. The router will restart itself automatically to activate
the new setting.
6. Now follow Step 2 of Section 5 – Getting On-line. The screen will show the
changes made: pppoe_8_35 has replaced the default pppoa_8_35.
Page 9

7
Some advanced functions of your router
Firewall, port forwarding, DMZ & traffic restrictions
By default a preset firewall is invoked to block all incoming requests including
Ping from the Internet to your private network. In the reverse direction all requests
sent from your network can freely pass through to the Internet.
If you want servers on your network accessible to Internet users, set up port
forwarding in Advanced > Virtual Servers > Port Forwarding. Refer to Chapter
4 – NAT Virtual Servers on page 43 of the User’s Manual.
If you run applications that require unrestricted 2-way traffic between computer
and the Internet, set computer up as DMZ Host in Advanced > Virtual Servers
> DMZ Host. Refer to Chapter 4 – NAT DMZ Host on page 45 of the User’s Manual.
Caution – any DMZ host computers are no longer protected by the firewall.
You can restrict Internet services to some computers on your network by setting
up IP Filtering. Refer to Chapter 4 Filtering by IP address on page 47 of the
User’s Manual.
IP extension bridging
In IP Extension Mode the ADSL router resembles a modem. Firewall protection
and Internet sharing are not available. The router becomes a bridge between
WAN & LAN. A computer or network device connected behind it receives a public
WAN IP directly. This arrangement is suitable for certain applications that require
a computer or network device to receive a public IP.
Page 10

ADSL Router Quick Set-up Guide
To set up IP extension, go to Advanced > Internet. Click on the "modify icon"
under Edit:
The next screen displays VPI and VCI as 8 and 35. Do not change these numbers.
Go Next. Select PPPoA VC MUX or PPPoE LLC/SNAP. If your ISP did not specify
PPPoE you can assume it is PPPoA. Go Next.
On the next screen untick Enable NAT, and tick PPP IP extension as illustrated.
Go Next.
Page 11

8
Enter your Internet account user name and password. Go Next.
The new configuration is displayed. Click Apply to confirm changes. The router
will restart itself to activate the new setting.
You will notice all NAT or firewall settings disappear from the Advanced menu
hereafter. Now follow Step 2 of Section 5 – Getting On-line.
Quality of Service (QoS)
The router allows prioritising of upstream traffic (to the Internet) by allowing the
user to overwrite the Type of Service (TOS) field in the IP datagram header. TOS
parameters such as Precedence, Delay, Throughput & Reliability are described
in the RFC791 Internet Protocol specification.
The user specifies the traffic conditions and traffic rules. The router has three
queues for traffic priority: high, medium and low. Low priority packets are not
sent when there are higher priority queues. When QoS is enabled a received
packet has the TOS field in its header overwritten by the traffic rule, subject to
traffic conditions are met.
The router supports both Bridge (layer 2) and IP (layer 3) QoS. The difference is
how traffic conditions can be set. With Bridge QoS, IEEE 802.1p priorities are
used as conditions for a traffic rule to apply. With IP QoS, it is the IP criteria
defined by the user that determines the rule to apply.
Please refer to the User’s Manual for other advanced functions. Always restart
the router to activate any changes to configuration.
Tips for security
This Dynalink series of Broadcom chipset powered routers are highly powerful,
secure and stable devices. To ensure that you get the maximum benefit from
your Dynalink router Dynalink makes the following strong recommendations:
Do:
Change and keep secret your router’s admin user name and password. This
will ensure that no unauthorised changes can be made to your settings and
will prevent any unauthorised changes to the embedded code. A router has
both a processor and memory and unauthorised access is highly undesirable.
Back up your router’s configuration. This function can be found in the router’s
Management > Backup Config menu.
Disable UPnP if you don’t need this function. Go to Advanced > Local Network
> UPnP to disable UPnP.
Read about the more advanced functions of this router. They can be found
in Chapter 4 of the User’s Manual on this CD.
Page 12

9
ADSL Router Quick Set-up Guide
Don’t:
Enable any form of remote access to the router unless you are confident in
handling the security implications. Beware that an attacker may compromise
the router and attempt to exploit the system without your knowledge. Remote
administration of the router opens up the opportunity to breach the security
of your router and network. Use the built in access control list to restrict
access to only authorised Internet hosts.
Enable IP extension bridging without firewall protection. If the router operating
in this mode is connected to a computer, to the minimum use a "personal
firewall" (software) to protect the computer.
Send your router away for repair or replacement without resetting to factory
default, or wiping out your Internet account login details. Use the Backup
Configuration option to store your router’s setting elsewhere. This function
can be found in the router’s Management > Backup Config menu. When a
replacement unit is received, restore the original setting from the backup file.
Indicator lights
There are 8 indicators on the front panel. Every time the router is powered on or
reset, the DIAG light will come on indicating self-test is in progress.
INDICATOR STATUS DESCRIPTION
PWR
DIAG
LAN1 - LAN4
USB
DSL
Off
Solid
Off
Flashing
Solid
Off
Flashing
Solid
Off
Flashing
Solid
Off
Flashing
Solid
Power off.
Power on.
Power off, or initial self-test OK.
Firmware uploading or updating.
Initial self-test failed. The unit is faulty.
Power off, or no Ethernet link is present.
Data are going through the Ethernet port.
The Ethernet link is ready.
Power off, or no link to USB port.
Data are going through the USB port.
The USB link is ready.
Power off, or ADSL line training is in progress.
Data are going through the ADSL link.
ADSL link is ready.
Page 13

Troubleshooting
10
Q1. Cannot open the router control panel from my browser.
1. Check that the router’s LAN (or USB) light is on. If not, check your Ethernet
(or USB) cable.
2. Perform a PING test. Go to Start–Programs–MS DOS/Command Prompt (In
Windows XP or 2000 you may click Start-Run. Enter cmd then OK). Type ping
192.168.1.1 then press Enter. The response should be:
Pinging 192.168.1.1 with 32 bytes of data:
Reply from 192.168.1.1: bytes=32 time=4ms TTL=30
….
If you see a similar response, the router is communicating with your computer
correctly and the problem lies elsewhere. If the result is Request timed out
or similar failures, there may be a networking problem. Check that the LAN
or USB cable is firmly plugged in.
3. Disable any personal firewall or virus checker temporarily. If you are using
Internet Explorer, go to Tools–Internet options-Security. Reset security level
of all 4 icons to default. You can revert to your customised settings after
configuring the router.
4. If previously the computer had a dialup modem, check browser setting. For
example in Internet Explorer, go to Tools–Internet options–Connections, and
select Never dial a connection. Also check LAN Settings that the option Use
a Proxy Server is not selected.
5. If the router is connected to a network hub, try connecting the router directly
to the computer in a standalone setup to eliminate any possible problem
associated with the hub.
6. The router’s private IP address is 192.168.1.1. To access the browser control
panel your computer must be on the same subnet as the router. See also Q3.
Q2. Cannot connect to Internet or cannot browse
1. Check router’s DSL light is on. Normally it takes less than one minute to
establish a link with the telephone exchange. The link will establish as long
as there is signal. If the DSL light does not come on the router is not seeing
any signal. Check that:
ADSL service has been enabled.
If there is a designated ADSL jackpoint for the service, make sure the router
is connected directly into this jackpoint. Other jackpoints cannot be used.
Page 14

ADSL Router Quick Set-up Guide
If there is no designated ADSL jackpoint, any jackpoints may be used.
Connect the router directly into a jackpoint, or through the port marked
MODEM on a filter.
2. If the router’s DSL light is already on, check if router is on line. Go to the Quick
Start menu as described in Section 5 – Getting On-line. If the router reports
"Your DSL router is ready to connect", you are not on line. Make sure the user
name and password have been entered in the exact format as specified by
the ISP.
3. Check the configuration of computer and router. If you still cannot browse,
perform a PING test as described in Q1-2, using these addresses:
(A) Ping www.dynalink.com.au (or any valid web address)
(B) Ping 205.178.180.16 (or any valid public IP address)
If both (A) & (B) reported failed response such as "request time out", and
you assigned an IP address to your computer manually. Go to Procedure (2)
of Section 4. Check that the router’s IP (192.168.1.1) is entered as gateway &
DNS. If these settings are correct ping the computer’s IP (eg. Ping 192.168.1.2).
If there is still no reply your network card may be faulty.
If (A) fails but (B) shows a response, this is probably a DNS problem. Go to
Procedure (2) of Section 4. Enter the router’s IP (192.168.1.1) as DNS.
If both (A) & (B) show a response, your router is actually on line. The problem
may be with your browser setting. Try returning any custom settings of the
browser to default. If you have a personal firewall, disable it to see if it makes
any difference. Also you may try shutting down the computer and restarting.
Q3. Need to install router on a network that uses a different subnet
If the existing network already has a DHCP server, disconnect one computer from
the network. Connect the computer to the router. The host computer will be
assigned 192.168.1.2. You can change the router’s IP so that it is consistent with
the network. Disable DHCP on the router.
Q4. Browsing is fine but I cannot run certain applications.
You need to set up virtual servers or DMZ host. See Section 7 on Firewall & traffic
restrictions.
Q5. The router’s IP and/or administrative password have been modified. But
the details have now been forgotten.
You can restore the router to factory default by pushing a pin into the hidden
reset button located next to the power on/off button at the back of the router.
Push and hold for 5 seconds then release to reset router.
Page 15

Q6. I need to know the dynamically assigned WAN IP when the router
goes on line
Go to Status > Internet Connection, the WAN IP is displayed here.
Q.7 How to get information update
This Quick Guide and User’s Manual on CD are the primary source of information
about the product. Please check the Dynalink website http://www.dynalink.com.au
regularly for updates, links, or to download a more current version of this Quick
Set-up Guide.
Page 16

Warranty
Dynalink warrants this product against defects in materials and workmanship
for a period of twelve months from the original date of purchase. We will, at our
discretion, repair or replace the faulty unit, free of charge, provided it is returned
to us with proof of purchase from an authorised dealer within the warranty
period. Return delivery after repair will be paid for by Dynalink. We reserve the
right not to repair or replace goods that:
have been mishandled, abused or not installed according
to the guidelines as outlined in the instructions.
have been subjected to a power surge from other
equipment or other external factors.
have been altered or modified.
Help
Always check that your hardware is installed correctly. Check our web site for
the latest information and troubleshooting guide. If you have difficulties, contact
Dynalink Technical Support for issues relating to installation and operation.
If possible, visit Dynalink's on-line support area at:
New Zealand
Australia www.dynalink.com.au/support
www.dynalink.co.nz/support
Contact Dynalink’s Technical Support:
New Zealand
Phone 0800 653 962
Fax 0800 503 962
(Monday-Friday: 8:30am-7:30pm)
Australia
Phone 1800 653 962
Fax 1800 063 962
(Monday-Friday: 8:30am-5:30pm)
AURTA770QG-02
 Loading...