

Page 1
Contents
1. Physical Connection
2. Network Configuration
3. Configuring Internet connection in Layer2 PPPoE
4. Configuring VoIP
5. Configuring Wireless
6. IPTV
7. Change of password
Please note: Please have your router powered on and connected
directly to your PC via Ethernet cable before you begin as these
1. Physical Connection
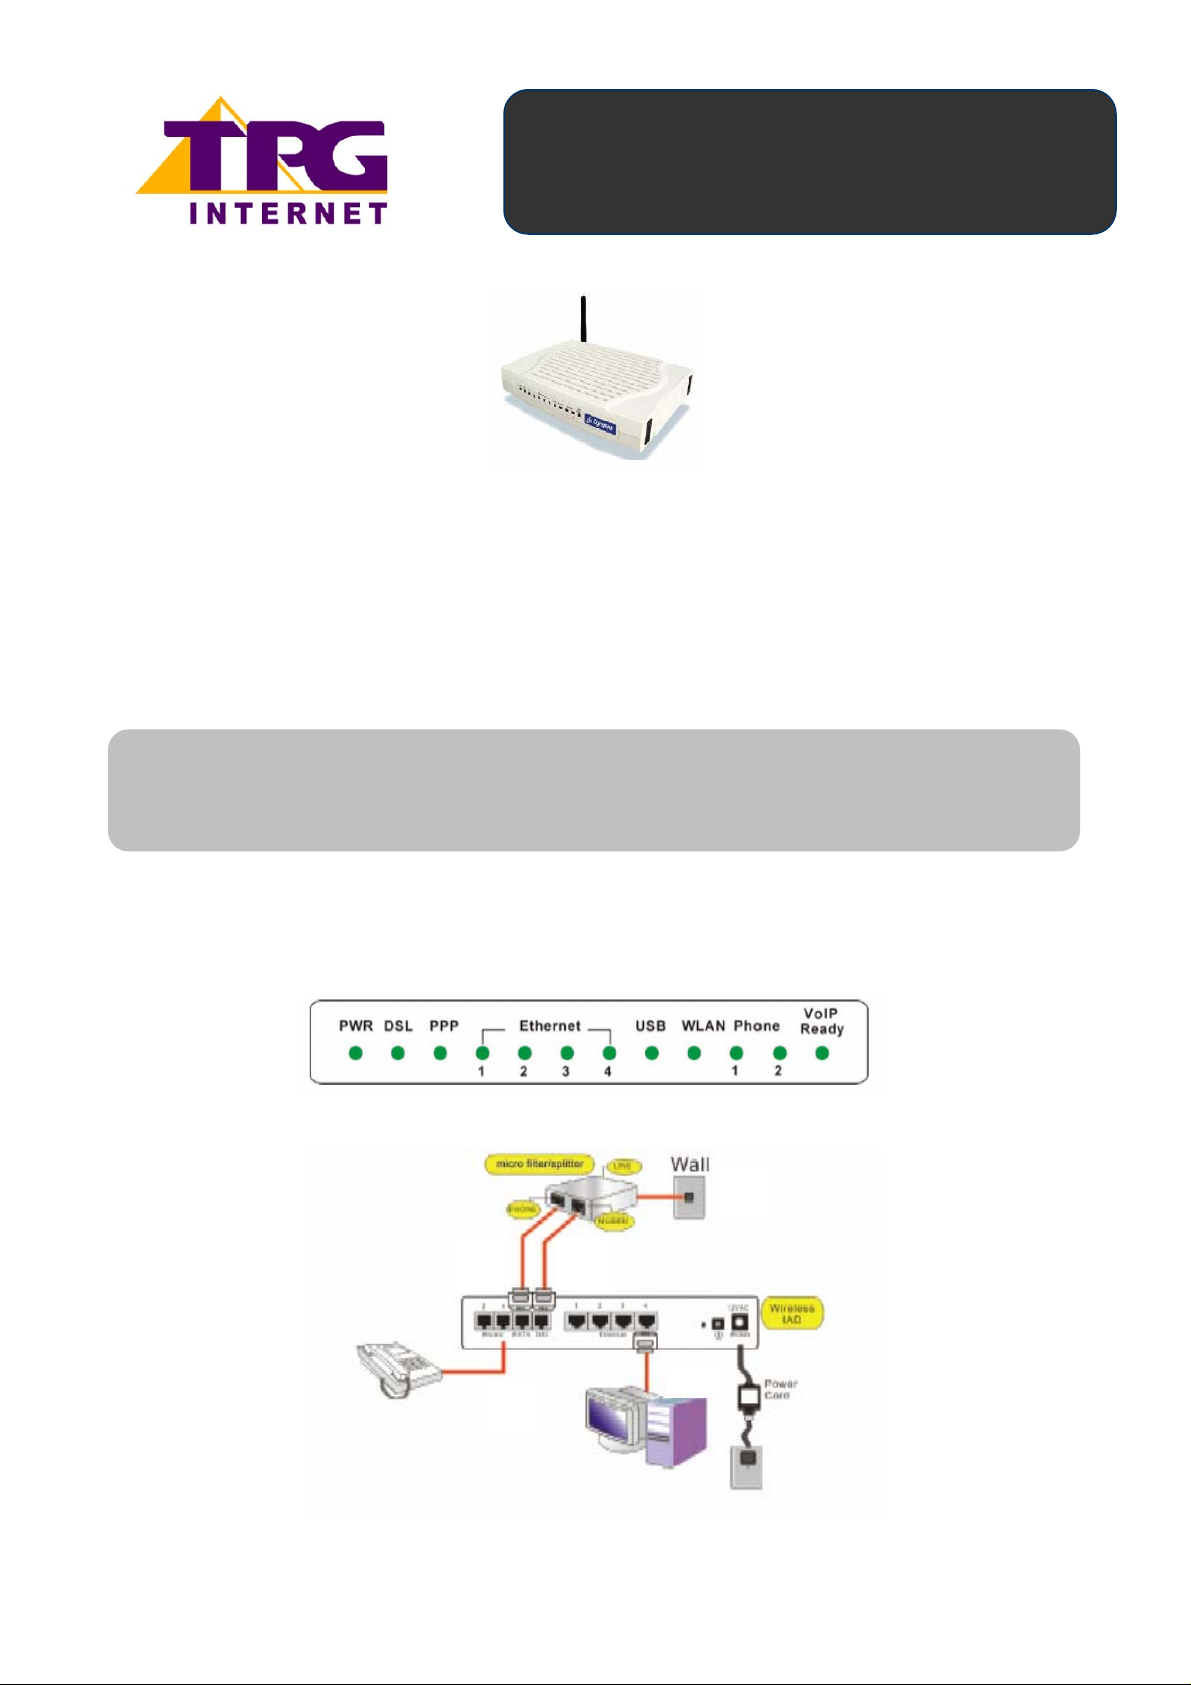
Front Panel
instruction are based on Ethernet
Configuring in Layer2 PPPoE
Dynalink RTA 1046VW
for Windows XP and 2000
Back Panel
6
4
3
1
5
1
Page 2
3. PSTN Telephone handset connected to Phone1 port – operating on VoIP
2. Network Configuration
4. RJ11 cable connecting PSTN port to Phone port on micro filter
5. RJ11 cable connecting DSL port to Modem port on micro filter
6. Line port of micro filter connecting to wall socket
PPPoE connection does not require you to have an IP address or DNS
settings manually encoded on your network card. PPPoE connection uses
authentication to establish the Internet connection and its after doing this
that your router is assigned an IP and DNS settings from TPG.
To begin, your PC needs to receive a private IP address from the router.
Most ADSL routers have DHCP enabled by default that will take care of
this.
To ensure your Network Card is ready for this, please follow the following
steps:
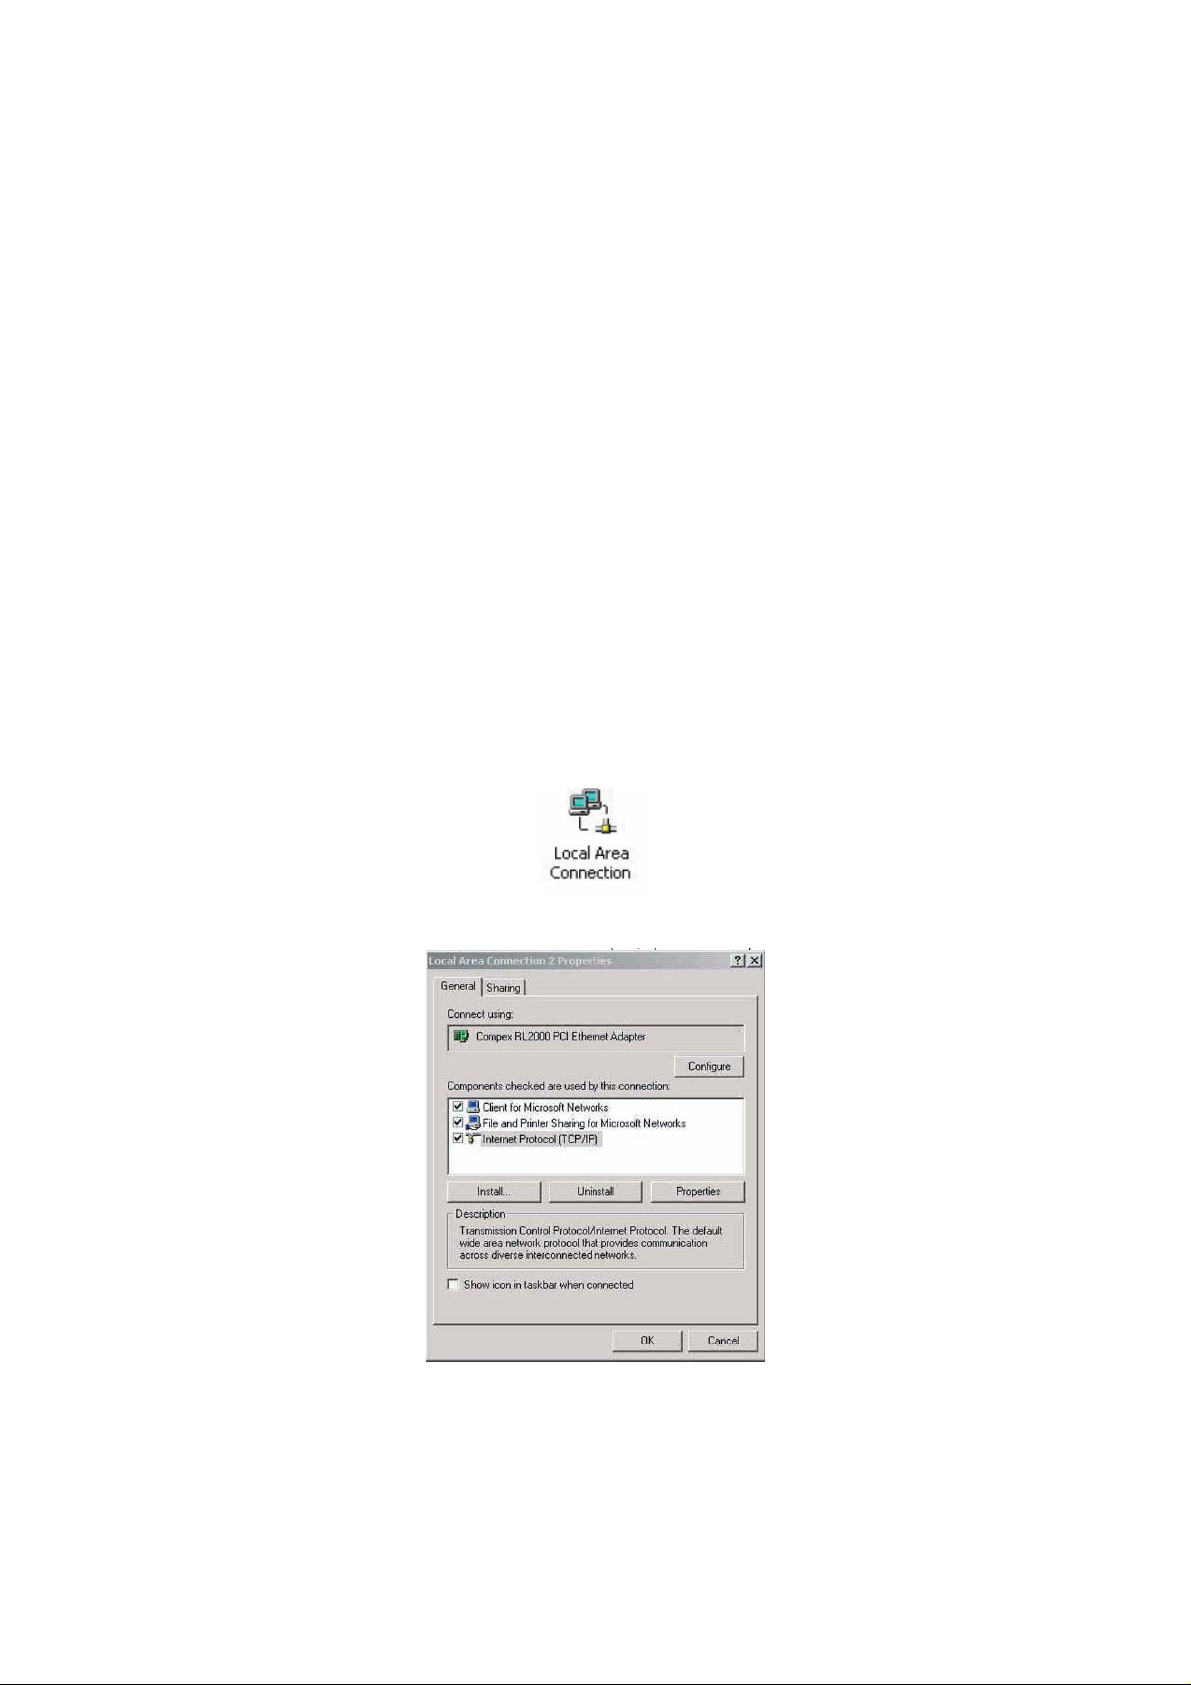
a. Click on Start -> Settings ->Control Panel -> Network
Connections
b. Find your Network Card then right click on this and select
Properties
2. RJ45 Ethernet cable to the PC
1. Power Supply
(RJ11 connection)
c. Double click on Internet Protocol TCP/IP
d. Ensure “Obtain an IP address automatically” is selected
e. Ensure “Obtain DNS server address automatically” is
selected
2
Page 3
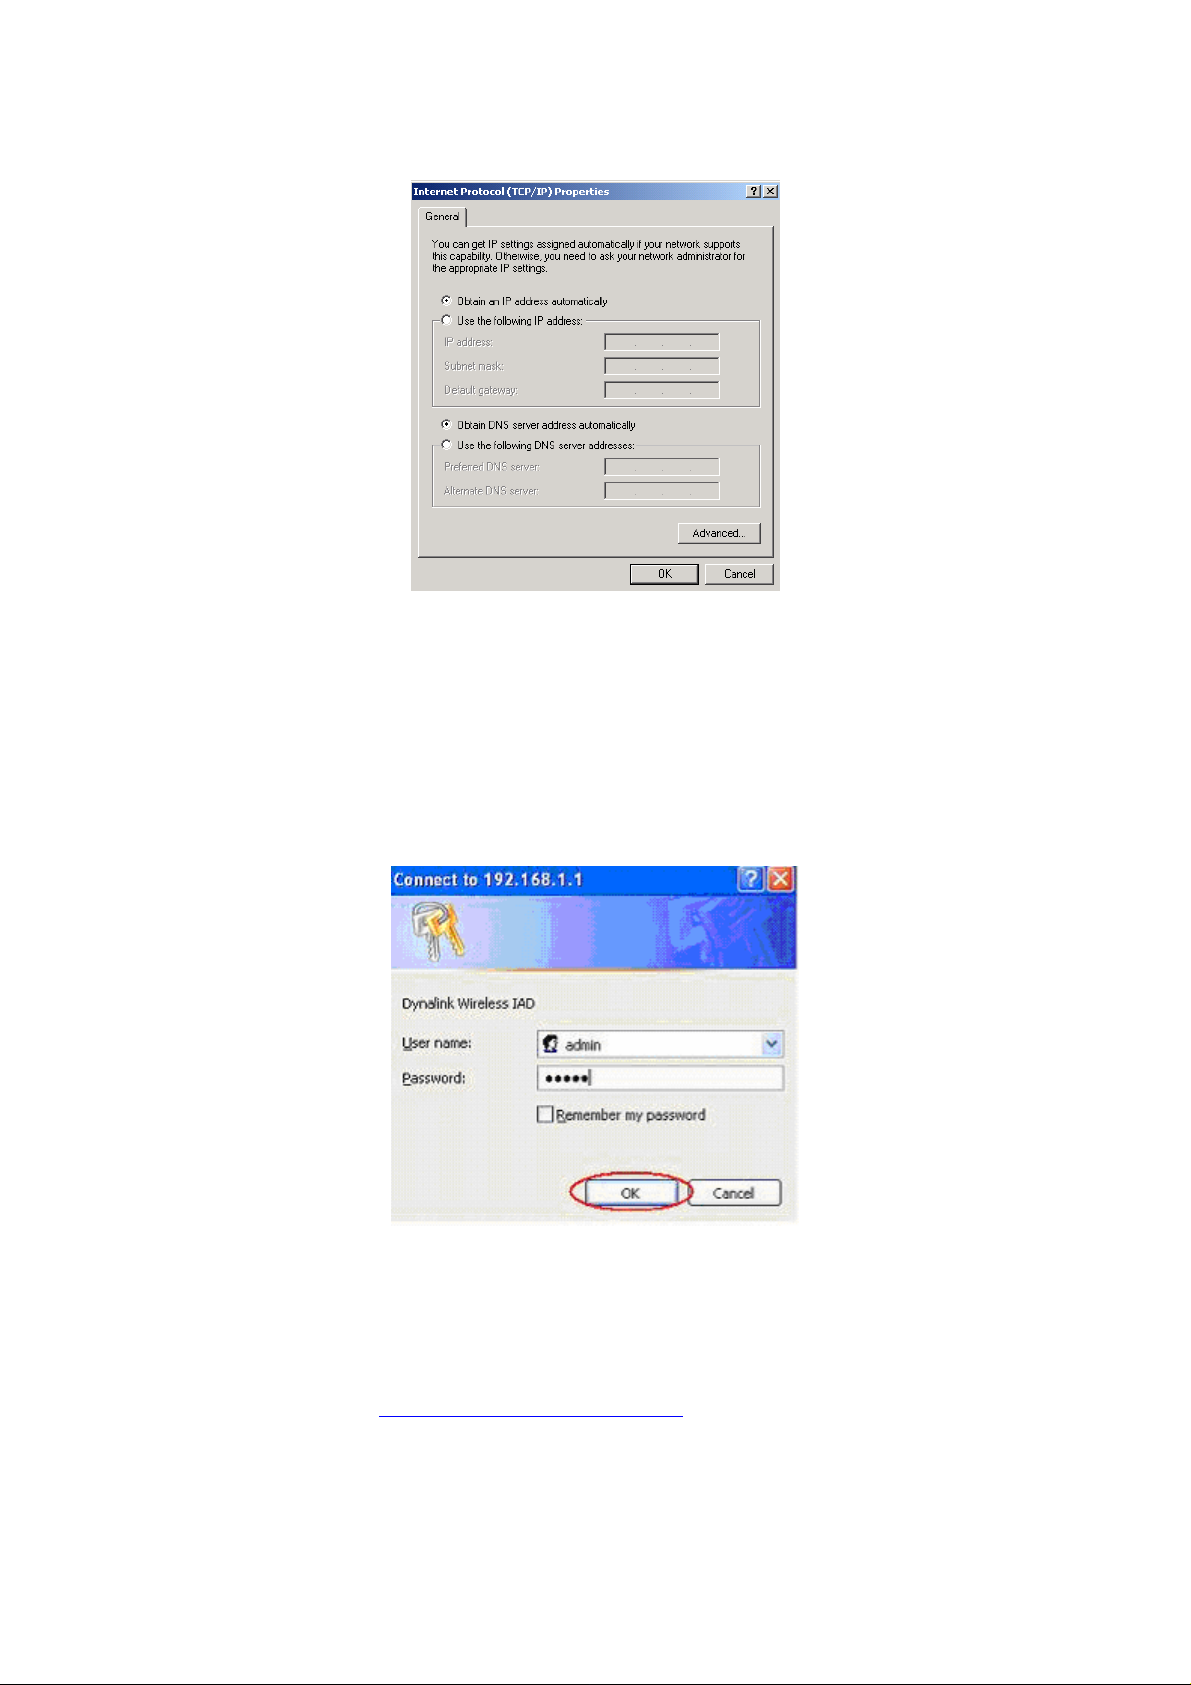
f. Click on OK
3. Configure In Layer 2 PPPoE
a. Open your browser and in the address bar type http://192.168.1.1 and
press enter
b. Enter admin for both the username and password and click on OK. If
you have changed the login credential, please enter the current
username and password for your router interface
c. In the “Broadband User Name” field enter:
<TPGusername>@L2TP.tpg.com.au for Fixed IP plans
OR
<TPGusername>@PPP.tpg.com.au for Dynamic IP plans
(e.g.
adsl1234@L2TP.tpg.com.au)
ADSL2+ customers can just use their TPG Username without the extension
(@PPP.tpg.com.au or @L2TP.tpg.com.au)
3
Page 4

d. In the “Password” filed enter your TPG Password
Click on Connect
e. You should now get a confirmation that your router has
authenticated/connected
4
Page 5

4. Configuring VoIP
a. If you are still logged into your router interface, click on the Voice Menu
at the top. If you are not logged in anymore use your browser to go to
192.168.1.1 and login with admin as the username and password (by
default)
b. In the SIP Basic section enter the following information:
i. SIP Registration Address = aphone4.tpg.com.au
ii. SIP Outbound Proxy = aphone4.tpg.com.au
iii. SIP Proxy Server Address = aphone4.tpg.com.au
(Please note: For the above 3 fields, some customers may need to use
aphone3.tpg.com.au. If in doubt please contact TPG Technical
Support)
iv. Under Phone 1, enter the following information
- Phone Number = Your TPG Username (without PPP
or L2TP extension)
- Username = Your TPG Username (without PPP or
L2TP extension)
- Password = Your current TPG password
v. Click on Apply
Please note: By entering details in the ‘Phone 1’ row, you are
setting up VoIP for the phone port at the back of your router labelled
“Phone 1” and so you must have your telephone handset connected
to this port to use VoIP. If you have a telephone handset connected
at Phone 2, this would be working on regular PSTN and not VoIP
5
Page 6

c. You should now see a confirmation of the VoIP connection under ‘SIP
Basic Settings’
5. Configuring Wireless (optional)
Things you need to know before you begin:
- By default the RTA1046VW does not have wireless security
setup. We recommend that you follow the steps below to set this us
before you use wireless
- To use wireless be sure that you already have set up your
wireless adapter.
- To begin your wireless setup, you can connect your computer to
your router via Ethernet cable.
a. If you are still logged into your router, click on “Wireless” in the top
menu. If you are not logged in anymore use your browser to go to
192.168.1.1 and login with admin as the username and password (by
default)
b. In the Basic settings, please check that you have the below settings.
Please take note of your SSID (wireless network name)
c. Click on Apply
d. Click on the Security menu on the left
6
Page 7

e. In the ‘Wireless Security’ drop down menu, select “64-bit WEP”
Click on Apply
f. Select the “Hexadecimal digits” radial button
g. In the ‘Key 1’ field enter a 10-character key of your choice consisting of
only numbers 0-9 and letters A-F (lower case is ok). This key will be
used when any computer wants to connect to your router. Please
remember this key
7
Page 8

h. Click on Apply
i. To connect using wireless, go to Start -> Control Panel
j. Double click on ‘Network Connections’
k. Right click on your wireless adapter and go to ‘View Available Wireless
Networks’
l. Find the SSID (network name) of your router and click on Connect.
By default the SSID should start with RTA1046VW
8
Page 9

m. You will now be prompted to enter your WEP Key.
n. After click on Connect
o. You should now see your status as ‘Connected’
6. IPTV
Your router is already IPTV ready, there is no need for further
configuration. To use IPTV you must first be registered. Please refer to
www.tpg.com.au/iptv for further details
7. Change of Password
For security purposes we highly recommend that you change your
password if you are using your default or if you believe your password
security has been compromised.
To change your password, first please visit
https://cyberstore.tpg.com.au/your_account/changepass.html. Your new
password will take approximately 10-15 minutes to take effect, after which
you must reconfigure your new password in your router.
To change your password in your router, please follow the following steps:
a. Open your browser and in the address bar type http://192.168.1.1
and press enter
b. Enter admin for both the username and password and click on OK.
If you have changed the login credential, please enter the current
username and password for your router interface
c. In the Password field, enter your new TPG password
9
Page 10

d. Click on Connect
Please Note: ADSL routers will by default be capable of automatic
authentication. This means your router will use your credentials you
have provided to make the Internet connection. Each time your router
is powered on, it will initialize this automated authentication process
after which your router will receive a public IP address (fixed or
dynamic depending on your plan) and DNS settings from TPG
Support Information
For further assistance, please call TPG Technical
Support on 1300 360 855
Technical Support Opening Hours
Monday to Friday 8am – midnight
Saturday and Sunday 9am – 9pm
Public Holidays 9am – 6pm
10
 Loading...